

Page 1

Petrol Chainsaws
MCS25, MCS38, MCS46, MCS52, YR4503
Owner’s Manual
Important
Please read this Owner’s Manual and the Express Warranty before using this product. The Warranty
does not cover damage due to misuse or failure to follow the operating and installation instructions
Keep the instructions in a safe place for future use.
This manual covers the Morrison MCS25, MCS38, MCS46, MCS52 and YR4503 Petrol Chainsaws.
www.morrisonoutdoor.com
Part No: 542037.F.0
Page 2

Contents
SYMBOLS ON THE MACHINE 3
SYMBOLS IN THIS OWNER’S MANUAL 4
PROPER USE 4
SAFETY INSTRUCTIONS 4
LOCATION OF PARTS 5
ASSEMBLING THE GUIDE BAR AND SAW CHAIN 5
FUEL AND CHAIN OIL SPECIFICATIONS 6
CHAIN OIL 6
OPERATING THE ENGINE 7
CHAIN BRAKE 8
SAWING 8
MAINTENANCE 9
MAINTENANCE OF THE SAW CHAIN AND 9
GUIDE BAR 9
TROUBLE SHOOTING 11
SPECIFICATIONS 13
Page 3
Do not operate this machine before
it has been assembled correctly
and you have read and understood
these instructions.
These instructions are intended as
a general guide and do not supersede
national or local codes in any
way. Contact local Authorities for
clarity of laws relating to the
operation of this appliance.
Keep the instructions in a safe place for future use.
3
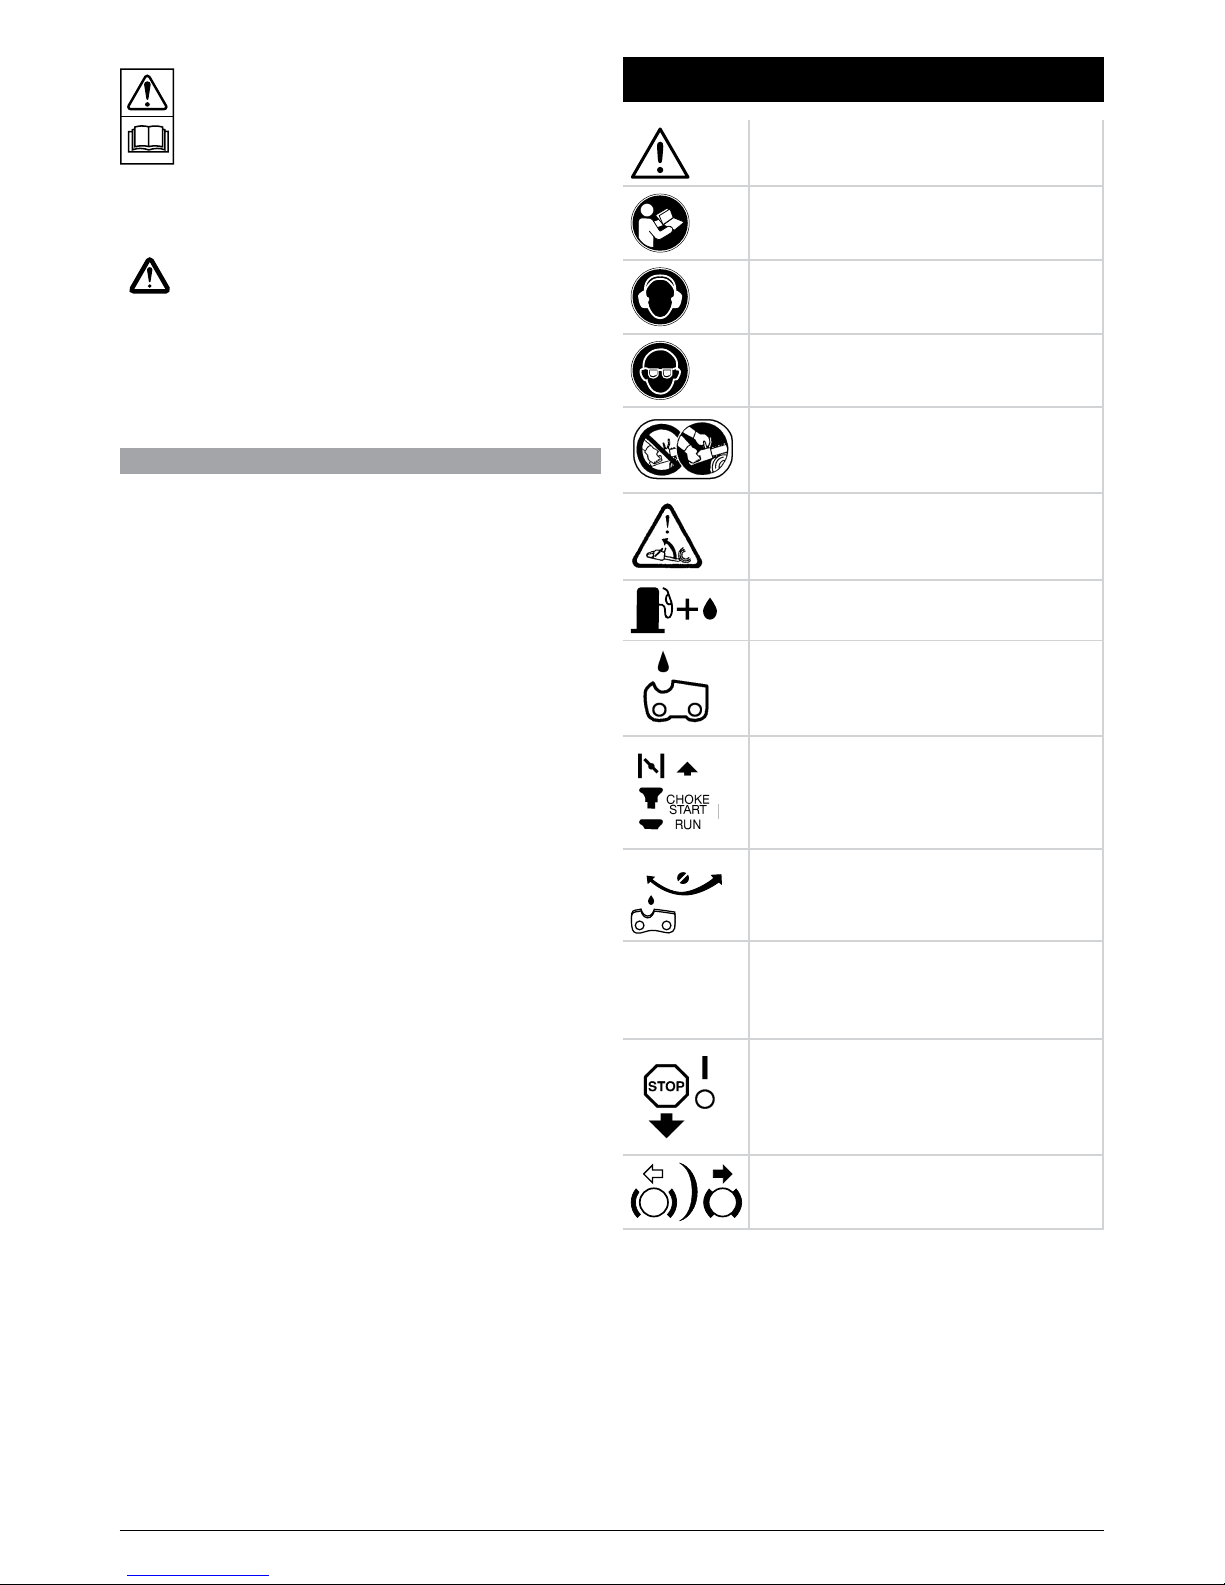
Symbols on the Machine
Warning / Caution!
Please read the instruction manual
carefully.
Wear ear protection!
Wear eye protection!
Always operate the chainsaw using
two hands.
Warning! Danger of kickback.
Fuel tank cap. Use two stroke gasoline/oil
mix.
Oil tank cap. For automatic chain oil
pump.
Pull knob out to activate choke.
MAXMIN
Chain oil adjuster nut flow regulator nut.
H
L
T
H– High speed adjustment screw
L– Low speed adjustment screw
T– Idle speed adjustment screw
Kill switch stop the engine immediately in
the ‘O’ position
Chain Brake ‘Off’–White arrow.
Chain Brake ‘On’–Black arrow.
Page 4
4
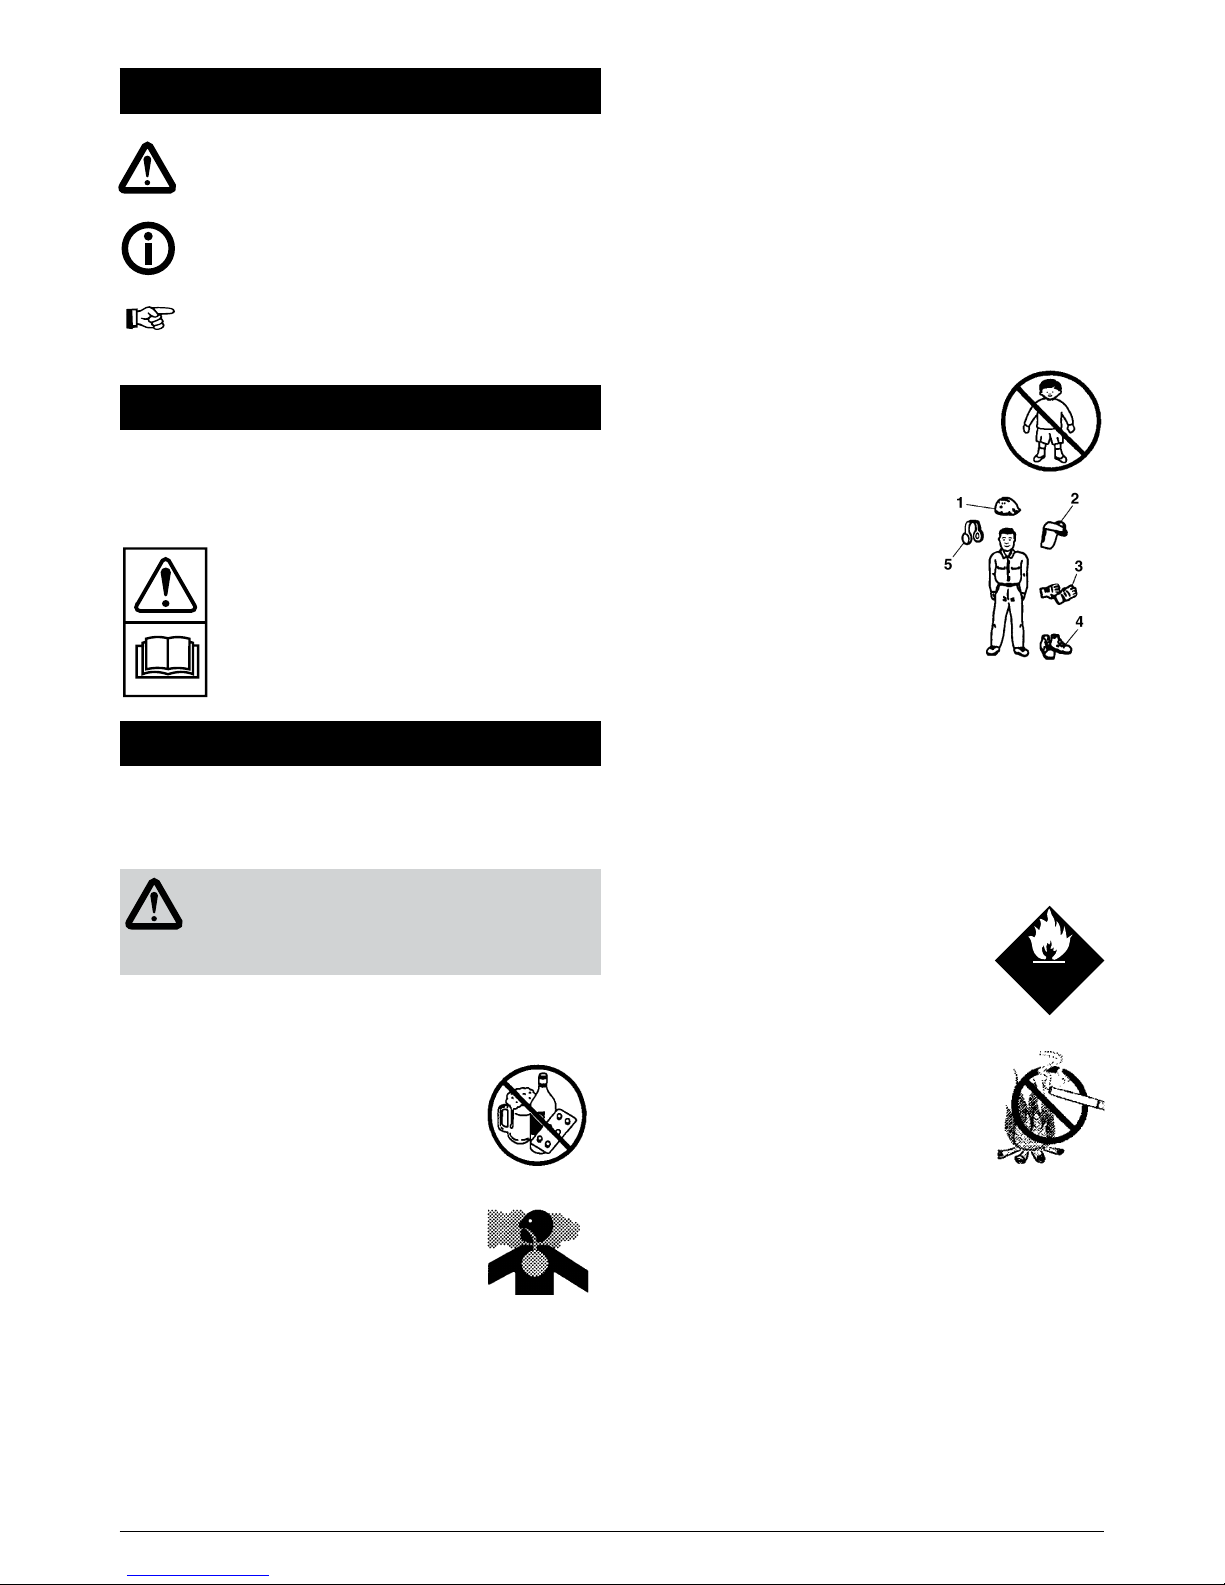
Symbols in this Owner’s Manual
Threatening hazard or hazardous situation.
Not observing this instruction can lead to
injuries or cause damage to property.
Important information on proper handling.
Not observing this instruction can lead to faults
in the machine.
User information. This information helps you to
use all the functions correctly.
Proper Use
For safety reasons, the Petrol Chainsaw is not to be used by
children, young people under 16 years of age, or any other
persons who are not acquainted with these directions for
use.
Specific safety information Please read this
safety information and the directions for use
carefully and be sure to follow the instructions
to the letter.
Safety Instructions
Use the chainsaw only to saw wood or objects made of
wood. Any other types of use are at your own risk and could
well be dangerous. The manufacturer cannot be held liable
for damage caused by improper or incorrect usage.
WARNING!
Read the operating instructions in their entirety before using
the machine for the first time. All the information on the
handling of the chainsaw is relevant to your personal safety.
Ask a professional to show you how to use the machine!
BEFORE USING THE MACHINE
A. Read this owner’s manual carefully to understand how to
operate this unit properly.
B. You should never use the product when
under the influence of alcohol, when
suffering from exhaustion or lack of sleep,
when suffering from drowsiness as a result
of having taken cold medicine. Nor at any
other time when a possibility exists that
your judgment might be impaired or that
you might not be able to operate the machine properly or in a safe manner.
C. Avoid running the engine indoors. The
exhaust gases contain harmful carbon
monoxide.
D. Never use the product under circumstances such as those
described below.
1. When the ground is slippery or when other
conditions exist which might make it not possible to
maintain a steady posture.
2. At night, at times of heavy fog, or at any other times
when your field of vision might be limited and it
could be difficult to gain a clear view of the area.
3. During rain storms, during lightning storms, at times
of strong or gale force winds, or at any other time
when weather conditions might make it unsafe to use
this product.
E. When using this product for the first time, before beginning
actual work, learn to use it from a skilled worker.
F. Lack of sleep, tiredness, or physical exhaustion results in
lower attention spans, and this in turn leads to accidents
and injury. Limit the amount of time of using the machine
continuously to somewhere around ten minutes per session, and take ten to twenty minutes of rest between work
sessions. Also try to keep the total amount of work performed in a single day under two hours or less.
G. Be sure to keep this manual handy so that you may refer to
it later whenever any questions arise.
H. Always be sure to include this manual when selling,
lending or otherwise transferring the ownership of the
product.
I. Never allow children or anyone unable to
fully understand the directions given in this
manual to use this product.
WORKING GEAR AND CLOTHING
A. When using the product you should
wear proper clothing and protective
equipment as follows.
1. Helmet.
2. Protection goggles or face
protector.
3. Thick work gloves.
4. Non-slip sole work boots.
5. Ear protectors.
B. And you should carry with you.
1. Provided tools and files.
2. Properly mixed fuel and chain oil.
3. Things to notify your working area– rope, warning
signs.
4. Whistle for collaboration or an emergency.
5. Hatchet or saw, for removal of obstacles.
C. Never use the product when wearing pants with loose
cuffs, when wearing sandals, or when barefoot.
WARNING CONSIDERATIONS WHEN
HANDLING FUEL
A. The engine of this product is designed to
run on a mixed fuel which contains highly
flammable gasoline. Never store cans of
fuel or refill the fuel tank in any place where
there is a boiler stove, wood fire, electrical
sparks, welding sparks, or any other source
of heat or fire which might ignite the fuel.
B. Smoking while operating the product or re-
filling its fuel tank is extremely dangerous,
Always be sure to keep lit cigarettes away
from the product at all times.
C. When refilling the tank always turn off the
engine first and take a careful look around
to make sure that there are no sparks or open flames anywhere nearby before refuelling.
D. If any fuel spillage occurs during refuelling, use a dry rag
to wipe up spills before starting the engine again.
E. After refuelling, screw fuel cap back tightly onto the fuel
tank and then carry the chainsaw three meters or more
away from where it was refuelled before restarting the
engine.
BEFORE STARTING ENGINE
• Check working place, the object being cut and felling
direction. If there are obstacles, remove them.
• Never start cutting until you have a clear work area, secure
footing and a planned retreat path from the falling tree.
• Use caution and keep bystanders and animals out of the
working area, about 2.5 the size of the object being cut.
FLAMMABL E
FUEL
Page 5
5
Inspect the machine for worn, loose, or damaged parts.
Never operate the machine that is damaged, improperly
adjusted, is incomplete or not securely assembled. Make
sure that the saw chain stops moving when the throttle
control trigger is released.
• Make sure the saw chain is not in contact with anything
while it is in idle mode.
AFTER STARTING THE ENGINE
• Always hold the machine firmly with both
hands when the engine is running. Use a
firm grip with thumb and fingers encircling
the handles.
• Keep all parts of your body away from the
machine when the engine is running.
OPERATION
• Keep the handles dry, clean and free of oil
or fuel mixture.
• Never touch the muffler, spark plug or other
metallic parts of the engine while the engine
is in operation or immediately after stopping the engine. Doing so could result in
serious burns or electrical shock.
• Use extreme caution when cutting small
size brush and saplings because slender material may
catch the saw chain and be whipped toward you or pull
you off balance.
• Operating this chainsaw with the use of apparatus to gain
height is extremely dangerous and requires specific, professional training for such work.
• Never work on a ladder, or any other support that is inse-
cure.
• When cutting a tree limb that is under tension, be alert for
spring back so that you won’t be struck when the tension
in the wood fibres is released
• Check the tree for dead branches that could fall during the
felling operation.
• Always shut off the engine before setting it down.
• Parts of the chainsaw get very hot. Do not sit the chain-
saw on any combustible material that could cause a fire.
KICKBACK SAFETY PRECAUTIONS
WARNING!
Kickback may occur when the nose or tip of the guide bar
touches an object, or when the wood closes in and pinches
the saw chain in the cut. Tip contact in some cases may
cause a lightning fast
reverse reaction, kicking the guide bar up
and back towards the operator. Pinching
the saw chain along the top of the guide bar may
push the guide bar rapidly back
towards the operator. Either of these reactions
may cause you to lose control of the saw which
could result in serious personal or fatal injury
• Do not rely exclusively on the safety devices built into your
saw. As a chain saw user you should take several steps to
keep cutting jobs free from accident or injury.
1. With a basic understanding of kickback you can
reduce or eliminate the element of surprise. Sudden
surprise contributes to accidents.
2. Keep a good grip on the saw with both hands, the
right hand on the rear handle and
the left hand on the front handle
when the engine is running. Use a
firm grip with thumbs and fingers
encircling the chain saw handles. A
firm grip will help you reduce kick
back and maintain control of the saw.
3. Make certain that the area in which you are cutting is
free from obstructions Do not let the nose of the
guide bar contact a log, branch, or any other
obstruction which could be hit while you are operat-
ing the saw.
4. Cut at a high engine speed.
5. Do not overreach or cut above shoul der height.
6. Follow manufactures sharpening and
maintenance instructions for the saw
chain
7. Only use replacement bars and chains specified by
the manufacturer or the specified equivalent.
MAINTENANCE
• In order to maintain your product in proper working order,
perform the maintenance and checking operations described in the manual at regular intervals.
• Always be sure to turn off the engine before performing any
maintenance or checking procedures.
WARNING!
The metallic parts reach high temperatures immediately
after stopping the engine.Leave all maintenance other than
the items listed in the Owner’s Manual to your competent
servicing dealer.
TRANSPORTATION
Always carry the chainsaw with the engine stopped, the
guide bar covered and with the protector to the rear. Keep
the muffler away from your body.
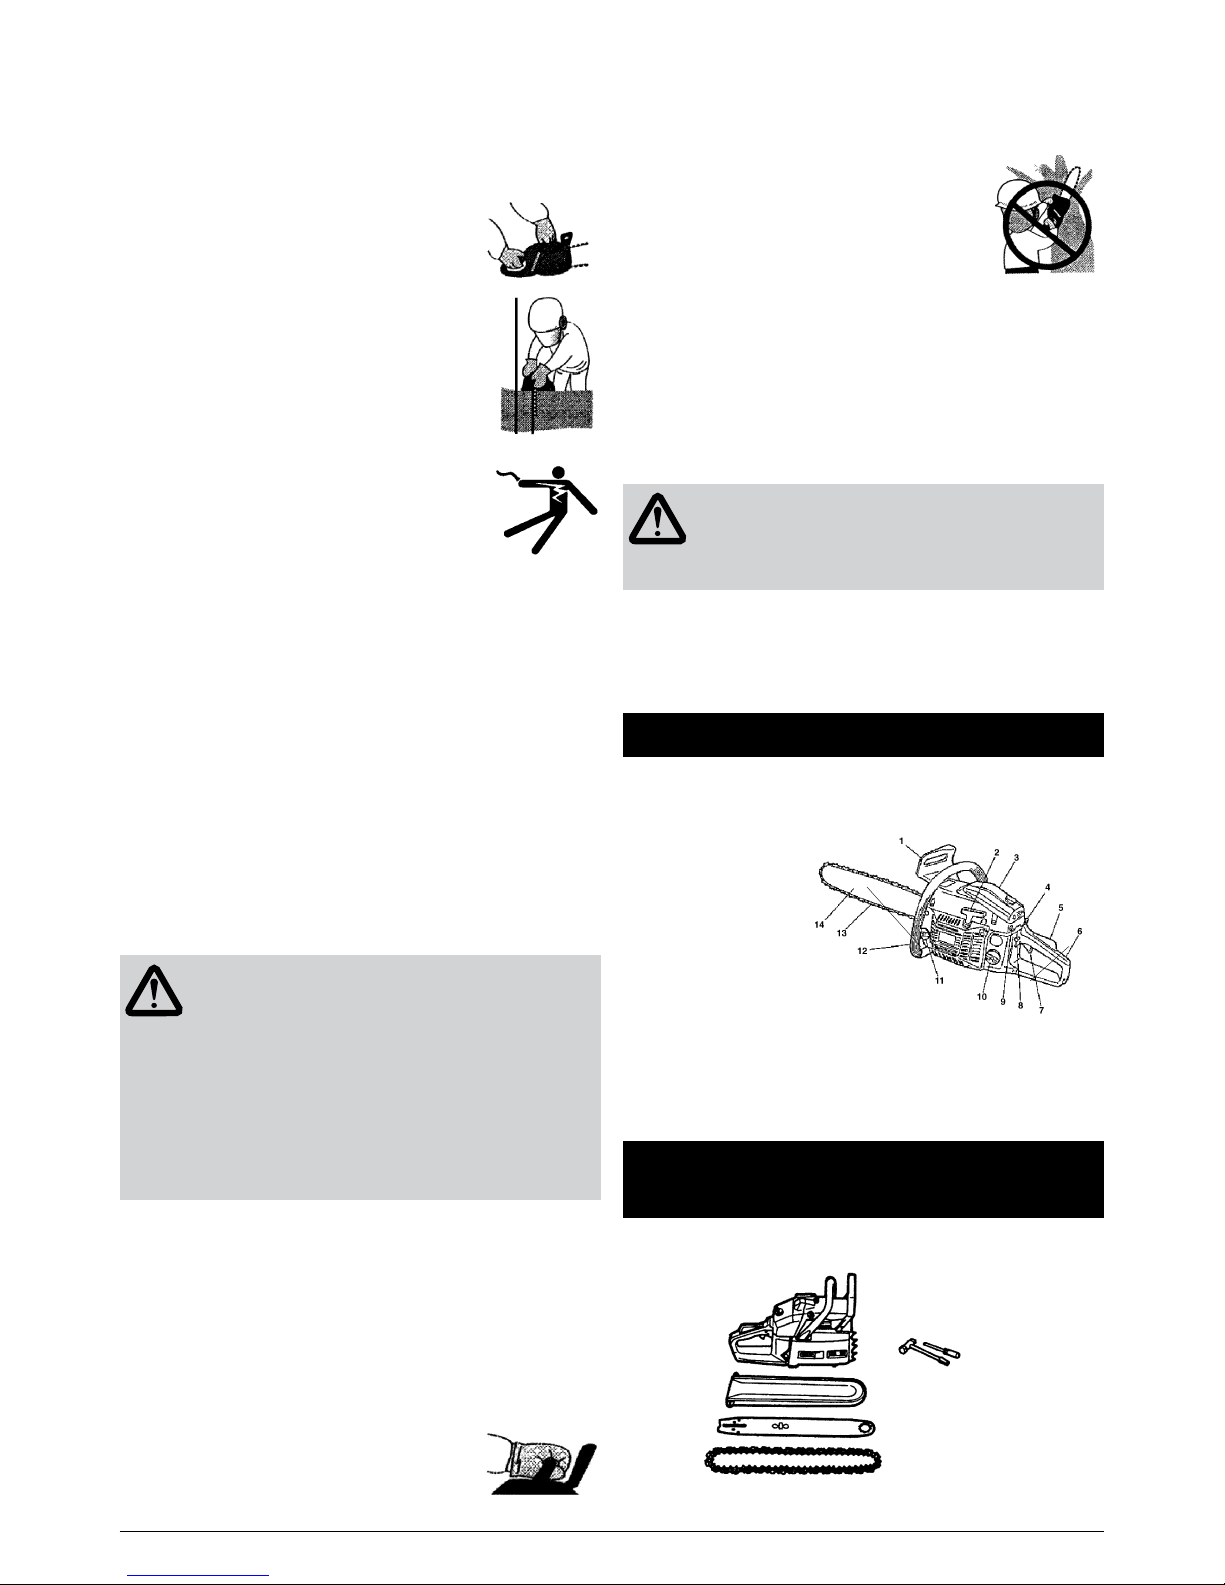
Location of parts
1. Front guard
2. Starter knob
3. Air cleaner
4. Choke knob
5. Throttle interlock
6. Rear handle
7. Throttle trigger
8. Priming bulb
9. Engine switch
10. Fuel tank
11. Oil tank
12. Front handle
13. Saw chain
14. Guide Bar
Note MCS38 Chain Oil Tank is below No. 10
MCS25 Fuel Tank is at the rear
MCS25 Engine Switch is at the right hand front of
handle assembly
Assembling the Guide Bar and Saw
Chain
A standard saw unit package contains the items as shown
below.
8 (MSC25)
8 (MSC38)
Plug wrench,
screwdriver
for carburettor
adjustment, a round file
and a petrol container.
Power unit.
Bar protector.
Guide bar.
Chainsaw
Page 6
6
free) and a quality proven motor oil for air cooled 2 cycle
engines.
Recommended mixing ratios:
Models MCS25, MCS38, MCS46, MCS52 and YR4503
Engine Condition Gasoline to Oil
Up to 20 hours use 25:1
All Models
After 20 hours use 25:1 or 40:1 (see below charts)
When using a mineral oil:
Mixing Ratio 25:1
Gasoline (litres) 1 2 3 4 5
2cycle oil (ml) 40 80 120 160 200
When using a semi-synthetic oil:
Mixing Ratio 40:1
Gasoline (litres) 1 2 3 4 5
2cycle oil (ml) 25 50 75 100 125
WARNING!
Keep open flames away from the area where fuel is handled
or stored. Mix and store fuel only in an approved gasoline
container.
IMPORTANT!
Most engine troubles are caused, directly or
indirectly, by the fuel used on the machine. Take special care
not to mix a motor oil for 4 cycle engines.
HOW TO MIX FUEL
WARNING!
Thorough mixing of the oil and fuel is critical to the
life and performance of the engine. Take extreme
care.
1. Measure out the quantities of gasoline and oil to be mixed.
2. Put some of the gasoline into a clean, fuel container.
3. Pour in all of the oil and agitate well.
4. Pour in the rest of gasoline and agitate again for at least
one minute. Some oils may take longer to mix depending on their ingredients. Thorough mixing is essential for
engine longevity.
FILLING THE FUEL TANK
1. Untwist and remove the fuel cap. Rest the fuel cap in a
dust free place.
2. Fill fuel tank to 80% of the full capacity.
MSC25 = 184mL, MSC38 = 264mL, MCS46, 52 & YR4503 =
440ml.
3. Fasten the fuel cap securely and wipe up any fuel spillage
from around the engine.
CHAIN OIL
All models
Use Masport Chain Bar Oil Part # 833043. This is specially
formulated to give best results. Alternatively you can use a
good quality motor oil, SAE 10W ~ 30 all year round or SAE
#30~#40 in Summer and SAE #20 in Winter.
Refer to specifications pg13 for OIL TANK capacities.
IMPORTANT!
Do not use waste or recycled oil that can cause
damage to the oil pump.
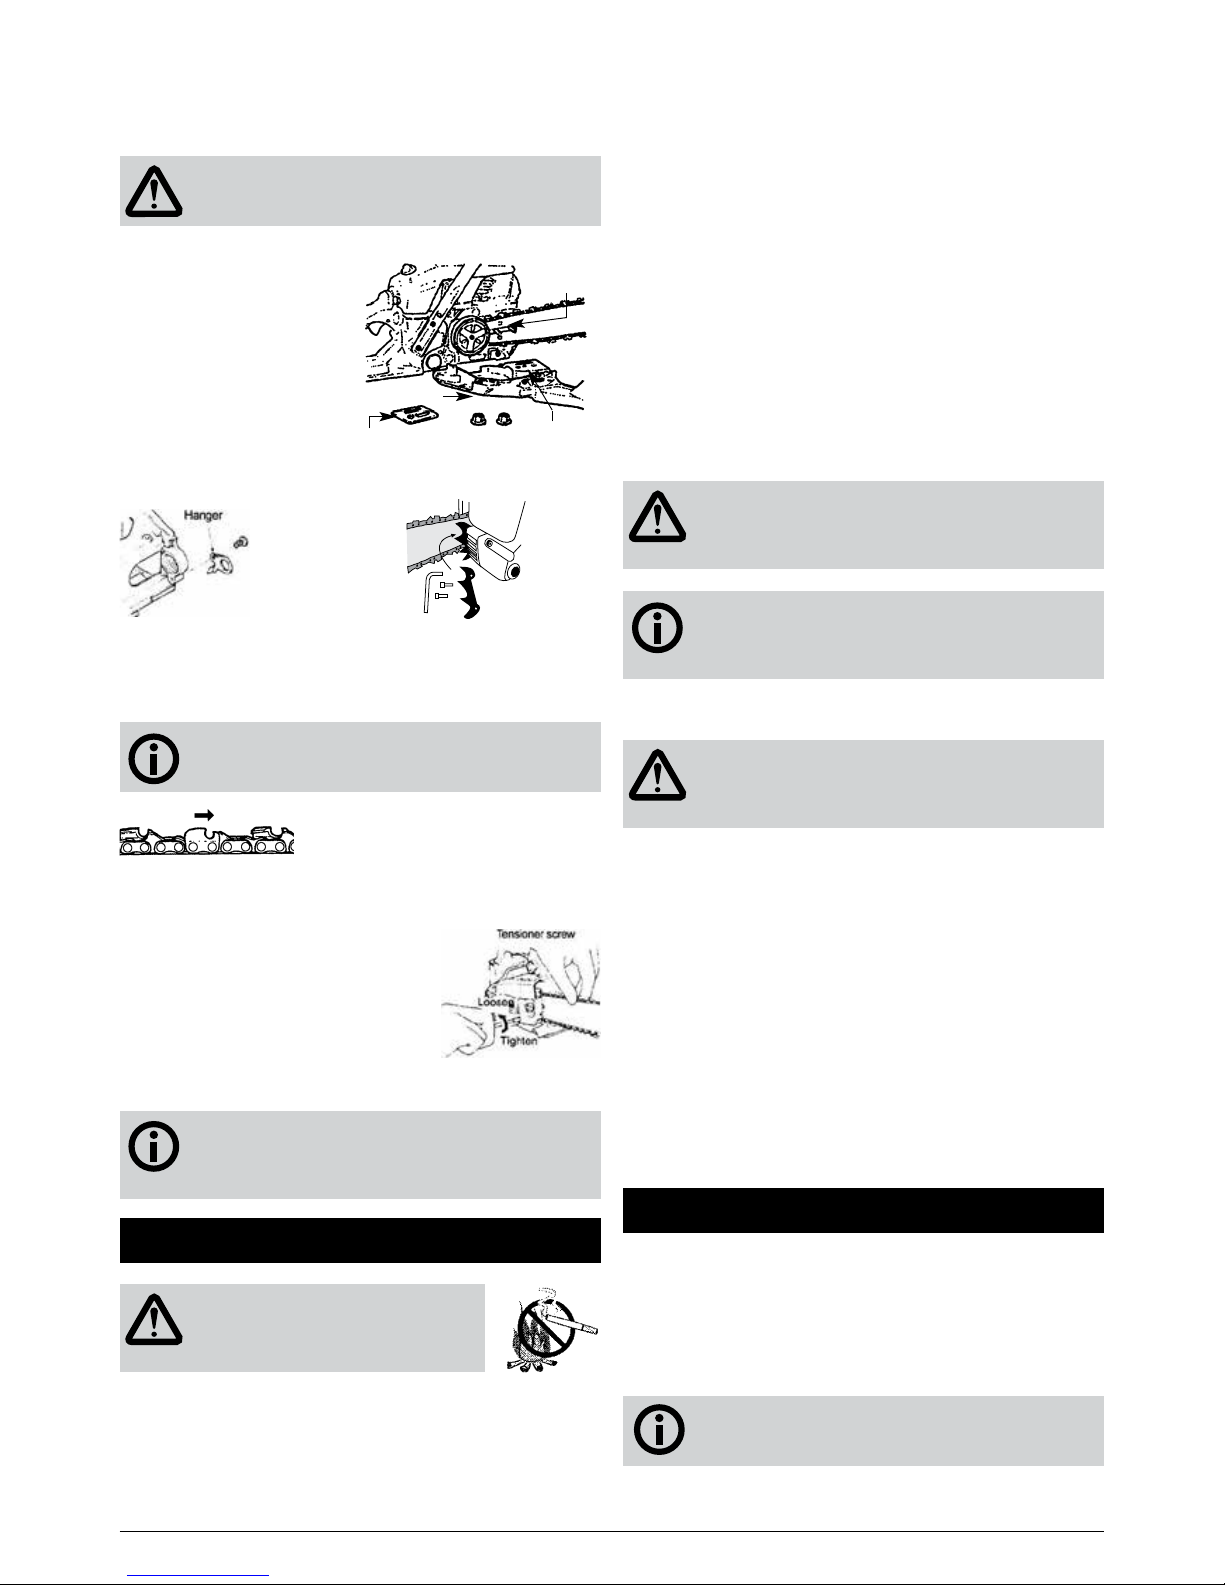
Open the box and assemble the guide bar and the saw chain
on the power unit as follows:
Note: For 45, 46 & 52 models assemble spike first. Spike is
not needed for models S25 & 38.
WARNING!
The saw chain has very sharp edges. Use thick
protective gloves for safety.
1. Pull the front guard towards
the front handle to check
that the chain brake is not
engaged.
2. Loosen the nuts and
remove the chain cover.
3. Attach the spike to the
front, saw side of the
power unit.
4. Fix the hanger on the rear of
the power unit by screw - MSC25 only.
YR4503, MCS46 and
MCS52 only- fitting
the Spike
5. Fit the chain over the sprocket and, while feeding the saw
chain around the guide bar, mount the guide bar to the
power unit. Adjust the position of chain tensioner nut on
the chain cover to the lower hole of guide bar.
IMPORTANT!
Pay attention to the correct direction of the saw chain.
6. Fit the chain cover to the power unit and fasten the nuts
until finger tight.
7. While holding up the tip of the bar, adjust the chain tension
by turning the tensioner screw until
the tie straps just touch the bottom
side of the guide bar.
8. Tighten the nuts securely with
the bar tip held up (12–15 Nm).
Then check the chain for smooth
rotation and proper tension while
moving it by hand. If necessary,
readjust.
IMPORTANT!
A new chain will stretch at the beginning of use. Check and
readjust the tension frequently as a loose chain can easily
derail or cause rapid chain wear and damage to the guide bar.
Fuel and Chain Oil Specifications
WARNING!
Gasoline is very flammable. Avoid smoking
or bringing any naked flame or sparks near
the fuel.
Make sure to stop the engine and allow it to
cool before refuelling the unit. Select outdoor
bare ground for fuelling and move at
least 3m (10ft) away from the fuelling point before starting the
engine.
Mix a regular 91 octane gasoline (leaded or unleaded, alcohol
Hole
Tensioner
nut
Chain cover
Tensioner screw
MCS38
MCS25,
45,46, 52
Page 7
7
position, too much fuel will enter into the engine resulting
in the engine failing to start.
3. Allow the engine to warm up with the choke lever pulled
out slightly.
WARNING!
Keep clear of the saw chain as it will start rotating
immediately upon starting of engine.
IMPORTANT!
When restarting immediately after stopping a hot
engine, leave the choke knob at the closed position
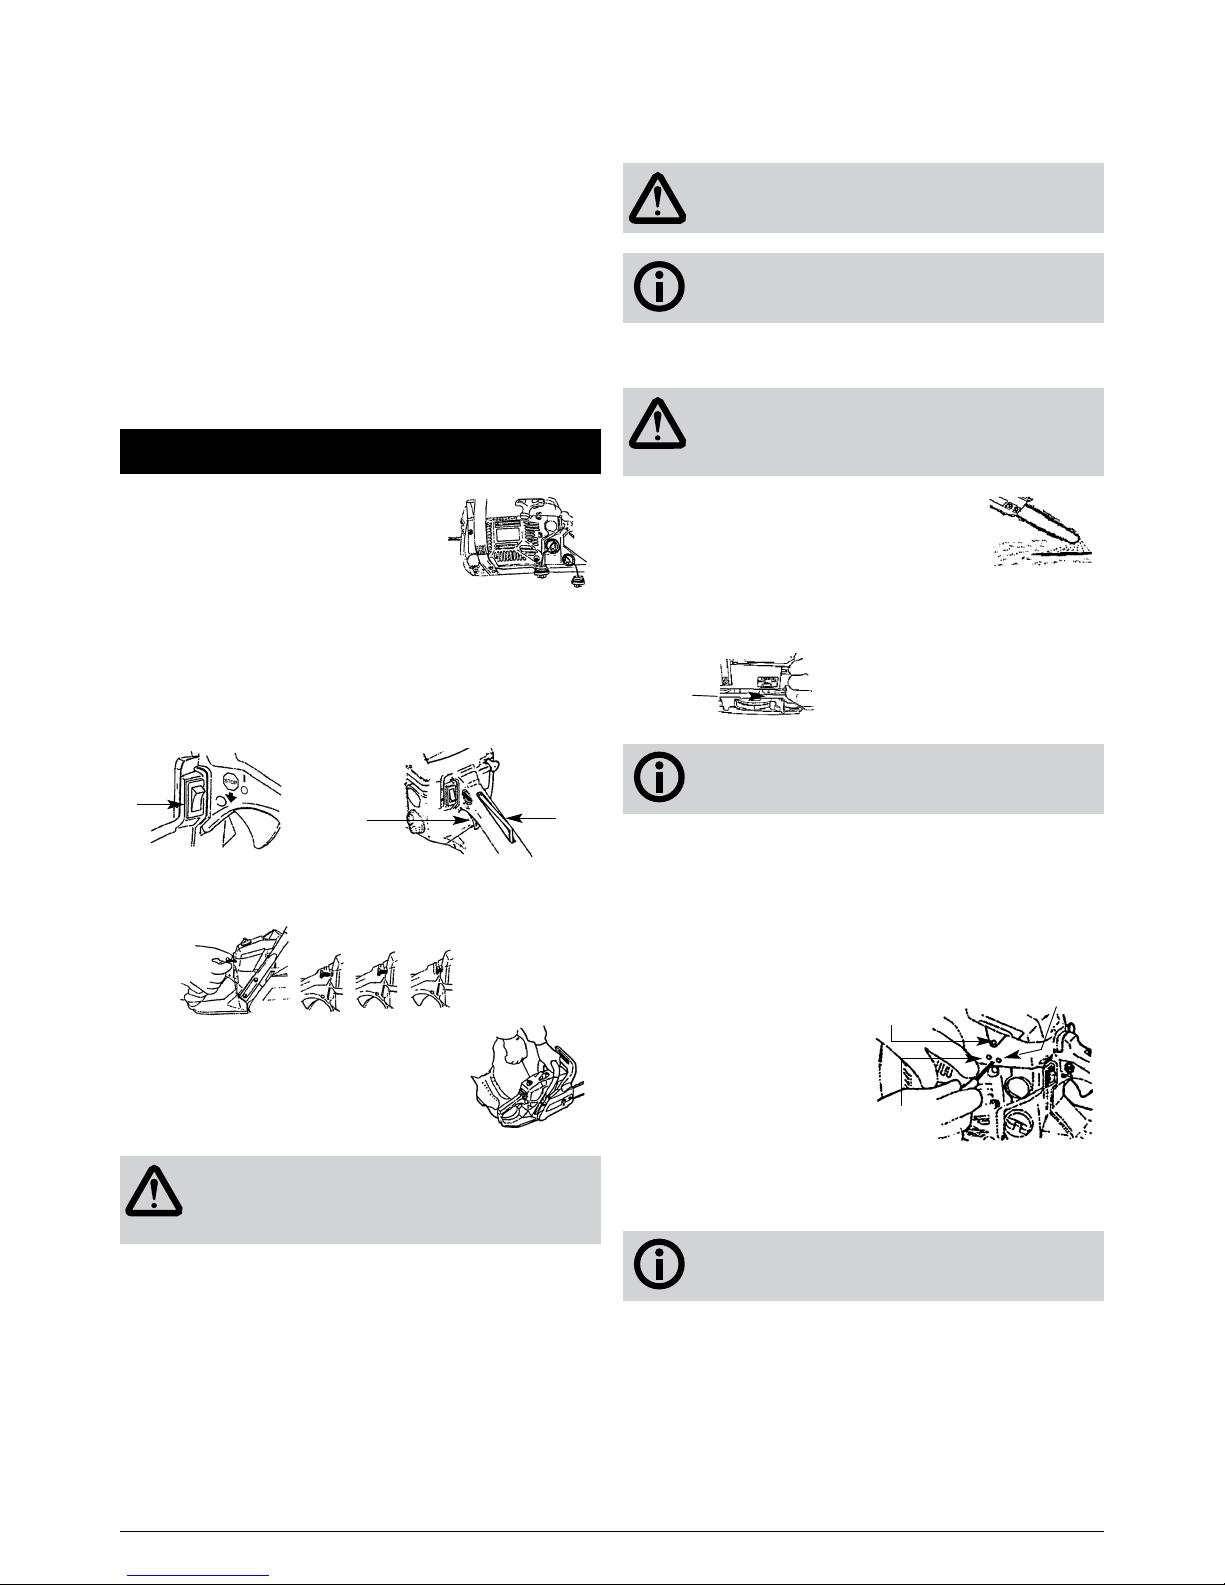
ADJUSTING THE OIL SUPPLY TO THE CHAIN
WARNING!
Make sure to set up the bar and the chain correctly
before adjusting the oil supply. If you don’t the rotating parts
may be exposed which is very dangerous.
After starting the engine. run the chain at
medium speed and see if excessive chain
oil is thrown off onto the ground.
Adjusting the Chain oil output.
The chain oil flow can be changed by inserting a screwdriver
in the hole on bottom of the clutch side. Adjust according to
your work conditions.
Chain Oil
Adjuster
IMPORTANT!
The oil tank should become nearly empty by the time fuel is used
up. Be sure to refill the oil tank every time you refuel the unit.
STOPPING THE ENGINE
1. Release the throttle lever to allow the engine to idle for a
few minutes.
2. Set the switch to the “O” (STOP) position.
ADJUSTING THE CARBURETTOR
This is best done by an authorised Masport or
Morrison dealer
The carburettor on your
engine has been factory
adjusted, but may require
fine tuning due to changes in
operating conditions. Before
adjusting the carburettor
make sure that the provided
air and fuel filters are in good
condition and the fuel is properly mixed.
When adjusting take the following steps:
IMPORTANT!
Be sure to adjust the carburettor with the bar and
chain attached.
1. Stop engine and screw in both the ‘H’ and ‘L’ needles until
they stop. Never force them. Then set them back the initial
number of turns as shown below.
Model MCS38 ‘H’ Needle: – ± ‘L’ Needle: 1 – ±
Model MCS25 ‘H’ Needle: 1 – ± ‘L’ Needle: 1 – ±
Model MCS45 ‘H’ Needle: 1 – ± ‘L’ Needle: 1 – ±
Model MCS52 ‘H’ Needle: 1 – ± ‘L’ Needle: 1 – ±
Model YR4503 ‘H’ Needle: 1 – ± ‘L’ Needle: 1 – ±
‘H’ Needle
‘L’ Needle
Idle adjuster
screw
TO GET MAXIMUM LIFE FROM YOUR ENGINE USE GOOD
QUALITY, WELL MIXED FUEL - AVOID...
1. Fuel with no oil (raw gasoline) that will very quickly cause
severe damage to the internal engine parts.
2. GASOHOL and E10. It can cause deterioration of rubber
and/or plastic parts and disruption of engine lubrication.
3. Mixing oils intended for use in four cycle engines with your
fuel. It can cause spark plug fouling, exhaust port blocking,
or piston ring sticking.
4. Mixed fuels which have been left unused for a period of
one month or more may clog the carburettor and result in
the engine failing to operate properly.
5. In the case of storing the chainsaw for a long period of
time, empty and clean the fuel tank. Turn the engine over to
empty the carburettor of the stale fuel.
6. When disposing of stale mixed fuel, take it to an authorised
disposal site.
Operating the Engine
STARTING THE ENGINE
Fill fuel and chain oil tanks respectively
and tighten the caps securely.
For models MCS25 & 38
1. Continuously push the priming
bulb until fuel comes into the bulb
(MCS25/38).
2. Put the switch to ‘I’ or up position.
3. Hold the throttle lever together with the throttle interlock
and push in the side throttle lock button. Release the
throttle lever to hold it at the starting position.
Throttle
interlock
Throttle
lever
Switch
4. Pull out the choke knob to the start position.
Closed
Choke
Knob
Start
5. While holding the saw unit securely
on the ground, pull the starter rope
vigorously.
WARNING!
Do not start the engine while dangling the chainsaw from
one hand. The saw chain may touch your body and cause
wounds that can be fatal.
6. If engine has started then stopped. Push the choke knob
in a little and pull the starter again to restart the engine
7. Allow the engine to warm up with the throttle lever pulled
out slightly.
For models MCS46, MCS52 and YR4503
1. For cold start, pull choke start lever.
2. Pull the starter cord until the first firing sound is heard.
Push in the choke knob to closed position. Pull start
handle vigorously again until engine runs.
NOTE If the starter handle is pulled after the first firing
sound is heard and the choke knob is in the start
Fuel
Chain
Oil
Page 8
8
2. Start the engine and allow it to warm up at half-throttle.
3. Turn the ‘L’ needle slowly clockwise to find a position
where idling speed is maximum, then set the needle back a
quarter (1/4) turn counterclockwise.
4. Turn the idle adjusting screw ‘T’ counterclockwise so that
the saw chain does not turn. If the idling speed is too slow,
turn the screw clockwise.
5. Make a test cut and adjust the ‘H’ needle for best cutting
power, not for maximum speed.
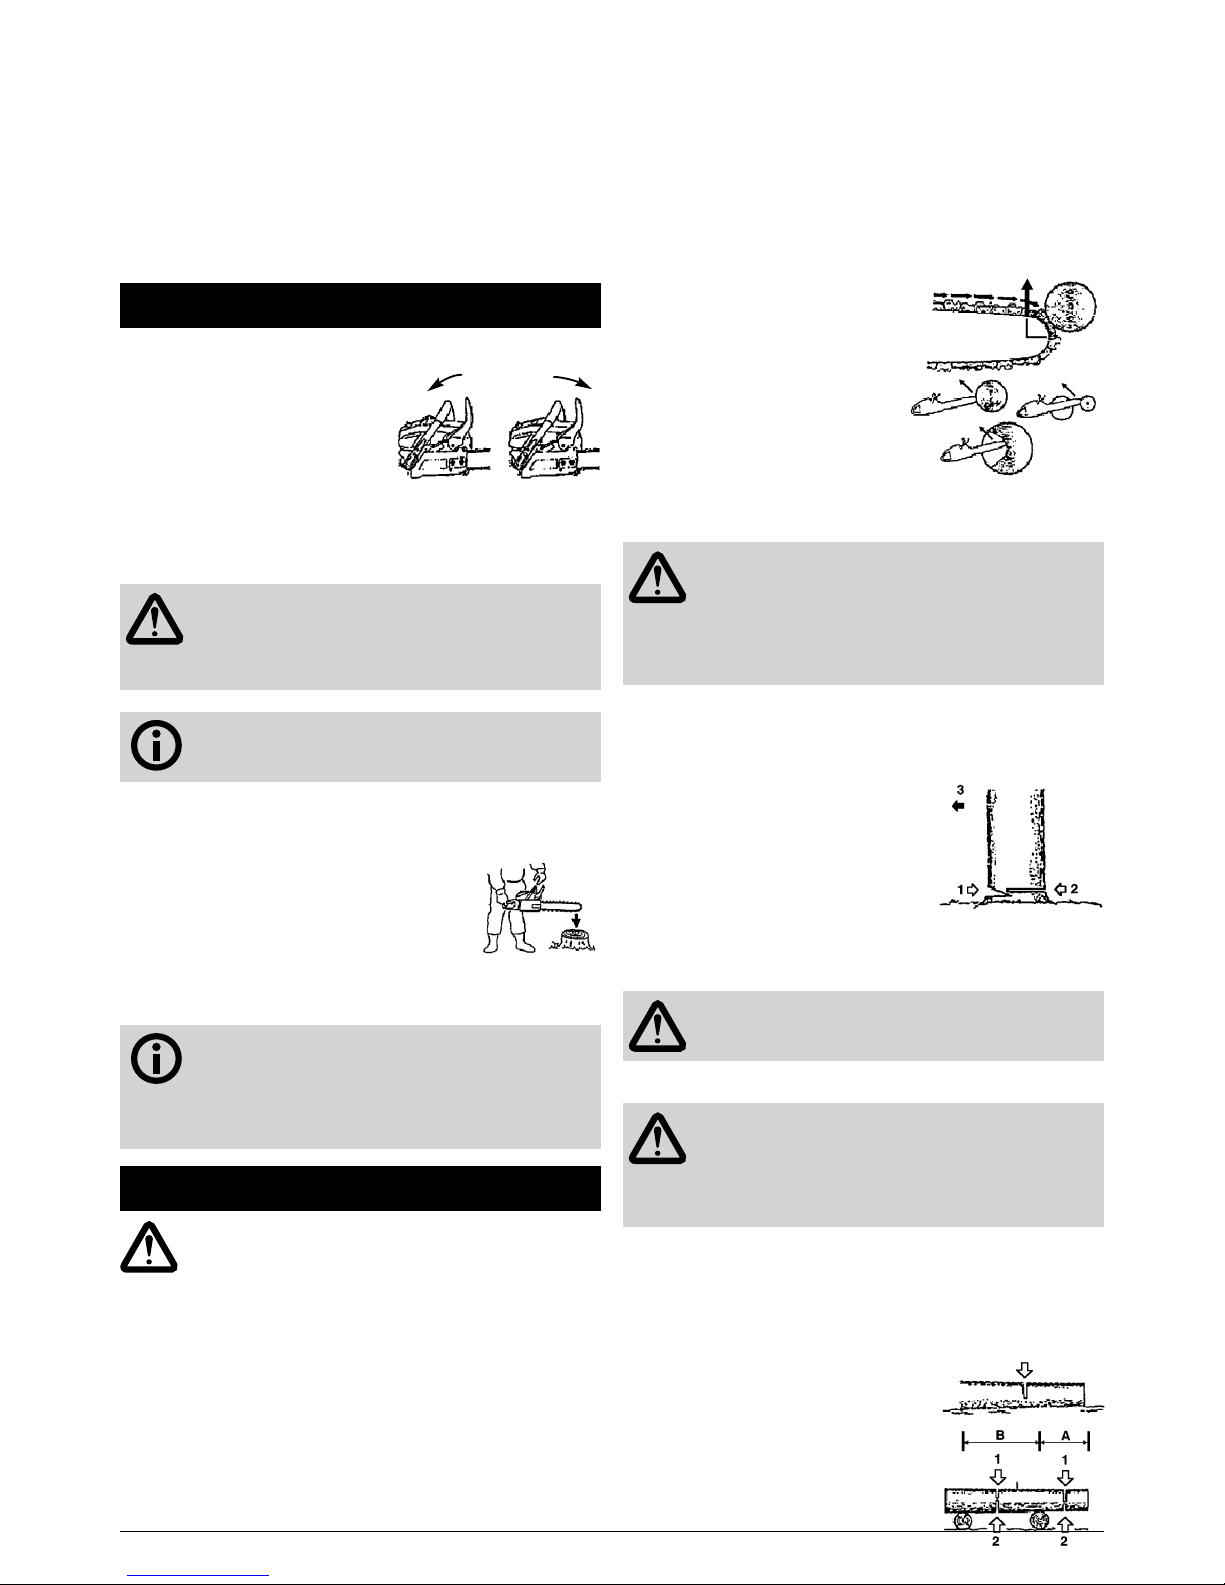
Chain Brake
This machine is equipped with an
automatic brake to stop the saw
chain rotating should kickback
occur while the saw is being used
for cutting. The brake is automatically operated by inertial force
which acts on the weight fitted
inside the front guard. This brake
can also be operated manually with the Front guard push
forward to the guide bar. To release brake, pull up the Front
guard toward the Front handle till ‘click’ sound is heard.
WARNING!
The kickback reaction happens so quickly that you will not be
able to react in time to avoid serious injury, even if the chain
brake works. The saw must never be in line with your face,
but should be to the right of your body. Never be distracted.
IMPORTANT!
Be sure to confirm brake operation is functioning correctly by
inspecting daily.
How to confirm brake is functioning correctly.
1. Turn off the engine.
2. Holding the chain saw horizontally,
release your hand from the Front handle,
hit the tip of the guide bar to a stump or a
piece of wood, to confirm brake operation. The Front guard should move away
from you, to the ‘On’ position. Operating
level varies by bar size. If the brake is not effective, ask
your dealer to inspect and repair.
IMPORTANT!
If the engine is kept rotated at high speed while the brake
is engaged, it will overheat the clutch, causing damage.
When the brake is operated while the engine is running,
immediately release your fingers from the throttle lever and
drop the engine speed to idle.
Sawing
WARNING!
• Before proceeding to your job, read the ‘Safety Instructions’ section at the beginning of this Manual. It is recommended to first practice sawing easy logs. This also helps
you get accustomed to your machine.
• Always follow the safety regulations. The chainsaw must
only be used for cutting wood. Never attempt to cut other
types of material due to vibrations and kickback which will
vary with different materials and the requirements of the
safety regulations would not be followed. Do not use the
Brake onBrake off
chain saw as a lever for lifting, moving or splitting objects.
Do not lock it over fixed stands. Never hitch tools or devices to the P.T.O. that are not specified by the manufacturer.
• It is not necessary to force the saw into the cut. Apply only
light pressure while running the engine at full throttle.
• When the saw chain is caught in the cut, do not attempt to
pull it out by force, but use a wedge or a lever to open the
cut.
GUARDING AGAINST KICKBACK
This saw is equipped with a chain
brake that will stop the chain in the
event of kickback when operating
properly. You must check the chain
brake operation before each usage.
Run the saw at full the throttle for
twelve seconds and push the Front
guard forward. The chain should
stop immediately with the engine
at full speed. If the chain is slow
to stop or does not stop, you must
replace the brake band and clutch drum before use. See your
chainsaw dealer.
WARNING!
It is extremely important that the chain brake is checked for
proper operation before each use and that the chain is sharp
in order to maintain the Kickback safety function of this saw.
Removal of safety devices, inadequate maintenance, or
incorrect replacement of the bar or chain may increase the
risk or serious personal injury or death due to kickback.
FELLING A TREE
1. Decide the felling direction. Consider the wind, lean of the
tree, location of heavy branches, ease of work after felling
and other factors
2. While clearing the area around the
tree, arrange a good foothold and
retreat path.
3. Make a notch cut one third of the
way into the tree on the felling side,
1.
4. Make a felling cut from the opposite side of the notch and at a level
slightly higher than the bottom of
the notch, 2.
WARNING!
When you fell a tree, be sure to warn your neighbouring
workers of the danger.
Bucking and Limbing
WARNING!
•Always ensure your footing. Do not stand on the log.
•Be alert to the rolling over of a cut log. Especially when
working on a slope, stand on the uphill side of the log.
•Follow the instructions in ‘Safe Operation’ to avoid kickback
of the saw.
Before starting work, check the direction of bending force
inside the log to be cut. Always finish cutting from the
oposite side of bending direction to prevent the guide bar
from being jammed in the cut.
Cutting a log lying on the ground.
Saw down halfway,then roll the log over
and cut from the opposite side.
Cutting a log hanging off the ground.
In area ‘A’ saw up from the bottom one
third and finish by sawing down from
the top. In area ‘B’ saw down from the
1. Notch cut
2. Felling cut
3. Felling direction
Page 9
9
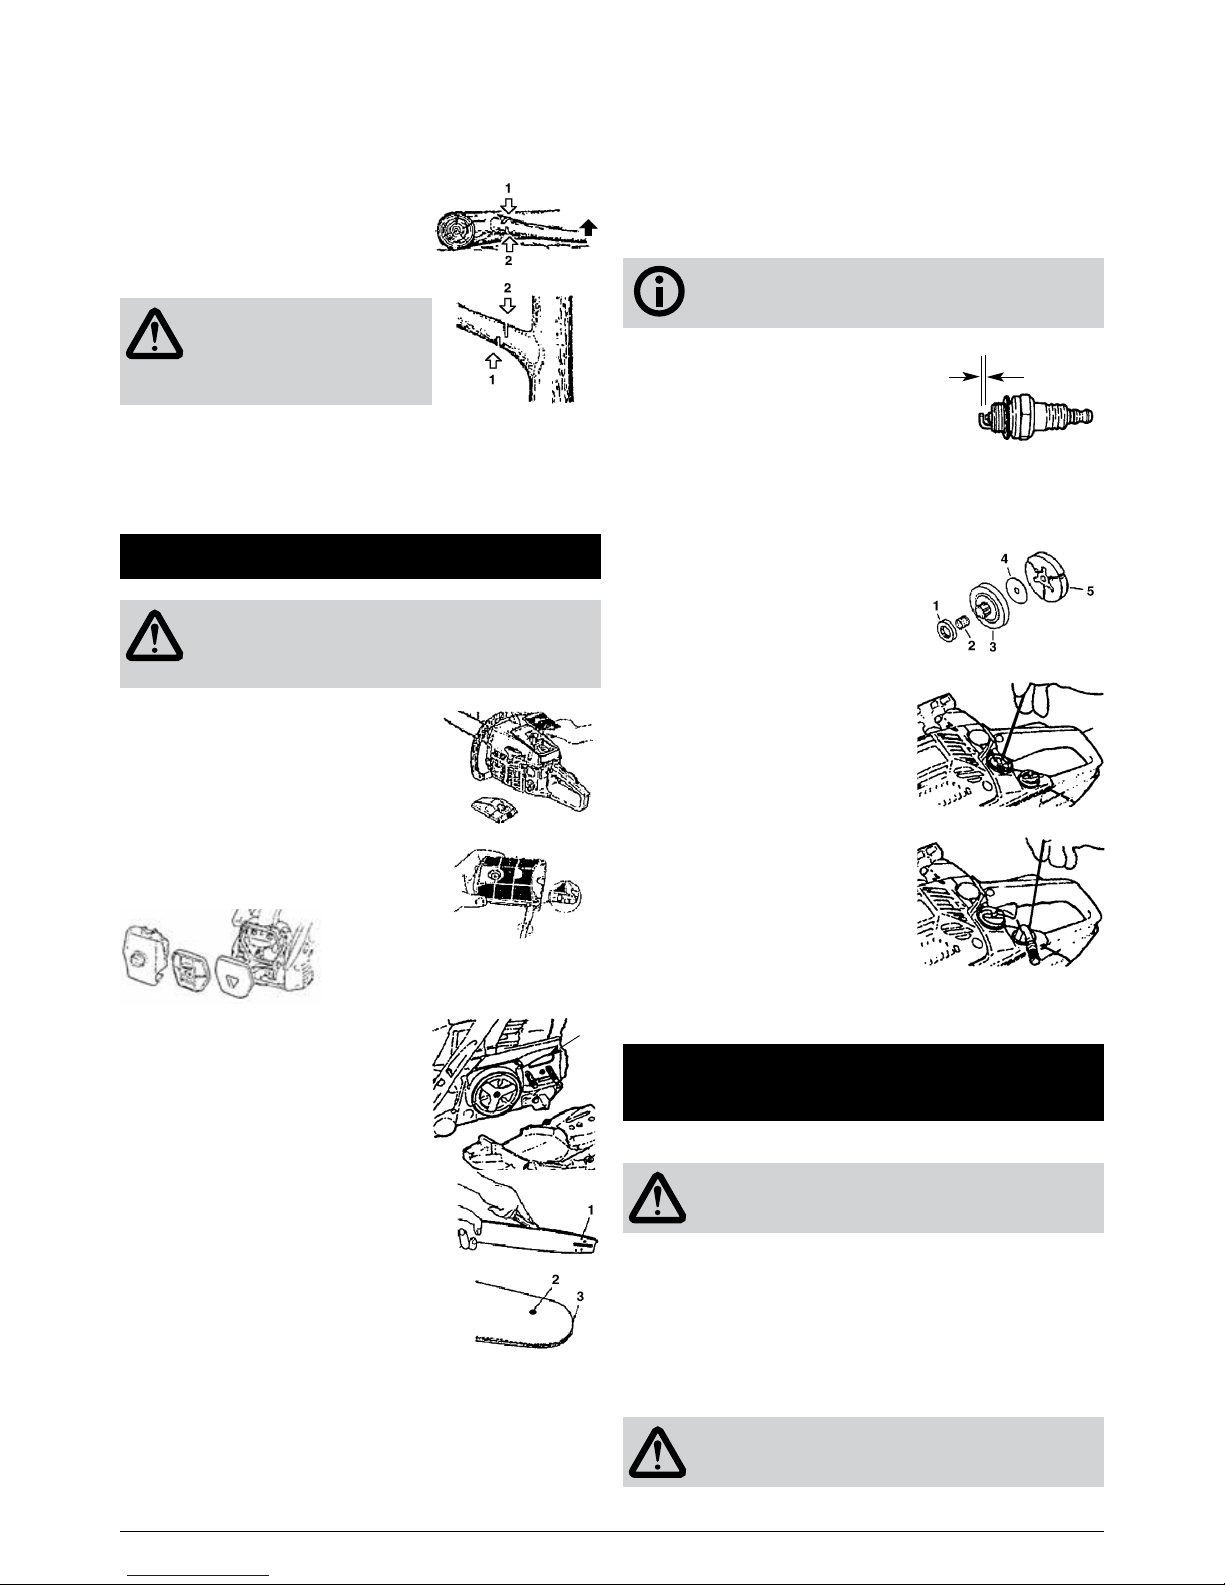
top one third and finish by sawing up
from the bottom
Cutting a limb of fallen tree.
First check to which side the limb is
bent. Then make the initial cut from the
bent side and finish by sawing from the
opposite side.
WARNING!
Be alert to the springing back of a
cut limb. Pruning of Standing Tree.
Cut up from the bottom, finish down
from the top.
• Do not use an unstable foothold or ladder.
• Do not overreach.
• Do not cut above shoulder height.
• Always use your both hands to grip the saw.
Maintenance
WARNING!
Before cleaning, inspecting, or repairing your unit, make sure
the engine has stopped and is cool. Disconnect the spark
plug to prevent accidental starting.
MAINTENANCE AFTER EACH USE
1. Air filter
Dust on the cleaner surface can be
removed by tapping a corner of the
cleaner against a hard surface. To
clean dirt in the meshes, split the
cleaner into halves and brush with
gasoline. When using compressed air,
blow from the inside.
2. Oiling port
Dismount the guide bar and check
the oiling port for clogging.
3. Guide bar.
When the guide bar is dismounted,
remove sawdust in the bar groove and
the oiling port. Grease the nose sprocket
from the feeding port on the tip of the bar.
4. General Maintenance.
Check for fuel leakage, loose fastenings and damage to major parts. Especially handle joints and guide bar mounting.
If any defects are found, make sure to have them repaired
before operating the machine again.
Oil Port
1. Oiling port
2. Grease port
3. Sprocket
PERIODICAL SERVICE CHECKS
1. Cylinder fins.
Dust clogging between the cylinder fins will cause overheating of the engine. Periodically check and clean the cylinder
fins after removing the air cleaner and the cylinder cover.
When installing the cylinder cover, make sure that switch
wires and grommets are positioned correctly in place.
IMPORTANT!
Be sure to cover the air intake hole whilst cleaning.
2. Spark plug.
Clean the electrodes with a wire brush
and reset the gap to 0.65mm as
necessary
3. Sprocket.
Check for cracks and for excessive wear interfering with the
chain drive. If wear is obvious, replace it with new one. Never
fit a new chain on a worn sprocket, or a worn chain on a new
sprocket.
1. Sprocket
2. Needle bearing
3. Clutch drum
4. Spacer
5. Clutch shoe
4. Fuel filter (MCS38 shown).
Disassemble the filter and wash with
gasoline, or replace with new one if
needed.
5. Oil filter (MCS38 shown).
Disassemble the oil filter and
wash with gasoline, or replace
with new one if needed.
6. Anti-vibration system
All models have rubber bumpers,
have your dealer replace them should
they show signs of cracking or damage.
Maintenance of the Saw Chain and
Guide Bar
SAW CHAIN
WARNING!
It is very important for smooth and safe operation to
always keep the cutters sharp.
Your chain saw cutters need to be sharpened when.
• Sawdust becomes powder like.
• You need extra force to saw.
• The cut way does not go straight.
• Vibration increases.
• Fuel consumption increases.
Cutter setting standards.
WARNING!
Be sure to wear safety gloves when servicing.
0.65mm
Page 10
10
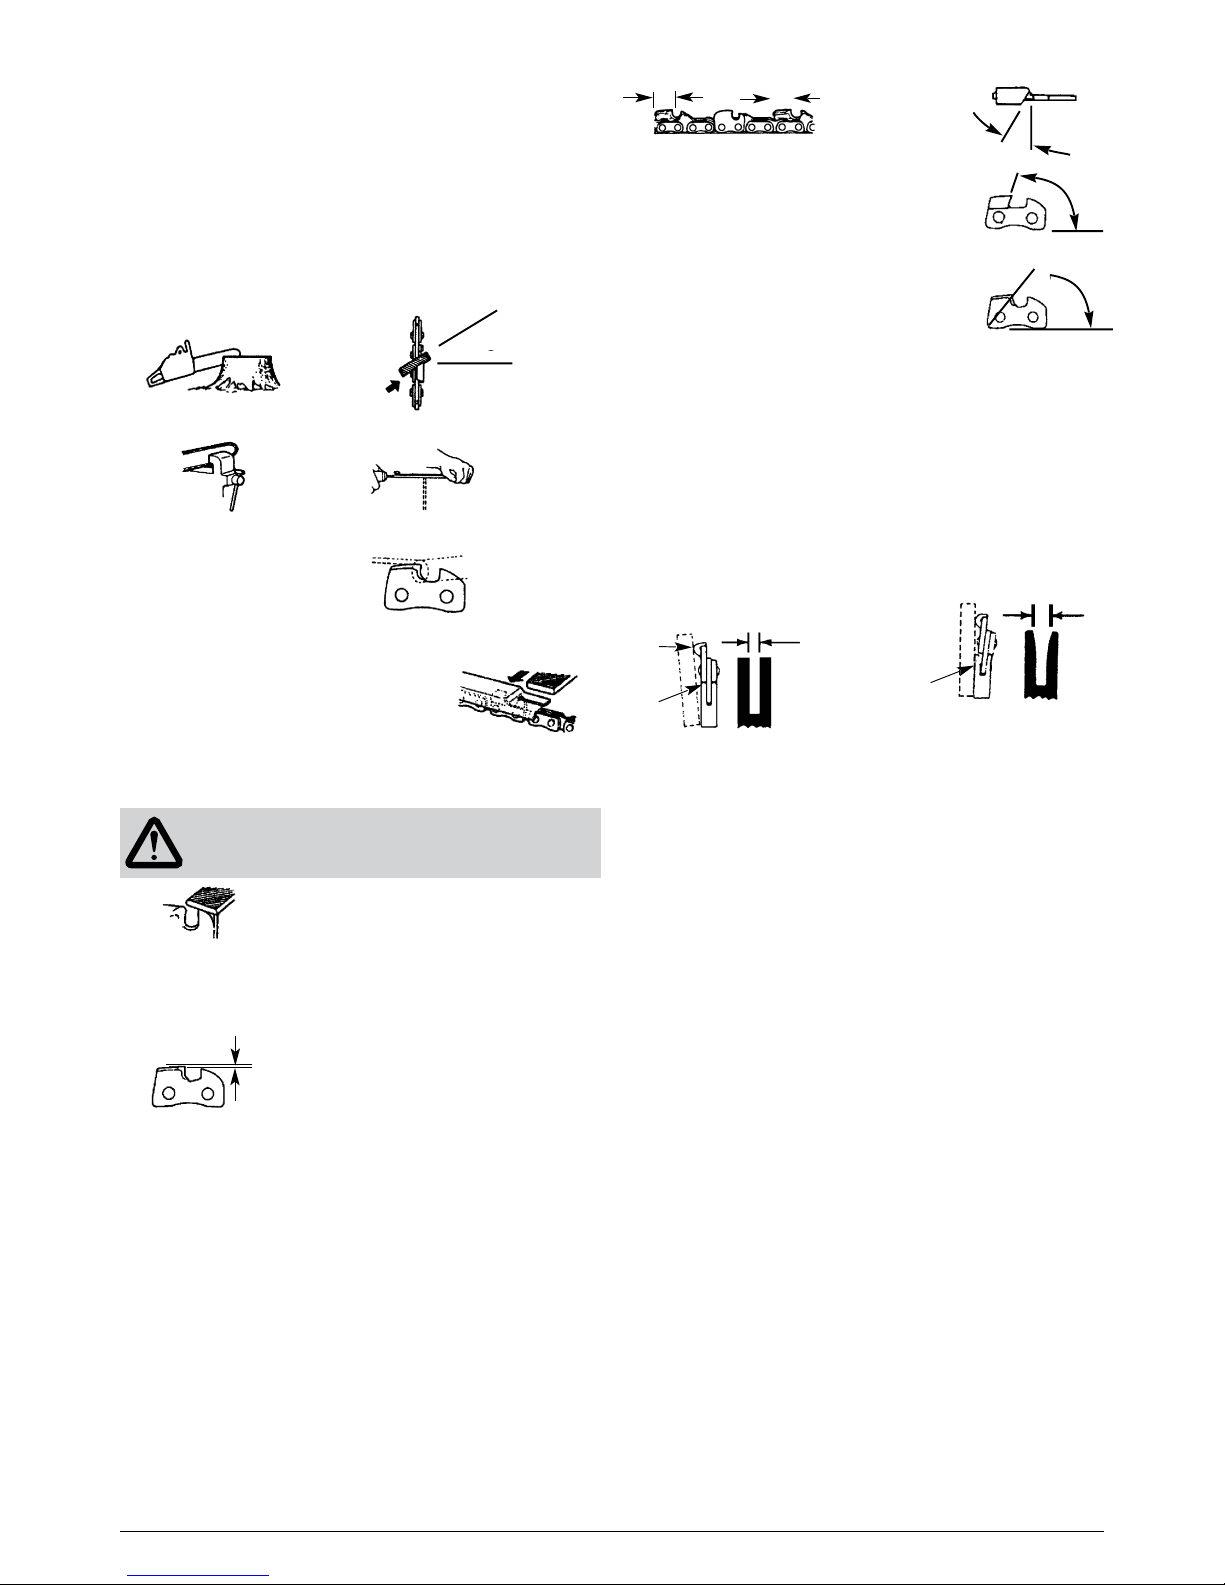
Before filing:
• Make sure the saw chain is held securely.
• Make sure the engine is stopped and the spark plug disconnected.
• Use a round file of proper size for your chain.
Model MCS25 Chain: 91VG File size: 5/32” (4.0 mm)
Model MCS38 Chain: 91VG File size: 5/32” (4.0 mm)
Model MCS46 Chain: 21VB File size: 3/16 ” (4.76 mm)
Model MCS52 Chain: 21VB File size: 3/16 ” (4.76 mm)
Model YR4503 Chain: 21VB File size: 3/16 ” (4.76 mm)
30˚
90˚
20˚
Fix chain so it can not move.
• Place your file on the cutter and
push straight forward. Keep the file
positioned as illustrated.
• After every cutter has been set,
check the depth gauge and file it to
the proper level.
WARNING!
Be sure to round off the front edge to reduce the chance of
kickback or tiestrap breakage.
Make shoulder rounded.
Make sure every cutter has the same length and edge angles
as illustrated.
Depth gauge standard.
Appropriate gauge checker.
x
x
Cutter length
Filing angle
Side plate angle
Top plate angle
30˚
85˚
60˚
GUIDE BAR
• Flip the bar upside down occasionally to promote even
wear.
• The bar rail should always be a square. Check for wear of
the bar rail. Apply a ruler to the bar and the outside of a
cutter. If a gap is observed between them– the rail is normal.
Good guide bar
Ruler
Gap
Guide bar rail
Guide bar needs replacing
No gap. Chain should not move
sideways in the guide rail
Guide bar rail
worn
Page 11

11
Trouble shooting
Engine does not start
What to Check Possible Cause Remedy
Does the engine crank?
YES
NO Faulty recoil starter.
Fluid in the crankcase.
Internal damage.
Return chainsaw to dealer
Good compression?
YES
NO Loose spark plug. Excess wear on cylinder,
piston, rings
Tighten and re-test. Return unit to
dealer
Does the tank contain fresh fuel
of the proper grade?
YES
NO Fuel/mixture incorrect, stale, contami-
nated.
Re-fill with fresh fuel (2-cycle
engine oil and gasoline, as specified.)
Is fuel visible and moving in the
return line when priming?
YES
NO Check for clogged fuel filter and/or vent. Clear as required. Re-start.
Check the spark plug If the plug is wet, excess fuel may be in the
cylinder
Crank the engine with plug
removed. replace the plug and
restart. (Refer to page 7)
The plug may be fouled or improperly
gapped
Clean and regap the plug to
0.65mm. Restart.
The plug may be damaged internally or of
the wrong size.
Replace the plug with the specified plug. Restart
Low power output
What to Check Possible Cause Remedy
Is the engine overheating? Operator is overworking the machine. Use lower throttle setting.
Carburettor mixture is too lean. Return chainsaw to dealer.
Improper fuel ratio. Re-fill with fresh fuel of the correct
mixture (2-cycle engine oil and
gasoline, in specified ratio Page 5.)
Fan cover, cylinder fins dirty or damaged. Clean, repair or replace as neces-
sary.
Carbon deposits on piston or in the muffler. Decarbonize.
Engine is rough at all speeds. Clogged air cleaner element. Service the air cleaner.
May also have black smoke and/ Loose or damaged spark plug. Tighten or replace.
or unburned fuel at the exhaust. Air leakage or clogged fuel line. Repair or replace filter and/or fuel
line.
Water in the fuel. Drain the fuel replace the fuel with
a fresh mix.
Piston seizure. Return chainsaw to dealer.
Faulty carburettor and/or diaphragm. Return chainsaw to dealer.
Engine is knocking. Overheating condition. Idle engine until cool; find reason
for overheating.
Improper fuel. Check fuel octane rating; check
for presence of alcohol in the fuel.
Refuel as necessary.
Carbon deposits in the combustion
chamber.
Decarbonize
Page 12

12
Additional problems
Symptom Possible Cause Remedy
Poor Acceleration. Clogged air cleaner element. Clean the element.
Clogged fuel filter. Replace the fuel filter as required.
Carburettor mixture too lean. Return chainsaw to the dealer.
Idle speed set too low. Adjust: Refer to specs pg. 12.
Engine stops abruptly. Fuel tank empty. Refuel.
Clogged fuel filter. Clean or replace the fuel filter as
required.
Water in the fuel. Drain; replace with clean fuel.
Shorted spark plug or loose terminal. Clean and replace spark tighten the
terminal.
Ignition failure. Return chainsaw to the dealer.
Piston seizure. Return chainsaw to the dealer.
Engine difficult to shut off. Ground (stop) wire is disconnected, or switch is
defective.
Test and replace as required.
Overheating due to incorrect spark plug. Use correctly specified plug
Overheated engine. Idle engine until cool.
Excessive vibration. Warped or damaged chainsaw fan. Inspect and replace fan as required.
Loose bolt or fastener. Tighten as required.
Internal engine damage. Return chainsaw to dealer.
Chain oiler problems
Symptom Possible Cause Remedy
Oil does not come out. Oil tank empty. Clean and fill
Oil passages and ports clogged. Clean and check
Check oil is of specified quality. Replace with correctly specified oil
If the chainsaw seems to need further service, please consult with an authorised service agent in your area.
Page 13

13
Specifications
Model MCS25 MCS38 MCS46 MCS52 YR4503
Power Unit
Dimensions 265l x 220h x 220w 370l x 235h x 270w 410l x 235h x 265w 410 x 235h 265w 410l x 235h x 265w
Engine: Two stroke air cooled petrol/oil engine, vertical cylinder. EUII
Displacement 25.4cc 37.2cc 46cc 49.3cc 45cc
Engine Speed Max 10,000rpm 11,000rpm 11,000rpm 11,000rpm 11,000rpm
Max Idle 3,000rpm 3,000rpm 3,000rpm 3,000rpm 3,000rpm
Maximum power output 0.85kw 1.3kw 2.0kw 2.0kw 1.7kw
Fuel: All models Gasoline / oil mixture 25:1
Chain Oil: All models Recomended Masport Chain Bar Oil Part # 833043, or SAE 10W-30 Motor oil
Oil system: All Models Automatic / Adjustable
Oil Tank Capacity 160ml 220ml 260ml 260ml 260ml
Carburettor: All Models Walbro WT-Diaphram type
Ignition System: All
Models
All Models All transistor electronic
Spark plug M7/LD
L8RTF/NHSP
LD L7T
NHSP L8RTF
LD L7T/L7T/JL
NHSP L8RTF
LD L7T/L7T/JL
NHSP L8RTF
LD L7T/L7T/JL
NHSP L8RTF
Starting: All Models Recoil starter
Stopping: All Models Grounding (switch)
Fuel Tank Capacity 230ml 320ml 550ml 550ml 550ml
Air Cleaner Type: All
Models
Semi-wet
Weight; power unit only 3.5kg 4.9kg 5.5kg 5.5kg 6.5kg
Cutting Bar
Type: All Models Sprocket nose
Guide Bar Size 30cm; 12” 40cm; 16” 45cm; 18” 50cm; 20” 45cm; 18”
Sprocket–teeth, pitch 6T x 3/8” 6T x 3/8” 7T x 0.325 7T x 0.325 7T x 0.325
Saw Chain
Type Oregon Oregon 91VG, 45X Oregon 91PO, 57X Oregon 21BP, 72X Oregon 21BP, 76X Oregon 21BP, 72X
Pitch Inches/mm 3/8” / 9.53mm 3/8” / 9.53mm 0.325” / 8.26mm 0.325” / 8.26mm 0.325” / 8.26mm
Gauge Inches/mm 0.05” / 1.27mm 0.05” / 1.27mm 0.058” / 1.47mm 0.058” / 1.47mm 0.058” / 1.47mm
Page 14

Page 15

Page 16

Copyright © 2017 Morrison
Morrison, a division of Masport Limited
1-37 Mt Wellington Highway
Panmure
Auckland 1060
New Zealand
P: 0800 627 767 (New Zealand)
P: 1300 366 225 (Australia)
 Loading...