

Page 1

MU User Manual
Introduction
Thank you for purchasing MU by Morpx and join our journey to bring vision and AI to all toys and
educational robots! MU is started from the simple idea of replacing remote controls with a more
natural ways of interaction. Today, with MU, your toys are no longer dummies controlled using
buttons or screens, but robots that can sense the environment and have their own minds of
“playing”, based on a set of rules programmed in their software.
MU is our first milestone in this direction and you are invited to experience what we've created.
To get you started quickly, MU is pre-loaded with models that can detect faces, people
silhouettes, lines, balls, fingers, and many remote-control codes of popular robotic kits. Take a
few minutes to look through this user manual and enjoy your robot building time with MU!
*This guide is for information purpose only and may be modified. The latest version of this guide
can be found at www.morpx.com/manuals.
What’s inside a MU package?
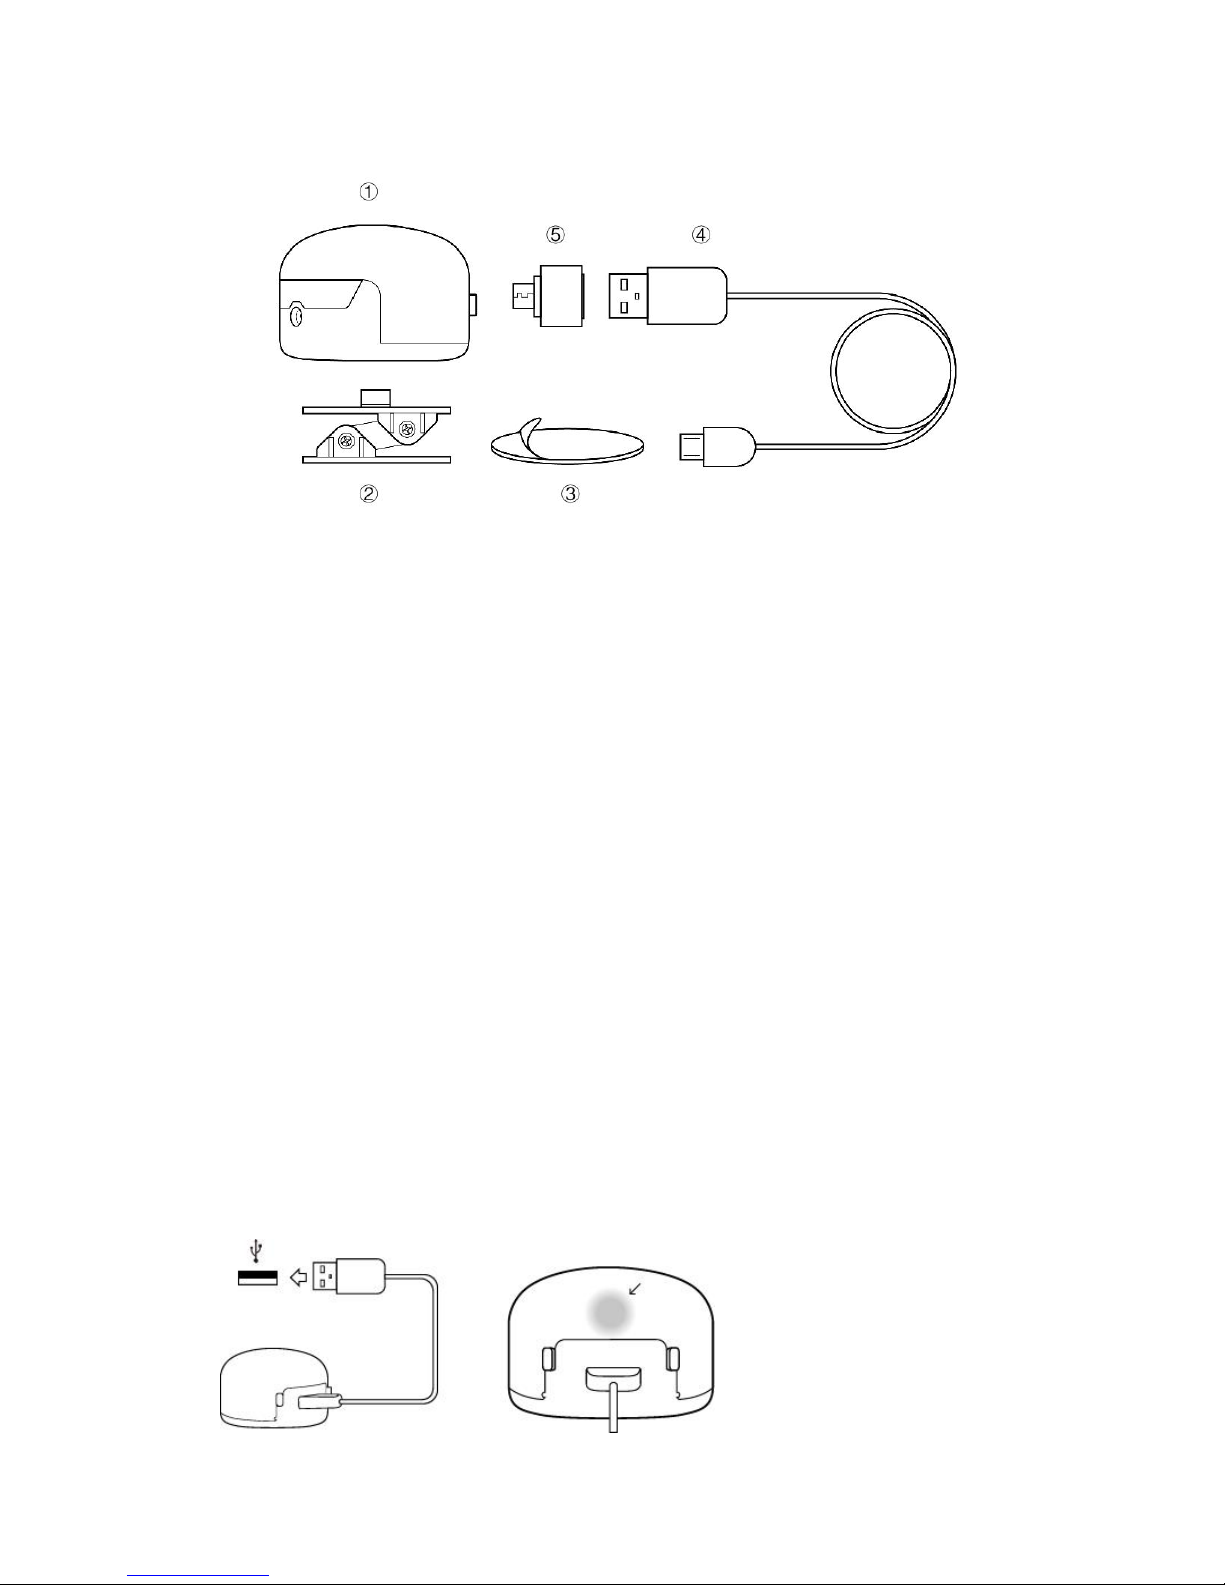
① MU robotic head with vision and AI on board.
② Universal mount for MU.
③ Double-sided foam stickers ×2.
④ Micro-USB cable for charging and data transferring.
⑤ OTG plug for data transferring with Android based devices.
Page 2
Warning
•DO NOT immerse MU or other parts in the water or any kind of liquid.
•DO NOT drop MU as this may damage the camera and the PCB assembly.
•Small parts, not for children under 3 years old.
Battery
•How to charge the battery
MU uses rechargeable Lithium Polymer battery.
To charge it, insert the USB cable to the micro-USB port on the back of MU. Insert the other side
of the cable to a standard USB port.
○ When MU is charging, the
charging light is on.
○ When MU is fully charged, the
charging light will automatically
shut off.
Page 3
•Battery Safety
1.Battery is a small object.
2.Battery CAN NOT be replaced. DO NOT replace the batteries.
3.DO NOT dispose of batteries in fire, as batteries may explode or leak.
4.Use only the batteries provided by the manufacturer.
5.DO NOT heat, dismantle or deform batteries.
6.DO NOT disassemble or modify, or for any other purpose.
7.DO NOT short-circuit the battery.
8.When the battery is accidentally ballooning or having effluent, or smoke, please stop using MU
immediately and contact Morpx.
9.MU has a battery management chip inside. Please use a computer USB port to charge. Using
mobile phone charger or power bank may cause damage or shorten the life of the battery.
10.DO NOT leave MU under direct sunlight for a long time.
11.If the device is left unused for a long time, the battery might be drained. Please recharge it
before use.
Overview
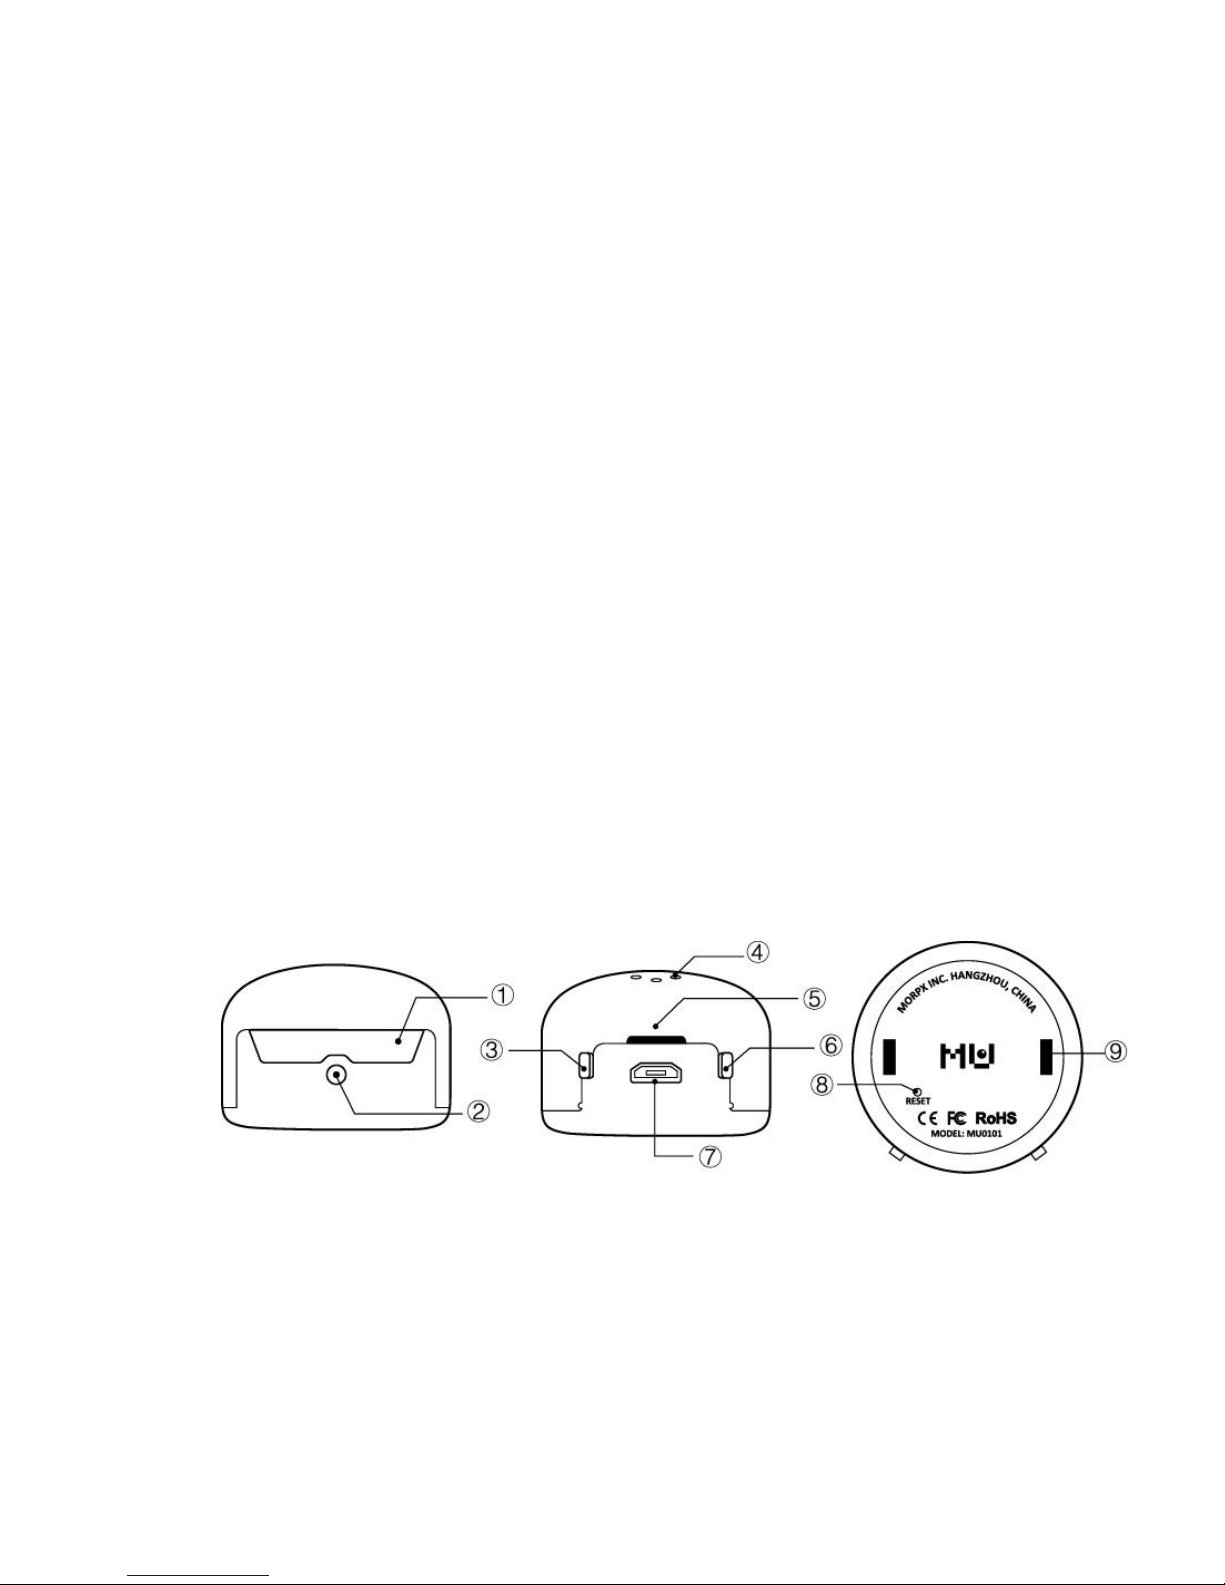
① LED eyes
② Camera
③ Mode button
④ Speaker
⑤ Charging light
⑥ Power button
⑦ Micro-USB port
⑧ Reset button
⑨ Mount port
Page 4
Getting Started
MU works with a robotic body by sending remote control commands. Just imagine a toy having
its remote control on top of its head.. Currently, MU supports the control commands of Lego
Mindstorms EV3, Lego Power Functions, Hexbug Spider, and Hexbug Fire ant.
MU uses infra-red (IR) technology to send control signals, theoretically any infra-red controlled
toy can potentially be controlled by MU. We will add newly supported toys through firmware
updates in our online forum (forum.morpx.com). For advanced users, MU also has ports to
connect directly with servos, Arduino, or Raspberry Pi (Please also check our online forum for
details).
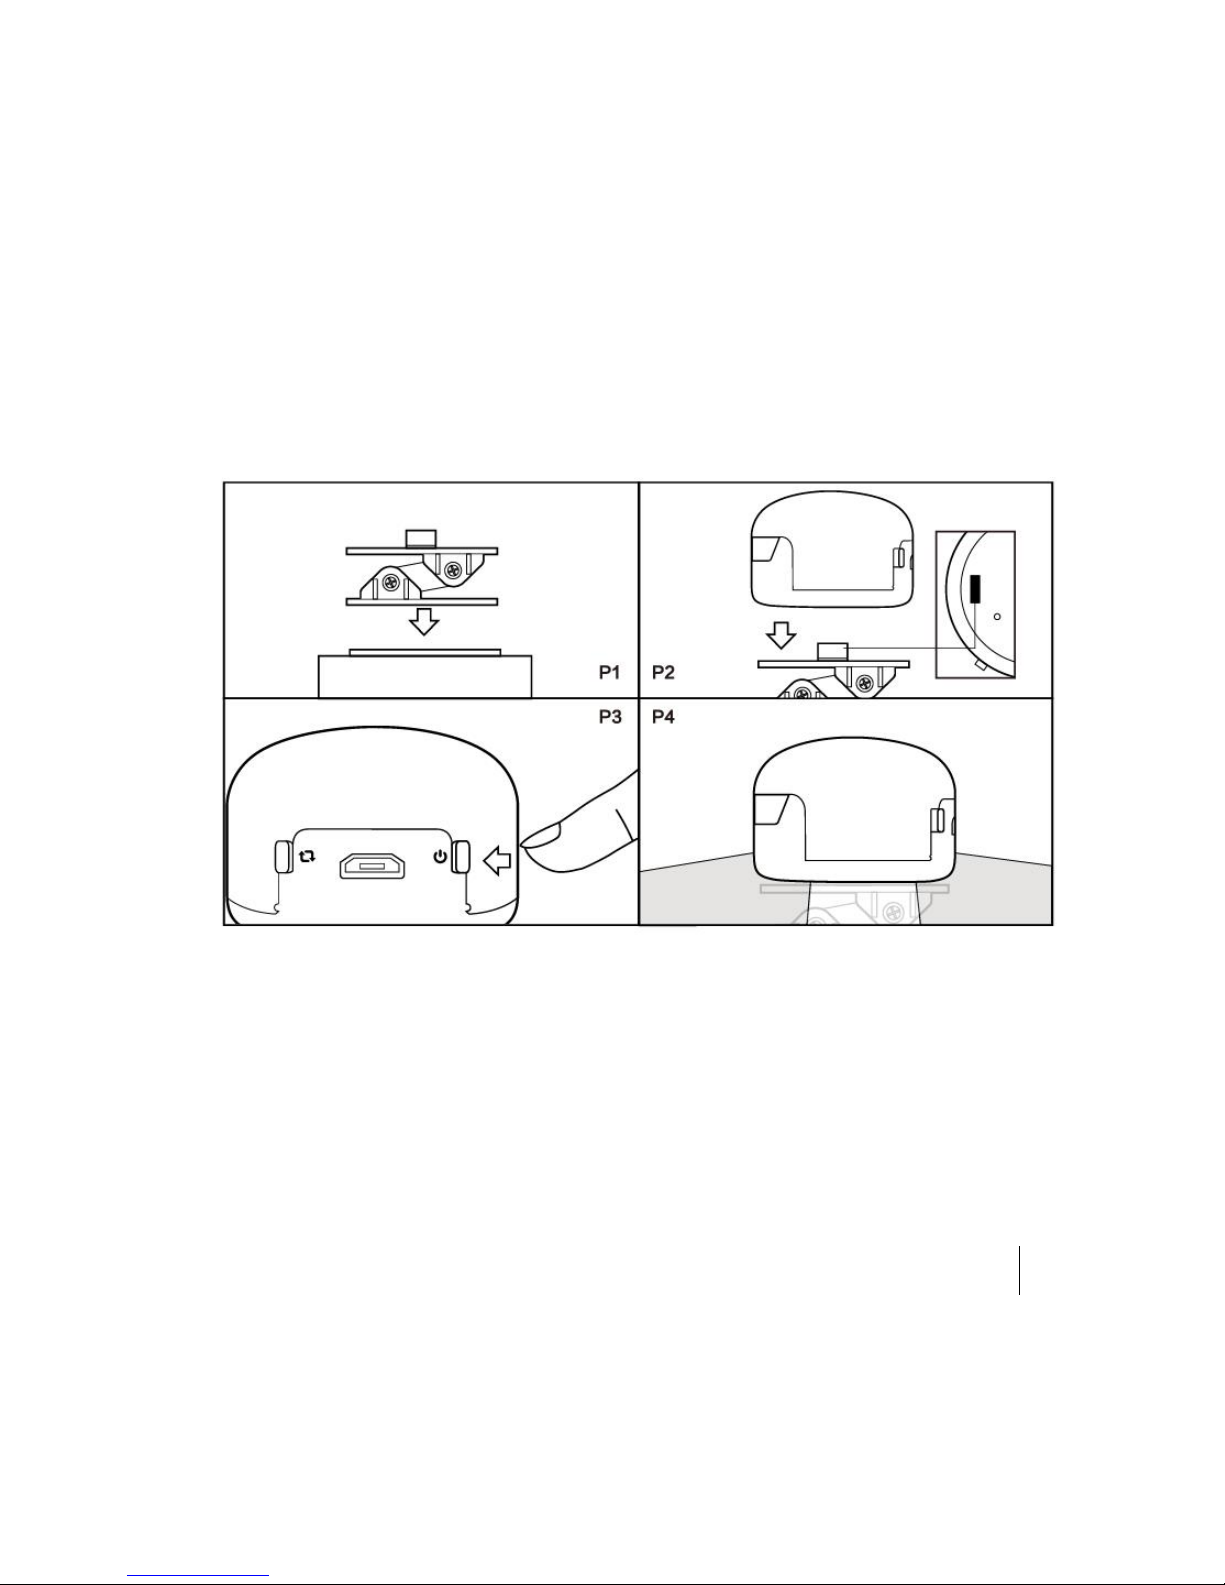
To mount MU on a toy, use the included double-sided tape. First, secure the mount on the toy.
(P1)
Then insert MU onto the mount. Make sure that the camera direction is looking forward. (P2)
Press the Power button to turn on MU. (P3)
NOTE: The effective range of the IR signal of MU is limited to avoid interferences with other
devices. The typical range is a few inches under or behind the device. P4 illustrates the effective
range. Please make sure your toy’s IR receiver is within the covered range.
For advanced usage of MU and building instructions of more fancy robots controlled by MU,
please visit forum.morpx.com.
Page 5
Mode Button
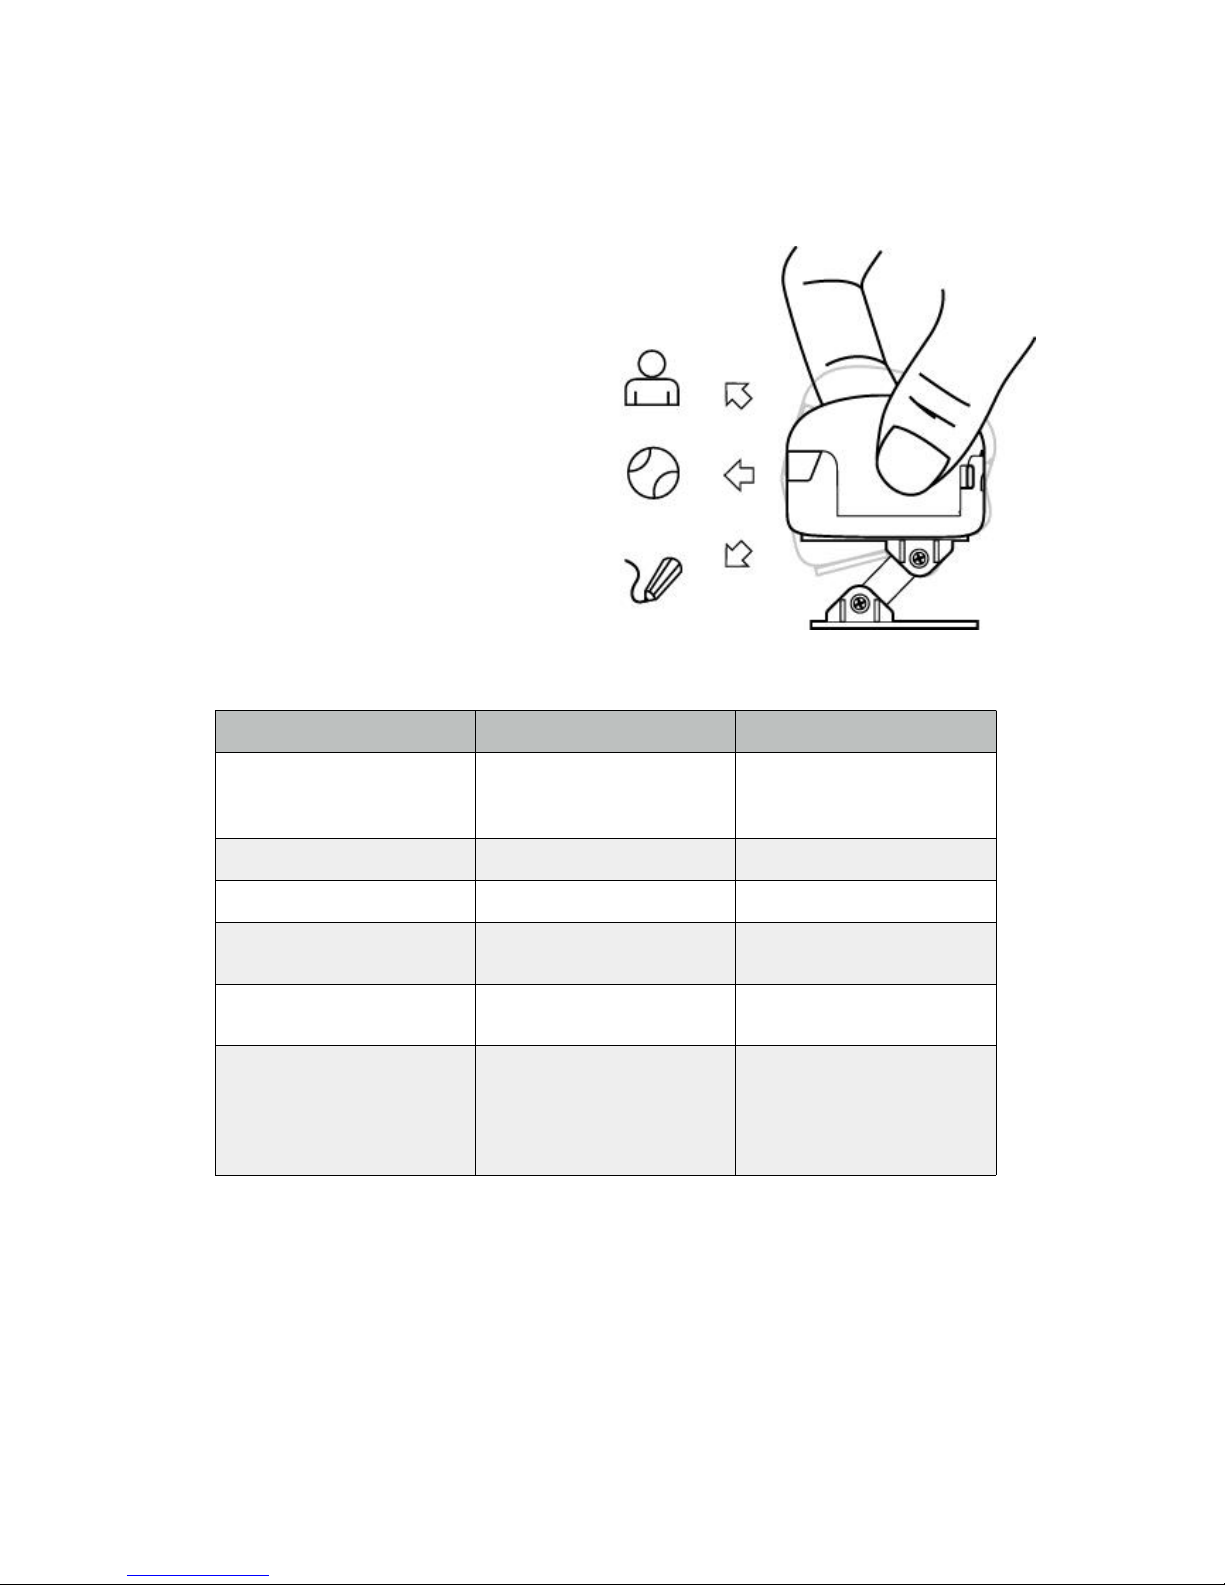
For a MU to work on a toy robot, it has to
know what the toy is and what target object is
selected for MU to detect. These two pieces of
information are selected using the mode
button at the back of MU. Long press the
mode button will switch among the supported
toy mode. MU will give voice confirmation of
each toy mode after the long press.
For each toy type, there may be different
target modes that MU will search and track.
Short press the mode button to switch among
these target modes. Again, MU will give voice
confirmation of what the current target mode
is.
Toy Select (Long press)
Target Select (Short press)
Explanation
No Toy Mode
human mode
demo mode that detects
faces and gives welcome
message
Lego EV3
greeting bot/snake
detecting human silhouette
Lego Power Functions
ball grabber
follow ball
Hexbug Spider
ball mode/ line mode/ human
mode
follow ball / line / human
Hexbug Ant
ball mode/ line mode/ human
mode
follow ball / line / human
Vision Sensor Mode
loop mode/setup mode
For arduino/raspberry pi
developer, detection results
sent through UART serial
port, please check our forum
for more details.
Page 6

The general behavior of the pre-programmed MU is searching, detecting and following.
When MU detects a target object, it will play a sound and drive the toy to follow it. Otherwise
MU will drive the toy around to find the target. Note that If multiple target objects appear, MU
might switch between the targets.
You should adjust the mount direction when the target mode is changed to make it easier for
MU to spot the target.
NOTE: The viewing angle of MU is about 40° horizontally in front of the camera. MU might not
respond to a target If the distance between them is more than 1 meter. MU also works better in
good lighting conditions and might have trouble finding object in low light situations.
Please vision www.morpx.com to get more details about the different modes of MU. We have
some videos that show you how to play with MU in each mode.
Q
&
A
Q: My MU cannot be turned on.
A: Charge MU to make sure its battery is full. If it still does not work, reset MU and try to turn it
on again. To reset MU, insert a thin needle tip to the reset whole on the bottom of MU until you
hear a button click sound
Q: My MU cannot respond to a target object.
A: Make sure the camera is facing forward, and possibly adjust the angle of the mount. Try to
give it an easy target object to follow.. Make sure MU is working in the right toy mode and target
mode. Also, make sure both MU and the toy is fully charged.
Q: When I charge the battery, the charging light is blinking
A: This might be due to a battery error. Try to detach and plug in the Micro-USB cable again. If
this does not work, contact [email protected] for help.
If you have other questions, please post it on forum.morpx.com. Someone in the MU team will
reply to the posts. Alternatively, you can
contact [email protected]. Thank you!
Page 7

FCC
This device complies with part 15 of the FCC rules. Operation is subject to the following two
conditions:
This device may not cause harmful interference.
This device’s signal may be interfered by other devices.
This equipment has been tested and found to comply with the limits for a Class B digital device,
pursuant to part 15 of the FCC Rules. These limits are designed to provide reasonable protection
against harmful interference in a residential installation. This equipment generates, uses and can
radiate radio frequency energy and, if not installed and used in accordance with the instructions,
may cause harmful interference to radio communications. However, there is no guarantee that
interference will not occur in a particular installation. If this equipment does cause harmful
interference to radio or television reception, which can be determined by turning the equipment
off and on, the user is encouraged to try to correct the interference by one or more of the
following measures:
—Reorient or relocate the receiving antenna.
—Increase the separation between the equipment and receiver.
—Connect the equipment into an outlet on a circuit different from that to which the receiver is
connected.
—Consult the dealer or an experienced radio/TV technician for help.
Warning: Changes or modifications to this unit not expressly approved by the party responsible
for compliance could void the user’s authority to operate the equipment.
Software License Agreement
The software and firmware running on MU is the intellectual property of Morpx Inc.
By powering on the MU, (either by press the power-on button, or connecting MU to a USB port),
you agree not to copy the software and/or firmware on MU elsewhere without the permission of
Morpx Inc. You also agree not to disassemble the software and/or firmware code on MU without
the permission of Morpx Inc.
Morpx 90-Day Limited Warranty
Morpx’s warranty obligations for MU (this “Product”) are limited to the terms set forth below.
Morpx Inc. warrants to the original end-user purchaser that this Product will be free from defects
in manufacturing, materials and workmanship under normal use for a period of 90 days from the
date of purchase. This warranty is extended only to the original end-user purchaser of a new
product that was not sold “as is”.
If a defect arises: you may email to [email protected] and describe what’s wrong with this
Product. We will evaluate the defect and contact you to provide the after-sale service.
EXCLUSIONS AND LIMITATIONS
This warranty covers the normal and intended use of this Product. This warranty does not apply:
(a) to damage caused by accident, abuse, unreasonable use, improper handling and care or other
external causes not arising out of defects in materials or workmanship; (b) to damage caused by
service performed by anyone who is not an authorized representative of Morpx; (c) to any
hardware, software or other add-on component that is not provided by Morpx, but installed by
the end-user; (d) if this Product has been disassembled or modified in any way; (e) to cosmetic
damage, including but not limited to scratches, dents or broken plastic, or normal wear and tear.
 Loading...