

Page 1
This guarantee is valid in the UK and Ireland
only. It is in your interest to retain the retailers receipt as
proof of purchase. Please quote the following information
if the product develops a fault. These numbers can be
found on the base of the product.
Model No. Serial No.
All Morphy Richards Products are individually tested
before leaving the factory. In the unlikely event of any
appliance proving to be faulty within 28 days of purchase it
should be returned to the place of purchase for it to be
replaced.
If the fault develops after 28 days and within 24
months of original purchase, you should contact the
helpline number quoting Model number and Serial number
on the product, or write to the address below. You will
be asked to return the product (in secure, adequate
packaging) to the address below along with a copy of proof
of purchase. Subject to the exclusions set out below (see
‘Exclusions’) the faulty appliance will then be repaired or
replaced and dispatched usually within 7 working days of
receipt.
If for any reason this item is replaced during the 2 year
guarantee period, the guarantee on the new item will be
calculated from original purchase date. Therefore it is vital
to retain your original till receipt or invoice to indicate the
date of initial purchase.
To qualify for the 2 year guarantee the appliance must
have been used according to the manufacturers
instructions. For example kettles should have been
regularly descaled or an iron cord should have been
stored as recommended by the instructions.
EXCLUSIONS
Morphy Richards shall not be liable to replace or
repair the goods under the terms of the Guarantee where:
1 The fault has been caused or is attributable to
accidental use, mis-use, negligent use or used contrary
to the manufacturers recommendations or where the
fault has been caused by power surges or damage
caused in transit.
2 The appliance has been used on a voltage supply other
than that stamped on the products.
3 Repairs have been attempted by persons other than
our service staff (or authorised dealer).
4 Where the appliance has been used for hire purposes
or non-domestic use.
5 Morphy Richards are not liable to carry out any type of
servicing work, under the guarantee.
6 Plastic filters for all Morphy Richards kettles and coffee
makers are not covered by the guarantee.
This guarantee does not confer any rights other than
those expressly set out above and does not cover any
claims for consequential loss or damage. This guarantee is
offered as an additional benefit and does not affect your
statutory rights as a consumer.
The After Sales Division, Morphy Richards Ltd, Mexborough, South Yorkshire, England, S64 8AJ
Helpline (office hours): UK (local rate) 08450 777700, Republic of Ireland 1800 409119
TTwwoo yyeeaarr gguuaarraanntteeee
Turbosteam iron
Page 2

2
IIMMPPOORRTTAANNTT
SSAAFFEEGGUUAARRDDSS
1 Read all instructions.
2 Use the iron only for its intended use.
3 To protect against a risk of electric
shock, do not immerse the iron in
water or other liquids.
4 The power socket should always be
switched off before plugging or
unplugging from outlet. Never yank
cord to disconnect from outlet;
instead, grasp plug and pull to
disconnect.
5 Do not allow cord to touch hot
surfaces. Let iron cool completely
before putting away. Loop cord loosely
around iron when storing.
6 Always disconnect iron from electrical
outlet when filling with water or
emptying, and when not in use.
7 Do not operate the iron with a
damaged cord or if the iron has been
dropped or damaged. To avoid the risk
of electric shock, do not disassemble
the iron, but telephone Morphy
Richards for advice. Incorrect
reassembly can cause a risk of electric
shock when the iron is used.
8 Do not use the vertical steam
feature on clothes that are being
worn.
9 Place all electrical appliances out
of the reach of children. Close
supervision is necessary for an
appliance being used near children.
10Do not leave the iron unattended
whilst plugged in or on an ironing
board. Never allow the power cord
to overhang the work surface.
11Burns can occur from touching hot
metal parts, hot water or steam. Use
caution when you turn a steam iron
upside down - there may be hot water
in the reservoir.
SSPPEECCIIAALL IINNSSTTRRUUCCTTIIOONNSS
1 If your iron does not work, check the
following points:
Has the temperature control been set
to the required temperature? Is the
plug in its socket? Is the plug itself or
the socket faulty? (Check by plugging in
another appliance)
2 Warning: When in use, your iron
should never be placed flat and
left on an ironing board.
3 To prevent damage to the textile being
ironed, follow the temperature guide
carefully. (Test the inside of the hem of
the garment).
4 When ironing is complete, remove the
plug from the socket, empty any
remaining water from the tank, and
allow to cool before storing.
5 If you drop or severely knock your iron
this could cause internal damage even if
the outside appears alright. Have it
checked by a qualified electrician.
6 It is recommended that you use up one
beaker of water by operating your
iron’s steam and shot of steam
functions before ironing any clothes as
some dripping may occur while your
iron’s steam system is activated.
SAVE THESE
INSTRUCTIONS
Anti-scale models only
12 Keep the anti-scale granules out of
reach of children.
13 Wipe up spilt anti-scale granules
immediately.
14 If the granules come into accidental
contact with the eyes, flush them with
water for at least 15 minutes and
remove all particles. Consult a physician
if irritation persists.
15 If the granules come into accidental
contact with the skin, remove particles
and wash with water.
16 Do not remove the anti-scale cartridge
from the iron, unless the tank is empty.
17 When filling, ensure that the iron is
disconnected from electrical outlet, and
that the cartridge is inserted correctly.
Page 3
EElleeccttrriiccaall rreeqquuiirreemmeennttss
Check that the voltage on the rating plate of
your appliance corresponds with your house
electricity supply which must be A.C. (Alternating
Current).
If the socket outlets in your home are not
suitable for the plug supplied with this appliance,
the plug should be removed and the appropriate
one fitted.
WARNING: The plug removed from the
mains lead, if severed, must be destroyed as a
plug with bared flexible cord is hazardous if
engaged into a live socket outlet.
WARNING: THIS APPLIANCE MUST
BE EARTHED
Should the fuse in the 13 amp plug require
replacement, a BS1362 13 amp fuse must be
fitted.
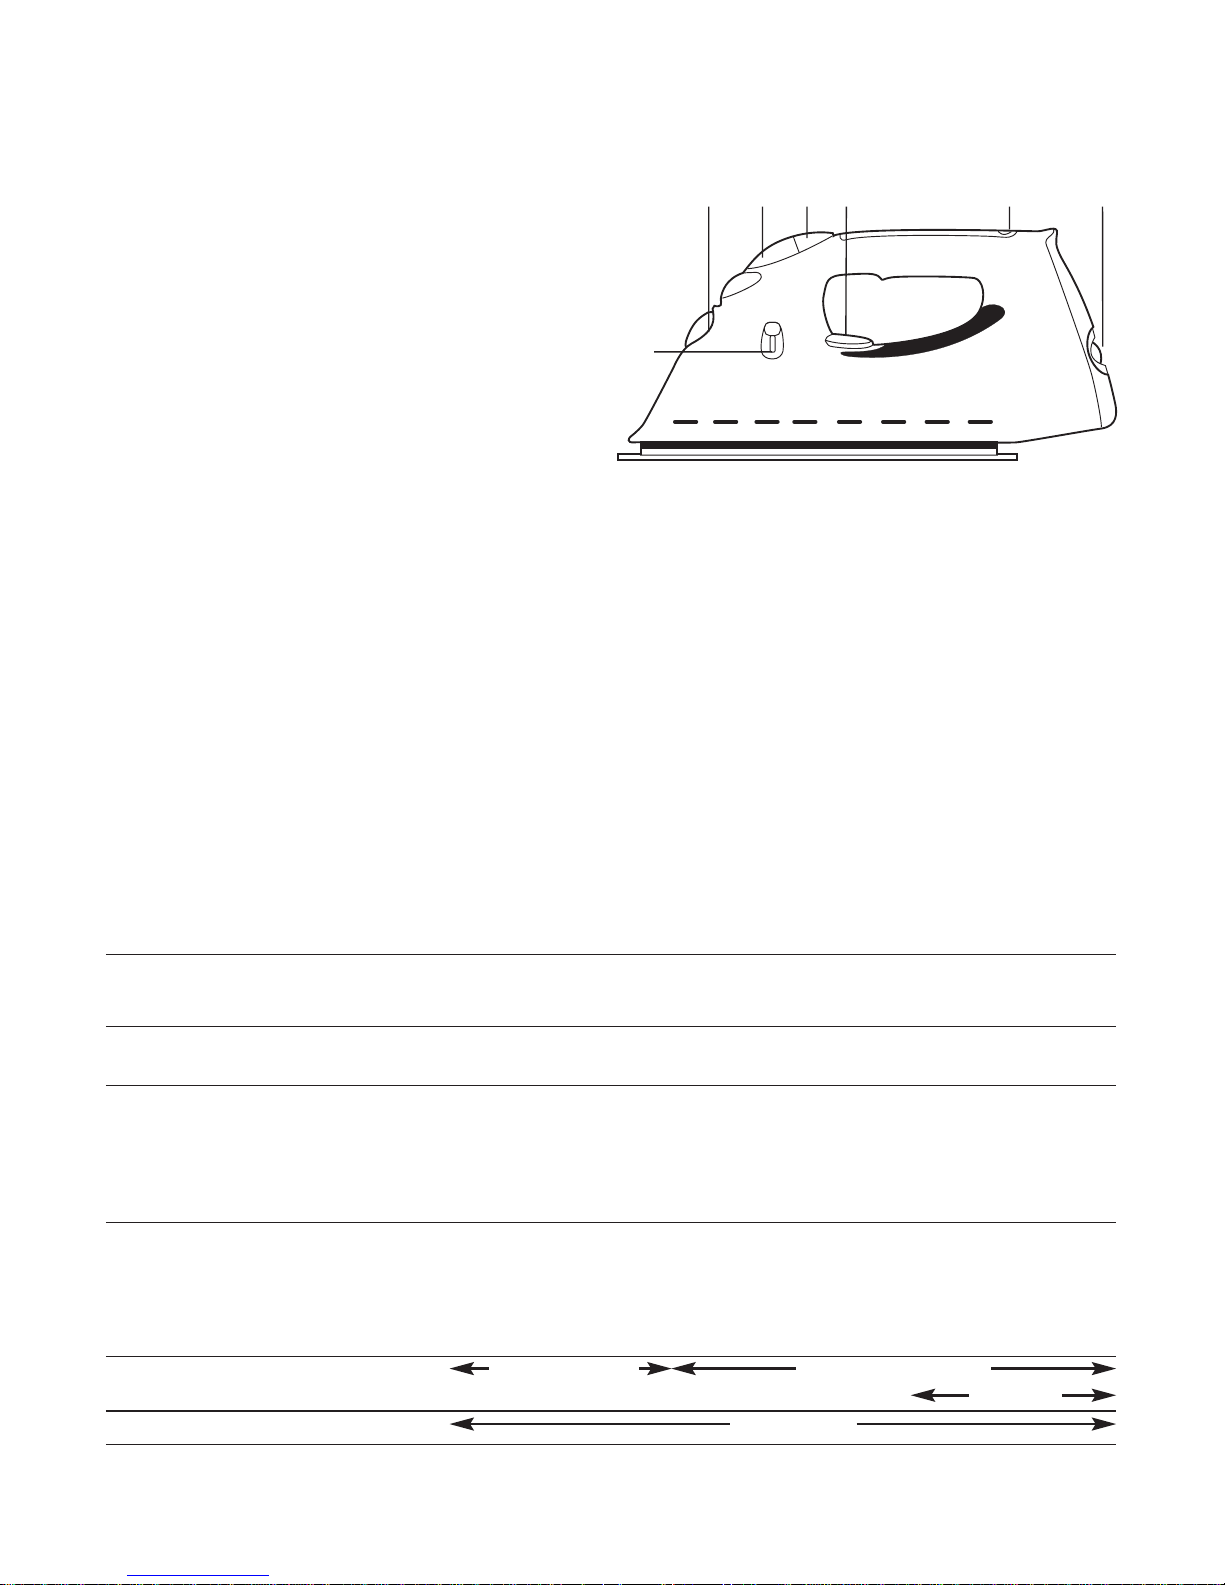
CCoommppoonneennttss ooff yyoouurr
iirroonn
⁄
Temperature control dial
¤
Temperature indicator light
‹
Water tank cap
›
Soleplate
fi
Spray button (certain models only)
fl
Shot of steam button (certain models only)
‡
Steam on-off button/variable steam button
· Anti-scale cartridge (certain models only)
3
IInnssttrruuccttiioonnss ffoorr uussee
Temperature Guide
Heat setting markings on the adjustable control dial of all Morphy Richards irons match those of
the International Textile Care Labelling Code.
⁄
‡
fi‹ fl
›
¤
Symbol 67 8 9
(120°C Max) Cool (160°C Max) Warm (210°C Max) Hot
Control knob Do not iron ● ●● ●●●
positions at all
Fabric Nylon, Acetates Wool, Polyester Cotton, Linen
E.g. Acrilan mixtures e.g. Rayon, Rayon
Courtelle, Orlon, Polyester/Cotton mixtures,
Triacetates, e.g. e.g. Rayon/Linen
Tricel/Polyester
Ironing Iron on wrong side. Fabrics requiring
If moisture required this setting usually
use damp cloth require steam
(Not Acetate) pressing for heavy
cotton, denim etc
With water in tank Dry and Spray Steam/spray & shot
Jet clean
Without water in tank Dry ironing
·
Page 4

4
BBeeffoorree uussee
Note: The Steam facility should only be used
on garments which are suitable for ironing at 2
and 3 dot settings. (Garments marked with 2 dot
recommendation should, if required, be ironed at
the lower end of the steam range).
Textiles and clothes are supposed to carry
ironing instructions. If they don’t you should
follow the temperature guide on page 3, but be
sure to test the temperature by ironing the hem
of the garment or similar area first. If you turn
the control dial down from a hot setting to a
cooler setting, wait until the iron temperature
has stabilised before you continue ironing.
FFiilllliinngg
Before filling your iron make sure that it is not
plugged in and ensure that the iron is in the
‘steam off’ position. To do this slide the steam
button to the ‘down’ position E/F.
Remove the water tank cap and hold the iron
by the handle. Fill using the beaker provided A.
Your iron has a large
capacity tank which can
hold 2 beakers of water.
After filling, replace the
water tank cap to prevent
any water escaping from
the tank during ironing B.
Your iron has been
specially designed for use
with tap water. Never use
battery topping up fluid or water containing any
substances such as starch or sugar, or defrosted
water from a refrigerator. In hard water areas
the use of distilled or demineralised water is
recommended. Warning: When filling your
iron with tap water always use your
beaker. Never fill directly under the tap.
TTeemmppeerraattuurree ccoonnttrrooll
Plug in the iron and switch on. Set the
temperature control dial
C to the temperature
required, but don’t start
ironing immediately. If
you wait a few minutes,
the iron will stabilise at
the required setting.
Your Morphy Richards
iron is fitted with an
indicator light which will
go on and off while your are ironing. This is
perfectly normal as it shows that the iron is
maintaining the heat setting you have chosen.
For the correct temperature always set the
control dial with the required setting at the
bottom of the dial nearest the back of the iron.
FFeeaattuurreess ooff yyoouurr iirroonn
Temperature indicator light
The temperature indicator light shows that
the iron is warming up. When the required
temperature is reached the light will go out and
will cycle on-off during operation.
Dry Ironing
You can use your iron as a dry iron only.
Make sure the steam control is off. Any
temperature setting may be used depending on
the garment. The spray feature (if fitted) may be
used provided there is water in the tank (see
filling section). The shot of steam feature (if
fitted) may also be used provided the
temperature control dial is set to the steam
range C. You do not need to put any water in
the tank when dry ironing only.
Spray (certain models only)
Press the spray button and aim spray of water
at stubborn creases. The grey region shows the
spray button on different models D. You can do
this whilst dry ironing providing there is water in
S
T
E
A
M
R
A
N
G
E
A
B
C
Page 5

5
the tank. When using the water spray it may be
necessary to push the button a few times to get
the spray pump primed.
Steam ironing
Ensure that the temperature
control dial is set in the steam
range C and that there is
water in the tank.
Rest the iron on its heel and
allow to heat up.
Before you start ironing,
slide the steam button up, to
the steam position E.
If you need to refill the
water tank during use, unplug
the iron and follow the filling
instructions taking care not to
spill any water over the iron.
Variable steam (certain
models only)
If your iron is fitted with variable steam, the
steam output can be varied from low to high.
Simply slide the variable steam button up or
down F.
The high position is for ironing
stubborn creases
The mid position is for normal
ironing
The low position switches the
steam off.
Shot of steam ironing
(certain models only)
Press the shot of steam
button G to obtain a burst of
extra steam for ironing out
creases in heavy material such as
denim etc. The shot of steam
can be used whilst dry ironing,
providing there is water in the
tank and the temperature
control is set in the steam range.
Do not use shot of steam at
temperatures below the steam
range shown on the control.
Vertical steam facility (certain models
only)
Hold the iron in a vertical position between
1cm to 2cm away from the item H. Press the
shot of steam button G, this will create vertical
steam. This feature is especially useful for
removing creases from hanging clothes, curtains,
wall hangings, etc.
Auto shut-off (certain models only)
If your iron is an ‘auto shut-off’ model it will
automatically turn your iron off within 60
seconds of not being used. Grasping the iron by
its handle will turn it on again. If the iron is below
the temperature set on the temperature control
dial, the temperature indicator light will illuminate
until the iron reaches the set temperature.
AUTO SHUT-OFF IS NOT AN
ALTERNATIVE TO UNPLUGGING THE
IRON WHEN NOT IN USE.
E
G
H
D
Steam spray irons Steam spray shot irons
F
Steam on
Steam off
High steam
Low steam
Steam off
Page 6

6
AAnnttii--ssccaallee ssyysstteemm
(certain models only)
The anti-scale cartridge is designed to reduce
the build-up of limescale which occurs during
steam ironing, this will prolong the working life of
your iron. However, please note that the antiscale cartridge will not completely stop the natural
process of limescale build-up.
Using your anti-scale iron for the first time
If you are using your iron for the first time you
will notice that there are no anti-scale granules
present in the anti-scale cartridge. To keep the
granules in optimum working condition they are
stored in an air-tight container located in the
packaging of your iron. To activate the anti-scale
system you must fill the anti-scale cartridge with
granules, as described below.
Filling/Refilling your anti-scale cartridge
1 Empty any remaining
water from the tank,
(see emptying and
storing section).
2 Remove the anti-scale
cartridge from the
iron by turning it anti-
clockwise a quarter of a
turn and pulling it out E.
3 Remove the cartridge lid
as follows: hold the
cartridge upright and
gently squeeze it by the
retaining lugs. Gently pull
off the lid F. If you are re-
filling, dispose of the used
granules then rinse the
cartridge under the cold
tap to remove any that
remain.
4 Remove the anti-scale
granule container from
its packaging and take
off the lid.
5 Fit the neck into the
cartridge and gently pour
in all of the granules G.
You may need to gently tap
the bottom of the container
to get all of the granules out.
6 Replace the lid back on the
cartridge by aligning the holes
with their lugs and pressing
down until it clicks shut on
both sides H.
7 Rinse the cartridge under the
cold water tap to remove any
loose granules which may be
on the outside surface. (Any
granules entering the iron
may harm it).
8 Insert the cartridge back in its
hole. Push it in as far as
possible making sure it is
aligned as shown J. Turn it
clockwise until the pointer
aligns with the marker on the
iron and it is closed flush tight
K.
9 Your iron is now ready to use
and the water tank can be
filled.
Refilling intervals
How often you need to refill your anti-scale
cartridge depends on how often you use your iron
with its steam functions and how ‘hard’ your
water supply is. Water hardness varies greatly
from one area to another. For advice on the
relative hardness of your water, contact your local
water supplier.
If, on average, you spend 2 hours per week
ironing then we suggest you refill your anti-scale
cartridge as shown in the table below. If you iron
more or less frequently then you should alter the
interval between refills accordingly.
6
G
E
F
H
Water hardness Soft Medium Hard
Refill interval
631
1
/
2
(months)
2
1
J
K
Page 7

7
EEmmppttyyiinngg aanndd ssttoorriinngg
When you have finished ironing unplug your
iron. Ensure that the steam button is in the
‘Steam off’ position and empty any remaining
water out of the filler hole I. Remember to
replace the water tank cap before storing.
Do not store in the box, but in an upright
position, so that any drops of water remaining
cannot leak out and discolour the soleplate. Your
iron has a cable tidy feature.
Important: The flex can be
damaged if wound too tightly
around the iron after use. Make
a loose loop with the flex and
wrap it around the iron using
the cord clip to keep the flex in
place. The iron must be cool
before winding the flex and
storing on its heel J.
MMaaiinntteennaannccee
Jet cleaning
Shot of Steam models have a built in cleaning
system designed to keep the water tank, water
valve, steam chamber and steam vents clear of
lint and loose mineral deposits. The ‘Jet Clean’
should be operated after each period of ironing.
To operate - ensure there is a little water in the
tank, place the iron on its heel. Having turned the
temperature control dial to its maximum
position, wait for the indicator light to go out,
then unplug the iron and hold it about 6"
(150mm) above the sink in the ironing position
and push the shot of steam button G about 10
times in succession. After this cleaning operation,
empty out any remaining water.
To clean an aluminium soleplate
To keep the soleplate of your iron clean and
free of limescale, make a paste of mild scouring
powder and a little water. Apply a small amount
to the soleplate, rub and then remove with a
damp cloth. Wipe thoroughly with a clean cloth.
To clean a mirror finished soleplate
If your iron has been fitted with a polished or
mirror finished soleplate for easier ironing please
follow the cleaning instructions below:
To keep the soleplate of your iron clean and
free of limescale we recommend that you use
one of the gentle chrome or silver cleaners
generally available, and always follow the
manufacturers instructions on the container. To
clean off melted on man-made fibre set the iron
to the 3 dot position and pass it over a clean
piece of cotton which will draw the deposit off
the surface.
To clean a coated soleplate
In the unlikely event of any man-made fibre
fusing to the soleplate set the iron at the 3 dot
position and pass it over a clean piece of cotton
which will draw the deposit off the surface.
Do not use scouring powder or solution
as this could damage the coating.
To clean the exterior
Allow to cool and wipe over with a damp
soapy cloth, then dry with a clean dry cloth.
J
I
Page 8

Morphy Richards products are intended for household use only.
Morphy Richards has a policy of continuous improvement in product quality and design.
The Company, therefore, reserves the right to change the specification of its models at any time.
441/3752/06 Rev 4
1/01
Morphy Richards Limited, Mexborough,
South Yorkshire, England S64 8AJ
For additional information on Morphy Richards products
www.morphyrichards.co.uk
 Loading...