

Page 1

Hand Blender Preparation Set
Please read and keep these instructions
Kit de préparation pour mixeur à main
Merci de bien vouloir lire et conserver ces instructions
Handmixer-Vorbereitungs-Set
Lesen Sie diese Bedienungsanleitung durch und bewahren Sie sie gut auf.
Juego de batidora
Lea y conserve estas instrucciones
Conjunto de varinha mágica
Leia e guarde estas instruções
Set frullatore manuale
Leggere e conservare le presenti istruzioni
Håndblender - tilberedelsessæt
Læs og gem venligst denne vejledning
Stavmixer
Läs och spara dessa anvisningar
Blender ręczny z zestawem akcesoriów
Zapoznaj się z tą instrukcją obsługi i zachowaj ją do użytku w przyszłości
Комплект ручного блендера
Внимательно изучите и сохраните данное руководство
Sada ručního mixéru pro přípravu
Přečtěte si tyto pokyny a uschovejte si je
El Blenderi Seti
Lütfen bu talimatları okuyun ve saklayın
g
f
d
e
p
i
q
s
}
≈
∂
t
Page 2

g
Health And Safety
The use of any electrical appliance requires the following common sense safety rules.
Please read these instructions carefully before using the product.
• This appliance can be used by persons with reduced physical,
sensory or mental capabilites, or lack of experience and
knowledge, if they have been given supervision or instruction
concerning the use of the appliance in a safe way and
understand the hazards involved.
• Children shall not play with the appliance.
• This appliance shall not be used by children.
• Keep the appliance and cord out of reach of children.
• Do not blend for longer than the time periods recommended in
the ‘Usage’ section.
• Always disconnect from the supply if left unattended and
before assembling, dissembling or cleaning.
• For care and cleaning refer to the relevant section.
• Avoid touching moving parts. Keep hands, hair and clothing,
and utensils away from the attachment blades during
operation, to prevent personal injury and/or damage to the
appliance.
• If the supply cord is damaged, it must be replaced by the
manufacturer, its service agent or similarly qualified persons in
order to avoid a hazard.
In addition, we offer the following safety advice.
Location
• Do not use outdoors or in a bathroom.
• Always locate your appliance away from the edge of the worktop.
• Do not place the beaker used with the appliance on a highly
polished wooden surface as damage may occur to the surface.
2
Mains cable
• Do not let the mains cable hang over the edge of the worktop
where a child could reach it.
• Do not let the lead run across an open space e.g.
between a low socket and a table.
• Do not let the cable run across a cooker or other hot area which
might damage the cable.
• The mains cable should reach from the socket to the base unit
without straining the connections.
Page 3

g
13
9
7
1
2
3
17
18
19
20
1
4
5
8
6
3
2
14
15
16
12
11
10
f
d
e
Personal safety
• Care shall be taken when handling the sharp cutting blades,
emptying the beaker and during cleaning.
Other safety considerations
• Do not use the appliance for anything other than its intended
purpose.
Product specific safety
• WARNING: The blender blades are very sharp. Handle with
care when using and cleaning.
• Do not clean the attachments under running water while they are
in position.
• IMPORTANT: Allow hot liquids to cool before adding to the
blender.
• Be careful whilst hot liquid is blending or poured into the blender
• Switch off the appliance and disconnect from supply
as it can be ejected due to sudden steaming.
before changing accessories or approaching parts that move in
use.
p
i
q
Electrical requirements
Check that the voltage on the rating plate of your
appliance corresponds with your house electricity supply which
must be A.C. (Alternating Current).
Should the fuse in the mains plug require changing, a 3 amp
BS1362 fuse must be fitted.
s
}
≈
∂
t
3
Page 4
5 6
3
21
4
87
109
4
Page 5
11
18
17
15
12
1413
g
f
d
16
e
p
i
19
20
q
s
}
≈
∂
t
5
Page 6

21
22
23
24
6
Page 7

Giving you the power to create with confidence.
Introducing the Total Control Hand Blender – the simple way to
bring confidence to your cooking.
The Total Control Hand Blender allows you to create delicious
smoothies and shakes, blend soups and sauces with the
confidence and reassurance that Smart Response Technology
delivers.
Smart Response Technology allows you to have Total Control of
the blending process with the simple squeeze of a button. The
Smart Response Technology gently feeds power into the
blender as you need it, so there are no sudden jerks or
splatters, giving you complete confidence in the kitchen.
Choose the speed that best suits the job at hand using the
simple twist motion Variable Speed Control, there are 8 to
choose from. Even when using a higher speed you can feel
assured that the Smart Response Technology feeds power in
gradually building to your chosen speed for the job at hand.
When you have blended to your desired consistency simply
release the button and the Total Control Hand Blender will
steadily slow down and stop, ensuring no splashing and no
suction.
Total Control Hand Blender, giving you the power to create with
confidence.
g
f
d
e
p
⁄
Variable Speed Control
¤
Precision Control Trigger
‹
Ergonomic Soft Grip Handle
›
650 Watt Motor
⁄
i
q
s
}
¤
‹
≈
∂
›
t
7
Page 8

Introduction
Thank you for your recent purchase of this Morphy Richards Total
Control Hand Blender Preparation Set.
Your Hand Blender Preparation Set comes with a number of
attachments. Please read the instructions for information on how
to use each attachment thoroughly before use.
Remember to visit www.morphyrichards.co.uk to register your
products two year guarantee.
Contents
Health And Safety 2
Introduction 3
Total Control 4
Product Overview 5
Before First Use 6
Using Your Hand Blender 6
Using Your Chopping Bowl 7
Using Your Smoothie Beaker 8
Suitable Foods 9
Usage 9
Attachments 9
Turbo Button 9
Blending In A Saucepan 10
Hints & Tips 10
Care And Cleaning 10
Contact Us 11
Recipes 13
Guarantee 24
Features
(1) Variable Speed Control
(2) Precise Control Trigger
(3) Turbo Button
(4) Main Unit
(5) Blending Leg
(6) Serrator Blade
(7) Beaker Lid
(8) Beaker
(9) Chopping Bowl Blending Lid
(10) Chopping Bowl (x3)
(11) Chopping Serrator Blade
(12) Chopping Bowl Lid (x2)
(13) Smoothie Blending Lid
(14) Smoothie Beaker (x2)
(15) Smoothie Blade
(16) Sports Lid (x2)
(17) Attachment Release Button
(18) Heel Rest
(19) Safety Seal
(20) Smoothie Safety Seal
Before First Use
• WARNING: Carefully unpack your Hand Blender Preparation
Set as the blades are very sharp.
• Wash all parts except the Main Unit (4), Chopping Bowl Blending
Lid (9) and Smoothie Blending Lid (13) in hot soapy water before
use. Dry all parts thoroughly before use.
• Do not fully submerge the Blending Leg in water. Wash only the
Serrator Blade head (6).
• Wipe the Chopping Bowl Blending Lid and Smoothie Blending Lid
with a hot damp cloth to clean. Do not immerse in water.
• Do not immerse the Main Unit in water.
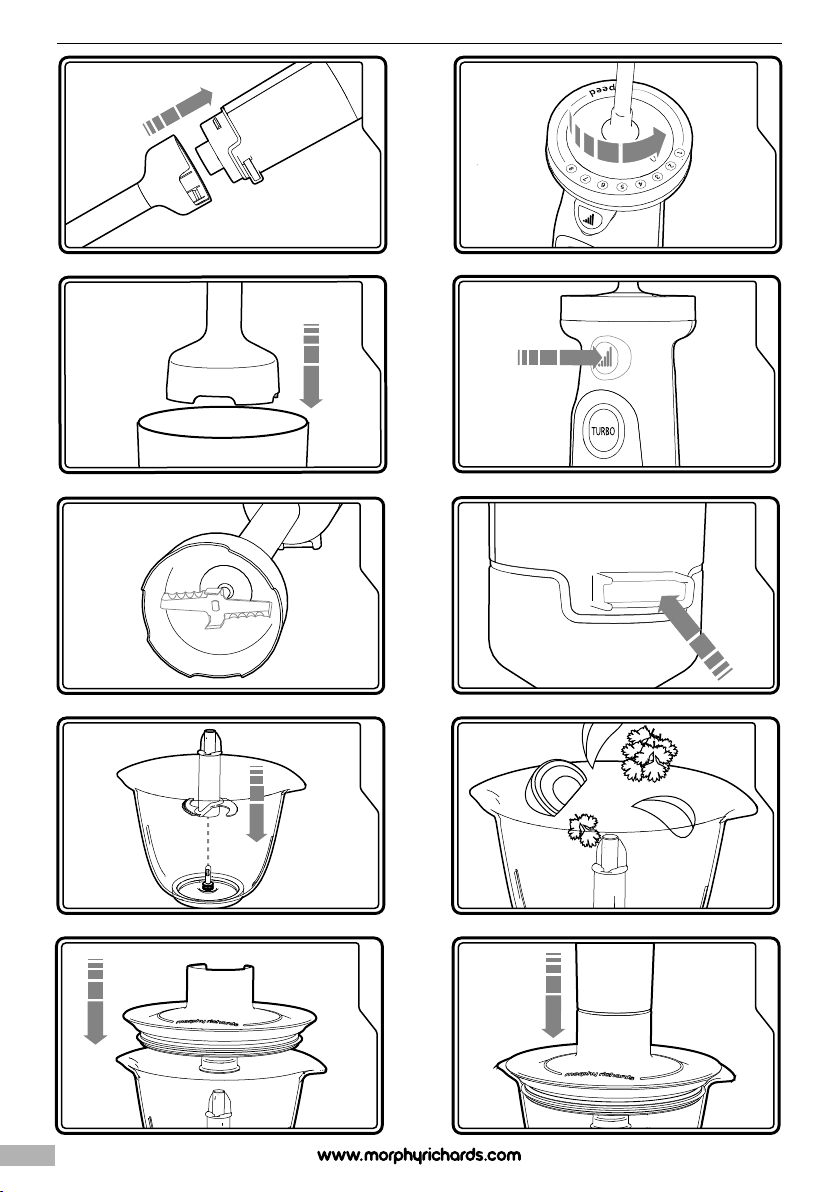
Using Your Hand Blender
1
Attach the Blending Leg (5) to the Main Unit (4) and push to lock
into place.
2
Select the speed on the Variable Speed Control (1). Your Hand
Blender will not start unless the Precise Control Trigger (2) or Turbo
Button (3) is pressed.
3
Place the Blending Leg into the food to be blended. We
recommend using the Beaker (8) for the best results.
4
Press the Precise Control Trigger to begin blending. The speed will
increase the harder you press the button.
5
Release the Precise Control Trigger to stop. Allow the blades to
slow and stop BEFORE removing your Hand Blender from the
food.
6
Unplug the Main Unit from the mains. Press the Attachment
Release Button (17) and remove the Blending Leg from the Main
Unit for cleaning.
8
Page 9

Using Your Chopping bowl
7
CAREFULLY insert the Chopping Serrator Blade (11) into the
Chopping Bowl (10). WARNING: Blades are sharp.
8
Place the food you wish to chop into the Chopping Bowl. Do not
fill more than half full.
9
Ensure the Safety Seal (19) is in place and push the Chopping
Bowl Blending Lid (9) onto Chopping Bowl. Push to secure into
place.
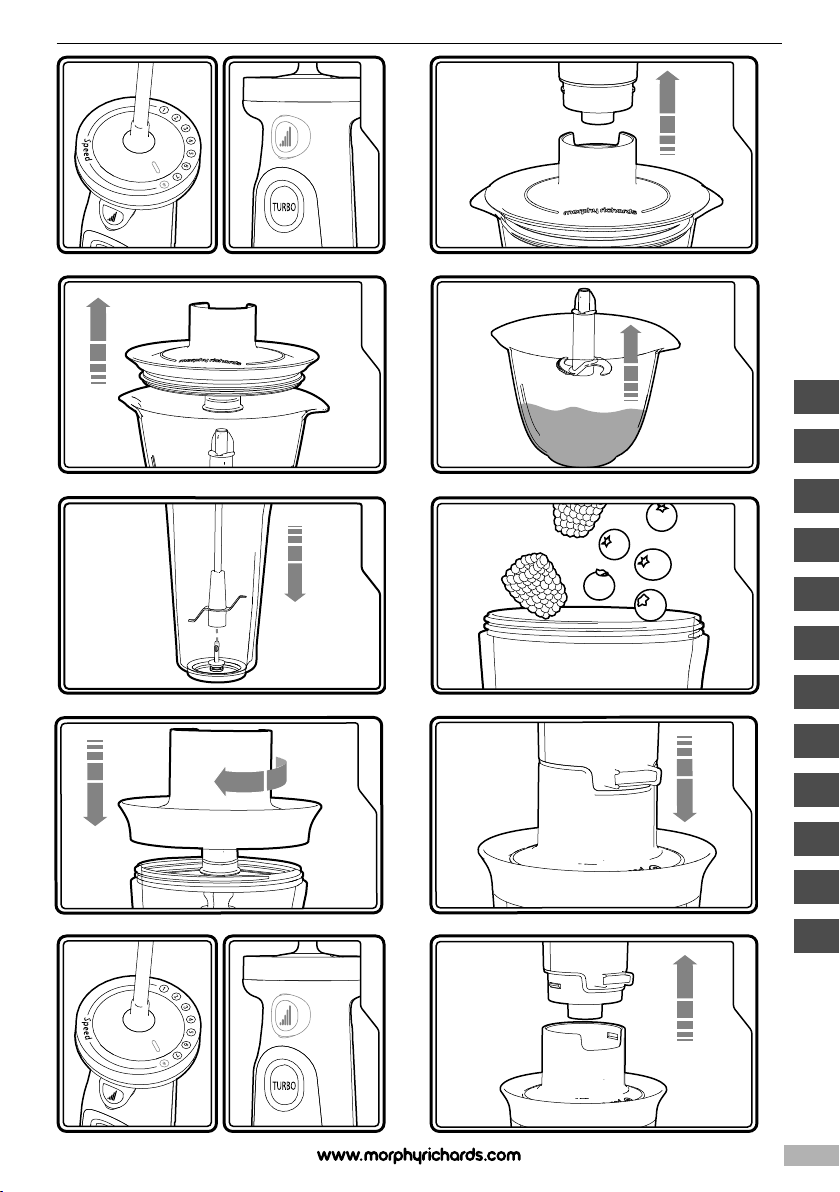
10
Attach the Main Unit (4) onto the Lid. The Main Unit will not lock
onto the Chopping Bowl Blending Lid for safety reasons.
11
Select a high speed on the Variable Speed Control (1) and press
and hold the Precise Control Trigger (2) to start. Do not open the
Lid while in use.
12
Allow your Hand Blender to completely stop before detaching the
Main Unit from the Chopping Bowl Blending Lid. Lift away to
remove.
13
Remove the Chopping Bowl Blending Lid from the Chopping
Bowl.
14
CAREFULLY remove the Chopping Serrator Blade before
emptying the food from the bowl.
Using Your Smoothie Beaker
15
CAREFULLY insert the Smoothie Blade (15) into the Smoothie
Beaker (14).
16
Add your ingredients to the Smoothie Beaker. To aid blending, add
soft fruit first.
17
Ensure the Smoothie Safety Seal (20) is in place (see page 11).
Screw the Smoothie Blending Lid (13) onto the Smoothie Beaker.
18
Attach the Main Unit (4) onto the Lid. The Main Unit will not lock
onto the Smoothie Blending Lid for safety reasons. Hold the
Smoothie Beaker when blending.
19
Select speed 8 on the Variable Speed Control (1) and press and
hold the Precise Control Trigger (2) to start. Do not open the Lid
while in use.
20
Allow your Hand Blender to completely stop before detaching the
Main Unit. Lift away from the Smoothie Blending Lid to remove.
21
Unscrew the Smoothie Blending Lid from the Smoothie Beaker.
22
CAREFULLY remove the Smoothie Blade from the Beaker before
drinking. Attach the Sports Lid (16) to enjoy your drink on the go.
Suitable Foods
The amounts listed below should be used as a guide. The Chopping Bowl (12) should not be filled more than half full.
Attachment Food Max Quantity Speed Time
Blending Leg Soup or Sauce - 4 40-60 seconds
Blending Leg* Milkshake 450ml 4-5 20-30 seconds
Blending Leg* Ice 3 cubes 8 5-15 seconds
Blending Leg* Carrots with water 200g 6 40-60 seconds
300ml
Chopping Bowl Onion 200g 7 5-10 seconds
Chopping Bowl Carrot 200g 7 5-15 seconds
Chopping Bowl Herbs 50g 7 5-15 seconds
Chopping Bowl Stewing Beef 100g 8 25-30 seconds
Chopping Bowl Nuts 100g 8 15-20 seconds
Smoothie Beaker Soft Fruits 500ml 8 20-30 seconds
*When using the Beaker supplied
g
9
Page 10

Usage
• WARNING: Your Hand Blender Set is designed for intermittent
use. Do not use continuously for more than 90 seconds. Allow
to cool down for a minimum of 5 minutes before further use.
• Do not use the Smoothie Beaker (14) for more than 60
seconds.
Attachments
Blending Leg (5)
• The Blending Leg is designed for pureeing foods such as soups,
sauces, milkshakes, smoothies, baby food or crushing ice.
• The Blending Leg is not suitable for grinding hard items such as
coffee beans.
Chopping Bowl (10)
• The Chopping Bowl is suitable for chopping nuts, vegetables,
meat, herbs, boiled eggs and dried bread. The chopping bowl
should be used on higher speeds for optimal performance.
Smoothie Beaker (14)
• The Smoothie Beaker is designed for smoothies and drinks on the
go.
• The Smoothie Beaker is not suitable for grinding coffee beans or
hard foods. After Blending in the Smoothie Beaker, remove the
Smoothie Blade (15) and attach the Sports Lid (16) to enjoy on the
go.
• Do not use the Smoothie Beaker to only crush ice without
other ingredients. Do not use more than 2 ice cubes.
• Do not use with hard vegetables such as potatoes or carrots.
Lids (7), (12), (16)
• If you have any leftovers, use the Bowls and Beakers with the
supplied Lids to store food safely.
When sealing the Sports Lid, press down on the centre of the top
instead of the edge to ensure a proper seal. Please ensure the
beaker is kept upright at all times.
• WARNING: No attachments are suitable for use in a
microwave, oven, dishwasher or freezer.
Turbo Button
• Your Hand Blender has 8 different speeds utilising Total Control
technology, as well as a Turbo Button (3). Press the Turbo Button
to run your Hand Blender at high speed for intermittent bursts.
• Note: The Chopping Bowl (10) attachment works best with the
Variable Speed Control (1) set to a high speed setting or when
using the Turbo Button (3).
Blending In A Saucepan
• Do not use a non stick pan. The Blending Leg may damage
the non stick coating.
1. Remove the saucepan from the heat.
2. To avoid excessive splashing, place the Blending Leg (5) into the
food before switching your Hand Blender on.
3. Hold the pan steady with your other hand, select the desired
speed and lightly press the Precise Control Trigger (2). Start slowly,
and increase the speed as needed using the Precise Control
Trigger.
4. Move the Blades (6) through the food using an up and down
motion.
5. Allow the Blades to stop moving before removing from the pan.
• WARNING: Lifting the Serrator Blade out of the food while
running, or using a high speed setting in a small pan could
splash hot liquid. Extra care should be taken when using your
Hand Blender in this manner.
• Do not insert your Hand Blender into the food past the join
between the Main Unit (4) and the
Blending Leg (5).
• Ensure the power cable does not touch any hot surfaces
(including the side of the pan).
Hints & Tips.
• When blending foods with strong colour (eg. carrots), the plastic
parts of the appliance may become discoloured. Wipe with
cooking oil to clean any discoloured parts. Wash thoroughly in hot
soapy water before re-using.
• When blending using the Blending Leg (5), start the process by
inserting the Blending Leg into the ingredients. This will ensure all
the ingredients are pulled into the blade to be processed. Gently
rotate the Blending Leg, lifting it up and down in the ingredients.
Continue this movement until the mixture is of the desired
consistency. Do not remove from the liquid while the blades are in
motion.
• Do not lift the Blending Leg out of the mixture completely when
running, as splashing may occur.
• While using the Chopping Bowl (10) you may need to scrape the
sides of the bowl down using a silicone spatula partway through
blending.
• When making a smoothie, add the fruit to the Smoothie Beaker
(14) first. It will be closer to the Smoothie Blade (15) and will blend
first.
10
Page 11

Care and Cleaning
• WARNING: Always unplug the appliance from the mains
socket before cleaning and maintenance.
• WARNING: Handle the blades with care as they are sharp.
• Wash all parts except the Main Unit (4), Chopping Bowl Blending
Lid (9) and Smoothie Blending Lid (13) in hot soapy water, dry
immediately.
• Clean the Main Unit with a damp cloth and dry all the parts
thoroughly.
• WARNING: Never immerse the Main Unit in water or any other
liquid.
• Do not fully submerge the Blender Leg in water, wash only the
Serrator Blade head (6).
• No parts are dishwasher safe.
Chopping Bowl Safety Seal (19)
The Chopping Bowl Blending Lid (9) and Chopping Bowl Lid (12)
both feature a Safety Seal. This is to prevent leakage from your
Chopping Bowl (10) when in use and for during storage.
• Always ensure the Safety Seal is in place before use. Failure to do
so could cause damage to the appliance. 23
• The Safety Seal only needs to be removed for cleaning (if
required). After cleaning ensure the seal is reattached as directed
before using your Total Control Hand Blender
• When reattaching the Safety Seal, ensure that it is pressed tightly
into the first channel in the Lids (see diagram). The ‘lip’ on the
Safety Seal should be pointed outwards, and not twisted within
the channel. Ensure the Safety Seal is correctly located before
use.
Smoothie Beaker Safety Seal (20)
The Smoothie Blending Lid (13) and Sports Lids (16) both feature
a Safety Seal. This is to prevent leakage when in use and for
during storage.
• Always ensure the Smoothie Safety Seal is in place before use.
Failure to do so could cause leakage or damage to the appliance.
• The Smoothie Safety Seal only needs to be removed for cleaning
(if required). After cleaning ensure the seal is reattached as
directed before use. 24
• When reattaching the Smoothie Safety Seal, ensure that it is
pressed tightly into the channel in the Lids (see diagram).
The ‘tabs’ on the Safety Seal should be pointed inwards. Ensure
the Safety Seal is correctly located before use.
Contact Us
Helpline
If you are having a problem with your appliance, please call our
Helpline, as we are more likely to be able to help than the store
you purchased the item from.
Please have the product name, model number and serial
number to hand when you call to help us deal with your enquiry
quicker.
UK Helpline: 0344 871 0944
IRE Helpline: 1800 409 119
Spares: 0344 873 0710
Talk To Us
If you have any questions or comments, or want some great
tips or recipe ideas to help you get the most out of your
products, join us online:
Blog: www.morphyrichards.co.uk/blog
Facebook: www.facebook.com/morphyrichardsuk
Twitter: @loveyourmorphy
Website: www.morphyrichards.com
g
11
Page 12
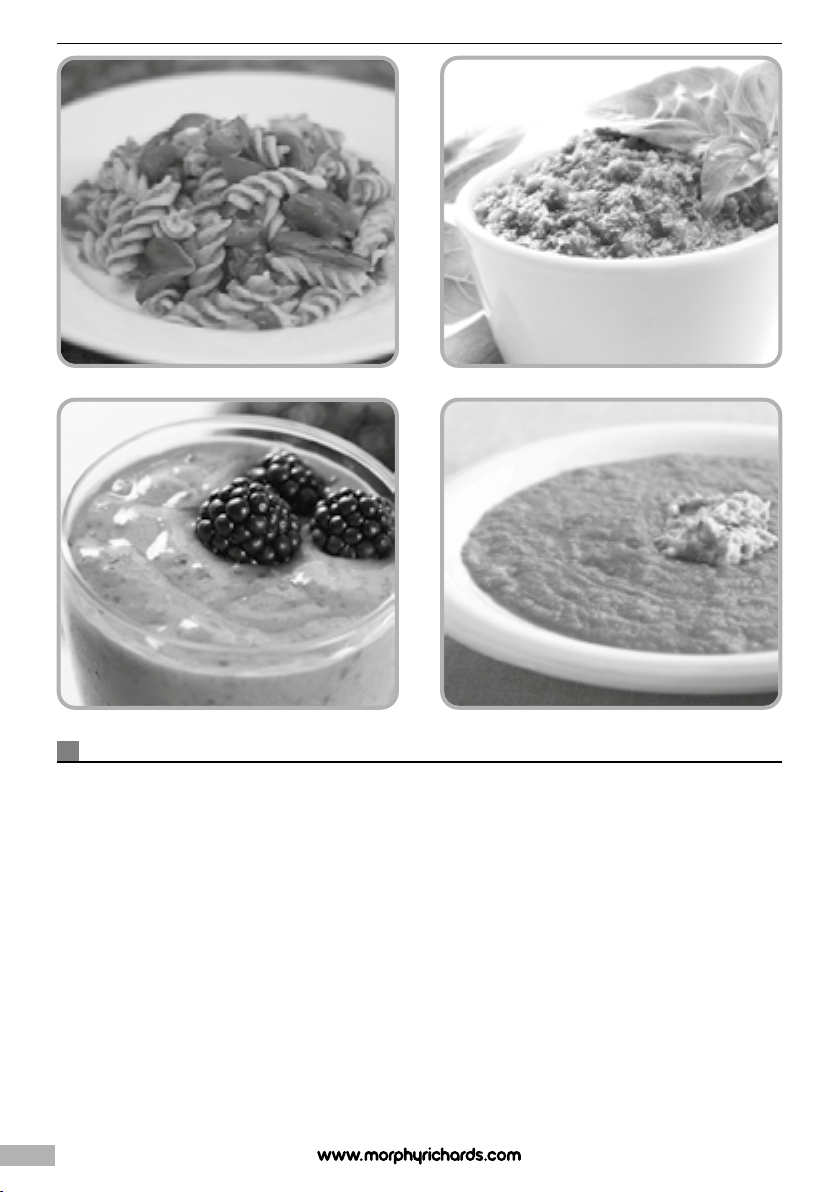
Recipes
12
We have developed delicious recipes for you to try with your new Total Control Hand
Blender Set. From smoothies to pesto there is something to suit every taste.
The recipes provided give you only a few suggestions of what you can make with
your Hand Blender and its attachments. When you are used to working with your
Hand Blender you will be able to easily adapt recipes for use from your favourite
cookbooks.
Page 13

Strawberry Banana Smoothie
Ingredients:
• 1 ripe banana (approx 90g) peeled, cut into chunks
• 65g strawberries washed, dried, hulled
• 2 ice cubes
• 135ml apple juice
• 200g low fat vanilla yogurt
Method:
1 Add all the ingredients to the Beaker in the order listed.
2 Fit the Blending Leg to the Main Unit and select speed 4 on the
Variable Speed Control.
3 Place the Blending Leg into the bottom of the beaker and gently
press the Precise Control Trigger. Move the Hand Blender up and
down in the Beaker for 20-30 seconds, until the smoothie is
blended.
Raspberry Milkshake
Ingredients:
• 80g fresh raspberries
• 100g vanilla ice cream
• 200ml semi skimmed milk
Method:
1 Add all the ingredients to the Beaker in the order listed.
2 Fit the Blending Leg to the Main Unit and select speed 4 on the
Variable Speed Control.
3 Place the Blending Leg into the bottom of the beaker and gently
press the Precise Control Trigger. Move the Hand Blender up and
down in the Beaker for 20-30 seconds, until the milkshake is
blended.
Leek & Potato Soup
Serves: 4
Ingredients:
• 25g butter or margarine
• 2 medium leeks (285g), sliced
• 1 small onion (100g), finely chopped
• 500g potatoes, thinly sliced
• 1.1 litres vegetable stock
• 1 tsp mixed herbs
• 1 tsp salt
• Black pepper
• Chives to garnish
• Crusty bread to serve
Method:
1 Melt the butter in a large saucepan (do not use non-stick), and
add the leeks and onion. Gently fry without browning for 10
minutes, stirring occasionally.
2 Add the potatoes, stock, herbs and seasoning, bring to the boil.
Cover and simmer gently for 30 minutes or until tender.
3 Allow to cool slightly then fit the Blending Leg to the Main Unit.
Turn the Variable Speed Control to 4.
4 Place the Blending Leg into the pan and using the Precise Control
Trigger, blend the soup until smooth, approximately 50 – 60
seconds. This can be done in the pan as long as the pan does not
have a non stick coating.
5 Check the seasoning and garnish with a few snipped chives and
serve with crusty bread.
g
13
Page 14

Matriciana Sauce (For Pasta)
Serves: 4
Ingredients:
• 1 onion (130g) finely chopped
• 1 garlic clove, crushed
• ½ green chilli, de-seeded and finely chopped
• 1½ tbsp extra virgin olive oil
• 100g bacon, rind removed and chopped
• 400g can plum tomatoes
• 100ml (120g) passata
• 2 tbsp white wine
• Salt and freshly ground black pepper
• Fresh boiled pasta to serve
• Parmesan cheese to serve
Method:
1 Place the oil in a large saucepan (do not use non-stick), and heat
for a few minutes.
2 Gently fry the onion, garlic and chilli for 2- 3 minutes without
browning, stirring occasionally with a wooden spoon.
3 Add the chopped bacon to the pan and fry for a further minute.
Place the lid on the pan and cook over a medium heat for
5 minutes.
4 Add the plum tomatoes, passata and wine, season with a little salt
and pepper to taste.
5 Place the lid on the pan and simmer gently for 25 minutes, or until
the onions are tender.
6 Ten minutes before the sauce is ready, cook the pasta according
to the pack instructions.
7 Use the Blending Leg at speed 4 on the Variable Speed Control to
make a smooth sauce. This can be done in the pan as long as the
pan does not have a non stick coating. Start the hand blender
using the Precise Control Trigger, gently moving it across the pan
until the desired consistency is achieved. For a smooth sauce, this
should take about a minute.
8 Drain the pasta then stir the sauce through it. Heat through if
necessary then serve immediately with Parmesan cheese.
Vegetable Sauce (For Pasta)
Serves: 4
Ingredients:
• 2 tbsp olive oil
• 1 onion (130g), chopped
• 2 carrots (160g), diced, small
• 2 celery sticks (80g), finely chopped
• 1 garlic clove, crushed
• 1 leek (120g), chopped
• 1 yellow pepper, diced
• 1 red pepper, diced
• 2x 400g cans chopped
tomatoes
• ½ tbsp balsamic vinegar
• ½ tbsp caster sugar
• 2 tsp oregano
• 1 tsp mixed herbs
• Salt and pepper
• Fresh boiled pasta to serve
• Parmesan cheese to serve
Method:
1 Heat the oil in a large saucepan (do not use non-stick) and gently
cook the onion, carrot, celery, garlic and leek for 5 minutes
without browning. Stir occasionally.
2 Place the lid on the pan and cook for 20 minutes, stirring
occasionally. Add the chopped peppers and cook gently for a
further 10 minutes with the lid on.
3 Add the tomatoes, herbs, sugar and vinegar to the pan. Season
with salt and pepper and simmer with the lid on for 45 minutes, or
until the carrot and celery are softened.
4 Cook the pasta according to the pack instructions.
5 Use the Blending Leg at speed 4 on the Variable Speed Control
to make a smooth sauce. This can be done in the pan as long as
the pan does not have a non stick coating. Start the hand blender
using the Precise Control Trigger, gently moving it across the pan
until the desired consistency is achieved. For a smooth sauce, this
should take about a minute.
6 Drain the pasta then stir the sauce through it. Heat through if
necessary then serve immediately with Parmesan cheese.
14
Page 15

Tomato Salsa
Ingredients:
250ml 350ml
• ½-1 ½-1 red chilli, halved with a few seeds
• 150g 225g ripe cherry tomatoes, halved
• 1 1½ limes, juiced
• 20g 30g fresh coriander, roughly cut to fit
inside the Bowl
• Pinch Pinch Sea salt
• Pinch Pinch Fresh ground pepper
Method:
1 Fit the blade into the Chopping Bowl.
2 Put all ingredients into the bowl in the order listed left.
3 Attach the Chopping Bowl Blending Lid and Main Unit. Blend
using the Precise Control Trigger on speed 7 for 10 seconds.
Scrape down the bowl with a spatula if necessary then blend
again for a further 5-10 seconds.
4 Pour into a serving bowl and allow to stand for an hour or so
before serving. This allows flavour to develop and froth to
subside.
Serve with tortilla chips.
Note: It is possible to make a 350ml quantity in the bowl if
desired.
Pesto
Ingredients:
• 50g pine nuts
• ½ garlic clove
• 25g Parmesan, grated
• 30g fresh basil, leaves only
• 50ml extra virgin olive oil
• Juice of half a lemon
• Salt and fresh ground pepper
Method:
1 Fit the blade into the Chopping Bowl.
2 Put all ingredients into the bowl in the order listed.
3 Attach the Chopping Bowl Blending Lid and Main Unit. Blend
using the Precise Control Trigger on speed 7 for 15 seconds.
Scrape down the bowl with a spatula if necessary then blend
again for a further 15-30 seconds.
Note: The consistency of the pesto may be thinned by adding a
little lemon juice and olive oil, according to taste.
Serve as an accompaniment to spaghetti bolognese, or stirred
through mashed potatoes.
Note: To store fresh pesto place in an airtight container and cover
the surface with a little olive oil before refrigerating.
Guacamole
Ingredients:
• 75g cherry tomatoes
• ½ fresh red chilli, de seeded
• 65g fresh coriander with stalks
• 1 ripe avocado, halved, stoned and skin removed
• Juice of ½ - 1 lime (according to taste)
• Salt and pepper to taste
Method:
1 Fit the Blade into the Chopping Bowl.
2 Cut each avocado half into two.
3 Put all the ingredients into the bowl in the order listed. Fit the
Chopping Bowl Blending Lid and Main Unit.
4 Blend using the Precise Control Trigger on speed 7 for 15
seconds. Scrape down the sides of the bowl with a spatula then
blend again for a further 15 seconds until smooth.
5 Adjust seasoning to taste.
Chicken Jalfrezi
Serves: 4
Ingredients:
For the Jalfrezi Paste
• 2 cloves garlic, halved
• 1 x 3cm piece fresh ginger, peeled and cut into 4 pieces
• 1 fresh green chilli (25g) stalk removed and cut into 4 pieces
• 12g fresh coriander
• 1 tsp coriander
• 1 tsp brown mustard seed
• 1 tsp fenugreek powder
• 2 tsp cumin seed
• 1 tsp turmeric
• ½ tsp salt
• 2 tbsp groundnut oil
• 2 tbsp tomato puree
• 2 tbsp water
• 2 tsp paprika
For the Curry
• 2 tbsp oil
• 240g onion, sliced
• 500g chicken breast cut into chunks
• 1 x 400g tin chopped
tomatoes
• 200ml water
• 1 medium green pepper, sliced
g
15
Page 16

Method:
1 Fit the Blade into the Chopping Bowl.
2 To make the paste, place all the paste ingredients into the
chopping bowl in the order listed.
3 Fit the Chopping Bowl Blending Lid and Main Unit. Blend on
speed 7 scraping the sides of the bowl down from time to time
until finely chopped, (around 30-40 seconds).
4 For the curry; heat the oil in a medium sized pan and gently fry
the onions with the lid on for 10 minutes until golden.
5 Add the diced chicken and fry until browned / sealed.
6 Add the fresh Jalfrezi paste and stir over medium heat for
3 minutes.
7 Add the tinned tomatoes, water and sliced pepper and cook for 1
hour. Remove the lid if necessary to reduce the liquid.
Serve with boiled rice and naan breads.
Chicken Satay
Makes: 10 skewers (Serves: 4-5)
Ingredients:
• 3 chicken breasts
• 20g fresh coriander
• 1 large red chilli (seeds
included), cut into 4 pieces
• 1 garlic clove, cut in half
• 5 tbsp (rounded) peanut butter
• Dash of soy sauce
• 3cm piece fresh ginger peeled and chopped into 4 pieces
• Zest and juice (50ml) of 2 limes
• A little water
• Salt and pepper
Method:
1 Fit the Blade into the Chopping Bowl. Soak 10 wooden skewers in
cold water.
3 Place all ingredients except the water into the Chopping Bowl, fit
the Chopping Bowl Blending Lid and Main Unit.
4 Using speed 7 depress the Precise Control Trigger fully in three
bursts of 10-15 seconds. Check the consistency, scraping the
sides of the bowl down with a plastic spatula if necessary.
Continue until well blended.
5 Add water until the mixture is soft enough to drop off a spoon by
the count of 3.
6 Cut the chicken into small chunks, and thread 8 pieces onto the
pre-soaked wooden skewers.
7 Rub the marinade into the chicken. Cover and refrigerate for a few
hours or overnight.
8 Grill under a preheated hot grill turning frequently until all juices
run clear.
Strawberry Milkshake
Ingredients:
• 150g strawberries, hulled and halved
• 2 scoops of vanilla ice cream (50g)
• 250ml semi-skimmed milk
Method:
1 Insert the Smoothie Blade into the Smoothie Beaker.
2 Place the strawberries in the bottom of the Smoothie Beaker, add
the ice cream and milk.
3 Attach the Smoothie Blending Lid and Main Unit. Blend on speed
8 for 4 short bursts, totalling 30 seconds.
4 Serve immediately.
Summer Berry Delight
Ingredients:
• 70g strawberries, hulled and halved
• 70g blueberries
• 40g raspberries
• 40g cherries, pitted
• 200ml apple juice
Method:
1 Insert the Smoothie Blade into the Smoothie Beaker.
2 Add all the ingredients to the Smoothie Beaker.
3 Attach the Smoothie Blending Lid and Main Unit. Blend on speed
8 in short bursts, totalling 30 seconds.
4 Serve immediately.
Sweet Berry Kiss
Ingredients:
• 2 ice cubes
• 50g frozen cherries
• 200g low fat vanilla yogurt
• 150ml semi skimmed milk
Method:
1 Insert the Smoothie Blade into the Smoothie Beaker.
2 Place the ingredients into the Smoothie Beaker in the order listed.
3 Attach the Smoothie Blending Lid and Main Unit. Blend on speed
8 in short bursts for 30 seconds.
4 Serve immediately.
16
Page 17

Chocolate Banana Smoothie
Ingredients:
• 1 small ripe banana, sliced (80g, peeled)
• 2 level tbsp drinking chocolate powder
• 150g low fat vanilla yogurt
• 200ml semi skimmed milk
Method:
1 Insert the Smoothie Blade into the Smoothie Beaker.
2 Place the sliced banana into the Smoothie Beaker, followed by the
remaining ingredients.
3 Attach the Smoothie Blending Lid and Main Unit. Blend on speed
8 in 3 short bursts, totalling 20-30 seconds.
4 Serve immediately.
Coffee Frappe
Ingredients:
• 3 ice cubes
• 6 scoops low fat frozen vanilla yogurt (150g)
• 200ml cold strong coffee
Method:
1 Insert the Smoothie Blade into the Smoothie Beaker.
2 Place the ingredients into the Smoothie Beaker in the order listed.
3 Attach the Smoothie Blending Lid and Main Unit. Blend on speed
8 in short bursts for up to 30 seconds.
4 Serve immediately.
Lifetime Blade Guarantee
The 'Serrator Blade' is warranted to be free from defects in
materials and workmanship for life. This warranty covers the
original purchaser only and is not assignable or
transferable to any other party. This warranty is available to
consumers who use the 'Serrator Blades' for non-commercial
household purposes. This warranty does not cover any damage
caused by accident, misuse or any use other than as described
in your owner's manual, or damage resulting from failure to
maintain and clean this product as specified in your owner's
manual.
THIS SECTION IS ONLY APPLICABLE FOR
CUSTOMERS IN UK AND IRELAND
REGISTERING YOUR TWO YEAR GUARANTEE
Your standard one year guarantee is extended for an additional
12 months when you register the product within 28 days of
purchase with Morphy Richards. If you do not register the
product with Morphy Richards within 28 days, your product is
guaranteed for 1 year. To validate your 2 year guarantee register
with us online at www.morphyrichards.co.uk
N.B. Each qualifying product needs to be registered with
Morphy Richards individually. Please refer to the one year
guarantee for more information.
YOUR ONE YEAR GUARANTEE
It is important to retain the retailer’s receipt as proof of
purchase. Staple your receipt to this back cover for future
reference. Please quote the following information if the product
develops a fault. These numbers can be found on the base of
the product.
Model no.
Serial no.
All Morphy Richards products are individually tested before
leaving the factory. In the unlikely event of any appliance
proving to be faulty within 28 days of purchase, it should be
returned to the place of purchase for it to be replaced. If the
fault develops after 28 days and within 12 months of original
purchase, you should contact the Helpline number quoting
Model number and Serial number on the product, or write to
Morphy Richards at the address shown. You may be asked to
return a copy of proof of purchase. Subject to the exclusions
set out below (see Exclusions), the faulty appliance will then be
repaired or replaced and dispatched usually within 7 working
days of receipt. If, for any reason, this item is replaced during
the 1 year guarantee period, the guarantee on the new item will
be calculated from original purchase date. Therefore it is vital to
retain your original till receipt or invoice to indicate the date of
initial purchase. To qualify for the 1 year guarantee, the
appliance must have been used according to the instructions
supplied. For example, crumb trays should have been emptied
regularly.
g
17
Page 18

EXCLUSIONS
Morphy Richards shall not be liable to replace or repair the
goods under the terms of the guarantee where:
1 The fault has been caused or is attributable to accidental use,
misuse, negligent use or used contrary to the manufacturer’s
recommendations or where the fault has been caused by power
surges or damage caused in transit.
2 The appliance has been used on a voltage supply other than that
stamped on the products.
3 Repairs have been attempted by persons other than our service
staff (or authorised dealer).
4 The appliance has been used for hire purposes or non domestic
use.
5 The appliance is second hand.
6 Morphy Richards are not liable to carry out any type of servicing
work, under the guarantee.
7 Plastic filters for all Morphy Richards kettles and coffee makers
are not covered by the guarantee.
8 Batteries and damage from leakage are not covered by the
guarantee.
9 The filters have not be cleaned and replaced as instructed.
This guarantee does not confer any rights other than those
expressly set out above and does not cover any claims for
consequential loss or damage. This guarantee is offered as an
additional benefit and does not affect your statutory rights as a
consumer.
YOUR INTERNATIONAL TWO YEAR
GUARANTEE
This appliance is covered by two-year repair or replacement
warranty.
It is important to retain the retailers receipt as proof of
purchase. Staple your receipt to this back cover for future
reference.
Please quote the following information if the product develops a
fault. These numbers can be found on the base of the product.
Model no.
Serial no.
All Morphy Richards products are individually tested before
leaving the factory. In the unlikely event of any appliance
proving to be faulty within 28 days of purchase it should be
returned to the place of purchase for it to be replaced.
If the fault develops after 28 days and within 24 months of
original purchase, you should contact your local distributor
quoting Model number and Serial number on the product, or
write to your local distributor at the addresses shown.
You will be asked to return the product (in secure, adequate
packaging) to the address below along with a copy of proof of
purchase.
Subject to the exclusions set out below (1-9) the faulty
appliance will then be repaired or replaced and dispatched
usually within 7 working days of receipt.
If for any reason this item is replaced during the 2-year
18
guarantee period, the guarantee on the new item will be
calculated from original purchase date. Therefore it is vital to
retain your original till receipt or invoice to indicate the date of
initial purchase.
To qualify for the 2-year guarantee the appliance must have
been used according to the manufacturers instructions. For
example, appliances must have been descaled and filters must
have been kept clean as instructed.
The local distributor shall not be liable to replace or repair the
goods under the terms of the guarantee where:
1 The fault has been caused or is attributable to accidental use,
misuse, negligent use or used contrary to the manufacturers
recommendations or where the fault has been caused by power
surges or damage caused in transit.
2 The appliance has been used on a voltage supply other than that
stamped on the products.
3 Repairs have been attempted by persons other than our service
staff (or authorised dealer).
4 Where the appliance has been used for hire purposes or non
domestic use.
5 The appliance is second hand.
6 The local distributor are not liable to carry out any type of
servicing work, under the guarantee.
7 The guarantee excludes consumables such as bags, filters and
glass carafes.
8 Batteries and damage from leakage are not covered by the
guarantee.
9 The filters have not be cleaned and replaced as instructed.
This guarantee does not confer any rights other than those
expressly set out above and does not cover any claims for
consequential loss or damage. This guarantee is offered as an
additional benefit and does not affect your statutory rights as a
consumer.
Page 19

AUSTRALIAN WARRANTY
This appliance is guaranteed for 2 years against faulty material,
components and workmanship.
This warranty is in addition and does not affect your statutory rights.
Proof of purchase must be produced for any warranty benefit.
In the unlikely event of any appliance proving to be faulty, securely
pack and return the item to the place of purchase accompanied by
the original receipt or invoice.
Our goods come with guarantees that cannot be excluded under
the Australian Consumer Law. You are entitled to a replacement or
refund for a major failure and for compensation for any other
reasonably foreseeable loss or damage. You are also entitled to
have the goods repaired or replaced if the goods fail to be of
acceptable quality and the failure does not amount to a major
failure.
NOT COVERED BY THIS WARRANTY
(Australian only)
• If the appliance has not been used in accordance with the
manufacturers’ recommendations or Instructions.
• If the fault is deemed to be caused by abuse, misuse, neglect,
modifications or in proper use and or care
Eg: Kettles: Excessive build up of scale.
Toasters: Excessive build up of crumbs or foreign matter etc.
• Connection to incorrect voltage to that stamped on the product.
• Unauthorised repairs.
• Appliance used other than for domestic purposes.
• Excluding bags, filters, glass, carafes, and cutting blades.
• Freight and insurance costs.
If for any reason this item is replaced during the 2 year
guarantee period, the guarantee on the new item will be
calculated from original purchase date. Therefore it is vital to
retain your original receipt or invoice to indicate the date of
original purchase.
Morphy Richards’s policy is to continually improve quality
design and product quality. The company therefore reserves the
right to change any specifications or to carry out modifications
as deemed worthy at any time.
The Australian supplier reserves the right to repair, modify,
exchange or replace the faulty appliance with the same or
similar model or product of equivalent value.
g
19
Page 20

f
Santé et sécurité
L'utilisation de tout appareil électrique implique de respecter les règles de sécurité et de bon sens suivantes.
Veuillez lire ces instructions attentivement avant d'utiliser le produit.
• Cet appareil peut être utilisé par des personnes aux capacités
physiques, sensorielles ou mentales réduites, ou manquant
d'expérience et de connaissances, pourvu qu'elles soient
surveillées ou qu'on leur fournisse des instructions quant
à l'utilisation de l'appareil en toute sécurité et qu'elles
comprennent les risques que cela comporte.
• Les enfants ne doivent pas jouer avec l'appareil.
• Cet appareil ne doit pas être utilisé par des enfants.
• Tenir l'appareil et le cordon hors de portée des enfants.
• Ne mixez pas les aliments plus longtemps qu’indiqué dans
le chapitre « Utilisation ».
• Débranchez toujours l'appareil du secteur lorsque vous le
laissez sans surveillance et avant de le monter, de le démonter
ou de le nettoyer.
• Pour l'entretien et le nettoyage, merci de vous reporter au
chapitre correspondant.
• Évitez de toucher les pièces mobiles. Veillez à tenir vos mains,
vos cheveux, vos vêtements et tout ustensile à l'écart des
lames pendant le fonctionnement pour éviter toute blessure
physique et/ou dommage de l'appareil.
• Si le cordon d'alimentation est endommagé, il doit être
remplacé par le fabricant, l'un de ses agents de maintenance
ou une personne qualifiée afin d'éviter tout risque.
20
Page 21

Nous vous donnons également les conseils de sécurité suivants.
Emplacement
• N’utilisez jamais l'appareil à l’extérieur ni dans une salle de bains.
• Veillez à placer l'appareil loin du bord du plan de travail.
• Ne posez pas le gobelet de l'appareil sur une surface en bois poli ;
cela risquerait d'endommager la surface.
Câble secteur
• Ne laissez pas le cordon d'alimentation dépasser du bord d'un
plan de travail, à un endroit où un enfant pourrait l'atteindre.
• Ne laissez pas traîner le câble au milieu d'un espace ouvert,
par exemple entre une prise basse et une table.
• Ne laissez pas le cordon passer sur une cuisinière ni aucune autre
surface chaude qui pourrait l'endommager.
• Placez l'appareil de manière à ce que le cordon d'alimentation
secteur puisse atteindre une prise électrique sans forcer sur les
connexions.
Sécurité personnelle
• Manipulez avec soin les lames de coupe aiguisées et prenez
toutes les précautions nécessaires pour vider le gobelet et
le nettoyer.
Autres points relatifs à la sécurité
• N'utilisez jamais l'appareil pour un usage autre que son
usage prévu.
Points de sécurité spécifiques au produit
• AVERTISSEMENT : Les lames du mélangeur sont très
tranchantes. Manipulez l'appareil avec précaution pendant
l'utilisation et le nettoyage.
• Ne lavez pas les accessoires à l’eau courante lorsqu’ils sont
insérés dans l'appareil.
• IMPORTANT : Laissez refroidir les liquides chauds avant de les
mixer.
• Procédez avec précaution lorsque vous mélangez ou versez des
liquides chauds dans le mixeur ; ils risquent d'éclabousser en
raison d'une injection de vapeur brusque.
• Arrêtez l'appareil et débranchez-le du secteur avant de changer
les accessoires ou d'approcher les pièces mobiles.
Exigences relatives à l'électricité
Vérifiez que la tension indiquée sur la plaque signalétique de
l'appareil correspond à l'alimentation électrique de votre domicile,
qui doit être en courant alternatif (CA).
Si le fusible de la prise secteur doit être changé, optez pour un
fusibles 3 amp. BS1362.
f
21
Page 22

Le pouvoir de créer en toute confiance.
Nous vous présentons le mélangeur à main Total Control : – le
moyen simple d'ajouter un zeste de confiance à votre cuisine.
Le mixeur à main Total Control vous permet de concocter de
délicieux smoothies, milkshakes, soupes et sauces en toute
confiance et assurance grâce à la technologie Smart Response.
La technologie Smart Response vous permet de garder le
contrôle total du processus de mixage par simple pression
d'une touche. La technologie Smart Response délivre
graduellement la puissance dans le mixeur en fonction de vos
besoins ; dites adieu aux éclaboussures inopinées, pour une
assurance parfaite dans votre cuisine.
Grâce à la fonction Variateur de vitesse, choisissez d'un simple
mouvement circulaire la vitesse adéquate parmi les 8 proposées.
Même lorsque vous utilisez une vitesse plus rapide, vous
pouvez être sûr(e) que la technologie Smart Response délivre
la puissance progressivement jusqu'à la vitesse sélectionnée
pour le mixage à effectuer.
Lorsque vous avez obtenu la consistance souhaitée, relâchez
simplement le bouton et le mixeur à main Total Control ralentira
petit à petit, puis s'arrêtera, évitant ainsi toute éclaboussure
ou tout phénomène d'aspiration.
Mixeur à main Total Control : le pouvoir de créer en toute
confiance.
⁄
Contrôle de vitesse variable
¤
Bouton de contrôle de précision
‹
Manche ergonomique pratique
›
Moteur de 650 watts
⁄
¤
‹
›
22
Page 23

Présentation
Merci d'avoir choisi le mixeur à main Total Control Morphy Richards.
Votre kit de préparation pour mixeur à main est fourni avec plusieurs
accessoires. Merci de lire attentivement les instructions d'utilisation
de votre mixeur à main avant de vous en servir.
N'oubliez pas de consulter notre site www.morphyrichards.co.uk
pour enregistrer votre produit et bénéficier de la garantie de
deux ans.
Table des matières
Santé et sécurité 20
Total Control 21
Présentation 23
Description du produit 23
Avant la première utilisation 23
Utilisation de votre mixeur à main 23
Utilisation de votre Bol hachoir 24
Utilisation de votre gobelet à smoothie 24
Aliments compatibles 24
Utilisation 25
Accessoires 25
Touche turbo 25
Mélange dans une casserole 25
Conseils et recommandations 25
Entretien et nettoyage 26
Nous contacter 26
Recettes 27
Garantie 32
Caractéristiques
(1) Variateur de vitesse
(2) Bouton de contrôle de précision
(3) Touche turbo
(4) Pièce principale
(5) Pied plongeur
(6) Lame dentelée
(7) Couvercle du gobelet
(8) Gobelet
(9) Couvercle de mixage du bol hachoir
(10) Bol hachoir (x 3)
(11) Lame hachoir dentelée
(12) Couvercle du bol hachoir (x 2)
(13) Couvercle de mixage pour smoothie
(14) Gobelet à smoothie (x 2)
(15) Lame à smoothie
(16) Couvercle sport (x 2)
(17) Bouton de libération d'accessoire
(18) Repose-socle
(19) Joint de sécurité
(20) Joint de sécurité pour smoothie
Avant la première utilisation
• AVERTISSEMENT : Procédez avec précaution pour déballer votre
ensemble mixeur à main Pro : les lames sont très
coupantes.
• Lavez toutes les pièces avec de l'eau chaude savonneuse avant
utilisation, à l'exception de la pièce principale (4), du couvercle
de mixage du bol hachoir (9) et du couvercle de mixage pour
smoothie (13). Essuyez et séchez complètement toutes les pièces
avant utilisation.
• Ne plongez pas entièrement le pied plongeur dans l'eau. Lavez
uniquement la tête de lame dentelée (6).
• Essuyez le couvercle de mixage du bol hachoir et le couvercle
de mixage pour smoothie à l'aide d'un chiffon humide et chaud
pour les nettoyer. Ne plongez pas l'appareil dans l'eau.
• Ne plongez pas la pièce principal dans l'eau.
Utilisation de votre mixeur à main
1
Fixez le pied plongeur (5) à la pièce principal (4) de façon à
les enclencher.
2
Sélectionnez la vitesse au moyen du variateur de vitesse (1).
Le mixeur à main ne démarrera que si vous appuyez sur le
bouton de contrôle de précision (2) ou sur la touche turbo (3).
3
Plongez le pied plongeur dans les aliments à mixer. Pour des
résultats optimaux, nous vous recommandons d'utiliser
le gobelet (8).
4
Appuyez sur le bouton de contrôle de précision pour commencer
à mixer. La vitesse augmentera en fonction de la pression que
vous exercerez sur le bouton.
5
Pour arrêter de mixer, relâchez le bouton de contrôle de précision.
Laissez les lames ralentir et arrêtez-vous AVANT de retirer le
mixeur à main des aliments mixés.
6
Débranchez la pièce principale de la prise. Appuyez sur le bouton
de libération d'accessoire (17) et détachez le pied plongeur de la
pièce principale pour le nettoyage.
f
23
Page 24

Utilisation de votre bol hachoir
7
Insérez TRÈS PRECAUTIONNEUSEMENT la lame hachoir
dentelée (11) dans le bol hachoir (10). AVERTISSEMENT :
Les lames sont coupantes.
8
Mettez les aliments que vous souhaitez hacher dans le bol hachoir.
Ne remplissez pas le bol à plus de la moitié de sa capacité.
9
Assurez-vous que le joint de sécurité (19) est en place et mettez
le couvercle de mixage du bol hachoir (9) sur le bol hachoir, en
appuyant. Appuyez bien jusqu'au verrouillage.
10
Ajustez la pièce principale (4) au couvercle. Pour des raisons
de sécurité, la pièce principale ne se fixe pas au couvercle
de mixage du bol hachoir.
11
Sélectionnez une vitesse sur le variateur de vitesse (1) et appuyez
sans relâcher le bouton de contrôle de précision (2) pour démarrer
l'appareil. Ne retirez pas le couvercle en cours d'utilisation.
12
Laissez le mixeur à main s'arrêter complètement avant de
détacher la pièce principale du couvercle de mixage du bol
hachoir. Soulevez-le pour l'enlever.
13
Enlevez le Couvercle de mixage du bol hachoir.
14 ENLEVEZ
dentelée avant de transvaser les aliments.
TRÈS PRÉCAUTIONNEUSEMENT la lame hachoir
Utilisation de votre gobelet à smoothie
15
AVEC PRÉCAUTION, insérez la lame pour smoothie (15) dans
le gobelet à smoothie (14).
16
Mettez vos ingrédients dans le gobelet pour smoothie.
Pour faciliter le mixage, mettez d'abord les fruits les plus mous.
17
Assurez-vous que le joint de sécurité pour smoothie (20) est en
place (voir page 11). Vissez le couvercle de mixage pour smoothie
(13) au gobelet à smoothie.
18
Ajustez la pièce principale au couvercle. Pour des raisons de
sécurité, la pièce principale ne se verrouille pas sur le couvercle
de mixage du bol hachoir. Maintenez le gobelet à smoothie au
cours du mixage.
19
Sélectionnez une vitesse sur le variateur de vitesse (1) et appuyez
sans relâcher le bouton de contrôle de précision (2) pour démarrer
l'appareil. Ne retirez pas le couvercle en cours d'utilisation.
20
Laissez votre mixeur à main s'arrêter complètement avant de
détacher la pièce principale. Soulevez le couvercle de mixage
pour smoothie pour le retirer.
21
Dévissez le couvercle de mixage pour smoothie du gobelet
à smoothie.
22
AVEC PRÉCAUTION, retirez la lame pour smoothie du gobelet
avant de boire. Fixez le couvercle sport (16) pour savourer votre
boisson en chemin.
Aliments compatibles
Les quantités ci-dessous sont fournies à titre indicatif. Le bol hachoir (10) ne doit pas être rempli à plus de la moitié de sa capacité.
Accessoire Aliments Quantité maximale Vitesse Durée
Pied plongeur Soupe ou sauce - 4 40 à 60 secondes
Pied plongeur* Milk-shake 450 ml 4-5 20 à 30 secondes
Pied plongeur* Glaçons 3 glaçons 8 5 à 15 secondes
Pied plongeur* Carottes avec de l'eau 200 g 6 40 à 60 secondes
300 ml
Bol hachoir Oignon 200 g 7 5 à 10 secondes
Bol hachoir Carottes 200 g 7 5 à 15 secondes
Bol hachoir Herbes 50 g 7 5 à 15 secondes
Bol hachoir Pièces de boeuf à bouillir 100 g 8 25 à 30 secondes
Bol hachoir Fruits à coque 100 g 8 15 à 20 secondes
Gobelet à smoothie Fruits mous 500 ml 8 20 à 30 secondes
*Lorsque vous utilisez le gobelet fourni
24
Page 25

Utilisation
• AVERTISSEMENT : Votre mixeur à main est conçu pour une
utilisation intermittente. Ne le faites pas fonctionner en continu
pendant plus d'1 minute. Laissez-le refroidir pendant au
moins 5 minutes avant de recommencer à l’utiliser.
• N'utilisez pas le gobelet à smoothie (14) pendant plus de
60 secondes.
Accessoires
Pied plongeur (5)
• Le pied plongeur est conçu pour réduire en purée des aliments,
pour réaliser des soupes, des sauces, des milk-shakes, des
smoothies et des plats pour bébés, ou pour piler de la glace.
• Le pied plongeur n'est pas destiné à moudre des aliments solides
tels que des grains de café.
Bol hachoir (10)
• Le bol hachoir est conçu pour hacher des fruits à coque, des
légumes, de la viande, des herbes, des oeufs durs et du pain dur.
Le bol hachoir doit être utilisé avec les vitesses rapides pour de
meilleurs résultats.
Gobelet à smoothie (14)
• Le gobelet à smothie est conçu pour les smoothies et les
boissons à emporter.
• Le gobelet à smoothie n'est pas conçu pour moudre des grains
de café ni des aliments durs. Après un mixage dans le gobelet à
smoothie, retirez la lame pour smoothie (15) et fixez le couvercle
sport (16) pour savourer votre boisson en chemin.
• N'utilisez pas le gobelet à smoothie pour piler de la glace
seule, sans autres ingrédients. N'utilisez pas plus
de 2 glaçons.
• N'utilisez pas de légumes durs, tels que des pommes de
terre ou des carottes.
Couvercles (7), (12), (16)
• S'il vous reste de la préparation, utilisez le bol et le gobelet avec
les couvercles fournis pour stocker les aliments de façon adéquate.
Lorsque vous fermez le couvercle sport, appuyez en haut,
sur le centre plutôt que sur le bord, pour assurer une fermeture
appropriée. Veuillez vous assurer que le gobelet reste toujours
droit.
• AVERTISSEMENT : Aucun des accessoires ne peut être
utilisé dans un micro-ondes, un four, un lave-vaisselle
ou un congélateur.
Touche turbo
• Votre mixeur à main propose 8 vitesses différentes faisant appel
à la technologie Total Control, et dispose d'une touche turbo (3).
Appuyez sur la touche turbo pour obtenir des pics de puissance.
• Remarque : Le bol hachoir (10) est plus performant à une vitesse
rapide sélectionnée sur le variateur de vitesse (1) ou si la touche
turbo est utilisée (3).
Mélange dans une casserole
• Ne pas utiliser de récipient à revêtement antiadhésif. Le pied
plongeur risque d'endommager le revêtement.
1. Retirez la casserole du feu.
2. Pour éviter les éclaboussures, plongez le pied plongeur (4) dans
les aliments avant d'actionner la touche marche.
3. Tenez la casserole de façon stable avec l'autre main, sélectionnez
la vitesse souhaitée et appuyez légèrement sur le bouton
de contrôle de précision (2). Commencez doucement, puis
augmentez la vitesse en fonction de vos besoins à l'aide
du bouton de contrôle de précision.
4. Déplacez la lame (6) dans les aliments en décrivant un
mouvement vertical.
5. Attendez que la lame ait fini de tourner avant de retirer le pied
plongeur de la casserole.
• AVERTISSEMENT : Si vous enlevez la lame dentelée des
aliments alors que le mixeur est en marche ou réglé sur une
vitesse rapide dans un petit récipient, il peut y avoir des
projections de liquides chauds. Redoublez de précaution
si vous utilisez le mixeur à main de cette manière.
• Lorsque vous plongez le mixeur à main dans les aliments, ne
dépassez pas le joint entre la pièce principale (4) et le pied
plongeur (5).
• Assurez-vous que le câble d'alimentation n'est pas en
contact avec une surface chaude (y compris les côtés
de la casserole).
Conseils et recommandations.
• Si vous utilisez le mixeur avec des aliments de couleur vive
(comme des carottes), les pièces en plastique de l’appareil
peuvent se décolorer. Utilisez de l’huile alimentaire pour nettoyer
les parties décolorées. Lavez-les parfaitement à l'eau chaude
savonneuse avant de les utiliser à nouveau.
• Lorsque vous utilisez le pied plongeur (5) pour mixer, commencez
par plonger le pied dans les aliments. Ainsi, tous les ingrédients
seront attirés vers la lame pour être mixés. Faites tourner
doucement le pied plongeur, en effectuant un mouvement vertical
dans les aliments. Continuez ce mouvement jusqu'à ce que le
mélange atteigne la consistance souhaitée. N'enlevez pas le pied
du liquide tant que les lames sont en mouvement.
• Ne sortez pas le pied plongeur du mélange pendant le
fonctionnement pour éviter les éclaboussures.
• Pendant le mixage dans le bol hachoir (10), vous pourrez avoir
besoin de racler les parois du bol à l'aide d'une spatule
en silicone.
• Lorsque vous préparez un smoothie, mettez d'abord les fruits
dans le gobelet à smoothie (14). Ceux-ci seront plus près de la
lame pour smoothie (15) et seront mixés plus rapidement.
f
25
Page 26

Entretien et nettoyage
• AVERTISSEMENT : Veillez à débrancher l'appareil du secteur
avant toute opération de nettoyage ou d'entretien.
• AVERTISSEMENT : Manipulez les lames avec une grande
précaution, car elles sont très coupantes.
• Lavez toutes les pièces, exceptés la pièce principale (4), le
couvercle de mixage du bol hachoir (9) et le couvercle de mixage
pour smoothie (13) à l'eau chaude ; séchez immédiatement.
• Nettoyez la pièce principale avec un chiffon humide et séchez
soigneusement toutes les pièces.
• AVERTISSEMENT : Ne plongez jamais la pièce principale
dans de l’eau ni dans un autre liquide.
• Ne plongez pas entièrement le pied plongeur dans l'eau ; nettoyez
uniquement la tête de lame dentelée (6).
• Ne mettez pas les pièces au lave-vaisselle.
Joint de sécurité du bol hachoir (19)
Le couvercle de mixage du bol hachoir (9) et le couvercle du bol
hachoir (12) sont dotés d'un joint de sécurité en caoutchouc. Il
permet d'éviter les fuites du bol hachoir (10) pendant son utilisation
et pendant le stockage.
• Assurez-vous toujours que le joint de sécurité est correctement
emboîté avant toute utilisation. Si vous ne le faites pas, cela
pourrait causer des dommages à l'appareil. 23
• Le joint de sécurité doit seulement être enlevé pour le nettoyage
(si nécessaire). Après nettoyage, assurez-vous que le joint est
parfaitement remis en place conformément aux instructions avant
d'utiliser votre mixeur à main Total Control.
• Lorsque vous remettez le joint de sécurité en place, assurez-vous
qu'il est bien serré dans la première rainure des couvercles (voir le
schéma). L'anneau en relief sur le joint de sécurité doit être placé
vers l'extérieur, et ne doit pas être coincé dans la rainure. Vérifiez
que le joint de sécurité est parfaitement remis en place avant toute
utilisation.
Joint de sécurité du gobelet à smoothie (20)
Le couvercle de mixage pour smoothie (13) et le couvercle sport
(16) possèdent tous les deux un joint de sécurité. Ceci pour éviter
les fuites lors de l'utilisation et du stockage.
• Assurez-vous toujours que le joint de sécurité est correctement
emboîté avant toute utilisation. Si vous ne le faites pas, cela risque
de causer des fuites ou des dommages à l'appareil.
• Le joint de sécurité doit seulement être enlevé pour le nettoyage
(si nécessaire). Après nettoyage, assurez-vous d'emboîter le joint
conformément aux instructions avant utilisation. 24
• Lors de la fixation du joint de sécurité pour smoothie, assurez-vous
que celui-ci est bien inséré dans la rainure des couvercles (voir
schéma).
Les « languettes » du joint de sécurité doivent être dirigées vers
l'intérieur. Vérifiez que le joint de sécurité est parfaitement remis
en place avant toute utilisation.
Nous contacter
Service d'assistance
Si vous rencontrez un problème avec votre appareil, veuillez
appeler notre service d'assistance. Nous pourrons certainement
vous aider plus efficacement que le magasin où vous avez
acheté l'article.
Munissez-vous du nom de produit, du numéro de modèle et
du numéro de série de l'appareil lorsque vous nous appelez.
Cela nous aidera à traiter plus rapidement votre demande.
Dialoguer avec nous
Pour toute question ou commentaire, ou pour recevoir plus
d'astuces et des idées de recettes et profiter au maximum
de votre appareil, vous pouvez nous contacter en ligne :
Blog : www.morphyrichards.co.uk/blog
Facebook : www.facebook.com/morphyrichardsuk
Twitter : @loveyourmorphy
Site internet : www.morphyrichards.com
26
Page 27

Recettes
Nous vous avons préparé de délicieuses recettes pour commencer à utiliser votre
nouveau mixeur à main Total Control. Des smoothies aux soupes, il y en a pour tous
les goûts.
Ces recettes vous donnent quelques idées de réalisation avec votre mixeur à main et
ses accessoires. Lorsque vous vous serez familiarisé avec votre mixeur à main, vous
pourrez facilement adapter ces recettes à celles de vos livres de cuisine préférés.
f
27
Page 28

Smoothie fraise banane
Ingrédients :
• 1 banane mûre (environ 90 g) pelée et coupée en morceaux
• 65 g de fraises lavées, séchées et équeutées
• 2 glaçons
• 135 ml de jus de pomme
• 200 g de yaourt allégé à la vanille
Méthode :
1 Ajoutez, dans l'ordre, tous les ingrédients dans le gobelet.
2 Fixez le pied plongeur à la pièce principale et sélectionnez la
vitesse 4 sur le variateur de vitesse.
3 Plongez le pied plongeur au fond du gobelet et appuyez légèrement
sur le bouton de contrôle de précision. Déplacez le mixeur à main
verticalement dans le gobelet pendant 20 à 30 secondes, jusqu'à
ce que le smoothie ait la consistance idéale.
Milk-shake framboise
Ingrédients :
• 80 g de framboises fraîches
• 100 g de glace à la vanille
• 200 ml de lait demi-écrémé
Méthode :
1 Ajoutez, dans l'ordre, tous les ingrédients dans le gobelet.
2 Fixez le pied plongeur à la pièce principale et sélectionnez
la vitesse 4 sur le variateur de vitesse.
3 Plongez le pied plongeur au fond du gobelet et appuyez
légèrement sur le bouton de contrôle de précision. Déplacez
le mixeur à main verticalement dans le gobelet pendant
20 à 30 secondes, jusqu'à ce que le milk-shake ait la
consistance idéale.
Velouté poireaux pommes de terre
Il vous faut : 4
Ingrédients :
• 25 g de beurre ou de margarine
• 2 poireaux moyens (285 g), émincés
• 1 petit oignon (100 g), émincé finement
• 500 g de pommes de terre, coupées en fines rondelles
• 1,1 litre de bouillon de légumes
• 1 c. à café de mélange d'herbes
• 1 c. à soupe de sel
• Poivre noir
• Ciboulette au moment de servir
• Pain croustillant en accompagnement
Méthode :
1 Faites fondre le beurre dans un grand récipient (sans revêtement
antiadhésif) et ajoutez les poireaux et l'oignon. Faites revenir à
feu moyen sans coloration pendant 10 minutes et en remuant
de temps en temps.
2 Ajoutez les pommes de terre, le bouillon, les herbes et
l'assaisonnement. Portez à ébullition. Couvrez et laissez mijoter
pendant 30 minutes ou jusqu'à ce que les légumes soient tendres.
3 Laissez un peu refroidir, puis fixez le pied Plongeur à la pièce
principale. Positionnez le variateur de vitesse sur 4.
4 Plongez le pied plongeur dans le récipient et à l'aide du bouton de
contrôle de précision, mixez la soupe jusqu'à obtenir un velouté,
soit environ 50 à 60 secondes. Le mixage peut être effectué dans
le récipient s'il est sans revêtement antiadhésif.
5 Vérifiez l'assaisonnement et ajoutez de la ciboulette ciselée au
moment de servir, avec du pain croustillant.
28
Page 29

Sauce all'amatriciana (pour pâtes)
Il vous faut : 4
Ingrédients :
• 1 oignon (130 g) finement émincé
• 1 gousse d'ail écrasée
• ½ piment vert, épépiné et finement haché
• 1½ c. à soupe d'huile d'olive extra-vierge
• 100 g de bacon, sans le gras, coupé en dés
• 400 g de chair de tomates
• 100 ml (120 g) de coulis de tomates
• 2 c. à soupe de vin blanc
• Sel et poivre noir frais moulu
• Pâtes fraîches
• Parmesan au moment de servir
Méthode :
1 Mettez l'huile dans une grande casserole (sans revêtement adhésif)
et faites-la chauffer pendant quelques minutes.
2 Faites revenir à feu doux l'oignon, l'ail et le piment pendant 2 à
3 minutes sans laisser colorer, en remuant de temps en temps
avec une cuillère en bois.
3 Ajoutez le bacon coupés en dés dans le récipient et faites revenir
une minute de plus. Mettez un couvercle sur le récipient et laissez
cuire sur feu moyen pendant 5 minutes.
4 Ajoutez la chair de tomates, le coulis et le vin, assaisonnez avec
le sel et le poivre.
5 Couvrez et laissez mijoter doucement pendant 25 minutes,
ou jusqu'à ce que les oignons soient tendres.
6 Dix minutes avant que la sauce soit prête, faites cuire les pâtes
suivant les instructions du paquet.
7 Mixez à l'aide du pied plongeur à vitesse 4 sur le variateur de
vitesse pour obtenir une sauce onctueuse. Le mixage peut être
effectué dans le récipient s'il est sans revêtement antiadhésif.
Démarrez le mixeur à main à l'aide du bouton de contrôle de
précision, en le déplaçant lentement dans le récipient jusqu'à
obtenir la consistance souhaitée. Pour une sauce onctueuse,
cela doit prendre environ 1 minute.
8 Égouttez les pâtes et mélangez-les à la sauce. Réchauffez le tout
si nécessaire, puis servez-les immédiatement avec du parmesan.
Sauce aux légumes (pour pâtes)
Il vous faut : 4
Ingrédients :
• 2 cuillères à soupe d'huile d'olive
• 1 oignon (130 g), émincé
• 2 carottes (160 g) coupés en petits cubes
• 2 branches de céleri (80 g), finement émincées
• 1 gousse d'ail écrasée
• 1 poireau (120 g), émincé
• 1 poivron jaune, coupé en dés
• 1 poivron rouge en dés
• 2 boîtes de 400 g de concassé de tomates
• ½ c. à soupe de vinaigre balsamique
• ½ c. à soupe de sucre en poudre
• 2 c. à café d'origan
• 1 c. à café de mélange d'herbes
• Sel et poivre
• Pâtes fraîches
• Parmesan au moment de servir
Méthode :
1 Faites chauffer l'huile dans un grand récipient (sans revêtement
antiadhésif) et faites revenir l'oignon, les carottes, le céleri, l'ail
et le poireau à feu doux pendant 5 minutes sans coloration.
Remuez de temps en temps.
2 Couvrez et laissez mijoter pendant 20 minutes en mélangeant
de temps en temps. Ajoutez les poivrons coupés en dés et laissez
mijoter pendant encore 10 minutes à couvert.
3 Ajoutez les tomates, les herbes, le sucre et le vinaigre.
Assaisonnez avec le sel et le poivre et laissez cuire avec le
couvercle pendant 45 minutes, ou jusqu'à ce que les carottes
et le céleri soient tendres.
4 Faites cuire les pâtes suivant les instructions du paquet.
5 Utilisez le pied plongeur à vitesse 4 sur le variateur de vitesse
pour obtenir une sauce onctueuse. Le mixage peut être effectué
dans le récipient s'il est sans revêtement antiadhésif. Démarrez le
mixeur à main à l'aide du bouton de contrôle de précision, en le
déplaçant lentement dans le récipient jusqu'à obtenir la consistance
souhaitée. Pour une sauce onctueuse, cela doit prendre environ
1 minute.
6 Égouttez les pâtes et mélangez-les à la sauce. Réchauffez le tout
si nécessaire, puis servez-les immédiatement avec du parmesan.
f
29
Page 30

Sauce tomate
Ingrédients :
250 ml 350 ml
• ½-1 ½-1 Piment rouge, coupé en deux
avec quelques graines
• 150 g 225 g Tomates cerise mûres, coupées
en deux
• 1 1½ Jus de citrons verts
• 20 g 30 g Coriandre fraîche, ciselée grossièrement pour tenir dans le bol
• Pincée Pincée Sel marin
• Pincée Pincée Poivre fraîchement moulu
Méthode :
1 Placez la lame dans le bol hachoir.
2 Mettez, dans l'ordre, tous les ingrédients dans le bol.
3 Fixez le couvercle de mixage du bol hachoir à la pièce principale.
Mixez à l'aide du bouton de contrôle de précision à vitesse
7 pendant 10 secondes. Raclez les parois du bol avec unes
spatule si nécessaire, puis mixez de nouveau pendant 5 à
10 secondes de plus.
4 Versez dans un plat de service et laissez reposer pendant environ
une heure avant de servir. Cela va permettre aux saveurs de se
développer et à la mousse de disparaître.
Servez avec des chips tortillas.
Remarque : Il est possible de préparer 350 ml de sauce dans
le bol si nécessaire.
Pesto
Ingrédients :
• 50 g de pignons de pin
• ½ gousse d'ail
• 25 g de parmesan râpé
• 30 g de basilic frais, uniquement les feuilles
• 50 ml d'huile d'olive extra-vierge
• Le jus d'un demi-citron
• Sel et poivre fraîchement moulu
Méthode :
1 Placez la lame dans le bol hachoir.
2 Mettez dans l'ordre tous les ingrédients dans le bol.
3 Fixez le couvercle de mixage du bol hachoir à la pièce principale.
Mixez à l'aide du bouton de contrôle de précision sur vitesse
7 pendant 15 secondes. Raclez les parois du bol avec une spatule
si nécessaire, puis mixez de nouveau de 15 à 30 secondes de
plus.
Remarque : Si le pesto est trop épais, vous pouvez ajouter un peu
de jus de citron et d'huile d'olive, à votre convenance.
Servez en accompagnement d'un plat de spaghetti ou mélangez
avec une purée de pommes de terre.
Remarque : Pour conserver du pesto frais, transvasez-le dans
un récipient hermétique et recouvrez-le d'un peu d'huile d'olive
avant de le placer au frais.
Guacamole
Ingrédients :
• 75 g de tomates cerises
• ½ piment vert frais, épépiné
• 65 g de coriandre fraîche avec les tiges
• 1 avocat mûr, coupé en deux, sans noyau ni peau
• Le jus d'½ ou d'1 citron vert, à votre goût
• Sel et poivre, à votre convenance
Méthode :
1 Placez la lame dans le bol hachoir.
2 Coupez chaque moitié d'avocat en deux.
3 Mettez, dans l'ordre, tous les ingrédients dans le bol. Fixez le
couvercle de mixage du bol hachoir à la pièce principale.
4 Mixez à l'aide du bouton de contrôle de précision sur vitesse 7
pendant 15 secondes. Raclez les parois du bol avec une spatule,
puis mixez de nouveau pendant 15 secondes supplémentaires,
jusqu'à ce que le mélange soit onctueux.
5 Assaisonnez à votre convenance.
Poulet Jalfrezi
Il vous faut : 4
Ingrédients :
Pour la pâte Jalfrezi
• 2 gousses d'ail écrasées
• 1 morceau de gingembre frais d'1 x 3 cm, pelé et coupé en 4
• 1 piment vert frais (25 g) étrogné et coupé en 4
• 12 g de coriandre fraîche
• 1 c. à café de coriandre
• 1 c. à café de graines de moutarde
• 1 c. à café de fenugrec en poudre
• 2 c. à café de graines de cumin
• 1 c. à café de curcuma
• ½ cuillère à café de sel
• 2 c. à soupe d'huile d'arachide
• 2 c. à soupe de purée de tomate
• 2 c. à soupe d'eau
• 2 cuillère à café de paprika
Pour le curry
• 2 c. à soupe d’huile
• 240 g d'oignons coupé sen rondelles
• 500 g de de poitrine de poulet coupée en morceaux
• 1 boîte de 400 g de tomates coupées en morceaux
• 200 ml d'eau
• 1 poivron vert moyen, coupé en tranches
30
Page 31

Méthode :
1 Placez la lame dans le bol hachoir.
2 Pour préparer la pâte, placez tous les ingrédients dans le bol
hachoir, selon l'ordre indiqué.
3 Fixez le couvercle de mixage du bol hachoir à la pièce principale.
Mixez à vitesse 7, en raclant les côtés du bol de temps en temps,
jusqu'à ce que le contenu soit finement coupé 'environ 30 à
40 secondes).
4 Pour le curry : chauffez l'huile dans une casserole de taille
moyenne et faites doucement revenir les oignons avec un
couvercle pendant 10 minutes, jusqu'à ce qu'ils soient dorés.
5 Ajoutez le poulet coupé en cubes et faites frire jusqu'à ce que
la préparation soit brune / saisi.
6 Ajoutez la pâte Jalfrezi fraîchement préparée et mélangez à feu
moyen pendant 3 minutes.
7 Ajoutez les tomates en boîte, l'eau et le poivron haché et faites
cuire 1 heure. Retirez le couvercle si nécessaire pour réduire le la
quantité de liquide.
Servez avec du riz bouilli et du pain naan.
Satay au poulet
Quantité : 10 brochettes (Il vous faut : 4-5)
Ingrédients :
3 poitrines de poulet
• 20 g de coriandre fraîche
• 1 grand poivron rouge (pépins inclus), coupé en 4
• 1 tête d'ail coupée en deux
• 5 c. à soupe (bombéesà de beurre de cacahuète
• Un petit peu de sauce soja
• Morceau de gingembre frais de 3 cm pelé et découpé en 4
• Zest et jus (50 ml) de 3 citrons verts
• Un peu d'eau
• Sel et poivre
Méthode :
1 Placez la lame dans le bol hachoir. Plongez 10 brochettes en bois
dans l'eau froide.
3 Placez tous les ingrédients, sauf l'eau, dans le bol hachoir et fixez
le couvercle de mixage du bol hachoir et la pièce principale.
4 Réglez sur la vitesse 7 et appuyez 3 fois sur le bouton de contrôle
de précision, entre 10 et 15 secondes à chaque fois. Vérifiez
la consistance, en raclant les côtés du bol avec une spatule
en plastique si nécessaire. Continuez jusqu'à ce que le contenu
soit bien mixé.
5 Ajoutez de l'eau jusqu'à ce que le mélange soit suffisamment
fluide pour couler de la cuillère lorsque vous comptez jusqu'à 3.
6 Coupez le poulet en petits morceaux et enfilez-en 8 sur les
brochettes en bois humides.
7 Étalez la marinade sur le poulet. Couvrez et mettez au
réfrigérateur quelques heures ou pour la nuit.
8 Faites griller sur un grill pré-chauffé, en tournant fréquemment,
jusqu'à disparition de tout le jus.
Milk-shake à la fraise
Ingrédients :
• 150 g de fraises, équeutées et coupées en deux
• 2 boules de glace à la vanille (50 g)
• 200 ml de lait demi-écrémé
Méthode :
1 Insérez la lame pour smoothie dans le gobelet à smoothie.
2 Placez les fraises au fond du gobelet à smoothie ; ajoutez la glace
et le lait.
3 Fixez le couvercle de mixage du bol hachoir à la pièce principale.
Mélangez à vitesse 8 en pressant 4 fois, pendant 30 secondes
au total.
4 Servez immédiatement.
Summer Berry Delight
Ingrédients :
• 70 g de fraises, équeutées et coupées en deux
• 70 g de myrtilles
• 40 g de framboises
• 40 g de cerises dénoyauté
• 200 ml de jus de pomme
Méthode :
1 Insérez la lame pour smoothie dans le gobelet à smoothie.
2 Mettez tous les ingrédients dans le gobelet à smoothie.
3 Fixez le couvercle de mixage du bol hachoir à la pièce principale.
Réglez sur la vitesse 8 et mixez par pressions rapides, pendant
30 secondes au total.
4 Servez immédiatement.
Sweet Berry Kiss
Ingrédients :
• 2 glaçons
• 50 g de cerises congelées
• 200 g de yaourt allégé à la vanille
• 150 ml de lait demi-écrémé
Méthode :
1 Insérez la lame pour smoothie dans le gobelet à smoothie.
2 Placez les ingrédients dans le gobelet à smoothie, dans
l'ordre indiqué.
3 Fixez le couvercle de mixage du bol hachoir à la pièce principale.
Réglez sur la vitesse 8 et mixez par pressions rapides, pendant
30 secondes.
4 Servez immédiatement.
f
31
Page 32

Smoothie chocolat banane
Ingrédients :
• 1 petite banane mûre, tranchée (80 g, pelée)
• 2 c. à soupe rases de chocolat en poudre
• 150 g de yaourt allégé à la vanille
• 200 ml de lait demi-écrémé
Méthode :
1 Insérez la lame pour smoothie dans le gobelet à smoothie.
2 Mettez la banane tranchée dans le gobelet à smoothie, puis
les autres ingrédients.
3 Fixez le couvercle de mixage du bol hachoir à la pièce principale.
Réglez sur la vitesse 8 et mixez en 3 pressions, pendant 20 à
30 secondes au total.
4 Servez immédiatement.
Café frappé
Ingrédients :
• 3 glaçons
• 6 cuilerées de yaourt maigre à la vanille congelé (150 g)
• 200 ml de café fort chaud
Méthode :
1 Insérez la lame pour smoothie dans le gobelet à smoothie.
2 Placez les ingrédients dans le gobelet à smoothie, dans
l'ordre indiqué.
3 Fixez le couvercle de mixage du bol hachoir à la pièce principale.
Réglez sur la vitesse 8 et mixez par brèves pressions, pendant
30 secondes au maximum.
4 Servez immédiatement.
Lames garanties à vie
La « lame dentelée » est garantie sans défaut de matériau ni
de fabrication, à vie. Cette garantie est réservée à l'acheteur
d'origine et n'est ni cessible, ni transférable à aucune autre
partie. Cette garantie est réservée aux clients utilisant les
« lames dentelées » chez eux, dans un cadre non commercial.
Cette garantie ne couvre aucun dommage causé par accident,
utilisation indue, ni aucune utilisation autre que celle mentionnée
dans le manuel du propriétaire, ni aucun dommage résultant
d'un mauvais entretien ou nettoyage de ce produit, comme
indiqué dans le manuel de l'utilisateur.
Garantie à vie de la lame
La « lame dentelée » est garantie sans défaut de matériau ni de
fabrication, à vie. Cette garantie est réservée à l’acheteur
d’origine et n’est ni cessible ni transférable à aucune autre
partie. Cette garantie est réservée aux clients utilisant les
« lames dentelées » dans des situations familiales non
commerciales. Cette garantie ne couvre aucun dommage causé
par accident, utilisation indue, ni aucune utilisation autre que
celle mentionnée dans le manuel du propriétaire, ni aucun
dommage résultant d’un mauvais entretien ou nettoyage de ce
produit, comme indiqué dans le manuel de l’utilisateur.
VOTRE GARANTIE DE DEUX ANS
Pour la clientèle en France
Il est important de conserver le ticket de caisse comme preuve
d’achat. Agrafez votre ticket de caisse à cette notice
d'utilisation; vous pourrez ainsi l’avoir sous la main
ultérieurement.
Merci de donner les informations ci-dessous si votre appareil
tombe en panne. Vous trouverez ces références à la base de
l’appareil.
Numéro du modèle
Numéro de série
Tous les produits Morphy Richards sont testés individuellement
avant de quitter l’usine.
Si un problème survient dans les 24 mois qui suivent l’achat
d’origine, vous devez contacter le magasin où vous avez
acheté votre appareil muni de votre ticket de caisse, celui ci le
renverra à Glen Dimplex France pour expertise.
Sous réserve des exclusions indiquées ci-dessous (1 à 9),
l’appareil défectueux sera alors réparé ou remplacé et
réexpédié dans un délai de 15 jours ouvrables maximum à
compter de son arrivée.
Si, pour quelque raison que ce soit, l’article est remplacé
pendant la période de garantie de deux ans, la période de
garantie du nouvel article sera calculée à partir de la date
d’achat d’origine. Vous devez donc absolument conserver votre
ticket de caisse ou votre facture d’origine pour indiquer la date
d’achat.
Pour bénéficier de la garantie de deux ans, l’appareil doit avoir
été utilisé conformément aux instructions du fabricant. Par
exemple, les fers doivent avoir été détartrés et les filtres doivent
avoir été nettoyés selon les instructions.
Morphy Richards ne sera pas dans l’obligation de remplacer ou
réparer les articles aux termes de la garantie dans les
circonstances suivantes :
1 Si le problème provient d’une utilisation accidentelle, d’une
utilisation abusive ou négligente, ou si l’appareil a été utilisé de
manière contraire aux recommandations du fabricant, ou encore
lorsque le problème provient de sautes de puissance ou de
dégâts occasionnés en transit.
2 Si l’appareil a été utilisé sur une alimentation électrique dont la
tension est différente de celle qui est indiquée sur l’appareil.
3 Si des personnes autres que nos techniciens (ou l’un de nos
revendeurs agréés) ont tenté de faire des réparations.
32
Page 33

4 Si l’appareil a été loué ou utilisé dans un contexte non
domestique.
5 Si l’appareil est d’occasion.
6 Morphy Richards n’est pas dans l’obligation de réaliser des
travaux d’entretien, quels qu’ils soient, aux termes de la garantie.
7 La garantie exclut les consommables tels que les sacs, les filtres
et les carafes en verre.
8 Les batteries et les dégâts provoqués par leur fuite ne sont pas
couverts par la garantie.
9 Les filtres n’ont pas été nettoyés ou remplacés suivant les
instructions.
Cette garantie ne confère aucun droit à l’exception de ceux qui
sont expressément indiqués ci-dessus, et ne couvre aucune
réclamation pour dommages immatériels ou indirects. Cette
garantie est offerte comme avantage supplémentaire et n’a
aucune incidence sur vos droits légaux en tant que
consommateur.
Pour la clientèle en Belgique
Les produits de Morphy Richards sont produits conformément
les normes de qualité, agrée international. Au-dessus vos droits
légaux, Morphy Richards vous garantit qu’à partir d’achat ce
produit sera sans défauts de fabrication ou de matériels
pendant une période de deux ans.
Il est important de conserver votre bon d’achat comme preuve.
Agrafez votre ticket à cette notice d’installation.
Veuillez mentionner ces informations ci-dessous si votre
appareil tombe en panne. Vous trouverez ces informations sur la
base de l’appareil.
Numéro du modèle
Numéro de série
Si, pour quelque raison que ce soit, l’article est remplacé
pendant la période de garantie (deux ans), la période de
garantie du nouvel article sera calculée à partir de la date
d’achat d’origine. Il est donc très importants de conserver votre
bon d’achat original afin de connaître la date initiale d’achat.
Cette garantie vaut uniquement quand l’appareil a été utilisé
conformément aux instructions du fabricant. Par exemple, les
appareils doivent être détartrés et les filtres doivent être tenus
propre selon le mode d’emploi.
Morphy Richard ne sera pas dans l’obligation de remplacer ou
réparer les articles aux termes de la garantie dans les
circonstances suivantes
1 Si le problème, prévient d’une utilisation accidentelle, d’une
utilisation abusive ou négligente, ou si l’appareil a été utilisé de
manière contraire aux recommandations du fabricant, ou encore
lorsque le problème provient de source de puissance ou de
dégâts occasionnés en transit.
2 Si l’appareil a été utilisé sur une alimentation électrique dont la
tension est différente de celle qui est indiquée sur l’appareil.
3 Si des personnes, autres que nos techniciens (ou revendeurs
agrées) ont tenté de faire des réparations.
4 Si l’appareil a été loué ou utilisé dans un contexte non
domestique.
5 Si l’appareil est d’occasion.
6 Morphy Richards n’est pas dans l’obligation de réaliser des
travaux d’entretien, quels qu’ils soient, aux termes de la garantie.
7 La garantie ne couvre pas les sachets, filtres et brocs en verre.
8 Les batteries et les dégâts provoqués par leur fuite ne sont pas
couverts par la garantie.
9 Les filtres n’ont pas été nettoyés ou remplacés suivant les
instructions.
Cette garantie ne confère aucun droit à l’exception de ceux qui
sont expressément indiqués ci-dessus, et ne couvre aucune
réclamation pour dommages immatériels ou indirects. Cette
garantie est offerte comme avantage supplémentaire et n’a
aucune incidence sur vos droits légaux en tant que
consommateur.
f
33
Page 34

d
Gesundheit und Sicherheit
Für die Benutzung elektrischer Haushaltsgeräte sind folgende Regeln zur Wahrung der Sicherheit einzuhalten.
Vor der Verwendung des Geräts bitte die Bedienungsanleitung aufmerksam lesen.
• Dieses Gerät kann von Personen, deren körperliche oder
geistige Unversehrtheit oder deren Wahrnehmungsfähigkeit
eingeschränkt ist, sowie von Personen mit mangelnden
Kenntnissen oder Erfahrung benutzt werden. Dies gilt nur unter
der Voraussetzung, dass sie beaufsichtigt werden oder dass sie
eine Einweisung in die sichere Nutzung des Geräts und die
damit verbundenen Gefahren erhalten haben.
• Kinder dürfen mit dem Gerät nicht spielen.
• Dieses Gerät darf nicht von Kindern benutzt werden.
• Das Gerät und das Netzkabel nicht in Reichweite von Kindern
aufbewahren.
• Nicht länger zerkleinern, als im Abschnitt „Verwendung“
empfohlen wird.
• Vor dem Zusammensetzen, Zerlegen oder Reinigen, oder wenn
das Gerät unbeaufsichtigt gelassen wird, stets den Netzstecker
aus der Steckdose ziehen.
• Anleitungen zur Pflege und Reinigung finden Sie im
entsprechenden Abschnitt.
• Keine sich bewegenden Teile anfassen. Hände, Haare, Kleidung
sowie Utensilien von den Schneiden fernhalten, solange das
Gerät in Betrieb ist. Nur so werden Verletzungen und/oder
Schäden am Gerät vermieden.
• Wenn das Netzkabel beschädigt ist, muss es vom Hersteller,
seinem Kundenservice oder einer gleichermaßen qualifizierten
Person ausgetauscht werden, um Gefahrenquellen zu
vermeiden.
34
Page 35

Außerdem enthält der Text folgende Sicherheitshinweise.
Aufstellungsort
• Nicht im Freien oder in Badezimmern benutzen.
• Das Gerät stets weit entfernt von der Kante einer Arbeitsplatte
aufstellen.
• Den Becher mit dem Gerät nicht auf einer HochglanzHolzoberfläche abstellen, da die Oberfläche beschädigt werden
könnte.
Netzkabel
• Lassen Sie das Netzkabel nicht über die Kante der Arbeitsplatte
herabhängen. Ein Kind könnte daran ziehen.
• Verlegen Sie das Kabel nicht über eine offene Fläche, z. B.
von einer tief angebrachten Steckdose über einen Tisch.
• Verlegen Sie das Kabel nicht über einen Herd oder eine andere
heiße Fläche. Das Kabel könnte beschädigt werden.
• Das Netzkabel muss spannungsfrei von der Steckdose bis zum
Unterteil des Geräts verlegt sein.
Eigene Sicherheit
• Die Schneiden sind sehr scharf, daher beim Entleeren des
Bechers und bei der Reinigung äußerst vorsichtig damit umgehen.
Weitere Sicherheitshinweise
• Das Gerät darf ausschließlich für den vorgesehenen Zweck
verwendet werden.
Produktspezifische Anmerkungen zur Sicherheit
• WARNHINWEIS: Die Schneiden des Stabmixers sind sehr
scharf. Bei der Benutzung und Reinigung vorsichtig vorgehen.
• Die Anbauteile nicht bei laufendem Wasser reinigen, solange sie
noch mit dem Elektroteil verbunden sind.
• ACHTUNG: Heiße Flüssigkeiten abkühlen lassen, bevor sie in
den Mixer gegeben werden.
• Beim Verarbeiten von heißen Flüssigkeiten vorsichtig vorgehen,
da die Flüssigkeit aufgrund des heißen Dampfes plötzlich
austreten könnte.
• Bevor Zubehörteile gewechselt oder Teile berührt werden können,
die sich im Betrieb bewegen, muss das Gerät ausgeschaltet und
der Netzstecker gezogen werden.
Elektrische Anforderungen
Stellen Sie sicher, dass die auf dem Typenschild des Geräts
angegebene Spannung mit der Haushaltsspannung Ihrer
Elektrizitätsversorgung übereinstimmt; es muss eine
Wechselstromspannung (abgekürzt AC) sein.
Falls die Sicherung im Netzstecker ausgetauscht werden muss, ist
eine Sicherung mit 3 A gemäß BS1362 zu verwenden.
d
35
Page 36

Leistung, die Sie kompromisslos kreieren lässt.
Der neue Total Control Handmixer – die –einfache Methode für
problemloses Kochen.
Mit dem Total Control Handmixer können Sie köstliche
Smoothies und Shakes kreieren, Suppen und Saucen mixen
und sich dabei ruhigen Gewissens auf die Leistung der SmartResponse-Technologie verlassen.
Dank der-Smart-Response-Technologie haben Sie auf
Knopfdruck völlige Kontrolle über den Mixvorgang. Die SmartResponse-Technologie leitet je nach Bedarf auf sanfte Weise
Strom in den Mixer, d. h. ruckartige Bewegungen oder Spritzer
werden vermieden und Sie haben alles problemlos im Griff.
Mit der variablen Geschwindigkeitsregelung wählen Sie mit
einer einfachen Drehbewegung die für Ihre Aufgabe am besten
geeignete Laufgeschwindigkeit aus. Hierfür stehen Ihnen 8
Stufen zur Verfügung. Auch bei höheren Laufgeschwindigkeiten
können Sie sicher sein, dass die Smart-Response-Technologie
die Leistung nach und nach auf die von Ihnen benötigte
Drehzahl erhöht.
Wenn Sie die gewünschte Konsistenz erreicht haben, lassen
Sie die Taste einfach los, und der Total Control Handmixer
verlangsamt sich allmählich und hält schließlich an. Somit
werden Spritzer und Saugwirkung vermieden.
Der Total Control Handmixer bietet Ihnen Leistung, die Sie
kompromisslos kreieren lässt.
⁄
Variable Geschwindigkeitskontrolle
¤
Präzisionsregler
‹
Ergonomisch geformter Softgriff
›
650-Watt-Motor
⁄
¤
‹
›
36
Page 37

Einführung
Wir danken Ihnen für den Kauf des Vorbereitungs-Sets für den
Total Control Handmixer von Morphy Richards.
Ihr Vorbereitungs-Set für den Handmixer wird mit einer Reihe von
Rührwerkzeugen ausgeliefert. Bitte lesen Sie die Anleitungen zur
Verwendung der einzelnen Rührwerkzeuge vor Gebrauch
sorgfältig durch.
Vergessen Sie nicht, Ihre zweijährige Produktgarantie unter
www.morphyrichards.co.uk anzumelden.
Inhalt
Gesundheit und Sicherheit 34
Total Control 36
Einführung 37
Produktübersicht 37
Vor der ersten Verwendung 37
Verwendung Ihres Handmixers 37
Verwendung Ihres Zerkleinerungsbehälters 38
Verwendung Ihres Smoothie-Bechers 38
Geeignete Speisen 38
Verwendung 39
Rührwerkzeuge 39
Turbotaste 39
Einsatz im Topf 39
Hinweise & Tipps 39
Reinigung und Pflege 40
Kontakt 40
Rezepte 41
Garantie 47
Besonderheiten
(1) Variable Geschwindigkeitsregelung
(2) Präzisionsregler
(3) Turbotaste
(4) Gerät
(5) Mixerstab
(6) Serrator-Schneide
(7) Becherdeckel
(8) Becher
(9) Mixdeckel für den Zerkleinerungsbehälter
(10) Zerkleinerungsbehälter (3 Stück)
(11) Serrator-Schneide zum Zerkleinern
(12) Deckel für den Zerkleinerungsbehälter (2 Stück)
(13) Smoothie-Mixerdeckel
(14) Smoothie-Becher (2 Stück)
(15) Smoothie-Klinge
(16) Sport-Deckel (2 Stück)
(17) Auswurftaste für Rührwerkzeuge
(18) Abstellfläche
(19) Sicherheitsabdichtung
(20) Smoothie-Sicherheitsabdichtung
Vor der ersten Verwendung
• WARNHINWEIS: Vorsicht beim Auspacken Ihres HandmixerVorbereitungs-Sets: Die Schneiden sind sehr scharf.
• Waschen Sie alle Teile mit Ausnahme des Hauptgeräts (4),
Zerkleinerungsbehälter-Mixerdeckels (9) und SmoothieMixerdeckels (13) vor der Verwendung in heißem Seifenwasser
ab. Alle Teile vor Gebrauch sorgfältig trocknen.
• Den Mixerstab nicht vollständig in Wasser eintauchen. Nur den
Kopf der Serrator-Schneide (6) reinigen.
• Wischen Sie den Zerkleinerungsbehälter-Mixerdeckel und den
Smoothie-Mixerdeckel zum Reinigen mit einem heißen feuchten
Tuch ab. Tauchen Sie das Gerät nicht unter Wasser.
• Das Gerät darf nicht in Wasser getaucht werden.
Verwendung Ihres Handmixers
1
Das Elektroteil (4) am Mixerstab (5) anbringen und drücken, bis er
einrastet.
2
Die Laufgeschwindigkeit mit der variablen
Geschwindigkeitskontrolle (1) auswählen. Der Handmixer startet
erst, wenn der Präzisionsregler (2) oder die Turbotaste (3)
gedrückt werden.
3
Den Mixerstab in die Speise geben. Für beste Ergebnisse
empfehlen wir die Verwendung des Bechers (8).
4
Den Präzisionsregler drücken, um mit dem Mixvorgang zu
beginnen. Je stärker die Taste gedrückt wird, desto schneller läuft
der Mixer.
5
Um den Mixer anzuhalten, den Präzisionsregler loslassen. Warten,
bis die Schneiden sich verlangsamt haben und angehalten sind,
BEVOR der Handmixer aus der Speise genommen wird.
6
Den Netzstecker des Elektroteils aus der Steckdose ziehen. Die
Entriegelungstaste für Anbauteile (17) drücken und den Mixerstab
zur Reinigung vom Gerät trennen.
d
37
Page 38

Verwendung Ihres Zerkleinerungsbehälters
7
Die Serrator-Schneide (11) VORSICHTIG in den
Zerkleinerungsbehälter (10) einsetzen. WARNHINWEIS: Die
Messerschneiden sind sehr scharf.
8
Gewünschte Speisen in den Zerkleinerungsbehälter geben.
Höchstens bis zur Hälfte befüllen.
9
Darauf achten, dass die Sicherheitsverriegelung (19) angebracht
ist und den Mixdeckel des Zerkleinerungsbehälters (9) auf den
Zerkleinerungsbehälter drücken. Drücken, bis er einrastet.
10
Elektroteil (4) am Deckel anbringen. Aus Sicherheitsgründen wird
das Elektroteil nicht auf dem Mixerdeckel des
Zerkleinerungsbehälters verriegelt.
11
Auf der variablen Geschwindigkeitsregelung (1) eine hohe
Laufgeschwindigkeit auswählen und den Präzisionsregler (2)
halten, um zu starten. Den Deckel während des Betriebs nicht
öffnen.
12
Den Handmixer vollständig zum Stillstand kommen lassen, bevor
das Elektroteil vom Mixdeckel des Zerkleinerungsbehälters
entfernt wird. Abheben.
13
Den Mixerdeckel des Zerkleinerungsbehälters vom
Zerkleinerungsbehälter abnehmen.
14
Vor Entleeren der Speise im Behälter die Serrator-Schneide
VORSICHTIG entfernen.
Verwendung Ihres Smoothie-Bechers
15
Stecken Sie die Smoothie-Klinge (15) VORSICHTIG in den
Smoothie-Becher (14).
16
Die Zutaten in den Smoothie-Becher geben. Um das Mixen zu
erleichtern, fügen Sie zuerst weiche Früchte hinzu.
17
Achten Sie darauf, dass das Smoothie-Sicherheitssiegel (20)
vorhanden ist(siehe Seite 11). Schrauben Sie den SmoothieMixerdeckel (13) auf den Smoothie-Becher.
18
Elektroteil (4) am Deckel anbringen. Aus Sicherheitsgründen wird
das Elektroteil nicht auf dem Smoothie-Mixerdeckel verriegelt.
Halten Sie den Smoothie-Becher beim Mixen fest.
19
Auf der variablen Geschwindigkeitsregelung (1)
Laufgeschwindigkeit 8 auswählen und den Präzisionsregler (2)
halten, um zu starten. Den Deckel während des Betriebs nicht
öffnen.
20
Den Stabmixer vollständig zum Stillstand kommen lassen, bevor
das Elektroteil getrennt wird. Zum Entfernen vom SmoothieMixerdeckel abheben.
21
Den Smoothie-Mixerdeckel vom Smoothie-Becher abschrauben.
22
Vor dem Trinken die Smoothie-Klinge VORSICHTIG vom Becher
entfernen. Den Sport-Deckel (16) anbringen, um Ihren Drink auch
unterwegs zu genießen.
Geeignete Speisen
Die nachstehend aufgeführten Mengen dienen als Richtwerte. Den Zerkleinerungsbehälter (12) höchstens bis zur Hälfte befüllen.
Anbauteil Speise Max. Menge Drehzahl Einschaltzeit
Mixerstab Suppe oder Sauce - 4 40 – 60 Sekunden
Mixerstab* Milchshake 450 ml 4-5 20 – 30 Sekunden
Mixerstab* Eis 3 Würfel 8 5 – 15 Sekunden
Mixerstab* Karotten mit Wasser 200 g 6 40 – 60 Sekunden
300 ml
Zerkleinerungsbehälter Zwiebel 200 g 7 5 – 10 Sekunden
Zerkleinerungsbehälter Karotte 200 g 7 5 – 15 Sekunden
Zerkleinerungsbehälter Kräuter 50 g 7 5 – 15 Sekunden
Zerkleinerungsbehälter Rindfleisch 100 g 8 25 – 30 Sekunden
Zerkleinerungsbehälter Nüsse 100 g 8 15 – 20 Sekunden
Smoothie-Becher Weiche Früchte 500 ml 8 20 – 30 Sekunden
*Bei der Anwendung des mitgelieferten Messbechers
38
Page 39

Verwendung
• WARNHINWEIS: Ihr Handmixer-Set ist für den kurzzeitigen
Gebrauch vorgesehen. Höchstens 90 Sekunden lang
ununterbrochen verwenden. Vor dem nächsten Gebrauch
mindestens 5 Minuten lang abkühlen lassen.
• Den Smoothie-Becher (14) nicht länger als 60 Sekunden
verwenden.
Rührwerkzeuge
Mixerstab (5)
• Der Mixerstab dient zum Pürieren von Speisen, z. B. Suppen,
Saucen, Milchshakes, Smoothies, Babynahrung oder zum
Zerkleinern von Eis.
• Der Mixerstab eignet sich nicht zum Mahlen harter Substanzen,
z. B. Kaffeebohnen.
Zerkleinerungsbehälter (10)
• Der Zerkleinerungsbehälter eignet sich zum Zerkleinern von
Nüssen, Gemüse, Fleisch, Kräutern, hartgekochten Eiern und
trockenem Brot. Für eine optimale Leistung sollte der
Zerkleinerungsbehälter mit höheren Laufgeschwindigkeitsstufen
verwenden werden.
Smoothie-Becher (14)
• Der Smoothie-Becher wurde für Smoothies und Getränke
unterwegs konzipiert.
• Der Smoothie-Becher ist nicht zum Mahlen von Kaffeebohnen
oder harter Lebensmittel geeignet. Nach dem Mixen im SmoothieBecher die Smoothie-Klinge (15) entfernen und den Sport-Deckel
(16) anbringen, damit Sie das Getränk auch unterwegs genießen
können.
• Den Smoothie-Becher nicht zum alleinigen Zerkleinern von
Eis ohne andere Zutaten verwenden. Nicht mehr als zwei
Eiswürfel verwenden.
• Nicht mit hartem Gemüse, wie Kartoffeln oder Karotten
verwenden.
Deckel (7), (12), (16)
• Die Zerkleinerungsbehälter und Becher können mit den mitgelieferten
Deckeln zur sicheren Aufbewahrung von Speisen dienen.
Zum Verschließen des Sport-Deckels nicht auf die Seite, sondern
die Mitte des Deckels drücken, um eine einwandfreie Abdichtung
zu gewährleisten. Bitte darauf achten, dass der Becher immer
aufrecht steht.
• WARNHINWEIS: Die Rührwerkzeuge sind nicht für den
Einsatz in Mikrowelle, Backofen, Geschirrspüler oder
Gefrierschrank geeignet.
Turbotaste
• Ihr Handmixer verfügt über 8 verschiedene Laufgeschwindigkeiten
mit Total-Control-Technologie sowie eine Turbotaste (3). Für
Intervallbetrieb bei hohen Geschwindigkeiten die Turbotaste drücken.
• Hinweis: Der Zerkleinerungsbehälter (10) funktioniert am besten,
wenn die variable Geschwindigkeitsregelung (1) auf eine hohe
Laufgeschwindigkeitsstufe gestellt oder die Turbotaste (3) verwendet
wird.
Einsatz im Topf
• Nicht in einem Topf mit Antihaft-Beschichtung verwenden. Die
Beschichtung kann durch den Mixerstab beschädigt werden.
1. Topf vom Herd nehmen.
2. Um übermäßiges Spritzen zu verhindern, den Mixerstab (5) vor
Einschalten des Handmixers in die Speise geben.
3. Die Schüssel mit der anderen Hand festhalten, die gewünschte
Geschwindigkeit wählen und den Präzisionsregler (2) leicht
drücken. Zu Beginn eine langsame Geschwindigkeit verwenden
und bei Bedarf die Geschwindigkeit mit dem Präzisionsregler
steigern.
4. Die Schneiden (6) in der Speise auf und ab bewegen.
5. Den Handmixer erst aus der Speise nehmen, wenn die Schneiden
nicht mehr laufen.
• WARNHINWEIS: Wenn die Serrator-Schneide noch läuft, wenn
sie aus der Speise genommen wird, oder bei Einsatz einer
hohen Laufgeschwindigkeit in einem kleinen Topf kann heiße
Flüssigkeit verspritzen. Wenn der Handmixer auf diese Weise
genutzt wird, muss besonders vorsichtig vorgegangen
werden.
• Handmixer nicht weiter als zur Verbindungsstelle zwischen
Gerät (4) und Mixerstab (5) in die Speise tauchen.
• Sicherstellen, dass das Netzkabel nicht mit heißen
Oberflächen in Kontakt kommt (auch nicht mit der Topfseite).
Hinweise und Tipps.
• Beim Mixen von Zutaten mit stark färbender Wirkung (z. B.
Karotten) können sich die Kunststoffteile des Geräts verfärben.
Zum Säubern verfärbter Teile diese mit Speiseöl abwischen. Vor
erneutem Gebrauch gründlich mit heißer Seifenlauge reinigen.
• Beim Mixen mit dem Mixerstab (5) den Vorgang beginnen, indem
der Mixerstab in die Zutaten getaucht wird Damit stellen Sie sicher,
dass die Messer alle Zutaten erreichen und verarbeiten können.
Den Mixerstab leicht drehen und in den Zutaten auf und ab
bewegen. Diese Bewegung durchführen, bis die Mischung die
gewünschte Konsistenz erreicht hat. Nicht aus der Flüssigkeit
nehmen, wenn die Schneiden noch laufen.
• Den laufenden Mixerstab nicht vollständig aus der Mischung
nehmen, da dies Spritzer verursachen kann.
• Bei Verwendung des Zerkleinerungsbehälters (10) müssen
während des Mixvorgangs möglicherweise Zutaten von den Seiten
des Behälters mit einem Silikonschaber abgeschabt werden.
• Bei der Zubereitung eines Smoothies zuerst die Frucht in den
Smoothie-Becher (14) geben. Dadurch befindet sie sich näher an
der Smoothie-Klinge (15) und wird zuerst gemixt.
d
39
Page 40

Reinigung und Pflege
• WARNHINWEIS: Vor Reinigung und Wartung den Netzstecker
des Geräts stets aus der Steckdose ziehen.
• WARNHINWEIS: Die Messer sind sehr scharf, Vorsicht bei der
Handhabung.
• Alle Teile mit Ausnahme des Elektroteils (4),
Zerkleinerungsbehälter-Mixerdeckels(9) und SmoothieMixerdeckels (13) in heißem Seifenwasser waschen und sofort
trocknen lassen.
• Das Elektroteil mit einem feuchten Tuch reinigen und alle Teile
gründlich abtrocknen.
• WARNHINWEIS: Das Elektroteil niemals in Wasser oder
andere Flüssigkeiten tauchen.
• Den Mixerstab nicht vollständig in Wasser versenken, sondern nur
den Serrator-Klingenkopf (6) waschen.
• Keines der Teile ist spülmaschinenfest.
Sicherheitsabdichtung des
Zerkleinerungsbehälters (19)
Der Mixerdeckel des Zerkleinerungsbehälters (9) und der Deckel
des Zerkleinerungsbehälters (12) sind mit einer
Sicherheitsabdichtung ausgestattet. Diese verhindert Auslaufen
von Flüssigkeiten vom Zerkleinerungsbehälter (10) während der
Verwendung und beim Aufbewahren von Speisen.
• Vor Verwendung stets sicherstellen, dass die
Sicherheitsabdichtung angebracht ist. Falls dies nicht beachtet
wird, können Schäden am Gerät entstehen. 23
• Die Sicherheitsabdichtung braucht nur zur Reinigung entfernt
werden (falls erforderlich). Nach der Reinigung sicherstellen, dass
die Dichtung vorschriftsgemäß angebracht ist, bevor der Total
Control Handmixer erneut verwendet wird.
• Beim erneuten Anbringen der Sicherheitsdichtung darauf achten,
dass sie fest in den ersten Kanal in den Deckeln gedrückt wird
(siehe Abb.). Die Lippe der Sicherheitsdichtung muss nach außen
zeigen und darf im Kanal nicht verdreht sein. Vor Gebrauch
sicherstellen, dass sich die Sicherheitsdichtung in korrekter
Position befindet.
Sicherheitsdichtung des Smoothie-Bechers (20)
Der Smoothie-Mixerdeckel (13) und der Sport-Deckel (16)
verfügen beide über eine Sicherheitsdichtung. Dadurch soll ein
Auslaufen verhindert werden, wenn die Teile in Gebrauch sind und
aufbewahrt werden.
• Vor Verwendung stets sicherstellen, dass die SmoothieSicherheitsdichtung angebracht ist. Anderenfalls kann es zu
Undichtigkeiten oder Beschädigungen am Gerät kommen.
• Die Smoothie-Sicherheitsdichtung braucht nur zur Reinigung
entfernt werden (falls erforderlich). Nach der Reinigung darauf
achten, dass die Dichtung vor erneuter Verwendung wieder
ordnungsgemäß angebracht wird. 24
• Beim erneuten Anbringen der Smoothie-Sicherheitsdichtung darauf
achten, dass sie fest in die Vertiefung im Deckel gedrückt wird
(siehe Diagramm). Die „Laschen“ an der Sicherheitsdichtung
sollten nach innen weisen. Vor Gebrauch sicherstellen, dass sich
die Sicherheitsdichtung in korrekter Position befindet.
Kontakt:
Helpline
Sollten Sie ein Problem mit Ihrem Gerät haben, wenden Sie sich
bitte telefonisch an unsere Helpline, da wir Ihnen sehr
wahrscheinlich besser helfen können als der Händler, bei dem
Sie das Gerät erworben haben.
Halten Sie den Gerätenamen sowie die Modell- und
Seriennummer bereit, wenn Sie uns anrufen, damit Ihnen
schneller geholfen wird.
Sprechen Sie mit uns
Haben Sie Fragen oder Anregungen oder benötigen Sie
hilfreiche Tipps oder Rezeptideen, um unsere Geräte optimal zu
nutzen, beteiligen Sie sich online:
Blog: www.morphyrichards.co.uk/blog
Facebook: www.facebook.com/morphyrichardsuk
Twitter: @loveyourmorphy
Website: www.morphyrichards.com
40
Page 41

Rezepte
Wir haben uns leckere Rezepte ausgedacht, die Sie mit Ihrem neuen Total Control
Handmixer-Set ausprobieren können. Von Smoothies bis zu Pesto – für jeden
Geschmack etwas Passendes.
Unsere Rezepte sind lediglich einige Vorschläge, was Sie mit Ihrem Handmixer und
den Rührwerkzeugen alles bewerkstelligen können. Wenn Sie sich an die Arbeit mit
Ihrem Handmixer gewöhnt haben, können Sie Rezepte aus Ihren beliebtesten
Kochbüchern leicht für den Einsatz Ihres Geräts abwandeln.
d
41
Page 42

Erdbeer-Banane-Smoothie
Zutaten:
• 1 reife Banane (ca. 90 g) geschält, in Stücke geschnitten
• 65 g Erdbeeren, gewaschen, abgetrocknet und entstielt
• 2 Eiswürfel
• 135 ml Apfelsaft
• 200 g fettarmer Vanillejoghurt
Zubereitung:
1 Alle Zutaten in der angegebenen Reihenfolge in den Becher geben.
2 Den Mixerstab am Elektroteil anbringen und Laufgeschwindigkeit
4 an der variablen Geschwindigkeitsregelung auswählen.
3 Den Mixerstab in den Boden des Bechers geben und den
Präzisionsregler vorsichtig eindrücken: Den Handmixer im Becher
20 – 30 Sekunden lang auf und ab bewegen, bis der Smoothie
gemixt ist.
Himbeer-Milchshake
Zutaten:
• 80 g frische Himbeeren
• 100 g Vanilleeiscreme
• 200 ml teilentrahmte Milch
Zubereitung:
1 Alle Zutaten in der angegebenen Reihenfolge in den Becher geben.
2 Den Mixerstab am Elektroteil anbringen und Laufgeschwindigkeit
4 an der variablen Geschwindigkeitsregelung auswählen.
3 Den Mixerstab in den Boden des Bechers geben und den
Präzisionsregler vorsichtig eindrücken: Den Handmixer im Becher
20 – 30 Sekunden lang auf und ab bewegen, bis der Milchshake
gemixt ist.
Lauch-Kartoffelsuppe
Portionen: 4
Zutaten:
• 25 g Butter oder Margarine
• 2 mittelgroße Lauchstangen (285 g), in Scheiben geschnitten
• 1 kleine Zwiebel (100 g), fein gehackt
• 500 g Kartoffeln, in dünne Scheiben geschnitten
• 1,1 Liter Gemüsebrühe
• 1 Teelöffel gemischte Kräuter
• 1 Teelöffel Salz
• Schwarzer Pfeffer
• Schnittlauch zum Garnieren
• Knuspriges Brot zum Servieren
Zubereitung:
1 Butter in einem großen Topf (ohne Antihaft-Beschichtung)
zerlassen. Lauch und Zwiebel zugeben. Unter gelegentlichem
Rühren 10 Minuten lang sanft anbraten, nicht braun werden
lassen.
2 Kartoffeln, Gemüsebrühe, Kräuter und Gewürze zugeben, zum
Kochen bringen. 30 Minuten zugedeckt sanft köcheln lassen, oder
bis alles weich ist.
3 Etwas abkühlen lassen, Mixerstab am Elektroteil anbringen.
Die variable Geschwindigkeitsregelung auf Stufe 4 drehen.
4 Den Mixerstab in den Topf geben und mit dem Präzisionsregler die
Suppe etwa 50 – 60 Sekunden lang mixen, bis sie eine glatte
Konsistenz hat. Dies kann im Topf (ohne Antihaft-Beschichtung)
erfolgen.
5 Ggf. nachwürzen, mit etwas kleingeschnittenem Schnittlauch
garnieren und mit knusprigem Brot servieren.
42
Page 43

Matriciana-Sauce (für Pasta)
Portionen: 4
Zutaten:
• 1 Zwiebel (130 g), fein gehackt
• 1 Knoblauchzehe, zerdrückt
• ½ grüne Chili, entsamt und fein gehackt
• 1½ Esslöffel extra-natives Olivenöl
• 100 g Speck ohne Rinde, gehackt
• 400 g Dosentomaten
• 100 ml (120 g) Passata
• 2 Esslöffel Weißwein
• Salz und frisch gemahlener schwarzer Pfeffer
• Frisch gekochte Pasta zum Servieren
• Parmesan zum Servieren
Zubereitung:
1 Öl in einen großen Topf geben (ohne Antihaft-Beschichtung) und
einige Minuten lang erhitzen.
2 Zwiebel, Knoblauch und Chili 2 – 3 Minuten lang sanft anbraten,
nicht braun werden lassen. Gelegentlich mit einem Holzlöffel
umrühren.
3 Den gehackten Speck in den Topf geben und eine weitere Minute
lang braten. Zugedeckt bei mittlerer Hitze 5 Minuten lang garen.
4 Dosentomaten, Passata und Wein zugeben, mit etwas Salz und
Pfeffer nach Geschmack würzen.
5 Zugedeckt 25 Minuten lang sanft köcheln lassen, oder bis die
Zwiebeln weich sind.
6 Zehn Minuten bevor die Sauce fertig ist, die Pasta nach
Packungsanleitung zubereiten.
7 Mit dem Mixerstab auf Stufe 4 der variablen
Geschwindigkeitskontrolle eine glatte Sauce herstellen. Dies kann
im Topf (ohne Antihaft-Beschichtung) erfolgen. Den Mixerstab mit
dem Präzisionsregler starten und ihn sanft durch den Topf
bewegen, bis die gewünschte Konsistenz erreicht ist. Für eine
glatte Sauce dürfte dies ungefähr eine Minute in Anspruch
nehmen.
8 Pasta abgießen und Sauce unterrühren. Ggf. aufwärmen und
anschließend sofort mit Parmesan bestreut servieren.
Gemüsesauce (für Pasta)
Portionen: 4
Zutaten:
• 2 Esslöffel Olivenöl
• 1 Zwiebel (130 g), gehackt
• 2 Karotten (160 g), gewürfelt, klein
• 2 Stangen Sellerie (80 g), fein gehackt
• 1 Knoblauchzehe, zerdrückt
• 1 Stange Lauch (120 g), gehackt
• 1 gelbe Paprikaschote, gewürfelt
• 1 rote Paprika, gewürfelt
• Zwei 400-Gramm-Dosen gehackte Tomaten
• ½ Esslöffel Balsamico-Essig
• ½ Esslöffel Streuzucker
• 2 Teelöffel Oregano
• 1 Teelöffel gemischte Kräuter
• Salz und Pfeffer
• Frisch gekochte Pasta zum Servieren
• Parmesan zum Servieren
Zubereitung:
1 Das Öl in einem großen Topf (ohne Antihaft-Beschichtung)
erhitzen und Zwiebel, Karotten, Sellerie, Knoblauch und Lauch
5 Minuten lang sanft garen, nicht braun werden lassen.
Gelegentlich umrühren.
2 Unter gelegentlichem Umrühren zugedeckt 20 Minuten garen.
Gehackte Paprikaschoten zugeben und weitere 10 Minuten
zugedeckt garen.
3 Tomaten, Kräuter, Zucker und Essig in den Topf geben. Mit Salz
und Pfeffer würzen und zugedeckt 45 lang Minuten garen, oder bis
Karotten und Sellerie weich sind.
4 Pasta nach Packungsanleitung zubereiten.
5 Mit dem Mixerstab auf Stufe 4 der variablen
Geschwindigkeitskontrolle eine glatte Sauce herstellen. Dies kann
im Topf (ohne Antihaft-Beschichtung) erfolgen. Den Mixerstab mit
dem Präzisionsregler starten und ihn sanft durch den Topf
bewegen, bis die gewünschte Konsistenz erreicht ist. Für eine
glatte Sauce dürfte dies ungefähr eine Minute in Anspruch
nehmen.
6 Pasta abgießen und Sauce unterrühren. Ggf. aufwärmen und
anschließend sofort mit Parmesan bestreut servieren.
d
43
Page 44

Tomatensalsa
Zutaten:
250 ml 350 ml
• ½-1 ½-1 rote Chilischote mit einigen
Samen, halbiert
• 150 g 225 g reife Kirschtomaten, halbiert
• 1 1½ Limetten, entsaftet
• 20 g 30 g frische Korianderblätter, grob
gehackt, sodass sie in den
Zerkleinerungsbehälter passen
• Prise Prise Meersalz
• Prise Prise frisch gemahlener schwarzer
Pfeffer
Zubereitung:
1 Schneide in den Zerkleinerungsbehälter setzen.
2 Alle Zutaten in der links aufgeführten Reihenfolge in den Behälter geben.
3 Mixdeckel des Zerkleinerungsbehälters und Elektroteil anbringen.
Mit dem Präzisionsregler auf Stufe 7 zehn Sekunden lang mixen.
Ggf. am Behälter anhaftende Zutaten mit einem Schaber
abschaben und erneut weitere 5 – 10 Sekunden lang mixen.
4 In eine Servierschüssel geben und vor dem Servieren etwa eine
Stunde stehen lassen. Dadurch entwickelt sich der Geschmack
und Schaum kann sich setzen.
Mit Tortilla-Chips servieren.
Hinweis: Auf Wunsch kann im Behälter eine Menge von 350 ml
zubereitet werden.
Pesto
Zutaten:
• 50 g Pinienkerne
• ½ Knoblauchzehe
• 25 g Parmesan, gerieben
• 30 g frisches Basilikum, nur Blätter
• 50 ml extra-natives Olivenöl
• Saft einer halben Zitrone
• Salz und frisch gemahlener schwarzer Pfeffer
Zubereitung:
1 Schneide in den Zerkleinerungsbehälter setzen.
2 Alle Zutaten in der aufgeführten Reihenfolge in den Behälter geben.
3 Mixdeckel des Zerkleinerungsbehälters und Elektroteil anbringen.
Mit dem Präzisionsregler auf Stufe 7 fünfzehn Sekunden lang
mixen. Ggf. am Behälter anhaftende Zutaten mit einem Schaber
abschaben und erneut weitere 15 – 30 Sekunden lang mixen.
Hinweis: Die Konsistenz des Pestos kann durch Zugabe von einer
kleinen Menge Zitronensaft und Olivenöl nach Belieben verdünnt
werden.
Als Beilage zu Spaghetti Bolognese servieren, oder unter
Kartoffelbrei rühren.
Hinweis: Frisches Pesto in einem luftdichten Behälter im
Kühlschrank lagern. Vor dem Kühlen die Oberfläche mit etwas
Olivenöl bedecken.
44
Page 45

Guacamole
Zutaten:
• 75 gKirschtomaten
• ½ frische rote Chilischote, entsamt
• 65 g frische Korianderblätter mit Stengeln
• 1 reife Avocado, halbiert, entkernt und Schale entfernt
• Saft von ½ – 1 Limette (nach Geschmack)
• Salz und Pfeffer nach Geschmack
Zubereitung:
1 Schneide in den Zerkleinerungsbehälter setzen.
2 Jede Avocadohälfte erneut halbieren.
3 Alle Zutaten in der aufgeführten Reihenfolge in den Behälter
geben. Mixdeckel des Zerkleinerungsbehälters und Elektroteil
anbringen.
4 Mit dem Präzisionsregler auf Stufe 7 fünfzehn Sekunden lang
mixen. Ggf. am Behälter anhaftende Zutaten mit einem Schaber
abschaben und erneut weitere 15 Sekunden lang mixen.
5 Nach Geschmack würzen.
Indisches Hähnchen Jalfrezi
Portionen: 4
Zutaten:
Für die Jalfrezi-Paste
• 2 Knoblauchzehen, halbiert
• ein 3 cm langes Stück frischer Ingwer, geschält und in 4 Stücke
geschnitten
• 1 frische grüne Chilischote (25 g), Stiel entfernt und in 4 Stücke
geschnitten
• 12 g frischer Koriander
• 1 Teelöffel Koriander
• 1 Teelöffel braune Senfkörner
• 1 Teelöffel Bockshornklee-Pulver
• 2 Teelöffel Kümmel
• 1 Teelöffel Kurkuma
• ½ Teelöffel Salz
• 2 Esslöffel Erdnussöl
• 2 Esslöffel Tomatenmark
• 2 Esslöffel Wasser
• 2 Teelöffel Paprikapulver
Für das Curry
• 2 Esslöffel Öl
• 240 g Zwiebel, in Streifen geschnitten
• 500 g Hähnchenbrust, in Stücke geschnitten
• eine 400-Gramm-Dose gehackte
Tomaten
• 200 ml Wasser
• 1 mittelgroße grüne Paprika, in Scheiben geschnitten
Zubereitung:
1 Schneide in den Zerkleinerungsbehälter setzen.
2 Um die Paste zuzubereiten, alle Zutaten für die Paste in der
aufgeführten Reihenfolge in den Zerkleinerungsbehälter geben.
3 Mixdeckel des Zerkleinerungsbehälters und Elektroteil anbringen.
Auf Drehstufe 7 mixen, dabei an den Schüsselrändern von Zeit
zu Zeit herunterkratzen, bis das Ganze fein gehackt ist
(etwa 30 – 40 Sekunden).
4 Curry-Zubereitung: Das Öl in einer mittelgroßen Pfanne erhitzen
und die Zwiebeln mit aufgesetztem Deckel 10 Minuten lang
anbraten, bis sie goldbraun sind.
5 Hähnchenwürfel hinzugeben und anbraten, bis sie goldgelb sind.
6 Die frische Jalfrezi-Paste hinzugeben und 3 Minuten lang bei
mittlerer Hitze umrühren.
7 Dosentomaten, Wasser und in Scheiben geschnittene Paprika
hinzugeben und 1 Stunde lang kochen. Bei Bedarf Deckel
entfernen, um die Flüssigkeit zu reduzieren.
Mit gekochtem Reis und Naan-Brot servieren.
d
45
Page 46

Hähnchen-Saté
Mengen: 10 Spieße (Portionen: 4-5)
Zutaten:
• 3 Hähnchenbrüste
• 20 g frischer Koriander
• 1 große rote Chilischote (mit
Samen), in 4 Stücke geschnitten
• 1 Knoblauchzehe, halbiert
• 5 Esslöffel Erdnussbutter (ungefähre Angabe)
• Schuss Sojasauce
• 3 cm langes Stück frischer Ingwer, geschält und in 4 Stücke gehackt
• Schale und Saft (50 ml) von 2 Limetten
• Etwas Wasser
• Salz und Pfeffer
Zubereitung:
1 Schneide in den Zerkleinerungsbehälter setzen. 10 Holzspieße in
kaltem Wasser einweichen.
3 Alle Zutaten außer dem Wasser in den Zerkleinerungsbehälter
geben; Zerkleinerungsbehälter-Mixerdeckel und Elektroteil
anbringen.
4 Bei Drehzahl 7 die Präzisionsregelung in drei Stößen zu je 10 – 15
Sekunden vollständig herunterdrücken. Konsistenz prüfen; die
Ränder der Schüssel mit einem Kunststoffspatel herunterkratzen,
falls nötig. Fortsetzen, bis das Ganze gut durchmischt ist.
5 Wasser hinzufügen, bis die Mischung weich genug ist, dass ein
hineingesteckter Löffel umfällt, wenn man bis 3 zählt.
6 Das Hähnchen in kleine Stücke schneiden, und je 8 Stücke auf die
eingeweichten Holzspieße aufziehen.
7 Die Marinade in das Hähnchen reiben. Ein paar Stunden oder
über Nacht abdecken und kühl lagern.
8 In einem vorgeheizten Grill unter häufigem Drehen grillen, bis der
Fleischsaft klar ist.
Erdbeer-Milchshake
Zutaten:
• 150 g Erdbeeren, entstielt und halbiert
• 2 Kugeln Vanilleeis (50 g)
• 250 ml teilentrahmte Milch
Zubereitung:
1 Die Smoothie-Klinge in den Smoothie-Becher setzen.
2 Die Erdbeeren auf den Boden des Smoothie-Bechers legen, das
Eis und die Milch hinzufügen.
3 Smoothie-Mixdeckel und Elektroteil anbringen. Auf
Geschwindigkeitsstufe 8 für 4 kurze Stöße, insgesamt
30 Sekunden, mischen.
4 Sofort servieren.
Sommerliche Beeren-Köstlichkeit
Zutaten:
• 70 g Erdbeeren, entstielt und halbiert
• 70 g Blaubeeren
• 40 g Himbeeren
• 40 g Kirschen, entsteint
• 200 ml Apfelsaft
Zubereitung:
1 Die Smoothie-Klinge in den Smoothie-Becher setzen.
2 Alle Zutaten in den Smoothie-Becher geben.
3 Smoothie-Mixdeckel und Elektroteil anbringen. Auf
Geschwindigkeitsstufe 8 in kurzen Stößen, insgesamt
30 Sekunden, mischen.
4 Sofort servieren.
Süßer Beerenkuss
Zutaten:
• 2 Eiswürfel
• 50 g gefrorene Kirschen
• 200 g fettarmer Vanillejoghurt
• 150 ml teilentrahmte Milch
Zubereitung:
1 Die Smoothie-Klinge in den Smoothie-Becher setzen.
2 Die Zutaten in der aufgeführten Reihenfolge in den Smoothie-
Becher legen.
3 Smoothie-Mixdeckel und Elektroteil anbringen. Auf
Geschwindigkeitsstufe 8 in kurzen Stößen 30 Sekunden lang
mischen.
4 Sofort servieren.
46
Page 47

Schokoladen-Bananen-Smoothie
Zutaten:
• 1 kleine reife Banane, in Scheiben geschnitten (80 g, geschält)
• 2 gestrichene Esslöffel Trinkschokoladenpulver
• 150 g fettarmer Vanillejoghurt
• 200 ml teilentrahmte Milch
Zubereitung:
1 Die Smoothie-Klinge in den Smoothie-Becher setzen.
2 Die in Scheiben geschnittenen Bananen und danach die restlichen
Zutaten in den Smoothie-Becher geben.
3 Smoothie-Mixdeckel und Elektroteil anbringen. Auf
Geschwindigkeitsstufe 8 in 3 kurzen Stößen, insgesamt 20 – 30
Sekunden lang, mischen.
4 Sofort servieren.
Griechischer Eiskaffee
Zutaten:
• 3 Eiswürfel
• 6 Kugeln fettarmer gefrorener Vanille-Joghurt (150 g)
• 200 ml kalter starker Kaffee
Zubereitung:
1 Die Smoothie-Klinge in den Smoothie-Becher setzen.
2 Die Zutaten in der aufgeführten Reihenfolge in den Smoothie-
Becher legen.
3 Smoothie-Mixdeckel und Elektroteil anbringen. Auf
Geschwindigkeitsstufe 8 in kurzen Stößen bis zu 30 Sekunden
lang mischen.
4 Sofort servieren.
Garantie auf Lebensdauer für die Schneide
Für die „Serrator-Schneide“ gilt eine lebenslange Garantie bei
Material- und Verarbeitungsfehlern. Diese Garantie schließt nur
den Erstkäufer ein und ist nicht auf andere Personen
übertragbar. Die Garantie gilt nur für Verbraucher, die die
„Serrator-Schneiden“ für rein private Zwecke und nicht
gewerblich gebrauchen. Von dieser Garantie ausgeschlossen
sind Falschgebrauch, Missbrauch oder jeder andere nicht in
diesem Handbuch beschriebene Gebrauch sowie Schäden
durch eine nicht nach den Angaben des Handbuchs
durchgeführte Wartung bzw. Reinigung.
GESETZLICHE GEWÄHRLEISTUNG
Für dieses Gerät gilt eine Gewährleistung von 2 Jahren.
Als Kaufnachweis sollte die Quittung des Fachhändlers
aufgehoben werden. Heften Sie Ihren Beleg an die Rückseite
dieser Unterlagen.
Sollte an diesem Gerät ein Fehler auftreten, sind immer
nachfolgende Angaben mitzuteilen. Diese Angaben sind auf der
Unterseite des Geräts zu finden.
Modellnr.
Seriennr.
Vor dem Verlassen des Werks werden alle Morphy Richards
Produkte geprüft. Sollte einmal der Fall auftreten, dass sich ein
Gerät innerhalb der Gewährleistung als fehlerhaft erweist,
wenden Sie sich bitte an unsere Service-Hotline
Falls das Gerät während der 2-jährigen Gewährleistung aus
welchem Grund auch immer ausgetauscht wird, wird zur
Berechnung der Restgarantie für das neue Gerät das OriginalKaufdatum zugrunde gelegt. Aus diesem Grunde ist es
besonders wichtig, den Original-Kaufbeleg bzw. die Rechnung
aufzubewahren, um das Datum des ursprünglichen Kaufs
nachweisen zu können.
Damit die 2-jährige Gewährleistung geltend gemacht werden
kann, muss das Gerät im Einklang mit den Anweisungen des
Herstellers benutzt worden sein. Beispielsweise muss das Gerät
entkalkt worden sein und gemäß den Anweisungen gereinigt
werden.
Morphy Richards übernimmt keine Verpflichtung zur Reparatur
oder zum Austausch der Waren im Rahmen der
Garantiebedingungen, wenn:
1 der Fehler auf einen versehentlich Gebrauch, Missbrauch,
unachtsamen Gebrauch oder auf einen Gebrauch zurückzuführen
ist, der den Empfehlungen des Herstellers entgegenwirkt oder
wenn der Fehler durch Stromspitzen oder durch Transportschäden
verursacht wurde.
2 das Gerät mit einer Spannung versorgt wurde, die nicht auf dem
Typenschild abgedruckt ist.
3 von anderen Personen als unserem Reparatur- und
Wartungspersonal (oder von einem unserer Vertragshändler)
Reparaturversuche unternommen wurden.
4 wenn das Gerät für Vermietungszwecke oder nicht allein für
private Zwecke gebraucht wurde.
5 das Gerät aus zweiter Hand stammt.
6 Morphy Richards kann nicht dafür haftbar gemacht werden,
Reparaturarbeiten im Rahmen der Gewährleistung auszuführen.
7 Verbrauchsmaterialien wie Tüten, Filter und Glaskaraffen sind von
der Gewährleistung ausgeschlossen.
8 Batterien und Schäden aufgrund undichter Batterien sind von der
Gewährleistung ausgeschlossen.
9 die Filter nicht gemäß Anleitung gereinigt und ausgewechselt
wurden
Diese Gewährleistung erkennt Ihnen ausschließlich die Rechte
zu, die ausdrücklich in den oben genannten Bestimmungen
niedergelegt sind und erstreckt sich nicht auf Forderungen
infolge eines Verlustes oder einer Beschädigung. Diese
Gewährleistung wird als zusätzliche Leistung angeboten und
greift Ihre gesetzlich zuerkannten Rechte als Verbraucher nicht
an.
d
47
Page 48

e
Seguridad e higiene
Para usar cualquier aparato eléctrico se deben seguir las siguientes normas de sentido común.
Lea detenidamente estas instrucciones antes de usar este producto.
• Este aparato pueden utilizarlo personas con capacidades
físicas, sensoriales o mentales reducidas, o que carezcan de
experiencia y conocimiento, siempre que hayan recibido la
supervisión o las instrucciones pertinentes para utilizar el
aparato de forma segura y comprendan los riesgos.
• Los niños no deben jugar con el aparato.
• Los niños no deben usar este aparato.
• Mantenga el aparato y su cable fuera del alcance de los niños.
• No continúe mezclando más tiempo del recomendado en la
sección “Uso”.
• Desconecte siempre el aparato de la corriente si lo deja
desatendido y antes de montarlo, desmontarlo o limpiarlo.
• Para conocer las instrucciones de cuidados y limpieza, diríjase
a la sección apropiada.
• Evite tocar las partes desmontables Mantenga las manos, el
pelo, la ropa y los utensilios de cocina alejados de las hojas del
accesorio durante el funcionamiento, así evitará lesiones
personales o daños en el aparato.
• Para evitar riesgos, si observa que el cable de alimentación
está dañado, debe ser sustituido por el fabricante, su
representante de servicio técnico u otra persona igualmente
cualificada.
48
Page 49

Además, le damos el siguiente consejo de seguridad.
Ubicación
• No lo use al aire libre ni en cuartos de baño.
• Coloque siempre su aparato alejado del borde de la superficie
de trabajo.
• No coloque el vaso usado con el aparato sobre una superficie
de madera muy pulida ya que pueden producirse daños
a dicha superficie.
Cable principal
• No deje el cable principal colgando del borde de la superficie de
trabajo de forma que un niño pueda alcanzarlo.
• No deje el cable colgando en un espacio abierto, por ejemplo
entre una toma de corriente baja y una mesa.
• No deje el cable en un fogón o en otra zona caliente que pueda
dañar el cable.
• El cable principal debe ir de la toma de corriente a la unidad base
sin tensar las conexiones.
Seguridad personal
• Tenga cuidado siempre al manipular las cuchillas afiladas,
al vaciar el vaso y al limpiar.
Otros consejos de seguridad
• No use el aparato para otros usos no previstos.
Seguridad específica del producto
• ADVERTENCIA: Las cuchillas de la batidora son muy
afiladas. Manéjela con precaución al usarla y limpiarla.
• No limpie las partes bajo agua corriente sin que estas partes estén
desmontadas.
• IMPORTANTE: Deje que los líquidos calientes se enfríen antes
de añadirlos a la batidora.
• Tenga cuidado al batir o verter líquidos calientes en la batidora
porque pueden salir expulsados por vapor repentino.
• Apague el aparato y desconéctelo de la corriente antes de
cambiar los accesorios o acercarse a las piezas que se mueven
durante su uso.
Requisitos eléctricos
Compruebe que el voltaje que se indica en la placa de
características de su aparato se corresponde con el suministro
eléctrico de su casa, que debe ser A.C. (corriente alterna).
Si el fusible de la toma de corriente necesita cambiarse,
debe usarse un fusible BS1362 de 3 amperios.
e
49
Page 50

El poder de crear con confianza.
Introducción de la Batidora manual de Total Control – la forma
más sencilla de aportar confianza a su cocina.
La batidora manual de Total Control le permite crear deliciosos
sorbetes y batidos, mezclar sopas y salsas con la confianza y
seguridad que ofrece la Tecnología de Respuesta Inteligente.
La tecnología Smart Response permite disponer de un control
total del proceso de batido con solo presionar un botón. La
Tecnología de Respuesta Inteligente gestiona la potencia de
entrada a la batidora a medida que la necesita, de forma que
no se producen sacudidas o salpicaduras, con lo que la
confianza es total en su cocina.
Elija la velocidad que se adapta mejor al trabajo en marcha con
solo girar el Control de Velocidad Variable, en donde tiene 8
opciones entre las que elegir. Incluso al usar una velocidad alta
puede sentirse seguro de que la Tecnología de Respuesta
Inteligente aportará la potencia gradualmente hasta llegar a la
velocidad elegida para el trabajo en marcha.
Una vez batido hasta lograr la consistencia que desee,
simplemente suelte el botón y la Batidora manual Total Control
se irá deteniendo poco a poco, con lo que se asegura que no
existan salpicaduras ni aspiración.
La Batidora manual de Total Control le ofrece el poder de crear
con confianza.
⁄
Control de velocidad variable
¤
Botón de control de precisión
‹
Mango blando ergonómico
›
Motor de 650 watios
⁄
¤
‹
›
50
Page 51

Introducción
Gracias por comprar esta batidora Total Control de Morphy
Richards.
Su juego de batidora viene con unas ciertos accesorios Lea las
instrucciones para informarse a fondo sobre el uso de la batidora
de mano antes de utilizarla.
Recuerde, visite www.morphyrichards.co.uk para registrar los dos
años de garantía de su producto.
Contenido
Seguridad e higiene 48
Control total 50
Introducción 51
Consideraciones generales del producto 51
Antes de usarlo por primera vez 51
Usar la batidora 51
Uso del recipiente para picar 52
Uso del vaso de licuados 52
Alimentos adecuados 52
Uso 53
Accesorios 53
Botón Turbo 53
Batir en un cazo 53
Consejos 53
Cuidados y limpieza 54
Contacto 54
Recetas 55
Garantía 60
Características
(1) Control de velocidad variable
(2) Interruptor de control de precisión
(3) Botón Turbo
(4) Unidad principal
(5) Brazo de la batidora
(6) Hoja de sierra
(7) Tapa del vaso
(8) Vaso
(9) Tapa de batir del recipiente para picar
(10) Recipiente para picar (x3)
(11) Cuchilla picadora de sierra
(12) Tapa del recipiente para picar (x2)
(13) Tapa de batir de licuados
(14) Vaso de licuados (x2)
(15) Cuchilla de licuados
(16) Tapa de deportes (x2)
(17) Botón de liberación de accesorios
(18) Apoyo de la palma de la mano
(19) Junta de seguridad
(20) Junta de seguridad de licuados
Antes de usarlo por primera vez
• ADVERTENCIA: Desembale la batidora de mano Pro Set con
cuidado, las cuchillas están muy afiladas.
• Lave todas las piezas con agua caliente con jabón antes de
usarlas, excepto la Unidad principal (4), la Tapa de batir del
recipiente para picar (9) y la Tapa de batir de licuados (13).
Antes de usarlas, seque por completo todas las piezas.
• No sumerja totalmente el Brazo de la batidora en el agua.
Lave solo el cabezal de la Hoja de sierra (6).
• Limpie la Tapa de batir del recipiente para picar y la Tapa de
batir de licuados con un trapo caliente para limpiar. No la sumerja
en agua.
• No sumerja en agua la Unidad principal.
Usar la batidora
1
Conecte el brazo de batir (5) a la unidad principal (4) y presione
para bloquear.
2
Seleccione la velocidad con el control de velocidad variable (1).
La batidora de mano no se pone en marcha hasta que no se
presiona el mando de control (2) o el botón Turbo (3).
3
Coloque el Brazo de la batidora en los ingredientes que desea
batir. Recomendamos usar el Vaso (8) para lograr los mejores
resultados.
4
Pulse el Interruptor de control de precisión para comenzar a batir.
La velocidad aumentará cuanto más apriete el botón.
5
Para parar, suelte el Interruptor de control de precisión. Espere a
que las cuchillas se hayan parado ANTES DE retirar la batidora de
mano del alimento.
6
Desenchufe la Unidad principal de la toma de corriente. Pulse el
botón de liberación de accesorios (18) y separe el brazo de la
unidad principal para limpiarlo.
e
51
Page 52

Uso del recipiente para picar
7
CON CUIDADO, inserte la cuchilla picadora de sierra (11) en el
recipiente para picar (10). PRECAUCIÓN: Las hojas están
afiladas.
8
Introduzca los alimentos que desea picar en el recipiente para
picar. No lo llene más de la mitad.
9
Asegúrese de que está bien colocada la junta estanca (20) y
empuje la tapa de batir del recipiente para picar (9) sobre éste.
Presione para que quede firme.
10
Empuje la Unidad principal (4) sobre la Tapa. Por motivos de
seguridad, la unidad principal no queda bloqueada en la tapa de
batir del recipiente para picar.
11
Seleccione una velocidad alta con el control de velocidad variable
(1) y mantenga presionado el mando de control preciso (2) para
empezar. No abra la tapa mientras esté usando el aparato.
12
Espere a que la batidora pare por completo antes de separar la
unidad principal de la tapa de batir del recipiente para picar.
Levántela para quitarla.
13
Retire la tapa de batir del recipiente para picar.
14
CON CUIDADO , retire la cuchilla picadora Serrator antes de
vaciar el contenido del recipiente.
Uso del vaso de licuados
15
CON CUIDADO introduzca la Cuchilla de licuados (15) en el vaso
de licuados (14).
16
Añada los ingredientes al Vaso de licuados. Para ayudar a batir,
primero añada frutas blandas.
17
Asegúrese de que la Junta de seguridad de licuados (20) está en
su sitio (consulte la página 11). Ajuste la Tapa de batir de licuados
(13) en el Vaso de licuados.
18
Empuje la Unidad principal (4) sobre la Tapa. Por motivos de
seguridad, la unidad principal no queda bloqueada en la tapa de
batir del recipiente para picar. Sujete el Vaso de licuados al batir.
19
Seleccione la velocidad 8 del Control de velocidad (1) y mantenga
pulsado el Interruptor de control de precisión (2) para comenzar.
No abra la tapa mientras esté usando el aparato.
20
Deje que la batidora se detenga completamente antes de
desmontar la Unidad principal. Tire de la tapa de batir de licuados
paa retirarla.
21
Desajuste la tapa de batir de licuados del vaso de licuados.
22
CON CUIDADO retire la cuchilla de licuados del vaso antes de
beber. Ajuste la tapa de deportes (16) para disfrutar de una bebida
para llevar.
Alimentos adecuados
Las cantidades indicadas a continuación deben usarse como guía. El recipiente para picar (10) no debe llenarse más de la mitad.
Accesorio Alimentos Cantidad máxima Velocidad Tiempo
Brazo de la batidora Sopa o salsa - 4 40-60 segundos
Brazo de la batidora* Batido de leche 450 ml 4-5 20-30 segundos
Brazo de la batidora* Hielo 3 cubos 8 5-15 segundos
Brazo de la batidora* Zanahorias y agua 200 g 6 40-60 segundos
300 ml
Recipiente para picar Cebolla 200 g 7 5-10 segundos
Recipiente para picar Zanahoria 200 g 7 5-15 segundos
Recipiente para picar Hierbas 50 g 7 5-15 segundos
Recipiente para picar Ternera estofada 100 g 8 25-30 segundos
Recipiente para picar Frutos secos 100 g 8 15-20 segundos
Vaso de licuado Frutas blandas 500 ml 8 20-30 segundos
*Al usar el recipiente suministrado
52
Page 53

Uso
• ADVERTENCIA: La batidora de mano está diseñada para un
uso intermitente. No la utilice de forma continua durante más
de 60 segundos. Deje que se enfríe durante un mínimo de
5 minutos antes de volver a usarla.
• No use el vaso de licuado (14) durante más de 60 segundos.
Accesorios
Brazo de la batidora (5)
• El Brazo de la batidora está diseñado para hacer purés, por
ejemplo sopas, salsas, batidos de leche, sorbetes, comida para
niños o triturar hielo.
• El Brazo de la batidora no es adecuado para moler ingredientes
duros como granos de café.
Recipiente para picar (10)
• El recipiente para picar es adecuado para picar frutos secos,
verduras, carne, hierbas, huevos duros y pan seco. El rendimiento
óptimo del recipiente para picar se consigue con las velocidades
más altas.
Vaso de licuado (14)
• El vaso de licuado está diseñado para preparar licuados y bebidas
para llevar.
• El vaso de licuados no es adecuado para molir granos de café ni
para alimentos duros. Después de batir en el vaso de licuados,
retire la cuchilla de licuados (15) y ajuste la tapa para deportes
(16) para disfrutar de una bebida para llevar.
• No use el vaso de licuado solo para picar hielo sin otros
ingredientes. No use más de 2 cubos de hielo.
• No la use para verduras duras, como patatas o zanahorias.
Tapas (7), (12), (16)
• Si le quedan sobras, use los recipientes y los vasos con las tapas
provistas para almacenar alimentos de forma segura.
• Al cerrar la tapa para deportes, presione en el centro de la parte
superior en lugar de en el borde para un cierre correcto.
Asegúrese de que el vaso de guarda siempre en posición vertical.
• ADVERTENCIA: Ningún accesorio es adecuado para su uso
en microondas, horno, lavavajillas o congelador.
Botón Turbo
• La batidora de mano tiene 8 velocidades diferentes con tecnología
Total Control, además de un botón Turbo (3). Pulse el botón Turbo
para hacer funcionar la batidora a alta velocidad en periodos
intermitentes.
• Nota: El recipiente para picar (10) funciona mejor si el control de
velocidad variable (1) se ajusta en una velocidad alta o se usa con
el botón Turbo (3).
Batir en un cazo
• No utilice utensilios antiadherentes. El brazo de la batidora
puede dañar el revestimiento antiadherente.
1. Retire el cazo del fuego.
2. Para evitar salpicaduras, introduzca el brazo (5) dentro del
alimento antes de poner en marcha la batidora de mano.
3. Sujete el cazo con firmeza con la otra mano, seleccione la
velocidad deseada y presione suavemente el mando de control
preciso (2). Empiece despacio y aumente la velocidad como sea
necesario usando el mando de control preciso.
4. Desplace las cuchillas (6) por el alimento con un movimiento
ascendente y descendente.
5. Deje que las Hojas se detengan antes de retirarlas del cazo.
• ADVERTENCIA: Puede haber salpicaduras de líquido caliente
si levanta la cuchilla Serrator del alimento mientras está
moviéndose o utilizada una velocidad alta en un recipiente
pequeño. Preste especial atención cuando utilice la batidora
de mano de este modo.
• No hunda en el alimento la batidora de mano hasta superar la
unión entre la unidad principal (4) y el brazo de batir (5).
• Asegúrese de que el cable de corriente no entra en contacto
con ninguna superficie caliente (incluido el borde del
utensilio de cocción).
Consejos y sugerencias.
• Al batir ingredientes con un color fuerte (p. ej. zanahorias), las
partes de plástico del aparato pueden decolorarse. Limpie con
aceite de cocina las partes manchadas o decoloradas. Limpie bien
en agua jabonosa caliente antes de volver a usarlo.
• Al batir con el Brazo de la batidora (5) comience por introducir el
Brazo de la batidora en los ingredientes. Así se asegurará de que
todos los ingredientes están en la cuchilla. Giresuavemente el
Brazo de la batidora y muévalo arriba y abajo en los ingredientes.
Continúe este movimiento hasta que la mezcla tenga la
consistencia que desee. No lo retire del líquido mientras las hojas
se encuentren en movimiento.
• No saque el Brazo de la batidora de la mezcla totalmente mientras
esté en funcionamiento, podría salpicar.
• Cuando use el recipiente para picar (10), tal vez necesite pasar
una espátula de silicona para rebañar la mezcla adherida a las
paredes.
• Al hacer un licuado, añada primero la fruta al vaso de licuado (14).
Así estará más cerca de la cuchilla de licuado (15) y se batirá
antes.
e
53
Page 54

Cuidados y limpieza
• ADVERTENCIA: Desenchufe siempre el aparato de la toma de
corriente antes de limpiarlo y realizar tareas de mantenimiento.
• PRECAUCIÓN: Manipule las cuchillas con cuidado, son muy
afiladas.
• Limpie todas las partes con agua caliente y jabón, excepto la
Unidad principal (4), la Tapa de batir del recipiente para picar (9) y
la Tapa de batir de licuados (13), y séquelas inmediatamente.
• Limpie la unidad principal con un paño húmedo y seque bien
todas las piezas.
• PRECAUCIÓN: Nunca sumerja la Unidad principal en agua ni
en ningún otro líquido.
• No sumerja por completo el Brazo de la batidora, lave solo el
cabezal de la Hoja de sierra.
• Ninguna parte es apta para lavavajillas.
Junta de seguridad del recipiente para picar (19)
La tapa de batir (9) y la tapa normal del recipiente para picar (12)
tienen una junta estanca de seguridad. Evita que se produzcan
fugas del recipiente para picar (10) mientras se usa o está
guardado.
• Antes de usarlo, cerciórese siempre de que la junta estanca esté
en su sitio. De lo contrario podría estropearse el aparato. 23
• Solo hay que quitar la junta estanca para limpiarla (si es preciso).
Una vez limpiada, asegúrese de volver a acoplarla directamente
antes de usar la batidora de mano Total Control.
• Al volver a acoplar la junta estanca, compruebe que esté bien
apretada dentro del primer canal de las tapas (observe la
ilustración). El borde de cierre de la junta debe quedar hacia fuera
y sin torcer dentro del canal. Asegúrese de que la junta estanca
está bien colocada antes de usar el aparato.
Junta de seguridad del vaso de licuados (20)
La tapa de batir para licuados (13) y la tapa para deportes (16)
tienen una junta de seguridad. Esta sirve para evitar escapes al
batir y durante el almacenamiento.
• Antes de usarlo, cerciórese siempre de que la junta estanca esté
en su sitio. En caso contrario podría haber escapes o se podría
dañar el aparato.
• Solo hay que quitar la junta estanca para limpiarla (si es preciso).
Después de limpiarla, asegúrese de que la junta se vuelve a
ajustar como se hizo antes de usarla. 24
• Al reajustar la junta de seguridad para licuados, asegúrese de que
la presiona firmemente (consulte el gráfico). Las lengüetas de la
junta de seguridad deberían mirar hacia adentro. Asegúrese de
que la junta de seguridad está bien colocada antes de usar el
aparato.
Contacto
Línea de ayuda
En caso de tener problemas con su aparato, póngase en contacto
con la línea de ayuda, ya que probablemente podremos ayudarle
más que en la tienda donde compró el artículo.
Cuando nos llame tenga a mano el nombre del producto, el
número del modelo y el número de serie para que la consulta
sea más rápida.
Hable con nosotros
En caso de tener preguntas o comentarios, de querer consejos
o ideas de recetas para aprovechar al máximo nuestros
productos, póngase en contacto con nosotros online:
Blog: www.morphyrichards.co.uk/blog
Facebook: www.facebook.com/morphyrichardsuk
Twitter: @loveyourmorphy
Página web: www.morphyrichards.com
54
Page 55

Recetas
Hemos creado recetas deliciosas para que pruebe su nueva Batidora manual Total
Control. Desde sorbetes hasta sopas, tenemos algo para cada gusto.
La recetas ofrecidas solo son sugerencias de lo que puede hacer con la Batidora
manual y sus accesorios. Cuando se acostumbre a trabajar con la Batidora manual
podrá adaptar fácilmente recetas de sus recetarios favoritos.
e
55
Page 56

Sorbete de fresa y plátano
Ingredientes:
• 1 plátano maduro (aprox. 90 g) pelado, cortado en trozos
• 65 g de fresas lavadas, secas y sin vainas
• 2 cubitos de hielo
• 135 ml de zumo de manzana
• 200 g de yogurt de vainilla bajo en calorías
Método:
1 Añada todos los ingredientes en el vaso en el orden indicado.
2 Coloque el Brazo de la batidora en la Unidad principal y
seleccione la velocidad 4 en el Control de velocidad variable.
3 Coloque el Brazo de la batidora en el fondo del vaso y pulse
suavemente el Interruptor de control de precisión. Suba y baje la
Batidora manual en el vaso durante 20 o 30 segundos, hasta que
se mezcle el sorbete.
Batido de frambuesa
Ingredientes:
• 80 g de frambuesas frescas
• 100 g de helado de vainilla
• 200 ml de leche semidesnatada
Método:
1 Añada todos los ingredientes en el vaso en el orden indicado.
2 Coloque el Brazo de la batidora en la Unidad principal y
seleccione la velocidad 4 en el Control de velocidad variable.
3 Coloque el Brazo de la batidora en el fondo del vaso y pulse
suavemente el Interruptor de control de precisión. Suba y baje la
Batidora manual en el vaso durante 20 o 30 segundos, hasta que
se mezcle el batido.
Sopa de puerro y patata
Personas: 4
Ingredientes:
• 25 g de mantequilla o margarina
• 2 puerros medianos (285 g), laminados
• 1 cebolla pequeña (100 g), cortada fina
• 500 g de patatas, láminas finas
• 1,1 litros de caldo de verduras
• 1 cucharada de hierbas variadas
• 1cucharada de sal
• Pimienta negra
• Cebolleta para decorar
• Pan crujiente para servir
Método:
1 Funda la mantequilla en un cazo grande (no use uno
antiadherente) y añada los puerros y la cebolla. Fría ligeramente
sin dorar durante 10 minutos, removiendo de vez en cuando.
2 Añada las patatas, el caldo, las hierbas y el sazonado, llévelo a
ebullición. Cubra y hierva a fuego lento ligeramente durante
30 minutos o hasta que este suave.
3 Deje que se enfríe un poco y luego coloque el Brazo de la
batidora en la Unidad principal. Coloque el Control de velocidad
variable en la posición 4.
4 Introduzca el brazo de batir en el recipiente y, con el mando de
control preciso, mezcle la sopa hasta que quede uniforme,
aproximadamente 50 – 60 segundos. Esto puede realizarse
en el cazo siempre que éste no disponga de un recubrimiento
antiadherente.
5 Rectifique de sal y decore con cebollino. Sirva con pan crujiente.
56
Page 57

Salsa Matriciana (para pasta)
Personas: 4
Ingredientes:
• 1 cebolla (130 g) finamente cortada
• 1 diente de ajo, aplastado
• ½ chili verde, sin semillas y cortado finamente
• 1½ cucharada sopera de aceite de oliva virgen
• 100 g de bacon, sin corteza y cortado
• 400 g de tomates rojos en lata
• 100 ml (120 g) pulpa
• 2 cucharadas soperas de vino blanco
• Sal y pimienta negra recién molida
• Pasta recién hervida para servir
• Queso parmesano para servir
Método:
1 Coloque el aceite en una cacerola grande (no use una
antiadherente) y caliente durante varios minutos.
2 Fría suavemente le cebolla, el ajo y los chiles durante
2 o 3 minutos sin dorarlos, removiendo cada cierto tiempo
con una cuchara de madera.
3 Añada la panceta troceada y fría un minuto más. Coloque la tapa
en la cacerola y cocine con fuego medio durante 5 minutos.
4 Añada los tomates rojos, la pulpa y el vino, sazone con un poco
de sal y pimienta al gusto.
5 Coloque la tapa en la cacerola y cocine a fuego lento suavemente
durante 25 minutos, o hasta que las cebollas queden blandas.
6 Diez minutos antes de que esté lista la salsa, cocine la pasta
según las instrucciones del paquete.
7 Use el Brazo de la batidora en la velocidad 4 del Control de
velocidad variable para obtener una salsa suave Esto puede
realizarse en el cazo siempre que éste no disponga de un
recubrimiento antiadherente. Comience a batir con el Interruptor
de control de precisión, moviendo suavemente la sartén hasta que
se obtenga la consistencia que desee. Para lograr una salsa
suave, basta con un minuto aproximadamente.
8 Escurra la pasta y vuelque en ella la pasta. Caliente si fuera
necesario, luego sirva inmediatamente con queso parmesano.
Sala de verduras (para pasta)
Personas: 4
Ingredientes:
• 2 cucharadas soperas de aceite de oliva
• 1 cebolla (130 g), corta
• 2 zanahorias (160 g), en taquitos pequeños
• 2 ramas de apio (80 g), cortadas finamente
• 1 diente de ajo, aplastado
• 1 puerro (120 g), cortado
• 1 pimiento amarillo, en tacos
• 1 pimiento rojo, en tacos
• 2 latas de 400 g de tomates cortados
• ½ cucharada sopera de vinagre balsámico
• ½ cucharada sopera de azúcar blanca
• 2 cucharadas de orégano
• 1 cucharada de hierbas variadas
• Sal y pimienta
• Pasta recién hervida para servir
• Queso parmesano para servir
Método:
1 Caliente el aceite en una cacerola grande (no use una
atiadherente) y cocine suavemente la cebolla, la zanahoria,
el apio, el ajo y el puerro durante 5 minutos sin que se doren.
Muévalo todo de vez en cuando.
2 Coloque la tapa en la cacerola y cocine durante 20 minutos,
mueva de vez en cuando. Añada los pimientos cortados y cocine
suavemente durante 10 minutos más con la tapa colocada.
3 Añada los tomates, las hierbas, el azúcar y el vinagre en la
cacerola. Sazone con sal y pimiento y cocine a fuego lento con la
tapa puesta unos 45 minutos, o hasta que la zanahoria y el apio
se ablanden.
4 Cocine la pasta según las instrucciones del paquete.
5 Use el Brazo de la batidora en la posición 4 del Control de
velocidad variable para lograr una salsa suave. Esto puede
realizarse en el cazo siempre que éste no disponga de un
recubrimiento antiadherente. Comience a batir con el Interruptor
de control de precisión, moviendo suavemente la sartén hasta que
se obtenga la consistencia que desee. Para lograr una salsa
suave, basta con un minuto aproximadamente.
6 Escurra la pasta y vuelque en ella la pasta. Caliente si fuera
necesario, luego sirva inmediatamente con queso parmesano.
e
57
Page 58

Salsa de tomate
Ingredientes:
250 ml 350 ml
• ½-1 ½-1 chili rojo, cortado por la mitad con
algunas semillas
• 150 g 225 g de tomates cherry maduros,
cortados por la mitad
• 1 1½ limas, exprimidas
• 20 g 30 g de cilantro fresco, en trozos
grandes que quepan en el recipiente
• Pellizco Pellizco de sal marina
• Pellizco Pellizco de pimienta recién molida
Método:
1 Acople la cuchilla picadora al recipiente para picar.
2 Ponga todos los ingredientes en el recipiente por el orden en que
aparecen en la lista.
3 Acople la tapa de batir del recipiente para picar y la unidad
principal. Bata durante 7 segundos con la velocidad 7 del mando
de control preciso. Rebañe el recipiente con una espátula si es
preciso y vuelva a batir unos 5-10 segundos.
4 Vierta en un cuenco para servir y deje reposar alrededor de una
hora antes de servir. Así se potencia el sabor y baja la espuma.
Sirva con tortillas de maíz.
Nota: El recipiente también sirve para elaborar 350 ml si se desea.
Pesto
Ingredientes:
• 50 g de piñones
• ½ diente de ajo
• 25 g de parmesano, rallado
• 30 g de albahaca fresca, sólo hojas
• 50 ml de aceite de oliva virgen extra
• El zumo de medio limón
• Sal y pimienta recién molida
Método:
1 Acople la cuchilla picadora al recipiente para picar.
2 Ponga todos los ingredientes en el recipiente por el orden en que
aparecen en la lista.
3 Acople la tapa de batir del recipiente para picar y la unidad
principal. Bata durante 15 segundos con la velocidad 7 del mando
de control preciso. Rebañe el recipiente con una espátula si es
preciso y vuelva a batir unos 5-10 segundos.
Nota: Para que el pesto tenga una consistencia más fina, se
puede añadir un poco de zumo de limón y aceite de oliva al gusto.
Se puede servir como acompañamiento de unos espaguetis a la
boloñesa o mezclado con puré de patatas.
Nota: Para guardar un pesto recién hecho, utilice un recipiente
hermético y cubra la superficie ligeramente con aceite de oliva
antes de introducirlo en el frigorífico.
58
Guacamole
Ingredientes:
• 75 g tomates cherri
• ½ chile rojo fresco, sin semillas
• 65 g de cilantro fresco con tallos
• 1 aguacate maduro, cortado por la mitad, sin hueso y sin piel
• El zumo de ½ - 1 lima (al gusto)
• Sal y pimienta al gusto
Método:
1 Acople la cuchilla picadora al recipiente para picar.
2 Divida en dos cada mitad del aguacate.
3 Ponga los ingredientes en el recipiente por el orden en que
aparecen en la lista. Acople la tapa de batir del recipiente para
picar y la unidad principal.
4 Bata durante 15 segundos con la velocidad 7 del mando de
control preciso. Rebañe el recipiente con una espátula y vuelva a
batir otros 15 segundos hasta obtener una mezcla homogénea.
5 Rectifique el condimento al gusto.
Pollo Jalfrezi
Personas: 4
Ingredientes:
Para la pasta del Jalfrezi
• 2 dientes de ajo partidos por la mitad
• Trozo de 1 x 3 cm de jengibre, pelado y cortado en 4
• 1 chile verde fresco (25 g) sin el rabo y cortado en 4 trozos
• 12 g de cilantro fresco
• 1 cucharada de cilantro
• 1 cucharada de semillas de mostaza marrón
• 1 cucharada de fenogreco en polvo
• 2 cucharadas de semillas de comino
• 1 cucharada de cúrcuma
• ½ cucharada de sal
• 2 cucharadas de aceite de cacahuete
• 2 cucharadas de puré de tomate
• 2 cucharadas de agua
• 2 cucharadas de paprika
Para el curry
• 2 cucharadas de aceite
• 240 g de cebolla en láminas
• 500 g de pechugas de pollo cortadas en trozos
• 1 x 400 tomates de lata picados
• 200 ml agua
• 1 pimiento verde mediano en rodajas
Page 59

Método:
1 Acople la cuchilla picadora al recipiente para picar.
2 Para hacer la pasta, coloque todos los ingredientes en el
recipiente para picar y en el orden mencionado.
3 Acople la tapa de batir del recipiente para picar y la unidad
principal. Bata a velocidad 7 hasta picarlo todo en trozos
pequeños (aproximadamente 30-40 segundos).
4 Para el curry: caliente el aceite en un cazo mediano y fría las
cebollas con la tapa puesta durante 10 minutos hasta que se
doren.
5 Añada los dados de pollo y fría hasta que se doren.
6 Añada la pasta Jalfrezi recién hecha y mezcle a fuego medio
durante 3 minutos.
7 Añada los tomates en lata, el agua y el pimineto en rodajas
y cocínelo durante 1 hora. Retire la tapa si es necesario para
reducir el líquido.
Sirva con arroz hervido y panes indios.
Pollo Satay
Para: 10 brochetas (Personas: 4-5)
Ingredientes:
• 3 pechugas de pollo
• 20 g de cilantro fresco
• 1 chile rojo grande (con las semillas) cortado en 4
• 1 diente de ajo, cortado por la mitad
• 5 cucharadas completas de mantequilla de cacahuete
• Una pizca de salsa de soja
• Un trozo de 3 cm de jengibre fresco pelado y cortado en 4
• Piel y zumo (50 ml) de 2 limas
• Un poco de agua
• Sal y pimienta
Método:
1 Acople la cuchilla picadora al recipiente para picar. Empape 10
brochetas de madera en agua fría.
3 Ponga todos los ingredientes excepto el agua en el recipiente para
picar, coloque la tapa de batir del recipiente para picar y la unidad
principal.
4 Con la velovidad 7 pulse el mando de control preciso en tres
pulsaciones de - segundos. Compruebe la consistencia y rebañe
los lados del recipiente con una espátula de plástico si es
necesario. Continúe hasta que esté bien batido.
5 Añada agua hasta que la mezcla sea lo suficientemente ligera
como para que se hunda en ella una cuchara en 3 segundos.
6 Corte el pollo en pequeños trozos y ponga 8 trozos en las
brochetas de madera previamente empapadas en agua.
7 Mezcle el adobo con el pollo. Cúbralo y guárdelo en la nevera
durante unas horas o toda la noche.
8 Ase a la parrilla en una parrilla previamente calentada dándole
vueltas con frecuencia hasta que el jugo esté claro.
Batido de frambuesa
Ingredientes:
• 150 g de fresas, peladas y cortadas a la mitad
• 2 bolas de helado de vainilla (50 g)
• 250 ml de leche semidesnatada
Método:
1 Introduzca la cuchilla para licuados en el vaso de licuados.
2 Vierta las fresas en el fondo del vaso de licuados, añada el helado
y la leche.
3 Acople la tapa de batir del recipiente para picar y la unidad
principal. Bata a velocidad 8 en 4 veces, en un total de
30 segundos.
4 Sirva inmediatamente.
Delicia de frutos del bosque de verano
Ingredientes:
• 70 g de fresas, peladas y cortadas a la mitad
• 70 g de arándanos
• 40 g de frambuesas
• 40 g de cerezas deshuesadas
• 200 ml de zumo de manzana
Método:
1 Introduzca la cuchilla para licuados en el vaso de licuados
2 Añada todos los ingredientes en el vaso de licuados.
3 Acople la tapa de batir del recipiente para picar y la unidad
principal. Bata a velocidad 8 en distintas veces, en un total de
30 segundos.
4 Sirva inmediatamente.
Beso de baya dulce
Ingredientes:
• 2 cubitos de hielo
• 50 g de cerezas congeladas
• 200 g de yogurt de vainilla bajo en calorías
• 150 ml de leche semidesnatada
Método:
1 Introduzca la cuchilla para licuados en el vaso de licuados.
2 Ponga los ingredientes en el vaso de licuados en el orden
mencionado.
3 Acople la tapa de batir del recipiente para picar y la unidad
principal. Bata a velocidad 8 en distintas veces durante
30 segundos.
4 Sirva inmediatamente.
e
59
Page 60

Batido de chocolate y banana
Ingredientes:
• 1 banana pequeña madura y en rodajas (80 g, pelada)
• 2 cucharadas de cacao en polvo para beber
• 150 g de yogurt de vainilla bajo en calorías
• 200 ml de leche semidesnatada
Método:
1 Introduzca la cuchilla para licuados en el vaso de licuados.
2 Ponga la banana en rodajas en el vaso de licuados, seguida del
resto de ingredientes.
3 Acople la tapa de batir del recipiente para picar y la unidad
principal. Bata a velocidad 8 en 3 veces, durante un total de
20-30 segundos.
4 Sirva inmediatamente.
Café Frappe
Ingredientes:
• 3 cubitos de hielo
• 6 bolas de yogurt de vainilla congelado bajo en grasas (150 g)
• 200 ml de café fuerte frío
Método:
1 Introduzca la cuchilla para licuados en el vaso de licuados.
2 Ponga los ingredientes en el vaso de licuados en el orden
mencionado.
3 Acople la tapa de batir del recipiente para picar y la unidad
principal. Bata a velocidad 8 en distintas veces durante
30 segundos.
4 Sirva inmediatamente.
Garantía de por vida de la cuchilla
Se garantiza de por vida que los materiales de la cuchilla de
sierra y la calidad no tienen ningún defecto. Esta garantía cubre
solo al comprador original y no puede asignarse ni transferirse a
terceros. Esta garantía es válida para consumidores que usan
las cuchilas de sierra con fines no comerciales. Esta garantía no
cubre daños causados por accidente, mal uso o cualquier otro
uso más allá del descrito en el manual, ni daños que resulten
de fallos a la hora de mantener y limpiar este producto como
se especifica también en el manual.
SU GARANTÍA DE DOS AÑOS
Este aparato está cubierto por una garantía de reparación o
sustitución de dos años.
Es importante guardar el recibo de la tienda en la que lo
adquirió como prueba de compra. Grape el recibo a esta
contraportada para poder consultarlo en el futuro.
Indique la siguiente información si el producto tiene algún fallo.
Estos números se encuentran en la base del producto.
N.º de modelo
N.º de serie
Todos los productos de Morphy Richards se prueban
individualmente antes de salir de fábrica. En el improbable caso
de que un aparato tenga un fallo, hay que devolverlo al lugar en
el que se compró en los 28 días posteriores a la compra para
cambiarlo.
Si el fallo se produce pasados 28 días de la compra y antes de
24 meses, debe ponerse en contacto con su distribuidor local
indicando el número de modelo y de serie del producto, o
escribir a su distribuidor local a las direcciones que se indican.
Le pedirán devolver el producto (en un embalaje seguro y
adecuado) a la siguiente dirección junto con una copia de la
factura de compra.
El aparato defectuoso se reparará o se sustituirá y se enviará en
un plazo de 7 días laborables desde la recepción del mismo, a
menos que se produzca una de las siguientes excepciones (1-9).
En caso de que reciba un artículo nuevo en el periodo de
garantía de 2 años, la garantía del nuevo artículo se calculará
desde la fecha original de compra. Por lo tanto, es esencial
guardar la factura o el recibo de caja original que indica la
fecha de compra original.
Para que la garantía de 2 años pueda aplicarse, el aparato
debe haberse utilizado siguiendo las instrucciones del
fabricante. Por ejemplo, debe eliminarse la cal de los aparatos
y mantener los filtros limpios según se indica en estas
instrucciones.
Morphy Richards o el distribuidor local no se hacen
responsables de sustituir o reparar los productos en virtud de
las condiciones de la garantía en los siguientes casos:
1 El fallo se ha producido o se puede atribuir a un uso accidental,
erróneo, negligente o contrario a las recomendaciones del
fabricante, o ha sido causado por una subida de tensión o por
daños en el transporte.
2 El aparato se ha utilizado con una tensión diferente a la indicada
en los productos.
3 Personas que no pertenecen a nuestro personal técnico (y que no
son el proveedor autorizado) han intentado reparar el aparato.
4 El aparato ha sido objeto de alquiler o de uso no doméstico.
5 El aparato es de segunda mano.
6 Ni Morphy Richards ni el distribuidor local no son responsables
de realizar ninguna revisión, en virtud de la garantía.
7 La garantía excluye los consumibles como bolsas, filtros y jarras
de vidrio.
8 La garantía no cubre las baterías ni las fugas de ácido de las
mismas.
9 Los filtros no se han limpiado ni sustituido tal y como se indica.
Esta garantía no le confiere más derechos que los
expresamente expuestos, ni incluye reclamaciones por daños o
pérdidas consiguientes. Esta garantía se ofrece como ventaja
adicional y no afecta a sus derechos legales como consumidor.
60
Page 61

p
Higiene e segurança
A utilização de qualquer aparelho elétrico exige o cumprimento das seguintes regras de segurança de senso comum.
Leia atentamente estas instruções antes de utilizar o produto.
• Este aparelho pode ser utilizado por pessoas cujas
capacidades físicas, sensoriais ou mentais sejam reduzidas ou
que não possuam os conhecimentos e a experiência
necessários, se as mesmas forem vigiadas e instruídas acerca
da utilização do aparelho de forma segura e compreenderem
os perigos envolvidos.
• As crianças não devem brincar com o aparelho.
• Este aparelho não deve ser usado por crianças.
• Mantenha o aparelho e o respetivo cabo fora do alcance das
crianças.
• Não utilize a varinha mágica durante intervalos de tempo
superiores aos recomendados na secção “Utilização”.
• Desligue sempre o aparelho da tomada de alimentação se o
deixar sem supervisão e antes de o montar, desmontar ou
limpar.
• Para cuidados e limpeza consulte a secção relevante.
• Evite o contacto com peças móveis. Mantenha as mãos,
cabelo e vestuário, e outros utensílios afastados das lâminas
acessórias durante o funcionamento, de modo a evitar danos
pessoais e/ou danos no aparelho.
• Caso esteja danificado, o cabo de alimentação deverá ser
substituído pelo fabricante, respectivo agente de serviço ou
técnico igualmente qualificado para evitar acidentes.
p
61
Page 62

Para além disso, oferecemos os seguintes conselhos de segurança.
Localização
• Não utilize o aparelho em exteriores ou numa casa de banho.
• Coloque sempre o seu aparelho afastado do bordo da superfície
de trabalho.
• Não coloque a taça usada com o aparelho numa superfície de
madeira extremamente polida, já que esta poderá ficar danificada.
Cabo de alimentação
• Não permita que o cabo de alimentação fique pendurado no bordo
da superfície de trabalho onde uma criança o possa alcançar.
• Não permita que o cabo atravesse um espaço em aberto, por
exemplo, entre uma tomada baixa e uma mesa.
• Não permita que o cabo passe sobre um fogão ou outra área
quente que possa danificar o cabo.
• O cabo de alimentação deverá ter o comprimento adequado,
desde a tomada até à unidade da base, sem forçar as ligações.
Segurança pessoal
• Tenha cuidado ao manusear as lâminas de corte afiadas, ao
esvaziar a taça e durante a limpeza.
Outras considerações de segurança
• Utilize o aparelho apenas para o fim a que destina.
Segurança específica do produto
• AVISO: As lâminas da varinha mágica são extremamente
afiadas. Devem ser manuseadas com extremo cuidado
aquando da sua utilização ou limpeza.
• Não limpe os acessórios debaixo de água enquanto estes se
encontram instalados.
• IMPORTANTE: Permita que os líquidos quentes arrefeçam antes
de os adicionar à varinha mágica.
• Tenha cuidado ao misturar ou deitar líquidos quentes na
liquidificadora pois podem ser projectados devido a vapor súbito.
• Desligue o aparelho e desligue o cabo da alimentação antes de
mudar acessórios ou ao aproximar-se de peças móveis.
Requisitos elétricos
Verifique se a voltagem na placa de características do aparelho
corresponde à alimentação existente na sua habitação, que deve
ser CA (Corrente Alterna).
Caso seja necessário substituir o fusível na ficha de alimentação,
deve ser colocado um fusível BS1362 de 3 amperes.
62
Page 63

Damos-lhe o poder para criar com confiança.
Apresentamos a varinha mágica Total Control – a forma
simples de trazer confiança aos seus cozinhados.
A varinha mágica Total Control permite-lhe criar deliciosos
“smoothies” e batidos, misturar sopas e molhos com a
confiança e a segurança proporcionadas pela Tecnologia
de Resposta Inteligente.
A Tecnologia de Resposta Inteligente permite-lhe assumir o
controlo completo do processo de mistura, carregando um
simples botão. A Tecnologia de Resposta Inteligente alimenta
suavemente a varinha mágica conforme as suas necessidades,
para que não ocorram puxões nem salpicos súbitos,
transmitindo-lhe confiança completa na cozinha.
Selecione a velocidade mais adequada à tarefa que tem em
mãos utilizando o controlo de velocidade variável com um
simples movimento de torção. Pode selecionar de entre 8
velocidades. Mesmo quando utilizar a velocidade mais elevada
pode estar seguro de que a Tecnologia de Resposta Inteligente
transmite a alimentação de forma gradual até atingir a
velocidade que selecionou para a tarefa atual.
Quando a mistura tiver a consistência pretendida, basta soltar o
botão e a varinha mágica de controlo completo irá lentamente
abrandar até parar, assegurando que não ocorrem salpicos
nem sucções.
A varinha mágica Total Control, dá-lhe o poder para criar com
confiança.
⁄
Controlo de velocidade variável
¤
Gatilho de controlo de precisão
‹
Pega suave ergonómica
›
Motor de 650 watts
⁄
¤
‹
p
›
63
Page 64

Introdução
Agradecemos a sua compra recente desta varinha mágica Total
Control da Morphy Richards.
A sua varinha mágica inclui vários acessórios. Leia atentamente
as instruções para obter informações sobre como utilizar cada
acessório antes de utilizá-lo.
Não se esqueça de aceder ao site www.morphyrichards.co.uk
para registar a garantia de dois anos do seu produto.
Conteúdos
Higiene e segurança 61
Introdução 64
Controlo completo 63
Descrição geral do produto 64
Antes da primeira utilização 64
Utilizar a varinha mágica 64
Utilizar o recipiente para picar 65
Utilizar o seu jarro para batidos 65
Alimentos adequados 65
Utilização 66
Acessórios 66
Botão turbo 66
Misturar numa caçarola 66
Sugestões e dicas 66
Cuidados e limpeza 67
Contacte-nos 67
Receitas 68
Garantia 73
Características
(1) Controlo de velocidade variável
(2) Gatilho de controlo de precisão
(3) Botão turbo
(4) Unidade principal
(5) Pé da varinha mágica
(6) Lâmina Serrator
(7) Tampa da taça
(8) Taça
(9) Tampa de mistura do recipiente para picar
(10) Recipiente para picar (x3)
(11) Lâmina Serrator para picar
(12) Tampa do recipiente para picar (x2)
(13) Tampa do jarro para batidos
(14) Jarro para batidos (x2)
(15) Lâmina para batidos
(16) Tampa desportiva (x2)
(17) Botão de ejeção de acessório
(18) Descanso
(19) Selo de segurança
(20) Selo de segurança de batidos
Antes da primeira utilização
• AVISO: Tenha cuidado ao desembalar o seu conjunto de
varinha mágica, pois as lâminas são bastante afiadas.
• Lave todas as peças, exceto a unidade principal (4), a tampa do
recipiente para picar (9) e a tampa do jarro para batidos (13) em
água quente com detergente antes de utilizar. Seque bem todas
as peças antes de as utilizar.
• Não submerja completamente o pé da varinha mágica em água.
Lave apenas a cabeça da lâmina Serrator (6).
• Limpe a tampa do recipiente para picar e a tampa do jarro para
batidos com um pano húmido. Não mergulhe na água.
• Não submerja a unidade principal em água.
Utilizar a varinha mágica
1
Fixe o pé da varinha mágica (5) à unidade principal (4) e
pressione para o encaixar no local.
2
Selecione a velocidade no controlo de velocidade variável (1).
A varinha mágica só começa a trabalhar se o gatilho de controlo
de precisão (2) ou o botão turbo (3) forem pressionados.
3
Coloque o pé da varinha mágica nos alimentos a misturar.
Para melhores resultados, recomendamos a utilização da taça (8).
4
Pressione o gatilho de controlo de precisão para iniciar a mistura.
Quanto mais pressionar o botão maior será a velocidade.
5
Solte o gatilho de controlo de precisão para parar. Permita que as
lâminas abrandem e parem ANTES de remover a varinha mágica
dos alimentos.
6
Desligue a unidade principal da alimentação. Pressione o botão
de ejeção do acessório (17) e retire o pé da varinha mágica da
unidade principal para o limpar.
64
Page 65

Utilizar o recipiente para picar
7
CUIDADOSAMENTE insira a lâmina Serrator para picar (11) no
recipiente para picar (10). AVISO: As lâminas são afiadas.
8
Coloque os alimentos que deseja picar no recipiente para picar.
Não encha para além de meio.
9
Certique-se de que o selo de segurança (19) está no local
e pressione a tampa de mistura do recipiente para picar (9)
contra o recipiente para picar. Pressione para encaixar.
10
Fixe a unidade principal (4) à tampa. Por motivos de segurança,
a unidade principal não irá encaixar na tampa de mistura do
recipiente principal.
11
Selecione uma velocidade alta no controlo de velocidade variável
(1) e pressione sem soltar no gatilho de controlo de precisão (2)
para iniciar. Não abra a tampa enquanto o aparelho estiver em
utilização.
12
Deixe que a varinha mágica pare completamente antes de
desprender a unidade principal do recipiente para picar. Levante-a
para a retirar.
13
Retire a tampa de mistura do recipiente para picar deste último.
14
CUIDADOSAMENTE insira a lâmina Serrator para picar, antes de
deitar todos os alimentos para a taça.
Utilizar o seu jarro para batidos
15
Introduza CUIDADOSAMENTE a lâmina para batidos (15) no
jarro para batidos (14).
16
Adicione os seus ingredientes ao jarro para batidos. Para ajudar
a misturar, adicione primeiro as frutas macias.
17
Certifique-se de que o selo de segurança (20) está encaixado
(consulte a página 11). Aperta a tampa do jarro para batidos (13)
no jarro para batidos.
18
Fixe a unidade principal (4) à tampa. Por motivos de segurança,
a unidade principal não irá encaixar na tampa do recipiente para
batidos. Segure no jarro para batidos enquanto mistura.
19
Selecione a velocidade 8 no controlo de velocidade variável (1) e
pressione sem soltar no gatilho de controlo de precisão (2) para
iniciar. Não abra a tampa enquanto o aparelho estiver em
utilização.
20
Permita que a varinha pare completamente antes de destacá-la
da unidade principal. Levante do jarro para batidos para remover.
21
Desaperte a tampa do jarro para batidos do jarro para batidos.
22
Retire CUIDADOSAMENTE a lâmina para batidos do jarro para
batidos antes de beber. Coloque a tampa desportiva (16) para
desfrutar da sua bebida em movimento.
Alimentos adequados
As quantidades indicadas abaixo devem servir apenas de orientação. O recipiente para picar (12) não deve ser enchido até mais de meio.
Acessórios Alimentos Quantidade máxima Velocidade Tempo
Pé da varinha mágica Sopa ou molho - 4 40-60 segundos
Pé da varinha mágica* Batido de leite 450 ml 4-5 20-30 segundos
Pé da varinha mágica* Gelo 3 cubos 8 5-15 segundos
Pé da varinha mágica* Cenouras com água 200 g 6 40-60 segundos
300 ml
Recipiente para picar Cebola 200 g 7 5-10 segundos
Recipiente para picar Cenoura 200 g 7 5-15 segundos
Recipiente para picar Ervas 50 g 7 5-15 segundos
Recipiente para picar Carne de vaca guisada 100 g 8 25-30 segundos
Recipiente para picar Nozes 100 g 8 15-20 segundos
Jarro para batidos Frutos macios 500 ml 8 20-30 segundos
*Ao utilizar o copo fornecido
p
65
Page 66

Utilização
• AVISO: A sua varinha mágica é concebida para uma utilização
não contínua. Não a utilize de forma contínua durante mais de
90 segundos. Deixe-a arrefecer pelo menos 5 minutos antes
de a voltar a utilizar.
• Não utilize o jarro para batidos (14) por mais de 60 segundos.
Acessórios
Pé da varinha mágica (5)
• O pé da varinha mágica foi concebido para liquidificar alimentos,
tais como sopas, molhos, batidos, “smoothies”, papas para bebés
ou para triturar gelo.
• O pé da varinha mágica não é adequado para moer itens duros
como os grãos de café.
Recipiente para picar (10)
• O recipiente para picar é adequado para triturar nozes, vegetais,
carne, ervas, ovos escalfados e pão ralado. O recipiente para
picar deve ser utilizado a velocidades mais altas para o obter
o desempenho ideal.
Jarro para batidos (14)
• O jarro para batidos foi concebido para smoothies e bebidas em
movimento.
• O jarro para batidos não é adequado para moer café em grão
nem alimentos rijos. Depois de misturar no jarro para batidos,
retire a lâmina para batidos (15) e coloque a tampa desportiva
(16) para desfrutar da sua bebida em movimento.
• Não utilize o jarro para batidos para triturar gelo sem outros
ingredientes. Não utilize mais de 2 cubos de gelo.
• Não utilize com legumes rijos, como batatas ou cenouras.
Tampas (7), (12), (16)
• Se tiver sobras, utilize o recipiente e a taça com as tampas
fornecidas para armazenar os alimentos em segurança.
Ao fechar a tampa de segurança, pressione no centro da tampa e
não nas margens para vedar corretamente. Certifique-se de que
mantém sempre o jarro na posição vertical.
• AVISO: Os acessórios não são adequados para utilizar em
fornos micro-ondas, fornos elétricos, máquinas de lavar ou
congeladores.
Botão turbo
• A sua varinha mágica tem 8 velocidades diferentes que utilizam a
tecnologia Total Control, bem como o botão turno (3). Pressione o
botão turbo para utilizar a varinha mágica a uma velocidade
elevada para passagens intermitentes.
• Nota: O acessório do recipiente para picar (10) funciona melhor
com o controlo de velocidade variável (1) configurado para uma
definição de velocidade elevada ou ao utilizar o botão turbo (3).
Misturar numa caçarola
• Não utilize uma caçarola não aderente. O pé da varinha
mágica pode danificar o revestimento antiaderente.
1. Retire a panela do lume.
2. Para evitar salpicos excessivos, coloque o pé da varinha mágica
(5) no preparado antes de ligar a varinha mágica.
3. Mantenha o recipiente fixo com a outra mão, selecione a
velocideade desejada e prima o gatilho de controlo de precisão
(2). Comece lentamente e aumente a velocidade conforme
necessário utilizando o gatilho de controlo de precisão.
4. Desloque as lâminas (6) através dos alimentos utilizando um
movimento ascendente e descendente.
5. Deixe as lâminas parar antes de as retirar da caçarola.
• AVISO: Se levantar a lâmina Blade para fora do preparado
enquanto estiver em funcionamento ou se utilizar uma
definição de alta velocidade numa caçarola pequena pode
provocar salpicos de líquido quente. Deve tomar extremo
cuidado quando utilizar a varinha mágica desta forma.
• Não insira a varinha mágica no preparado para além da junção
entre a unidade principal (4) e o pé da varinha mágica (5).
• Certifique-se de que o cabo de alimentação entra em contacto
com quaisquer superfícies quentes (incluindo a borda da
caçarola).
Sugestões e dicas
• Ao triturar alimentos com cores fortes (por exemplo, cenouras) as
peças de plástico do aparelho podem ficar com a sua cor original
alterada. Utilize óleo de cozinha para limpar as peças cuja cor foi
alterada. Lave bem em água quente com detergente antes de
reutilizar.
• Quando misturar com o pé da varinha mágica (5), inicie o
processo mergulhando a varinha mágica nos ingredientes. Isto irá
garantir que todos os ingredientes são atraídos para a lâmina para
serem processados. Rode suavemente o pé da varinha mágica,
movimentando-o de forma ascendente e descendente pelos
ingredientes. Continue este movimento até que o preparado tenha
atingido a consistência desejada. Não retire nada do preparado
enquanto as lâminas estiverem em movimento.
• Não eleve o pé da varinha mágica completamente para fora do
preparado durante a execução pois podem ocorrer salpicos.
• Por vezes, quando utilizar o recipiente para picar (10), poderá ter
de raspar o preparado nos lados do recipiente para o fundo
utilizando uma espátula de silicone durante o processo de mistura.
• Ao fazer um smoothie, junte primeiro a fruta ao jarro para batidos
(14). A fruta fica mais perto da lâmina (15) e mistura em primeiro
lugar.
66
Page 67

Cuidados e limpeza
• AVISO: Desligue sempre a unidade da tomada antes de
proceder à sua limpeza e manutenção.
• AVISO: Manuseie as lâminas com cuidado, pois são afiadas.
• Lave todas as peças, exceto a unidade principal (4), a tampa do
recipiente para picar (9) e a tampa do jarro para batidos (13) em
água quente com detergente imediatamente.
• Limpe a unidade principal com um pano húmido e seque bem
todas as peças.
• AVISO: Nunca submerja a unidade principal em água ou
qualquer outro líquido.
• Não submerja completamente o pé da varinha mágica em água,
lave apenas a cabeça da lâmina Serrator (6).
• Não existem peças que possam ser lavadas na máquina de
lavar louça.
Selo de segurança do recipiente para picar (19)
A tampa de mistura do recipiente para picar (9) e a tampa do
recipiente para picar (12) ambas incluem um selo de segurança.
Este selo impede fugas do recipiente para picar (10) quando em
utilização e durante o seu armazenamento.
• Certifique-se sempre que o selo de segurança está colocado
antes da utilização. A inobservância deste procedimento pode
resultar em danos no aparelho. 23
• O selo de segurança só precisa de ser removido para limpeza
(se necessário). Após a limpeza, certifique-se de que o selo é
recolocado conforme é indicado antes de utilizar a varinha mágica
Total Control.
• Quando voltar a colocar o selo de segurança, certifique-se de que
é pressionado ligeiramente contra o primeiro canal nas tampas
(ver diagrama). O rebordo do selo de segurança deve estar a
apontar para fora e não dobrado no canal. Certifique-se de que
o selo de segurança está bem colocado antes da utilização.
Selo de segurança do jarro para batidos (20)
A tampa do jarro para batidos (13) e a tampa desportiva (16)
incluem um selo de segurança. Destina-se a evitar fugas durante
a utilização ou arrumação.
• Certifique-se sempre que o selo de segurança está colocado
antes da utilização. Não fazê-lo pode provocar fugas ou danos
no aparelho.
• O selo de segurança só precisa de ser removido para limpeza
(se necessário). Depois de limpar, certifique-se de que coloca
novamente o selo de segurança de acordo com as instruções. 24
• Ao colocar novamente o selo de segurança, certifique-se de que
está corretamente comprimido no canal e nas tampas (consulte
o diagrama). As “patilhas” no selo de segurança devem apontar
para dentro. Certifique-se de que o selo de segurança está bem
colocado antes da utilização.
Contacte-nos
Linha de atendimento
Se tiver qualquer problema com o seu aparelho, contacte a
nossa Linha de atendimento. Provavelmente, poderemos ajudálo mais do que a loja onde adquiriu o aparelho.
Quando entrar em contacto connosco sobre quaisquer dúvidas,
deve ter o nome do produto, o número do modelo e o número
de série disponíveis.
Fale connosco
Se tiver quaisquer questões ou comentários ou se desejar obter
dicas ou ideias de receitas para tirar o maior partido dos nossos
produtos, visite-nos online:
Blogue: www.morphyrichards.co.uk/blog
Facebook: www.facebook.com/morphyrichardsuk
Twitter: @loveyourmorphy
Web site: www.morphyrichards.com
p
67
Page 68

Receitas
68
Criámos receitas deliciosas para poder experimentar com a sua nova varinha mágica
Total Control. Desde “smoothies” a “pesto”, há tudo para todos os gostos.
As receitas fornecidas dão apenas algumas sugestões do que é possível fazer com
a sua varinha mágica e os respetivos acessórios. Quando estiver habituado a utilizar
a varinha mágica poderá facilmente adaptar receitas dos seus livros de cozinha
preferidos.
Page 69

“Smoothie” de morango e banana
Ingredientes:
• 1 banana madura (cerca de 90 g) pelada e cortada aos bocados
• 65 g de morangos lavados, secos e sem pé
• 2 cubos de gelo
• 135 ml de sumo de maçã
• 200 g de iogurte magro de baunilha
Método:
1 Adicione todos os ingredientes à taça pela ordem indicada.
2 Coloque o pé da varinha mágica na unidade principal e seleccione
a velocidade 4 no controlo de velocidade variável.
3 Insira o pé da varinha mágica até ao fundo da taça e pressione
suavemente o gatilho de controlo de precisão. Desloque a varinha
mágica num movimento ascendente e descendente na taça
durante 20-30 segundos, até o “smoothie” estar pronto.
Batido de leite com framboesas
Ingredientes:
• 80 g de framboesa fresca
• 100 g de gelado de baunilha
• 200 ml de leite meio gordo
Método:
1 Adicione todos os ingredientes à taça pela ordem indicada.
2 Coloque o pé da varinha mágica na unidade principal e seleccione
a velocidade 4 no controlo de velocidade variável.
3 Insira o pé da varinha mágica até ao fundo da taça e pressione
suavemente o gatilho de controlo de precisão. Desloque a varinha
mágica num movimento ascendente e descendente na taça
durante 20-30 segundos, até o batido estar pronto.
Sopa de alho francês e batata
Serve: 4
Ingredientes:
• 25 g de manteiga ou margarina
• 2 alhos franceses de tamanho médio (285 g), cortados às rodelas
• 1 cebola pequena (100 g), finamente picada
• 500 g de batatas, cortadas às rodelas finas
• 1,1 litros de caldo de vegetais
• 1 colher de chá de mistura de ervas
• 1 colher de chá de sal
• Pimenta preta
• Cebolinho para guarnecer
• Pão estaladiço para servir
Método:
1 Derreta a manteiga numa caçarola grande (não utilize uma
caçarola antiaderente) e acrescente os alhos franceses e a
cebola. Cozinhe suavemente sem alourar durante 10 minutos,
mexendo ocasionalmente.
2 Acrescente as batatas, o caldo, as ervas e o tempero, e deixe
ferver. Tape e cozinhe suavemente em lume brando durante
30 minutos ou até amaciar.
3 Permita que arrefeça ligeiramente e coloque o pé da varinha
mágica na unidade principal. Regule o controlo de velocidade
variável para o 4.
4 Insira o pé da varinha mágica na caçarola e, utilizando o gatilho
de controlo de precisão, misture a sopa até ficar cremosa, durante
cerca de 50 a 60 segundos. Esta operação pode ser feita na
caçarola desde que a mesma não tenha um revestimento
antiaderente.
5 Verifique o tempero, decore com alguns bocados de cebolinho
e sirva com pão estaladiço.
p
69
Page 70

Molho à matriciana (para massa)
Serve: 4
Ingredientes:
• 1 cebola (130 g), finamente picada
• 1 dente de alho, esmagado
• ½ malagueta vermelha, sem sementes e cortada finamente
• 1½ colher de sopa de azeite virgem extra
• 100 g de bacon, cortado aos bocados, sem courato
• Lata de 400 g de tomates cereja
• 100 ml (120 g) de passata
• 2 colheres de sopa de vinho branco
• Sal e pimenta acaba de moer
• Massa acabada de cozer para servir
• Queijo parmesão para servir
Método:
1 Coloque o azeite numa caçarola grande (não utilize uma
antiaderente) e aqueça durante alguns minutos.
2 Cozinhe suavemente a cebola, o alho e a malagueta durante
2-3 minutos sem deixar alourar, mexendo ocasionalmente com
uma colher de pau.
3 Acrescente o bacon cortado à caçarola e cozinhe durante mais
um minuto. Coloque a tampa na caçarola e cozinhe em lume
médio durante 5 minutos.
4 Acrescente os tomates cereja, a passata e o vinho, e tempere
com um pouco de sal e pimenta a gosto.
5 Coloque a tampa na caçarola e cozinhe em lume brando durante
25 minutos ou até as cebolas estarem macias.
6 Dez minutos antes de o molho estar pronto, cozinhe a massa de
acordo com as instruções da embalagem.
7 Utilize o pé da varinha mágica na velocidade 4 do controlo de
velocidade variável para fazer um molho cremoso. Esta operação
pode ser feita na caçarola desde que a mesma não tenha um
revestimento antiaderente. Acione a varinha mágica com o gatilho
de controlo de precisão e desloque-a suavemente pela caçarola
até obter a consistência pretendida. Para obter um molho
cremoso, esta operação deve demorar cerca de um minuto.
8 Escorra a massa e acrescente-lhe o molho, mexendo. Aqueça se
necessário e sirva imediatamente com queijo parmesão.
Molho de legumes (para massa)
Serve: 4
Ingredientes:
• 2 colheres de sopa de azeite
• 1 cebola (130 g), picada
• 2 cenouras (160 g), cortadas aos cubos pequenos
• 2 talos de aipo (80 g), finamente picados
• 1 dente de alho, esmagado
• 1 alho francês (120 g), picado
• 1 pimento amarelo, cortado aos cubos
• 1 pimentão cortado aos cubos
• 2 latas de 400 g de tomate picado
• ½ colher de sopa de vinagre balsâmico
• ½ colher de sopa de açúcar refinado
• 2 colheres de chá de orégãos
• 1 colher de chá de mistura de ervas
• Sal e pimenta
• Massa acabada de cozer para servir
• Queijo parmesão para servir
Método:
1 Aqueça o azeite numa caçarola grande (não utilize uma caçarola
antiaderente) e cozinhe suavemente a cebola, as cenouras, o alho
francês, o alho e os aipos durante 5 minutos, sem deixar alourar.
Mexa ocasionalmente.
2 Coloque a tampa na caçarola e cozinhe durante 20 minutos,
mexendo ocasionalmente. Acrescente os pimentos cortados e
cozinhe suavemente durante mais 10 minutos, com a caçarola
tapada.
3 Acrescente os tomates, as ervas, o açúcar e o vinagre à caçarola.
Tempere com sal e pimenta e cozinhe em lume brando com a
tampa colocada durante 45 minutos ou até as cenouras e os aipos
estarem macios.
4 Cozinhe a massa de acordo com as instruções da embalagem.
5 Utilize o pé da varinha mágica na velocidade 4 do controlo de
velocidade variável para criar um molho cremoso. Esta operação
pode ser feita na caçarola desde que a mesma não tenha um
revestimento antiaderente. Acione a varinha mágica com o gatilho
de controlo de precisão e desloque-a suavemente pela caçarola
até obter a consistência pretendida. Para obter um molho
cremoso, esta operação deve demorar cerca de um minuto.
6 Escorra a massa e acrescente-lhe o molho, mexendo. Aqueça se
necessário e sirva imediatamente com queijo parmesão.
70
Page 71

Salsa de tomate
Ingredientes:
250 ml 350 ml
• ½-1 ½-1 Malagueta vermelha, cortada ao
meio com algumas sementes
• 150 g 225 g Tomates cereja maduros, cortados
ao meio
• 1 1½ Sumo de lima
• 20 g 30 g Coentros frescos, grosseiramente
cortados para caberem no recipiente
• Pitada Pitada Sal marinho
• Pitada Pitada Pimenta acabada de moer
Método:
1 Coloque a lâmina no recipiente para picar.
2 Deite todos os ingredientes no recipiente pela ordem indicada à
esquerda.
3 Coloque a tampa de mistura do recipiente para picar e a unidade
principal. Pique os ingredientes utilizando o gatilho de controlo de
precisão na velocidade 7 durante 10 segundos. Se necessário,
raspe os lados do recipiente com uma espátula para o preparado
e pique novamente durante 5-10 segundos.
4 Deite numa taça para servir e deixe repousar durante cerca de
uma hora antes de servir. Isto permite que os aromas se
desenvolvam e a espuma desapareça.
Sirva com chips de tortilha.
Nota: Se desejar, é possível fazer uma quantidade de 350 ml no
recipiente para picar.
Pesto
Ingredientes:
• 50 g de pinhões
• ½ dente de alho
• 25 g de parmesão, ralado
• 30 g de manjericão fresco, só folhas
• 50 ml de azeite extra virgem
• Sumo de metade de um limão
• Sal e pimenta acabada de moer
Método:
1 Coloque a lâmina no recipiente para picar.
2 Deite todos os ingredientes no recipiente pela ordem indicada.
3 Coloque a tampa de mistura do recipiente para picar e a unidade
principal. Pique os ingredientes utilizando o gatilho de controlo de
precisão na velocidade 7 durante 15 segundos. Se necessário,
raspe os lados do recipiente com uma espátula para o preparado
e pique novamente durante 15-30 segundos.
Nota: A consistência do pesto pode ficar mais fina adicionando um
pouco de sumo de limão e azeite a gosto.
Sirva como acompanhamento de esparguete à bolonhesa ou
misturado com puré de batata.
Nota: Para conservar pesto fresco, coloque-o num recipiente
hermético e cubra com um pouco de azeite antes de refrigerar.
Guacamole
Ingredientes:
• 75 g de tomates-cereja
• ½ malagueta vermelha fresca, sem sementes
• 65 g de coentros frescos com os pés
• 1 abacate maduro, cortado às metades, sem caroço e sem pele
• Sumo de ½ - 1 lima (consoante o gosto)
• Sal e pimenta a gosto
Método:
1 Coloque a lâmina no recipiente para picar.
2 Corte cada metade do abacate em duas.
3 Deite todos os ingredientes no recipiente pela ordem indicada.
Coloque a tampa de mistura do recipiente para picar e a unidade
principal.
4 Pique os ingredientes utilizando o gatilho de controlo de precisão
na velocidade 7 durante 15 segundos. Se necessário, raspe os
lados do recipiente com uma espátula para o preparado e pique
novamente durante 15 segundos.
5 Retifique o tempero a gosto.
Frango Jalfrezi
Doses: 4
Ingredientes:
Para a pasta Jalfrezi
• 2 dentes de alho, cortados ao meio
• 1 pedaço de gengibre com3 cm, sem casca e cortados em 4 cubos
• 1 malagueta verde fresca (25 g) sem as grainhas e cortada em
4 pedaços
• 12 g de coentros frescos
• 1 colher de chá de coentros
• 1 colher de chá de sementes de mostarda castanha
• 1 colher de chá de feno-grego em pó
• 2 colheres de chá de sementes de cominhos
• 1 colher de chá de curcuma
• 1/2 colher de chá de sal
• 2 colheres de sopa de óleo vegetal
• 2 colheres de sopa de concentrado de tomate
• 2 colheres de sopa de água
• 2 colheres de chá de pimentão vermelho
Para o caril
• 2 colheres de sopa de óleo
• 240 g de cebola, às rodelas
• 500 g de peito de frango cortados em pedaços
• 1 lata de tomate pelado (400 g)
• 200 ml de água
• 1 pimento verde, médio às rodelas
p
71
Page 72

Preparação:
1 Coloque a lâmina no recipiente para picar.
2 Para fazer a pasta, coloque todos os ingredientes para a pasta no
recipiente para picar pela ordem indicada.
3 Coloque a tampa de mistura do recipiente para picar e a unidade
principal. Misture na velocidade 7, raspando os lados do recipiente
ocasionalmente até picar finamente (cerca de 30-40 segundos).
4 Para o caril; aqueça o óleo numa frigideira média e refogue as
cebolas durante cerca de 10 minutos até alourar.
5 Junte o franco em pedaços e frite até alourar/selar.
6 Junte a pasta Jalfrezi e mexa a lume médio durante 3 minutos.
7 Junte o tomate enlatado, a água e as rodelas de pimento e
cozinhe durante 1 hora. Retire a tampa se necessário para reduzir
o líquido.
Sirva com arroz branco e pães naan.
Frango Satay
Serve: 10 espetadas (Serve: 4-5)
Ingredientes:
• 3 peitos de frango
• 20 g de coentros frescos
• 1 malagueta vermelha grande (com as sementes), cortada em
4 pedaços
• 1 dente de alho, cortado em metade
• 5 cores de sopa de manteiga de amendoim
• Um pouco de molho de soja
• Um pedaço de gengibre com 3 cm, sem casca e cortado em
4 pedaços
• Raspa e sumo (50 ml) de 2 limas
• Um pouco de água
• Sal e pimenta
Método:
1 Coloque a lâmina no recipiente para picar. Mergulhe as
10 espetadas de madeira em água fria.
3 Coloque todos os ingredientes, exceto a água, no recipiente para
picar, coloque a tampa do recipiente para picar e a unidade
principal.
4 Utilizando a velocidade 7, pressione o gatilho do controlo de
precisão completamente durante períodos de 10-15 segundos.
Verifique a consistência, raspando dos lados do recipiente com
uma espátula de plástico, conforme necessário. Continue até
misturar bem.
5 Junte água até a mistura ficar suave o suficiente para escorrer da
colher ao contar até 3.
6 Corte o frango em pequenos pedaço e coloque 8 pedaços nas
espetadas demolhadas.
7 Esfregue o franco com a marinada. Cubra e coloque no frigorífico
durante algumas horas ou toda a noite.
8 Grelhe numa grelha pré-aquecida, virando frequentemente até
produzir sucos transparentes.
Batido de morango
Ingredientes:
• 150 g de morangos, sem o pé e cortados ao meio
• 2 colheres de gelado de baunilha (50 g)
• 250 ml de leite meio gordo
Método:
1 Introduza a lâmina para batidos no jarro para batidos.
2 Coloque os morangos no fundo do jarro para batidos, junte o
gelado e o leite.
3 Coloque a tampa do jarro para batidos e a unidade principal.
Misture na velocidade 8 durante 4 rajadas rápidas, num total de
30 segundos.
4 Sirva imediatamente.
Delícia de Frutos de Verão
Ingredientes:
• 70 g de morango, sem pé e cortados ao meio
• 70 g de mirtilos
• 40 g de framboesas
• 40 g de cerejas, sem caroço
• 200 ml de sumo de maçã
Método:
1 Introduza a lâmina para batidos no jarro para batidos.
2 Junte todos os ingredientes no jarro para batidos.
3 Coloque a tampa do jarro para batidos e a unidade principal.
Misture na velocidade 8 e rajadas rápidas, num total de
30 segundos.
4 Sirva imediatamente.
Sweet Berry Kiss
Ingredientes:
• 2 cubos de gelo
• 50 g de cerejas congeladas
• 200 g de iogurte magro de baunilha
• 150 ml de leite meio gordo
Método:
1 Introduza a lâmina para batidos no jarro para batidos.
2 Coloque os ingredientes no jarro para batidos pela ordem
indicada.
3 Coloque a tampa do jarro para batidos e a unidade principal.
Misture na velocidade 8 em rajadas rápidas durante 30 segundos.
4 Sirva imediatamente.
72
Page 73

Smoothie de Bana de Chocolate
Ingredientes:
• 1 bana madura pequena, cortada (80 g, sem casca)
• 2 colheres de sopa rasas de chocolate em pó
• 150 g de iogurte magro de baunilha
• 200 ml de leite meio gordo
Método:
1 Introduza a lâmina para batidos no jarro para batidos.
2 Coloque a banana cortada no jarro para batidos, seguida pelos
restantes ingredientes.
3 Coloque a tampa do jarro para batidos e a unidade principal.
Misture na velocidade 3 e, 3 rajadas rápidas, num total de
20-30 segundos.
4 Sirva imediatamente.
Frappé de Café
Ingredientes:
• 3 cubos de gelo
• 6 colheres de iogurte gelado de baunilha magro (150 g)
• 200 ml de café forte frio
Método:
1 Introduza a lâmina para batidos no jarro para batidos.
2 Coloque os ingredientes no jarro para batidos pela ordem
indicada.
3 Coloque a tampa do jarro para batidos e a unidade principal.
Misture na velocidade 8 em rajadas rápidas durante 30 segundos.
4 Sirva imediatamente.
Garantia vitalícia da lâmina
A lâmina Serrator tem a garantia de isenção de defeitos de
material e mão-de-obra durante a sua vida útil. Esta garantia
abrange apenas o comprador original e não pode ser atribuída
ou transferida para terceiros. Esta garantia está disponível
para consumidores que utilizam as lâminas Serrator para fins
domésticos não comerciais. Esta garantia não abrange qualquer
dano causado por acidente, utilização indevida ou outra não
descrita no seu manual de proprietário, ou dano resultante de
uma manutenção e limpeza incorretas deste produto, conforme
especificado no seu manual de proprietário.
A SUA GARANTIA DE DOIS ANOS
Este aparelho tem uma garantia de reparação ou substituição
de 2 anos.
É importante guardar o talão de compra como comprovativo de
compra. Agrafe-o ao verso deste folheto para referência futura.
Mencione a seguinte informação se o produto apresentar uma
avaria. Estes números podem ser encontrados na base do
artigo.
N.º do modelo
N.º de série
Todos os artigos Morphy Richards são testados
individualmente antes de saírem da fábrica. No caso improvável
de algum produto apresentar uma avaria no prazo de 28 dias
após a compra, o mesmo deverá ser devolvido ao local de
compra, para a sua substituição.
Se a avaria surgir passados 28 dias e dentro dos 24 meses a
partir da data de aquisição do aparelho, deverá contactar o seu
distribuidor local e referir o número do modelo e de série do
produto ou escrever ao seu distribuidor local para o endereço
abaixo citado.
Ser-lhe-á solicitado que devolva o produto (numa embalagem
segura e apropriada) para o endereço apresentado, juntamente
com uma cópia do talão de compra.
Tirando as excepções abaixo referenciadas (1-9), o artigo
avariado será reparado ou substituído e enviado, normalmente
no prazo de 7 dias úteis a contar da data de recepção.
Se por qualquer razão, este artigo for substituído durante o
período de garantia de 2 anos, a garantia do novo artigo será
calculada a partir da data original de compra. Por esta razão, é
importante guardar o talão ou factura originais de modo a
indicar a data inicial de compra.
Para ser abrangido pela garantia de 2 anos, o artigo deverá ter
sido utilizado de acordo com as instruções do fabricante. Por
exemplo, os artigos têm de ter sido escamados e os filtros
mantidos limpos, tal como indicado nas instruções.
A Morphy Richards ou o distribuidor local não serão obrigados
a substituir ou reparar artigos sob os termos da garantia
quando:
1 A avaria tiver sido provocada ou for atribuída a uma utilização
inadvertida, indevida, negligente, contrária às recomendações do
fabricante ou no caso de ter sido causada por oscilações de
corrente ou danos provocados pelo transporte.
2 O aparelho tiver sido utilizado com uma voltagem diferente da
p
73
Page 74

recomendada.
3 Tiverem sido efectuadas tentativas de reparação por pessoas que
não os técnicos da Morphy Richards (ou o seu representante
autorizado).
4 O aparelho tiver sido utilizado com fins de aluguer ou utilização
não doméstica.
5 O aparelho foi adquirido em segunda mão.
6 A Morphy Richards ou o distribuidor local não são responsáveis
pela execução de qualquer tipo de trabalho de manutenção, ao
abrigo da garantia.
7 A garantia não abrange consumíveis, tais como sacos, filtros e
garrafas de vidro
8 Baterias e danos causados por derrame não estão abrangidos
pela garantia.
9 Os filtros não foram limpos e substituídos de acordo com as
instruções.
Esta garantia não confere quaisquer direitos para além dos
expressamente definidos anteriormente e não abrange
quaisquer reclamações por danos ou perdas sucessivos. Esta
garantia é um benefício adicional e não afecta quaisquer
direitos estatutários do consumidor.
74
Page 75

i
Salute e sicurezza
Per utilizzare un qualunque apparecchio elettrico, è necessario seguire delle basilari regole di sicurezza dettate dal buon senso.
Leggere queste istruzioni con attenzione prima di utilizzare il prodotto.
• Questo elettrodomestico può essere utilizzato da persone con
capacità fisiche, sensoriali o mentali ridotte o una scarsa
esperienza e conoscenza, soltanto sotto la dovuta supervisione
o previa spiegazione relativa all'utilizzo sicuro
dell'elettrodomestico e una volta compresi a fondo i rischi
coinvolti.
• Evitare che i bambini giochino con l'elettrodomestico.
• Evitare che i bambini utilizzino questo elettrodomestico.
• Mantenere l'elettrodomestico e il cavo lontano dalla portata dei
bambini.
• Non utilizzare in modo ininterrotto il frullatore per periodi
superiori a quelli consigliati nella sezione "Utilizzo".
p
• Scollegare sempre l'alimentazione se l'elettrodomestico viene
lasciato incustodito e prima del montaggio, dello smontaggio o
della pulizia.
• Per la pulizia e la manutenzione, fare riferimento alle apposite
sezioni.
• Non toccare i componenti in movimento. Tenere mani, capelli,
indumenti, spatole e altri utensili lontani dalle lame
dell'accessorio durante il funzionamento, per evitare lesioni
personali e/o danni all'elettrodomestico.
• Se il cavo di alimentazione è danneggiato, richiederne la
sostituzione al produttore, al servizio di assistenza autorizzato o
a personale similmente qualificato per evitare rischi.
i
75
Page 76

Di seguito sono riportate ulteriori informazioni sulla sicurezza.
Luogo di utilizzo
• Non utilizzare l'elettrodomestico all'aperto o in bagno.
• Tenere sempre l'elettrodomestico lontano dal bordo del piano di
lavoro.
• Non posizionare il recipiente utilizzato con l'elettrodomestico su
una superficie di legno lucidata per non danneggiarla.
Cavo dell'alimentazione
• Non lasciare che il cavo di alimentazione penda dal bordo di un
piano di lavoro dove un bambino potrebbe raggiungerlo.
• Non lasciare che il cavo attraversi uno spazio aperto come, ad
esempio, tra una presa bassa e il tavolo.
• Fare attenzione a che il cavo non passi al di sopra di un fornello o
altra area rovente in grado di danneggiarlo.
• Il cavo d'alimentazione, che collega la presa a muro e
l'apparecchio, deve essere sufficientemente lungo in modo da non
tendere le connessioni.
Sicurezza personale
• Prestare attenzione quando si maneggiano le lame affilate,
durante lo svuotamento del bicchiere e durante la pulizia.
Altre informazioni di sicurezza
• Non utilizzare l'elettrodomestico per scopi diversi da quelli a cui è destinato.
Istruzioni di sicurezza specifiche per il
prodotto
• AVVERTENZA: le lame del frullatore sono affilate. Maneggiare
con attenzione durante l'uso e la pulizia.
• Non pulire gli accessori con acqua corrente quando sono fissati
allo sbattitore.
• IMPORTANTE: Lasciare raffreddare i liquidi caldi prima di versarli
nel frullatore.
• Prestare attenzione nel frullare o versare liquidi caldi nel frullatore in
quanto un'evaporazione improvvisa ne può causare la fuoriuscita.
• Spegnere l'elettrodomestico e scollegarlo dalla rete di
alimentazione prima di sostituire gli accessori o di avvicinarsi ad
eventuali componenti in movimento durante l'utilizzo.
Requisiti elettrici
Controllare che la tensione indicata sulla targhetta dei dati
dell'elettrodomestico corrisponda a quella dell'abitazione, che deve
essere a corrente alternata (C.A.).
Qualora fosse necessario sostituire il fusibile nella spina,
installarne uno del tipo BS1362 da 3 A.
76
Page 77

Il potere di creare con sicurezza.
Siamo lieti di presentarvi il frullatore Total Control – il modo più
semplice per portare la sicurezza in cucina.
Il frullatore Total Control consente di creare deliziosi frullati e
frappè, zuppe e salse con la sicurezza e la garanzia date dalla
tecnologia Smart Response.
La tecnologia Smart Response consente di avere il controllo
totale del processo di frullatura, grazie al semplice tocco di un
pulsante. La tecnologia Smart Response fornisce potenza al
frullatore in maniera graduale, in base alle necessità, evitando
scatti o schizzi improvvisi e offrendo la completa sicurezza in
cucina.
È possibile scegliere la velocità che meglio si adatta
all'operazione da effettuare tra le 8 velocità disponibili,
utilizzando l'intuitivo selettore di velocità azionabile con
movimento rotatorio. Anche quando si utilizza una velocità
superiore, la tecnologia Smart Response assicura che la
potenza sia fornita al frullatore gradualmente, fino ad arrivare
alla velocità desiderata per l'operazione da effettuare.
Dopo aver frullato gli alimenti alla consistenza desiderata, basta
rilasciare il pulsante e il frullatore Total Control rallenterà
gradualmente e si fermerà, evitando schizzi e risucchi.
Frullatore Total Control: il potere di creare con sicurezza.
⁄
Selettore di velocità
¤
Regolatore di precisione
‹
Morbida impugnatura ergonomica
›
Motore da 650 Watt
⁄
¤
‹
›
i
77
Page 78

Introduzione
Grazie per aver acquistato il set frullatore manuale Total Control di
Morphy Richards.
Il set frullatore da voi acquistato è dotato di numerosi accessori.
Prima dell'uso, si prega di leggere attentamente le istruzioni su
come utilizzare ciascun accessorio.
Non dimenticate di visitare il sito www.morphyrichards.co.uk per
registrare la garanzia di due anni sul prodotto.
Sommario
Salute e sicurezza 75
Introduzione 78
Total Control 77
Panoramica del prodotto 78
Prima di utilizzare l'elettrodomestico la prima volta 78
Utilizzo del frullatore 78
Utilizzo della ciotola tritatutto 79
Come usare il bicchiere Smoothie Beaker 79
Alimenti idonei 79
Utilizzo 80
Accessori 80
Pulsante Turbo 80
Utilizzo del frullatore in una pentola 80
Suggerimenti e consigli 80
Manutenzione e pulizia 81
Contatti 81
Ricette 82
Garanzia 87
Componenti
(1) Selettore di velocità
(2) Regolatore di precisione
(3) Pulsante Turbo
(4) Unità principale
(5) Frullatore a immersione
(6) Lama Serrator
(7) Coperchio del bicchiere
(8) Bicchiere
(9) Coperchio frullatura ciotola tritatutto
(10) Ciotola tritatutto (3)
(11) Lama Serrator tritatutto
(12) Coperchio ciotola tritatutto (2)
(13) Coperchio frullatura Smoothie
(14) Bicchiere Smoothie (2)
(15) Lama Smoothie
(16) Coperchio Sports (2)
(17) Pulsante di rilascio accessorio
(18) Alloggiamento
(19) Guarnizione di sicurezza
(20) Guarnizione di sicurezza Smoothie
Prima di utilizzare l'elettrodomestico la prima
volta
• AVVERTENZA: Rimuovere con attenzione il set frullatore
manuale, poiché le lame sono molto affilate.
• Lavare tutti i componenti eccetto l'unità principale (4) e il coperchio
di frullatura ciotola tritatutto (9) e il coperchio di frullatura Smoothie
(13) in acqua calda e sapone prima dell'uso. Asciugare
completamente tutti i componenti prima di utilizzarli.
• Non immergere completamente il frullatore ad immersione
nell'acqua. Lavare solo la testa della lama Serrator (6).
• Pulire il coperchio frullatura della ciotola tritatutto con un panno
caldo umido. Non immergere in acqua.
• Non immergere in acqua l'unità principale.
Utilizzo del frullatore
1
Fissare il frullatore a immersione (5) all'unità principale (4) e
premere per bloccarlo in posizione.
2
Selezionare la velocità usando il selettore di velocità (1). Il
frullatore non entrerà in funzione fino a quando non si preme il
regolatore di precisione (2) o il pulsante Turbo (3).
3
Introdurre il frullatore a immersione negli alimenti da frullare. Per
ottenere risultati migliori, è consigliabile utilizzare il bicchiere (8).
4
Premere il regolatore di precisione per azionare il frullatore.
La velocità aumenterà all'aumentare della pressione esercitata sul
pulsante.
5
Rilasciare il regolatore di precisione per interrompere l'operazione
di frullatura. Lasciare che le lame rallentino e si fermino PRIMA di
estrarre il frullatore dagli alimenti.
6
Scollegare l'unità principale dalla rete. Premere il pulsante di
rilascio dell'accessorio (17) e rimuovere il frullatore a immersione
dall'unità principale per la pulizia.
78
Page 79

Utilizzo della ciotola tritatutto
7
Inserire con ATTENZIONE la lama Serrator tritatutto (11) nella
ciotola tritatutto (10). AVVERTENZA: le lame sono affilate.
8
Porre gli alimenti da tritare nella ciotola tritatutto. Non riempire oltre
la metà.
9
Assicurarsi che la guarnizione di sicurezza (19) sia in posizione e
premere il coperchio di frullatura della ciotola tritatutto (9) sulla
ciotola tritatutto. Premere per assicurare in posizione.
10
Fissare l'unità principale (4) sul coperchio. L'unità principale non si
blocca sul coperchio frullatura della ciotola tritatutto per motivi di
sicurezza.
11
Selezionare una velocità alta sul regolatore di velocità (1) e
premere il regolatore di precisione (2) per avviare. Non aprire il
coperchio durante l'uso.
12
Consentire al frullatore di fermarsi completamente prima di
staccare l'unità principale dal coperchio di frullatura della ciotola
tritatutto. Sollevare per rimuovere.
13
Rimuovere il coperchio frullatura della ciotola tritatutto da
quest'ultima.
14
Rimuovere con ATTENZIONE la lama Serrator di tritatura prima di
svuotare gli alimenti dalla ciotola.
Come usare il bicchiere Smoothie Beaker
15
Inserire ATTENTAMENTE la lama Smoothie (15) nel bicchiere
Smoothie (14).
16
Aggiungere gli ingredienti al bicchiere Smoothie. Per favorire la
frullatura, aggiungere per prima la frutta morbida.
17
Assicurarsi che la guarnizione di sicurezza Smoothie (20) sia al
suo posto (vedi pag. 11). Avvitare il coperchio di frullatura
Smoothie (13) sul bicchiere Smoothie.
18
Fissare l'unità principale (4) sul coperchio. L'unità principale non si
blocca sul coperchio di frullatura Smoothie per motivi di sicurezza.
Durante la frullatura tenere il bicchiere Smoothie.
19
Selezionare la velocità 8 sul regolatore di velocità (1) e premere il
regolatore di precisione (2) per avviare. Non aprire il coperchio
durante l'uso.
20
Prima di stacca l'unità principale, consentire al frullatore di fermarsi
completamente. Sollevare dal coperchio di frullatura Smoothie per
la rimozione.
21
Svitare il coperchio di frullatura Smoothie dal bicchiere Smoothie.
22
Rimuovere con CURA la lama Smoothie dal bicchiere prima di
bere. Fissare il coperchio Sports (16) per potersi godere la
bevanda in movimento.
Alimenti idonei
Utilizzare le seguenti quantità come guida. La ciotola tritatutto (12) non deve essere riempita più della metà.
Accessorio Alimento Quantità max. Velocità Tempo
Frullatore a immersione Zuppa o salsa - 4 40-60 secondi
Frullatore a immersione* Frullato 450 ml 4-5 20-30 secondi
Frullatore a immersione* Ghiaccio 3 cubetti 8 5-15 secondi
Frullatore a immersione* Carote con acqua 200 g 6 40-60 secondi
300 ml
Ciotola tritatutto Cipolla 200 g 7 5-10 secondi
Ciotola tritatutto Carote 200 g 7 5-15 secondi
Ciotola tritatutto Erbe 50 g 7 5-15 secondi
Ciotola tritatutto Carne di manzo 100 g 8 25-30 secondi
per stufato
Ciotola tritatutto Noci 100 g 8 15-20 secondi
Bicchiere Smoothie Frutta morbida 500 ml 8 20-30 secondi
*Quando si utilizza il bicchiere fornito
i
79
Page 80

Utilizzo
• AVVERTENZA: Il frullatore è previsto per uso intermittente.
Non utilizzare l'elettrodomestico in maniera continuativa per
più 90 secondi alla volta. Lasciare che si raffreddi per almeno
5 minuti prima di utilizzarlo di nuovo.
• Non utilizzare il bicchiere Smoothie (14) per oltre 60 secondi.
Accessori
Frullatore a immersione (5)
• Il frullatore a immersione è progettato per frullare alimenti come
zuppe, salse, frullati, frappè, alimenti per l'infanzia o per tritare il
ghiaccio.
• Il frullatore a immersione non è adatto per macinare sostanze
dure come chicchi di caffè.
Ciotola tritatutto (10)
• La ciotola tritatutto è idonea per tritare noci, verdure, carne, erbe,
uova sode e pane raffermo. La ciotola tritatutto deve essere usata
ad alte velocità per prestazioni ottimali.
Bicchiere Smoothie (14)
• Il bicchiere Smoothie è studiato per ottenere frappè e bevande da
passeggio.
• Il bicchiere Smoothie non è adatto per macinare alimenti duri o
chicchi di caffè. Dopo la frullatura nel bicchiere Smoothie, togliere
la lama Smoothie (15) e fissare il coperchio Sports (16) per
godersi le bevande a passeggio.
• Non utilizzare il bicchiere Smoothie esclusivamente per
tritare il ghiaccio da solo. Non usare più di 2 cubetti di
ghiaccio.
• Non utilizzare con verdure dure come patate o carote.
Coperchi (7), (12), (16)
• Se ci sono degli avanzi, utilizzare la ciotola e il bicchiere con i
coperchi forniti per conservare gli alimenti in modo sicuro.
Quando si sigilla il coperchio Sports, premere al centro della
sommità invece che al bordo per garantire una tenuta corretta.
Assicurarsi che il bicchiere venga sempre tenuto in posizione
verticale.
• AVVERTENZA: Nessun accessorio è adatto per uso in
microonde, forno, lavastoviglie o congelatore.
Pulsante Turbo
• Il frullatore ha 8 diverse velocità utilizzando la tecnologia Total
Control, nonché il pulsante Turbo (3). Premere il pulsante Turbo
per far funzionare il frullatore ad elevata velocità a intervalli
intermittenti.
• Nota: La ciotola tritatutto (10) funziona meglio con il regolatore di
velocità (1) impostato ad alta velocità o quando si utilizza il
pulsante Turbo (3)
Utilizzo del frullatore in una pentola
• Non utilizzare una casseruola antiaderente. Il frullatore a
immersione potrebbe danneggiare il rivestimento
antiaderente.
1. Togliere la pentola dal fuoco.
2. Per evitare eccessivi schizzi, introdurre il frullatore a immersione
(5) negli alimenti prima di accenderlo.
3. Tenere la pentola ferma con la mano, scegliere la velocità
desiderata e premere leggermente sul regolatore di precisone (2).
Iniziare lentamente e aumentare la velocità in base alle necessità
utilizzando il regolatore di precisione.
4. Muovere la lame (6) verso l'alto e il basso attraverso gli alimenti.
5. Attendere che le lame si siano fermate prima di estrarle dalla
pentola.
• AVVERTENZA: Estrarre la lama Serrator dagli alimenti
durante il funzionamento o utilizzare un'impostazione di
velocità elevata all'interno di una pentola piccola può
provocare schizzi di liquidi bollenti. Prestare particolare
attenzione quando si utilizza il frullatore in questo modo.
• Non immergere il frullatore negli alimenti oltre il punto di
giunzione tra l'unità principale (4) e il frullatore a immersione
(5).
• Assicurarsi che il cavo di alimentazione non sia a contatto
con superfici incandescenti (compreso il bordo della
pentola).
Suggerimenti e consigli.
• Quando si lavorano alimenti di colore intenso (ad esempio carote),
i componenti in plastica possono sbiadire. Strofinare con olio da
cucina per pulire i componenti sbiaditi. Prima del successivo
utilizzo, lavare bene con acqua calda e detersivo.
• Quando si utilizza il frullatore a immersione (5), iniziare
l'operazione immergendolo negli ingredienti, In tal modo tutti gli
ingredienti verranno attirati verso la lama per la lavorazione.
Ruotate piano il frullatore a immersione, muovendolo verso il
basso e verso l'alto all'interno degli ingredienti. Continuare con
questo movimento finché la miscela non ha raggiunto la
consistenza desiderata. Non estrarre dal liquido mentre le lame
sono in movimento.
• Non estrarre completamente il frullatore a immersione dalla
miscela per evitare spruzzi.
• Mentre si utilizza la ciotola tritatutto (10) è possibile raschiare i lati
della ciotola usando una spatola in silicone attraverso la miscela.
• Quando si prepara un frullato, aggiungere per prima la frutta al
bicchiere Smoothie (14). Sarà più vicina alla lama Smoothie (15) e
verrà frullata per prima.
80
Page 81

Manutenzione e pulizia
• AVVERTENZA: scollegare sempre l'elettrodomestico dalla
presa elettrica prima di pulirlo e sottoporlo a manutenzione.
• AVVERTENZA: Maneggiare le lame con attenzione: sono
molto taglienti.
• Lavare tutti i componenti con acqua calda e detersivo, ad
eccezione dell'unità principale (4) del coperchio di frullatura per
ciotola tritatutto (9) e del frullatore a immersione Smoothie (13).
Asciugare immediatamente.
• Pulire l'unità principale con un panno umido e asciugarla
accuratamente.
• AVVERTENZA: Non immergere mai l'unità principale in acqua
o in qualsiasi altro liquido.
• Non immergere il frullatore a immersione in acqua, lavare solo la
testa della lama Serrator (6).
• Nessun componente è lavabile in lavastoviglie.
Guarnizione di sicurezza della ciotola tritatutto (19)
Il coperchio di frullatura della ciotola tritatutto (9) e il coperchio
della ciotola tritatutto (12) hanno una guarnizione di sicurezza. Ciò
previene perdite dalla ciotola tritatuttto (10) durante l'uso e la
conservazione.
• Assicurarsi sempre che la tenuta di sicurezza sia in posizione
prima dell'uso. L'inosservanza può causare il danneggiamento del
dispositivo. 23
• La guarnizione di sicurezza deve essere rimossa solo per la
pulizia (se necessario). Dopo la pulizia, assicurarsi che la
guarnizione sia rifissata come indicato prima di utilizzare il
frullatore Total Control.
• Quando si fissa nuovamente la guarnizione di sicurezza,
assicurarsi di premere a fondo nel primo canale dei coperchi (vedi
figura). Il 'labbro' della guarnizione di sicurezza deve essere rivolto
verso l'esterno e non girato all'interno del canale. Assicurarsi che
la guarnizione di sicurezza sia posizionata correttamente prima
dell'uso.
Guarnizione di sicurezza bicchiere Smoothie (20)
Il coperchio di frullatura Smoothie (13) e i coperchi Sports (16)
sono entrambi dotati di guarnizione di sicurezza. Ciò previene
perdite durante l'uso e la conservazione.
• Assicurarsi sempre che la guarnizione di sicurezza Smoothie sia in
posizione prima dell'uso. L'inosservanza può causare perdite o il
danneggiamento del dispositivo.
• La guarnizione di sicurezza Smoothie deve essere rimossa solo
per la pulizia (se necessario). Dopo la pulizia accertarsi di
reinserire la guarnizione come indicato prima dell'uso. 24
• Quando si fissa nuovamente la guarnizione di sicurezza Smoothie,
assicurarsi di premere a fondo nel primo canale nei coperchi (vedi
figura). Le ‘linguette’ sulla guarnizione di sicurezza devono essere
rivolte verso l'interno. Assicurarsi che la guarnizione di sicurezza
sia posizionata correttamente prima dell'uso.
Contatti
Servizio di assistenza telefonica
In caso di problemi col vostro elettrodomestico, vi invitiamo a
contattare il nostro Servizio di assistenza telefonica, in quanto
saremo in grado di fornirvi un'assistenza più mirata rispetto a
quella fornita dal punto vendita.
Vi consigliamo di tenere a portata di mano il nome del prodotto,
il numero del modello e il numero di matricola per consentirci di
gestire la vostra chiamata nel minor tempo possibile.
Parlatene con noi
Per eventuali domande o commenti, o semplicemente se volete
dei suggerimenti o delle idee di ricette per sfruttare al meglio il
vostro elettrodomestico, seguiteci online:
Blog: www.morphyrichards.co.uk/blog
Facebook: www.facebook.com/morphyrichardsuk
Twitter: @loveyourmorphy
Sito web: www.morphyrichards.com
i
81
Page 82

82
Ricette
Abbiamo creato delle deliziose ricette da realizzare con il set del frullatore Total
Control. Dai frullati al pesto, troverete qualcosa in grado di soddisfare tutti i palati.
Le ricette forniscono solo alcuni suggerimenti su quello che è possibile realizzare con
il frullatore Hand Blender e i suoi accessori. Una volta acquisita una certa esperienza
nell'utilizzo del frullatore, sarà possibile adattare le ricette dei libri di cucina preferiti
con facilità.
Page 83

Frappè di fragole e banana
Ingredienti:
• 1 banana matura (di circa 90g) sbucciata e tagliata a pezzetti
• 65g di fragole mondate, lavate e asciugate
• 2 cubetti di ghiaccio
• 135 ml di succo di mela
• 200 g di yogurt magro alla vaniglia
Metodo di preparazione:
1 Mettere tutti gli ingredienti nel bicchiere nell'ordine in cui sono
elencati.
2 Fissare il frullatore a immersione all'unità principale e selezionare
la velocità 4 sul regolatore di velocità.
3 Posizionare il frullatore a immersione nel fondo del bicchiere e
premere leggermente il regolatore di precisione. Muovere il
frullatore all'interno del bicchiere verso l'alto e verso il basso per
20-30 secondi, fino a quando il frappè avrà raggiunto la
consistenza desiderata.
Frullato ai lamponi
Ingredienti:
• 80 g di lamponi freschi
• 100 g di gelato alla vaniglia
• 200 ml di latte parzialmente scremato
Metodo di preparazione:
1 Mettere tutti gli ingredienti nel bicchiere nell'ordine in cui sono
elencati.
2 Fissare il frullatore a immersione all'unità principale e selezionare
la velocità 4 sul regolatore di velocità.
3 Posizionare il frullatore a immersione nel fondo del bicchiere e
premere leggermente il regolatore di precisione. Muovere il
frullatore all'interno del bicchiere verso l'alto e verso il basso per
20-30 secondi, fino a quando il frullato avrà raggiunto la
consistenza desiderata.
Zuppa di porri e patate
Serve: 4
Ingredienti:
• 25 g di burro o margarina
• 2 porri di grandezza media (285 g), tagliati a fette
• 1 cipolla piccola (100 g), finemente tritata
• 500 g di patate, tagliate a fette sottili
• 1,1 litro di brodo vegetale
• 1 cucchiaino di erbe aromatiche miste
• 1 cucchiaino di sale
• Pepe nero
• Erba cipollina per guarnire
• Crostini di pane per accompagnare la zuppa
Metodo di preparazione:
1 Sciogliere il burro in una pentola capiente (non usare una pentola
antiaderente), e aggiungere i porri e la cipolla. Soffriggere per 10
minuti senza far rosolare, girando di tanto in tanto.
2 Aggiungere le patate, il brodo, le erbe e i condimenti e portare ad
ebollizione. Coprire con il coperchio e cuocere a fuoco lento per 30
minuti o fino a quando gli ingredienti saranno teneri.
3 Lasciar raffreddare leggermente e collegare il frullatore a
immersione all'unità principale.
Portare il selettore di velocità sul 4.
4 Inserire il frullatore a immersione nella pentola e, usando il
regolatore di precisione, frullare la zuppa fino a ottenere un
composto omogeneo, per circa 50 – 60 secondi. Quest'operazione
si può effettuare nella pentola, a condizione che questa non abbia
un rivestimento antiaderente
5 Controllare i condimenti e guarnire con qualche ciuffo di erba
cipollina. servire la zuppa accompagnata dai crostini di pane.
i
83
Page 84

Sugo all'amatriciana (per pasta)
Serve: 4
Ingredienti:
• 1 cipolla (130 g) finemente tritata
• 1 spicchio d'aglio schiacciato
• ½ peperoncino verde, privato dei semi e finemente tritato
• 1½ cucchiaio di olio extra vergine di oliva
• 100 g di guanciale, privato della cotenna a tagliato a tocchetti
• 1 barattolo da 400 g di pomodori pelati
• 100 ml (120 g) di passata
• 2 cucchiai di vino bianco
• Sale e pepe nero macinato fresco
• Pasta appena scolata
• Parmigiano grattugiato
Metodo:
1 Porre l'olio in una casseruola grande (non antiaderente) e
riscaldare per alcuni minuti.
2 Soffriggere la cipolla, l'aglio e il peperoncino per 2- 3 minuti senza
farli rosolare, girando di tanto in tanto con un cucchiaio di legno.
3 Aggiungere i tocchetti di guanciale alla pentola e soffriggere per un
altro minuto. Coprire la pentola col coperchio e cuocere a fuoco
medio per 5 minuti.
4 Aggiungere i pelati, la passata e il vino e aggiustare di sale e
pepe.
5 Coprire la pentola col coperchio e cuocere a fuoco lento per 25
minuti, o fino a quando le cipolle saranno tenere.
6 Dieci minuti prima che il sugo sia pronto, cuocere la pasta
seguendo le istruzioni riportate sulla confezione.
7 Utilizzare il frullatore a immersione alla velocità 4 sul regolatore di
velocità per realizzare un sugo omogeneo. Quest'operazione si
può effettuare nella pentola, a condizione che questa non abbia un
rivestimento antiaderente Utilizzando il regolatore di precisione,
azionare il frullatore muovendolo piano all'interno della pentola fino
a raggiungere la consistenza desiderata. Per ottenere un sugo
omogeneo serve circa 1 minuto.
8 Scolare la pasta e condirla con il sugo
Riscaldare se necessario e servire immediatamente con una
spolverata di parmigiano grattugiato.
Sugo vegetale (per pasta)
Serve: 4
Ingredienti:
• 2 cucchiai di olio di oliva
• 1 cipolla (130g), tritata
• 2 carote (160g), tagliate a tocchetti
• 2 gambi di sedano (80g), finemente tritati
• 1 spicchio d'aglio schiacciato
• 1 porro (120g), tritato
• 1 peperone giallo, tagliato a cubetti
• 1 peperone rosso, tagliato a cubetti
• 2 barattoli da 400g di
pomodori a pezzetti
• ½ cucchiaio di aceto balsamico
• ½ cucchiaio di zucchero semolato
• 2 chucchiaini di origano
• 1 cucchiaino di erbe aromatiche miste
• Sale e pepe
• Pasta appena scolata
• Parmigiano grattugiato
Metodo di preparazione:
1 Scaldare l'olio in una pentola capiente (non utilizzare una pentola
antiaderente) e soffriggere la cipolle, le carote, il sedano, l'aglio e il
porro per 5 minuti senza farli rosolare. Girare di tanto in tanto.
2 Coprire la pentola col coperchio e cuocere per 20 minuti, girando
di tanto in tanto. Aggiungere i peperoni a cubetti e cuocere a fuoco
lenti per altri 10 minuti, coprendo con il coperchio.
3 Aggiungere nella pentola i pomodori, le erbe, lo zucchero e l'aceto.
Aggiustare di sale e pepe e cuocere a fuoco lento con il coperchio
per 45 minuti, o fino a quando le carote e il sedano saranno teneri.
4 Cuocere la pasta seguendo le istruzioni riportate sulla confezione.
5 Utilizzare il frullatore a immersione posizionato sulla velocità 4 nel
selettore di velocità per ottenere un sugo omogeneo.
Quest'operazione si può effettuare nella pentola, a condizione che
questa non abbia un rivestimento antiaderente Utilizzando il
regolatore di precisione, azionare il frullatore muovendolo piano
all'interno della pentola fino a raggiungere la consistenza
desiderata. Per ottenere un sugo omogeneo serve circa 1 minuto.
6 Scolare la pasta e condirla con il sugo
Riscaldare se necessario e servire immediatamente con una
spolverata di parmigiano grattugiato.
84
Page 85

Salda di pomodoro
Ingredienti:
250 ml 350 ml
• ½-1 ½-1 Peperoncino rosso, tagliato a
metà con alcuni semi
• 150 g 225 g Pomodori ciliegini maturi,
tagliati a metà
• 1 1½ Lime, succo
• 20 g 30 g Coriandolo fresco,
tagliato grezzamente nella ciotola
• pizzico pizzico Sale marino
• pizzico pizzico Pepe in polvere fresco
Metodo di preparazione:
1 Porre la lama nella ciotola tritatutto.
2 Porre tutti gli ingredienti nella ciotola nell'ordine indicato a sinistra.
3 Fissare la ciotola tritatutto, il coperchio di miscelazione e l'unità
principale. Frullare usando il regolatore di precisione a velocità 7
per 10 secondi. Se necessario, raschiare la ciotola con una
spatola, quindi frullare nuovamente per altri 5-10 secondi.
4 Versare in una ciotola per servire e far riposare per circa un'ora
prima di servire. Questo permette di sviluppare il sapore e di
ridurre la schiuma.
Servire con tortilla.
Nota: Se desiderato, nella ciotola è possibile prepararne una
quantità di 350 ml.
Pesto
Ingredienti:
• 50 g di pinoli
• ½ spicchio di aglio
• 25 g di Parmigiano, grattugiato
• 30 g di basilico fresco, solo foglie
• 50 ml di olio extra vergine di oliva
• Succo di mezzo limone
• Sale e pepe fresco in polvere
Metodo di preparazione:
1 Porre la lama nella ciotola tritatutto.
2 Porre tutti gli ingredienti nella ciotola nell'ordine indicato.
3 Fissare la ciotola tritatutto, il coperchio di miscelazione e l'unità
principale. Frullare usando il regolatore di precisione a velocità 7
per 15 secondi. Se necessario, raschiare la ciotola con una
spatola, quindi frullare nuovamente per altri 15-30 secondi.
Nota: La consistenza del pesto può essere diluita con l'aggiunta di
un po' di succo di limone e olio d'oliva, a seconda dei gusti.
Servire come contorno agli spaghetti alla bolognese o mescolato
con purè di patate.
Nota: Conservare il pesto fresco in un contenitore ermetico e coprire
la superficie con un po' di olio di oliva prima di mettere in frigo.
Guacamole
Ingredienti:
• 75 g di pomodori ciliegini
• ½ peperoncino rosso fresco, senza semi
• 65 g di coriandolo fresco con gambi
• 1 avocado maturo, tagliato a metà, senza noccioli e buccia
• Succo di ½ - 1 lime (a seconda dei gusti)
• Sale e pepe quanto basta
Metodo di preparazione:
1 Porre la lama nella ciotola tritatutto.
2 Tagliare ogni metà di avocado in due parti.
3 Porre tutti gli ingredienti nella ciotola nell'ordine indicato. Fissare la
ciotola tritatutto, il coperchio di miscelazione e l'unità principale.
4 Frullare usando il regolatore di precisione a velocità 7 per 15
secondi. Raschiare i lati della ciotola con una spatola, quindi
frullare nuovamente per altri 15 secondi fino a quando non diventa
omogeneo.
5 Condire secondo il gusto.
Chicken Jalfrezi
Serve: 4
Ingredienti:
Per la Jalfrezi Paste
• 2 spicchi di aglio, tritati
• Un pezzo di zenzero fresco da 1 x 3 cm, pelato e tagliato in
4 pezzi
• 1 peperoncino verde fresco (25 g) privato del picciolo e tagliato in
4 pezzi
• 12 g di coriandolo fresco
• 1 cucchiaino di coriandolo
• 1 cucchiaino di semi di senape marrone
• 1 cucchiaino di polvere di fieno greco
• 2 cucchiaini di semi di cumino
• 1 cucchiaino di curcuma
• ½ cucchiaino di sale
• 2 cucchiai di olio di arachidi
• 2 cucchiai di concentrato di pomodoro
• 2 cucchiai di acqua
• 2 cucchiaini di paprika
Per il curry
• 2 cucchiai di olio
• 240 g di cipolla, affettata
• 500 g di petto di pollo taglioato a tocchetti
• 1 barattolo da 400g di pomodori a pezzetti
• 200 ml di acqua
• 1 peperone verde medio, a fette
i
85
Page 86

Metodo:
1 Porre la lama nella ciotola tritatutto.
2 Per fare la pasta, riporre tutti gli ingredienti nella ciotola tritatutto
nell'ordine indicato.
3 Fissare la ciotola tritatutto, il coperchio di miscelazione e l'unità
principale. Frullare alla velocità 7 raschiando di tanto in tanto i lati
della ciotola verso il basso fino ad ottenere una taglio fine, (circa
30-40 secondi).
4 Per il curry; scaldare l'olio in una pentola di media grandezza e far
friggere delicatamente le cipolle con sopra il coperchio per
10 minuti fino a doratura.
5 Aggiungere il pollo a dadini e friggere finché non è rosolato.
6 Aggiungete la pasta Jalfrezi fresca e mescolare a fuoco medio per
3 minuti.
7 Aggiungere il pomodoro in scatola, l'acqua e il peperone a fette e
cuocere per 1 ora. Togliere il coperchio se fosse necessario ridurre
la quantità di liquido.
Servire con riso bollito e pane Naan.
Satay di pollo
Porzioni: 10 spiedini (Serve: 4-5)
Ingredienti:
• 3 petti di pollo
• 20 g di coriandolo fresco
• 1 peperoncino rosso grande (semi inclusi),
tagliare in 4 pezzi
• 1 spicchio di aglio, tagliato a metà
• 5 cucchiai (tondi) di burro di arachidi
• Un pizzico di salsa di soia
• Un pezzo di zenzero fresco di 3 cm pelato e tagliato in 4 tocchetti
• Scorza e succo di 2 lime (50 ml)
• Un po' d'acqua
• Sale e pepe
Metodo di preparazione:
1 Porre la lama nella ciotola tritatutto. Lasciare in ammollo in acqua
fredda 10 spiedini di legno.
3 Mettere tutti gli ingredienti tranne l'acqua nella ciotola tritatutto,
fissare il coperchio frullatore sulla ciotola e l'unità principale.
4 Usando la velocità 7, premere il regolatore di precisione
completamente con tre passate di 10-15 secondi. Controllare la
consistenza e raschiare i lati della ciotola con una spatola di
plastica, se necessario. Continuare a frullare per bene.
5 Aggiungere acqua finché la miscela è abbastanza morbida da
fuoriuscire da un cucchiaio contando fino a 3.
6 Tagliare il pollo in piccoli tocchetti e infilarne 8 pezzi sugli spiedini
di legno precedentemente messi in ammollo.
7 Spalmare la marinata nel pollo. Coprire e conservare in frigorifero
per alcune ore o durante la notte.
8 Grigliare su griglia calda preriscaldata girando frequentemente
affinché tutti i succhi fuoriescano.
Frullato di fragole
Ingredienti:
• 150 g di fragole, mondate e tagliate a metà
• 2 palline di gelato alla vaniglia (50 g)
• 250 ml di latte parzialmente scremato
Metodo di preparazione:
1 Inserire la lama Smoothie nel bicchiere Smoothie.
2 Riporre le fragole sul fondo del bicchiere Smoothie e aggiungere il
gelato e il latte.
3 Fissare il coperchio di miscelazione Smoothie e l'unità principale.
Frullare alla velocità 8 con 4 brevi passate per un totale di 30
secondi.
4 Servire immediatamente.
Summer Berry Delight
Ingredienti:
• 70 g di fragole, mondate e tagliate a metà
• 70 g di mirtilli
• 40 g di lamponi
• 40 g di ciliege snocciolate
• 200 ml di succo di mela
Metodo di preparazione:
1 Inserire la lama Smoothie nel bicchiere Smoothie.
2 Aggiungere tutti gli ingredienti nel bicchiere Smoothie.
3 Fissare il coperchio di miscelazione Smoothie e l'unità principale.
Frullare alla velocità 8 con brevi passate per un totale di 30
secondi.
4 Servire immediatamente.
Sweet Berry Kiss
Ingredienti:
• 2 cubetti di ghiaccio
• 50 g di ciliege surgelate
• 200 g di yogurt magro alla vaniglia
• 150 ml di latte parzialmente scremato
Metodo di preparazione:
1 Inserire la lama Smoothie nel bicchiere Smoothie.
2 Mettere gli ingredienti nel bicchiere Smoothie nell'ordine in cui
sono elencati.
3 Fissare il coperchio di miscelazione Smoothie e l'unità principale.
Frullare alla velocità 8 con brevi passate per 30 secondi.
4 Servire immediatamente.
86
Page 87

Frappè di banana al cioccolato
Ingredienti:
• 1 banana piccola matura, a fette (80 g, sbucciata)
• 2 cucchiai pieni di cioccolata in polvere per bevande
• 150 g di yogurt magro alla vaniglia
• 200 ml di latte parzialmente scremato
Metodo di preparazione:
1 Inserire la lama Smoothie nel bicchiere Smoothie.
2 Mettere le fette di banana nel bicchiere Smoothie e
successivamente gli altri ingredienti.
3 Fissare il coperchio di miscelazione Smoothie e l'unità principale.
Frullare alla velocità 8 con 3 brevi passate per un totale di 20-30
secondi.
4 Servire immediatamente.
Frappè al caffe
Ingredienti:
• 3 cubetti di ghiaccio
• 6 palline di yogurt magro alla vaniglia (150 g)
• 200 ml di caffè forte freddo
Metodo di preparazione:
1 Inserire la lama Smoothie nel bicchiere Smoothie.
2 Mettere gli ingredienti nel bicchiere Smoothie nell'ordine in cui
sono elencati.
3 Fissare il coperchio di miscelazione Smoothie e l'unità principale.
Frullare alla velocità 8 con brevi passate per un totale max. 30
secondi.
4 Servire immediatamente.
Garanzia a vita della lama
La lama 'Serrator' è garantita priva di difetti dei materiali e di
produzione per tutta la sua durata. Questa garanzia copre solo
l'acquirente originale e non è trasferibile o cedibile a terzi.
Questa garanzia è disponibile per i clienti che usano le lame
"Serrator" per scopi domestici, non commerciali. Questa
garanzia non copre eventuali danni causati da incidenti, uso
improprio o qualsiasi uso diverso da quello descritto nel nostro
manuale utente o per danni derivanti da mancata manutenzione
e pulizia come specificato nel manuale utente.
Garanzia di due anni
Questo elettrodomestico è coperto da una garanzia di due anni
per la riparazione o la sostituzione.
È importante conservare la ricevuta del rivenditore a titolo di
prova di acquisto. Appuntare la ricevuta sulla retrocopertina del
presente manuale per futuro riferimento.
Indicare le informazioni riportate di seguito se si verifica
un’anomalia sul prodotto. Questi numeri sono riportati sulla
base del prodotto.
N. modello
N. di serie
Tutti i prodotti Morphy Richards sono testati singolarmente
prima di lasciare lo stabilimento. Nell’improbabile eventualità
della comparsa di un difetto entro 28 giorni dall’acquisto, si
consiglia di restituire il prodotto dove è stato acquistato per
richiederne la sostituzione.
Se il problema si manifesta dopo 28 giorni ed entro 24 mesi
dall’acquisto, contattare il rivenditore più vicino, citando il
numero di modello e il numero di matricola riportati sul
prodotto oppure scrivergli all’indirizzo indicato.
Verrà richiesto di rispedire il prodotto (in un imballaggio idoneo
e sicuro) unitamente alla copia della prova d’acquisto.
Fatte salve le esclusioni sotto riportate (1-9), l’elettrodomestico
difettoso viene riparato o sostituito e spedito di solito entro 7
giorni lavorativi dal ricevimento.
Se per qualsiasi motivo questo articolo viene sostituito entro il
periodo di garanzia di 2 anni, la garanzia sul nuovo prodotto
sarà calcolata a decorrere dalla data dell’acquisto iniziale. È
pertanto importante conservare la ricevuta o fattura originale
per poter dimostrare la data dell’acquisto.
Per usufruire della garanzia di due anni, l’elettrodomestico deve
essere stato usato nel modo indicato dal produttore. Ad
esempio, è necessario disincrostare l’elettrodomestico e tenere
puliti i filtri nel modo indicato.
Morphy Richards o il rivenditore di zona non sono tenuti a
sostituire o riparare i prodotti, come indicato dalle disposizioni
di garanzia, se:
1 Il guasto è stato causato o è attribuibile a un uso accidentale,
improprio, negligente o contrario alle istruzioni del produttore
oppure il guasto è stato causato da sovratensioni momentanee o
dal trasporto.
2 L’elettrodomestico è stato utilizzato a una tensione diversa da
quella indicata su di esso.
i
87
Page 88

3 Le riparazioni sono state eseguite da persone diverse dal
personale tecnico Morphy Richards (o rivenditori autorizzati).
4 L’elettrodomestico è stato noleggiato oppure non impiegato per
uso domestico.
5 L’elettrodomestico è di seconda mano.
6 Morphy Richards o il rivenditore di zona non sono tenuti ad
eseguire alcun tipo di intervento di assistenza ai sensi della
garanzia.
7 I sacchetti, i filtri e le caraffe di vetro non sono coperti dalla
garanzia.
8 Le batterie e i danni dovuti a perdite non sono coperti dalla
garanzia.
9 I filtri non sono stati puliti e sostituiti come da istruzioni.
La presente garanzia non conferisce alcun diritto diverso da
quelli sopra elencati e non copre alcuna richiesta di danni o
perdite consequenziali. La presente garanzia viene offerta a titolo
di vantaggio aggiuntivo e non incide sui diritti del consumatore
previsti dalla legge.
88
Page 89

q
Sundhed og sikkerhed
Ved brug af elektriske apparater skal følgende sikkerhedsregler baseret på sund fornuft overholdes.
Læs vejledningen grundigt, inden du tager produktet i brug.
• Apparatet kan anvendes af personer med nedsatte fysiske,
sansemæssige eller mentale evner eller med manglende
erfaring eller viden, hvis de får støtte og vejledning i at bruge
apparatet sikkert og forstår de risici, der er forbundet med det.
• Børn må ikke lege med apparatet.
• Dette apparat må ikke bruges af børn.
• Opbevar køkkenredskabet uden for børns rækkevidde.
• Blend ikke i længere tid ad gangen end anbefalet i afsnittet
”Anvendelse”.
• Træk altid stikket ud af kontakten, hvis blenderen er uden
opsyn og før samling, adskillelse eller rengøring.
• Se det relevante afsnit for vedligeholdelse og rengøring.
• Undgå kontakt med de bevægelige dele. Hold hænder, hår, tøj
og køkkenredskaber væk fra de tilhørende blade under brug for
at forhindre personskade og/eller beskadigelse af apparatet.
• Hvis ledningen er beskadiget, skal den udskiftes af
producenten eller dennes reparatør eller en lignende kvalificeret
person for at undgå farer.
i
q
89
Page 90

Derudover har vi følgende sikkerhedsråd.
Placering
• Undlad brug udendørs eller i badeværelset.
• Hold altid apparatet væk fra kanten af overfladen.
• Placer ikke bægeret med apparatet på en kraftig poleret
træoverflade, da det kan beskadige overfladen.
Netledning
• Lad ikke ledningen hænge ud over køkkenbordet eller lign.,
hvor den kan nås af et barn.
• Før ikke ledningen på tværs af et åbent rum, f.eks. mellem en
lavtsiddende kontakt og et bord.
• Lad ikke ledningen løbe hen over et komfur eller andet varmt
område, som kan beskadige ledningen.
• Ledningen skal kunne nå fra stikkontakten til soklen uden, at den
belaster tilslutningerne.
Personalets sikkerhed
• Vær forsigtig ved håndtering af skarpe knivblade, når bægeret
tømmes og under rengøring.
Andre sikkerhedsovervejelser
• Brug ikke apparatet til andet end det, det er beregnet til.
Produktspecifik sikkerhed
• ADVARSEL: Blenderens blade er meget skarpe. Vær forsigtig,
når de bruges og rengøres.
• Rengør ikke redskaberne under rindende vand, mens de sidder på
blenderen.
• VIGTIGT: Lad varme væsker køle af, før du hælder dem i
blenderen.
• Pas på mens varme væsker blandes eller hældes i blenderen,
da de kan sprøjte ud pga. pludselig fordampning.
• Sluk for apparatet, og træk stikket ud, før du skifter tilbehør eller
kommer i nærheden af dele, der er i bevægelse ved brug.
Elektriske krav
Kontroller, at enhedens typeskilt viser en spænding, der svarer til
husholdningens (vekselstrøm).
Hvis sikringen i stikket skal udskiftes, skal den udskiftes med en
3 A BS1362-sikring.
90
Page 91

Giver dig styrke til at kreere i fuld tryghed.
Lancering af Total Control-stavblenderen – den simple måde at
lave mad på en tryg måde.
Total Control-stavblenderen giver dig mulighed for at kreere
lækre smoothies og milkshakes, blende supper og saucer med
den tryghed og sikkerhed, som intelligent, hurtigt reagerende
teknologi giver dig.
Intelligent, hurtigt reagerende teknologi giver dig fuld kontrol
med blendingen med et simpelt tryk på en knap. Intelligent,
hurtigt reagerende teknologi tilfører blenderen styrke på en
nænsom måde, når du skal bruge den, så der ikke opstår
pludselige stød eller sprøjt og giver dig fuld tryghed i køkkenet.
Vælg den hastighed, der passer bedst til opgaven, du er i gang
med ved hjælp af den variable hastghedskontrols simple
drejebevægelse. Du kan vælge mellem 8 hastigheder. Selv når
du bruger en højere hastighed, kan du være sikker på, at den
intelligente, hurtigt reagerende teknologi tilfører gradvis styrke til
den opgave, du er i gang med.
Når du har blendet til den ønskede konsistens, skal du blot
slippe knappen, så nedsætter Total Control-stavblenderen
langsomt hastigheden og stopper, så den sikrer, at der ikke
opstår sprøjt og sugning.
Total Control-stavblenderen, som giver dig styrke til at kreere i
fuld tryghed.
⁄
Variabel hastighedskontrol
¤
Precision Control-udløser
‹
Ergonomisk greb med blød
gummibelægning
›
⁄
¤
‹
650 watt motor
q
›
91
Page 92

Introduktion
Tak for dit nylige køb af denne Total Control-stavblender fra
Morphy Richards.
Læs brugervejledningen grundigt før brug for at forstå, hvordan du
skal bruge din stavblender.
Husk at besøge www.morphyrichards.co.uk for at registrere dit
produkts toårige garanti.
Indholdsfortegnelse
Sundhed og sikkerhed 89
Fuld kontrol 91
Introduktion 92
Produktoversigt 92
Før første ibrugtagning 92
Sådan bruger du din stavblender 92
Sådan bruger du din hakkeskål 93
Brug af Smoothie Beaker 93
Velegnede fødevarer 93
Anvendelse 94
Tilbehør 94
Turboknap 94
Blending i en gryde 94
Råd og tips 94
Vedligeholdelse og rengøring 95
Kontakt os 95
Opskrifter 96
Garanti 102
Funktioner
(1) Variabel hastighedskontrol
(2) Precise Control-udløser
(3) Turboknap
(4) Hovedenhed
(5) Blenderstav
(6) Serratorblad
(7) Låg til bæger
(8) Bæger
(9) Blendelåg til hakkeskål
(10) Hakkeskål (x3)
(11) Serrator-blad til hakning
(12) Låg til hakkeskål
(13) Smoothie-blendelåg
(14) Smoothie-bæger (x2)
(15) Smoothie-klinge
(16) Sports-låg (x2)
(17) Udløsningsknap til tilbehør
(18) Fodstøtte
(19) Sikkerhedsforsegling
(20) Smoothie-sikkerhedsforsegling
Før første ibrugtagning
• ADVARSEL: Vær forsigtig når du pakker din Pro Setstavblender ud, da bladene er meget skarpe.
• Vask alle dele undtagen hovedenheden (4), snitteskål med
blendelåg (9) og blendelåg til smoothie (13) i varmt sæbevand
inden brug. Tør alle dele grundigt før brug.
• Sænk ikke blenderstaven helt ned i vand. Vask kun Serratorbladets hoved (6).
• Tør snitteskålens blenderlåg af og blenderlåget til smoothie med
en varm fugtig klud Må ikke nedsænkes i vand.
• Sænk ikke hovedenheden ned i vand.
Sådan bruger du din stavblender
1
Sæt blenderstaven (5) på hovedenheden (4) og skub den, til den
låses på plads.
2
Vælg hastigheden på den variable hastighedskontrol (1).
Stavblenderen starter ikke, medmindre der trykkes på Precise
Control-udløseren (2) eller turboknappen (3).
3
Anbring blenderstaven i det, der skal blendes. Vi anbefaler at
bruge bægeret (8) for at få de bedste resultater.
4
Tryk på Precise Control-udløseren for at starte blenderen.
Hastigheden øges efter, hvor hårdt du trykker på knappen.
5
Slip Precise Control-udløseren for at stoppe. Lad bladene
nedsætte hastigheden langsomt og stoppe, FØR du fjerner
stavblenderen fra det, du har blendet.
6
Træk hovedenhedens stik ud at stikkontakten. Tryk på tilbehørets
udløsningsknap (17) og tag blenderstaven af hovedenheden for at
rengøre den.
92
Page 93

Sådan bruger du din hakkeskål
7
Sæt FORSIGTIGT hakke-Serrator-bladet (11) i hakkeskålen (10).
ADVARSEL: Bladene er skarpe.
8
Kom det, du vil blende, i hakkeskålen. Fyld den kun halvt op.
9
Sørg for, at sikkerhedsforsgelingen (20) er på plads, og skub
hakkeskålens blendelåg (9) på hakkeskålen. Skub det for at låse
det sikekrt på plads.
10
Sæt hovedenheden (4) på låget. Hovedenheden låses ikke fast på
hakkeskålens blendelåg af sikkerhedgrunde.
11
Vælg en høj hastighed på den variable hastighedkontrol (1), og
tryk på Precise Control-udløseren (2) for at starte. Åbn ikke låget,
mens det er i brug.
12
Stavblenderen skal være standset helt, inden du tager
hovedenheden af hakkeskålens blendelåg. Løft den
for at tage den af.
13
Tag hakkeskålens blendelåg af hakkeskålen.
14
Fjern FORSIGTIGT hakke-Serrator-bladet, inden du tager maden
ud af skålen.
Brug af Smoothie Beaker
15
FORSIGTIG indsæt Smoothie Blade (15) i Smoothie Beaker (14).
16
Tilføj ingredienser i Smoothie Beaker. Kom først bløde frugter i så
det er lettere at blende.
17
Sørg for Smoothie Safety Seal (20) er sat på plads (se side 11).
Skrue Smoothie Blending Lid (13) på Smoothie Beaker.
18
Sæt hovedenheden (4) på låget. Hovedenheden låses ikke fast på
hakkeskålens blendelåg af sikkerhedgrunde. Hold Smoothie
Beaker mens du blender.
19
Vælg en høj hastighed på den variable hastighedkontrol (1), og
tryk på Precise Control-udløseren (2) for at starte. Åbn ikke låget,
mens det er i brug.
20
Lad håndblenderen standse helt før hovedenheden tages af.
Tages af ved at løfte væk fra Smoothie Blending Lid.
21
Skru Smoothie Blending Lid af Smoothie Beaker.
22
FORSIGTIG fjern Smoothie Blade fra Beaker før du drikker.
Monter sportslåget (16) så du kan nyde indeholdet undervejs.
Velegnede fødevarer
De anviste mængder er ment som vejledning. Hakkeskålen (10) må ikke fyldes mere end halvt op.
Tilbehør Fødevarer Maks. mængde Hastighed Tid
Blenderstav Suppe eller sauce - 4 40-60 sekunder
Blenderstav* Milkshake 450 ml 4-5 20-30 sekunder
Blenderstav* Is 3 terninger 8 5-15 sekunder
Blenderstav* Gulerødder med vand 200 g 6 40-60 sekunder
300 ml
Hakkeskål Løg 200 g 7 5-10 sekunder
Hakkeskål Gulerødder 200 g 7 5-15 sekunder
Hakkeskål Urter 50 g 7 5-15 sekunder
Hakkeskål Bankekød 100 g 8 25-30 sekunder
Hakkeskål Nødder 100 g 8 15-20 sekunder
Smoothie Beaker Bløde frugter 500 ml 8 20-30 sekunder
*Når du bruger det medfølgende bæger
q
93
Page 94

Anvendelse
• ADVARSEL: Stavblenderen er beregnet til trinvis brug. Den
må ikke bruges uafbrudt i mere end 1 minut ad gangen. Lad
blenderen køle af i mindst fem minutter, inden den igen
benyttes.
• Brug ikke Smoothie Beaker (14) i over 60 sekunder.
Tilbehør
Blenderstav (5)
• Blenderstaven er designet til at purere fødevarer som f.eks. supper,
saucer, milkshakes, smoothies, babymad eller til at knuse is.
• Blenderstaven er ikke egnet til at kværne hårde ting som
kaffebønner.
Hakkeskål (10)
• Hakkeskålen er velegnet til at hakke nødder, grøntsager, kød,
urter, kogte æg og tørret brød. Hakkeskålen skal bruges på højere
hastigheder for at få en optimal ydelse.
Smoothie Beaker (14)
• Smoothie Beaker er designet til smoothies og drinks på farten.
• Smoothie Beaker er ikke egnet til malede kaffebønner eller hårde
madvarer. Efter blending i Smoothie Beaker fjernes Smoothie
Blade (15) og sportslåget sættes på (16) for at nyde indholdet
undervejs.
• Anvend ikke Smoothie Beaker til kun at knuse is uden andet
indhold. Anvend ikke mere end 2 isterninger.
• Anvend ikke hårde grøntsager såsom kartolfer eller gulerødder.
Låg (7), (12), (16)
• Hvis du har nogle rester tilovers kan du opbevare dem i skålen og
bægeret med det tilhørende låg.
Ved lukning af sportslåget trykkes der ned oppefra i midten og ikke
i kanten for at det lukker tæt. Sørg for bægeret altid er oprejst.
• ADVARSEL: Intet tilbehør er egnet til brug i mikrovoen,
opvaskemaskine eller fryser.
Turboknap
• Din stavblender har 8 forskellige hastigheder med brug af Total
Control-teknologien samt en turboknap (3). Tryk på turboknappen
for at køre stavblenderen på en hurtigere hastighed for intervalfunktion.
• Bemærk: Hakkeskålens tilbehør (10) fungerer bedst med den
variable hastighedskontrol (1) indstillet til en høj hastighed eller
ved brug af turboknappen (3).
Blending i en gryde
• Brug ikke en gryde med slip let-belægning. Blenderstaven
kan beskadige
1. Fjern gryden fra varmen.
2. For at undgå for meget sprøjt placeres blenderstaven (5) i
fødevaren, før der tændes for stavblenderen.
3. Hold den rolig med den anden hånd, vælg ønsket hastighed og
tryk let på udløseren (2). Start langsomt og øg hastigheden efter
behov med Precise Control-udløseren.
4. Bevæg bladeene (6) gennem fødevaren med en op- og
nedadgående bevægelse.
5. Bladet skal stoppe bevægelsen, før det fjernes fra gryden.
• ADVARSEL: Hvis du løfter Serrator-bladet ud af fødevaren,
mens du blender, eller hvis fu bruger hurtig hastighed i en
lilel gryde, kan det få varm væske til at sprøjte. Du bør være
ekstra omhyggelig ved brug af stavblenderen på denne måde.
• Indsæt ikke stavblenderen i fødevaren forbi sammenføjningen
mellem hovedenheden (4) og blenderstaven (5).
• Sørg for, at ledningen ikke kommer i nærheden af varme
overflader (herunder siden af gryden).
Råd og tips
• Når der tilberedes fødevarer med stærke farver (f.eks. gulerødder),
kan plastdelene blive misfarvede. Brug madlavningsolie til at
rengøre misfarvede dele. Vask grundigt i sæbevand før brug igen.
• Når blenderstaven (5) er i brug, skal bearbejdningen af fødevarer
påbegyndes ved at sætte blenderen ned i ingredienserne. Det
sikrer, at alle ingredienserne trækkes ind i bladet og forarbejdes.
Drejblenderstaven forsigtigt, mens du løfter den op og ned i
ingredienserne. Fortsæt denne bevægelse, indtil blandingen har
den ønskede konsistens. Fjern den ikke fra væsken, mens
bladene er i bevægelse.
• Løft ikke blenderstaven helt ud af blandingen, mens den kører, da
det kan medføre stænk.
• Når du bruger hakkeskålen (10), skal du muligvis skrabe skålens
sider med en plastikspatel midt under blendingen.
• Når du laver en smoothie, skal du først putte frugt i bægeret (14).
Det er tættere på bladet (15) og blendes først.
94
Page 95

Vedligeholdelse og rengøring
• ADVARSEL: Frakobl altid apparatet fra stikkontakten før
rengøring og vedligeholdelse.
• ADVARSEL: Håndter bladene forsigtigt, da de er skarpe.
• Vask alle dele unden hovedenheden (4), blendelåget skålen (9)
og blendelåget (13) i varmt sæbevand, og tør det straks af.
• Rengør hovedenheden med en fugtig klud, og aftør alle delene
grundigt.
• ADVARSEL: Sænk aldrig hovedenheden i vand eller nogen
anden væske.
• Sænk aldrig blenderstaven helt ned i vand, vask kun Serratorbladets hoved.
• Ingen andre dele tåler opvaskemaskine.
Sikkerhedsforsegling til hakkeskål (19)
Hakkeskålens blendelåg (9) hakkeskålens låg (12) har begge en
sikkerhedsforsegling i gummi. Det er for at forhindre, at der kan
sive noget ud fra hakkeskålen (10) under brug og opbevaring.
• Sørg altid for, at sikkerhedsforseglingen er på plads inden brug.
Hvis det ikke er tilfældet, kan det beskadige apparatet. 23
• Sikkerhedsforseglingen skal kun flyttes til rengøring (om
nødvendigt). Sørg for at sætte forseglingen på igen efter
rengøring, som anvist, inden du bruger din Total Controlstavblender igen.
• Når du sætter sikkerhedsforseglingen på igen, skal du sørge for at
den er presset tæt ind i den første rille på lågene (se diagram).
Sikkerhedsforseglingens ”læbe” skal vende udad, og må ikke
vrides ind i rillen. Sørg for, at sikkerhedsforseglingen er korrekt på
plads før brug.
Sikkerhedsforsegling til Smoothiebæger (20)
Blenderlåg (13) og sportslåg (16) har begge sikkerhedsforsegling.
Det er for at undgå lækage i brug og under opbevaring.
• Sørg altid for, at sikkerhedsforseglingen er på plads inden brug.
Ellers kan der opstå lækage eller skade på apparatet.
• Sikkerhedsforseglingen skal kun flyttes til rengøring (om
nødvendigt). Efter rengøring skal forseglingen påmonteres jf. inden
brug. 24
• Ved genmontering af forseglingen skal det trykkes let på i kanalen
i låget (se tegning). Sørg for, at sikkerhedsforseglingen er korrekt
på plads før brug.
Kontakt os
Hjælpelinje
Hvis du har et problem med dit apparat, kan du ringe til vores
Helpline, da vi sikkert er bedre til at hjælpe dig end den
forretning, hvor du har købt det.
Hav produktnavn, modelnummer og serienummer parat, når du
ringer til os, så vi kan ekspedere din forespørgsel hurtigere.
Tal med os
Hvis du har spørgsmål eller kommentarer, eller hvis du ønsker
nogle gode tip eller opskriftsidéer til at hjælpe dig med at få
mest muligt ud af dine produkter, kan du være med online:
Blog: www.morphyrichards.co.uk/blog
Facebook: www.facebook.com/morphyrichardsuk
Twitter: @loveyourmorphy
Websted: www.morphyrichards.com
q
95
Page 96

Opskrifter
96
Vi har udviklet nogle lækre opskrifter til dig, som du kan prøve med din nye Total
Control-blender. Fra smoothies til suppe, der er noget for enhver smag.
De medfølgende opskrifter giver dig kun nogle få forslag til, hvad du kan lave med
din stavblender og dens tilbehør. Når du har vænnet dig til at bruge din stavblender,
kan du nemt tilpasse opskrifterne til brug fra din yndlingskogebog.
Page 97

Smoothie med jordbær og banan
Ingredienser:
• 1 moden skrællet banan (ca. 90 g) skåret i stykker
• 65 g vaskede, tørrede og rensede jordbær
• 2 isterninger
• 135 ml æblesaft
• 200 g fedtfattig vaniljeyoghurt
Fremgangsmåde:
1 Tilsæt alle ingredienserne i bægeret i den nævnte rækkefølge.
2 Sæt blenderstaven på hovedenheden, og vælg hastighed 4 på
den variable hastighedskontrol.
3 Sæt blenderstaven i bunden af bægeret og tryk forsigtigt på
Precise Control-udløseren. Bevæg stavblenderen op og ned i
bægeret i 20-30 sekunder, indtil smoothien er blendet.
Hindbærmilkshake
Ingredienser:
• 80 g friske hindbær
• 100 g vaniljeis
• 200 ml letmælk
Fremgangsmåde:
1 Tilsæt alle ingredienserne i bægeret i den nævnte rækkefølge.
2 Sæt blenderstaven på hovedenheden, og vælg hastighed 4 på
den variable hastighedskontrol.
3 Sæt blenderstaven i bunden af bægeret og tryk forsigtigt på
Precise Control-udløseren. Bevæg stavblenderen op og ned
i bægeret i 20-30 sekunder, indtil milkshaken er blendet.
Porre- og kartoffelsuppe
Antal portioner: 4
Ingredienser:
• 25 g smør eller margarine
• 2 mellemstore porrer (285 g), skåret i skiver
• 1 lille finthakket løg (100 g)
• 500 g kartofler, skåret i tynde skiver
• 1,1 liter grøntsagsbouillon
• 1 tsk blandede urter
• 1 spsk. salt
• Sort peber
• Purløg til garnering
• Serveres med brød med sprød skorpe
Fremgangsmåde:
1 Smelt smørret i en stor gryde (brug ikke en gryde med slip let-
belægning) og tilsæt porrer og løg. Steg let uden at brune i
10 minutter, rør rundt af og til:
2 Tilsæt kartofler, bouillon, krydderurter og krydderier, bring det hele
i kog. Tildæk og lad det simre let i 30 minutter, eller indtil det bliver
mørt.
3 Lad det køle let af, og sæt derefter blenderstaven på
hovedenheden. Stil den variable hastighedskontrol på 4.
4 Anbring blenderstaven i gryden, og blend suppen med Precise
Control-udløseren, indtil den bliver jævn i ca. 50-60 sekunder.
Det kan gøres i gryden, så længe gryden ikke har en slip letbelægning.
5 Smag til med krydderier, og pynt med lidt klippet purløg, og servér
med brød med sprød skorpe.
q
97
Page 98

Matriciana sauce (til pasta)
Antal portioner: 4
Ingredienser:
• 1 fint hakket løg (130 g)
• 1 fed hvidløg, knust
• ½ grøn chilipeber, uden kerner og finthakket
• 1½ spsk. ekstra jomfruolie
• 100 g hakket bacon uden svær
• 400 g dåseblommetomater
• 100 ml (120 g) passata
• 2 spsk hvidvin
• Salt og friskkværnet sort peber
• Serveres med friskt kogt pasta
• Serveres med parmesanost
Fremgangsmåde:
1 Hæld olie i en stor gryde (brug ikke en gryde med slip let-
belægningnon-stick), og varm den i et par minutter.
2 Steg let løg, hvidløg og chilipebrene i 2- 3 minutter uden at brune
dem, rør rundt af og til med en grydeske i træ.
3 Tilsæt den hakkede bacon i gryden, og steg endnu et minut.
Læg låget på gryden, og kog ved mellemvarme i 5 minutter.
4 Tilsæt blommetomaterne, passata og vin, krydr med lidt salt og
smag til med lidt salt og peber.
5 Læg låget på gryden pg lad det simre let i 25 minutter, eller indtil
løgene er møre.
6 Kog pastaen efter anvisningerne på pakken ti minutter før. saucen
er klar.
7 Brug blenderstaven på hastighed 4 på den variable
hastighedskontrol for at få en jævn sauce. Det kan gøres i gryden,
så længe gryden ikke har en slip let-belægning. Start
stavblenderen med Precise Control-udløseren ved at bevæge den
let på tværs af gryden, indtil du opnår den ønskede konsistens.
Det kan tage ca. et minut for at få en jævn sauce.
8 Hæld vandet fra pastaen, og bland saucen i den. Gennemvarm,
om nødvendigt og servér straks parmesan-ost.
Grøntsagssauce (til pasta)
Antal portioner: 4
Ingredienser:
• 2 spsk. olivenolie
• 1 hakket løg (130 g)
• 2 små gulerødder (160 g), skåret i terninger
• 2 fint hakkede selleristængler (80 g)
• 1 fed hvidløg, knust
• 1 porre (120 g), hakket
• 1 gul peber, skåret i terninger
• 1 rød peber, skåret i terninger
• 2x 400 g hakkede dåsetomater
• ½ spsk. balsamisk eddike
• ½ spsk. strøsukker
• 2 tsk oregano
• 1 tsk blandede urter
• Salt og peber
• Serveres med friskt kogt pasta
• Serveres med parmesanost
Fremgangsmåde:
1 Opvarm olien i en stor gryde (brug ikke en gryde med slip let-
belægning) og steg løg, gulerod, selleri, hvidløg og porre let
i 5 minutter uden at brune dem. Rør rundt af og til.
2 Læg låg på gryden, og lad det koge i 20 minutter, rør rundt af og
til. Tilsæt hakkede peberfrugter, og kog dem let i yderligere
10 minutter under låg.
3 Tilsæt tomater, krydderurter, sukker og eddike i gryden. Krydr med
salt og peber, og lad det simre under låg i 45 minutter, eller indtil
guleroden eller sellerien er blevet mør.
4 Kog pastaen efter pakkens anvisninger.
5 Brug blenderstaven på hastighed 4 på den variable
hastighedskontrol for at få en jævn sauce. Det kan gøres i gryden,
så længe gryden ikke har en slip let-belægning. Start
stavblenderen med Precise Control-udløseren ved at bevæge den
let på tværs af gryden, indtil du opnår den ønskede konsistens.
Det kan tage ca. et minut for at få en jævn sauce.
6 Hæld vandet fra pastaen, og bland saucen i den. Gennemvarm,
om nødvendigt og servér straks parmesan-ost.
98
Page 99

Tomatsalat
Ingredienser:
250 ml 350 ml
• ½-1 ½-1 rød chili, i halve med få kerner
• 150 g 225 g modne cherrytomater, halve
• 1 1½ limefrugter, pressede
• 20 g 30 g frisk koriander, groftskåret, så det
kan være i skålen
• i pulverform i pulverform Havsalt
• i pulverform i pulverform Friskt kværnet peber
Fremgangsmåde:
1 Sæt bladet på hakkeskålen.
2 Kom alle ingredienserne i skålen i den anførte rækkefølge.
3 Sæt hakkeskålens blendelåg på hovedenheden. Blend ved hjælp
af Precise Control-udløseren på hastighed 7 i 10 sekunder. Skrap
skålen med en spatel, om nødvendigt, og blend derefter igen i
endnu 5 - 10 sekunder.
4 Hæld det i en serveringsskål, og lad det stå i ca. en time før
servering. Det fremhæver smagen og gør det endu mere lækkert.
Servér med tortilla chips.
Bemærk: Du kan lave 350 ml i skålen, hvis du vil.
Pesto
Ingredienser:
• 50 g pinjekerner
• ½ fed hvidløg
• 25 g parmesan, revet
• 30 g frisk basilikum, kun blade
• 50 ml ekstra jomfruolivenolie
• Saften fra en halv citron
• Salt og friskt kværnet peber
Guacamole
Ingredienser:
• 75 g cherrytomater
• ½ frisk rød chili, uden kerner
• 65 g frisk koriander med stilke
• 1 moden avocado, i halve, uden sten og skind
• Saft af ½ - 1 lime (efter smag)
• Salt og peber efter smag
Fremgangsmåde:
1 Sæt bladet på hakkeskålen.
2 Skær avocadoen i to halve dele.
3 Kom alle ingredienserne i skålen i den anførte rækkefølge. Sæt
hakkeskålens blendelåg og hovedenheden på.
4 Blend ved hjælp af Precise Control-udløseren på hastighed 7 i 15
sekunder. Skrab skålens sider med en spatel, og blend derefter
igen i yderligere 15 sekunder, indtil det bliver jævnt.
5 Smag til med krydderier.
q
Fremgangsmåde:
1 Sæt bladet på hakkeskålen.
2 Kom alle ingredienserne i skålen i den anførte rækkefølge.
3 Sæt hakkeskålens blendelåg på hovedenheden. Blend ved hjælp
af Precise Control-udløseren på hastighed 7 i 15 sekunder. Skrab
skålen med en spatel, om nødvendigt, og blend igen i endnu
15-30 sekunder.
Bemærk: Pestoens konsistens kan fortyndes ved at tilsætte
lidt citronsaft og olivenolie efter behov.
Servér som tilbehør til spaghetti bolognese eller blandet i mosede
kartofler.
Bemærk: Opbevar frisk pesto i en lufttæt beholder og dæk
pestoens overflade med lidt olivenolie, inden du sætter den i
køleskabet.
99
Page 100

Kylling Jalfrezi
Antal portioner: 4
Ingredienser:
Til Jalfrezi-pasta
• 2 halvede hvidløg
• 1 x 3cm stykke frisk ingefær, pillet og skåret i 4 stykker
• 1 frisk chilli (25g) uden stilk og skåret i 4 stykker
• 12 gram frisk koriander
• 1 teskefuld koriander
• 1 teskefuld brunt sennepsfrø
• 1 teskefuld bukkehornspulver
• 2 teskefuld spidskommen
• 1 teskefuld gurkemeje
• ½ spsk. salt
• 2 spsk. jordnøddeolie
• 2 spsk. tomatpuré
• 2 spsk. vand
• 2 spsk. paprika
Til karry
• 2 spsk. olie
• 240 g snittede løg
• 500 g kyllingbryst i tern
• 1 x 400 g tyndskårne tomater
• 200 ml vand
• 1 mellemstor grøn peber i skiver
Metode:
1 Sæt bladet på hakkeskålen.
2 Placer alle ingredienserne i hakkeskålen i den nævnte rækkefølge
3 Sæt hakkeskålens blenderlåg og hovedenhed på. Blend ved
hastighed 7 og skrab begge sider undervejs indtil det er fint
snittet (ca. 30-40 sekunder).
4 Til karryen varmes olien i en mellemstor gryde og løggene brunes
let med låg i 10 minutter indtil de er gyldne.
5 TIlføj kylling og steg til den er brun.
6 Kom frisk jalfrezi i og kog over mellemvarme i 3 minutter.
7 Kom dåsetomater i med vand og skiveskåren peberfrugt, og kog i
1 time. Fjern låget efter behov for at reducere væsken.
Serveres med kogte ris og naanbrød.
Kylling-satay
Forberedelse: 10 spyd (Antal portioner: 4-5)
Ingredienser:
• 3 kylilngebrys
• 20 gram frisk koriander
• 1 stor rød chilli (inkl. frø), skåret i 4 stykker
• 1 fed hvidløg, skåret i halve
• 5 spiseskefulde (afrundet) peanutsmør
• Lidt soyasauce
• 3 cm frisk ingefær afpillet og skåret i 4 stykker
• Saft (50 ml) af 2 limefrugter
• Lidt vand
• Salt og peber
Fremgangsmåde:
1 Sæt bladet på hakkeskålen. Opblød 10 træspyd i koldt vand.
3 Læg det hele i vandet i hakkeskåen, sæt låget på og
hovedenheden.
4 Brug hastighed nr. 7 og tre ganges tryk på 10-15 sekunder.
Kontroller ensartetheden, skrab siden af skålen med en plastspatel
efter behov. Fortsæt til det er blendet fint.
5 Kom vand i blandingen til den er blød nok til at den glider af en
ske når du tæller til 3.
6 Skær kyllingen i små stykker og sæt 8 stykker på de vædede
træspyd.
7 Gnub marinaden på kyllingen. Dækkes til og sættes på køl et par
timer eller til næste dag.
8 Grilles på forvarmet grill og vendes ofte til kødsaften er lys.
100
 Loading...