

Page 1

SC461007MEE Rev1_Instruction Book 17/06/2014 17:11 Page 1
Supreme Precision 3 in 1 Slow Cooker
Please read and keep these instructions
Supreme Precision 3 in 1 Slow Cooker
Lesen Sie diese Bedienungsanleitung, und heben Sie sie gut auf
Supreme Precision 3 in 1 Slow Cooker
Lea estas instrucciones atentamente y guárdelas
Supreme Precision 3 in 1 Slow Cookerr
Leia e guarde estas instruções
Supreme Precision 3 in 1 Slow Cooker
Leggere e conservare le presenti istruzioni
Supreme Precision 3 in 1 Slow Cooker
Læs og gem venligst denne vejledning
Supreme Precision 3 in 1 Slow Cooker
Prosimy zapoznać się z niniejszą instrukcją obsługi i zachować ją do wykorzystania w przyszłości
g
d
e
p
i
q
}
Page 2

SC461007MEE Rev1_Instruction Book 17/06/2014 17:11 Page 2
g
Health and Safety
The use of any electrical appliance requires the following common sense safety rules.
Please read these instructions carefully before using the product.
• This appliance can be used by children aged from 8 years and above if they have been given
supervision or instruction concerning use of the appliance in a safe way and if they
understand the hazards involved. Cleaning and user maintenance shall not be made by
children unless they are older than 8 and supervised. Keep the appliance and its cord out of
reach of children aged less than 8 years.
• Appliances can be used by persons with reduced physical, sensory or mental capabilities or
lack of experience and knowledge if they have been given supervision or instruction
concerning use of the appliance in a safe way and understand the hazards involved.
• Children shall not play with the appliance.
• Cleaning and user maintenance shall not be made by children unless they are older than 8
and supervision.
• Keep the appliance and it’s cord out of reach of children less than 8 years.
• This appliance is intended to be used in household and similar applications such as: farm
houses, by clients in hotels, motels and other residential type environments, and bed and
breakfast type environments.
It is not suitable for use in staff kitchen areas in shops, offices and other working
environments.
Location
• Always locate your appliance away from the edge of the worktop.
• Ensure that the appliance is used on a firm, flat, heat resistant surface.
• Do not use the appliance outdoors or near water.
Mains cable
• The mains cable should reach from the socket to the appliance without straining the connections.
• Do not let the mains cable hang over the edge of the worktop or open space where a child could
reach it.
• Do not let the cable run across a cooker or hot area which might damage the cable.
• If the supply cable is damaged, it must be replaced by the manufacturer, its service agent or
similarly qualified
Personal safety
• WARNING: Do not touch the top of the appliance or other hot parts during or after use, use handles
or knobs.
• To protect against the risk of electrical shock do not put base in water or in any other liquid.
• Do not touch hot surfaces. Use oven gloves or a cloth when removing lid or handling hot containers.
• Extreme caution must be used when moving an appliance containing hot food, water, or other hot
liquids.
Other safety considerations
• Do not switch on the Slow Cooker if the Cooking Pot is empty.
• Allow the Glass Lid and Cooking Pot to cool before immersing in water.
• Never cook directly in the Base Unit. Use the Cooking Pot.
• Do not use the Cooking Pot or Glass Lid if cracked or chipped.
• Do not switch on the appliance when it is upside down or laid on it’s side.
• The Glass Lid and Cooking Pot are fragile. Handle them with care.
• The use of attachments or tools not recommended by Morphy Richards may cause fire, electric
shock or injury.
• Do not place on or near a hot gas or electric burner or in a heated oven.
• Unplug from the socket when not in use, before putting on or taking off attachments, and before
cleaning.
• The appliance is not intended to be operated by means of an external timer or a separate remotecontrol system.
Electrical requirements
Check that the voltage on the rating plate of your appliance corresponds with your house electricity
supply which must be A.C. (Alternating Current). Should the fuse in the mains plug require changing,
a 3 amp BS1362 fuse must be fitted.
WARNING: This appliance must be earthed.
2
Page 3

SC461007MEE Rev1_Instruction Book 17/06/2014 17:11 Page 3
⁄
¤
‹
A
B
C
›
fi
fl
·‚
„
g
d
D
e
p
i
q
E
}
‡
F
‰
Â
3
Page 4

SC461007MEE Rev1_Instruction Book 17/06/2014 17:11 Page 4
G
H
I
4
Page 5

SC461007MEE Rev1_Instruction Book 17/06/2014 17:11 Page 5
Easy set-up guide
Please also refer to the main instruction booklet, which contains
important safety information and more detail on how to use
Supreme Precision 3 in 1 Slow Cooker.
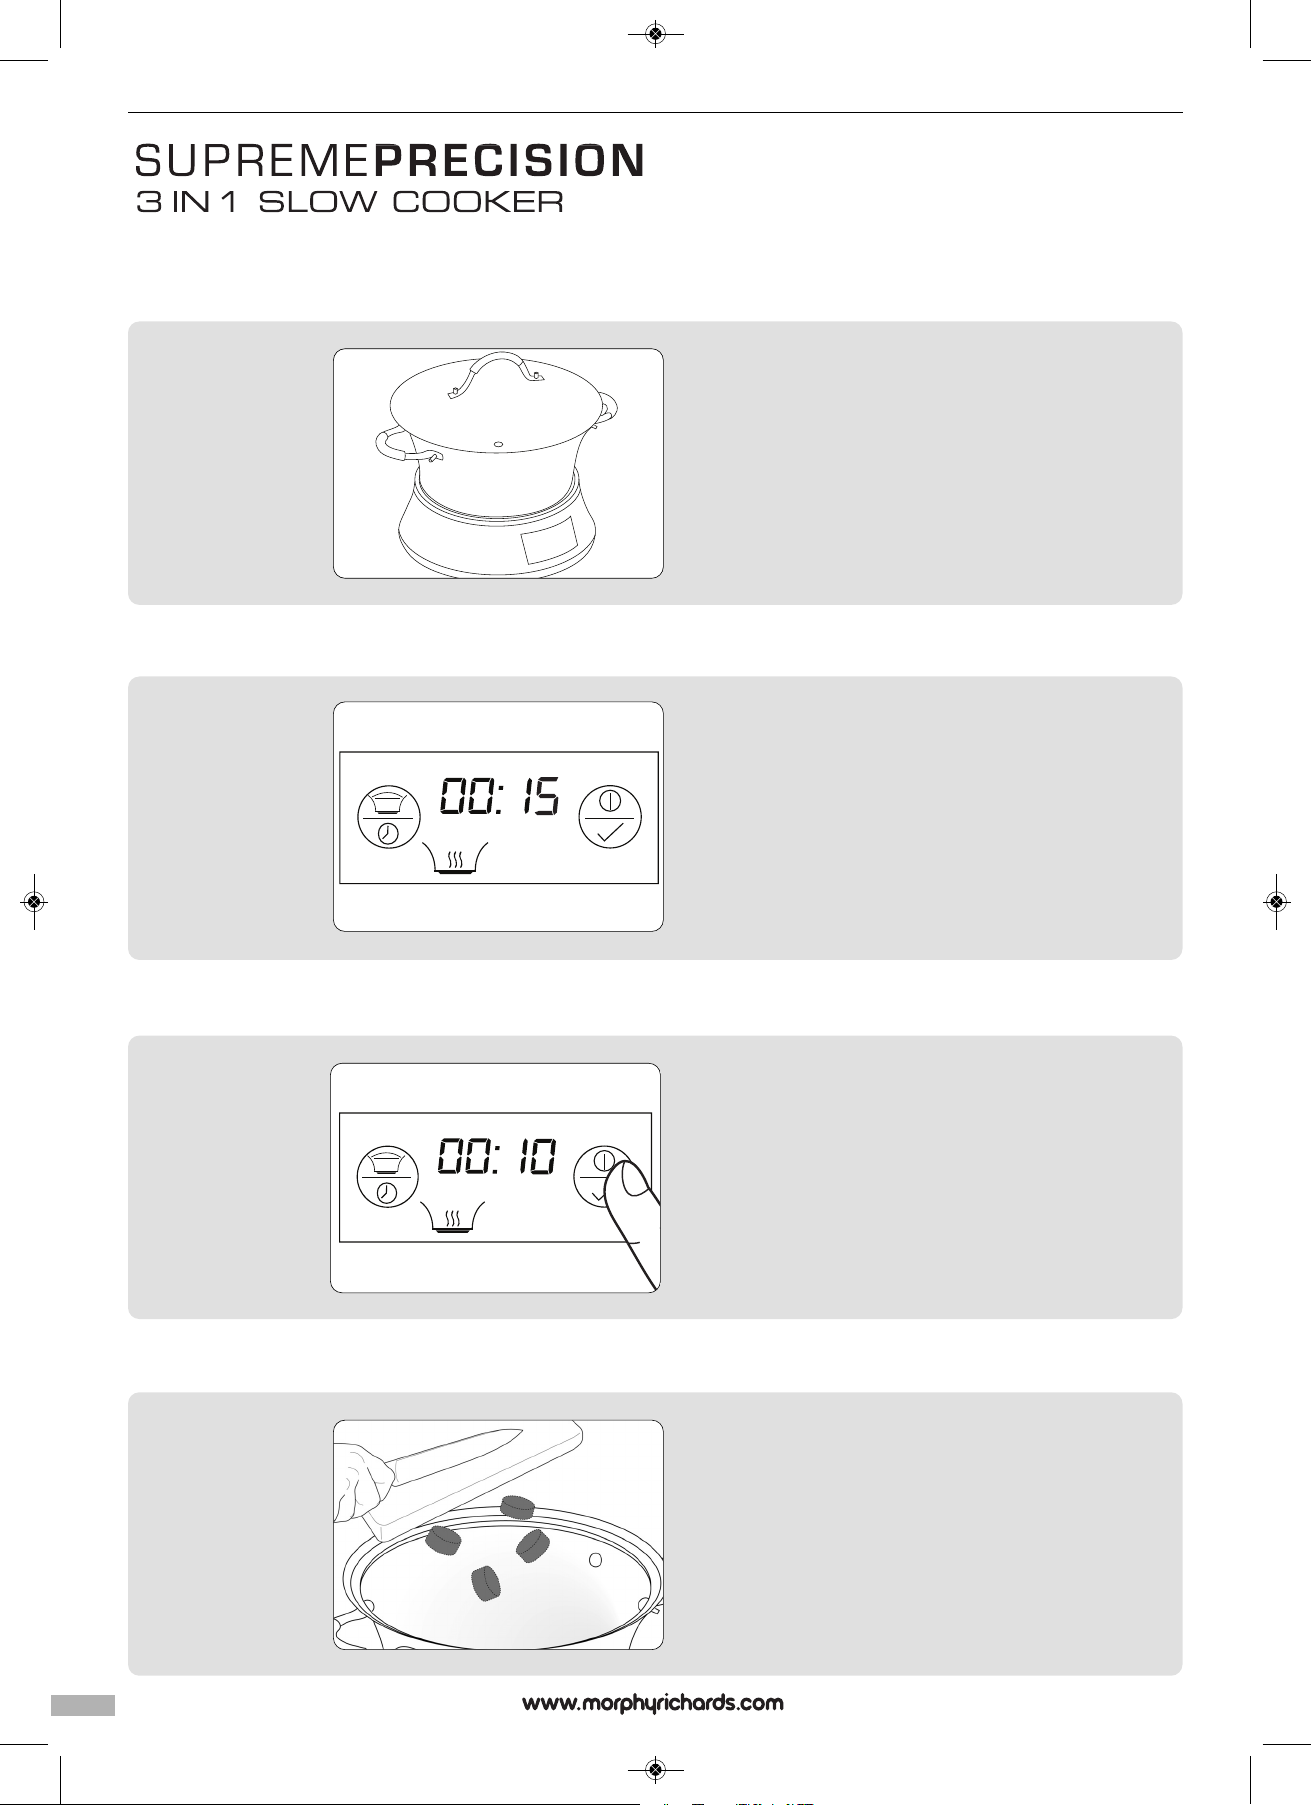
This guide tells you how to use the Supreme Precision 3 in 1 Slow Cooker to seal / brown
approximately 1kg of meat and then use the 1:30 hour stew or 8 hour slow cook
programme. For all other programmes, please see the full instructions.
To Use the Seal / Brown Function
1
2
Place the pan ‹on to the base unit fi, plug the Supreme Precision 3 in 1 Slow
Cooker in.
‰
The display will show the default screen (left.) The Seal / Brown icon
‚
will be flashing.
display
Add an appropriate amount of oil to the pan for the quantity of meat you wish to
seal.
Press the ‘Accept’ button „. The Supreme Precision 3 in 1 Slow Cooker will beep
for approximately 2 seconds and the display will stop flashing. The pan will then
start to heat up and the timer
approximately 5 minutes to reach the correct temperature for sealing/browning
meat (i.e. when the timer reads 00:10)
‚
will begin to countdown. The oil will take
and time
g
d
e
p
i
q
}
3
Add the meat to pan and stir regularly until the outside of the meat is
sealed/browned. When the timer reaches zero, the base will beep and the cooking
process will stop. If your meat is sealed before the 15 minutes is up, hold down
the ‘Accept’ button
cooking process will stop. If you need to continue, repeat the process from stage
2 above.
„
for approximately 3 seconds. The base will beep and the
5
Page 6

SC461007MEE Rev1_Instruction Book 17/06/2014 17:11 Page 6
To use the 1:30 Stew Function
4
OR to use the Slow Cook Function
5
When the sealing/browning process is complete, add your remaining ingredients
(as per the recipe). Press the ‘Function / Time’ button
screen will appear (left) Press the ‘Accept’ button
beep for approximately 2 seconds before the cooking process begins. Replace
the lid when using the Supreme Precision 3 in 1 Slow Cooker on this setting. For
countdown timer and keep warm, please see point 6.
·
once and the following
„
twice, the base will then
·
twice and the following
„
twice, the base will then
Countdown Timer and Keep Warm Function
6
At the end of the cooking process the product will beep and automatically switch
to keep warm. Keep warm will last for up to two hours and counts up from H0:00
to H2:00. At the end of the 2 hours, the display will show ‘H’ which will stay on the
screen until the hot plate reaches ambient temperature (approximately 40°C). The
screen will then go blank.
Pressing any button will take you back to the screen shown when
first turned on.
6
Page 7

SC461007MEE Rev1_Instruction Book 17/06/2014 17:11 Page 7
g
Getting the best from your new appliance...
Safety
Never touch the outer surface of the slow cooker pan during it’s operation or before it has
cooled down. Use oven gloves when removing the lid or stainless steel cooking pan.
Efficiency
Removing the lid will allow valuable heat to escape, reducing the efficiency of your slow cooker
and increasing the cooking time. Try not to remove the lid more than 3 or 4 times to stir or add
ingredients.
Enjoy the benefits
Slow cooking gives you convenient, versatile and flavoursome food. Longer cooking times allow
better distribution of flavours, giving them time to blend and season the food. A slow cooker
heats food gently, making it a great way to cook meats, less expensive cuts in particular, such
as stewing beef, which are tenderised through the long cooking process. Remember, there are
no limits to the potential uses of your slow cooker, only your imagination!
Features
⁄
Glass lid
¤
Steam vent
‹
Stainless steel cooking / serving pan (either 4.5L or 6.5L depending on model)
›
Heating element
fi
Base unit
fl
Control / Display panel (see enlarged diagram)
‡
Drain hole x2 (underneath)
·
Function / Time button
‚
Time display
„
Accept button
‰
Seal / Brown icon and Stew Icon
Â
Slow Cook icon
Key
Seal/Brown icon
Stew icon
Slow Cook icon
Cooking Capacity
• The 6.5 litre Supreme Precision 3 in 1 Slow Cooker has a maximum working capacity of 5 litres.
• The capacity can be found on the rating label, located underneath the product.
Before using the Supreme Precision 3 in 1 Slow Cooker
for the first time
Remove all labels and tags from the product.
Wash the stainless steel pan and lid in hot soapy water with a sponge or dishcloth. DO NOT use
a scouring pad or other abrasive material as this will mark the stainless steel. Rinse the pan and
lid thoroughly and dry.
IMPORTANT: DO NOT IMMERSE THE SUPREME PRECISION 3 IN 1 SLOW COOKER BASE IN
WATER
Please note:
During initial use, you may notice a slight odour due to the burning off of manufacturing residue.
This is completely normal, does not effect the food being cooked and will disappear after a few
uses.
Supreme Precision 3 in 1 Slow Cooker Hints & Tips
• All ingredients should be at room temperature before adding. If chilled, allow to come to room
temperature, as cold food will affect the cooking time.
• Meat can be used chilled from the fridge, but do not use frozen meat. Use the browning function to
seal the meat.
• Make sure all frozen ingredients are thoroughly thawed before use.
• If using cold stock in the slow cooking recipe (for example, wine) you will need to pre-heat the
ingredients. Start with the browning function first, adding all the ingredients. When the 15 min time is
up, continue with the slow cooking function.
• In traditional stove top slow cooking, it is advised to coat the meat in flour before browning. There is
no need to do this in the Supreme Precision 3 in 1 Slow Cooker. Simply brown / seal the meat as
instructed. If the liquid needs to be thickened, add and stir in a corn flour / cold water paste mix 30
minutes towards the end of the cooking time.
• If using meat on the bone (for example, chicken thighs, spare ribs, etc), the slow cooking process
can make the meat fall away from the bone - this is normal, and results in a richer flavour. However,
watch out for small bones that could be in the liquid.
• Do not over fill the pan, as the recipes in this instruction booklet are designed for maximum
capacity, and allows room above the food for even cooking. The capacity can be found on the rating
label, located underneath the product. If using your own recipe, do not fill above the handle rivets
that can be seen inside the pan.
• The lid will become very hot in use, especially the glass window and the stainless steel rim. The
silicon insulated handles will stay cool, allowing you to lift the lid with. However, it is advisable to
take the precaution of using oven gloves when doing this.
• Ingredients should be evenly distributed throughout the pan. However, root vegetables are better
placed in the lower half of the pot to start cooking. All ingredients should be immersed in the
cooking liquid.
• To ensure even cooking, root vegetables should be cut to size (approx 20mm cubed).
• If the pan over boils, this will usually be because it has been over filled, so remove some of the
ingredients and /or liquid.
• In general, tough meats like stewing meat require longer cooking times which are ideal for slow
cooking. For the stew function, a better quality cut of meat is required to suit the 1:30–1:45 cooking
time.
• Chicken and quality cuts of meat require less time to cook. You should therefore use the lower value
of the time range – for example, for level 1 use 8 hours.
• For dumplings, add to the stew 30-45 minutes before the end time. You can add these to the
surface, and there is no need to submerge in the liquid.
• Ham joints should be left in the plastic wrapper, if supplied. If not, use a suitable heat resistant
plastic bag or tie with butchers string to prevent the ham from falling apart during the cooking.
• If using the stew setting, allow the cooked food to rest for 10 minutes in the pan before serving. This
allows the hot (boiling) food to cool before eating.
• When you have become experienced at using your Supreme Precision 3 in 1 Slow Cooker, you can
begin to create your own recipes, but it is advisable to follow an existing recipe as a guide. If using
ingredients such as pasta, milk, cream, seafood or shellfish in a recipe, these should be added 30
minutes towards the end of the cooking of the other ingredients. Coconut milk and rice pudding
recipe does not apply.
• Do not leave raw, uncooked food in the pan for any length of time. Start the cooking process as
soon as possible. If you have to delay the cooking, store the food in a fridge, and when ready, allow
to come back to room temperature.
• If a previously cooked recipe has gone cold, use the stew setting at 1:30hrs to reheat the food.
Depending on the recipe, this can take 30-45 minutes to reheat. Ensure the food is hot before
serving.
• If you are cooking half quantities, cooking time can usually be reduced to two thirds. Check that the
food is thoroughly cooked before serving.
• Adapting existing recipes from conventional cooking to use in a slow cooker may require reducing
the liquid used, as liquid does not evaporate to the same extent.
• Where stock is required, use boiling water.
• When cooking joints of meat, start by covering with boiling water or stock. This can be reduced
towards the end of the cooking time.
• Uncooked red kidney beans must be soaked and boiled for 10 minutes to remove toxins before use
in the Supreme Precision 3 in 1 Slow Cooker.
• If required pour off excess oil after browning.
• If using stock or sauces from jars or containers, heat first in a microwave and then add to the pan.
Alternatively add 30 minutes to the cooking time.
A
Explanation of Terms
Browning/Sealing:
Before stewing or slow cooking meat, it is important that the meat is sealed / browned first. This
means to cook the meat lightly on the outside in hot oil before starting the stewing or slow
cooking process (the meat should still be raw in the middle). Sealing / browning your meat in
this way helps it to retain flavour as well as moisture.
Stewing:
With respect to the Supreme Precision 3 in 1 Slow Cooker, stewing means to cook your meat
and / or vegetables in a liquid (eg wine, stock, water) in between 1 hour 30 minutes and 1 hour
45 minutes.
Slow Cooking:
Slow cooking is a way of cooking food over a long period of time (usually between 4 and 10
hours) in a liquid (eg wine, stock, water). As the name suggests, food is cooked more slowly and
gently, often meaning that meat will be more tender. Meats with a higher fat content are well
suited to slow cooking as the process allows the fat to melt, leaving the meat very tender.
Instructions for Use
Place the base fion to a dry, level, heat resistant surface, away from the edge of the work
surface. Do not use on the floor.
Please note:
If the product is switched on and not in use, the timer display light will switch off to standby
mode after 30 seconds.
g
7
Page 8

SC461007MEE Rev1_Instruction Book 17/06/2014 17:11 Page 8
Supreme Precision 3 in 1 Slow Cooker Sealing/Browning Function
Place the pan ‹on to the base unit fiand plug the Supreme Precision 3 in 1 Slow Cooker in.
fl
The display
The time display
amount of oil to the pan for the quantity of meat you wish to seal.
See recipes in this instruction booklet.
We recommend that approximately two tablespoons of vegetable oil is suitable to seal between
800g-1200g of meat. This can however be varied depending on personal taste and the amount
of fat in the meat being sealed.
To select the Sealing function, press the ‘Accept’ button
Slow Cooker will beep for approximately 2 seconds and the display will stop flashing. The pan
will then start to heat up and the timer
approximately 5 minutes to reach the correct temperature for sealing / browning meat (i.e. when
the timer reads 00:10). A good way to test if the oil if hot enough is to add a small piece of meat
or onion to the pan. If it sizzles when it hits the oil, the temperature is sufficient to seal / brown.
If it does not sizzle, let the pan heat up for another minute or so and then test it again.
Add the meat to pan and stir regularly until the outside of the meat is sealed / browned. When
the timer reaches zero, the base will beep and the cooking process will stop. If your meat is
sealed before the timer reaches zero, hold down the ‘Accept’ button
seconds. The base will beep, the cooking process will stop and the screen will return to the
default display
If your meat needs a few extra minutes sealing after the timer has reached zero, simply press the
‘Accept’ button to start the sealing/browning function again. As explained above, to cancel the
sealing function before the timer reaches zero, hold down the ‘Accept’ button
approximately 3 seconds.
Due to the high temperature that the Supreme Precision 3 in 1 Slow Cooker operates at in Seal /
Brown mode, you should only carry out a maximum of two 15 minute programmes in quick
succession. If you try to select the programme a third time and the unit is hot, the following
screen will show --:-- and the ‘Seal / Brown’ icon
The function cannot be selected again until the product has cooled down sufficiently. This
should however not cause any difficulties as it should always be possible to seal/brown the
required amount of meat in 30 minutes (2 x 15).
Please note:
Do not start the ‘Sealing / Browning’ function without the pan
make the product overheat. You should also not start the ‘Sealing / Browning’ function without
adding your oil to the pan.
will show the default screen B.
‚
and the Sealing Function icon ‰will both be flashing. Add an appropriate
„
once. The Supreme Precision 3 in 1
‚
will begin to countdown. The oil will take
„
for approximately 3
B
.
„
for
‰
will flash C.
‹
on the base fias this will
Sealing/Browning on your gas or electric hob in your
Supreme Precision 3 in 1 Slow Cooker Pan
If you prefer, you can use your Supreme Precision 3 in 1 Slow Cooker pan on your gas or
electric hob to seal / brown your meat.
Simply add your oil as detailed above and place the pan on your stove. The oil may heat up
slightly more quickly on your hob, so use a small piece of meat / onion as explained previously
to test the temperature.
Sealing / browning meat tip
When sealing large quantities of meat, we suggest you split the meat into smaller batches to
make the job easier. As the meat should be stirred at all times during the process, smaller
quantities of meat are easier to handle.
Stew Function
Place the pan ‹on to the base unit fi. Add your ingredients as per the recipe instructions you
are following. Whether you have used the ‘Seal / Brown’ function or just turned the Supreme
Precision 3 in 1 Slow Cooker on, the display screen showing should be the default one
·
Press the ‘Function / Time’ button
The time display‚and Stew Icon ‰will both be flashing. Press the ‘Accept’ button „to
choose Stew function. The Stew icon
(Please note that if you have selected the Stew Function by mistake, you can return to the
previous screen by holding down the ‘Accept’ button
You can then select either the 1 hour 30 minute or 1 hour 45 minute programme (dependent on
which recipe you are following). To select the 1 hour 30 minute programme, press the ‘Accept /
Start / Stop’ button
„
button
The time will then stop flashing and the base will beep for approximately 2 seconds before the
cooking process begins. The timer will then countdown to zero.
If more cooking time is required you can repeat the stew setting. You must however determine
how much extra cooking time you need.
If for any reason you need to cancel the cooking process before the timer has reached zero,
hold down the ‘Accept’ button
process will stop and the screen will return to the default display
During the stew function, steam will escape through the steam vent. Ensure the vent is
positioned at the back of the product.
WARNING: The steam and vent will be hot.
At the end of the cooking process the Supreme Precision 3 in 1 Slow Cooker will beep and
automatically switch to Keep Warm
„
. The Time Display‚will then change to show 01:45. Press the ‘Accept’ button „.
. To select the 1 hour 45 minute programme, press the ‘Function / Time’
once and the display will change to
‰
will then stop flashing.
„
for approximately 2 seconds.)
„
for approximately 3 seconds. The base will beep, the cooking
E.
B
.
D
.
Slow Cook Function
Place the pan ‹on to the base unit fi. Add your ingredients as per the recipe instructions you
are following. Whether you have used the ‘Seal / Brown’ function or just turned the Supreme
Precision 3 in 1 Slow Cooker on, the display screen showing should be the default one as below
F
.
·
Press the ‘Function / Time’ button
‚
The time display
Cook programmes available – 1, 2 and 3. The difference is the amount of time that each
programme can be set for. Each slowcook programme enables you to select cooking times at 30
minute intervals between the minimum and maximum cooking times. For example on low setting
it is possible to select a cooktime of 9 1/2 hours if desired. The keep warm function is additional
to this time setting.
Each programme has a different icon as below.
If you wish to use Slow Cook programme 1, press the ‘Accept’ button
amount of time you would like the Slow Cook programme to run for. Pressing the ‘Function /
Time’ button
displayed, press the ‘Accept’ button
for approximately 2 seconds before the cooking process begins. The timer will then countdown
to zero.
The time will then stop flashing and the base will beep for approximately 2 seconds before the
cooking process begins. The timer will then countdown to zero.
If you wish to use Slow Cook programme 2, press the ‘Function / Time’ button
Cook icon 2 will appear), before pressing the ‘Accept’ button
above.
If you wish to use Slow Cook programme 3, press the ‘Function / Time’ button
Cook icon 3 will appear), before pressing the ‘Accept’ button
above.
The time will then stop flashing and the base will beep for approximately 2 seconds before the
cooking process begins and the timer will then countdown to zero.
Once you press the ‘Accept’ button
time will flash. (Please note that if you have selected the ‘Slow Cook Function’ by mistake, you
can return to the previous screen by holding down the ‘Accept’ button
seconds)
If for any reason you need to cancel the cooking process before the timer has reached zero,
hold down the ‘Accept’ button
process will stop and the screen will return to the default display
and Slow Cook Icon Âwill both be flashing. There are three different Slow
Between 8 and 10 hours (low)
Between 6 and 8 hours (medium)
Between 4 and 6 hours (high)
·
allows you to cycle through the times available. When the time you want is
twice and the display will change to G.
„
then select the
„
. The time will then stop flashing and the base will beep
·
„
. Then select the cook time as
„
. Then select the cook time as
„
, the Slow Cook icon Âwill stop flashing and just the
„
for approximately 3 seconds. The base will beep, the cooking
H
.
once (Slow
·
twice (Slow
„
for approximately 2
Keep Warm
At the end of the cooking process the product will beep and automatically switch to keep warm.
Keep warm lasts for up to two hours and counts up from H0:00 to H2:00. At the end of the 2
hours, the base will beep and the display will show H which will stay on the screen until the hot
plate reaches ambient temperature (approximately 40°C)
The screen will then go blank. Pressing any button will take you back to the screen shown when
first turned on.
Please note that the Keep Warm function can be stopped at any time during the 2 hour period
by holding down the ‘Accept’ button
After cooking
Switch off at the mains socket and unplug the unit.
Important: Ensure base unit is cool before storing in the pan.
„
for approximately 2 seconds.
I
.
Cleaning and Taking Care of Your Supreme Precision 3 in 1
Slow Cooker
• The pan and lid can be washed in a dishwasher. Alternatively, you may use hot, soapy water with a
non-abrasive scouring pad. Do not use abrasive cleaners or detergents.
• Do not immerse the power base in water or any other liquids. To clean, use a damp cloth and dry
thoroughly.
• Ensure the base of the pan, and the hot plate surface are clean, free from burnt-on food, and dry
before use. The outer base of the pan can be cleaned with a metal scouring pad if required, to
remove stubborn stains.
• When adding ingredients and liquid to the cooking pot, avoid over filling. If an over-spill does occur
that runs down into the base, switch off and unplug from the mains socket, remove the pan, and
allow the liquid to drain away through the drain holes. Fully clean away any excess food or liquid that
may have lodged in the recess between the heater plate and the metal reflector, wipe over with a
damp cloth, and dry thoroughly before next use.
8
Page 9

SC461007MEE Rev1_Instruction Book 17/06/2014 17:11 Page 9
RECIPES
Beef Stew
6.5L
Beef, cubed 1kg
Potatoes, cubed 700g
Carrots, sliced 700g
Leeks, sliced 3 large
Onion, chopped 2
Beef stock 1.5L
Mixed herbs 3 tsp
Salt and freshly ground black pepper
When using the browning / sealing function, always add 30ml (2 tbsp) of cooking oil to the pan
first.
Method
• Use browning / sealing function to brown meat and fry onions.
(Fry meat in two batches)
• Mix in rest of ingredients.
• Switch to slow cook setting.
• Cook for maximum time for the setting.
• Thicken with corn flour / water mix.
• Add dumplings 30 minutes to 1hr before end.
Chicken and White Wine
6.5L
Chicken breasts 10
Butter 40g
Onion, chopped 2 large
Mushrooms, sliced 400g
White wine 5 tbsp
Chicken stock 750ml
Mixed herbs 2 tsp
Corn flour 5 tbsp
Egg yolks 3
Double cream 150ml
Salt and freshly ground black pepper
Method
• No need to use browning / sealing function.
• Add all ingredients except flour, egg and cream to pan and set to slow cook.
• Thicken with corn flour / water mix.
• Once cooked, mix egg and cream together with a little of the hot liquid and stir into the dish.
• Chicken recipes are usually cooked for the shortest time for each setting.
e.g. 8hrs 6 hrs 3-4hrs
Boiled Ham
6.5L
Gammon joint 1.8kg
Method
• No need to use browning / sealing function.
• Place gammon in pan and cover with boiling water.
• Can be cooked for the min or max time for each setting.
Vegetable soup
6.5L
Vegetable selection peeled and chopped 1.8kg
Vegetable stock 2L
Mixed herbs to taste
Salt and freshly ground black pepper
Method
• No need for browning / sealing function.
• Add all ingredients at once, and cook for the maximum time for the setting.
• Liquidise when cooled.
New England Beef
6.5L
Beef joint, brisket 1.5kg
Bouquet garni 1
Thyme 2 tsp
Peppercorns 2 tsp
Shallots, peeled 10
Carrots, chopped 550g
Swede, chopped 300g
Water, enough to cover joint
When using the browning / sealing function, always add 30ml (2 tbsp) of cooking oil to the pan first.
Method
• Use browning / sealing function to brown all sides of beef.
• Add rest of ingredients and cook for minimum time for the setting.
• Thicken sauce with corn flour for gravy.
Bolognese sauce
6.5L
Minced beef 1.5kg
Onions, chopped 3
Celery, sliced 6 sticks
Garlic cloves, crushed 3
Tomato puree 7 tbsp
Flour 3 tbsp
Tinned tomatoes, chopped 3 cans
Beef stock 600ml
Mushrooms, sliced 300g
Mixed herbs 2 tsp
Salt and freshly ground black pepper
When using the browning / sealing function, always add 30ml (2 tbsp) of cooking oil to the pan first.
Method
• Use browning / sealing function to brown mince, in batches.
• Add onions, garlic and celery and fry until soft.
• Switch to slow cook.
• Mix flour with puree and add along with rest of ingredients.
• Stir well.
• Can be cooked for minimum to maximum time for the setting.
g
9
Page 10

SC461007MEE Rev1_Instruction Book 17/06/2014 17:11 Page 10
Sausage Pot
6.5L
Oil 1 tbsp
Sausages 1.5 kg
Onions, chopped 3 large
Carrots, sliced 5
Leeks, sliced 3
Beef stock 1.5ltr
Chutney 6 tbsp
Worcestershire sauce 5 tbsp
Salt and freshly ground black pepper
When using the browning / sealing function, always add 30ml (2 tbsp) of cooking oil to the pan first.
Method
• Use browning / sealing function to brown sausages in batches.
• Add vegetables and fry until soft.
• Switch to slow cook.
• Add rest of ingredients and cook for minimum time for the setting.
Beef Curry
6.5L
Vegetable oil 4 tbsp
Cooking apples, peeled cored and chopped 3 medium
Onions, chopped 3 large
Stewing steak, cubed 1.5kg
Curry powder 5 tsp
Beef stock 1L
Mango Chutney 5 tbsp
Sultanas 150g
Tinned tomatoes, chopped 600g
Lemon juice 3 tbsp
Corn flour 5 tbsp
Salt and freshly ground black pepper
When using the browning / sealing function, always add 30ml (2 tbsp) of cooking oil to the pan first.
Method
• Use browning / sealing function to brown the meat, a bit at a time.
• Add onions and fry until soft.
• Switch to slow cook
• Add other ingredients and stir well.
• Mix flour with puree and add along with rest of the ingredients.
• Stir well.
• Can be cooked for minimum to maximum time for the setting.
Thai Beef Curry
6.5L
Butter 60g
Stewing beef, cubed 1kg
Onion, chopped 2
Garlic cloves, crushed 4
Peanut butter 6 tbsp
Coconut milk 800g
Potatoes, quartered 700g
Curry powder 4 tbsp
Thai fish sauce 4 tbsp
Soft brown sugar 4 tbsp
Beef stock 1L
Method
• Melt butter in pan on browning / sealing function and add meat, garlic and onion and brown. (fry
meat in two batches for the 6.5L)
• Add onions and garlic and fry until soft.
• Add other ingredients and stir well.
• Switch to slow cook.
• Best cooked using Slow Cook function
BBQ Ribs
6.5L
Ribs 1.5kg
BBQ sauce 300ml
Method
• Marinade ribs in the sauce for a few hours or overnight.
• Place in pan and cook for required time.
• The longer the cook time the more tender the meat.
Syrup Sponge Pudding
6.5L
Butter 125g
Golden syrup 4 tbsp
Caster sugar 100g
Eggs 2
Self raising flour 200g
Milk 2 tbsp
Lemon juice 2 tbsp
Method
• Butter inside of a 1.25l pudding basin and line bottom with baking paper.
• Pour the syrup into the bottom of the basin.
• Cream butter and sugar until smooth and creamy.
• Gradually mix in eggs and flour and stir in milk and juice. Spoon mixture on top of syrup and cover
with pleated baking paper. Tie with string and make a handle.
• Place into Supreme Precision 3 in 1 Slow Cooker and fill with boiling water half way up the sides.
• Best cooked on fast stew setting for 1:45hr
10
Page 11

SC461007MEE Rev1_Instruction Book 17/06/2014 17:11 Page 11
Rice Pudding
6.5L
Butter 60g
Pudding rice 250g
Sugar 250g
Milk 2L
Nutmeg 1 tsp
Method
• Lightly grease the pan with butter.
• Add all ingredients to pan and stir.
• For best results cook on slow cook setting 1 (8 - 10hrs).
Chocolate Cake
6.5L
Cocoa 50g
Boiling water 6 tbsp
Baking powder 1 tsp
Self raising flour 175g
Caster sugar 150g
Oil 150ml
Eggs 3
Method
• Line a 7” cake tin with baking paper.
• Mix the cocoa with boiling water to a paste.
• Mix flour, baking powder and sugar together in a bowl.
• Beat eggs and oil together and add to mixture together with chocolate paste, mix well.
• Pour into tin and cover with foil. Tie with string and make a handle. Place into slow cooker and fill
with boiling water half way up the sides.
• Best cooked on fast stew setting for 1:45hr
Berry Cobbler
6.5L
Fresh fruit / berries(raspberries, blackberries, blueberries etc) 1.2kg
Sugar 150g
Self raising flour 200g
Suet 100g
Salt Pinch
Lemon zest 2 Lemons
Milk 6-8 tbsp
Method
• Place the fruit in the pan and stir in half the sugar.
• Mix the rest of the sugar with the flour, suet, salt and lemon zest.
• Add milk to bind into a dough, do not handle too much.
• Place balls of dough in the centre of the pan on top of the fruit. Do not allow the dough balls to
touch the pan sides as they will expand during cooking.
• Cook for the minimum time for the setting.
HELPLINE
If you have any difficulty with your appliance, do not hesitate to call us.
We are more likely to be able to help than the store from where you bought it.
Please have the following information ready to enable our staff to deal with your query quickly.
• Name of the product.
• Model number as shown on the underside of the appliance.
• Serial number as shown on the underside of the appliance.
UK Helpline 0844 871 0956
Replacement Parts 0844 873 0722
Ireland Helpline 1800 409 119
Website
You may also contact us through our website, or visit the site to browse and purchase
appliances, spare parts and accessories from the extensive Morphy Richards range.
THIS SECTION IS ONLY APPLICABLE FOR CUSTOMERS IN UK AND IRELAND
Registering your two year guarantee
Your standard one year guarantee is extended for an additional 12 months when you register the
product within 28 days of purchase with Morphy Richards. If you do not register the product
with Morphy Richards within 28 days, your product is guaranteed for 1 year. To validate your 2
year guarantee register with us online at www.morphyrichards.co.uk
N.B. Each qualifying product needs to be registered with Morphy Richards individually. Please
refer to the one year guarantee for more information.
YOUR ONE YEAR GUARANTEE
It is important to retain the retailer’s receipt as proof of purchase. Staple your receipt to this
back cover for future reference. Please quote the following information if the product develops a
fault. These numbers can be found on the base of the product.
Model no.
Serial no.
All Morphy Richards products are individually tested before leaving the factory. In the unlikely
event of any appliance proving to be faulty within 28 days of purchase, it should be returned to
the place of purchase for it to be replaced. If the fault develops after 28 days and within 12
months of original purchase, you should contact the Helpline number quoting Model number
and Serial number on the product, or write to Morphy Richards at the address shown. You may
be asked to return a copy of proof of purchase. Subject to the exclusions set out below (see
Exclusions), the faulty appliance will then be repaired or replaced and dispatched usually within
7 working days of receipt. If, for any reason, this item is replaced during the 1 year guarantee
period, the guarantee on the new item will be calculated from original purchase date. Therefore it
is vital to retain your original till receipt or invoice to indicate the date of initial purchase. To
qualify for the 1 year guarantee, the appliance must have been used according to the
instructions supplied. For example, crumb trays should have been emptied regularly.
EXCLUSIONS
Morphy Richards shall not be liable to replace or repair the goods under the terms of the
guarantee where:
1 The fault has been caused or is attributable to accidental use, misuse, negligent use or used
contrary to the manufacturer’s recommendations or where the fault has been caused by power
surges or damage caused in transit.
2 The appliance has been used on a voltage supply other than that stamped on the products.
3 Repairs have been attempted by persons other than our service staff (or authorised dealer).
4 The appliance has been used for hire purposes or non domestic use.
5 The appliance is second hand.
6 Morphy Richards are not liable to carry out any type of servicing work, under the guarantee.
7 Plastic filters for all Morphy Richards kettles and coffee makers are not covered by the guarantee.
8 Batteries and damage from leakage are not covered by the guarantee.
9 The filters have not be cleaned and replaced as instructed.
This guarantee does not confer any rights other than those expressly set out above and does not
cover any claims for consequential loss or damage. This guarantee is offered as an additional benefit
and does not affect your statutory rights as a consumer.
g
11
Page 12

SC461007MEE Rev1_Instruction Book 17/06/2014 17:11 Page 12
YOUR INTERNATIONAL TWO-YEAR GUARANTEE
This appliance is covered by two-year repair or replacement warranty.
It is important to retain the retailers receipt as proof of purchase. Staple your receipt to this back
cover for future reference.
Please quote the following information if the product develops a fault. These numbers can be found
on the base of the product.
Model no.
Serial no.
All Morphy Richards products are individually tested before leaving the factory. In the unlikely event
of any appliance proving to be faulty within 28 days of purchase it should be returned to the place
of purchase for it to be replaced.
If the fault develops after 28 days and within 24 months of original purchase, you should contact
your local distributor quoting Model number and Serial number on the product, or write to your
local distributor at the addresses shown.
You will be asked to return the product (in secure, adequate packaging) to the address below along
with a copy of proof of purchase.
Subject to the exclusions set out below (1-9) the faulty appliance will then be repaired or replaced
and dispatched usually within 7 working days of receipt.
If for any reason this item is replaced during the 2-year guarantee period, the guarantee on the
new item will be calculated from original purchase date. Therefore it is vital to retain your original till
receipt or invoice to indicate the date of initial purchase.
To qualify for the 2-year guarantee the appliance must have been used according to the
manufacturers instructions. For example, appliances must have been descaled and filters must
have been kept clean as instructed.
The local distributor shall not be liable to replace or repair the goods under the terms of the
guarantee where:
1 The fault has been caused or is attributable to accidental use, misuse, negligent use or used
contrary to the manufacturers recommendations or where the fault has been caused by power
surges or damage caused in transit.
2 The appliance has been used on a voltage supply other than that stamped on the products.
3 Repairs have been attempted by persons other than our service staff (or authorised dealer).
4 Where the appliance has been used for hire purposes or non domestic use.
5 The appliance is second hand.
6 The local distributor are not liable to carry out any type of servicing work, under the guarantee.
7 The guarantee excludes consumables such as bags, filters and glass carafes.
8 Batteries and damage from leakage are not covered by the guarantee.
9 The filters have not be cleaned and replaced as instructed.
This guarantee does not confer any rights other than those expressly set out above and does not
cover any claims for consequential loss or damage. This guarantee is offered as an additional
benefit and does not affect your statutory rights as a consumer.
AUSTRALIAN WARRANTY
This appliance is guaranteed for 2 years against faulty material, components and workmanship.
This warranty is in addition and does not affect your statutory rights.
Proof of purchase must be produced for any warranty benefit.
In the unlikely event of any appliance proving to be faulty, securely pack and return the item to
the place of purchase accompanied by the original receipt or invoice.
NOT COVERED BY THIS WARRANTY
(Australian only)
• If the appliance has not been used in accordance with the manufacturers’ recommendations or
Instructions.
• If the fault is deemed to be caused by abuse, misuse, neglect, modifications or in proper use and
or care
Eg: Kettles: Excessive build up of scale.
Toasters: Excessive build up of crumbs or foreign matter etc.
• Connection to incorrect voltage to that stamped on the product.
• Unauthorised repairs.
• Appliance used other than for domestic purposes.
• Excluding bags, filters, glass, carafes, and cutting blades.
• Freight and insurance costs.
If for any reason this item is replaced during the 2 year guarantee period, the guarantee on the new
item will be calculated from original purchase date. Therefore it is vital to retain your original
receipt or invoice to indicate the date of original purchase.
Morphy Richards’s policy is to continually improve quality design and product quality. The company
therefore reserves the right to change any specifications or to carry out modifications as deemed
worthy at any time.
The Australian supplier ASKO Appliances reserves the right to repair, modify, exchange or replace
the faulty appliance with the same or similar model or product of equivalent value.
12
Page 13

SC461007MEE Rev1_Instruction Book 17/06/2014 17:11 Page 13
d
Gesundheit und Sicherheit
Für die Benutzung elektrischer Haushaltsgeräte sind folgende Regeln zur Wahrung der Sicherheit einzuhalten.
Vor der Verwendung des Geräts bitte die Bedienungsanleitung aufmerksam lesen.
• Dieses Gerät kann von Kindern ab 8 Jahren und darüber verwendet werden, wenn sie
beaufsichtigt werden oder eine ausführliche Anleitung zur sicheren Benutzung des Geräts
erhalten und die damit verbundenen Gefahren verstehen. Reinigung und Wartung durch den
Benutzer darf nicht von Kindern durchgeführt werden, wenn sie nicht älter als 8 Jahre alt sind
und dabei nicht beaufsichtigt werden. Halten Sie das Gerät und seine Kabel außerhalb der
Reichweite von Kindern die jünger als 8 Jahre alt sind.
• Geräte können von Personen mit eingeschränkten physischen, sensorischen oder geistigen
Fähigkeiten oder mangels Erfahrung und Wissen benutzt werden, wenn sie beaufsichtigt
werden oder eine ausführliche Anleitung zur sicheren Benutzung des Geräts erhalten und die
damit verbundenen Gefahren verstehen.
• Kinder dürfen mit dem Gerät nicht spielen.
• Reinigung und Wartung dürfen ohne Beaufsichtigung nicht von Kindern unter 8 Jahren
durchgeführt werden.
• Bewahren Sie das Gerät und das dazugehörige Netzkabel nicht in Reichweite von Kindern
unter 8 Jahren auf.
• Dieses Gerät ist für Haushalte und ähnliche Zwecke vorgesehen, wie z. B.: Bauernhöfe, von
Kunden in Hotels, Motels oder anderen wohnungsähnlichen Räumlichkeiten, Pensionen und
vergleichbaren Unterbringungsmöglichkeiten.
Für Personalküchenbereiche in Ladengeschäften, Büros und anderen Arbeitsumfeldern ist es
nicht geeignet.
g
d
Aufstellungsort
• Das Gerät stets weit entfernt von der Kante einer Arbeitsplatte aufstellen.
• Achten Sie darauf, dass das Gerät sicher auf einer festen, ebenen und hitzebeständigen Unterlage
steht.
• Das Gerät nicht im Freien oder in der Nähe von Wasser benutzen.
Netzkabel
• Das Netzkabel muss ohne Anspannung von der Steckdose bis zum Gerät verlegt sein.
• Lassen Sie das Netzkabel nicht über die Kante der Arbeitsplatte oder einer offenen Fläche
herabhängen. Ein Kind könnte daran ziehen.
• Das Netzkabel nicht über eine warme Herdplatte oder heiße Flächen verlegen, da das Kabel sonst
beschädigt werden kann.
• Ist das Netzkabel beschädigt, muss es zur Vermeidung von Unfällen vom Hersteller, dem
Kundendienst oder einer ähnlich qualifizierten Fachkraft ersetzt werden.
Eigene Sicherheit
• WARNUNG: Während und nach dem Gebrauch das Gerät nur an den Griffen anfassen. Die
Oberseite des Geräts und weitere Geräteteile werden während des Gebrauchs sehr heiß.
• Zum Schutz vor elektrischen Schlägen darf das Unterteil nicht in Wasser oder andere Flüssigkeiten
eingetaucht werden.
• Heiße Flächen nicht berühren. Verwenden Sie zum Abnehmen des Deckels oder zum Festhalten
heißer Behälter Topflappen oder Handschuhe.
• Äußerste Vorsicht ist anzuwenden, wenn ein Gerät heiße Zutaten, Wasser oder andere heiße
Flüssigkeiten enthält und an eine andere Stelle befördert werden soll.
Weitere Sicherheitshinweise
• Slow Cooker nicht einschalten, wenn der Kochtopf leer ist.
• Glasdeckel und Kochtopf vor dem Eintauchen in Wasser immer abkühlen lassen.
• Niemals direkt im Unterteil kochen. Immer den Kochtopf verwenden.
• Kochtopf oder Glasdeckel nicht verwenden, wenn diese Risse aufweisen oder angeschlagen sind.
• Gerät nicht einschalten, wenn es auf dem Kopf steht oder auf der Seite liegt.
• Glasdeckel und Kochtopf sind zerbrechlich. Sie müssen immer vorsichtig benutzt werden.
• Bei der Benutzung von Auf- oder Einsätzen bzw. Hilfsmitteln, die nicht von Morphy Richards
empfohlen wurden, besteht Brand-, Stromschlag- und Verletzungsgefahr.
• Nicht in der Nähe eines oder auf einen Heißgas- oder Elektrobrenner(s) oder in einen beheizten Ofen
stellen.
• Immer den Netzstecker ziehen, wenn das Gerät nicht benutzt wird, Zubehörteile eingesetzt bzw. herausgenommen werden oder das Gerät gereinigt werden soll.
• Das Gerät ist nicht für den Betrieb über eine externe Zeitschaltvorrichtung oder eine separate
Fernsteuerung vorgesehen.
Elektrische Anforderungen
Stellen Sie sicher, dass die auf dem Typenschild des Geräts angegebene Spannung mit der
Haushaltsspannung Ihrer Elektrizitätsversorgung übereinstimmt; es muss eine
Wechselstromspannung (abgekürzt AC) sein. Falls die Sicherung in dem Sicherungshalter
ausgetauscht werden muss, ist eine Sicherung mit 3 A gemäß BS1362 zu verwenden.
WARNUNG: Dieses Gerät muss an eine geerdete Steckdose angeschlossen werden.
13
Page 14
SC461007MEE Rev1_Instruction Book 17/06/2014 17:11 Page 14
Kurzanleitung
Ziehen Sie auch die umfangreiche Bedienungsanleitung mit wichtigen
Sicherheitshinweisen und ausführlicheren Anweisungen für die
Verwendung des Supreme Precision 3 in 1 Slow Cooker zu Rate.
In dieser Anleitung wird erläutert, wie Sie mit dem Supreme Precision 3 in 1 Slow
Cooker etwa 1 kg Fleisch anbraten/bräunen können und anschließend das
Garprogramm mit 1,5 Stunden Dauer oder das 8-stündige Schongarprogramm
benutzen. Zu allen übrigen Programmen lesen Sie bitte die vollständige
Gebrauchsanleitung durch.
Die Anbrat-/Bräunungsfunktion
1
2
Stellen Sie den Behälter ‹auf das Unterteil fi, und schließen Sie das Netzkabel
des Supreme Precision 3 in 1 Slow Cooker an.
Im Display erscheint nun die Standardanzeige (links). Das Symbol für
Anbraten/Bräunen
Entsprechend der Menge Fleisch, die Sie anbraten möchten, geben Sie nun die
jeweilige Menge Öl in den Behälter.
Drücken Sie die Taste “Übernehmen” „. Der Supreme Precision 3 in 1 Slow
Cooker gibt anschließend etwa 2 Sekunden lang einen Piepton aus und das
Display hört zu blinken auf. Der Behälter wird nun erwärmt, und der Timer
beginnt mit dem Zurückzählen des Intervalls. Bis das Öl die richtige Temperatur für
das Anbraten/Bräunen des Fleischs erreicht, dauert es etwa 5 Minuten (d. h. wenn
der Timer 00:10 anzeigt.)
‰
und die Zeitanzeige ‚blinken.
‚
Geben Sie das Fleisch in den Behälter, und drehen Sie es regelmäßig um, bis es
von außen angebraten/gebräunt ist. Wenn der Timer null erreicht, gibt das Unterteil
einen Piepton aus, und der Garvorgang hält an. Falls das Fleisch bereits vor
Ablauf der 15 Minuten angebraten ist, halten Sie die Taste “Übernehmen”
3
14
3 Sekunden lang gedrückt. Das Unterteil gibt einen Piepton aus, und der
Garvorgang hält an. Wenn doch weiter fortgesetzt werden soll, wiederholen Sie die
Schritte ab Punkt 2 oben.
„
etwa
Page 15

SC461007MEE Rev1_Instruction Book 17/06/2014 17:11 Page 15
Verwendung der 1,5-Stunden-Garfunktion
4
ODER verwenden Sie die Schongarfunktion
5
Nach dem Anbraten/Bräunen geben Sie die übrigen Zutaten (nach Rezept) hinzu.
Drücken Sie die Taste “Funktion/Zeit”
angezeigt. Drücken Sie zweimal die Taste “Übernehmen”
etwa 2 Sekunden lang einen Piepton aus, bevor der Garprozess gestartet wird.
Setzen Sie bei dieser Einstellung des Supreme Precision 3 in 1 Slow Cooker den
Deckel auf den Behälter. Zum Nullzähl-Timer und zur Warmhaltefunktion lesen Sie
bitte Punkt 6.
Nach dem Anbraten/Bräunen geben Sie die übrigen Zutaten (nach Rezept) hinzu.
Drücken Sie zweimal die Taste “Funktion/Zeit”
angezeigt. Drücken Sie zweimal die Taste “Übernehmen”
etwa 2 Sekunden lang einen Piepton aus, bevor der Garprozess gestartet wird.
Setzen Sie bei dieser Einstellung des Supreme Precision 3 in 1 Slow Cooker den
Deckel auf den Behälter. Zum Nullzähl-Timer und zur Warmhaltefunktion lesen Sie
bitte Punkt 6.
·
kurz. Folgendes Display (links) wird
„
. Das Unterteil gibt
·
. Folgendes Display (links) wird
„
. Das Unterteil gibt
d
Nullzähl-Timer und Warmhaltefunktion
6
Am Ende des Garprozesses gibt das Gerät einen Piepton aus und schaltet
automatisch auf Warmhalten um. Die Warmhaltefunktion bleibt bis zu zwei
Stunden aktiv. Dabei zählt der Timer im Display von H0:00 bis H2:00. Nach Ablauf
der 2 Stunden bleibt im Display “H” stehen, bis die Heizplatte wieder die
Umgebungstemperatur (ca. 40 °C) erreicht hat. Das Display ist danach leer.
Durch Drücken einer beliebigen Taste gelangen Sie zurück zum Displayinhalt, der
nach dem ersten Einschalten angezeigt wird.
15
Page 16

SC461007MEE Rev1_Instruction Book 17/06/2014 17:11 Page 16
d
Das neue Gerät optimal nutzen...
Sicherheitshinweise
Die Außenfläche des Schongarbehälters während des Betriebs oder vor dem Abkühlen niemals
berühren. Zum Abnehmen des Deckels bzw. zum Herausnehmen des Edelstahlbehälters
Topfhandschuhe benutzen.
Effizienter garen
Durch Abnehmen des Deckels entweicht wertvolle Hitze. Die Garwirkung des Schongarens verringert
sich dadurch und die Garzeit verlängert sich. Versuchen Sie, den Deckel nicht häufiger als 3 oder 4 mal
zum Umrühren oder Zugeben von Zutaten zu öffnen.
Nutzen Sie die Vorzüge
Das Langsamgaren ist eine praktische Möglichkeit, schmackhafte Speisen auf vielseitige Weise
zuzubereiten. Die längeren Garzeiten sorgen für eine bessere Verteilung der Geschmacksstoffe, denn
diese haben mehr Zeit, um sich mit den Speisen zu verbinden und Geschmack zu entwickeln. Ein
Schongarer erwärmt Speisen langsam und eignet ist daher bestens zum Garen von Fleisch, speziell
preisgünstigerem Fleisch (z.B. Rindfleisch zum Kochen), das durch den längeren Garvorgang zart wird.
Die Möglichkeiten zur Verwendung des Schongarers sind quasi unbegrenzt. Lassen Sie Ihrer Phantasie
ruhig freien Lauf!
Erläuterung
⁄
Glasdeckel
¤
Dampfauslass
‹
Gar-/Servierbehälter aus Edelstahl (je nach Modell entweder mit 4,5 oder 6,5 l))
›
Heizelement
fi
Hauptgehäuse
fl
Bedien-/Anzeigefeld (siehe vergrößerte Darstellung
‡
2 Ablauföffnungen (unten)
·
Taste Funktion/Zeit
‚
Zeitanzeige
„
Taste “Übernehmen”
‰
Anbrat-/Bräunungssymbol und Garsymbol
Â
Schongarsymbol
Symbole
Symbol für Anbraten/Bräunen
Symbol für Garvorgang
Symbol für Schongaren
Garkapazität
• Das 6,5-Liter-Modell hat ein maximales Fassungsvermögen von 5 Litern.
• Das Fassungsvermögen ist auf dem Typenschild unter dem Gerät angegeben.
Vor dem ersten Gebrauch des Supreme Precision 3 in 1 Slow Cooker
Entfernen Sie alle Beschriftungen und Aufkleber vom Gerät.
Waschen Sie den Edelstahl-Behälter und den Deckel mit einem Schwamm oder Spüllappen in heißer
Lauge ab. AUF KEINEN FALL einen Scheuerschwamm oder ein anderes Scheuermittel benutzen, da
diese Streifen auf den Edelstahlflächen hinterlassen. Den Behälter und Deckel gründlich klar abspülen
und trocknen.
WICHTIG: DAS SUPREME PRECISION 3 IN 1 SLOW COOKER UNTERTEIL NICHT IN WASSER
TAUCHEN
Hinweis:
Bei dem ersten Einsatz bemerken Sie möglicherweise einen leichten Geruch, der durch das
Abbrennen von Herstellungsrückständen entsteht. Das ist vollkommen normal, hat keinerlei
Auswirkungen auf die zubereiteten Speisen und verschwindet nach mehrmaligem Gebrauch.
Tipps und Tricks zum Supreme Precision 3 in 1 Slow Cooker
• Alle Zutaten sollten vor dem Zugeben Raumtemperatur haben. Gekühlte Zutaten zunächst auf
Raumtemperatur warm werden lassen, da sich die Garzeit durch kalte Zutaten verlängert.
• Gekühltes Fleisch aus dem Kühlschrank kann verwendet werden, jedoch kein gefrorenes Fleisch. Zum
Anbraten benutzen Sie die Anbrat-/Bräunungsfunktion.
• Achten Sie darauf, dass alle tiefgekühlten Zutaten vor Gebrauch vollkommen aufgetaut sind.
• Bei der Verwendung von kalten Zutaten für ein Schongar-Rezept (zum Beispiel Wein) müssen die Zutaten
vorgewärmt werden. Beginnen Sie mit der Anbrat-/Bräunungsfunktion und geben Sie dann alle Zutaten
hinzu. Setzen Sie nach 15 Minuten das Schongaren fort.
• Beim traditionellen Zubereiten auf dem Herd wird immer dazu geraten, das Fleisch vor dem Anbraten in
Mehl zu wälzen. Dies ist beim Supreme Precision 3 in 1 Slow Cooker nicht nötig. Braten Sie das Fleisch
einfach an, wie dies in der Anleitung beschrieben wird. Wenn die Flüssigkeit angedickt werden muss,
rühren Sie 30 Minuten vor dem Ende der Garzeit eine Mischung aus kaltem Wasser und Weizenmehl unter.
• Bei der Verwendung von Fleisch mit Knochen (z. B. Hähnchenschenkel, Spare Ribs u. ä.) kann sich das
Fleisch beim Schongaren vom Knochen ablösen. Das ist normal und sorgt für mehr Aroma. Allerdings ist
dabei zu beachten, das sich in der Flüssigkeit noch kleinere Knochen befinden können.
• Den Behälter nicht überfüllen, denn die Rezepte in dieser Gebrauchsanleitung sind für das maximale
Fassungsvermögen konzipiert und berücksichtigen dabei noch etwas Ausdehnungsreserve nach oben, um
für ein gleichmäßiges Garen zu sorgen. Das Fassungsvermögen ist auf dem Typenschild unter dem Gerät
angegeben. Bei der Verwendung eines eigenen Rezepts darf der Behälter nicht über die Griffnieten hinaus
angefüllt werden, die auf der Innenseite des Behälters zu sehen sind.
• Der Deckel wird während des Gebrauchs sehr heiß, besonders das Glasfenster und der Edelstahlrahmen.
Die mit Silikon isolierten Griffe bleiben aber kühl, damit Sie den Deckel gefahrlos hochheben können.
Vorsichtshalber empfiehlt es sich dabei aber, Ofenhandschuhe anzuziehen.
• Die Zutaten sollten gleichmäßig im Behälter verteilt werden. Wurzelgemüse sollte zum Garen aber besser in
der unteren Hälfte des Behälters untergebracht werden. Sämtliche Zutaten sollten von Garflüssigkeit
umgeben werden.
• Für gleichmäßiges Garen sollte das Wurzelgemüse gewürfelt (ca. 20 mm große Stücke) werden.
• Falls der Behälter überkocht, ist dies in der Regel auf Überfüllung zurückzuführen. In diesem Fall einige
Zutaten und/oder Flüssigkeit abschöpfen.
• Generell ist für zähere Fleischsorten wie z. B. Bratenfleisch eine längere Garzeit anzusetzen. Sie sind
deshalb ideal für das Schongaren. Um mit der Garfunktion bei einer kürzeren Garzeit zwischen 1:30 –1:45
zuzubereiten, muss das Fleisch eine höhere Qualität haben.
• Hähnchen sowie hochwertige Fleischstücke benötigen weniger Garzeit. Deshalb sollten Sie ein kürzeres
Zeitintervall ansetzen. –Verwenden Sie z. B. 8 Stunden für Stufe 1.
• Knödel geben Sie 30 bis 45 Minuten vor Garzeitende hinzu. Diese können Sie an der Oberfläche
schwimmen lassen, sie müssen nicht unbedingt in Flüssigkeit getaucht sein.
• Schinkenbratenstücke sollte in der Plastikfolie gelassen werden, sofern zutreffend. Falls nicht, verwenden
Sie eine geeignete, wärmebeständige Kunststofffolie oder umwickeln Sie die Stücke mit Küchenzwirn, um
ein Zerfallen des Schinkens beim Garen zu verhindern.
• Bei Verwendung der Gareinstellung die zubereitete Mahlzeit vor dem Servieren 10 Minuten im Behälter
ruhen lassen. Die heißenden (siedenden) Speisen können dadurch serviergerecht abkühlen.
• Wenn Sie einige Erfahrungen im Umgang mit dem Supreme Precision 3 in 1 Slow Cooker gesammelt
haben, können Sie dazu übergehen, Ihre eigenen Rezepte auszuprobieren. Es ist allerdings ratsam, ein
vorhandenes Rezept als Leitfaden zu verwenden. Wenn für ein Rezept Zutaten wie Nudeln, Milch, Sahne,
Meeresfrüchte oder Schalentiere benötigt werden, sollten diese 30 Minuten vor Garzeitende der übrigen
Zutaten hinzugegeben werden. Das Kokosnussmilch und Reispudding-Rezept trifft nicht zu.
• Rohe, ungekochte Zutaten nicht im Behälter lassen, ganz gleich wie kurz oder wie lange. Den Garprozess
so schnell wie möglich starten. Wenn das Zubereiten auf einen späteren Zeitpunkt verlegt werden muss,
lagern Sie die Zutaten im Kühlschrank. Wenn Sie Zeit zum Kochen haben, lassen Sie die Zutaten wieder
auf Raumtemperatur warm werden.
• Wenn ein zuvor zubereitetes Gericht kalt geworden ist, erwärmen Sie es mithilfe der Gareinstellung bei 1:30
Std. wieder. Je nach Rezept dauert das Aufwärmen zwischen 30 und 45 Minuten. Vor dem Servieren
kontrollieren, ob die Speisen warm genug sind.
• Beim Zubereiten halber Mengen kann die Garzeit in der Regel auf zwei Drittel verkürzt werden. Vor dem
Servieren kontrollieren, ob die Zutaten vollständig gegart sind.
• Wenn bereits vorhandene Rezepte für die herkömmliche Zubereitung abgewandelt werden, um sie nach
dem Schongarprinzip zu garen, muss die verwendete Menge Flüssigkeit wahrscheinlich verringert werden,
da diese beim Schongaren nicht im gleichen Maße verdampft.
• Falls Brühe benötigt wird, verwenden Sie siedendes Wasser.
• Beim Zubereiten von Bratenstücken müssen diese zuerst mit siedendem Wasser oder Brühe bedeckt
werden. Die Menge kann gegen Ende der Garzeit verringert werden.
• Vor dem Garen im Supreme Precision 3 in 1 Slow Cooker müssen ungekochte rote Bohnen eingeweicht
und mindestens 10 Minuten lang gekocht werden, um Giftstoffe zu entfernen.
• Nach dem Anbraten überschüssiges Öl ggf. abschütten.
• Bei Verwendung von Brühe oder Saucen aus Dosen oder Behältern, vor dem Zugeben zum Behälter
zuerst im Mikrowellenherd erwärmen. Statt dessen können auch weitere 30 Minuten zur Garzeit
hinzugerechnet werden.
A
Erläuterung von Fachausdrücken
Anbraten/Bräunen:
Vor dem Garen oder Schongaren von Fleisch muss dieses zuerst angebraten bzw. gebräunt werden.
Das Fleisch wird dabei von Außen in heißem Öl leicht gebraten, bevor der Gar- oder Schongarvorgang
zugeschaltet wird. (In der Mitte sollte das Fleisch noch roh sein.) Wenn das Fleisch auf diese Weise
angebraten bzw. gebräunt wird, bleibt nicht nur das Aroma erhalten, sondern es geht auch nicht so
viel Feuchtigkeit verloren.
Garen:
Garen im Zusammenhang mit dem Supreme Precision 3 in 1 Slow Cooker ist damit das Zubereiten
von Fleisch und/oder Gemüse in einer Flüssigkeit (z. B. Wein, Brühe, Wasser) über einen Zeitraum von
1 Stunde 30 Minuten bis 1 Stunde 45 Minuten gemeint.
Schongaren:
Beim Schongaren werden die Zutaten über einen längeren Zeitraum (in der Regel zwischen 4 und 10
Stunden) in einer Flüssigkeit (z. B. Wein, Brühe, Wasser) gegart. Wie der Ausdruck bereits besagt,
werden die Speisen dabei schonender und langsamer zubereitet. Das Fleisch wird dadurch erheblich
zarter. Fleisch mit höherem Fettgehalt eignet sich bestens für das Schongaren, denn dabei kann das
Fett schmelzen und das Fleisch wird äußerst zart.
16
Page 17

SC461007MEE Rev1_Instruction Book 17/06/2014 17:11 Page 17
Benutzungshinweise
Das Unterteil fiauf eine trockene, ebene und hitzefeste Oberfläche und von der Kante der
Arbeitsfläche entfernt stellen. Nicht auf dem Boden verwenden.
Hinweis:
Wenn das Gerät eingeschaltet ist aber nicht benutzt wird, schaltet die Timer-Displaybeleuchtung nach
30 Sekunden auf Standbybetrieb um.
Supreme Precision 3 in 1 Slow Cooker Anbrat-/Bräunungsfunktion
Stellen Sie den Behälter ‹auf das Unterteil fi, und schließen Sie das Netzkabel des Supreme
Precision 3 in 1 Slow Cooker an.
fl
Im Display
Die Zeitanzeige
Sie anbraten möchten, geben Sie nun die jeweilige Menge Öl in den Behälter.
Beachten Sie die Rezeptangaben in dieser Anleitung.
Zum Anbraten von 800 - 1200 g Fleisch empfehlen wir etwa zwei Esslöffel Pflanzenöl. Je nach
Geschmack und der gewünschten Menge an Fett im angebratenen Fleisch kann diese Mengenangabe
aber auch variiert werden.
Zur Auswahl der Anbratfunktion drücken Sie kurz die Taste “Übernehmen”
3 in 1 Slow Cooker gibt anschließend etwa 2 Sekunden lang einen Piepton aus und das Display hört
zu blinken auf. Der Behälter wird nun erwärmt, und der Timer
Intervalls. Bis das Öl die Anbrat-/Bräunungstemperatur für das Fleisch erreicht hat, dauert es ca. 5
Minuten (d.h. im Timer steht dann 00:10). Ob das Öl heiß genug ist, lässt sich mit einem kleinen
Stückchen Fleisch oder etwas Zwiebel im Behälter gut prüfen. Wenn das Öl beim Zugeben zischt, ist
die Temperatur zum Anbraten/Bräunen hoch genug. Zischt es nicht, müssen Sie eine weitere Minute
oder länger warten, bis die Temperatur erreicht ist. Probieren Sie es dann erneut.
Geben Sie das Fleisch in den Behälter und wälzen Sie regelmäßig um, bis das Fleisch von außen
angebraten/gebräunt ist. Wenn der Timer null erreicht, gibt das Unterteil einen Piepton aus, und der
Garvorgang hält an. Falls das Fleisch bereits angebraten ist, bevor der Timer null erreicht hat, halten Sie
die Taste “Übernehmen”
Garvorgang hält an, und das Display kehrt wieder zur Standardanzeige
Wenn das Fleisch noch ein paar Minuten länger für das Anbraten braucht, nachdem der Timer bereits
null erreicht hat, drücken Sie einfach die Taste “Übernehmen”, um die Anbrat-/Bräunungsfunktion
nochmals zu starten. Um die Anbratfunktion zu stoppen, bevor der Timer, wie oben bereits erläutert,
null erreicht hat, halten Sie die Taste “Übernehmen”
Wegen der hohen Temperatur, mit der die Anbrat-/Bräunungsfunktion des Supreme Precision 3 in 1
Slow Cooker arbeitet, sollten Sie kurz hintereinander nicht mehr als zwei 15-Minuten-Programme
aktivieren. Wenn Sie das Programm danach ein drittes Mal versuchen zu aktivieren und das Gerät ist
heiß, erscheint im Display —:— und das Symbol für “Anbraten/Bräunen”
Die Funktion kann danach erst wieder aktiviert werden, wenn das Gerät ausreichend abgekühlt hat.
Das sollte aber zu keinerlei Schwierigkeiten führen, denn es sollte immer möglich sein, die benötigte
Menge Fleisch in 30 Minuten (2 x 15) anzubraten bzw. zu bräunen.
Hinweis:
Die Funktion “Anbraten/Bräunen” nicht ohne den Behälter
Gerät dadurch überhitzt. Ebenso sollte die Anbrat-/Bräunungsfunktion auch nicht ohne Öl im Behälter
gestartet werden.
wird der Standardinhalt Bangezeigt.
‚
und das Anbratfunktionssymbol ‰blinken. Entsprechend der Menge Fleisch, die
„
. Der Supreme Precision
‚
beginnt mit dem Zurückzählen des
„
etwa 3 Sekunden lang gedrückt. Das Unterteil gibt einen Piepton aus, der
„
etwa 3 Sekunden lang gedrückt.
‹
B
zurück.
‰
blinkt C.
auf dem Unterteil fistarten, da das
Anbraten/Bräunen auf Ihrem Gas- oder Elektrokochfeld mit Ihrem
Supreme Precision 3 in 1 Slow Cooker Behälter
Sie können den Supreme Precision 3 in 1 Slow Cooker Behälter zum Anbraten/Bräunen von Fleisch
auch auf den Gas- oder Elektroherd stellen.
Geben Sie einfach die gewünschte Menge Öl wie oben erläutert hinzu, und stellen Sie den Behälter
auf den Herd. Auf dem Herd wird das Öl eventuell etwas schneller heiß. Prüfen Sie die Temperatur
daher mit einem kleinen Stückchen Fleisch oder Zwiebel, wie zuvor bereits erläutert.
Tipp zum Anbraten/Bräunen von Fleisch
Zum Anbraten größerer Mengen Fleisch schlagen wir vor, das Fleisch in kleinere Portionen aufzuteilen.
Das macht die Aufgabe etwas leichter. Da das Fleisch während des Vorgangs ständig gewendet
werden muss, sind kleinere Fleischmengen einfacher zu handhaben.
Garfunktion
Stellen Sie den Behälter ‹auf das Unterteil fi. Geben Sie die Zutaten gemäß verwendetem Rezept
hinzu. Ganz gleich, ob Sie die Funktion “Anbraten/Bräunen” verwendet oder den Supreme Precision 3
in 1 Slow Cooker nur eingeschaltet haben, im Display sollte stets die Standardanzeige zu sehen sein
D
.
·
Drücken Sie kurz die Taste “Funktion/Zeit”
‚
Die Zeitanzeige
um die Garfunktion auszuwählen. Das Garfunktionssymbol
(Falls Sie die Garfunktion versehentlich aktiviert haben, können Sie wieder zum vorherigen Display
zurückkehren, indem Sie die Taste “Übernehmen”
Sie haben die Auswahl zwischen einer Programmdauer von 1 Stunde 30 Minuten oder 1 Stunde 45
Minuten (das hängt vom jeweiligen Rezept ab). Zur Auswahl der Programmdauer 1 Stunde 30 Minuten
drücken Sie die Taste “Übernehmen/Start/Stopp”
Minuten drücken Sie die Taste “Funktion/Zeit”
Drücken Sie die Taste “Übernehmen”
Die Zeitanzeige hört zu blinken auf und das Unterteil gibt etwa 2 Sekunden lang einen Piepton aus,
bevor der Garvorgang gestartet wird. Danach zählt der Timer bis auf null zurück.
Falls die Garzeit verlängert werden muss, können Sie die Garfunktion erneut einstellen. Sie müssen
dabei allerdings selbst ermitteln, wie viel Garzeit Sie zusätzlich benötigen.
und das Garfunktionssymbol „blinken. Drücken Sie die Taste “Übernehmen” „,
. Im Display erscheint daraufhin E.
‰
blinkt anschließend nicht mehr.
·
etwa 2 Sekunden gedrückt halten.)
„
. Zur Auswahl der Programmdauer 1 Stunde 45
„
. In der Zeitanzeige ‚steht anschließend 01:45.
,,
.
Um den Zubereitungsvorgang, aus welchen Gründen auch immer, zu stoppen, bevor der Timer null
erreicht hat, halten Sie die Taste “Übernehmen”
einen Piepton aus, der Garvorgang hält an, und das Display kehrt wieder zur Standardanzeige
zurück.
Während des Garens entweicht Dampf über den Dampfauslass. Der Auslass muss sich auf der
Rückseite des Geräts befinden.
WARNUNG: Der Dampf und der Auslass selbst werden sehr heiß.
Am Ende des Garprozesses gibt der Supreme Precision 3 in 1 Slow Cooker einen Piepton aus und schaltet
automatisch auf Warmhalten um.
„
etwa 3 Sekunden lang gedrückt. Das Unterteil gibt
B
Schongarfunktion
Stellen Sie den Behälter ‹auf das Unterteil fi. Geben Sie die Zutaten gemäß verwendetem Rezept
hinzu. Ganz gleich, ob Sie die Funktion “Anbraten/Bräunen” verwendet oder den Supreme Precision 3
in 1 Slow Cooker nur eingeschaltet haben, im Display sollte stets die Standardanzeige zu sehen sein
F
(siehe unten).
·
Drücken Sie die Taste “Funktion/Zeit”
‚
Die Zeitanzeige
Schongarprogramme zur Verfügung: – 1, 2 und 3. Der Unterschied ist die Zeitdauer, auf die jedes
Programm eingestellt werden kann. Jedes Schongarprogramm ermöglicht Ihnen die Auswahl der
Kochzeit in 30-Minuten-Intervallen zwischen den Minimal- und Maximalkochzeiten. Falls gewünscht
kann beispielsweise bei niedriger Einstellung eine Kochzeit von 9,5 Std. eingestellt werden. Die
Warmhaltefunktion ist zusätzlich zu dieser Zeiteinstellung.
Zu jedem Programm gehört ein anderes Symbol, und zwar:
Wenn Sie das Schongarprogramm 1 benutzen wollen, drücken Sie die Taste “Übernehmen”
wählen Sie dann die Zeitdauer für das Schongarprogramm. Durch mehrmaliges Betätigen der Taste
“Funktion/Zeit”
gewünschte Dauer im Display erscheint, drücken Sie die Taste “Übernehmen”
zu blinken auf und das Unterteil gibt etwa 2 Sekunden lang einen Piepton aus, bevor der Garvorgang
gestartet wird. Danach zählt der Timer bis auf null zurück.
Die Zeitanzeige hört zu blinken auf und das Unterteil gibt etwa 2 Sekunden lang einen Piepton aus,
bevor der Garvorgang gestartet wird. Danach zählt der Timer bis auf null zurück.
Zur Verwendung von Schongarprogramm 2 drücken Sie einmal kurz die Taste “Funktion/Zeit”
Schongarsymbol 2 wird eingeblendet), bevor Sie auf die Taste “Übernehmen”
dann die Kochzeit wie oben.
Zur Verwendung von Schongarprogramm 3 drücken Sie zweimal die Taste “Funktion/Zeit”
Schongarsymbol 3 wird eingeblendet), bevor Sie auf die Taste “Übernehmen”
dann die Kochzeit wie oben.
Die Zeitanzeige hört danach zu blinken auf, und das Unterteil gibt etwa 2 Sekunden lang einen Piepton
aus, bevor der Garvorgang startet und der Timer auf null zurückzählt.
Nach dem Drücken auf die Taste “Übernehmen”
es blinkt nur noch die Zeitanzeige. (Falls Sie versehentlich die “Schongarfunktion” aktiviert haben,
können Sie wieder zum vorherigen Display zurückkehren, indem Sie die Taste “Übernehmen”
Sekunden gedrückt halten.)
Um den Zubereitungsvorgang, aus welchen Gründen auch immer, zu stoppen, bevor der Timer null
erreicht hat, halten Sie die Taste “Übernehmen”
einen Piepton aus, der Garvorgang hält an, und das Display kehrt wieder zur Standardanzeige
zurück.
und das Schongarfunktionssymbol Âblinken. Es stehen drei unterschiedliche
Zwischen 8 und 10 Stunden (niedrig)
Zwischen 6 und 8 Stunden (mittel)
Zwischen 4 und 6 Stunden (hoch)
·
werden die einzelnen Programmzeiten nacheinander aufgerufen. Wenn die
zweimal. Im Display erscheint daraufhin G.
„
. Die Zeitanzeige hört
„
drücken. Wählen Sie
„
drücken. Wählen Sie
„
hört das Schongarsymbol Âzu blinken auf und
„
etwa 3 Sekunden lang gedrückt. Das Unterteil gibt
,,
und
·
(das
·
(das
,,
etwa 2
H
Warmhalten
Am Ende des Garprozesses gibt das Gerät einen Piepton aus und schaltet automatisch auf
Warmhalten um. Die Warmhaltefunktion bleibt bis zu zwei Stunden aktiv. Dabei zählt der Timer im
Display von H0:00 bis H2:00. Nach Ablauf der 2 Stunden gibt das Unterteil einen Piepton aus, und im
Display bleibt “H” stehen, bis die Heizplatte die Umgebungstemperatur (ca. 40 °C) erreicht hat.
Das Display ist danach leer. Durch Drücken einer beliebigen Taste gelangen Sie zurück zum
Displayinhalt, der nach dem ersten Einschalten angezeigt wird.
Die Warmhaltefunktion können Sie im Verlauf der 2-stündigen Warmhaltezeit jederzeit unterbrechen,
indem Sie ca. 2 Sekunden auf die Taste “Übernehmen”
Nach dem Garen
Schalten Sie die Stromzufuhr ab, und ziehen Sie den Netzstecker aus der Steckdose.
Wichtig: Darauf achten, dass das Unterteil abgekühlt ist, bevor der Behälter zur Aufbewahrung verstaut
wird.
„
drücken.
I
.
Reinigung und Pflege Ihres Supreme Precision 3 in 1 Slow Cookers
• Der Behälter und der Deckel sind spülmaschinenfest. Sie können aber auch heiße Seifenlauge und einen
glatten, nicht scheuernden Schwamm verwenden. Keine Scheuermittel oder Haushaltsreiniger verwenden.
• Das Elektro-Unterteil nicht in Wasser oder andere Flüssigkeiten tauchen. Zum Reinigen einen feuchten
Lappen verwendet und gründlich abtrocknen.
• Darauf achten, dass das Unterteil des Behälters und die Heizplattenfläche vor dem Gebrauch sauber, frei
d
17
Page 18

SC461007MEE Rev1_Instruction Book 17/06/2014 17:11 Page 18
von angebrannten Zutatenresten und trocken sind. Um hartnäckige Flecken zu beseitigen, kann der
Behälterboden außen ggf. mit einem Metallscheuerschwamm gereinigt werden.
• Beim Einfüllen von Zutaten und Flüssigkeit den Behälter nicht überfüllen. Falls doch überfüllt wurde und
der Inhalt in das Unterteil hinunterläuft, das Gerät abschalten und den Netzstecker ziehen. Den Behälter
entnehmen und die Flüssigkeit über die Ablauföffnungen ablaufen lassen. Speisereste, überschüssige
Zutaten oder Flüssigkeiten, die sich im Spalt zwischen der Heizplatte und dem Metallreflektor eventuell
gesammelt haben, vollständig beseitigen, mit einem feuchten Lappen abwischen und vor dem nächsten
Gebrauch vollständig trocknen.
REZEPTE
Rinderbraten
6,5 l
Rindfleisch, gewürfelt 1 kg
Kartoffeln, gewürfelt 700 g
Karotten, in Scheiben geschnitten 700 g
Lauchstangen, in Scheiben geschnitten 3 große
Zwiebeln, gehackt 2
Rinderbrühe 1,5 l
Gemischte Kräuter 3 TL
Salz und frisch gemahlenen schwarzen Pfeffer
Bei Verwendung der Anbrat-/Bräunungsfunktion immer zuerst 30 ml (2 EL) Speiseöl in den
Behälter geben.
Zubereitung
• Mit der Anbrat-/Bräunungsfunktion das Fleisch bräunen und die Zwiebeln dünsten.
(Braten Sie Fleisch in zwei Durchgängen)
• Die übrigen Zutaten zugeben.
• Auf Schongaren umschalten.
• Die maximale Zubereitungsdauer der Einstellung zum Garen verwenden.
• Mit Weizenmehl-/Wassergemisch andicken.
• Knödel 30 Minuten bis 1 Stunden vor Garzeitende zugeben.
Hähnchen und Weißwein
6,5 l
Hähnchenbrust 10
Butter 40 g
Zwiebeln, gehackt 2 große
Champignons, in Scheiben geschnitten 400g
Weißwein 5 EL
Hühnerbrühe 750 ml
Gemischte Kräuter 2 TL
Weizenmehl 5 EL
Eigelb 3
Sahne 150 ml
Salz und frisch gemahlenen schwarzen Pfeffer
Gemüsesuppe
6,5 l
Gemüseauswahl geschält und gehackt 1,8 kg
Gemüsebrühe 2 l
Gemischte Kräuter nach Geschmack
Salz und frisch gemahlenen schwarzen Pfeffer
Zubereitung
• Die Anbrat-/Bräunungsfunktion wird nicht benötigt.
• Alle Zutaten auf einmal zugeben und mit der maximalen Garzeit für die Einstellung zubereiten.
• Nach dem Abkühlen verdünnen.
New England-Braten
6,5 l
Rinderbraten, Bruststück 1,5 kg
Bouquet Garni 1
Thymian 2 TL
Pfefferkörner 2 TL
Schalotten geschält 10
Karotten gehackt 550 g
Kohlrübe gehackt 300 g
Genügend Wasser zum Bedecken des Bratenstücks
Bei Verwendung der Anbrat-/Bräunungsfunktion immer zuerst 30 ml (2 EL) Speiseöl in den Behälter
geben.
Zubereitung
• Mit der Anbrat-/Bräunungsfunktion das Rindfleisch von allen Seiten bräunen.
• Die übrigen Zutaten zugeben und mit der minimalen Garzeit für die Einstellung zubereiten.
• Bratensaft mit Weizenmehl andicken, um die Sauce herzustellen.
Bolognese-Sauce
6,5 l
Rinderhackfleisch 1,5 kg
Zwiebeln, gehackt 3
Sellerie, in Streifen geschnitten 6 Stangen
Knoblauchzehen, zerdrückt 3
Tomatenmark 7 EL
Mehl 3 EL
Dosentomaten, gehackt 3 Dosen
Rinderbrühe 600 ml
Champignons, in Scheiben geschnitten 300 g
Gemischte Kräuter 2 TL
Salz und frisch gemahlenen schwarzen Pfeffer
Zubereitung
• Die Anbrat-/Bräunungsfunktion wird nicht benötigt.
• Alle Zutaten außer Mehl, Eier und Sahne in den Behälter geben und auf Schongaren einstellen.
• Mit Weizenmehl-/Wassergemisch andicken.
• Nach dem Garen das Ei und die Sahne mit ein wenig von der heißen Garflüssigkeit vermischen und
unter das Gericht heben.
• Hähnchenrezepte werden in der Regel mit der kürzesten Garzeiteinstellung zubereitet,
d.h. 8 Std. 6 Std. 3-4 Std.
Gekochter Schinken
6,5 l
Ganzer Schinken 1,8 kg
Anleitung
• Die Anbrat-/Bräunungsfunktion wird nicht benötigt.
• Ganzen Schinken in den Behälter legen und mit kochendem Wasser bedecken.
• Zur Zubereitung kann die min. oder max. Garzeit für jede Einstellung gewählt werden.
18
Bei Verwendung der Anbrat-/Bräunungsfunktion immer zuerst 30 ml (2 EL) Speiseöl in den Behälter
geben.
Anleitung
• Das Hackfleisch mit der Anbrat-/Bräunungsfunktion in mehren Durchgängen bräunen.
• Zwiebeln, Knoblauch und Sellerie zugeben und dünsten.
• Auf Schongaren umschalten.
• Mehl mit Tomatenmark mischen, danach die übrigen Zutaten zugeben.
• Gut umrühren.
• Kann mit der minimalen bis maximalen Garzeit für die Einstellung zubereitet werden.
Page 19

SC461007MEE Rev1_Instruction Book 17/06/2014 17:11 Page 19
Wursttopf
6,5 l
Öl 1 EL
Würstchen 1,5 kg
Zwiebeln, gehackt 3 große
Karotten, in Scheiben geschnitten 5
Lauchstangen, in Scheiben geschnitten 3
Rinderbrühe 1,5 l
Chutney 6 EL
Worcestershire-Sauce 5 EL
Salz und frisch gemahlenen schwarzen Pfeffer
Bei Verwendung der Anbrat-/Bräunungsfunktion immer zuerst 30 ml (2 EL) Speiseöl in den Behälter
geben.
Zubereitung
• Die Würstchen bündelweise mit der Anbrat-/Bräunungsfunktion bräunen.
• Das Gemüse zugeben und dünsten.
• Auf Schongaren umschalten.
• Die übrigen Zutaten zugeben und mit der minimalen Garzeit für die Einstellung zubereiten.
Rinder-Curry
6,5 l
Pflanzenöl 4 EL
Backäpfel, geschält, entkernt und in kleine Stücke geschnitten 3 mittlere
Zwiebeln, gehackt 3 große
Rindfleisch zum Kochen, gewürfelt 1,5 kg
Currypulver 5 TL
Rinderbrühe 1 l
Mango Chutney 5 EL
Sultaninen 150 g
Dosentomaten, gehackt 600 g
Zitronensaft 3 EL
Weizenmehl 5 EL
Salz und frisch gemahlenen schwarzen Pfeffer
Bei Verwendung der Anbrat-/Bräunungsfunktion immer zuerst 30 ml (2 EL) Speiseöl in den Behälter
geben.
Zubereitung
• Mit der Anbrat-/Bräunungsfunktion das Fleisch nach und nach braun braten.
• Die Zwiebeln zugeben und dünsten.
• Auf Schongaren umschalten.
• Alle übrigen Zutaten zugeben und gut umrühren.
• Mehl mit Tomatenmark mischen, danach die übrigen Zutaten zugeben.
• Gut umrühren.
• Kann mit der minimalen bis maximalen Garzeit für die Einstellung zubereitet werden.
Rinder-Curry thailändische Art
6,5 l
Butter 60 g
Rindfleisch zum Kochen, in Würfel geschnitten 1 kg
Zwiebeln, gehackt 2
Knoblauchzehen, zerdrückt 4
Erdnussbutter 6 EL
Kokosnussmilch 800 g
Kartoffeln, geviertelt 700 g
Currypulver 4 EL
Thai-Fischsauce 4 EL
Weicher brauner Zucker 4 EL
Rinderbrühe 1 l
Zubereitung
• Butter im Behälter beim Anbraten/Bräunen schmelzen lassen. Fleisch, Knoblauch und Zwiebeln
zugeben und anbraten. (Bei 6,5 l das Fleisch in zwei Durchgängen braten)
• Zwiebeln und Knoblauch zugeben und weich braten.
• Alle übrigen Zutaten zugeben und gut umrühren.
• Auf Schongaren umschalten.
• Wird am Besten mit der Schongarfunktion gekocht
Grillrippchen
6,5 l
Rippe 1,5 kg
Grillsauce 300 ml
Zubereitung
• Die Rippchen mehrere Stunden oder über Nacht in der Sauce marinieren.
• In den Behälter legen und für den benötigten Zeitraum garen lassen.
• Je länger die Kochzeit, desto zarter wird das Fleisch.
Lockerer Syrup-Pudding
6,5 l
Butter 125 g
Sirup, hell 4 EL
Puderzucker 100 g
Eier 2
Mehl mit Backpulverzusatz 200 g
Milch 2 EL
Zitronensaft 2 EL
Zubereitung
• Eine 1,25 l Puddingform von innen mit Butter einfetten und den Boden mit Backpapier auslegen.
• Den Sirup auf den Boden der Form gießen.
• Butter und Zucker glatt und kremig schlagen.
• Schrittweise die Eier und das Mehl untermischen und in Milch und Saft umrühren. Die Mischung mit
Löffel oben auf den Syrup auftragen und mit gefaltetem Backpapier abdecken. Mit Zwirn zubinden
und eine Schlaufe formen.
• In den Supreme Precision 3 in 1 Slow Cooker stellen und an den Seiten bis zur Hälfte mit
kochendem Wasser auffüllen.
• Beste Zubereitung bei schneller Gareinstellung bzw. 1:45 Std.
Reispudding
6,5 l
Butter 60 g
Milchreis 250 g
Zucker 250 g
Milch 2 l
Muskat 1 TL
d
Zubereitung
• Den Behälter leicht mit Butter einfetten.
• Alle Zutaten in Behälter füllen und umrühren.
• Beste Ergebnisse erhalten Sie mit der Schongareinstellung 1 (8 - 10 Std.).
19
Page 20

SC461007MEE Rev1_Instruction Book 17/06/2014 17:11 Page 20
Schokokuchen
6,5 l
Kakao 50 g
Kochendes Wasser 6 EL
Backpulver 1 TL
Mehl mit Backpulverzusatz 175 g
Puderzucker 150 g
Öl 150 ml
Eier 3
Zubereitung
• Eine 17,8 cm Kuchenform mit Backpapier auslegen.
• Den Kakao mit dem kochenden Wasser breiig rühren.
• Mehl, Backpulver und Zucker in einer Schüssel vermischen.
• Eier und Öl schlagen und zusammen mit der Schokomasse zur Mischung zugeben und ebenfalls gut
durchmischen.
• In die Form füllen und mit Folie abdecken. Mit Zwirn zubinden und eine Schlaufe formen. In den
Schongarer stellen und an den Seiten bis zur Hälfte mit kochendem Wasser auffüllen.
• Beste Zubereitung bei schneller Gareinstellung bzw. 1:45 Std.
Beerenpastete
6,5 l
Frisches Obst / Beeren (Himbeeren, Johannisbeeren, Heidelbeeren o. ä.) 1,2 kg
Zucker 150 g
Mehl mit Backpulverzusatz 200 g
Suet-Pudding 100 g
Salz Prise
Zitronenschale 2 Zitronen
Milch 6-8 EL
Zubereitung
• Das Obst in den Supreme Precision 3 in 1 Slow Cooker geben und die Hälfte des Zucker einrühren.
• Den übrigen Zucker mit dem Mehl, Suet-Pudding, Salz und Zitronenschale vermischen.
• Milch zugeben, bis eine Teigmasse entsteht, nicht zu viel.
• Teigballen in der Mitte des Behälters oben auf das Obst legen. Die Teigballen sollten nicht die
Behälterwände berühren, da sie sich während des Kochens ausdehnen.
• Die minimale Zubereitungsdauer der Einstellung zum Garen verwenden.
SUPPORT
Sollten Sie Schwierigkeiten mit Ihrem neuen Gerät haben, helfen wir Ihnen gern weiter.
Oft können wir eher behilflich sein als das Geschäft, in dem Sie das Gerät gekauft haben.
Damit unsere Mitarbeiter Ihre Anfrage zügig bearbeiten können, sollten Sie folgende Angaben
parat halten.
• Name des Gerätes.
• Modellnummer (an der Unterseite des Geräts zu finden).
• Seriennummer (an der Unterseite des Geräts zu finden).
Website
Sie können uns auch über unsere Internetseite kontaktieren oder dort in unserem umfangreichen
Angebot nach Geräten, Ersatzteilen und Zubehör suchen und bestellen.
GESETZLICHE GEWÄHRLEISTUNG
Für dieses Gerät gilt eine Gewährleistung von 2 Jahren.
Als Kaufnachweis sollte die Quittung des Fachhändlers aufgehoben werden. Heften Sie Ihren
Beleg an die Rückseite dieser Unterlagen.
Sollte an diesem Gerät ein Fehler auftreten, sind immer nachfolgende Angaben mitzuteilen.
Diese Angaben sind auf der Unterseite des Geräts zu finden.
Modellnr.
Seriennr.
Vor dem Verlassen des Werks werden alle Morphy Richards Produkte geprüft. Sollte einmal der
Fall auftreten, dass sich ein Gerät innerhalb der Gewährleistung als fehlerhaft erweist, wenden
Sie sich bitte an unsere Service-Hotline
Falls das Gerät während der 2-jährigen Gewährleistung aus welchem Grund auch immer
ausgetauscht wird, wird zur Berechnung der Restgarantie für das neue Gerät das OriginalKaufdatum zugrunde gelegt. Aus diesem Grunde ist es besonders wichtig, den OriginalKaufbeleg bzw. die Rechnung aufzubewahren, um das Datum des ursprünglichen Kaufs
nachweisen zu können.
Damit die 2-jährige Gewährleistung geltend gemacht werden kann, muss das Gerät im Einklang
mit den Anweisungen des Herstellers benutzt worden sein. Beispielsweise muss das Gerät
entkalkt worden sein und gemäß den Anweisungen gereinigt werden.
Morphy Richards übernimmt keine Verpflichtung zur Reparatur oder zum Austausch der Waren
im Rahmen der Garantiebedingungen, wenn:
1 der Fehler auf einen versehentlich Gebrauch, Missbrauch, unachtsamen Gebrauch oder auf einen
Gebrauch zurückzuführen ist, der den Empfehlungen des Herstellers entgegenwirkt oder wenn der
Fehler durch Stromspitzen oder durch Transportschäden verursacht wurde.
2 das Gerät mit einer Spannung versorgt wurde, die nicht auf dem Typenschild abgedruckt ist.
3 von anderen Personen als unserem Reparatur- und Wartungspersonal (oder von einem unserer
Vertragshändler) Reparaturversuche unternommen wurden.
4 wenn das Gerät für Vermietungszwecke oder nicht allein für private Zwecke gebraucht wurde.
5 das Gerät aus zweiter Hand stammt.
6 Morphy Richards kann nicht dafür haftbar gemacht werden, Reparaturarbeiten im Rahmen der
Gewährleistung auszuführen.
7 Verbrauchsmaterialien wie Tüten, Filter und Glaskaraffen sind von der Gewährleistung
ausgeschlossen.
8 Batterien und Schäden aufgrund undichter Batterien sind von der Gewährleistung ausgeschlossen.
9 die Filter nicht gemäß Anleitung gereinigt und ausgewechselt wurden
Diese Gewährleistung erkennt Ihnen ausschließlich die Rechte zu, die ausdrücklich in den oben
genannten Bestimmungen niedergelegt sind und erstreckt sich nicht auf Forderungen infolge
eines Verlustes oder einer Beschädigung. Diese Gewährleistung wird als zusätzliche Leistung
angeboten und greift Ihre gesetzlich zuerkannten Rechte als Verbraucher nicht an.
GARANTIEKARTE
Kauf datum Typen- Nr.
Händlerstempel und Unterschrift Händlerstempel und Unterschrift
Fehler / Man gel
Deutschland:
Bei Störungen oder Schäden
wenden Sie sich bitte an
unseren Kundenservice unter:
Hotline: +49 (0 ) 9 11/6 57 19-719
Fax: +49 (0) 1805-355 467
Fax: 01805 / 355 467
eMail: service@glend impl ex.de
Die zuständige Stelle in allen an deren Ländern ist der jewe ilige Fachhändler bzw. die Bezugsquelle.
20
Österreich:
Bei Störungen oder Schäden
wenden Sie sich bitte an
unseren Kundendienst:
Gerhard Schu rz, Servicewerkstatten
Merangasse 17
A-8010 G raz
Tel. : +43 316 32 30 41
Fax: +43 316 38 29 6 3
eMail: office@schurz.biz
Schweiz:
Bei Störungen oder Schäden
wenden Sie sich bitte an
unseren Kundendienst:
BLUEPOINT Service Sagl
Via Cant onale 14; C.P. 46;
CH - 6917 Barbengo
Tel: + 41 91 980 49 72
Fax: + 41 91 60 5 37 55
E-Mail: info @bluepoint-service. ch
Page 21

SC461007MEE Rev1_Instruction Book 17/06/2014 17:11 Page 21
e
Salud y seguridad
El uso de cualquier aparato eléctrico requiere la aplicación de las siguientes normas lógicas de seguridad.
Lea estas instrucciones detenidamente antes de utilizar este producto.
• Este aparato puede ser utilizado por niños en edades a partir de 8 años y personas con sus
capacidades físicas, mentales o sensoriales reducidas, o con falta de experiencia y
conocimientos, si han recibido la necesaria supervisión o instrucciones en relación con el uso
del aparato y los peligros relacionados.
• No permita que los niños jueguen con el aparato.
• La limpieza y el mantenimiento del usuario no serán realizados por niños menores de 8 años
y si no es bajo la supervisión de un adulto.
• Mantenga el aparato y el cable fuera del alcance de los niños menores de 8 años.
• Este aparato eléctrico ha sido diseñado para su uso doméstico y aplicaciones similares, tales
como: alquerías y para huéspedes de hoteles, moteles, y otro tipo de dominios residenciales
como hostales.
No es recomendable su uso en cocinas para empleados de tiendas, oficinas y otros
entornos laborales.
d
Ubicación
• Mantenga siempre el aparato lejos del borde de la superficie sobre la que esté apoyado.
• Utilice el aparato sobre una superficie firme, plana y resistente al calor.
• No utilice el aparato en el exterior ni cerca del agua.
Cable de alimentación
• El cable de alimentación debe tenderse desde la toma de corriente hasta el aparato sin quedar
tirante.
• Coloque el cable de modo que no cuelgue por el borde de la encimera o sobre un espacio abierto
donde los niños puedan alcanzarlo.
• Evite que el cable entre en contacto con hornos u otras superficies calientes, que podrían dañarlo.
• Si se daña el cable, debe ser sustituido por el fabricante, su personal de servicio técnico u otra
persona con una cualificación similar
Seguridad personal
• PRECAUCIÓN: No toque la parte superior del aparato ni otras partes calientes durante o después
de su uso; utilice los mangos o tiradores.
• Para evitar riesgos de descargas eléctricas, nunca sumerja la base en agua ni otros líquidos.
• No toque las superficies calientes. Utilice guantes o un paño para destapar la cacerola o manipular
recipientes calientes.
• Debe tener una precaución extrema al trasladar un aparato que contenga comida, agua u otros
líquidos calientes.
Otras consideraciones de seguridad
• No encienda la hoya de cocción lenta si la cacerola está vacía.
• Deje que la tapa de vidrio y la cacerola se enfríen antes de sumergirlas en el agua.
• Nunca cocina directamente en la unidad base. Utilice la cacerola.
• No utilice la cacerola ni la tapa de vidrio si están agrietadas o astilladas.
• No encienda el aparato si está boca abajo o apoyado de lado.
• La tapa de vidrio y la cacerola son frágiles. Utilícelas con cuidado.
• El uso de accesorios o herramientas no recomendadas por Morphy Richards podría provocar
incendios, descargas eléctricas o lesiones.
• No lo coloque encima o cerca de un quemador de gas o eléctrico caliente, o en un horno
precalentado.
• Desenchúfelo de la toma de corriente cuando no lo utilice, antes de colocar o de retirar accesorios
y antes de limpiarlo.
• Este aparato no está diseñado para ser manejado mediante temporizadores externos ni mandos a
distancia.
Requisitos eléctricos
Compruebe que el voltaje indicado en la placa de características del aparato se corresponde con el
suministro de electricidad de su casa, que debe ser CA (corriente alterna). Si fuese necesario
cambiar el fusible del enchufe, debe utilizarse un fusible BS1362 de 3 amperios.
PRECAUCIÓN: Este aparato debe estar conectado a tierra.
e
21
Page 22

SC461007MEE Rev1_Instruction Book 17/06/2014 17:11 Page 22
Guía de configuración sencilla
Consulte también el libro de instrucciones principal, que contiene
información de seguridad importante y detalles sobre cómo utilizar
la Supreme Precision 3 in 1 Slow Cooker.
Esta guía le indica cómo utilizar la Supreme Precision 3 in 1 Slow Cooker para dorar o tostar
aproximadamente 1 kg de carne y, a continuación, utilizar el programa de cocción lenta de
8 horas o el programa de guiso de 1 hora y media. Para el resto de programas, consulte las
instrucciones completas.
Para utilizar la función de dorar o tostar
1
2
Coloque la cacerola ‹sobre la base fiy enchufe la Supreme Precision 3 in 1
Slow Cooker.
‰
Aparecerá la pantalla predeterminada (izquierda). El icono Dorar/Tostar
indicador de tiempo
Añada a la cacerola el aceite necesario para la cantidad de carne que desea
dorar.
Pulse el botón “Aceptar” „. La Supreme Precision 3 in 1 Slow Cooker pitará
durante 2 segundos aproximadamente, y la pantalla dejará de parpadear. A
continuación, la cacerola comenzará a calentarse y el temporizador
comenzará la cuenta atrás. El aceite tardará unos 5 minutos en alcanzar la
temperatura adecuada para dorar o tostar la carne (es decir, el temporizador
indicará 00:10 cuando se alcance la temperatura adecuada)
‚
parpadearán.
y el
‚
Añada la carne a la cacerola y remueva con frecuencia hasta que el exterior de la
carne esté dorado o tostado. Cuando el temporizador llegue a cero, la base pitará
y el proceso de cocción se detendrá. Si la carne está dorada antes de que
3
22
transcurran los 15 minutos, mantenga pulsado el botón “Aceptar”
segundos aproximadamente. La base pitará y el proceso de cocción se detendrá.
Si necesita más tiempo, repita el proceso a partir del paso 2.
„
durante 3
Page 23

SC461007MEE Rev1_Instruction Book 17/06/2014 17:11 Page 23
Para utilizar la función de guiso de 1 hora y media
4
Cuando haya finalizado el proceso de dorar o tostar, añada el resto de
ingredientes (siguiendo lo indicado en la receta). Pulse una vez el botón
“Función/Tiempo”
veces el botón “Aceptar”
segundos antes de que comience el proceso de cocción. Vuelva a colocar la
tapadera cuando utilice la Supreme Precision 3 in 1 Slow Cooker con esta
configuración. Para el temporizador y para mantener el calor, consulte el punto 6.
·
y aparecerá la siguiente pantalla (izquierda). Pulse dos
„
y la base pitará durante aproximadamente 2
O para utilizar la función de cocción lenta
Cuando haya finalizado el proceso de dorar o tostar, añada el resto de
ingredientes (siguiendo lo indicado en la receta). Pulse dos veces el botón
“Función/Tiempo”
veces el botón “Aceptar”
5
segundos antes de que comience el proceso de cocción. Vuelva a colocar la
tapadera cuando utilice la Supreme Precision 3 in 1 Slow Cooker con esta
configuración. Para el temporizador y para mantener el calor, consulte el punto 6.
Función de cuenta atrás y mantenimiento del calor
Al final del proceso de cocción el aparato emitirá un pitido y comenzará
automáticamente a mantener el calor. Mantendrá el calor durante un máximo de
dos horas, desde H0:00 hasta H2:00. Transcurridas las 2 horas, en la pantalla
aparecerá “H”, que permanecerá visible hasta que la placa alcance la temperatura
ambiente (aproximadamente 40 ºC). A continuación, la pantalla se quedará en
6
blanco.
·
y aparecerá la siguiente pantalla (izquierda). Pulse dos
„
y la base pitará durante aproximadamente 2
e
Al pulsar cualquier botón volverá a la pantalla mostrada la primera
vez que encendió el aparato.
23
Page 24

SC461007MEE Rev1_Instruction Book 17/06/2014 17:11 Page 24
e
Cómo sacar el máximo partido a su nuevo aparato...
Seguridad
Nunca toque la superficie exterior de la cacerola de cocción lenta durante su funcionamiento o
antes de que se haya enfriado. Utilice guantes para tocar la tapadera o la cacerola de acero
inoxidable.
Eficiencia
Si destapa la cacerola dejará escapar el calor, lo que reducirá su eficiencia y prolongará el
tiempo de cocción. Intente no destapar la cacerola más de 3 o 4 veces para remover o añadir
ingredientes.
Disfrute de las ventajas
La cocción lenta le permite disfrutar de comidas sanas, variadas y sabrosas. La cocción
prolongada permite que los alimentos se mezclen y absorban mejor los sabores. Una cacerola
de cocción lenta calienta poco a poco los alimentos, y es ideal para cocinar carnes, sobre todo
si son un poco duras, como la carne de vaca para estofar, porque se ablandan durante el largo
proceso de cocción. ¡El único límite para los posibles usos de su cacerola de cocción lenta es
su propia imaginación!
Características
⁄
Tapa de vidrio
¤
Salida de vapor
‹
Cacerola para servir/cocinar de acero inoxidable (de 4,5 l o 6,5 l, en función del modelo)
›
Resistencia
fi
Unidad base
fl
Panel de control/visualización (consulte la imagen ampliada)
‡
Orificio de drenaje x 2 (debajo)
·
Botón Función/Tiempo
‚
Indicador de tiempo
„
Botón Aceptar
‰
Icono Dorar/Tostar e icono Guisar
Â
Icono Cocción lenta
Leyenda
Icono Dorar/Tostar
Icono Guisar
Icono Cocción lenta
Capacidad de cocción
• La Supreme Precision 3 in 1 Slow Cooker de 6,5 litros tiene una capacidad máxima de 5 litros.
• La capacidad se encuentra en la etiqueta de características, situada debajo del aparato.
Antes de utilizar la Supreme Precision 3 in 1 Slow Cooker
por primera vez
Retire todas las etiquetas del producto.
Lave la tapadera y la cacerola de acero inoxidable en agua caliente jabonosa con una esponja o
una bayeta. NO utilice estropajos ni otros productos abrasivos, ya que dañarán el acero
inoxidable. Enjuague bien la cacerola y la tapadera y séquelas.
IMPORTANTE: NO SUMERJA LA BASE DE LA SUPREME PRECISION 3 IN 1 SLOW COOKER
EN AGUA
Tenga en cuenta que:
Durante los primeros usos, es posible que note un suave olor como consecuencia de la quema
de residuos de fabricación. Esto es completamente normal, no afecta a la comida que se está
cocinando y desparecerá al cabo de unos cuantos usos.
Consejos sobre la Supreme Precision 3 in 1 Slow Cooker
• Todos los ingredientes deben estar a temperatura ambiente antes de añadirlos. Si están demasiado
fríos, deje que alcancen la temperatura ambiente, ya que la comida demasiado fría afectará al
tiempo de cocción.
• La carne puede utilizarse si ha sido refrigerada en un frigorífico, pero no utilice carne congelada.
Utilice la función de tostar para dorar la carne.
• Asegúrese de que los ingredientes congelados se hayan descongelado por completo antes de su
uso.
• Si utiliza caldo frío en la receta de cocción lenta (por ejemplo, vino) tendrá que precalentar los
ingredientes. Comience en primer lugar con la función de tostar, añadiendo todos los ingredientes.
Una vez transcurridos los 15 minutos, continúe con la función de cocción lenta.
• En el método tradicional de cocción lenta, se recomienda enharinar la carne antes de tostar. No es
necesario realizar este paso en la Supreme Precision 3 in 1 Slow Cooker. Solo tiene que tostar o
dorar la carne tal y como se indica. Si es necesario espesar el líquido, añada y remueva una mezcla
de harina de maíz y agua fría 30 minutos antes de que finalice el tiempo de cocción.
• Si utiliza carne con hueso (por ejemplo, muslos de pollo, costillas, etc.), el proceso de cocción lenta
puede desprender la carne del hueso; esto es normal, y potencia aún más el sabor. Sin embargo,
esté atento por si hay pequeños huesos en el líquido.
• No llene en exceso la cacerola, ya que las recetas que se incluyen en este libro de instrucciones se
han creado para lograr la capacidad máxima, y deje espacio encima de la comida para una cocción
uniforme. La capacidad se encuentra en la etiqueta de características, situada debajo del aparato.
Si utiliza una receta de cosecha propia, no llene la cacerola por encima de los remaches de las asas
que se pueden ver en el interior de la misma.
• La tapadera se calentará mucho durante su uso, especialmente la parte de cristal y el borde de
acero inoxidable. Las asas aisladas con silicona se mantendrán frías, lo que le permite levantar la
tapadera. Sin embargo, se recomienda tomar la precaución de utilizar guantes al hacerlo.
• Los ingredientes deben distribuirse de forma uniforme en la cacerola. Sin embargo, se recomienda
colocar los tubérculos en la mitad inferior de la olla para comenzar la cocción. Todos los
ingredientes deben estar sumergidos en el líquido de cocción.
• Para garantizar una cocción uniforme, los tubérculos deben cortarse en dados (de
aproximadamente 20 mm).
• Si el líquido de la cacerola rebosa al hervir, esto suele deberse a que se ha llenado en exceso, así
que retire algunos de los ingredientes y/o parte del líquido.
• Por lo general, las carnes duras como la carne para estofar necesitan tiempos de cocción más
prolongados, que son ideales para la cocción lenta. Para la función de guiso se necesita carne de
mejor calidad, que se cocine en 1:30–1:45 horas.
• El pollo y la carne de calidad necesitan menos tiempo de cocción. Por tanto, debe utilizar el valor
inferior del tiempo seleccionable – por ejemplo, para el nivel 1, utilice 8 horas.
• Para las bolas de masa, añádalas al guiso 30 o 45 minutos antes de finalizar el tiempo de cocción.
Puede añadirlas en la superficie, y no es necesario sumergirlas en el líquido.
• El jamón debe dejarse en el envoltorio de plástico, si estuviera envasado. Si no es así, utilice una
bolsa de plástico adecuada y resistente al calor o átelo con hilo de cocina para evitar que el jamón
se desmenuce durante la cocción.
• Si utiliza la función de guiso, deje que la comida cocinada repose durante 10 minutos en la cacerola
antes de servirla. Esto permite que la comida caliente (hirviendo) se enfríe antes de comerla.
• Cuando sea un usuario experimentado de la Supreme Precision 3 in 1 Slow Cooker, podrá
comenzar a crear sus propias recetas, pero se recomienda seguir una receta existente como
referencia. Si utiliza ingredientes tales como la pasta, leche, nata, pescado o marisco en una receta,
deben añadirse 30 minutos antes del final de cocción del resto de ingredientes. Esto no se aplica a
la receta de arroz con leche ni a la leche de coco.
• No deje comida cruda sin cocinar en la cacerola durante un periodo de tiempo prolongado.
Comience el proceso de cocción lo antes posible. Si tiene que retrasar el proceso de cocción,
guarde la comida en el frigorífico y, cuando vaya a cocinar, deje que vuelva a la temperatura
ambiente.
• Si una receta cocinada previamente se ha enfriado, utilice la función de guiso durante 1:30 horas
para volver a calentar la comida. En función de la receta, puede tardar entre 30 y 45 minutos en
volver a calentarse. Asegúrese de que la comida esté caliente antes de servirla.
• Si está cocinando la mitad de la cantidad indicada, el tiempo de cocción suele reducirse a dos
tercios. Compruebe que la comida se haya cocinado por completo antes de servirla.
• Al adaptar recetas de la cocina tradicional para utilizarlas en una cacerola de cocción lenta es
posible que necesite reducir el líquido utilizado, ya que el líquido no se evapora igual.
• Si necesita añadir caldo, utilice agua hirviendo.
• Al cocinar piezas de carne, comience cubriéndolas con caldo o agua hirviendo. Este líquido puede
reducirse a medida que se acerca el final del tiempo de cocción.
• Las judías pintas sin cocinar deben ponerse a remojo y hervirse durante 10 minutos para eliminar
las toxinas antes de cocinarlas en la Supreme Precision 3 in 1 Slow Cooker.
• Si es necesario, elimine el exceso de aceite después de dorar.
• Si utiliza caldo o salsas de tarros o recipientes, caliéntelos primero en un microondas y, a
continuación, añádalos a la cacerola. También puede añadir 30 minutos al tiempo de cocción.
A
Explicación de los términos
Tostar/dorar:
Antes de guisar o cocer lentamente la carne, es importante dorarla o tostarla antes. Esto
significa cocinar ligeramente el exterior de la carne en aceite caliente antes de comenzar el
proceso de guiso o cocción lenta (la carne debe estar aún cruda en su interior). Si dora o tuesta
la carne con este método, conservará todo su sabor y jugosidad.
Guiso:
En lo que respecta a la Supreme Precision 3 in 1 Slow Cooker, guisar significa cocinar la carne
y/o las verduras en un líquido (por ejemplo, vino, caldo, agua) entre 1 hora y 30 minutos y 1 hora
y 45 minutos.
Cocción lenta:
La cocción lenta es una forma de cocinar la comida durante un periodo de tiempo prolongado
(por lo general, entre 4 y 10 horas) en un líquido (por ejemplo, vino, caldo, agua). Tal y como
sugiere el nombre, la comida se cocina de forma más lenta y suave, lo que suele traducirse en
una carne mucho más tierna. Las carnes con un alto contenido en grasa son ideales para la
cocción lenta, ya que el proceso permite que la grasa se derrita, dejando la carne muy tierna.
24
Page 25

SC461007MEE Rev1_Instruction Book 17/06/2014 17:11 Page 25
Instrucciones de uso
Coloque la base fisobre una superficie seca, nivelada y resistente al calor, lejos del borde de
la superficie de trabajo. No la utilice sobre el suelo.
Tenga en cuenta que:
Si el producto está encendido y no se utiliza, el indicador luminoso del temporizador se apagará
y entrará en modo de espera después de 30 segundos.
Función de dorar o tostar de la Supreme Precision 3 in 1 Slow Cooker
Coloque la cacerola ‹sobre la base fiy enchufe la Supreme Precision 3 in 1 Slow Cooker.
fl
Aparecerá la pantalla
El indicador de tiempo
cacerola el aceite necesario para la cantidad de carne que desea dorar.
Consulte las recetas que se incluyen en este libro de instrucciones.
Recomendamos que utilice aproximadamente dos cucharadas de aceite vegetal para dorar
entre 800 g y 1200 g de carne. Sin embargo, esto puede variar en función del gusto personal y
la cantidad de grasa de la carne que se va a dorar.
Para seleccionar la función de dorar, pulse una vez el botón “Aceptar”
Precision 3 in 1 Slow Cooker pitará durante 2 segundos aproximadamente, y la pantalla dejará
de parpadear. A continuación, la cacerola comenzará a calentarse y el temporizador
comenzará la cuenta atrás. El aceite tardará unos 5 minutos en alcanzar la temperatura
adecuada para dorar o tostar la carne (es decir, el temporizador indicará 00:10). Una buena
forma de comprobar si el aceite está caliente es añadir un trozo pequeño de carne o de cebolla
a la cacerola. Si crepita al entrar en contacto con el aceite, la temperatura es adecuada para
dorar o tostar. Si no crepita, deje que la cacerola se caliente durante otro minuto
aproximadamente y vuelva a probar.
Añada la carne a la cacerola y remueva frecuentemente hasta que el exterior de la carne esté
dorado o tostado. Cuando el temporizador llegue a cero, la base pitará y el proceso de cocción
se detendrá. Si la carne está dorada antes de que el temporizador llegue a cero, mantenga
pulsado el botón “Aceptar”
el proceso de cocción se detendrá y aparecerá de nuevo la pantalla predeterminada
Si la carne necesita unos minutos adicionales para dorarse después de que el temporizador
haya llegado a cero, pulse el botón “Aceptar” para volver a comenzar con la función de dorar o
tostar. Tal y como se ha explicado anteriormente, para cancelar la función de dorar antes de que
el temporizador llegue a cero, mantenga pulsado el botón “Aceptar”
aproximadamente.
Dada la elevada temperatura que alcanza la Supreme Precision 3 in 1 Slow Cooker en el modo
de dorar/tostar, debe realizar un máximo de dos programas de 15 minutos de forma
consecutiva. Si trata de seleccionar el programa una tercera vez y la unidad está caliente,
aparecerá esta pantalla —:— y el icono “Dorar/tostar”
Esta función no puede volver a seleccionarse hasta que el aparato se haya enfriado lo
suficiente. Sin embargo, esto no debería ser un problema, ya que siempre es posible dorar o
tostar la cantidad de carne en 30 minutos (2 x 15).
Tenga en cuenta que:
No inicie la función de “Dorar/tostar” si la cacerola
puede provocar que el aparato se sobrecaliente. Además, no debe iniciar la función de
“Dorar/tostar” sin añadir aceite a la cacerola.
predeterminada B.
‚
y el icono de la función de dorar ‰parpadearán. Añada a la
„
. La Supreme
„
durante 3 segundos aproximadamente. La base emitirá un pitido,
„
durante 3 segundos
‰
parpadeará C.
‹
no está en la base fi, ya que esto
‚
B
.
Sellar o dorar en la placa de gas o eléctrica con la
cacerola Supreme Precision 3 in 1 Slow Cooker
Si lo prefiere, puede utilizar su cacerola Supreme Precision 3 in 1 Slow Cooker en su cocina
eléctrica o de gas para dorar o tostar su carne.
Añada aceite tal y como se ha indicado anteriormente, y coloque la cacerola en su hornilla. El
aceite puede calentarse ligeramente de forma más rápida en su hornilla, así que utilice un trozo
pequeño de carne/cebolla tal y como se ha explicado anteriormente para comprobar la
temperatura.
Sugerencia para dorar o tostar la carne
Al dorar grandes cantidades de carne, le recomendamos que corte la carne en trozos más
pequeños para facilitar el proceso. Dado que la carne debe removerse en todo momento
durante el proceso, resulta más fácil remover trozos de carne más pequeños.
Función de guiso
Coloque la cacerola ‹en la base fi. Añada sus ingredientes según lo indicado en la receta
que está siguiendo. Si ha utilizado la función de “Dorar/Tostar” o ha encendido la Supreme
Precision 3 in 1 Slow Cooker, debe aparecer la pantalla predeterminada
·
Pulse una vez el botón “Función/Tiempo”
‚
El indicador de tiempo
elegir la función de guiso. El icono Guisar
(Tenga en cuenta que si ha seleccionado la función de guiso por error, puede volver a la pantalla
anterior manteniendo pulsado el botón “Aceptar”
Puede seleccionar el programa de 1 hora y 30 minutos o 1 hora y 45 minutos (en función de la
receta que esté siguiendo). Para seleccionar el programa de 1 hora y 30 minutos, pulse el botón
“Aceptar/Puesta en marcha/Detener”
pulse el botón “Función/Tiempo”
Pulse el botón “Aceptar”
El tiempo dejará de parpadear y la base emitirá un pitido durante 2 segundos aproximadamente,
antes de que el proceso de cocción comience. El temporizador comenzará la cuenta atrás hasta
llegar a cero.
y el icono Guisar „parpadearán. Pulse el botón “Aceptar” „para
„
„
.
y la pantalla cambiará a E.
‰
dejará de parpadear.
„
durante 2 segundos aproximadamente.)
„
. Para seleccionar el programa de 1 hora y 45 minutos,
. El indicador de tiempo ‚cambiará para mostrar 01:45.
D
.
Si necesita más tiempo de cocción, puede repetir el ajuste de guiso. Sin embargo, debe
determinar el tiempo de cocción adicional que necesitará.
Si por cualquier motivo necesita cancelar el proceso de cocción antes de que el temporizador
llegue a cero, mantenga pulsado el botón “Aceptar”
La base emitirá un pitido, el proceso de cocción se detendrá y aparecerá de nuevo la pantalla
predeterminada
Durante la función de guiso, el vapor saldrá por la salida de vapor. Asegúrese de que la salida
esté colocada en la parte posterior del aparato.
PRECAUCIÓN: El vapor y la salida estarán calientes.
Al final del proceso de cocción, Supreme Precision 3 in 1 Slow Cooker emitirá un pitido y comenzará
automáticamente a mantener el calor.
B
.
„
durante 3 segundos aproximadamente.
Función de cocción lenta
Coloque la cacerola ‹en la base fi. Añada sus ingredientes según lo indicado en la receta
que está siguiendo. Si ha utilizado la función “Dorar/Tostar” o ha encendido la Supreme
Precision 3 in 1 Slow Cooker, debe aparecer la pantalla predeterminada tal y como se muestra a
continuación
Pulse dos veces el botón “Función/Tiempo”
El indicador de tiempo
distintos de cocción lenta: 1, 2 y 3. La diferencia es la cantidad de tiempo en que cada
programa puede ajustarse. Todos los programas de cocción lenta permiten seleccionar tiempos
de cocción en intervalos de 30 minutos entre el tiempo mínimo y el máximo. Por ejemplo, en el
ajuste bajo es posible seleccionar un tiempo de cocción de 9 1/2 horas si se desea. La función
de mantener caliente es adicional a este ajuste de tiempo.
Cada programa tiene un icono diferente tal y como se indica a continuación.
Si desea utilizar el programa de cocción lenta 1, pulse el botón “Aceptar”
seleccione la cantidad de tiempo durante la que desee que se realice la cocción lenta. Al pulsar
el botón “Función/Tiempo”
tiempo que desea establecer, pulse el botón “Aceptar”
base emitirá un pitido durante 2 segundos aproximadamente, antes de que el proceso de
cocción comience. El temporizador comenzará la cuenta atrás hasta llegar a cero.
El tiempo dejará de parpadear y la base emitirá un pitido durante 2 segundos aproximadamente,
antes de que el proceso de cocción comience. El temporizador comenzará la cuenta atrás hasta
llegar a cero.
Si desea utilizar el programa de cocción lenta 2, pulse una vez el botón “Función/Tiempo”
(aparecerá el icono Cocción lenta 2), antes de pulsar el botón “Aceptar” „. Después
seleccione el tiempo de cocción como se ha explicado anteriormente.
Si desea utilizar el programa de cocción lenta 3, pulse dos veces el botón “Función/Tiempo”
(aparecerá el icono Cocción lenta 3), antes de pulsar el botón “Aceptar” „. Después
seleccione el tiempo de cocción como se ha explicado anteriormente.
El tiempo dejará de parpadear y la base emitirá un pitido durante 2 segundos aproximadamente
antes de que el proceso de cocción comience y el temporizador comience la cuenta atrás hasta
llegar a cero.
Una vez que pulse el botón “Aceptar”
tiempo parpadeará. (Tenga en cuenta que si ha seleccionado la función de cocción lenta por
error, puede volver a la pantalla anterior manteniendo pulsado el botón “Aceptar”
segundos aproximadamente.)
Si por cualquier motivo necesita cancelar el proceso de cocción antes de que el temporizador
llegue a cero, mantenga pulsado el botón “Aceptar”
La base emitirá un pitido, el proceso de cocción se detendrá y aparecerá la pantalla
predeterminada
F
.
‚
y el icono Cocción lenta Âparpadearán. Hay tres programas
Entre 8 y 10 horas (bajo)
Entre 6 y 8 horas (medio)
Entre 4 y 6 horas (alto)
·
podrá recorrer los tiempos disponibles. Cuando aparezca el
H
.
·
y la pantalla cambiará a G.
„
y después
„
. El tiempo dejará de parpadear y la
„
, el icono Cocción lenta Âdejará de parpadear y el
„
„
durante 3 segundos aproximadamente.
·
·
durante 2
Mantener el calor
Al final del proceso de cocción el aparato emitirá un pitido y comenzará automáticamente a
mantener el calor. La función de mantener el calor dura un máximo de dos horas y contabilizará
desde H0:00 hasta H2:00. Transcurridas las 2 horas, la base emitirá un pitido y la pantalla
mostrará H que permanecerá visible en la pantalla hasta que la placa alcance la temperatura
ambiente (aproximadamente 40ºC)
A continuación, la pantalla se quedará en blanco. Al pulsar cualquier botón volverá a la pantalla
mostrada la primera vez que encendió el aparato.
Tenga en cuenta que la función de mantener el calor puede detenerse en cualquier momento
durante el periodo de 2 horas manteniendo pulsado el botón “Aceptar”
aproximadamente.
Después del proceso de cocción
Apague la toma de corriente y desenchufe el aparato.
Importante: Asegúrese de que la base esté fría antes de guardar la cacerola.
I
.
„
durante 2 segundos
e
25
Page 26

SC461007MEE Rev1_Instruction Book 17/06/2014 17:11 Page 26
Limpieza y cuidado de su Supreme Precision 3 in 1 Slow Cooker
• La cacerola y la tapadera pueden lavarse en el lavavajillas. También, puede utilizar agua caliente
jabonosa con un estropajo no abrasivo. No utilice limpiadores ni detergentes abrasivos.
• No sumerja la base eléctrica en agua ni en ningún otro líquido. Para limpiarla, utilice un paño
húmedo y séquela a fondo.
• Asegúrese de que la base de la cacerola y la superficie de la placa estén limpias y no tengan restos
de comida quemada, y séquelas antes de su uso. La base exterior de la cacerola puede limpiarse
con un estropajo metálico para eliminar las manchas rebeldes, si fuera necesario.
• Al añadir ingredientes y líquido a la cacerola de cocción, evite llenarla en exceso. Si el líquido se
desborda y llega a la base, apáguela y desconéctela de la toma de corriente, retire la cacerola y
deje que el líquido salga por los orificios de drenaje. Limpie cualquier exceso de comida o líquido
que pueda haberse acumulado en el hueco entre la placa del calentador y el metal reflector, limpie
la zona con un paño húmedo y séquela antes de seguir utilizando el aparato.
RECETAS
Estofado de ternera
6,5 L
Carne de ternera, en cubos 1kg.
Patatas, en cubos 700g.
Zanahorias, en rodajas 700g.
Puerros, en rodajas 3 grandes
Cebolla, picada 2
Caldo de ternera 1,5 L
Hierbas 3 cucharadita
Sal y pimienta negra molida frescas
Al utilizar la función de tostar o dorar, añada en primer lugar 30 ml (2 cucharadas) de aceite de
cocina a la cacerola.
Elaboración
• Utilice la función de tostar o dorar para tostar la carne y freír las cebollas.
(Fría la carne en dos partes)
• Mezcle el resto de ingredientes.
• Cambie al ajuste de cocción lenta.
• Cocine durante el tiempo máximo para el ajuste.
• Espese con una mezcla de harina de maíz y agua.
• Añada las bolas de masa guisada entre 30 minutos y 1 hora antes de que finalice la cocción.
Pollo en salsa de vino blanco
6,5 L
Pechugas de pollo 10
Mantequilla 40g.
Cebolla, picada 2 grandes
Champiñones, en rodajas 400g.
Vino blanco 5 cucharadas
Caldo de pollo 750ml.
Hierbas 2 cucharadita
Harina de maíz 5 cucharadas
Yemas de huevo 3
Nata para montar 150ml.
Sal y pimienta negra molida frescas
Elaboración
• No es necesario utilizar la función de tostar o dorar
• Añada todos los ingredientes excepto la harina, los huevos y la nata a la cacerola y ajuste el
programa de cocción lenta.
• Espese con una mezcla de harina de maíz y agua.
• Una vez cocinado, mezcle los huevos y la nata con un poco del líquido caliente y remueva la
mezcla en el plato.
• Las recetas de pollo suelen cocinarse en el tiempo más corto de cada ajuste.
Por ejemplo 8 horas 6 horas 3 a 4 horas
Jamón hervido
6,5 L
Jamón 1,8kg.
Elaboración
• No es necesario utilizar la función de tostar o dorar.
• Coloque el jamón en la cacerola y cúbralo con agua hirviendo.
• Puede cocinarse durante el tiempo mínimo o máximo de cada ajuste.
Sopa de verduras
6,5 L
Selección de verduras peladas y troceadas 1,8kg.
Caldo de verduras 2 L
Hierbas al gusto
Sal y pimienta negra molida frescas
Elaboración
• No es necesario utilizar la función de tostar o dorar.
• Añada todos los ingredientes a la vez, y cocine durante el tiempo máximo del ajuste.
• Licúelo cuanto se enfríe.
Ternera al estilo Nueva Inglaterra
6,5 L
Tapa y pecho de ternera 1,5kg.
Bouquet garni 1
Tomillo 2 cucharadita
Granos de pimienta 2 cucharadita
Chalotas, peladas 10
Zanahorias, picadas 550g.
Colinabo, picado 300g.
Agua, suficiente para cubrir la pieza
Al utilizar la función de tostar o dorar, añada en primer lugar 30 ml (2 cucharadas) de aceite de
cocina a la cacerola.
Elaboración
• Utilice la función de tostar o dorar para tostar de forma homogénea la ternera.
• Añada el resto de ingredientes y cocine durante el tiempo mínimo del ajuste.
• Espese la salsa con harina de maíz para salsas.
Salsa boloñesa
6,5 L
Carne picada 1,5kg.
Cebollas, picadas 3
Apio, en rodajas 6 ramas
Dientes de ajo, triturados 3
Tomate triturado 7 cucharadas
Harina 3 cucharadas
Tomates en conserva, troceados 3 latas
Caldo de ternera 600ml.
Champiñones, en rodajas 300g.
Hierbas 2 cucharadita
Sal y pimienta negra recién molida
Al utilizar la función de tostar o dorar, añada en primer lugar 30 ml (2 cucharadas) de aceite de
cocina a la cacerola.
Elaboración
• Utilice la función de tostar o dorar para tostar la carne picada poco a poco.
• Añada las cebollas, el ajo y el apio y fríalos hasta que se ablanden.
• Cambie a cocción lenta.
• Mezcle harina con el concentrado y añada la mezcla con el resto de ingredientes.
• Remueva bien.
• Se puede cocinar durante el tiempo mínimo o máximo del ajuste.
26
Page 27

SC461007MEE Rev1_Instruction Book 17/06/2014 17:11 Page 27
Guiso de salchichas
6,5 L
Aceite 1 cucharadas
Salchichas 1,5 kg.
Cebollas, picadas 3 grandes
Zanahorias, en rodajas 5
Puerros, en rodajas 3
Caldo de ternera 1,5 litros
Chutney 6 cucharadas
Salsa de Worcestershire 5 cucharadas
Sal y pimienta negra recién molida
Al utilizar la función de tostar o dorar, añada en primer lugar 30 ml (2 cucharadas) de aceite de
cocina a la cacerola.
Elaboración
• Utilice la función de tostar o dorar para tostar las salchichas poco a poco.
• Añada verduras y fríalas hasta que se ablanden.
• Cambie a cocción lenta.
• Añada el resto de ingredientes y cocine durante el tiempo mínimo del ajuste.
Ternera al curry
6,5 L
Aceite vegetal 4 cucharadas
Manzanas para cocinar, sin piel ni semilla y troceadas 3 medianas
Cebollas, picadas 3 grandes
Carne para guisar, en cubos 1,5kg.
Curry en polvo 5 cucharadita
Caldo de ternera 1 L
Chutney de mango 5 cucharadas
Sultanas 150g.
Tomates en conserva, troceados 600g.
Zumo de limón 3 cucharadas
Harina de maíz 5 cucharadas
Sal y pimienta negra recién molida
Al utilizar la función de tostar o dorar, añada en primer lugar 30 ml (2 cucharadas) de aceite de
cocina a la cacerola.
Elaboración
• Utilice la función de tostar o dorar para tostar la carne, poco a poco.
• Añada las cebollas y fríalas hasta que se ablanden.
• Cambie a cocción lenta
• Añada otros ingredientes y remueva bien.
• Mezcle harina con el concentrado y añada la mezcla con el resto de ingredientes.
• Remueva bien.
• Se puede cocinar durante el tiempo mínimo o máximo del ajuste.
Ternera Thai con curry
6,5 L
Mantequilla 60g.
Carne para guisar, en cubos 1kg.
Cebolla, picada 2
Dientes de ajo, triturados 4
Mantequilla de cacahuete 6 cucharadas
Leche de coco 800g.
Patatas, cortadas en cuartos 700g.
Curry en polvo 4 cucharadas
Salsa de pescado Thai 4 cucharadas
Azúcar moreno suave 4 cucharadas
Caldo de ternera 1 L
Elaboración
• Derrita la mantequilla en la cacerola con la función de tostar o dorar y añada carne, ajo y cebolla, y
dórelos. (fría la carne en dos partes para la capacidad de 6,5 L)
• Añada las cebollas y el ajo y fríalos hasta que se ablanden.
• Añada otros ingredientes y remueva bien.
• Cambie a cocción lenta.
• Recomendamos utilizar la función de cocción lenta
Costillas con salsa barbacoa
6,5 L
Costillas 1,5kg.
Salsa barbacoa 300ml.
Elaboración
• Marine las costillas en la salsa durante unas horas o durante toda la noche.
• Colóquelas en la cacerola y cocínelas durante el tiempo necesario.
• La carne quedara más tierna cuanto mayor sea el tiempo de cocción.
Pudín esponjoso con almíbar
6,5 L
Mantequilla 125g.
Almíbar dorado 4 cucharadas
Azúcar para espolvorear 100g.
Huevos 2
Harina con levadura 200g.
Leche 2 cucharadas
Zumo de limón 2 cucharadas
Elaboración
• Cubra con una fina capa de mantequilla el interior de un cuenco de pudín de 1,25 litros y coloque
en la parte inferior papel para horno.
• Vierta el almíbar en la parte inferior del cuenco.
• Bata la mantequilla y el azúcar hasta que no queden grumos.
• Mezcle poco a poco los huevos y la harina y remueva la leche y el zumo. Vierta la mezcla encima
del almíbar y cúbrala con papel para horno plegado. Átela con una cuerda y haga una asa.
• Colóquela en la Supreme Precision 3 in 1 Slow Cooker y llénela con agua hirviendo hasta la mitad.
• La mejor cocción se lleva a cabo en el ajuste de guiso rápido durante 1:45 horas
e
27
Page 28

SC461007MEE Rev1_Instruction Book 17/06/2014 17:11 Page 28
Pudín de arroz
6,5 L
Mantequilla 60g.
Arroz para pudín 250g.
Azúcar 250g.
Leche 2 L
Nuez moscada 1 cucharadita
Elaboración
• Engrase ligeramente la cacerola con mantequilla.
• Añada todos los ingredientes a la cacerola y remueva.
• El mejor resultado se obtiene en ajuste de cocción lenta 1 (8 - 10 horas)
Tarta de chocolate
6,5 L
Cacao 50g.
Agua hirviendo 6 cucharadas
Levadura en polvo 1 cucharadita
Harina con levadura 175g.
Azúcar para espolvorear 150g.
Aceite 150ml.
Huevos 3
Elaboración
• Cubra un molde de tarta de 18 cm con un papel para horno.
• Mezcle el cacao con agua hirviendo para crear una pasta.
• Mezcle la harina, la levadura en polvo y el azúcar en un recipiente.
• Bata los huevos y el aceite y añádalos a la mezcla junto con la pasta de chocolate, mezcle todo bien.
• Vierta la mezcla en el molde y cúbrala con papel de aluminio. Átela con una cuerda y haga una asa.
Colóquelo en la cacerola de cocción lenta y llénela con agua hirviendo hasta la mitad.
• La mejor cocción se lleva a cabo en el ajuste de guiso rápido durante 1:45 horas
Pastel de frutas del bosque
6,5 L
Frutas del bosque frescas (frambuesas, moras, arándanos, etc.) 1,2kg.
Azúcar 150g.
Harina con levadura 200g.
Grasa de pella 100g.
Sal Pizca
Cáscara de limón 2 limones
Leche De 6 a 8 cucharadas
SU GARANTÍA DE DOS AÑOS
Este aparato está cubierto por una garantía de reparación o sustitución de dos años.
Es importante guardar el recibo de la tienda en la que lo adquirió como prueba de compra.
Grape el recibo a esta contraportada para poder consultarlo en el futuro.
Indique la siguiente información si el producto tiene algún fallo. Estos números se encuentran en
la base del producto.
N.º de modelo
N.º de serie
Todos los productos de Morphy Richards se prueban individualmente antes de salir de fábrica.
En el improbable caso de que un aparato tenga un fallo, hay que devolverlo al lugar en el que se
compró en los 28 días posteriores a la compra para cambiarlo.
Si el fallo se produce pasados 28 días de la compra y antes de 24 meses, debe ponerse en
contacto con su distribuidor local indicando el número de modelo y de serie del producto, o
escribir a su distribuidor local a las direcciones que se indican.
Le pedirán devolver el producto (en un embalaje seguro y adecuado) a la siguiente dirección
junto con una copia de la factura de compra.
El aparato defectuoso se reparará o se sustituirá y se enviará en un plazo de 7 días laborables
desde la recepción del mismo, a menos que se produzca una de las siguientes excepciones (1-
9).
En caso de que reciba un artículo nuevo en el periodo de garantía de 2 años, la garantía del
nuevo artículo se calculará desde la fecha original de compra. Por lo tanto, es esencial guardar
la factura o el recibo de caja original que indica la fecha de compra original.
Para que la garantía de 2 años pueda aplicarse, el aparato debe haberse utilizado siguiendo las
instrucciones del fabricante. Por ejemplo, debe eliminarse la cal de los aparatos y mantener los
filtros limpios según se indica en estas instrucciones.
Morphy Richards o el distribuidor local no se hacen responsables de sustituir o reparar los
productos en virtud de las condiciones de la garantía en los siguientes casos:
1 El fallo se ha producido o se puede atribuir a un uso accidental, erróneo, negligente o contrario a
las recomendaciones del fabricante, o ha sido causado por una subida de tensión o por daños en
el transporte.
2 El aparato se ha utilizado con una tensión diferente a la indicada en los productos.
3 Personas que no pertenecen a nuestro personal técnico (y que no son el proveedor autorizado) han
intentado reparar el aparato.
4 El aparato ha sido objeto de alquiler o de uso no doméstico.
5 El aparato es de segunda mano.
6 Ni Morphy Richards ni el distribuidor local no son responsables de realizar ninguna revisión, en
virtud de la garantía.
7 La garantía excluye los consumibles como bolsas, filtros y jarras de vidrio.
8 La garantía no cubre las baterías ni las fugas de ácido de las mismas.
9 Los filtros no se han limpiado ni sustituido tal y como se indica.
Esta garantía no le confiere más derechos que los expresamente expuestos, ni incluye
reclamaciones por daños o pérdidas consiguientes. Esta garantía se ofrece como ventaja
adicional y no afecta a sus derechos legales como consumidor.
Elaboración
• Coloque la fruta en el interior de la cacerola y remueva con la mitad del azúcar.
• Mezcle el resto del azúcar con la harina, grasa de pella, sal y cáscara de limón.
• Añada leche para crear una masa, no la remueva demasiado.
• Coloque bolas de masa en el centro de la cacerola sobre la fruta. No deje que las bolas de masa
toquen los laterales de la cacerola porque crecerán durante la cocción.
• Cocine durante el tiempo mínimo para el ajuste.
Servicio telefónico de asistencia
Si tiene cualquier dificultad con el aparato, no dude en llamarnos.
Lo más probable es que podamos ayudarle más que en la tienda en la que adquirió el producto.
Para que nuestro personal pueda atenderle a la mayor brevedad, al llamar, tenga a mano la
siguiente información:
• Nombre del producto.
• Número de modelo (aparece en la base del producto).
• Número de serie (aparece en la base del producto).
Sitio web
También puede ponerse en contacto con nosotros a través de nuestro sitio web, o visitar el sitio
para buscar y adquirir aparatos, recambios y accesorios de la completa gama de productos
Morphy Richards.
28
Page 29

SC461007MEE Rev1_Instruction Book 17/06/2014 17:11 Page 29
p
Higiene e segurança
A utilização de qualquer dispositivo elétrico exige o respeito por regras de segurança do senso comum.
Leia atentamente estas instruções antes de utilizar o produto.
• Este aparelho pode ser utilizado por crianças com 8 ou mais anos de idade e pessoas cujas
capacidades físicas, sensoriais ou mentais sejam reduzidas ou que não possuam os
conhecimentos e a experiência necessários, se as mesmas forem vigiadas e instruídas
acerca da utilização do aparelho de forma segura e compreenderem os perigos envolvidos.
• As crianças não devem brincar com o aparelho.
• As tarefas de limpeza e manutenção pelo utilizador não devem ser realizadas por crianças
com menos de 8 anos e sem supervisão.
• Mantenha o aparelho e o respetivo cabo de alimentação afastado do alcance de crianças
com menos de 8 anos.
• Este aparelho destina-se a ser utilizado em aplicações domésticas e similares, tais como:
turismo rural; por clientes em hotéis, motéis e outros ambientes de tipo residencial e
ambientes de tipo alojamento e pequeno-almoço.
Não se destina a ser utilizado em áreas de copa em lojas, escritórios e outros ambientes de
trabalho.
Localização
• Coloque sempre o seu aparelho afastado do bordo da superfície de trabalho.
• Certifique-se de que o aparelho se encontra numa superfície estável, lisa e resistente ao calor.
• Não utilize o aparelho no exterior ou próximo de água.
Cabo de alimentação
• O cabo de alimentação deve chegar da tomada ao aparelho sem estar esticado.
• Não permita que o cabo de alimentação fique pendurado no bordo da superfície de trabalho ou
num espaço aberto onde uma criança o possa alcançar.
• Não permita que o cabo passe sobre um fogão ou outra área quente que possa danificar o cabo.
• Se o cabo de alimentação estiver danificado, deve ser substituído pelo fabricante, agente de
assistência ou por uma pessoa igualmente qualificada
Segurança pessoal
• AVISO: Não toque na parte superior do aparelho ou quaisquer outras partes quentes durante ou
após a utilização; utilize pegas ou botões.
• Para se proteger do risco de choque elétricos, não mergulhe a base em água nem em qualquer
outra substância.
• Não toque nas superfícies quentes. Utilize luvas para forno ou um pano ao retirar a tampa ou ao
manusear recipientes quentes.
• Deve fazer uso de extrema precaução quando deslocar um aparelho com alimentos quentes, água
ou outros líquidos quentes.
Outras considerações de segurança
• Não ligue o aparelho se o recipiente em cerâmica estiver vazio.
• Permita que a tampa de vidro e o recipiente em cerâmica arrefeçam antes de mergulhá-los em
água.
• Nunca cozinhe diretamente na unidade da base. Utilize o recipiente em cerâmica.
• Não utilize o recipiente em cerâmica ou a tampa de vidro se estiverem rachados ou lascados.
• Não ligue o aparelho quando estiver voltado ao contrário ou deitado de lado.
• A tampa de vidro e o recipiente em cerâmica são frágeis. Manuseie-as com cuidado.
• A utilização de acessórios ou ferramentas não recomendados pela Morphy Richards podem causar
risco de incêndio, choque elétrico ou danos.
• Não coloque o equipamento próximo de gases quentes ou de bicos elétricos, ou num forno
aquecido.
• Retire a ficha da tomada quando não se encontrar em utilização, antes de colocar ou retirar
qualquer acessório e antes de efetuar a limpeza.
• O aparelho não se destina a ser utilizado através de um temporizador externo ou de um sistema de
controlo remoto separado.
Requisitos elétricos
Verifique se a voltagem na placa nominal do seu aparelho corresponde à alimentação existente na
sua habitação, que deverá ser CA (corrente alterna). Caso seja necessário substituir o fusível na
ficha de alimentação, deve ser colocado um fusível BS1362 de 3 amperes.
AVISO: Este aparelho deve ser ligado à massa.
e
p
29
Page 30

SC461007MEE Rev1_Instruction Book 17/06/2014 17:11 Page 30
Manual de instalação rápida
Consulte também o manual de instruções principal, que contém
informações de segurança importantes e mais detalhes acerca da
utilização da Supreme Precision 3 in 1 Slow Cooker.
Este manual indica-lhe como utilizar a Supreme Precision 3 in 1 Slow Cooker para selar /
alourar cerca de 1kg de carne e, em seguida, utilizar o programa de guisado de 1:30 horas
ou o programa de cozinhado lento de 8 horas. Para os restantes programas, consulte as
instruções completas.
Para utilizar a função de selar / alourar
1
2
Coloque a panela ‹na unidade de base fie ligue a Supreme Precision 3 in 1
Slow Cooker.
O visor mostra o ecrã predefinido (à esquerda). O ícone da função selar / alourar
‰
e o visor de tempo ‚apresentam-se intermitentes.
Acrescente a quantidade de óleo à panela para a quantidade de carne que
pretende selar.
Prima o botão “Aceitar” „. A Supreme Precision 3 in 1 Slow Cooker emite um
sinal sonoro durante cerca de 2 segundos e o visor deixa de piscar. A panela
inicia então a aquecer e o cronómetro
demora cerca de 5 minutos para atingir a temperatura correta para selar/alourar a
carne (ou seja, quando o relógio chegar a 00:10)
‚
inicia a contagem decrescente. O óleo
Coloque a carne na panela e mexa regularmente até a carne apresentar uma
superfície selada/alourada. Quando o relógio chegar a zero, a base emite um sinal
sonoro e o processo de cozedura pára. Se a sua carne estiver selada antes de se
esgotarem os 15 minutos, mantenha o botão “Aceitar” sob pressão
3
30
cerca de 3 segundos. A base emite um sinal sonoro e o processo de cozedura
pára. Se necessitar de continuar, repita o processo a partir do passo 2 descrito
acima.
„
durante
Page 31

SC461007MEE Rev1_Instruction Book 17/06/2014 17:11 Page 31
Para utilizar a função de guisado de 1:30 horas
4
Depois de concluído o processo de selar/alourar, acrescente os restantes
ingredientes (de acordo com a receita). Prima uma vez o botão “Função/Tempo”
·
e é apresentado o seguinte ecrã (à esquerda). Prima duas vezes o botão
„
“Aceitar”
de ser iniciado o processo de cozedura. Coloque a tampa quando utilizar a
Supreme Precision 3 in 1 Slow Cooker nesta regulação. Para obter informações
acerca do relógio e da função de manter quente, consulte o ponto 6.
e a base emite um sinal sonoro durante cerca de 2 segundos antes
OU para utilizar a função de cozinhado lento
5
Relógio e função de manter quente
6
Depois de concluído o processo de selar/alourar, acrescente os restantes
ingredientes (de acordo com a receita). Prima duas vezes o botão
“Função/Tempo”
vezes o botão “Aceitar”
segundos antes de ser iniciado o processo de cozedura. Coloque a tampa
quando utilizar a Supreme Precision 3 in 1 Slow Cooker nesta regulação. Para
obter informações acerca do relógio e da função de manter quente, consulte o
ponto 6.
No fim do processo de cozedura, o equipamento emite um sinal sonoro e desligase automaticamente para manter a temperatura. A função de manter quente tem
uma duração máxima de duas horas e inicia a contagem de H0:00 a H2:00. No
fim das 2 horas, o visor mostra “H”, que se mantém visível até que a placa atinja
a temperatura ambiente (cerca de 40°C). Em seguida, o ecrã apresenta-se em
branco.
·
e é apresentado o seguinte ecrã (à esquerda). Prima duas
„
e a base emite um sinal sonoro durante cerca de 2
p
Ao premir qualquer botão, o utilizador regressa ao ecrã apresentado
na ligação.
31
Page 32

SC461007MEE Rev1_Instruction Book 17/06/2014 17:11 Page 32
p
Tire o melhor partido do seu novo aparelho...
Segurança
Nunca toque na superfície exterior da panela elétrica de cozedura lenta durante o seu
funcionamento ou antes de ter arrefecido. Utilize luvas de forno ao retirar a tampa ou a cuba de
aço inoxidável.
Eficácia
Retirar a tampa para permitir que o calor precioso saia, reduzindo a eficácia da sua panela
eléctrica de cozedura lenta e aumentando o tempo necessário para a cozedura. Tente não retirar
a tampa mais do que 3 ou 4 vezes para mexer ou adicionar ingredientes.
Desfrute dos benefícios
O cozinhado lento oferece-lhe alimentos cómodos, versáteis e cheios de sabor. Os tempos de
cozedura mais prolongados permitem uma melhor distribuição dos sabores, dando-lhes tempo
para se misturarem e temperarem o cozinhado. Uma panela elétrica de cozedura lenta aquece
os alimentos suavemente, o que é uma excelente forma de cozinhar carne, em particular, as
partes menos caras, tais como vaca para guisar, que se torna mais macia durante o longo
processo de cozedura. Lembre-se de que não existem limites para as potenciais utilizações da
sua panela eléctrica, apenas a sua imaginação!
Características
⁄
Tampa em vidro
¤
Saída de vapor
‹
Cuba de cozedura/servir em aço inoxidável (de 4,5L ou 6,5L, dependendo do modelo)
›
Resistência
fi
Unidade da base
fl
Painel de controlo / visor (ver o diagrama ampliado)
‡
Furo de escoamento x2 (por baixo)
·
Botão Função / Tempo
‚
Visor de tempo
„
Botão Aceitar
‰
Ícone Selar / Alourar e ícone Guisar
Â
Ícone de Cozinhado lento
Legenda
Ícone Selar/Alourar
Ícone Guisar
Ícone de Cozinhado lento
Capacidade de cozinhados
• A Supreme Precision 3 in 1 Slow Cooker de 6,5 litros tem uma capacidade máxima de 5 litros.
• A capacidade pode ser encontrada na etiqueta de classificação, situada por baixo do produto.
Antes de utilizar a Supreme Precision 3 in 1 Slow Cooker
pela primeira vez
Retire todas as etiquetas e marcadores do produto.
Lave a cuba em aço inoxidável e a tampa com água quente com detergente, utilizando uma
esponja ou um pano para a louça. NÃO utilize um esfregão de palha de aço ou qualquer outro
material abrasivo, pois tais produtos deixam marcas no aço inoxidável. Enxagúe bem a cuba e a
tampa e seque.
IMPORTANTE: NÃO MERGULHAR A BASE DA SUPREME PRECISION 3 IN 1 SLOW COOKER
EM ÁGUA
Nota:
Durante a utilização inicial, poderá notar um ligeiro odor devido à combustão de resíduos de
fabrico. Isto é normal, não afeta os alimentos cozinhados e desaparece ao fim de algumas
utilizações.
Dicas e sugestões da Supreme Precision 3 in 1 Slow Cooker
• Todos os ingredientes devem estar à temperatura ambiente antes de serem adicionados. Se
estiverem no frigorífico, permitem que cheguem à temperatura ambiente, uma vez que os alimentos
frios afetam o tempo de cozedura.
• A carne pode ser utilizada fria, mas não utilize carne congelada. Utilize a função de alourar para
selar a carne.
• Certifique-se de que todos os ingredientes congelados estão completamente descongelados antes
de utilizá-los.
• Se utilizar caldo frio na receita de cozinhado lento (por exemplo, vinho), tem de pré-aquecer os
ingredientes. Comece pela função de alourar, adicionando todos os ingredientes. Quando se
esgotarem os 15 minutos, continue com a função de cozinhado lento.
• No cozinhado lento em fogão tradicional, é aconselhável cobrir a carne com farinha antes de
alourar. Não tem de fazer isto com a Supreme Precision 3 in 1 Slow Cooker. Basta alourar / selar a
carne de acordo com as instruções. Se necessitar de espessar o caldo, junte e mexa uma pasta de
farinha e água 30 minutos antes do fim do tempo de cozinhado.
• Se utilizar carne com osso (por exemplo, coxas de galinha, costeletas, etc), o processo de
cozinhado lento pode fazer com que a carne se desprenda do osso - isto é normal e o resultado é
um sabor ainda mais rico. No entanto, atenção aos ossos pequenos que se podem encontrar no
molho.
• Não encha demasiado a cuba, uma vez que as receitas neste manual de instruções foram
concebidas para a capacidade máxima e permitem o espaço necessário por cima dos alimentos
para um cozinhado uniforme. A capacidade pode ser encontrada na etiqueta de classificação,
situada por baixo do produto. Se utilizar a sua própria receita, não encha acima dos rebites das
asas, que podem ser vistos no interior da cuba.
• Durante a utilização, a tampa fica muito quente, em especial o vidro e o rebordo em aço inoxidável.
As asas isoladas com silicone mantêm-se frias permitindo que as utilize para levantar a tampa. No
entanto, é recomendada toda a cautela e a utilização de luvas de forno para retirar a tampa.
• Os ingredientes devem ser distribuídos uniformemente na cuba. Contudo, é melhor colocar os
tubérculos na metade inferior da cuba para iniciar a cozedura. Todos os ingredientes devem ser
mergulhados no molho da cozedura.
• Para garantir um cozinhado uniforme, os tubérculos devem ser cortados ao tamanho adequado
(cubos com cerca de 20mm).
• Se a cuba transbordar durante a fervura, normalmente deve-se ao facto de ter sido cheia em
demasia, pelo que deve retirar alguns dos ingredientes e/ou molho.
• Em geral, as carnes rijas, como a carne para guisar, requerem tempos de cozedura mais longos,
tornando-as ideias para o cozinhado lento. Para a função de guisar, é necessário um corte de carne
da melhor qualidade para se adaptar ao tempo de cozedura de 1:30–1:45 horas.
• Frango e carne de alta qualidade requerem menos tempo de cozedura. Assim sendo, deverá utilizar
o valor mais baixo no intervalo de tempo – por exemplo, para o nível 1 utilize 8 horas.
• Para bolas de massa, acrescente ao guisado 30-45 minutos antes do fim do tempo de cozedura.
Pode adicioná-las à superfície e não é necessário mergulhá-las no molho.
• As peças de fiambre devem ser deixadas no invólucro de plástico, se fornecido. Caso contrário,
utilize um saco de plástico resistente ao calor adequado ou ate com cordão de culinária para evitar
que o fiambre se desfaça durante a cozedura.
• Se utilizar a regulação de guisado, permita que os alimentos cozinhados repousem durante 10
minutos na cuba antes de servir. Desta forma, permite que os alimentos quentes (a ferver)
arrefeçam antes de comer.
• Depois de obter alguma experiência na utilização da Supreme Precision 3 in 1 Slow Cooker, pode
começar a criar as suas próprias receitas, mas recomendamos seguir uma receita existente como
guia. Se utilizar ingredientes como massa, leite, natas, delícias do mar ou marisco numa receita,
devem ser adicionados 30 minutos antes do fim do tempo de cozedura dos outros ingredientes.
Não se aplica ao leito de côco e à receita de arroz doce.
• Não deixe alimentos crus, não cozinhados no interior da cuba durante qualquer período de tempo.
Inicie o processo de cozedura logo que possível. Se tiver de atrasar o cozinhado, guarde os
alimentos no frigorífico e, quando estiver preparado(a), permita que voltem à temperatura ambiente.
• Se uma receita cozinhada previamente tiver arrefecido, utilize a regulação de guisado de 1:30 horas
para aquecer os alimentos. Dependendo da receita, pode demorar 30-45 minutos a aquecer.
Certifique-se de que os alimentos estão quentes antes de servir.
• Se estiver a cozinhar meias quantidades, o tempo de cozedura é normalmente reduzido para dois
terços. Verifique se os alimentos estão completamente cozinhados antes de servir.
• A adaptação das receitas existentes da cozedura tradicional para utilização numa panela eléctrica
poderá exigir a redução da quantidade de líquido utilizada, uma vez que o líquido não evapora na
mesma medida.
• Sempre que for necessário molho, junte água a ferver.
• Quando cozinhar peças de carne, comece por cobrir com água a ferver ou caldo. Esta quantidade
pode ser reduzida no fim do tempo de cozedura.
• Os feijões vermelhos não cozinhados deverão ser colocados de molho e fervidos durante 10
minutos para a remoção das toxinas antes da utilização na Supreme Precision 3 in 1 Slow Cooker.
• Se necessário, verta o excesso de óleo depois de alourar.
• Se utilizar caldos ou molhos de frascos ou recipientes, primeiro, aqueça num forno microondas e
junte, em seguida, à cuba. Alternativamente, acrescente 30 minutos ao tempo de cozedura.
A
Explicação dos termos
Alourar/Selar:
Antes de guisar ou cozinhar carne lentamente, é importante que primeiro a carne seja
selada/alourada. Isto significa cozinhar ligeiramente o exterior da carne em óleo quente antes
de iniciar o processo de guisado ou de cozedura lenta (a carne deve continuar crua no meio).
Selar/alourar a carne desta forma ajudar a reter os sabores e os sucos.
Guisar:
No que respeita à Supreme Precision 3 in 1 Slow Cooker, guiar significa cozinhar a carne e/ou
vegetais num líquido (por exemplo, vinho, caldo, água) entre 1 hora e 30 minutos e 1 horas e 45
minutos.
Cozedura lenta:
A cozedura lenta é uma forma de cozinhar alimentos durante um longo período de tempo
(normalmente, entre 4 e 10 horas) num líquido (por exemplo, vinho, caldo, água). Tal como o
nome sugere, os alimentos são cozinhados mais lenta e suavemente, o que significa muitas
vezes que os alimentos ficarão mais tenros. As carnes com um elevado teor de gordura são
32
Page 33

SC461007MEE Rev1_Instruction Book 17/06/2014 17:11 Page 33
bastante adequadas para a cozedura lenta, uma vez que o processo permite que a gordura
derreta, deixando a carne muito tenra.
Instruções de utilização
Coloque a base finuma superfície seca, nivelada e resistente ao calor, afastada do rebordo de
qualquer superfície de trabalho. Não utilize no chão.
Nota:
Se o equipamento for ligado e não estiver em utilização, a luz do ecrã desliga-se e entra no
modo de espera (standby) após 30 segundos.
Função de selar/alourar da Supreme Precision 3 in 1 Slow Cooker
Coloque a cuba ‹na unidade de base fie ligue a Supreme Precision 3 in 1 Slow Cooker.
fl
mostra o ecrã predefinido B.
O visor
‚
O visor do relógio
a quantidade de óleo à panela para a quantidade de carne que pretende selar.
Consulte as receitas neste manual de instruções.
Recomendamos cerca de duas colheres de sopa de óleo vegetal para selar entre 800g e 1200g
de carne. No entanto, esta quantidade pode variar, dependendo do gosto pessoal e da
quantidade de gordura na carne a selar.
Para selecionar a função de selar, prima uma vez o botão “Aceitar”
in 1 Slow Cooker emite um sinal sonoro durante cerca de 2 segundos e o visor deixa de piscar.
A panela inicia então a aquecer e o cronómetro
demora cerca de 5 minutos a atingir a temperatura correta para selar / alourar a carne (ou seja,
quando o relógio mostrar 00:10). Uma boa forma de testar se o óleo está suficientemente
quente é colocar um pequeno pedaço de carne ou cebola na cuba. Se fervilhar quando atingir o
óleo, a temperatura está suficientemente quente para selar / alourar. Se não fervilhar, permita
que a cuba aqueça durante mais um minuto aproximadamente e teste novamente.
Coloque a carne na cuba e mexa regularmente até que o exterior da carne esteja selado /
alourado. Quando o relógio chegar a zero, a base emite um sinal sonoro e o processo de
cozedura pára. Se a sua carne estiver selada antes do relógio chegar a zero, mantenha o botão
“Aceitar” sob pressão
processo de cozedura pára e o ecrã volta à apresentação inicial
Se a sua carne necessitar de selar mais alguns minutos antes do relógio chegar a zero, basta
premir o botão “Aceitar” para iniciar novamente a função de selar/alourar. Tal como explicado
acima, para cancelar a função de selar antes do relógio chegar a zero, mantenha o botão
“Aceitar” sob pressão
Devido à alta temperatura a que a Supreme Precision 3 in 1 Slow Cooker funciona no modo de
selar / alourar, só deverá realizar um máximo de dois programas de 15 minutos em sucessão
rápida. Se tentar seleccionar o programa uma terceira vez e a unidade estiver quente, o ecrã
que se segue mostra —:— e o ícone “Selar / Alourar”
A função não pode ser selecionada novamente até que o aparelho tenha arrefecido o suficiente.
No entanto, esta situação não deve causar quaisquer dificuldades, uma vez que é sempre
possível selar/alourar a quantidade de carne necessária em 30 minutos (2 x 15).
Nota:
Não inicie a função “Selar / Alourar” sem a cuba
sobreaquecimeno do aparelho. Também não deve iniciar a função “Selar / Alourar” sem juntar
óleo à cuba.
e o ícone da função de selar ‰apresentam-se intermitentes. Acrescente
„
. A Supreme Precision 3
‚
inicia a contagem decrescente. O óleo
„
durante cerca de 3 segundos. A base emite um sinal sonoro, o
„
durante cerca de 3 segundos.
‹
B
.
‰
pisca C.
na base fipois provoca o
Selar/Alourar no fogão a gás ou elétrico na sua
Supreme Precision 3 in 1 Slow Cooker
Se preferir, pode utilizar a cuba da sua Supreme Precision 3 in 1 Slow Cooker no seu fogão
elétrico ou a gás para selar/alourar a carne.
Basta juntar óleo, tal como detalhado acima, e colocar a cuba sobre o fogão. O óleo pode
aquecer mais rapidamente no fogão, por isso, utilize um pequeno pedaço de carne / cebola (tal
como explicado anteriormente) para testar a temperatura.
Dica para selar/alourar carne
Quando selar grandes quantidades de carne, sugerimos que divida a carne em lotes mais
pequenos para facilitar a tarefa. Uma vez que deve mexer ocasionalmente a carne durante o
processo, quantidades de carne mais pequenas são mais fáceis de manusear.
Função Guisar
Coloque a cuba ‹na base fi. Junte os ingredientes de acordo com as instruções da receita
que está a seguir. Quer tenha utilizado a função “Selar / Alourar” ou tenha acabado de ligar a
Supreme Precision 3 in 1 Slow Cooker, deverá ver apresentado o ecrã predefinido
·
Prima uma vez o botão “Função / Tempo”
‚
O visor do relógio
botão “Aceitar”
(Note que se tiver selecionado a função Guisar por erro, pode voltar ao ecrã anterior mantendo
o botão “Função / Tempo”
Pode então selecionar o programa de 1 hora e 30 minutos ou 1 hora e 45 minutos (dependendo
da receita que está a seguir). Para selecionar o programa de 1 hora e 30 minutos, prima o botão
“Aceitar / Iniciar / Parar”
“Função / Tempo
„
“Aceitar”
O tempo pára de piscar e a base emite um sinal sonoro durante cerca de 2 segundos antes de
se iniciar o processo de cozedura. O relógio efetua então a contagem decrescente até zero.
Se for necessário mais tempo de cozedura, pode repetir a regulação da função de guisar. Deve,
no entanto, determinar o tempo extra de cozedura de que necessita.
e o ícone da função de guisar „apresentam-se intermitentes. Prima o
„
para escolher a função de guisar. O ícone Guisar ‰pára de piscar.
·
sob pressão durante cerca de 2 segundos.)
„
. Para selecionar o programa de 1 hora e 45 minutos, prima o botão
„
. O visor do relógio ‚muda então para mostrar 01:45. Prima o botão
.
e o ecrã muda para E.
D
.
Se, por qualquer razão, tiver de cancelar o processo de cozedura antes do relógio chegar a
zero, mantenha o botão “Aceitar” sob pressão
um sinal sonoro, o processo de cozedura pára e o ecrã volta à apresentação inicial
Durante a função de guisar, sai vapor pela respetiva saída. Certifique-se de que a saída está
posicionada na parte traseira do produto.
AVISO: O vapor e a saída estão quentes.
No fim do processo de cozedura, a Supreme Precision 3 in 1 Slow Cooker emite um sinal sonoro e
desliga-se automaticamente para manter a temperatura
„
durante cerca de 3 segundos. A base emite
B
.
Função de cozinhado lento
Coloque a cuba ‹na base fi. Junte os ingredientes de acordo com as instruções da receita
que está a seguir. Quer tenha utilizado a função “Selar / Alourar” ou tenha acabado de ligar a
Supreme Precision 3 in 1 Slow Cooker, deverá ver apresentado o ecrã predefinido como o
apresentado em baixo
Prima duas vezes o botão “Função / Tempo”
O visor do relógio
Existem três programas de Cozinhado lento diferentes – 1, 2 e 3. A diferença é o período de
tempo atribuída a cada programa. Cada programa de cozedura lenta permite selecionar os
tempso de cozedura em intervalos de 30 minutos entre os tempos de cozedura mínimos e
máximos. Por exemplo, na regulação mínima, é possível selecionar um tempo de cozedura de 9
horas e meia, se desejar. A função para manter a temperatura é adicional a esta regulação de
tempo.
Cada programa conta com um ícone diferente como se mostra em baixo:
Se desejar utilizar o programa de Cozinhado lento 1, prima o botão “Aceitar”
selecione o período de tempo desejado para o programa de Cozinhado lento. Premir o botão
“Função / Tempo”
for apresentado, prima o botão “Aceitar”
sonoro durante cerca de 2 segundos antes de se iniciar o processo de cozedura. O relógio
efetua então a contagem decrescente até zero.
O tempo pára de piscar e a base emite um sinal sonoro durante cerca de 2 segundos antes de
se iniciar o processo de cozedura. O relógio efetua então a contagem decrescente até zero.
Se pretender utilizar o programa Cozinhado lento 2, prima uma vez o botão “Função / Tempo”
·
(é apresentado o ícone de Cozinhado lento 2) antes de premir o botão “Aceitar” „. Em
seguida, selecione o tempo de cozedura tal como se indica acima.
Se pretender utilizar o programa Cozinhado lento 3, prima duas vezes o botão “Função / Tempo”
·
(é apresentado o ícone de Cozinhado lento 3) antes de premir o botão “Aceitar” „. Em
seguida, selecione o tempo de cozedura tal como se indica acima.
O tempo pára de piscar e a base emite um sinal sonoro durante cerca de 2 segundos antes de
se iniciar o processo de cozedura; o relógio inicia então a contagem decrescente até zero.
Depois de premir o botão “Aceitar”
o tempo apresenta-se intermitente. (Note que se tiver selecionado a função “Cozinhadio lento”
por erro, pode voltar ao ecrã anterior mantendo o botão “Aceitar”
de 2 segundos.)
Se, por qualquer razão, tiver de cancelar o processo de cozedura antes do relógio chegar a
zero, mantenha o botão “Aceitar” sob pressão
um sinal sonoro, o processo de cozedura pára e o ecrã volta à apresentação inicial
F
.
·
e o ecrã muda para G.
‚
e o ícone da função de cozinhado lente Âapresentam-se intermitentes.
Entre 8 e 10 horas (lento)
Entre 6 e 8 horas (médio)
Entre 4 e 6 horas (alto)
„
e, em seguida,
·
permite percorrer os tempos disponíveis. Quando o tempo que pretender
„
. O tempo pára de piscar e a base emite um sinal
„
, o ícone de Cozinhado lento Âpára de piscar e apenas
„
sob pressão durante cerca
„
durante cerca de 3 segundos. A base emite
H
.
Manter Quente
No fim do processo de cozedura, o equipamento emite um sinal sonoro e desliga-se
automaticamente para manter a temperatura. A função de manter quente tem uma duração
máxima de duas horas e inicia a contagem de H0:00 a H2:00. No fim das 2 horas, a base emite
um sinal sonoro e o visor mostra “H”, que se mantém visível até que a placa atinja a
temperatura ambiente (cerca de 40°C)
Em seguida, o ecrã apresenta-se em branco. Ao premir qualquer botão, o utilizador regressa ao
ecrã apresentado na ligação.
Note que a função Manter quente pode ser interrompida a qualquer momento durante o período
de 2 horas mantendo o botão “Aceitar”
Depois de cozinhar
Desligue o aparelho da corrente elétrica e desative a unidade.
Importante: certifique-se de que a base está fria antes de guardá-la.
I
.
„
sob pressão durante cerca de 2 segundos.
p
33
Page 34

SC461007MEE Rev1_Instruction Book 17/06/2014 17:11 Page 34
Limpar e cuidar da sua Supreme Precision 3 in 1 Slow Cooker
• A cuba e a tampa podem ser lavadas na máquina de lavar louça. Alternativamente, pode utilizar
água quente com detergente e um esfregão não abrasivo. Não utilize esfregões ou produtos de
limpeza abrasivos.
• Nunca submerja a base elétrica em água ou qualquer outro líquido. Para limpar, utilize um pano
húmido e seque bem.
• Certifique-se de que a base e a superfície da placa quente estão limpas, sem alimentos queimados
e secas antes de utilizar. A base exterior pode ser limpa com um esfregão de palha de aço se
necessário, para eliminar a sujidade mais resistente.
• Ao juntar ingredientes e líquidos à cuba, evite encher demasiado. Se ocorrerem derrames que
escorram para a base, desactive o equipamento e desligue-o da corrente elétrica, retire a cuba e
permita que o líquido escorra pelos orifícios de drenagem. Limpe completamente qualquer excesso
de alimentos ou líquidos que se tenham alojado no intervalo entre a chapa da resistência e o
refletor metálico, limpe com um pano húmido e seque totalmente antes da utilização seguinte.
RECEITAS
Guisado de vaca
6,5L
Carne de vaca cortada em cubos 1kg.
Batatas em cubos 700g.
Cenouras às rodelas 700g.
Alho francês, às rodelas 3 grandes
Cebola, picada 2
Caldo de carne 1,5L
Ervas variadas 3 colher de chá
Sal e pimenta acaba de moer
Quando utilizar a função de selar / alourar, primeiro, junte sempre 30ml (2 colheres de sopa) de
óleo à cuba.
Método
• Utilize a função de selar / alourar para alourar a carne e fritar as cebolas.
(Frite a carne em dois lotes)
• Misture os restantes ingredientes.
• Mude para a regulação de cozinhado lento.
• Cozinhe durante o período de tempo máximo da regulação.
• Engrosse o molho com uma mistura de farinha e água.
• Junte as bolas de massa 30 minutos a 1 hora antes do fim do cozinhado.
Frango com vinho branco
6,5L
Peitos de frango 10
Manteiga 40g.
Cebola, picada 2 grandes
Cogumelos, cortados 400g.
Vinho branco 5 colheres de sopa
Caldo de galinha 750ml.
Ervas variadas 2 colher de chá
Farinha de milho 5 colheres de sopa
Gemas de ovo 3
Natas 150ml.
Sal e pimenta acaba de moer
Método
• Não é necessária a utilização da função alourar / selar.
• Junte todos os ingredientes, exceto a farinha, os ovos e as natas à cuba e regule para a função de
Cozinhado lento.
• Engrosse o molho com uma mistura de farinha e água.
• Depois de cozinhado, misture os ovos e as natas com um pouco de molho quente e misture.
• Normalmente, as receitas de frango são cozinhadas na regulação do tempo mais curto.
Por exemplo 8 horas 6 horas 3-4 horas
Fiambre cozido
6,5L
Um presunto 1,8kg.
Preparação
• Não é necessária a utilização da função alourar / selar.
• Coloque a peça na cuba e cubra com água a ferver.
• Pode cozinhar durante o tempo mínimo ou máximo para cada regulação.
Sopa de legumes
6,5L
Variedade de legumes descascados e cortados 1,8kg.
Caldo de legumes 2L
Ervas variadas a gosto
Sal e pimenta acaba de moer
Método
• Não é necessária a utilização da função alourar / selar.
• Junte todos os ingredientes de uma só vez e cozinhe durante o tempo máximo para a regulação.
• Passe com a varinha depois de arrefecer.
Vaca à Nova Inglaterra
6,5L
Lombo, chambão 1,5kg.
Ramo de ervas aromáticas 1
Tomilho 2 colher de chá
Pimenta em grão 2 colher de chá
Chalotas, descascadas 10
Cenouras, cortadas 550g.
Colza, cortada 300g.
Água suficiente para cobrir o lombo
Quando utilizar a função de selar / alourar, primeiro, junte sempre 30ml (2 colheres de sopa) de óleo
à cuba.
Método
• Utilize a função de Alourar / Selar para alourar todos os lados da carne.
• Junte os restantes ingredientes e cozinhe durante o período de tempo mínimo da regulação.
• Espesse o molho com farinha de milho.
Molho para bolonhesa
6,5L
Carne de vaca picada 1,5kg.
Cebolas, picadas 3
Aipo, às rodelas 6 talos
Dentes de alho, esmagados 3
Polpa de tomate 7 colheres de sopa
Farinha 3 colheres de sopa
Tomate em lata, cortado 3 latas
Caldo de carne 600ml.
Cogumelos, cortados 300g.
Ervas variadas 2 colher de chá
Sal e pimenta acaba de moer
Quando utilizar a função de selar / alourar, primeiro, junte sempre 30ml (2 colheres de sopa) de óleo
à cuba.
Preparação
• Utilize a função de Alourar / Selar para alourar as salsichas em lotes.
• Junte as cebolas, o alho e o aipo e frite até amolecer.
• Mude para a regulação de cozinhado lento.
• Misture a farinha com o tomate e junte com o resto dos ingredientes.
• Mexa bem.
• Pode cozinhar durante o tempo mínimo a máximo para a regulação.
34
Page 35

SC461007MEE Rev1_Instruction Book 17/06/2014 17:11 Page 35
Caçarola de enchidos
6,5L
Óleo 1 colheres de sopa
Salsichas 1,5 kg.
Cebolas, picadas 3 grandes
Cenouras às rodelas 5
Alho francês, às rodelas 3
Caldo de carne 1,5L
Chutney 6 colheres de sopa
Molho Worcestershire 5 colheres de sopa
Sal e pimenta acaba de moer
Quando utilizar a função de selar / alourar, primeiro, junte sempre 30ml (2 colheres de sopa) de óleo
à cuba.
Método
• Utilize a função de Alourar / Selar para alourar as salsichas em lotes.
• Junte os legumes e refogue até amolecerem.
• Mude para a regulação de cozinhado lento.
• Junte os restantes ingredientes e cozinhe durante o período de tempo mínimo da regulação.
Caril de vaca
6,5L
Óleo vegetal 4 colheres de sopa
Maçãs descaroçadas e sem pele, cortadas 3 médias
Cebolas, picadas 3 grandes
Carne de vaca para guisar, aos cubos 1,5kg.
Caril em pó 5 colher de chá
Caldo de carne 1L
Chutney de manga 5 colheres de sopa
Sultanas 150g.
Tomate em lata, cortado 600g.
Sumo de limão 3 colheres de sopa
Farinha de milho 5 colheres de sopa
Sal e pimenta acaba de moer
Quando utilizar a função de selar / alourar, primeiro, junte sempre 30ml (2 colheres de sopa) de óleo
à cuba.
Método
• Utilize a função de Alourar / Selar para alourar a carne, um pouco de cada vez.
• Junte as cebolas e refogue até amolecerem.
• Mude para a regulação de cozinhado lento.
• Junte os restantes ingredientes e mexa.
• Misture a farinha com o tomate e junte com o resto dos ingredientes.
• Mexa bem.
• Pode cozinhar durante o tempo mínimo a máximo para a regulação.
Caril de vaca tailandês
6,5L
Manteiga 60g.
Carne de vaca para guisar, aos cubos 1kg.
Cebola, picada 2
Dentes de alho, esmagados 4
Manteiga de amendoim 6 colheres de sopa
Leite de côco 800g.
Batatas, aos quartos 700g.
Caril em pó 4 colheres de sopa
Molho de peixe tailandês 4 colheres de sopa
Açúcar amarelo 4 colheres de sopa
Caldo de carne 1L
Método
• Derreta a manteiga na cuba na função de Alourar / Selar e junte a carne, os alhos e as cebolas e
aloure. (Aloure a carne em dois lotes para a capacidade de 6,5L)
• Junte as cebolas e os alhos e refogue até amolecer.
• Junte os restantes ingredientes e mexa.
• Mude para a regulação de cozinhado lento.
• Melhores resultados utilizando a função de Cozinhado lento
Costeletas BBQ
6,5L
Costeletas 1,5kg.
Molho BBQ 300ml
Método
• Coloque as costeletas a marinar no molho durante algumas horas ou durante a noite.
• Coloque-as na cuba e cozinhe durante o tempo necessário.
• Quanto mais prolongado for o tempo de cozedura, mais macia fica a carne.
Pudim de xarope
6,5L
Manteiga 125g
Xarope de cana de açúcar 4 colheres de sopa
Açúcar refinado 100g
Ovos 2
Farinha com fermento 200g
Leite 2 colheres de sopa
Sumo de limão 2 colheres de sopa
Método
• Unte uma forma de pudim de 1,25L com manteiga e forre o fundo com papel vegetal.
• Verta o xarope para o fundo da forma.
• Bata a manteiga e o açúcar até obter uma mistura suave e cremosa.
• Misture gradualmente os ovos e junte o leite e o sumo de limão. Coloque a mistura sobre o xarope
e tape com o papel vegetal. Até com fio formando uma pega.
• Coloque na Supreme Precision 3 in 1 Slow Cooker e encha com água a ferver até meio.
• Recomenda-se a regulação de guisado rápido durante 1:45 horas
p
35
Page 36

SC461007MEE Rev1_Instruction Book 17/06/2014 17:11 Page 36
Arroz doce
6,5L
Manteiga 60g
Leite creme 250g
Açúcar 250g
Leite 2L
Noz moscada 1 colher de chá
Método
• Unte ligeiramente a panela com manteiga.
• Junte todos os ingredientes e mexa.
• Para os melhores resultyados, cozinhe na regulação de Cozinhado lento 1 (8 - 10 horas).
Bolo de chocolate
6,5L
Cacau 50g
Água a ferver 6 colheres de sopa
Fermento em pó 1 colher de chá
Farinha com fermento 175g
Açúcar refinado 150g
Óleo 150ml
Ovos 3
Método
• Forre uma forma de bolo de 18 cm com papel vegetal.
• Misture o cacau com a água a ferver para formar uma pasta.
• Misture a farinha, o fermento e o açúcar numa taça.
• Bata os ovos e o óleo e junte a mistura à pasta de chocolate; misture bem.
• Coloque na forma e tape com folha de alumínio. Até com fio formando uma pega. Coloque na
Supreme Precision 3 in 1 Slow Cooker e encha com água a ferver até meio.
• Recomenda-se a regulação de guisado rápido durante 1:45 horas
Tarte de frutos vermelhos
6,5L
Frutos frescos (framboesas, amoras, mirtilos, etc.) 1,2kg
Açúcar 150g
Farinha com fermento 200g
Gordura 100g
Sal Pitada
Raspa de limão 2 limões
Leite 6-8 de colheres de sopa
A sua garantia de dois anos
Este aparelho tem uma garantia de reparação ou substituição de 2 anos.
É importante guardar o talão de compra como comprovativo de compra. Agrafe-o ao verso
deste folheto para referência futura.
Mencione a seguinte informação se o produto apresentar uma avaria. Estes números podem ser
encontrados na base do artigo.
N.º do modelo
N.º de série
Todos os artigos Morphy Richards são testados individualmente antes de saírem da fábrica. No
caso improvável de algum produto apresentar uma avaria no prazo de 28 dias após a compra, o
mesmo deverá ser devolvido ao local de compra, para a sua substituição.
Se a avaria surgir passados 28 dias e dentro dos 24 meses a partir da data de aquisição do
aparelho, deverá contactar o seu distribuidor local e referir o número do modelo e de série do
produto ou escrever ao seu distribuidor local para o endereço abaixo citado.
Ser-lhe-á solicitado que devolva o produto (numa embalagem segura e apropriada) para o
endereço apresentado, juntamente com uma cópia do talão de compra.
Tirando as excepções abaixo referenciadas (1-9), o artigo avariado será reparado ou substituído
e enviado, normalmente no prazo de 7 dias úteis a contar da data de recepção.
Se por qualquer razão, este artigo for substituído durante o período de garantia de 2 anos, a
garantia do novo artigo será calculada a partir da data original de compra. Por esta razão, é
importante guardar o talão ou factura originais de modo a indicar a data inicial de compra.
Para ser abrangido pela garantia de 2 anos, o artigo deverá ter sido utilizado de acordo com as
instruções do fabricante. Por exemplo, os artigos têm de ter sido escamados e os filtros
mantidos limpos, tal como indicado nas instruções.
A Morphy Richards ou o distribuidor local não serão obrigados a substituir ou reparar artigos
sob os termos da garantia quando:
1 A avaria tiver sido provocada ou for atribuída a uma utilização inadvertida, indevida, negligente,
contrária às recomendações do fabricante ou no caso de ter sido causada por oscilações de
corrente ou danos provocados pelo transporte.
2 O aparelho tiver sido utilizado com uma voltagem diferente da recomendada.
3 Tiverem sido efectuadas tentativas de reparação por pessoas que não os técnicos da Morphy
Richards (ou o seu representante autorizado).
4 O aparelho tiver sido utilizado com fins de aluguer ou utilização não doméstica.
5 O aparelho foi adquirido em segunda mão.
6 A Morphy Richards ou o distribuidor local não são responsáveis pela execução de qualquer tipo de
trabalho de manutenção, ao abrigo da garantia.
7 A garantia não abrange consumíveis, tais como sacos, filtros e garrafas de vidro
8 Baterias e danos causados por derrame não estão abrangidos pela garantia.
9 Os filtros não foram limpos e substituídos de acordo com as instruções.
Esta garantia não confere quaisquer direitos para além dos expressamente definidos
anteriormente e não abrange quaisquer reclamações por danos ou perdas sucessivos. Esta
garantia é um benefício adicional e não afecta quaisquer direitos estatutários do consumidor.
Método
• Coloque os frutos no interior da panela e misture metade do açúcar.
• Misture o resto do açúcar com a farinha, a gordura, o sal e a raspa de limão.
• Junte o leite para ligar tudo numa massa, sem amassar demasiado.
• Coloque as bolas de massa no centro da panela sobre a fruta. Não permita que as bolas de massa
toquem nos lados da panela, uma vez que aumentam de tamanho durante a cozedura.
• Cozinhe durante o período de tempo mínimo da regulação.
LINHA DE APOIO
Se houver qualquer problema com o seu aparelho, não hesite em contactar-nos.
Poderemos provavelmente ajudá-lo mais do que a loja onde adquiriu o aparelho.
Tenha os seguintes dados disponíveis, de modo a que a nossa equipa possa resolver
rapidamente o seu problema.
• Nome do produto.
• Número do modelo conforme indicado na parte inferior do aparelho.
• Número de série, conforme indicado na parte inferior do aparelho.
Website
Também poderá contactar-nos através do nosso website ou visitar o site para procurar e
comprar aparelhos, peças e acessórios da vasta gama Morphy Richards.
36
Page 37

SC461007MEE Rev1_Instruction Book 17/06/2014 17:11 Page 37
i
Salute e sicurezza
Per utilizzare un qualsiasi elettrodomestico, è necessario seguire delle basilari regole di sicurezza dettate dal buon senso comune.
Leggere queste istruzioni con attenzione prima di utilizzare il prodotto.
• L’apparecchio può essere utilizzato dai bambini a partire da 8 anni e da persone con ridotte
capacità fisiche, sensoriali o mentali, o prive di esperienza e familiarità con il prodotto, posto
che siano sempre sotto supervisione, ricevano adeguate istruzioni su come adoperare
l’elettrodomestico in sicurezza e siano consapevoli dei pericoli correlati.
• Evitare che i bambini giochino con l’elettrodomestico.
• La pulizia e gli interventi di manutenzione non devono essere eseguiti dai bambini di età
inferiore agli 8 anni e in assenza di supervisione.
• Tenere l’elettrodomestico e il cavo di alimentazione fuori dalla portata di bambini di età
inferiore agli 8 anni.
• Questo elettrodomestico è destinato all’uso domestico e applicazioni simili quali: abitazioni di
campagna; clienti in alberghi, motel e altri ambienti di tipo residenziale; ambienti tipo bed and
breakfast.
Non è adatto per essere utilizzato nelle cucine destinate all’uso da parte del personale in
negozi, uffici e altri ambienti di lavoro.
Luogo di utilizzo
• Tenere sempre l’elettrodomestico lontano dal bordo del piano di lavoro.
• Utilizzare l’apparecchiatura su una superficie stabile, orizzontale e resistente al calore.
• Non utilizzare l’elettrodomestico all’esterno o vicino all’acqua.
Cavo dell’alimentazione
• Il cavo dell’alimentazione, che collega la presa a muro e l’apparecchio, deve essere sufficientemente
lungo.
• Non lasciare che il cavo di alimentazione penda dal bordo di un piano di lavoro dove un bambino
potrebbe raggiungerlo.
• Fare attenzione a che il cavo dell’alimentazione non si trovi sopra a un fornello o area calda che
potrebbe danneggiarlo.
• Se il cavo dell’alimentazione è danneggiato, deve essere sostituito dal produttore, dal servizio di
assistenza o da un tecnico con pari qualifica
Sicurezza personale
• AVVERTENZA: non toccare la parte superiore del tostapane o altri componenti caldi durante o dopo
l’uso. Utilizzare manici o manopole.
• Per proteggersi dal rischio di scosse elettriche, fare in modo che l’elettrodomestico non entri mai in
contatto con acqua o altro liquido.
• Non toccare le superfici bollenti. Utilizzare i guanti o uno strofinaccio per rimuovere il coperchio e
per maneggiare i contenitori caldi.
• Spostare lo slow cooker con estrema attenzione se contiene cibi, acqua o altri liquidi bollenti.
Altre informazioni di sicurezza
• Non accendere lo slow cooker se la pentola di ceramica è vuota.
• Far raffreddare il coperchio e la pentola di ceramica prima di immergerli in acqua.
• Non cuocere direttamente nell’unità di base. Utilizzare la pentola di ceramica.
• Non utilizzare la pentola di ceramica o il coperchio di vetro se lesionati o scheggiati.
• Non accendere l’elettrodomestico quando è capovolto o piegato su un lato.
• Il coperchio di vetro e la pentola di ceramica sono fragili. Maneggiarli con cura.
• Non utilizzare accessori o strumenti diversi da quelli consigliati da Morphy Richards, in quanto
potrebbero provocare incendi, scosse elettriche o lesioni.
• Non porre l’elettrodomestico sopra o vicino a un fornello a gas o elettrico o in un forno riscaldato.
• Scollegare l’elettrodomestico dalla presa quando non è in uso, prima di collegare o rimuovere dei
componenti e prima di eseguirne la pulizia.
• L’apparecchio non è indicato per l’uso mediante timer esterno o sistema separato di controllo a
distanza.
Requisiti elettrici
Controllare che la tensione indicata sulla targhetta dei dati dell’apparecchiatura corrisponda a quella
dell’abitazione, che deve essere a corrente alternata. Qualora fosse necessario sostituire il fusibile
nella spina, installarne uno del tipo BS1362 da 3 A.
AVVERTENZA: L’elettrodomestico deve essere collegato a terra.
p
i
37
Page 38

SC461007MEE Rev1_Instruction Book 17/06/2014 17:11 Page 38
Guida rapida
Consultare anche l’opuscolo di istruzioni principale, che contiene
informazioni importanti per la sicurezza e maggiori dettagli sull’uso
di Supreme Precision 3 in 1 Slow Cooker.
Questa guida fornisce istruzioni su come utilizzare Supreme Precision 3 in 1 Slow Cooker
per scottare / rosolare circa 1 kg di carne e quindi utilizzare il programma per stufare da 1:30
ore o quello a cottura lenta da 8 ore. Per tutti gli altri programmi, vedere le istruzioni
complete.
Per utilizzare la funzione Scotta / Rosola
1
2
Posizionare la casseruola ‹sulla base fi, collegare il Supreme Precision 3 in 1
Slow Cooker all’alimentazione.
Il display visualizza la schermata predefinita (a sinistra). L’icona Scotta / Rosola
‰
e l’ora ‚lampeggiano.
Aggiungere alla casseruola una quantità d’olio appropriata per il peso di carne che
si desidera scottare.
Premere il pulsante ‘Accetta’ „. Supreme Precision 3 in 1 Slow Cooker fa
risuonare il cicalino per circa 2 secondi e il display smette di lampeggiare. La
casseruola inizia quindi a riscaldarsi mentre il timer
Occorreranno circa 5 minuti perché l’olio raggiunga la temperatura adeguata per
la scottatura/rosolatura (ovvero quando il timer visualizza 00:10).
,
avvia il conto alla rovescia.
Mettere la carne in casseruola e rimescolare regolarmente finché l’esterno della
carne non sia scottato/rosolato. Quando il timer raggiunge lo zero, si udrà il
cicalino della base e il processo di cottura sarà terminato. Se la carne è scottata
3
38
prima che passino i 15 minuti, tenere premuto il pulsante ‘Accetta’
secondi. La base fa risuonare il cicalino e il processo di cottura termina. Se è
necessario continuare, ripetere il processo dal passaggio 2 sopra.
„
per circa 3
Page 39

SC461007MEE Rev1_Instruction Book 17/06/2014 17:11 Page 39
Utilizzo della funzione Stufato da 1:30 h
4
OPPURE utilizzo della funzione di Cottura lenta
5
Una volta terminato il processo di scottatura / rosolatura, aggiungere i rimanenti
ingredienti (come da ricetta). Premere una volta il pulsante ‘Funzione / Timer’
verrà visualizzata la seguente schermata (a sinistra). Premere due volte il pulsante
„
‘Accetta’
processo di cottura. Riposizionare il coperchio utilizzando il Supreme Precision 3
in 1 Slow Cooker con questa impostazione. Per il timer del conto alla rovescia e il
mantenimento al caldo, vedere il punto 6.
Una volta terminato il processo di scottatura / rosolatura, aggiungere i rimanenti
ingredienti (come da ricetta). Premere due volte volta il pulsante ‘Funzione / Timer’
·
pulsante ‘Accetta’
iniziare il processo di cottura. Riposizionare il coperchio utilizzando il Supreme
Precision 3 in 1 Slow Cooker con questa impostazione. Per il timer del conto alla
rovescia e il mantenimento al caldo, vedere il punto 6.
; la base fa risuonare il cicalino per circa 2 secondi prima di iniziare il
; verrà visualizzata la seguente schermata (a sinistra). Premere due volte il
„
; la base fa risuonare il cicalino per circa 2 secondi prima di
·
;
i
Timer di conto alla rovescia e funzione di mantenimento a caldo
Al termine del processo di cottura, risuona il cicalino e la funzione di
mantenimento al caldo si attiva automaticamente. La conservazione in caldo
durerà per un massimo di due ore e il conteggio sarà compreso tra H0:00 e
H2:00. Al termine delle 2 ore, sul display sarà visualizzata la lettera ‘H’, che
rimarrà visibile fino a quando la piastra calda non avrà raggiunto la temperatura
6
ambiente (approssimativamente 40 °C). A questo punto il display si azzera.
Premendo qualsiasi pulsante, si torna alla schermata illustrata in occasione della
prima accensione.
39
Page 40

SC461007MEE Rev1_Instruction Book 17/06/2014 17:11 Page 40
i
Per ottenere il massimo dal vostro nuovo elettrodomestico...
Sicurezza
Evitare di toccare la parte esterna della casseruola a cottura lenta durante il funzionamento e
prima che si sia raffreddata. Utilizzare guanti da forno per rimuovere il coperchio o la casseruola di
cottura in acciaio inox.
Efficienza
Togliendo il coperchio si libera buona parte del calore, riducendo l’efficacia della casseruola a
cottura lenta e aumentando il tempo di cottura. Evitare di togliere il coperchio per più di 3 o 4 volte
per dare una rimescolata o aggiungere ingredienti.
Vantaggi
La cottura lenta è conveniente, pratica e permette ai cibi di mantenere inalterato tutto il loro
sapore. Una cottura più lunga infatti permette una migliore distribuzione dei sapori, rendendo i cibi
più gustosi. Una casseruola a cottura lenta riscalda i cibi in modo delicato. È l’ideale per cucinare
la carne, soprattutto i tagli meno pregiati come il manzo per stufato, che diventano così più teneri.
È possibile utilizzare la casseruola a cottura lenta in migliaia di modi: basta un po’ di fantasia!
Componenti
⁄
Coperchio di vetro
¤
Scarico vapore
‹
Casseruola di cottura / servizio in acciaio inox (da 4,5 l o 6, 5 l a seconda del modello)
›
Elemento riscaldante
fi
Base
fl
Quadro di controllo / Display (vedere figura ingrandita)
‡
Foro di scolo x2 (sotto)
·
Pulsante Funzione / Timer
‚
Visualizzazione Timer
„
Pulsante Accetta
‰
Icona Scotta / Rosola e icona Stufato
Â
Icona Cottura lenta
Legenda
Icona Scotta / Rosola
Icona Stufato
Icona Cottura lenta
Capacità di cottura
• Supreme Precision 3 in 1 Slow Cooker da 6,5 l ha una capacità di lavoro massima di 5 litri.
• La capacità è riportata sull’etichetta identificativa, ubicata sotto il prodotto.
Prima di utilizzare Supreme Precision 3 in 1 Slow Cooker
per la prima volta
Rimuovere tutte le etichette dal prodotto.
Lavare la casseruola in acciaio inox e il coperchio con acqua calda mista a detergente utilizzando
una spugna o uno strofinaccio apposito. NON utilizzare spugnette o altri materiali abrasivi per
evitare di lasciare segni sull’acciaio inox. Risciacquare ed asciugare con cura la casseruola ed il
coperchio.
IMPORTANTE: NON IMMERGERE LA BASE DI SUPREME PRECISION 3 IN 1 SLOW COOKER IN
ACQUA
Nota:
Iniziando a utilizzare l’apparecchio, si potrebbe avvertire un lieve odore dovuto alla combustione
dei residui di produzione. Ciò è assolutamente normale, non ha effetto sugli alimenti cotti e
scompare dopo aver utilizzato più volte l’apparecchio.
Suggerimenti e consigli per utilizzare Supreme Precision 3 in 1
Slow Cooker
• Tutti gli ingredienti devono essere a temperatura ambiente prima di metterli in casseruola. Se gli
alimenti sono refrigerati, attendere che raggiungano la temperatura ambiente per evitare di prolungare
il tempo di cottura.
• È possibile utilizzare carne refrigerata in frigo, ma evitare di utilizzare carne surgelata. Utilizzare la
funzione di rosolatura per scottare la carne.
• Verificare che gli ingredienti surgelati siano ben scongelati prima di utilizzarli.
• Se si utilizzano liquidi freddi nella ricetta a cottura lenta (ad esempio, vino), sarà necessario preriscaldare gli ingredienti. Iniziare prima con la funzione di rosolatura, aggiungendo tutti gli ingredienti.
Una volta terminati i 15 minuti, continuare con la funzione di cottura lenta.
• In caso di cottura lenta tradizionale su fornello, solitamente la carne viene infarinata prima di rosolarla.
Ciò non è necessario con Supreme Precision 3 in 1 Slow Cooker. È sufficiente scottare / rosolare la
carne come da istruzioni. Se è necessario ispessire il sugo, aggiungere e mescolare una miscela di
farina di grano e acqua fredda 30 minuti prima della fine della cottura.
• Se si utilizza carne con l’osso (ad esempio, cosce di pollo, costine ecc.), il processo di cottura lenta
può fare sì che la carne si distacchi dall’osso: ciò è normale e arricchisce il sapore. Tuttavia, occorre
prestare attenzioni agli ossicini che possono essere presenti nel sugo.
• Evitare di riempire eccessivamente la casseruola, poiché le ricette in questo libretto d’istruzioni sono
studiate per la capacità massima e tengono conto dello spazio libero sopra gli alimenti per una cottura
uniforme. La capacità è riportata sull’etichetta identificativa, ubicata sotto il prodotto. Se si utilizza una
ricetta propria, evitare di riempire al di sopra dei rivetti delle maniglie visibili all’interno della casseruola.
A
• Il coperchio diventa molto caldo durante la cottura, specialmente la finestrella in vetro e il bordo in
acciaio inox. Le maniglie isolate con silicone restano fresche, permettendo di sollevare il coperchio.
Tuttavia, per precauzione è consigliabile utilizzare guanti da forno per farlo.
• Gli ingredienti devono essere distribuiti uniformemente nella casseruola. Verificare che le radici siano
ben posizionate nella metà inferiore della casseruola per iniziare la cottura. Tutti gli ingredienti devono
essere immersi nel liquido di cottura.
• Per garantire una cottura uniforme, le radici devono essere tagliate in pezzi (dadi di circa 20 mm).
• Se dovesse traboccare del liquido, in genere è la conseguenza di un riempimento eccessivo della
casseruola; rimuovere parte degli ingredienti e/o di liquido.
• In generale, le carni più dure come quelle da stufato richiedono tempi di cottura più lunghi, ideali per la
cottura lenta. Per la funzione di stufatura, è richiesto un taglio di carne di qualità superiore con tempi di
cottura pari a 1:35– 1:45.
• Il pollame e i tagli di carne di qualità superiore richiedono meno tempo per cuocere. Utilizzare quindi il
valore più basso dell’intervallo di cottura – ad esempio, per il livello 1 utilizzare 8 ore.
• Aggiungere le polpette allo stufato 30-45 minuti prima di concludere la cottura. Queste possono
essere aggiunte in superficie, senza doverle immergere nel sugo.
• I cosciotti di prosciutto devono essere lasciati nella plastica, se presente. In caso contrario, utilizzare
una borsa di plastica resistente al calore o legare il taglio con corda da macellaio per impedire che
l’alimento si disfi durante la cottura.
• Adoperando l’impostazione di stufatura, lasciare che gli alimenti cotti riposino per 10 minuti in
casseruola prima di servire. Questo consentirà al cibo caldo (bollente) di raffreddarsi prima di essere
consumato.
• Una volta acquisita una certa esperienza nell’uso di Supreme Precision 3 in 1 Slow Cooker, potrete
iniziare a creare le vostre ricette; è comunque consigliabile partire da una ricetta esistente come guida.
Utilizzando in una ricetta ingredienti come pasta, latte, panna, pesce o frutti di mare, questi devono
essere aggiunti a 30 minuti dalla fine della cottura degli altri ingredienti. Ciò non vale per il latte di
cocco e le ricette di budino di riso.
• Non lasciare alimenti crudi nella casseruola. Iniziare la cottura non appena possibile. Se fosse
necessario rimandare la cottura, conservare il cibo in frigo, e riportare alla temperatura ambiente prima
della cottura.
• Se una ricetta precedentemente cotta si è raffreddata, utilizzare l’impostazione l’impostazione di
stufatura a 1:30 h per riscaldare l’alimento. A seconda della ricetta, potrebbero essere necessari 30-45
minuti per riscaldare. Verificare che il cibo sia caldo prima di servirlo.
• Se si stanno utilizzando quantità dimezzate, il tempo di cottura può solitamente essere ridotto a due
terzi. Verificare che il cibo sia ben cotto prima di servirlo.
• Adattare le ricette esistenti per la cottura convenzionale all’utilizzo con una casseruola per cottura lenta
potrebbe richiedere la riduzione del liquido utilizzato, poiché i liquidi evaporano meno.
• Quando è necessario aggiungere liquido di cottura, utilizzare acqua bollente.
• Quando si cuociono cosciotti di carne, iniziare coprendo il tutto con acqua bollente o brodo. I liquidi
possono restringersi verso la fine della cottura.
• I fagioli rossi crudi devono essere prima messi in ammollo e poi bolliti per almeno 10 minuti per
rimuovere le tossine prima di utilizzarli con Supreme Precision 3 in 1 Slow Cooker.
• Se è il caso, rimuovere l’olio in eccesso dopo la rosolatura.
• Utilizzando brodi o salse da vasetti o barattoli, riscaldarli in un forno a microonde prima di aggiungerli
in casseruola. In alternativa, aggiungere 30 minuti al tempo di cottura.
Spiegazione dei termini utilizzati
Scottatura/rosolatura
Prima di stufare la carne o sottoporla a cottura lenta, è importante prima scottarla / rosolarla. Ciò
significa cuocere leggermente l’esterno della carne in olio caldo prima di iniziare il processo di
stufatura o cottura lenta (la carne deve essere ancora cruda al centro). In questo modo, la carne
mantiene il proprio sapore e non si asciuga.
Stufatura
In relazione a Supreme Precision 3 in 1 Slow Cooker, stufare significa cuocere la carne e/o le
verdure in liquido (ad esempio vino, brodo, acqua) per un tempo compreso tra 1 e 30 minuti e 1
ora e 45 minuti.
Cottura lenta
La cottura lenta è un modo di cuocere gli alimenti per un tempo esteso (solitamente tra 4 e 10 ore)
in liquido (ad esempio vino, brodo, acqua). Come suggerisce il nome, gli alimenti vengono cotti più
lentamente e delicatamente, il che significa che la carne sarà più tenera. Le carni a maggior
contenuto di grassi sono più adatte alla cottura lenta poiché tale processo consente di sciogliere il
grasso, rendendo la carne molto tenera.
40
Page 41

SC461007MEE Rev1_Instruction Book 17/06/2014 17:11 Page 41
Istruzioni per l’uso
Posizionare la base
bordo del piano. Non utilizzare l’apparecchio sul pavimento.
Nota:
se il prodotto è acceso ma non utilizzato, la luce del timer sul display si spegne per la modalità
stand-by dopo 30 minuti.
fi
su una superficie asciutta, in piano e resistente al calore, lontano dal
Funzione di stufatura / rosolatura del Supreme Precision 3 in 1
Slow Cooker
Posizionare la casseruola ‹sulla base fie collegare il Supreme Precision 3 in 1 Slow Cooker
all’alimentazione.
fl
Il display
La visualizzazione Timer
Aggiungere alla casseruola una quantità d’olio appropriata per il peso di carne che si desidera
scottare.
Vedere le ricette nel presente libretto d’istruzioni.
Consigliamo l’utilizzo di due cucchiai da tavola di olio vegetale per scottare circa 800 g - 1220 g
di carne. Tale proporzione può comunque variare in funzione del gusto personale e della quantità
di grasso presente nella carne da cucinare.
Per selezionare la funzione Scottatura, premere il pulsante ‘Accetta’
Precision 3 in 1 Slow Cooker fa risuonare il cicalino per circa 2 secondi e il display smette di
lampeggiare. La casseruola inizia quindi a riscaldarsi mentre il timer
Occorreranno circa 5 minuti perché l’olio raggiunga la temperatura adeguata per scottare/rosolare
la carne (ovvero quando il timer visualizza 00:10). Un buon modo per verificare se l’olio è caldo a
sufficienza è aggiungere un pezzetto di carne o cipolla in casseruola. Se sfrigola non appena
entrato in contatto con l’olio, la temperatura è quella giusta. Se non sfrigola, lasciar riscaldare la
casseruola per un altro minuto quindi riprovare.
Aggiungere carne nella casseruola e rimescolare finché l’esterno della carne non è ben
rosolato/scottato. Quando il timer raggiunge lo zero, si udrà il cicalino della base e il processo di
cottura sarà terminato. Se la carne è scottata prima che il timer raggiunga lo zero, tenere premuto
il pulsante ‘Accetta’
termina e il display torna alla schermata predefinita
Se la carne richiede un altro paio di minuti di scottatura dopo che il timer è giunto a zero, basta
premere il pulsante ‘Accetta’ per avviare nuovamente la funzione di scottatura/rosolatura. Come
spiegato sopra, per annullare la funzione di scottatura prima che il timer raggiunga lo zero, tenere
premuto il pulsante ‘Accetta’
A causa dell’elevata temperatura di funzionamento del Supreme Precision 3 in 1 Slow Cooker in
modalità di scottatura / rosolatura, eseguire al massimo due programmi da 15 minuti in rapida
successione. Se si cerca di selezionare il programma una terza volta con l’unità calda, verrà
visualizzata la seguente schermata —:—, mentre l’icona ‘Scotta / Rosola’
La funzione potrà essere selezionata solo una volta raffreddato a sufficienza il prodotto. Tuttavia,
ciò non dovrebbe causare alcun problema poiché 30 minuti (2 x 15) dovrebbero essere più che
sufficienti per scottare/rosolare la quantità di carne richiesta.
Nota:
Non avviare la funzione ‘Scottatura / Rosolatura’ senza la casseruola
causerà il surriscaldamento del prodotto. Evitare inoltre di avviare la funzione di scottatura /
rosolatura senza olio in casseruola.
visualizza la schermata predefinita B.
‚
e l’icona della funzione Scottatura ‰lampeggeranno entrambi.
„
una volta. Supreme
,
avvia il conto alla rovescia.
„
per circa 3 secondi. La base fa risuonare il cicalino, il processo di cottura
„
per circa 3 secondi.
B
.
‹
‰
lampeggia C.
sulla base fipoiché ciò
Scottare/rosolare con la casseruola Supreme Precision 3 in 1 Slow
Cooker sul fornello elettrico o a gas.
È anche possibile utilizzare la casseruola Supreme Precision 3 in 1 Slow Cooker sul fornello
elettrico o a gas.
Basta aggiungere olio come spiegato sopra e porre la casseruola sul fornello. L’olio potrebbe
scaldarsi più rapidamente sul fornello, quindi utilizzare un pezzetto di carne o cipolla come
spiegato sopra per testare la temperatura.
Scottare / rosolare grandi quantità di carne
Per rosolare grandi quantità di carne, è consigliabile suddividere l’operazione in quantità più
piccole per facilitarla. Essendo necessario rimescolare continuamente la carne durante il
processo, le quantità più piccole sono più facili da gestire.
Funzione Stufato
Posizionare la casseruola ‹sulla base fi. Aggiungere gli ingredienti come specificato dalla
ricetta che si sta seguendo. Sia che si stia utilizzando la funzione di scottatura / rosolatura o che
si sia appena acceso il Supreme Precision 3 in 1 Slow Cooker, il display dovrebbe visualizzare la
schermata predefinita
Premere una volta il pulsante Funzione / Timer
La visualizzazione Timer
Premere il pulsante ‘Accetta’
lampeggiare.
(Si noti che se è stata selezionata la funziona Stufato per errore, è possibile tornare alla
schermata precedente tenendo premuto il pulsante ‘Funzione / Timer’
È quindi possibile selezionare il programma da 1 ora e 30 minuti o quello da 1 ora e 45 minuti (in
funzione della ricetta prescelta). Per selezionare il programma da 1 ora e 30 minuti, premere il
pulsante ‘Accetta / Avvio / Arresto’
premere il pulsante ‘Funzione / Timer’
Premere il pulsante ‘Accetta’
Il timer smette di lampeggiare e la base fa risuonare il cicalino per circa 2 secondi prima di
avviare il processo di cottura. A questo punto il timer conta fino a raggiungere zero.
D
.
·
e il display passerà a E.
‚
e l’icona della funzione Stufatura „lampeggeranno entrambe.
„
per scegliere la funzione Stufato. L’icona Stufato ‰cesserà di
„
per circa 2 secondi.)
„
. Per selezionare il programma da 1 ora e 45 minuti,
„
. Il display del timer‚visualizzerà allora 01:45.
„
.
Se si necessita di più tempo per la cottura, la funzione stufato può essere ripetuta. È comunque
necessario determinare quanto tempo in più sia necessario.
Se per qualsiasi ragione è necessario annullare il processo di cottura prima che il timer raggiunga
lo zero, tenere premuto il pulsante ‘Accetta’
cicalino, il processo di cottura termina e il display torna alla schermata predefinita
Durante la funzione di stufatura, uscirà vapore dall’apposito scarico. Verificare che esso sia
posizionato sul retro del prodotto.
AVVERTENZA: Il vapore e lo scarico sarà caldo.
Al termine del processo di cottura, risuona il cicalino e la funzione di mantenimento al caldo si attiva
automaticamente.
„
per circa 3 secondi. La base fa risuonare il
B
.
Funzione Cottura lenta
Posizionare la casseruola ‹sulla base fi. Aggiungere gli ingredienti come specificato dalla
ricetta che si sta seguendo. Sia che si stia utilizzando la funzione di scottatura / rosolatura o che
si sia appena acceso il Supreme Precision 3 in 1 Slow Cooker, il display dovrebbe visualizzare la
seguente schermata predefinita
Premere due volte il pulsante Funzione / Timer
La visualizzazione Timer
programmi di cottura lenta disponibili: – 1, 2 e 3. Si differenziano per la durata per la quale
possono essere impostati. Ogni programma di cottura lenta consente di selezionare tempi di
cottura con intervalli di 30 minuti tra il tempo di cottura massimo e quello minimo. Ad esempio,
per un’ impostazione bassa, è possibile selezionare un tempo di cottura di 9 ore e 1/2, se lo si
desidera. La funzione di conservazione in caldo è aggiuntiva a questa impostazione.
Ciascun programma ha un’icona diversa, come indicato di seguito:
Tra 8 e 10 ore (bassa)
Tra 6 e 8 ore (medio)
Tra 4 e 6 ore (alta)
Se si desidera utilizzare il programma di cottura lenta 1, premere il pulsante ‘Accetta’
selezionare la durata per la quale si desidera attivare il programma. Premere due volte il pulsante
‘Funzione / Timer’
visualizzata la temporizzazione desiderata, premere il pulsante ‘Accetta’
lampeggiare e la base fa risuonare il cicalino per circa 2 secondi prima di avviare il processo di
cottura. A questo punto il timer conta fino a raggiungere zero.
Il timer smette di lampeggiare e la base fa risuonare il cicalino per circa 2 secondi prima di
avviare il processo di cottura. A questo punto il timer conta fino a raggiungere zero.
Per utilizzare il programma di cottura lenta 2, premere una volta il pulsante ‘Funzione / Timer’
(verrà visualizzata l’icona di cottura lenta 2) prima di premere il pulsante ‘Accetta’ „. Selezionare
quindi il tempo di cottura come indicato in precedenza.
Per utilizzare il programma di cottura lenta 3, premere due volte il pulsante ‘Funzione / Timer’
(verrà visualizzata l’icona di cottura lenta 3) prima di premere il pulsante ‘Accetta’ „. Selezionare
quindi il tempo di cottura come indicato in precedenza.
Il timer smetterà di lampeggiare e la base farà risuonare il cicalino per circa 2 secondi prima di
avviare il processo di cottura; il timer inizierà il conto alla rovescia fino a zero.
Una volta premuto il pulsante ‘Accetta’
lampeggia solo il timer. (Si noti che se è stata selezionata la funziona di cottura lenta per errore, è
possibile tornare alla schermata precedente tenendo premuto il pulsante ‘Accetta’
secondi.)
Se per qualsiasi ragione è necessario annullare il processo di cottura prima che il timer raggiunga
lo zero, tenere premuto il pulsante ‘Accetta’
cicalino, il processo di cottura termina e il display torna alla schermata predefinita
·
F
.
·
e il display passa a G.
‚
e l’icona di cottura lenta Âlampeggeranno entrambi. Tre sono i
„
consente di visualizzare le temporizzazioni disponibili. Quando viene
„
, l’icona di cottura lenta Âcessa di lampeggiare e
„
per circa 3 secondi. La base fa risuonare il
„
. Il timer smette di
„
H
per circa 2
.
quindi
·
·
Funzione di tenuta in caldo
Al termine del processo di cottura, risuona il cicalino e la funzione di mantenimento al caldo si
attiva automaticamente. La conservazione in caldo durerà per un massimo di due ore e il
conteggio sarà compreso tra H0:00 e H2:00. Al termine delle 2 ore, sul display sarà visualizzata la
lettera ‘H’, che rimarrà visibile fino a quando la piastra calda non avrà raggiunto la temperatura
ambiente (approssimativamente 40 °C).
A questo punto il display si azzera. Premendo qualsiasi pulsante, si torna alla schermata iniziale di
accensione.
Si noti che la funzione di mantenimento al caldo può essere arrestata in qualsiasi momento
nell’arco delle 2 ore, tenendo premuto il pulsante ‘Accetta’
Dopo la cottura
Spegnere e scollegare l’alimentazione dell’apparecchio.
Importante: Verificare che la base si sia raffreddata prima di riporla nella casseruola.
I
.
„
per circa 2 secondi.
i
41
Page 42

SC461007MEE Rev1_Instruction Book 17/06/2014 17:11 Page 42
Pulizia e cura di Supreme Precision 3 in 1 Slow Cooker
• La casseruola e il coperchio sono lavabili in lavastoviglie. In alternativa, è possibile utilizzare acqua
calda con detergente per piatti e uno strofinaccio non abrasivo. Evitare l’utilizzo di detergenti o
detersivi abrasivi.
• Evitare di immergere la base dell’apparecchio in acqua o altri liquidi. Per la pulizia utilizzare un panno
umido e asciugare accuratamente.
• Verificare prima dell’uso che la base della casseruola e la superficie della piastra calda siano pulite,
prive di resti di cibo bruciati e asciutte. Pulire la base esterna della casseruola con una spugnetta
metallica se necessario, per asportare le macchie più resistenti.
• Evitare di riempire eccessivamente la casseruola quando si aggiungono ingredienti o liquidi. In caso
di trabocco che raggiunga la base, spegnere e scollegare dalla presa d’alimentazione, rimuovere la
casseruola e lasciare che il liquido coli via attraverso gli appositi fori. Pulire accuratamente il cibo o il
liquido in eccesso rimasto nell’incavo tra la piastra riscaldante e il riflettore metallico, strofinare con
un panno umido e asciugare accuratamente prima del prossimo utilizzo.
RICETTE
Stufato di manzo
6,5 l
Manzo (a dadini) 1 kg
Patate (a dadini) 700 g
Carote (affettate) 700 g
Porri tagliati a fettine 3 (grandi)
Cipolla (tritata) 2
Brodo di manzo 1,6 l
Gusti misti 3 cucchiaini
Sale e pepe nero macinato fresco
Utilizzando la funzione di rosolatura / scottatura, aggiungere prima alla casseruola 30 ml (2
cucchiaini) di olio per cottura.
Preparazione
• Utilizzare la funzione di rosolatura / scottatura per rosolare la carne e soffriggere le cipolle.
(Rosolare la carne in due riprese)
• Aggiungere gli altri ingredienti.
• Passare alla cottura lenta.
• Cuocere per il tempo massimo previsto dall’impostazione selezionata.
• Ispessire con una mescola di farina di grano e acqua.
• Aggiungere le polpette da 30 minuti a 1 ora prima di concludere la cottura.
Pollo con vino bianco
6,5 l
Petto di pollo 10
Burro 40 g
Cipolla (tritata) 2 (grandi)
Funghi (a fettine) 400 g
Vino bianco 5 cucchiai
Brodo di pollo 750 ml
Gusti misti 2 cucchiaini
Farina di granturco 5 cucchiai
Tuorli d’uovo 3
Panna densa 150 ml
Sale e pepe nero macinato fresco
Preparazione
• La funzione di rosolatura / scottatura non serve.
• Aggiungere tutti gli ingredienti (tranne farina, uovo e panna) nella casseruola e impostare la cottura
lenta.
• Ispessire con una mescola di farina di grano e acqua.
• Al termine della cottura, mescolare l’uovo e la panna con un po’ del liquido caldo e mescolare in
casseruola.
• In genere le ricette a base di pollo richiedono i tempi più brevi per ciascuna impostazione.
P. es. 8 ore 6 ore 3-4ore
Prosciutto bollito
6,5 l
Prosciutto 1,8 kg
Metodo
• La funzione di rosolatura / scottatura non serve.
• Mettere il prosciutto in casseruola e coprirlo con acqua bollente.
• Si può cucinare scegliendo il tempo di cottura minimo o massimo per ciascuna impostazione.
42
Page 43

SC461007MEE Rev1_Instruction Book 17/06/2014 17:11 Page 43
Zuppa di verdura
6,5 l
Verdure miste pelate e tritate 1,8 kg
Brodo vegetale 2 l
Gusti misti a piacere
Sale e pepe nero macinato fresco
Preparazione
• La funzione di rosolatura / scottatura non serve.
• Aggiungere tutti gli ingredienti contemporaneamente e cuocere per il tempo massimo previsto
dall’impostazione selezionata.
• Aggiungere liquido una volta raffreddato.
Manzo alla Nuova Inghilterra
6,5 l
Manzo, punta di petto 1,5 kg
Erbe aromatiche 1
Timo 2 cucchiaini
Pepe in grani 2 cucchiaini
Scalogno (pelato) 10
Carote (tritate) 550 g
Rutabraga (tritata) 300 g
Acqua, sufficiente a coprire il manzo
Utilizzando la funzione di rosolatura / scottatura, aggiungere prima alla casseruola 30 ml
(2 cucchiaini) di olio per cottura.
Preparazione
• Utilizzare la funzione di rosolatura / scottatura per rosolare il manzo su tutti i lati.
• Aggiungere gli altri ingredienti e cuocere per il tempo minimo previsto dall’impostazione selezionata.
• Ispessire il sugo di carne con di farina di grano.
Ragù alla bolognese
6,5 l
Carne di manzo tritata 1,5 kg
Cipolle (tritate) 3
Sedano (affettato) 6 gambi
Spicchi d’aglio (schiacciati) 3
Passata di pomodoro 7 cucchiai
Farina 3 cucchiai
Pomodori in scatola (tritati) 3 lattine
Brodo di manzo 600 ml
Funghi (a fettine) 300 g
Gusti misti 2 cucchiaini
Sale e pepe nero macinato fresco
Utilizzando la funzione di rosolatura / scottatura, aggiungere prima alla casseruola 30 ml (2
cucchiaini) di olio per cottura.
Metodo
• Utilizzare la funzione di rosolatura / scottatura per rosolare il trito di carne a più riprese.
• Aggiungere le cipolle, l’aglio e il sedano e soffriggere fino a quando tutti gli ingredienti saranno
morbidi.
• Passare alla cottura lenta.
• Mescolare la farina con la salsa e aggiungere col resto degli ingredienti.
• Mescolare bene.
• Si può selezionare il tempo di cottura più breve o più lungo di ciascuna impostazione.
Salsicce in tegame
6,5 l
Olio 1 cucchiaio
Salsicce 1,5 kg
Cipolle (tritate) 3 (grandi)
Carote (affettate) 5
Porri tagliati a fettine 3
Brodo di manzo 1,5 l
Chutney 6 cucchiai
Salsa Worcester 5 cucchiai
Sale e pepe nero macinato fresco
Utilizzando la funzione di rosolatura / scottatura, aggiungere prima alla casseruola 30 ml (2
cucchiaini) di olio per cottura.
Preparazione
• Utilizzare la funzione di rosolatura / scottatura per rosolare le salsicce in più turni.
• Aggiungere le verdure e soffriggere fino a quando tutti gli ingredienti saranno morbidi.
• Passare alla cottura lenta.
• Aggiungere gli altri ingredienti e cuocere per il tempo minimo previsto dall’impostazione selezionata.
Manzo al curry
6,5 l
Olio vegetale 4 cucchiai
Mele per cottura, sbucciate, ripulite del torsolo e tritate 3 medie
Cipolle (tritate) 3 (grandi)
Carne di manzo per stufato (a cubetti) 1,5 kg
Curry in polvere 5 cucchiaini
Brodo di manzo 1 l
Mango Chutney 5 cucchiai
Uva sultanina 150 g
Pomodori in scatola (tritati) 600 g
Succo di limone 3 cucchiai
Farina di granturco 5 cucchiai
Sale e pepe nero macinato fresco
Utilizzando la funzione di rosolatura / scottatura, aggiungere prima alla casseruola 30 ml (2
cucchiaini) di olio per cottura.
Preparazione
• Utilizzare la funzione di rosolatura / scottatura per rosolare la carne, un poco per volta.
• Aggiungere le cipolle e soffriggere fino a quando tutti gli ingredienti saranno morbidi.
• Passare alla cottura lenta
• Aggiungere gli altri ingredienti e mescolare.
• Mescolare la farina con la salsa e aggiungere con il resto degli ingredienti.
• Mescolare bene.
• Si può selezionare il tempo di cottura minimo o massimo di ciascuna impostazione.
i
43
Page 44

SC461007MEE Rev1_Instruction Book 17/06/2014 17:11 Page 44
Curry di manzo alla tailandese
6,5 l
Burro 60 g
Carne di manzo per stufato (a cubetti) 1 kg
Cipolla (tritata) 2
Spicchi d’aglio (schiacciati) 4
Burro di arachidi 6 cucchiai
Latte di cocco 800 g
Patate (tagliate in quattro) 700 g
Curry in polvere 4 cucchiai
Salsa Thai fish 4 cucchiai
Zucchero di canna raffinato 4 cucchiai
Brodo di manzo 1 l
Preparazione
• Sciogliere il burro in casseruola con la funzione di rosolatura / scottatura, aggiungere la carne, l’aglio
e le cipolle e soffriggere. (Soffriggere la carne in due riprese nel caso di 6,5 l).
• Aggiungere le cipolle e l’aglio e soffriggere fino a quando tutti gli ingredienti saranno morbidi.
• Aggiungere gli altri ingredienti e mescolare.
• Passare alla cottura lenta.
• Ottimale se preparato con la cottura lenta
Costine alla griglia
6,5 l
Costine 1,5 kg
Salsa barbeque 300 ml
Preparazione
• Marinare le costine nella salsa per un paio d’ore o per tutta la notte.
• Mette in casseruola e cuocere per il tempo previsto.
• Maggiore è il tempo di cottura, tanto più tenera sarà la carne.
Budino spugnoso allo sciroppo
6,5 l
Burro 125 g
Melassa 4 cucchiai
Zucchero semolato 100 g
Uova 2
Farina autolievitante 200 g
Latte 2 cucchiai
Succo di limone 2 cucchiai
Budino di riso
6,5 l
Burro 60 g
Riso per dessert 250 g
Zucchero 250 g
Latte 2 l
Noce moscata 1 cucchiaino
Preparazione
• Ungere leggermente la casseruola con burro.
• Aggiungere gli altri ingredienti in casseruola e mescolare.
• Per un risultato ottimale, selezionare la cottura lenta (8 - 10 ore).
Torta al cioccolato
6,5 l
Cacao 50 g
Acqua bollente 6 cucchiai
Lievito in polvere 1 cucchiaino
Farina autolievitante 175 g
Zucchero semolato 150 g
Olio 150 ml
Uova 3
Preparazione
• Ricoprire il fondo di uno stampo per torte da 18 cm con carta da forno.
• Mescolare il cacao con l’acqua bollente fino ad ottenere un impasto.
• Mescolare la farina, il lievito in polvere e lo zucchero in una ciotola.
• Sbattere insieme le uova e l’olio e aggiungere alla mescola unitamente all’impasto di cioccolato,
mescolare bene.
• Versare nello stampo e coprire con carta stagnola. Legare con corda facendo una maniglia. Mettere
nella casseruola di cottura lenta e riempire a metà con acqua bollente.
• La cottura ottimale si ottiene con l’impostazione di stufatura rapida per 1 ora e 45 minuti.
Ciabatta ai frutti di bosco
6,5 l
Frutta e bacche fresche (lamponi, more, mirtilli ecc.) 1,2 kg
Zucchero 150 g
Farina autolievitante 200 g
Strutto 100 g
Sale pizzico
Scorza di limone 2 limoni
Latte 6-8 cucchiai
Preparazione
• Imburrare l’interno di una teglia per dolci da 1,25 l e coprire il fondo con carta da forno.
• Versare lo sciroppo sul fondo della teglia.
• Amalgamare il burro e lo zucchero fino a ottenere un amalgama uniforme e cremoso.
• Aggiungere gradatamente le uova e la farina e aggiungere latte e succo. Con un cucchiaio,
distribuire la mescola sulla superficie dello sciroppo e coprire con carta da forno pieghettata. Legare
con corda facendo una maniglia.
• Disporre nel Supreme Precision 3 in 1 Slow Cooker e riempire a metà con acqua bollente.
• La cottura ottimale si ottiene con l’impostazione di stufatura rapida per 1 ora e 45 minuti.
44
Preparazione
• Mettere la frutta nel Supreme Precision 3 in 1 Slow Cooker e mescolare con metà dello zucchero.
• Mescolare il resto dello zucchero con la farina, lo strutto e la scorza di limone.
• Aggiungere il latte per creare un impasto, da non maneggiare eccessivamente.
• Disporre polpettine di impasto al centro della casseruola sopra la frutta. Le polpette di impasto non
devono toccare le pareti della casseruola, poiché aumenteranno di volume durante la cottura.
• Cuocere per il tempo massimo previsto dall’impostazione selezionata.
Servizio di assistenza telefonica
Se si verificano problemi con l’apparecchio, chiamare il nostro servizio di assistenza.
Potremo essere di maggiore aiuto rispetto al negozio presso il quale l’apparecchio è stato
acquistato.
Tenere pronte le seguenti informazioni per consentire al nostro personale di fornire il supporto
più rapidamente.
• Nome del prodotto.
• Numero del modello, riportato sulla base dell’elettrodomestico.
• Numero di serie riportato sulla base dell’elettrodomestico.
Sito internet
È inoltre possibile contattarci attraverso il nostro sito internet o visitare il sito per cercare e
acquistare un apparecchio, pezzi di ricambio ed accessori della vasta gamma Morphy Richards.
Page 45

SC461007MEE Rev1_Instruction Book 17/06/2014 17:11 Page 45
q
Sundhed og sikkerhed
Brug af alt elektrisk udstyr kræver du følger disse regler for sund fornuft.
Læs vejledningen grundigt, inden du tager produktet i brug.
• Apparatet kan bruges af børn fra 8 år og personer med fysiske, følelses- eller mentale
handicaps eller manglende erfaring og viden, hvis de får tilsyn og vejledning i brug af
apparatet på en sikker måde og forstår risikoen det indebærer.
• Børn må ikke lege med apparatet.
• Rengøring og vedligeholdelse må ikke udføres af et barn, medmindre det er over 8 år og der
er tilsyn.
• Hold apparatet og ledningen ude af rækkevidde for børn under 8 år.
• Apparatet er tiltænkt privat brug og tilsvarende såsom: landbrugssteder, af gæster på et
hotel, motel og tilsvarende samt bed- og breakfast-steder.
Det er ikke egnet til personalekøkkener i butikker, kontorer og andre arbejdsområder.
Beliggenhed
• Hold altid apparatet væk fra kanten af overfladen.
• Sørg for apparatet bruges på en fast, flad og varmeafvisende overflade.
• Må ikke anvendes udendørs eller i nærheden af vand.
Netledning
• Netledningen skal kunne nå fra stikket til apparatet uden at stramme forbindelsen.
• Lad ikke netledningen hænge ud over overfladens kant eller et åbent sted, hvor et barn vil kunne nå
den.
• Lad ikke ledningen løbe på tværs af et komfurt eller varmt sted, der kan beskadige ledningen.
• Hvis strømledningen beskadiges, skal den udskiftes af producenten, serviceagenten eller tilsvarende
kvalificeret person
Personalets sikkerhed
• ADVARSEL: Rør ikke toppen af apparatet eller andre varme dele under eller efter brug, anvend
håndtag eller knapper.
• For at beskytte mod risikoen for elektrisk stød må apparatet ikke placeres i vand eller anden væske.
• Varme overflader må ikke berøres. Brug ovnhandsker eller et stykke stof, når du fjerner låget eller
håndterer varme beholdere.
• Vær yderst forsigtig, når du flytter apparatet med varm mad, vand eller andre varme væsker.
Andre sikkerhedsovervejelser
• Tænd ikke for kogeren, hvis den keramiske skål er tom.
• Lad låget og den keramiske skål køle af før nedsænkning i vand.
• Kog aldrig i basisenheden. Brug den keramiske skål.
• Brug ikke den keramiske skål eller låget, hvis det er revnet eller skåret.
• Tænd ikke for apparatet, når det er vendt på hovedet eller ligger på siden.
• Glaslåg og keramisk skål er skrøbelige. Håndter dem med forsigtighed.
• Brug af tilbehør eller værktøj, der ikke er anbefalet eller solgt af Morphy Richards, kan forårsage
brand, elektrisk stød eller personskade.
• Riskogeren må ikke placeres på eller i nærheden af en varm gas- eller elektrisk kogeplade eller i en
varm ovn.
• Du skal altid trække grydens stik ud af stikkontakten, før du monterer eller afmonterer tilbehør og før
rengøring.
• Apparatet er ikke beregnet til betjening af en ekstern timer eller et separat fjernbetjeningssystem.
Elektriske krav
Kontroller, at enhedens typeskilt viser en spænding, der svarer til husholdningens (vekselstrøm). Hvis
sikringen i stikket skal udskiftes, skal den udskiftes med en 3 A BS1362-sikring.
ADVARSEL: Denne enhed skal jordforbindes.
i
q
45
Page 46

SC461007MEE Rev1_Instruction Book 17/06/2014 17:11 Page 46
Nem opstillingsvejledning
Læs også hovedvejledningen, som indeholder vigtige
sikkerhedsoplysninger og flere oplysninger om, hvordan du bruger
Supreme Precision 3 in 1 Slow Cooker.
Denne vejledning fortæller, hvordan du bruger Supreme Precision 3 in 1 Slow Cooker til at
lukke/brune 1 kg kød, og derefter bruger programmet 1:30 times stuvning eller 8 timers
langsom stegning. For alle andre programmer gælder det, at du skal læse den fulde
vejledning.
Sådan anvendes lukke-/brunefunktionen
1
2
Anbring gryden ‹på basisenheden fi, og sæt Supreme Precision 3 in 1 Slow
Cooker i.
‰
Displayet viser standardskærmen (venstre). Ikonet til lukke/brune
tidsvisningen
Kom en passende mængde olie i gryden til den mængde kød, som du vil lukke.
Tryk på “Acceptér”-knappen „. Supreme Precision 3 in 1 Slow Cooker bipper i
ca. 2 sekunder, og displayet holder op med at blinke. Gryden begynder derefter at
varme op og timeren
den rigtige temperatur til at lukke/brune kødet (dvs., når timeren viser 00:10)
‚
blinker.
‚
begynder at tælle ned. Olien er ca. 5 minutter om at nå
og
Kom kødet i gryden, og rør jævnligt, indtil den udvendige side af kødet er
lukket/brunet. Når timeren viser nul, bipper basisenheden, og tilberedningen
stopper. Hvis kødet lukkes, før de 15 minutter er gået, skal du holde “Acceptér”-
„
3
46
knappen
stopper. Hvis du skal fortsætte, skal du gentage processen fra trin 2 ovenfor.
nede i ca. 3 sekunder. Basisenheden bipper, og tilberedningen
Page 47

SC461007MEE Rev1_Instruction Book 17/06/2014 17:11 Page 47
Sådan anvendes 1:30 stuvningsfunktionen
Når lukningen/bruningen er færdig, kan du komme de resterende ingredienser i
(som i opskriften). Tryk på “Funktion/timer”-knappen
skærmbillede vises (venstre) Tryk på “Acceptér”-knappen
4
basisenheden bipper i ca. 2 sekunder, før tilberedningen starter. Sæt låget på, når
du bruger Supreme Precision 3 in 1 Slow Cooker ved denne indstilling. Se punkt 6
angående nedtællingstimer for at holde maden varm.
ELLER for at bruge den langsomme stegefunktion
Når lukningen/bruningen er færdig, kan du komme de resterende ingredienser i
(som i opskriften). Tryk på “Funktion/timer”-knappen
skærmbillede vises (venstre) Tryk på “Acceptér”-knappen
5
basisenheden bipper i ca. 2 sekunder, før tilberedningen starter. Sæt låget på, når
du bruger Supreme Precision 3 in 1 Slow Cooker ved denne indstilling. Se punkt 6
angående nedtællingstimer for at holde maden varm.
·
én gang, og følgende
„
to gange, hvorefter
·
to gange, og følgende
„
to gange, hvorefter
q
Nedtællingstimer og holde varm-funktionen
6
Til slut i tilberedningen bipper produktet og skifter automatisk til holde varmfunktionen. Holde varm-funktionen kan vare i op til to timer og tæller op fra H0:00
til H2:00. Når de 2 timer er gået, viser displayet “H”, der forbliver på
skærmbilledet, indtil den varme plade når den omgivende temperatur (ca. 40 °C).
Skærmen bliver derefter blank.
Ved at trykke på en knap kommer du tilbage til det skærmbillede, hvor du var, da
du først tændte den.
47
Page 48
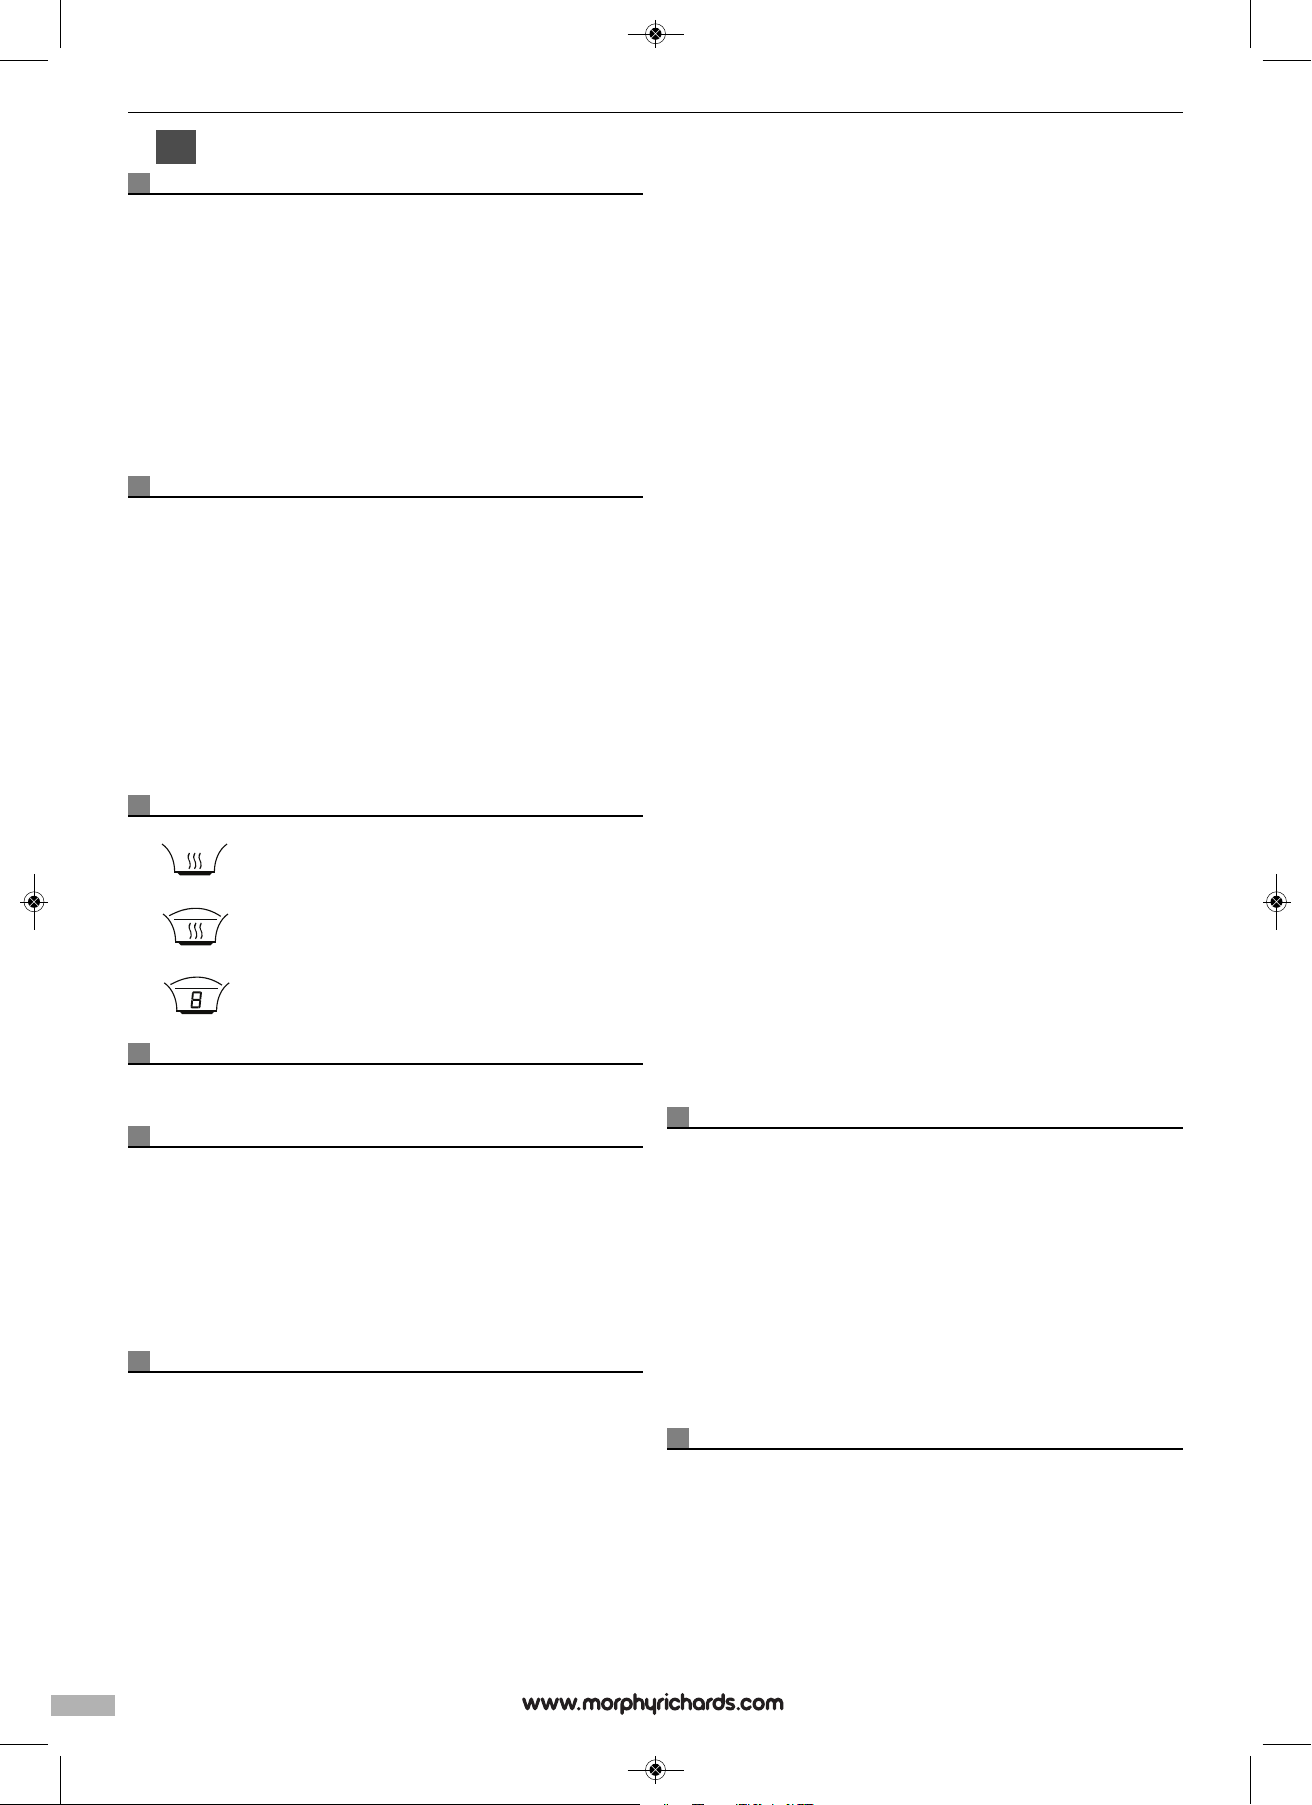
SC461007MEE Rev1_Instruction Book 17/06/2014 17:11 Page 48
q
Få mest ud af apparatet…
Sikkerhed
Rør aldrig ved den udvendige side af den langsomme stegegryde under brug, eller før den er
kølet ned. Brug ovnhandsker, når du flytter låget eller stegegryden i rustfrit stål.
Effektivitet
Fjernelse af låget giver værdifuld varme mulighed for at komme ud, så den langsomme
stegegrydes effektivitet reduceres, og tilberedningstiden forlænges. Prøv ikke at fjerne låget
mere end 3 eller 4 gange for at omrøre ingredienserne.
Glæd dig over fordelene
Langsom tilberedning giver praktisk, alsidig og smagfuld mad. Længere stegetider giver bedre
fordeling af smagsstofferne, så de har tid til at blande sig med og krydre maden. En langsom
stegegryde opvarmer maden skånsomt og er fremragende til tilberedning af kød, specielt
billigere udskæringer, f.eks. bankekød, som bliver mørt ved denne lange tilberedningstid. Husk,
at der ingen grænser er for de mulige anvendelser af din langsomme stegegryde, kun fantasien!
Funktioner
⁄
Glaslåg
¤
Dampventil
‹
Stege-/serveringsgryde i rustfrit stål (enten 4,5 l eller 6,5 l, afhængigt af model)
›
Varmelegeme
fi
Basisenhed
fl
Kontrol-/displaypanel (se forstørret diagram)
‡
Aftømningshul x2 (nedenunder)
·
Funktions-/timerknap
‚
Tidsvisning
„
Acceptér-knap
‰
Lukke/brune-ikonet og stuvning-ikonet
Â
Langsom stegning-ikonet
Symbol
Lukke-/brune-ikon
Stuvning-ikon
Langsom stegning-ikonet
Tilberedningskapacitet
• Den 6,5 l Supreme Precision 3 in 1 Slow Cooker har en maksimal brugskapacitet på 5 l.
• Kapaciteten findes på typemærket, der er anbragt nedenunder produktet.
Før Supreme Precision 3 in 1 Slow Cooker bruges for første gang
Fjern alle mærkater og mærker fra produktet.
Vask gryden og låget i rustfrit stål i varmt sæbevand med en svamp eller et viskestykke. Brug
IKKE en skuresvamp eller andet slibende materiale, så dette vil sætte mærker i det rustfrie stål.
Skyl gryden og låget grundigt, og tør det.
VIGTIGT: DYB ALDRIG SUPREME PRECISION 3 IN 1 SLOW COOKER’S BASISENHED I VAND
Bemærk:
Ved den første ibrugtagning oplever du muligvis en svag lugt på grund af afbrænding af rester
fra fremstillingen. Det er helt normalt, og har ikke indflydelse på den mad, der tilberedes, og
forsvinder efter nogle få anvendelser.
Råd og tip til Supreme Precision 3 in 1 Slow Cooker
• Alle ingredienser bør have stuetemperatur, før de tilsættes. Hvis de er afkølede, skal de have
stuetemperatur, da kolde fødevarer påvirker tilberedningstiden.
• Kød kan bruges afkølet fra køleskabet, men ikke frosset kød. Anvend bruningsfunktionen til at lukke
kødet.
• Sørg for, at alle frosne ingredienser er helt tøet op, før de anvendes.
• Hvis du bruger kold fond i opskriften til langsom stegning (f.eks. vin), skal du på forhånd opvarme
ingredienserne. Begynd med bruningsfunktionen først, og tilsæt alle ingredienserne. Når der er gået
15 minutter, skal du fortsætte med funktionen til langsom stegning.
• Ved langsom stegning på almindelige komfurplader tilrådes det at dække kødet med mel inden
bruningen. Det er ikke nødvendigt at gøre dette i Supreme Precision 3 in 1 Slow Cooker. Brun/luk
kødet som angivet. Hvis væsken skal tyknes, kan du tilsætte majsmel/sovsejævning udrørt i koldt
vand, når der er 30 minutter tilbage af tilberedningstiden.
• Hvis du bruger kød med ben (f.eks. kyllingelår, ribben osv.), kan den langsomme stegning få kødet til
at falde af benene - dette er normalt, og giver en kraftigere smag. Men vær opmærksom på små
ben, der kunne være i væsken.
• Overfyld ikke gryden, da opskrifterne i denne vejledning er fremstillet til maksimal kapacitet og giver
mulighed for plads over fødevaren for endnu bedre stegning. Kapaciteten findes på typemærket, der
er anbragt nedenunder produktet. Hvis du bruger dine egne opskrifter, skal du ikke fylde over
håndtagsnitten, som ses på den indvendige side af gryden.
• Låget bliver meget varmt i brug, især glasvinduet og kanten af det rustfrie stål. Det er muligt at løfte
låget med de siliciumisolerede håndtag, der forbliver kolde. Det tilrådes imidlertid at tage sine
forholdsregler ved at bruge ovnhandsker til dette.
• Ingredienserne bør fordeles ligeligt i gryden. Imidlertid er det bedre at anbringe rodfrugter i den
nederste del af skålen i begyndelsen af tilberedningen. Alle ingredienserne bør være dækket af
væsken.
• Rodfrugterne bør skæres i stykker (i tern på ca. 20 mm) for at sikre en jævn tilberedning.
• Hvis gryden koger over, vil det normalt være fordi den er overfyldt, så fjern nogle af ingredienserne
og/eller noget af væsken.
• Sejt kød, som stuvning, kræver almindeligvis længere stegetid, hvilket er ideelt ved langsom
stegning. Ved brug af stuvningsfunktionen kræves en bedre kvalitets afskæring, for at den passer til
1:30-1:45 stegetiden.–
• Kylling og kvalitets afskæringer af kød kræver mindre stegetid. Du bør derfor bruge den lavere værdi
for tidsintervallet - f.eks. for niveau 1 brug 8 timer.–
• Melboller skal ved stuvningen have 30-45 minutter længere i slutningen af tilberedningstiden. Du kan
placere disse på overfladen, og det er ikke nødvendigt at dykke dem ned i væsken.
• Skinkesteg bør forblive i plastikemballagen, hvis den medfølger. Hvis ikke, skal du bruge en
passende plastikpose, der er modstandsdygtig overfor varme, eller binde stegen med kødsnor for at
forhindre, at skinken falder fra hinanden under tilberedningen.
• Hvis du bruger stuvningsindstillingen, skal den tilberedte mad hvile i 10 minutter i gryden, inden den
serveres. Herved får det varme (kogende) mad lov til at køle af, før det skal spises.
• Når du er blevet ekspert i brugen af Supreme Precision 3 in 1 Slow Cooker, kan du begynde at
kreere dine egne opskrifter, men det tilrådes at følge en eksisterende opskrift som vejledning. Hvis
der anvendes ingredienser, såsom pasta, mælk, fløde, fisk og skaldyr i en opskrift, bør disse have
30 minutter længere i slutningen af tilberedningen, end de andre ingredienser. Det gælder ikke for
kokosmælk og opskrift på risengrød.
• Efterlad ikke rå, ikke færdiglavet mad i gryden i længere tid. Begynd stegningen så hurtigt som
muligt. Hvis du skal udskyde tilberedningen, skal fødevaren opbevares i et køleskab, og når du er
klar, skal den igen tilbage til rumtemperatur.
• Hvis en færdiglavet ret er blevet kold, kan du sætte stuvningsindstillingen på 1:30 timer for at varme
maden op igen. Afhængigt at opskriften kan det tage 30-45 minutter at varme maden op igen. Sørg
for, at maden er varm før serveringen.
• Hvis du kun tilbereder halve portioner, kan tilberedningstiden normalt nedsættes til to tredjedele.
Kontroller, at maden er grundigt tilberedt før serveringen.
• Bruges eksisterende opskrifter fra almindelige kogebøger i en langsom stegegryde, skal den
anvendte væske reduceres, da væske ikke fordamper i samme grad.
• Brug kogende vand til fond.
• Start med at dække med kogende vand eller fond, når der tilberedes kødstykker. Dette kan
reduceres ved slutningen af tilberedningstiden.
• Ikke færdiglavede røde kidney-bønner skal opblødes og koges i mindst 10 minutter for at fjerne
toksiner, før de anvendes i Supreme Precision 3 in 1 Slow Cooker.
• Tilsætning af olie skal ske efter bruningen.
• Hvis der anvendes fond eller sovser fra glas eller dåser, skal disse først varmes op i en mikroovn og
derefter kommes i gryden. Alternativt skal der lægges 30 minutter til tilberedningstiden.
A
Ordforklaringer
Bruning/lukning:
Før stuvning eller langsom tilberedning af kød er det vigtigt, at kødet lukkes/brunes først. Det
betyder, at kødet skal steges let på overfladen i varm olie før stuvningen eller den langsomme
stegning (kødet bør fortsat være råt i midten). Lukning/bruning af kødet på denne måde hjælper
med at bevare smagen og saftigheden.
Stuvning:
For så vidt angår Supreme Precision 3 in 1 Slow Cooker betyder stuvning at tilberede maden
og/eller grøntsagerne i en væske (f.eks. fond, vand) mellem 1 time og 30 minutter og 1 time og
45 minutter.
Langsom tilberedning:
Langsom tilberedning er en måde at stege maden på i længere tid (normalt mellem 4 og 10
timer) i en væske (f.eks. vin, fond, vand). Som navnet siger, så færdiglaves mad langsommere og
mere forsigtigt, hvilket ofte betyder, at kødet bliver mere mørt. Kød med et højere fedtindhold
passer godt til langsom tilberedning, da fedtet smelter og derved bliver kødet meget mørt.
Brugsvejledning
Anbring basisenheden fipå et tørt, vandret og varmebestandigt underlag og væk fra kanten af
arbejdsområdet. Brug den ikke på gulvet.
Bemærk:
Hvis produktet er slukket og ikke i brug, skifter timervisningslyset til standby-tilstand efter 30
sekunder.
48
Page 49

SC461007MEE Rev1_Instruction Book 17/06/2014 17:11 Page 49
Lukning med Supreme Precision 3 in 1 Slow Cooker/bruningsfunktion
Anbring gryden ‹på basisenheden fi, og sæt stikket til Supreme Precision 3 in 1 Slow
Cooker i.
fl
Displayet
Tidsvisningen
olie i gryden til den mængde kød, som du vil lukke.
Se opskrifter i denne vejledning.
Vi anbefaler, at ca. to spsk. vegetabilsk olie er passende til at lukke mellem 800 g-1200 g kød.
Det kan dog variere afhængigt af personlig smag og mængden af fedt i det kød, der lukkes.
Tryk på”Acceptér”-knappen
Slow Cooker bipper i ca. 2 sekunder, og displayet holder op med at blinke. Gryden begynder
derefter at varme op og timeren
nå den rigtige temperatur til lukning/bruning af kødet (dvs. når timeren viser 00:10). En god
måde at prøve om olien er varm nok er at komme et lille stykke kød eller løg i gryden. Hvis det
syder, når det rammer olien, er temperaturen tilpas til lukning/bruning. Hvis det ikke syder, skal
gryden varme op i endnu nogle minutter, og derefter kan det prøves igen.
Kom kødet i gryden og rør jævnligt, indtil den udvendige side af kødet er lukket/brunet. Når
timeren viser nul, bipper basisenheden, og tilberedningen stopper. Hvis kødet lukkes, før timeren
når nul, skal du holde “Acceptér”-knappen
tilberedningen stopper og skærmbilledet vender tilbage til standardvisningen
Hvis kødet skal lukkes et par minutter længere, efter timeren er nået til nul, skal du blot trykke
på “Acceptér”-knappen for at starte lukke-/bruningsfunktionen igen. Som forklaret ovenfor skal
du holde “Acceptér”-knappen
timeren når nul.
På grund af den høje temperatur, som Supreme Precision 3 in 1 Slow Cooker kan få i
lukke/bruningstilstanden, bør det kun ske i maks. to gange 15 minutters programmer hurtigt
efter hinanden. Hvis du prøver at vælge programmet en tredje gang, og enheden er varm, vises
følgende skærmbillede —:— og “lukke-/brune-ikonet
Funktionen kan ikke vælges igen, før produktet er kølet tilstrækkeligt ned. Dette bør imidlertid
ikke give problemer, da det altid bør være muligt at lukke/brune den ønskede mængde kød i 30
minutter (2 x 15).
Bemærk:
Start ikke “luknings-/bruningsfunktionen”, uden at gryden
da dette kan få produktet til at overophede. Du bør heller ikke starte “luknings/bruningsfunktionen” uden at komme olie i gryden.
viser standardskærmbilledet B.
‚
og lukningsfunktion-ikonet ‰blinker begge to. Kom en passende mængde
„
igen for at vælge lukkefunktionen. Supreme Precision 3 in 1
‚
begynder at tælle ned. Det tager ca. 5 minutter for olien at
„
nede i ca. 3 sekunder. Basisenheden bipper,
„
nede i ca. 3 sekunder for at annullere lukkefunktionen, før
‰
blinker C.
‹
er placeret på basisenheden fi,
B
.
Lukke/bruning på gas- eller elkomfur i Supreme Precision 3 in 1
Slow Cooker Pan
Hvis du foretrækker det, kan du bruge Supreme Precision 3 in 1 Slow Cooker-gryden på gaseller el-komfuret til at lukke/brune kødet på.
Tilsæt olien, som ovenfor nævnt, og anbring gryden på komfuret. Olien kan varmes op lidt
hurtigere på komfuret, så brug lidt mindre kød/løg, som forklaret tidligere, for at kontrollere
temperaturen.
Tip til lukning/bruning af kød
Ved lukning af større mængder kød foreslår vi, at du deler kødet i mindre stykker for at gøre
arbejdet nemmere. Da der hele tiden skal røres i kødet, er det nemmere at håndtere mindre
mængder kød.
Stuvningsfunktion
Anbring gryden ‹på basisenheden fi. Kom dine ingredienser i gryden i henhold til den
opskrift, du følger. Uanset om du har brugt “lukke-/brunefunktionen” eller tændt for Supreme
Precision 3 in 1 Slow Cooker, viser skærmbilledet standarden
·
Tryk på “Funktion/timer”-knappen
‚
Tidsvisningen
vælge “stuvningsfunktionen”. Stuvning-ikonet
(Bemærk, at hvis du ved en fejltagelse har valgt stuvningsfunktionen, kan du vende tilbage til det
tidligere skærmbillede ved at holde “Acceptér”-knappen
Du kan derefter vælge enten 1 time 30 minutter- eller 1 time 45 minutter-programmet (afhængigt
af, hvilken opskrift du følger). Hvis du vælger 1 time 30 minutter-programmet, skal du trykke på
“Acceptér/start/stop”-knappen
trykke på “Funktion/timer”-knappen
på “Acceptér”-knappen
Tidsvisningen holder derefter op med at blinke, og basisenheden bipper i ca. 2 sekunder, før
tilberedningen starter. Derefter tæller timeren ned til nul.
Hvis der er behov for mere tilberedningstid, kan du gentage stuvningsindstillingen. Du skal dog
finde ud af, hvor meget ekstra tilberedningstid, der er brug for.
Hvis du af en eller anden grund skal annullere tilberedningsprocessen, før timeren er nået til nul,
skal du holde “Acceptér”-knappen
tilberedningen stopper og skærmbilledet vender tilbage til standardvisningen
Under stuvningsfunktionen forsvinder dampen ud af dampventilen. Sørg for, at ventilen er
anbragt bagpå produktet.
ADVARSEL: Dampen og ventilen bliver varme.
Til slut i tilberedningen bipper Supreme Precision 3 in 1 Slow Cooker og skifter automatisk til holde
varm-funktionen.
og stuvning-ikonet ‰blinker begge to. Tryk på “Acceptér”-knappen „for at
„
en gang, og visning ændres til E.
‰
holder op med at blinke.
„
. Hvis du vælger 1 time 45 minutter-programmet, skal du
·
.
. Timervisningen ‚ændres derefter til at vise 01:45. Tryk
„
nede i ca. 3 sekunder. Basisenheden bipper,
D
.
·
nede i ca. 2 sekunder).
B
.
Langsom stegefunktion
Anbring gryden ‹på basisenheden fi. Kom dine ingredienser i gryden i henhold til den
opskrift, du følger. Uanset om du har brugt “lukke-/brunefunktionen” eller kun tændt for
Supreme Precision 3 in 1 Slow Cooker, skal visningsskærmbilledet være standarden ét som
F
nedenfor
Tryk på “Funktion/timer”-knappen
Tidsvisningen
programmer til langsom stegning - 1, 2 og 3. Forskellen er den tid, som hvert program kan
indstilles til.– Med hvert program til langsom stegning kan du vælge en stegetid med 30
minutters interval mellem den største og mindste stegetid. Ved den lave indstilling kan du fx
vælge en stegetid på 9 1/2 time. Holde-varm-funktionen er udover denne tidsindstilling.
Hvert program har forskellige ikoner som nedenfor.
Hvis du vil bruge langsom stegning, program 1, så tryk på ‘Acceptér’
langsom stegning skal vare. Ved at trykke på “Funktion/timer”-knappen
gennem de tilgængelige tider. Når den ønskede tid vises, skal du trykke på “Acceptér”-knappen
„
tilberedningen starter. Derefter tæller timeren ned til nul.
Tidsvisningen holder derefter op med at blinke, og basisenheden bipper i ca. 2 sekunder, før
tilberedningen starter. Derefter tæller timeren ned til nul.
Hvis du vil bruge programmet til langsom stegning 2, skal du trykke på “Funktion/timer-knappen
·
stegetiden som ovenfor.
Hvis du vil bruge programmet til langsom stegning 3, skal du trykke på “Funktion/timer-knappen
·
stegetiden som ovenfor.
Tidsvisningen holder derefter op med at blinke, og basisenheden bipper i ca. 2 sekunder, før
tilberedningen starter, og timeren tæller derefter ned til nul.
Når du trykker på “Acceptér”-knappen
og kun tidsvisningen blinker. (Bemærk, at hvis du ved en fejltagelse har valgt langsom stegning,
kan du vende tilbage til det tidligere skærmbillede ved at holde “Acceptér”-knappen
ca. 2 sekunder).
Hvis du af en eller anden grund skal annullere tilberedningsprocessen, før timeren er nået til nul,
skal du holde “Acceptér”-knappen
stopper, og skærmbilledet vender tilbage til standardvisningen
.
·
to gange, og visning ændres til G.
‚
og langsom stegning-ikonet Âblinker begge to. Der findes tre forskellige
Mellem 8 og 10 timer (lav)
Mellem 6 og 8 timer (mellem)
Mellem 4 og 6 timer (høj)
„
og vælg hvor længe
·
, kan du bevæge dig
. Tidsvisningen holder derefter op med at blinke, og basisenheden bipper i ca. 2 sekunder, før
en gang (langsom stegning-ikon 2 vises), før du trykker på “Acceptér”-knappen „. Vælg
to gange (langsom stegning-ikon 3 vises), før du trykker på “Acceptér”-knappen „. Vælg
„
, stopper langsom stegning-ikonet Âmed at blinke,
·
nede i
„
nede i ca. 3 sekunder. Basisenheden bipper, kogningen
H
.
Hold varm
Til slut i tilberedningen bipper produktet og skifter automatisk til holde varm-funktionen. Holde
varm-funktionen varer i op til to timer og tæller op fra H0:00 til H2:00. Når de 2 timer er gået,
bipper basisenheden, og displayet viser H, der forbliver på skærmbilledet, indtil den varme plade
når den omgivende temperatur (ca. 40 °C)
Skærmen bliver derefter blank. Ved at trykke på en knap kommer du tilbage til det skærmbillede,
hvor du var, da du først tændte den.
Bemærk, at holde varm-funktionen når som helst kan stoppes under den 2 timer lange periode
ved at holde “Acceptér”-knappen
Efter tilberedning
Sluk ved hovedafbryderen, og træk stikket ud af enheden.
Vigtigt: Kontroller, at basisenheden er kold, før gryden sættes væk.
I
.
„
nede i ca. 2 sekunder.
Rengøring og vedligeholdelse af din Supreme Precision 3 in 1
Slow Cooker
• Gryden og låget kan komme i opvaskemaskinen. Alternativt kan du bruge varmt sæbevand med en
ikke-slibende skuresvamp. Brug ikke skuremidler eller rengøringsmidler.
• Sænk ikke basisenheden ned i vand eller anden væske. Brug en fugtig klud, og aftør grundigt for at
rengøre den.
• Kontroller, at basisenheden til gryden/bunden og overfladen på den varme plade er fri for fastbrændt
mad, og tør før brug. Grydens fod skal rengøres udvendig med en metalskuresvamp, hvis det er
nødvendigt for at fjerne vanskelige pletter.
• Når du kommer ingredienser og væske i skålen, skal du undgå at overfylde den. Hvis væske flyder
over og løber ned i basisenheden, skal du slukke for den og tage stikket ud, fjerne gryden og lade
væsken løbe ud gennem afløbshullerne. For helt at fjerne overskydende mad eller væske, der kan
have sat sig fast i fordybningen mellem varmepladen og metalreflektoren, skal basisenheden
aftørres med en fugtig klud og tørre grundigt, før næste brug.
q
49
Page 50

SC461007MEE Rev1_Instruction Book 17/06/2014 17:11 Page 50
OPSKRIFTER
Bankekød
6,5 l
Oksekød, skåret i tern 1kg
Kartofler, skåret i tern 700g
Gulerødder, skåret i skiver 700g
Porrer, skåret i skiver 3 store
Løg, hakket 2
Oksekødfond 1,5 l
Blandede krydderurter 3 tsk.
Salt og friskkværnet sort peber
Ved brug af brunings-/lukkefunktionen, skal der altid kommes 30 ml (2 spsk.) madolie i gryden
først.
Fremgangsmåde
• Brug brunings-/lukkefunktionen til at brune kødet og stege løgene.
(Steg kød ad to gangen)
• Bland resten af ingredienserne i.
• Skift til langsom stegning-indstilling.
• Steg i den længste tid for indstillingen.
• Jævn den med majsmel/sovsejævningsblanding.
• Tilsæt melboller 30 minutter til 1 time før slutningen af tilberedningstiden.
Kylling og hvidvin
6,5 l
Kyllingebryster 10
Smør 40g
Løg, hakket 2 store
Svampe, skåret i skiver 400g
Hvidvin 5 spsk.
Kyllingefond 750ml
Blandede krydderurter 2 tsk.
Majsmel 5 spsk.
Æggeblommer 3
Piskefløde 150ml
Salt og friskkværnet sort peber
Fremgangsmåde
• Der er ikke behov for brunings-/lukkefunktionen.
• Kom alle ingredienserne i gryden, undtagen mel, æg og fløde, og indstil til langsom stegning.
• Jævn den med majsmel/sovsejævningsblanding.
• Når maden er færdig, blandes æg og fløde sammen med lidt af den varme væske i skålen.
• I opskrifter med kylling er tilberedningstiden normalt kortere for hver indstilling.
Dvs. 8 timer 6 timer 3-4 timer
Kogt skinke
6,5 l
Yderlår 1,8kg
Fremgangsmåde
• Der er ikke behov for brunings-/lukkefunktionen.
• Anbring yderlåret i gryden, og dæk det med kogende vand.
• Kan færdiglaves i mindste eller længste tid for hver indstilling.
Grøntsagssuppe
6,5 l
Grøntsagsvalg af skrællet eller snittet 1,8kg
Grøntsagsfond 2 l
Blandede krydderurter efter smag
Salt og friskkværnet sort peber
Fremgangsmåde
• Der er ikke behov for brunings-/lukkefunktionen.
• Kom alle ingredienserne i på en gang, og tilbered i den længste tid for indstillingen.
• Bliver flydende ved afkøling.
New England bøf
6,5 l
Et stykke oksekød, brisket 1,5kg
Suppevisk 1
Timian 2 tsk.
Peberkorn 2 tsk.
Pillede løg 10
Snittede gullerødder 550g
Snittet kålroe 300g
Vand, nok til at dække stykket
Ved brug af brunings-/lukkefunktionen, skal der altid kommes 30 ml (2 spsk.) madolie i gryden først.
Fremgangsmåde
• Brug brunings-/lukkefunktionen til at brune alle sider af kødet.
• Tilsæt resten af ingredienserne, og tilbered i den mindste tid for indstillingen.
• Jævn sovsen med majsmel til sovs.
Bolognesesovs
6,5 l
Hakkekød 1,5kg
Løg, hakket 3
Selleri skåret i skiver 6 stænger
Fed hvidløg, knust 3
Tomatpuré 7 spsk.
Mel 3 spsk.
Tomater i dåse, hakkede 3 dåser
Oksekødfond 600ml
Svampe, skåret i skiver 300g
Blandede krydderurter 2 tsk.
Salt og friskkværnet sort peber
Ved brug af brunings-/lukkefunktionen, skal der altid kommes 30 ml (2 spsk.) madolie i gryden først.
Fremgangsmåde
• Brug brunings-/lukkefunktionen til at brune kødet i flere omgange.
• Tilsæt løg, hvidløg og selleri, og steg til de er bløde.
• Skift til langsom stegning.
• Bland mel med puré, og tilsæt resten af ingredienserne hen af vejen.
• Rør godt rundt.
• Kan færdiglaves i den mindste eller længste tid for indstillingen.
50
Page 51

SC461007MEE Rev1_Instruction Book 17/06/2014 17:11 Page 51
Pølsegryde
6,5 l
Olie 1 spsk.
Pølser 1,5 kg
Løg, hakket 3 store
Gulerødder, skåret i skiver 5
Porrer, skåret i skiver 3
Oksekødfond 1,5 l
Chutney 6 spsk.
Worcestershire sovs 5 spsk.
Salt og friskkværnet sort peber
Ved brug af brunings-/lukkefunktionen, skal der altid kommes 30 ml (2 spsk.) madolie i gryden først.
Fremgangsmåde
• Brug brunings-/lukkefunktionen til at brune pølserne i flere omgange.
• Tilsæt grøntsager, og steg indtil de er bløde.
• Skift til langsom stegning.
• Tilsæt resten af ingredienserne, og tilbered i den mindste tid for indstillingen.
Kød i karry
6,5 l
Vegetabilsk olie 4 spsk.
Madæbler, skrællede, fri for kerner og hakkede 3 mellemstore
Løg, hakket 3 store
Oksekød i tern 1,5kg
Karry 5 tsk.
Oksekødfond 1 l
Mango Chutney 5 spsk.
Sultanas rosiner 150g
Tomater i dåse, hakkede 600g
Citronsaft 3 spsk.
Majsmel 5 spsk.
Salt og friskkværnet sort peber
Ved brug af brunings-/lukkefunktionen, skal der altid kommes 30 ml (2 spsk.) madolie i gryden først.
Fremgangsmåde
• Brug brunings-/lukkefunktionen til at brune kødet, lidt ad gangen.
• Tilsæt løg, og steg, indtil de er bløde.
• Skift til langsom stegning.
• Tilsæt alle ingredienser, og rør godt rundt.
• Bland mel med puré, og tilsæt resten af ingredienserne hen af vejen.
• Rør godt rundt.
• Kan færdiglaves i den mindste eller længste tid for indstillingen.
Thailandsk kød i karry
6,5 l
Smør 60g
Bankekød, skåret i tern 1kg
Løg, hakket 2
Fed hvidløg, knust 4
Jordnøddesmør 6 spsk.
Kokosmælk 800g
Kartofler, skåret i kvarte 700g
Karry 4 spsk.
Thailandsk fiskesuppe 4 spsk.
Brun farin 4 spsk.
Oksekødfond 1 l
Fremgangsmåde
• Smelt smørret i gryden på brunings-/lukkefunktionen, og tilsæt kød, hvidløg og løg og brun det.
(steg kødet i to omgange ved 6,5 l)
• Tilsæt løg og hvidløg, og steg til de er bløde.
• Tilsæt alle ingredienser, og rør godt rundt.
• Skift til langsom stegning.
• Steges bedst med langsom funktion
BBQ ribben
6,5 l
Ribben 1,5kg
BBQ sovs 300ml
Fremgangsmåde
• Marinér ribbenene i sovsen i nogle timer eller natten over.
• Kom det i gryden, og steg i den nødvendige tid.
• Jo længere stegetid, jo mere mørt kød.
Sirupskage
6,5 l
Smør 125g
Lys sirup 4 spsk.
Strøsukker 100g
Æg 2
Selvhævende mel 200g
Mælk 2 spsk.
Citronsaft 2 spsk.
Fremgangsmåde
• Smør den indvendige side af en 1,25 l kageform med smør, og gør bunden tæt med bagepapir.
• Hæld siruppen i bunden af formen.
• Sammenpisk smør og sukker, indtil det er blødt og cremet.
• Bland lidt efter lidt æg og mel i, og rør mælk og saft i. Hæld blandingen ovenpå siruppen, og
overdæk med bagepapir. Bind snor omkring, og lav et håndtag.
• Anbring den i Supreme Precision 3 in 1 Slow Cooker, og fyld halvvejs op i siderne med kogende
vand.
• Bages bedst på hurtig stuvningsindstilling i 1 time og 45 minutter.
q
51
Page 52

SC461007MEE Rev1_Instruction Book 17/06/2014 17:11 Page 52
Risengrød
6,5 l
Smør 60g
Grødris 250g
Sukker 250g
Mælk 2 l
Muskat 1 tsk.
Fremgangsmåde
• Smør panden let med smør.
• Kom alle ingredienser i gryden, og omrør.
• Det bedste resultat fås med langsom funktion 1 (8 - 10 timer).
Chokoladekage
6,5 l
Kakao 50g
Kogende vand 6 spsk.
Bagepulver 1 tsk.
Selvhævende mel 175g
Strøsukker 150g
Olie 150ml
Æg 3
Fremgangsmåde
• Beklæd en 7” kageform med bagepapir.
• Bland kakaoen med kogende vand til en masse.
• Bland mel, kagepulver og sukker sammen i en skål.
• Slå æg og olie sammen, kom det i blandingen sammen med chokolademassen, og bland det godt.
• Hæld massen i formen, og dæk den med stanniol. Bind snor omkring, og lav et håndtag. Anbring
den i den langsomme stegegryde, og fyld vand halvt op ad siderne.
• Bages bedst på hurtig stuvningsindstilling i 1 time og 45 minutter.
Punch af bær
6,5 l
Frisk frugt/bær (hindbær, solbær, blåbær osv.) 1,2kg
Sukker 150g
Selvhævende mel 200g
Talg 100g
Salt i pulverform
Revet citronskal 2 citroner
Mælk 6-8 spsk.
DIN TOÅRIGE GARANTI
Apparatet er dækket af en toårig reparations- eller ombytningsgaranti.
Det er vigtigt, at du gemmer kvitteringen som dokumentation for købet. Du kan hæfte kvitteringen
til bagsiden af denne vejledning for fremtidig reference.
Opgiv venligst følgende numre, hvis der opstår fejl ved produktet. Du finder numrene på produktets
underside.
Modelnr.
Serienr.
Alle produkter fra Morphy Richards testes individuelt, før de forlader fabrikken. Hvis det
usandsynlige skulle ske, at der opstår fejl ved enheden inden for 28 dage efter købsdatoen, skal
enheden returneres til den forretning, hvor den er købt, og ombyttes med en anden.
Hvis der opstår en fejl efter de første 28 dage efter købsdatoen og inden for 24 måneder fra
købsdatoen, skal du kontakte den lokale distributør og give dem produktets modelnummer og
serienummer eller skrive til den lokale distributør på de anførte adresser.
Du bliver bedt om at returnere produktet (forsvarligt indpakket) til nedenstående adresse sammen
med en kopi af kvitteringen.
Det defekte apparat repareres eller ombyttes derefter, sædvanligvis inden for 7 arbejdsdage efter
modtagelse, dog med forbehold for undtagelserne som beskrevet nedenfor (1-9).
Hvis enheden af en eller anden grund ombyttes inden for garantiperioden på to år, beregnes
garantien på den nye enhed fra den oprindelige købsdato. Derfor er det vigtigt at gemme den
originale kvittering eller faktura, så du kan dokumentere købsdatoen.
For at være dækket af garantiperioden på to år skal enheden have været brugt i overensstemmelse
med fabrikantens anvisninger. For eksempel skal enhederne have været afkalket, ligesom filtrene
skal have været holdt rene i henhold til anvisningerne.
Det er ikke Morphy Richards eller den lokale distributørs ansvar at ombytte eller reparere enheden
under garantiens betingelser, hvis:
1 Defekten er forårsaget af eller kan tilskrives uforsætlig brug, misbrug, forsømmelig brug eller brug
uden at følge fabrikantens anbefalinger, eller hvis defekten er forårsaget af elektriske
spændingsbølger eller er opstået under transport.
2 Enheden er anvendt med en anden strømspænding end den, der er påtrykt produktet.
3 Andre personer (ud over vores serviceafdeling eller en autoriseret forhandler) har forsøgt at
reparere enheden.
4 Enheden har været brugt til udlejningsformål eller har været anvendt til andre formål end
husholdningsbrug.
5 Enheden er købt brugt.
6 Morphy Richards eller den lokale distributør er ikke ansvarlig for at udføre nogen form for
servicearbejde under garantien.
7 Garantien omfatter ikke forbrugsvarer som poser, filtre og glaskarafler.
8 Batterier og skade fra lækage er ikke dækket af garantien.
9 Filtrene ikke er blevet rengjorte og udskiftet som specificeret.
Denne garanti overdrager ikke nogen rettigheder ud over dem, der udtrykkeligt er beskrevet
ovenfor, og dækker ikke krav i forbindelse med følgetab eller -skader. Denne garanti tilbydes som
en ekstra fordel og påvirker ikke dine lovbestemte rettigheder som forbruger.
Fremgangsmåde
• Anbring frugten i panden og rør halvdelen af sukkeret i.
• Bland resten af sukkeret med melet, talgen, salt og revet citronskal.
• Tilsæt mælk til en dej, rør ikke for meget i den.
• Placer dejbollerne i midten af pnaden oven på frugten. Lad ikke dejbollerne røre ved pandens sider,
da de udvider sig under stegningen.
• Steg i den korteste tid for indstillingen.
HJÆLPELINJE
Hvis der opstår problemer med apparatet, er du velkommen til at ringe til os.
Vi kan højst sandsynligt hjælpe dig bedre end forretningen, hvor du købte apparatet.
Sørg for at have følgende informationer parat, når du ringer, for at gøre det lettere og hurtigere
for vores medarbejdere at hjælpe dig.
• Produktets navn.
• Modelnummer, der findes på undersiden af apparatet.
• Serienummer, der findes på undersiden af apparatet.
Hjemmeside
Du kan også kontakte os via vores websted eller besøge stedet for at se på og købe apparater,
reservedele og tilbehør i det omfattende Morphy Richards’ sortiment.
52
Page 53

SC461007MEE Rev1_Instruction Book 17/06/2014 17:11 Page 53
}
Bezpieczeństwo i ochrona zdrowia
Użytkowanie każdego urządzenia elektrycznego wymaga przestrzegania następujących podstawowych zasad bezpieczeństwa.
Przed rozpoczęciem używania tego urządzenia należy uważnie przeczytać te instrukcje.
• To urządzenie może być używane przez dzieci w wieku od 8 lat oraz przez osoby o
ograniczonych zdolnościach fizycznych, sensorycznych lub umysłowych bądź nieposiadające
odpowiedniego doświadczenia i wiedzy, pod warunkiem że osoby te są nadzorowane lub
zostały poinstruowane w zakresie bezpiecznej obsługi urządzenia i rozumieją grożące
niebezpieczeństwa.
• Należy dopilnować, aby dzieci nie używały tego urządzenia do zabawy.
• Dzieciom w wieku poniżej 8 lat i pozbawionym nadzoru nie wolno czyścić ani przeprowadzać
czynności konserwacyjnych urządzenia.
• Urządzenie oraz przewód zasilający powinny znajdować się poza zasięgiem dzieci w wieku
do 8 lat.
• To urządzenie jest przeznaczone do zastosowań domowych i podobnych, takich jak:
gospodarstwa, klienci hoteli, moteli oraz innych obiektów mieszkalnych, miejsca
zakwaterowania.
Urządzenie nie jest przeznaczone do zastosowań profesjonalnych lub przemysłowych, tzn. w
kuchniach, zakładach, biurach lub innych placówkach przemysłowych.
Lokalizacja
• Zawsze umieszczaj urządzenie z dala od krawędzi blatu.
• Upewnij się, że urządzenie stoi na twardej, płaskiej i odpornej na wysoką temperaturę powierzchni.
• Nie korzystaj z urządzenia na wolnym powietrzu ani w pobliżu wody.
Przewód zasilający
• Po podłączeniu do gniazda elektrycznego przewód zasilający nie powinien być naprężony.
• Przewód zasilający nie może zwisać z blatu, w miejscu, które jest dostępne dla dziecka.
• Przewód zasilający nie może leżeć na kuchence ani innej gorącej powierzchni, na której mógłby ulec
uszkodzeniu.
• Jeśli przewód zasilający ulegnie uszkodzeniu, musi on zostać wymieniony przez producenta, jego
autoryzowany punkt serwisowy lub podobnego wykwalifikowanego specjalistę.
Bezpieczeństwo osób
• OSTRZEŻENIE: W trakcie używania i zaraz po wyłączeniu urządzenia nie dotykaj jego górnej
powierzchni ani innych gorących części, korzystaj z uchwytów lub gałek.
• Aby ochronić się przed porażeniem prądem elektrycznym, nie wolno zanurzać przewodu, wtyczek
ani urządzenia w wodzie lub innych płynach.
• Nie dotykaj gorących powierzchni. W przypadku podnoszenia pokrywki lub dotykania gorących
pojemników należy zakładać rękawice kuchenne.
• Należy zachować szczególną ostrożność podczas przenoszenia urządzenia z gorącymi potrawami,
wodą lub innymi płynami.
Pozostałe uwagi dotyczące bezpieczeństwa
• Nie włączaj garnka do powolnego gotowania, jeśli garnek jest pusty.
• Poczekaj aż szklana pokrywka i garnek ostygną przed zanurzeniem ich w wodzie.
• Nie wolno gotować potraw bezpośrednio w komorze urządzenia. Zawsze należy używać garnka.
• Nie wolno używać pękniętej lub wyszczerbionej szklanej pokrywki lub garnka.
• Nie włączaj urządzenia stojącego spodem do góry lub na boku.
• Szklana pokrywka oraz garnek są delikatne. Obchodź się z nimi ostrożnie.
• Używanie przystawek lub narzędzi niezatwierdzonych przez firmę Morphy Richards może wywołać
pożar lub spowodować porażenie prądem lub obrażenia ciała.
• Nie umieszczaj urządzenia w pobliżu gorącego gazu, elektrycznej płyty grzejnej ani w gorącym
piekarniku.
• Gdy urządzenie nie jest używane, przed zdejmowaniem lub zakładaniem elementów lub przed
czyszczenie należy wyjąć wtyczkę z gniazda elektrycznego.
• Do urządzenia nie może być podłączony zewnętrzny wyłącznik czasowy ani system zdalnego
sterowania.
Wymogi elektryczne
Upewnij się, że napięcie podane na tabliczce znamionowej urządzenia odpowiada napięciu gniazda
elektrycznego, które doprowadza prąd przemienny. Jeżeli wystąpi konieczność wymiany
bezpiecznika we wtyczce, należy go wymienić na bezpiecznik 3 A o oznaczeniu BS1362.
OSTRZEŻENIE: To urządzenie musi być uziemione.
q
}
53
Page 54

SC461007MEE Rev1_Instruction Book 17/06/2014 17:11 Page 54
Porady dotyczące szybkiego uruchomienia
Proszę również zapoznać się z główną instrukcją, która zawiera
ważne informacje dotyczące bezpieczeństwa oraz porady na temat
obsługi urządzenia
Supreme Precision 3 in 1 Slow Cooker.
Ten poradnik informuje, jak korzystać z urządzenia do prużenia/przyrumienienia około 1 kg
mięsa, a następnie duszenia przez 1:30 godziny lub powolnego gotowania przez 8 godzin.
W przypadku wszystkich pozostałych programów zapoznaj się z pełną instrukcją.
Użycie funkcji prużenia/przyrumienienia
1
2
Umieść garnek ‹na podstawie fii włącz Supreme Precision 3 in 1 Slow
Cooker.
Na wyświetlaczu pojawi się domyślny ekran (po lewej). Ikona
Prużenie/przyrumienianie
Dolej odpowiednią ilość oleju do garnka, zgodnie z ilością mięsa, które będzie
prużone.
Naciśnij przycisk „Zaakceptuj” . Urządzenie Supreme Precision 3 in 1 Slow Cooker
będzie wydawać sygnały dźwiękowe przez około 2 sekundy i przestanie migać.
Garnek następnie zacznie się nagrzewać i zegar zacznie
osiągnie odpowiednią temperaturę po około 5 minutach – wtedy można rozpocząć
prużenie/przyrumienianie mięsa (tzn. gdy na zegarze podana jest wartość 00:10)
‰
oraz godzina ‚będą migać.
‚
odliczać czas. Olej
Umieść mięso w garnku i mieszaj regularnie, aż zewnętrzna część mięsa będzie
przyrumieniona. Gdy zegar osiągnie wartość zero, podstawa wyda sygnał
dźwiękowy i proces pieczenia zakończy się. Jeśli mięso jest przyprużone zanim
3
54
minie 15 minut, przytrzymaj przycisk „Zaakceptuj”
Baza wyda sygnał dźwiękowy i proces pieczenia zostanie zatrzymany. Jeśli musisz
kontynuować, powtórz proces od punktu 2 powyżej.
„
przez około 3 sekundy.
Page 55

SC461007MEE Rev1_Instruction Book 17/06/2014 17:11 Page 55
Używanie funkcji duszenia 1:30
Gdy proces prużenia/rumienienia zostanie zakończony, dodaj pozostałe składniki
(zgodnie z przepisem). Naciśnij jeden raz przycisk „Funkcja/czas
następujący ekran (po lewej). Naciśnij dwukrotnie przycisk „Zaakceptuj”
podstawa wyemituje dwa sygnały w ciągu około 2 sekund i rozpocznie się proces
4
pieczenia. Załóż pokrywę podczas korzystania z urządzenia Supreme Precision 3
in 1 Slow Cooker z tym ustawieniem. Więcej informacji na temat funkcji odliczania
czasu i podtrzymywania ciepła można znaleźć w punkcie 6.
LUB na temat używania funkcji powolnego gotowania
Gdy proces prużenia/rumienienia zostanie zakończony, dodaj pozostałe składniki
(zgodnie z przepisem). Naciśnij dwukrotnie przycisk „Funkcja/czas”
następujący ekran (po lewej). Naciśnij dwukrotnie przycisk „Zaakceptuj”
podstawa wyemituje dwa sygnały w ciągu około 2 sekund i rozpocznie się proces
5
pieczenia. Załóż pokrywę podczas korzystania z urządzenia Supreme Precision 3
in 1 Slow Cooker z tym ustawieniem. Więcej informacji na temat funkcji odliczania
czasu i podtrzymywania ciepła można znaleźć w punkcie 6.
·
i pojawi się
·
„
–
i pojawi się
„
–
Odliczanie czasu podtrzymywanie ciepła
6
}
Po zakończeniu procesu pieczenia urządzenie wyemituje sygnał dźwiękowy i
automatycznie przełączy się w tryb podtrzymywania ciepła. Podtrzymanie ciepła
trwa do dwóch godzin i odliczanie rozpoczyna się do H0:00 do H2:00. Po
upłynięciu 2 godzin na wyświetlaczu pojawi się symbol „H”, który pozostanie na
wyświetlaczu do momentu, gdy gorąca płyta osiągnie temperaturę otoczenia
(około 40°C). Wyświetlacz wtedy będzie pusty.
Naciśnięcie dowolnego przycisku spowoduje powrót do
ekranu początkowego.
55
Page 56

SC461007MEE Rev1_Instruction Book 17/06/2014 17:11 Page 56
}
Jak najlepiej wykorzystać zalety Twojego nowego urządzenia...
Bezpieczeństwo
Nie wolno dotykać zewnętrznej obudowy garnka do powolnego gotowania podczas pracy
urządzenia lub przed jego ostygnięciem. Stosuj rękawice w przypadku zdejmowania pokrywy lub
garnka do gotowania ze stali nierdzewnej.
Skuteczność
Zdjęcie pokrywki spowoduje spadek temperatury w urządzeniu oraz intensywności gotowania i
jednocześnie wydłuża czas gotowania potrawy. Staraj się nie podnosić pokrywki więcej niż 3 lub
4 razy w celu zamieszania potrawy lub dodania składników.
Wykorzystaj możliwości urządzenia
Powolne gotowanie sprawia, że potrawy są aromatyczne i pełne smaku. Dłuższe czasy
gotowania zapewniają lepsze rozchodzenie się aromatów, dając im czas na odpowiednie
wymieszanie i dodanie smaku potrawie. Garnek do powolnego gotowania delikatnie podgrzewa
potrawę, co stanowi doskonały sposób gotowania mięs, np. duszenia wołowiny, która staje się
delikatna i krucha dzięki długotrwałemu procesowi gotowania. Pamiętaj, że nie ma żadnych
ograniczeń co do zastosowań tego garnka do powolnego gotowania. Jedyne ograniczenie
stanowi Twoja wyobraźnia!
Wyposażenie
⁄
Szklana pokrywka
¤
Wylot pary
‹
Garnek do gotowania ze stali nierdzewnej/naczynie do serwowania
(4.5 l lub 6,5 l, w zależności od modelu)
›
Grzałka
fi
Korpus urządzenia
fl
Panel sterowania/wyświetlacz (patrz powiększona ilustracja)
‡
Otwór drenażowy x2 (pod spodem)
·
Przycisk Funkcja/czas
‚
Wyświetlanie czasu
„
Przycisk Zaakceptuj
‰
Ikona prużenia/przyrumienienia i duszenia
Â
Ikona powolnego gotowania
Przycisk
Ikona prużenia/przyrumienienia
Ikona duszenia
Ikona powolnego gotowania
Pojemność robocza
• Urządzenie Supreme Precision 3 in 1 Slow Cooker ma objętość 6,5 litra, a jego pojemność robocza
wynosi 5 litrów.
• Pojemność jest podana na tabliczce znamionowej, która znajduje się pod spodem produktu.
Przed pierwszym użyciem urządzenia Supreme Precision 3 in 1
Slow Cooker
Usuń wszystkie naklejki i etykiety z produktu.
Umyj garnek i pokrywkę ze stali nierdzewnej w gorącej wodzie z płynem za pomocą gąbki lub
szmatki. NIE używaj zmywaków drucianych lub innych środków szorujących, ponieważ zarysują
one powierzchnię stali nierdzewnej. Wypłucz i dokładnie wytrzyj do sucha garnek i pokrywę.
WAŻNE: NIE ZANURZAJ W WODZIE PODSTAWY SUPREME PRECISION 3 IN 1 SLOW
COOKER
Pamiętaj, że:
Podczas pierwszego użycia może być wyczuwalny dziwny zapach, spowodowany wypalaniem
się pozostałości z procesu produkcyjnego. Jest to całkowicie normalne zjawisko, nie pływa na
pieczone produkty i ustąpi po kilku użyciach.
Supreme Precision 3 in 1 Slow Cooker – wskazówki i porady
• Wszystkie składniki przed dodaniem powinny mieć temperaturę pokojową. Jeśli były zamrożone,
poczekaj aż powrócą do temperatury pokojowej, ponieważ zimne składniki mają wpływ na czas
pieczenia.
• Można użyć zimne mięso z lodówki, ale nie można używać zamrożonego mięsa. Używaj funkcji
przyrumieniania do prużenia mięsa.
• Wszystkie zamrożone składniki przed gotowaniem muszą być całkowicie odmrożone.
• W przypadku używania zimnego bulionu w przepisie z powolnym gotowaniem (np. wina), należy
wstępnie podgrzać składniki. Rozpocznij od funkcji przyrumieniania i dodaj wszystkie składniki. Gdy
upłynie 15 minut, kontynuuj z funkcją powolnego gotowania.
• W przypadku tradycyjnego powolnego gotowania na ogniu, zalecamy oprószyć mięso mąką przed
rumienieniem. Nie trzeba tego robić w urządzeniu Supreme Precision 3 in 1 Slow Cooker. Należy
przyrumienić/uprużyć mięso zgodnie z instrukcją. Jeśli sos ma być zagęszczony, dodaj wymieszaną
mąkę kukurydzianą z wodą około 30 minut przed końcem czasu pieczenia.
• W przypadku używania mięsa z kością (na przykład, udek kurczaka, żeberek itp.) proces powolnego
gotowania może spowodować, że mięso oddzieli się od kości – jest to normalne zjawisko, które
zapewnia bogatszy smak potrawy. Jednak zwróć uwagę na małe kości, które mogą znajdować się w
sosie.
• Nie przepełniaj garnka – przepisy zamieszczone w tej instrukcji dotyczą pełnej pojemności i
uwzględniają wolną przestrzeń nad potrawą, która zapewnia równomierne dopieczenie. Pojemność
jest podana na tabliczce znamionowej, która znajduje się pod spodem produktu. W przypadku
używania własnego przepisu zwróć uwagę, aby nie napełniać garnka powyżej nitów uchwytu (są one
widoczne wewnątrz garnka).
• Pokrywa podczas pieczenia staje się bardzo gorąca – szczególnie szklane okienko i obręcz ze stali
nierdzewnej. Uchwyty zaizolowane sylikonem pozostaną chłodne, dzięki czemu można podnieść
pokrywę. Jednak w tym celu zalecamy stosowanie rękawic kuchennych.
• Składniki powinny być rozmieszczone równomiernie w całym garnku. Jednak warzywa korzenne lepiej
umieszczać w dolnej części garnka na początku pieczenia. Wszystkie składniki powinny być zanurzone
w wywarze.
• Aby zapewnić równomierne gotowanie, warzywa korzenne powinny być odpowiednio pocięte (w
kostkę o wymiarze 20 mm).
• Jeśli zawartość garnka wykipi, jest to z reguły spowodowane przepełnieniem – należy więc wyjąć
część składników oraz/lub wywaru.
• Ogólnie twardsze mięso, np. mięso duszone, wymaga dłuższego czasu gotowania, który jest idealny w
przypadku powolnego gotowania. W przypadku funkcji duszenia dobre dopieczenie większych
kawałków mięsa wymaga czasu pieczenia około 1:30–1:45 godziny.–
• Kurczak i kawałki mięsa wymagają mniej czasu pieczenia. Należy stosować w związku z tym krótszy
zakres czasu – na przykład, w przypadku poziomu 1 ustaw 8 godzin.–
• W przypadku pierogów należy dodać je do wywaru 30–45 minut przed zakończeniem gotowania.
Można położyć je na wierzchu – nie ma konieczności zanurzania ich w wywarze.
• Kawałki szynki należy pozostawić w folii, jeśli tak zostały przygotowane. W przeciwnym razie użyj folii
do pieczenia lub owiń nicią kuchenną, aby nie dopuścić do rozpadnięcia się mięsa podczas
gotowania.
• W przypadku używania ustawienia powolnego gotowania, pozostaw ugotowaną potrawę na 10 minut
przed podaniem. Dzięki temu gorąca (wrząca) potrawa zdąży nieco ostygnąć.
• Gdy nabierzesz wprawy z używania urządzenia Supreme Precision 3 in 1 Slow Cooker, możesz zacząć
tworzyć własne przepisy. Jednak zalecamy traktowanie podanego przepisu jako przepisu bazowego.
W przypadku stosowania składników takich jak makaron, mleko, śmietana, owoce morza lub
skorupiaki, należy dodać je 30 minut przed końcem czasu gotowania pozostałych składników. Nie
dotyczy to mleka kokosowego i puddingu ryżowego.
• Nie pozostawiać surowej, nieugotowanej żywności w garnku. Rozpocznij proces gotowania jak
najszybciej. Jeśli musisz opóźnić gotowanie, przechowuj je w chłodziarce i gdy jesteś gotowy do
rozpoczęcia, poczekaj, aż składniki osiągną temperaturę pokojową.
• Jeśli wcześniej ugotowana potrawa ostygła, podgrzej ją używając ustawienia powolnego gotowania
1:30 godz. W zależności od przepisu podgrzanie może potrwać od 30 do 45 minut. Przed podaniem
sprawdź, czy potrawa jest odpowiednio podgrzana.
• W przypadku gotowania połowy podanej ilości, czas gotowania z reguły skraca się o jedną trzecią.
Przed podaniem sprawdź, czy potrawa jest równomiernie ugotowana.
• Dostosowanie istniejących przepisów konwencjonalnego gotowania do zastosowania w urządzeniu do
powolnego gotowania może wymagać ograniczenia ilości wywaru, ponieważ płyny nie odparują w tak
dużej ilości.
• Tam gdzie wymagany jest bulion, zastosuj wrzącą wodę.
• Przygotowując kawałki mięsa rozpocznij od zalania ich wrzącą wodą lub bulionem. Jego ilość pod
koniec czasu gotowania może się zmniejszyć.
• Surowa czerwona fasola musi być namoczona i gotowana przynajmniej przez 10 minut w celu
usunięcia toksyn. Dopiero wtedy można ją przełożyć do garnka Supreme Precision 3 in 1 Slow Cooker.
• Po zarumienieniu można odlać nadmiar oleju, jeśli jest to wymagane.
• W przypadku używania bulionu lub sosu ze słoika lub pojemnika, najpierw należy podgrzać go w
kuchence mikrofalowej, a następnie dolać do garnka. Można również dodać 30 minut do czasu
gotowania.
A
Wyjaśnienie pojęć
Rumienienie/prużenie:
Przed duszenie lub powolnym gotowaniem mięsa ważne jest, aby mięso zostało najpierw
zarumienione/uprużone. Oznacza to lekkie obgotowanie mięsa na zewnątrz w gorącym oleju przed
rozpoczęciem procesu duszenia lub powolnego gotowania (mięso nadal powinno być surowe w
środku). Prużenie/rumienienie mięsa w ten sposób pomaga zachować jego smak oraz wilgotność.
Duszenie:
W przypadku urządzenia Supreme Precision 3 in 1 Slow Cooker, duszenie oznacza gotowanie
mięsa oraz/lub warzyw w wywarze (np. winie, bulionie, wodzie) przez 1 godzinę i 30 minut do 1
godziny i 45 minut.
Powolne gotowanie:
Powolne gotowanie to sposób na gotowanie potrawy przez długi czas (z reguły jest to od 4 do 10
godzin) w wywarze (np. w winie, bulionie, wodzie). Jak sugeruje nazwa potrawa jest gotowana
wolniej i spokojniej – często oznacza to, że mięso będzie delikatniejsze. Mięso o dużej zawartości
tłuszczu dobrze nadaje się do powolnego gotowania, ponieważ ten proces umożliwia skuteczne
wytopienie się tłuszczu, przez co mięso staje się bardzo delikatne.
56
Page 57

SC461007MEE Rev1_Instruction Book 17/06/2014 17:11 Page 57
Instrukcja użytkowania
Umieść podstawę fina suchej, równej powierzchni odpornej na wysoką temperaturę, z dala od
krawędzi blatu roboczego. Nie stawiaj urządzenia na podłodze.
Pamiętaj, że:
Jeśli urządzenie zostanie włączone i nie będzie używane, oświetlenie wyświetlacza zegara
przełączy się w tryb czuwania po 30 minutach.
Funkcja prużenia/rumienienia Supreme Precision 3 in 1 Slow Cooker
Umieść garnek ‹na podstawie fii włącz Supreme Precision 3 in 1 Slow Cooker.
fl
Na wyświetlaczu
Wyświetlanie czasu
garnka, zgodnie z ilością mięsa, które będzie prużone.
Zapoznaj się z przepisami w instrukcji obsługi.
Zalecamy dolanie około dwóch łyżek stołowych oleju roślinnego na prużenie około 800 g–1200 g
mięsa. Ta ilość można zmienić, zgodnie z własnym gustem oraz zawartością tłuszczu w mięsie.
Aby wybrać funkcję prużenia, należy nacisnąć jeden raz przycisk „Zaakceptuj”
Supreme Precision 3 in 1 Slow Cooker będzie wydawać sygnały dźwiękowe przez około 2
sekundy i przestanie migać. Garnek następnie zacznie się nagrzewać i zegar zacznie
odliczać czas. Olej osiągnie odpowiednią temperaturę po około 5 minutach – wtedy można
rozpocząć prużenie/przyrumienianie mięsa (tzn. gdy na zegarze podana jest wartość 00:10).
Dobrym sposobem na sprawdzenie, czy olej jest wystarczająco gorący, jest położenie małego
kawałka mięsa lub cebuli w garnku. Jeśli mięso lub cebula skwierczy w oleju, oznacza to, że olej
ma odpowiednią temperaturę do prużenia/rumienienia. Jeśli nie skwierczy – poczekaj jeszcze
minutę i powtórz sprawdzenie.
Umieść mięso w garnku i mieszaj regularnie, aż zewnętrzna część mięsa będzie przyrumieniona.
Gdy zegar osiągnie wartość zero, podstawa wyda sygnał dźwiękowy i proces pieczenia
zakończy się. Jeśli mięso jest przyprużone zanim zegar osiągnie wartość zero, przytrzymaj
przycisk „Zaakceptuj”
gotowania zatrzyma się i na wyświetlaczu pojawi się ekran domyślny
Jeśli mięso wymaga kilku dodatkowych minut duszenia, a zegar wskazuje już zero, wystarczy
nacisnąć przycisk „Zaakceptuj”, aby uruchomić ponownie funkcję prużenia/rumienienia. Zgodnie
z powyższym opisem, aby anulować funkcję prużenia zanim na zegarze pojawi się wartość zero,
przytrzymaj przycisk „Zaakceptuj”
W związku z wysoką temperaturą urządzenia Supreme Precision 3 in 1 Slow Cooker w trybie
prużenia/rumienienia, można jedynie wykonać maksymalnie dwa 15-minutowe programy
pieczenia bezpośrednio po sobie. W przypadku próby wybrania programu po raz trzeci, gdy
urządzenie jest gorące, na wyświetlaczu pojawi się —:— i będzie migać ikona
„Prużenie/rumienienie”
Funkcja będzie niedostępna aż do chwili, gdy urządzenie odpowiednio ostygnie. Nie powinno to
stanowić problemu, ponieważ w ciągu 30 minut (2 x 15) można wystarczająco
zarumienić/uprużyć wymaganą ilość mięsa.
Pamiętaj, że:
Nie uruchamiaj funkcji „Prużenie/rumienienie” bez pokrywki
ponieważ spowoduje to przegrzanie urządzenia. Nie należy również uruchamiać funkcji
„Prużenie/rumienienie” bez wcześniejszego dodania oleju do garnka.
pojawi się ekran domyślny B.
‚
i ikona funkcji prużenia ‰będą migać. Dolej odpowiednią ilość oleju do
„
. Urządzenie
‚
„
przez około 3 sekundy. Podstawa wyemituje sygnał dźwiękowy, proces
„
przez około 3 sekundy.
‰C
.
B
.
‹
założonej na podstawie,
fi
Prużenie/rumienienie na płycie gazowej lub elektrycznej w
garnku Supreme Precision 3 in 1 Slow Cooker
Jeśli wolisz, możesz użyć garnka Supreme Precision 3 in 1 Slow Cooker i uprużyć/zarumienić
mięso na płycie gazowej lub elektrycznej.
Wystarczy dodać olej zgodnie z powyższym opisem i umieścić garnek na palniku. Olej może
nagrzać się nieco szybciej na płycie grzejnej, więc użyj małego kawałka mięsa/cebuli, aby
sprawdzić, czy temperatura jest odpowiednia.
Wskazówka dotycząca prużenia/rumienienia mięsa
W przypadku prużenia dużych kawałków mięsa zalecamy podzielenie mięsa na mniejsze porcje
w celu ułatwienia zadania. W związku z tym, że mięso należy mieszać w trakcie tego procesu,
mniejsze kawałki mięsa ułatwiają tę czynność.
Funkcja duszenia
Umieść garnek ‹na podstawie fi. Dodaj składniki zgodnie z przepisem. Niezależnie od tego,
czy wcześniej użyta była funkcja „Prużenie/rumienienie” lub urządzenie Supreme Precision 3 in 1
Slow Cooker właśnie zostało włączone, na wyświetlaczu powinien pojawić się ekran domyślny
D
.
·
Naciśnij jeden raz przycisk „Funkcja/czas”
‚
Wyświetlanie czasu
„
, aby wybrać funkcję duszenia. Ikona duszenia ‰przestanie wtedy migać.
(Jeśli funkcja duszenia została wybrana przypadkowo, można wrócić do poprzedniego ekranu,
przytrzymując przez około 2 sekundy przycisk „Zaakceptuj”
Następnie można wybrać program 1:30 godziny lub 1:45 godziny (w zależności od używanego
przepisu). Aby wybrać program 1:30 godziny, naciśnij przycisk „Zaakceptuj/Start/Stop”
wybrać program 1:45 godziny, naciśnij przycisk „Funkcja/czas”
wtedy pojawi się wartość 01:45.
Naciśnij przycisk „Zaakceptuj”
dźwiękowy przez około 2 sekundy. Następnie rozpocznie się proces pieczenia. Rozpocznie się
odliczanie czasu na zegarze do zera.
Jeśli czas pieczenia był za krótki, można ponownie wybrać ustawienie duszenia. Trzeba jednak
określić ile dodatkowego czasu pieczenia ma być wybrane.
i ikona funkcji duszenia ‰będą migać. Naciśnij przycisk „Zaakceptuj”
„
i na wyświetlaczu pojawi się E.
„
).
„
„
. Na wyświetlaczu czasu
. Czas przestanie migać i podstawa będzie emitować sygnał
. Aby
‚
Jeśli z jakiegokolwiek powodu konieczne jest anulowanie procesu pieczenia zanim na zegarze
pojawi się wartość zero, przytrzymaj przycisk „Zaakceptuj”
wyemituje sygnał dźwiękowy, proces gotowania zatrzyma się i na wyświetlaczu pojawi się ekran
B
domyślny
Podczas trwania funkcji duszenia para wodna będzie wydostawać się przez otwór wentylacyjny
pary. Otwór wentylacyjny powinien znajdować się z tyłu urządzenia.
OSTRZEŻENIE: Para i otwór wentylacyjne będą gorące.
Po zakończeniu procesu pieczenia urządzenie Supreme Precision 3 in 1 Slow Cooker wyemituje sygnał
dźwiękowy i automatycznie przełączy się w tryb podtrzymywania ciepła.
.
„
przez około 3 sekundy. Podstawa
Funkcja powolnego gotowania
Umieść garnek ‹na podstawie fi. Dodaj składniki zgodnie z przepisem. Niezależnie od tego,
czy wcześniej użyta była funkcja „Prużenie/rumienienie” lub urządzenie Supreme Precision 3 in 1
Slow Cooker właśnie zostało włączone, na wyświetlaczu powinien pojawić się ekran domyślny,
F
jak poniżej
Naciśnij dwukrotnie przycisk „Funkcja/czas”
Wyświetlanie czasu
programy powolnego gotowania – 1, 2 i 3.– Programy różnią się zakresem czasowym. Każdy
program powolnego gotowania umożliwia wybór czasu gotowania o długości 30 minut pomiędzy
minimalnym i maksymalnym czasem gotowania. Na przykład przy niskim ustawieniu można
wybrać czas gotowania 9:30 godz., jeśli jest to wymagane. Funkcja podtrzymania temperatury
jest dodatkowym elementem tego ustawienia czasu.
Każdy program ma inną ikonę, jak pokazano poniżej:
Jeśli chcesz użyć 1. programu powolnego gotowania, naciśnij przycisk „Zaakceptuj”
następnie wybierz czas, przez który program powolnego gotowania ma być włączony.
Naciśnięcie przycisku „Funkcja/czas”
czasu. Gdy na wyświetlaczu pojawi się wymagany czas, naciśnij przycisk „Zaakceptuj”
przestanie migać i podstawa będzie emitować sygnał dźwiękowy przez około 2 sekundy.
Następnie rozpocznie się proces pieczenia. Rozpocznie się odliczanie czasu na zegarze do zera.
Czas przestanie migać i podstawa będzie emitować sygnał dźwiękowy przez około 2 sekundy.
Następnie rozpocznie się proces pieczenia. Rozpocznie się odliczanie czasu na zegarze do zera.
Jeśli chcesz użyć programu powolnego gotowania 2, naciśnij jeden raz przycisk „Funkcja/czas”
·
Następnie wybierz czas gotowania, zgodnie z powyższym opisem.
Jeśli chcesz użyć programu powolnego gotowania 3, naciśnij dwukrotnie przycisk
„Funkcja/czas”
„Zaakceptuj”
Czas przestanie migać i podstawa będzie emitować sygnał dźwiękowy przez około 2 sekundy.
Następnie rozpocznie się proces pieczenia i zegar zacznie odliczać czas do zera.
Po naciśnięciu przycisku „Zaakceptuj”
tylko czas będzie migać. (Uwaga: jeśli funkcja powolnego gotowania została wybrana
przypadkowo, można wrócić do poprzedniego ekranu, przytrzymując przez około 2 sekundy
przycisk „Zaakceptuj”
Jeśli z jakiegokolwiek powodu konieczne jest anulowanie procesu pieczenia zanim na zegarze
pojawi się wartość zero, przytrzymaj przycisk „Zaakceptuj”
wyemituje sygnał dźwiękowy, proces gotowania zatrzyma się i na wyświetlaczu pojawi się ekran
domyślny
.
·
i na wyświetlaczu pojawi się G.
‚
i ikona powolnego gotowania ‰będą migać. Dostępne są trzy
Od 8 do 10 godzin (niski)
Od 6 do 8 godzin (średni)
Od 4 do 6 godzin (wysoki)
„
i
·
umożliwia przejście przez wszystkie dostępne wartości
(pojawi się ikona powolnego gotowania 2) – przed naciśnięciem przycisku „Zaakceptuj” „.
·
(pojawi się ikona powolnego gotowania 3) – przed naciśnięciem przycisku
„
. Następnie wybierz czas gotowania, zgodnie z powyższym opisem.
„
, ikona powolnego gotowania Âprzestanie migać i
„
).
„
przez około 3 sekundy. Podstawa
H
.
„
Podtrzymanie ciepła
Po zakończeniu procesu pieczenia urządzenie wyemituje sygnał dźwiękowy i automatycznie
przełączy się w tryb podtrzymywania ciepła. Podtrzymanie ciepła trwa do dwóch godzin i
odliczanie rozpoczyna się do H0:00 do H2:00.
Po upłynięciu 2 godzin na wyświetlaczu pojawi się symbol „H”, który pozostanie na
wyświetlaczu do momentu, gdy gorąca płyta osiągnie temperaturę otoczenia (około 40°C)
Wyświetlacz wtedy będzie pusty. Naciśnięcie dowolnego przycisku spowoduje powrót do ekranu
początkowego.
Funkcję podtrzymywania ciepła można wyłączyć w dowolnym czasie w ciągu 2 godzin, poprzez
przytrzymanie przez około 2 sekundy przycisku „Zaakceptuj”
Po gotowaniu
Odłącz przewód zasilający od źródła zasilania.
Ważne: Przed schowaniem garnka należy upewnić się, że urządzenie jest chłodne.
„
.
Czyszczenie i konserwacja urządzenia Supreme Precision 3 in 1
Slow Cooker
• Garnek i pokrywkę można myć w zmywarce. Można również myć je ręcznie w gorącej wodzie z
płynem, używając do mycia miękką szmatkę. Nie używaj środków chemicznych ani mechanicznych
o działaniu ściernym.
. Czas
I
.
}
57
Page 58

SC461007MEE Rev1_Instruction Book 17/06/2014 17:11 Page 58
• Nigdy nie zanurzaj korpusu urządzenia (z elementami elektrycznymi) w wodzie lub innym płynie. Do
czyszczenia należy stosować wilgotną szmatkę i następnie dokładnie wytrzeć.
• Przed użyciem upewnij się, że podstawa garnka oraz powierzchnia płyty grzejnej są czyste,
pozbawione przypalonych resztek potraw i suche. Zewnętrzną podstawę garnka w razie potrzeby
można czyścić drucianym zmywakiem, aby usunąć uporczywe zabrudzenia.
• W przypadku dodawania składników i płynów do garnka należy zwrócić uwagę, aby nie przepełniać
go. W przypadku wykipienia, jeśli płyn dostanie się na podstawę, należy wyłączyć urządzenie,
odłączyć przewód zasilający od źródła zasilania i odczekać, aż płyn ścieknie przez otwory
odprowadzające. Całkowicie wytrzeć nadmiar produktu lub płynu, który mógł pozostać we wnęce
pomiędzy płytą grzejną i metalowym reflektorem, przetrzeć wilgotną szmatką i dokładnie wysuszyć
przed następnych użyciem.
PRZEPISY
Gulasz wołowy
6,5 l
Wołowina, pokrojona w kostkę 1 kg
Ziemniaki, pokrojone w kostkę 700 g
Marchew, plasterki 700 g
Poszatkowany por 3 duże
Pokrojona cebula 2
Bulion wołowy 1,5 l
Mieszanka przypraw 3 łyżeczki
Sól i świeżo zmielony czarny pieprz
W przypadku używania funkcji rumienienia/prużenia na początku zawsze należy dodać 30 ml (2
łyżki stołowe) oleju do pieczenia.
Sposób przyrządzania
• Używaj funkcji rumienienia/prużenia do rumienienia mięsa i smażenia cebuli.
(Podsmaż mięso w dwóch porcjach)
• Zmieszaj pozostałe składniki.
• Przełącz na ustawienie powolnego gotowania.
• Gotuj przez maksymalny czas danego ustawienia.
• Zagęść mieszanką mąki kukurydzianej/wody.
• Dodaj pierogi 30 minut do 1 godziny przed zakończeniem.
Kurczak z białym winem
6,5 l
Piersi kurczaka 10
Masło 40 g
Pokrojona cebula 2 duże
Poszatkowane pieczarki 400 g
Białe wino 5 łyżek
Bulion drobiowy 750 ml
Mieszanka przypraw 2 łyżeczki
Mąka kukurydziana 5 łyżek
Żółtka 3
Śmietana kremowa 150 ml
Sól i świeżo zmielony czarny pieprz
Sposób przyrządzania
• Nie trzeba używać funkcji rumienienia/prużenia.
• Dodaj wszystkie składniki oprócz mąki, jajek i śmietany do garnka i włącz powolne gotowanie.
• Zagęść mieszanką mąki kukurydzianej/wody.
• Po ugotowaniu zmieszaj jajka i śmietanę z odrobiną gorącego wywaru i wymieszaj z potrawą.
• W przypadku przepisów z kurczakiem najczęściej ustawiany jest najkrótszy czas,
np. 8 godz. 6 godz. 3-4 godz.
Gotowana szynka
6,5 l
Szynka wędzona 1,8 kg
Zupa warzywna
6,5 l
Mieszanka warzywna – obrane i posiekane warzywa 1,8 kg
Bulion warzywny 2 l
Mieszanka przypraw do smaku
Sól i świeżo zmielony czarny pieprz
Sposób przyrządzania
• Nie trzeba używać funkcji rumienienia/prużenia.
• Dodaj od razu wszystkie składniki i gotuj przez maksymalny czas danego ustawienia.
• Zmiksuj po schłodzeniu.
Wołowina po angielsku
6,5 l
Mostek wołowy 1,5 kg
Bouquet garni 1
Tymianek 2 łyżeczki
Ziarna pieprzu 2 łyżeczki
Szalotki, obrane 10
Marchew, posiekana 550 g
Brukiew, posiekana 300 g
Woda, aby zakryć mięso
W przypadku używania funkcji rumienienia/prużenia na początku zawsze należy dodać 30 ml (2 łyżki
stołowe) oleju do pieczenia.
Sposób przyrządzania
• Zarumienić mięso ze wszystkich stron za pomocą funkcji rumienienia/prużenia.
• Dodać pozostałe składniki i gotować przez minimalny czas dla danego ustawienia.
• Zagęścić sos za pomocą mąki kukurydzianej.
Sos boloński
6,5 l
Zmielona wołowina 1,5 kg
Pokrojona cebula 3
Seler, pokrojony 6 gałązek
Zmiażdżone ząbki czosnku 3
Przecier pomidorowy 7 łyżek
Mąka 3 łyżki
Pomidory z puszki, pokrojone 3 puszki
Bulion wołowy 600 ml
Poszatkowane pieczarki 300 g
Mieszanka przypraw 2 łyżeczki
Sól i świeżo zmielony czarny pieprz
W przypadku używania funkcji rumienienia/prużenia na początku zawsze należy dodać 30 ml (2 łyżki
stołowe) oleju do pieczenia.
Sposób przyrządzenia
• Zarumienić kiełbasę partiami za pomocą funkcji rumienienia/prużenia.
• Dodaj cebulę, czosnek i seler i smaż dopóki warzywa będą miękkie.
• Przełącz na ustawienie powolnego gotowania.
• Zmieszaj mąkę z puree i dodaj do pozostałych składników.
• Dobrze wymieszaj.
• Można gotować przez minimalny lub maksymalny czas dla danego ustawienia.
Sposób przyrządzenia
• Nie trzeba używać funkcji rumienienia/prużenia.
• Umieść szynkę w garnku i zalej wrzątkiem.
• Można gotować zgodnie z minimalnym lub maksymalnym czasem każdego ustawienia.
58
Page 59

SC461007MEE Rev1_Instruction Book 17/06/2014 17:11 Page 59
Sausage Pot
6,5 l
Olej 1 łyżka
Kiełbasy 1,5 kg
Pokrojona cebula 3 duże
Marchew, plasterki 5
Poszatkowany por 3
Bulion wołowy 1,5 litra
Sos korzenny 6 łyżek
Sos worcestershire 5 łyżek
Sól i świeżo zmielony czarny pieprz
W przypadku używania funkcji rumienienia/prużenia na początku zawsze należy dodać 30 ml (2 łyżki
stołowe) oleju do pieczenia.
Sposób przyrządzania
• Zarumienić kiełbasę partiami za pomocą funkcji rumienienia/prużenia.
• Dodaj warzywa i smaż do miękkości.
• Przełącz na ustawienie powolnego gotowania.
• Dodać pozostałe składniki i gotować przez minimalny czas dla danego ustawienia.
Curry z wołowiny
6,5 l
Olej roślinny 4 łyżki
Jabłka do gotowania, obrane i pokrojone 3 średnie
Pokrojona cebula 3 duże
Steki pokrojone w kostkę 1,5 kg
Curry w proszku 5 łyżeczek
Bulion wołowy 1 l
Sos mango 5 łyżek
Rodzynki sułtańskie 150 g
Pomidory z puszki, pokrojone 600 g
Sok z cytryny 3 łyżki
Mąka kukurydziana 5 łyżek
Sól i świeżo zmielony czarny pieprz
W przypadku używania funkcji rumienienia/prużenia na początku zawsze należy dodać 30 ml (2 łyżki
stołowe) oleju do pieczenia.
Sposób przyrządzania
• Lekko zarumienić mięso za pomocą funkcji rumienienia/prużenia.
• Dodaj cebule i smaż do miękkości.
• Przełącz na ustawienie powolnego gotowania
• Dodaj wszystkie pozostałe składniki i wymieszaj.
• Zmieszaj mąkę z puree i dodaj do pozostałych składników.
• Dobrze wymieszaj.
• Można gotować przez minimalny lub maksymalny czas dla danego ustawienia.
Tajskie curry wołowe
6,5 l
Masło 60 g
Wołowina pokrojona w kostkę 1 kg
Pokrojona cebula 2
Zmiażdżone ząbki czosnku 4
Masło orzechowe 6 łyżek
Mleko kokosowe 800 g
Ziemniaki pocięte na ćwiartki 700 g
Curry w proszku 4 łyżki
Tajski sos rybny 4 łyżki
Cukier lekko brązowy 4 łyżki
Bulion wołowy 1 l
Sposób przyrządzania
• Stop masło w garnku z włączoną funkcją rumienienia/prużenia i dodaj mięso, czosnek oraz cebulę,
a następnie zarumień wszystko. (W przypadku garnka 6,5 l mięso należy piec w dwóch etapach)
• Dodaj cebulę i czosnek i smaż dopóki warzywa będą miękkie.
• Dodaj wszystkie pozostałe składniki i wymieszaj.
• Przełącz na ustawienie powolnego gotowania.
• Najlepiej przygotować przy użyciu funkcji powolnego gotowania
Żeberka grillowe
6,5 l
Żeberka 1,5 kg
Sos BBQ 300 ml
Sposób przyrządzania
• Namocz na kilka godzin lub na noc żeberka w sosie.
• Przełóż do garnka i gotuj przez wymagany czas.
• Im dłuższy czas gotowania, tym mięso będzie delikatniejsze.
Pudding syropowy
6,5 l
Masło 125 g
Złoty syrop 4 łyżki
Drobny cukier 100 g
Jajka 2
Mąka samorosnąca 200 g
Mleko 2 łyżki
Sok z cytryny 2 łyżki
Sposób przyrządzania
• Nasmaruj masłem miskę do puddingu 1,25 l i wyłóż papierem do pieczenia.
• Wlej syrop na dno miski.
• Ubij masło i cukier na puszystą masę.
• Stopniowo dodaj jajka i mąkę oraz zmieszaj z mlekiem i sosem. Rozłóż łyżką masę na syropie i
nakryj papierem do pieczenia. Zwiąż sznurkiem i zrób uchwyt.
• Umieść w urządzeniu Supreme Precision 3 in 1 Slow Cooker i napełnij do połowy gorącą wodą.
• Najlepiej gotować na ustawieniu szybkiego duszenia przez 1:45 godz.
}
59
Page 60

SC461007MEE Rev1_Instruction Book 17/06/2014 17:11 Page 60
Pudding ryżowy
6,5 l
Masło 60 g
Ryż do puddingu 250 g
Cukier 250 g
Mleko 2 l
Gałka muszkatołowa 1 łyżeczka
Sposób przyrządzania
• Nasmaruj lekko garnek masłem.
• Dodaj wszystkie składniki i wymieszaj.
• Aby uzyskać najlepszy rezultat, należy wybrać ustawienie powolnego gotowania 1 (8–10 godz.).
Ciasto czekoladowe
6,5 l
Kakao 50 g
Wrząca woda 6 łyżek
Proszek do pieczenia 1 łyżeczka
Mąka samorosnąca 175 g
Drobny cukier 150 g
Olej 150 ml
Jajka 3
Sposób przyrządzania
• Wyłóż formę do ciasta 18 cm z papierem do pieczenia.
• Zmieszaj kakao z wrzącą wodą.
• Wymieszaj mąkę proszek do pieczenia i cukier w misce.
• Ubij razem jajka i olej, a następnie dodaj do polewy czekoladowej i dobrze wymieszaj.
• Przelej do formy i zakryj folią. Zwiąż sznurkiem i zrób uchwyt. Umieść w urządzeniu Supreme
Precision 3 in 1 Slow Cooker i napełnij do połowy gorącą wodą.
• Najlepiej gotować na ustawieniu szybkiego duszenia przez 1:45 godz.
Berry Cobbler
6,5 l
Świeże owoce/jagody (maliny, jagody, jeżyny itp.) 1,2 kg
Cukier 150 g
Mąka samorosnąca 200 g
Tłuszcz 100 g
Sól Szczypta
Starta skórka cytrynowa 2 cytryny
Mleko 6-8 łyżek
DWULETNIA GWARANCJA
Niniejsze urządzenie jest objęte dwuletnią gwarancją, upoważniającą do naprawy lub wymiany.
Zachowaj paragon ze sklepu jako dowód zakupu. Aby móc skorzystaç z niego w przyszłości,
przymocuj swój paragon do tylnej okładki tej instrukcji za pomocą zszywacza.
Jeśli urządzenie okaże się wadliwe, prosimy podaç następujące informacje. Informacje
umieszczone poniżej znajdują się na podstawie obudowy urządzenia.
Model
Numer seryjny
Przed opuszczeniem fabryki wszystkie produkty Morphy Richards są indywidualnie testowane.
Jeżeli urządzenie okaże się wadliwe, należy je zwróciç do punktu sprzedaży w ciągu 28 dni od
daty zakupu, w celu wymiany.
Jeśli urządzenie okaże się wadliwe po 28 dniach, lecz przed upływem 24 miesięcy od daty
zakupu, należy skontaktowaç się z lokalnym dystrybutorem, podając model i numer seryjny
urządzenia, lub napisaç do lokalnego dystrybutora, wysyłając list na podany adres.
Zostaniesz poproszony o dostarczenie, na poniższy adres, urządzenia (w odpowiednim
opakowaniu zabezpieczającym) wraz z kopią dowodu zakupu.
Jeśli powód wystąpienia wady urządzenia jest inny niż podane poniżej (1-9), zostanie ono
naprawione lub wymienione oraz odesłane w ciągu 7 dni roboczych od daty otrzymania.
Jeśli z jakiegoś powodu urządzenie zostanie wymienione w ciągu 2 lat gwarancji, gwarancja
nowego urządzenia będzie liczona od momentu nabycia oryginalnego produktu. Dlatego też
należy zachowaç oryginalny paragon lub fakturę z umieszczoną datą zakupu urządzenia.
Aby dwuletnia gwarancja obowiązywała, urządzenie musi byç użytkowane zgodnie z instrukcją
eksploatacji wydaną przez producenta. Na przykład niektóre urządzenia muszą byç regularnie
odkamieniane, a filtry należy utrzymywaç w czystości według zaleceƒ producenta.
Morphy Richards lub lokalny dystrybutor nie dokona naprawy ani wymiany urządzenia w ramach
gwarancji, jeśli:
1 Wada została spowodowana lub jest związana z przypadkową, niewłaściwą, niedbałą lub niezgodną
z zaleceniami producenta eksploatacją urządzenia albo jest wynikiem skoków napięcia lub
niewłaściwego transportu.
2 Urządzenie zostało podłączone do źródła zasilania o innym napięciu niż oznaczono na urządzeniu.
3 Dokonano prób naprawy urządzenia przez osoby nienależące do personelu serwisowego firmy
Morphy Richards (lub autoryzowanego sprzedawcy urządzenia).
4 Urządzenie było przedmiotem wypożyczania lub było użytkowane w celach innych niż przewidziane
w gospodarstwie domowym.
5 Urządzenie pochodzi z wtórnego rynku.
6 Firma Morphy Richards lub lokalny dystrybutor nie wykonuje, w ramach niniejszej gwarancji,
żadnych czynności serwisowych.
7 Gwarancja nie obejmuje materiałów eksploatacyjnych, np. worków, filtrów czy szklanych karafek.
8 Baterie oraz szkody powstałe w wyniku ich wycieku nie podlegają gwarancji.
9 Baterie oraz szkody powstałe w wyniku ich wycieku nie podlegają gwarancji.
Niniejsza gwarancja nie nadaje żadnych praw innych niż te wyraźnie określone powyżej oraz nie
pokrywa roszczeƒ związanych ze stratami lub uszkodzeniami wynikającymi z eksploatacji
urządzenia. Niniejsza gwarancja stanowi dodatkową korzyśç i nie narusza praw konsumenckich
użytkownika.
Sposób przyrządzania
• Włóż owoce do garnka i zmieszaj z połową cukru.
• Zmieszaj pozostały cukier z mąką, tłuszczem, solą i skórką cytrynową.
• Dodaj mleko i wymieszaj, ale nie za mocno.
• Umieść kulki z ciasta na środku garnka na owocach. Kulki z ciasta nie mogą dotykać brzegów
garnka, ponieważ urosną one podczas gotowania.
• Gotuj przez minimalny czas danego ustawienia.
Infolinia
W przypadku wystąpienia jakichkolwiek trudności z użytkowaniem urządzenia prosimy bez
wahania dzwonić na numer infolinii.
Z pewnością będziemy mogli służyć bardziej kompetentną pomocą niż sklep, w którym został
kupiony produkt.
Przed wybraniem numeru telefonu prosimy przygotować następujące informacje, które pomogą
naszym specjalistom sprawnie odpowiedzieć na wszelkie pytania:
• Nazwa produktu.
• Model produktu, podany na spodzie urządzenia.
• Numer seryjny produktu, podany na spodzie urządzenia
Strona internetowa
Można również skontaktować się z nami za pośrednictwem naszej strony internetowej:
sprawdzić naszą ofertę, zamówić urządzenia, części zamienne oraz akcesoria Morphy Richards.
60
Page 61

SC461007MEE Rev1_Instruction Book 17/06/2014 17:11 Page 61
}
61
Page 62

SC461007MEE Rev1_Instruction Book 17/06/2014 17:11 Page 62
g Morphy Richards products are intended for household use only.
See usage limitations within the location sub-heading in the important safety instructions.
Morphy Richards has a policy of continuous improvement in product quality and design.
The Company, therefore, reserves the right to change the specification of its models at any time.
The After Sales Division,
Morphy Richards Ltd, Mexborough, South Yorkshire, England, S64 8AJ
Helpline (office hours) UK 0845 871 0954 Republic of Ireland 1800 409119
o Australia - Sales office locations
Asko Appliances (Australia) Pty Ltd.
Victoria
35 Sunmore Close, Moorabbin. 3189 T: 03 8551 2200
f Les produits Morphy Richards sont conçus pour unusage exclusivement domestique. Voir les limitations d’usage dans le sous-titre
Positionnement des Consignes de sécurité importantes. Morphy Richards s’engage à mener une politique d’amélioration continue en termes
de qualité et de conception. Le fabricant se réserve donc le droit de modifier sans préavis la spécification de ses modèles.
Glen Dimplex France
Zl Petite Montagne Sud
12 rue des Cevennes
91017 EVRY - LISSES Cedex
www.glendimplex.fr
T: + 33 (0)1 69 11 11 91 F: + 33 (0)1 60 86 15 24
d Morphy Richards Produkte sind nur für den Einsatz im Haushalt vorgesehen. Lesen Sie dazu die Einschränkungen bezüglich der Nutzung, die
in der Zweitüberschrift der wichtigen Sicherheitshinweise erläutert werden. Ständige Verbesserungen an der Produktqualität und dem Design
gehören zur Philosophie von Morphy Richards. Aus diesem Grunde behält sich die Firma das Recht vor, die Angaben zu ihren Modellen
jederzeit zu ändern.
Glen Dimplex Deutschland GmbH
Bei Storungen oder Schaden wenden Sie sich bitte an unseren Kundenservice unter:
Hotline: +49 (0) 9 11/6 57 19-719 Fax: +49 (0) 1805-355 467
Österreich
Kundendienst
Merangasse 17
A-8010 Graz
T: +43(0) 316/323-041 F: +43(0)316/382-963
e Los productos Morphy Richards están concebidos solamente para usodoméstico. Consulte las limitaciones de uso en un subtítulo de las
instrucciones de seguridad importantes.
Morphy Richards tiene una política de mejora en la calidad ydiseño de sus artículos. La compañía, por lo tanto, se reserva el derecho
decambiar en cualquier momento las especificaciones de sus modelos.
h De producten van Morphy Richards zijn alleen bedoeld voor huishoudelijk gebruik. Zie gebruiksbeperkingen binnen de locatiesubtitel in de
belangrijke veiligheidsinstructies.
Morphy Richards streeft ernaar de kwaliteit en het design van zijn producten voortdurend te verbeteren. Het bedrijf behoudt zich daarom het
recht voor om de specificaties van de producten op ieder ogenblik te wijzigen.
Glen Dimplex Benelux BV
Antennestraat 84
1322 AS Almere
Nederland
T: +31-(0)-36 538 70 40 F: +31-(0)-36-538 70 41
Service: +31-(0)-36-538 70 55
E: info@glendimplex.nl www.morphyrichards.nl
b Les produits Morphy Richards sont conçus pour un usage exclusivement domestique. Voir les limitations d’usage dans le sous-titre
Positionnement des Consignes de sécurité importantes. Morphy Richards s’engage à mener une politique d’amélioration continue en termes
de qualité et de conception. Le fabricant se réserve donc le droit de modifier sans préavis la spécification de ses modèles.
De producten van Morphy Richards zijn alleen bedoeld voor huishoudelijk gebruik.
Morphy Richards streeft ernaar de kwaliteit en het design van zijn producten voortdurend te verbeteren. Het bedrijf behoudt zich daarom het
recht voor om de specificaties van de producten op ieder ogenblik te wijzigen.
Glen Dimplex Benelux BV
Gentsestraat 60
B- 9300 Aalst
België
T: +32-(0)-53 82 88 62 F: +32-(0)-53 82 88 63
E: info@glendimplex.be www.morphyrichards.be
p Os produtos Morphy Richards foram concebidos apenas para utilizaçãodoméstica. Consulte as limitações à utilização no sub-cabeçalho de
posicionamento, nas instruções importantes de segurança. A Morphy Richards respeita uma política de aperfeiçoamento contínuo
daqualidade e design do produto. Desta forma, a companhia reserva-se o direitode alterar as especificações destes modelos a qualquer
momento.
Imporaudio Lda
Rua D. Marcos Da Cruz 1281
4455-482 Perafita
Portugal
T: +351 22 996 67 40 Fax: +351 22 996 67 41
i I prodotti Morphy Richards sono concepiti esclusivamente per uso domestico. Vedere le limitazioni d’uso nel sottotitolo delle importanti istruzioni di sicurezza. Morphy
Richards è costantemente impegnata a migliorare la qualità e il design dei propri prodotti, pertanto si riserva il diritto di modificare le specifiche dei diversi modelli in
qualunque momento.
PER ASSISTENZA TECNICA:
HELPLINE 199.193.328 LUN-VEN 9,30-13,00 e 14,30-17,30.
Costo della chiamata 14,26 cent. di Euro al minuto IVA inclusa (da rete fissa).
E: assistenza@necchi.it F: +39-0693496270
I prodotti Morphy Richards sono distribuiti in Italia da:
Necchi Spa, Via Cancelliera 60 00040 Ariccia (RM).
q Morphy Richards produkter er kun beregnet til husholdningsbrug. Se brugsbegrænsningerne under overskriften om placering i de vigtige
sikkerhedsinstruktioner. Det er praksis hos
Morphy Richards at fortsætte udviklingen af produktets kvalitet og design. Firmaet forbeholder sig derfor retten til at ændre modellernes
specifikationer når som helst.
Albaline AS
Avedoreholmen 84
2650 Hvidovre
Denmark
T: (45) 3678 8083
s Produkter från Morphy Richards är endast avsedda för hushållsbruk.
Se användarbegränsningar under rubriken i de viktiga säkerhetsinstruktionerna.
Morphy Richards har en policy för kontinuerlig förbättring i produktkvalitet och utformning. Företaget förbehåller sig därför rätten att när som
helst ändra specifikationen för sina modeller.
} Produkty Morphy Richards są przeznaczone wyłącznie do użytku domowego. Zapoznaj się z informacjami na temat ograniczonego
uźytkowania urzàdzenia, które znajdujà się w podrozdziale instrukcji dotyczàcych bezpieczeňstwa. Morphy Richards prowadzi politykę ciągłej
poprawy jakości i wzoru produktów. Firma zastrzega sobie prawo zmiany specyfikacji modeli w dowolnej chwili.
Proteas Sp. Z o.o.
Ul Sarmacka 9/45
02-972 Warsaw
Poland
T: 0048 666 555603
≈ Изделия Morphy Richards предназначены только для бытового использования. См. информацию об ограничениях использования в
подразделе “Размещение” в главе “Важные меры предосторожности”. Morphy Richards постоянно совершенствует качество и дизайн
своей продукции. Таким образом, компания оставляет за собой право в любое время вносить изменения в технические
характеристики своих изделий.
Technopark Holding
Pr-t Mira 119, VVC EN1, Fl 1, pav. 61
Moscow 129223
Russia
T: 74 957 555777
∂ Výrobky Morphy Richards jsou určeny pouze k použití v domácnostech. Podívejte se na omezení použití v podtitulku umístění v důležitých bezpečnostních
pokynech.
Morphy Richards usiluje o neustálé zdokonalování kvality a provedení.
Proto si vyhrazuje právo kdykoliv změnit specifikace svých modelů.
Tauer Elektro a.s.
Milady Horákové 4
568 02 Svitavy
T: +420 461 540 130
t
Morphy Richards ürünleri sadece ev içi kullanım amaçlıdır.
Morphy Richards, ürün kalitesi ve tasarımında sürekli geliştirme politikasına sahiptir.
Bu nedenle Şirket, modellerinin özelliklerini herhangi bir zamanda değiştirme hakkını saklı tutar.
Gizpa Dayanıkılı Tüketim Mamülleri
Tic. ve Paz. İth. İhr. A.Ş.
Atatürk Cd. 19 Mayıs Mah. Esin Sok. No: 2/2
Koyzyataği-İSTANBUL
Tel +90(0216) 411 23 77 Fax +90(0216) 369 33 42
∑ Should your Morphy Richards product become faulty, please do not return the product
to the store, contact the Customer Care Help Line 086 111 5006 or e-mail help@creativehousewares.co.za for remedial action. For guarantee
claims please furnish your proof of purchase and product serial number.
Creative Housewares
27 Nourse Ave; Epping 2; Cape Town; 7460
P.O. Box 975; Eppindust; 7475
Tel: 021 534 8114 Fax 021 534 8086
www.creativehousewares.co.za
k
Τα προϊόντα Morphy Richards προορίζονται αποκλειστικά για οικιακή χρήση.
Δείτε περιορισμούς χρήσης κάτω από την κεφαλίδα Τοποθέτηση στις Σημαντικές οδηγίες ασφαλείας.
Η Morphy Richards ακολουθεί πολιτική συνεχούς
βελτίωσης της ποιότητας των προϊόντων και του σχεδιασμού.
Ως εκ τούτου, η εταιρεία διατηρεί το δικαίωμα τροποποίησης των προδιαγραφών των μοντέλων της ανά πάσα στιγμή.
Δεν εντοπίστηκε ιός στο παρόν εισερχόμενο μήνυμα.
Service Center:
Thetaco Traders,
Aradhippou Industrial Area,
Larnaka, Cyprus
Phone: 24-532220 or 24-531720 Fax: 24-532221
62
Page 63

SC461007MEE Rev1_Instruction Book 17/06/2014 17:11 Page 63
g For electrical products sold within the European Community.
At the end of the electrical products useful life it should not be disposed of with household waste.
Please recycle where facilities exist.
Check with your Local Authority or retailer for recycling advice in your country.
f Pour les appareils électriques vendus dans la Communauté européenne.
Lorsque les appareils électriques arrivent à la fin de leur vie utile, il ne faut pas les jeter à la poubelle.
Il faut les recycler dans des centres spécialisés, s’ils existent.
Consultez la municipalité ou le magasin où vous avez acheté l’appareil pour obtenir des conseils sur le recyclage dans votre pays.
d Für elektrische Artikel, die in der europäischen Gemeinschaft verkauft werden.
Am Ende der Nutzungsdauer sollte das Gerät nicht im regulären Hausmüll entsorgt werden.
Bitte einer Recycling-Sammelstelle zuführen.
Informationen über geeignete Recycling-Annahmestellen erhalten Sie bei Ihrer Stadt- bzw. Ortsverwaltung.
e Para productos eléctricos vendidos en la Comunidad Europea.
Al final de su vida útil los productos eléctricos no deberán desecharse con el resto de residuos domésticos.
Recíclelos en las instalaciones destinadas para ello.
Infórmese sobre consejos de reciclaje en su tienda habitual o consulte a las autoridades locales de su país.
h Voor elektrische producten verkocht in de Europese Gemeenschap.
Op het einde van zijn levensduur mag een elektrisch product niet worden meegegeven met het gewone huisvuil.
Laat het product recycleren als deze mogelijkheid voorzien is.
Vraag bij uw lokale overheid of in uw winkel waar u daarvoor terecht kunt.
p Para produtos eléctricos vendidos na Comunidade Europeia.
Quando os produtos eléctricos atingirem o final da sua vida útil, não devem ser eliminados juntamente com o lixo doméstico.
Faça a reciclagem nos locais apropriados.
Contacte as autoridades locais ou o revendedor para saber como efectuar a reciclagem no seu país.
i Per gli elettrodomestici venduti all’interno della Comunità europea.
Al termine della vita utile, non smaltire l’elettrodomestico nei rifiuti domestici.
Riciclarlo laddove esistano le strutture.
Verificare con la Locale Autorità o con il dettagliante in merito alle possibilità di riciclaggio nel proprio paese.
q Angående elektriske produkter, der sælges inden for EU.
Når det elektriske produkt har nået enden af sin levetid, må det ikke bortkastes sammen med husholdningsaffaldet.
Det bedes genbrugt, hvor der er faciliteter hertil.
Bed de lokale myndigheder eller forhandleren om råd om genbrug i dit land.
s Gäller elektriska produkter som säljs inom Europeiska Unionen.
När elektriska produkter inte längre kan användas ska de inte kastas med vanliga hushållssopor.
Lämna dem till återvinning där det finns möjlighet.
Kontakta lokala myndigheter eller försäljningsstället och kontrollera vad som gäller för återvinning i ditt land.
} Dla produktów elektrycznych sprzedawanych na terenie Wspólnoty Europejskiej.
Po zakończeniu okresu uźywalności produktów elektrycznych, nie naleźy ich wyrzucać wraz z odpadkami pochodzącymi z
gospodarstwa domowego.
Jeźeli istnieją odpowiednie zakłady zajmujące się utylizacją, produkty naleźy poddać recyklingowi.
W celu uzyskania porady na temat recyklingu w Twoim kraju zwróć się do miejscowych władz lub lokalnego sprzedawcy.
∂ Pro elektrické výrobky prodávané v Evropském společenství.
Elektrické výrobky se po skončení životnosti nesmí vyhazovat do domovního odpadu.
Nechte je recyklovat v příslušných zařízeních.
Informace o recyklaci ve vaší zemi si zjistěte od místních úřadů nebo prodejce.
k Για ηλεκτρικά προϊόντα τα οποία διατίθενται εντός της
Ευρωπαϊκής Κοινότητας.
Τα ηλεκτρικά προϊόντα, όταν λήξει η διάρκεια ζωής τους, δεν πρέπει να απορρίπτονται στα οικιακά απορρίΒΒατα.
Ανακυκλώστε τα προϊόντα, εφόσον υπάρχουν οι κατάλληλες εγκαταστάσεις.
Επικοινωνήστε Βε τις τοπικές αρχές ή το κατάστηΒα λιανικής πώλησης σχετικά Βε τις διαδικασίες
ανακύκλωσης στη χώρα σας.
g
d
e
p
i
q
}
63
Page 64

SC461007MEE Rev1_Instruction Book 17/06/2014 17:11 Page 64
SC461007MEE Rev1 06/14
 Loading...