


CM47560MEE Rev1_9225 47507 MEE pump - Jon 11/03/2011 09:05 Page 1
Meno Milk Frother
Please read and keep these instructions
Accessoire Meno pour faire mousser le lait
Merci de bien vouloir lire et conserver ces instructions
Meno Milchaufschäumer
Lesen Sie diese Bedienungsanleitung, und heben Sie sie gut auf
Hervidor de leche Meno
Lea estas instrucciones atentamente y guárdelas
Meno Melkopschuimer
Lees deze instructies en bewaar ze
Batedor de Leite Meno
Leia e guarde estas instruções
Montalatte Meno
Leggere e conservare le presenti istruzioni
Meno-mælkeskummer
Læs og gem denne vejledning
Meno mjölkskummare
Läs och spara denna bruksanvisning
Spieniacz do mleka Meno
Należy zapoznać się z niniejszą instrukcją obsługi i zachować ją na przyszłość`Z
Вспениватель молока Meno
Внимательно изучите и сохраните данное руководство
Pěnič mléka Meno
Přečtěte si tyto pokyny a uschovejte si je
Süt Köpürtücü
Bu talimatları okuyun ve saklayın
Συσκευή για αφρόγαλα Meno
Διαβάστε και φυλάξτε αυτές τις οδηγίες
g
f
d
e
h
p
i
q
s
}
≈
∂
t
k
CM47560MEE Rev1_9225 47507 MEE pump - Jon 11/03/2011 09:05 Page 2
⁄
¤
‹
›
›
fi
fl
‡
·
‚
„
‰
A
B
C
D
2

CM47560MEE Rev1_9225 47507 MEE pump - Jon 11/03/2011 09:05 Page 3
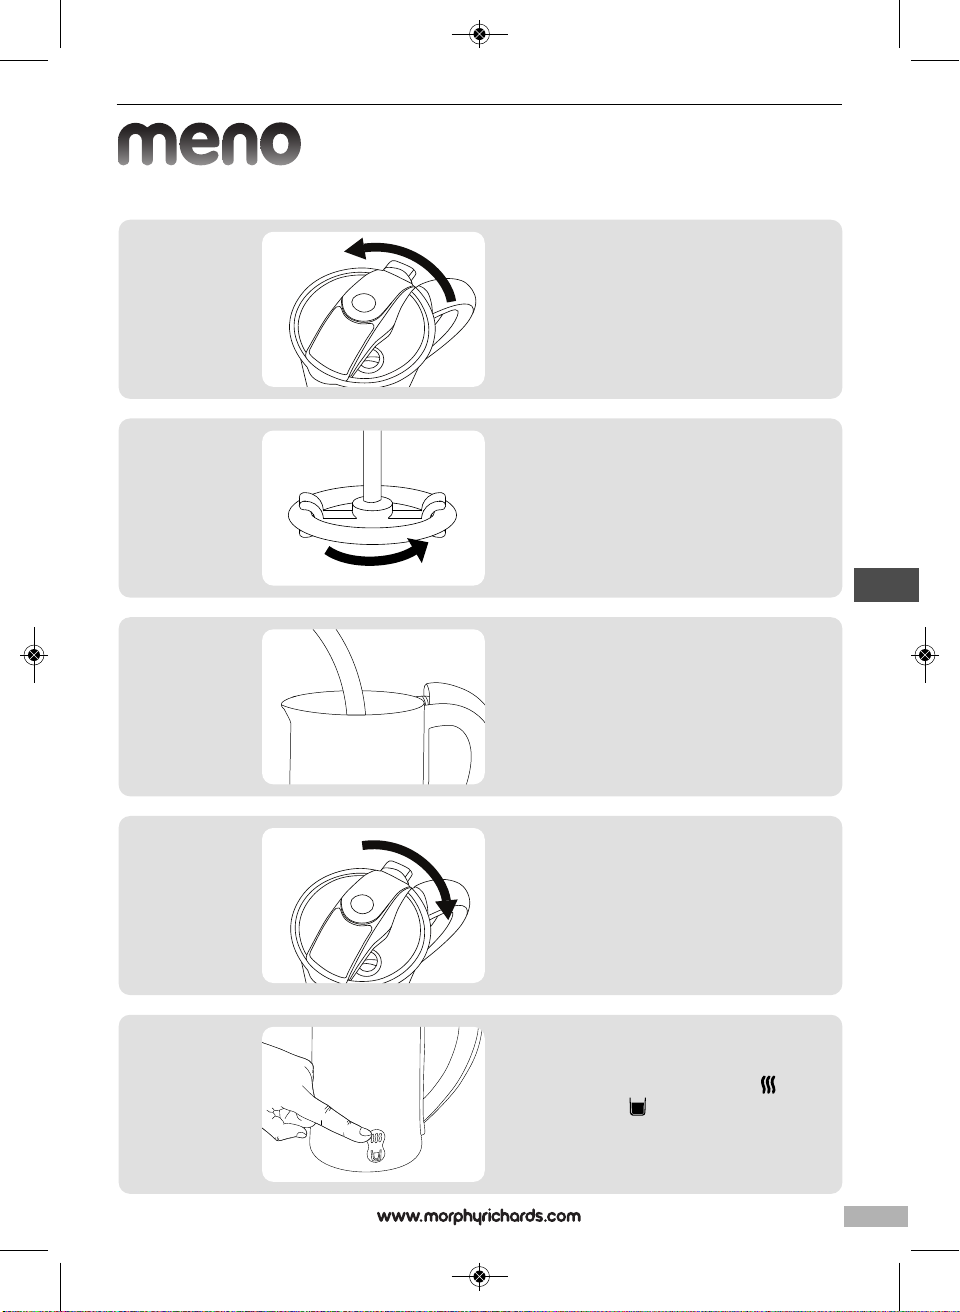
Please also refer to the main instruction booklet,
which contains important safety information and
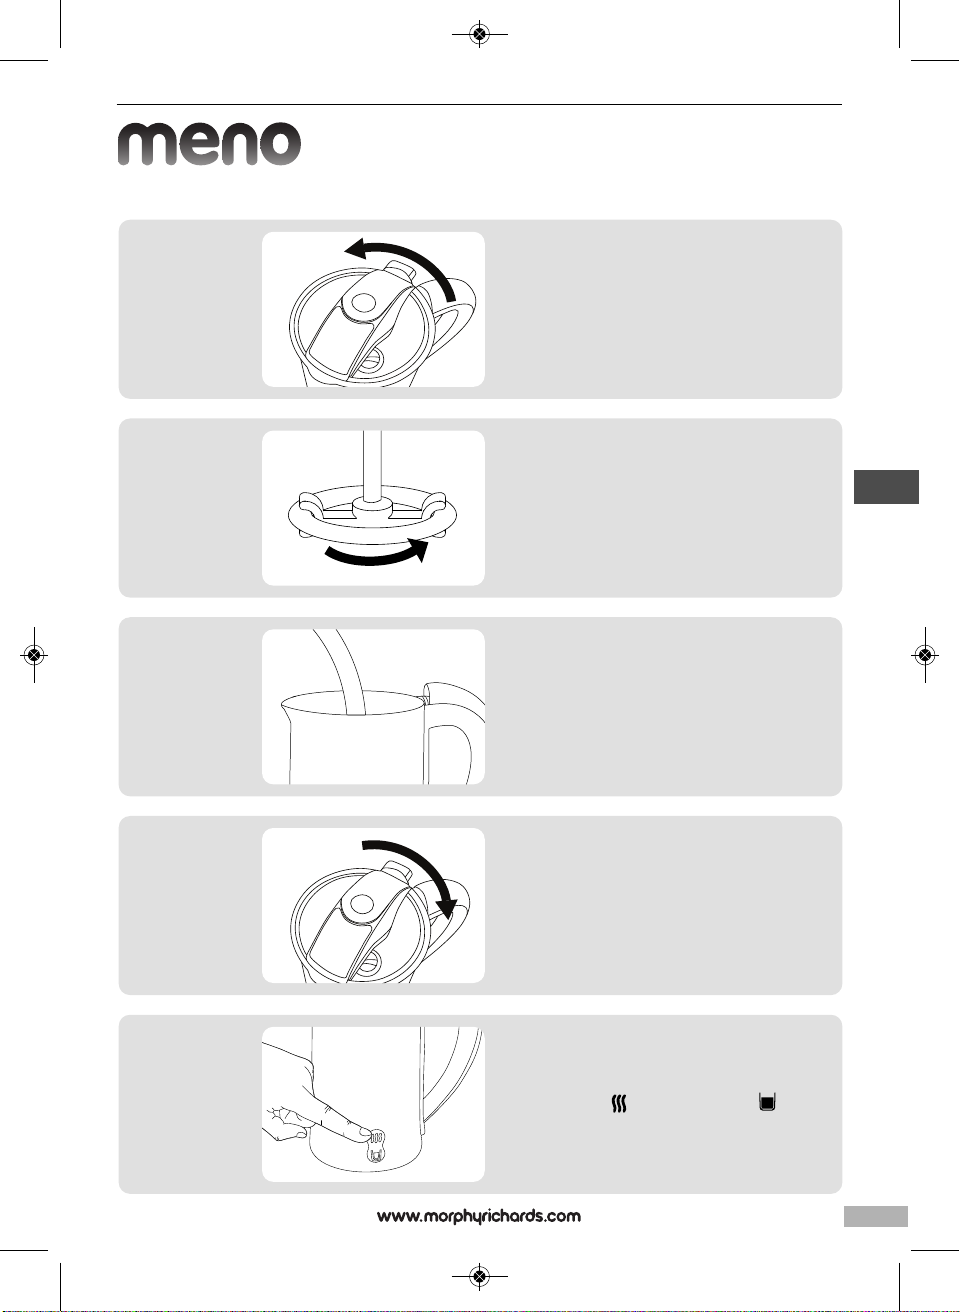
Quick start guide
1
2
more detail on how to use the Meno Milk Frother.
Remove the lid by twisting anti clockwise and lifting
upwards.
Check the Frothing Attachment is securely fixed to
the Blending Rod. Tighten by rotating clockwise.
g
3
4
5
Fill your Meno Milk Frother with milk, do not exceed
the max level indicator.
Replace the lid and secure in place by twisting
clockwise.
Your Meno Milk Frother will not operate until the lid is
locked into the handle.
Press either the Heat and Froth or Froth only
button, dependant upon the drink you are creating.
3

CM47560MEE Rev1_9225 47507 MEE pump - Jon 11/03/2011 09:05 Page 4
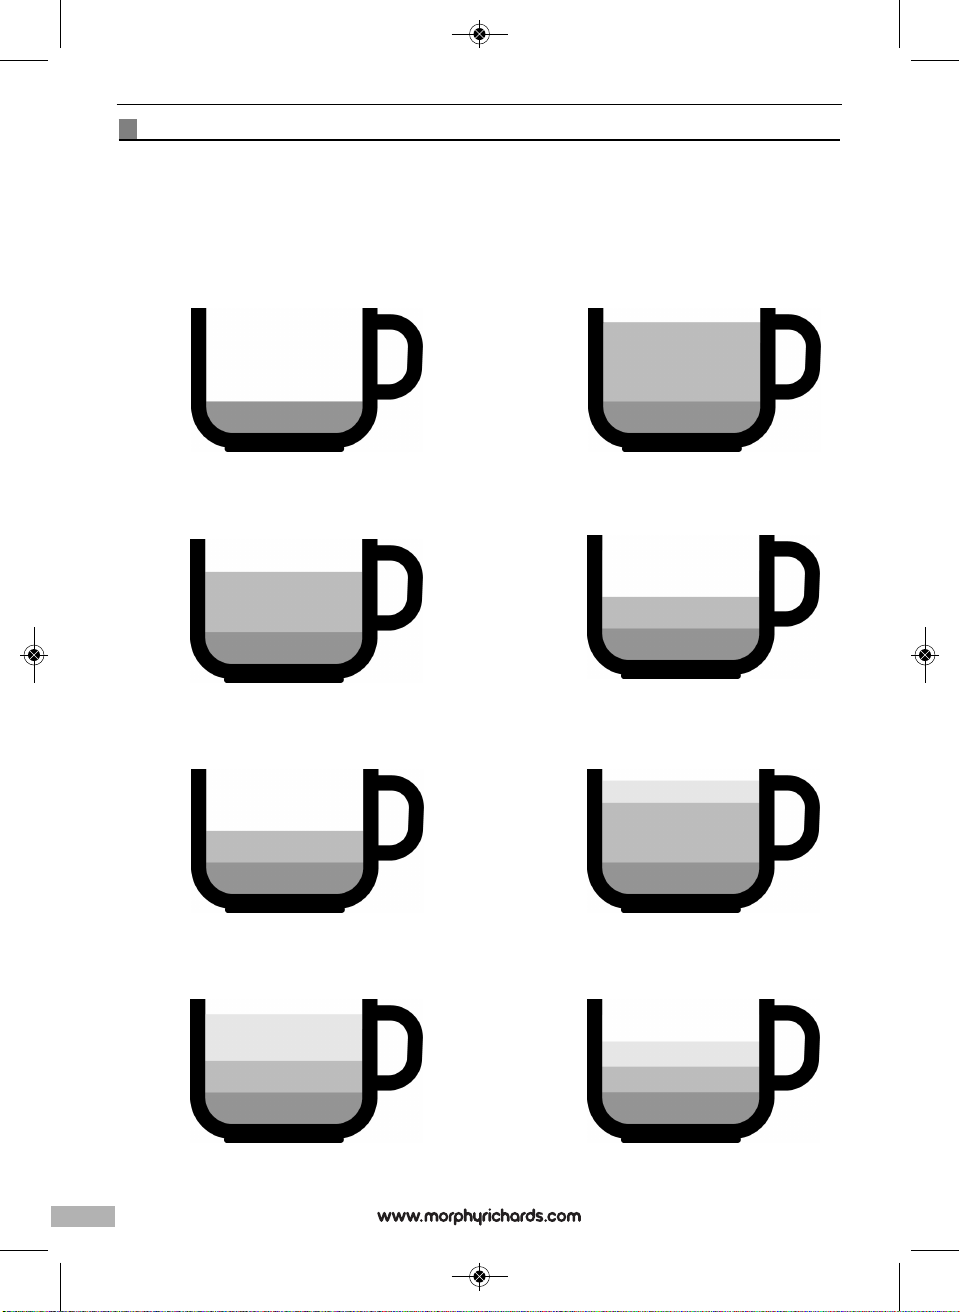
Coffee preparation guide
Your Meno milk frother helps you to create a variety of coffee drinks helping you to create the coffee shop experience in your own home.
The diagrams on this page are a simple guide showing you the percentage of ingredients that make up each of the drink types. Please
refer to the quick start guide at the front of this booklet on how to create the perfect frothy milk. For further details as well as hints and
tips please visit us at www.homeofthehouseproud.com
Water
Espresso
Espresso
Hot Milk
Espresso
Flat White
Whipped Cream
Espresso
Espresso con Panna
Espresso
Americano
Milk Froth
Espresso
Espresso Macchiato
Milk Froth
Hot Milk
Espresso
Caffé Latte
Milk Froth
Whipped Cream
Hot Milk
Hot Milk
Espresso
Cappuccino
4
Chocolate Syrup
Espresso
Caffé Mocha
CM47560MEE Rev1_9225 47507 MEE pump - Jon 11/03/2011 09:05 Page 5
g
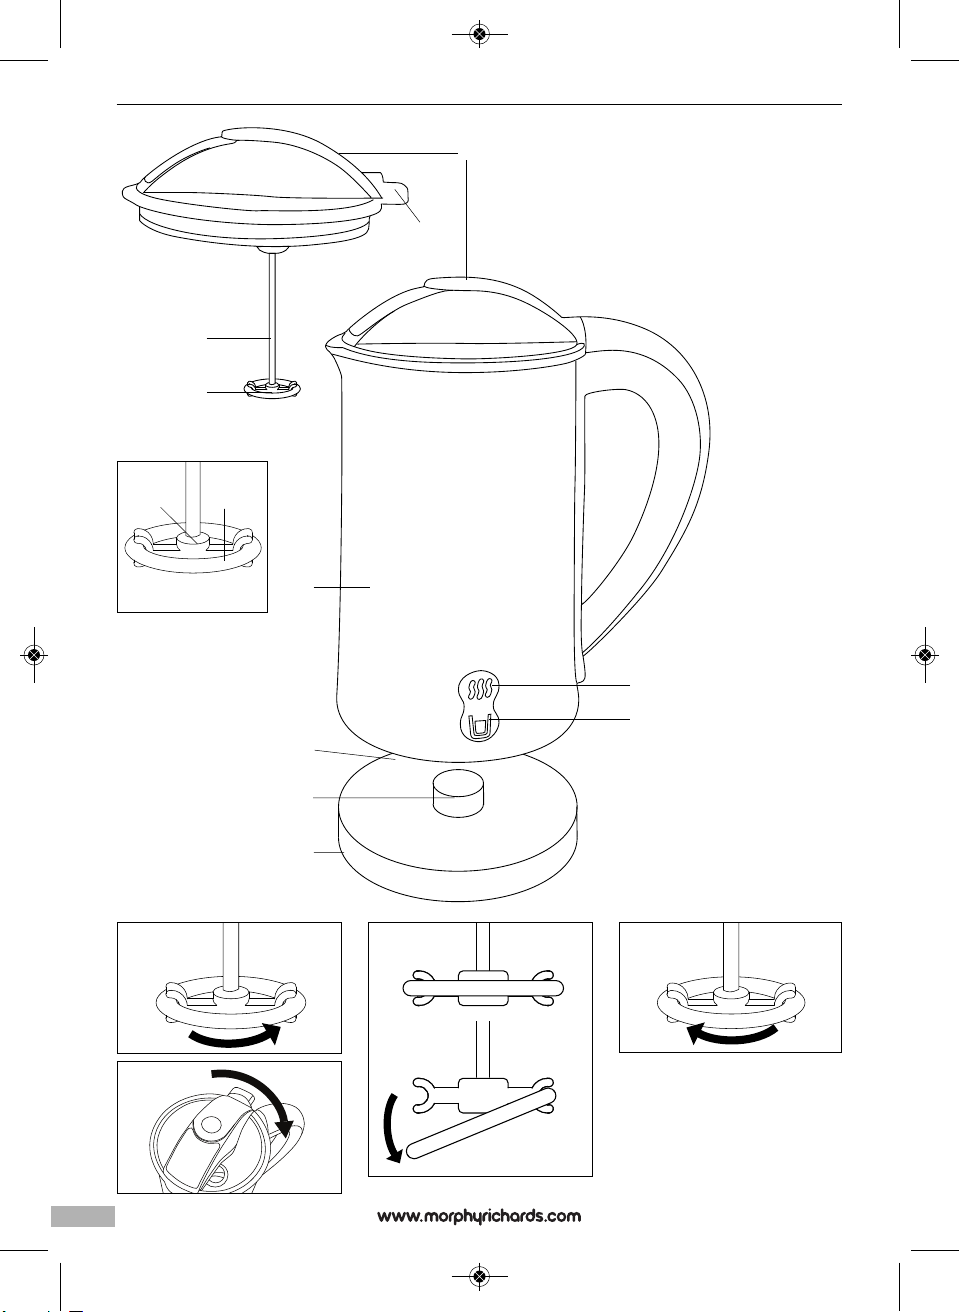
Features
⁄
Lid
¤
Lid Lock
‹
Blending Rod
›
Frothing Attachment
fi
Circular Whisk
fl
Jug
‡
Heat and Froth Button
·
Froth Button
‚
Base
„
360˚ Connector
‰
Cable Storage (underneath)
Before first use
Remove the protective cardboard between the base and jug.
Wash the inside of the Meno Milk Frother using warm soapy water
and a soft damp cloth. DO NOT use a scouring pad or abrasive
material as this will mark the stainless steel. Rinse and dry.
DO NOT IMMERSE IN WATER
Instructions for use
1. Place the Meno Milk Frother onto a dry, level surface.
2. Remove the lid by twisting anti clockwise and lifting upwards.
›
3. Ensure the Frothing Attachment
‹
. Screw it on by rotating it clockwise to tighten A.
Rod
4. Pour milk into the jug.
When using the Frothing Attachment with the Circular Whisk
use a minimum 150ml of milk, and a maximum of 300ml.
Do not exceed the max level indicator.
5. Put the lid back onto the jug by twisting clockwise into place. The
Milk Frother will not operate until the lid is locked into the handle
B
.
6. Select the required programme – Heat and Froth
To heat and froth
Press the Heat and Froth button ‡on the jug. The button will
light up red and the programme will begin.
It takes approximately 3 minutes to heat and froth your milk,
heating your milk to a temperature of 65ºC. When heating and
frothing is complete, the milk frother will automatically switch off.
To stop mid cycle, press the Heat and Froth button once, there
will be an approximate 30 second wait time before the
programme can be restarted.
Note: After heating and frothing, let the Milk Frother cool down for
approximately 30 seconds and always clean before reusing.
is fixed on to the Blending
‡
or Froth ·.
fi
To froth
Press the Froth button on the jug ·. The button will light up blue
and the programme will begin.
It takes approximately 2 minutes to froth your milk, when frothing
is complete, the milk frother will automatically switch off.
To stop mid cycle, press the Froth button once.
Always clean before reusing.
Pouring the milk
• To make the perfect frothy drink it is recommended that the froth
is separated from the milk.
• Use a spoon / spatula to retain the froth in the jug, pouring the
milk into your drink, adding the froth to the top of your drink
afterwards.
Flavoured milk drinks
Remove the lid by twisting anti clockwise and lifting upwards.
fi
Ensure the Circular Whisk
› C
Attachment
Pour milk into the jug. 150ml minimum capacity, 500ml maximum
capacity.
For one serving of flavoured milk, pour 25ml of syrup and 175ml
milk into the jug. For two servings, simply double the measures.
Put the lid back onto the jug by twisting clockwise into place. The
Milk Frother will not operate until the lid is locked.
Press the Froth button
It takes approximately 2 minutes for your drink to be prepared;
when complete the milk frother will automatically switch off.
is removed from the Frothing
.
·
.
Hot chocolate
This product is limited to 65˚C so that milk is not burnt. Therefore
it can be used for hot chocolate if you are satisfied to drink it at
this temperature.
Follow the instructions for ‘Flavoured milk drinks’ but use the heat
and froth button
‡
.
Cleaning and care
Always clean after every use.
›
Carefully remove the Frothing Attachment
‹
by unscrewing anti clockwise D.
Rod
Run the lid incorporating the Blending Rod, under warm water,
wipe with a soapy cloth and rinse.
Run the Frothing Attachment under warm water, wipe with a
soapy cloth and rinse.
Clean the outer surfaces of the jug and lid with a soft damp cloth.
In the case of heavy soiling, a mild cleaning agent can be used.
Clean the inside of the jug using hot water, a soft cloth, soap
solution and rinse well.
No parts of the Meno Milk Frother are dishwasher safe.
DO NOT SUBMERGE THE MILK FROTHER IN WATER
WARNING: Care must be taken when cleaning not to get the
electrical contacts on the lid or main body wet.
from the Blending
g
5
CM47560MEE Rev1_9225 47507 MEE pump - Jon 11/03/2011 09:05 Page 6
Helpline
If you have any difficulty with your appliance, do not hesitate to
call us.
We are more likely to be able to help than the store from where
you bought it.
Please have the following information ready to enable our staff to
deal with your query quickly.
• Name of the product.
• Model number as shown on the underside of the appliance.
• Serial number as shown on underside of the appliance.
UK Helpline 0844 871 0960
Replacement Parts 0844 873 0726
Ireland Helpline 1800 409 119
Website
You may also contact us through our website, or visit the site to
browse and purchase appliances, spare parts and accessories
from the extensive Morphy Richards range.
www.morphyrichards.com
Important safety instructions
The use of any electrical appliance requires the following common
sense safety rules.
Primarily there is danger of injury or death and secondly the
danger of damage to the appliance. These are indicated in the text
by the following two conventions:
WARNING: Danger to the person!
IMPORTANT: Damage to the appliance!
In addition, we offer the following safety advice.
Location
• This appliance is intended to be used in household and similar
applications such as:
farm houses;
by clients in hotels, motels and other residential type
environments;
bed and breakfast type environments.
It is not suitable for use in staff kitchen areas in shops, offices and
other working environments.
• Always locate your appliance away from the edge of a worktop.
• Ensure that the appliance is used on a firm, flat surface.
• Do not use the appliance outdoors, or near water.
Mains cable
• The mains cable should reach from the socket to the base unit
without straining the connections.
• Do not let the mains cable hang over the edge of a worktop
where a child could reach it.
• Do not let the cable run across an open space e.g. between a low
socket and table.
• Do not let the cable run across a cooker or toaster or other hot
area which might damage the cable.
• If the supply cable is damaged, it must be replaced by the
manufacturer, its service agent or similarly qualified persons in
order to avoid a hazard.
Personal safety
• WARNING: To protect against fire, electric shock and personal
injury, do not immerse cord, plug and appliance in water or
any other liquid.
• WARNING: Avoid contact with moving parts.
• Extreme caution must be observed when moving an appliance
with hot contents.
• Do not use product with wet or moist hands
• This appliance is not intended for use by persons (including
children) with reduced physical, sensory or mental capabilities, or
lack of experience and knowledge, unless they have been given
supervision or instruction concerning the use of the appliance by
a person responsible for their safety.
Children
• Never allow a child to operate this appliance.
• Children are vulnerable in the kitchen, particularly when
unsupervised and if appliances are being used or cooking is being
carried out.
• Teach children to be aware of dangers in the kitchen, warn them
of the dangers of reaching up to areas where the cannot see
properly or should not be reaching.
• Children should be supervised to ensure that they do not play
with the appliance.
Treating scalds
• Run cold water over the affected area immediately. Do not stop to
remove clothing, get medical help quickly.
6
CM47560MEE Rev1_9225 47507 MEE pump - Jon 11/03/2011 09:05 Page 7
Other safety considerations
• If the mains cable of this appliance is damaged do not use it.
Telephone Morphy Richards helpline for advice.
• The use of accessory attachments not recommended by the
manufacturer may cause damage to the unit.
• Do not place the appliance on or near heat sources such as gas
or electric stove, ovens, or burners.
• Keep the appliance and the cable away from heat, direct sunlight,
moisture, sharp edges and the like.
• This appliance is not intended to be operated by means of an
external timer or separate remote control system.
• When using the unit, ensure the lid is in place before switching on,
otherwise it will not work.
• Do not remove the lid until the blade has stopped.
• Never fill your milk frother above the fill line. The bottom line
indicates the level for frothing the milk and the top line indicates
the level for heating the milk.
• Always place the lid on its side (supported by the Blending Rod)
and not on its head.
• Do not attempt to connect any other appliance to the base unit or
this appliance to another base unit.
Electrical requirements
Check that the voltage on the rating plate of your appliance
corresponds with your house electricity supply which must be
A.C. (Alternating Current).
WARNING: THIS APPLIANCE MUST BE EARTHED.
UK only
If the socket outlets in your home are not suitable for the plug
supplied with this appliance, the plug should be removed and the
appropriate one fitted by a qualified individual.
Note: The plug removed from the mains cable, if severed, must be
destroyed as a plug with bared flexible cable is hazardous if
engaged into a live socket outlet.
Should the fuse in the 13 amp plug require changing a 13 amp
BS1362 fuse must be fitted.
THIS SECTION IS ONLY APPLICABLE FOR
CUSTOMERS IN UK AND IRELAND
REGISTERING YOUR TWO YEAR GUARANTEE
Your standard one year guarantee is extended for an additional
12 months when you register the product within 28 days of
purchase with Morphy Richards. If you do not register the
product with Morphy Richards within 28 days, your product is
guaranteed for 1 year. To validate your 2 year guarantee register
with us online at www.morphyrichards.co.uk
N.B. Each qualifying product needs to be registered with
Morphy Richards individually. Please refer to the one year
guarantee for more information.
YOUR ONE YEAR GUARANTEE
It is important to retain the retailer’s receipt as proof of
purchase. Staple your receipt to this back cover for future
reference. Please quote the following information if the product
develops a fault. These numbers can be found on the base of
the product.
Model no.
Serial no.
All Morphy Richards products are individually tested before
leaving the factory. In the unlikely event of any appliance
proving to be faulty within 28 days of purchase, it should be
returned to the place of purchase for it to be replaced. If the
fault develops after 28 days and within 12 months of original
purchase, you should contact the Helpline number quoting
Model number and Serial number on the product, or write to
Morphy Richards at the address shown. You may be asked to
return a copy of proof of purchase. Subject to the exclusions
set out below (see Exclusions), the faulty appliance will then be
repaired or replaced and dispatched usually within 7 working
days of receipt. If, for any reason, this item is replaced during
the 1 year guarantee period, the guarantee on the new item will
be calculated from original purchase date. Therefore it is vital to
retain your original till receipt or invoice to indicate the date of
initial purchase. To qualify for the 1 year guarantee, the
appliance must have been used according to the instructions
supplied. For example, crumb trays should have been emptied
regularly.
EXCLUSIONS
Morphy Richards shall not be liable to replace or repair the
goods under the terms of the guarantee where:
1 The fault has been caused or is attributable to accidental use,
misuse, negligent use or used contrary to the manufacturer’s
recommendations or where the fault has been caused by power
surges or damage caused in transit.
2 The appliance has been used on a voltage supply other than that
stamped on the products.
3 Repairs have been attempted by persons other than our service
staff (or authorised dealer).
4 The appliance has been used for hire purposes or non domestic
use.
5 The appliance is second hand.
6 Morphy Richards are not liable to carry out any type of servicing
work, under the guarantee.
7 Plastic filters for all Morphy Richards kettles and coffee makers
are not covered by the guarantee.
8 Batteries and damage from leakage are not covered by the
guarantee.
9 The filters have not be cleaned and replaced as instructed.
This guarantee does not confer any rights other than those
expressly set out above and does not cover any claims for
consequential loss or damage. This guarantee is offered as an
additional benefit and does not affect your statutory rights as a
consumer.
g
7
CM47560MEE Rev1_9225 47507 MEE pump - Jon 11/03/2011 09:05 Page 8
YOUR INTERNATIONAL TWO YEAR
GUARANTEE
This appliance is covered by two-year repair or replacement
warranty.
It is important to retain the retailers receipt as proof of
purchase. Staple your receipt to this back cover for future
reference.
Please quote the following information if the product develops a
fault. These numbers can be found on the base of the product.
Model no.
Serial no.
All Morphy Richards products are individually tested before
leaving the factory. In the unlikely event of any appliance
proving to be faulty within 28 days of purchase it should be
returned to the place of purchase for it to be replaced.
If the fault develops after 28 days and within 24 months of
original purchase, you should contact your local distributor
quoting Model number and Serial number on the product, or
write to your local distributor at the addresses shown.
You will be asked to return the product (in secure, adequate
packaging) to the address below along with a copy of proof of
purchase.
Subject to the exclusions set out below (1-9) the faulty
appliance will then be repaired or replaced and dispatched
usually within 7 working days of receipt.
If for any reason this item is replaced during the 2-year
guarantee period, the guarantee on the new item will be
calculated from original purchase date. Therefore it is vital to
retain your original till receipt or invoice to indicate the date of
initial purchase.
To qualify for the 2-year guarantee the appliance must have
been used according to the manufacturers instructions. For
example, appliances must have been descaled and filters must
have been kept clean as instructed.
The local distributor shall not be liable to replace or repair the
goods under the terms of the guarantee where:
1 The fault has been caused or is attributable to accidental use,
misuse, negligent use or used contrary to the manufacturers
recommendations or where the fault has been caused by power
surges or damage caused in transit.
2 The appliance has been used on a voltage supply other than that
stamped on the products.
3 Repairs have been attempted by persons other than our service
staff (or authorised dealer).
4 Where the appliance has been used for hire purposes or non
domestic use.
5 The appliance is second hand.
6 The local distributor are not liable to carry out any type of
servicing work, under the guarantee.
7 The guarantee excludes consumables such as bags, filters and
glass carafes.
8 Batteries and damage from leakage are not covered by the
guarantee.
9 The filters have not be cleaned and replaced as instructed.
This guarantee does not confer any rights other than those
expressly set out above and does not cover any claims for
consequential loss or damage. This guarantee is offered as an
additional benefit and does not affect your statutory rights as a
consumer.
AUSTRALIAN WARRANTY
This appliance is guaranteed for 2 years against faulty material,
components and workmanship.
This warranty is in addition and does not affect your statutory rights.
Proof of purchase must be produced for any warranty benefit.
In the unlikely event of any appliance proving to be faulty, securely
pack and return the item to the place of purchase accompanied by
the original receipt or invoice.
Our goods come with guarantees that cannot be excluded under
the Australian Consumer Law. You are entitled to a replacement or
refund for a major failure and for compensation for any other
reasonably foreseeable loss or damage. You are also entitled to have
the goods repaired or replaced if the goods fail to be of acceptable
quality and the failure does not amount to a major failure.
NOT COVERED BY THIS WARRANTY
(Australian only)
• If the appliance has not been used in accordance with the
manufacturers’ recommendations or Instructions.
• If the fault is deemed to be caused by abuse, misuse, neglect,
modifications or in proper use and or care
Eg: Kettles: Excessive build up of scale.
Toasters: Excessive build up of crumbs or foreign matter etc.
• Connection to incorrect voltage to that stamped on the product.
• Unauthorised repairs.
• Appliance used other than for domestic purposes.
• Excluding bags, filters, glass, carafes, and cutting blades.
• Freight and insurance costs.
If for any reason this item is replaced during the 2 year
guarantee period, the guarantee on the new item will be
calculated from original purchase date. Therefore it is vital to
retain your original receipt or invoice to indicate the date of
original purchase.
Morphy Richards’s policy is to continually improve quality
design and product quality. The company therefore reserves the
right to change any specifications or to carry out modifications
as deemed worthy at any time.
The Australian supplier ASKO Appliances reserves the right to
repair, modify, exchange or replace the faulty appliance with the
same or similar model or product of equivalent value.
8

CM47560MEE Rev1_9225 47507 MEE pump - Jon 11/03/2011 09:05 Page 9
Reportez-vous également au manuel d'utilisation
principal qui contient des consignes de sécurité
importantes et davantage de détails concernant
Guide de démarrage rapide
1
2
l'accessoire pour faire mousser le lait.
Retirez le couvercle en le soulevant et en le faisant
tourner dans le sens anti-horaire.
Vérifiez que l'accessoire pour faire mousser le lait est
bien fixé au pied mélangeur. Serrer en le faisant
tourner dans le sens horaire.
g
f
3
4
5
Remplissez l'accessoire Meno de lait, ne dépassez
pas l'indicateur de niveau maximum.
Remettez le couvercle en place en le faisant tourner
dans le sens horaire.
Votre accessoire Meno pour faire mousser le lait ne
fonctionnera pas, tant que le couvercle n'aura pas été
verrouillé dans la poignée.
Pressez sur le bouton Chauffer et faire mousser
ou seulement sur le bouton Faire mousser , suivant
la boisson que vous voulez préparer.
9
CM47560MEE Rev1_9225 47507 MEE pump - Jon 11/03/2011 09:05 Page 10
Guide pour la préparation du café
Votre accessoire pour faire mousser le lait vous aide à créer différents types de café et à amener la qualité du coffee shop à la maison.
Les schémas sur cette page sont destinés à vous guider et à vous montrer le pourcentage des ingrédients qui composent chacun des
types de boissons. Veuillez consulter le guide de démarrage rapide qui figure au début de ce manuel pour savoir comment créer le parfait
lait mousseux. Pour plus d'informations et pour découvrir nos trucs et astuces, rendez-vous sur le site www.homeofthehouseproud.com
Eau
Espresso
Espresso
Lait chaud
Espresso
Café crème
Crème fouettée
Espresso
Espresso con Panna
Espresso
Américano
Mousse de lait
Espresso
Espresso Macchiato
Mousse de lait
Lait chaud
Espresso
Caffé Latte
Mousse de lait
Crème fouettée
Lait chaud
Lait chaud
Espresso
Cappuccino
10
Sirop de chocolat
Espresso
Caffé Mocha
CM47560MEE Rev1_9225 47507 MEE pump - Jon 11/03/2011 09:05 Page 11
f
Caractéristiques
⁄
Couvercle
¤
Verrou du couvercle
‹
Pied mélangeur
›
Accessoire à mousse
fi
Fouet circulaire
fl
Pot
‡
Bouton Chauffer et faire mousser
·
Bouton Faire mousser
‚
Socle
„
Connecteur 360˚
‰
Rangement du cordon (sous l'appareil)
Avant la première utilisation
Retirez le carton protecteur placé entre le socle et le pot.
Nettoyez l'intérieur de l'accessoire Meno pour faire mousser le
lait, à l'eau chaude savonneuse, avec un chiffon doux. N'UTILISEZ
JAMAIS de tampons à récurer ou autres matériaux abrasifs car ils
risquent de rayer l'acier inoxydable. Rincer et sécher.
NE PAS LE PLONGER DANS L'EAU
Mode d'emploi
1. Placez l'accessoire pour faire mousser le lait sur une surface à
niveau plane et sèche.
2. Retirez le couvercle en le soulevant et en le faisant tourner dans le
sens anti-horaire.
›
3. Vérifiez que l'accessoire pour faire mousser le lait
au pied mélangeur
A
.
4. Versez le lait dans le pot.
Lorsque vous utilisez l'accessoire pour faire mousser le lait et le
fouet circulaire
plus de 300 ml.
Ne jamais le remplir au-delà du niveau maximal.
5. Remettez en place le couvercle sur le pot en le faisant tourner
dans le sens horaire. L'accessoire pour faire mousser le lait ne
fonctionnera pas, tant que le couvercle n'aura pas été verrouillé
dans la poignée
6. Sélectionnez le programme requis – Chauffer et faire mousser
‡
ou Faire mousser) ·.
–
‹
. Serrez-le en vissant dans le sens horaire
fi
n'employez pas moins de 150 ml de lait et pas
B
.
est bien fixé
Pour chauffer et faire mousser
Appuyez sur le bouton Chauffer et faire mousser ‡sur le pot. Le
voyant rouge s'allume et le programme démarre.
Il faut environ 3 minutes pour chauffer votre lait à 65ºC et le faire
mousser. L'accessoire pour faire chauffer le lait s'éteint
automatiquement une fois l'opération terminée.
Pour interrompre le cycle, appuyez une fois sur le bouton Chauffer
et faire mousser. Il faut attendre environ 30 secondes avant de
pouvoir redémarrer le programme.
Remarque : Après avoir fait chauffer et mousser le lait, laissez-le
refroidir pendant environ 30 secondes. Nettoyez toujours
l'accessoire avant de le réutiliser.
Pour faire mousser
Appuyez sur le bouton Chauffer et faire mousser sur le pot ·. Le
voyant bleu s'allume et le programme démarre.
Il faut environ 2 minutes pour faire mousser votre lait. L'accessoire
pour faire mousser le lait s'éteint automatiquement une fois
l'opération terminée.
Pour interrompre le cycle, appuyez une fois sur le bouton Faire
mousser.
Nettoyez toujours l'accessoire avant de le réutiliser.
Verser le lait
• Pour préparer la parfaite boisson mousseuse, il est recommandé
de séparer la mousse du lait.
• Utilisez une cuillère / spatule pour retenir la mousse dans le pot
en versant le lait dans votre boisson, puis ajoutez la mousse par
dessus.
Boissons au lait aromatisé
Retirez le couvercle en le soulevant et en le faisant tourner dans le
sens anti-horaire.
fi
Vérifiez que le fouet circulaire
› C
mousse
Versez le lait dans le pot. Capacité minimum de 150 ml, capacité
maximum de 500 ml.
Pour une seule boisson au lait aromatisé, versez 25 ml de sirop et
175 ml de lait dans le pot. Pour deux boissons, doublez
simplement les doses.
Remettez en place le couvercle sur le pot en le faisant tourner
dans le sens horaire. L'accessoire pour faire mousser le lait ne
fonctionnera pas, tant que le couvercle ne sera pas verrouillé.
Appuyez sur le bouton Faire mousser
La préparation de votre boisson prend environ 2 minutes.
L'accessoire pour faire mousser le lait s'éteint automatiquement
une fois l'opération terminée.
.
a été retiré de l'accessoire de
·
.
f
11
CM47560MEE Rev1_9225 47507 MEE pump - Jon 11/03/2011 09:05 Page 12
Chocolat chaud
Ce produit ne chauffe pas au-delà de 65ºC afin de ne pas brûler
le lait. Il peut toutefois être utilisé pour préparer un chocolat chaud
si cette température vous convient.
Suivez les instructions pour préparer des ‘boissons au lait
aromatisé’ et utilisez le bouton Chauffer et faire mousser
Entretien et nettoyage
Nettoyer toujours après chaque utilisation.
›
Retirez soigneusement l'accessoire à mousse
‹
mélangeur
Passez sous l'eau chaude le pied mélangeur, essuyez-le avec un
chiffon savonneux, puis rincez-le.
Passez sous l'eau chaude l'accessoire à mousse, essuyez-le avec
un chiffon savonneux, puis rincez-le.
Nettoyez les surfaces extérieures du pot et du couvercle avec un
chiffon doux humide. En cas de saleté tenace, utilisez un produit
de nettoyage doux.
Nettoyez l'intérieur du pot avec de l'eau savonneuse et un chiffon
doux et rincez bien.
Aucune pièce de l'accessoire pour faire mousser le lait ne peut
passer au lave-vaisselle.
NE TREMPEZ PAS L'ACCESSOIRE A FAIRE MOUSSER LE
LAIT DANS L'EAU
DANGER : Des précautions doivent être prises en nettoyant,
pour éviter que les contacts électriques sur le couvercle ou
l'appareil ne soient mouillés.
en dévissant dans le sens anti-horaire D.
du pied
Service d'assistance
Si vous rencontrez la moindre difficulté avec l'appareil, n'hésitez
pas à nous appeler.
Nous pourrons certainement vous aider plus efficacement que le
magasin où vous avez acheté l'appareil.
Merci de tenir les informations suivantes à portée de main pour
que notre personnel puisse répondre à vos questions le plus
rapidement possible.
• Nom du produit.
• Numéro du modèle, indiqué au-dessous de l'appareil.
• Numéro de série, indiqué au-dessous de l'appareil.
Site web
Vous pouvez également nous joindre par le biais de notre site web
ou visiter le site pour découvrir et acheter des appareils, des
pièces de rechange et des accessoires de la vaste gamme
Morphy Richards.
www.morphyrichards.com
Consignes de sécurité importantes
Lorsque vous utilisez un appareil électrique, vous devez respecter
des consignes de sécurité de bon sens.
Tout appareil électrique peut blesser ou même provoquer la mort.
‡
.
Vous risquez également d'endommager l'appareil. Ces dangers
sont indiqués dans le texte par les deux conventions suivantes :
DANGER : Risque de blessure !
IMPORTANT : Risque d'endommager l'appareil !
Nous vous donnons également les conseils de sécurité suivants.
Positionnement
• Cet appareil est conçu pour être utilisé dans un cadre domestique
ou similaire tel que :
les fermes ;
par les clients dans les hôtels, motels et autres environnements
de type
résidentiel ;
les environnements de type « Bed and Breakfast ».
Il n'est pas destiné à être utilisé dans les cuisines réservées au
personnel des magasins, bureaux et autres lieux de travail.
• Positionnez toujours votre appareil loin du bord du plan de travail.
• Utilisez l'appareil sur une surface solide et plane.
• N'utilisez jamais l'appareil à l'extérieur ou près d'une source
d'eau.
Cordon d'alimentation
• Positionnez le socle de l'appareil de manière à ce que le cordon
d'alimentation secteur puisse atteindre une prise électrique sans
forcer sur les connexions.
• Ne laissez pas le cordon d'alimentation dépasser du bord d'un
plan de travail, à un endroit où un enfant pourrait l'atteindre.
• Ne laissez jamais le cordon traverser un espace accessible, par
exemple entre une prise murale basse et une table.
• Ne le laissez pas passer au-dessus d'une cuisinière, d'un grillepain ou d'une autre surface chaude qui pourrait endommager le
câble.
• Si le cordon d'alimentation est endommagé, il doit être remplacé
par le fabricant, son agent de service ou une personne qualifiée
afin d'éviter tout risque.
12
CM47560MEE Rev1_9225 47507 MEE pump - Jon 11/03/2011 09:05 Page 13
Sécurité personnelle
• DANGER : Pour vous protéger des risques d'incendie, de
choc électrique et de blessure, ne plongez pas le cordon
d'alimentation, la fiche électrique ou l'appareil dans l'eau ou
dans d'autres liquides.
• DANGER : Évitez de toucher les pièces mobiles .
• Soyez extrêmement prudent lorsque vous déplacez un appareil
dont le contenu est chaud.
• N'utilisez pas l'appareil lorsque vos mains sont mouillées ou
humides.
• Cet appareil n'est pas conçu pour être utilisé par des personnes
(y compris les enfants) ayant des capacités physiques,
sensorielles ou mentales réduites, ou un manque d'expérience et
de connaissance, sauf si elles sont surveillées ou si elles ont reçu
des instructions concernant l'utilisation de l'appareil par une
personne responsable de leur sécurité.
Enfants
• Ne laissez jamais un enfant utiliser cet appareil.
• Les enfants sont vulnérables dans la cuisine, surtout lorsqu'ils ne
sont pas surveillés, lorsque des appareils fonctionnent ou pendant
la préparation des repas.
• Apprenez aux enfants à reconnaître les dangers de la cuisine,
expliquez-leur les risques qu'ils courent lorsqu'ils allongent le bras
en hauteur pour prendre quelque chose qu'ils ne voient pas
correctement ou qu'ils ne devraient pas toucher.
• Une surveillance s'impose pour éviter que les enfants ne jouent
avec l'appareil.
Traitement des brûlures
• Faites couler immédiatement de l'eau froide sur la zone touchée.
Ne prenez pas le temps de vous changer, appelez rapidement un
médecin.
Autres consignes de sécurité
• Si le cordon d'alimentation de cet appareil est endommagé, ne
l'utilisez pas. Appelez le service d'assistance de Morphy Richards
pour demander conseil.
• Si vous utilisez des accessoires non recommandés par le
fabricant, vous risquez d'endommager l'appareil.
• Ne placez pas l'appareil sur ou près de sources de chaleur telles
que des cuisinières, fours ou plaques de cuisson à gaz ou
électriques.
• Tenez l'appareil et son cordon d'alimentation éloignés de la
chaleur, des rayons du soleil, de l'humidité, des arêtes vives et
autres risques.
• L'appareil n'est pas conçu pour être commandé par un
programmateur extérieur ni par un système de commande à
distance.
• Lorsque vous utilisez l'appareil, assurez-vous que le couvercle est
bien en placé avant de le mettre sous tension, autrement il ne
fonctionnera pas.
• Ne retirez pas le couvercle avant que la lame soit immobilisée.
• Ne remplissez pas votre accessoire à faire mousser le lait au-delà
du repère. Le repère inférieur indique le niveau pour faire mousser
le lait et le repère supérieur désigne le niveau pour chauffer le lait.
• Placez toujours le couvercle sur son côté (soutenu par le pied
mélangeur) et non sur sa tête.
• Ne tentez pas de connecter un autre appareil sur le socle ou de
mettre cet appareil sur un autre socle.
Alimentation électrique
Vérifiez que la tension indiquée sur la plaque signalétique de
l'appareil correspond à l'alimentation électrique de votre domicile,
qui doit être en courant alternatif (CA).
DANGER : CET APPAREIL DOIT ÊTRE MIS À LA TERRE.
VOTRE GARANTIE DE DEUX ANS
Pour la clientèle en France
Il est important de conserver le ticket de caisse comme preuve
d’achat. Agrafez votre ticket de caisse à cette notice
d'utilisation; vous pourrez ainsi l’avoir sous la main
ultérieurement.
Merci de donner les informations ci-dessous si votre appareil
tombe en panne. Vous trouverez ces références à la base de
l’appareil.
Numéro du modèle
Numéro de série
Tous les produits Morphy Richards sont testés individuellement
avant de quitter l’usine.
Si un problème survient dans les 24 mois qui suivent l’achat
d’origine, vous devez contacter le magasin où vous avez
acheté votre appareil muni de votre ticket de caisse, celui ci le
renverra à Glen Dimplex France pour expertise.
Sous réserve des exclusions indiquées ci-dessous (1 à 9),
l’appareil défectueux sera alors réparé ou remplacé et
réexpédié dans un délai de 15 jours ouvrables maximum à
compter de son arrivée.
Si, pour quelque raison que ce soit, l’article est remplacé
pendant la période de garantie de deux ans, la période de
garantie du nouvel article sera calculée à partir de la date
d’achat d’origine. Vous devez donc absolument conserver votre
ticket de caisse ou votre facture d’origine pour indiquer la date
d’achat.
Pour bénéficier de la garantie de deux ans, l’appareil doit avoir
été utilisé conformément aux instructions du fabricant. Par
exemple, les fers doivent avoir été détartrés et les filtres doivent
avoir été nettoyés selon les instructions.
Morphy Richards ne sera pas dans l’obligation de remplacer ou
réparer les articles aux termes de la garantie dans les
circonstances suivantes :
1 Si le problème provient d’une utilisation accidentelle, d’une
utilisation abusive ou négligente, ou si l’appareil a été utilisé de
manière contraire aux recommandations du fabricant, ou encore
lorsque le problème provient de sautes de puissance ou de
dégâts occasionnés en transit.
2 Si l’appareil a été utilisé sur une alimentation électrique dont la
tension est différente de celle qui est indiquée sur l’appareil.
f
13
CM47560MEE Rev1_9225 47507 MEE pump - Jon 11/03/2011 09:05 Page 14
3 Si des personnes autres que nos techniciens (ou l’un de nos
revendeurs agréés) ont tenté de faire des réparations.
4 Si l’appareil a été loué ou utilisé dans un contexte non
domestique.
5 Si l’appareil est d’occasion.
6 Morphy Richards n’est pas dans l’obligation de réaliser des
travaux d’entretien, quels qu’ils soient, aux termes de la garantie.
7 La garantie exclut les consommables tels que les sacs, les filtres
et les carafes en verre.
8 Les batteries et les dégâts provoqués par leur fuite ne sont pas
couverts par la garantie.
9 Les filtes n’ont pas été nettoyés ou remplacés suivant les
instructions.
Cette garantie ne confère aucun droit à l’exception de ceux qui
sont expressément indiqués ci-dessus, et ne couvre aucune
réclamation pour dommages immatériels ou indirects. Cette
garantie est offerte comme avantage supplémentaire et n’a
aucune incidence sur vos droits légaux en tant que
consommateur.
Pour la clientèle en Belgique
Les produits de Morphy Richards sont produits conformément
les normes de qualité, agrée international. Au-dessus vos droits
légaux, Morphy Richards vous garantit qu’à partir d’achat ce
produit sera sans défauts de fabrication ou de matériels
pendant une période de deux ans.
Il est important de conserver votre bon d’achat comme preuve.
Agrafez votre ticket à cette notice d’installation.
Veuillez mentionner ces informations ci-dessous si votre
appareil tombe en panne. Vous trouverez ces informations sur la
base de l’appareil.
Numéro du modèle
Numéro de série
Si, pour quelque raison que ce soit, l’article est remplacé
pendant la période de garantie (deux ans), la période de
garantie du nouvel article sera calculée à partir de la date
d’achat d’origine. Il est donc très importants de conserver votre
bon d’achat original afin de connaître la date initiale d’achat.
Cette garantie vaut uniquement quand l’appareil a été utilisé
conformément aux instructions du fabricant. Par exemple, les
appareils doivent être détartrés et les filtres doivent être tenus
propre selon le mode d’emploi.
Morphy Richard ne sera pas dans l’obligation de remplacer ou
réparer les articles aux termes de la garantie dans les
circonstances suivantes
1 Si le problème, prévient d’une utilisation accidentelle, d’une
utilisation abusive ou négligente, ou si l’appareil a été utilisé de
manière contraire aux recommandations du fabricant, ou encore
lorsque le problème provient de source de puissance ou de
dégâts occasionnés en transit.
2 Si l’appareil a été utilisé sur une alimentation électrique dont la
tension est différente de celle qui est indiquée sur l’appareil.
3 Si des personnes, autres que nos techniciens (ou revendeurs
agrées) ont tenté de faire des réparations.
4 Si l’appareil a été loué ou utilisé dans un contexte non
14
domestique.
5 Si l’appareil est d’occasion.
6 Morphy Richards n’est pas dans l’obligation de réaliser des
travaux d’entretien, quels qu’ils soient, aux termes de la garantie.
7 La garantie ne couvre pas les sachets, filtres et brocs en verre.
8 Les batteries et les dégâts provoqués par leur fuite ne sont pas
couverts par la garantie.
9 Les filtres n’ont pas été nettoyés ou remplacés suivant les
instructions.
Cette garantie ne confère aucun droit à l’exception de ceux qui
sont expressément indiqués ci-dessus, et ne couvre aucune
réclamation pour dommages immatériels ou indirects. Cette
garantie est offerte comme avantage supplémentaire et n’a
aucune incidence sur vos droits légaux en tant que
consommateur.
CM47560MEE Rev1_9225 47507 MEE pump - Jon 11/03/2011 09:05 Page 15
Ziehen Sie auch die umfangreiche
Bedienungsanleitung mit wichtigen
Sicherheitshinweisen und ausführlichen
Anweisungen für den Gebrauch des Meno
Kurzanleitung
1
Milchaufschäumers zu Rate.
Nehmen Sie den Deckel ab, indem Sie in nach links
drehen und anheben.
2
3
4
Prüfen Sie, dass der Aufschäumaufsatz fest am
Mischstab angebracht ist. Schrauben Sie ihn durch
Drehen nach links fest.
Füllen Sie Ihren Meno Milchaufschäumer mit Milch,
aber nicht über die Höchstfüllstandsmarkierung
hinaus.
Legen Sie den Deckel wieder auf und drehen Sie in
nach rechts fest.
Ihr Meno Milchaufschäumer funktioniert nur, wenn der
Deckel im Griff verriegelt ist.
d
5
Drücken Sie entweder die Taste „Erwärmen und
Aufschäumen“ oder nur „Aufschäumen“ , je
nach gewünschtem Getränk.
15

CM47560MEE Rev1_9225 47507 MEE pump - Jon 11/03/2011 09:05 Page 16
Anleitungen zur Zubereitung von Kaffee
Mit Ihrem Meno Milchaufschäumer können Sie viele verschiede Kaffeegetränke zaubern und Café-Atmosphäre zuhause erleben. Die
schematischen Abbildungen auf dieser Seite zeigen Ihnen den prozentualen Anteil der Zutaten für die verschiedenen Getränkearten. Bitte
lesen Sie die Kurzanleitung am Anfang dieser Anleitung, um zu erfahren, wie Sie den perfekten Milchschaum kreieren. Weitere
Einzelheiten sowie praktische Tipps finden Sie unter www.homeofthehouseproud.com
Wasser
Espresso
Espresso
Heiße Milch
Espresso
Einfacher Milchkaffee
Schlagsahne
Espresso
Espresso con Panna
Espresso
Americano
Milchschaum
Espresso
Espresso Macchiato
Milchschaum
Heiße Milch
Espresso
Caffé Latte
Milchschaum
Schlagsahne
Heiße Milch
Heiße Milch
Espresso
Cappuccino
16
Schokoladesirup
Espresso
Caffé Mocha
CM47560MEE Rev1_9225 47507 MEE pump - Jon 11/03/2011 09:05 Page 17
d
Ausstattung
⁄
Deckel
¤
Deckelverriegelung
‹
Mischstab
›
Aufschäumaufsatz
fi
Rundschneebesen
fl
Kanne
‡
Taste „Erwärmen und Aufschäumen“
·
Taste „Aufschäumen“
‚
Unterteil
„
360° drehbare Kontaktverbindung
‰
Kabelfach (darunter)
Vor dem ersten Gebrauch
Nehmen Sie den Schutzkarton zwischen Unterteil und Kanne
heraus.
Reinigen Sie das Innere des Meno Milchaufschäumers mit warmer
Seifenlauge und einem weichen, feuchten Tuch. AUF KEINEN
FALL einen Scheuerschwamm oder ein Scheuermittel benutzen,
da diese Streifen auf den Edelstahlflächen hinterlassen. Abspülen
und gründlich trocknen lassen.
NICHT IN WASSER TAUCHEN
Benutzungshinweise
1. Stellen Sie den Meno Milchaufschäumer auf eine trockene, ebene
Fläche.
2. Nehmen Sie den Deckel ab, indem Sie ihn nach links drehen und
anheben.
4
3. Stellen Sie sicher, dass der Aufschäumaufsatz
4. Gießen Sie Milch in die Kanne
5. Setzen Sie den Deckel wieder auf die Kanne und drehen Sie ihn
6. Wählen Sie das gewünschte Programm aus - Erwärmen und
3
Mischstab
ihn nach rechts drehen
Wenn Sie den Aufschäumaufsatz mit dem Rundschneebesen
benutzen, gießen Sie mindestens 150 ml und höchstens 300 ml
Milch ein.
Nicht über das Maximum hinaus befüllen.
nach rechts fest. Der Meno Milchaufschäumer funktioniert nur,
wenn der Deckel im Griff
Aufschäumen –
angebracht ist. Schrauben Sie ihn fest, indem Sie
A
.
B
verriegelt ist.
7
oder Aufschäumen 8.
fest am
5
Erwärmen und Aufschäumen
Drücken Sie die Taste „Erwärmen und Aufschäumen“ 7auf der
Kanne. Die Taste leuchtet rot auf, und das Programm startet.
Es dauert etwa 3 Minuten, um die Milch auf eine Temperatur von
65 °C zu erwärmen und aufzuschäumen. Nach Abschluss des
Erwärm- und Aufschäumvorgangs schaltet der Milchaufschäumer
automatisch ab.
Um das Gerät während des Vorgangs anzuhalten, drücken Sie die
Taste „Erwärmen und Aufschäumen“ einmal. Nach einer Wartezeit
von 30 Sekunden kann das Programm erneut gestartet werden.
Hinweis: Lassen Sie die den Milchaufschäumer nach Abschluss
des Erwärm- und Aufschäumvorganges circa 30 Sekunden
abkühlen. Reinigen Sie das Gerät stets bevor Sie es wieder
verwenden.
Aufschäumen
Drücken Sie die Taste „Aufschäumen“ auf der Kanne 8. Die Taste
leuchtet blau auf, und das Programm startet.
Es dauert etwa 2 Minuten, um die Milch aufzuschäumen. Nach
Abschluss des Aufschäumvorgangs schaltet der
Milchaufschäumer automatisch ab.
Um das Gerät während des Vorgangs anzuhalten, drücken Sie die
Taste „Aufschäumen“ einmal.
Reinigen Sie das Gerät stets bevor Sie es wieder verwenden.
Milch ausgießen
• Um das perfekte Schaumgetränk zuzubereiten, wird empfohlen,
dass der Schaum von der Milch getrennt wird.
• Gießen Sie die Milch in das Getränk und halten Sie dabei den
Schaum mit einem Löffel/Spatel in der Kanne zurück und geben
Sie ihn am Ende auf Ihr Getränk.
Aromatisierte Milchgetränke
Nehmen Sie den Deckel ab, indem Sie ihn nach links drehen und
anheben.
5
Achten Sie darauf, dass der Rundschneebesen
Aufschäumaufsatz
Gießen Sie Milch in die Kanne (mindestens 150 ml, höchstens 500
ml).
Für eine Portion aromatisierter Milch gießen Sie 25 ml Sirup und
175 ml Milch in die Kanne. Für zwei Portionen verdoppeln Sie die
Mengen einfach.
Setzen Sie den Deckel wieder auf die Kanne und drehen Sie ihn
nach rechts fest. Der Meno Milchaufschäumer funktioniert nur,
wenn der Deckel verriegelt ist.
Drücken Sie die Taste „Aufschäumen“
Es dauert etwa 2 Minuten, bis das Getränk zubereitet ist. Nach
Abschluss schaltet der Milchaufschäumer automatisch ab.
4 C
abgenommen wird.
8
vom
.
d
17
CM47560MEE Rev1_9225 47507 MEE pump - Jon 11/03/2011 09:05 Page 18
Heiße Schokolade
Dieses Produkt erwärmt Getränke nur auf 65 °C, damit die Milch
nicht anbrennt. Wenn Sie mit dieser Temperatur zufrieden sind,
können Sie das Gerät also auch für die Zubereitung von heißer
Schokolade verwenden.
Befolgen Sie die Anleitungen für „Aromatisierte Milchgetränke“,
drücken Sie jedoch die Taste „Erwärmen und Aufschäumen“
Reinigung und Pflege
Nach jedem Gebrauch reinigen.
4
Trennen Sie den Aufschäumaufsatz
3
, indem Sie ihn nach links abschrauben D.
Halten Sie den Deckel mit dem Mischstab unter laufendes
warmes Wasser, reinigen Sie die Teile mit einem in warmer
Seifenlauge angefeuchteten Tuch und spülen Sie sie mit klarem
Wasser ab.
Halten Sie den Aufschäumaufsatz unter laufendes warmes
Wasser, reinigen Sie ihn mit einem in warmer Seifenlauge
angefeuchteten Tuch und spülen Sie ihn mit klarem Wasser ab.
Reinigen Sie die Außenflächen der Kanne und des Deckels mit
einem weichen, feuchten Tuch. Bei starker Verschmutzung kann
ein mildes Reinigungsmittel verwendet werden.
Reinigen Sie das Innere der Kanne mit heißem Wasser, einem
weichen Tuch, Seifenlauge und spülen Sie sie gründlich aus.
Die Teile des Meno Milchaufschäumer sind nicht
spülmaschinenfest.
DEN MILCHAUFSCHÄUMER NIEMALS IN WASSER TAUCHEN
WARNUNG: Achten Sie bei der Reinigung darauf, dass die
elektrischen Anschlüsse auf dem Deckel oder dem Gehäuse
nicht nass werden.
vorsichtig vom Mischstab
Helpline
Sollten Sie Schwierigkeiten mit Ihrem neuen Gerät haben, helfen
wir Ihnen gern weiter.
Oft können wir eher behilflich sein als das Geschäft, in dem Sie
das Gerät gekauft haben.
Damit unsere Mitarbeiter Ihre Anfrage zügig bearbeiten können,
sollten Sie folgende Angaben parat halten.
• Name des Gerätes.
• Modellnummer (an der Unterseite des Geräts zu finden).
• Seriennummer (an der Unterseite des Geräts zu finden).
Website
Sie können uns auch über unsere Internetseite kontaktieren oder
dort in unserem umfangreichen Angebot nach Geräten,
Ersatzteilen und Zubehör suchen und bestellen.
www.morphyrichards.com
Wichtige Sicherheitshinweise
Für die Benutzung elektrischer Haushaltsgeräte sind folgende
Regeln zur Wahrung der Sicherheit einzuhalten.
Es besteht vorwiegend Verletzungs- bzw. Lebensgefahr und
sekundär auch die Gefahr einer Beschädigung des Geräts. Auf
7
.
diese Gefahren wird im Text wie folgt hingewiesen:
WARNUNG: Verletzungsgefahr!
WICHTIG: Gerät kann beschädigt werden!
Außerdem enthält der Text folgenden Sicherheitshinweis.
Aufstellungsort
• Dieses Gerät ist für Haushalte und für ähnliche Umfelder
vorgesehen, z. B.:
Bauernhöfe,
von Gästen in Hotels, Motels und anderen wohnungsähnlichen
Umgebungen,
Pensionen und vergleichbaren Unterbringungsmöglichkeiten.
Für Personalküchenbereiche in Geschäften, Büros und anderen
Arbeitsumfeldern ist es nicht geeignet.
• Das Gerät stets weit entfernt von der Kante einer Arbeitsplatte
aufstellen.
• Das Gerät auf einer fest stehenden, flachen Oberfläche benutzen.
• Das Gerät darf nicht im Freien oder in der Nähe von Wasser
benutzt werden.
Netzkabel
• Das Netzkabel muss zugspannungsfrei von der Steckdose bis
zum Unterteil verlegt sein.
• Das Netzkabel nicht über die Kante einer Arbeitsplatte
herabhängen lassen. Ein Kind könnte daran ziehen.
• Das Kabel nicht über eine offene Fläche verlegen, z. B. zwischen
einer tief angebrachten Steckdose und einem Tisch.
• Das Netzkabel nicht über eine warme Herdplatte, einen Toaster
oder andere heiße Flächen verlegen, da das Kabel sonst
beschädigt werden kann.
• Wenn das Netzkabel beschädigt ist, muss es vom Hersteller,
seinem Kundenservice oder einer gleichermaßen qualifizierten
Person ausgetauscht werden, um Gefahrenquellen zu vermeiden.
18

CM47560MEE Rev1_9225 47507 MEE pump - Jon 11/03/2011 09:05 Page 19
Eigene Sicherheit
• WARNUNG: Zum Schutz vor Feuer, elektrischen Schlägen und
vor Verletzungen weder das Kabel, noch den Stecker oder das
Gerät in Wasser oder andere Flüssigkeiten tauchen.
• WARNUNG: Keine beweglichen Teile berühren.
• Beim Transportieren von Geräten mit heißem Inhalt sehr vorsichtig
vorgehen.
• Das Gerät nicht mit feuchten oder nassen Händen benutzen.
• Für Personen (einschließlich Kinder), deren körperliche, geistige
Unversehrtheit oder deren Wahrnehmungsfähigkeiten
eingeschränkt sind oder für Personen mit mangelnden
Kenntnissen und Erfahrungen ist dieses Gerät nicht geeignet, es
sei denn, sie werden beaufsichtigt oder haben von einer Person,
die für deren Sicherheit verantwortlich ist, eine Einweisung in die
Nutzung des Geräts erhalten.
Kinder
• Kindern die Bedienung dieses Haushaltsgeräts stets verbieten.
• Bei unbeaufsichtigten Kindern in der Küche besteht
Verletzungsgefahr, besonders dann, wenn das Gerät benutzt bzw.
wenn gekocht wird.
• Kinder immer über Gefahrenstellen in der Küche aufklären und sie
darauf hinweisen, dass sie über ihrer Augenhöhe bzw. außerhalb
ihrer Reichweite abgestellte Gegenstände nicht von der
Arbeitsplatte ziehen dürfen.
• Kinder müssen beaufsichtigt werden, und es ist sicher zu stellen,
dass sie nicht mit dem Gerät spielen.
Behandlung von Verbrennungen
• Verbrennungen unverzüglich mit kaltem Wasser kühlen. Mit dem
Kühlen der Wunde auch beim Ausziehen von Kleidungsstücken
nicht aufhören und rasch einen Arzt rufen.
Weitere Sicherheitshinweise
• Gerät nicht verwenden, wenn das Netzkabel des Geräts
beschädigt ist. Weitere Hilfe erhalten Sie telefonisch bei Morphy
Richards.
• Der Einsatz von Zubehörein- oder -aufsätzen, die vom Hersteller
nicht empfohlen werden, kann zu Schäden am Gerät führen.
• Das Gerät nicht auf oder dicht neben Wärmequellen aufstellen,
wie z. B. Gas- oder Elektroherde oder Herdplatten.
• Das Gerät und das Kabel vor Wärme, direkter Sonnenbestrahlung,
Feuchtigkeit, scharfen Kanten und ähnlichen Gefahrenquellen
fernhalten.
• Dieses Gerät ist nicht für den Betrieb über eine externe
Zeitschaltvorrichtung oder eine separate Fernsteuerung
vorgesehen.
• Bei der Benutzung sicherstellen, dass der Deckel vor Einschalten
des Geräts angebracht ist, da es sonst nicht funktioniert.
• Den Deckel nicht abnehmen, solange das Blatt noch läuft.
• Den Milchaufschäumer niemals über die
Höchstfüllstandsmarkierung befüllen. Die untere Linie markiert
den Füllstand zum Aufschäumen von Milch und die obere Linie
zum Erwärmen von Milch.
• Den Deckel stets auf seiner Seite ablegen (so dass er vom
Mischstab abgestützt wird), nicht auf den Kopf legen.
• Andere Haushaltsgeräte nicht an den Untersatz bzw. den Behälter
nicht an den Untersatz eines anderen Geräts anschließen.
Elektrischer Anschluss
Es ist sicherzustellen, dass die auf dem Typenschild des Geräts
angegebene Spannung mit der Haushaltsspannung Ihrer
Elektrizitätsversorgung übereinstimmt; es muss eine
Wechselstromspannung (abgekürzt AC) sein.
WARNUNG: DIESES GERÄT MUSS GEERDET WERDEN.
GESETZLICHE GEWÄHRLEISTUNG
Für dieses Gerät gilt eine Gewährleistung von 2 Jahren.
Als Kaufnachweis sollte die Quittung des Fachhändlers
aufgehoben werden. Heften Sie Ihren Beleg an die Rückseite
dieser Unterlagen.
Sollte an diesem Gerät ein Fehler auftreten, sind immer
nachfolgende Angaben mitzuteilen. Diese Angaben sind auf der
Unterseite des Geräts zu finden.
Modellnr.
Seriennr.
Vor dem Verlassen des Werks werden alle Morphy Richards
Produkte geprüft. Sollte einmal der Fall auftreten, dass sich ein
Gerät innerhalb der Gewährleistung als fehlerhaft erweist,
wenden Sie sich bitte an unsere Service-Hotline
Falls das Gerät während der 2-jährigen Gewährleistung aus
welchem Grund auch immer ausgetauscht wird, wird zur
Berechnung der Restgarantie für das neue Gerät das OriginalKaufdatum zugrunde gelegt. Aus diesem Grunde ist es
besonders wichtig, den Original-Kaufbeleg bzw. die Rechnung
aufzubewahren, um das Datum des ursprünglichen Kaufs
nachweisen zu können.
Damit die 2-jährige Gewährleistung geltend gemacht werden
kann, muss das Gerät im Einklang mit den Anweisungen des
Herstellers benutzt worden sein. Beispielsweise muss das Gerät
entkalkt worden sein und gemäß den Anweisungen gereinigt
werden.
Morphy Richards übernimmt keine Verpflichtung zur Reparatur
oder zum Austausch der Waren im Rahmen der
Garantiebedingungen, wenn:
1 der Fehler auf einen versehentlich Gebrauch, Missbrauch,
unachtsamen Gebrauch oder auf einen Gebrauch zurückzuführen
ist, der den Empfehlungen des Herstellers entgegenwirkt oder
wenn der Fehler durch Stromspitzen oder durch Transportschäden
verursacht wurde.
2 das Gerät mit einer Spannung versorgt wurde, die nicht auf dem
Typenschild abgedruckt ist.
3 von anderen Personen als unserem Reparatur- und
Wartungspersonal (oder von einem unserer Vertragshändler)
Reparaturversuche unternommen wurden.
4 wenn das Gerät für Vermietungszwecke oder nicht allein für
private Zwecke gebraucht wurde.
5 das Gerät aus zweiter Hand stammt.
d
19

CM47560MEE Rev1_9225 47507 MEE pump - Jon 11/03/2011 09:05 Page 20
6 Morphy Richards kann nicht dafür haftbar gemacht werden,
Reparaturarbeiten im Rahmen der Gewährleistung auszuführen.
7 Verbrauchsmaterialien wie Tüten, Filter und Glaskaraffen sind von
der Gewährleistung ausgeschlossen.
8 Batterien und Schäden aufgrund undichter Batterien sind von der
Gewährleistung ausgeschlossen.
9 die Filter nicht gemäß Anleitung gereinigt und ausgewechselt
wurden
Diese Gewährleistung erkennt Ihnen ausschließlich die Rechte
zu, die ausdrücklich in den oben genannten Bestimmungen
niedergelegt sind und erstreckt sich nicht auf Forderungen
infolge eines Verlustes oder einer Beschädigung. Diese
Gewährleistung wird als zusätzliche Leistung angeboten und
greift Ihre gesetzlich zuerkannten Rechte als Verbraucher nicht
an.
GARANTIEKARTE
Kauf datum Typen-Nr.
Händlerstempel und Unterschr ift Händlerstempel und Unterschr ift
Fehler / Mangel
Deutschland:
Bei Störungen oder Schäden
wenden Sie sich bitte an
unseren Kundenservice unter:
Tel.: 01805 / 398 346
(0,14€ / Min. aus dem deutschen Festnetz;
max. 0,42€ /Min. aus dem Mobilfunk)
Fax: 01805 / 355 467
eMail: service@glendimplex.de
Die zuständige Stelle in allen anderen Ländern ist der jeweilige Fachhändler bzw. die Bezugsquelle.
20
Österreich:
Bei Störungen oder Schäden
wenden Sie sich bitte an
unseren Kundendienst:
Firma Schurz
Merangasse 17
A-8010 Graz
Tel.: +43 316 32 30 41
Fax: +43 316 38 29 63
eMail: office@schurz.biz
Schweiz:
Bei Störungen oder Schäden
wenden Sie sich bitte an
unseren Kundendienst:
Vamel AG
Im Emmet 8
CH-5524 Niederwill
Tel.: +41 (0) 56 619 - 7090
Fax: +41 (0) 56 619 - 7099
eMail: Info@vamel.ch

CM47560MEE Rev1_9225 47507 MEE pump - Jon 11/03/2011 09:05 Page 21
Consulte el folleto principal de instrucciones, donde
encontrará importante información de seguridad y
más detalles acerca de la utilización del hervidor de
Guía de inicio rápido
1
leche Meno.
Para quitar la tapa, gírela en la dirección opuesta a
las agujas del reloj y levántela.
2
3
4
Compruebe que el accesorio hervidor esté
correctamente fijado en la varilla batidora. Apriete
girando en la dirección de las agujas del reloj.
Llene el hervidor Meno con leche, sin superar el
indicador de nivel máximo.
Ponga la tapa y fíjela girándola en la dirección de las
agujas del reloj.
El hervidor de leche Meno no funcionará si la tapa no
se ha cerrado en el asa.
d
e
5
Pulse el botón Calentar y Espumar o sólo
Espumar , dependiendo de la bebida que esté
preparando.
21

CM47560MEE Rev1_9225 47507 MEE pump - Jon 11/03/2011 09:05 Page 22
Guía para la preparación de café
El hervidor de leche Meno le ayuda a preparar diferentes bebidas de café en su hogar, como si estuviera en una cafetería. Los gráficos
de esta página son una guía donde encontrará el porcentaje de ingredientes para la elaboración de cada tipo de bebida. Consulte la guía
de inicio rápido al principio de este folleto para preparar una bebida con la espuma perfecta. Para obtener más información, así como
diferentes consejos, visítenos en www.homeofthehouseproud.com
Agua
Espresso
Espresso
Leche caliente
Espresso
Flat White
Nata batida
Espresso
Espresso con Panna
Espresso
Americano
Leche espumada
Espresso
Espresso Macchiato
Leche espumada
Leche caliente
Espresso
Café con leche
Leche espumada
Nata batida
Leche caliente
Leche caliente
Espresso
Cappuccino
22
Sirope de chocolate
Espresso
Caffé Mocha

CM47560MEE Rev1_9225 47507 MEE pump - Jon 11/03/2011 09:05 Page 23
e
Partes
⁄
Tapa
¤
Cierre de la tapa
‹
Varilla batidora
›
Accesorio espumador
fi
Batidor circular
fl
Jarra
‡
Botón de Calentar y Espumar
·
Botón de Espumar
‚
Base
„
Conector 360º
‰
Recogecables (bajo el aparato)
Antes del primer uso
Retire el cartón de protección colocado entre la base y la jarra.
Lave el interior del hervidor con agua jabonosa y limpie con un
trapo suave. NO utilice estropajos ni otros productos abrasivos,
ya que dañarán el acero inoxidable. Enjuague y seque.
NO SUMERJA EL HERVIDOR EN AGUA
Instrucciones de uso
1. Coloque el hervidor de leche Meno sobre una superficie seca y
nivelada.
2. Quite la tapa girándola en la dirección de las agujas del reloj y
levantándola.
›
3. Compruebe que el accesorio hervidor
colocado en la varilla batidora
agujas del reloj para apretarlo
4. Vierta leche en la jarra.
Cuando utilice el accesorio espumador con el batidor circular
use un mínimo de 150 ml de leche, y un máximo de 300 ml.
No exceda el indicador de nivel máximo.
5. Ponga la tapa en la jarra girando en la dirección de las agujas del
reloj. El hervidor de leche Meno no funcionará si la tapa no se
cerrado en el asa
6. Seleccione el programa deseado - Calentar y espumar –
Espumar
B
.
·
.
Para calentar y espumar
Pulse el botón de Calentar y Espumar ‡de la jarra. El botón se
iluminará en rojo y comenzará el programa.
Son necesarios aproximadamente 3 minutos para calentar y
espumar la leche, calentándola a una temperatura de 65ºC.
Cuando la leche se ha calentado y espumado, el aparato se
apaga automáticamente.
Para detener el ciclo antes de su finalización, pulse una vez el
botón de Calentar y Espumar, y transcurrirá un tiempo
aproximado de 30 segundos antes de reiniciarse el programa.
Nota: Tras calentarse y espumarse la leche, deje enfriar el hervidor
durante aproximadamente 30 segundos y límpielo antes de volver
a usarlo.
esté correctamente
‹
. Gírelo en la dirección de las
A
.
‡
o
Para espumar
Pulse el botón de Espumar ·de la jarra. El botón se iluminará
en azul y se iniciará el programa.
Se necesitan aproximadamente 2 minutos para espumar la leche;
cuando haya finalizado, el hervidor se apagará automáticamente.
Para detener el ciclo antes de su finalización, pulse el botón de
Espumar una vez.
Limpie el aparato antes de volver a utilizarlo.
Cómo servir la leche
• Para obtener una bebida con la espuma perfecta, se recomienda
separar la espuma de la leche.
• Utilice una cuchara / espátula para retener la espuma en la jarra, y
vierta la leche en la bebida, añadiendo la espuma sobre la bebida
posteriormente.
Bebidas de leche a base de aromas
Quite la tapa girándola en la dirección de las agujas del reloj y
levantándola.
Asegúrese de haber retirado el batidor circular
› C
espumador
Vierta leche en la jarra. Capacidad mínima 150 ml, capacidad
máxima 500 ml.
Para servir una bebida a base de aromas, vierta 25 ml de sirope y
175 ml de leche en la jarra. Para dos bebidas, simplemente
duplique las proporciones.
Ponga la tapa en la jarra girando en la dirección de las agujas del
reloj. El hervidor de leche no funcionará si no se ha cerrado la
tapa.
Pulse el botón de Espumar
Se necesitan aproximadamente 2 minutos para preparar la
fi
bebida; el aparato se apagará automáticamente cuando se haya
espumado la leche.
.
·
.
Chocolate caliente
Este producto tiene un límite de 65˚C, para evitar que pueda
quemarse la leche. Por lo tanto, puede utilizarse para chocolate
caliente si ha usted le apetece beberlo a esa temperatura.
Siga las instrucciones de las bebidas a base se aromas, pero
utilizando el botón de Calentar y Espumar
‡
fi
del accesorio
.
e
23

CM47560MEE Rev1_9225 47507 MEE pump - Jon 11/03/2011 09:05 Page 24
Limpieza y cuidado
Limpie el aparato después de cada uso.
Retire cuidadosamente el accesorio espumador
‹
batidora
reloj
Ponga la tapa que incorpora la varilla batidora bajo agua
templada, límpiela con un paño enjabonado y séquela.
Ponga el accesorio espumador bajo agua templada, límpielo con
un paño enjabonado y séquelo.
Limpie las superficies exteriores de la jarra y la tapa con un trapo
suave. Para la suciedad resistente, puede utilizar un producto de
limpieza suave.
Limpie el interior de la jarra con agua caliente, un trapo suave,
una solución jabonosa y enjuague correctamente.
Ninguna de las piezas del hervidor de leche Meno puede lavarse
en el lavavajillas.
NO SUMERJA EL HERVIDOR DE LECHE EN AGUA
ADVERTENCIA: Durante la limpieza, tenga cuidado de que no
se mojen los contactos eléctricos de la tapa o el cuerpo
principal.
aflojando en la dirección opuesta a las agujas del
D
.
›
Atención al cliente
Si tiene cualquier dificultad con el aparato, no dude en llamarnos.
Lo más probable es que podamos ayudarle más que en la tienda
en la que adquirió el producto.
Para que nuestro personal pueda atenderle a la mayor brevedad,
al llamar, tenga a mano la siguiente información:
• Nombre del producto.
• Número de modelo (aparece en la base del producto).
• Número de serie (aparece en la base del producto).
Sitio web
También puede ponerse en contacto con nosotros a través de
nuestro sitio web, o visitar el sitio para buscar y adquirir aparatos,
recambios y accesorios de la completa gama de productos
Morphy Richards.
www.morphyrichards.com
Instrucciones importantes de seguridad
El uso de cualquier aparato eléctrico requiere la aplicación de las
normas lógicas de seguridad que se indican a continuación.
En primer lugar, existe el peligro de lesiones o muerte y, en
segundo, el peligro de dañar el aparato. Se indican en el texto
mediante las dos siguientes convenciones:
ADVERTENCIA: ¡Peligro para el usuario!
IMPORTANTE: ¡Peligro para el aparato!
Asimismo, le ofrecemos los siguientes consejos de seguridad.
de la varilla
Ubicación
• Este aparato está diseñado para ser utilizado en el ámbito
doméstico y en ámbitos similares, tales como:
casas de labranza;
clientes de hoteles, moteles y otros
alojamientos;
entornos tipo pensiones.
No se recomienda su uso en cocinas para empleados de tiendas,
oficinas y otros entornos laborales.
• Mantenga el aparato lejos del borde de la encimera en todo
momento.
• Asegúrese de colocar el aparato sobre una superficie firme y
plana.
• No utilice el aparato en el exterior ni cerca del agua.
Cable
• El cable debe llegar desde el enchufe hasta la base sin necesidad
de forzar las conexiones.
• No deje que el cable de alimentación cuelgue del borde de una
encimera, al alcance de los niños.
• No pase el cable por donde haya peligro de tropezar con él (por
ejemplo, entre un enchufe situado a baja altura y una mesa).
• Evite que el cable entre en contacto con cocinas, tostadoras u
otras superficies calientes, que podrían dañarlo.
• Para evitar riesgos, si se daña el cable, debe ser sustituido por el
fabricante, su personal de servicio técnico u otra persona con una
cualificación similar.
Seguridad personal
• ADVERTENCIA: Para evitar incendios, descargas eléctricas y
daños personales, no introduzca el cable, el enchufe y el
aparato en agua o en cualquier otro líquido.
• ADVERTENCIA: Evite el contacto con las partes móviles.
• Tome todas las medidas necesarias al desplazar el aparato con
ingredientes calientes en su interior.
• No utilice el aparato con las manos mojadas o húmedas.
• Este aparato no debe ser utilizado por personas (incluidos los
niños) cuyas facultades físicas, sensoriales o mentales estén
mermadas, o que no tengan suficiente experiencia o
conocimientos, a menos que estén supervisadas o hayan recibido
instrucciones acerca del uso del aparato por parte de una
persona responsable de su seguridad.
24

CM47560MEE Rev1_9225 47507 MEE pump - Jon 11/03/2011 09:05 Page 25
Niños
• Nunca deje que los niños utilicen este aparato.
• Los niños son vulnerables en la cocina, especialmente cuando no
están vigilados y si se están utilizando aparatos o se está
cocinando.
• Enseñe a los niños a ser conscientes de los peligros de la cocina:
adviértales de los riesgos de acceder a zonas que no pueden ver
correctamente o a las que no deberían acceder.
• Es necesario vigilar a los niños para evitar que jueguen con este
aparato.
Tratamiento de las quemaduras
• Coloque inmediatamente bajo el grifo de agua fría la zona
afectada. No se pare a quitarse la ropa, solicite ayuda médica
rápidamente.
Otras consideraciones de seguridad
• Si el cable de alimentación de este aparato está dañado, no lo
utilice. Llame al servicio de asistencia telefónica para recibir
asesoramiento.
• El uso de accesorios no recomendados por el fabricante podría
dañar el aparato.
• No coloque el aparato encima o cerca de fuentes de calor como
hornos de gas, hornos eléctricos o quemadores.
• Mantenga el aparato y el cable alejados del calor, la luz solar
directa, la humedad, los bordes afilados y similares.
• Este aparato no está diseñado para ser manejado mediante
temporizadores externos ni mandos a distancia.
• Antes de encender el aparato, asegúrese de haber colocado la
tapa, de lo contrario, no funcionará.
• No retire la tapa hasta que se haya detenido.
• No llene el aparato por encima de la línea de llenado. La línea
inferior indica el nivel para espumar la leche, y la línea superior
indica el nivel para calentarla.
• Coloque siempre la tapa sobre su lado (apoyada en la varilla
batidora) y no sobre el cabezal.
• No intente conectar ningún otro aparato a la base ni conectar
este aparato a otra base.
Requisitos eléctricos
Compruebe que el voltaje indicado en la placa de características
del aparato se corresponde con el suministro de electricidad de
su casa, que debe ser CA (corriente alterna).
ADVERTENCIA: ESTE APARATO DEBE CONECTARSE A
TIERRA.
SU GARANTÍA DE DOS AÑOS
Este aparato está cubierto por una garantía de reparación o
sustitución de dos años.
Es importante guardar el recibo de la tienda en la que lo
adquirió como prueba de compra. Grape el recibo a esta
contraportada para poder consultarlo en el futuro.
Indique la siguiente información si el producto tiene algún fallo.
Estos números se encuentran en la base del producto.
N.º de modelo
N.º de serie
Todos los productos de Morphy Richards se prueban
individualmente antes de salir de fábrica. En el improbable caso
de que un aparato tenga un fallo, hay que devolverlo al lugar en
el que se compró en los 28 días posteriores a la compra para
cambiarlo.
Si el fallo se produce pasados 28 días de la compra y antes de
24 meses, debe ponerse en contacto con su distribuidor local
indicando el número de modelo y de serie del producto, o
escribir a su distribuidor local a las direcciones que se indican.
Le pedirán devolver el producto (en un embalaje seguro y
adecuado) a la siguiente dirección junto con una copia de la
factura de compra.
El aparato defectuoso se reparará o se sustituirá y se enviará
en un plazo de 7 días laborables desde la recepción del mismo,
a menos que se produzca una de las siguientes excepciones
(1-9).
En caso de que reciba un artículo nuevo en el periodo de
garantía de 2 años, la garantía del nuevo artículo se calculará
desde la fecha original de compra. Por lo tanto, es esencial
guardar la factura o el recibo de caja original que indica la
fecha de compra original.
Para que la garantía de 2 años pueda aplicarse, el aparato
debe haberse utilizado siguiendo las instrucciones del
fabricante. Por ejemplo, debe eliminarse la cal de los aparatos
y mantener los filtros limpios según se indica en estas
instrucciones.
Morphy Richards o el distribuidor local no se hacen
responsables de sustituir o reparar los productos en virtud de
las condiciones de la garantía en los siguientes casos:
1 El fallo se ha producido o se puede atribuir a un uso accidental,
erróneo, negligente o contrario a las recomendaciones del
fabricante, o ha sido causado por una subida de tensión o por
daños en el transporte.
2 El aparato se ha utilizado con una tensión diferente a la indicada
en los productos.
3 Personas que no pertenecen a nuestro personal técnico (y que no
son el proveedor autorizado) han intentado reparar el aparato.
4 El aparato ha sido objeto de alquiler o de uso no doméstico.
5 El aparato es de segunda mano.
6 Ni Morphy Richards ni el distribuidor local no son responsables
de realizar ninguna revisión, en virtud de la garantía.
7 La garantía excluye los consumibles como bolsas, filtros y jarras
de vidrio.
e
25
CM47560MEE Rev1_9225 47507 MEE pump - Jon 11/03/2011 09:05 Page 26
8 La garantía no cubre las baterías ni las fugas de ácido de las
mismas.
9 Los filtros no se han limpiado ni sustituido tal y como se indica.
Esta garantía no le confiere más derechos que los
expresamente expuestos, ni incluye reclamaciones por daños o
pérdidas consiguientes. Esta garantía se ofrece como ventaja
adicional y no afecta a sus derechos legales como consumidor.
Productos Glen Dimplex
Carta de GARANTÍA
Producto adquirido
Fecha de compra
Titular de la Garantía
26
Sello del establecimiento
CM47560MEE Rev1_9225 47507 MEE pump - Jon 11/03/2011 09:05 Page 27
Raadpleeg ook het hoofdinstructieboekje waarin
belangrijke veiligheidsinformatie staat en dat meer
Snelstartgids
1
2
informatie bevat over de Meno Melkopschuimer.
Verwijder het deksel door het naar links te draaien en
omhoog te trekken.
Controleer of de opschuimer goed op de mixstaaf is
bevestigd. Span deze aan door naar rechts te
draaien.
h
3
4
5
Vul de Meno Melkopschuimer met melk, maar laat de
melk niet hoger komen dan het max. niveau.
Plaats het deksel terug door het naar rechts te
draaien.
Als het deksel niet op het handvat vastzit, zal uw
Meno Melkopschuimer niet werken.
Druk op de knop Opwarmen en Opschuimen of
Alleen opschuimen , afhankelijk van de soort koffie
die u aan het brouwen bent.
27

CM47560MEE Rev1_9225 47507 MEE pump - Jon 11/03/2011 09:05 Page 28
Gids bij het brouwen van koffie
Uw Meno melkopschuimer helpt u bij het bereiden van verschillende koffiedranken, zodat u thuis een heuse koffiehuis-beleving kunt
ervaren De schematische voorstellingen op deze pagina zijn een eenvoudige leidraad die u voor elk koffiedrankje het percentage
ingrediënten laat weten. Raadpleeg de snelstartgids - die u aan het begin van dit boekje terugvindt - voor meer informatie over het
bereiden van het perfecte melkschuim. Voor meer informatie, hints en tips surft u naar www.homeofthehouseproud.com
Water
Espresso
Espresso
Warme melk
Espresso
Flat White
Slagroom
Espresso
Espresso con Panna
Espresso
Americano
Melkschuim
Espresso
Espresso Macchiato
Melkschuim
Warme melk
Espresso
Caffe Latte
Melkschuim
Slagroom
Warme melk
Warme melk
Espresso
Cappuccino
28
Chocoladesiroop
Espresso
Caffé Mocha
 Loading...