

Page 1

For details of other Morphy Richards products, please see our website:
Please read and keep these instructions
MC48815 MUK Rev 3
If you have a problem or complaint, please call our dedicated UK based helpline
before returning your product to the retailer from where it was purchased.
UK Helpline: 0844 871 0956
Replacement Parts: 0844 873 0722
Ireland Helpline: 1800 409 119
Getting the best from your new appliance...
Safety
Always keep hands and face away from Pressure Release Valve, when venting pressure.
Use extreme caution when removing lid after cooking. Always tilt the lid away from you,
so any remaining steam is blocked from your face.
Never attempt to open lid while cooking, or before pressure has dropped. Do not attempt
to defeat this safety feature by forcing it.
Do not cover or block the valves.
Do not touch the pot or lid except for the handle immediately after using.
To avoid burns, allow food to cool before tasting. The temperature of the food gets
considerably hotter than with conventional cooking.
Register online for your 2 year
guarantee. See back of this
instruction book for details.
(UK and Ireland customers only)
www.morphyrichards.co.uk
48815 rev3_x 21/06/2010 10:11 Page 1
Upon registration with Morphy Richards
(UK & ROI only)
Page 2

2
UK Helpline 0844 871 0956 Replacement Parts 0844 873 0722 Ireland Helpline 1800 409 119
Please also refer to the main
instruction booklet, which contains
important safety information and
more detail on how to use the Rapid
Cook.
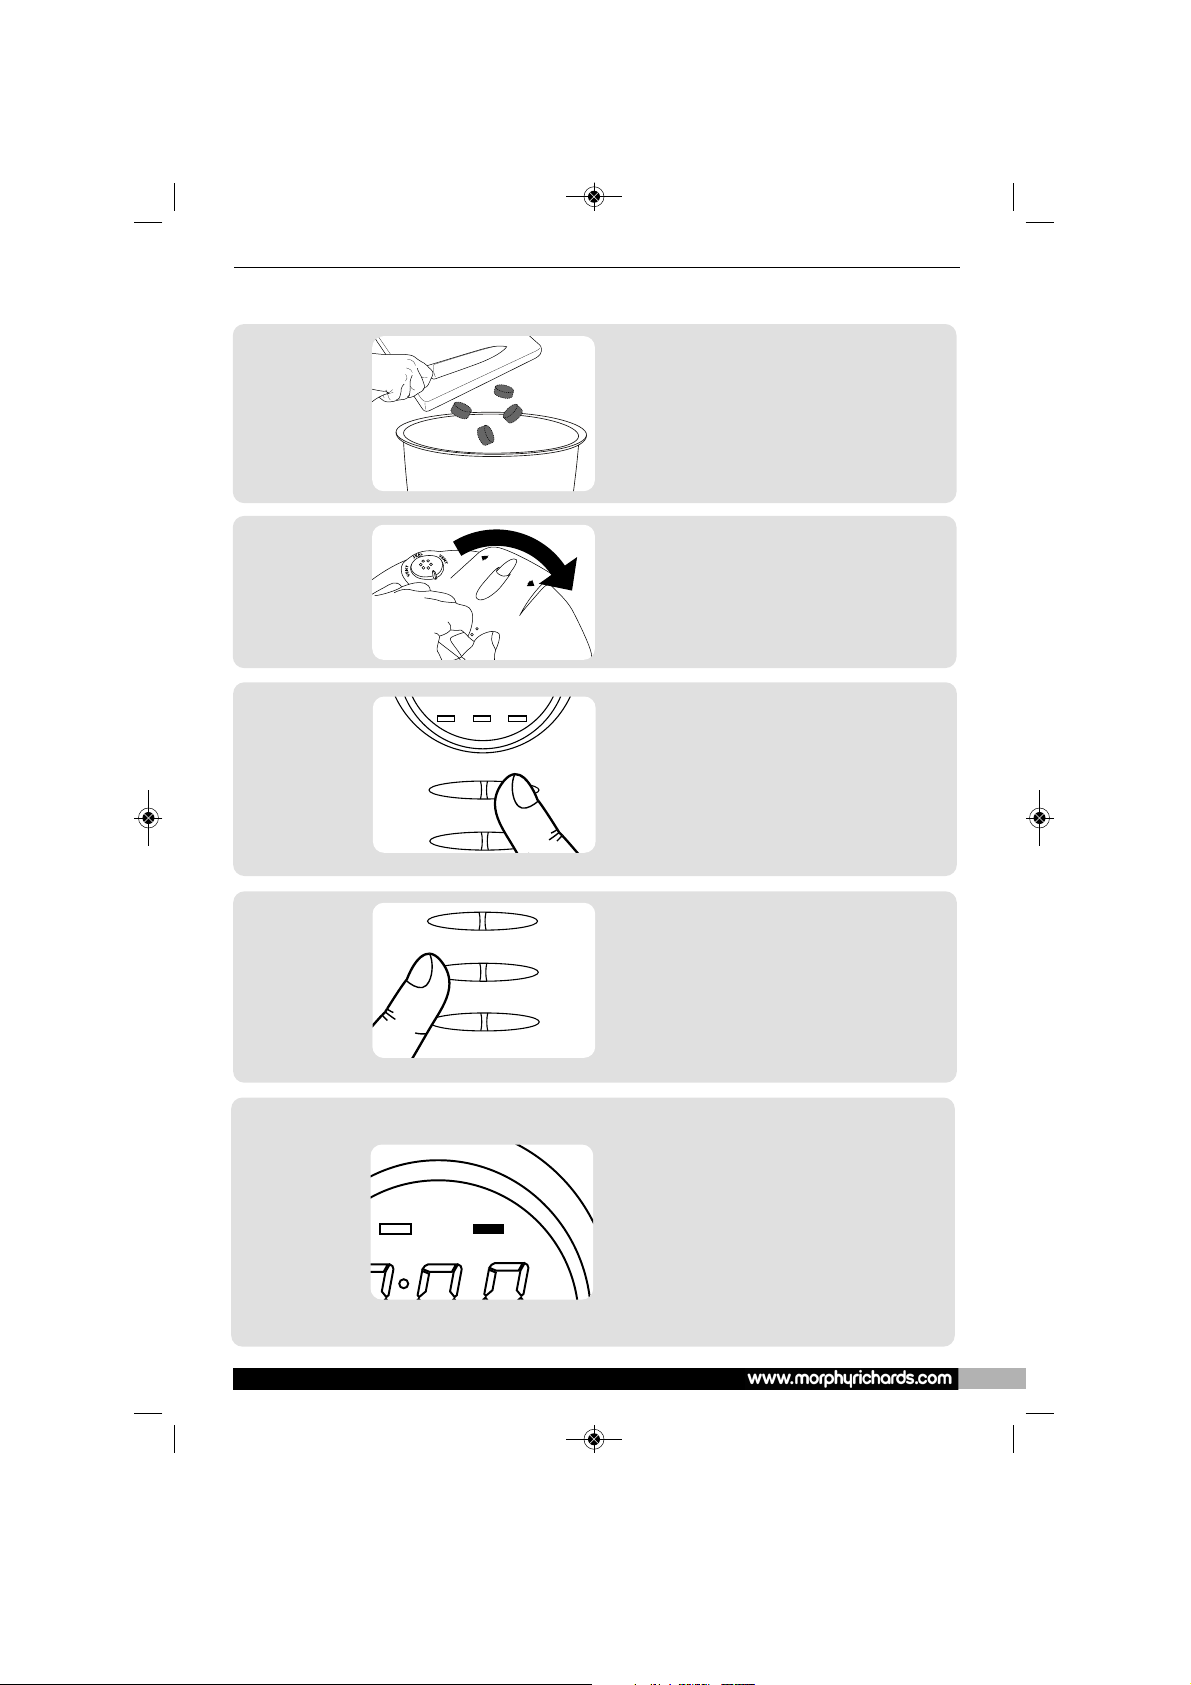
Place the Rapid Cook › on to the kitchen
work surface and plug in. Add the appropriate
amount of oil to the pan ¤ for the quantity of
meat you wish to seal. Press the Standby
button ‚, the display will show the default
screen. Then press the Function button fl
once.
1
Heat
Warm
Browning 1-10 11-20 21-40
41-90 Delay Time Time
The Rapid Cook will beep and the browning
indicator will illuminate Ê. The pan will then
start to heat up and the timer  will begin to
count down from 15 minutes. The oil will take
approximately 5 minutes to reach the correct
temperature for sealing / browning meat (i.e.
when the timer reads 0:10)
2
Heat
Warm
Browning 1-10 11-20 21-40
41-90 Delay Time Time
Add the meat to the pan and stir regularly until
the outside of the meat is sealed / browned.
Stir the meat in the pan moving the spoon
forward and back to prevent the bowl from
rotating in the Rapid Cook. When the timer
reaches zero, the Rapid Cook will beep and the
cooking process will stop. If your meat is
sealed before the 15 minutes is up, hold down
the Keep Warm / Cancel button ·. The Rapid
Cook will beep and the cooking process will
stop.
3
Easy set-up guide
To use the seal / brown function
fl Function button
‡ Time / Delay button
· Keep warm / Cancel button
‚ Standby button
„ Heat indicator
 Time / delay time display
Ê Browning indicator
Heat
Warm
Browning 1-10 11-20 21-40
41-90 Delay Time Time
fl
‡
·
‚
„
Ê
Â
Only the relevant controls are shown here. For complete list of features see page 5
48815 rev3_x 21/06/2010 10:11 Page 2
41-90 Delay Time Time
Function
Time Delay Time
Keep Warm Cancel
Page 3
3
For details of other Morphy Richards products, please see our website:
When the sealing / browning process is
complete, add your remaining ingredients,
ensuring you keep to the min quantity (defined
by the 1/5 point on the scale marked inside the
pan) and the max quantity (defined by the 3/5 –
point, also marked on the scale inside the pan.)
4
Then place the lid on as directed, and turn
clockwise to lock in place. Ensure the valve is
in the ‘SEAL’ position
5
OP
EN
CLOSE
6
Function
41-90 Delay Time Time
At the end of the cooking process the product
will beep and automatically switch to keep
warm. Keep warm will last for up to two hours,
but you cancel this at any time by pressing the
Standby button ‚. Then release any excess
pressure still contained within the cooker, by
putting on oven gloves and moving the release
valve to the ‘VENT’ position. This will allow
steam to escape under pressure from the vent
WARNING: you must keep your face well
away from the valve when releasing
excess pressure, and only do this when
you are wearing protective oven gloves.
8
Heat
War m
Press the Function button fl the appropriate
number of times to select the desired cooking
time.
Press 2 times: 1-10 mins
Press 3 times: 11-20 mins
Press 4 times: 21-40 mins
Press 5 times: 41-90 mins
For each range, the Rapid Cook will select the
lowest value (e.g. 11 minutes in the 11-20 mins
range)
To select a longer value within the selected
range, press the Time button ‡ to increase the
cooking time within the selected range. For
example, to select a 27 minute cooking time
after selecting the 21-40 mins range (as
instructed above), press the Time button ‡ six
times, until 0:27 displays on the timer. The
Rapid Cook will then start to heat up and the
cooking process will begin.
7
Function
Time Delay Time
Keep Warm Cancel
To use the Normal Cooking function
48815 rev3_x 21/06/2010 10:11 Page 3
Page 4

4
UK Helpline 0844 871 0956 Replacement Parts 0844 873 0722 Ireland Helpline 1800 409 119
IMPORTANT
SAFETY
INSTRUCTIONS
Personal safety
• Do not touch hot surfaces. Use
oven gloves or a cloth when
opening the lid or handling hot
containers as hot steam will
escape.
• WARNING: To protect against
fire, electric shock and
personal injury, do not immerse
cord, plugs, or appliance in
water or other liquid.
• WARNING: Extreme caution
must be used when moving the
appliance when containing hot
food, water, or other hot
liquids.
• Unplug from the socket when not
in use, before putting on or
taking off attachments, before
cleaning, and allowing to cool.
• Do not operate any appliance
with a damaged lead or plug, or
after an appliance has
malfunctioned, or has been
dropped or damaged in any way.
Contact Morphy Richards for
advice on examination, repair or
electrical or mechanical
adjustment.
• This appliance is not intended for
use by persons (including
children) with reduced physical,
sensory or mental capabilities, or
lack of experience and
knowledge, unless they have
been given supervision or
instruction concerning the use of
the appliance by a person
responsible for their safety.
Location
• This appliance is intended to be
used in household and similar
applications such as:
farm houses;
by clients in hotels, motels and
other residential type
environments;
bed and breakfast type
environments.
It is not suitable for use in staff
kitchen areas in shops, offices
and other working environments.
• Do not use outdoors or near
water.
• Ensure that this appliance is
situated out of reach of children.
• Do not place the appliance
directly under kitchen wall
cupboards when in use, as it
produces steam. Avoid reaching
over the appliance when in use.
• Do not use the appliance near or
below combustible materials,
such as curtains.
Mains cable
• The mains cable should reach
from the socket to the base unit
without straining the connections.
• Do not let the cable hang over
the edge of the table or counter
and keep it away from any hot
surfaces.
• Do not let the cable run across
an open space e.g. between a
low socket and table.
• If the supply cable is damaged, it
must be replaced with a special
cable assembly available from
the manufacturer or it’s service
agent.
Children
• Never allow a child to operate
this appliance. Teach children to
be aware of dangers in the
kitchen, warn them of the
dangers of reaching up to areas
where they cannot see properly
or should not be reaching.
• Children should be supervised to
ensure that they do not play with
the appliance.
Other safety
considerations
• Do not use attachments or tools
not recommended by Morphy
Richards as this may cause fire,
electric shock or injury.
• To open, hold and rotate the lid
anticlockwise but do not lean
over the appliance.
• Do not place on or near a hot
gas or electric burner, or in a
heated oven.
• Do not leave it in a damp and
corrosive environment.
• To prevent over-heating, always
ensure there is food or water in
the bowl.
• This appliance is not intended to
be operated by means of an
external timer or separate
remote-control system.
• Extreme caution must be used
when moving the appliance when
it contains hot food, water or
other hot liquids.
• Do not use any parts of this
appliance in a microwave or any
cooking / heated surfaces.
• Never use the appliance to boil
acid or other alkaline foodstuffs.
• The use of sharp implements
inside the bowl may damage the
non-stick coating.
• The ducts in the pressure release
valve should be checked
regularly to ensure that they are
not blocked.
Electrical
requirements
Check that the voltage on the
rating plate of your appliance
corresponds with your house
electricity supply which must be
A.C. (Alternating Current).
If the socket outlets in your home
are not suitable for the plug
supplied with this appliance, the
plug should be removed and the
appropriate one fitted.
WARNING: The plug removed
from the mains cable, if
severed, must be destroyed, as
a plug with bared flexible cord
is hazardous if engaged into a
live socket outlet.
Should the fuse in the 13 amp
plug require replacement, a 13
amp BS1362 fuse must be fitted.
WARNING: This appliance must
be earthed.
48815 rev3_x 21/06/2010 10:11 Page 4
Page 5

5
For details of other Morphy Richards products, please see our website:
Product Features
⁄ Cooker lid
¤ Stainless steel cooking pan
‹ Drainage channel
› Base unit
fi Display panel (see enlarged
diagram)
fl Function button
‡ Time / delay button
· Keep warm / cancel button
‚ Standby button
„ Heat indicator
‰ Warm indicator
 Time / delay time display
Ê Browning indicator
Á 1-10 mins timer indicator
Ë 11-20 mins timer indicator
È 21-40 mins timer indicator
Í 41-90 mins timer indicator
Î Delay timer indicator
Ï Time indicator
Ì Pressure release valve
Ó Spatula
Ô Spoon
Measuring cup
Ò Drip tray
Ú Steaming tray & trivet
⁄
¤
‹
›
fl
‡
·
‚
„‰
Ê
Á
Í
Ë
È
ÎÏ
fi
Â
Ì
Ì
Ó
Ô
Ò
Ú
48815 rev3_x 21/06/2010 10:11 Page 5
Warm
Heat
Browning 1-10 11-20 21-40
41-90 Delay Time Time
Heat
Browning 1-10 11-20 21-40
41-90 Delay Time Time
War m
N
T
E
V
L
A
E
S
T
N
E
V
Page 6

6
UK Helpline 0844 871 0956 Replacement Parts 0844 873 0722 Ireland Helpline 1800 409 119
Enjoy the benefits
Pressure cooking is an ideal
way to make fast, tasty meals
for your family! This method
of cooking makes it easy for
even the busiest cooks to
prepare meals from scratch.
Use your Rapid Cook for fish,
chicken, fresh vegetables,
rice, legumes, and even
dessert – and everything can
be cooked to perfection in
minutes. The Rapid Cook will
save you time, energy and
money, as well as valuable
nutrients. Boiling liquid inside
the tightly sealed pot
produces steam, which is
trapped inside to create
pressure. The very hot
temperature produced
reduces cooking times. The
steam helps break down
fibres of whatever you are
cooking and infuse the food
with flavours. This also
captures all of the watersoluble nutrients, making the
food higher in flavour and
more nutritious than with
conventional cooking
methods.
Before using the
Rapid Cook for
the first time
Remove all labels and tags
from the product.
Wash the internal cooking
pan and accessories and lid
in hot soapy water with a
sponge or dishcloth. DO
NOT use a scouring pad or
other abrasive material as
this will mark the stainless
steel. Rinse the pan and lid
thoroughly and dry.
Avoid leaving the lid fully
immersed in water, as it will
take a long time to drain.
Attach the drip tray Ò to the
space provided at the rear,
simply clip into place. Any
overspill into the drainage
channel ‹ at the top of the
cooking pot will collect into
this tray.
After use fully clean this area
by wiping away any spilled
food and clean the drip tray.
IMPORTANT
DO NOT IMMERSE THE
MAIN COOKING UNIT IN
WATER
Please note:
During initial use, you may
notice a slight odour due to
the burning off of
manufacturing residue. This is
completely normal, does not
effect the food being cooked
and will disappear after a few
uses.
Instructions for
Use
Place the base › on to a
dry, level, heat resistant
surface, away from the edge
of the work surface. Do not
use on the floor.
Steam will escape from the
vent while heating, and
sometimes during the
cooking cycle. This is
perfectly normal. Therefore,
do not use the Rapid Cook
under overhanging wall
cupboards.
Unlocking the lid
Remove the lid (after
releasing the pressure) by
turning the lid anti clockwise,
grip the handle as shown A.
If the lid is tight use two
hands.
Explanation of
terms
Browning / Sealing:
Before cooking the meat in
the Rapid Cook, it is
important that the meat is
sealed / browned first. This
means to cook the meat
lightly on the outside in hot
oil before starting the
cooking process (the meat
should still be raw in the
middle). Sealing / browning
your meat in this way helps it
to retain flavour as well as
moisture.
Sealing /
Browning
Function
Place the Rapid Cook onto
the kitchen work surface,
plug it in and press the
Standby button ‚.
The display fi will show the
default screen B.
Add the appropriate amount
of oil to the pan for the
quantity of meat you wish to
seal.
We recommend that
approximately two
tablespoons of vegetable oil
is suitable to seal between
800g-1200g of meat. This
can however be varied
depending on personal taste
and the amount of fat in the
meat being sealed.
To select the Sealing
function, press the Function
button fl once. The Rapid
Cook will beep once, and the
display will show 0:15
minutes on the timer, and the
Browning indicator Ê will be
illuminated.
The Rapid Cook will then
start to heat up and the timer
 will begin to countdown.
The oil will take
approximately 5 minutes to
reach the correct temperature
for sealing / browning meat
(i.e. when the timer reads
0:10.)
A good way to test if the oil
is hot enough is to add a
small piece of meat or onion
to the pan. If it sizzles when it
B
A
48815 rev3_x 21/06/2010 10:11 Page 6
OPEN
CLO
S
E
Browning 1-10 11-20 21-40
Warm
Heat
41-90 Delay Time Time
Page 7

7
For details of other Morphy Richards products, please see our website:
hits the oil, the temperature is
sufficient to seal / brown. If it
does not sizzle, let the pan
heat up for another minute or
so and then test it again.
Add the meat to pan and stir
regularly until the outside of
the meat is sealed / browned.
When the timer reaches zero,
the Rapid Cook will beep five
times and the cooking
process will stop. If your
meat is sealed before the
timer reaches zero, press the
Keep Warm / Cancel button
once. The Rapid Cook will
beep once, and the cooking
process will stop. The screen
will return to the default
display B.
If your meat needs a few
extra minutes sealing after
the timer has reached zero,
simply press the Function
button fl once to start the
Sealing / Browning function
again. As explained above, to
cancel the sealing function
before the timer reaches zero,
press the Keep Warm /
Cancel button · once.
Please note:
Do not start the ‘Sealing /
Browning’ function without
the pan ¤ in the Base unit
› as this will make the
product overheat. You should
not start the ‘Sealing /
Browning’ function without
adding your oil to the pan.
Normal Cooking
Function
• Add the ingredients into the
cooking pot when it is in
place in the base unit. Be
careful not to spill any liquid
into the base unit. If it
happens switch off, remove
plug from the mains and
clean fullly.
Except when cooking rice,
never load the Rapid Cook
above maximum ingredient
level line marked “2/3 MAX
PC” on cooking pot. Foods
that expand while cooking
(i.e. legumes, peas etc)
should never go above the
3/5 mark.
Then place the lid onto the
top of the Rapid Cook, so the
Morphy Richards logo is
pointing to the left of the
display panel on the front of
the cooker.
Then turn the lid using the
handle, gently clockwise C,
so the logo is aligned with
the front control panel.
Ensure that the pressure
release valve Ì on top on
the lid ⁄ is positioned to
‘SEAL’ D.
Whether you have used the
‘Seal / Brown’ function or just
turned the Rapid Cook on,
the display screen should
show the default setting B.
Press the Function button fl
the appropriate number of
times to select the desired
cooking time.
Press twice: 1-10 mins
Press 3 times: 11-20 mins
Press 4 times: 21-40 mins
Press 5 times: 41-90 mins
For each range, the Rapid
Cook will select the lowest
value (e.g. 11 minutes in the
11-20 mins range)
To select a longer value
within the selected range,
press the Time / Delay button
‡ to increase the cooking
time within the selected
range. For example, to select
a 27 minute cooking time
after selecting the 21-40 mins
range (as instructed above),
press the Time button ‡ six
times, until 0:27 displays on
the timer. The Rapid Cook will
then start to heat up and the
cooking process will begin.
Once pressure has been
achieved, pressure will
automatically be maintained.
Cooking time begins at this
point, and the time will begin
counting down in the display.
After selecting the desired
cooking function, you can
add cooking time by pressing
the Time button until total
cooking time is displayed.
You can set total cooking
time from 5 minutes up to
120 minutes for Rice, Meat,
Vegetables, Soup and Stew.
After selecting the desired
cooking function, you can
delay the start time for up to
2 hours by pressing the Time
/ Delay button ‡ until total
delay time is displayed.
Countdown will begin once
the colon ( : ) starts flashing.
When pressure cooking is
complete, the Rapid Cook
will automatically switch to
Keep Warm. The Warm
indicator light ‰ will
illuminate. To manually switch
to Keep Warm and / or
cancel any cooking process,
press the Keep Warm /
Cancel Button ·. After
pressure cooking is
complete, pressure can be
released manually or on its
own. If a recipe states “let
pressure drop on its own”,
press the Standby button ‚
and unplug the cooker. When
recipe states “reduce
pressure at once” or “reduce
pressure manually” put on
oven gloves and move the
Pressure Release Device Ì
to the ‘VENT’ position to
C
D
B
48815 rev3_x 21/06/2010 10:11 Page 7
Warm
Heat
Browning 1-10 11-20 21-40
41-90 Delay Time Time
OP
EN
V
E
L
A
E
S
T
N
E
V
CLOSE
N
T
Page 8

8
UK Helpline 0844 871 0956 Replacement Parts 0844 873 0722 Ireland Helpline 1800 409 119
release steam and reduce
pressure E.
During the heat cycle, steam
will escape from the vent.
This is normal, and self
controlling.
WARNING: you must keep
your face well away from
the valve when releasing
excess pressure, and only
do this when you are
wearing protective oven
gloves. It is not
recommended to release
steam manually with
recipes containing lots of
liquid, such as soups and
stews.
Pressure is completely
reduced when the Steam
Release Dial is in the ‘VENT’
position E,
and you no longer hear
steam escaping from the
valve, and the lid opens freely
with no force. Only then is it
safe to remove the Rapid
Cook lid and serve the food.
Remove lid by grasping the
handle and twisting the lid
anti-clockwise. As a safety
feature, the lid will not open
unless all pressure is
reduced. DO NOT force the
lid open if it does not open
freely, this means the unit is
still under pressure.
Using the
steaming tray
• If using the trivet and tray Ú
to steam vegetables, use the
appropriate amount of water.
The tray needs to stand on
the trivet to keep the
vegetables above the base
and out of the boiling water.
Note: When using the tray,
the amount of vegetables
that can be cooked is limited
to the trays capacity. See the
amounts in the recipes for
quantities.
HELPFUL HINTS
• Read this manual thoroughly
and follow all
recommendations.
• Be familiar with the recipe
and have all ingredients
ready before you begin.
• Be sure the lid is secured
properly before beginning.
• You may wish to brown some
meats before cooking with
other ingredients. To do so,
select browning function and
preheat for 5 minutes without
lid. Add oil to brown meat.
Do not cover when browning.
• Cut foods into uniform-size
pieces to promote even
cooking. In recipes that call
for various ingredients, cut
those that cook more quickly
into larger pieces and those
that cook more slowly into
smaller pieces.
• Many different cooking
liquids can be used in a
pressure cooker: wine, beer,
bouillon, fruit juices, water
and more.
• After becoming familiar with
your Rapid Cook, you can
convert conventional recipes
for pressure cooking. In
general, reduce cooking
times by two-thirds. The
amount of liquid used may
also have to be adjusted
because there is very little
evaporation from the
pressure cooker. Reduce the
amount of liquid so there is
only about ½ cup more than
desired in the finished
product. Remember,
however, there must always
be some liquid in the
pressure cooker to form the
necessary steam. Try this
formula: 1 cup of liquid for
the first 15 minutes of
pressure cooking then 1/3
cup of liquid for each
subsequent 15 minutes.
• Since flavours are more
concentrated, reduce
amounts of herbs and
seasonings when converting
conventional recipes. Fresh
herbs are better for pressure
cooking than dried herbs.
• Generally speaking, pressure
cookers cook foods in about
1/3 the time of conventional
cooking methods.
• Increase cooking times by
about ten percent when
cooking in high altitudes over
3,500 feet.
• If you wish to cook food for
less time than the preprogrammed amount, watch
the timer and press Cancel
when desired cooking time
has elapsed.
• Pressure will not be achieved
until the internal temperature
in the pot is 40 degrees
higher than the boiling point
of water. The cooking time
will not begin until pressure is
achieved.
• Always check to make sure
your gasket and float valve
are clean and in good
working order.
• We have included recipes
using the maximum level.
Use this as a guide when
creating or adapting your
own recipes. Do not fill above
the 3/5 max level.
• If food needs more cooking
select the 10 minutes
cooking cycle and press
start.
• Do not cook on the browning
function if using the steaming
tray and trivet.
Note: Raw meat is
perishable food, which
should not be left at room
temperature for more
than 2 hours. We advise
to not use the delay timer
when cooking recipes
that include meat
products.
E
48815 rev3_x 21/06/2010 10:11 Page 8
N
T
E
V
L
A
E
S
T
N
E
V
Page 9

9
For details of other Morphy Richards products, please see our website:
Chicken Soup serves 4
Chicken portions, bone in, skinned 4
Chicken stock 4 cups
Carrot, chopped 1
Small onion, chopped 1
Celery stick, chopped 1
Salt and freshly ground black pepper
• Place all ingredients in the Rapid Cook and secure lid
• Cook for 50 mins.
• Release pressure when cooked and strip chicken to
serve. Discard bones or use to make stock.
Spicy Lentil Soup serves 4
Oil 1 tbsp
Onion, chopped 2
Garlic cloves, crushed 2
Celery sticks, chopped 2
Carrots, chopped 2
Whole lentils 300g
Water 1L
Chorizo sausage, diced 200g
Cumin 1 tsp
Bay Leaf
Salt and freshly ground black pepper
• Use browning setting to fry onions and garlic until
translucent
• Add rest of ingredients.
• Secure lid and cook for 45 minutes once pressure is
reached.
Lemon and Dill Cod serves 4
Cod fillets 4
Water 1 cup
Lemon juice dash
Fresh dill
Salt and freshly ground black pepper
• Sprinkle fish with dill and arrange on steaming tray.
• Season with salt and pepper and lemon juice and
place water in bottom of pan.
• Secure lid and cook for 4 minutes once pressure is
reached.
Salmon Steaks serves 4
Salmon steak 4
Water 1 cup
Lemon juice dash
• Put salmon on steamer tray and place in pan.
• Add water to pan.
• Cover and cook for 7 minutes once reached pressure
Prawns with Garlic serves 4
Raw prawns, peeled and de-veined 450g
Butter 2 tbsp
Spring onion, chopped 1 bunch
Garlic, crushed 2 tsp
Lemon juice 2 tsp
Pinch of salt
• Use the Rapid Cook on the browning setting
• Heat butter in the pan, sauté onion and garlic.
• Stir in lemon juice, salt and prawns.
• Stir fry prawns for 5 minutes with the lid off until
cooked.
Prawn Jambalaya serves 4
Long grain rice 30 0g
Water 500ml
Tomatoes, tinned 1 can (400g)
Chicken stock 200ml
Cooked ham, chopped 300g
Onion, chopped 100g
Celery stick, chopped 1
Red pepper, chopped 1
Garlic cloves, crushed 2
Bay leaf 1
Tomato purée 2 tbsp
Basil 1 tsp
Chilli powder 1 tsp
Prawns, cooked 400g
• Use the Rapid Cook on the browning setting
• Sautee onions and celery in the Rapid Cook with the
lid off until soft.
• Add the rice and water and cook for 6 minutes
• Once cooked stir in the other ingredients except the
prawns. Replace lid and cook under pressure for 5
minutes.
Recipes
48815 rev3_x 21/06/2010 10:11 Page 9
Page 10

10
UK Helpline 0844 871 0956 Replacement Parts 0844 873 0722 Ireland Helpline 1800 409 119
• Stir in prawns and heat up using the browning setting
with the lid off for a few minutes until warmed
through.
Sweet and Sour Chicken serves 4
Chicken portions, bone in, skinless 6
Oil 1 tbsp
Pineapple chunks with juice 225g
Celery stick, chopped 1
Red pepper, chopped 1
Brown sugar 4 tbsp
Vinegar 100ml
Soy sauce 2 tbsp
Ketchup 1 tbsp
Worcestershire sauce 1/2 tsp
Ground ginger 1/2 tsp
Water 2 tbsp
Corn flower 2 tbsp
• Use browning function to brown chicken pieces in the
oil.
• Add rest of ingredients except water and corn flour.
Close lid and cook for 20 mins
• Remove meat and vegetables and set aside.
• Mix water and flour and add to sauce stir until
thickened.
• If needed, use the browning setting to heat the sauce
to aid the thickening.
Herby Chicken serves 4
Oil 2 tbsp
Chicken legs and thighs 1kg
Onion, chopped 1
Tomatoes, medium, sliced 3
Chicken stock 300ml
Parsley, chopped handful
Rosemary sprig
Sage leaves, chopped 2
Salt and freshly ground black pepper
• Heat oil on the browning function and brown the
chicken pieces on all sides.
• Remove the chicken and sauté onion until brown.
• Stir in the tomatoes, stock, parsley, and season well.
Add the chicken and herbs.
• Lock lid in place and cook for 20 minutes once
pressure is reached.
Whole Chicken serves 4
Whole chicken 1 small
Oil 1 tbsp
Water 1 cup
• Heat oil on browning setting and brown chicken in
pan.
• Place water in bottom of the Rapid Cook and place
chicken on steaming tray.
• Cook for 45mins
Coq au vin serves 4
Chicken portions, bone in, skin on 4
Flour for dusting
Oil 2 tbsp
Bacon rashers, chopped 3
Onion, chopped 1
Garlic cloves, crushed 2
Carrot, chopped 1
Flour 1 tbsp
Red wine 250ml
Bay leaf 1
Thyme 1/2 tsp
Mushrooms, sliced 100g
Salt and freshly ground black pepper
• Dust chicken in flour and brown in the Rapid Cook,
then set aside
• Use the browing setting to fry bacon, garlic and onion
and add the chicken to Rapid Cook with rest of
ingredients apart from the mushrooms.
• Cook for 15 minutes once pressure is reached.
• Once cooked add mushrooms and add flour to
thicken sauce if necessary.
• Replace lid and bring to pressure, once reached end
cooking and serve.
Beef stew serves 4
Lean beef, cubed 500g
Onion, chopped 1
Potatoes, quartered 400g
Leeks, sliced 2
Carrots, chopped 200g
Beef stock 700ml
Mixed herbs 2 tsp
Cornflour 2 tbsp
Salt and freshly ground black pepper
• Brown beef and onion in Rapid Cook on browning
setting.
48815 rev3_x 21/06/2010 10:11 Page 10
Page 11

11
For details of other Morphy Richards products, please see our website:
• Add other ingredients except corn flour. Secure lid
and cook on stew setting for 20 minutes.
• At the end of cooking, mix corn flour with a little
water and stir into stew until thickened.
Beef Brisket serves 4
Beef brisket joint 1kg
Oil 1 tbsp
Water 2 cups
Onion 1
Bay leaf 1
Salt and freshly black pepper.
• Add oil to the pan and use the browning setting to
brown all sides of the joint.
• Place on steamer tray with rest of ingredients.
• Put water in bottom of pan, secure lid and cook for 1
hour.
• Thicken juice with corn flour to make gravy.
Lamb Madras serves 4
Coriander seeds 2 tbsp
Fenugreek seeds 2 tsp
Cumin seeds 1 tsp
Black Peppercorns 1 tsp
Fennel seeds 1/2 tsp
Cinnamon stick 1
Cloves 3
Tumeric 1 tbsp
Chili Powder 1 tsp
Salt 1 tsp
Stewing lamb, diced 1 kg
Sunflower oil 1 tbsp
Mustard seeds 1 tsp
Curry leaves 10
Onion, chopped 1
Green Chili, finely chopped 1
Ginger, finely chopped 1.5 cm
Garlic cloves, crushed 2
Tinned tomatoes, chopped 200g
Tamarind concentrate
in 50ml of water 2 tsp
Chili powder 1 tsp
• Grind first 7 ingredients in pestle and mortar to a
powder. Stir in turmeric, chilli powder and salt to
create a rub.
• Place in a large bowl and rub onto the lamb.
• Heat oil in Rapid Cook using browning function. Add
mustard seeds and allow to ‘pop’ for a few seconds
to release their flavour.
• Add the curry leaves and onions and fry for a minute
or so to soften.
• Stir in the chilli, ginger and garlic and fry for a few
minutes until the aroma develops.
• Stir in the tomatoes, tamarind, chilli, and then the
lamb.
• Secure the lid and cook under pressure for 30
minutes.
Lamb shanks serves 4
Lamb shanks 4
Onion, chopped 1
Celery Sticks, diced 2
Carrot, diced 1
Beef stock 150ml
Red stock 100ml
Brown sugar 1 tbsp
Tomato puree 2 tbsp
Bay leaf 1
Olive oil 2 tbsp
Salt and freshly ground black pepper
Corn flower (to thicken) 1-2 tbsp
• Heat oil on browning function and brown lamb
shanks. Add onion to soften.
• Add rest of ingredients, stir well and secure lid. Cook
for 1hr.
• Once cooked thicken with corn flour mixed with a
little cooking liquid.
Pork loin serves 4
Pork loin 700g
Oil 1 tbsp
Medium potatoes, cubed 3
Garlic clove, crushed 1
Rosemary 1 tsp
Thyme 1 tsp
Basil 1/2 tsp
Marjoram 1/2 tsp
Water 125ml
Salt and freshly ground black pepper.
• Heat oil in pan on browing setting, and fry potatoes
until golden, remove and reserve.
• Add pork and brown all sides.
48815 rev3_x 21/06/2010 10:11 Page 11
Page 12

12
UK Helpline 0844 871 0956 Replacement Parts 0844 873 0722 Ireland Helpline 1800 409 119
• Add garlic, herbs and water, secure lid and cook for 1
hour.
• Once completed add potatoes, secure lid and cook
for a further 5 minutes once reached pressure.
New Potatoes serves 4
New potatoes, halved 450g
Water 1 cup
• Place potatoes on steamer tray and put 1 cup (225ml)
water in pan.
• Cook for 20 minutes once pressure is reached.
Corn on the cob serves 4
Corn cob 2
Water 1 cup
• Place cobs on steamer tray with water in bottom of
pan
• Cook for 5 mins
Ratatouille serves 4
Oilve oil 2 tbsp
Onion, large, chopped 1
Garlic cloves, crushed 2
Aubergine, cubes 1
Courgette, sliced 3
Red peppers, sliced 2
Beef tomatoes, chopped 2
Vegetable stock 1
Salt and pepper to taste
• Heat oil on browning function
• Add garlic and onion and fry until softened.
• Add rest of vegetables and fry for 2 minutes, sprinkle
stock cube over the vegetables and season, stir well.
• Secure lid and cook for 5 minutes once pressure is
reached.
Risotto with Peas serves 4
Oil 2 tbsp
Onion, finley chopped 1
Arborio rice 200g
Frozen peas 140g
Vegetable stock 400ml
White wine 100ml
Parmesan cheese 25g
Freshly ground black pepper
• Sautee onion in pan without lid until soft, add arborio
rice and sauté until light brown.
• Stir in peas, stock, wine and pepper.
• Secure lid and cook for 15 minutes once pressure is
reached.
• Stir in cheese and let melt
Creme brule serves 4
Double cream 500ml
Vanilla pod 1
Caster sugar 100g
Egg yolks 6
• Heat cream using the browning function.
• Split the vanilla pod, scrape out the seeds and add
seeds and pod into the cream.
• Once brought to a boil, switch off the power and stir
for a few minutes.
• Beat the sugar and egg yolks together in a bowl until
pale and creamy.
• Switch the unit back onto the browning function, re
heat the cream and add to the egg mixture a little at a
time, whisking all the time until thickened slightly.
• Remove vanilla pod and fill 4 ramekin dishes with
mixture.
• Rinse the bowl and fill with 1 cup of water.
• Cover tightly with foil and stack on the trivet.
• Cook for 30 minutes.
• Once cooked, cool to room temperature, sprinkle
with sugar and caramelise with a blow torch. Allow to
set then serve.
48815 rev3_x 21/06/2010 10:11 Page 12
Page 13

13
For details of other Morphy Richards products, please see our website:
Rice Pudding serves 4
Butter 1 tbsp
Long grain rice 135g
Whole milk 500ml
Water 250ml
Sugar 100g
Salt Pinch
Egg 1
Evaporated milk 60ml
Vanilla essence 1/2 tsp
Nutmeg pinch
•
Use the browning function to melt the butter and
stir in the rice.
• Add milk, water, sugar and salt, stir and place on
lid.
• Cook for 15 minutes. Remove lid and keep on
keep warm.
• Mix together egg, evaporated milk, nutmeg and
vanilla and add some of the rice mixture.
• Stir into rest of rice mixture and continue stirring
until thickened.
Beef Stew serves 6
Oil 2 tbsp
Beef, cubed 700g
Carrots sliced 50 0g
Potatoes, quarterd 500g
Leeks, sliced 3
Onion, chopped 1
Beef stock 1 litre
Mixed herbs to taste
Salt and freshly ground black pepper
• Heat oil on browning function
• Brown meat on all sides
• Add onion and soften
• Add rest of ingredients and lock lid
• Cook for 20 minutes once pressure is reached.
• Thicken with corn flour after cooking if required.
• Most recipes included in this guide are based on 4
portions for a complete meal. The Rapid Cook is
capable of increasing this capacity up to 6 portions
depending on your personal preference. Do not fill the
cooking pot more than the 3/5 mark.
• Note; when maximum capacity is used steam
pressure internally can force hot water to spit out of
the steam vent when released, take care when
releasing pressure through the pressure release vent.
• If required adjust the other recipes within this recipe
guide to take advantage of the larger capacity, but do
not fill more than 3/5 full.
Pressure steamed vegetables
All Pressure cooked vegetables are cooked on the
steaming tray and trivet using 1 cup of water. All
quantities are for the steaming tray provided, if
another tray with a larger quantity is used, cooking
times will need to be adjusted.
Broccoli, florets, 300g 7 min
Cauliflower, florets 300g 7 min
New potatoes, halved 450g 20 min
Carrots, baby 350g 7 min
Butternut squash, cubed 200g 8 min
Frozen mixed vegetables 300g 3 min
Brussel sprouts 300g 10 min
48815 rev3_x 21/06/2010 10:11 Page 13
Page 14

14
UK Helpline 0844 871 0956 Replacement Parts 0844 873 0722 Ireland Helpline 1800 409 119
Cleaning
See ‘before using the Rapid
Cook for the first time’
section for information on
cleaning your Rapid Cook.
No parts are suitable for the
dishwasher.
Helpline
If you have any difficulty with
your appliance, do not hesitate
to call us.
We are more likely to be able
to help than the store from
where you bought it. Please
have the following information
ready to enable our staff to
deal with your query quickly.
• Name of the product.
• Model number as shown on
the underside of the appliance.
• Serial number as shown on
underside of the appliance.
UK Helpline 0844 871 0956
Replacement Parts 0844 873 0722
Ireland Helpline 1800 409 119
Website
You may also contact us
through our website, or visit
the site to browse and
purchase appliances, spare
parts and accessories from the
extensive Morphy Richards
range.
48815 rev3_x 21/06/2010 10:11 Page 14
Page 15

15
For details of other Morphy Richards products, please see our website:
This page is intentionally blank
48815 rev3_x 21/06/2010 10:11 Page 15
Page 16

16
Morphy Richards products are intended for household use only.
See usage limitations within the location safety instructions.
Morphy Richards has a policy of continuous improvement in product quality and
design. The company, therefore reserves the right to change the specification of
it’s models at any time
The After Sales Division
Morphy Richards Ltd
Mexborough, South Yorkshire,
England, S64 8AJ
Helplines (office hours)
UK 0844 871 0956
Spare Parts 0844 873 0722
Republic of Ireland 1800 409 119
MC48815 MUK Rev 3 06/10
REGISTERING
YOUR TWO YEAR
GUARANTEE
Your standard one year guarantee is
extended for an additional 12
months when you register the
product within 28 days of purchase
with Morphy Richards. If you do not
register the product with Morphy
Richards within 28 days, your
product is guaranteed for 1 year. To
validate your 2 year guarantee
register with us online at
www.morphyrichards.co.uk
N.B. Each qualifying product needs
to be registered with Morphy
Richards individually.
Please note that the 2 year
guarantee is only available in the
UK and Ireland. Please refer to the
one year guarantee for more
information.
YOUR ONE YEAR
GUARANTEE
It is important to retain the retailer’s
receipt as proof of purchase. Staple
your receipt to this back cover for
future reference.
Please quote the following
information if the product develops
a fault. These numbers can be
found on the base of the product.
Model no.
Serial no.
All Morphy Richards products are
individually tested before leaving the
factory. In the unlikely event of any
appliance proving to be faulty within
28 days of purchase, it should be
returned to the place of purchase
for it to be replaced.
If the fault develops after 28 days
and within 12 months of original
purchase, you should contact the
Helpline number quoting Model
number and Serial number on the
product, or write to Morphy
Richards at the address shown.
You may be asked to return a copy
of proof of purchase.
Subject to the exclusions set out
below (see Exclusions), the faulty
appliance will then be repaired or
replaced and dispatched usually
within 7 working days of receipt.
If, for any reason, this item is
replaced during the 1 year
guarantee period, the guarantee on
the new item will be calculated from
original purchase date. Therefore it
is vital to retain your original till
receipt or invoice to indicate the
date of initial purchase.
To qualify for the 1 year guarantee,
the appliance must have been used
according to the instructions
supplied. For example, crumb trays
should have been emptied regularly.
EXCLUSIONS
Morphy Richards shall not be liable
to replace or repair the goods under
the terms of the guarantee where:
1 The fault has been caused or is
attributable to accidental use,
misuse, negligent use or used
contrary to the manufacturer’s
recommendations or where the fault
has been caused by power surges
or damage caused in transit.
2 The appliance has been used on a
voltage supply other than that
stamped on the products.
3 Repairs have been attempted by
persons other than our service staff
(or authorised dealer).
4 The appliance has been used for
hire purposes or non domestic use.
5 The appliance is second hand.
6 Morphy Richards are not liable to
carry out any type of servicing work,
under the guarantee.
7 Plastic filters for all Morphy
Richards kettles and coffee makers
are not covered by the guarantee.
8 Batteries and damage from leakage
are not covered by the guarantee.
• This guarantee does not confer any
rights other than those expressly set
out above and does not cover any
claims for consequential loss or
damage. This guarantee is offered
as an additional benefit and does
not affect your statutory rights as a
consumer.
For electrical products sold within the
European Community. At the end of the
electrical products useful life, it should not
be disposed of with household waste.
Please recycle where facilities exist. Check
with your Local Authority or retailer for
recycling advice in your country.
48815 rev3_x 21/06/2010 10:11 Page 16
 Loading...