

Page 1
Issue 2 26/07/2021 1
23L Rotisserie Mini
Oven
Installation & User Instructions –
Please keep for future reference
KR-F20RL-E1Dkh
Page 2

Issue 2 26/07/2021 2
Contents
Safety Information………………………………………………..
3
Parts ………………………………………………………………
6
Oven functions…………………………………………………..
7
Before first use..………………………………………………….
7
Fitting the crumb tray and racks……………………………….
8
Using the racks and other cooking vessels……………………
9
Assembling and fitting the rotisserie spit.……………………..
10
Basic oven operation……………………………………………
11
Rotisserie operation..……………………………………………
13
Cleaning your oven………………………………………………
14
Replacing the bulb………………………………………………
15
Technical Specification………………………………………….
16
Recycling electrical products……………………………………
16
Plug / Wiring advice ……………………………………………..
17
Guarantee………………………………………………………..
18
Page 3

Issue 2 26/07/2021 3
Safety information
Important – Please read these instructions fully before installation
Electrical safety
• You should only plug the appliance into a 220V‐240V AC, 50Hz
supply. Connecting it to other power sources may damage the
appliance and will invalidate the guarantee.
• Switch off and unplug when not in use and before cleaning the
appliance.
• Keep the appliance and its cord out of reach of children less
than 8 years.
• Do not allow children to use the appliance without supervision.
• This appliance can be used by children aged from 8 years and
above and persons with reduced physical, sensory or mental
capabilities or lack of experience and knowledge if they have
been given supervision or instruction concerning use of the
appliance in a safe way and understand the hazards involved.
Children shall not play with the appliance. Cleaning and user
maintenance shall not be made by children unless they are older
than 8 and supervised.
• Keep cable, plug and appliance dry and away from areas where
it is likely to get splashed. Never immerse in water. Never clean
with a steam cleaner.
• Do not pull on the cable to disconnect from mains supply.
• Do not operate the appliance if damaged or after it malfunctions.
In the event the supply cord is damaged, in order to avoid a
hazard it must only be replaced by a qualified service engineer,
with a suitably approved part.
• This appliance must be positioned so that the plug is accessible
and the plug socket is within easy reach of the power cord.
• This appliance must be plugged into an earthed socket outlet.
Page 4

Issue 2 26/07/2021 4
Warning!
• This appliance is intended exclusively for use in domestic
households. It is not suitable for commercial use.
• The surfaces of the oven and the containers inside will
become hot during and immediately after use; wear
oven gloves when handling. Note the elements are
subject to residual heat after use. Do not touch.
• Do not leave unattended during use. Bread and other
foodstuffs can catch fire if overdone.
• Do not use the oven on, near or under flammable or heat
sensitive items. Place the back of the oven against the wall and
leave a clear gap of at least 12cm on all sides and 50 cm above
the oven to allow adequate ventilation
• Do not cover and allow the oven to cool fully before storing.
• Do not operate the oven using a timer or separate remote
control.
• Do not use without the crumb tray fitted. Ensure crumb tray is
fitted below the lower heating elements. If incorrectly
positioned in the oven it could lead to abnormally high
temperatures.
• Do not place tinned or bottled food in this oven.
• If smoke is emitted, switch off the appliance and keep the door
closed in order to stifle any flames. Smother with a damp cloth
or fire blanket.
• Do not permit food or cooking vessels to touch the four heating
elements, the sides, roof or base of the oven cavity.
• Only use for intended purpose - cooking or grilling food. This
appliance can cause personal injury if misused.
Page 5

Issue 2 26/07/2021 5
Food safety
• Thoroughly defrost frozen meat, poultry, fish and seafood in the
refrigerator before cooking unless cooking from frozen advice is
provided by the food packaging.
• Keep raw meat and poultry separate from cooked foods.
• Always wash hands after handling raw meat and poultry, before
handling any ready to eat foods.
• Wipe and disinfect surfaces that have been in contact with raw
meat and poultry.
• Use separate utensils for handling raw meat/poultry and cooked
food or wash them thoroughly between use.
• To check whether meat, particularly poultry, is cooked, pierce
the flesh with a skewer or fork; the juices should run clear.
Ensure the product is piping hot throughout.
• Fish is cooked when it appears opaque and can be flaked
easily.
Page 6
Issue 2 26/07/2021 6
Parts
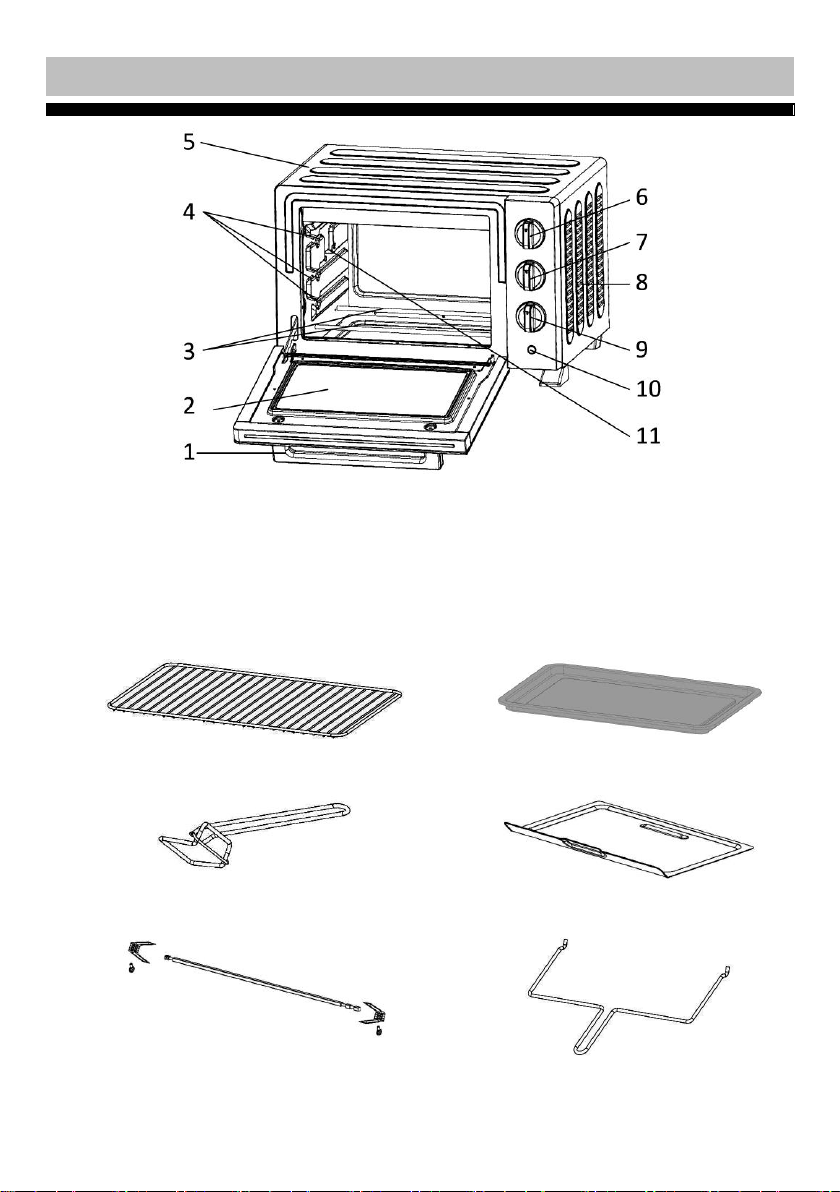
1. Door handle
2. Glass door
3. Lower heating
elements
4. Rack supports
5. Housing
6. Temperature
control knob
7. Function knob
8. Air vents
9. Timer knob
10. Indicator
11. Bracket for
rotisserie spit
Grill rack
Baking tray
Rack / Tray handle
Crumb tray
Rotisserie spit
Rotisserie handle
Page 7
Issue 2 26/07/2021 7
Oven functions
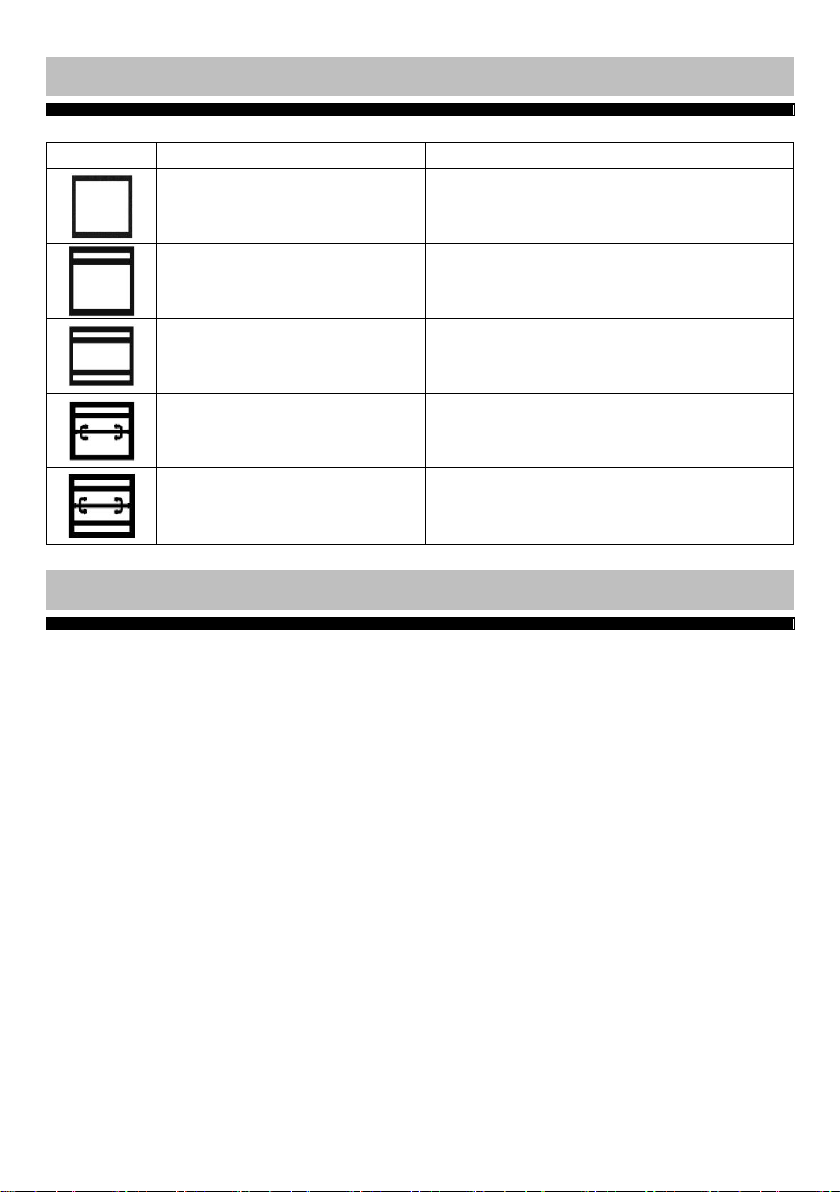
Symbol Suggested use
Hotplates and heating
elements off
During storage and for timer use.
Upper heating elements
Toasting and grilling
Upper and lower heating
elements
Baking and roasting
Rotisserie with upper
heating elements
Spit roasting meat and poultry
Rotisserie with upper
and lower heating
elements
Faster spit roasting of meat and
poultry
Before first use
1.
1. Dispose of all packaging safely.
2. Become familiar with -
• The parts of the oven – see page 6
• Where to fit the crumb tray - see fig. 1
• Where to fit the baking tray and rack – see fig. 2
• How to fit the handle to the baking tray and grill rack - See figs. 3 &
4.
• How to assemble and fit the rotisserie spit and practice how to lift
out the spit with the rotisserie handle see figs. 5 – 9.
• How to open and close the door – see figs. 10 -12
3. Some smoke may be emitted when the oven is first used. To
eliminate any manufacturing residues, open the room window and
operate the empty oven at maximum temperature for 10 minutes.
4. Clean oven and all detachable parts in accordance with the cleaning
section of these instructions.
Page 8
Issue 2 26/07/2021 8
Fitting the crumb tray and racks
1.
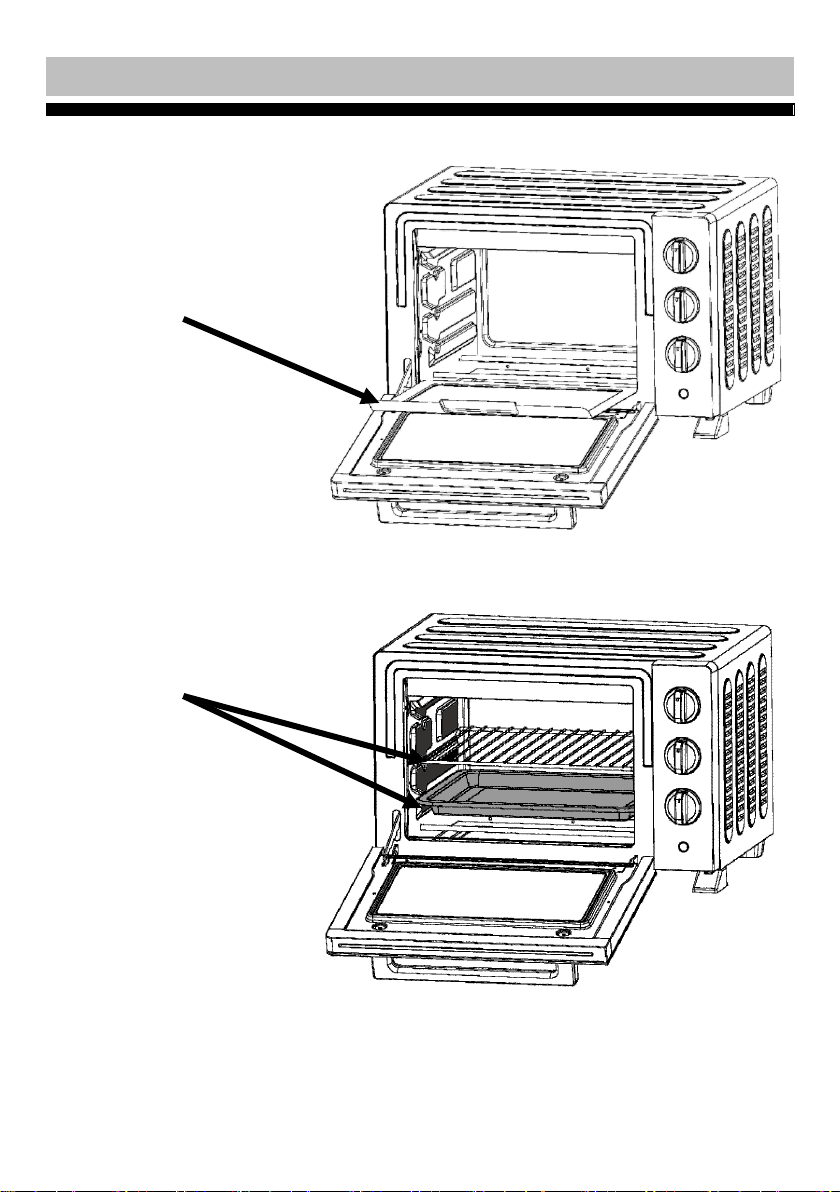
• Slide the crumb tray
underneath the lower
heating elements so
that it lays flush with
the base of the oven
(fig. 1)
• Slide the grill rack and
/ or baking tray onto
the rack supports
(fig. 2)
Fig. 1
Fig. 2
Page 9
Issue 2 26/07/2021 9
Using the racks and other cooking vessels
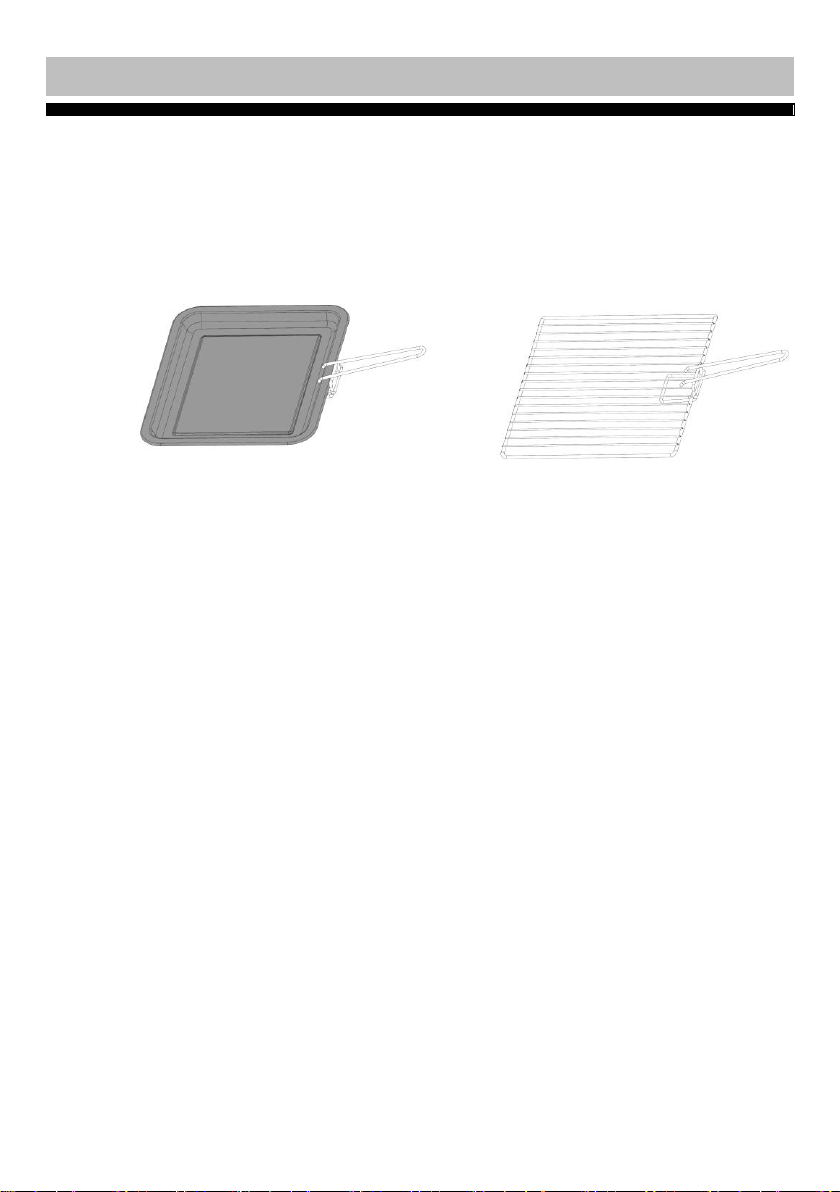
• Food can be placed directly onto the grill rack and the baking tray
supplied.
• If placing food directly onto the grill rack, fit the baking tray into the
lower oven rack rest to act as a drip / crumb tray (fig 2 & 11).
• Always use the handle supplied when fitting or removing the rack /
tray from the oven. See figs 3 & 4 below on how to fit the handle.
Fig. 3 Fig. 4
• If using another cooking vessel
➢ Always place the container onto the grill rack.
➢ Ensure that it will fit into the oven cavity without touching the sides
of the oven or the heating elements.
➢ Ensure that the vessel is suitable for this type of oven e.g. Ferrite
materials such as enamel, cast or stainless steel and heat resistant
glass. Do not use copper, aluminium, paper or plastic
containers.
Page 10
Issue 2 26/07/2021 10
Assembling and fitting the rotisserie spit
•
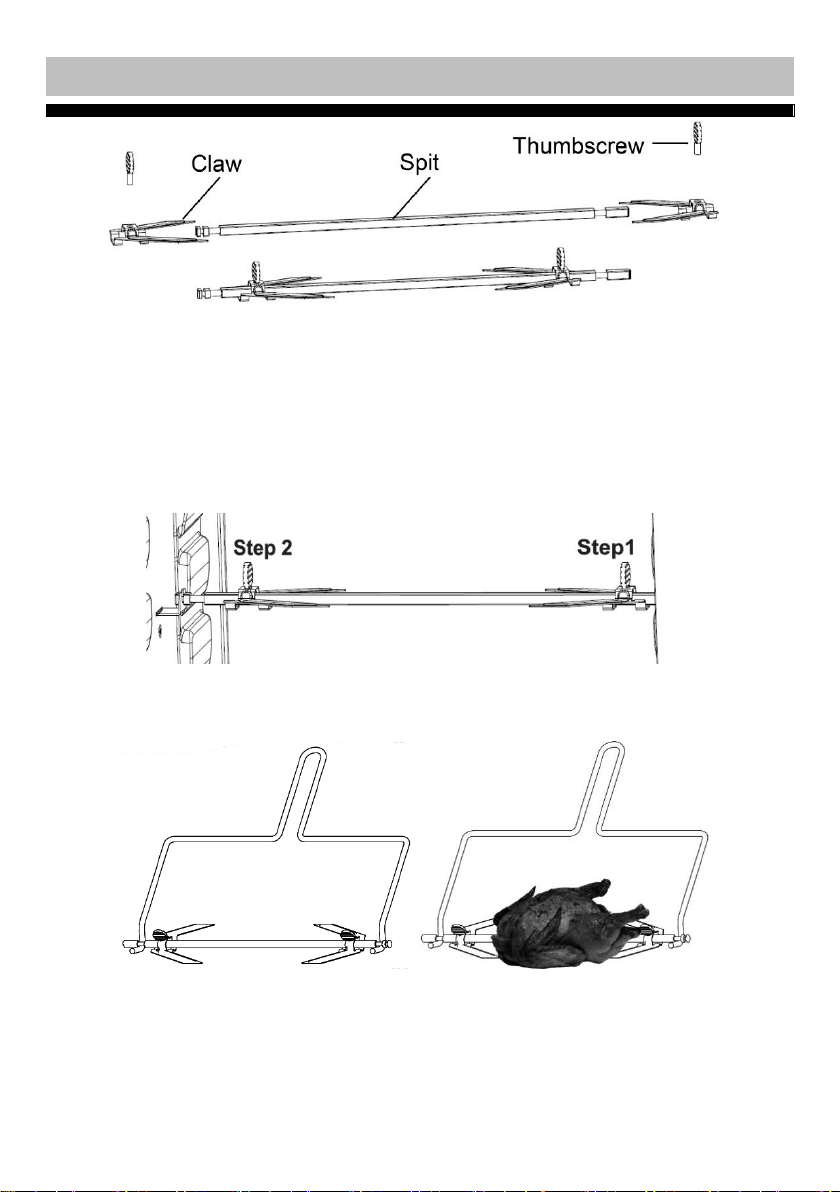
• Fit the claws onto the rotisserie spit with the claws facing inwards
(figs. 5 & 6).
• Fit the thumb screws into the holes in the claws and turn until secure
(fig. 6).
• Note that the spit has different shaped ends – see end ‘A’ and end ‘B’
in the diagram above. End A is fitted first into the socket on the right
hand side of the oven before fitting end B into the bracket on the left
hand side of the oven (fig .7).
• Always use the rotisserie handle to remove the spit from the oven
when hot. Place the hooked ends of the rotisserie handle under the
spit and into the notches (figs 8 & 9) and lift out.
A
B
Fig. 6
Fig. 5
Fig. 7
Fig. 9
Fig. 8
Page 11
Issue 2 26/07/2021 11
Basic oven operation
The oven can be used in a similar manner to a conventional electric oven
to bake, roast and grill food.
1. Place the oven on a stable, flat, heat resistant surface and away from
any flammable materials.
2. Fit the crumb tray into the base of the oven.
3. Check that the TIMER knob is in the ‘OFF’ position.
4. Fully unwind the cable, plug in and switch on at the mains (no indicator
should be lit). For safety do not allow the cable to dangle over the
edge of units.
5. Turn the TEMPERATURE control knob and select the desired cooking
temperature (100 - 220°C).
6. Turn the FUNCTION control knob and select the desired cooking
method.
7. Turn the TIMER control knob, select the cooking time required and the
oven light and power indicator will illuminate to show that the cooker is
now operational.
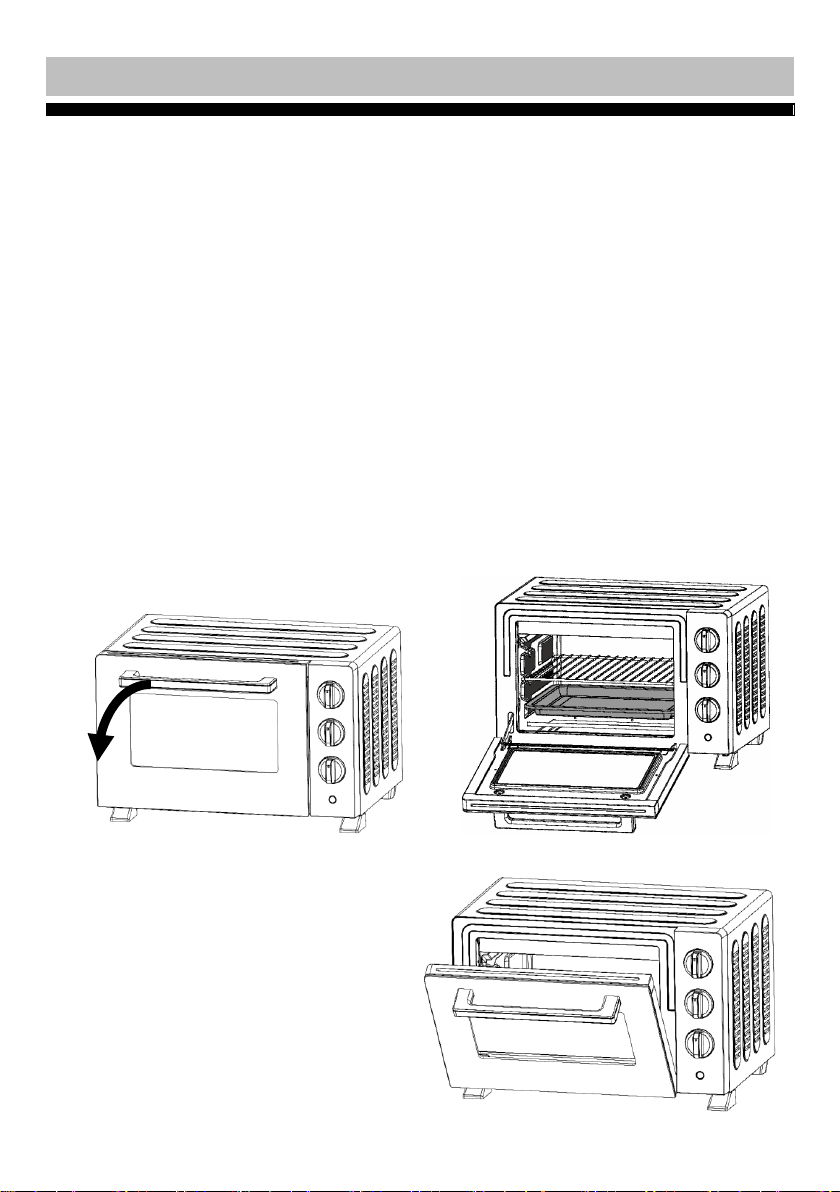
8. Open the oven door (Fig. 10 & 11) and place the food into the oven
using the grill rack and / or baking tray.
Fig. 10 Fig. 11
9. If baking or roasting, close
the oven door.
10. If grilling or toasting, leave
the oven door ajar (fig. 12).
Fig. 12
Page 12

Issue 2 26/07/2021 12
Basic Oven operation (continued)
11. If the timer has been selected – when the cooking time has finished,
a bell will sound and the oven will turn off automatically.
12. If ‘stay on’ has been selected – it will be necessary to turn off the
oven after use.
13. The oven can be stopped at any time by turning the TIMER control
knob to the ‘OFF’ position or by switching off at the mains
Notes:
• When the oven is in use the top of the oven can be used to warm
plates.
• When not in use, always ensure that the timer is set to ‘OFF.’
Tips for successful cooking
• Follow cooking instructions on food packaging.
• For more accurate timing, preheat the oven for a few minutes before
placing food into the cavity for cooking.
• Turn or stir food some foods halfway through cooking process.
• Distribute food evenly across the grill rack and baking tray.
• The cooking time will vary according to the shape, thickness and
composition of the food.
• Smaller pieces will cook quicker than larger pieces. For best results,
ensure pieces of food are similar in size and thickness.
Page 13
Issue 2 26/07/2021 13
Rotisserie operation
1. Place the oven on a stable, flat, heat resistant surface and away from
any flammable materials. Check that the TIMER knob is in the OFF
position.
2. Fully unwind the cable, plug in and switch on at the mains (no
indicator should be lit). For safety, do not allow the cable to dangle
over the edge of units.
3. Fit the baking tray into the lowest slot (not the base) of the oven so it
can act as a drip tray or use to roast your vegetables at the same
time.
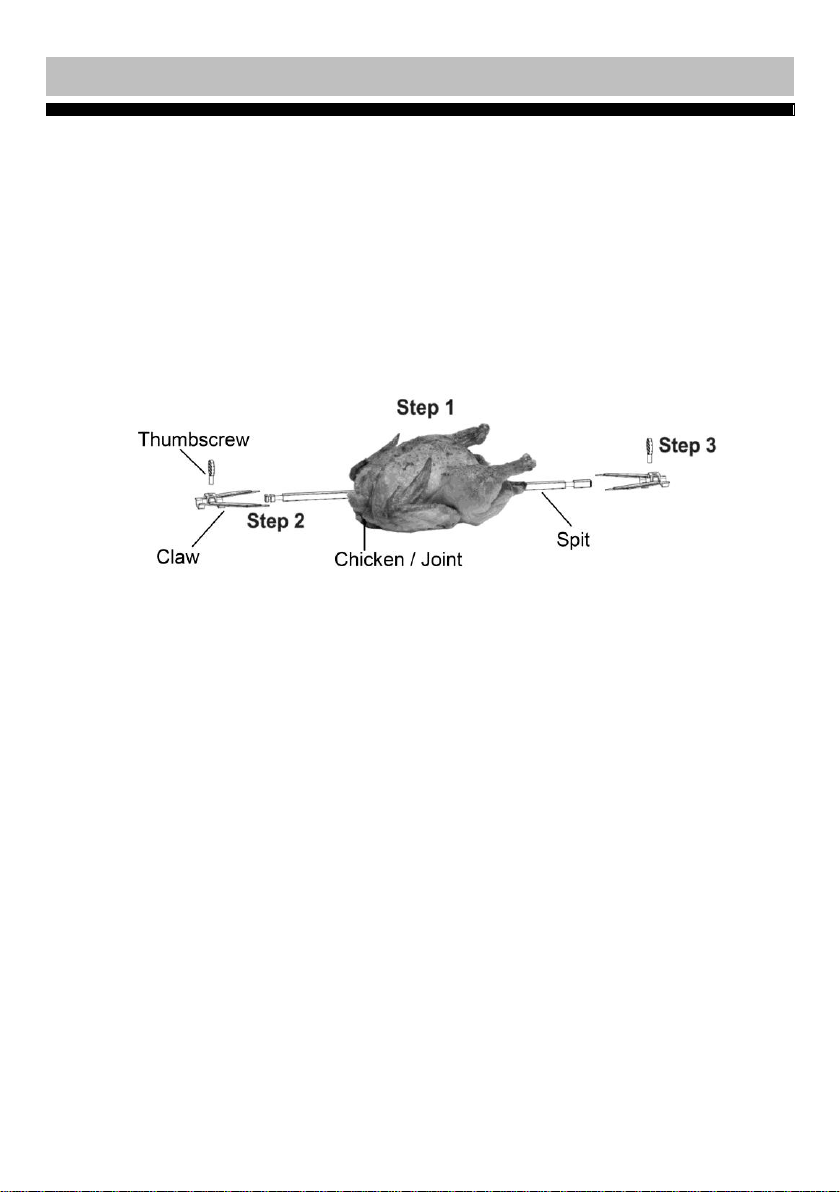
4. Make a hole through the centre of the joint or chicken and insert the
rotisserie spit.
Fig. 13
5. Fit the claws onto the spit and ensure the spikes enter the joint /
chicken. Secure the claws into position using the thumbscrews as
these will ensure the joint rotates when the spit turns.
6. Insert the rotisserie spit and joint into the oven cavity and ensure that
there is sufficient clearance for the food to rotate without touching the
heating elements.
7. Close the oven door.
8. Turn the TEMPERATURE control knob and select temperature
220°C.
9. Turn the FUNCTION control knob and select the desired rotisserie
option – see section oven function (page 6).
10. Turn the TIMER control knob and select the cooking time required
and the oven light and indicator will illuminate to show that the cooker
is now operational and the rotisserie spit will start to turn.
11. If the timer has been selected – when the cooking time has finished,
a bell will sound and the oven will turn off automatically.
12. If ‘stay on’ has been selected – it will be necessary to turn off the
oven after use.
13. The oven can be stopped at any time by turning the TIMER control
knob to ‘OFF’ or by switching off at the mains.
14. Using the rotisserie spit handle lift out the roast.
Page 14

Issue 2 26/07/2021 14
Rotisserie operation (continued)
Notes:
• The maximum weight of food that can be roasted using the rotisserie
spit is 4.5kg
• The baking tray can be used to roast vegetables at the same time as
acting as a drip tray.
• When not in use, always ensure that the timer is set to ‘OFF.’
Cleaning the oven
Clean the oven, rotisserie spit, grill rack, baking and crumb tray after each
use.
1. Switch off and unplug the oven and allow it and the accessories to
cool completely. Cleaning the oven whilst hot may cause the glass
door to shatter and risk personal injury.
2. Wipe external surfaces of the oven with a soft damp cloth and dry
surfaces with a soft dry cloth.
3. Wipe internal oven surfaces with a soft damp cloth soaked in soapy
water. Rinse and dry surfaces with a soft dry cloth.
4. Do not use strong detergents or abrasives, as these may dull or
scratch the surface which may result in the glass door shattering. Do
not immerse in water. Do not use a steam cleaner.
5. Slide and lift out the crumb tray from the bottom of the oven.
6. Wash loose parts (crumb tray, grill rack, baking tray and baking tray
handle, rotisserie spit and handle) in hot water with a little washing up
liquid. Rinse and dry thoroughly. Not suitable for the dishwasher.
7. Refit all parts.
Page 15
Issue 2 26/07/2021 15
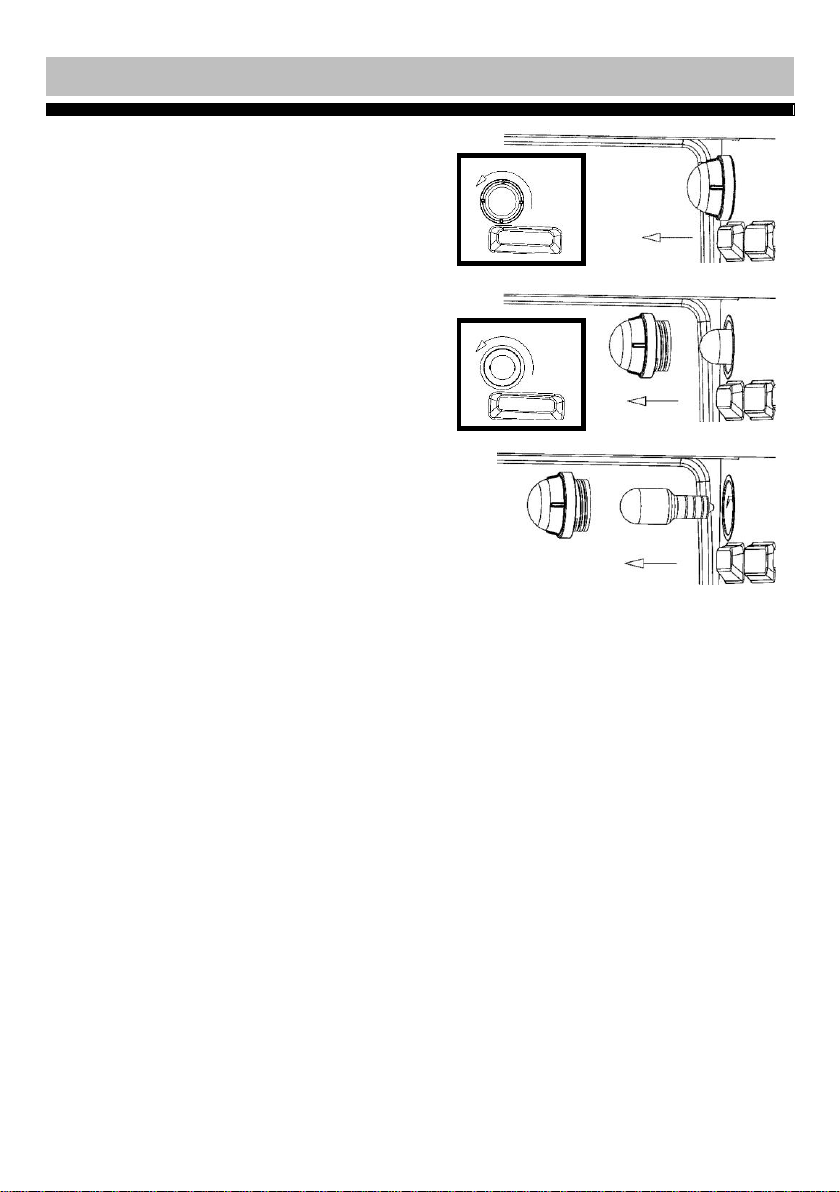
Replacing the bulb
1. Switch off the oven, unplug from
the mains supply and allow the
oven to cool completely.
2. Carefully unscrew the glass
cover (figs. 14 & 15) and place
to one side.
3. Remove (unscrew) the spent
bulb (figs. 15 & 16) and replace
with one of the same type (Max
15W E14 (small Edison screw)
incandescent oven bulb).
Handle the new one carefully
and screw in firmly, taking care
not to cross threads. Always
use the same or lower wattage
bulb. Please use low energy
bulbs where possible.
4. Refit the glass cover.
Fig 14
Fig 15
Fig 16
Page 16
Issue 2 26/07/2021 16
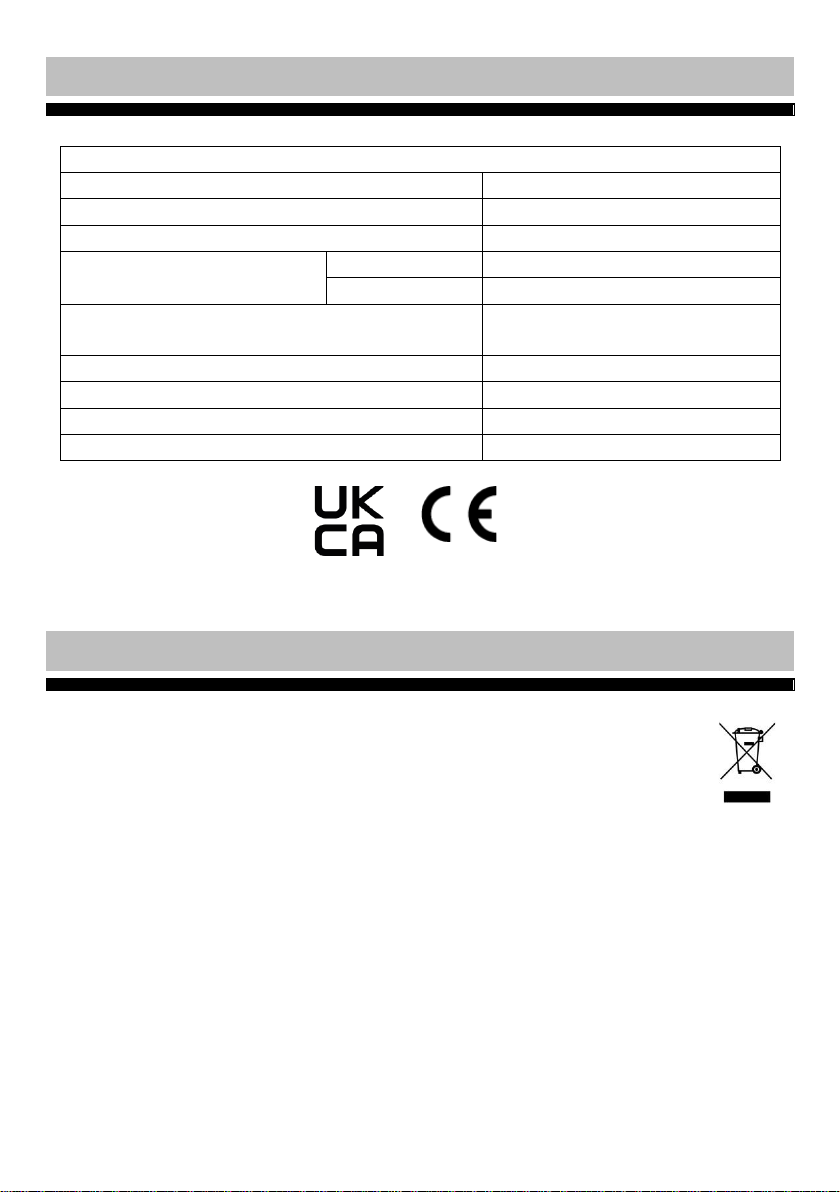
Technical specification
Morphy Richards 23 Litre Rotisserie Mini Oven
Model
KR-F20RL-E1Dkh
Rated Voltage & Frequency
220 - 240V AC 50/60Hz
Rated Power Input
1500W
Capacity
Overall
23 litre
Useable
16 litre
Replacement bulb type
Max 15 W E14 (SES)
incandescent oven bulb
Class rating
1 (earthed)
BS 1362 fuse
10A
Product dimensions (external)
461 x 403 x 298 mm
Product weight (net)
7.8 kg approx.
Recycling electrical products
You should now recycle your waste electrical goods and in
doing so help the environment.
This symbol means an electrical product should not be
disposed of with normal household waste. Please ensure it is
taken to a suitable facility for disposal when finished with.
Visit www.recycle-more.co.uk, click on “bank locator” and enter
your postcode to find your nearest recycling site.
Page 17
Issue 2 26/07/2021 17
Plug / Wiring advice
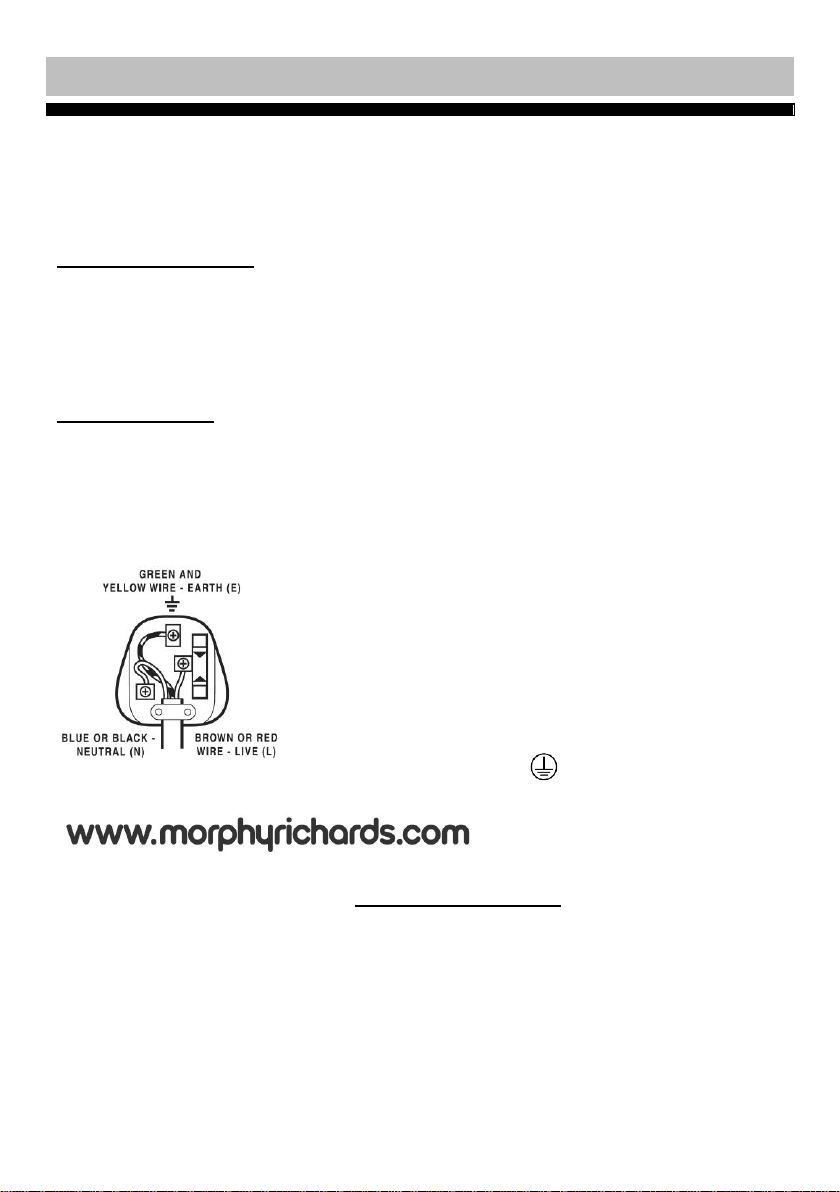
The wires in this mains lead are coloured in accordance with the following
UK electrical code: BLUE = NEUTRAL
BROWN = LIVE
GREEN + YELLOW = EARTH
Non-rewireable plug
This appliance may be fitted with a “non‐rewireable” plug. If you need to
change the fuse in a “non‐rewireable” plug, the fuse cover must be
refitted. If the fuse cover is lost or damaged, the appliance must not be
used.
Rewireable plug
The colours of the wires in the mains lead of this appliance may not
correspond with the coloured markings identifying the terminals in a
rewireable plug. Rewireable plugs should only be replaced by a
suitably competent person. If in doubt, consult a qualified
electrician.
The BLUE wire must be connected to the
terminal marked with the letter N
The BROWN wire must be connected to the
terminal marked with the letter L
The GREEN & YELLOW wire must be
connecting to the terminal marked with the letter
E or the earth symbol .
Imported by Argos MK9 2NW. Argos (N.I.) BT8 6FX. Argos Distributors
(Ireland) A84 YY86
If you require assistance, please call the Sainsbury’s Argos helpline on
0345 604 0105
Your statutory rights are not affected.
Made in China. All brand names are registered trademarks of their
respective owners.
Page 18
Issue 2 26/07/2021 18
 Loading...