

Page 1

Your two year guarantee
It is important to retain the retailers receipt
as proof of purchase. Staple your receipt to
this back cover for future reference.
Please quote the following information if
the product develops a fault. These numbers
can be found on the base of the product.
Model no. Serial no.
All Morphy Richards products are
individually tested before leaving the factory.
In the unlikely event of any appliance proving
to be faulty within 28 days of purchase it
should be returned to the place of purchase
for it to be replaced.
If the fault develops after 28 days and
within 24 months of original purchase, you
should contact the Helpline number quoting
Model number and Serial number on the
product, or write to Morphy Richards at the
address shown.
You will be asked to return the product (in
secure, adequate packaging) to the address
below along with a copy of proof of
purchase.
Subject to the exclusions set out below (see
Exclusions) the faulty appliance will then be
repaired or replaced and dispatched usually
within 7 working days of receipt.
If for any reason this item is replaced
during the 2 year guarantee period, the
guarantee on the new item will be calculated
from original purchase date. Therefore it is
vital to retain your original till receipt or
invoice to indicate the date of initial
purchase.
To qualify for the 2 year guarantee the
appliance must have been used according to
the manufacturers instructions. For example
kettles should have been regularly descaled.
EXCLUSIONS
Morphy Richards shall not be liable to
replace or repair the goods under the terms
of the guarantee where:
1 The fault has been caused or is
attributable to accidental use, misuse,
negligent use or used contrary to the
manufacturers recommendations or where
the fault has been caused by power
surges or damage caused in transit.
2 The appliance has been used on a voltage
supply other than that stamped on the
products.
3 Repairs have been attempted by persons
other than our service staff (or authorised
dealer).
4 Where the appliance has been used for
hire purposes or non domestic use.
5 Morphy Richards are not liable to carry
out any type of servicing work, under the
guarantee.
6 Plastic filters for all Morphy Richards
kettles and coffee makers are not covered
by the guarantee.
This guarantee does not confer any rights
other than those expressly set out above and
does not cover any claims for consequential
loss or damage. This guarantee is offered as
an additional benefit and does not affect your
statutory rights as a consumer.
• This guarantee is valid in the UK and
Ireland only.
Morphy Richards products are intended for
household use only.
Morphy Richards has a policy of continuous
improvement in product quality and design.
The company, therefore reserves the right
to change the specification of its models at
any time.
The After Sales Division
Morphy Richards Ltd, Mexborough
South Yorkshire, England, S64 8AJ
Helpline (office hours)
UK 0870 060 2614
Republic of Ireland 1800 409119
444/8503/04 Rev 1
Page 2

Sandwich press
Please read and keep these instructions
www.morphyrichards.co.uk
getting the best from your
new sandwich press
• Safety first
Caution must be used when handling this appliance as it does get
very hot. Always switch off the unit and allow to cool before
cleaning or storing.
• Toasting
Always place sandwiches towards the rear of the bottom cooking
plate for optimum performance.
Page 3

Important safety
instructions
The use of any electrical appliance
requires the following common sense safety
rules.
Primarily there is danger of injury or
death and secondly the danger of damage
to the appliance. These are indicated in the
text by the following two conventions:
WARNING: Danger to the person!
IMPORTANT: Damage to the appliance! In
addition we offer the following safety advice.
Location
• Remove all the packaging and retain for
future reference.
• Ensure the sandwich press is used on a
firm, flat surface.
• Do not use the sandwich press outdoors
or in a bathroom.
• Do not place the sandwich press on a
highly polished wooden surface as
damage may occur to the surface.
• Do not place the sandwich press on or
near hot surfaces such as a hot plate or
radiant rings or near a naked flame.
• Do not let the mains lead hang over the
edge of the table or worktop or touch hot
surfaces.
Children
• Children do not understand the dangers
associated with operating electrical
appliances. Never allow children to use
this appliance.
Personal safety
• During cooking steam and hot air will be
ejected from the food. Take extreme care
when opening and closing the appliance
when hot.
Other safety considerations
• IN COMMON WITH MOST COOKING
APPLIANCES YOUR SANDWICH PRESS
WILL GET HOT DURING USE,
PARTICULARLY THE PLATES. AFTER
PLACING YOUR FOOD ON THE HOT
PLATES TOUCH ONLY THE HANDLE
DURING AND IMMEDIATELY AFTER
COOKING.
• Disconnect the sandwich press from the
mains supply when cleaning or not in
use.
• Do not touch hot surfaces. Always use
handles or knobs.
• Do not immerse the sandwich press itself
in water and always ensure the electrical
connections are kept dry.
• Do not operate any appliance with a
damaged cord or plug or after the
appliance malfunctions or has been
damaged in any manner. Ring the
helpline number for advice on
examination and repair.
• The use of attachments or tools not
recommended or sold by Morphy
Richards may cause fire, electric shock
or injury.
• Do not use the sandwich press for
anything other than its intended purpose.
• Do not leave unattended whilst switched
on.
Treating scalds
• Run cold water over the affected area
immediately. Do not stop to remove
clothing, get medical help quickly.
2
Page 4
Worth noting
If your sandwich press does not
work, check the following points:
1 Is the plug in its socket and the switch in
the ‘on’ position.
2 Is the plug itself or the socket faulty
- check this by plugging in another
appliance.
Electrical requirements
Check that the voltage on the rating plate
of your appliance corresponds with your
house electricity supply which must be A.C.
(Alternating current).
For appliances with fitted plug.
If the socket outlets in your home are not
suitable for the plug supplied with this
appliance the plug should be removed and
the appropriate one fitted.
IMPORTANT : THE PLUG REMOVED
FROM THE MAINS LEAD, IF SEVERED,
MUST BE DESTROYED AS A PLUG WITH A
BARED FLEXIBLE CORD IS HAZARDOUS IF
ENGAGED INTO A LIVE SOCKET OUTLET.
Should the fuse in the 13 amp plug
require changing a 13 amp BS1362 fuse
must be fitted.
WARNING: THIS APPLIANCE MUST BE
EARTHED.
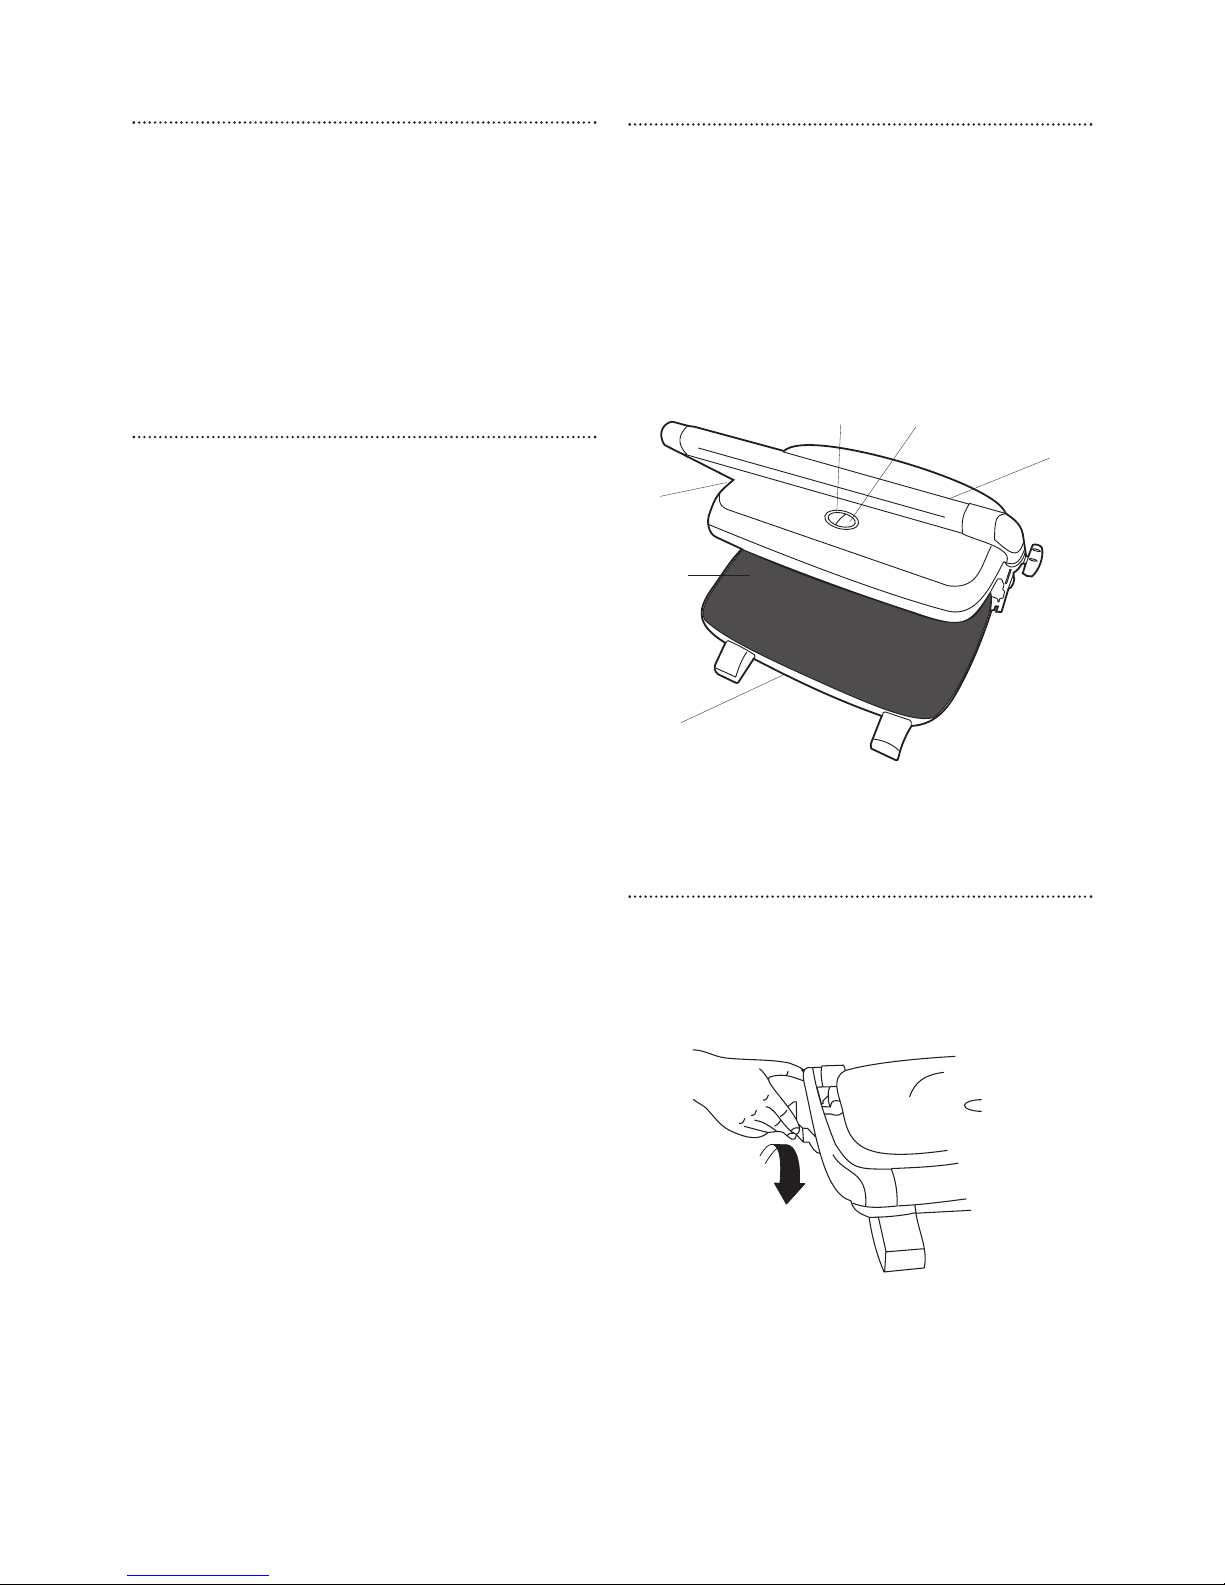
Features
⁄ Locking clip (not shown)
¤ Sandwich press plates
‹ Cord storage (on underside)
› Power on neon (red)
fi Ready to cook neon (orange)
fl Non slip feet
‡ Height adjustment knob
· Handle
Using your sandwich
press
Open the sandwich press by undoing the
locking clip on the side of the sandwich
press and raise the upper half of the press
with the handle.
Check that the cooking plates are clean
and dust free. If you need to wipe the
sandwich plates over do so with a damp
cloth.
Your sandwich press should be in the
closed position for pre-heating.
⁄
¤
‹
›
fi
fl
‡
·
3
Page 5

Prepare your sandwich in advance.
Follow the cooking instructions in the
recipes.
1 Plug the sandwich press into the mains
socket and switch on. The red light
›
will glow indicating it is switched on.
2 Keep the sandwich press closed while
preheating. When the orange light
fi
comes on this shows the sandwich press
is ready for use. Please note that this
light will cycle on/off during use.
3 Now open the press and place the
sandwiches on the hot plates.
REMEMBER THE TOASTER PLATES
ARE VERY HOT.
When using for the first time you may
notice a fine smoke haze being emitted
from the unit, this is due to the ‘bake in’
of some of the components and is not
harmful.
4 Pull down the handle until it rests on the
sandwich.
Note: The storage clip must not be used
to clamp the sandwich press together
when the sandwiches are in the press.
The weight of the top plate is sufficient.
5 The sandwiches will take approximately
5-7 minutes to cook. However, this time
should be used as a guide only, as
cooking times will vary depending on
type of bread, ingredients and personal
preference.
6 Once your sandwich is cooked, push
open the lid using the handle. When
removing sandwiches from the press
NEVER use a metal implement such as a
knife or fork. Always use a heat proof
plastic or wooden spatula.
TAKE EXTREME CARE AS THE BODY
OF THE APPLIANCE AND THE PLATES
BECOME VERY HOT.
7 Remember to re-heat the sandwich press
before cooking more sandwiches.
Toasting open
sandwiches and melts
Your sandwich press has an adjustable
height facility that enables you to make
open sandwiches and to melt toppings of
your choice.
1 Pre-heat the sandwich press with the lid
closed until the orange ready to cook
neon lights.
2 Place your sandwich on the sandwich
plates.
3 Once you have selected the desired
height turn the adjustable height knob
‡
in a clockwise direction to fix the top
sandwich plate in position.
4 Melting will take approximately 3-4
minutes. Melting times may vary due to
the desired taste and the set height of
the top sandwich plate.
4
Page 6

Hints and tips
Breads
A wide variety of breads can be used,
wholemeal, wholegrain, kibbled wheat,
raisin loaf, focaccia, turkish bread,
ciabbatta baguettes as well as bread
rolls. Sweet breads such as raisin bread
and brioche.
Fillings
Fillings such as tomatoes, jam and fruit
may be hot and can burn if eaten
immediately.
Cleaning and storage
BEFORE CLEANING, SWITCH OFF AND
UNPLUG THE MAINS LEAD.
After use, allow the plates to cool down,
wipe them with a damp cloth. Never use
abrasives or cream cleaners. Clean any
other parts of the toaster with a damp cloth
or kitchen paper roll.
NEVER IMMERSE THE SANDWICH
PRESS IN WATER.
After the sandwich press has cooled
down, close the sandwich press and click
the locking clip into position to secure the
handle
Cord storage
The mains lead can be wound round
the storage area and stored vertically to
save space.
Helpline
If you have any difficulty with your
appliance, do not hesitate to call us.
We are more likely able to help than the
store from where you bought it.
Please have the following information
ready to enable our staff to deal with your
query quickly.
• Name of the product
• Model number as shown on the
underside of the appliance.
5
Page 7

Recipes
Breakfast in a bun
4 rashers bacon
2 medium boiled eggs
Spinach
Fresh tomatoes
2 bread rolls
Grill the bacon and boil the eggs. Slice the
boiled eggs and tomatoes. Place them in the
bread rolls with the spinach and bacon. Cook in
the sandwich press for approx. 3 minutes.
Chicken filled naan bread
200g chicken breast
1 small onion
1
/
2
a green pepper
100g mushrooms
Seasoning
2 small naan breads
Cut the chicken breast into thin slices and fry
in a little oil. Slice the onion, pepper and
mushrooms and add to the chicken. Season
with salt and pepper. When the chicken is
cooked through and the vegetables are
softened remove the pan from the heat. Open
up the naan breads by slicing the top, fill the
pockets with the chicken mixture and cook on
the sandwich press for approx. 4-5 minutes.
Roast beef & horseradish baguette
100g sliced cooked roast beef
1 small onion
Horseradish
2 baguettes
Slice the onions and fry in a knob of butter.
Slice the baguettes in half without cutting all the
way through. Spread a thin layer of horseradish
on the insides. Fill the baguettes with the beef
and onions and cook on the sandwich press for
approx. 4 minutes.
Pork & stuffing
100g cooked roast pork
Stuffing
Apple and mint chutney
2 crusty rolls
Cut the rolls in half without cutting all the way
through. Spread the apple and mint chutney on
the bottom of the rolls, add the roast pork and a
thin layer of stuffing. Cook in the sandwich
press for approx. 4 minutes.
Salmon & egg
200g tinned red salmon
3 medium eggs
Fresh chives
1 tomato
Salt & pepper
4 slices of rye bread
Drain the salmon, take any skin and bones
out before flaking the fish chunks and season.
Scramble the 3 eggs. When the eggs have been
cooked add the salmon and mix together with
chopped chives. Spread the egg and salmon
mixture onto the rye bread and garnish with
sliced tomato. Cook in the sandwich press for
approx. 4 minutes.
Tuna & sweetcorn
213g tin tuna mayonnaise with sweet corn
Lettuce leaves
Sliced crusty bread
Take 4 slices of crusty bread and lightly
butter on the outer sides. Spread the tuna
mayonnaise evenly over the 2 slices, add a few
lettuce leaves, place on top the remaining 2
slices and toast for approx. 3 minutes.
Smoked salmon focaccia
180g soft cheese
Thin sliced smoke salmon
1 tbsp chopped basil
1 chopped garlic clove
Water cress
1 large focaccia
Cut the focaccia in half to form a sandwich.
Mix the basil and garlic into the cheese spread.
Spread the cheese mix onto the bread, add the
smoked salmon and watercress. Toast in the
sandwich press for approx. 4 minutes.
6
Page 8

Prawn salad
100g Ready to eat prawns
1 tbsp of honey & mustard salad dressing
Spinach or lettuce leaves
Garlic butter
French stick
Place the prawns into a dish and add the
salad dressing and mix into the prawns until all
the prawns are coated. Cut the french stick
open and spread on a little garlic butter, add the
prawns and green leaves. Toast on the
sandwich press for approx. 4 minutes.
Mediterranean vegetable
Coloured peppers
Red onion
Courgette
Cherry tomatoes
Vegetable oil
Seasoning
French stick
Cut the vegetables into small chunks, season
with vegetable oil and herbs and roast in the
oven for 30 minutes. Slice the french stick in half
without cutting all the way through. Add the
vegetables and toast on the sandwich press for
approx. 4 minutes.
Vegetable fajitas
350g mixed vegetables
Bean sprouts, white cabbage, mushrooms,
carrots, green cabbage, onion,
red & green pepper
1 teaspoon cajun spices
180g jar fajitas sauce
Salt & pepper
4 tortillas
Stir fry the vegetables until tender, add the
cajun spices, salt & pepper, sauce and cook
gently for 5 minutes. Put a quarter of the mixture
in the middle of the tortilla and roll. Repeat this
with the rest of the tortillas. Toast in the
sandwich press for approx. 5 minutes.
Feta & green olives
100g cubed feta
30g pitted green olives
1 teaspoon olive oil
Chives
Ciabbatta
Put all ingredients into a bowl and mix
together. Cut the ciabbatta in half and add the
mixture. Toast on the sandwich toaster for
approx. 5 minutes.
Blue cheese & onion
100g blue cheese
2 spring onions
Cranberry sauce
French stick
Cut the french stick in half and spread the
cranberry sauce, then spread on the cheese.
Cut the spring onions up finely and sprinkle
over the cheese. Toast on the sandwich toaster
for approx. 4 minutes.
Any sort of fresh breads can be used with the
above recipes.
7
Page 9

8
All the following recipes have been compiled by
www.breakfastandbrunch.com - visit them for
100’s more delicious ways to start the day.
Smokey Breakfast Ciabbatta
Preparation time 5-6 minutes
Toasting time 4 minutes
For two people
1 small freshly baked Ciabbatta loaf
2 large slices smoked salmon (or pieces)
2 level dessert spoons mango chutney
6 rashers rindless streaky bacon, grilled until
crisp
Plenty of freshly milled black pepper or cayenne
pepper
Unsalted butter for spreading
Small handful of rocket leaves
Cut ciabbatta loaf in half length ways.
Spread each half with a little butter and the
mango chutney. Next lay the slices of smoked
salmon on the base of the ciabbatta and top
with the cooked crispy bacon. Season liberally
with fresh black pepper or cayenne pepper to
taste. Place on the sandwich press, bring down
the lid until the top of the press is level and
resting on the ciabbatta and toast for 4 minutes.
When ready lift out and scatter the rocket
leaves inside the ciabbatta, then cut the loaf in
half and eat at once.
Farmhouse Granary Breakfast Sandwich
Preparation time 5-6 minutes
Toasting time 4 minutes
Per person
2 slices of thick granary bread
4 rashers rindless smoked streaky bacon
15g unsalted butter
100g sliced mushrooms, wild and cultivated
Sea salt and black pepper
1 tablespoon double cream
Grill the bacon until crispy. Meanwhile, melt
the butter in a frying pan, add the mushrooms
and saute until they soften, season towards the
end of cooking. Add the double cream and
continue to cook until the mushrooms are
coated in the thickened sauce.
Lay the bacon rashers on one slice of bread
and pile the mushroom mixture on top of the
bacon rashers adding a further grind of black
pepper. Put the other slice of bread on top to
complete the sandwich. Place in the sandwich
press, bring down the top and toast for 4
minutes. Serve with a handful of fresh salad
leaves.
You can toast 2 sandwiches at a time.
Page 10

9
Breakfast Pizza
Preparation time 15 minutes
Toasting time 8-10 minutes
Per person
1 ready-made cheese & tomato mini pizza
(defrosted if frozen)
1 pork & herb sausage, cooked and thinly
sliced
2 rashers of streaky bacon
1 tomato, roughly chopped
1 mushroom, sliced
1 dessert spoon tomato puree mixed with
1 teaspoon Worcestershire sauce
1 tablespoon grated mozzarella
Mixed herbs
Take the pre-made pizza (defrosted if frozen)
and spread it with the tomato puree and
Worcester sauce mixture. Place the sliced
cooked sausages over the pizza and top with
the tomatoes and sliced mushrooms. Sprinkle
the whole pizza with diced streaky bacon and
finish with the mozzarella cheese. Sprinkle a few
mixed herbs on the top and lay the pizza in the
sandwich press. Bring the lid of the sandwich
press down and secure it just above the top of
the pizza, but not touching it. Toast the pizza for
8-10 minutes until the cheese has melted and
the bacon has cooked.
You can toast 2 mini pizzas at a time.
 Loading...