

Page 1

g
340 Series
Instructions
Page 2

Your new vacuum cleaner is a powerful and
quiet model with a highly efficient suction action
and advanced features which provide high levels of
cleaning on all types of surface around the home.
A comprehensive range of accessories is provided
with some stored at the back of the machine for
added convenience.
The cleaner has a large capacity dustbag and a
highly effective filtration system ensuring that the
exhaust air is as clean as possible.
Please note
The models described in these instructions are
similar in most respects but some of the features
described apply to specific models only.
To obtain the best results from your cleaner
please read these instructions carefully and keep
them in a safe place for future reference.
Introduction
¤
‹
·
›
‰
‚
Â
Ê
⁄
„
Ë
Á
⁄ Carrying handle
¤ Dustbag compartment lid release
‹ Hose inlet
› Dustbag condition indicator
fi Accessory storage
fl Crevice tool
‡ Upholstery tool
· Auto cable rewind foot pedal (certain models)
‚ On/off power foot pedal
„ Electronic power control (certain models)
‰ Stair-Lock bracket (certain models)
 Dustbag securing tab
Ê Motor protection filter
Á Filter safety catch
Ë Exhaust filter
A
fi
fl
‡
Page 3

Electrical connection and supply
Check that the supply voltage details given on
the rating plate are in accordance with your
electricity supply.
Important The wires in the mains lead of this
appliance are coloured in accordance with the
following code: Blue- Neutral, Brown- Live. As the
colours of the wires in the mains lead of this
appliance may not correspond with the markings
identifying the terminals in your plug proceed as
follows:
The wire which is coloured brown must be
connected to the terminal which is marked with
the letter ‘L’ or is coloured red.
The wire which is coloured blue must be
connected to the terminal which is marked with
the letter ‘N’ or is coloured black.
This appliance is double insulated and must not
be connected to the terminal of the plug which
may be marked with the letter ‘E’ or by the earth
wire symbol # or coloured green or green and
yellow. Each wire must be properly connected to
the appropriate terminal pin of a suitable plug and
the outer sheath of the mains lead securely
retained by the anchorage arrangements of the
plug. In case of doubt the plug should be fitted by
a qualified electrician or competent person as the
guarantee offered on this product does not cover
any fault in the plug or damage caused to the
appliance as a result. (If a fused 3-pin 13A plug is
used a standard 13A fuse should be fitted).
European conformity information
A sample of this product has been tested and
found to be in conformity with the following
European Directives:
73/23/EEC Low Voltage
93/68/EEC CE Marking
89/336/EEC EMC directive
This product has been designed with your
safety in mind. However, for safe operation,
it is important that you observe the
following points:
• Never pick up liquids or damp materials.
• Never use in the presence of explosive liquids or
vapours.
• Never pick up asbestos or asbestos dust.
• Never pick up hot or glowing ash, hot cigarette
ends, hot coals or any other similar items.
• Never use the machine to pick up health
endangering dust.
• Never modify the cleaner in any way.
• Use only genuine Goblin spare parts and
accessories.
• Repairs should only be carried out by authorised
Service Agents.
• Never allow children to play with or use this
appliance.
• Do not use or keep this product outside when it
is raining.
Important user information
Mains cable/supply cord
NOTE: If the supply cord is damaged it must be
replaced by a special cord or cord rewind assembly
available from your nearest Service Agent.
A list of Goblin Authorised Service Agents is
supplied separately.
Unwanted products and the environment
Should you find one day that your product needs
replacement, or is of no further use to you, think of
the protection of the environment.
Your local Service Dealer will accept your old
products and will dispose of them in an
environmentally safe way.
Page 4

Assembly
To fit the hose to the cleaner, insert the hose
end into the hose inlet ‹ until it clips securely
into position.
Attach the extension tubes to the handle end
of the hose. The hose handle features a regulator
which allows the suction to be reduced as
required.
Attaching the accessories
Fit the floor nozzle onto the end of the
extension tube. The hard floor attachment
(certain models) can be attached to the floor
nozzle, to facilitate vacuuming hard floors.
Other accessories are stored in the back of the
cleaner and include:
• upholstery nozzle for stairs, furniture;
• crevice tool for awkward places, behind
radiators etc.
Automatic cable rewind (certain models)
Reel out the cable fully. After use, unplug and
press the foot pedal ·, holding the plug until fully
rewound.
On/off
The on/off control is operated by the foot
pedal ‚.
Electronic power control (certain models)
This is a rotating knob „ which allows the
suction power of the cleaner to be set at the
precise level required. For example:
• turn fully clockwise for maximum suction
for carpets, hard floors etc.
• turn anti-clockwise for reduced suction
for upholstery and curtains.
Stair Lock (certain models)
This unique device (patent applied for) assists
with stair cleaning. The special bracket ‰, found
underneath, is lifted out as shown B and locked
onto the stairs. In addition, the rear wheels are
locked in position as further security. After use,
simply push firmly back into position.
Please note
When cleaning on stairs, for convenience and
safety, work from the bottom to the top with the
upholstery nozzle or crevice tool connected
directly onto
the hose
handle. It is
recommended
that the
extension tubes
are not used.
Using your Goblin vacuum cleaner
B
Page 5
Replacing/emptying the dustbag
To obtain the best results from your cleaner be
sure to change the dustbag when necessary,
otherwise the airflow and cleaning power will be
reduced.
When the dustbag condition indicator › shows
fully red and performance deteriorates, first check
if there are any blockages in the accessories or
tubes. If these are clear, it is necessary to
replace/empty the dustbag.
Paper dustbags
1 Remove the hose end from the hose inlet.
2 Slide the dustbag compartment lid release ¤,
lift and remove the cover.
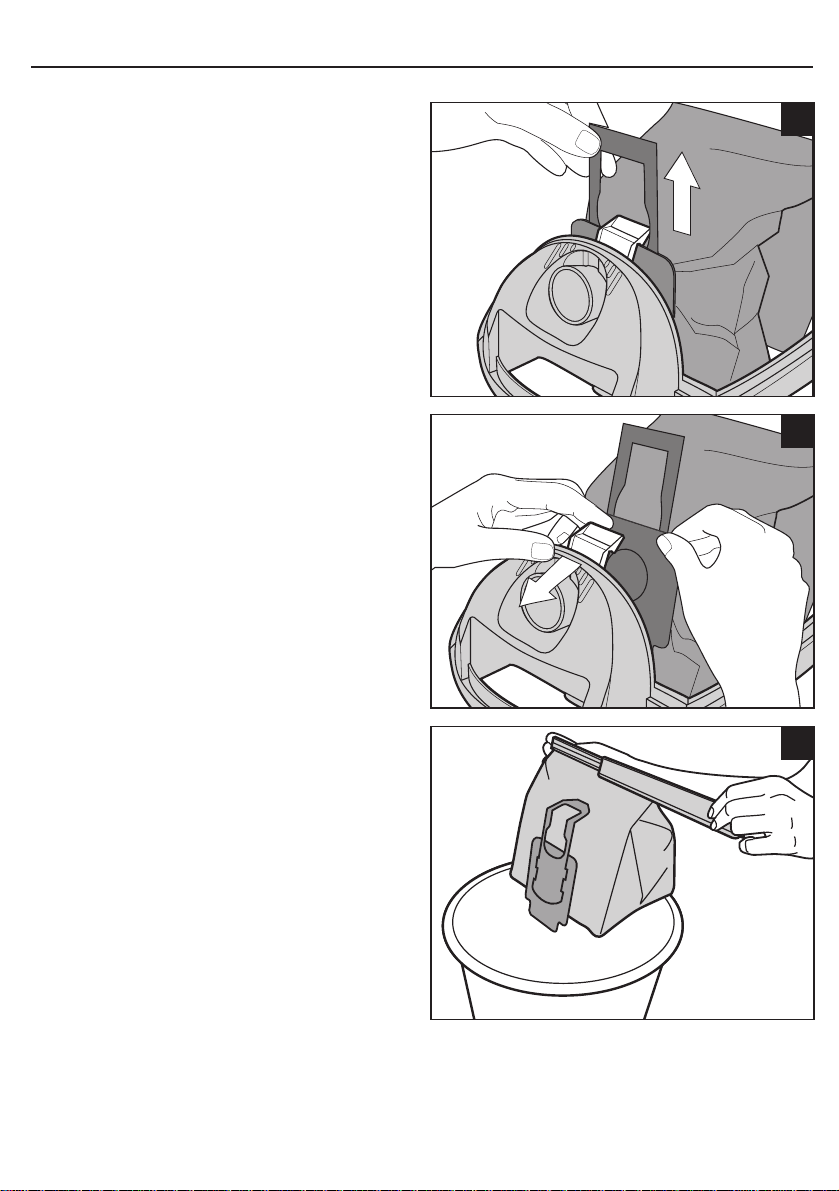
3 Pull the cardboard seal up, to close the opening
to prevent dust spillage C.
4 Remove the dustbag from its location by pulling
the dustbag securing tab  as shown D.
5 Insert the new dustbag into position ensuring
the cardboard collar is firmly secured at the base
as shown F.
6 Pull forward as shown G so it locks under the
plastic securing tab at the top.
7 The folds of the dustbag should be opened out.
8 Relocate the lid at the front (carrying handle ⁄)
end first and then close the cover securely.
Note: The securing tab  prevents the cover
being closed unless a dustbag is fitted correctly.
Permanent dustbag E
1 Remove the hose end from the hose inlet.
2 Slide the dustbag compartment lid release ¤,
lift and remove the cover.
3 Pull the plastic seal up, to close the opening to
prevent dust spillage C.
4 Remove the dustbag from its location by pulling
the dustbag securing tab  as shown D.
5 Hold the dustbag over a dustbin and slide the
clip from the bottom of the bag E and tip the
contents of the bag carefully into the bin. Shake
the bag vigorously to remove excess dust.
C
D
E
Page 6

6
Slide the clip back onto the bottom of the dustbag
and replace the dustbag into position ensuring
the collar is firmly secured at the base F.
7 Pull forward as shown G so it locks under the
plastic securing tab at the top.
8 Important Ensure the plastic seal is pushed
down otherwise it will not be possible to fit the
hose.
9 The folds of the dustbag should be opened out.
10
Relocate the lid at the front (carrying handle ⁄)
end first and then close the cover securely.
Note The securing tab  prevents the cover
being closed unless a dustbag is fitted correctly.
11
To maintain performance we recommend
that the bag is washed regularly in warm
water. Allow to dry naturally as direct heat
may effect the material.
IMPORTANT ENSURE THE DUSTBAG IS
TOTALLY DRY BEFORE INSTALLING IT BACK
INTO YOUR VACUUM CLEANER.
Replacement dust collection bags
It is possible to fit either paper or permanent
dustbags into this product. These are available
from Goblin or from your local service agent - see
back cover for details.
F
G
Page 7

Cleaning and replacing the filters
Motor protection filter Ê
This is in the dustbag compartment. Clean it
everytime you change/empty the dustbag and
replace it after approximately 5 dustbag changes.
1 Lift out the red filter as shown H and clean by
tapping.
2 Replace the filter by sliding it into position as
shown J.
Note The filter safety catch Á prevents the
cover being closed unless a motor protection filter
is fitted.
Exhaust filter Ë
This is located on top of the motor housing K.
Clean it everytime you change/empty the dustbag
and replace it after approximately 5 dustbag
changes. To remove, lift it from its location and
shake to clean or replace.
Ë
H
J
K
Page 8

The floor nozzle can be secured on the
underside of the cleaner when it is stood on end
by locating the bracket found on the nozzle into
the slot provided.
Storage
Care and maintenance
ALWAYS DISCONNECT FROM THE MAINS BEFORE
WORKING ON OR CLEANING YOUR CLEANER.
Your cleaner is manufactured to withstand
normal day-to-day use, but an occasional wipe over
with a damp cloth will help maintain its good
looks.
Abrasive cleaners should not be used.
L
Page 9

Guarantee and service procedure
If you suspect a fault, first of all carry out the
following simple checks:
1 Check the filters - be certain that they have not
been blocked by fine dust. Dirty filters can
damage your cleaner and are not covered by the
guarantee.
2 Check that the plug is firmly in the socket and
the supply is switched on.
3 Make sure that the socket is working by trying
another appliance.
4 If the socket is working but the motor is still not
running, check or replace any fuses and check
that all plug connections are sound.
Note the serial number of your cleaner and
retain your receipt should it be required as proof of
purchase.
However, should your vacuum cleaner become
defective during the guarantee period, please
return it to your nearest Authorised Service Agent,
a list of which is supplied with your product.
The defective part will be repaired or, at our
option, replaced free of charge for labour and
materials provided that:
• the cleaner has been operated on an electricity
supply which matches that shown on the rating
plate.
• the cleaner is accompanied by proof of purchase.
• only Genuine Goblin parts have been used and
have been fitted correctly.
• the cleaner has not been used for commercial
applications.
Accessory Part number
Paper dustbags Pack of 5 9056024
Permanent dustbags Pack of 1 3001770
Aztec motor protection filter Pack of 1 9180324
Aztec standard exhaust filter Pack of 2 9180424
Aztec double layer exhaust filter with Pack of 2 9180524
anti-odour
Aztec double layer exhaust filter with Pack of 2 9180624
anti-odour and anti-bacteria
Flexible hose and handle assembly 5330575
Crevice tool 0311690
Upholstery nozzle 0071490
Hard floor attachment 0073690
Floor nozzle 0073590
Plastic extension tube 3770290
Metal extension tube 3770570
Metal telescopic extension tube 3779870
To maintain the performance and prolong the life
of your cleaner, fit only genuine Goblin accessories
(see table below), available from your local
Authorised Service Agent. If you experience any
difficulty in obtaining service or spare parts, please
telephone our Customer Helpline (during office
hours):
UK (local rate call) Republic of Ireland
08450 777700
01 842 4833
The After Sales Division The After Sales Division
Goblin Dimpco Ltd
Mexborough Cloghran
South Yorkshire County Dublin
S64 8AJ Ireland
Buying genuine Goblin accessories the easy way
Goblin Ireland
Tralee
Co. Kerry
P/N 87383-70 Rev 04/01
 Loading...