

Page 1

Stereo micro hi-fi system
with cd player
29107 OPERATING INSTRUCTIONS
Page 2
Illustration
19
11
1
2
3
4
5
10
9
8
7
6
17
12
13 14
2
18
16
15
20
Page 3
Display illustration
Remote control
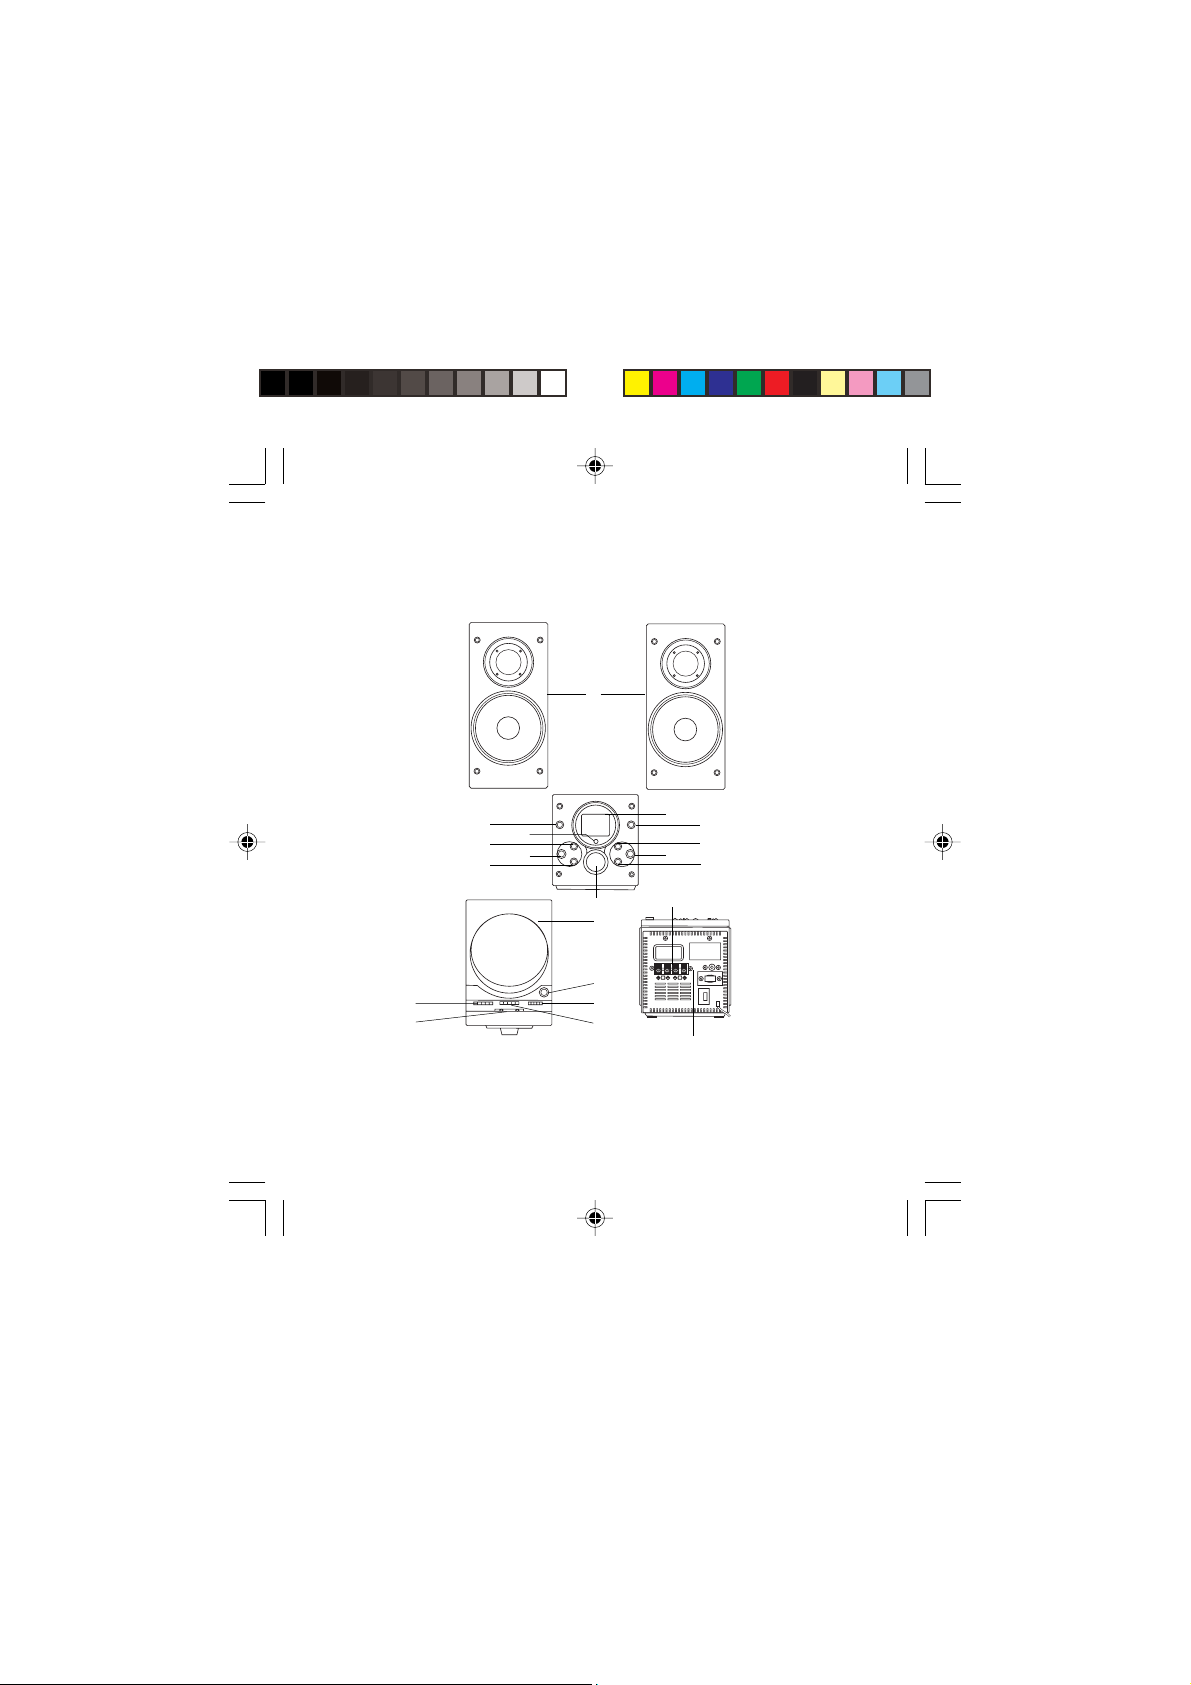
1 Head phone jack
2 IR (infra red) sensor
3 Prog/clk-adj button
4 Stop button
5 Cd mode button
6 Tuning control
7 Skip / search down button
8 Play / pause button
9 Skip / search up button
10 Power / standby indicator button
11 LCD display window
12 Cd / radio switch
13 Volume (up / down) button
14 MW / FM - FM ST. band switch
15 X - bass switch
16 Cd open button
17 Cd door
18 Speaker terminals
19 Speaker
20 FM aerial
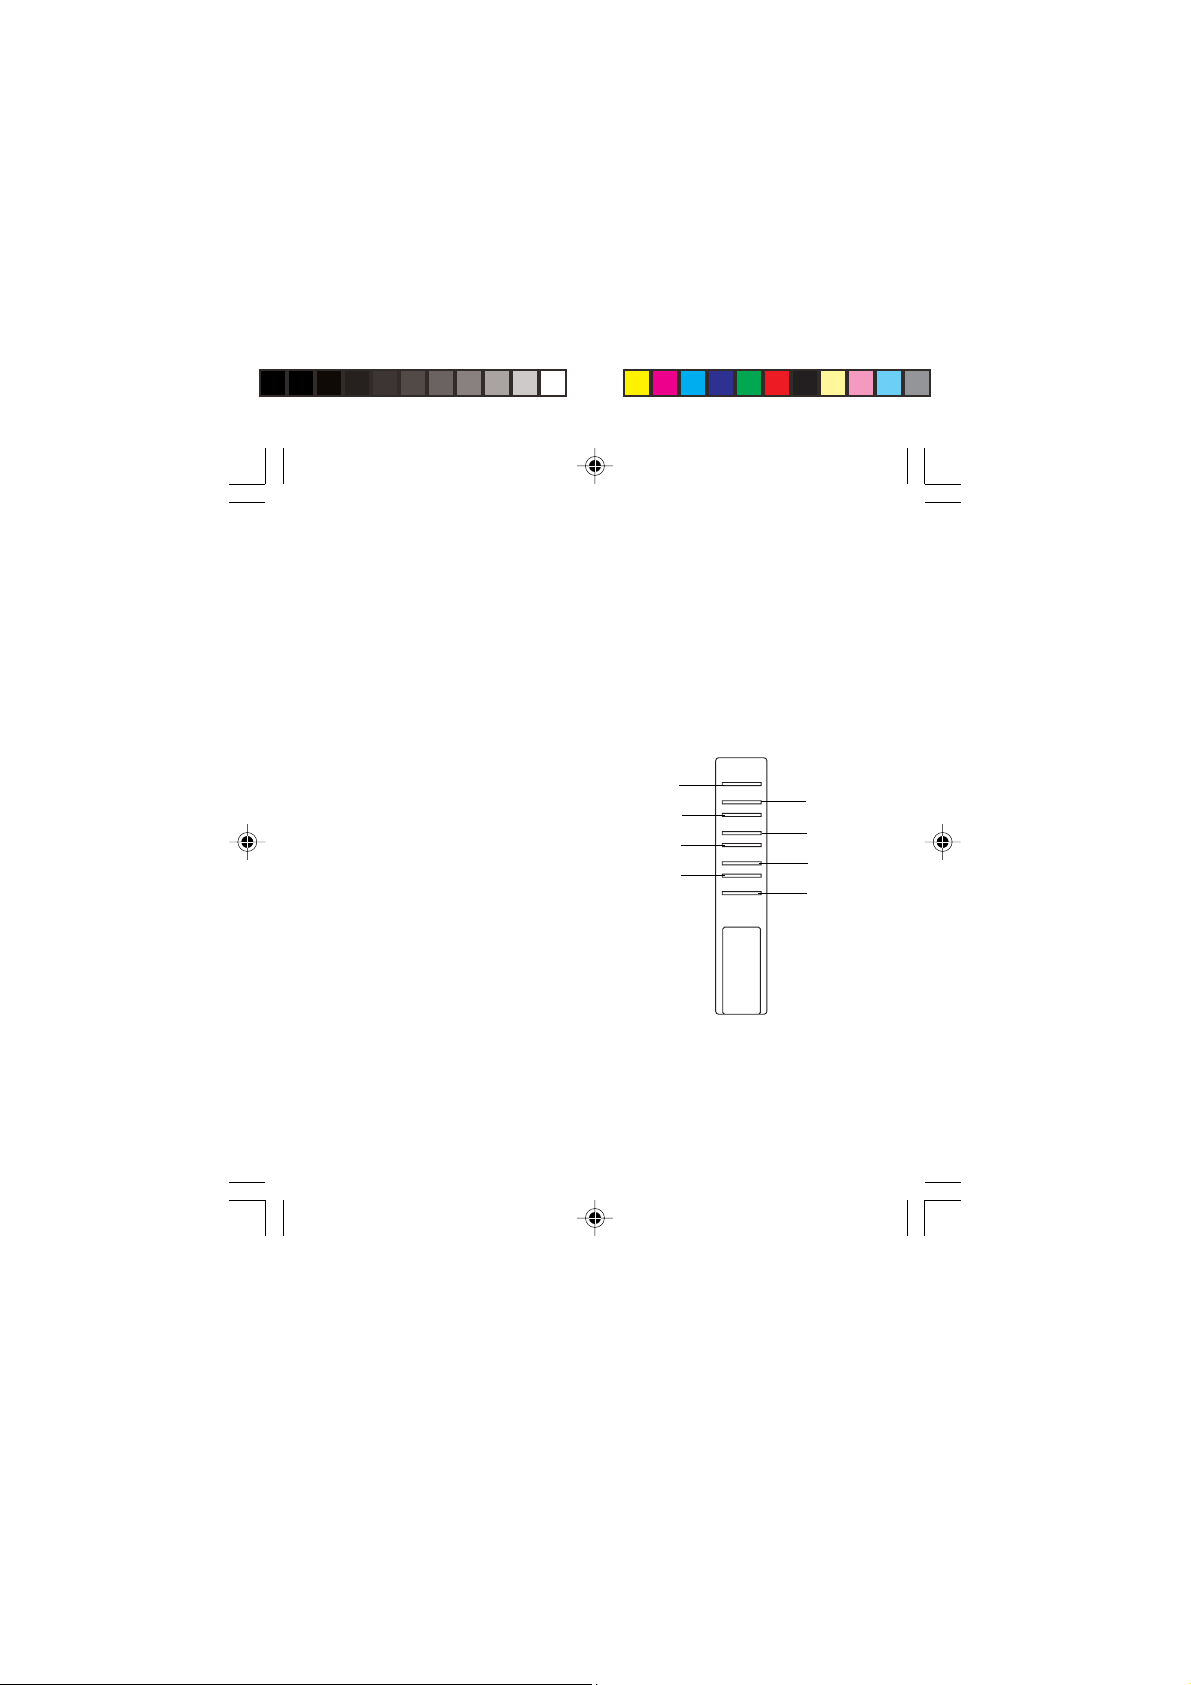
1 Standby/on button
2 Stop button
3 Prog/clk-adj button
4 Mute button
5 Play / pause button
6 Skip / search button
7 Cd mode button
8 Volume button
1
2
3
4
5
6
7
8
3
Page 4
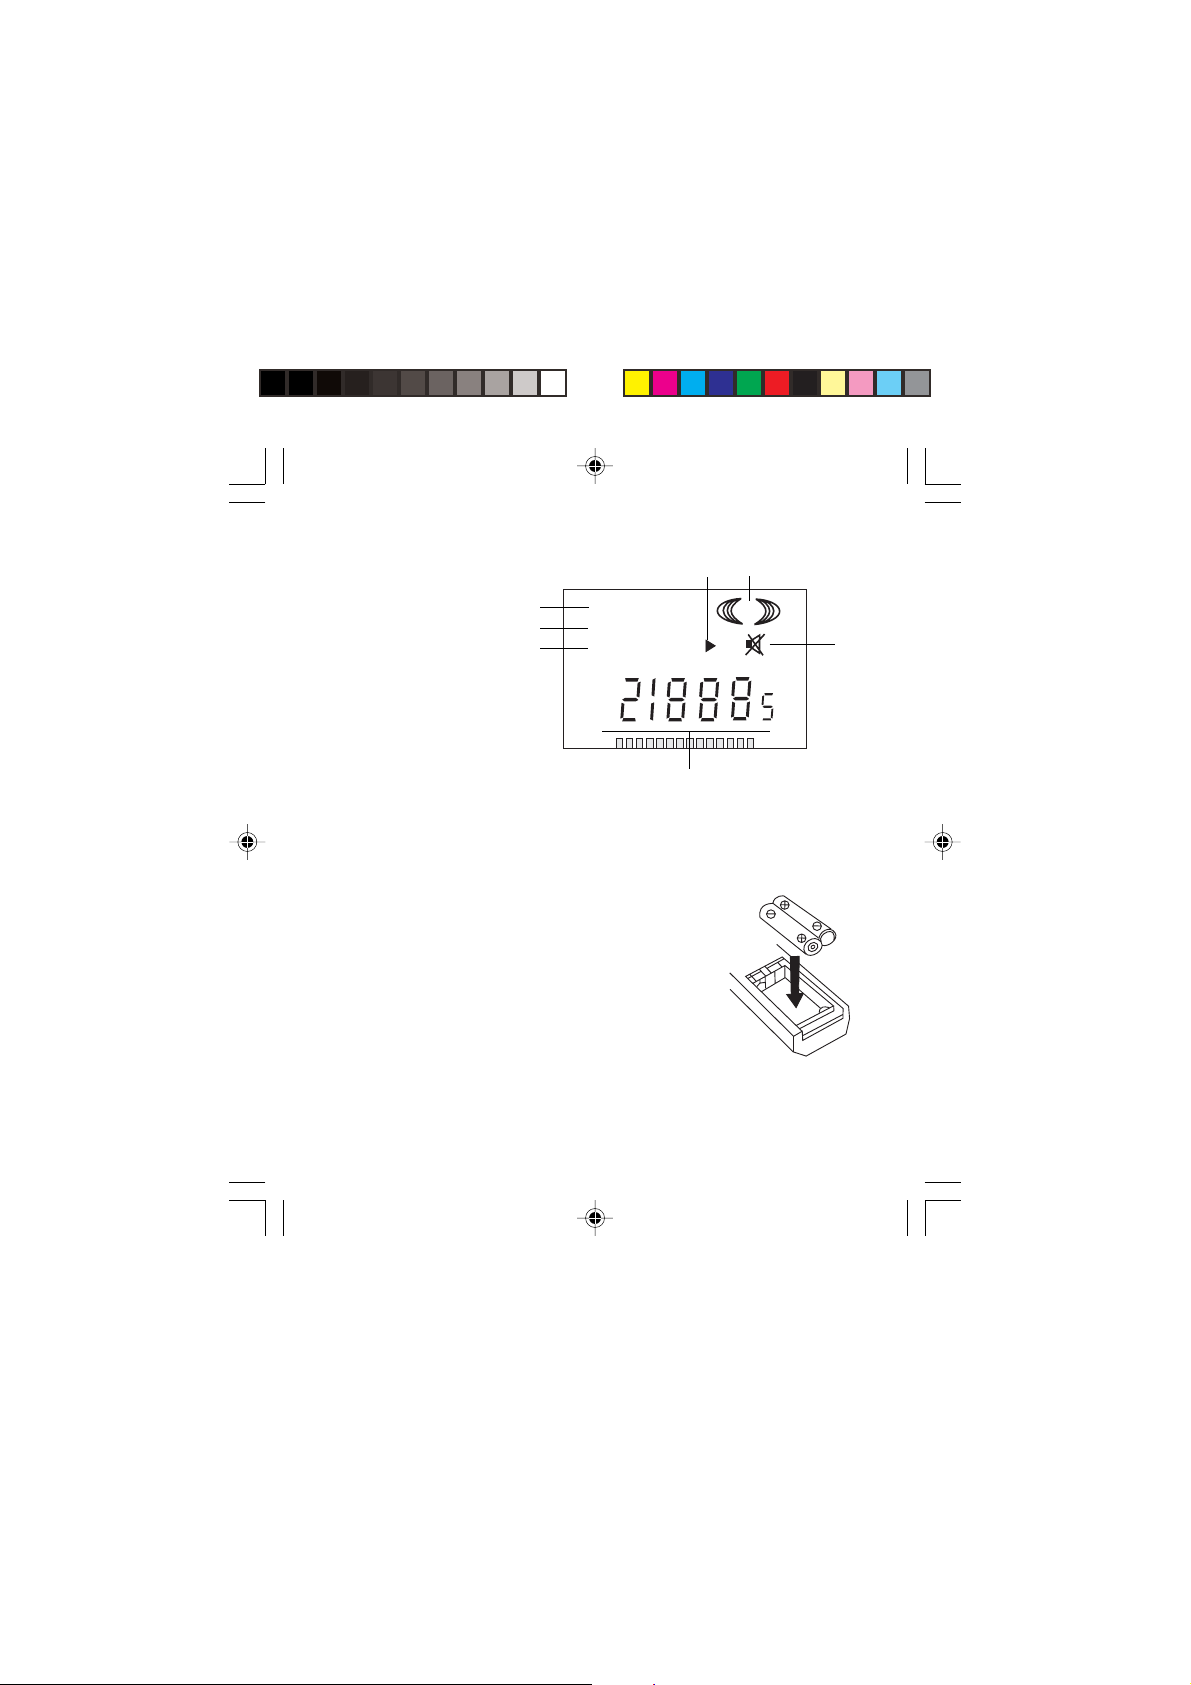
Cd display
A Stereo indicator
B Program indicator
C Random indicator
D Repeat indicator
E Track number indicator
F Mute indicator
G Play/pause indicator
Putting the batteries into the remote
control unit
1 Press down the compartment cover, and slide the cover off
and open the compartment.
2 Place the two (UM3), (AA), (LR6) batteries in the remote
control according to the polarity markings (‘+’ and ‘-’) inside
the compartment and on the batteries.
3 Place the cover over the compartment, press down lightly,
and push it upward until it snaps on.
Batteries not included.
If the unit is not to be used for a prolonged period,
remove the batteries to avoid battery leakage.
In the interests of environmental safety : dispose of
batteries safely.
D
C
B
REPEAT
RANDOM
PROGRAM
FM
MW
AM
PM
.
.
E
A
ST
F
KHzMHz
.
Batteries not included
4G5
Page 5

Electrical requirements
Check the voltage on the rating plate of your CD microsystem corresponds with
your house electricity supply which must be A.C. (alternating current).
If the socket outlets in your home are not suitable for the plug supplied with
this appliance the plug should be removed and the appropriate one fitted.
WARNING: The plug if severed from the mains lead must be destroyed as a
plug with a bared flexible cord is hazardous if engaged into a live socket
outlet.
Should the fuse in the 13 amp plug require changing a 3 amp BS1362 fuse
must be fitted.
Installing the speaker wire to the speaker terminals
1 Speakers connection
Extend the speaker wires and connect them to the speaker terminals.
Operating the unit
When you first plug in the unit it will be in standby mode.
1 Press the POWER button on the unit (or the STANDBY / ON button on the
remote control), press once to switch on and then again to switch off.
2 Pull the plug from the wall socket if you wish to disconnect the power supply to
the unit.
Clock setting
When you first plug in the unit it will be in standby mode.
1 Press the PROGRAM/CLK-ADJ button, the LCD display shows either 12H or
24H.
2 Press the SKIP/SEARCH (up or down) button to adjust 24-hour or 12-hour digit.
3 Press PROGRAM/CLK-ADJ button again, the LCD display shows the hour digit
flashing, then press the SKIP / SEARCH (up or down) to adjust the hour digit.
Page 6

4 Press the PROGRAM/CLK-ADJ button again, the LCD display shows the minute
digit flash, then press the skip/search (up or down) button to adjust the minute
digit.
5 Last press the PROGRAM/CLK-ADJ button to validate the clock.
Radio operation
1 Set the CD / RADIO switch to the radio position.
FM
2 Select FM mode with the BAND switch.
3 Turn the TUNING control to select the required station.
4 Fully extend the FM aerial and adjust its direction for best FM reception
MW
2 Select MW on the BAND switch.
3 Turn the TUNING control to select the required station.
4 For operation on MW the unit has a built-in ferrite ariel which is directional.
Therefore, the set should be positioned for the best signal strength.
FM Stereo reception
2 For reception of FM stereo broadcast, set the MW / FM / FM ST. switch to FM ST
position. The ‘
STEREO broadcast is being received.
ST
’ symbol will indicate on the LCD display when an FM
Adjusting the sound
1 Press the VOLUME +/- buttons to set the sound level.
• For increased bass at all volume levels, switch the BASS SWITCH on to boost
the low frequency sound.
• To mute the sound, press the MUTE button, if using the remote control the
“MUTE” indicator will flash.
• To resume the sound, press the MUTE button again or just press the volume +/(this will disable the MUTE function).
6
Page 7

FM aerial
FM wire aerial
To obtain the maximum FM reception fully extend the wire FM aerial (which is located
at the rear of the unit) and alter the direction of the wire for best results.
Listening to the compact disc (cd)
The LCD indicator will always show the tracks of a disc or program which are still to
be played. In stop mode all tracks on the disc will be displayed.
Playing back the entire disc
1 Playback will start by pressing PLAY/PAUSE, theindicator then appears.
Playback starts with the first track. The display shows the current track number
and its elapsed time.
2 To interrupt playback, press PLAY/PAUSE, theindicator will flash.
3 To resume playback, press PLAY/PAUSE again.
4 To stop playback, press STOP.
To select a different track during playback
1 Press the SKIP/SEARCH button on the unit (or remote) until the required track
number appears in the display.
2 Press the PLAY/PAUSE button to start playing. Starting again with the track that
is currently playing.
Starting again with the track that is currently playing
1 Press the SKIP/SEARCH DOWN button once.
2 The track will be started again from the beginning.
3 Press and hold the SKIP/SEARCH UP button to fast forward current track.
Release the button when the desired location has been reached.
To stop play
1 Press STOP if you wish to stop play. The total amount of tracks on the disc will
be displayed.
2 Open the CD door on the unit to remove the CD.
7
Page 8

Programmed playback
Upto 20 tracks can be programmed for playback.
1 Press the PROGRAM/CLK-ADJ button when the cd has been stopped.
2 Select the desired track number using the SKIP/SEARCH button on the unit or
the remote control.
3 Press the PROG button to select the track.
4 Repeat steps 1 and 3 depending on how many tracks are to be programmed
(upto a maximum of 20).
5 Press the PLAY/PAUSE button to start playing the first of the selected tracks.
6 To stop playing, press the STOP button.
7 Opening the door clears all the programmes or press the STOP button.
Repeat play
1 When playing CD’s, if the same track is to be repeated press the CD MODE
button once, the ‘REPEAT’ indicator will flash on the display.
2 If you wish to repeat all, press CD MODE button twice and the ‘REPEAT’
indicator will appear steady on the display.
3 To cancel repeat play, press the CD MODE button twice, the repeat indicator will
disappear.
Random play (for remote handset)
1 Press the CD MODE button three times, and the ‘RANDOM’ indicator will appear
on the display.
2 Press the PLAY/PAUSE button to start playing. The tracks will be played
randomly.
3 To cancel random play, press the STOP or CD MODE button again.
Mute setting (for remote handset)
1 If you press the MUTE button on the remote, the indicator will appear on the
display and the audio output will temporarily terminate.
2 Press the MUTE button again the
the audio output will continue as normal.
indicator will disappear on the display and
8
Page 9

Compact disc
1 Always use compact discs bearing the mark as shown.
2 Notes on handling discs:
When removing the disc from its storage case and loading it.
* Do not touch the reflective recorded surface.
* Do not stick paper or write anything on the surface.
* Do not bend the disc.
3 Storage:
* Store the disc in its case.
* Do not expose discs to direct sunlight or high temperatures, high
humidity or dusty places.
4 Cleaning a disc:
* Should the disc become soiled, wipe off dust, dirt and fingerprints with a
soft cloth.
* The disc should be cleaned from the centre to the edge.
FROM THE CENTRE TO THE EDGE
CORRECT
INCORRECT
* Never use benzene, thinners, record cleaner fluid or anti static spray.
* Be sure to close the CD door so the lens is not contaminated by dust.
Do not touch the lens.
9
Page 10

Listen to music on headphones
A stereo headphone jack is provided for private listening. To listen using headphones
(NOT INCLUDED) insert the 3.5mm mini-stereo plug from the headphones into the
phones jack on the front panel. The external speakers are automatically
disconnected when headphones are in use.
Warning labels
WARNING: to reduce the risk of an electric shock, do not expose this
appliance to rain or moisture.
ATTENTION: To reduce the risk of an electric shock, do not
remove the cover. There are no user serviceable parts inside
the unit. Refer any servicing to qualified personnel.
The lightning flash with arrowhead symbol within the triangle is a warning
sign alerting the user of ‘dangerous voltage’ inside the unit.
The exclamation point within the triangle is a warning sign alerting the user
of important instructions accompanying the product.
To prevent fire or shock hazard do not expose this apparatus to dripping or
splashing.
Ventilation warning :
WARNING: The normal ventilation of the product shall not be impeded for
intended use.
Maintenance
Do not expose your cd micro system to extreme of temperatures. The product
should be kept in a warm environment free from dust and damp. For external
cleaning use only a soft, clean, damp cloth. Use of detergents may damage the
finish.
10
Page 11

Technical specification
AC power supply : 230V 50Hz
AC power consumption : 30W
Remote control unit : 3V (AA size/UM3/ x 2)
Speaker : 3 inch woofer + 1.5 inch x 2 tweeter
Speaker capacity power : 10W x 2 (4 Ohm)
Amplifier max power : 2 x 2W
Radio : FM 87.5MHz - 108MHz
Compact disc : 3 - Beam laser
Frequency response : 100Hz - 16kHz
WARNING : This unit uses a laser beam. To prevent an accident occuring the
unit should only be opened by a qualified engineer. If the door interlocks
become defective the laser may cause invisible radiation. Avoid exposure to
the beam.
If there is a scratch, dirt or finger prints on the CD, it may cause tracking errors.
Before playing, clean the CD with a clean cloth. Wipe the CD from the centre
outwards. After playing, store the disc in its CD case.
The CD micro system is for indoor use only.
Batteries not included
: MW 540KHz - 1600KHz
11
Page 12

Guarantee
Morphy Richards products are manufactured to internationally accepted quality
standards. In addition to your statutory rights, Morphy Richards guarantee your
product to be free from manufacturing and component defects for a period of TWO
YEARS from date of purchase.
If your product proves to be defective within 28 days of purchase, your Morphy
Richards dealer from whom the product was purchased will be pleased to replace it
free of charge.
Should your product develop a defect within the guarantee period but after the
replacement period, please return the product to the following address, together with
the proof of purchase, brief details of the symptoms and your own name and
address.
Your post office will provide a certificate of posting. The product will be repaired
and returned to you promptly.
Helpline (8:30-5:00 Mon-Thur/ 8:30-4:00 Fri) UK 0870 060 2614
Republic of Ireland 1800 409119
Replacement parts 0870 167 6645
Morphy Richards Website: www.morphyrichards.com
Morphy Richards Ltd, Mexborough, South Yorkshire, S64 8AJ
After Sales Division
Morphy Richards Limited
Mexborough
South Yorkshire
S64 8AJ
AD29107M UK Rev 1
 Loading...