

Page 1

Micro system
with cd player and built in subwoofer
29106 OPERATING INSTRUCTIONS
Page 2
Illustration
2
1
3
23
24
7
8
6
21
9101112
20
19
5
22
16
1718
4
14
13
15
23
24
2
Page 3
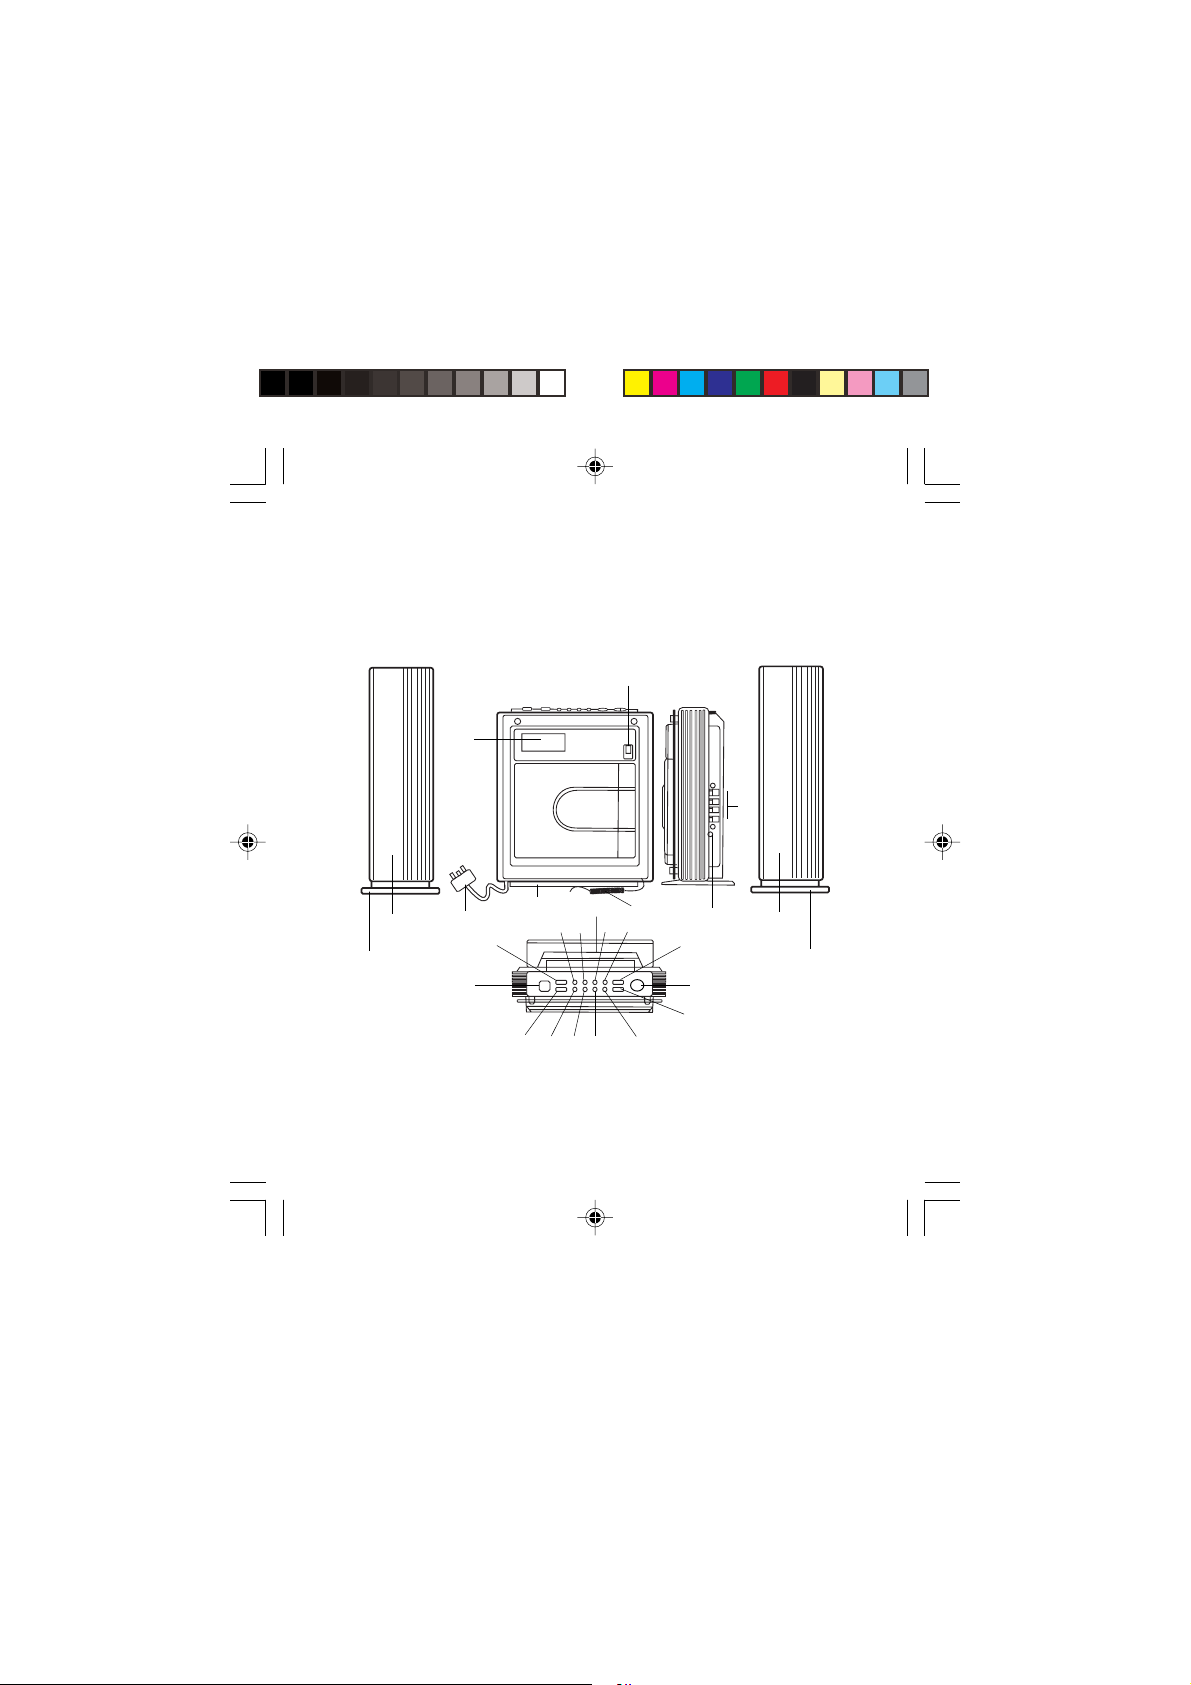
Display illustration
1 Digital multi-function display
2 Remote control sensor
3 Speaker out sockets (left & right)
4 Headphone jack
5 FM wire aerial
6 Desk stand for main unit
7 AC cord and plug
8 Power on/off switch
9 Memory clock/adj button
10 Super bass button
11 EQ (equaliser) button
12 Repeat / memory-up button
13 Cd door open close button
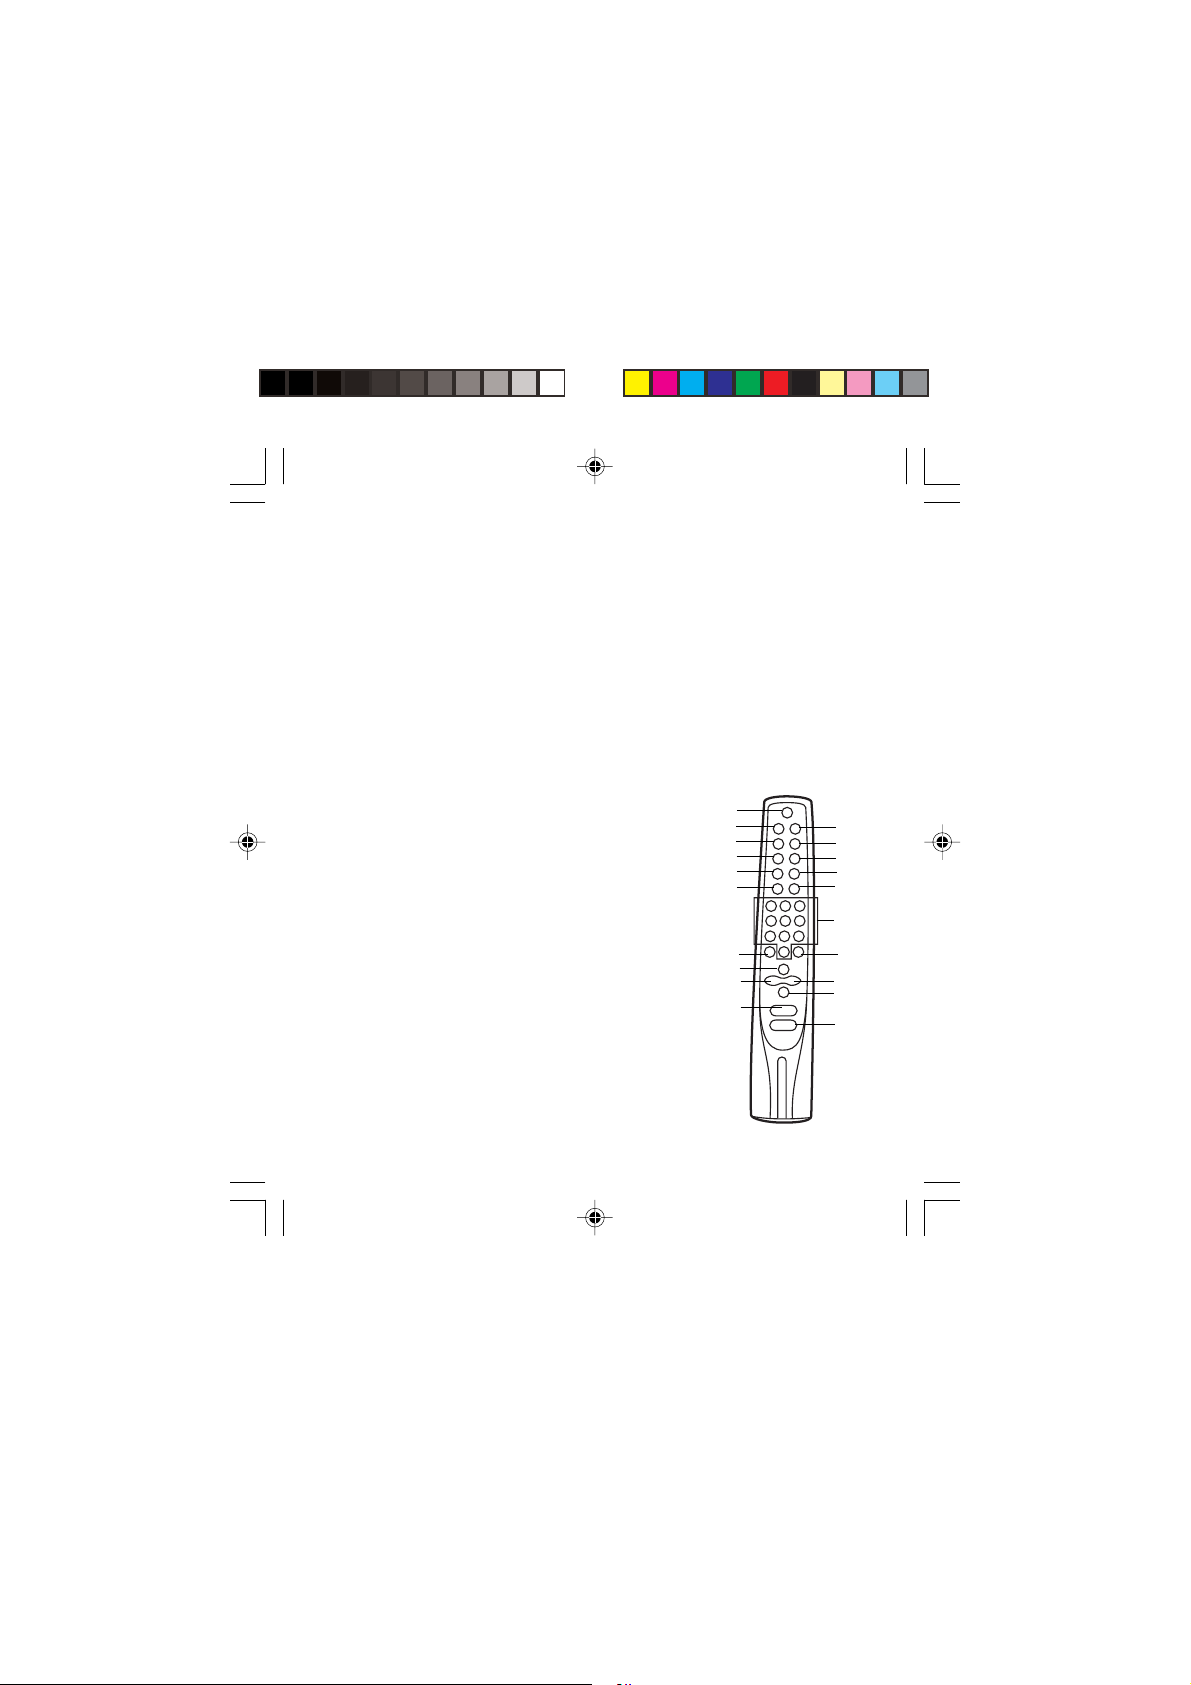
Remote control
1 Power on/off button
2 Cd / tuner button
3 Super bass button
4 EQ (equaliser) button
5 Sleep button
6 Snooze button
7 Display button
8 Repeat / Mem. up button
9 Random button
10 Intro button
11 Timer button
12 Direct keys (number keys)
13 Mute button
14 Memory / prog /
15 Cd play/pause button
16 Cd next / tune up button
17 Cd back / tune down button
18 Cd stop / band button
19 Volume up button
20 Volume down button
14 Cd stop / radio band button
15 Cd play/pause button
16 Cd next / tune-up button
17 Cd back / tune down button
18 Tuner select button (radio mode)
19 Cd select button (cd mode)
20 Volume down button
21 Volume up button
22 Battery back-up compartment
(behind the unit)
23 Tower speakers (left & right)
24 Stands for speakers
clock adjust button
1
2
3
4
5
6
13
15
17
19
7
8
9
10
11
12
14
16
18
20
3
Page 4

Remote control functions
• POWER ON/OFF button to switch the unit on and off.
• CD / TUNER button to select ‘cd’ or ‘tuner’ function.
• SUPER BASS button to switch ‘on’ or ‘off’ super bass function.
•EQ button to select preset equaliser function.
• SNOOZE button - whenever the alarm timer comes on, it can be temporarily
suspended for a short period of 5 minutes using this switch.
• DISPLAY button - press repeatedly to indicate cd remaining time / real time / clock
and timer.
• REPEAT / MEM UP button to activate repeat function (cd mode) and to recall
memory positions in (tuner mode).
• RANDOM button to activate random play mode.
• INTRO button - to play the first 10 seconds of each track on the disc.
• DIRECT / NUMBER keys to directly choose any specific track between 1-9 and
begin to play this track or directly recall tuner memory position.
• MUTE button - The audio will be muted and the mute indicator will be displayed.
• MEMORY / PROG / CLOCK / ADJUST button to save tuner memory position,
programming the cd player and adjust the digital clock.
• PLAY / PAUSE button to start playing the track or pause the cd player.
• CD NEXT / TUNE button to skip / fast forward the specific track or SCAN UP /
SEEK DOWN tuner frequency.
• CD BACK / TUNE DOWN button to back / fast reverse the specific track or SCAN
DOWN / SEEK DOWN tuner frequency.
• CD STOP / BAND button to stop the cd player or select desired radio band.
• VOLUME UP button to increase the volume.
• VOLUME DOWN button to decrease the volume.
System set up procedure
Assembly of a shelf system (table top use)
• Includes one piece base for the main unit.
• Includes two piece base for the speakers.
4
Page 5
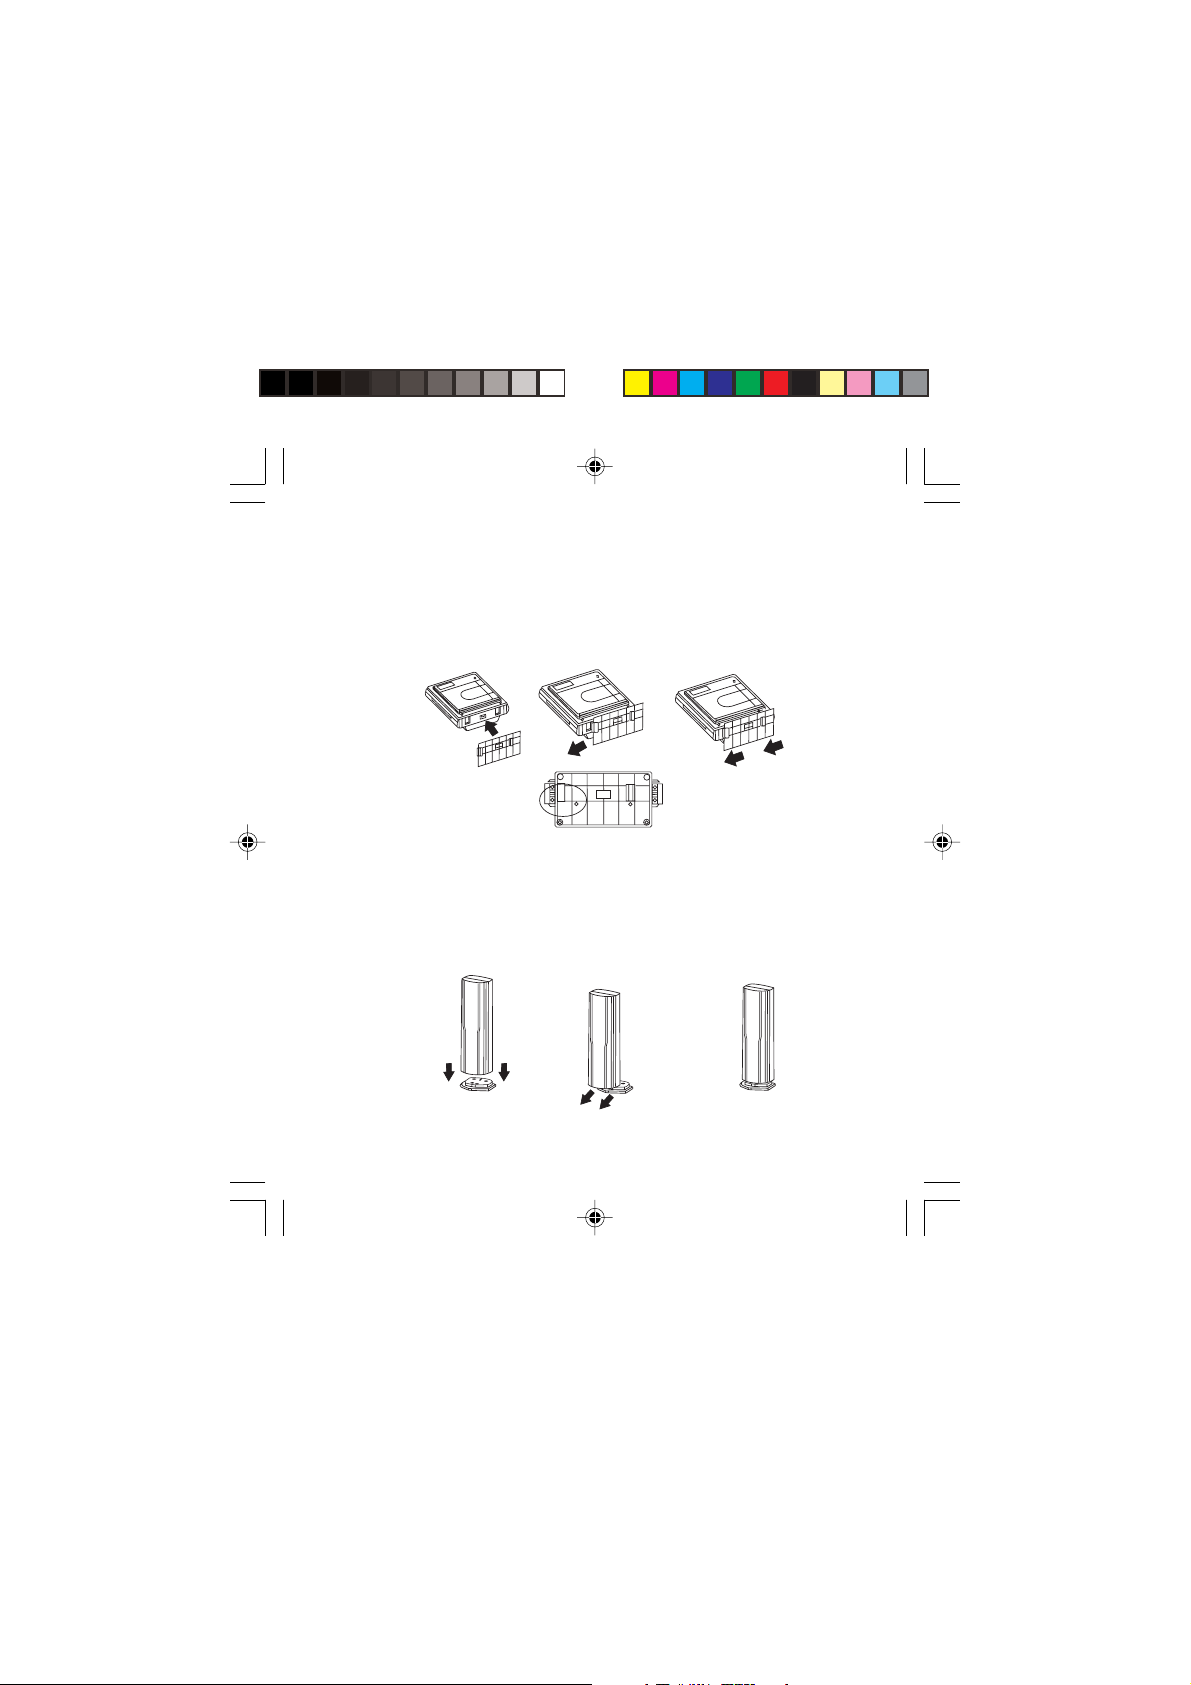
Fixing the base to the main unit
1 Place the base under the main unit.
2 Slide the base from right to left (see diagram below).
3 Stop when the arrows are aligned (see diagram). The base is now locked to the main
unit.
4 To release the base from the main unit, slide the base from right to left until it is
released.
12 3
Slide unit locked
When these
arrows are aligned
the base is properly
installed onto main unit
(arrows are aligned)
Fixing the base to the speaker box
1 Place the base under the speaker.
2 Slide the base forward until you hear a click. The base will now be locked into
position.
3 To release the base from the speaker lift the latch at the rear of the bottom of the
speaker box and push forward, then the base will unlock.
12 3
Lower the
speaker box
onto the base
Slide the base
forwards until
it locks
‘CLICK’
5
Page 6

Assembly of a wall mounted unit
1 The base of the main unit can be used as a template for fixing the two screws on the
wall.
• The two guide holes (see diagram) will help you to obtain exact locations of the
screws.
2 Drill two holes into the wall in the desired location.
3 Insert two of the wall plugs into the two drilled holes.
4 Insert two screws into the wall plugs and screw them down, leaving about 1cm of the
screw head exposed.
5 Locate the two wall hanging locations on the back of the unit over the screw heads.
6 Once you have mounted the main unit in its intended location fix the speaker
position as desired, by following steps 2 and 5. Please take care to leave enough
room for the sliding cd door to open (see diagram below).
Wall mount
screw guide
Wall mount
screw guide
6
Page 7

Connection of speaker boxes
1 Unwrap the speaker cords from both speaker boxes.
2 Insert the ‘red wire’ of the left speaker box into the ‘red’ (+) speaker connector
behind the main unit, which has the ‘L’ inidication (under the speaker connector).
3 Insert the ‘black wire’ of the left speaker box into the ‘black’ (-) speaker connector
behind the main unit, which has the ‘L’ indication (under the speaker connector).
4 Repeat the above 2 steps for the red and black wires for the right speaker box, but
this time insert them into the red and black connectors with the ‘R’ indication.
5 When inserting each wire into a connector, press downwards on the connectors
plastic latch (red or black part) and push the exposed metal end of the wire all the
way into the hole above this catch.
6 Place the speaker boxes as far apart as possible for the best sound effect.
110mm
7
Page 8

Electrical requirements
Check the voltage on the rating plate of your CD micro system corresponds with
your house electricity supply which must be A.C. (alternating current).
If the socket outlets in your home are not suitable for the plug supplied with
this appliance the plug should be removed and the appropriate one fitted.
Warning : The plug if severed from the mains lead must be destroyed as a
plug with a bared flexible cord is hazardous if engaged into a live socket
outlet.
Should the fuse in the 13 amp plug require changing a 3 amp BS1362 fuse
must be fitted.
Back-up batteries
• Please note the unit will operate without back-up batteries fitted.
1 Open the battery door at the rear of the unit.
2 Insert four batteries (UM3), (AA), (LR6) batteries (not supplied) in the battery
compartment. Ensure the polarity markings are observed or the memory will not be
properly maintained.
• These batteries are for back-up of the clock and radio memory preset stations during
any brief power disruptions.
If the unit is not to be used for a prolonged period, remove the batteries to
avoid battery leakage.
In the interests of environmental safety : dispose of batteries safely.
8
Page 9

Operating the unit (Power/standby)
1 When you first plug the unit into the AC outlet, the unit will be in STANDBY
mode. You can press the POWER button on the unit (or on the remote
control) to switch the unit ON and OFF. Pull the AC plug out of the wall socket
if you want to switch off completely.
• When the power is ‘on’ the entire digital display will be illuminated with a blue
backlight. This indicates the system is switched ‘on’.
2 Press POWER button to switch off the unit.
Digital clock function
Your micro system has a built-in digital clock which is displayed when the unit is
off. To the set the correct time, follow this procedure:
1 Press the ON/OFF button to the ‘off’ position. The unit must still be connected
to the mains supply.
2 Press and hold the CLOCK / ADJ button until ‘12H’ or ‘24H’ is flashing.
3 Press NEXT / UP or BACK / DOWN button to select 12/24 hour format.
4 Press CLOCK / ADJ button once. The time will be displayed with the hour
digits flashing.
5 Press NEXT / UP or BACK / DOWN button to adjust the hour.
6 Press CLOCK / ADJ button once. The minute digits should be flashing.
7 Press NEXT / UP or BACK / DOWN button to adjust the minutes.
8 Press CLOCK / ADJ button to set the settings to the new time.
Operation of radio
1 Press the POWER ON/OFF button to switch on the unit.
2 Press the TUNER button to select the radio.
3 Press the BAND button to switch between FM and MW.
• For FM stations, fully extend the wire FM aerial and adjust its position to
improve radio reception.
9
Page 10

Manual frequency adjustment scan mode
1 Push and immediately release the UP / DOWN button. To scan manually adjust
the radio frequency up or down by 1 step increments.
• The radios digital display will indicate the exact frequency at each steps position.
2 When a desired frequency or station is reached, it can be saved into one of the
‘memory positions’, see ‘Radio memory’ section.
3 Press the VOLUME UP or DOWN buttons to adjust volume to the desired level.
4 To turn off the radio press the POWER button once.
Automatic frequency adjustment (seek mode)
1 Push and hold for 2 seconds the UP or DOWN button to search. This automati-
cally adjusts the radio frequency up or down to the next available radio station.
2 The radio digital display will indicate the exact frequency of the next station that
is found.
3 When a desired station is reached, it can be saved into one of the ‘memory
positions’, see ‘Radio memory’ section.
Radio memory station pre-set storage
• At any time, the currently displayed station or frequency can be stored into one
of the memory positions.
1 Press the MEMORY button once.
2 Press MEM UP button to select to the desired memory position.
• There are 10 memory positions for each radio band.
3 Press the MEMORY button once to save the selected station into the selected
memory position.
4 To recall any saved memory pre-sets, simply press the MEM UP button
repeatedly. This will advance the memory position in the display from 1 upwards
to 10 (1-2-3-10) at each position. The station that was previously stored in that
position will be recalled.
5 To clear the memory of any particular position, simply save a new station to the
same position.
10
Page 11

Electronic volume control
• This unit uses an electronic volume control.
1 To increase or decrease the volume of the unit, press the VOLUME UP or
VOLUME DOWN buttons.
2 Release the buttons when the desired volume is reached.
• When adjusting the volume, the display will indicate the sound level in decibels.
(dB) ‘OdB’ will mean there is no sound or ‘80dB’ is the maximum sound level.
Equaliser function
1 Press EQ button repeatedly to choose the desired sound equalisation according
to the music you are listening to:
CLASSIC ROCK POP
• A blank box means the equaliser is deactivated or off.
• When the equaliser function is activated, it will automatically switch off the
super bass function.
Super bass function
• The built in ‘super bass booster’ circuit provides a powerful enhancement to low
frequency music giving a stronger bass sound.
1 Press SUPER BASS button once to switch on super bass function. (‘S-bass’
symbol will be displayed on the digital display.
2 Press the SUPER BASS button once again to switch off the super bass function.
• When the super bass function is activated, it will automatically switch off the
equaliser function.
11
Page 12

Loading and unloading of Cds
1 The set must be switched ‘on’ and in ‘cd mode’, by pressing CD SELECT button.
2 Press the door OPEN / CLOSE button once to open the door.
3 Place a cd into the compartment with the label-side facing outwards towards you.
4 Press the door OPEN / CLOSE button to close the cd door.
• The cd is now ready to be played.
5 To remove a disc, reverse the procedure as described above.
Cd operation
1 Insert a cd as described.
• Once the cd door is closed (with a disc inside) the unit will immediately read the
disc and display the number of tracks on the cd as well as the total playback
duration in minutes and seconds.
2 Press the PLAY / PAUSE button.
will play. The display will indicate the current track number ‘01’ if it is the first
track.
3 To pause playback at anytime during playback, press the PLAY / PAUSE button.
Press the PLAY / PAUSE button again to resume operation at the same
track and position.
4 At any time during playback, press the STOP button
stop playing and display the total number of tracks and playtime.
5 To start playing press play, the first track will be played and its information will
be displayed.
6 At any time during playback, press and release the seek/scan switches:
BACK or NEXT to skip backwards or forwards by one track.
7 Press and hold the seek / scan switches BACK or NEXT to fast-reverse or fast-
forward the specific track which is currently playing.
8 At any time during playback, press the ‘cd repeat switch’ as follows:
Press once to repeat the current track (repeat symbol will flash).
Press again to repeat all tracks (full cd). The repeat symbol will stay on and
press again to disable repeat.
The disk will start spinning and the first track
to stop playback. This will
12
Page 13

Programming the cd player
• The cd player can be programmed to play any sequence of upto 20 tracks as
desired.
1 Always press the STOP button before starting the programming.
2 Press the MEMORY button once, the display will show a memory symbol
flashing. The display will show ‘P-01’ to indicate that it is now in memory
programming mode, at memory position 1.
3 Press the NEXT or BACK button to select the track number (displayed in large
digits on the left) that you wish to be stored in the first memory position and
press MEMORY button to confirm your selection.
4 When you press MEMORY the display will advance to the next memory position
number (eg ‘P-02’ for 2nd position).
5 Repeat the previous steps, each time you select any track number of your
choice to be stored in the successive memory (program positions).
• After programming the track number remember to press the MEMORY button.
6 After a maximum of 20 tracks (or less) have been selected, press the PLAY
button
• The display will now indicate the track number of the 1st track in the memory
• The memory symbol will remain on to indicate that you have saved a program
7 Pressing NEXT / BACK buttons will move to the next or previous song in the
8 To clear (cancel) the entire program stored in memory, simply press the STOP
9 To stop playback of your saved sequence temporarily without going to the 1st
.
currently playing.
memory sequence.
saved sequence.
button to return to normal cd mode or press OPEN / CLOSE button to clear the
entire memory.
track in memory use the PLAY / PAUSE button
instead of the stop button.
13
Page 14

Sleep function
• This function allows you to listen to the radio or cd player while you fall asleep.
1 Press the SLEEP button (on remote control) repeatedly to choose the length of
time, the music should play while you fall asleep.
90 80 70 60 50 40 30 20 10 Off
• Now you can enjoy listening to the selected music for the pre-set period of
‘sleep time’.
• After this pre-set time has elapsed, the unit will switch off automatically.
How to set the timer
1 Press the TIMER button (on remote control) once. The timer symbol will flash on
the display.
2 Press and hold the CLOCK / ADJ button for about 5 seconds, until the first
digits begin to flash.
3 Press the NEXT / TUNE UP or BACK / TUNE DOWN button to adjust the hour.
4 Press and hold the CLOCK / ADJ button once, the minute digits will flash.
5 Press the NEXT / TUNE UP or BACK / TUNE DOWN button to adjust the
minutes.
6 Press and hold the CLOCK / ADJ button once the timer is set.
7 After all settings are correct, the timer symbol will continue flashing for a few
seconds then will stay on.
8 To switch off the timer function, simply press the TIMER button once. Note: the
automatic power on timer will switch on the unit as if you have manually pressed
the power button. The exact pre-set, radio band and station will become activated
when the power switches on.
• Please remember to leave the system in ‘tuner’ (radio) mode and at the desired
station and volume level before setting the timer and switching off the unit.
14
Page 15

Snooze
1 Press the SNOOZE button on the remote to give 5 extra minutes.
2 Snooze can be turned off by switching off the POWER button.
Automatic ‘power on’ timer (alarm clock function)
• This unit has a timer function to enable you to program the unit automatically to
switch on at pre-set times. This is useful as a morning alarm clock.
15
Page 16

Compact disc
1 Always use compact discs bearing the mark as shown.
2 Notes on handling discs:
When removing the disc from its storage case and loading it.
* Do not touch the reflective recorded surface.
* Do not stick paper or write anything on the surface.
* Do not bend the disc.
3 Storage:
* Store the disc in its case.
* Do not expose discs to direct sunlight or high temperatures, high
humidity or dusty places.
16
Page 17

4 Cleaning a disc:
* Should the disc become soiled, wipe off dust, dirt and fingerprints with a
soft cloth.
* The disc should be cleaned from the centre to the edge.
FROM THE CENTRE TO THE EDGE
CORRECT
INCORRECT
* Never use benzene, thinners, record cleaner fluid or anti static spray.
* Be sure to close the CD door so the lens is not contaminated by dust.
Do not touch the lens.
17
Page 18

Warning labels
WARNING: to reduce the risk of an electric shock, do not expose this
appliance to rain or moisture.
ATTENTION: To reduce the risk of an electric shock, do not
remove the cover. There are no user serviceable parts inside
the unit. Refer any servicing to qualified personnel.
The lightning flash with arrowhead symbol within the triangle is a warning
sign alerting the user of ‘dangerous voltage’ inside the unit.
The exclamation point within the triangle is a warning sign alerting the user
of important instructions accompanying the product.
To prevent fire or shock hazard do not expose this apparatus to dripping or
splashing.
Ventilation warning
The normal ventilation of the product shall not be impeded for intended use.
Maintenance
Do not expose your cd micro system to extreme of temperatures. The product
should be kept in a warm environment free from dust and damp. For external
cleaning use only a soft, clean, damp cloth. Use of detergents may damage the
finish.
18
Page 19

Technical specification
AC power supply : 230V 50Hz
AC power consumption : 30W
Subwoofer power : 20W
Back-up batteries : 6V (AA size/UM3/LR6 x 4)
Remote control unit : 3V (AAA size/UM4/ x 2)
Speaker : 4” is woofer + 2” x 2 tweeter
Speaker capacity power : 10W x 2 (4 Ohm)
Amplifier max power : 5W
Radio : FM 87.5MHz - 108MHz
WARNING : This unit uses a laser beam. To prevent an accident occuring the
unit should only be opened by a qualified engineer. If the door interlocks
become defective the laser may cause invisible radiation. Avoid exposure to
the beam.
If there is a scratch, dirt or finger prints on the CD, it may cause tracking errors.
Before playing, clean the CD with a clean cloth. Wipe the CD from the centre
outwards. After playing, store the disc in its CD case.
The CD micro system is for indoor use only.
Batteries not included
Batteries not included
: MW 522KHz - 1620KHz
19
Page 20

Guarantee
Morphy Richards products are manufactured to internationally accepted quality
standards. In addition to your statutory rights, Morphy Richards guarantee your
product to be free from manufacturing and component defects for a period of TWO
YEARS from date of purchase.
If your product proves to be defective within 28 days of purchase, your Morphy
Richards dealer from whom the product was purchased will be pleased to replace it
free of charge.
Should your product develop a defect within the guarantee period but after the
replacement period, please return the product to the following address, together with
the proof of purchase, brief details of the symptoms and your own name and
address.
Your post office will provide a certificate of posting. The product will be repaired
and returned to you promptly.
Helpline (8:30-5:00 Mon-Thur/ 8:30-4:00 Fri) UK 0870 060 2614
Republic of Ireland 1800 409119
Replacement parts 0870 167 6645
Morphy Richards Website: www.morphyrichards.com
Morphy Richards Ltd, Mexborough, South Yorkshire, S64 8AJ
After Sales Division
Morphy Richards Limited
Mexborough
South Yorkshire
S64 8AJ
AD29106M UK Rev 1
 Loading...