

Page 1

EPG DAB radio
Electronic programme guide
FM/DAB radio
Alarm
Instructions
Conventions used in text
BUTTON Small capitals for the name of a button
Function/Mode Function or mode names in italics
1
2
3
4
5
6
7
PRESET
BREAK
S
E
L
E
C
T
S
N
O
O
Z
E
EPG
INFO
BACK UP
VOL +
MUTE
VOL -
Model 27018
9241 EPG DAB radio MUK 2.qx4 12/5/05 10:09 AM Page 1
Page 2

Easy set-up guide
1 Fully extend the telescopic aerial.
2 Connect to a mains power supply or insert four D size batteries
into the battery compartment.
3 The display will light up and will show Morphy Richards then
RadioScape. The display will show scanning.
4 After a few minutes scanning will stop and the radio will start
playing.
5 Adjust the volume by pressing
VOLUME + and VOLUME -.
6Press and release
STANDBY to turn the radio off.
2
Quick set up
9241 EPG DAB radio MUK 2.qx4 12/5/05 10:09 AM Page 2
Page 3
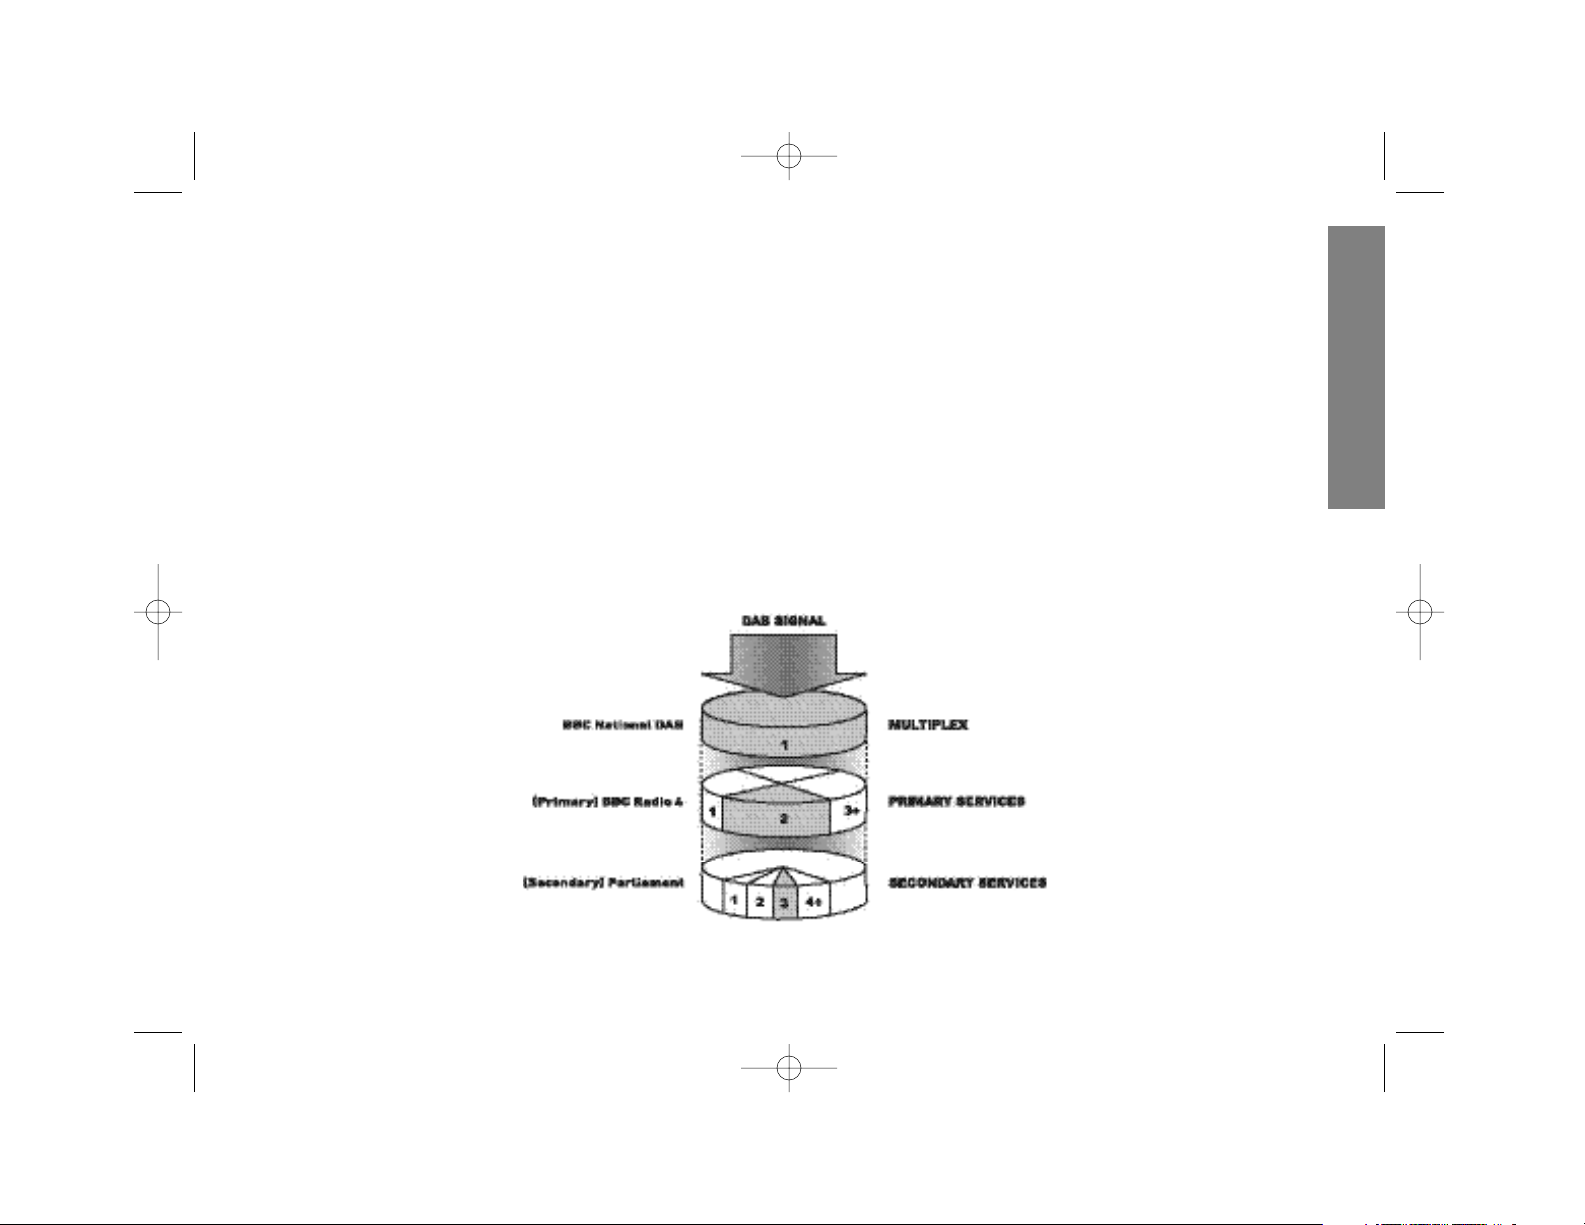
What is DAB digital radio?
DAB radio is a totally new way of transmission. It uses digital signals
rather than the analogue signals that FM and MW wavebands
transmit on. This enables near digital quality audio and enables more
stations to be broadcast using a narrow waveband. DAB can also
transmit additional data with the audio channels.
The stations broadcast on a single frequency network, called an
ensemble or multiplex. These can contain many different stations and
are on 1 frequency. Each multiplex is transmitted on a set frequency
range and are broadcast in the frequency band III (174 – 240MHz),
which is sub-divided into 41 blocks labeled 5A to 13F. Each can
contain 1 multiplex.
Secondary services and additional data are available in each
multiplex.
The number of multiplexes that you will receive will vary upon the
geographical location.
So instead of knowing the frequency, you just need to select the
station name, making it much easier to tune to your favorite station.
3
Introduction
9241 EPG DAB radio MUK 2.qx4 12/5/05 10:09 AM Page 3
Page 4
4
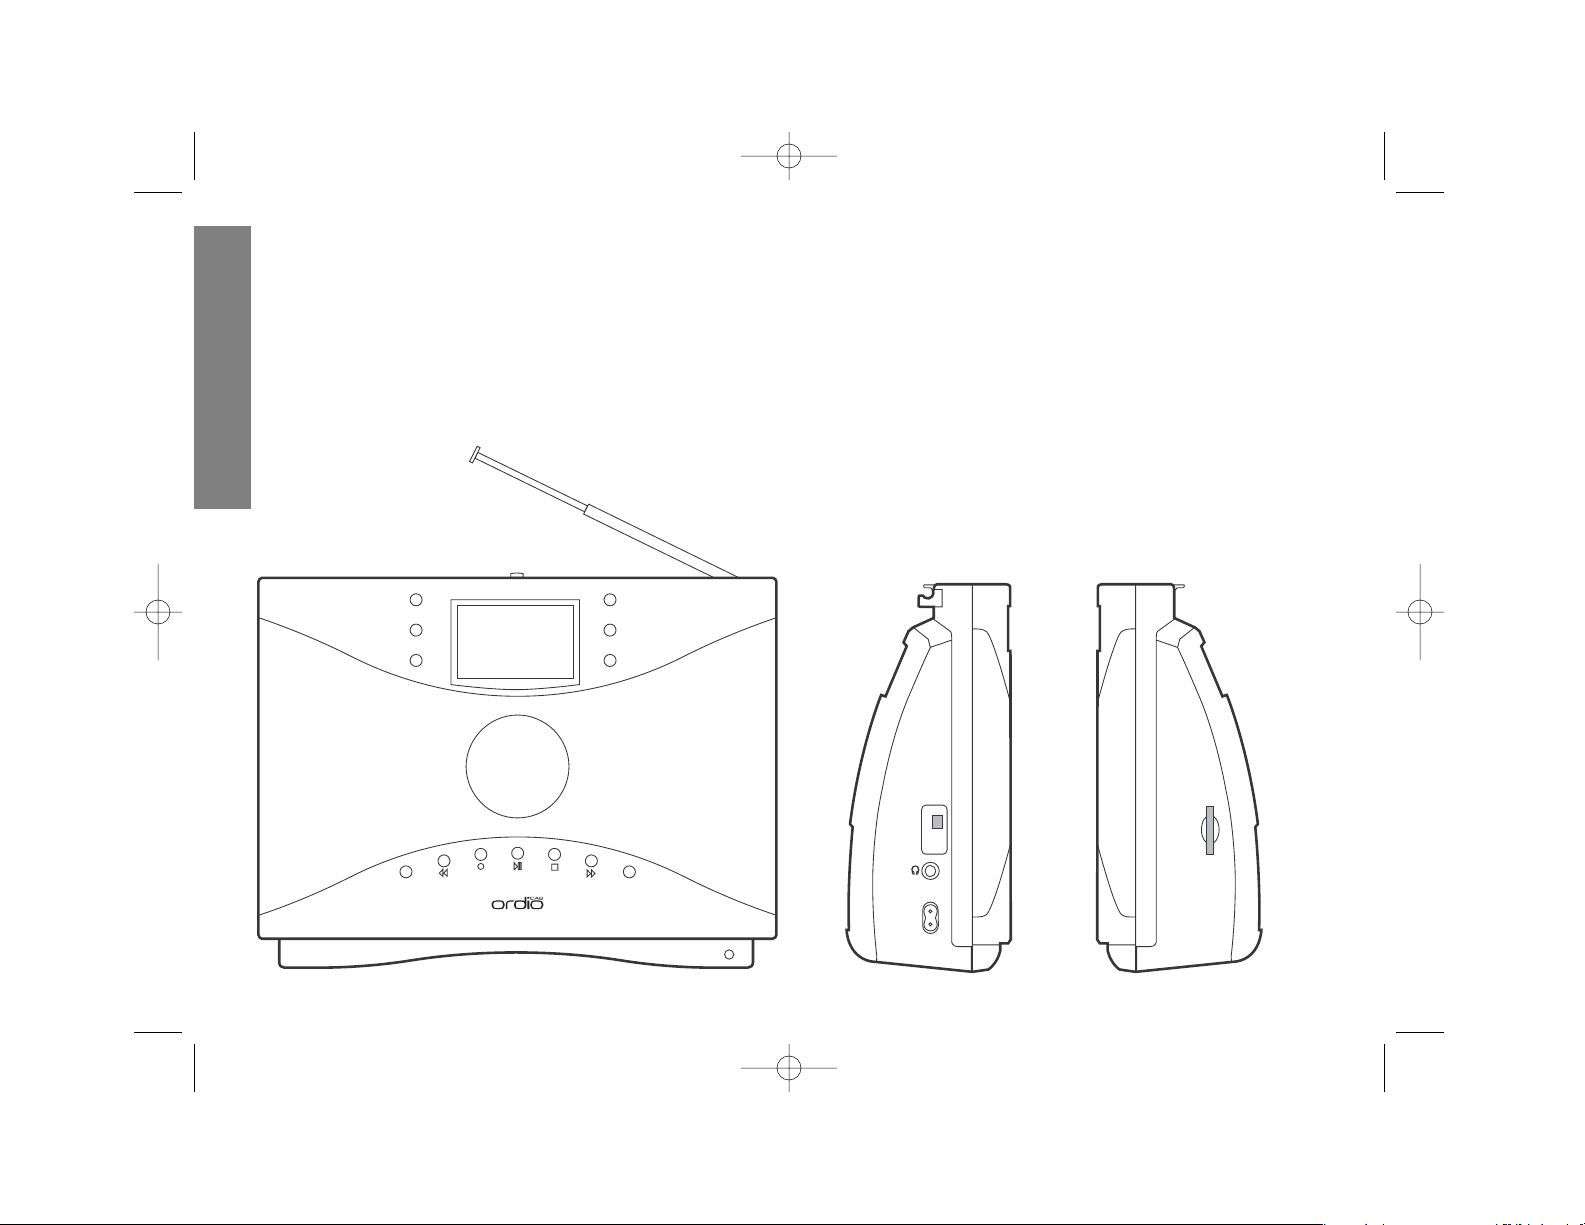
Features
⁄ to ‡ Preset buttons (store
and select)
⁄ Preset mode button
¤ Rewind
‹ Record
› Pause/play
fi Stop
fl Forward
‡ Break button
· Telescopic aerial
‚ Standby and stop alarm
button
„ EPG button (shows DAB
stations with electronic
programme guide)
‰ Info button (shows DAB
station electronic programme
guide)
 Back up button (returns to
previous screen)
Ê LCD display with backlight
(press any key when in battery
mode
Á Volume up button
Ë Mute button
È Volume down button
Í Select rotary control
Î Power indicator light
Ï Battery compartment
Ì Optical digital output socket
Ó Earphone jack socket
Ô Mains input socket
SD memory card compartment
ı Record indicator
··
‚
Ê
Á
Ë
È
Í
Î
ÏÓ
Ì
Ô
„
‰
Â
Parts
9241 EPG DAB radio MUK 2.qx4 12/5/05 10:09 AM Page 4
EPG
INFO
BACK UP
3
2
1
PRESET
VOL +
MUTE
VOL -
E
C
L
E
T
S
S
N
E
O
Z
O
SPDIF
4
5
6
7
BREAK
AC MAINS
SD CARD
Page 5

Electrical requirements
Check the voltage on the rating plate of your radio corresponds with
your house electricity supply, which must be A.C. (alternating current).
If the socket outlets in your home are not suitable for the plug
supplied with this appliance the plug should be removed and the
appropriate one fitted.
WARNING: The plug if severed from the mains lead must be
destroyed, as a plug with a bared flexible cord is hazardous if
engaged into a live socket outlet.
Should the fuse in the 13-amp plug require changing a 3-amp BS
1362 fuse must be fitted.
Power
The radio will work on mains or can be battery operated for portable
use. When the mains connector is fitted the batteries will be
overridden.
Mains supply
Insert the figure-of-eight connector on the mains lead into the mains
input socket, insert the plug into a mains socket and switch the
socket on.
Installing batteries (not supplied)
1 Remove the battery compartment cover (located at the rear).
2 Insert 4 x D batteries as shown by the diagram inside the
compartment being careful to observe polarity. The ribbon will help
in removing the batteries in the future.
3 Replace the battery compartment cover.
IMPORTANT: If the unit is not to be used for a prolonged period,
remove the batteries to avoid battery leakage. In the interests of
environmental safety, dispose of batteries safely.
5
Electrical
9241 EPG DAB radio MUK 2.qx4 12/5/05 10:09 AM Page 5
Page 6

Tur ning on the radio
Press STANDBY.
1 The radio switches on when the power is connected.
2 Switch on/off by pressing
STANDBY.
In stanby, the display shows the date and time.
Easy push-and-turn operation
This radio uses a special push and turn control (the rotary SELECT
control) which provides easy navigation of the menus on the large
LCD screen.
Press to enter a menu and turn clockwise or anti-clockwise to scroll
through the options.
Press
BACK UP to return to the previous menu. (Alternatively, at the
end of the main menu is exit, press SELECT to return to the previous
menu.)
Items with ‘...’ will take you to a further submenu, items without will
perform an immediate operation.
Here are four typical screens, although they vary by subject:
Usual radio screen Main menu screen with scroll
bar
Menu screen with check boxes Menu screen with choosable
preset options
Automatic tuning
When the radio is switched on for the first time it will select DAB
mode and scanning will start. The radio will scan DAB first and then
FM. The screen shows the number of stations found, a bar graph of
progress and the current frequency.
All stations that are found are stored alphanumerically. When
scanning has finished, the first station in the list will play. <Tuning>
will appear briefly.
If no stations are found, then try the following:
1 Ensure the aerial is fully extended.
2 Move the radio to a new location.
Selecting stations
1To select another station, turn the rotary control anti-clockwise or
clockwise.
• The list of stations will appear in the LCD screen. Turn the rotary
control anti-clockwise or clockwise to choose a station. FM
stations are listed first by frequency, then DAB stations
alphabetically.
6
Simple user guide
Signal Srength
Mute indicator
DAB/FM indicator
9241 EPG DAB radio MUK 2.qx4 12/5/05 10:09 AM Page 6
Page 7

To choose a station, press the SELECT control. <Tuning> will appear
briefly.
Presets
There are seven preset buttons available on both DAB and FM,
making a total of 14.
To store
To store a station that you are listening to, press PRESET to alter the
button functions from recording mode to preset mode. ‘Preset mode
is shown.’ Press the preset number of your choice for more than two
seconds.(With in 3 seconds of pragram preset).
• Preset stored will appear on the display. Any previous station
stored in that location will be over-written.
To recall
Press PRESET to alter the button functions from recording mode to
preset mode. Press the preset number, the radio will tune to that
station. If the preset is empty the display will revert back to the radio
screen.
• Power can be disconnected without losing this information.
Electronic programme guide (EPG)
The radio may need to have been on for a moment or two to backup
EPG signals
1Press
EPG. If the service is available a list of stations providing the
service will be displayed. Otherwise ‘There are no EPG enabled
services available currently’ will show.
2 Use the rotary control to select the desired station and a schedule
of programs will be displayed.
3 Use the rotary control to select the desired program, information
about that program will be displayed.
4Press
SELECT to go to the options menu, use the rotary control to
select either Record or Select station. ‘Record’ will set record
event. Select station will tune to that station.
5 After selecting Record you have the option to select how many
times the program will be recorded e.g. Once, Weekly etc. Select
Set to confirm the record event.
6. You have then taken to the recording schedule, all record events
are shown and can be edited/deleted. Press backup to go back to
the radio.
Information
Press INFO to display the current program information, press SELECT to
go to the options menu. If the text is too long for the screen, the text
scrolls. If no electronic programme information is available ‘There are
no EPG enabled services available currently’ will show.
Recording
You can record from the recording menu or use the buttons ¤ - fi.
For more detailed recording information see the advanced user
section.
DAB Rewind
Review mode
This allows the user to repeat approximately the last 10 minutes of
the current broadcast, to repeat songs or dialogue. (Note: in order to
review the maximum 10 minutes, the station must have been playing
on this channel for this length of time). The user can skip back to live
broadcast at any time. By pressing backup.
Review mode operation
Pause
1Press and release the
PLAY/PAUSE button › to pause a live
broadcast. Or press STOP to go to the beginning of the recording.
2 The sound will mute and the radio will record the program. A
progress bar will indicate how many minutes and seconds of
recording have taken place.
• The right-hand timer indicates the amount by which playback is
delayed. The left-hand timer indicates how much additional delay
is possible.
• The radio has a record time of approximately ten minutes.
• After the maximum pause time the radio will record over the
earliest section of the recording (i.e. loop back).
Play
3Pressing and releasing
PLAY/PAUSE or SELECT in review mode will
7
Simple user guide
9241 EPG DAB radio MUK 2.qx4 12/5/05 10:09 AM Page 7
Page 8

toggle between pause and playback of the current review.
• While the player is paused, the pause icon will appear on the
screen.
Fast forward
•Pressing and releasing
FAST FORWARD fl will fast forward the audio
by 1 second. Or turn the rotary control clockwise.
• Holding down
FAST FORWARD will fast forward the recording..
• During fast forwarding, if the radio is not paused the radio will play
a short burst of audio to allow you to monitor its progress.
Rewind
•Pressing and releasing
REWIND ¤ will rewind the audio by 1
second. Or turn the rotary control anti-clockwise.
• Holding down
REWIND will rewind the recording.
• During rewinding, if the radio is not paused the radio will play a
short burst of audio to allow you to monitor its progress.
Stop
•Pressing STOP fi will return to the start of the recording.
Press BACKUP Â will return the radio to take live broadcasts
BACKUP button
Pressing BACKUP takes you back to a previous menu or station.
MUTE/VOLUME +/- buttons
Pressing MUTE will silence the the speakers and headphone socket,
but not the SPDIF output.
Pressing
VOLUME +/- will adjust the volume of the sound. If the volume
menu is still on-screen the rotary control can also be used to adjust
the volume.
8
Simple user guide
9241 EPG DAB radio MUK 2.qx4 12/5/05 10:09 AM Page 8
Page 9

9
Main menu
When the radio is operating normally and the radio display is
showing, pressing SELECT brings up the main menu with the following
options: Record…, Stations…, Settings…, Alarms, Sleep Timer,
Rewind, Auto Tune, [Exit].
• Options with ‘…’ indicate sub menus.
Record… submenus
Pressing SELECT when this menu is highlighted brings up the
following: Recording List, New Timer, Recording Schedule, Start
Recording.
Recording list
Shows a list of recordings you have made that are stored on the
memory card. (If the sceen is blank there are no recordings, the
memory card is empty and there are no further options.)
Highlight the desired recording, press
SELECT to play the recording
(with all rewind functions).
The recording can be deleted by pressing
BREAK.
New timer
Brings up the Timer Record menu to set the fields for station, start,
duration, date, and repeat. Once all fields are complete using the
rotary control Í select Set. This then displays the Recording
Schedule showing the record events set. Selecting the desired event
allows the user to edit this.
Press
BACK UP to return to the Radio Menu.
Recording schedule
Shows items you have programmed. The Recording schedule can be
edited as described above.
Start recording
Press
SELECT to start recording, the record icon will show on the
screen.
• Changing the current service (while recording) to another service
will display a warning dialogue box - choose yes or no as
appropriate.
Advanced user guide
9241 EPG DAB radio MUK 2.qx4 12/5/05 10:09 AM Page 9
Page 10

Alternative record function
When the radio is in review mode and the user wishes to record this
reviewed program, to the SD card this can be done by pressing
RECORD. The display will indicate a Record event with an ‘R’, showing
the recording of a review section. This can be useful for saving a
popular song or announcement permantly to your SD card.
Stations... submenus
Pressing SELECT when this heading is highlighted brings up the
following: Station Scan, Station List, Station Text, Station Info, Select
Favourites, DAB Manual Tune, FM Manual Tune, Clear All Stations,
Settings.
Station scan
Choose to scan from UK DAB stations, Other DAB (band III), and/or
FM stations. Press
SELECT to highlight and select scan to complete.
Station list
FM stations are listed first by frequency, then DAB stations
alphabetically.
Station text
The lower part of the screen shows the station text. If the text is too
long, the text will scroll. Pressing
SELECT shows the station list menu
and other stations can be tuned from this.
Station info
In DAB the screen shows the following information: Frequency,
Station Name, PTy (station genre), Now (Pty - program type), data rate
and audio type.
In FM the screen shows the following information: FM Frequency and
Audio Mode.
Select favourites
Shows the station list, allowing the user to highlight required stations
as favourites.
To use this the user must enable favourites in the Settings menu.
If favorites are used, only your selected favourite stations will
appear in the station list.
DAB manual tune
Selecting this shows the current station playing. The user can change
to a known Ensemble frequency by pressing
SELECT and using the
rotary control.
Highlighting and pressing
SELECT on ‘Svc’ allows the user to select
other stations on the same Ensemble.
FM manual tune
Turn the rotary control clockwise and the frequency will advance in
50kHz increments. Pressing
SELECT will add the station to the station
list.
Clear all stations
Clears all stations from memory. A warning is shown. After
completion the station scan menu is shown.
10
Advanced user guide
9241 EPG DAB radio MUK 2.qx4 12/5/05 10:09 AM Page 10
Page 11

Settings
Allows the user to turn On/Off favourites and automatic switching.
Auto switching allows the radio to tune to other frequencies for the
same station (Service Linking, for example BBC Radio 4 may have
station on DAB and normal FM),which is indicated by a right facing
arrow on the radio display along side the station name.
Settings... submenu
Pressing select when this happens is highlighted brings up the
following:
Colour, Volume, Audio setttings,announcements format mmd SD
card, factory reset.
Clock
To alter date, time and source.
Source can be selected as either DAB exact,Time and date from DAB
signs. DAB offset time and date but can alter time or internal normal
colour. The last two allow user programmable offsets from local DAB
(local) time. Select Set to confirm.
between stations.
Volume
Enables the volume to be controlled by the rotary control.
Audio settings (DAB only)
Shows the Smart Range Control, selecting this enables volume
levelling of stations, preventing jumps in volume when switching
Announcements
Allows the user to select announcement – if selected this shows the
type of announcements possible (depending upon the station), such
as traffic news etc. Selecting the desired announcements allows the
user to see this information on the radio screen.
Format MMC/Sd card
If no card inserted then no action is performed.
Choose to completely erase the inserted memory card.
11
Advanced user guide
9241 EPG DAB radio MUK 2.qx4 12/5/05 10:09 AM Page 11
Page 12

Factory reset
Selecting this will reset to factory setting and start scanning.
Alarm
Choose from alarm number (1 to 4), time (at which time of day the
alarm will go off), repeat (once, every day, weekdays, weekends), and
station. Then select set. If the chosen alarm has already been set, a
cancel option is offered.
When the alarm goes off, the radio switches on with an alarm clock
icon in the bottom left hand corner of the main screen. Press
BACK UP
to stop the alarm, press SNOOZE to silence the alarm for seven
minutes. Snooze is displayed and counts down. Press BACK UP to
stop the alarm.
• Ensure that the radio station selected for alarm on time will be
active as no alarm sound is available.
Sleep timer
Makes the sleep timer active. The main screen shows a moon symbol
and counts down in hours, minutes and seconds. When the count
reaches zero the radio enters standby mode and switches off. Turn
the rotary knob to increase or decrease the remaining time from 1
second to 23 hours 44 minutes 59 seconds.
Rewind
Places radio into review mode. (See Review Mode for controls.)
AutoTune
Selecting this performs a full scan.
Exit
Selecting this returns the radio screen.
12
Advanced user guide
9241 EPG DAB radio MUK 2.qx4 12/5/05 10:09 AM Page 12
Page 13

Menu map
The following shows the structure of the menu system.
External connectors
Ensure the radio and any external devices are switched off before
connecting.
You can connect earphones with a 3.5mm plug to the earphone
connector for private listening. Ensure that the volume is not too loud.
You can connect the radio to an external amplifier or other device
fitted with SPDIF input. Use a suitable toslink optical (SPDIF) audio
cable to connect to the auxiliary input on the amplifier and insert the
optical cable.
Memory card
If there is no memory card in the slot, and a function is selected
which requires it the screen will display ‘please insert a memory card’.
Push in with the terminals face to the front until it clicks into place. To
remove, push and it will spring out.
13
Advanced user guide
If memory card inserted please put unit into standby mode before
removing SD card.
9241 EPG DAB radio MUK 2.qx4 12/5/05 10:09 AM Page 13
Page 14

Specifications
AC Power supply: 230V 50Hz
Battery: 4 x D size (not provided)
Compliant with ETS 300 401
Capable of decoding all DAB transmission modes 1 – 4
Speakers: 2 x 3” speakers – full stereo output
Frequency range: DAB band III (174 – 240MHz)
FM (87.5 – 108MHz)
Earphone socket: 3.5mm diameter stereo output
SPDIF optical output
LCD graphic display:132x64 positive with blue backlight
Warnings
The normal ventilation of the product shall not be impeded for
intended use.
WARNING: to reduce the risk of electric shock, do not expose
this appliance to rain or moisture.
No naked flame sources, such as lighted candles, should be placed
on the apparatus.
CAUTION: Danger of explosion if battery is incorrectly replaced.
Replace only with the same or equivalent type.
Helpline
Monday-Thursday 8.30-5.00 / Friday 8.30-4.00
UK 0870 060 2614
Republic of Ireland 1800 409119
Replacement parts
0870 167 6645
Morphy Richards Ltd., Mexborough, South Yorkshire, S64 8AJ
www.morphyrichards.co
m
Guarantee
Morphy Richards products are manufactured to internationally
accepted quality standards. In addition to your statutory rights,
Morphy Richards guarantee your product to be free from
manufacturing and component defects for a period of TWO YEARS
from date of purchase.
If your product proves to be defective within 28 days of purchase,
your Morphy Richards dealer from whom the product was purchased
will be pleased to replace it free of charge.
Should your product develop a defect within the guarantee period but
after the replacement period, please return the product to the
following address, together with the proof of purchase, brief details of
the symptoms and your own name and address.
After Sales Division, Morphy Richards Limited, Talbot Road,
Mexborough, South Yorkshire, S64 8AJ
Your post office will provide a certificate of posting. The product will
be repaired and returned to you promptly.
Morphy Richards products are intended for household use only.
Morphy Richards has a policy of continuous improvement in product
quality and design.
The company, therefore reserves the right to change the specification
of its models at any time.
27018MUK Rev 1 3/05
9241 EPG DAB radio MUK 2.qx4 12/5/05 10:09 AM Page 14
Page 15

Model 27018
15
9241 EPG DAB radio MUK 2.qx4 12/5/05 10:09 AM Page 15
 Loading...