

Page 1

Touch screen radio
27010 OPERATING INSTRUCTIONS
Page 2
Illustration
25
24
23
22
1
2
3
4
5
6
7 8 9 10
11
Touch screen rod
The touch screen rod is used for pressing the touch screen buttons.
To store clip the rod onto the telescopic aerial as shown.
2021
19
18
17
16
15
14
13
12
2
Page 3

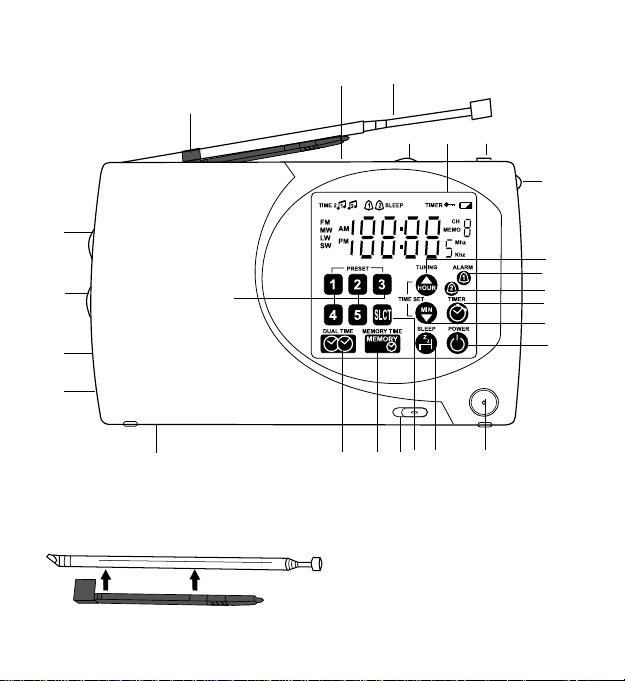
Locations of control
1 Volume control
2 Tone switch
3 Earphone socket
4 DC socket (DC 6V ) for adaptor (supplied).
5 Battery compartment - (underneath the unit).
6 Preset station buttons 1-5
7 Dual time button - for time 1 and 2.
8 Memory/time button - for setting time 1 and 2 and preset radio stations.
9 Lock switch
10 Select button - for selecting programmed stations.
11 Sleep button
12 Snooze button
13 On/off power button
14 Down/minute button
15 Timer button
16 Alarm 2 button
17 Alarm 1 button
18 Up/hour button
19 Sensitivity switch (SENS LOC/DX) LOC=nearby stations, DX=remote stations
20 Display illumination button
21 Display
22 Waveband switch FM/MW/LW/SW
23 Touch screen pointer rod
24 Telescopic aerial
25 Foldable stand - on the rear of the cabinet.
Key lock function
When your radio is in the lock position
operation will be prevented.
The lock key symbol
will show on the display.
LOCK
all buttons are locked. Accidental
3
Page 4

Electrical requirements
Check that the voltage on the rating plate of your AC/DC adaptor corresponds
with your house electricity supply which must be A.C. (alternating current).
Power supply
Connecting AC/DC adaptor (supplied). As soon as you connect AC/DC adaptor the
clock will start working at 12:00. You will need to set the correct time.
Battery low indicator
The unit checks the battery voltage capacity when the AC/DC adapter is not in use.
The low battery icon will appear on the top of the LCD display when the unit is
checking for a low battery. This symbol will also appear when a power cut happens.
The AC/DC adaptor, when fitted, overrides the batteries, if fitted. The battery low
indicator will appear constantly when the battery life is low. When this happens you
will need to insert new batteries.
Note: In order to avoid losing alarm settings, turn off the radio before replacing the
batteries. Replacing the batteries must be within 30 seconds, otherwise the memory
and alarm settings will be erased.
Installing batteries (not supplied)
1 Remove the battery compartment cover (located underneath the unit) by
sliding off.
2 Insert 3 x AA batteries and connect to terminals (Ensure batteries are inserted
correctly). Replace the battery compartment cover.
If the unit is not to be used for a prolonged period, remove the batteries to avoid
battery leakage. In the interests of environmental safety : dispose of batteries
safely.
Touch screen display
Y our radio has an innovative touch screen interactive display panel. Use the pad of
your finger or use the touch screen pointer rod to operate. We recommend the pointer
rod to avoid fingerprints.
To clean the display use a duster to polish. Do not use a spray polish.
4
Page 5
Setting the clock time
- The clock must be set with the unit switched off. Time 1 is to set the normal
time and Time 2 can be set to view an additional world time.
• A single press of the Down/minute button or Up/hour button advances the
setting by one hour or one minute. If the button is held setting will advance rapidly.
• While listening to the radio you can check TIME 1 and TIME 2 as follows:
Press Dual time button for 5 seconds, the display will show TIME 1, press the
dual time button again for 5 seconds, the display will show TIME 2.
Press the power button twice to return to the frequency display.
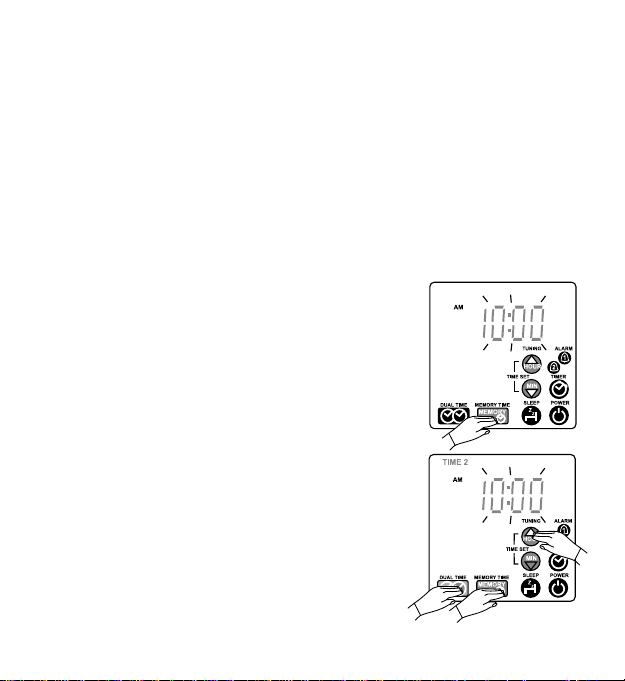
To set Time 1 (normal time)
1 Time 1 will be displayed when power is applied to the unit.
2 Press the Memory time button (a) once, the clock display will flash. You must
adjust the time while the clock display is flashing.
3 Now set the correct time with the Down/minute button
(to set minutes) Up/hour button (to set hours).
4 Press the Memory time button (a) to save the setting or
wait 5 seconds, and the time display will be saved
automatically.
To set Time 2 (world time)
1 Press the Dual time button (a), ‘Time 2’ will appear on
the display.
2 Press the Memory time button (b) once, the clock
display will flash. You must adjust the time while the
clock display is flashing.
3 Now set the correct time with the Up/hour button (c)
(to set hours).
Note : only the hour segment should be changed.
This is to comply with world time zone differences
from GMT which are always + or - hours.
• When the clock reaches midday the AM symbol will
change to PM.
a
a
b
c
5
Page 6

Radio operation
Note: The lock switch must be set to the unlock position.
1 Switch the unit on by pressing the Power on/off button on the touch screen
display.
To obtain the maximum reception for SW and FM fully extend the telescopic aerial
which is located at the rear of the unit and alter the direction for best results.
The aerial for the MW and LW wavebands is located inside the unit. To obtain, the
maximum MW and LW reception rotate your radio.
Intermediate frequencies: FM 10.7 MHz, MW/LW/SW 450kHz.
2 Select the waveband with the Waveband switch.
3 Start the station search with the Up/hour button for searching the higher
frequencies or press Down/minute button for searching lower frequencies.
4 Pressing briefly will tune the frequency in steps. Pressing for several seconds will
tune automatically and find the next station.
The tuning steps are 50Hz for FM,
9kHz in the case of MW, 1kHz for LW manual tuning,
9kHz for LW auto-tuning
5 kHz for SW.
As a result of poor reception conditions during automatic station search it may
happen that the station received is not optimally tuned in. In such instances briefly
press the Up/hour button or Down/minute button once or twice until the station
is correctly tuned in.
Note: When the battery voltage decreases, the automatic station may not work
correctly. In this case, change the batteries if the low battery indicator is
showing.
Sensitivity switch (SENS LOC/DC)
Normally this switch should be set to the DX position for national stations.
If the signal received is too strong, set the switch to Local for nearby
stations. (This switch functions only on FM/SW reception) If searching
for local stations switch to local to obtain optimum reception.
6
Local
DX
Page 7
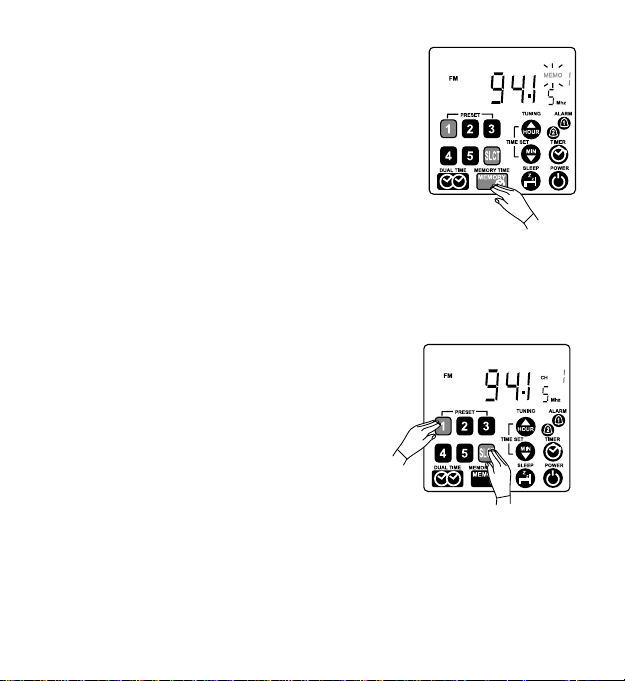
Preset stations
Y ou can store a total of 40 memory stations (10 on each
waveband).
1 Tune to the required station as described for ‘Radio
operation’.
2 Press the Memory/time button (a), and ‘MEMO’ will
flash for several seconds.
3 Press the Preset stations buttons 1-5 or SLCT (select)
button for locations 1-10.
4 Press Memory/time button (a) again, the station is now
stored in the memory. It replaces any previously stored
frequencies to the button in the same waveband. The
frequency and the station number are shown in the display.
5 Repeat for all presets on all wavebands as required.
Selecting preset stations
1 Select the required waveband with the Waveband
switch.
2 Press one of the preset station buttons between
1-5.
3 The display shows the waveband, the frequency,
the number of the pre-set station button 1-5 and
you will hear the programmed station.
4 Alternatively, press the SLCT (select) button and
the preset stations will step up.
Volume control
1 Adjust the volume with the Volume control, on the side of the unit.
Tone
1 The tone can be adjusted High/low with the Tone switch as required.
a
7
Page 8
Last station memory function
1 The frequency of the last station tuned to before switching off the unit will be
stored in the memory. When the unit is switched on again, it will receive this
station in the respective waveband. When you are changing the waveband, the last
station tuned on each waveband will also be stored in memory.
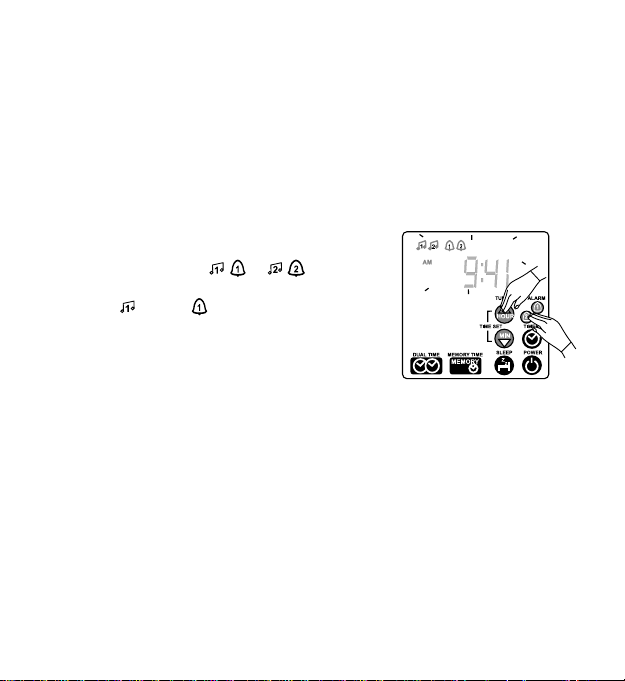
Setting the alarm time
1 When the radio is set in the off position, the display will show the clock time.
(Ensure time 1 is displayed).
2 Press the Alarm button 1 or 2 (a) for the alarm
setting, the alarm icon
the display.
Choose
alarm by repeatedly pressing of the alarm button.
This applies to alarm 1 and 2.
3 Set the required alarm time with the Up/hour button
and Down/minute button (b).
4 A single press of the respective button advances the
setting by one hour or one minute respectively; if the button is pressed constantly
the settings advance rapidly.
5 While the display is flashing you must set the alarm. After the display stops
flashing, the alarm is set. Press Alarm 1 or 2 button three times, and the
relevant alarm function will be cancelled.
6 When the clock reaches the alarm time, the alarm will sound. Press any key to
stop the alarm. The alarm will sound again 24 hours later. To cancel the alarm see
point 5.
Note: alarm 1 and alarm 2 cannot be set at the same time.
Note: The alarm will sound at the time shown on the display.
radio or buzzer as your choice of
, or , will flash on
b
a
8
Page 9

Snooze
1 To silence the alarm temporarily press the Snooze button which is located on the
front of the unit. The alarm will sound again in 9 minutes time. You can press the
Snooze button as many times as desired.
Sleep function
1 Select the required station as described in ‘Radio Operation’.
2 Switch the unit off by pressing the Power on/off button (a).
3 Press the Sleep button (b).
4 The radio will come on for 10 minutes and the display
will show ‘10’ and SLEEP.
5 Press the Sleep button twice to increase sleep time to
20, press 3 times to 30. The minimum sleep time
available is 10 minutes, maximum 90 minutes.
6 Press the Power on/off button for immediate
cancellation of the sleep function.
7 When the sleep time has elasped, the set switches off
and SLEEP goes out.
Timer button
1 Engage the timer by pressing the Timer button (a).
2 The timer is adjusted by pressing the Timer button (a) for 10 minute increments
and the Down/minute button (b) for 1 minute
increments.
3 Once correct count down time has been set do not
touch the unit for 5 seconds and the time will be set.
After the 5 seconds has passed the display will revert
back to time display (with timer shown at the top of the
display).
b
ab
a
9
Page 10

4 To cancel the timer change the timer time until the display reads ‘00’. Wait for 5
seconds the display will revert back to the time display.
5 The buzzer will sound at the end of the set time. Press Timer button once to turn
off the buzzer. After 5 seconds, the display will revert back to the time display.
Display illumination
The display will illuminate for 5 seconds when you touch the upper part of the display.
This enables the buttons to be seen before any buttons are pressed in a dark room.
Press the display illumination button to light up the display.
Maintenance
Do not expose your radio to extremes of temperature. The product should
be kept in a warm environment free from dust and damp. For external cleaning
use only a soft, clean, damp cloth. Use of detergents may damage the finish.
Technical specification
External power supply : 6V DC Adaptor (6V 200mA)
Adaptor : Model 35G-6-200
Input power 230v
Output 6V DC 200mA
DC voltage socket : 5.5mm diameter
Battery : 3 x AA (not provided)
Radio : FM 87.5MHz - 108MHz
: MW 531kHz - 1611khz
: LW 144kHz - 281kHz for manual tuning
: LW 144kHz - 279kHz for automatic tuning
: SW 5.9MHz - 15.6MHz
Earphone socket : 3.5mm diameter mono output
50Hz
10
Page 11

Warning labels
WARNING: To reduce the risk of electric shock, do not expose this appliance or adaptor to rain or
moisture.
ATTENTION: To reduce the risk of electric shock, do not remove the cover.
There are no user serviceable parts inside the unit. Refer any servicing to
qualified personnel.
To prevent fire or shock hazard do not expose this apparatus or adaptor to dripping and splashing.
Earphones
When connecting earphones to the earphone socket, the built in loudspeaker is automatically
switched off. Do not plug in the earphones when the alarm buzzer is set.
When using your radio in Europe the BBC World Service can be heard on
the following short waveband and frequencies:-
FREQUENCY IN MEGAHERTZ (MHz)
6.180 6.195
7.115 7.120 7.150 7.325
9.410
11.780 11.785
15.485 15.575
IMPORTAN T
Not all the frequencies will be audible in all parts of Europe, the listener should
try each frequency in turn as some are not used all the time and can change
according to atmospheric conditions or because of interference.
11
Page 12

Guarantee
Morphy Richards products are manufactured to internationally accepted quality standards. In addition to your statutory rights, Morphy Richards guarantee your product to be
free from manufacturing and component defects for a period of TWO YEARS from date
of purchase.
If your product proves to be defective within 28 days of purchase, your Morphy Richards
dealer from whom the product was purchased will be pleased to replace it free of charge.
Should your product develop a defect within the guarantee period but after the replacement period, please return the product to the following address, together with the proof
of purchase, brief details of the symptoms and your own name and address.
After Sales Division
Morphy Richards Limited
Talbot Road
Mexborough
South Y orkshire
S64 8AJ
Your post office will provide a certificate of posting. The product will be repaired and
returned to you promptly.
Helpline (8:30-5:00 Mon-Thur/ 8:30-4:00 Fri) UK 0870 060 2614
Republic of Ireland 1800 409119
Replacement parts 0870 167 6645
Morphy Richards Website: www.morphyrichards.co.uk
446/8001/97 Rev 2
Morphy Richards Ltd, Talbot Road, Mexborough, S64 8AJ
Morphy Richards products are intended for household use only.
Morphy Richards has a policy of continuous improvement in product quality and design.
The company, therefore reserves the right to change the specification of its models at any time.
 Loading...