

Page 1

f
g
Easy Blend Deluxe
Please read and keep these instructions
Easy Blend Deluxe
Merci de bien vouloir lire et conserver ces instructions
FP404001MEE Rev1.qxp_Morphy Richards Instruction Book 25/02/2016 16:46 Page 1
Page 2

2
Health And Safety
The use of any electrical appliance requires the following common sense safety rules.
Please read these instructions carefully before using the product.
• This appliance can be used by persons with reduced physical,
sensory or mental capabilites, or lack of experience and
knowledge, if they have been given supervision or instruction
concerning the use of the appliance in a safe way and
understand the hazards involved.
• Children shall not play with the appliance.
• This appliance shall not be used by children.
• Keep the appliance and cord out of reach of children.
• For operation and ‘Usage’ refer to page 8.
• For care and cleaning refer to page 8.
• Always disconnect from the supply if left unattended and before
assembling, disassemble or cleaning.
• Avoid touching moving parts. Keep hands, hair and clothing,
and utensils away from the attachment blades during operation,
to prevent personal injury and/or damage to the appliance.
• If the supply cord is damaged, it must be replaced by the
manufacturer, its service agent or similarly qualified persons in
order to avoid a hazard.
g
In addition, we offer the following safety advice.
Location
• Do not use outdoors or in a bathroom.
• Always locate your appliance away from the edge of the worktop.
• Do not place the beaker used with the appliance on a highly
polished wooden surface as damage may occur to the surface.
Mains cable
• Do not let the mains cable hang over the edge of the worktop
where a child could reach it.
• Do not let the lead run across an open space e.g.
between a low socket and a table.
• Do not let the cable run across a cooker or other hot area which
might damage the cable.
• The mains cable should reach from the socket to the base unit
without straining the connections.
FP404001MEE Rev1.qxp_Morphy Richards Instruction Book 25/02/2016 16:46 Page 2
Page 3
3
Other safety considerations
• Do not use the appliance for anything other than its
intended purpose.
Product specific safety
• WARNING: Misuse of this appliance could cause personal injury.
• Do not clean the attachments under running water while they are
in position.
• Switch off the appliance and disconnect from supply
before changing accessories or approaching parts that move in
use.
Electrical requirements
Check that the voltage on the rating plate of your
appliance corresponds with your house electricity supply which
must be A.C. (Alternating Current).
Should the fuse in the mains plug require changing,
a 3 amp BS1362 fuse must be fitted.
g
f
9
1
6
15
7
8
5
12
4
3
2
1
10
13
12
14
5
11
FP404001MEE Rev1.qxp_Morphy Richards Instruction Book 25/02/2016 16:46 Page 3
Page 4
4
1
2
3
4
FP404001MEE Rev1.qxp_Morphy Richards Instruction Book 25/02/2016 16:46 Page 4
Page 5
5
g
f
8
5
6
7
9
FP404001MEE Rev1.qxp_Morphy Richards Instruction Book 25/02/2016 16:46 Page 5
Page 6
6
1
I
O
R
ON REV
10
1
I
O
R
ON
OFF
REV
12
11
13
1
2
FP404001MEE Rev1.qxp_Morphy Richards Instruction Book 25/02/2016 16:46 Page 6
Page 7

7
g
f
14
15
4
3
2
16
17
FP404001MEE Rev1.qxp_Morphy Richards Instruction Book 25/02/2016 16:46 Page 7
Page 8

8
Introduction
Congratulations on becoming a Morphy Richards Slow Juicer
owner, the quick and easy way to your five-a-day with high quality
nutritious juices.
The method of extraction is masticating and pressing, using the
screw-like auger similar to a mortar and pestle. The action tears
open the food’s cell membranes and releases deep-seated
nutrients and enzymes. It also breaks up more of the
phytonutrients, resulting in a richer coloured juice that retains
more vitamins and minerals. The slow RPM ensures that the
cellular structure of fruits and vegetables is kept intact. Thus, it
preserves the precious enzymes and nutrients that are closest to
their natural form, even from wheatgrass, soy, and leafy greens.
For better use and optimal results, please follow the instructions
carefully. Please refer to this instruction manual if you are having
technical difficulties or are unsure of usage of the appliance.
Contents
Health and Safety 2
Product Overview 3
Introduction 8
Assembly Instructions 8
How to use your juicer 8
How to disassemble & clean 9
Cleaning Tips 9
Contact Us 9
Trouble Shooting 10
Recipes 11
Guarantee 12
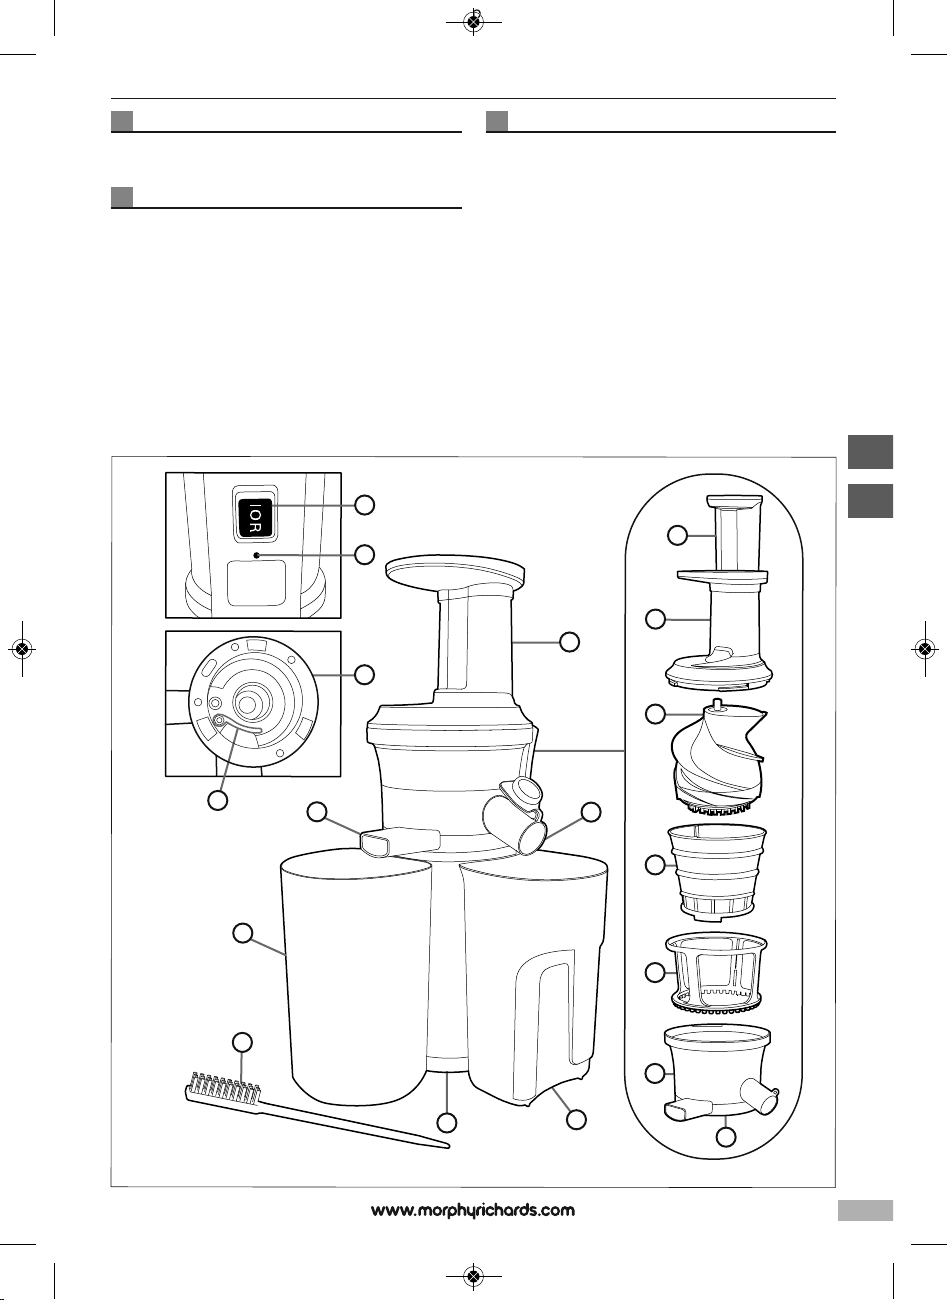
Features
(1) Hopper
(2) Auger
(3) Micro-mesh Filter
(4) Spinning Brush
(5) Bowl
(6) Pulp outlet
(7) Juice outlet
(8) Base
(9) Cleaning Brush
(10) Pusher
(11) Juice Container
(12) Extractor Seal
(13) On/Off/Reverse
(14) Reset Button
(15) Pulp Container
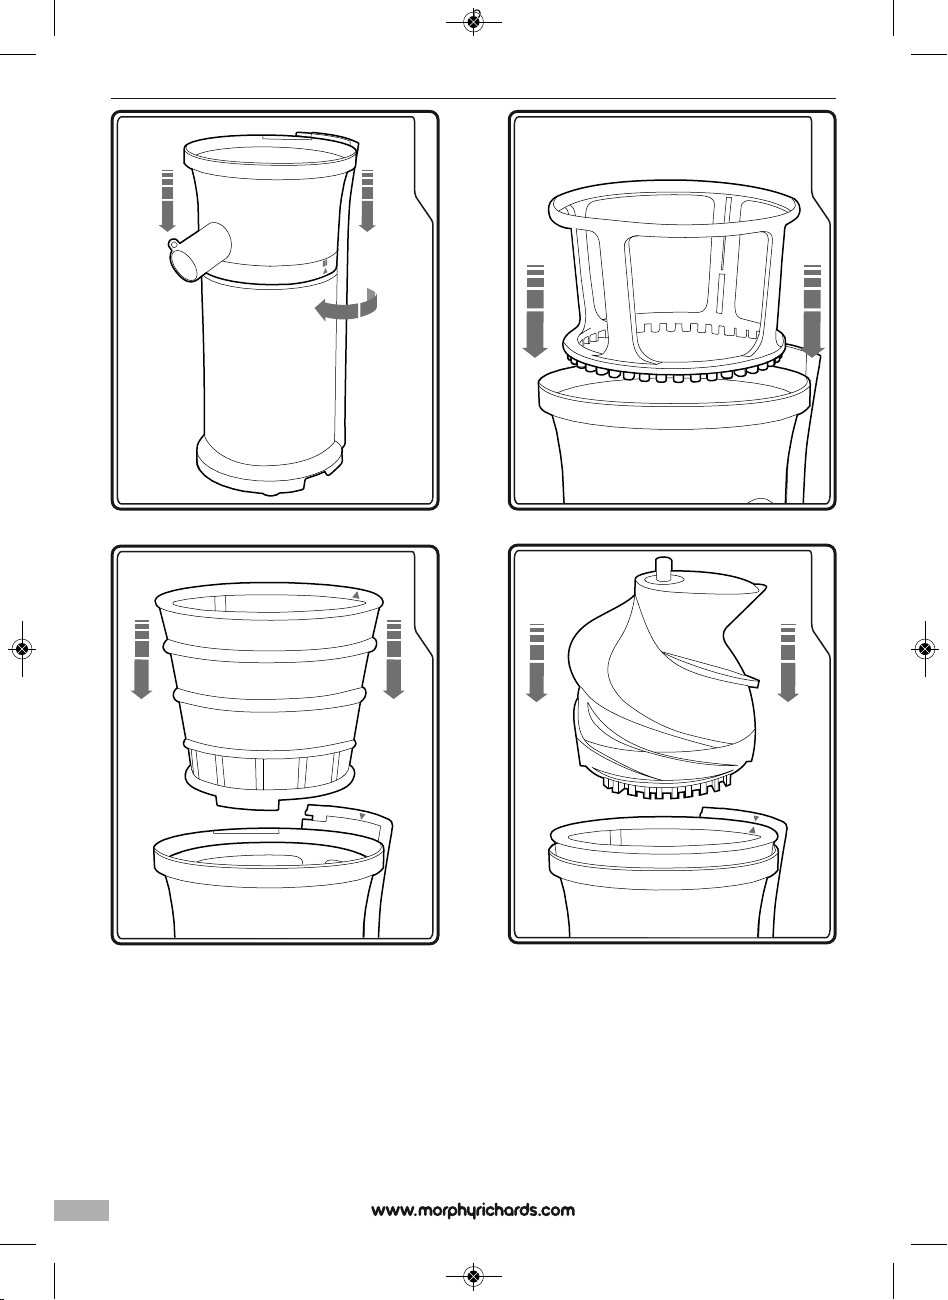
Assembly Instructions
1
Place the bowl (5) onto the base (8), align the II with the arrow,
rotate clockwise and lock into place.
2
Place the spinning brush (4) into the bowl (5).
3
Place the micro-mesh filter (3) inside the spinning brush (4) and
align the arrows.
4
Place the auger (2) inside the micro-mesh filter (3) and rotate until
it clicks into place.
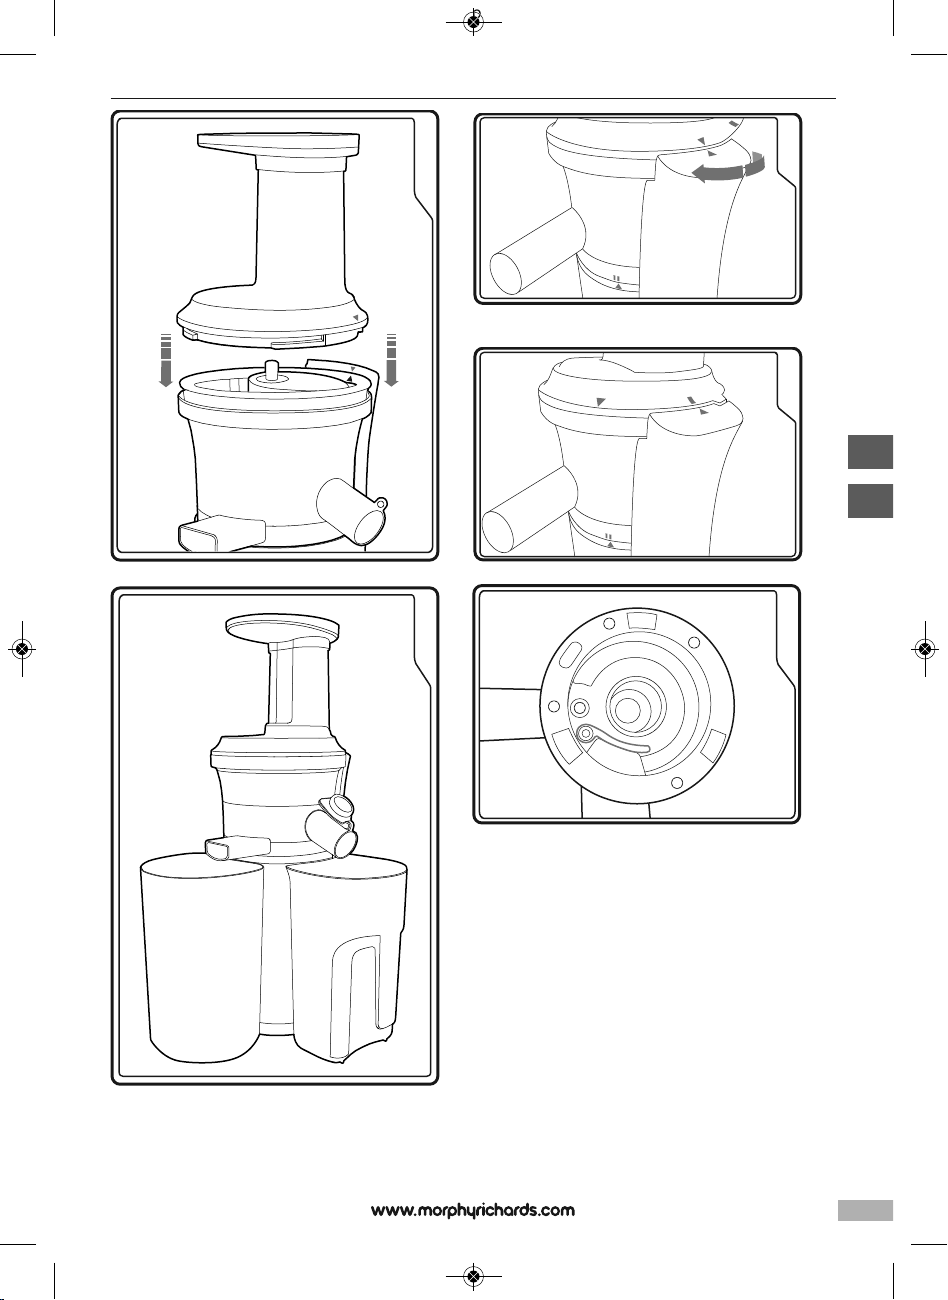
5
Place the hopper (1) onto the bowl (5).
6
Align the arrows and twist clockwise.
7
Lock into place and plug in the unit.
8
Place containers (11) under both the Juice & pulp outlets (6 & 7)
underneath the bowl (5), there is a rubber pad called the Extractor
Seal (12) which allows all of the juice only to discharge from the
juice outlet.
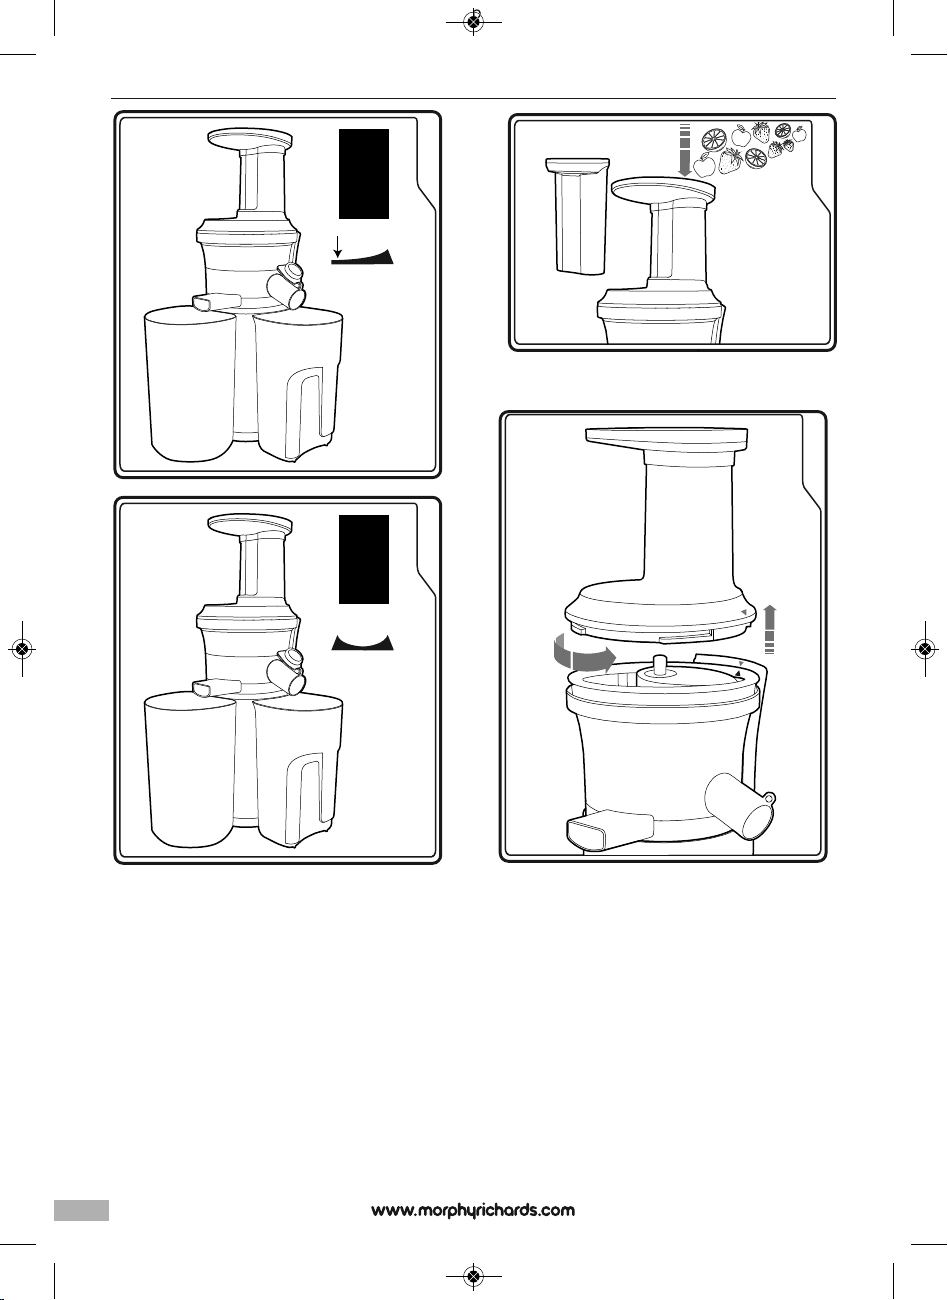
9
Before juicing, please make sure the Extractor Seal (12) is fitted
correctly to prevent any leakage.
How To Use
10
Your slow juicer has three settings.
• "On" starts the motor/makes juice.
• "Rev"reverses the motor and is to be used only when food is
stuck.
• “Off” stops the motor/turns off the unit.
11
Placing food into your slow juicer:
• Rinse food thoroughly before juicing.
• Be sure to cut food into pieces no larger than 5cm for optimal
extraction, and remove any large, hard seeds and hard peel e.g.
melon.
• Turn"On" your slow juicer, drop food into the hopper. Do not push,
force or over fill. The pusher helps guide the fruit through the
hopper. Insert food at a slow pace, allowing all the juice to extract.
• Hard skins such as melon, citrus and pineapple should be
removed.
• Some splashing may occur when dispensing into the container.
• Stir juice before serving.
• The juice may contain small pieces of peel/herbs. Alternate soft
and hard ingredients for optimum extraction.
12
Turn “Off” when done.
• Ensure that hands are completely dry before touching the switch.
• Do not operate with an empty bowl.
• Left over juice should be immediately refrigerated or frozen.
FP404001MEE Rev1.qxp_Morphy Richards Instruction Book 25/02/2016 16:46 Page 8
Page 9

9
How to Disassemble & Clean
13
Turn the unit “Off” and unplug at the wall. Twist anti-clockwise to
unlock the hopper, lift and remove.
14
Lift out the auger (2), micro-mesh filter (3) and spinning brush (4)
still attached together as one piece from the bowl (5).
15
Once separated from the bowl (5) lift out the auger (2), micro-
mesh filter (3) and spinning brush (4) in order.
Use the cleaning brush (9) to clean thoroughly after use.
• The cleaning brush handle may be used to dislodge any pulp/skin
trapped in the bowl.
• To remove all food from the bowl unplug the seal (12) and flush
through with clean water.
Ensure all attachments are dry after cleaning. (See cleaning tips
on page 9).
• Do not use metal sponge or scouring powders to clean, they can
damage the machine.
• No parts are dishwasher safe.
• Do not immerse the base (8) in water. Use a damp cloth to clean.
Cleaning Tips
16
• Carefully clean the Spinning Brush (4) periodically by removing the
silicone "brushes" to prevent staining or mould forming.
• Thoroughly rinse and clean immediately after each use to
minimise staining.
• Make sure the Extractor Seal (12) pulled out completely when
cleaning. Plug back in securely after cleaning to prevent leaks.
• NO PARTS ARE DISHWASHER SAFE.
• For best cleaning results, use warm water and washing up liquid.
• Do not use rough abrasives or harsh chemicals as they can
scratch or damage the plastic.
• The micro mesh filter and rubber blades (A) should be cleaned
immediately after use with the brush provided in hot soapy water.
If a rubber blade (A) becomes dislodged carefully reinsert by
sliding into the slot in the spinning brush.
17
Ensure the blade is the correct way round (use the one already in
place as a guide).
Contact Us
Helpline
If you are having a problem with your appliance, please call our
Helpline, as we are more likely to be able to help than the store you
purchased the item from.
Please have the product name, model number and serial number
to hand when you call to help us deal with your enquiry more
quickly.
UK Helpline: 0344 871 0944
IRE Helpline: 1800 409 119
Spares: 0344 873 0710
Talk To Us
If you have any questions or comments, or want some great tips or
recipe ideas to help you get the most out of your products, join us
online:
Blog: www.morphyrichards.co.uk/blog
Facebook: www.facebook.com/morphyrichardsuk
Twitter: @loveyourmorphy
Website: www.morphyrichards.com
g
FP404001MEE Rev1.qxp_Morphy Richards Instruction Book 25/02/2016 16:46 Page 9
Page 10

10
Trouble Shooting
Problem Possible Reasons Solution
1 The bowl is stuck and does not detach
from the base.
Excessive food in the bowl.
Unknown substance in the bowl.
Press the reverse button for 3-5 seconds.
Repeat the process 2-3 times.
Then, push the bowl upwards while turning.
2 The hopper/lid is stuck. Excessive food in the bowl.
Unknown substance in the bowl.
Press reverse the button for 3-5 seconds.
Repeat process 2-3 times.
Then, press down on the top of lid while
turning.
3 The motor is stuck or has stopped.
Excessive food in the bowl.
Safety feature: automatic shutoff.
due to overheating.
Press the reverse button 3-5 seconds.
Repeat the process 2-3 times.
If the motor has stopped, allow it to cool,
before trying again.
Press the reset button (14).
4 Leaking from underneath the bowl. Extraction Seal not plugged in correctly. Be sure to plug in the Extraction
Seal tightly after cleaning.
5 Squeaking noise when juicing. Friction between the auger and bowl or
food.
Squeaking sound is perfectly normal. Do not
run the juicer without any food.
7 Water mark or scratch on the auger. Moulding marks during manufacturing
process.
These marks and lines on the auger are
perfectly normal.
8 Colour stain on the bowl, micro-mesh
filter, auger or spinning brush.
Natural dye from food. The Slow Juicer is BPA-free and chemical
free on all attachments, therefore natural
dye from food when juicing is perfectly
normal.
To reduce staining, rinse and clean
immediately after each use. Diluted vinegar
or bleach can also be used.
9 Mould in the silicone part of the silicone
brushes from the spinning brush.
Poor cleaning. Be sure to clean thoroughly by detaching
the spinning brush.
Do not forget to plug it back in before
juicing.
10 Micro-mesh filter damage. Frozen foods, large hard seeds or pips,
unknown substance, or excess food
Refer to Instruction Manual for correct
usage and juicing tips. Remember not to
over-fill with food or force foods in.
11 Deformation of the attachments. Exposed to heat or abrasive materials. Do not clean any attachments in a
dishwasher or use abrasive cleaners.The
plastics tend to deform when exposed to
high heat.
12 Too much pulp coming out. Excess food in the bowl clogging
up the micro-mesh filter or food not cut into
small pieces.
Cut food, especially fibrous foods,into
smaller pieces to avoid the fibres wrapping
around the auger.
Also input food at a slow pace allowing all
the pulp to eject before adding more food.
FP404001MEE Rev1.qxp_Morphy Richards Instruction Book 25/02/2016 16:46 Page 10
Page 11

11
Recipes
Here are some recipe suggestions to get you started.
Simple Tonic
Ingredients:
400ml
• 2 carrots, cut into batons (160g)
• 2 oranges (195g peeled weight) quartered
• 2 red apples, cored (300g) and each sliced into 8 pieces
200ml
• 1 carrot, cut into batons (80g)
• 1 orange (90g peeled weight) quartered
• 1 red apple, cored (150g) and
sliced into 8 pieces.
Citrus Twist
Ingredients:
400ml
• 80g pomegranate seeds
• ½ (105g) ruby grapefruit, peeled and segmented
• 15g slice lime, peel removed
• 2 oranges, peeled and quartered weight (220g)
• 1 carrot, cut into batons (110g)
200ml
• 40g pomegranate seeds
• ¼ (55g) ruby grapefruit, peeled and segmented
• 7g slice lime, peel removed
• 1 orange peeled and quartered weight (125g)
• 1 small carrot, cut into batons (55g)
Berry Blast
Ingredients:
400ml
• 200g strawberries, hulled
• 200g raspberries
• 200g blueberries
200ml
• 100g strawberries, hulled
• 100g raspberries
• 100g blueberries
Pineapple Refresher
Ingredients:
400ml
• ½ large pineapple, peeled, core removed and cut into chunks
(320g)
• ½ cucumber, skin on, cut into chunks (170g)
• ½ lemon, peel removed (18g)
• 1 large red apple, cored and cut into quarters (150g)
200ml
• ¼ large pineapple, peeled, core removed and cut into chunks
(160g)
• ¼ cucumber, skin on, cut into chunks (85g)
• Slice lemon, peel removed (9g)
• small red apple, cored and cut into quarters (75g)
g
FP404001MEE Rev1.qxp_Morphy Richards Instruction Book 25/02/2016 16:46 Page 11
Page 12

12
THIS SECTION IS ONLY APPLICABLE FOR CUSTOMERS
IN UK AND IRELAND
REGISTERING YOUR TWO YEAR GUARANTEE
Your standard one year guarantee is extended for an additional 12
months when you register the product within 28 days of purchase
with Morphy Richards. If you do not register the
product with Morphy Richards within 28 days, your product is
guaranteed for 1 year. To validate your 2 year guarantee register
with us online at www.morphyrichards.co.uk
N.B. Each qualifying product needs to be registered with Morphy
Richards individually. Please refer to the one year guarantee for
more information.
YOUR ONE YEAR GUARANTEE
It is important to retain the retailer’s receipt as proof of purchase.
Staple your receipt to this back cover for future reference. Please
quote the following information if the product develops a fault.
These numbers can be found on the base of the product.
Model no.
Serial no.
All Morphy Richards products are individually tested before leaving
the factory. In the unlikely event of any appliance proving to be
faulty within 28 days of purchase, it should be returned to the
place of purchase for it to be replaced. If the fault develops after 28
days and within 12 months of original purchase, you should
contact the Helpline number quoting Model number and Serial
number on the product, or write to Morphy Richards at the
address shown. You may be asked to return a copy of proof of
purchase. Subject to the exclusions set out below (see Exclusions),
the faulty appliance will then be repaired or replaced and
dispatched usually within 7 working days of receipt. If, for any
reason, this item is replaced during the 1 year guarantee period,
the guarantee on the new item will be calculated from original
purchase date. Therefore it is vital to retain your original till receipt
or invoice to indicate the date of initial purchase. To qualify for the 1
year guarantee, the appliance must have been used according to
the instructions supplied. For example, crumb trays should have
been emptied regularly.
EXCLUSIONS
Morphy Richards shall not be liable to replace or repair the goods
under the terms of the guarantee where:
1 The fault has been caused or is attributable to accidental use,
misuse, negligent use or used contrary to the manufacturer’s
recommendations or where the fault has been caused by power
surges or damage caused in transit.
2 The appliance has been used on a voltage supply other than that
stamped on the products.
3 Repairs have been attempted by persons other than our service staff
(or authorised dealer).
4 The appliance has been used for hire purposes or non domestic use.
5 The appliance is second hand.
6 Morphy Richards are not liable to carry out any type of servicing
work, under the guarantee.
7 Plastic filters for all Morphy Richards kettles and coffee makers are
not covered by the guarantee.
8 Batteries and damage from leakage are not covered by the
guarantee.
9 The filters have not be cleaned and replaced as instructed.
This guarantee does not confer any rights other than those expressly
set out above and does not cover any claims for consequential loss
or damage. This guarantee is offered as an additional benefit and
does not affect your statutory rights as a consumer.
YOUR INTERNATIONAL TWO YEAR GUARANTEE
This appliance is covered by two-year repair or replacement
warranty.
It is important to retain the retailers receipt as proof of purchase.
Staple your receipt to this back cover for future reference.
Please quote the following information if the product develops a
fault. These numbers can be found on the base of the product.
Model no.
Serial no.
All Morphy Richards products are individually tested before leaving
the factory. In the unlikely event of any appliance proving to be
faulty within 28 days of purchase it should be returned to the place
of purchase for it to be replaced.
If the fault develops after 28 days and within 24 months of original
purchase, you should contact your local distributor quoting Model
number and Serial number on the product, or write to your local
distributor at the addresses shown.
You will be asked to return the product (in secure, adequate
packaging) to the address below along with a copy of proof of
purchase.
Subject to the exclusions set out below (1-9) the faulty appliance
will then be repaired or replaced and dispatched usually within 7
working days of receipt.
If for any reason this item is replaced during the 2-year guarantee
period, the guarantee on the new item will be calculated from
original purchase date. Therefore it is vital to retain your original till
receipt or invoice to indicate the date of initial purchase.
To qualify for the 2-year guarantee the appliance must have been
used according to the manufacturers instructions. For example,
appliances must have been descaled and filters must have been
kept clean as instructed.
The local distributor shall not be liable to replace or repair the
goods under the terms of the guarantee where:
1 The fault has been caused or is attributable to accidental use,
misuse, negligent use or used contrary to the manufacturers
recommendations or where the fault has been caused by power
surges or damage caused in transit.
2 The appliance has been used on a voltage supply other than that
stamped on the products.
3 Repairs have been attempted by persons other than our service staff
(or authorised dealer).
4 Where the appliance has been used for hire purposes or non
domestic use.
5 The appliance is second hand.
FP404001MEE Rev1.qxp_Morphy Richards Instruction Book 25/02/2016 16:46 Page 12
Page 13

13
6 The local distributor are not liable to carry out any type of servicing
work, under the guarantee.
7 The guarantee excludes consumables such as bags, filters and glass
carafes.
8 Batteries and damage from leakage are not covered by the
guarantee.
9 The filters have not be cleaned and replaced as instructed.
This guarantee does not confer any rights other than those
expressly set out above and does not cover any claims for
consequential loss or damage. This guarantee is offered as an
additional benefit and does not affect your statutory rights as a
consumer.
AUSTRALIAN WARRANTY
This appliance is guaranteed for 2 years against faulty material,
components and workmanship.
This warranty is in addition and does not affect your statutory rights.
Proof of purchase must be produced for any warranty benefit.
In the unlikely event of any appliance proving to be faulty, securely pack
and return the item to the place of purchase accompanied by the
original receipt or invoice.
Our goods come with guarantees that cannot be excluded under the
Australian Consumer Law. You are entitled to a replacement or refund
for a major failure and for compensation for any other reasonably
foreseeable loss or damage. You are also entitled to have the goods
repaired or replaced if the goods fail to be of acceptable quality and the
failure does not amount to a major failure.
NOT COVERED BY THIS WARRANTY
(Australian only)
• If the appliance has not been used in accordance with the
manufacturers’ recommendations or Instructions.
• If the fault is deemed to be caused by abuse, misuse, neglect,
modifications or in proper use and or care
Eg: Kettles: Excessive build up of scale.
Toasters: Excessive build up of crumbs or foreign matter etc.
• Connection to incorrect voltage to that stamped on the product.
• Unauthorised repairs.
• Appliance used other than for domestic purposes.
• Excluding bags, filters, glass, carafes, and cutting blades.
• Freight and insurance costs.
If for any reason this item is replaced during the 2 year guarantee
period, the guarantee on the new item will be calculated from
original purchase date. Therefore it is vital to retain your original
receipt or invoice to indicate the date of original purchase.
Morphy Richards’s policy is to continually improve quality design
and product quality. The company therefore reserves the right to
change any specifications or to carry out modifications as deemed
worthy at any time.
The Australian supplier reserves the right to repair, modify,
exchange or replace the faulty appliance with the same or similar
model or product of equivalent value.
g
f
FP404001MEE Rev1.qxp_Morphy Richards Instruction Book 25/02/2016 16:46 Page 13
Page 14

14
Santé et sécurité
L’utilisation de tout appareil électrique implique de respecter les règles de sécurité et de bon sens suivantes.
Veuillez lire attentivement ces instructions avant d’utiliser le produit.
• Cet appareil peut être utilisé par des personnes aux capacités
physiques, sensorielles ou mentales réduites, ou manquant
d’expérience et de connaissances, pourvu qu’elles soient surveillées
ou qu’on leur fournisse des instructions quant à l’utilisation de
l’appareil en toute sécurité et qu’elles comprennent les risques que
cela comporte.
• Les enfants ne doivent pas jouer avec l’appareil.
• Cet appareil ne doit pas être utilisé par des enfants.
• Tenez l’appareil et le cordon hors de portée des enfants.
• Pour le fonctionnement et l’utilisation de l’appareil, reportez-vous à la
page 16.
• Pour toute information concernant l’entretien et le nettoyage,
reportez-vous à la page 16.
• Débranchez toujours l’appareil du secteur lorsque vous le laissez
sans surveillance et avant de le monter, de le démonter ou de le
nettoyer.
• Évitez de toucher les pièces mobiles. Veillez à tenir vos mains, vos
cheveux, vos vêtements et tout ustensile éloignés des lames pendant
le fonctionnement pour éviter toute blessure et/ou tout
endommagement de l’appareil.
• Si le cordon d’alimentation est endommagé, il doit être remplacé par
le fabricant, son agent de maintenance ou une personne qualifiée
afin d’éviter tout risque.
f
FP404001MEE Rev1.qxp_Morphy Richards Instruction Book 25/02/2016 16:46 Page 14
Page 15

15
Voici en outre quelques conseils supplémentaires de sécurité.
Emplacement
• N’utilisez pas l’appareil en extérieur ou dans une salle de bains.
• Veillez à placer l’appareil loin du bord du plan de travail.
• Ne posez pas le gobelet de l’appareil sur une surface en bois
ciré ; cela risquerait d’endommager la surface.
Câble secteur
• Ne laissez pas le cordon d’alimentation dépasser du bord d’un
plan de travail, à un endroit où un enfant pourrait l’atteindre.
• Ne laissez pas le câble traverser un espace ouvert, par exemple
entre une prise basse et une table.
• Ne laissez pas le cordon passer sur une cuisinière ni aucune autre
surface chaude qui pourrait l’endommager.
• Placez l’appareil de manière à ce que le cordon d’alimentation
secteur puisse atteindre une prise électrique sans forcer sur les
connexions.
Autres points relatifs à la sécurité
• N’utilisez jamais l’appareil pour un usage autre que
celui prévu.
Points de sécurité spécifiques au produit
• DANGER : Une mauvaise utilisation de cet appareil pourrait
provoquer des blessures.
• Ne lavez pas les accessoires à l’eau courante lorsqu’ils sont
emboîtés dans l’appareil.
• Arrêtez l’appareil et débranchez-le du secteur
avant de changer les accessoires ou d’approcher des pièces
mobiles.
Exigences relatives à l’électricité
Assurez-vous que la tension indiquée sur la plaque signalétique
de
l’appareil correspond à l’alimentation électrique de votre
logement, qui doit être en courant alternatif (CA).
Si le fusible de la prise principale doit être changé,
optez pour un fusible 3 A BS1362.
Introduction
Merci pour votre achat de l’extracteur de jus à rotation lente de
Morphy Richards, qui vous permettra de consommer facilement
vos cinq fruits et légumes par jour en concoctant des jus à forte
valeur nutritive.
Le jus est extrait par broyage et compression, la vis sans fin
agissant comme un pilon dans un mortier. Son action déchire les
membranes cellulaires des aliments et libère leurs nutriments et
enzymes. Elle extrait également les phyto-nutriments, pour des jus
aux couleurs plus riches qui conservent davantage de vitamines
et de minéraux. La rotation lente préserve la structure cellulaire
des fruits et légumes. Elle épargne ainsi les précieuses enzymes
et nutriments, qui conservent leur forme naturelle, y compris pour
l’herbe de blé, le soja, et les légumes verts à feuilles.
Pour des résultats optimaux, suivez scrupuleusement les
instructions d’utilisation. Veuillez vous référer à ce manuel si vous
rencontrez des problèmes techniques ou si vous avez des doutes
quant à l’utilisation de l’appareil.
Sommaire
Santé et sécurité 14
Description du produit 3
Introduction 15
Instructions de montage 16
Comment utiliser votre extracteur de jus 16
Démontage et nettoyage 16
Conseils de nettoyage 16
Nous contacter 17
Dépannage 18
Recettes 19
Garantie 20
Caractéristiques
(1) Trémie
(2) Vis sans fin
(3) Micro-filtre
(4) Raclette rotative
(5) Bol
(6) Sortie pulpe
(7) Sortie jus
(8) Base
(9) Brosse de nettoyage
(10) Poussoir
(11) Bac à jus
(12) Joint d’extraction
(13) Marche/Arrêt/Retour
(14) Bouton de réinitialisation
(15) Bac à pulpe
f
FP404001MEE Rev1.qxp_Morphy Richards Instruction Book 25/02/2016 16:46 Page 15
Page 16

16
Instructions de montage
1
Posez le bol (5) sur la base (8), alignez le II sur la flèche, tournez
dans le sens des aiguilles d’une montre et clipsez.
2
Placez la raclette rotative (4) dans le bol (5).
3
Placez le micro-filtre (3) à l’intérieur de la raclette rotative (4) et
alignez les flèches.
4
Placez la vis sans fin (2) à l’intérieur du micro-filtre (3) et faites-la
tourner jusqu’à ce qu’elle s’enclenche en position.
5
Posez la trémie (1) sur le bol (5).
6
Alignez les flèches et tournez dans le sens des aiguilles d’une
montre.
7
Enclenchez en position et branchez l’appareil.
8
Placez les bacs (11) sous les sorties jus et pulpe (6 & 7). Sous le
bol (5) se trouve un coussinet en caoutchouc. Il s’agit du joint
d’extraction (12), qui garantit que seul le jus s’échappe de la sortie
jus.
9
Avant de faire du jus, vérifiez que le joint d’extraction (12) est
correctement posé pour éviter toute fuite.
Mode d’emploi
10
Votre extracteur de jus à rotation lente a trois réglages.
• « On » (marche) lance le moteur/produit le jus.
• « Rev » (retour) change le sens de rotation du moteur, et doit
uniquement être utilisé lorsque des aliments sont coincés.
• « Off » (arrêt) arrête le moteur/éteint l’appareil.
11
Placement des aliments dans votre extracteur de jus à rotation
lente :
• Rincez les aliments abondamment avant de faire du jus.
• Pour une extraction optimale, coupez les aliments en morceaux
de moins de 5 cm et ôtez les gros pépins durs et les peaux dures,
par exemple de melon.
• Allumez votre extracteur de jus à rotation lente (« On ») et versez
les aliments dans la trémie. N’exercez pas de pression, ne forcez
pas et ne remplissez pas trop la trémie. Le poussoir aide à guider
les fruits à travers la trémie. Introduisez les aliments petit à petit,
en laissant le temps au jus de s’extraire.
• Les peaux et écorces dures, comme les peaux de melon,
d’agrumes et d’ananas, doivent être enlevées.
• Des éclaboussures peuvent se produire lors du versement dans le
récipient.
• Remuez le jus avant de servir.
• Le jus peut contenir des petits bouts de peau/d’herbes. Alternez
ingrédients mous et durs pour une extraction optimale.
12
Éteignez (« Off ») l’appareil lorsque vous avez terminé.
• Veillez à avoir les mains complètement sèches avant de toucher
l’interrupteur.
• Ne faites pas marcher l’appareil avec un bol vide.
• Le reste de jus doit être mis immédiatement au réfrigérateur ou au
congélateur.
Démontage et nettoyage
13
Éteignez l’appareil (« Off ») et débranchez-le du secteur. Tournez la
trémie dans le sens contraire des aiguilles d’une montre pour la
déverrouiller, soulevez-la et ôtez-la.
14
Sortez la vis sans fin (2), le micro-filtre (3) et la raclette rotative (4)
du bol (5) comme un seul bloc.
15
Une fois hors du bol (5), séparez la vis sans fin (2), le micro-filtre
(3) et la raclette rotative (4) dans cet ordre.
Nettoyez soigneusement après usage à l’aide de la brosse de
nettoyage (9).
• La poignée de la brosse de nettoyage peut être utilisée pour
déloger toute pulpe/peau collée dans le bol.
• Pour débarrasser le bol de tous les résidus d’aliments, ôtez le
joint (12) et rincez à l’eau propre.
Veillez à essuyer tous les accessoires après nettoyage. (Voir les
conseils de nettoyage en page 9).
• Ne pas utiliser d’éponges métalliques ou de poudres à récurer
pour nettoyer la machine car cela pourrait l’abîmer.
• Ne mettez pas les pièces au lave-vaisselle.
• N’immergez jamais la base (8) dans l’eau. Nettoyez à l’aide d’un
chiffon humide.
Conseils de nettoyage
16
• Nettoyez soigneusement et régulièrement la raclette rotative (4) en
retirant les « brosses » en silicone pour éviter l’apparition de
taches ou de moisi.
• Rincez abondamment et nettoyez immédiatement après chaque
usage pour minimiser le risque d’apparition de taches.
• Veillez à ôter le joint d’extraction (12) lorsque vous nettoyez.
Remettez le joint après nettoyage pour prévenir les fuites.
• NE METTEZ PAS LES PIÈCES AU LAVE-VAISSELLE.
• Pour des résultats de nettoyage optimaux, lavez à l’eau tiède et
au liquide vaisselle.
• N’utilisez pas de produits abrasifs ou chimiques agressifs, car ils
pourraient attaquer le plastique.
• Le micro-filtre et les lames en caoutchouc (A) doivent être lavés à
l’eau tiède savonneuse immédiatement après usage à l’aide de la
brosse fournie. Si une lame en caoutchouc (A) se détache,
remettez-la prudemment en l’introduisant dans la fente sur la
raclette rotative.
17
Veillez à ce que la lame soit dans le bon sens (utilisez celle déjà
en place comme point de repère).
FP404001MEE Rev1.qxp_Morphy Richards Instruction Book 25/02/2016 16:46 Page 16
Page 17

17
Nous contacter
Service d’assistance
Si vous rencontrez un problème avec votre appareil, veuillez
appeler notre service d’assistance. Nous pourrons certainement
vous aider plus efficacement que le magasin où vous avez acheté
l’article.
Munissez-vous du nom de produit, du numéro de modèle et du
numéro de série de l’appareil lorsque vous nous appelez. Cela
nous aidera à traiter plus rapidement votre demande.
Dialoguer avec nous
Pour toute question ou commentaire, ou pour recevoir plus
d’astuces et des idées de recettes et profiter au maximum de votre
appareil, vous pouvez nous contacter en ligne :
Blog : www.morphyrichards.co.uk/blog
Facebook : www.facebook.com/morphyrichardsuk
Twitter : @loveyourmorphy
Site Internet : www.morphyrichards.com
f
FP404001MEE Rev1.qxp_Morphy Richards Instruction Book 25/02/2016 16:46 Page 17
Page 18

18
Dépannage
Problème Raisons possibles Solution
1 Le bol est coincé et ne se détache pas de la
base.
Trop-plein d’aliments dans le bol.
Substance inconnue dans le bol.
Appuyez sur le bouton de retour pendant 3 à 5
secondes.
Répétez l’opération 2-3 fois.
Tirez ensuite le bol vers le haut tout en tournant.
2 La trémie/le couvercle est coincé. Trop-plein d’aliments dans le bol.
Substance inconnue dans le bol.
Appuyez sur le bouton Retour pendant 3 à 5 secondes.
Répétez l’opération 2-3 fois.
Appuyez ensuite sur le haut du couvercle tout en
tournant.
3 Le moteur est bloqué ou s’est arrêté. Trop-plein d’aliments dans le bol.
Dispositif de sécurité : arrêt automatique.
dû à une surchauffe.
Appuyez sur le bouton Retour pendant 3 à 5 secondes.
Répétez l’opération 2-3 fois.
Si le moteur s’est arrêté, laissez-le refroidir avant de
réessayer.
Appuyez sur le bouton de réinitialisation (14).
4 Fuite sous le bol. Le joint d’extraction n’est pas introduit correctement.
Veillez à réintroduire le joint
d’extraction hermétiquement après nettoyage.
5 Un couinement est émis pendant l’extraction du
jus.
Friction entre la vis sans fin et le bol ou les aliments.
Il est parfaitement normal d’entendre un
couinement. Ne faites pas tourner l’extracteur de jus
à vide, sans aliments.
7 Moirure ou rayure sur la vis sans fin. Marques de moulage pendant le processus de
fabrication.
Ces marques et lignes sur la vis sans sont
parfaitement normales.
8 Tache colorée sur le bol, le micro-filtre, la vis
sans fin ou la raclette rotative.
Teinte naturelle laissée par les aliments. Les accessoires de l’extracteur de jus à rotation
lente étant sans BPA et sans produits chimiques, il
est parfaitement normal que les aliments laissent
une teinte naturelle.
Pour réduire ce problème, rincez et nettoyez
immédiatement après chaque usage. Du vinaigre
dilué ou de l’eau de Javel peuvent également être
utilisés.
9 Moisissure sur la partie en silicone de la raclette
rotative.
Nettoyage insuffisant. Veillez à nettoyer en profondeur en détachant la
raclette rotative.
N’oubliez pas de la remettre avant de faire du jus.
10 Micro-filtre endommagé. Aliments congelés, gros pépins durs, substance
inconnue, ou trop-plein d’aliments
Reportez-vous au mode d’emploi de l’appareil pour
connaître l’usage approprié et avoir des conseils sur
l’extraction du jus. Rappelez-vous de ne pas trop
remplir l’appareil et de ne pas faire entrer les
aliments de force.
11 Déformation des accessoires. Exposition à la chaleur ou à des matériaux abrasifs. Ne lavez pas les accessoires au lave-vaisselle et
n’utilisez pas de produits nettoyants abrasifs.Le
plastique a tendance à se déformer lorsqu’il est
exposé à une chaleur importante.
12 Une quantité excessive de pulpe sort de
l’appareil.
Un trop-plein d’aliments dans le bol obstrue le
micro-filtre, ou bien les aliments ne sont pas coupés
en petits morceaux.
Coupez les aliments – en particulier les aliments
fibreux – en petits morceaux pour éviter que les
fibres ne s’emmêlent autour de la vis sans fin.
Pensez aussi à verser les aliments petit à petit, et
attendez que la pulpe soit éjectée avant d’ajouter
plus d’aliments.
FP404001MEE Rev1.qxp_Morphy Richards Instruction Book 25/02/2016 16:46 Page 18
Page 19

19
Recettes
Voici quelques suggestions de recettes pour que vous
commenciez à utiliser votre appareil.
Tonique Classique
Ingrédients :
400 ml
• 2 carottes, coupées en bâtonnets (160 g)
• 2 oranges (195 g épluchées) en quartiers
• 2 pommes rouges évidées (300 g) et coupées chacune en 8
morceaux
200 ml
• 1 carotte, coupée en bâtonnets (80 g)
• 1 orange (90 g épluchée) en quartiers
• 1 pomme rouge évidée (150 g) et
coupée en 8 morceaux.
Touche d’Agrumes
Ingrédients :
400 ml
• 80 g de graines de grenade
• ½ (105 g) pamplemousse rose, pelé et coupé en suprêmes
• 15 g de citron vert en tranches, pelé
• 2 oranges, 220 g (poids après pelage et coupe en quartiers)
• 1 carotte, coupée en bâtonnets (110 g)
200 ml
• 40 g de graines de grenade
• ¼ (55 g) de pamplemousse rose, pelé et coupé en suprêmes
• 7 g de citron vert en tranches, pelé
• 1 orange, 125 g (poids après pelage et coupe en quartiers)
• 1 petite carotte, coupée en bâtonnets (55 g)
Explosion de Fruits Rouges
Ingrédients :
400 ml
• 200 g de fraises équeutées
• 200 g de framboises
• 200 g de myrtilles
200 ml
• 100 g de fraises équeutées
• 100 g de framboises
• 100 g de myrtilles
Ananas Fraîcheur
Ingrédients :
400 ml
• ½ gros ananas, pelé, évidé et coupé en morceaux (320 g)
• ½ concombre, avec la peau, coupé en morceaux (170 g)
• ½ citron pelé (18 g)
• 1 grosse pomme rouge, évidée et coupée en quartiers (150 g)
200 ml
• ¼ de gros ananas, pelé, évidé et coupé en morceaux (160 g)
• ¼ de concombre, avec la peau, coupé en morceaux (85 g)
• Citron en tranches pelé (9 g)
• petite pomme rouge, évidée et coupée en quartiers (75 g)
f
FP404001MEE Rev1.qxp_Morphy Richards Instruction Book 25/02/2016 16:46 Page 19
Page 20

20
Votre garantie de deux ans
Pour la clientèle en France
Il est important de conserver le ticket de caisse comme preuve
d’achat. Agrafez votre ticket de caisse à cette notice d'utilisation;
vous pourrez ainsi l’avoir sous la main ultérieurement.
Merci de donner les informations ci-dessous si votre appareil
tombe en panne. Vous trouverez ces références à la base de
l’appareil.
Numéro du modèle
Numéro de série
Tous les produits Morphy Richards sont testés individuellement
avant de quitter l’usine.
Si un problème survient dans les 24 mois qui suivent l’achat
d’origine, vous devez contacter le magasin où vous avez acheté
votre appareil muni de votre ticket de caisse, celui ci le renverra
à Glen Dimplex France pour expertise.
Sous réserve des exclusions indiquées ci-dessous (1 à 9),
l’appareil défectueux sera alors réparé ou remplacé et réexpédié
dans un délai de 15 jours ouvrables maximum à compter de son
arrivée.
Si, pour quelque raison que ce soit, l’article est remplacé
pendant la période de garantie de deux ans, la période de
garantie du nouvel article sera calculée à partir de la date d’achat
d’origine. Vous devez donc absolument conserver votre ticket de
caisse ou votre facture d’origine pour indiquer la date d’achat.
Pour bénéficier de la garantie de deux ans, l’appareil doit avoir
été utilisé conformément aux instructions du fabricant. Par
exemple, les fers doivent avoir été détartrés et les filtres doivent
avoir été nettoyés selon les instructions.
Morphy Richards ne sera pas dans l’obligation de remplacer ou
réparer les articles aux termes de la garantie dans les
circonstances suivantes :
1 Si le problème provient d’une utilisation accidentelle, d’une
utilisation abusive ou négligente, ou si l’appareil a été utilisé de
manière contraire aux recommandations du fabricant, ou encore
lorsque le problème provient de sautes de puissance ou de dégâts
occasionnés en transit.
2 Si l’appareil a été utilisé sur une alimentation électrique dont la
tension est différente de celle qui est indiquée sur l’appareil.
3 Si des personnes autres que nos techniciens (ou l’un de nos
revendeurs agréés) ont tenté de faire des réparations.
4 Si l’appareil a été loué ou utilisé dans un contexte non domestique.
5 Si l’appareil est d’occasion.
6 Morphy Richards n’est pas dans l’obligation de réaliser des travaux
d’entretien, quels qu’ils soient, aux termes de la garantie.
7 La garantie exclut les consommables tels que les sacs, les filtres et
les carafes en verre.
8 Les batteries et les dégâts provoqués par leur fuite ne sont pas
couverts par la garantie.
9 Les filtres n’ont pas été nettoyés ou remplacés suivant les
instructions.
Cette garantie ne confère aucun droit à l’exception de ceux qui
sont expressément indiqués ci-dessus, et ne couvre aucune
réclamation pour dommages immatériels ou indirects. Cette
garantie est offerte comme avantage supplémentaire et n’a
aucune incidence sur vos droits légaux en tant que
consommateur.
Pour la clientèle en Belgique
Les produits de Morphy Richards sont produits conformément
les normes de qualité, agrée international. Au-dessus vos droits
légaux, Morphy Richards vous garantit qu’à partir d’achat ce
produit sera sans défauts de fabrication ou de matériels pendant
une période de deux ans.
Il est important de conserver votre bon d’achat comme preuve.
Agrafez votre ticket à cette notice d’installation.
Veuillez mentionner ces informations ci-dessous si votre appareil
tombe en panne. Vous trouverez ces informations sur la base de
l’appareil.
Numéro du modèle
Numéro de série
Si, pour quelque raison que ce soit, l’article est remplacé
pendant la période de garantie (deux ans), la période de garantie
du nouvel article sera calculée à partir de la date d’achat
d’origine. Il est donc très importants de conserver votre bon
d’achat original afin de connaître la date initiale d’achat.
Cette garantie vaut uniquement quand l’appareil a été utilisé
conformément aux instructions du fabricant. Par exemple, les
appareils doivent être détartrés et les filtres doivent être tenus
propre selon le mode d’emploi.
Morphy Richard ne sera pas dans l’obligation de remplacer ou
réparer les articles aux termes de la garantie dans les
circonstances suivantes
1 Si le problème, prévient d’une utilisation accidentelle, d’une
utilisation abusive ou négligente, ou si l’appareil a été utilisé de
manière contraire aux recommandations du fabricant, ou encore
lorsque le problème provient de source de puissance ou de dégâts
occasionnés en transit.
2 Si l’appareil a été utilisé sur une alimentation électrique dont la
tension est différente de celle qui est indiquée sur l’appareil.
3 Si des personnes, autres que nos techniciens (ou revendeurs
agrées) ont tenté de faire des réparations.
4 Si l’appareil a été loué ou utilisé dans un contexte non domestique.
5 Si l’appareil est d’occasion.
6 Morphy Richards n’est pas dans l’obligation de réaliser des travaux
d’entretien, quels qu’ils soient, aux termes de la garantie.
7 La garantie ne couvre pas les sachets, filtres et brocs en verre.
8 Les batteries et les dégâts provoqués par leur fuite ne sont pas
couverts par la garantie.
9 Les filtres n’ont pas été nettoyés ou remplacés suivant les
instructions.
Cette garantie ne confère aucun droit à l’exception de ceux qui
sont expressément indiqués ci-dessus, et ne couvre aucune
réclamation pour dommages immatériels ou indirects. Cette
garantie est offerte comme avantage supplémentaire et n’a
aucune incidence sur vos droits légaux en tant que
consommateur.failure does not amount to a major failure.
FP404001MEE Rev1.qxp_Morphy Richards Instruction Book 25/02/2016 16:46 Page 20
Page 21

21
f
g Morphy Richards products are intended for household use only.
Morphy Richards has a policy of continuous improvement in product quality and design.
The Company, therefore, reserves the right to change the specification of its models at any
time.
The After Sales Division,
Morphy Richards Ltd, Mexborough, South Yorkshire, England, S64 8AJ
Helpline (office hours) UK 0845 871 0960 Republic of Ireland 1800 409119
o Glen Dimplex Australia
Unit 1, 21 Lionel Road, Mount Waverley, Victoria 3149
T : 1300 556 816
E : sales@glendimplex.com.au
Glen Dimplex New Zealand
38 Harris Road, East Tamaki, Auckland, New Zealand
T : 09 2748265
E : sales@glendimplex.co.nz
f Les produits Morphy Richards sont conçus pour unusage exclusivement domestique. Voir les
limitations d’usage dans le sous-titre Positionnement des Consignes de sécurité importantes.
Morphy Richards s’engage à mener une politique d’amélioration continue en termes de qualité et
de conception. Le fabricant se réserve donc le droit de modifier sans préavis la spécification de
ses modèles.
Glen Dimplex France
Zl Petite Montagne Sud
12 rue des Cevennes
91017 EVRY - LISSES Cedex
www.glendimplex.fr
T : + 33 (0)1 69 11 11 91 F : + 33 (0)1 60 86 15 24
g For electrical products sold within the European Community.
At the end of the electrical products useful life it should not be disposed of with
household waste.
Please recycle where facilities exist.
Check with your Local Authority or retailer for recycling advice in your country.
f Pour les appareils électriques vendus dans la Communauté européenne.
Lorsque les appareils électriques arrivent à la fin de leur vie utile, il ne faut pas les
jeter à la poubelle.
Il faut les recycler dans des centres spécialisés, s’ils existent.
Consultez la municipalité ou le magasin où vous avez acheté l’appareil pour obtenir
des conseils sur le recyclage dans votre pays.
NZ
FP404001MEE Rev1.qxp_Morphy Richards Instruction Book 25/02/2016 16:46 Page 21
Page 22

22
FP404001MEE Rev1.qxp_Morphy Richards Instruction Book 25/02/2016 16:46 Page 22
Page 23

23
f
FP404001MEE Rev1.qxp_Morphy Richards Instruction Book 25/02/2016 16:46 Page 23
Page 24

FP404001MEE Rev 1 2/16
FP404001MEE Rev1.qxp_Morphy Richards Instruction Book 25/02/2016 16:46 Page 24
 Loading...