

Page 1

FP403021MEE Rev2.qxp_Morphy Richards Instruction Book 27/07/2015 16:37 Page 1
Easy Blend Deluxe
Please read and keep these instructions
Easy Blend Deluxe
Merci de bien vouloir lire et conserver ces instructions
Easy Blend Deluxe
Leggere e conservare queste istruzioni per uso futuro
g
f
i
Page 2

FP403021MEE Rev2.qxp_Morphy Richards Instruction Book 27/07/2015 16:37 Page 2
g
Health And Safety
The use of any electrical appliance requires the following common sense safety rules.
Please read these instructions carefully before using the product.
• This appliance shall not be used by children. Keep the
appliance and its cord out of the reach of children.
• Appliances can be used by persons with reduced physical,
sensory or mental capabilities or of experience and knowledge
if they have been given supervision or instruction concerning
use of the appliance in a safe way and if they understand the
hazards involved.
• Children shall not play with the appliance.
• Unplug from the outlet when not in use, or when left
unattended, and before assembling, disassembling or cleaning.
• Only use for the maximum time specified in the manual before
allowing to cool.
• If the supply cord is damaged, it must be replaced by the
manufacturer, its service agent or similarly qualified
persons in order to avoid a hazard.
Location
• This appliance is intended to be used in household and similar
applications.
• Do not use outdoors or in a bathroom.
Personal safety
• Avoid touching moving parts. Keep hands, hair and
clothing, and utensils away from the blender
attachment blades during operation, to prevent personal injury
and/or damage to the appliance.
Other safety considerations
• The use of attachments or tools not recommended or sold by
Morphy Richards may cause fire, electric shock or injury.
• Do not use the appliance for anything other than its
intended purpose.
Product specific safety
• WARNING: The blender blades are very sharp. Handle with
care when using, emptying and cleaning.
• WARNING: To protect against fire, electric shock and
personal injury, do not immerse the cord, plug or blender in
water or other liquid.
• Do not clean the attachments under running water while they are
in position.
• Do not use the appliance if the Juice Filter is damaged.
• Make sure the blender is switched off before connecting to or
disconnecting from the mains supply and when left unattended.
• Switch off the appliance and disconnect from the supply before
changing accessories or approaching parts that move in use.
• Do not use hot liquids in the blender as it can be ejected out of
the appliance due to sudden steaming.
2
Page 3
8
4
2
5
1
2
3
4
5
12
10
9
7
6
17
18
11
1514
16
13
FP403021MEE Rev2.qxp_Morphy Richards Instruction Book 27/07/2015 16:37 Page 3
Electrical requirements
• Check that the voltage on the rating plate of your
appliance corresponds with your house electricity supply which must
be A.C. (Alternating Current).
• Should the fuse in the mains plug require changing, a 3 amp BS1362
fuse must be fitted.
Introduction
Thank you for purchasing your new Morphy Richards Easy
Blend Deluxe.
Your Easy Blend Deluxe will allow you to create an extensive
selection of sauces, dips, rubs and drinks.
Please read the instructions thoroughly before use.
Remember to visit www.morphyrichards.co.uk to register your
products two year guarantee.
g
f
i
3
Page 4

4
3
2
1
5
6
8
7
9
10
FP403021MEE Rev2.qxp_Morphy Richards Instruction Book 27/07/2015 16:37 Page 4
4
Page 5

11
13
12
14
15
17
16
18
19
20
FP403021MEE Rev2.qxp_Morphy Richards Instruction Book 27/07/2015 16:37 Page 5
g
f
i
5
Page 6

21
22
23
24
25
26
27
28
29
30
FP403021MEE Rev2.qxp_Morphy Richards Instruction Book 27/07/2015 16:37 Page 6
6
Page 7

31
32
FP403021MEE Rev2.qxp_Morphy Richards Instruction Book 27/07/2015 16:37 Page 7
Contents
Health and Safety 2
Introduction 3
Features 7
Before First Use 7
Using The Easy Blend Beakers 7
Safety Seal 8
Usage 8
Crushing Ice 8
Grinding Spices 8
Using The Easy Blend Juicer 8
Suitable Foods 8
Beakers, Lids And Jug 9
Blending In The Jug 9
Blades 9
Hints And Tips For Juicing 9
General Hints And Tips 9
Care And Cleaning 10
Contact Us 10
Guarantee 10
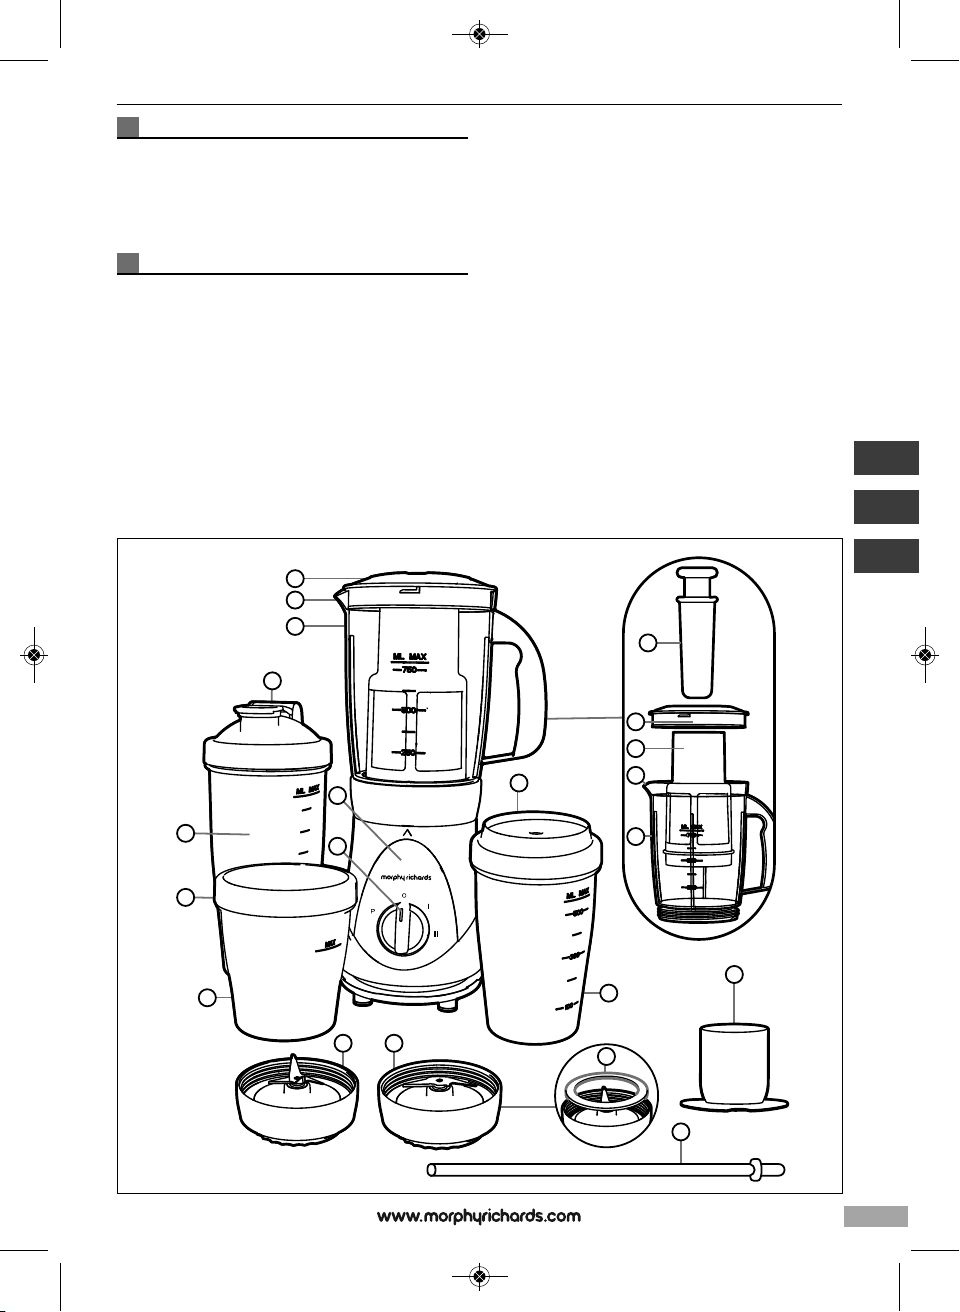
Features
(1) Pusher
(2) Juicer Lid
(3) Filter
(4) Spout
(5) Jug
(6) Main Unit
(7) Speed Control
(8) Sports Lid (x2)
(9) 750ml Beaker (x2)
(10) Flat Lid
(11) 300ml Beaker
(12) Straw Lid (x2)
(13) 500ml Beaker (x2)
(14) Quad Blade Lid
(15) Dual Blade Lid
(16) Safety Seal
(17) 30ml Measuring Cap
(18) Straw (x2)
Before First Use
WARNING: Sharp blades, handle with care.
Before using for the first time or if un-used for a long period, wash
your Easy Blend Deluxe
thoroughly before use.
1. Remove the Safety Seals (16) from the Blade Lids (14), (15).
2. Wash all parts except the Main Unit (6) in hot soapy water and dry
thoroughly. Do not allow the Blade Lids to stand in water.
Using Your Easy Blend Beakers
1
WARNING: Ensure your Easy Blend is unplugged from the
mains before use.
2
Add the ingredients to the desired Beaker (9), (11) or (13). Do not
exceed the maximum level for the chosen beaker.
3
Ensure the Safety Seal (16) is fitted correctly in the Quad
Blade Lid (14). Attach to the Beaker, screw to fix into place
securely.
4
Attach the Blade Lid to the Main Unit (6). Align the open padlock
and arrow and twist to lock into place.
5
Plug into the mains. Turn the Speed Control (7) to the desired
speed High (II), Low (I), or Pulse (P). Your Easy Blend will begin to
blend.
6
When finished, turn the Speed Control to the Off (O) position and
unplug from the mains.
7
Hold the Blade Lid and twist to unlock from the Main Unit. DO
NOT hold the Beaker.
8
Unscrew the Blade Lid from the Beaker. For drinks on the go,
attach a Lid (8), (10), (12) to the Beaker.
g
f
i
7
Page 8

FP403021MEE Rev2.qxp_Morphy Richards Instruction Book 27/07/2015 16:37 Page 8
Safety Seal
• There is a Safety Seal (16) in place on both the Blade Lids (14),
(15). This is to prevent leakage from your Easy Blend when in use
and for when the Beaker (9), (11), (13) is upside down.
• When inserting the Safety Seal, ensure that it is pressed tightly
into the channel in the Blade Lid. Ensure the Safety Seal is
correctly located before the Beaker or Jug (5) is screwed onto the
Blade Lid.
• After screwing the Blade Lid onto the Beaker or Jug, look inside
to check the Safety Seal is
securely fitted before attaching to the Main Unit.
• Always ensure the Safety Seal is in place before use. Failure to do
so could cause damage to the appliance.
• The Safety Seal only needs to be removed for cleaning. After
cleaning ensure the seal is
reinserted as directed before using the Easy Blend.
9
Usage
After 40 seconds of continuous use, you will need to switch off
your Easy Blend and leave to cool for 5 minutes to prevent
overheating.
For Juicing, after 60 seconds of continuous use, switch off and
leave to cool for 30 seconds.
Crushing Ice
• If using ice in a recipe (i.e. blending it with other
liquids). Do not use more than 6 ice cubes.
• Only crush ice as part of the recipe - do not crush ice on its own.
Grinding Spices
10
WARNING: Ensure your Easy Blend is unplugged from the
mains before use.
11
Add the ingredients to the 300ml Beaker (11). Do not exceed the
maximum level.
12
Ensure the Safety Seal (16) is fitted correctly in the Quad or
Dual Blade Lid (14), (15). Attach the selected Blade Lid to the
Beaker. Screw to fix into place securely.
13
Attach the Lid to the Main Unit (6). Align the open padlock and
arrow and twist to lock into place.
14
Plug into the mains. Turn the Speed Control (7) to the desired
speed High (II), Low (I), or Pulse (P). Your Easy Blend will begin to
grind.
15
When finished, turn the Speed Control to the Off (O) position and
unplug from the mains.
16
It may be necessary to shake your Easy Blend to loosen the
spices when grinding.
17
Hold the Blade Lid and twist to unlock from the Main Unit.
DO NOT hold the Beaker.
Using Your Easy Blend Juicer
18
WARNING: Ensure your Easy Blend is unplugged from the
mains before use.
19
Ensure the Safety Seal (16) is fitted correctly to the Quad
Blade Lid (14). Attach the Quad Blade Lid to the Jug (5). Screw
to fix into place securely.
20
Attach the Quad Blade Lid to the Main Unit (6). Align the open
padlock and arrow and twist to lock into place.
21
Insert the Filter (3) into the Jug. Align the black frame with the
lines in the Jug. The four lines on the inside of the Jug will line up
with the four cut-outs on the base of the Filter.
22
Attach the Juicer Lid (2). Twist clockwise to lock, aligning the grate
with the spout of the Jug. The Juicer Lid will not fit the Jug
correctly if the Filter is not properly inserted.
23
Plug into the mains. Turn the Speed Control (7) to High (II).
24
Add a small amount of fruit or vegetables to the Jug, do not over
fill.
25
If required, gently press down with the Pusher (1) pushing the fruit
or vegetables into the
blades.
26
Do not run for more than 60 seconds, switch off your Easy Blend
and wait 30 seconds
before continuing.
27
When adding fruit for juicing, do not look into the Lid while your
Easy Blend is running as ‘spitting’ may occur. Switch off before
looking into the top of the Jug.
28
If the Jug becomes full, switch off, unscrew from the Main Unit
(see step 13) and decant before continuing. Mix the juices
together before drinking for a better flavour.
29
When finished, turn the Speed Control to the Off (O) position and
unplug from the mains.
30
Hold the Blade Lid and twist to unlock from the Main Unit. DO
NOT hold the Jug.
31
Pour the juice from the Jug and dismantle for cleaning. Clean the
Filter immediately after use.
Suitable Foods
Blending
Your Easy Blend Deluxe is ideal for blending a wide range of
foods, including fruit and dairy. However it is NOT suitable for the
following uses:
• Grinding or mashing heavy foods (e.g. potatoes or meat).
• Stirring thick mixtures (eg dough).
Grinding
The spice mixes produced are best made with the Dual Blade
(15). When grinding garlic or ginger however, the Quad Blade (14)
should be used.
Juicing
• A wide range of fruits can be juiced, however it should be
prepared correctly before juicing. Your Easy Blend Deluxe is
unable to separate citrus peel or pith from fruit so it should be
removed and flesh cut into segments prior to juicing.
8
Page 9

FP403021MEE Rev2.qxp_Morphy Richards Instruction Book 27/07/2015 16:37 Page 9
• DO NOT juice hard vegetables (turnip, carrot potatoes,
uncooked beetroot etc).
• Cut all fruit and vegetables into segments or thin sticks before
juicing.
Beakers, Lids And Jug
Your Easy Blend comes with 5 beakers of varying capacity.
Blending beakers (9), (11), (13)
There are 3 sizes of blending beakers supplied. 300ml (11), 500ml
(13) and 750ml (9). Do not overfill. The Beakers have 3 separate
Lids, all are interchangeable between the different sizes. We
recommend grinding spices or coffee in the 300ml capacity
beaker.
Lids (8), (10), (12)
There are three types of beaker lids supplied. All the lids are
compatible with all the beakers. Use the Sports (8) and Straw Lids
(12) for drinks on the go. Use the Flat Lid (10) to store rubs,
marinades and sauces.
Jug (5)
The Jug supplied is for use with the Juicing process, as depicted
on page 8-9. It has a
maximum capacity of 750ml. You can also use the Jug to blend
smoothies and milkshakes by
following the steps detailed to the right.
Blending In The Jug
1. Follow steps 1-3 of ‘Using your Easy Blend Juicer.’
2. Add your ingredients to the Jug (5), Do not over fill. The Jug has a
maximum capacity of 750ml.
3. Insert the Measuring Cap (17) into the Juicer Lid (2) twist to lock
into place. Attach the Lid to the Jug ensuring the blank side of
the Lid is aligned with the spout (not the grate). See above.
Ensure the Measuring Cap and Lid are fixed in place securely.
4. Blend as normal (Steps 5-6 of ‘Using your Easy Blend Beakers’).
5. Before pouring your drink from the Jug, detach from the Main Unit
(6).
32
Blades
Your Easy Blend comes with 2 separate Blade Lids.
Quad Blade (14)
The Quad Blade is designed for blending and mixing wet
ingredients such as fruit or vegetables. This blade should be used
for making smoothies or juicing.
Dual Blade (15)
The Dual Blade is designed for use with dry ingredients like coffee
beans or herbs and spices.
Note: neither blade is suitable for blending bone, potatoes, dough
or heavy foods.
Hints And Tips For Juicing
• Prepare all the ingredients first and have them conveniently placed
near the appliance, this will ensure you keep the juicing time
short. Do not exceed 550g of prepared fruit for juicing.
• The recipe cards supplied should give you 1 glass (approximately
200ml) of fresh juice depending on the condition of the fruits
used.
• If you should need to juice for more than 1 minute, switch off,
allow to rest for 30 seconds, continue for a further 30 seconds if
required. Do not exceed this 1 minute run time as permanent
damage could be caused to the motor and blade bearing.
• When removing the Jug from the Main Unit (6), ensure you do not
unscrew the jar from the Blade Lid. Support the Blade Lid if you
see it turning, leakage will occur if you allow this to happen.
• When pouring juice out keep the pusher in place to retain the
pulp.
• After pouring the juice out into a glass allow the pulp to stand in
the jug for 2 minutes, this will allow more juice to flow through the
Filter mesh (3).
General Hints And Tips
• To reduce the thickness of a smoothie, use the Pulse setting.
• Use the Pulse speed setting (P) for short periods of up to 10
seconds. For longer periods of time blending, use Speed II.
• When removing the Beaker from the Main Unit (6) hold the edge
of the Blade Lid and twist. DO NOT hold the Beaker.
• If using seeded berries, you may wish to sieve the drink before
serving for a smoother consistency.
• Ripe bananas give a much better, sweeter flavour than green
ones.
• Pineapple should be fresh, with all skin removed.
• Mango should be ripe, peeled and de-stoned.
• Remove the peel and pith from citrus fruit to avoid a bitter tasting
juice and damaging the Easy Blend Deluxe.
• Soak fresh ginger in cold water for a few minutes before use for a
milder flavour.
• Ingredients at room temperature will give a higher juice yield than
those used straight from the refrigerator.
• Tomatoes produce a thick juice, adding a few grapes will dilute
the drink and add sweetness.
• Use seasonal ingredients to add variety to your fruit juices.
• Add a few herbs to vary the flavour or add a handful of kale for a
healthier option.
• Remove the skin from cucumber to alleviate the bitterness.
g
9
Page 10

FP403021MEE Rev2.qxp_Morphy Richards Instruction Book 27/07/2015 16:37 Page 10
Care And Cleaning
It is important to clean your Easy Blend Deluxe
immediately after use.
1. Switch your Easy Blend Deluxe off and unplug from the mains
outlet.
2. Remove the Safety Seal (16) from the Blade Lids (14), (15).
WARNING: Extreme care must be taken when washing the
metal blades as they are sharp.
3. Wash all parts except the Main Unit (6) in hot soapy water, dry
thoroughly. Do not allow the Blade Lid to stand in water.
A small brush can be used to remove food from under the blade
on the Blade Lids and the Filter (3).
4. Replace the Safety Seal into the Blade Lids before use. Ensure
the Safety Seal is correctly located before the Beaker is screwed
onto the Blade Lid.
5. Clean the Main Unit with a damp cloth. Do not immerse in water.
• The Beakers (9),(11),(13), and Lids (8),(10),(12), are dishwasher
safe, place on the top shelf on a cool wash only.
WARNING: Always unplug the appliance before cleaning.
Contact Us
Helpline
If you are having a problem with your appliance, please call our
Helpline, as we are more likely to be able to help than the store you
purchased the item from.
Please have the product name, model number and serial number
to hand when you call to help us deal with your enquiry more
quickly.
UK Helpline: 0344 871 0944
IRE Helpline: 1800 409 119
Spares: 0344 873 0710
Talk To Us
If you have any questions or comments, or want some great tips or
recipe ideas to help you get the most out of your products, join us
online:
Blog: www.morphyrichards.co.uk/blog
Facebook: www.facebook.com/morphyrichardsuk
Twitter: @loveyourmorphy
Website: www.morphyrichards.com
THIS SECTION IS ONLY APPLICABLE FOR CUSTOMERS
IN UK AND IRELAND
REGISTERING YOUR TWO YEAR GUARANTEE
Your standard one year guarantee is extended for an additional 12
months when you register the product within 28 days of purchase
with Morphy Richards. If you do not register the
product with Morphy Richards within 28 days, your product is
guaranteed for 1 year. To validate your 2 year guarantee register
with us online at www.morphyrichards.co.uk
N.B. Each qualifying product needs to be registered with Morphy
Richards individually. Please refer to the one year guarantee for
more information.
YOUR ONE YEAR GUARANTEE
It is important to retain the retailer’s receipt as proof of purchase.
Staple your receipt to this back cover for future reference. Please
quote the following information if the product develops a fault.
These numbers can be found on the base of the product.
Model no.
Serial no.
All Morphy Richards products are individually tested before leaving
the factory. In the unlikely event of any appliance proving to be
faulty within 28 days of purchase, it should be returned to the
place of purchase for it to be replaced. If the fault develops after 28
days and within 12 months of original purchase, you should
contact the Helpline number quoting Model number and Serial
number on the product, or write to Morphy Richards at the
address shown. You may be asked to return a copy of proof of
purchase. Subject to the exclusions set out below (see Exclusions),
the faulty appliance will then be repaired or replaced and
dispatched usually within 7 working days of receipt. If, for any
reason, this item is replaced during the 1 year guarantee period,
the guarantee on the new item will be calculated from original
purchase date. Therefore it is vital to retain your original till receipt
or invoice to indicate the date of initial purchase. To qualify for the 1
year guarantee, the appliance must have been used according to
the instructions supplied. For example, crumb trays should have
been emptied regularly.
EXCLUSIONS
Morphy Richards shall not be liable to replace or repair the goods
under the terms of the guarantee where:
1 The fault has been caused or is attributable to accidental use,
misuse, negligent use or used contrary to the manufacturer’s
recommendations or where the fault has been caused by power
surges or damage caused in transit.
2 The appliance has been used on a voltage supply other than that
stamped on the products.
3 Repairs have been attempted by persons other than our service staff
(or authorised dealer).
4 The appliance has been used for hire purposes or non domestic use.
5 The appliance is second hand.
6 Morphy Richards are not liable to carry out any type of servicing
work, under the guarantee.
10
Page 11

FP403021MEE Rev2.qxp_Morphy Richards Instruction Book 27/07/2015 16:37 Page 11
7 Plastic filters for all Morphy Richards kettles and coffee makers are
not covered by the guarantee.
8 Batteries and damage from leakage are not covered by the
guarantee.
9 The filters have not be cleaned and replaced as instructed.
This guarantee does not confer any rights other than those expressly
set out above and does not cover any claims for consequential loss
or damage. This guarantee is offered as an additional benefit and
does not affect your statutory rights as a consumer.
YOUR INTERNATIONAL TWO YEAR GUARANTEE
This appliance is covered by two-year repair or replacement
warranty.
It is important to retain the retailers receipt as proof of purchase.
Staple your receipt to this back cover for future reference.
Please quote the following information if the product develops a
fault. These numbers can be found on the base of the product.
Model no.
Serial no.
All Morphy Richards products are individually tested before leaving
the factory. In the unlikely event of any appliance proving to be
faulty within 28 days of purchase it should be returned to the place
of purchase for it to be replaced.
If the fault develops after 28 days and within 24 months of original
purchase, you should contact your local distributor quoting Model
number and Serial number on the product, or write to your local
distributor at the addresses shown.
You will be asked to return the product (in secure, adequate
packaging) to the address below along with a copy of proof of
purchase.
Subject to the exclusions set out below (1-9) the faulty appliance
will then be repaired or replaced and dispatched usually within 7
working days of receipt.
If for any reason this item is replaced during the 2-year guarantee
period, the guarantee on the new item will be calculated from
original purchase date. Therefore it is vital to retain your original till
receipt or invoice to indicate the date of initial purchase.
To qualify for the 2-year guarantee the appliance must have been
used according to the manufacturers instructions. For example,
appliances must have been descaled and filters must have been
kept clean as instructed.
The local distributor shall not be liable to replace or repair the
goods under the terms of the guarantee where:
1 The fault has been caused or is attributable to accidental use,
misuse, negligent use or used contrary to the manufacturers
recommendations or where the fault has been caused by power
surges or damage caused in transit.
2 The appliance has been used on a voltage supply other than that
stamped on the products.
3 Repairs have been attempted by persons other than our service staff
(or authorised dealer).
4 Where the appliance has been used for hire purposes or non
domestic use.
5 The appliance is second hand.
6 The local distributor are not liable to carry out any type of servicing
work, under the guarantee.
7 The guarantee excludes consumables such as bags, filters and glass
carafes.
8 Batteries and damage from leakage are not covered by the
guarantee.
9 The filters have not be cleaned and replaced as instructed.
This guarantee does not confer any rights other than those
expressly set out above and does not cover any claims for
consequential loss or damage. This guarantee is offered as an
additional benefit and does not affect your statutory rights as a
consumer.
AUSTRALIAN WARRANTY
This appliance is guaranteed for 2 years against faulty material,
components and workmanship.
This warranty is in addition and does not affect your statutory rights.
Proof of purchase must be produced for any warranty benefit.
In the unlikely event of any appliance proving to be faulty, securely pack
and return the item to the place of purchase accompanied by the
original receipt or invoice.
Our goods come with guarantees that cannot be excluded under the
Australian Consumer Law. You are entitled to a replacement or refund
for a major failure and for compensation for any other reasonably
foreseeable loss or damage. You are also entitled to have the goods
repaired or replaced if the goods fail to be of acceptable quality and the
failure does not amount to a major failure.
NOT COVERED BY THIS WARRANTY
(Australian only)
• If the appliance has not been used in accordance with the
manufacturers’ recommendations or Instructions.
• If the fault is deemed to be caused by abuse, misuse, neglect,
modifications or in proper use and or care
Eg: Kettles: Excessive build up of scale.
Toasters: Excessive build up of crumbs or foreign matter etc.
• Connection to incorrect voltage to that stamped on the product.
• Unauthorised repairs.
• Appliance used other than for domestic purposes.
• Excluding bags, filters, glass, carafes, and cutting blades.
• Freight and insurance costs.
If for any reason this item is replaced during the 2 year guarantee
period, the guarantee on the new item will be calculated from
original purchase date. Therefore it is vital to retain your original
receipt or invoice to indicate the date of original purchase.
Morphy Richards’s policy is to continually improve quality design
and product quality. The company therefore reserves the right to
change any specifications or to carry out modifications as deemed
worthy at any time.
The Australian supplier reserves the right to repair, modify,
exchange or replace the faulty appliance with the same or similar
model or product of equivalent value.
g
11
Page 12

FP403021MEE Rev2.qxp_Morphy Richards Instruction Book 27/07/2015 16:37 Page 12
f
Santé et sécurité
L’utilisation de tout appareil électrique implique de respecter les règles de sécurité et de bon sens suivantes.
Veuillez lire attentivement ces instructions avant d’utiliser ce produit.
• Cet appareil ne doit pas être utilisé par des enfants. Tenez l’appareil et le
cordon hors de portée des enfants.
• Les appareils électriques peuvent être utilisés par des personnes ayant
des capacités physiques, mentales et sensorielles réduites ainsi que
celles manquant d’expérience et de connaissances lorsqu’elles ne sont
pas sous la surveillance et les instructions d’une personne responsable
de leur sécurité et comprennent les risques encourus.
• Les enfants ne doivent pas jouer avec l’appareil.
• Débranchez l’appareil du secteur lorsqu’il n’est pas utilisé ou qu’il est
laissé sans surveillance, et avant tout montage, démontage ou
nettoyage.
• Utilisez uniquement pendant la durée maximum spécifiée dans le
manuel avant de laisser refroidir.
• Si le cordon d’alimentation est endommagé, il doit être remplacé par le
fabricant, son agent de service ou une personne qualifiée afin d’éviter
tout risque.
Emplacement
• Cet appareil est conçu pour être utilisé dans des applications
domestiques et similaires.
• Ne l’utilisez jamais à l’extérieur ou dans une salle de bains.
Sécurité personnelle
• Évitez de toucher les pièces mobiles. Veillez à tenir vos mains, vos
cheveux, vos vêtements et tout ustensile à l’écart des lames
pendant le fonctionnement pour éviter toute blessure personnelle
et/ou dommage de l’appareil.
Autres points relatifs à la sécurité
• Ne pas utiliser d’accessoires ni d’outils non recommandés par
Morphy Richards, car ils pourraient entraîner un incendie, un choc
électrique ou une blessure.
• -
12
Points de sécurité spécifiques au produit
• AVERTISSEMENT : les lames du mélangeur sont très
tranchantes. Manipulez l’appareil avec précaution pendant
l’utilisation, le vidage et le nettoyage.
• AVERTISSEMENT : pour vous protéger des risques
d’incendie, de choc électrique et de blessure, ne plongez
pas le cordon d’alimentation, la fiche électrique ou
l’appareil lui-même dans l’eau ou dans d’autres liquides.
• Ne lavez pas les accessoires à l’eau courante lorsqu’ils sont
insérés dans l’appareil.
• N’utilisez pas l’appareil si le filtre à jus est endommagé.
• Le mixeur doit être arrêté avant de le brancher ou de le
débrancher au secteur et quand il est laissé sans surveillance.
• Mettez l’appareil hors tension et débranchez-le du secteur avant
de remplacer des accessoires ou de toucher des pièces mobiles.
• N’utilisez pas de liquides chauds dans le mixeur, car ils sont
susceptibles d’être éjectés hors de l’appareil en raison d’une
Page 13

FP403021MEE Rev2.qxp_Morphy Richards Instruction Book 27/07/2015 16:37 Page 13
vaporisation brutale.
Exigences relatives à l’électricité
• Vérifiez que la tension indiquée sur la plaque signalétique de l’appareil
correspond à l’alimentation électrique de votre domicile, qui doit être
en courant alternatif (CA).
• Si le fusible de la prise principale doit être changé, opter pour un
fusible 3 A BS1362.
Introduction
Nous vous remercions d’avoir acheté votre nouveau Easy Blend
Deluxe Morphy Richards.
Votre Easy Blend Deluxe va vous permettre de créer un grand
choix de sauces, de sauces froides, de mousses et de
boissons. Veuillez lire soigneusement les instructions avant
utilisation.
N’oubliez pas de consulter notre site
www.morphyrichards.co.uk pour enregistrer votre produit et
bénéficier de la garantie de deux ans.
Table des matières
Santé et sécurité 12
Introduction 13
Caractéristiques 13
Avant la première utilisation 13
Utilisation des gobelets Easy Blend 13
Joint de sécurité 14
Utilisation 14
Pour piler la glace 14
Broyer des épices 14
Utilisation de la centrifugeuse Easy Blend 14
Aliments compatibles 15
Gobelets, couvercles et verseuse 15
Mixage dans la verseuse 15
Lames 15
Conseils et recommandations pour l’extraction de jus 15
Conseils et recommandations généraux 16
Entretien et nettoyage 16
Nous contacter 16
Garantie 16
Caractéristiques
(1) Poussoir
(2) Couvercle de la centrifugeuse
(3) Filtre
(4) Bec verseur
(5) Verseuse
(6) Corps de l’appareil
(7) Commande de vitesse
(8) Couvercle sport (x 2)
(9) Gobelet 750 ml (x2)
(10) Couvercle plat
(11) Gobelet 300 ml
(12) Couvercle avec paille (x2)
(13) Gobelet 500 ml (x2)
(14) Couvercle Lame quadruple
(15) Couvercle Lame double
(16) Joint de sécurité
(17) Bouchon gradué 30 ml
(18) Paille (x2)
Avant la première utilisation
AVERTISSEMENT : lames tranchantes, manipulez avec
précaution.
Avant la première utilisation ou s’il n’a pas été utilisé depuis
longtemps, lavez votre Easy Blend Deluxe soigneusement avant
utilisation.
Retirez les joints de sécurité (16) des couvercles de la lame (14), (15).
1.
2.
Lavez toutes les pièces à l’exception du corps de l’appareil (6) dans
de l’eau savonneuse chaude et laissez complètement sécher. Ne
laissez pas les couvercles de la lame tremper dans l’eau.
Utilisation de vos gobelets Easy Blend
1
AVERTISSEMENT : assurez-vous que votre Easy Blend est
débranché du secteur avant utilisation.
2
Ajoutez les ingrédients dans le gobelet souhaité (9), (11) ou (13).
Ne dépassez pas le niveau maximum pour le gobelet choisi.
3
Assurez-vous que le joint de sécurité (16) est correctement
monté dans le couvercle Lame quadruple (14). Fixez le gobelet,
en le vissant pour le mettre bien en place.
4
Fixez le couvercle de la lame au corps de l’appareil (6). Alignez
le cadenas ouvert et la flèche et faites tourner pour verrouiller
en place.
5
Branchez l’appareil sur secteur. Tournez la commande de vitesse
(7) sur la vitesse souhaitée Haute (II), Basse (I) ou Pulse (P). Votre
Easy Blend va commencer à mixer.
6
Quand il a terminé, mettez la commande de vitesse sur la position
Off (O) et débranchez l’appareil du secteur.
7
Maintenez le couvercle de la lame et faites-le tourner pour le
déverrouiller du corps de l’appareil. NE TENEZ PAS le gobelet.
8
Dévissez le couvercle de la lame du gobelet. Pour disposer de
boissons en déplacement, fixez un couvercle (8), (10), (12) au
gobelet.
f
13
Page 14

FP403021MEE Rev2.qxp_Morphy Richards Instruction Book 27/07/2015 16:37 Page 14
Joint de sécurité
• Un joint de sécurité (16) est en place sur les deux couvercles de
lame (14), (15). Ceci afin d’empêcher les fuites depuis votre Easy
Blend quand il est en cours d’utilisation et pendant que le gobelet
(9), (11), (13) est renversé.
• Lors de l’insertion du joint de sécurité, assurez-vous qu’il est bien
appliqué dans le canal du couvercle de la lame. Assurez-vous
que le joint de sécurité est correctement placé avant que le
gobelet ou la verseuse (5) soit vissé(e) sur le couvercle de la lame.
• Après avoir vissé le couvercle de la lame sur le gobelet ou la
verseuse, regardez à l’intérieur pour vérifier que le joint de sécurité
est bien monté avant de le fixer au corps de l’appareil.
• Assurez-vous toujours que le joint de sécurité est correctement
emboîté avant toute utilisation. Si vous ne le faites pas, cela
pourrait causer des dommages à l’appareil.
• Le joint de sécurité ne doit être enlevé que pour le nettoyage.
Après le nettoyage assurez-vous que le joint a été réinséré
comme indiqué avant d’utiliser l’Easy Blend.
9
Utilisation
Après 40 secondes d’utilisation continue, vous devrez mettre
votre Easy Blend hors tension et le laisser refroidir pendant 5
minutes pour empêcher une surchauffe.
Pour l’extraction de jus, après 60 secondes d’utilisation continue,
mettez l’appareil hors tension et laissez refroidir pendant 30 secondes.
Pour piler la glace
• Si vous utilisez de la glace dans le cadre d’une recette (en la
mixant, par exemple, avec d’autres liquides), n’utilisez pas plus de
6 glaçons.
• Ne pilez de la glace que dans le cadre d’une recette, pas de façon
autonome.
Broyer des épices
10
AVERTISSEMENT : assurez-vous que votre Easy Blend est
débranché du secteur avant utilisation.
11
Ajoutez les ingrédients dans le gobelet de 300 ml (11). Ne le
remplissez jamais au-delà du niveau maximal.
12
Assurez-vous que le joint de sécurité (16) est correctement
monté dans le couvercle Lame quadruple ou Lame double
(14), (15). Fixez le couvercle de la lame choisi sur le gobelet.
Vissez-le pour bien le fixer en place.
13
Fixez le couvercle au corps de l’appareil (6). Alignez le cadenas
ouvert et la flèche et faites tourner pour verrouiller en place.
14
Branchez l’appareil sur secteur. Tournez la commande de vitesse
(7) sur la vitesse souhaitée Haute (II), Basse (I) ou Pulse (P). Votre
Easy Blend va commencer à broyer.
15
Quand il a terminé, mettez la commande de vitesse en position
Off (O) et débranchez l’appareil du secteur.
16
Il peut être nécessaire de secouer votre Easy Blend pour décoller
les épices après leur broyage.
17
Maintenez le couvercle de la lame et faites-le tourner pour le
déverrouiller du corps de l’appareil.
NE TENEZ PAS le gobelet.
Utilisation de votre centrifugeuse Easy Blend
18
AVERTISSEMENT : assurez-vous que votre Easy Blend est
débranché du secteur avant utilisation.
19
Assurez-vous que le joint de sécurité (16) est monté
correctement sur le couvercle Lame quadruple (14). Fixez le
couvercle Lame quadruple à la verseuse (5). Vissez-le pour bien le
fixer en place.
20
Fixez le couvercle Lame quadruple sur le corps de l’appareil (6).
Alignez le cadenas ouvert et la flèche et faites tourner pour
verrouiller en place.
21
Insérez le filtre (3) dans la verseuse. Alignez le cadre noir avec les
lignes dans la verseuse. Les quatre lignes à l’intérieur de la
verseuse s’alignent avec les quatre découpes de la base du filtre.
22
Fixez le couvercle de la centrifugeuse (2). Faites tourner dans le
sens horaire, en alignant la râpe avec le bec verseur de la
verseuse. Le couvercle de la centrifugeuse ne se montera pas
correctement sur la verseuse si le filtre n’est pas bien inséré.
23
Branchez l’appareil sur secteur. Mettez la commande de vitesse
(7) sur Haute (II).
24
Ajoutez une petite quantité de fruits ou de légumes dans la
verseuse, ne la remplissez pas trop.
25
Si nécessaire, poussez délicatement les fruits ou les légumes
entre les lames avec le poussoir (1).
26
Ne faites pas fonctionner pendant plus de 60 secondes, mettez
votre Easy Blend hors tension et attendez 30 secondes avant de
continuer.
27
Lors de l’ajout de fruits pour l’extraction de jus, ne regardez pas à
l’intérieur du couvercle pendant que votre Easy Blend fonctionne
car des projections sont susceptibles de se produire. Mettez
l’appareil hors tension avant de regarder en haut de la verseuse.
28
Quand la verseuse semble pleine, mettez l’appareil hors tension,
dévissez la verseuse du corps de l’appareil (voir étape13) et
laissez décanter avant de continuer. Mélangez les jus avant de les
boire pour obtenir de meilleurs arômes.
29
Quand vous avez terminé, mettez la commande de vitesse sur la
position Off (O) et débranchez l’appareil du secteur.
30
Maintenez le couvercle de la lame et faites-le tourner pour le
déverrouiller du corps de l’appareil. NE TENEZ PAS la verseuse.
31
Versez le jus hors de la verseuse et démontez-la pour nettoyage.
Nettoyez le filtre immédiatement après utilisation.
14
Page 15

FP403021MEE Rev2.qxp_Morphy Richards Instruction Book 27/07/2015 16:37 Page 15
Aliments compatibles
Pour mixer
Votre Easy Blend Deluxe est idéal pour mixer une grande variété
d’aliments, dont des fruits et des laitages. Il n’est cependant PAS
adapté aux utilisations suivantes :
• Broyage ou écrasement d’aliments durs (pommes de terre ou
viande, par exemple).
• Agitation de mélanges épais (pâte, par exemple).
Broyage
Les mélanges d’épices produits sont mieux faits avec la Lame
double (15). Cependant, pour broyer de l’ail ou du gingembre,
il vaut mieux utiliser la Lame quadruple (14).
Pour extraire le jus
• Il est possible d’extraire le jus d’une grande variété de fruits, il
doivent cependant être préparés correctement avant d’en
extraire le jus. Votre Easy Blend Deluxe ne peut pas séparer le
zeste et la peau blanche des agrumes, ils doivent donc être
retirés et la chair des fruits doit être coupée en petits morceaux
avant d’en extraire le jus.
• NE PAS extraire le jus de légumes durs (navets, carottes,
pommes de terre, betteraves crues, etc).
• Coupez tous les fruits et les légumes en petits morceaux avant
d’en extraire le jus.
Gobelets, couvercles et verseuse
Votre Easy Blend est livré avec 5 gobelets de divers volumes.
Gobelets de mixage (9), (11), (13)
Les gobelets de mixage fournis sont de 3 tailles. 300 ml (11),
500 ml (13) et 750 ml (9). Ne dépassez pas le niveau maximum
dans le gobelet. Les gobelets ont 3 couvercles distincts, tous sont
interchangeables entre les différentes tailles. Nous recommandons
de broyer les épices ou le café dans le gobelet de 300ml.
Couvercles (7), (12), (16)
Les couvercles de gobelets fournis sont de trois types. Tous les
couvercles sont compatibles avec tous les gobelets. Utilisez les
couvercles Sports (8) et Paille (12) pour les boissons en
déplacement. Utilisez le couvercle Plat (10) pour stocker les
sauces froides, les marinades et les sauces.
Verseuse (5)
La verseuse fournie doit être utilisée au cours du processus
d’extraction des jus, comme indiqué en page 8-9. Elle a un
volume maximum de 750 ml. Vous pouvez aussi utiliser la
verseuse pour mixer des smoothies et des milkshakes en suivant
les étapes détaillées sur la droite.
Mixage dans la verseuse
1. Suivre les étapes 1-3 de « Utilisation de votre centrifugeuse Easy
Blend »
2. Ajoutez vos ingrédients dans la verseuse (5), ne la remplissez pas
trop. La verseuse a un volume maximum de 750 ml.
3. Insérez le bouchon gradué (17) dans le couvercle de la
centrifugeuse (2), faites-le tourner pour le verrouiller en place.
Fixez le couvercle sur la verseuse en vous assurant que le côté
blanc de celle-ci est aligné avec le bec verseur (pas avec la râpe).
Voir ci-dessus.
Assurez-vous que le bouchon gradué et le couvercle sont bien
fixés en place.
4. Mixez normalement (étapes 5-6 de « Utilisation des gobelets de
votre Easy Blend »).
5. Avant de verser votre boisson hors de la verseuse, détachez-la du
corps de l’appareil (6).
32
Lames
Votre Easy Blend est livré avec 2 couvercles de lames distincts.
Lame quadruple (14)
La lame quadruple est conçue pour mixer et mélanger des
ingrédients humides comme les fruits ou les légumes. Cette lame
doit être utilisée pour faire des smoothies ou extraire des jus.
Lame double (15)
La lame double est conçue pour être utilisée avec des ingrédients
secs comme les grains de café, les herbes ou les épices.
Remarque : aucune lame n’est adaptée au mixage des os, des
pommes de terre, des pâtes ou des aliments durs.
Conseils et recommandations pour
l’extraction de jus
• Préparez tout d’abord tous les ingrédients et placez-les
commodément à côté de l’appareil, ceci vous permettra de
réduire la durée de l’extraction du jus. Ne dépassez pas 550 g de
fruits préparés pour l’extraction du jus.
• Les fiches de recettes fournies permettent d’obtenir 1 verre
(environ 200 ml) de jus frais selon l’état des fruits utilisés.
• Si vous devez extraire du jus pendant plus de 1 minute, mettez
l’appareil hors tension, laissez-le reposer pendant 30 secondes,
poursuivez pendant encore 30 secondes si nécessaire. Le moteur
et le palier de la lame sont susceptibles d’être endommagés de
façon permanente en cas de dépassement de cette durée de
fonctionnement de 1 minute.
• Quand vous retirez la verseuse du corps de l’appareil (6), assurezvous de ne pas dévisser la cruche du couvercle de la lame.
Soutenez le couvercle de la lame si vous le voyez tourner, des
fuites peuvent survenir si vous laissez cela se produire.
• Quand vous versez le jus, maintenez le poussoir en place pour
retenir la pulpe.
• Après avoir versé le jus dans un verre, laissez la pulpe reposer
dans la verseuse pendant 2 minutes, ceci permettra à une plus
grande quantité de jus de s’écouler à travers la grille du filtre (3).
f
15
Page 16

FP403021MEE Rev2.qxp_Morphy Richards Instruction Book 27/07/2015 16:37 Page 16
Conseils et recommandations généraux
• Pour rendre un smoothie plus fluide, utilisez le réglage Pulse.
• Utilisez le réglage de vitesse Pulse (P) pendant de courtes
périodes, jusqu’à 10 secondes. Pour des durées de mixage plus
longues, utilisez Speed II.
• Lors du retrait du gobelet du corps de l’appareil (6), tenez le bord
du couvercle de la lame et faites-le tourner. NE TENEZ PAS le
gobelet.
• Si vous utilisez des baies à graines, vous pouvez vouloir tamiser la
boisson avant de la servir pour obtenir une consistance plus
onctueuse.
• Les bananes mûres donnent un meilleur arôme, plus doux, que
les vertes.
• Les ananas doivent être frais et débarrassés de toutes leurs
peaux.
• Les mangues doivent être mûres, pelées et dénoyautées.
• Retirez le zeste et la peau blanche des agrumes pour éviter
l’amertume du jus et que l’Easy Blend Deluxe ne soit endommagé.
Faites tremper le gingembre frais dans l’eau froide pendant quelques
•
minutes avant utilisation pour obtenir un arôme plus léger.
• Les ingrédients à température donneront une quantité de jus plus
importante que ceux qui viennent juste d’être sortis du
réfrigérateur.
• Les tomates produisent un jus épais, l’ajout de quelques grains de
raisin vous permettra de le diluer et de l’adoucir.
• Utilisez des ingrédients de saison pour obtenir une grande variété
de jus de fruit.
• Ajoutez quelques herbes pour faire varier les arômes ou une
poignée de chou frisé pour une option plus saine.
• Retirez la peau du concombre pour en atténuer l’amertume.
Entretien et nettoyage
Il est important de nettoyer votre Easy Blend Deluxe
immédiatement après utilisation.
1. Mettez votre Easy Blend Deluxe hors tension et débranchez-le de
la prise secteur.
2. Retirez le joint de sécurité (16) des couvercles de la lame (14), (15).
AVERTISSEMENT : soyez extrêmement attentif lorsque vous
lavez les lames métalliques, elles sont très coupantes.
3. Lavez toutes les pièces à l’exception du corps de l’appareil (6)
dans de l’eau savonneuse chaude, laissez complètement sécher.
Ne laissez pas le couvercle de la lame tremper dans l’eau.
Une petite brosse peut être utilisée pour retire les aliments sous la
lame, sur les couvercles de la lame et sur le filtre (3).
4. Replacez le joint de sécurité dans les couvercles de la lame avant
utilisation. Assurez-vous que le joint de sécurité est correctement
en place avant de visser le gobelet sur le couvercle de la lame.
5. Essuyez le corps de l’appareil avec un chiffon humide. Ne plongez
pas l’appareil dans l’eau.
• Les gobelets (9),(11),(13) et les couvercles (8),(10),(12) passent au
lave-vaisselle, placez-les sur la clayette du haut, uniquement lors
d’un lavage à froid.
AVERTISSEMENT : débranchez toujours l’appareil avant de le
nettoyer.
Nous contacter
Service d’assistance
Si vous rencontrez un problème avec votre appareil, veuillez
appeler notre service d’assistance. Nous pourrons certainement
vous aider plus efficacement que le magasin où vous avez
acheté l’article.
Munissez-vous du nom de produit, du numéro de modèle et du
numéro de série de l’appareil lorsque vous nous appelez. Cela
nous aidera à traiter plus rapidement votre demande.
Dialoguer avec nous
Pour toute question ou commentaire, ou pour recevoir plus
d’astuces et des idées de recettes et profiter au maximum de votre
appareil, vous pouvez nous contacter en ligne :
Blog : www.morphyrichards.co.uk/blog
Facebook : www.facebook.com/morphyrichardsuk
Twitter : @loveyourmorphy
Site Internet : www.morphyrichards.com
Votre garantie de deux ans
Pour la clientèle en France
Il est important de conserver le ticket de caisse comme preuve
d’achat. Agrafez votre ticket de caisse à cette notice d'utilisation;
vous pourrez ainsi l’avoir sous la main ultérieurement.
Merci de donner les informations ci-dessous si votre appareil
tombe en panne. Vous trouverez ces références à la base de
l’appareil.
Numéro du modèle
Numéro de série
Tous les produits Morphy Richards sont testés individuellement
avant de quitter l’usine.
Si un problème survient dans les 24 mois qui suivent l’achat
d’origine, vous devez contacter le magasin où vous avez acheté
votre appareil muni de votre ticket de caisse, celui ci le renverra
à Glen Dimplex France pour expertise.
Sous réserve des exclusions indiquées ci-dessous (1 à 9),
l’appareil défectueux sera alors réparé ou remplacé et réexpédié
dans un délai de 15 jours ouvrables maximum à compter de son
arrivée.
Si, pour quelque raison que ce soit, l’article est remplacé
pendant la période de garantie de deux ans, la période de
garantie du nouvel article sera calculée à partir de la date d’achat
d’origine. Vous devez donc absolument conserver votre ticket de
caisse ou votre facture d’origine pour indiquer la date d’achat.
Pour bénéficier de la garantie de deux ans, l’appareil doit avoir
été utilisé conformément aux instructions du fabricant. Par
exemple, les fers doivent avoir été détartrés et les filtres doivent
avoir été nettoyés selon les instructions.
Morphy Richards ne sera pas dans l’obligation de remplacer ou
réparer les articles aux termes de la garantie dans les
16
Page 17

FP403021MEE Rev2.qxp_Morphy Richards Instruction Book 27/07/2015 16:37 Page 17
circonstances suivantes :
1 Si le problème provient d’une utilisation accidentelle, d’une
utilisation abusive ou négligente, ou si l’appareil a été utilisé de
manière contraire aux recommandations du fabricant, ou encore
lorsque le problème provient de sautes de puissance ou de dégâts
occasionnés en transit.
2 Si l’appareil a été utilisé sur une alimentation électrique dont la
tension est différente de celle qui est indiquée sur l’appareil.
3 Si des personnes autres que nos techniciens (ou l’un de nos
revendeurs agréés) ont tenté de faire des réparations.
4 Si l’appareil a été loué ou utilisé dans un contexte non domestique.
5 Si l’appareil est d’occasion.
6 Morphy Richards n’est pas dans l’obligation de réaliser des travaux
d’entretien, quels qu’ils soient, aux termes de la garantie.
7 La garantie exclut les consommables tels que les sacs, les filtres et
les carafes en verre.
8 Les batteries et les dégâts provoqués par leur fuite ne sont pas
couverts par la garantie.
9 Les filtres n’ont pas été nettoyés ou remplacés suivant les
instructions.
Cette garantie ne confère aucun droit à l’exception de ceux qui
sont expressément indiqués ci-dessus, et ne couvre aucune
réclamation pour dommages immatériels ou indirects. Cette
garantie est offerte comme avantage supplémentaire et n’a
aucune incidence sur vos droits légaux en tant que
consommateur.
Pour la clientèle en Belgique
Les produits de Morphy Richards sont produits conformément
les normes de qualité, agrée international. Au-dessus vos droits
légaux, Morphy Richards vous garantit qu’à partir d’achat ce
produit sera sans défauts de fabrication ou de matériels pendant
une période de deux ans.
Il est important de conserver votre bon d’achat comme preuve.
Agrafez votre ticket à cette notice d’installation.
Veuillez mentionner ces informations ci-dessous si votre appareil
tombe en panne. Vous trouverez ces informations sur la base de
l’appareil.
Numéro du modèle
Numéro de série
Si, pour quelque raison que ce soit, l’article est remplacé
pendant la période de garantie (deux ans), la période de garantie
du nouvel article sera calculée à partir de la date d’achat
d’origine. Il est donc très importants de conserver votre bon
d’achat original afin de connaître la date initiale d’achat.
Cette garantie vaut uniquement quand l’appareil a été utilisé
conformément aux instructions du fabricant. Par exemple, les
appareils doivent être détartrés et les filtres doivent être tenus
propre selon le mode d’emploi.
Morphy Richard ne sera pas dans l’obligation de remplacer ou
réparer les articles aux termes de la garantie dans les
circonstances suivantes
1 Si le problème, prévient d’une utilisation accidentelle, d’une
utilisation abusive ou négligente, ou si l’appareil a été utilisé de
manière contraire aux recommandations du fabricant, ou encore
lorsque le problème provient de source de puissance ou de dégâts
occasionnés en transit.
2 Si l’appareil a été utilisé sur une alimentation électrique dont la
tension est différente de celle qui est indiquée sur l’appareil.
3 Si des personnes, autres que nos techniciens (ou revendeurs
agrées) ont tenté de faire des réparations.
4 Si l’appareil a été loué ou utilisé dans un contexte non domestique.
5 Si l’appareil est d’occasion.
6 Morphy Richards n’est pas dans l’obligation de réaliser des travaux
d’entretien, quels qu’ils soient, aux termes de la garantie.
7 La garantie ne couvre pas les sachets, filtres et brocs en verre.
8 Les batteries et les dégâts provoqués par leur fuite ne sont pas
couverts par la garantie.
9 Les filtres n’ont pas été nettoyés ou remplacés suivant les
instructions.
Cette garantie ne confère aucun droit à l’exception de ceux qui
sont expressément indiqués ci-dessus, et ne couvre aucune
réclamation pour dommages immatériels ou indirects. Cette
garantie est offerte comme avantage supplémentaire et n’a
aucune incidence sur vos droits légaux en tant que
consommateur.failure does not amount to a major failure.
f
17
Page 18

FP403021MEE Rev2.qxp_Morphy Richards Instruction Book 27/07/2015 16:37 Page 18
i
Salute e sicurezza
Per utilizzare un qualunque apparecchio elettrico, è necessario seguire delle basilari regole di sicurezza dettate dal buon senso.
Leggere queste istruzioni con attenzione prima di utilizzare il prodotto.
• Evitare che i bambini utilizzino questo elettrodomestico.
Mantenere l'elettrodomestico e il cavo lontano dalla portata dei
bambini.
• Queste apparecchiature possono essere usate da persone con
ridotte capacità fisiche, sensoriali o mentali o con scarsa
esperienza e conoscenza solo se supervisionate od istruite
circa l'uso dell'apparecchiatura in tutta sicurezza e se sono in
grado di comprendere i rischi che il suo utilizzo implica.
• Evitare che i bambini giochino con l'elettrodomestico.
• Scollegare l'elettrodomestico dall'alimentazione quando non è
in uso o se incustodito, e prima delle operazioni di
assemblaggio, smontaggio o pulizia.
• Utilizzarlo solo per il tempo massimo specificato nel manuale
prima di farlo raffreddare.
• Se il cavo di alimentazione è danneggiato, richiederne la
sostituzione al produttore, al servizio di assistenza autorizzato o
a personale similmente qualificato per evitare rischi.
Luogo di utilizzo
• Questo elettrodomestico è destinato ad un uso domestico e
applicazioni simili.
• Non utilizzare l'elettrodomestico all'aperto o in bagno.
Sicurezza personale
• Non toccare i componenti in movimento. Tenere mani, capelli,
indumenti ed altri utensili lontani dalle lame del frullatore durante il
funzionamento, per evitare lesioni personali e/o danni
all'elettrodomestico.
Altre informazioni di sicurezza
• Non utilizzare accessori o strumenti diversi da quelli consigliati da
Morphy Richards, in quanto potrebbero provocare incendi,
scosse elettriche o lesioni.
• Non utilizzare l'elettrodomestico per scopi diversi da quelli a cui è
destinato.
Istruzioni di sicurezza specifiche per il
prodotto
• AVVERTENZA: le lame del frullatore sono molto affilate.
Maneggiare con cura durante l'uso, lo svuotamento e la
pulizia.
18
Page 19

FP403021MEE Rev2.qxp_Morphy Richards Instruction Book 27/07/2015 16:37 Page 19
• AVVERTENZA: per evitare incendi, scosse elettriche e lesioni
personali, non immergere il cavo, la spina o l’elettrodomestico
in acqua o in altri liquidi.
• Non pulire gli accessori con acqua corrente quando sono ancora
fissati all'elettrodomestico.
• Non usare l'elettrodomestico se il filtro succhi è danneggiato.
• Verificare che il frullatore sia spento prima di collegarlo o
scollegarlo dall’alimentazione di rete e quando viene lasciato
incustodito.
• Spegnere l'elettrodomestico e scollegare il cavo di alimentazione
prima di sostituire accessori o toccare parti che si muovono
durante l'uso.
• Non usare liquidi caldi nel frullatore dato che potrebbero
fuoriuscire dall'apparecchiatura per improvvisa evaporazione.
Requisiti elettrici
• Controllare che la tensione indicata sulla targhetta dei dati
dell'elettrodomestico corrisponda a quella dell'abitazione, che
deve essere a corrente alternata (C.A.).
• Qualora fosse necessario sostituire il fusibile nella spina,
installarne uno del tipo BS1362 da 3 A
Introduzione
Complimenti per aver acquistato un nuovo Easy Blend Deluxe
di Morphy Richards.
Easy Blend Deluxe vi permetterà di creare una vasta gamma di
salse, cremine, intingoli e bevande.
Leggere attentamente le istruzioni prima di utilizzare
l'appaercchio.
Non dimenticate di visitare il sito www.morphyrichards.co.uk
per registrare la garanzia di due anni sul prodotto.
Sommario
Salute e sicurezza 18
Introduzione 19
Caratteristiche 19
Prima di utilizzare l'elettrodomestico 20
Come usare il bicchiere Easy Blend 20
Guarnizione di sicurezza 20
Utilizzo 20
Tritaghiaccio 20
Macinatura di spezie 20
Come usare lo spremiagrumi Easy Blend 20
Alimenti idonei 21
Bicchieri, coperchi e brocca 21
Come miscelare nella brocca 21
Lame 21
Suggerimenti e consigli per le spremute 22
Suggerimenti e consigli generali 22
Manutenzione e pulizia 22
Contattateci 22
Garanzia 23
i
Componenti
(1) Spingitore
(2) Coperchio spremiagrumi
(3) Filtro
(4) Erogatore
(5) Brocca
(6) Unità principale
(7) Regolatore di velocità
(8) Coperchio Sports Lid (2x)
(9) Bicchiere da 750 ml (2x)
(10) Coperchio piatto
(11) Bicchiere da 300 ml
(12) Coperchio con cannuccia (2x)
(13) Bicchiere da 500 ml (2x)
(14) Coperchio a quattro lame
(15) Coperchio a due lame
(16) Guarnizione di sicurezza
(17) Tazza graduata da 30 ml
(18) Cannuccia (2x)
19
Page 20

FP403021MEE Rev2.qxp_Morphy Richards Instruction Book 27/07/2015 16:37 Page 20
Prima del primo utilizzo
AVVERTENZA: lame affilate, maneggiare con cura.
Prima di usarlo per la prima volta o se non viene usato da molto
tempo, lavare a fondo Easy Blend Deluxe.
1. Rimuovere le guarnizioni di sicurezza (16) dai coperchi con lame
(14), (15).
2. Lavare tutti i componenti, fatta eccezione per l'unità principale (6),
in acqua saponata calda e far asciugare completamente. Non
lasciare i coperchi con lame nell'acqua.
Come usare i bicchieri Easy Blend
1 AVVERTENZA: prima dell'uso accertarsi che Easy Blend sia
scollegato dalla rete.
2 Aggiungere gli ingredienti nel bicchiere scelto (9), (11) o (13). Non
superare il livello massimo del bicchiere scelto.
3 Accertarsi che la guarnizione di sicurezza (16) sia montata
correttamente sul coperchio a quattro lame (14). Applicare al
bicchiere e avvitare per fissarlo saldamente in posizione.
4 Fissare il coperchio con lame all'unità principale (6). Allineare il
lucchetto aperto e la freccia e ruotare per bloccare in posizione.
5 Inserire la spina di rete. Ruotare il selettore di velocità (7) in modo
da impostare la velocità desiderata: alta (II), bassa (I) oppure ad
impulsi (P). Easy Blend inizierà a mescolare.
6 Una volta terminato, portare il regolatore di velocità in posizione
Off (O) e staccare la spina dalla presa.
7 Sostenere il copri-lama e ruotare per sbloccarlo dall'unità
principale. NON afferrare il bicchiere.
8 Svitare il copri-lama dal bicchiere. Per le bevande da passeggio,
fissare un coperchio (8), (10), (12) al bicchiere.
Guarnizione di sicurezza
• C'è una guarnizione di sicurezza (16) su entrambi i sul coperchi a
lame (14), (15). Questa evita che possano esserci perdite da Easy
Blend mentre lo si usa e quando il bicchiere (9), (11), (13) viene
capovolto.
• Quando si inserisce la guarnizione di sicurezza, accertarsiche sia
ben pressata sul canale del coperchio a lame. Accertarsi che la
guarnizione di sicurezza sia ben posizionata prima di avvitare il
bicchiere o la brocca (5) sul coperchio a lame.
• Dopo aver avvitato il coperchio a lame sul bicchiere o brocca,
dare uno sguardo all'interno per verificare che la guarnizione di
sicurezza sia ben alloggiata prima di attaccare l'unità principale.
• Assicurarsi sempre che la guarnizione di sicurezza sia in posizione
prima dell'uso. L'inosservanza può causare il danneggiamento
dell'apparecchio.
• La guarnizione di sicurezza deve essere rimossa solo per la
pulizia. Dopo la pulizia accertarsi di reinserire la guarnizione come
indicato, prima di usare Easy Blend.
9
Utilizzo
Dopo 40 secondi di uso continuo, è meglio spegnere Easy
Blend e lasciarlo raffreddare per 5 minuti per evitare il
surriscaldamento.
Quando si preparano dei succhi di frutta, dopo 60 secondi di
uso continuativo, spegnere e lasciar raffreddare per 30 secondi.
Tritaghiaccio
• Se si utilizza del ghiaccio per una ricetta (cioè mescolato con altri
liquidi), non utilizzare più di 6 cubetti di ghiaccio per volta.
• Tritare il ghiaccio solo assieme ad altri ingredienti, mai da solo.
Macinatura di spezie
10
AVVERTENZA: assicurarsi che Easy Blend sia staccato dalla
presa di rete prima dell'uso.
11
Aggiungere gli ingredienti nel bicchiere da 300 ml (11). Non
superare il livello massimo.
12
Accertarsi che la guarnizione di sicurezza (16) sia montata
correttamente nel coperchio a quattro o due lame (14), (15).
Applicare il coperchio a lame scelto al bicchiere. Avvitare per
fissare bene in posizione.
13
Fissare il coperchio all'unità principale (6). Allineare il lucchetto
aperto e la freccia e ruotare per bloccare in posizione.
14
Inserire la spina di rete. Ruotare il selettore di velocità (7) in modo
da impostare la velocità desiderata: alta (II), bassa (I) oppure ad
impulsi (P). Easy Blend inizierà a frullare.
15
Una volta terminato, girare il regolatore velocità sulla posizione Off
(O) e staccare la spina dalla presa.
16
Potrebbe essere necessario scuotere Easy Blend per staccare le
spezie durante la frullatura.
17
Sostenere il coperchio a lame e ruotare per sbloccarlo dall'unità
principale. NON afferrare il bicchiere.
Come usare lo spremiagrumi Easy Blend
18
AVVERTENZA: prima dell'uso accertarsi che Easy Blend sia
scollegato dalla rete.
19
Accertarsi che la guarnizione di sicurezza (16) sia montata
correttamente nel coperchio a quattro lame (14). Fissare il
coperchio a quattro lame alla brocca (5). Avvitare per fissare bene
in posizione.
20
Fissare il coperchio a quattro lame all'unità principale (6). Allineare
il lucchetto aperto e la freccia e ruotare per bloccare in posizione.
21
Inserire il filtro (3) nella brocca. Allineare il telaio nero con i segni
sulla brocca. I quattro segni all'interno della brocca devono essere
allineati con i quattro incavi sulla base del filtro.
22
Mettere il coperchio dello spremiagrumi (2). Avvitare in senso
orario per bloccarlo, allineando la grata con il beccuccio della
brocca. Non è possibile inserire correttamente il coperchio dello
spremiagrumi se il filtro non è ben inserito.
23
Inserire la spina di rete. Girare il selettore di velocità (7) su Alto (II).
24
Aggiungere una piccola quantità di frutta o verdura nella brocca,
senza riempire troppo.
20
Page 21

FP403021MEE Rev2.qxp_Morphy Richards Instruction Book 27/07/2015 16:37 Page 21
25
Se necessario, premere delicatamente con lo spingitore (1) per
spingere la frutta o la verdura nelle lame.
26
Non far funzionare per più di 30 secondi, spegnere Easy Blend ed
attendere 30 secondi prima di continuare.
27
Quando si aggiunge frutta per una spremuta, non guardare dentro
il coperchio mentre Easy Blend è in funzione, perché potrebbero
verificarsi degli spruzzi. Spegnere l'apparecchiatura prima di
controllare la parte alta della brocca.
28
Se la brocca si riempie, spegnere e svitarla dall'unità principale
(vedi punto 13) e far decantare prima di continuare. Per migliorare
il gusto miscelare la spremuta prima di berla.
29
Una volta terminato, portare il regolatore di velocità in posizione
Off (0) e staccare la spina dalla presa.
30
Sostenere il coperchio a lame e ruotare per sbloccarlo dall'unità
principale. NON afferrarlo per la brocca.
31
Versare il succo dalla brocca e smontare per la pulizia. Pulire il
filtro immediatamente dopo l'uso.
Alimenti idonei
Mescolare
Easy Blend Deluxe è l'ideale per mescolare una gran quantità di
alimenti, compresa frutta e prodotti caseari. Però NON è adatto
per i seguenti usi:
• Grattugiare o macerare alimenti solidi (per esempio patate o
carne).
• Mescolare miscele troppo dense (ad esempio impasti).
Frullare
Il miglior modo per realizzare i mix di spezie è quello di utilizzare la
doppia lama (15). Quando si frulla l'aglio o lo zenzero è comunque
meglio utilizzare il quattrolame (14).
Estrazione del succo
• Si possono spremere molti tipi di frutta, che però deve essere
adeguatamente preparata prima. Your Easy Blend Deluxe non è in
grado di separare la buccia di un limone o il nocciolo di un frutto
che perciò devono essere rimossi, inoltre la polpa deve essere
tagliata a pezzi prima della spremitura.
• NON spremere verdura dura (rape, carote, patate, barbabietole
crude, ecc).
• Prima della spremitura, tagliare a pezzetti o a bastoncini tutta la
frutta e la verdura.
Bicchieri, coperchi e brocca
Easy Blend ha in dotazione 5 bicchieri di diversa capacità.
Bicchieri di mescolatura (9), (11), (13)
Sono fornite 3 misure di bicchieri di mescolatura. 300 ml (11), 500
ml (13) e 750 ml (9). Non riempire eccessivamente. I bicchieri
hanno 3 diversi coperchi, tutti intercambiabili per le varie misure.
Consigliamo di frullare le spezie o il caffè nel bicchiere con
capacità di 300 ml.
Coperchi (8), (10), (12)
Vendono dati in dotazione tre tipi di coperchi per bicchieri. Tutti i
coperchi sono compatibili con tutti i bicchieri. Utilizzare i coperchi
Sports (8) e con cannuccia (12) per le bevande da passeggio.
Usare il coperchio piatto (10) per conservare intingoli, marinate e
salse.
Brocca (5)
La brocca fornita viene usata durante la spremitura, come
illustrato a pag. 8-9. La brocca ha una capacità massima di 750
ml. Si può usare la brocca anche per miscelare frullati e frappé.
Seguire le istruzioni dettagliate a destra.
Come miscelare nella brocca
1. Seguire i passi 1-3 del capitolo ‘Come usare lo spremiagrumi Easy
Blend.’
2. Aggiungere gli ingredienti alla brocca (5), non riempire
eccessivamente. La brocca ha una capacità massima di 750 ml.
3. Inserire la tazza graduata (17) nel coperchio dello spremiagrumi
ruotare per bloccare in posizione. Mettere il coperchio sulla
brocca accertandosi che il lato aperto del coperchio sia allineato
con il beccuccio (non la grata). Vedere sopra.
Accertarsi che la tazza graduata ed il coperchio siano ben
posizionati.
4. Miscelare come al solito (Passi 5-6 di ‘Come usare il bicchiere
Easy Blend a pag. 5).
5. Prima di versare la bibita dalla brocca, staccarla dall'unità
principale (6).
Lame
Easy Blend viene fornito con due diversi coperchi a lame.
Quad Blade (a quattro lame) (14)
Quad Blade è progettato per mescolare ed amalgamare
ingredienti umidi come la frutta o le verdure. Questo tipo va usato
per ottenere frullati o succhi.
Dual Blade (a due lame) (15)
Dual Blade è studiato per essere usato con ingredienti secchi
come i chicchi di caffè o le erbe aromatiche e le spezie.
Nota: entrambi i modelli sono inadatti per mescolare ossa, patate,
impasti o cibi duri.
32
i
21
Page 22

FP403021MEE Rev2.qxp_Morphy Richards Instruction Book 27/07/2015 16:37 Page 22
Suggerimenti e consigli per le spremute
• Preparare prima tutti gli ingredienti e posizionarli vicino
all'apparecchio, in questo modo il tempo per realizzare la
spremuta sarà più breve. Per ogni spremuta non superare i 550 g
di frutta preparata.
• Le schede con le ricette in dotazione dovrebbero assicurarvi 1
bicchiere (di circa 200 ml) di succo fresco, a seconda delle
condizioni della frutta usata.
• Se fosse necessario spremere per più di 1 minuto, spegnere,
lasciar riposare per 30 secondi e continuare per altri 30 secondi,
se necessario. Non far funzionare l'apparecchio per più di 1
minuto per evitare danni permanenti al motore ed al cuscinetto
lama.
• Quando si stacca la brocca dall'unità principale (6), accertarsi di
non svitarla dal coperchio a lame. Sostenere il coperchio lame se
lo si vede girare, per evitare perdite.
• Quando si versa il succo, tenere in posizione il pressino in modo
da trattenere la polpa.
• Dopo aver versato il succo in un bicchiere, lasciar riposare la
polpa nella brocca per 2 minuti, in questo modo si raccoglierà
ulteriore succo dal filtro (3).
Suggerimenti e consigli generali
• Per ridurre le dimensioni dei pezzi all'interno di un frullato, usare il
funzionamento ad impulsi.
• Usare l'impostazione velocità ad impulsi (P) solo per brevi periodi
di non più di 10 secondi. Per mescolare per periodi di tempo più
lunghi, usare la velocità II.
• Quando si stacca il bicchiere dall'unità principale (6), afferrare il
bordo del copri-lama e girarlo. NON afferrare il bicchiere.
• Se si usano frutti con semi, potrebbe essere una buona idea
setacciare la bibita per ottenere una consistenza più morbida.
• Con le banane ben mature si ottiene un sapore migliore e più
dolce rispetto a quelle verdi.
• I pompelmi devono essere freschi e senza buccia.
• Il mango deve essere maturo, pelato e senza noccioli.
• Sbucciare e togliere i semi dai limoni per evitare non solo che il
succo sia amarognolo ma anche di danneggiare Easy Blend
Deluxe.
• Lasciare in ammollo lo zenzero fresco in acqua fredda per alcuni
minuti prima dell'uso per ottenere un sapore più delicato.
• Gli ingredienti a temperatura ambiente permettono di ottenere un
succo di frutta migliore rispetto a quelli appena tolti dal frigorifero.
• I pomodori producono un succo denso, aggiungere pochi chicchi
d'uva per diluire la bevanda ed addolcirla.
• Trarre nuove idee per nuovi succhi di frutta, sfruttando gli
ingredienti di stagione.
• Aggiungere alcune erbe per variare il sapore o aggiungere del
ravizzone per una bibita salutare.
• Sbucciare i cetrioli per ridurre il apore amaro.
Manutenzione e pulizia
È importante pulire Easy Blend Deluxe immediatamente dopo
l'uso.
1. Spegnere Easy Blend Deluxe e togliere la spina dalla presa.
2. Togliere la guarnizione di sicurezza (16) dai coperchi con lame (14),
(15).
AVVERTENZA: prestare la massima attenzione quando si
lavano le lame di metallo, poiché sono estremamente affilate.
3. Lavare tutti i componenti, fatta eccezione per l'unità principale (6),
in acqua saponata calda e far asciugare completamente. Non
lasciare il coperchio lame nell'acqua.
Usare uno spazzolino per rimuovere l'eventuale cibo da sotto il
coperchio lame ed il filtro (3).
4. Rimettere al suo posto la guarnizione di sicurezza nel coperchio
lame prima dell'uso. Accertarsi di posizionare correttamente la
guarnizione di sicurezza prima di avvitare il bicchiere sul coperchio
lame.
5. Pulire l'unità principale con un panno umido. Non immergere in
acqua.
• I bicchieri (9), (11), (13) ed i coperchi (8), (10), (12), possono essere
lavati in lavastoviglie e devono essere posizionati sul ripiano
superiore solo con lavaggio in acqua fredda.
AVVERTENZA: prima di pulire l'elettrodomestico, scollegarlo
dalla rete elettrica.
Contattateci
Servizio di assistenza telefonica
In caso di problemi col vostro elettrodomestico, vi invitiamo a
contattare il nostro Servizio di assistenza telefonica, perché
saremo in grado di offrirvi un'assistenza più mirata rispetto a
quella fornita dal punto vendita.
Vi consigliamo di tenere a portata di mano il nome del prodotto,
il numero del modello e il numero di serie per consentirci di
gestire la vostra chiamata nel minor tempo possibile.
Parlatene con noi
Per eventuali domande o commenti, o semplicemente se volete
dei suggerimenti o delle idee di ricette per sfruttare al meglio il
vostro elettrodomestico, seguiteci online:
Blog: www.morphyrichards.co.uk/blog
Facebook: www.facebook.com/morphyrichardsuk
Twitter: @loveyourmorphy
Sito web: www.morphyrichards.com
22
Page 23

FP403021MEE Rev2.qxp_Morphy Richards Instruction Book 27/07/2015 16:37 Page 23
GARANZIA DI DUE ANNI
Questo elettrodomestico è coperto da una garanzia di due anni
per la riparazione o la sostituzione.
È importante conservare la ricevuta del rivenditore a titolo di
prova di acquisto. Appuntare la ricevuta sulla retrocopertina del
presente manuale per futuro riferimento.
Indicare le informazioni riportate di seguito se si verifica
un’anomalia sul prodotto. Questi numeri sono riportati sulla
base del prodotto.
N. modello
N. di serie
Tutti i prodotti Morphy Richards sono testati singolarmente
prima di lasciare lo stabilimento. Nell’improbabile eventualità
della comparsa di un difetto entro 28 giorni dall’acquisto, si
consiglia di restituire il prodotto dove è stato acquistato per
richiederne la sostituzione.
Se il problema si manifesta dopo 28 giorni ed entro 24 mesi
dall’acquisto, contattare il rivenditore più vicino, citando il
numero di modello e il numero di matricola riportati sul
prodotto oppure scrivergli all’indirizzo indicato.
Verrà richiesto di rispedire il prodotto (in un imballaggio idoneo
e sicuro) unitamente alla copia della prova d’acquisto.
Fatte salve le esclusioni sotto riportate (1-9), l’elettrodomestico
difettoso viene riparato o sostituito e spedito di solito entro 7
giorni lavorativi dal ricevimento.
Se per qualsiasi motivo questo articolo viene sostituito entro il
periodo di garanzia di 2 anni, la garanzia sul nuovo prodotto
sarà calcolata a decorrere dalla data dell’acquisto iniziale. È
pertanto importante conservare la ricevuta o fattura originale
per poter dimostrare la data dell’acquisto.
Per usufruire della garanzia di due anni, l’elettrodomestico deve
essere stato usato nel modo indicato dal produttore. Ad
esempio, è necessario disincrostare l’elettrodomestico e tenere
puliti i filtri nel modo indicato.
Morphy Richards o il rivenditore di zona non sono tenuti a
sostituire o riparare i prodotti, come indicato dalle disposizioni
di garanzia, se:
1 Il guasto è stato causato o è attribuibile a un uso accidentale,
improprio, negligente o contrario alle istruzioni del produttore
oppure il guasto è stato causato da sovratensioni momentanee o
dal trasporto.
2 L’elettrodomestico è stato utilizzato a una tensione diversa da
quella indicata su di esso.
3 Le riparazioni sono state eseguite da persone diverse dal
personale tecnico Morphy Richards (o rivenditori autorizzati).
4 L’elettrodomestico è stato noleggiato oppure non impiegato per
uso domestico.
5 L’elettrodomestico è di seconda mano.
6 Morphy Richards o il rivenditore di zona non sono tenuti ad
eseguire alcun tipo di intervento di assistenza ai sensi della
garanzia.
7 I sacchetti, i filtri e le caraffe di vetro non sono coperti dalla
garanzia.
8 Le batterie e i danni dovuti a perdite non sono coperti dalla
garanzia.
9 I filtri non sono stati puliti e sostituiti come da istruzioni.
La presente garanzia non conferisce alcun diritto diverso da
quelli sopra elencati e non copre alcuna richiesta di danni o
perdite consequenziali. La presente garanzia viene offerta a titolo
di vantaggio aggiuntivo e non incide sui diritti del consumatore
previsti dalla legge.
i
23
Page 24

FP403021MEE Rev2.qxp_Morphy Richards Instruction Book 27/07/2015 16:37 Page 24
g Morphy Richards products are intended for household use only.
Morphy Richards has a policy of continuous improvement in product quality and design.
The Company, therefore, reserves the right to change the specification of its models at any
time.
The After Sales Division,
Morphy Richards Ltd, Mexborough, South Yorkshire, England, S64 8AJ
Helpline (office hours) UK 0845 871 0960 Republic of Ireland 1800 409119
o Glen Dimplex Australia
Unit 1, 21 Lionel Road, Mount Waverley, Victoria 3149
T : 1300 556 816
E : sales@glendimplex.com.au
NZ
Glen Dimplex New Zealand
38 Harris Road, East Tamaki, Auckland, New Zealand
T : 09 2748265
E : sales@glendimplex.co.nz
f Les produits Morphy Richards sont conçus pour unusage exclusivement domestique. Voir les
limitations d’usage dans le sous-titre Positionnement des Consignes de sécurité importantes.
Morphy Richards s’engage à mener une politique d’amélioration continue en termes de qualité et
de conception. Le fabricant se réserve donc le droit de modifier sans préavis la spécification de
ses modèles.
Glen Dimplex France
Zl Petite Montagne Sud
12 rue des Cevennes
91017 EVRY - LISSES Cedex
www.glendimplex.fr
T : + 33 (0)1 69 11 11 91 F : + 33 (0)1 60 86 15 24
i I prodotti Morphy Richards sono concepiti esclusivamente per uso domestico.
Morphy Richards è costantemente impegnata a migliorare la qualità e il design dei propri
prodotti, pertanto si riserva il diritto di modificare le specifiche dei diversi modelli in qualunque
momento.
PER ASSISTENZA TECNICA:
HELPLINE 199.193.328 LUN-VEN 9,30-13,00 e 14,30-17,30.
Costo della chiamata 14,26 cent. di Euro al minuto IVA inclusa (da rete fissa).
E : assistenza@necchi.it F : +39-0693496270
I prodotti Morphy Richards sono distribuiti in Italia da:
Necchi Spa, Via Cancelliera 60 00040 Ariccia (RM).
g For electrical products sold within the European Community.
At the end of the electrical products useful life it should not be disposed of with
household waste.
Please recycle where facilities exist.
Check with your Local Authority or retailer for recycling advice in your country.
f Pour les appareils électriques vendus dans la Communauté européenne.
Lorsque les appareils électriques arrivent à la fin de leur vie utile, il ne faut pas les
jeter à la poubelle.
Il faut les recycler dans des centres spécialisés, s’ils existent.
Consultez la municipalité ou le magasin où vous avez acheté l’appareil pour obtenir
des conseils sur le recyclage dans votre pays.
i Per gli elettrodomestici venduti all’interno della Comunità europea.
Al termine della vita utile, non smaltire l’elettrodomestico nei rifiuti domestici.
Riciclarlo laddove esistano le strutture.
Verificare con la Locale Autorità o con il dettagliante in merito alle possibilità di
riciclaggio nel proprio paese.
FP403021MEE Rev 2 07/15
 Loading...