

Page 1

TTwwoo yyeeaarr gguuaarraanntteeee
This guarantee is valid in the UK and Ireland only. It is in
your interest to retain the retailers receipt as proof of purchase. Please
quote the following information if the product develops a fault. These
numbers can be found on the base of the product.
Model No.
Serial No.
All Morphy Richards Products are individually tested before leaving
the factory. In the unlikely event of any appliance proving to be faulty
within 28 days of purchase it should be returned to the place of
purchase for it to be replaced.
If the fault develops after 28 days and within 24 months of original
purchase, you should contact the helpline number quoting Model
number and Serial number on the product, or write to the address
below. You will be asked to return the product (in secure, adequate
packaging)to the address below along with a copy of proof of purchase.
Subject to the exclusions set out below (see ‘Exclusions’) the faulty
appliance will then be repaired or replaced and dispatched usually
within 7 working days of receipt.
If for any reason this item is replaced during the 2 year guarantee
period, the guarantee on the new item will be calculated from original
purchase date. Therefore it is vital to retain your original till receipt or
invoice to indicate the date of initial purchase.
To qualify for the 2 year guarantee the appliance must have been
used according to the manufacturers instructions. For example kettles
should have been regularly descaled or an iron cord should have been
stored as recommended by the instructions.
EExxcclluussiioonnss
Morphy Richards shall not be liable to replace or repair the goods
under the terms of the Guarantee where:
1 The fault has been caused or is attributable to accidental use, mis-
use, negligent use or used contrary to the manufacturers
recommendations or where the fault has been caused by power
surges or damage caused in transit.
2 The appliance has been used on a voltage supply other than that
stamped on the products.
3 Repairs have been attempted by persons other than our service
staff (or authorised dealer).
4Where the appliance has been used for hire purposes or non-
domestic use.
5 Morphy Richards are not liable to carry out any type of servicing
work, under the guarantee.
6 Plastic filters for all Morphy Richards kettles and coffee makers are
not covered by the guarantee.
This guarantee does not confer any rights other than those
expressly set out above and does not cover any claims for
consequential loss or damage. This guarantee is offered as an additional
benefit and does not affect your statutory rights as a consumer.
SSeelleecctt 776600
FFoooodd pprroocceessssoorr wwiitthh bblleennddeerr
Please read and save these instructions
The After Sales Division, Morphy Richards Ltd, Mexborough, South Yorkshire, England, S64 8AJ
Helpline (office hours): UK (local rate) 08450 777700, Republic of Ireland 1800 409119
Page 2

2
UUnnppaacckkiinngg aanndd
uussiinngg yyoouurr
mmaacchhiinnee ffoorr
tthhee ffiirrsstt ttiimmee
Carefully unpack your new
processor and all its
attachments and tools, checking
them against the illustrations at
the beginning of this book to
familiarise yourself with the
product. Remove any stickers
(except for the serial label) and
wash all the parts which are
safe to immerse in water.
NEVER IMMERSE THE
PROCESSOR BODY ⁄ OR
WHISK ARM Ú IN
WATER OR ANY OTHER
LIQUID. These may be wiped
over with a clean, damp cloth but only when unplugged from
the electrical outlet.
EElleeccttrriiccaall
rreeqquuiirreemmeennttss
Place all electrical appliances
out of the reach of children.
Never allow the mains lead to
overhang the work surface.
Check that the voltage on
the rating plate of your
appliance corresponds with
your house electricity supply
which must be A.C. (Alternating
Current).
If the socket outlets in your
home are not suitable for the
plug supplied with this
appliance, the plug should be
removed and the appropriate
one fitted.
The wires in the mains lead
are coloured in accordance
with the following code.
Blue - neutral (N)
Brown - live (L)
ON NO ACCOUNT
MUST EITHER THE
BROWN OR BLUE WIRES
BE CONNECTED TO THE
EARTH TERMINAL.
The 13 amp fitted plug is not
rewireable, should the mains
lead or plug become damaged
in any way, cut off the existing
plug and dispose of it safely. Do
not attempt to refit this this
plug.
WARNING: THE
PLUG REMOVED FROM
THE MAINS LEAD, IF
SEVERED, MUST BE
DESTROYED AS A PLUG
WITH BARED FLEXIBLE
CORD IS HAZARDOUS IF
ENGAGED INTO A LIVE
SOCKET OUTLET.
Check that the existing
mains lead is in good condition
and then fit a rewireable
BS1363 plug.
If you use a 13 amp BS1363
plug, a 3 amp BS1362 fuse must
be fitted.
Thank you for choosing a Morphy Richards Select Food Processor - a machine with
space saving storage, designed to help you prepare all types of dishes and to save you
time and effort too.
Please make sure you read the instructions before using the machine for the first time to be sure that you get the most use out of its many helpful features. Recipes have also
been included for dishes that can be prepared using your Select food processor.
IIMMPPOORRTTAANNTT
SSAAFFEEGGUUAARRDDSS
When using electrical
appliances, basic safety
precautions should always
be followed, including the
following:
1 Read all the instructions.
2 IMPORTANT: THE
METAL BLADE, DISC
ATTACHMENTS AND
BLENDER BLADES ARE
VERY SHARP. Take care
when handling them,
especially when
removing them from the
bowl and when cleaning.
3 To protect against risk
of electrical shock
NEVER immerse the
processor body in water
or any other liquid.
4 NEVER allow a child to
use this product. Close
supervision is necessary
when any appliance is
used near children.
5 Unplug from the mains
when not in use, before
putting on or taking off
attachments, and before
cleaning.
6 Always fit the safety
cover before using the
food processor.
7 Avoid touching moving
parts. Keep hands, hair,
clothing, as well as
spatulas and other
utensils away from
processor tools and
blender blades during
operation, to prevent
personal injury and/or
damage to the appliance.
8 Place the processor
bowl onto the base of
the processor before
fitting any attachments.
9 Do not operate any
appliance with a
damaged lead or plug, or
after an appliance has
malfunctioned, or has
been dropped or
damaged in any way.
Contact Morphy
Richards for advice on
examination, repair or
electrical or mechanical
adjustment.
10 The use of attachments
or tools not
recommended or sold
by Morphy Richards may
cause fire, electric shock
or injury.
11 Do not use outdoors.
12 DO NOT let the mains
lead overhang the edge
of the table or worktop, or touch hot
surfaces.
13 All tools and
attachments should be
removed before
cleaning.
14 DO NOT PLACE THE
APPLIANCE ON OR
NEAR A HOT GAS OR
ELECTRIC HOB, OR IN
A HEATED OVEN.
15 When using the blender,
make sure there are no
tools fitted in the
processor.
16 Do not over fill the
processor or blender.
This could cause damage
to the motor. The 3A
fuse will blow if the
processor or blender
are overloaded. Replace
fuse and do not exceed
the maximum
recommended volumes.
Always refer to the
operating chart.
17 Do not process or
blend for longer than
the time periods
recommended in the
operating chart.
18 When using the
processor or blender,
ensure the lid is in place
before switching on and
do not remove the lid
until the blade has
stopped rotating.
19 When blending hot
liquids, remove the small
blender lid.
20 Always remove the tool
before emptying the
processor bowl of its
contents.
21 Should the mains lead of
the appliance need
replacing, do not
attempt this repair
yourself as special tools
are required. Contact
Morphy Richards
helpline for advice on
service or repair.
22 Never feed the food by
hand. Always use the
food pusher. NEVER
PUT YOUR
FINGERS INTO THE
FEEDER TUBE.
SAVE THESE
INSTRUCTIONS
Page 3
3
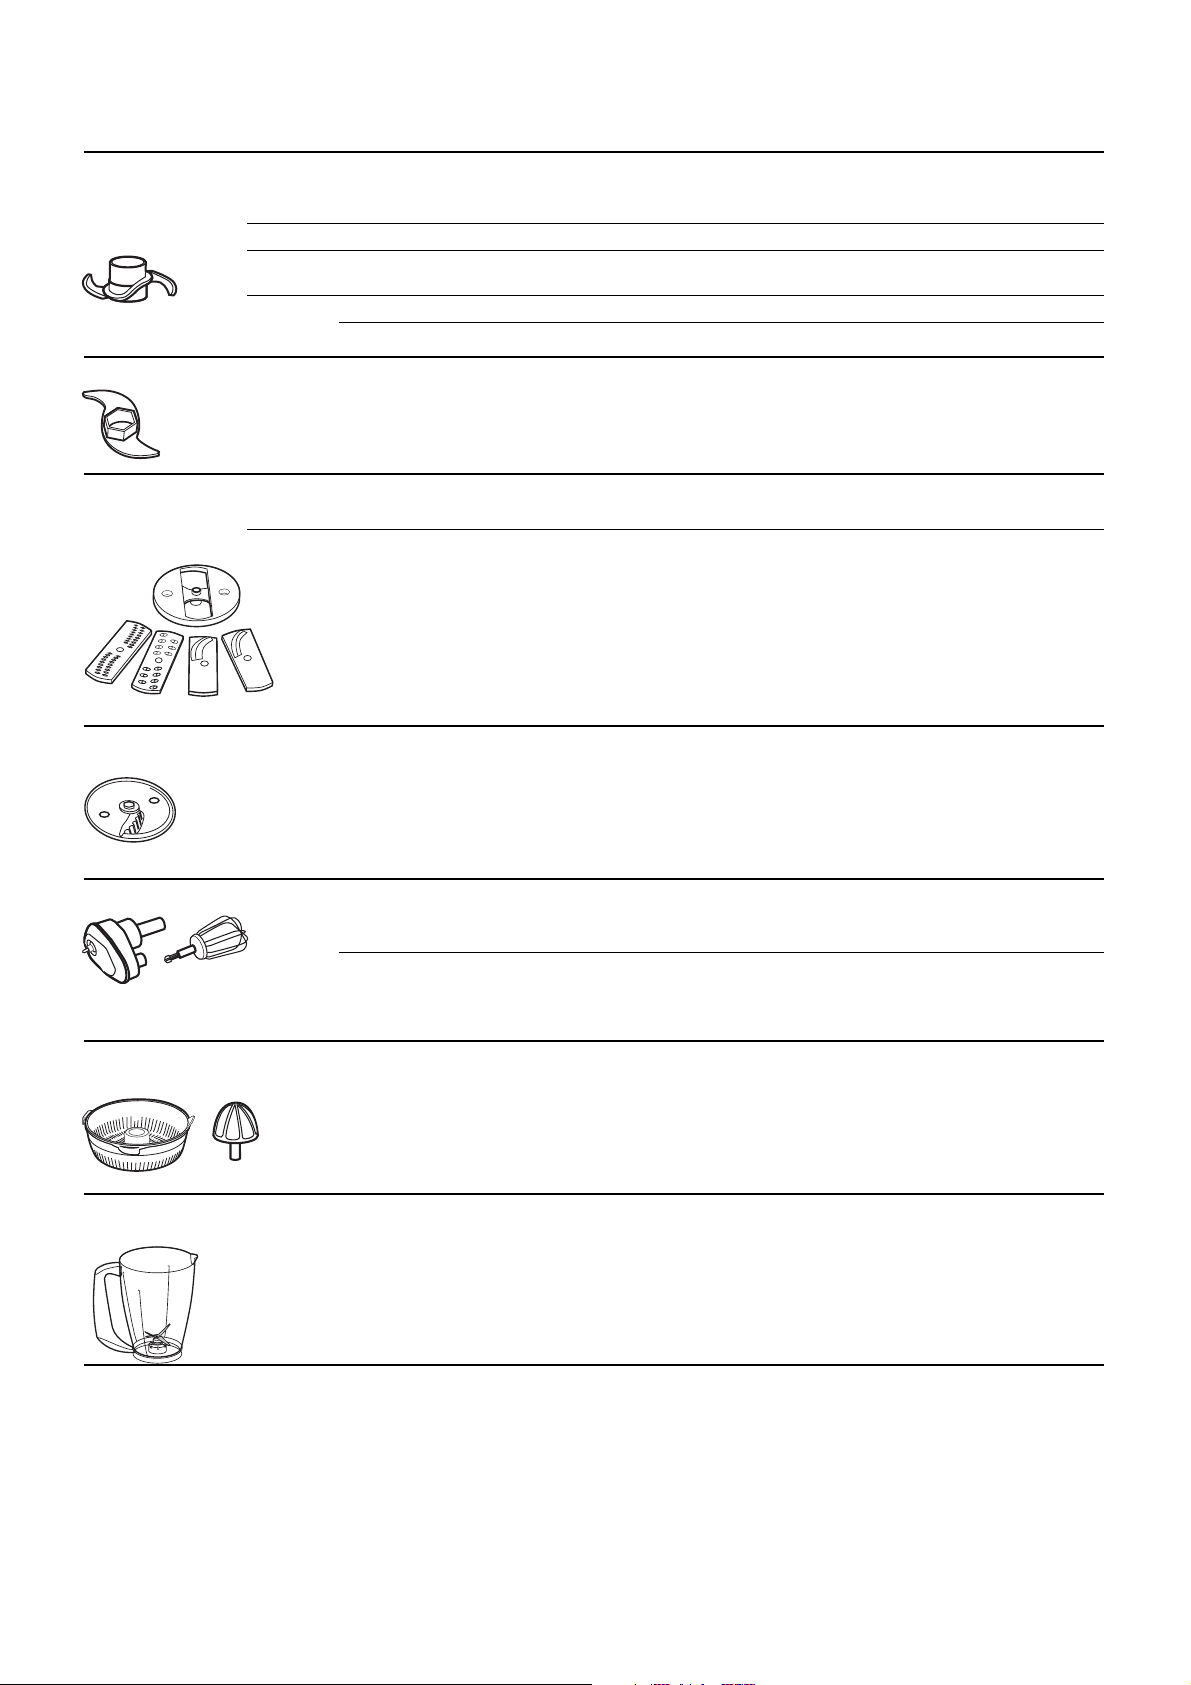
EEaassyy rreeffeerreennccee ttaabbllee
Attachments & tools
Name Function Types of food Max vol. Speed Time Special notes
METAL BLADE Chopping Meat, vegetables, 700g 8-Max 15-20 secs pulse gives control over
cheese, chocolate texture
Blending Soups, drinks 700g 1-8 20 secs
Pureeing Cooked vegetables 600g 5-9 10-15 secs
and potatoes, fruit
Mixing Pastry, scones 350g 5-max 1 min max max vol = weight of flour
Cakes (total weight) 1kg 5-max 1 min max
PLASTIC BLADE Kneading Bread dough 600g flour max 20 secs max vol = weight of flour
400g water + 2 min rest Do not over process
SLICING/
Slicing Vegetables, cheese, 5-6
SHREDDING
potatoes, fruit
BLADES AND
Shredding Vegetables, cheese, 5-6
HOLDER
fruit, chocolate
CHIPPING BLADE Chipping Potatoes, vegetable 5-6 Speed of control depends on
batons thickness required
WHISK Whisking Egg whites 6 eggs 9-max 1-2 mins
(min 2-max 6)
Cream 570ml 9 40-50 secs Do not over process
CITRUS JUICER Juicing Citrus fruits - orange, 1 lt ? Press down
grapefruit, lemon, lime, onto moving
cut into halves citrus press
with cupped
hand. Always
use slowest
speed
BLENDER Blending/ Soup, purees, drinks, 1.5 lt 1-6
15secs-1min
Begin with low
liquidising milkshakes, batters + pulse speed and
increase
to high if
required
DO NOT PROCESS FOR LONGER THAN RECOMMENDED TIME
DO NOT EXCEED RECOMMENDED MAXIMUM VOLUMES
·
Ú
Û
Ô
ı
Ù
Í
Ì
Ó
Î
Ï
ˆ
Page 4
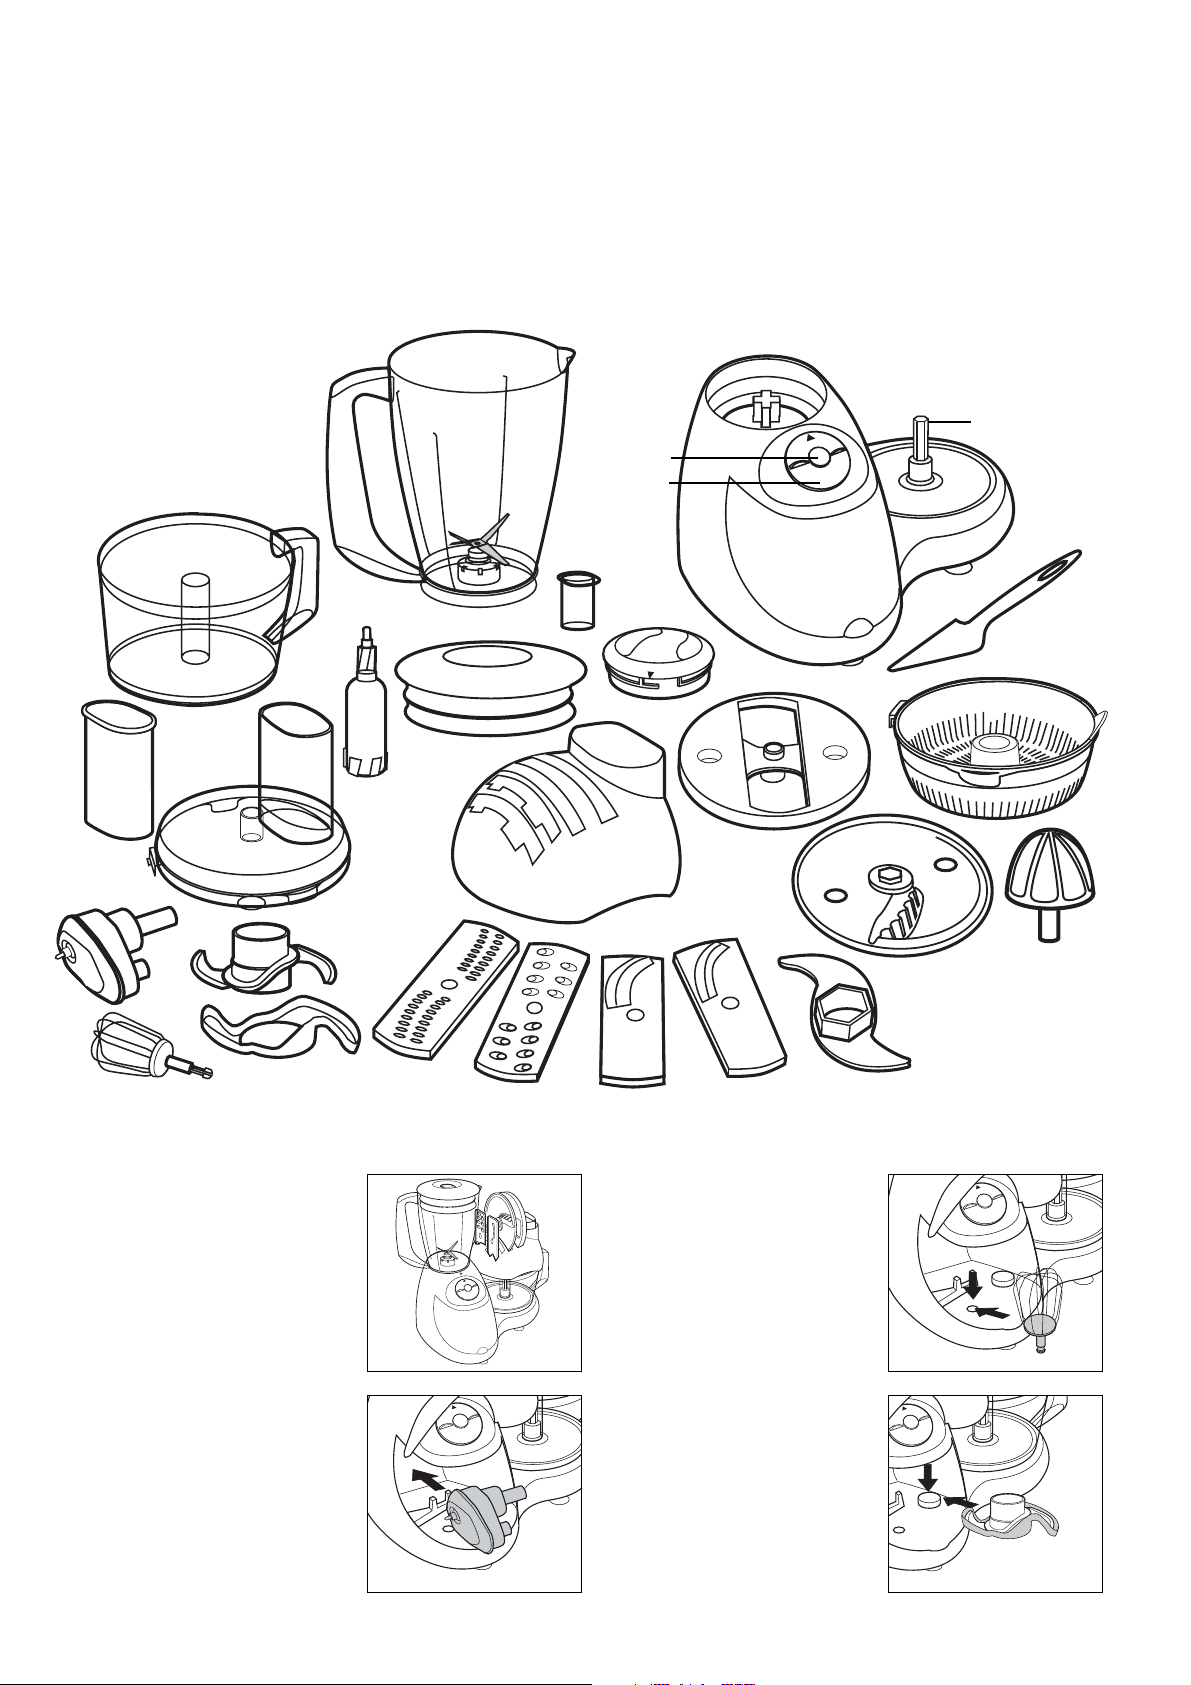
4
FFeeaattuurreess ooff
yyoouurr ffoooodd
pprroocceessssoorr
⁄ Processor body
¤ Safety cover
‹ Safety cover/blender
location
› On/off/speed control dial
fi Pulse button
fl Motor shaft
‡ Storage compartment
· Blender
‚ Blender lid (large)
„ Goblet
‰ Processor bowl
 Spindle
Ê Processor lid
Á Food pusher
Ë Storage dome
È Spatula
Í Blade holder
Î Fine shredding blade
Ï Coarse shredding blade
Ì Coarse slicing blade
Ó Fine slicing blade
Ô Chipping blade
Chopping blade
Ò Chopping blade protective
cover
Ú Whisk arm
Û Whisk head
Ù Citrus press bowl
ı Citrus cone
ˆ Plastic dough blade
⁄
¤
‹
›
fi
fl
Ê
Á
‰
‡
·
‚
Ú
Û
Ô
Ï
È
Ò
Ì
Ë
Î
Í
„
Â
Ó
ı
Ù
ˆ
SSttoorraaggee
The Select food processors
have been designed so that most
of the attachments can be stored
‘on-board’.
SSttoorraaggee ccoommppaarrttmmeenntt
1 Lift the lid of storage
compartment ‡.
2 Place whisk arm Ú in storage
compartment as indicated.
3 Push shaft of whisk head Û
firmly into the hole.
4 Place the protective cover
on to the chopping blade Ò
and place into storage
compartment. The highest part
of the blade should be placed
at the back of the
compartment.
5 Close the lid of storage
compartment.
Page 5

SSttoorraaggee ddoommee
1 Fit the processor bowl ‰ and
processor lid Ê onto the
processor base.
2 Place the storage dome Ë
onto the processor lid.
3 Add the spindle  into the
circular hole in the storage
dome.
4 Place the plastic blade holder
Í and metal chipping disc Ô
into the two longer slots.
5 Add the slicing blades Ì Ó
and shredding blades Î Ï
into their slots in the storage
dome.
SSppaattuullaa
Slide the spatula È into the
slot provided on the side of the
processor body ⁄.
CCoorrdd ssttoorraaggee
The mains lead can be stored
by feeding it into the opening at
the back of the processor body.
OOppeerraattiinngg
ccoonnttrroollss
The processor and blender
control dials have settings as
follows:
Off/9+ speeds
Pulse
The speed can be adjusted
whilst the processor or blender is
in use.
Using the pulse button allows
greater control over the texture
of the food produced. It is only
intended to be used for short
‘bursts’ of processing or blending.
OOppeerraattiinngg tthhee
ffoooodd pprroocceessssoorr
SSeettttiinngg uupp
1 Ensure the processor is
unplugged from the mains.
2 Fit the safety cover ¤ into the
processor body and turn anti-
clockwise firmly until it ‘clicks’
into place (the arrows will now
be lined up). THE FOOD
PROCESSOR WILL NOT
OPERATE WITHOUT THE
SAFETY COVER IN PLACE.
3 Place the processor bowl ‰
onto the processor body ⁄,
(there is no need to turn the
bowl).
4 When fitted correctly, the
handle will be to the right of
the assembly, and the ridge on
the base of the bowl will fit
into the slot at the back of the
processor body.
5 Fit the spindle  onto the
motor shaft fl and the
appropriate attachments onto
the spindle. Refer to following
section, ‘Fitting and using the
tools’.
6 Holding the processor lid Ê
by the feed tube, fit the lid by
rotating anti-clockwise.
5
Page 6

7 Ensure that the lid tab has
‘clicked’ into place and the
arrows are lined up.
8 Plug in the processor and
switch on. If the processor
does not come on, check that
the machine cover and
processor lid are both
correctly fitted.
FOR SAFETY, ALWAYS USE
THE PUSHER WHEN
PUTTING FOOD INTO THE
FEEDER TUBE. NEVER FEED
BY HAND.
FFiittttiinngg aanndd
uussiinngg tthhee ttoooollss
In general, all attachments
which are fitted within the
processor bowl must be firmly
attached to the spindle Â. Always
adjust the attachments until you
are sure that they are correctly
fitted.
CChhooppppiinngg bbllaaddee
1 Fit the processor bowl and
spindle as detailed previously.
2 Remove the protective cover
Ò from the metal chopping
blade.
3 Fit the blade over the spindle
and press firmly into place.
WARNING: USE
EXTREME CAUTION -
BLADES ARE SHARP.
ALWAYS HANDLE THE
CHOPPING BLADE BY
ITS CENTRAL PLASTIC
SECTION.
4 Place the food into the bowl.
5 Fit the lid and click into place
as detailed in the ‘Setting up’
section.
6 Plug in the processor.
7 Use the food pusher Á to add
food into the processor bowl
through the feeder tube.
8 When the processing is
complete, remove the spindle
and blade from the bowl
before removing the processed
food.
9 AFTER CLEANING, ALWAYS
REPLACE THE PROTECTIVE
COVER Ò ON THE METAL
CHOPPING BLADE .
PPllaassttiicc ddoouugghh bbllaaddee
Ú
1 Fit the processor bowl and
spindle as detailed previously.
2 Fit the plastic dough blade over
the spindle and press firmly
into place.
3 Place the ingredients into the
bowl.
4 Fit the lid and click into place
as detailed in the ‘Setting up’
section.
5 Plug in the processor.
6 Turn the processor on
selecting maximum speed
7 Remove the blade from the
bowl before the dough.
WHEN KNEADING DOUGH,
DO NOT OPERATE THE
MACHINE LONGER THAN 20
SECONDS. AFTERWARDS WAIT
AT LEAST 2 MINUTES BEFORE
OPERATING THE MACHINE
AGAIN.
FOR SAFETY, ALWAYS
LEAVE THE PUSHER IN
PLACE WHILST
OPERATING THE
PROCESSOR
WWhhiisskk aarrmm Úaanndd wwhhiisskk
hheeaadd
Û
1 Fit the processor bowl as
detailed previously.
2 Click the whisk head into the
short extension of the whisk
arm.
3 Place the long extension of the
whisking arm onto the motor
shaft fl.
4 Add ingredients into the bowl.
5 Fit the lid and click into place
as detailed in the ‘Setting up’
section.
6 Plug in the processor.
7 Turn the processor on
selecting maximum speed
NEVER USE THE WHISK
ATTACHMENT FOR DOUGH
KNEADING.
DO NOT IMMERSE THE WHISK
ARM Ú IN LIQUID.
To clean the whisk head
remove it from the whisk arm and
wash. Wipe the whisk arm clean
with a damp cloth.
6
Page 7
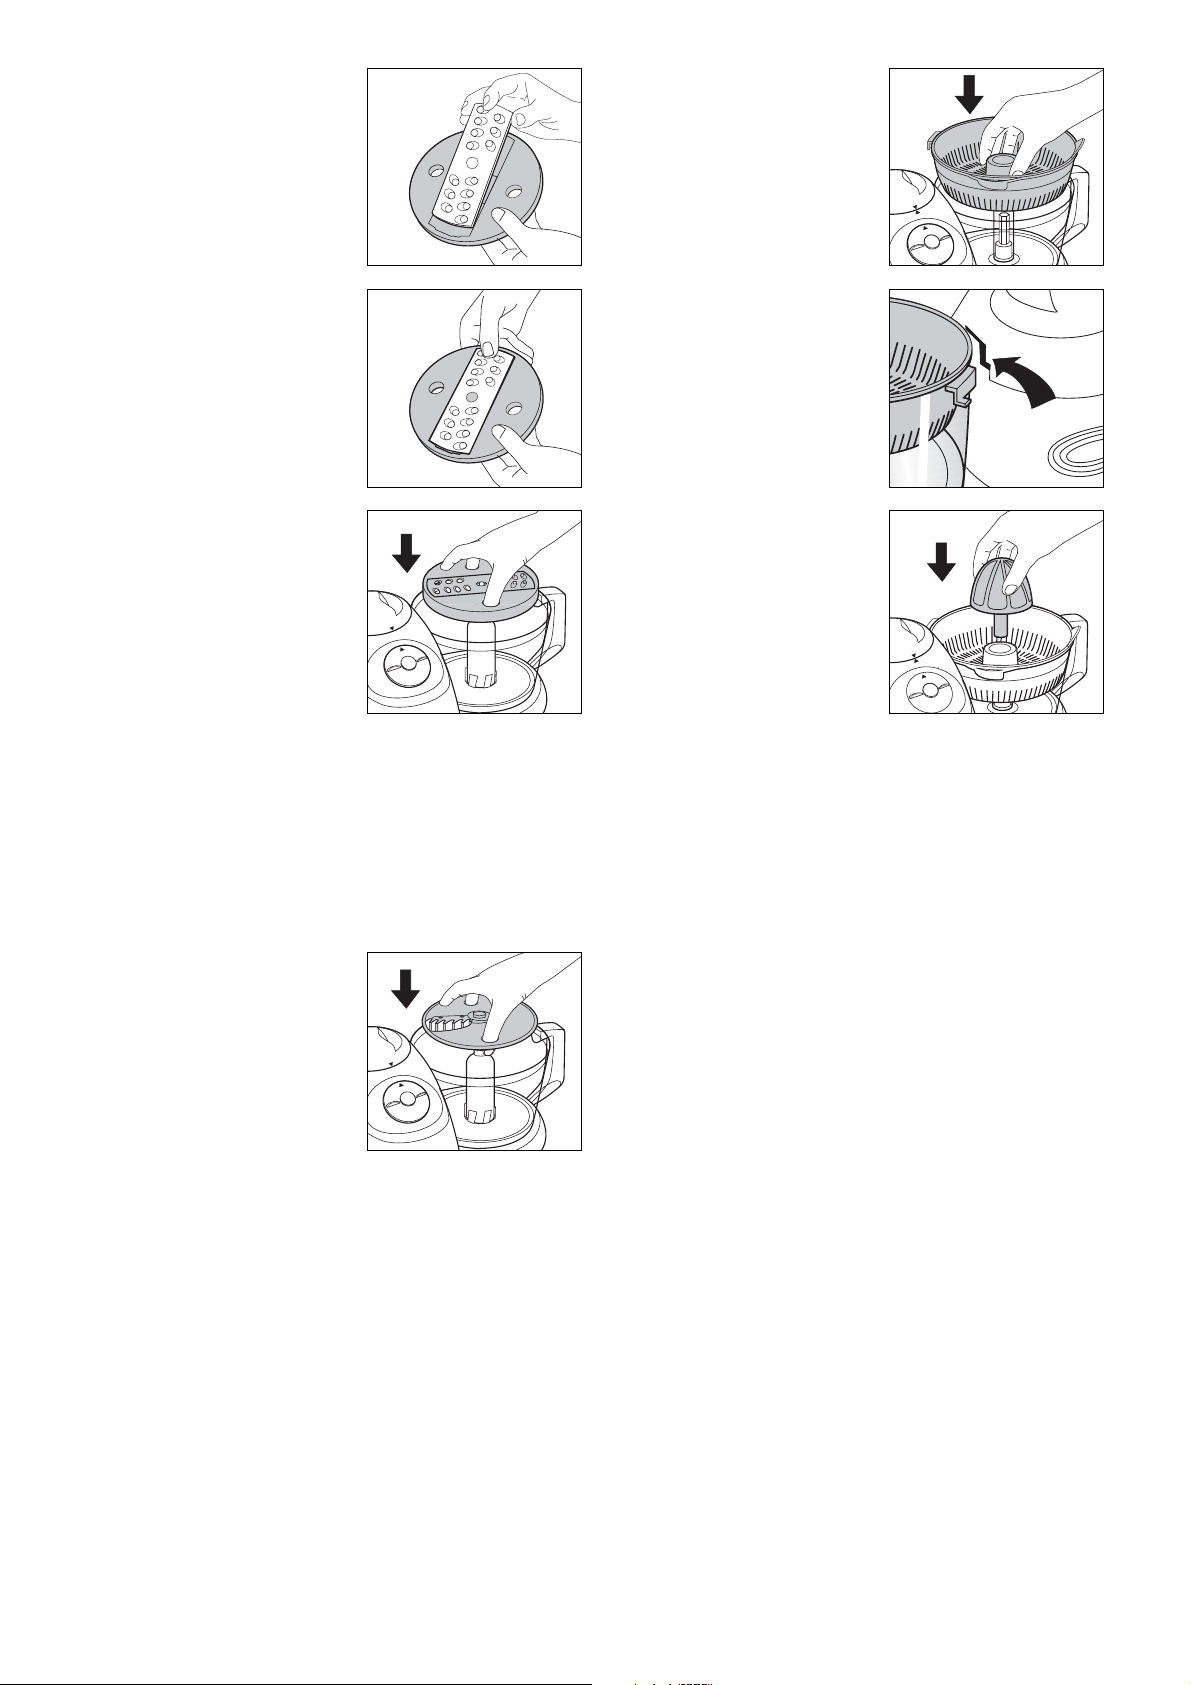
SSlliicciinngg aanndd sshhrreeddddiinngg bbllaaddeess
1 Place the blade of your choice
on the blade holder Í,
inserting the longer tab on the
side on the blade first.
2 Press the other end of the
blade until it ‘clicks’ into place.
3 Fit the processor bowl and
spindle as detailed previously.
4 Using the finger holes in the
blade holder, fit it over the
spindle and press firmly into
place as indicated.
WARNING: USE
EXTREME CAUTION BLADES ARE SHARP.
5 Fit the lid and click into place
as detailed in the ‘Setting up’
section.
6 Plug in the processor.
7 Use the food pusher Á to add
food into the processor bowl
through the feeder tube.
CChhiippppiinngg bbllaaddee
Ô
1 Fit the processor bowl and
spindle as detailed previously.
2 Using the finger holes in the
chipping blade, fit it over the
spindle and press firmly into
place as indicated.
WARNING: USE
EXTREME CAUTION BLADES ARE SHARP.
3 Fit the lid and click into place
as detailed in the ‘Setting up’
section.
4 Plug in the processor.
5 Use the food pusher Á to add
food into the processor bowl
through the feeder tube.
CCiittrruuss jjuuiicceerr
1 Fit the processor bowl as
detailed previously.
2 Fit the citrus press bowl Ù
into the processor bowl.
3 Rotate anti-clockwise. Ensure
that the citrus press bowl tab
has ‘clicked’ into place.
4 Insert the citrus cone ı into
the centre of the citrus press
bowl, with its shaft inside the
central column of the bowl.
5 Plug in processor
6 Place fruit on citrus cone and
hold with a cupped hand.
7 Turn speed control to MIN.
WARNING: ALWAYS
OPERATE THE JUICER
AT MINIMUM SPEED
ONLY.
7
Page 8

BBlleennddeerr
·
1 Remove the processor bowl
and lid.
2 Remove the safety cover ¤.
This can only be done once
the processor lid has been
removed.
3 Place the blender · into its
location on the processor
body, with handle to the left.
Turn anti-clockwise until
blender clicks in place and
the arrows are aligned.
4 Place food in blender.
5 Place the lid ‚ and goblet
„ on the blender.
6 Replace the processor bowl
and processor lid. Ensure
that the lid tab has clicked
into place. The blender will
not operate if the processor
lid is not ‘clicked’ in place.
7 Plug in the processor.
8 Always operate the blender
with the lid in place.
9 When blending hot liquids,
remove the goblet „.
10Never operate the blender
with more than 1500ml of
liquid or when empty.
TO REMOVE BLENDER,
YOU MUST FIRST UNLOCK
AND REMOVE THE
PROCESSOR LID.
FOR SAFETY, DO NOT
FIT ANY ATTACHMENTS
INTO THE FOOD
PROCESSOR BOWL
WHEN USING THE
BLENDER.
CClleeaanniinngg tthhee
pprroocceessssoorr aanndd
aattttaacchhmmeennttss
1 Switch the processor off and
unplug from the electrical
socket.
2 All accessories and
processor tools can be
washed in hot soapy water
except for the processor
body ⁄ and the whisk arm
Ú. WARNING:
EXTREME CARE MUST
BE TAKEN WHEN
WASHING THE METAL
BLADES AS THESE
ITEMS ARE
EXTREMELY SHARP.
3 The stainless steel blades
and citrus press are the only
dishwasher-safe items.
4 Clean the processor body
and whisk arm by wiping
with a damp cloth. ALWAYS
UNPLUG THE
PROCESSOR BODY
BEFORE CLEANING.
5 To clean the blender · fill
with warm water and
washing up liquid, run for 30
seconds on maximum speed
and repeat as necessary.
HHiinnttss aanndd ttiippss
• The metal blade can be
used for chopping meat, fish
vegetables, cheese etc,
setting the speed to
maximum.
• For finer chopping, increase
the length of time you
process.
• For coarser chopping, use
the pulse button for a few
seconds and monitor food
texture.
• Pre-cut larger pieces to
make them fit into the feed
tube. When chopping hard
foods (eg meat, cheese) cut
into 1 inch/2.5cm cubes.
• For shredding and chipping,
place food horizontally into
the feed tube, for slicing
place the food vertically.
• When blending, pour the
liquids in first and then add
the solid food. Begin
blending at the lower speed
and increase when needed.
• When slicing carrots, place 2
at a time in the feeder tube
to keep upright.
8
Page 9

9
RReecciippeess
SSaavvoouurryy ttrreeaattss
White bread
Makes 2 loaves or 12 rolls
Preparation time 5 minutes
Cooking time 30 minutes
Standing time 60 minutes
Ingredients
500g plain flour
300g (+/- 10g) lukewarm water
1 teaspoon salt
20g dry yeast
Cooking instructions
Mix the yeast with 3 tablespoons of warm water until it dissolves.
Using the plastic dough blade, mix together the flour, diluted yeast
and salt at speed 3 and press the 'pulse' button for six short bursts.
Whilst keeping the processor at speed 3 pour in the remainder
of the water through the feeder tube and continue for a further 20
seconds.
Increase the speed to maximum and continue kneading for another
30 seconds or until dough has a smooth and supple texture. Interrupt
this process at least twice to flatten the dough with your hand.
Remove the dough from the processor bowl and leave to stand
on a surface dusted with flour for approximately 15 minutes.
Divide the dough into two loaves or twelve rolls as desired and
shape as required. Place it on a flour dusted oven tray, cover with
a cloth and store in a warm place (approximately 15°C) for 40-50
minutes to allow it to rise.
Remove the cloth and place the dough in a pre-heated oven at
240°C/Gas mark 8 and bake for approximately 30 minutes.
Helpful tips
• The dough should rise up to twice its original size
• Putting a glass of water in the oven can help the crust to form
• Do not allow the dry yeast to come into contact with the salt
Farmhouse Paté
Serves 6
Preparation time 15 minutes
Cooking time 75 minutes
Ingredients
250g boneless pork loin
200g bacon fat
200g shoulder of veal
150g mushrooms
4 sprigs of parsley
1 bay leaf
1 sprig of thyme
1 shallot
1 egg
1 teaspoon salt
nutmeg and pepper to taste
Cooking instructions
Place the metal chopping blade into the processor bowl. Dice
all the meat into large chunks and add to the processor bowl.
Chop the meat for 10 seconds at maximum speed. Press the
‘pulse’ button for 5 short bursts.
Transfer the meat into another container and mix in the brandy.
Using the slicing blade, slice the washed mushrooms at speed
5-6 for a few seconds and add to the meat.
Chop the parsley and shallot and add to mixture. Stir in the egg
and season with salt, pepper and nutmeg.
Smooth out the mixture in a 1 litre terrine, sprinkle the thyme
leaves and garnish with the bay leaf.
Place the terrine in a simmering bain-marie and cook in a pre-
heated oven at 180°C/Gas mark 6 for 75 minutes.
Leave the terrine to cool before serving
Leek and potato soup
Serves 4
Preparation time 10 minutes
Cooking time 20 minutes
Ingredients
150g leeks
150g potatoes
200ml water
2 chicken stock cubes
salt and pepper to taste
Cooking instructions
Wash, peel and dice the potatoes. Wash the leeks and remove
excess green.
Place the slicing disc in the processor and slice the leeks at
speed 5-6.
Pour the water into a large pan, add the chicken stock and
bring to boil.
Add the sliced leeks, diced potatoes and salt, and cook for a
further 20 minutes.
Allow the mixture to cool for 60 minutes.
Attach the blender to the processor body, pour in the mixture
and blend at maximum until the mixture is smooth.
Pour the mixture back into the pan and bring to boil.
Potato Gratin
Serves 4
Preparation time 10 minutes
Cooking time 45 minutes
Ingredients
600g potatoes
150ml milk
1 clove garlic
2 egg yolks
100g fresh cream
1
/
2
teaspoon nutmeg
25g mild cheddar cheese
10g butter
salt and pepper to taste
Cooking instructions
Shred the cheese using the shredding blade in the processor
bowl at speed 5-6 and place to one side.
Replace the shredding disc with the slicing disc. Feed the
potatoes through the feeder tube and slice at speed 5-6.
Chop the garlic into tiny cubes and spread in an oven dish
along with the sliced potatoes.
Replace the slicing disk with the whisk attachments and pour in
the cream, milk, egg yolks, salt, pepper and nutmeg. Whisk at
speed 9 for 30 seconds.
Pour the mixture over the potatoes, sprinkle with cheese and
small knobs of butter and cook for 45 minutes.
Ì
Ì
·
Ï
Î
Ú
Û
Page 10

10
Chilli con carne
Serves 4
Preparation time 10 minutes
Cooking time 25 minutes
Ingredients
1 tin kidney beans
1 tin tomatoes
1 large onion
1 clove garlic
75g streaky bacon
350g beef steak
1 beef stock cube
150ml water
2 tablespoons oil
1 teaspoon marjoram
1 teaspoon caraway seeds
2 tablespoons tomato pureé
salt and pepper to taste
Cooking instructions
Finely chop the onion, garlic clove and put to one side. Prepare
the stock and put to one side.
Cut the bacon and steak into reasonable sized cubes. Place the
chopping blade in the processor bowl and chop the bacon and
steak on maximum speed for approximately 15-20 seconds. Finally,
press the 'pulse' button for 4 to 5 short bursts.
Transfer the meat into another container and add the chopped
onions and garlic.
Put the tomatoes in the processor bowl and chop using the
'pulse' button. Add the tomato pureé and put to one side.
Heat the oil in a pan and cook the onion, garlic, bacon and
meat for approximately 5 minutes. Add the pimentos, marjoram,
caraway, salt and pepper and cook for a little longer.
Pour in the tomato mixture and stock and cook for a further
15 minutes, stirring occasionally.
Finally, add the drained kidney beans and leave to cook for a
further 15 minutes, stirring occasionally.
Quiche Lorraine
Serves 4
Preparation time 15 minutes
Cooking time 45 minutes
Ingredients
Filling
120g bacon
2 eggs
100ml milk
130g fresh cream
ground nutmeg, salt and pepper to taste
Pastry
70g butter
130 g flour
40ml water
salt
Cooking instructions
Put the flour in the processor bowl , add a pinch of salt and the
butter cubes. Using the dough blade, mix at maximum speed for
approximately 10 seconds.
Whilst keeping the processor on, add the water through the
feeder tube and knead for a further 15 seconds on maximum
speed or until the mixture forms into a pastry ball. Remove the
pastry and stand for 30 minutes in a cool place.
Roll out the pastry in a 25cm greased flan dish and place in a
pre-heated oven at 210°C/Gas mark 7 for 15 minutes.
Chop the bacon and dry fry in a pan until lightly browned. Dry
any excess fat with a kitchen towel.
Beat the eggs using the whisk for 20 seconds at speed 9.
Add the milk, cream, salt, pepper and ground nutmeg. Whisk
for a further 15 seconds.
Evenly sprinkle the bacon across the pre-cooked pastry base
and pour the mixture on top. Replace the dish in the oven and
cook for a further 30 minutes.
Bolognaise sauce
Serves 4
Preparation time 10 minutes
Cooking time 30 minutes
Ingredients
200g beef
50g bacon
1 onion
1 carrot
1 clove garlic
1 celery stick
1 tablespoon olive oil
1 can tomatoes
2 teaspoons tomato pureé
1 beef stock cube
100ml water
salt and pepper to taste
few sprigs of thyme, parsley and bay leaf
Cooking instructions
Dice the beef and bacon and chop using the chopping blade at
maximum speed for 15-20 seconds and put to one side.
Peel the carrot, celery, garlic and onion and cut into pieces.
Using the chopping blade, chop at maximum and put to one side.
Put the tomatoes in the processor bowl and chop using the ‘pulse’
button and add the tomato pureé.
Heat the oil in a pan and brown the vegetable mixture for
approximately 5 minutes. Add the meat and mix. Add the tomato
mixture, beef stock and season with herbs, salt and pepper.
Leave to cook for 30 minutes on a low heat, stirring
occasionally. Serve with a pasta.
Page 11

11
DDeesssseerrttss
Banana fritters
Serves 4
Preparation time 15 minutes
Cooking time 15 minutes
Ingredients
4 bananas
10g dry yeast
100g flour
150ml light lager
4 tablespoons oil
Cooking instructions
Dilute the yeast with 3 tablespoons water. Put the flour in the
processor bowl and add diluted yeast. Mix using the metal blade at
speed 5-max for 20 seconds.
Whilst the processor is still working, gradually pour in the lager
through the feeder tube and increase the speed to 8. Mix for 30
seconds or until mixture is smooth.
Leave the mixture to stand for 30 minutes.
Slice the bananas. Heat a tablespoon of oil in a frying pan, dip
the bananas into the mixture and cook (both sides) for 30
seconds.
Serve with an ice cream of your choice.
Apple crumble
Serves 4
Preparation time 10 minutes
Cooking time 45 minutes
Ingredients
900g Golden Delicious apples
200g blackberries
1
/
2
teaspoon ground cinnamon
2 tablespoons lemon juice
140g flour
75g butter
75g sugar
100ml water
Cooking instructions
Put peeled and cubed apples into a heated saucepan with the
lemon juice, cinnamon and water. Cover and cook for 15 minutes.
Put the flour, sugar and diced butter in the processor bowl.
Mix using the metal chopping blade at speed 5 for approximately
10 seconds (Do not allow the mixture to become a smooth
pastry). Finally, finish by using the 'pulse' a few times to crumb the
mixture.
Strain any excess juice from the apples and arrange in a cake
mould (approximately 22cm). Arrange the blackberries and finally
cover with the crumble.
Bake in a pre-heated oven at 220°C/Gas mark 7 for
approximately 45 minutes. The crumble should form a golden
crunchy crust on the fruit.
Chocolate mousse
Serves 4
Preparation time 10 minutes
Cooking time 15 minutes
Ingredients
200g plain cooking chocolate
4 eggs
1 tablespoon fresh cream
30g butter
40g sugar
Cooking instruction
Break the chocolate into pieces and place in a bowl.
Melt the chocolate by placing the bowl in hot water.
Add 2 tablespoons of water and the diced butter to the
chocolate and stir to obtain a smooth texture.
Pour the egg yolks (save egg whites) and 20g of the sugar into
the processor bowl and whisk using the whisk attachment at speed
9 for 30 seconds. Add the cream and whisk at the same speed for
a further 15 seconds.
Lower the speed to 4 and gradually pour in the melted
chocolate through the feeder tube. Mix this for 20 seconds and
place to one side.
After cleaning the processor bowl, whisk the egg whites at
speed 9 until soft and fluffy.
Add a pinch of salt and pour remainder of the sugar through
the feeder tube and whisk for a further 10 seconds.
Gently fold the whisked egg whites with the chocolate mix (fold
mixture as little as possible). Leave to chill for at least 30 minutes
before serving.
DDeelliicciioouuss sshhaakkeess
Banana milkshake
Serves 4
Preparation time 5 minutes
Cooking time 5 minutes
Ingredients
2 ripened bananas
2 scoops vanilla ice cream
2 teaspoons sugar
400ml cold milk
Instructions
Skin and dice the bananas and put in the blender.
Add the ice cream, sugar and milk.
Blend at maximum until the mixture is blended and frothy.
This recipe can be adjusted to your taste by varying the fruit
and flavour of the ice cream used.
Ú
Û
·
Page 12

444/8502/79 Rev 1
Morphy Richards products are intended for household
use only.
Morphy Richards has a policy of continuous improvement in
product quality and design. The Company, therefore, reserves
the right to change the specification of its models at any time.
The After Sales Division, Morphy Richards Ltd,
Mexborough, South Yorkshire, England, S64 8AJ
Helpline (office hours): UK (local rate) 08450 777700,
Republic of Ireland 1800 409119
 Loading...