

○○○○○○○○○○○○○○○○○○○○○○○○○○○○○○○○○○○○○○○○○○○○○○○○○○○○○○○○○○○○○○○○○○○
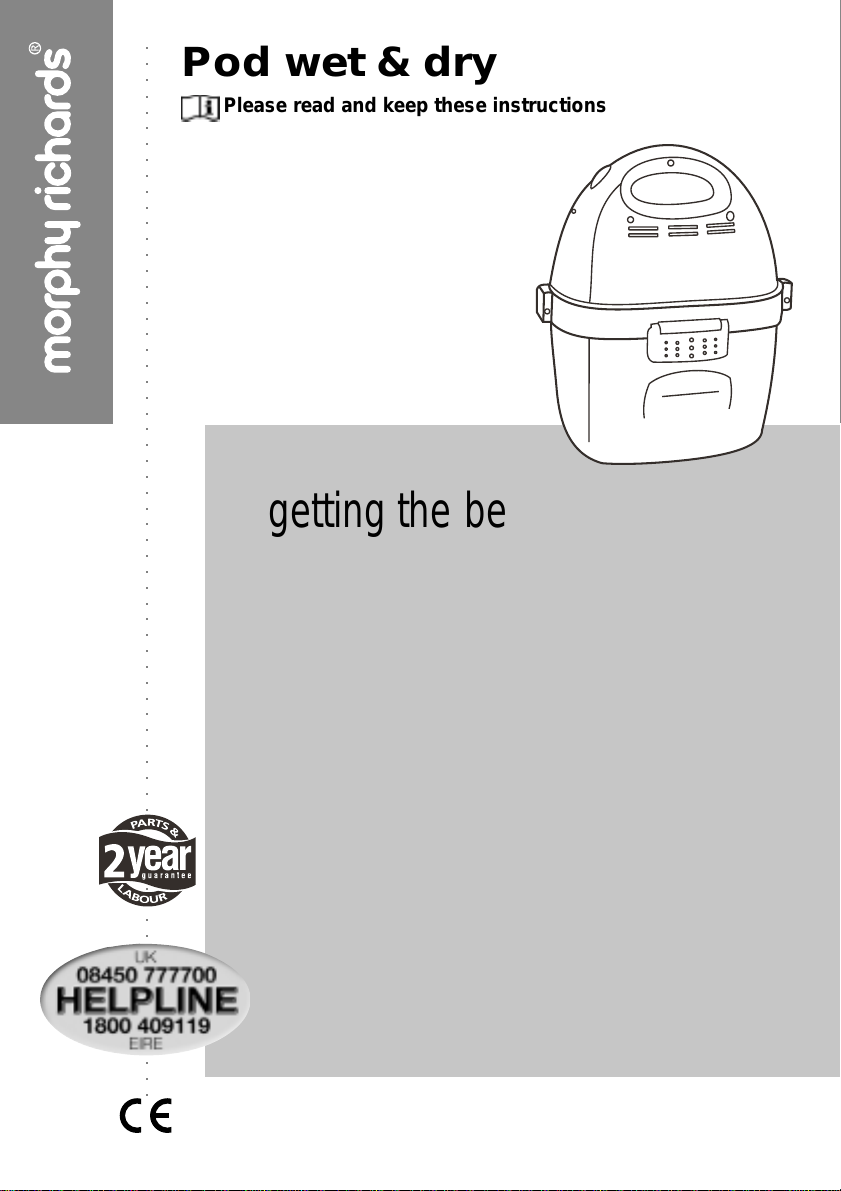
Pod wet & dry
Please read and keep these instructions
getting the best from your
new cleaner...
If your cleaner is not picking up as well as it
should, please check
• Filters
It is important that the filter is cleaned regularly to allow air through the
appliance.
A spare filter is provided to allow you to continue using your POD vacuum
whilst the original filter is washed and dried. (see page 6)
• Blockages
Check the nozzle, tubes and hose for blockages.
• Charging
Check that your cleaner is fully charged before using. Do not overcharge.
(see page 5)
www.morphyrichards.co.uk
Important safety
instructions
○○○○○○○○○○○○○○○○○○○○○
The use of any electrical appliance
requires the following basic common
sense safety rules.
Primarily there is danger of injury or
death and secondly the danger of
damage to the appliance. These are
indicated in the text by the following two
conventions:
WARNING: Danger to the person!
IMPORTANT: Damage to the
appliance! In addition we offer the
following safety advice.
Location
○○○○○○○○○○○○○○○○○○○○○
• Do not use or keep this product
outside when it is raining.
• Do not store the appliance near hot
ovens or heating appliances.
Children
○○○○○○○○○○○○○○○○○○○○○
• Children do not understand the
dangers associated with operating
electrical appliances. Never allow
children to use this appliance.
Other safety considerations
○○○○○○○○○○○○○○○○○○○○○
• Never use in the presence of explosive
liquids or vapours.
• Never pick up inflammable or
poisonous liquids such as petrol,
copier toner, or other volatile
substances. Never pick up acids,
asbestos or asbestos dust.
• Always disconnect the appliance from
the mains supply after use or prior to
cleaning or replacing dust bags.
• The appliance should never be left
running unsupervised.
• Repairs to electrical appliances are
only to be undertaken by trained
personnel. Unprofessional repairs can
be dangerous for users.
• Use only genuine Morphy Richards
spare parts and accessories.
Product safety
○○○○○○○○○○○○○○○○○○○○○
• Never use the appliance without the
filter installed.
• Never use the appliance to vacuum hot
ashes, broken glass or sharp objects.
• Never modify the cleaner in any way.
• To protect against fire, electric shock
and personal injury do not immerse
cord, plug or cleaner in water or other
liquid.
2

Battery Disposal
○○○○○○○○○○○○○○○○○○○○○
Electrical
This product contains a sealed lead acid
battery. When it reaches the end of its useful life
it must not be disposed of in normal household
waste. The battery must be removed and
disposed of at an authorised recycling plant. Y our
local authority will have a centre which accepts
such waste for recycling.
T o remove the battery see battery
replacement page 7.
pb
pb
Features
○○○○○○○○○○○○○○○○○○○○○
Handle
On/off switch
LED charging indicator
Tank
(6 & 7 stored on underside)
Nozzle
Brush attachment
Upholstery wet pick up
attachment
Crevice tool
Carrying strap
Screws
Hose
Charging unit
latches
Inlet hole
Accessory clip
Battery door
Charging socket
Motor unit
18
requirements
○○○○○○○○○○○○○○○○○○○○○
Check that the voltage on the rating plate of
your charger unit corresponds with your house
electricity supply which must be A.C. (Alternating
Current).
Use only the charger unit supplied.
18
3

Quick start
○○○○○○○○○○○○○○○○○○○○○
1 Ensure the unit is fully charged.
2 Assemble the nozzle, and hose as described
below.
3 Ensure you have the filter installed correctly.
4 Switch on the unit by sliding the on/off switch
downwards.
Accessories
○○○○○○○○○○○○○○○○○○○○○
1 Fit the hose to the cleaner by inserting the
hose end (short end) into the hose inlet .
2 When removing push the release button in
and pull the hose out.
release
button
4 Attach the upholstery/wet pick up attachment
to the hose.
5 Attach the brush for hard surfaces,
pelmets and delicate objects etc.
3 Attach the crevice tool to the hose
nozzle (for those awkward places,
behind radiators etc). Twist slightly
to tighten the connection.
Carrying strap
○○○○○○○○○○○○○○○○○○○○○
1 Insert the strap end into the end hole on both
sides of the unit. Fasten the supplied screws
with a ‘cross’ head screwdriver.
4

Charging the battery
○○○○○○○○○○○○○○○○○○○○○
Y our vacuum cleaner comes with the battery
fully assembled. The battery will be in a low
charge condition. It should be charged for 20-24
hours prior to initial use.
Note: Charging should not be carried o ut
when the ambient temperature is below 0oC or
above +40oC.
The charging unit will become warm during
use. This is normal.
IMPORTANT: Do not charge for more than
72 hours as overcharging may damage the
battery. Do not allow the battery to completely
discharge. Low suction indicates a low battery.
Recharge the battery as soon as possible.
To Recharge
1 Slide the on/off switch to the off position.
2 Insert the connector plug from the end of the
charging unit into the charging socket
on the cleaner.
Controls
○○○○○○○○○○○○○○○○○○○○○
1 Slide the on/off switch downwards to turn
the unit on.
2 Slide upwards to switch the unit off.
Dry pick up
○○○○○○○○○○○○○○○○○○○○○
1 Disconnect the unit from the charging
adaptor .
2 Slide the on/off switch downwards to turn the
unit on.
3 When picking up dry debris, vacuum in any
direction until the area is clean. For heavily
soiled areas, a backwards and forwards
sweeping motion should be used. A brush
attachment is included for cleaning the
carpet.
Wet pick up
○○○○○○○○○○○○○○○○○○○○○
Empty the container before picking up liquid
or wet debris.
1 Do not suck in liquid above the ‘FILL LINE’
marking. Handle with care when you have
liquid inside the tank.
3 Plug the charging unit into the electrical
socket, the LED charging indicator will
light up. This indicates that the unit is
charging correctly.
When the battery is fully charged the LED
indicator will go off.
4 Remove the charger unit from the electrical
outlet socket then remove the connector plug
from the cleaner.
IMPORT ANT : Do not use the cleaner with the
charger unit connected.
IMPORT ANT : Keep the water away from the
tank cover/motor unit as this could damage the
unit.
2 After use rinse the tank and filter in warm
water (no detergent) and thoroughly dry
before re-assembly.
5

Emptying the tank
○○○○○○○○○○○○○○○○○○○○○
1 T o empty , pull out the latches on both
sides of the unit.
2 Lift up the tank cover/motor unit.
3 Deposit the waste contents in a bin
and liquid contents in a suitable drain.
I
Cleaning the filter
○○○○○○○○○○○○○○○○○○○○○
1 The cloth filter must be cleaned on a
regular basis to maintain suction. The
efficiency of the vacuum is largely
dependant on the filter.
2 T o clean the reusable filter , remove the lid
and shake off loose dirt and dust. The brush
attachment may be used for this.
3 Lift off the cloth filter and shake
vigorously.
4 If necessary wash the filter in warm water. Do
not use detergent. Allow the filter to dry
naturally and ensure it is totally dry before
installing back into the cleaner.
A spare filter is provided to allow you to
continue using your POD vacuum whilst the
original filter is washed and dried.
I
4 When the tank is empty, reverse the process
to reassemble the cleaner. The cleaner is
now ready to use again.
Storage
○○○○○○○○○○○○○○○○○○○○○
1 Before storing your vacuum cleaner, the tank
should be emptied,cleaned and thoroughly
dried before re-assembly.
2 The hose can be wound around the housing
of the unit for convenience and located
behind the accessory clip.
6

3 The brush accessory can be stored
underneath the unit.
5 Replace the new battery into the battery
compartment. Insert the battery holder
back to the correct position.
6 Close the battery door.
7 Follow the instructions for fully charging the
new battery.
Helpline
○○○○○○○○○○○○○○○○○○○○○
If you have any difficulty with your appliance,
do not hesitate to call us. We’re more likely able
to help than the store from where you bought it.
Please have the following information ready to
enable our staff to deal with your query quickly .
Battery pack
○○○○○○○○○○○○○○○○○○○○○
1 Y our cleaner is equipped with a sealed
lead, acid battery. The battery pack is located
at the rear end of the motor unit.
Replacing the battery
○○○○○○○○○○○○○○○○○○○○○
CAUTION: disconnect from the charger
before replacing the battery.
1 Open the battery door .
Note: Observe the position of the battery
holder before removing.
2 Pull out the battery holder and slowly remove
the battery.
3 Carefully pull and remove the red (positive)
and black (negative) wires from battery
terminals.
4 Replace red (positive) and black (negative)
wires onto the corresponding positive and
negative terminals of the new battery.
18
• Name of the product
• Model number as shown on the
underside of the appliance.
Care and
maintenance
○○○○○○○○○○○○○○○○○○○○○
Y our cleaner is manufactured to withstand
normal day-to-day use, but an occasional wipe
over with a damp cloth will help maintain its good
looks. Abrasive cleaners should not be used.
Purchasing filters
○○○○○○○○○○○○○○○○○○○○○
Use original filters. Replacement packs can
be purchased from specialist retailers. If you have
difficulty , call the number on the front of this
booklet.
7

Your two year
guarantee
○○○○○○○○○○○○○○○○○○○○○○
• It is important to retain the retailers receipt
as proof of purchase. Staple your receipt to this
back cover for future reference.
Please quote the following information if the
product develops a fault. These numbers can be
found on the base of the product.
Model No. Serial No.
All Morphy Richards products are individually
tested before leaving the factory . In the unlikely event
of any appliance proving to be faulty within 28 days
of purchase it should be returned to the place of purchase for it to be replaced.
If the fault develops after 28 days and within 24
months of original purchase, you should contact
the Helpline number quoting Model number and
Serial number on the product, or write to Morphy
Richards at the address shown. Y ou will be asked
to return the product (in secure, adequate
packaging) to the address below along with a copy
of proof of purchase. Subject to the exclusions set
out below (1-5) the faulty appliance will then be
repaired or replaced and dispatched usually within
7 working days of receipt.
If you suspect a fault, follow the simple checks
detailed below before returning the appliance or
calling the helpline.
• Check the dust bag and filters for blockages.
• Check the hose and tubes for blockages.
• Check the plug is firmly in the socket and the
supply is switched on.
• Make sure the socket is working by trying
another appliance.
If for any reason this item is replaced during the
2 year guarantee period, the guarantee on the new
item will be calculated from original purchase date.
Therefore it is vital to retain your original till receipt
or invoice to indicate the date of initial purchase.
T o qualify for the 2 year guarantee the appliance
must have been used according to the manufacturers instructions. For example bags and filters
should be changed or cleaned regularly.
EXCLUSIONS
Morphy Richards shall not be liable to replace
or repair the goods under the terms of the
Guarantee where:
1 The fault has been caused or is attributable
to accidental use, misuse, negligent use or
used contrary to the manufacturers
recommendations or where the fault has
been caused by power surges or damage
caused in transit.
2 The appliance has been used on a voltage
supply other than that stamped on the
products.
3 Repairs have been attempted by persons
other than our service staff (or authorised
dealer).
4 Where the appliance has been used for hire
purposes or non-domestic use.
5 The guarantee excludes consumables such as
filters and batteries.
This guarantee does not confer any rights other
than those expressly set out above and does not
cover any claims for consequential loss or damage.
This guarantee is offered as an additional benefit
and does not affect your statutory rights as a
consumer.
• This guarantee is valid in the UK and Ireland
only .
Morphy Richards products are
intended for household use only.
Morphy Richards has a policy of
continuous improvement in product
quality and design.
The Company, therefore, reserves
the right to change the
specification of its models at any time.
The After Sales Division,
Morphy Richards Ltd, Mexborough,
South Yorkshire, England, S64 8AJ
Helpline (office hours)
UK (local rate) 08450 777700,
Republic of Ireland 1800 409119
VC73100M Rev 1
 Loading...