

3 in 1 cleaning system
Instruction Manual
2 year parts and labour guarantee
This guarantee is valid in the UK and Ireland
only. It is in your interest to retain the retailers receipt
as proof of purchase. Please quote the following
information if the product develops a fault. These
numbers can be found on the motor unit of the product.
Model No. Serial No.
(Please enter numbers for future reference)
All Goblin products are individually tested before
leaving the factory. In the unlikely event of any
appliance proving to be faulty within 28 days of
purchase it should be returned to the place of purchase
for it to be replaced.
If the fault develops after 28 days and within 24
months of original purchase, you should take the
appliance to your nearest service agent. A list
containing details of your nearest service agent is
included with your appliance but please contact the
helpline quoting Model number and Serial number should
you require further assistance, repair or replacement of
the product is subject to the following exclusions. (see
Exclusions).
If you suspect a fault, follow the simple checks
detailed below before returning the appliance or
calling the helpline.
1 Check the dustbags and filters for blockages.
2 Check the hose and tubes for blockages.
3 Check the plug is firmly in the socket and the
supply is switched on.
4 Make sure the socket is working by trying
another appliance.
To qualify for the 2 year parts and labour guarantee
the appliance must have been used according to the
manufacturers instructions.
EXCLUSIONS
Goblin shall not be liable to replace
or repair the goods under the terms of the
Guarantee where:
1 The fault has been caused or is attributable to
accidental use, misuse, negligent use or used
contrary to the manufacturers recommendations
or where the fault has been caused by power
surges or damage caused in transit.
2 The appliance has been used on a voltage
supply other than that stamped on the
products.
3 Repairs have been attempted by persons other
than our service staff (or authorised dealer).
4 Where the appliance has been used for hire
purposes or non-domestic use.
5 The guarantee excludes consumables such as
bags, filters and air freshners.
This guarantee does not confer any rights other
than those expressly set out above and does not cover
any claims for consequential loss or damage. This
guarantee is offered as an additional benefit and does
not affect your statutory rights as a consumer.
If for any reason this item is replaced during the 2
year guarantee period, the guarantee on the new item
will be calculated from original purchase date. Therefore
it is vital to retain your original till receipt or invoice to
indicate the date of initial purchase.
The After Sales Division, Goblin, Mexborough, South Yorkshire, England, S64 8AJ
HELPLINE (OFFICE HOURS ): UK (LOCAL RA TE) 0345 010340, REPUBLIC OF IRELAND
DIMPCO LTD 01 842 4833

Important SafeguardsImportant Safeguards
Important Safeguards
Important SafeguardsImportant Safeguards
This product has been designed with your
safety in mind. However, for safe operation, it
is important that you observe the following
points:
1 Read all the instructions.
2 To obtain best results from your
cleaner please read these instructions
carefully and keep them in a safe
place.
3 This product conforms to the relevant
safety regulations for electrical appliances.
4 Never use the appliance without the foam
pre filter and motor protection panel filter
installed.
5 Use only genuine Goblin spare parts and
accessories.
6 If the electrical cable becomes damaged the
complete cable assembly must be replaced.
Do not attempt this task yourself, contact
Goblin using the helpline number on the
front of this leaflet.
7 Never use this appliance to vacuum hot
ashes, hot cigarette ends, hot coals or
other similar items.
8 Never use in the presence of explosive
liquids or vapours.
9 Never pick up inflammable or poisonous
liquids such as petrol, copier toner, or other
volatile substances.
10 Never pick up acids, asbestos or asbestos
dust.
11 Do not store the appliance near hot ovens
or heating appliances.
12 The appliance should never be left running
unsupervised.
13 Children do not understand the dangers
associated with operating electrical
appliances. Never allow children to use this
appliance.
14 Always disconnect the appliance from the
mains supply after use or prior to cleaning
or replacing dust bags or filters.
SAVE THESESAVE THESE
SAVE THESE
SAVE THESESAVE THESE
INSTRUCTIONSINSTRUCTIONS
INSTRUCTIONS
INSTRUCTIONSINSTRUCTIONS
15 Do not use or keep this product outside
when it is raining.
16 Never modify the cleaner in any way.
17 Repairs to electrical appliances are only to
be undertaken by authorised service
agents. Unprofessional repairs can be
dangerous for users.
18 This vacuum cleaner is intended for
domestic use only. Misuse or use for
commercial or any other purpose will
render the guarantee invalid.
Electrical requirementsElectrical requirements
Electrical requirements
Electrical requirementsElectrical requirements
When using this appliance outdoors it
should be additionally protected by a RCCB
(Residual Current Circuit Breaker).
Check that the voltage on the rating plate of
your appliance corresponds with your house
electricity supply which must be A.C. (Alternating current).
For appliances with fitted plug.
If the socket outlets in your home are not
suitable for the plug supplied with this
appliance the plug should be removed and the
appropriate one fitted.
IMP0RT ANT : THE PLUG REMOVED FROM
THE MAINS LEAD, IF SEVERED, MUST BE
DESTROYED AS A PLUG WITH A BARED
FLEXIBLE CORD IS HAZARDOUS IF ENGAGED
INTO A LIVE SOCKET OUTLET .
Should the fuse in the 13 amp plug require
changing a 13 amp BS1362 fuse must be
fitted.
For models with cable rewind
If you cut the plug off and let go of the
cable it will rewind into the machine. Therefore
you must pull out a length of cable and secure
it BEFORE cutting off the plug and refitting a
new one.
2

Electrical connection and supplyElectrical connection and supply
Electrical connection and supply
Electrical connection and supplyElectrical connection and supply
Check that the supply voltage details given
on the rating plate are in accordance with your
electricity supply.
IMPORTANT :The wires in the mains lead
of this appliance are coloured in accordance
with the following code : Blue-Neutral, BrownLive. As the colours of the wires in the mains
lead of this appliance may not correspond with
the markings identifying the terminals in your
plug proceed as follows,
The wire which is coloured brown must be
connected to the terminal which is marked
with the letter ‘L’ or is coloured red.
The wire which is coloured blue must be
connected to the terminal which is marked
with the letter ‘N’ or is coloured black.
European conformity informationEuropean conformity information
European conformity information
European conformity informationEuropean conformity information
A sample of this product has been tested and found to be in conformity with the following
European Directives.
73/23/EEC Low voltage
93/68/EEC CE Marking
89/336/EEC EMC directive
This appliance is double insulated and must not
be connected to the terminal of the plug which
may be marked with the letter ‘E’ or by the
earth wire symbol or coloured green or green
and yellow. Each wire must be properly
connected to the appropriate terminal pin of a
suitable plug and the outer sheath of the mains
lead securely retained by the anchorage
arrangements of the plug. In case of doubt the
plug should be fitted by a qualified electrician
or competent person as the guarantee offered
on this product does not cover any fault in the
plug or damage caused to the appliance as a
result.
(If a fused 3-pin 13A plug is used a standard
13A fuse should be fitted).
3
FeaturesFeatures
Features
FeaturesFeatures
23
22
24
25
18
19
20
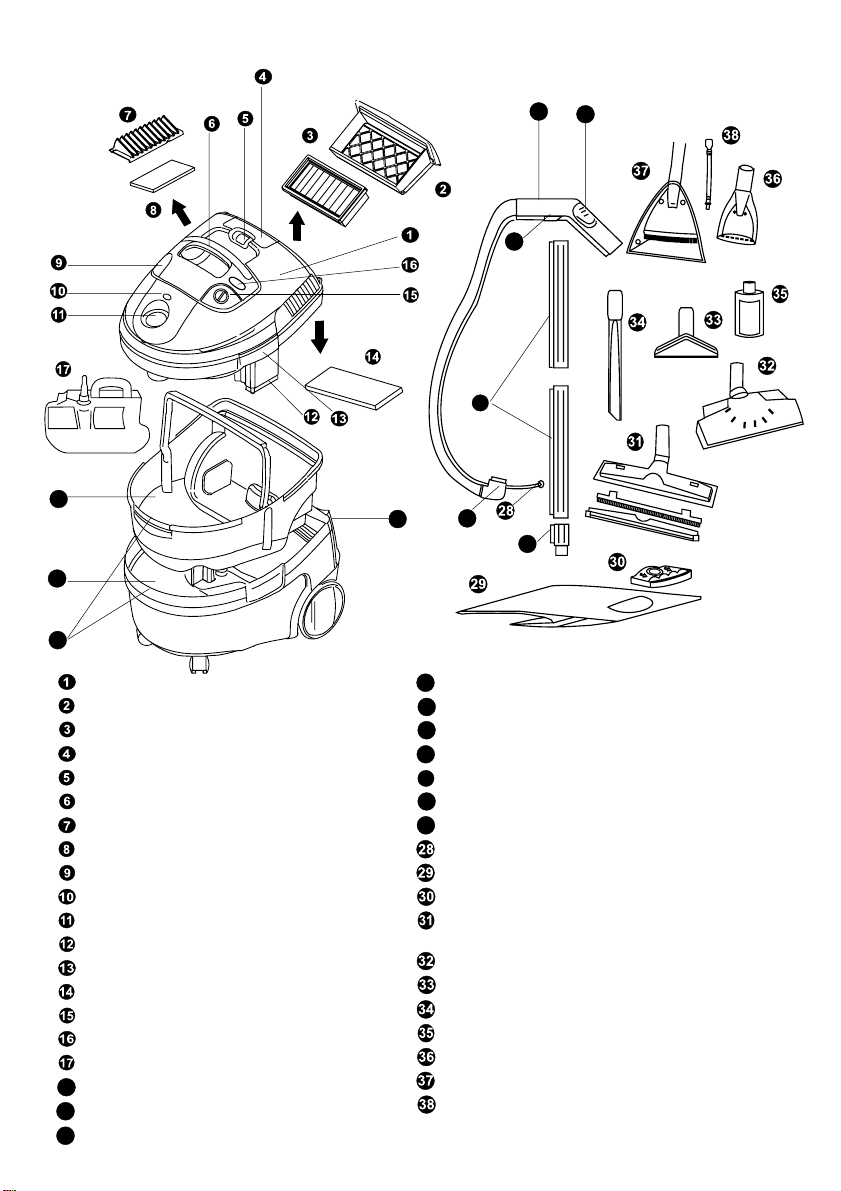
Motor unit
Motor protection panel filter drawer
Motor protection panel filter
Cord wrap hook
Filter condition indicator
Carrying handle
Exhaust filter frame
Exhaust filter
Automatic cord rewind (certain models)
Shampoo connection outlet
Hose inlet
Float
Latches
Foam pre-filter
On/off switch
Shampoo button
Shampoo tank
Inner tank
18
Main tank
19
Paper bag location slots (on main and inner tank)
20
21
27
26
T ool storage area
21
Air bleed
22
Hose handle
23
Shampoo trigger with lock on button
24
Extension tubes
25
Accessory adaptor
26
Hose swivel connector
27
Machine shampoo connector tube
Paper bag (certain models)
Paper bag holder (certain models)
Wet pick up nozzle with inserts
brush and squeegee
Floor nozzle
Upholstery nozzle (certain models)
Crevice tool (certain models)
Concentrated carpet shampoo
Upholstery shampoo nozzle (certain models)
Carpet shampoo nozzle
Accessory shampoo connector tube
(certain models)
4

Using your vacuum cleaner to pick up dry and wet dirtUsing your vacuum cleaner to pick up dry and wet dirt
Using your vacuum cleaner to pick up dry and wet dirt
Using your vacuum cleaner to pick up dry and wet dirtUsing your vacuum cleaner to pick up dry and wet dirt
Your vacuum cleaner may feature a removable inner tank and large capacity paper bag and can be
operated in a variety of ways detailed in the table below.
Dry usage - vacuuming fine or coarse dry dirt.
Wet usage - picking up liquids or wet dirt, ie leaves.
Pick up option
1 Main tank only
2 Inner tank fitted
3 Paper bag fitted
AssemblyAssembly
Assembly
AssemblyAssembly
Option 1 Using the main tank 19 only
1 Release the latches and lift off the motor
unit .
2 Remove the shampoo tank and inner tank 18 if
fitted.
3 Replace the motor unit and ensure the latches
are secure.
Option 2 Inner tank 18 fitted
1 Release the latches and lift off the motor
unit .
2 Remove the shampoo tank .
3 Replace the motor unit and ensure the latches
are secure.
Usage
Dry and / or Wet
Dry and / or Wet
Dry Only
No liquids or
wet dirt
Application
Maximum capacity.
RECOMMENDED METHOD FOR
GENERAL USE.
Hygenic dirt disposal.
Option 3 Paper bag fitted
The paper bag can be fitted with or without the inner
tank in place.
1 Release the latches and lift off the motor
unit and remove the shampoo tank .
2 Slide the card collar on the paper bag into
the bag holder and fit into the location slots
on the main or inner tank.
20
3 Replace the motor unit and ensure the latches
are secure.
5

AccessoriesAccessories
Accessories
AccessoriesAccessories
Tools
Hose
1 Push and rotate the elbow-shaped
connector on the end of the hose
into the hose inlet until it clicks into
position
Hose features a swivel action for
improved manoeuvrability.
Extension tubes
1 For normal vacuuming
join the two tubes together
and close the locking tab.
2 Attach the two tubes to
the handle . Some tasks
may be easier with only
one tube fitted.
3 To allow accessories to be
attached to the tubes
ensure that the accessory
adaptor 26is fitted. Attach
adaptor to the tube and
close locking tab.
On board storageOn board storage
On board storage
On board storageOn board storage
Your vacuum cleaner has on board storage
facility for hose, tubes and tools. Wrap hose
around the tool storage area and position hose
handle in location provided.
27
26
The tools can be attached either to the
tube or directly to the handle providing
the accessory adaptor
1
2
3
4
5
6
is fitted.
26
Floor nozzle
General purpose
tool that can be
used on a variety
of floor coverings.
Wet pick up
nozzle
inserts, brush
and squeegee.
Suitable for
outdoor and wet
usage.
Upholstery nozzle
Nozzle can be used
for curtains, sofas
and armchairs.
Crevice tool
Used for small
gaps, joints and
corners.
Carpet shampoo
nozzle
shampoo connector
tube . Used to
clean carpets.
Upholstery
shampoo nozzle
with shampoo
connector tube .
Used to clean
upholstery.
with
with
7
Concentrated
carpet
shampoo
.
6

OperationOperation
Operation
OperationOperation
Motor safety shut off
If your cleaner features the automatic
cable rewind pull out the cable fully.
If your cleaner features cable wrap
ensure the cable is fully unwrapped.
Plug into the electrical socket.
Switching on
Switch the cleaner on using the on/off
button
Controlling suction power
use, adjust the air bleed 22 on the hose
handle 23.
.
To reduce the suction power during
When the waste tank is full of liquid
the float will automatically switch off
the motor. When this occurs, always:
• Switch off the machine as it may
restart if you lift the motor unit from
the tank.
• Disconnect from the electrical supply
by removing the plug from the wall
socket.
• Raise hose to drain liquid back into
the tank.
• Empty the main tank or inner tank.
IMPORTANT
If the cleaner overturns during use, the
motor may switch off. Return the cleaner
to upright and motor will restart.
Closed :full suction
Open :low suction
Note: When the task is to suck up a
large quantity of liquid, best results are
achieved if the air bleed is opened
slightly.
7

Using your vacuumUsing your vacuum
Using your vacuum
Using your vacuumUsing your vacuum
cleaner to shampoocleaner to shampoo
cleaner to shampoo
cleaner to shampoocleaner to shampoo
carpetscarpets
carpets
carpetscarpets
1 Release the latches and lift off the
motor unit .
2 Ensure the inner tank is fitted 18.
3 Lift the handle on the inner tank to the
upright position.
6 Slide the shampoo tank into the
rear section of the inner tank 18 and
foldthe handle down to the horizontal
position.
7 Replace the motor unit and ensure
the latches are secure.
8 Push and twist the machine shampoo
connector tube onto the shampoo
outlet until it locks into place.
4 Lift out the shampoo tank .
5 Remove the top from the shampoo
tank , add one capful of the
concentrated shampoo and fill the
tank with cold or warm tap water. Do
not use HOT OR BOILING WATER.
Replace the top on the shampoo tank.
9 Fit the desired shampoo nozzle to the
end of the accessory adaptor
Push and twist the accessory
shampoo connector tube
accessory adaptor
place . Then push the bottom end of
the shampoo connector tube into the
shampoo attachment .
YOUR CLEANER IS NOW READY TO
WASH CARPETS.
26
into the
until it locks into
8
26
.

Shampoo OperationShampoo Operation
Shampoo Operation
Shampoo OperationShampoo Operation
Your cleaner features a pumped shampoo
delivery system which is switched on/off by
pressing the shampoo pump button
Shampoo delivery is operated by squeezing the
trigger 24 on the handle.
For continuous shampoo spray, squeeze the
trigger and slide the lock on button towards the
trigger 24.
To release the lock on button. Squeeze the trigger
and slide the lock on button away from the
24
trigger.
.
When washing carpets the cleaner can be
operated in a variety of ways as detailed in the
table below:
Usage Option
1 Vacuum suction on &
& shampoo pump on
2 Shampoo pump only
3 Vacuum suction on only
Application
RECOMMENDED METHOD FOR GENERAL USE.
Simultaneously washes and sucks up dirty water.
RECOMMENDED METHOD FOR STUBBORN
STAINS. Allows shampoo to penetrate deeper into
the carpet pile.
RECOMMENDED TO HELP DRY CARPETS AFTER
WASHING. Can be used after either option 1 or 2.
9

After vacuum cleaningAfter vacuum cleaning
After vacuum cleaning
After vacuum cleaningAfter vacuum cleaning
Option 2 Inner tank 18 fitted
1 Switch off the vacuum cleaner.
2 Unplug from the mains.
3 Use a hand or your foot to operate the
cable rewind pedal to rewind the
cable.(on certain models)
IMPORTANT
For safety reasons the final section of
cable rewinds slowly. Lift the plug to
ensure the cable rewinds fully.
4 For models without the cable rewind
facility wind the cable around the hose
storage area and cable wrap hook
at the rear of the unit.
1 Release the latches and lift off the
motor unit and carefully place to
one side.
2 Carefully lift out the inner tank by its
rotating handle and empty.
3 Rinse or clean the inner tank after
emptying if necessary.
Option 3 Paper bag fitted
1 Release the latches and lift off the
motor unit and carefully place to
one side.
2 Gripping the bag holder lift the bag
out of the main or inner tank.
3 Slide the bag off the holder and
carefully dispose of the bag.
After each option replace the motor unit
and ensure the latches are secured.
Emptying your cleanerEmptying your cleaner
Emptying your cleaner
Emptying your cleanerEmptying your cleaner
after shampoo operationafter shampoo operation
after shampoo operation
after shampoo operationafter shampoo operation
Emptying your cleanerEmptying your cleaner
Emptying your cleaner
Emptying your cleanerEmptying your cleaner
of wet and dry dirtof wet and dry dirt
of wet and dry dirt
of wet and dry dirtof wet and dry dirt
Option 1 Using the Main tank19 only
1 Release the latches and lift off the
motor unit and carefully place to
one side.
2 Carefully lift the main tank and empty.
3 Rinse or clean the main tank after
emptying if necessary.
1 Release the latches and lift off the
motor unit and carefully place to
one side.
2 Carefully lift the shampoo tank out
of the inner tank 18, remove the cap
and empty.
3 Lift out the inner tank and dispose of
soiled water. The shampoo tank can
then be refilled and re-used.
4 Rinse or clean the inner tank
emptying if necessary.
Must always empty the inner tank before
refilling and re-using the shampoo tank.
10
18
after

FiltersFilters
Filters
FiltersFilters
Your product has been designed to pick up both wet and dry dirt without having to change
or remove the filters.
The table below explains the purpose of each filter.
Filter
Foam pre-filter
(washable)
Motor protection
panel filter
Exhaust filter
(non washable)
IMPORTANT
• The motor protection panel filter should be checked regularly for signs of
damage, preferably after each cleaning task. The filter must be replaced
immediately if it has become damaged.
• Always disconnect the cleaner from the mains when checking filters.
• Always make sure all filters are fitted before use. Failure to do so may result in
damage to your product.
Purpose
Stops large dirt particles and
prolongs the life of the panel filter.
Stops smaller dust particles and
protects the motor from damage.
Stops very fine dust particles to
ensure the air leaving the product is
clean.
11

Cleaning the filtersCleaning the filters
Cleaning the filters
Cleaning the filtersCleaning the filters
If the filter condition indicator shows red either the :
• bag needs to be changed
• foam pre-filter needs to be cleaned
• motor protection panel filter needs to be cleaned
• Also check hose for blockages
If after changing the bag or cleaning the filters the condition indicator still shows red then
the filters should be replaced.
T o clean the foam pre-filter
1 Unclip and remove the motor unit.
2 Turn the motor unit over.
3 Remove and clean the filter using
a soft brush or wash in warm soapy
water.
4 Ensure the filter is totally dry before
refitting.
5 Make sure it is secure on its two clips.
T o clean the motor protection
panel filter
1 Slide open the drawer at the rear of
cleaner.
2 Remove filter and clean between
lower pleats with a soft brush.
IMPORTANT
The filters should be replaced at least
every 6 months or immediately if they
become damaged.
T o clean the exhaust filter
1 Pull out the exhaust frame .
2 Remove the filter and tap to remove
the dirt.
12

Cleaning andCleaning and
Cleaning and
Cleaning andCleaning and
MaintenanceMaintenance
Maintenance
MaintenanceMaintenance
Purchasing new dustPurchasing new dust
Purchasing new dust
Purchasing new dustPurchasing new dust
bags and filtersbags and filters
bags and filters
bags and filtersbags and filters
Unplug from the mains before cleaning.
The vacuum cleaner, and all the acces-
sories can be cleaned using a damp
cloth or a non abrasive domestic cleaner
and wiped dry.
To keep the underside of the floor nozzle
clean, vacuum it at regular intervals using
the crevice tool.
PROBLEM
The cleaner does not start
Reduced suction power/
filter condition indicator
shows red
Dust expelled from air
exhaust during use
Water expelled from air
exhaust during use
Hose detached from
product during use
Intermittent on/off
switching
POSSIBLE CAUSE
No electricity supply
Hose, nozzle or filter
blocked
Filter is not fitted
correctly, is damaged or
is missing altogether
Float is damaged or
clogged
Hose not fitted correctly
Waste tank is full
Only use original Goblin bags and
filters. Replacement packs can be
purchased from specialist retailers. If you
have difficulty, call our Helpline number
on the front of this booklet.
SOLUTION
Check fuse, cable, plug and socket, if
necessary have them replaced by a
qualified technician.
Remove blockages and refit hose or
nozzle / check filters.
Refit or replace filter.
Remove any blockage and restart.
If float is damaged then contact service
agent.
Refit hose following instructions
carefully.
Switch off product and empty.
If none of the above solutions resolve the problem, please contact your nearest service agent or
telephone the helpline at the front of this booklet.
13

Consumables new 3 in 1 cleaning system UKConsumables new 3 in 1 cleaning system UK
Consumables new 3 in 1 cleaning system UK
Consumables new 3 in 1 cleaning system UKConsumables new 3 in 1 cleaning system UK
If you experience any difficulty in obtaining service or spare parts, please telephone our Customer
Helpline (during office hours):
UK (local rate call)
0345 010340
The After Sales Division Goblin
Mexborough
South Yorkshire
S64 8AJ
Republic of Ireland
01 842 4833
The After Sales Division Dimpco Ltd
Cloghran
County Dublin
Ireland
Accessory
A/v Goblin dustbags (pack of 3)
Bag holder
A/v panel filter + foam pre-filter + standard
exhaust filter in one box
Floor nozzle
Hard floor attachment for floor nozzle
Wet pick up nozzle
Squeegee insert
Brush insert
Crevice tool
Upholstery nozzle
Carpet shampoo nozzle
Upholstery shampoo nozzle
Extension tube with integrated shampoo feed
Hose and trigger handle
Concentrated shampoo (105 ml bottle)
Part number
9050475
1781434
9030075
0073534
0073690
7870434
7930271
7924868
0310234
0070834
7520075
7860476
3771334
5330734
0100370
14

The Company, therefore, reserves the right to change the specification of its models at any time.
Goblin has a policy of continuous improvement in product quality and design.
Goblin products are intended for non commercial use only.
Goblin, Mexborough,
South Y orkshire, England, S64 8AJ
8738270 Rev OI
 Loading...