

Page 1
g
p
f
d
i
q
}
∂
Table Blender
Please read and keep these instructions
Blender de table
Veuillez lire et conserver ces instructions
Standmixer
Lesen Sie diese Anweisungen sorgfältig durch und bewahren Sie sie auf.
Liquidificador de mesa
Leia e guarde as presentes instruções
Frullatore da tavolo
Si prega di leggere e conservare le presenti istruzioni
Bordblender
Læs og opbevar vejledningen
Blender kielichowy
Niniejszą instrukcję obsługi należy przeczytać i zachować
Stolní mixér
Přečtěte si návod k použití a uschovejte jej
FP403040MEE Rev1.qxp_Morphy Richards Instruction Book 11/07/2016 17:38 Page 1
Page 2

2
Health And Safety
The use of any electrical appliance requires the following common sense safety rules.
Please read these instructions carefully before using the product.
• This appliance can be used by persons with reduced physical,
sensory or mental capabilities, or lack of experience and
knowledge, if they have been given supervision or instruction
concerning the use of the appliance in a safe way and understand
the hazards involved.
• This appliance shall not be used by children.
• Children shall not play with the appliance.
• Keep appliance and cord out of the reach of children.
• CAUTION: Ensure that the blender is switched off before
removing it from the stand or approaching parts that move in use.
• Do not blend for longer than the time periods recommended in
the ‘Operating chart’.
• Avoid touching moving parts. Keep hands, hair and clothing, and
utensils away from the blender blades during operation, to
prevent personal injury and/or damage to the appliance.
• Always disconnect the blender from the supply if it is left
unattended and before assembling, disassembling or cleaning.
• Care shall be taken when handling the sharp cutting blades,
emptying the jug and during cleaning.
• For care & cleaning refer to page 10.
g
In addition, we offer the following safety advice.
Location
• Do not use outdoors or in a bathroom.
• Always locate your appliance away from the edge of the worktop.
• Do not place the jug used with the appliance on a highly polished
wooden surface as damage may occur to the surface.
Mains cable
• Do not let the mains cable hang over the edge of the worktop
where a child could reach it.
• Do not let the lead run across an open space e.g.
between a low socket and a table.
• Do not let the cable run across a cooker or other hot area which
FP403040MEE Rev1.qxp_Morphy Richards Instruction Book 11/07/2016 17:38 Page 2
Page 3

3
p
f
d
i
q
}
∂
g
5
2
4
1
6
15
16
7
8
12 13 1411
9
3
1
2
Rear of the Base Unit
10
might damage the cable.
• The mains cable should reach from the socket to the base unit
without straining the connections.
• The power cord cannot be replaced. Contact Morphy Richards for
advice.
Other safety considerations
• Do not use the appliance for anything other than its
intended purpose.
• The use of attachments or tools not recommended or sold by
Morphy Richards may cause fire, electric shock or injury.
• WARNING: Misuse of appliance could cause personal injury.
Product specific safety
• IMPORTANT: Allow hot liquids to cool before adding to the
blender, always ensure the lid is fitted correctly.
• Be careful if hot liquid is poured into the blender as it can be
ejected out of the appliance due to sudden steaming.
• Do not use the appliance if the plastic jug or lid is damaged or
has visible cracks.
Electrical requirements
Check that the voltage on the rating plate of your
appliance corresponds with your house electricity supply which
must be A.C. (Alternating Current).
Should the fuse in the mains plug require changing,
a 5 amp BS1362 fuse must be fitted.
WARNING: This appliance must be earthed.
FP403040MEE Rev1.qxp_Morphy Richards Instruction Book 11/07/2016 17:38 Page 3
Page 4
4
4
3
2
1
8
7
10
9
6
5
FP403040MEE Rev1.qxp_Morphy Richards Instruction Book 11/07/2016 17:38 Page 4
Page 5
5
g
p
f
d
i
q
}
∂
1212
11
16
15
14
13
17
18
19
20
FP403040MEE Rev1.qxp_Morphy Richards Instruction Book 11/07/2016 17:38 Page 5
Page 6
6
22
21
24
23
26
25
FP403040MEE Rev1.qxp_Morphy Richards Instruction Book 11/07/2016 17:38 Page 6
Page 7

7
Introduction
Thank you for your recent purchase of this Morphy Richards
Total Control Table Blender
Remember to visit www.morphyrichards.co.uk to register your
product’s two year guarantee
Contents
Health And Safety 2
Introduction 7
Total Control 8
Product Overview 3
Before First Use 9
Using Your Table Blender - Manual Control 9
Using Your Table Blender - Preset Programs 9
Top Tips 9
Care And Cleaning 10
Operating Chart 10
Recipes 11
Contact Us 14
Guarantee 14
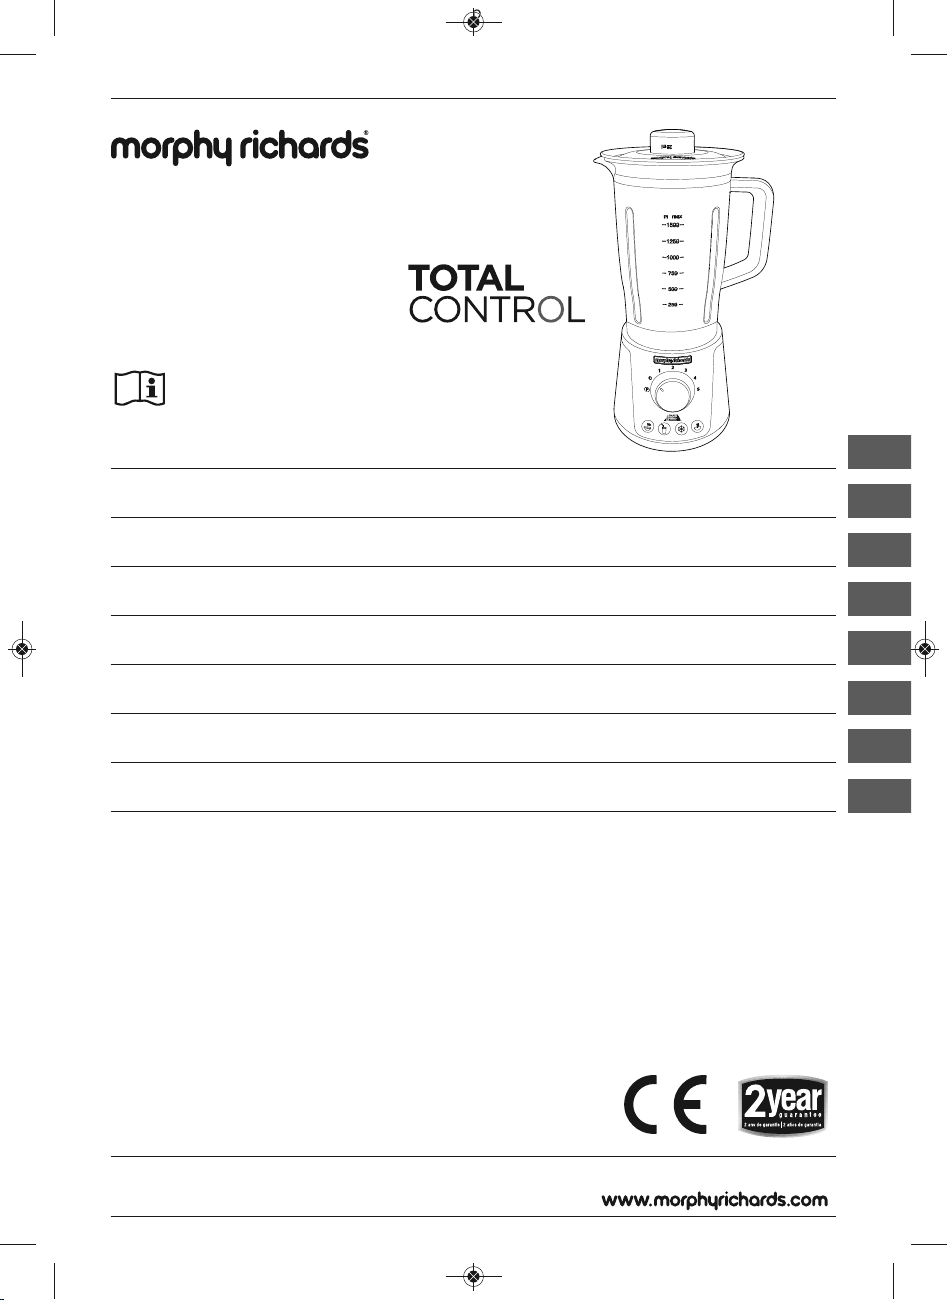
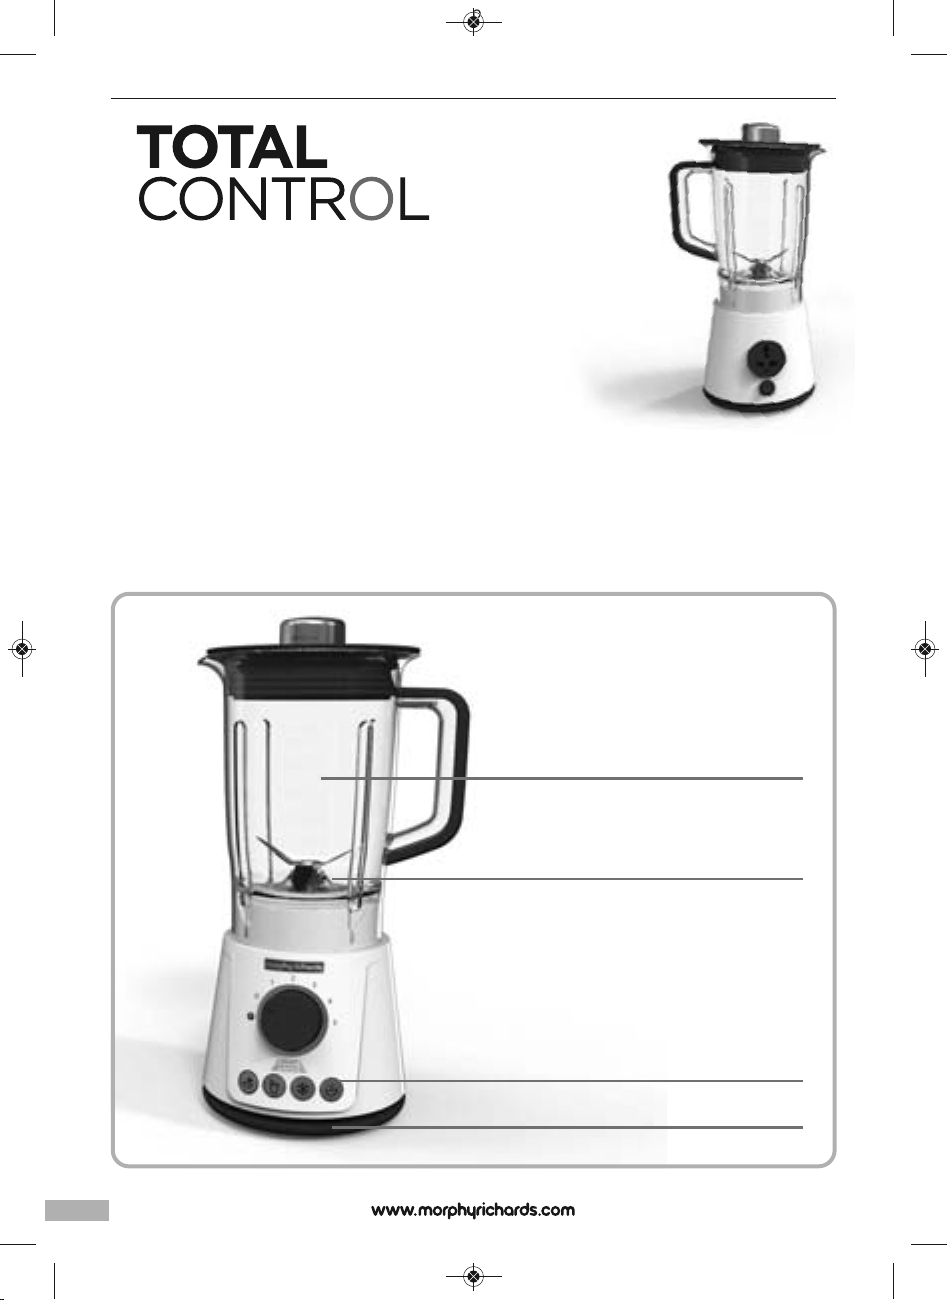
Features
(1) Measuring Cup
(2) Lid
(3) Pouring Hole
(4) Spout
(5) Plastic Jug
(6) Blade
(7) Base Unit
(8) Control Dial
(9) Pulse Function
(10) Cable Storage
(11) Preset Dips & Sauces
(12) Preset Smoothies
(13) Preset Ice Crushing
(14) Preset Soup & Sauces
(15) Plug Storage (on rear)
(16) On/Off Switch
g
p
f
d
i
q
}
∂
FP403040MEE Rev1.qxp_Morphy Richards Instruction Book 11/07/2016 17:38 Page 7
Page 8
8
1.5L Working Capacity
Stainless Steel Serrator Blades
Pre-program settings
Integrated cord storage
Giving you the power to create with confidence
Introducing the Total Control Table Blender is a versatile fusion of practical design
and smart response technology, designed to give users the power to create with
confidence.
Thanks to Smart Response Technology, this intelligent table blender delivers
exactly the right amount of power for a variety of food preparation tasks.
The 4 preset programs give unparalleled assistance for dips, smoothies, soups,
sauces and ice, completely removing the guesswork from blending.
5 speeds and a pulse function help maintain total control throughout. And the
extra-large 1.5 litre capacity allows users to make plenty of delicious drinks,
soups and sauces.
The table blender’s easy store plug is a tidy storage solution.
Total Control Table Blender gives users the power to create with confidence.
FP403040MEE Rev1.qxp_Morphy Richards Instruction Book 11/07/2016 17:38 Page 8
Page 9

9
g
p
f
i
q
}
∂
d
Before First Use
• Carefully unpack your Table Blender as the Blending Blades are
very sharp.
• Remove any stickers (except for the serial label on the base of the
product).
• Carefully wash the Jug, Lid and Measuring Cup in hot soapy
water. Rinse and dry.
• Wipe over the Base Unit with a damp cloth.
• WARNING: Never immerse the Base Unit in water or in any
other liquid. Always ensure the electrical connections are
kept dry. This may be wiped with a clean, damp cloth.
Using Your Total Control Table Blender -
Manual Control
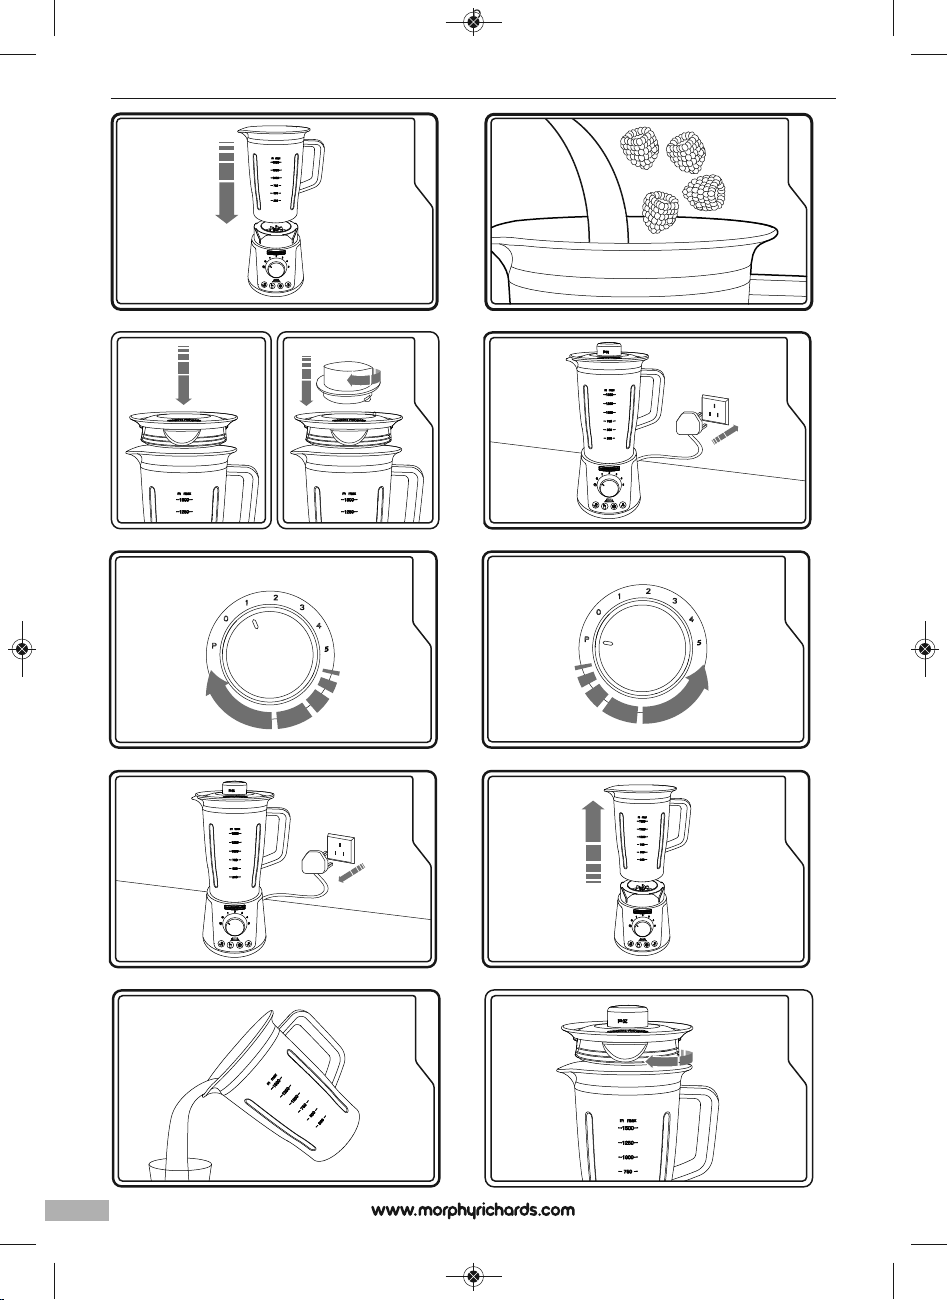
1
Place the Plastic Jug (5) onto the Base Unit (7).
2
Place the food or cold liquids into the Plastic Jug (5). Do not
exceed more than the recommended amount.
3
Place the Lid (2) on the Plastic Jug (5), pushing down firmly.
Place the Measuring Cup (1) into place twisting clockwise to lock
into place. To avoid spillages ensure the pouring hole in the Lid (2)
is turned away from the Spout (4).
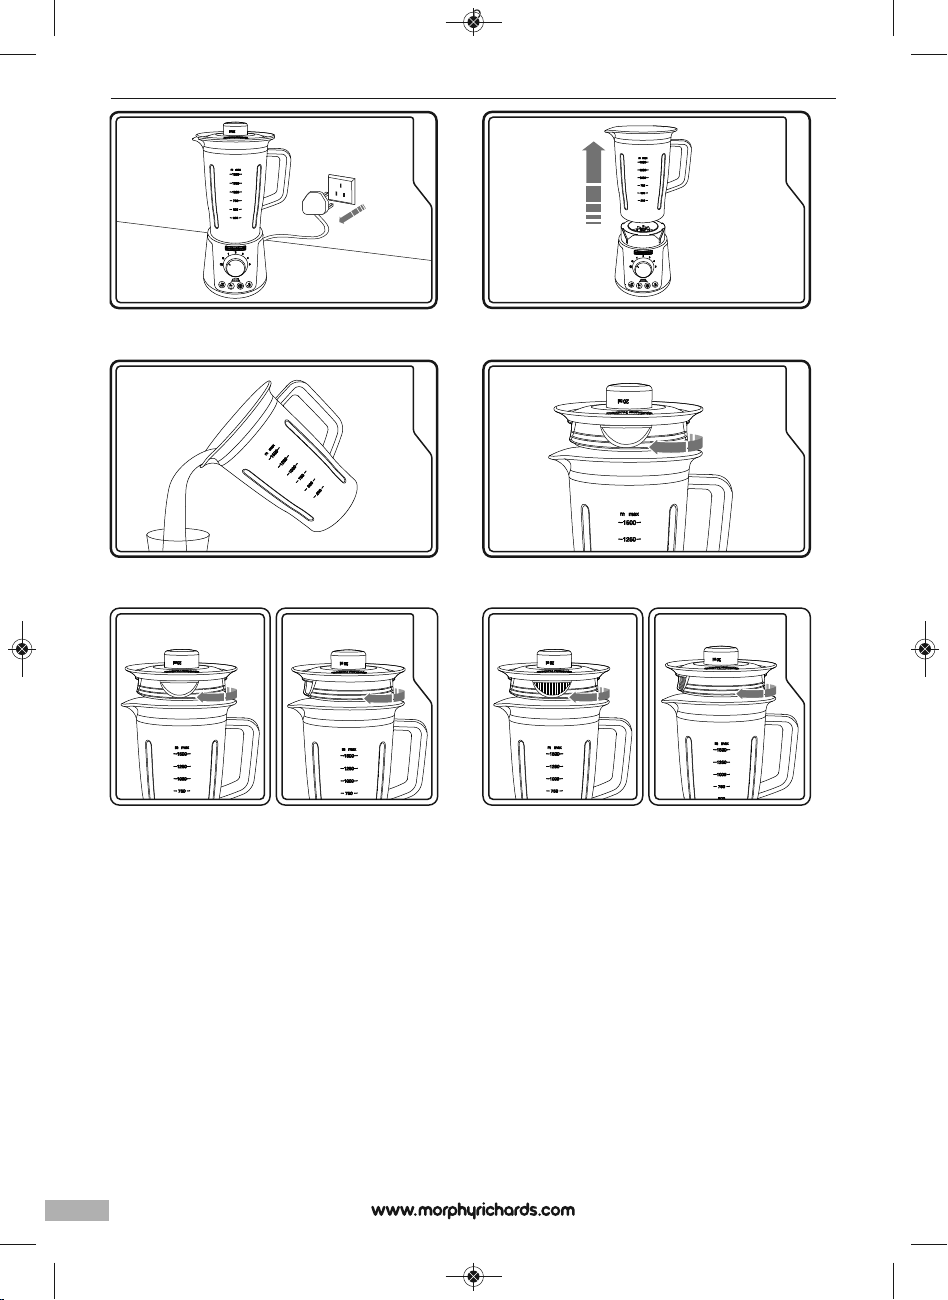
4
Plug the Total Control Table Blender into the mains socket &
switch on (16).
5
Turn the Control Dial (8) to 1 to start blending. Increase the speed
as required.
6
To use the Pulse function (9) turn the Control Dial (8) to P. Do not
use for prolonged periods of time.
7
Switch off (16) and unplug from the mains socket before serving.
8
Remove the Plastic Jug (5) from the Base Unit (7).
9
To pour, remove the Lid (2) and pour out of the spout (4) .
10
To use the flow control lift Lid (2) and reposition as required below.
11
Turn to the large filter in the Lid (2) for a full flow.
12
Turn to the gridded filter in the Lid (2) to prevent any large pieces
from flowing through if present.
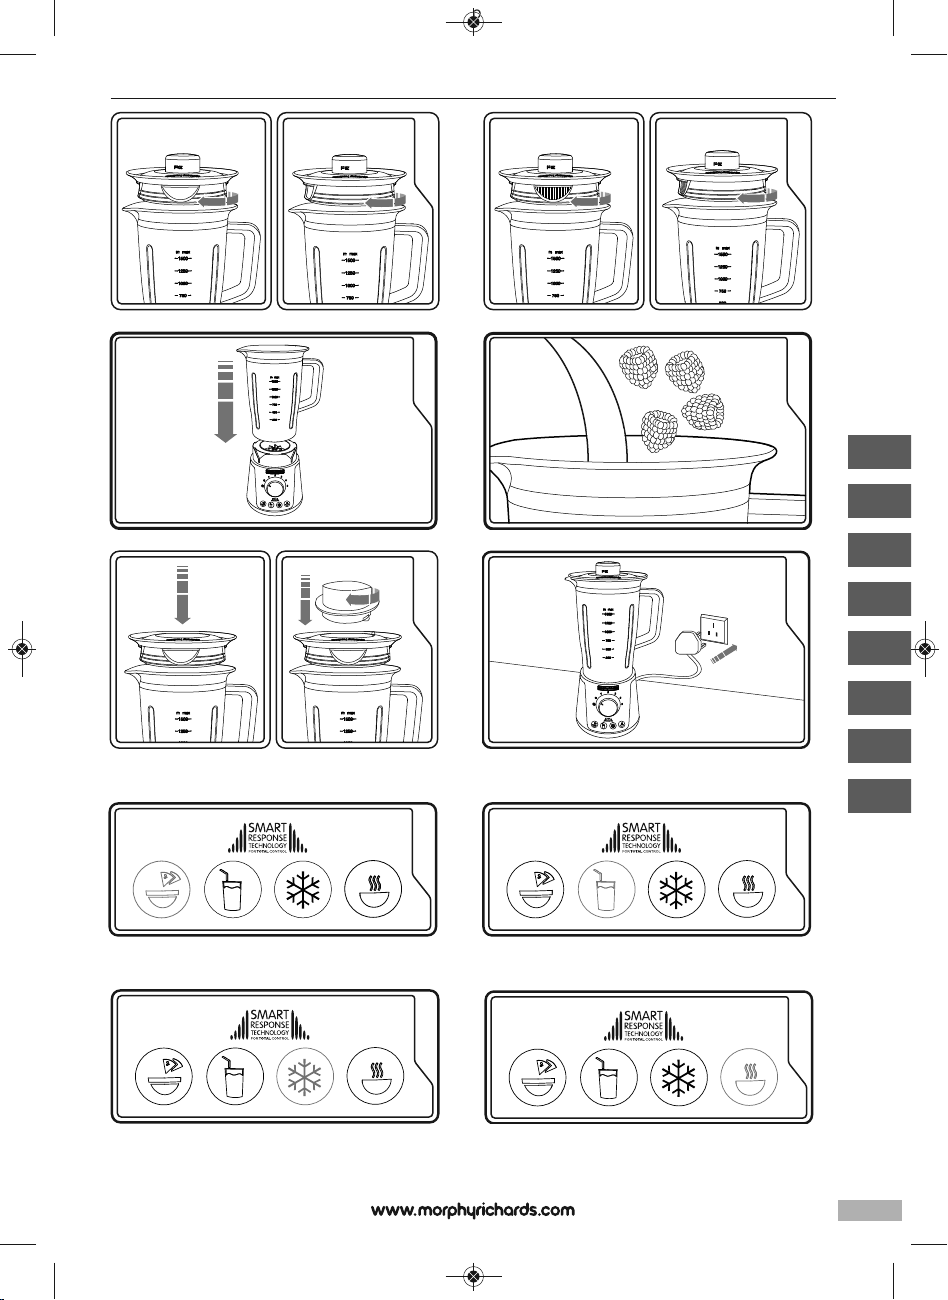
Using the preset programs
13
Place the Plastic Jug (5) onto the Base Unit (7).
14
Place the food or cold liquids into the Plastic Jug (5). Do not
exceed more than the recommended amount.
15
Place the Lid (2) on the Plastic Jug (5),
pushing down firmly. Place the Measuring Cup (1) into place
twisting clockwise to lock into place.
16
To avoid spillages ensure the pouring hole in the Lid (2) is turned
away from the Spout (4). Plug the Total Control Table Blender into
the mains socket & switch on (16).
17
Select Dips & Sauces button (11) on the Preset Programs for
smooth dips, sauces, batters and icecream. A blue light will come
on around the button, this light will stay on until the program is
complete. PLEASE NOTE: The program may pause for several
seconds. Do not remove the Plastic Jug (5) or Lid (2) until the light
has gone off.
WARNING: DO NOT ADD INGREDIENTS OR REMOVE THE LID
WHILST THE PROGRAMME IS RUNNING.
18
Select Smoothies button (12) on the Preset Programs for delicious
healthy smoothies. A blue light will come on around the button,
this light will stay on until the program is complete. PLEASE
NOTE: The program may pause for several seconds. Do not
remove the Plastic Jug (5) or Lid (2) until the light has gone off.
19
Select Ice Crushing button (13) on the Preset Programs for
flavoured slushies. A blue light will come on around the button,
this light will stay on until the program is complete. PLEASE
NOTE: The program may pause for several seconds. Do not
remove the Plastic Jug (5) or Lid (2) until the light has gone off.
20
Select Soup & Sauces button (14) on the Preset Programs for
nutritious soups and sauces. A blue light will come on around the
button, this light will stay on until the program is complete.
PLEASE NOTE: The program may pause for several seconds. Do
not remove the Plastic Jug (5) or Lid (2) until the light has gone
off.
21
Switch off (16) and unplug from the mains socket before serving.
22
Remove the Plastic Jug (5) from the Base Unit (7).
23
To pour, remove the Lid (2) and pour out of the Spout (4) .
24
To use the flow control lift Lid (2) and reposition as required below.
25
Turn to the large filter in the Lid (2) for a full flow.
26
Turn to the gridded filter in the Lid (2) to prevent any large pieces
from flowing through if present.
IMPORTANT
DO NOT ADD BOILING WATER/VERY HOT LIQUID TO THE
JUG. ALLOW TO COOL FIRST.
Measuring Cup
• The Measuring Cup (1) can be used to measure small quantities
of liquid.
1 Pour the liquid through the Pouring Hole (3) in the Lid (2).
2 Place the Measuring Cup (1) back in the Lid (2), twisting to
lock/unlock. Then proceed with your blending.
Crushing Ice
• Follow the procedure in the ‘Using your Total Control Table
Blender section, replacing food with the ice cubes to be crushed.
• Select Ice Crushing Button (13) on the Preset Programs.
• Note: The maximum capacity for ice crushing at any one time is
500ml.
Top Tips
Use your Blender for soups, sauces, drinks, pates, mayonnaise,
dressing etc.
• Do not put dry ingredients into the Blender without addition of
other wet ingredients or liquid.
• When blending, pour the liquids in first and then add the solid
food. Begin blending at the lower speed and increase when
needed.
IMPORTANT: To ensure the long life of your blender when using
FP403040MEE Rev1.qxp_Morphy Richards Instruction Book 11/07/2016 17:38 Page 9
Page 10

10
the Manual Speed Settings never run it for longer than 60
seconds and allow to cool for 5 minutes. Switch off as soon as
you have reached the desired consistency.
• The machine will not work if the Plastic Jug (5) is fitted incorrectly.
• Don’t use the Plastic Jug as a storage container. Keep it empty
when not in use.
• Never blend more than 1 litre (1 3⁄4 pints) - of frothy liquids, such
as milk shakes.
• If using a max of 1.5L do not use any higher than speed 2.
• When blending soup do not fill over the
1 Litre mark.
• Do not overfill the blender. This could cause
damage to the motor. The plug fuse will blow if the blender is
overloaded. Replace the fuse and do not exceed the maximum
recommended volumes. Refer to the ‘Operating chart’.
Care And Cleaning
• Before cleaning and maintenance, switch the appliance off and
unplug it, remove the Plastic Jug (5) from the Base Unit (7).
• After use, fill the Plastic Jug (5) with 1L (13⁄4 pints) of warm water
and run for 30 seconds on the pulse setting and repeat as
necessary. Never use abrasives or cream cleaners.
• Clean the Base Unit (7) with a damp cloth or kitchen paper roll.
• There is a facility to wrap your power cable around the base of the
product and fit the plug into the Plug Storage (15).
• Reassemble the Total Control Table Blender by carefully placing
the Plastic Jug (5) on the Base Unit (7), ensuring it fits correctly.
• WARNING : Never immerse the Base Unit in water.
• WARNING: If any liquid is spilt in the top of the Base Unit,
switch off and unplug from the socket and dry with a cloth.
Operating Chart
Volume Speed (Manual) Time Hints
Preset or Manual
Soups* 1L 1-4+ pulse 15 seconds to 1 minute max Begin with low speed and
increase to high if required
Milkshakes 1L 1-5+ pulse 15 seconds to 1 minute
Blending / 1.5L 1-2 pulse 15 seconds to 1 minute Begin with low speed and
liquidizing increase to high if required
(purees, drinks, batters)
Crushing ice 500ml max pulse 10-20 seconds
• Do not process for longer than recommended time.
• Do not exceed recommended maximum volumes.
• * Do not add boiling water and very hot liquids to the Plastic Jug, allow to cool first.
Preset programs running times
Dips & Sauces - 44 Seconds
Smoothies - 54 Seconds
Soups & Sauces - 58 Seconds
Ice Crush - 20 Seconds
FP403040MEE Rev1.qxp_Morphy Richards Instruction Book 11/07/2016 17:38 Page 10
Page 11
11
Recipes
Preset Recipes
Strawberry Sauce (to serve with ice cream)
Preparation time: 5 minutes (plus 5 minutes cooling)
Setting: Dips & Sauces
Makes: 200ml
Serves: 4
Cooking time: 5 minutes
Ingredients:
• 150g strawberries, hulled
• 65g caster sugar
• 65ml water
• ½ tbsp elderflower cordial
Method:
1 Wash and halve the strawberries.
2 Place the sugar and water into a pan and stir frequently over a low
heat until the sugar has dissolved.
3 Bring to the boil and then add the prepared strawberries.
Cook 3 -3½ minutes or until softened.
4 Cool in the pan for 5 minutes.
5 Place the strawberry syrup into the Jug, add the elderflower
cordial, fit the lid and press Preset button.
Pour the sauce into a jug to serve.
6 Serve warm with pancakes or refrigerate and pour over vanilla ice
cream.
Summer Fruit Ice cream
Preparation time: 10 minutes
Setting: Dips & Sauces
Freezing time: overnight
Serves: 8
Ingredients:
• 250g raspberries
• 125g strawberries,
hulled and halved
• 75g blueberries
• 225g icing sugar, sieved
• 1 tbsp lemon juice
• 300ml double cream
Method:
1 Place the fruit in the jug, fit the lid and press preset button.
2 Add the lemon juice and then the sieved icing sugar into the jug,
fit the lid and pulse (4 times or for about 20 seconds) until evenly
blended.
3 Whip the double cream with a balloon whisk or mixer until soft
peaks form. Lightly fold the fruit puree into the cream, until evenly
mixed then pour into a freezer container and freeze uncovered
until icy at the edges and slushy. (2-3 hours)
4 Turn sides to centre with a fork and stir to a creamy consistency.
5 Freeze uncovered for several hours without stirring.
6 To store cover the container with a lid.
Chocolate Milkshake
Preparation time: 5 minutes
Setting: Smoothies
Yield : 1 litre
Serves: 5 (200ml servings)
Ingredients:
• 750ml semi skimmed milk
• 250g chocolate ice cream
• 1½ level tbsp drinking chocolate powder
Method:
1 Place the milk and ice cream into the Jug, add the drinking
chocolate powder.
2 Fit the lid and press preset button.
3 When ready, serve immediately.
Hints & Tips:
For a change substitute vanilla ice cream, which gives a lighter
flavour.
Strawberry Banana Smoothie
Preparation time: less than 5 minutes
Setting: Smoothies
Yield : 1.1 litre
Serves: 5
Ingredients:
• 180g strawberries washed and hulled
• 2 ripe bananas (approx. 150g) peeled and cut into chunks
• 450g low fat vanilla yogurt
• 300ml semi skimmed milk
• 3 ice cubes (optional)
Method:
1 If using, place the ice cubes in the Jug.
2 Add the remaining ingredients in the order listed and fit the lid
3 Press the preset Smoothie button.
4 Serve immediately when ready.
g
p
f
d
i
q
}
∂
FP403040MEE Rev1.qxp_Morphy Richards Instruction Book 11/07/2016 17:38 Page 11
Page 12

12
Mango Slushie
Preparation time: 5 minutes
Setting: Ice Crush
Serves: 2
Yield 500ml
Ingredients:
• Ice
• 180g – 200g prepared mango, chopped
• Juice of 1 orange (60ml)
Method:
1 Place ice in jug up to 500ml mark, fit lid, and press ice preset
button.
2 When ice is ready add the mango and orange juice, fit lid and
pulse two or three times until of the desired consistency.
3 Pour into two glasses and serve immediately.
Celery Soup
Preparation time: 5 minutes
Setting: Soup & Sauces
Serves: 4
Cook time: 30 minutes
Yield: 1.6 litres
Ingredients:
• 25g butter
• 1 head of celery, roughly chopped (including leaves)
• 1 onion (approx. 100g), chopped
• 3 small potatoes (approx. 150g) peeled and chopped
• 1L of hot vegetable stock
• Salt and ground black pepper
• Fresh parsley to garnish
Method:
1 Place the butter into a large saucepan and melt on the hob over
medium heat. Ensure the butter does not burn.
2 Add the vegetables, and cook for 4 – 5 minutes, stirring
occasionally with a wooden spoon.
3 Add the vegetable stock and seasoning. Bring to the boil.
4 Place the lid on the pan, reduce the heat and simmer for
approximately 20 minutes or until the vegetables have softened.
5 Allow the soup to cool slightly then place roughly half into the Jug
up to the 1 litre mark. Fit the jug lid and press the preset Soup
button.
6 Pour the soup back into the pan then blend the remaining soup as
above. Reheat as necessary, check the seasoning and garnish
with freshly chopped parsley to serve.
Vegetable Pasta Sauce
Preparation time: 10 minutes
Setting: Soup & Sauces
Serves: 4-6
Cook time: 1 hour 10 minutes
Yield: 1.3 litres
Ingredients:
• 2 tbsp olive oil
• 1 onion, (130g) chopped
• 2 celery sticks,(80g) finely chopped
• 2 carrots,(160g) peeled and diced
• 1 clove garlic, crushed
• 1 leek,(120g) sliced into rounds
• 1 red pepper, diced
• 2 x 400g cans chopped tomatoes
• ½ tbsp balsamic vinegar
• 2 level tsp oregano
• 1 level tsp mixed herbs
• Salt and pepper
Method:
1 Heat the oil in a large pan and gently cook the onion, celery,
carrot, garlic and leek for 5 minutes without colouring, stirring
occasionally. Place the lid on the pan and cook for 20 minutes,
stirring occasionally. Add the diced peppers and cook gently for a
further 10 minutes with the lid on.
2 Place the tomatoes, vinegar, herbs, salt and pepper in the pan
and simmer for 40 minutes or until the carrot and celery is
softened. Cool slightly.
3 Carefully pour the sauce into the Jug. The level should be just over
the 1 litre mark. Fit the lid.
4 Press the preset Soup button.
5 Check the seasoning reheating if necessary. Stir through spaghetti
and serve with grated Parmesan and garlic bread on the side.
FP403040MEE Rev1.qxp_Morphy Richards Instruction Book 11/07/2016 17:38 Page 12
Page 13

13
Manual Recipes
Tomato salsa
Preparation time: 5 minutes
Setting: Manual
Serves: 4-8
Ingredients:
• 150g small whole ripe cherry tomatoes,
• 1 small red chilli (10g)
• 20g coriander leaves
• Juice of 1 lime (2tbsp)
• level tsp salt
• Fresh ground black pepper
Method:
1 Remove the stalk from the chilli, cut the chilli in half.
2 Place all ingredients into the jug in the order listed.
3 Pulse for around 10-15 seconds then scrape the sides of the jug
down with a spatula before pulsing for a few more seconds until
of the desired consistency.
4 Pour into a serving bowl and allow to stand for 30 minutes before
serving.
Matriciana pasta sauce
Preparation time: 5 minutes
Cooking time: 40 minutes
Setting: Manual
Serves: 4
Yield: 600ml
Ingredients:
• 1 onion (approx. 130g)
roughly chopped
• 1 clove garlic, crushed
• ½ green chilli, de-seeded, roughly chopped
• 1½ tbsp extra virgin olive oil
• 100g rind less plain bacon, roughly chopped
• 1 x 400g can plum tomatoes
• 100ml passata
• 4 tbsp white wine
• freshly ground black pepper
• Penne pasta and grated parmesan to serve
Method:
1 Place the oil in a large pan and heat for a few minutes. Gently fry
the onion, garlic and chilli for 2- 3 minutes without colouring,
stirring occasionally with a wooden spoon.
2 Add the chopped bacon and fry for a further minute. Place the lid
on the pan and cook over a medium heat for 5 minutes.
3 Add the plum tomatoes, passata and wine, season with pepper.
4 Place the lid on the pan and simmer gently for 25 - 30 minutes or
until the onion is tender. Cool slightly.
5 Ten minutes before the sauce is ready, cook the pasta according
to the pack instructions.
6 Place the sauce into the Blender jug, fit the lid and blend using
low speed or pulse for a few seconds only until the desired
consistency is achieved.
7 Drain the pasta then stir the sauce through it. Heat for a moment
if necessary then serve immediately with Parmesan cheese.
Green Kiwi and Apple Smoothie
Preparation time: 5 minutes
Setting: Manual
Serves: 4-5
Makes: 1 litre
Ingredients:
• 2 kiwi fruit (200g), skin on
• 1x 80g ripe banana (peeled weight), 30mm chunks
• 120g cucumber, skin on and chopped , 30mm chunks
• 65g baby spinach leaves
• 400ml Apple juice, chilled
Method:
1 Cut the kiwi fruit in half removing any hard core, roughly chop.
2 Mix the kiwi, banana and cucumber chunks and then place into
the Jug. Add the spinach and apple juice.
3 Fit the lid and gradually increase the speed from 1-5. After
approximately 20 - 30 seconds, return the knob gradually to zero
and then pulse until smooth.
4 When ready, serve immediately.
Pineapple Sorbet
Preparation time: 10 minutes plus chilling and freezing time
Setting: Manual
Serves: 4-6
Yield: 600ml
Ingredients:
• ½ large pineapple, peeled, core removed and chopped (prepared
weight approx. 385g)
• 50ml lime juice
• 140g caster sugar
• 130ml water
Method:
1 Place all ingredients in the jug. Blend using speeds 1-4 then pulse
until smooth. (Total time 1 minute).
2 Refrigerate for an hour or so then stir, turn into a shallow freezer
container and cover with the lid.
3 Freeze mixture for 3 hours or until firm on the outside but slushy in
the middle. Remove it from the freezer, place the sorbet in the
blender jug and process for 20 – 30 seconds on low speed.
4 Return to the freezer, covered, for several hours or overnight
until firm.
g
p
f
d
i
q
}
∂
FP403040MEE Rev1.qxp_Morphy Richards Instruction Book 11/07/2016 17:38 Page 13
Page 14

14
Leek and potato soup
Preparation time: 5 minutes
Cooking time: 35 minutes
Setting: Manual
Serves: 4-6
Yield: 2 litres
Ingredients:
• 25g butter
• 2 medium leeks (320g), washed and sliced
• 1 small onion (125g), peeled and finely chopped
• 560g peeled potatoes, thinly sliced
• 1.2 litres vegetable stock
• 1 level tsp mixed herbs
• 1 level tsp salt
• Black pepper
Garnish:
A few chives
Method:
1 Melt the butter in a large saucepan and add the leeks and onion.
Gently cook without colouring for 5-10 minutes, stirring
occasionally with a wooden spoon.
2 Add the potatoes, stock, herbs and seasoning, bring to the boil,
cover and simmer gently for 30 minutes or until tender.
3 Allow to cool slightly and then carefully pour half of the soup into
a measuring jug and the remainder into the Blender jug.
4 Use low speeds to blend for a few seconds. Use the pulse setting
in short bursts to achieve the desired consistency. Blending time
should be around 20 – 30 seconds.
5 Pour the blended soup back into the pan and repeat the above
with the remaining soup. Check the seasoning, reheat, garnish
with a few snipped chives and serve with crusty bread.
Contact Us
Helpline
If you are having a problem with your appliance, please call our
Helpline, as we are more likely to be able to help than the store
you purchased the item from.
Please have the product name, model number and serial
number to hand when you call to help us deal with your enquiry
quicker.
UK Helpline: 0344 871 0944
IRE Helpline: 1800 409 119
Spares: 0344 873 0710
Talk To Us
If you have any questions or comments, or want some great
tips or recipe ideas to help you get the most out of your
products, join us online:
Blog: www.morphyrichards.co.uk/blog
Facebook: www.facebook.com/morphyrichardsuk
Twitter: @loveyourmorphy
Website: www.morphyrichards.com
THIS SECTION IS ONLY APPLICABLE FOR
CUSTOMERS IN UK AND IRELAND
REGISTERING YOUR TWO YEAR GUARANTEE
Your standard one year guarantee is extended for an additional
12 months when you register the product within 28 days of
purchase with Morphy Richards. If you do not register the
product with Morphy Richards within 28 days, your product is
guaranteed for 1 year. To validate your 2 year guarantee register
with us online at www.morphyrichards.co.uk
N.B. Each qualifying product needs to be registered with
Morphy Richards individually. Please refer to the one year
guarantee for more information.
YOUR ONE YEAR GUARANTEE
It is important to retain the retailer’s receipt as proof of
purchase. Staple your receipt to this back cover for future
reference. Please quote the following information if the product
develops a fault. These numbers can be found on the base of
the product.
Model no.
Serial no.
All Morphy Richards products are individually tested before
leaving the factory. In the unlikely event of any appliance
proving to be faulty within 28 days of purchase, it should be
returned to the place of purchase for it to be replaced. If the
fault develops after 28 days and within 12 months of original
purchase, you should contact the Helpline number quoting
Model number and Serial number on the product, or write to
Morphy Richards at the address shown. You may be asked to
return a copy of proof of purchase. Subject to the exclusions
set out below (see Exclusions), the faulty appliance will then be
repaired or replaced and dispatched usually within 7 working
FP403040MEE Rev1.qxp_Morphy Richards Instruction Book 11/07/2016 17:38 Page 14
Page 15

15
days of receipt. If, for any reason, this item is replaced during
the 1 year guarantee period, the guarantee on the new item will
be calculated from original purchase date. Therefore it is vital to
retain your original till receipt or invoice to indicate the date of
initial purchase. To qualify for the 1 year guarantee, the
appliance must have been used according to the instructions
supplied. For example, crumb trays should have been emptied
regularly.
EXCLUSIONS
Morphy Richards shall not be liable to replace or repair the
goods under the terms of the guarantee where:
1 The fault has been caused or is attributable to accidental use,
misuse, negligent use or used contrary to the manufacturer’s
recommendations or where the fault has been caused by power
surges or damage caused in transit.
2 The appliance has been used on a voltage supply other than that
stamped on the products.
3 Repairs have been attempted by persons other than our service
staff (or authorised dealer).
4 The appliance has been used for hire purposes or non domestic
use.
5 The appliance is second hand.
6 Morphy Richards are not liable to carry out any type of servicing
work, under the guarantee.
7 Plastic filters for all Morphy Richards kettles and coffee makers
are not covered by the guarantee.
8 Batteries and damage from leakage are not covered by the
guarantee.
9 The filters have not be cleaned and replaced as instructed.
This guarantee does not confer any rights other than those
expressly set out above and does not cover any claims for
consequential loss or damage. This guarantee is offered as an
additional benefit and does not affect your statutory rights as a
consumer.
YOUR INTERNATIONAL TWO YEAR
GUARANTEE
This appliance is covered by two-year repair or replacement
warranty.
It is important to retain the retailers receipt as proof of
purchase. Staple your receipt to this back cover for future
reference.
Please quote the following information if the product develops a
fault. These numbers can be found on the base of the product.
Model no.
Serial no.
All Morphy Richards products are individually tested before
leaving the factory. In the unlikely event of any appliance
proving to be faulty within 28 days of purchase it should be
returned to the place of purchase for it to be replaced.
If the fault develops after 28 days and within 24 months of
original purchase, you should contact your local distributor
quoting Model number and Serial number on the product, or
write to your local distributor at the addresses shown.
You will be asked to return the product (in secure, adequate
packaging) to the address below along with a copy of proof of
purchase.
Subject to the exclusions set out below (1-9) the faulty
appliance will then be repaired or replaced and dispatched
usually within 7 working days of receipt.
If for any reason this item is replaced during the 2-year
guarantee period, the guarantee on the new item will be
calculated from original purchase date. Therefore it is vital to
retain your original till receipt or invoice to indicate the date of
initial purchase.
To qualify for the 2-year guarantee the appliance must have
been used according to the manufacturers instructions. For
example, appliances must have been descaled and filters must
have been kept clean as instructed.
The local distributor shall not be liable to replace or repair the
goods under the terms of the guarantee where:
1 The fault has been caused or is attributable to accidental use,
misuse, negligent use or used contrary to the manufacturers
recommendations or where the fault has been caused by power
surges or damage caused in transit.
2 The appliance has been used on a voltage supply other than that
stamped on the products.
3 Repairs have been attempted by persons other than our service
staff (or authorised dealer).
4 Where the appliance has been used for hire purposes or non
domestic use.
5 The appliance is second hand.
6 The local distributor are not liable to carry out any type of
servicing work, under the guarantee.
7 The guarantee excludes consumables such as bags, filters and
glass carafes.
8 Batteries and damage from leakage are not covered by the
guarantee.
9 The filters have not be cleaned and replaced as instructed.
This guarantee does not confer any rights other than those
expressly set out above and does not cover any claims for
consequential loss or damage. This guarantee is offered as an
additional benefit and does not affect your statutory rights as a
consumer.
AUSTRALIAN WARRANTY
This appliance is guaranteed for 2 years against faulty material,
components and workmanship.
This warranty is in addition and does not affect your statutory rights.
Proof of purchase must be produced for any warranty benefit.
In the unlikely event of any appliance proving to be faulty, securely
pack and return the item to the place of purchase accompanied by
the original receipt or invoice.
Our goods come with guarantees that cannot be excluded under
the Australian Consumer Law. You are entitled to a replacement or
refund for a major failure and for compensation for any other
g
p
f
d
i
q
}
∂
FP403040MEE Rev1.qxp_Morphy Richards Instruction Book 11/07/2016 17:38 Page 15
Page 16

16
reasonably foreseeable loss or damage. You are also entitled to
have the goods repaired or replaced if the goods fail to be of
acceptable quality and the failure does not amount to a major
failure.
NOT COVERED BY THIS WARRANTY
(Australian only)
• If the appliance has not been used in accordance with the
manufacturers’ recommendations or Instructions.
• If the fault is deemed to be caused by abuse, misuse, neglect,
modifications or in proper use and or care
Eg: Kettles: Excessive build up of scale.
Toasters: Excessive build up of crumbs or foreign matter etc.
• Connection to incorrect voltage to that stamped on the product.
• Unauthorised repairs.
• Appliance used other than for domestic purposes.
• Excluding bags, filters, glass, carafes, and cutting blades.
• Freight and insurance costs.
If for any reason this item is replaced during the 2 year
guarantee period, the guarantee on the new item will be
calculated from original purchase date. Therefore it is vital to
retain your original receipt or invoice to indicate the date of
original purchase.
Morphy Richards’s policy is to continually improve quality
design and product quality. The company therefore reserves the
right to change any specifications or to carry out modifications
as deemed worthy at any time.
The Australian supplier reserves the right to repair, modify,
exchange or replace the faulty appliance with the same or
similar model or product of equivalent value.
FP403040MEE Rev1.qxp_Morphy Richards Instruction Book 11/07/2016 17:38 Page 16
Page 17

17
Hygiène et sécurité
L’utilisation de tout appareil électrique nécessite les règles de sécurité suivantes, relevant du bon sens.
Veuillez lire soigneusement ces instructions avant d’utiliser le produit.
• Cet appareil peut être utilisé par les personnes à capacités
physiques, sensorielles ou mentales réduites, ou ayant un
manque d’expérience et de connaissances, si on leur a donné
des instructions ou qu’on les surveille lors de l’utilisation de
l’appareil de manière sécurisée et qu’elles comprennent les
risques encourus.
• Cet appareil ne doit pas être utilisé par des enfants.
• Les enfants ne doivent pas jouer avec cet appareil.
• Maintenir l’appareil et son cordon hors de portée des enfants.
• AVERTISSEMENT : S’assurer que le blender est éteint avant de
le retirer de sa base ou de s’approcher des pièces mobiles en
cours d’utilisation.
• Ne pas mixer pendant plus longtemps que les durées
recommandées indiquées dans le « Tableau d'opération ».
• Éviter de toucher les pièces mobiles.
Garder les mains, les cheveux et les vêtements, ainsi que les
ustensiles à l’écart des lames du blender pendant son
utilisation afin de prévenir toute blessure personnelle et/ou
dommage à l’appareil.
• Toujours débrancher le blender lorsqu’il n’est pas sous
surveillance et avant de l’assembler, de le désassembler ou de
le nettoyer.
• Rester prudent lorsque vous manipulez les lames coupantes,
que vous videz la carafe et que vous nettoyez l’appareil.
• Pour l’entretien et le nettoyage, référez-vous à la page 21.
f
g
p
f
d
i
q
}
∂
FP403040MEE Rev1.qxp_Morphy Richards Instruction Book 11/07/2016 17:38 Page 17
Page 18

18
Nous donnons également les conseils de sécurité suivants.
Emplacement
• Ne pas utiliser à l’extérieur ou dans une salle de bains.
• Toujours placer votre appareil à l’écart du bord du plan de travail.
• Ne pas placer la carafe de l’appareil sur une surface en bois poli
au risque d’endommager la surface.
Câble d’alimentation
• Ne pas laisser pendre le câble du plan de travail où un enfant
pourrait l’atteindre.
• Ne pas tirer le câble pour qu’il traverse une surface dégagée, par
exemple entre une prise basse et une table.
• Ne pas faire passer un câble sur une cuisinière ou une autre
surface chaude au risque d’endommager le câble.
• Le câble d’alimentation devrait atteindre la prise depuis la base de
l’appareil sans tirer sur les connexions.
• Le câble d’alimentation ne peut pas être remplacé. Contactez
Morphy Richards pour plus de conseils.
Autres considérations de sécurité
• Ne pas utiliser l’appareil pour une autre utilisation que celle
prévue.
• L’utilisation d’accessoires ou d’outils non recommandés ou
vendus par Morphy Richards peut causer un incendie, un choc
électrique ou des blessures.
• AVERTISSEMENT : La mauvaise utilisation de cet appareil peut
causer des blessures personnelles.
Notices de sécurité spécifiques à ce produit
• IMPORTANT : Laissez refroidir les liquides chauds avant de les
verser dans le blender, assurez-vous toujours que le couvercle est
bien fixé.
• Soyez prudent si vous versez du liquide chaud dans le blender car
il pourrait être rejeté de l’appareil en raison d’une soudaine
production de vapeur.
• Ne pas utiliser l’appareil si la carafe en plastique ou le couvercle
sont endommagés ou visiblement fissurés.
Exigences électriques
Vérifiez que la tension sur la plaque signalétique de votre appareil
corresponde à l’alimentation électrique de votre logement, qui doit
être CA. (Courant alternatif)
Si le fusible de la prise d’alimentation a besoin d’être remplacé, il
faut installer un fusible de 5 ampères BS1362.
AVERTISSEMENT : Cet appareil doit être relié à la terre.
Introduction
Nous vous remercions de votre achat récent de ce blender de
table Total Control de Morphy Richards
N’oubliez pas de vous rendre sur www.morphyrichards.co.uk
pour activer la garantie de deux ans de votre produit
Sommaire
Hygiène et sécurité 17
Introduction 18
Total Control 19
Aperçu du produit 3
Avant la première utilisation 20
Comment utiliser votre blender de table - commandes manuelles
20
Comment utiliser votre blender de table - programmes préréglés
20
Meilleurs conseils 21
Entretien et nettoyage 21
Tableau d’opération 21
Recettes 22
Contactez-nous 25
Garantie 25
Caractéristiques
(1) Bouchon mesureur
(2) Couvercle
(3) Orifice de coulée
(4) Bec verseur
(5) Carafe en plastique
(6) Lame
(7) Base
(8) Cadran de réglage
(9) Fonction de pulsation
(10) Rangement du cordon
(11) Sauces préréglées
(12) Smoothies préréglés
(13) Glace pilée préréglée
(14) Soupes et sauces préréglées
(15) Range prise (à l’arrière)
(16) Interrupteur On/Off
FP403040MEE Rev1.qxp_Morphy Richards Instruction Book 11/07/2016 17:38 Page 18
Page 19

19
g
p
f
d
i
q
}
∂
Capacité de travail de 1,5 litres
Lames en acier inoxydable
Programmes préréglés
Range-câble intégré
Vous donne la puissance de créer en toute confiance
Nous vous présentons le blender de table Total Control, un mélange polyvalent de
design pratique et d’une technologie de réponse intelligente, conçu pour donner à ses
utilisateurs la puissance de créer en toute confiance.
Grâce à la technologie de réponse intelligente, ce blender de table intelligent fournit
exactement la quantité d’énergie nécessaire à la préparation d'une multitude
d’aliments.
Les 4 programmes préréglés constituent une aide inégalée pour les sauces, les
smoothies, et la glace, éliminant complètement les approximations lors du mélange.
Ses 5 vitesses et sa fonction de pulsation aident à garder le contrôle du début à la fin.
Et sa capacité extra-large de 1,5 litres vous permet de créer de délicieuses boissons,
soupes et sauces.
Le range-câble de ce blender de table offre une solution de rangement en toute
simplicité.
Le blender de table Total Control donne aux utilisateurs la puissance de créer en
toute confiance.
FP403040MEE Rev1.qxp_Morphy Richards Instruction Book 11/07/2016 17:38 Page 19
Page 20

20
Avant la première utilisation
• Déballer soigneusement le blender de table, les lames sont
extrêmement coupantes.
• Retirer tous les autocollants (sauf le numéro de série sur le socle
du produit).
• Laver prudemment la carafe, le couvercle et le bouchon mesureur
dans de l’eau chaude savonneuse. Rincer et sécher.
• Essuyer la base avec un chiffon humide.
• AVERTISSEMENT : Ne jamais submerger la base dans l’eau
ou tout autre liquide. Toujours s’assurer que les
raccordements électriques sont au sec. Ils peuvent être
essuyés avec un chiffon humide et propre.
Comment utiliser votre blender de table -
commandes manuelles
1
Placer la carafe en plastique (5) sur la base (7).
2
Placer les aliments ou liquides froids dans la carafe en plastique
(5).
Ne pas dépasser les quantités recommandées.
3
Placer le couvercle (2) sur la carafe en plastique (5), en appuyant
fermement. Mettre le bouchon mesureur (1) en place en tournant
dans le sens des aiguilles d’une montre pour le fixer. Afin d’éviter
les renversements, assurez-vous que le trou de coulée du
couvercle (2) soit tourné à l’écart du bec verseur (4).
4
Brancher le blender de table Total Control à la prise de courant et
l’allumer (16).
5
Tourner le cadran de contrôle (8) sur 1 pour commencer à mixer.
Augmenter la vitesse au besoin.
6
Pour utiliser la fonction de pulsation (9), tourner le cadran de
contrôle (8) sur P. Ne pas utiliser pendant des périodes
prolongées.
7
Éteindre (16) et débrancher la prise avant de servir.
8
Retirer la carafe en plastique (5) de la base (7).
9
Pour verser, retirer le couvercle (2) et verser avec le bec verseur
(4).
10
Pour utiliser le contrôle de débit, soulever le couvercle (2) et
repositionner comme indiqué ci-dessous.
11
Tourner le grand filtre dans le couvercle (2) pour un plein débit.
12
Sélectionner le filtre grillagé du couvercle (2) afin de prévenir le
passage d’éventuels gros morceaux.
Utiliser les programmes préréglés
13
Placer la carafe en plastique (5) sur la base (7).
14
Placer les aliments ou liquides froids dans la carafe en plastique
(5). Ne pas dépasser les quantités recommandées.
15
Placer le couvercle (2) sur la carafe en plastique (5), en appuyant
fermement. Mettre le bouchon mesureur (1) en place en tournant
dans le sens des aiguilles d’une montre pour le fixer.
16
Afin d’éviter les renversements, s’assurer que le trou de coulée du
couvercle (2) soit tourné à l’écart du bec verseur (4). Brancher le
blender de table Total Control à la prise de courant et l’allumer
(16).
17
Sélectionner le bouton pour les sauces (11) parmi les programmes
préréglés pour les sauces lisses, les pâtes et les glaces.
Un voyant bleu s’allumera autour du bouton, il restera allumé
jusqu’à ce que le programme soit complété. VEUILLEZ NOTER :
Le programme pourra s’interrompre pendant plusieurs secondes.
Ne pas retirer la carafe en plastique (5) ou le couvercle (2) avant
que le voyant soit éteint.
AVERTISSEMENT : NE PAS AJOUTER D’INGREDIENTS NI
RETIRER LE COUVERCLE PENDANT QUE LE PROGRAMME
SUIT SON COURS.
18
Sélectionner le bouton pour smoothies (12) parmi les programmes
préréglés pour obtenir des smoothies délicieux et sains. Un
voyant bleu s’allumera autour du bouton, il restera allumé jusqu’à
ce que le programme soit complété.
VEUILLEZ NOTER : Le programme pourra s’interrompre pendant
plusieurs secondes. Ne pas retirer la carafe en plastique (5) ou le
couvercle (2) avant que le voyant soit éteint.
19
Sélectionner le bouton pour la glace pilée (13) parmi les
programmes préréglés pour obtenir des granitas à divers arômes.
Un voyant bleu s’allumera autour du bouton, il restera allumé
jusqu’à ce que le programme soit complété.
VEUILLEZ NOTER : Le programme pourra s’interrompre pendant
plusieurs secondes. Ne pas retirer la carafe en plastique (5) ou le
couvercle (2) avant que le voyant soit éteint.
20
Sélectionner le bouton pour les soupes et sauces (14) parmi les
programmes préréglés pour obtenir des soupes nutritives et des
sauces. Un voyant bleu s’allumera autour du bouton, il restera
allumé jusqu’à ce que le programme soit complété.
VEUILLEZ NOTER : Le programme pourra s’interrompre pendant
plusieurs secondes. Ne pas retirer la carafe en plastique (5) ou le
couvercle (2) avant que le voyant soit éteint.
21
Éteindre (16) et débrancher la prise avant de servir.
22
Retirer la carafe en plastique (5) de la base (7).
23
Pour verser, retirer le couvercle (2) et verser avec le bec verseur
(4).
24
Pour utiliser le contrôle de débit, soulever le couvercle (2) et
repositionner comme indiqué ci-dessous.
25
Tourner le grand filtre dans le couvercle (2) pour un plein débit.
26
Sélectionner le filtre grillagé du couvercle (2) afin de prévenir le
passage d’éventuels gros morceaux.
IMPORTANT
NE PAS AJOUTER D’EAU BOUILLANTE/DE LIQUIDE
EXTRÊMEMENT CHAUD DANS LA CARAFE. LAISSER
D’ABORD REFROIDIR.
Bouchon mesureur
• Le bouchon mesureur (1) peut être utilisé pour mesurer de petites
quantités de liquide.
1 Verser le liquide dans le trou de coulée (3) du couvercle (2).
2 Repositionner le bouchon mesureur (1) dans le couvercle (2), en
tournant pour verrouiller/déverrouiller. Puis effectuer le mélange.
FP403040MEE Rev1.qxp_Morphy Richards Instruction Book 11/07/2016 17:38 Page 20
Page 21

21
Glace pilée
• Suivre les instructions dans la rubrique « Comment utiliser votre
blender de table Total Control », en remplaçant les aliments par les
glaçons à piler.
• Sélectionner le bouton pour la glace pilée (13) parmi les
programmes préréglés.
• Remarque : La capacité maximale de glace pilée et de 500 ml.
Meilleurs conseils
Utilisez votre blender pour préparer des soupes, des sauces, des
boissons, des pâtés, des mayonnaises, des vinaigrettes, etc.
• Ne pas mettre d'ingrédients secs dans le blender sans ajouter
d’ingrédients mouillés ou de liquides.
• Lorsque vous mélangez, versez les liquides en premier, puis
ajouter les aliments secs.
Commencez à mélanger à la vitesse minimale, puis augmentez au
besoin.
IMPORTANT : Afin d’assurer la durée de vie optimale de votre
blender lorsque vous utilisez les paramètres de vitesse manuelle,
ne le faites jamais fonctionner pendant plus de 60 secondes et
laissez refroidir pendant 5 minutes.
Éteignez dès que vous obtenez la consistance désirée.
• L’appareil ne fonctionnera pas si la carafe en plastique (5) n’est
pas bien installée.
• Ne pas utiliser la carafe en plastique comme récipient de
stockage. Gardez-la vide lorsque vous ne l’utilisez pas.
• Ne jamais mélanger plus de 1 litre (1 pinte 3/4) de liquides
mousseux tels que les milkshakes.
• Lorsque vous utilisez un maximum de 1,5 litres, n’opérez pas une
vitesse supérieure à 2.
• Lorsque vous mixez des soupes, ne remplissez pas au-delà de 1
litre.
• Ne surchargez pas le blender. Cela pourrait endommager le
moteur. Le fusible de la prise sautera si le blender est surchargé.
Remplacer le fusible et ne pas dépasser les volumes maximum
recommandés. Se référer au « Tableau d’opération ».
Entretien et nettoyage
• Avant d’effectuer l’entretien et le nettoyage, éteindre et
débrancher l’appareil, retirer la carafe en plastique (5) de la base
(7).
• Après utilisation, remplir la carafe en plastique (5) de 1 litre (1 pinte
3/4) d’eau et mettre en marche pendant 30 secondes sur le
paramètre de pulsation. Répéter au besoin. Ne jamais utiliser de
nettoyants abrasifs ou en crème.
• Nettoyer la base (7) avec un chiffon humide ou de l'essuie-tout.
• L’appareil vous permet d’enrouler le câble électrique autour du
socle et de ranger la prise dans le range prise (15).
• Remonter le blender de table Total Control soigneusement en
plaçant la carafe en plastique (5) sur la base (7), en s’assurant
qu’elle soit bien fixée.
• AVERTISSEMENT : Ne jamais submerger la base dans l’eau.
• AVERTISSEMENT : Si un liquide est renversé sur la base,
éteindre l’appareil à la prise et sécher avec un chiffon.
g
p
f
d
i
q
}
∂
Tableau d’opération
Volume Vitesse (Manuelle) Heure Conseils
Préréglé ou manuel
Soupes * 1 L 1-4+ pulsations de 15 secondes à 1 minute maximum Commencer à basse vitesse
puis augmenter jusqu’au
maximum si nécessaire
Milkshakes 1 L 1-5 + pulsations de 15 secondes à 1 minute
Mixer / 1,5 L 1-2 pulsations 15 secondes à une minute Commencer à basse vitesse
puis augmenter jusqu’au
maximum si nécessaire
Glace pilée 500 ml maximum Pulsation 10 à 20 secondes
• Ne pas opérer pendant plus longtemps que la durée
recommandée.
• Ne pas dépasser les volumes maximum recommandés.
• * Ne pas ajouter d’eau bouillante et de liquides très chauds dans
la carafe en plastique, laisser d’abord refroidir.
Durée des programmes préréglés
Sauces - 44 secondes
Smoothies - 54 secondes
Soupes et sauces - 58 secondes
Glace pilée - 20 secondes
FP403040MEE Rev1.qxp_Morphy Richards Instruction Book 11/07/2016 17:38 Page 21
Page 22

22
Recettes
Recettes préréglées
Sauce à la fraise (pour servir avec de la glace)
Temps de préparation : 5 minutes (et 5 minutes de
refroidissement)
Réglage : Sauces
Quantité : 200 ml
Pour : 4 personnes
Temps de cuisson : 5 minutes
Ingrédients :
• 150 g de fraises, équeutées
• 65 g de sucre en poudre
• 65 ml d’eau
• ½ c. à s. de sirop de fleur de sureau
Méthode :
1 Lavez les fraises et coupez-les en deux.
2 Mettez le sucre et l’eau dans une casserole. Mélangez
fréquemment à feu doux jusqu’à ce que le sucre soit dissout.
3 Portez à ébullition puis ajoutez les fraises. Faites cuire pendant 3-
3½ minutes ou jusqu’à ce que les fraises soit tendres.
4 Laissez refroidir dans la casserole pendant 5 minutes.
5 Mettez le sirop de fraise dans le bol, ajoutez le sirop de sureau,
fixez le couvercle et appuyer sur le bouton Préréglé. Versez la
sauce dans un bol pour servir.
6 Servez chaud avec des pancakes ou réfrigérez et versez sur de la
glace à la vanille.
Glace aux fruits rouges
Temps de préparation : 10 minutes
Réglage : Sauces
Temps de congélation : une nuit
Pour : 8 personnes
Ingrédients :
• 250 g de framboises
• 125 g de fraises, équeutées et coupées en deux
• 75 g de myrtilles
• 225 g de sucre glace, tamisé
• 1 c. à s. de jus de citron
• 300 ml de crème liquide
Méthode :
1 Placez les fruits dans la carafe, fixez le couvercle et appuyez sur
le bouton préréglé.
2 Ajoutez le jus de citron puis le sucre glace tamisé dans la carafe,
fixez le couvercle et opérez par pulsations (4 fois ou pendant 20
secondes) ou jusqu’à ce que tout soit mixé uniformément.
3 Battez la crème au fouet ou au mixeur jusqu’à la formation de
pics mous. Incorporez doucement la purée de fruits à la crème,
jusqu’à l’obtention d'un mélange homogène. Versez dans un bac
de congélation et congelez découvert jusqu’à ce que le mélange
soit glacé sur les bords et mou. (2-3 heures)
4 Ramenez les bords au centre à l’aide d’une fourchette et
mélangez pour obtenir une consistance crémeuse.
5 Congelez à découvert pendant plusieurs heures sans mélanger.
6 Pour conserver, couvrez le bac avec un couvercle.
Milkshake au chocolat
Temps de préparation : 5 minutes
Réglage : Smoothies
Volume : 1 litre
Pour : 5 personnes (portions de 200 ml)
Ingrédients :
• 750 ml de lait demi-écrémé
• 250 g de glace au chocolat
• 1½ c. à s. rase de poudre chocolatée
Méthode :
1 Mettez le lait et la glace dans la carafe, ajoutez la poudre
chocolatée.
2 Fixez le couvercle et appuyez sur le bouton de pré-réglage.
3 Une fois prêt, servez immédiatement. Conseils et astuces : Si
vous voulez quelque chose de différent, utilisez de la glace à la
vanille pour un goût plus subtil.
Smoothie fraise-banane
Temps de préparation : moins de 5 minutes
Réglage : Smoothies
Volume : 1,1 litre
Pour : 5 personnes
Ingrédients :
• 180 g de fraises, lavées et équeutées
• 2 bananes mures (environ 150 g), épluchées et coupées en
rondelles
• 450 g de yaourt allégé à la vanille
• 300 ml de lait demi-écrémé
• 3 glaçons (facultatif)
Méthode :
1 Si vous les utilisez, placez les glaçons dans la carafe.
2 Ajoutez les autres ingrédients dans l’ordre de la liste et fixez le
couvercle.
3 Appuyez sur le bouton de pré-réglage pour smoothies.
4 Servez immédiatement une fois prêt.
FP403040MEE Rev1.qxp_Morphy Richards Instruction Book 11/07/2016 17:38 Page 22
Page 23

23
Granita à la mangue
Temps de préparation : 5 minutes
Réglage : Glace pilée
Pour : 2 personnes
Volume 500 ml
Ingrédients :
• Glaçons
• 180-200 g de mangue préparée, coupée
• Le jus d'une orange (60 ml)
Méthode :
1 Mettez les glaçons dans la carafe jusqu’à 500 ml, fixez le
couvercle et appuyez sur le bouton de pré-réglage pour glaçons.
2 Une fois les glaçons prêts, ajoutez la mangue et le jus d’orange,
fixez le couvercle et opérez par pulsations deux ou trois fois
jusqu’à l’obtention de la consistance voulue.
3 Versez dans deux verres et servez immédiatement.
Soupe de céleri
Temps de préparation : 5 minutes
Réglage : Soupes et sauces
Pour : 4 personnes
Temps de cuisson : 30 minutes
Volume : 1,6 litre
Ingrédients :
• 25 g de beurre
• 1 tête de céleri, coupé grossièrement (y compris les feuilles)
• 1 oignon (environ 100 g), coupé
• 3 petites pommes de terre (environ 150 g), épluchées et coupées
• 1 litre de bouillon de légume chaud
• Sel et poivre noir moulu
• Persil frais pour garnir
Méthode :
1 Mettez le beurre dans une grande casserole et faites fondre à feu
moyen. Assurez-vous que le beurre ne brûle pas.
2 Ajoutez les légumes et faites cuire pendant 4-5 minutes, en
mélangeant occasionnellement avec une cuillère en bois.
3 Ajoutez le bouillon de légumes et l’assaisonnement. Portez à
ébullition.
4 Placez le couvercle sur la casserole, réduisez le feu et laissez
mijoter pendant environ 20 minutes ou jusqu’à ce que les légumes
soient tendres.
5 Laissez légèrement refroidir la soupe, puis versez à peu près la
moitié dans la carafe - jusqu’à 1 litre. Fixez le couvercle et
appuyez sur le bouton de pré-réglage pour soupes.
6 Versez la soupe dans la casserole et mixez le reste de la soupe
comme ci-dessus. Réchauffez au besoin, vérifiez
l’assaisonnement et garnissez avec du persil frais pour servir.
Sauce pour pâtes aux légumes
Temps de préparation : 10 minutes
Réglage : Soupes et sauces
Pour : 4-6 personnes
Temps de cuisson : 1 heure 10
Volume : 1,3 litre
Ingrédients :
• 2 c. à s. d’huile d’olive
• 1 oignon (environ 130g), coupé
• 2 branches de céleri (80 g), coupés finement
• 2 carottes (160 g), épluchées et coupées en dés
• 1 gousse d’ail, écrasée
• 1 poireau (120 g), coupé en rondelles
• 1 poivron rouge, coupé en dés
• 2 x 400 g de tomates coupées en boîte
• ½ c. à s. de vinaigre balsamique
• 2 c. à c. d'origan
• 1 c. à c. de mélange d’herbes aromatiques
• Sel et poivre
Méthode :
1 Faites chauffer l’huile dans une grande poêle et faites revenir
doucement l’oignon, le céleri, les carottes, l’ail et le poireau
pendant 5 minutes sans qu'ils colorent, en mélangeant
occasionnellement. Mettez le couvercle et laissez cuire pendant
20 minutes, en mélangeant occasionnellement. Ajoutez le poivron
en dés et faites cuire doucement pendant 10 minutes
supplémentaires avec le couvercle.
2 Mettez les tomates, le vinaigre, les herbes, le sel et le poivre dans
la poêle et laissez mijoter pendant 40 minutes ou jusqu’à ce que
les carottes et le céleri soient tendres. Laissez légèrement refroidir.
3 Versez prudemment la sauce dans la carafe. Le niveau devrait
presque atteindre 1 litre. Fixez le couvercle.
4 Appuyez sur le bouton de pré-réglage pour soupes.
5 Vérifiez l’assaisonnement et réchauffez si nécessaire. Mélangez à
des spaghettis et servez avec du parmesan râpé et un
accompagnement de pain à l’ail.
g
p
f
d
i
q
}
∂
FP403040MEE Rev1.qxp_Morphy Richards Instruction Book 11/07/2016 17:38 Page 23
Page 24

24
Recettes manuelles
Sauce tomate salsa
Temps de préparation : 5 minutes
Réglage : Manuel
Pour : 4-8 personnes
Ingrédients :
• 150 g de petites tomates cerises mures entières,
• 1 petit piment rouge (10 g)
• 20 g de feuilles de coriandre
• Le jus d’un citron vert (2 c.à.s.)
• ⅛ c. à c. de sel
•
Po
ivre noir moulu
Méthode :
1 Retirez la tige du piment, coupez-le en deux.
2 Mettez les ingrédients dans la carafe, dans l’ordre de la liste.
3 Opérez par pulsations pendant 10-15 secondes puis raclez les
côtés de la carafe avec une spatule avant de pulser pendant
quelques secondes de plus, jusqu’à l’obtention de la consistance
voulue.
4 Versez dans un bol et laissez reposer pendant 30 minutes avant
de servir.
Sauce pour pâtes matriciana
Temps de préparation : 5 minutes
Temps de cuisson : 40 minutes
Réglage : Manuel
Pour : 4 personnes
Volume : 600 ml
Ingrédients :
• 1 oignon (environ 130g), coupé grossièrement
• 1 gousse d’ail, écrasée
• ½ piment vert, épépiné, coupé grossièrement
• 1½ c. à s. d’huile d’olive extra vierge
• 100 g de lard sans couenne, coupé grossièrement
• 1 x 400 g de tomates italiennes en boîte
• 100 ml de passata
• 4 c. à s. de vin blanc
• Poivre noir moulu
• Pâtes penne et parmesan râpé pour servir
Méthode :
1 Mettez l’huile dans une grande poêle et faites chauffer pendant
quelques minutes. Faites revenir l’oignon, l’ail et le piment pendant
2-3 minutes sans les colorer, en mélangeant occasionnellement
avec une cuillère en bois.
2 Ajoutez le lard coupé et faites cuire pendant une minute
supplémentaire. Mettez le couvercle et faites cuire à feu moyen
pendant 5 minutes.
3 Ajoutez les tomates italiennes, la passata et le vin, assaisonnez
avec du poivre.
4 Mettez le couvercle et faites mijoter pendant 25-30 minutes ou
jusqu’à ce que l’oignon soit tendre. Laissez légèrement refroidir.
5 Dix minutes avant que la sauce soit prête, faites cuire les pâtes
selon les instructions sur le paquet.
6 Mettez la sauce dans la carafe du blender, fixez le couvercle et
mixez à vitesse minimale ou par pulsations pendant quelques
secondes, jusqu’à obtention de la consistance voulue.
7 Égouttez les pâtes et mélangez-les à la sauce. Faites chauffer
pendant quelques secondes si nécessaire et servez
immédiatement avec du parmesan.
Smoothie vert au kiwi et à la pomme
Temps de préparation : 5 minutes
Réglage : Manuel
Pour : 4-5 personnes
Quantité : 1 litre
Ingrédients :
• 2 kiwis (200 g), avec la peau
• 1 x 80 g de banane mure (poids épluchée), morceaux de 3 cm
• 120 g de concombre, avec la peau, coupé en morceaux de 3 cm
• 65 g de jeunes épinards
• 400 ml de jus de pomme, froid
Méthode :
1 Coupez le kiwi en deux, retirez le cœur dur, puis coupez-le
grossièrement.
2 Mélangez les morceaux de kiwi, banane et concombre puis
placez-les dans la carafe. Ajoutez les épinards et le jus de
pomme.
3 Fixez le couvercle et augmentez graduellement la vitesse de 1 à 5.
Après environ 20-30 secondes, baissez graduellement la vitesse
jusqu’à arriver à 0, puis utilisez la fonction pulsation jusqu’à ce
que le mélange soit lisse.
4 Une fois prêt, servez immédiatement.
Sorbet à l’ananas
Temps de préparation : 10 minutes + temps de refroidissement
et de congélation
Réglage : Manuel
Pour : 4-6 personnes
Volume : 600 ml
Ingrédients :
• ½ gros ananas, épluché, cœur retiré et coupé (poids préparé
environ 385 g)
• 50 ml de jus de citron vert
• 140 g de sucre en poudre
• 130 ml d’eau
Méthode :
1 Placez tous les ingrédients dans la carafe. Mélangez avec les
FP403040MEE Rev1.qxp_Morphy Richards Instruction Book 11/07/2016 17:38 Page 24
Page 25

25
vitesses 1-4, puis utilisez la fonction pulsation jusqu’à l’obtention
d’un mélange homogène. (Durée complète 1 minute).
2 Réfrigérez pendant environ une heure puis mélangez, transvasez
dans un bac de congélation peu profond et fermez avec le
couvercle.
3 Congelez le mélange pendant 3 heures ou jusqu’à ce qu'il soit
ferme sur l’extérieur et mou à l’intérieur. Retirez-le du congélateur,
placez le sorbet dans la carafe du blender et mélangez pendant
20 à 30 secondes à faible vitesse.
4 Remettez au congélateur, couvert, pendant plusieurs heures ou
jusqu’au lendemain, jusqu’à ce que le sorbet soit ferme.
Soupe de pomme de terre et poireau
Temps de préparation : 5 minutes
Temps de cuisson : 35 minutes
Réglage : Manuel
Pour : 4-6 personnes
Volume : 2 litres
Ingrédients :
• 25 g de beurre
• 2 poireaux moyens (320 g), lavés et coupés en rondelles
• 1 petit oignon (125 g), épluché et coupé finement
• 560 g de pommes de terre épluchées, coupées en fines rondelles
• 1,2 litres de bouillon de légumes
• 1 c. à c. de mélange d’herbes aromatiques
• 1 c. à c. rase de sel
• Poivre noir
Garniture :
Quelques brins de ciboulette
Méthode :
1 Faites fondre le beurre dans une grande casserole et ajoutez les
poireaux et l’oignon. Faites cuire doucement les légumes sans les
colorer pendant 5-10 minutes, en mélangeant occasionnellement
avec une cuillère en bois.
2 Ajoutez les pommes de terre, le bouillon, les herbes et
l’assaisonnement. Portez à ébullition et laissez mijoter pendant 30
minutes ou jusqu’à ce que les légumes soient tendre.
3 Laissez refroidir légèrement puis versez avec soin la moitié de la
soupe dans un verre mesureur et le reste dans la carafe du
blender.
4 Mixez à faible vitesse pendant quelques secondes. Utilisez la
fonction de pulsation par brefs à-coups afin d’obtenir la
consistance voulue. La durée de mixage devrait s’élever à 20-30
secondes.
5 Reversez la soupe mixée dans la casserole et répétez les étapes
ci-dessus pour le reste de la soupe. Vérifiez l’assaisonnement,
réchauffez, garnissez avec quelques brins de ciboulettes coupés
et servez avec du pain frais.
Contactez-nous
Assistance téléphonique :
En cas de problème avec votre appareil, appelez notre
assistance téléphonique - elle sera plus susceptible de pouvoir
vous aider que le revendeur auprès duquel vous avez effectué
votre achat.
Assurez-vous d’avoir le nom du produit, le numéro de modèle
et le numéro de série à portée de main lors de votre appel afin
de nous aider à résoudre votre problème plus rapidement.
Parlez-nous
Si vous avez des questions, des commentaires ou que vous
souhaitez obtenir de bons conseils ou des idées de recettes
pour profiter au mieux de votre produit, rejoignez-nous en ligne :
Blog : www.morphyrichards.co.uk/blog
Facebook : www.facebook.com/morphyrichardsuk
Twitter : @loveyourmorphy
Site Internet : www.morphyrichards.com
VOTRE GARANTIE DE DEUX ANS
Pour la clientèle en France
Il est important de conserver le ticket de caisse comme preuve
d’achat. Agrafez votre ticket de caisse à cette notice
d'utilisation; vous pourrez ainsi l’avoir sous la main
ultérieurement.
Merci de donner les informations ci-dessous si votre appareil
tombe en panne. Vous trouverez ces références à la base de
l’appareil.
Numéro du modèle
Numéro de série
Tous les produits Morphy Richards sont testés individuellement
avant de quitter l’usine.
Si un problème survient dans les 24 mois qui suivent l’achat
d’origine, vous devez contacter le magasin où vous avez
acheté votre appareil muni de votre ticket de caisse, celui ci le
renverra à Glen Dimplex France pour expertise.
Sous réserve des exclusions indiquées ci-dessous (1 à 9),
l’appareil défectueux sera alors réparé ou remplacé et
réexpédié dans un délai de 15 jours ouvrables maximum à
compter de son arrivée.
Si, pour quelque raison que ce soit, l’article est remplacé
pendant la période de garantie de deux ans, la période de
garantie du nouvel article sera calculée à partir de la date
d’achat d’origine. Vous devez donc absolument conserver votre
ticket de caisse ou votre facture d’origine pour indiquer la date
d’achat.
Pour bénéficier de la garantie de deux ans, l’appareil doit avoir
été utilisé conformément aux instructions du fabricant. Par
exemple, les fers doivent avoir été détartrés et les filtres doivent
avoir été nettoyés selon les instructions.
Morphy Richards ne sera pas dans l’obligation de remplacer ou
réparer les articles aux termes de la garantie dans les
g
p
f
d
i
q
}
∂
FP403040MEE Rev1.qxp_Morphy Richards Instruction Book 11/07/2016 17:38 Page 25
Page 26

26
circonstances suivantes :
1 Si le problème provient d’une utilisation accidentelle, d’une
utilisation abusive ou négligente, ou si l’appareil a été utilisé de
manière contraire aux recommandations du fabricant, ou encore
lorsque le problème provient de sautes de puissance ou de
dégâts occasionnés en transit.
2 Si l’appareil a été utilisé sur une alimentation électrique dont la
tension est différente de celle qui est indiquée sur l’appareil.
3 Si des personnes autres que nos techniciens (ou l’un de nos
revendeurs agréés) ont tenté de faire des réparations.
4 Si l’appareil a été loué ou utilisé dans un contexte non
domestique.
5 Si l’appareil est d’occasion.
6 Morphy Richards n’est pas dans l’obligation de réaliser des
travaux d’entretien, quels qu’ils soient, aux termes de la garantie.
7 La garantie exclut les consommables tels que les sacs, les filtres
et les carafes en verre.
8 Les batteries et les dégâts provoqués par leur fuite ne sont pas
couverts par la garantie.
9 Les filtres n’ont pas été nettoyés ou remplacés suivant les
instructions.
Cette garantie ne confère aucun droit à l’exception de ceux qui
sont expressément indiqués ci-dessus, et ne couvre aucune
réclamation pour dommages immatériels ou indirects. Cette
garantie est offerte comme avantage supplémentaire et n’a
aucune incidence sur vos droits légaux en tant que
consommateur.
Pour la clientèle en Belgique
Les produits de Morphy Richards sont produits conformément
les normes de qualité, agrée international. Au-dessus vos droits
légaux, Morphy Richards vous garantit qu’à partir d’achat ce
produit sera sans défauts de fabrication ou de matériels
pendant une période de deux ans.
Il est important de conserver votre bon d’achat comme preuve.
Agrafez votre ticket à cette notice d’installation.
Veuillez mentionner ces informations ci-dessous si votre
appareil tombe en panne. Vous trouverez ces informations sur la
base de l’appareil.
Numéro du modèle
Numéro de série
Si, pour quelque raison que ce soit, l’article est remplacé
pendant la période de garantie (deux ans), la période de
garantie du nouvel article sera calculée à partir de la date
d’achat d’origine. Il est donc très importants de conserver votre
bon d’achat original afin de connaître la date initiale d’achat.
Cette garantie vaut uniquement quand l’appareil a été utilisé
conformément aux instructions du fabricant. Par exemple, les
appareils doivent être détartrés et les filtres doivent être tenus
propre selon le mode d’emploi.
Morphy Richard ne sera pas dans l’obligation de remplacer ou
réparer les articles aux termes de la garantie dans les
circonstances suivantes
1 Si le problème, prévient d’une utilisation accidentelle, d’une
utilisation abusive ou négligente, ou si l’appareil a été utilisé de
manière contraire aux recommandations du fabricant, ou encore
lorsque le problème provient de source de puissance ou de
dégâts occasionnés en transit.
2 Si l’appareil a été utilisé sur une alimentation électrique dont la
tension est différente de celle qui est indiquée sur l’appareil.
3 Si des personnes, autres que nos techniciens (ou revendeurs
agrées) ont tenté de faire des réparations.
4 Si l’appareil a été loué ou utilisé dans un contexte non
domestique.
5 Si l’appareil est d’occasion.
6 Morphy Richards n’est pas dans l’obligation de réaliser des
travaux d’entretien, quels qu’ils soient, aux termes de la garantie.
7 La garantie ne couvre pas les sachets, filtres et brocs en verre.
8 Les batteries et les dégâts provoqués par leur fuite ne sont pas
couverts par la garantie.
9 Les filtres n’ont pas été nettoyés ou remplacés suivant les
instructions.
Cette garantie ne confère aucun droit à l’exception de ceux qui
sont expressément indiqués ci-dessus, et ne couvre aucune
réclamation pour dommages immatériels ou indirects. Cette
garantie est offerte comme avantage supplémentaire et n’a
aucune incidence sur vos droits légaux en tant que
consommateur.
FP403040MEE Rev1.qxp_Morphy Richards Instruction Book 11/07/2016 17:38 Page 26
Page 27

27
Sicherheitshinweise
Bei der Verwendung eines jeden elektrischen Gerätes sind die nachfolgenden allgemeingültigen Sicherheitsregeln zu beachten.
Lesen Sie diese Anweisungen vor dem Gebrauch bitte sorgfältig durch.
• Dieses Gerät ist zum Gebrauch durch Personen mit
eingeschränkten körperlichen, sensorischen oder geistigen
Fähigkeiten bzw. mit mangelnden Erfahrungen und
Kenntnissen geeignet, sofern dies unter angemessener Aufsicht
bzw. nach Anleitung hinsichtlich der ordnungsgemäßen
Nutzung des Gerätes sowie Erläuterung möglicher Gefahren
geschieht.
• Dieses Gerät ist für Kinder nicht geeignet.
• Kinder dürfen keinesfalls mit dem Gerät spielen.
• Gerät und Kabel sind für Kinder unzugänglich aufzubewahren.
• VORSICHT: Vergewissern Sie sich, dass Sie das Gerät
ausgeschaltet haben, bevor Sie es vom Fuß abnehmen oder
Teile berühren, die beim Gebrauch beweglich sind.
• Überschreiten Sie beim Mixvorgang keinesfalls die in der
„Bedienungstabelle“ empfohlenen Zeitangaben.
• Vermeiden Sie das Berühren beweglicher Teile. Bringen Sie
Hände, Haare, Kleidung und Utensilien während des
Gebrauchs nicht in die Nähe der Mixerklingen, um Verletzungen
und/oder Geräteschäden zu vermeiden.
• Trennen Sie den Mixer stets von der Stromversorgung, wenn er
unbeaufsichtigt
ist, bzw. vor der Montage, Demontage oder Reinigung.
• Gehen Sie beim Umgang mit den scharfen Schneidklingen,
beim Leeren des Behälters und bei der Reinigung vorsichtig
vor.
• Hinweise zur Pflege und Reinigung finden Sie auf Seite 31.
d
g
p
f
d
i
q
}
∂
FP403040MEE Rev1.qxp_Morphy Richards Instruction Book 11/07/2016 17:38 Page 27
Page 28

28
Ergänzend geben wir nachfolgende Sicherheitshinweise.
Verwendungsort
• Verwenden Sie den Mixer keinesfalls in Außenbereichen oder im
Bad.
• Stellen Sie das Gerät niemals an den Rand der Arbeitsfläche.
• Stellen Sie den Behälter des Geräts keinesfalls auf eine
glanzpolierte Holzoberfläche, da diese unter Umständen Schaden
nimmt.
Netzkabel
• Lassen Sie das Netzkabel niemals über den Rand der
Arbeitsfläche hängen, wo ein Kind es greifen könnte.
• Führen Sie das Kabel keinesfalls durch einen freien Raum, zum
Beispiel
zwischen einer Steckdose im unteren Wandbereich und einem
Tisch.
• Führen Sie das Kabel keinesfalls über eine Kochplatte oder eine
andere heiße Fläche, durch die Schäden am Kabel entstehen
könnten.
• Das Netzkabel darf nicht zwischen der Steckdose und dem
Gerätefuß gespannt sein, sondern muss locker liegen.
• Das Netzkabel kann nicht ausgetauscht werden.
Wenden Sie sich an Morphy Richards, um Unterstützung zu
erhalten.
Weitere Sicherheitsbestimmungen
• Verwenden Sie das Gerät ausschließlich für den
vorgesehenen Zweck.
• Der Einsatz von Aufsätzen oder Zubehörteilen, die nicht von
Morphy Richards empfohlen oder verkauft werden, kann Feuer,
Stromschläge oder Verletzungen verursachen.
• WARNUNG: Die fehlerhafte Verwendung des Gerätes kann zu
Verletzungen führen.
Produktspezifische Sicherheitshinweise
• WICHTIG: Lassen Sie heiße Flüssigkeiten stets abkühlen, bevor
Sie sie in den Mixer geben. Achten Sie stets darauf, dass die
Abdeckung ordnungsgemäß befestigt ist.
• Gehen Sie beim Einfüllen warmer Flüssigkeiten in den Mixer
vorsichtig vor, da diese aufgrund plötzlicher Dampfentwicklung
wieder aus dem Gerät ausgestoßen werden können.
• Verwenden Sie das Gerät keinesfalls, wenn der Plastikbehälter
oder die Abdeckung sichtbare Risse oder andere Schäden
aufweisen.
Elektrische Anforderungen
Vergewissern Sie sich, dass die erforderliche Stromversorgung
laut Typenschild des
Gerätes mit Ihrem Hausanschluss übereinstimmt; es muss
Wechselstrom anliegen.
Muss die Sicherung am Netzstecker ausgetauscht werden,
so ist eine 5-Amp-BS1362-Sicherung zu verwenden.
WARNUNG: Dieses Gerät muss geerdet werden.
Einführung
Vielen Dank, dass Sie sich für den Standmixer Total Control
von Morphy Richards entscheiden haben.
Vergessen Sie nicht, das Gerät unter ww.morphyrichards.co.uk
für die zweijährige Garantie zu registrieren.
Inhalt
Sicherheitshinweise 27
Einführung 28
Total Control 29
Produktübersicht 3
Vor dem erstmaligen Gebrauch 30
Anwendung des Standmixers – Manuelle Steuerung 30
Anwendung des Standmixers – Voreingestellte Programme 30
Wichtige Hinweise 31
Pflege und Reinigung 31
Bedienungstabelle 32
Rezepte 33
Kontakt 37
Garantie 37
Geräteaufbau und Funktionen
(1) Messbecher
(2) Abdeckung
(3) Einfüllloch
(4) Ausgießer
(5) Plastikbehälter
(6) Klinge
(7) Gerätefuß
(8) Drehregler
(9) Impulsfunktion
(10) Kabelaufwicklung
(11) Programm Dips & Saucen
(12) Programm Smoothies
(13) Programm Crushed Ice
(14) Programm Suppen & Saucen
(15) Netzsteckerfach (Rückseite)
(16) An/Aus-Schalter
FP403040MEE Rev1.qxp_Morphy Richards Instruction Book 11/07/2016 17:38 Page 28
Page 29

29
g
p
f
d
i
q
}
∂
Hand.1,5 l Fassungsvermögen
Serrator-Klingen aus Edelstahl
Voreingestellte Programme
Integrierte Kabelaufbewahrung
Die Schöpfung neuer Kreationen liegt in Ihrer Hand.
Der Standmixer Total Control zeichnet sich durch die raffinierte Kombination
praktischen Designs und intelligenter Technologie aus – er wurde entwickelt, um die
Schöpfung neuer Kreationen in Ihre Hand zu legen.
Dank der Smart-Response-Technologie liefert dieser intelligente Standmixer genau
die passende Leistung für die Zubereitung verschiedenster Gerichte.
Von nun an bedeutet Mixen kein Herumprobieren mehr: Die 4 voreingestellten
Programme bieten eine einmalige Unterstützung bei der Zubereitung von Dips,
Smoothies, Suppen, Saucen und Eis.
Mithilfe der 5 Geschwindigkeitsstufen und der Impulsfunktion können Sie die
komplette Zubereitung individuell steuern.
Zudem bietet der 1,5-Liter-Behälter ein extragroßes Fassungsvermögen, sodass
Nutzer Unmengen leckerer Drinks,
Suppen und Saucen zaubern können.
Der Netzstecker des Standmixers lässt sich einfach und ordentlich verstauen.
Mit dem Standmixer Total Control liegt die Schöpfung neuer Kreationen in Ihrer
FP403040MEE Rev1.qxp_Morphy Richards Instruction Book 11/07/2016 17:38 Page 29
Page 30

30
Vor dem erstmaligen Gebrauch
• Nehmen Sie den Standmixer vorsichtig aus der Verpackung, da
die Schneidklingen sehr scharf sind.
• Entfernen Sie alle Etiketten (außer dem Etikett mit der
Seriennummer auf der Geräteunterseite).
• Reinigen Sie Behälter, Abdeckung und Messbecher sorgfältig mit
heißem Wasser und Seife.Anschließend abspülen und abtrocknen.
• Wischen Sie mit einem feuchten Tuch über den Gerätefuß.
• WARNUNG: Tauchen Sie den Gerätefuß niemals in Wasser oder
jegliche andere Flüssigkeiten ein. Achten Sie stets darauf, dass die
elektrischen Anschlüsse trocken sind. Diese können mit einem
sauberen, feuchten Tuch abgewischt werden.
Anwendung des Standmixers Total Control –
Manuelle Steuerung
1
Setzen Sie den Plastikbehälter (5) auf den Gerätefuß (7).
2
Geben Sie die Zutaten oder kalten Flüssigkeiten in den
Plastikbehälter (5). Überschreiten Sie keinesfalls die empfohlenen
Mengen (siehe Seite 11).
3
Setzen Sie die Abdeckung (2) auf den Plastikbehälter (5) und
drücken Sie sie fest nach unten. Setzen Sie den Messbecher an
die vorgesehene Stelle und drehen Sie ihn im Uhrzeigersinn, um
ihn zu fixieren. Um das Verschütten von Zutaten zu vermeiden,
vergewissern Sie sich, dass das Einfüllloch in der Abdeckung (2)
vom Ausgießer (4) weg zeigt.
4
Stecken Sie den Netzstecker des Standmixers Total Control in die
Steckdose und schalten Sie den Mixer an (16).
5
Drehen Sie den Regler (8) auf die Position 1, um den Mixvorgang
zu starten.Erhöhen Sie die Geschwindigkeit je nach Bedarf.
6
Drehen Sie den Regler (8) zur Verwendung der Impulsfunktion (9)
auf die Position P. Nutzen Sie diese Funktion jedoch nicht über
einen längeren Zeitraum.
7
Schalten Sie den Mixer aus (16) und ziehen Sie vor dem Servieren
den Stecker ab.
8
Nehmen Sie den Plastikbehälter (5) vom Gerätefuß (7).
9
Entfernen Sie zum Ausgießen die Abdeckung (2) und verwenden
Sie den Ausgießer (4).
10
Um das Ausgießen gezielt zu steuern, heben Sie die Abdeckung
(2) an und setzen Sie sie nach Belieben wie nachfolgend
beschrieben wieder auf.
11
Drehen Sie die Abdeckung (2) für einen vollständigen Fluss auf
den großen Filter.
12
Drehen Sie die Abdeckung (2) auf den Siebfilter, um eventuell
vorhandene große Stücke abzufangen.
Anwendung der voreingestellten Programme
13
Setzen Sie den Plastikbehälter (5) auf den Gerätefuß (7).
14
Geben Sie die Zutaten oder kalten Flüssigkeiten in den
Plastikbehälter (5). Überschreiten Sie keinesfalls die empfohlenen
Mengen (siehe Seite 11).
15
Setzen Sie die Abdeckung (2) auf den Plastikbehälter (5)
und drücken Sie sie fest nach unten. Setzen Sie den Messbecher
(1) an die vorgesehene Stelle und drehen Sie ihn im Uhrzeigersinn,
um ihn zu fixieren.
16
Um das Verschütten von Zutaten zu vermeiden, vergewissern Sie
sich, dass das Einfüllloch in der Abdeckung (2) vom Ausgießer (4)
weg zeigt (siehe Seite 7). Stecken Sie den Netzstecker des
Standmixers Total Control in die Steckdose und schalten Sie den
Mixer an (16).
17
Wählen Sie das voreingestellte Programm für Dips und Saucen
(11) aus, wenn Sie geschmeidige Dips, Saucen, Teig oder
Eiscreme zubereiten möchten. Um den Schalter herum leuchtet
ein blaues Licht auf, das solange leuchtet, bis das Programm
beendet ist. HINWEIS:Das Programm unterbricht den Betrieb
möglicherweise mehrere Sekunden lang. Entfernen Sie jedoch den
Plastikbehälter (5) oder die Abdeckung (2) erst, wenn das Licht
erloschen ist.
WARNUNG: GEBEN SIE KEINESFALLS ZUTATEN HINZU
ODER ENTFERNEN SIE DIE ABDECKUNG, WÄHREND DAS
PROGRAMM LÄUFT.
18
Wählen Sie das voreingestellte Programm für Smoothies (12),
wenn Sie köstliche, gesunde Smoothies zubereiten möchten. Um
den Schalter herum leuchtet ein blaues Licht auf, das solange
leuchtet, bis das Programm beendet ist. HINWEIS: Das Programm
unterbricht den Betrieb möglicherweise mehrere Sekunden lang.
Entfernen Sie jedoch den Plastikbehälter (5) oder die Abdeckung
(2) erst, wenn das Licht erloschen ist.
19
Wählen Sie das voreingestellte Programm für Crushed Ice (13),
wenn Sie aromatisches Slush-Eis zubereiten möchten. Um den
Schalter herum leuchtet ein blaues Licht auf, das solange leuchtet,
bis das Programm beendet ist. HINWEIS: Das Programm
unterbricht den Betrieb möglicherweise mehrere Sekunden lang.
Entfernen Sie jedoch den Plastikbehälter (5) oder die Abdeckung
(2) erst, wenn das Licht erloschen ist.
20
Wählen Sie das voreingestellte Programm für Suppen und Saucen
(14) aus, wenn Sie nahrhafte Suppen und Saucen zubereiten
möchten. Um den Schalter herum leuchtet ein blaues Licht auf,
das solange leuchtet, bis das Programm beendet ist. HINWEIS:
Das Programm unterbricht den Betrieb möglicherweise mehrere
Sekunden lang. Entfernen Sie jedoch den Plastikbehälter (5) oder
die Abdeckung (2) erst, wenn das Licht erloschen ist.
21
Schalten Sie den Mixer aus (16) und ziehen Sie vor dem Servieren
den Stecker ab.
22
Nehmen Sie den Plastikbehälter (5) vom Gerätefuß (7).
23
Entfernen Sie zum Ausgießen die Abdeckung (2) und verwenden
Sie den Ausgießer (4).
24
Um das Ausgießen gezielt zu steuern, heben Sie die Abdeckung
(2) an und setzen Sie sie nach Belieben wie nachfolgend
beschrieben wieder auf.
25
Drehen Sie die Abdeckung (2) für einen vollständigen Fluss auf
FP403040MEE Rev1.qxp_Morphy Richards Instruction Book 11/07/2016 17:38 Page 30
Page 31

31
den großen Filter.
26
Drehen Sie die Abdeckung (2) auf den Siebfilter, um eventuell
vorhandene große Stücke abzufangen.
WICHTIG
GEBEN SIE KEINESFALLS KOCHENDES WASSER ODER
SEHR HEISSE FLÜSSIGKEITEN IN DEN BEHÄLTER.
LASSEN SIE DIESE ZUNÄCHST ABKÜHLEN.
Messbecher
• Der Messbecher (1) dient zum Abmessen kleiner
Flüssigkeitsmengen.
1 Schütten Sie die Flüssigkeit durch das Einfüllloch (3) in der
Abdeckung (2).
2 Setzen Sie den Messbecher (1) zurück in die Abdeckung (2);
durch Drehbewegungen wird er ver- bzw. entriegelt. Setzen Sie
den Mixvorgang anschließend fort.
Herstellung von Crushed Ice
• Befolgen Sie die Schritte im Abschnitt „Anwendung des
Standmixers Total Control“ und ersetzen Sie die Speisezutaten
durch Eiswürfel.
• Wählen Sie das voreingestellte Programm für Crushed Ice (13).
• Hinweis:Das maximale Fassungsvermögen für einen Mixvorgang
beträgt bei der Herstellung von Crushed Ice 500 ml.
Wichtige Hinweise
Mit dem Mixer können Sie Suppen, Saucen, Drinks, Teig,
Mayonnaise, Dressings usw. zubereiten.
• Geben Sie keine trockenen Zutaten in den Mixer, ohne weitere,
feuchtigkeitsreiche Zutaten oder Flüssigkeiten hinzuzufügen.
• Geben Sie für den Mixvorgang zunächst die Flüssigkeiten in den
Behälter und erst dann die festen Zutaten. Beginnen Sie den
Mixvorgang bei geringer Geschwindigkeit und erhöhen Sie sie bei
Bedarf.
WICHTIG: Um die lange Haltbarkeit des Mixers zu gewährleisten,
betreiben Sie ihn bei Anwendung der manuellen
Geschwindigkeitsstufen niemals länger als 60 Sekunden und
lassen Sie ihn anschließend 5 Minuten lang abkühlen. Schalten
Sie ihn aus, sobald die gewünschte Konsistenz erreicht ist.
• Das Gerät funktioniert nicht, wenn der Plastikbehälter (5) nicht
richtig eingerastet ist.
• Verwenden Sie den Plastikbehälter keinesfalls als
Aufbewahrungsbehälter. Leeren Sie ihn, wenn er nicht in
Gebrauch ist.
• Verwenden Sie beim Mixen schaumiger Flüssigkeiten, wie
beispielsweise Milchshakes, niemals mehr als 1 Liter Flüssigkeit.
• Wenn Sie die maximal zulässige Menge von 1,5 l ausreizen, dann
schalten Sie die Geschwindigkeit keinesfalls höher als auf Stufe 2.
• Überschreiten Sie beim Mixen von Suppen keinesfalls die
1-Liter-Markierung.
• Füllen Sie den Mixer nicht zu voll. Dies könnte Schäden am
Motor verursachen. Die Sicherung des Netzsteckers brennt durch,
wenn der Mixer überlastet ist. Geschieht dies, so ersetzen Sie die
Sicherung und überschreiten Sie keinesfalls erneut die
empfohlenen Höchstmengen. Weitere Informationen finden Sie in
der „Bedienungstabelle“ auf Seite 11.
Pflege und Reinigung
• Schalten Sie das Gerät aus, ziehen Sie den Stecker und nehmen
Sie den Plastikbehälter (5) vom Gerätefuß (7), bevor Sie mit der
Reinigung und Pflege des Gerätes beginnen.
• Geben Sie nach dem Gebrauch 1 Liter warmes Wasser in den
Plastikbehälter (5) und lassen Sie das Gerät 30 Sekunden lang mit
der Impulsfunktion laufen. Wiederholen Sie den Vorgang bei
Bedarf. Verwenden Sie niemals Scheuermittel oder
Reinigungsmilch.
• Reinigen Sie den Gerätefuß (7) mit einem feuchten Tuch oder
Küchenpapier.
• Sie können das Stromkabel um den Gerätefuß wickeln und den
Netzstecker im Steckerfach (15) verstauen.
• Setzen Sie den Standmixer Total Control wieder zusammen, indem
Sie den Plastikbehälter (5) vorsichtig auf den Gerätefuß (7) setzen;
achten Sie darauf, dass er richtig einrastet.
• WARNUNG: Tauchen Sie den Gerätefuß niemals in Wasser ein.
• WARNUNG: Wird Flüssigkeit auf die Oberseite des
Gerätefußes verschüttet, dann schalten Sie das Gerät aus,
ziehen Sie den Netzstecker und trocknen Sie das Gerät mit
einem Tuch ab.
g
p
f
d
i
q
}
∂
FP403040MEE Rev1.qxp_Morphy Richards Instruction Book 11/07/2016 17:38 Page 31
Page 32

32
Bedienungstabelle
Menge Geschwindigkeit Zeit Hinweise
Programm oder Manuell (Manuell)
Suppen* 1 l 1 - 4 + Impuls 15 Sekunden bis Auf geringer
max. 1 Minute Geschwindigkeitsstufe
beginnen und bei Bedarf
erhöhen
Milchshakes 1 l 1 - 5 + Impuls 15 Sekunden
Mixen/ Verflüssigen bis 1 Minute
(Püree, Drinks, Teig )1,5 l 1 - 2 Impuls 15 Sekunden Auf geringer
bis 1 Minute Geschwindigkeitsstufe
beginnen und bei Bedarf
erhöhen
Herstellung von max. 500 ml Impuls 10 - 20 Sekunden
Crushed Ice
• Überschreiten Sie keinesfalls die empfohlenen Zeitangaben.
• Überschreiten Sie keinesfalls die empfohlenen Höchstmengen.
• * Geben Sie keinesfalls kochendes Wasser oder sehr heiße
Flüssigkeiten in den Plastikbehälter. Lassen Sie diese zunächst
abkühlen.
Laufzeiten der voreingestellten Programme
Dips & Saucen – 44 Sekunden
Smoothies – 54 Sekunden
Suppen & Saucen – 58 Sekunden
Crushed Ice – 20 Sekunden
FP403040MEE Rev1.qxp_Morphy Richards Instruction Book 11/07/2016 17:38 Page 32
Page 33

33
Rezepte
Rezepte für die voreingestellten Programme
Erdbeersauce (für Eiscreme)
Zubereitungszeit: 5 Minuten (plus 5 Minuten Kühlzeit)
Programm: Dips & Saucen
Ergibt: 200 ml
Portionen: 4
Kochzeit: 5 Minuten
Zutaten:
• 150 g Erdbeeren, entstielt
• 65 g Streuzucker
• 65 ml Wasser
• ½ EL Holunderblütensaft
Zubereitung:
1 Die Erdbeeren waschen und halbieren.
2 Zucker und Wasser in einen Topf geben und bei geringer Hitze
unter häufigem Rühren erwärmen, bis sich der Zucker aufgelöst
hat.
3 Aufkochen und die vorbereiteten Erdbeeren zugeben.
3 - 3 ½ Minuten kochen, oder solange, bis die Erdbeeren weich sind.
4 5 Minuten lang im Topf abkühlen lassen.
5 Den Erdbeersirup in den Behälter geben, den Holunderblütensaft
zugeben; anschließend die Abdeckung aufsetzen und den
Programmknopf drücken. Die Sauce zum Servieren in ein
Behältnis geben.
6 Warm mit Eierkuchen oder gekühlt über Vanilleeis servieren.
Sommerliche Fruchteiscreme
Zubereitungszeit: 10 Minuten
Programm: Dips & Saucen
Gefrierzeit: über Nacht
Portionen: 8
Zutaten:
• 250 g Himbeeren
• 125 g Erdbeeren,
entstielt und halbiert
• 75 g Heidelbeeren
• 225 g Puderzucker, gesiebt
• 1 EL Zitronensaft
• 300 ml Sahne
Zubereitung:
1 Die Früchte in den Behälter geben, die Abdeckung aufsetzen und
den Programmknopf drücken.
2 Den Zitronensaft und anschließend den gesiebten Puderzucker
zugeben, die Abdeckung wieder aufsetzen und die Impulsfunktion
4 Mal oder ca. 20 Sekunden lang betätigen, bis eine gleichmäßige
Mischung entsteht.
3 Die Sahne mit einem Schneebesen oder Handmixer schlagen, bis
sich weiche Spitzen bilden.
Das Fruchtpüree vorsichtig unter die Sahne heben, bis eine
gleichmäßige Mischung entsteht. Diese anschließend in ein
Gefrierbehältnis füllen und ohne Deckel solange einfrieren, bis die
Ränder fest und die Mitte wässrig sind. (2 - 3 Stunden)
4 Die Ränder mit einer Gabel lockern und unter die restliche Masse
rühren, um eine cremige Konsistenz zu erhalten.
5 Aufgedeckt mehrere Stunden lang einfrieren, ohne umzurühren.
6 Zur Aufbewahrung das Behältnis mit einem Deckel abdecken.
Schokoladen-Milchshake
Zubereitungszeit: 5 Minuten
Programm: Smoothies
Ergibt: 1 Liter
Portionen: 5 (Portionen zu je 200 ml)
Zutaten:
• 750 ml fettarme Milch
• 250 g Schokoladeneiscreme
• 1 ½ gestrichene EL Trinkschokoladenpulver
Zubereitung:
1 Milch und Eiscreme mit dem Trinkschokoladenpulver in den
Behälter geben.
2 Die Abdeckung aufsetzen und den Programmknopf drücken.
3 Den fertigen Milchshake sofort servieren.
Hinweise und Tipps:
Ersetzen Sie das Schokoladeneis auch gern einmal durch
Vanilleeis – dies ergibt ein leichteres Aroma.
Erdbeer-Bananen-Smoothie
Zubereitungszeit: weniger als 5 Minuten
Programm: Smoothies
Ergibt: 1,1 Liter
Portionen: 5
Zutaten:
• 180 g Erdbeeren, gewaschen und entstielt
• 2 reife Bananen (ca. 150 g), geschält und in Stücke geschnitten
• 450 g fettarmer Vanillejoghurt
• 300 ml fettarme Milch
• 3 Eiswürfel (je nach Wunsch)
Zubereitung:
1 Die Eiswürfel in den Behälter geben, falls diese gewünscht
werden.
2 Die restlichen Zutaten in der zuvor aufgeführten Reihenfolge
zugeben und die Abdeckung aufsetzen.
3 Den Programmknopf für Smoothies drücken.
4 Den fertigen Smoothie sofort servieren.
g
p
f
d
i
q
}
∂
FP403040MEE Rev1.qxp_Morphy Richards Instruction Book 11/07/2016 17:38 Page 33
Page 34

34
Mango-Slush-Eis
Zubereitungszeit: 5 Minuten
Programm: Crushed Ice
Portionen: 2
Ergibt 500 ml
Zutaten:
• Eis
• 180 - 200 g Mango, in kleinen Stücken
• Saft von 1 Orange (60 ml)
Zubereitung:
1 Bis zur 500-ml-Markierung Eis in den Behälter geben, die
Abdeckung aufsetzen und den Programmknopf für Crushed Ice
drücken.
2 Zu dem fertig zubereiteten Eis die Mangostücke und den
Orangensaft zugeben, die Abdeckung wieder aufsetzen und die
Impulsfunktion zwei- bis dreimal betätigen, bis die gewünschte
Konsistenz erreicht ist.
3 Das Slush-Eis in zwei Gläser füllen und sofort servieren.
Selleriesuppe
Zubereitungszeit: 5 Minuten
Programm: Suppen & Saucen
Portionen: 4
Kochzeit: 30 Minuten
Ergibt: 1,6 Liter
Zutaten:
• 25 g Butter
• 1 Selleriekopf, grob gehackt (einschl. Blätter)
• 1 Zwiebel (ca. 100 g), gehackt
• 3 kleine Kartoffeln (ca. 150 g), geschält und in Stücke geschnitten
• 1 l heiße Gemüsebrühe
• Salz und gemahlener schwarzer Pfeffer
• Frische Petersilie zum Garnieren
Zubereitung:
1 Die Butter in einen großen Kochtopf geben und auf der Herdplatte
bei mittlerer Hitze zerlassen. Die Butter nicht anbrennen lassen.
2 Das Gemüse zugeben und 4 - 5 Minuten lang kochen. Dabei
gelegentlich mit einem Holzlöffel umrühren.
3 Gemüsebrühe und Gewürze zugeben. Alles aufkochen.
4 Den Topf mit einem Deckel abdecken, die Hitze reduzieren und die
Suppe 20 Minuten lang köcheln lassen, oder solange, bis das
Gemüse weich ist.
5 Die Suppe etwas abkühlen lassen; anschließend etwa die Hälfte in
den Behälter geben (bis zur 1-Liter-Markierung). Die Abdeckung auf
den Behälter setzen und den Programmknopf für Suppen drücken.
6 Die Suppe zurück in den Topf geben und anschließend die zweite
Hälfte wie zuvor beschrieben mixen. Bei Bedarf erneut erwärmen,
abschmecken und zum Servieren mit der frischen, gehackten
Petersilie garnieren.
Vegetarische Pastasauce
Zubereitungszeit: 10 Minuten
Programm: Suppen & Saucen
Portionen: 4 - 6
Kochzeit: 1 Stunde 10 Minuten
Ergibt: 1,3 Liter
Zutaten:
• 2 EL Olivenöl
• 1 Zwiebel (130 g), gehackt
• 2 Selleriestangen (80 g), fein gehackt
• 2 Möhren (160 g), geschält und gewürfelt
• 1 Knoblauchzehe, zerdrückt
• 1 Lauchstange (120 g), in Ringe geschnitten
• 1 rote Paprika, gewürfelt
• 2 x 400-g-Dosen gehackte Tomaten
• ½ EL Balsamico-Essig
• 2 gestrichene EL Oregano
• 1 gestrichener EL gemischte Kräuter
• Salz und Pfeffer
Zubereitung:
1 Das Öl in einem großen Topf erhitzen; anschließend Zwiebel,
Sellerie, Möhren, Knoblauch und Lauch 5 Minuten lang unter
gelegentlichem Umrühren leicht anbraten, ohne dass das Gemüse
Farbe annimmt. Den Topf mit einem Deckel abdecken und das
Gemüse 20 Minuten lang unter gelegentlichem Umrühren kochen.
Die Paprikawürfel zugeben und weitere 10 Minuten lang
abgedeckt kochen lassen.
2 Tomaten, Essig, Kräuter sowie Salz und Pfeffer zugeben und die
Sauce 40 Minuten lang köcheln lassen, oder so lange, bis Möhren
und Sellerie weich sind. Etwas abkühlen lassen.
3 Die Sauce vorsichtig in den Behälter geben. Die Menge sollte
knapp über der 1-Liter-Markierung liegen. Die Abdeckung
aufsetzen.
4 Den Programmknopf für Suppen drücken.
5 Abschmecken und bei Bedarf erneut erwärmen.Die Sauce unter
die Spaghetti rühren und mit geriebenem Parmesan und
Knoblauchbrot servieren.
FP403040MEE Rev1.qxp_Morphy Richards Instruction Book 11/07/2016 17:38 Page 34
Page 35

35
Rezepte für die manuelle Bedienung
Tomatensalsa
Zubereitungszeit: 5 Minuten
Programm: Manuell
Portionen: 4 - 8
Zutaten:
• 150 g kleine, ganze, reife Cherrytomaten
• 1 kleine rote Chilischote (10 g)
• 20 g Korianderblätter
• Saft von 1 Limette (2 EL)
• gestrichener EL Salz
• Frisch gemahlener schwarzer Pfeffer
Zubereitung:
1 Den Stiel von der Chilischote entfernen und diese halbieren.
2 Alle Zutaten in der aufgeführten Reihenfolge in den Behälter
geben.
3 Die Impulsfunktion etwa 10 - 15 Sekunden lang betätigen.
Anschließend mit einem Spatel die Stücke von den Seiten des
Behälters nach unten streichen und die Mischung einige weitere
Sekunden lang mit der Impulsfunktion bearbeiten, bis die
gewünschte Konsistenz erreicht ist.
4 Die Salsasauce in eine Servierschüssel geben und vor dem
Servieren 30 Minuten lang durchziehen lassen.
Pastasauce „Matriciana“
Zubereitungszeit: 5 Minuten
Kochzeit: 40 Minuten
Programm: Manuell
Portionen: 4
Ergibt: 600 ml
Zutaten:
• 1 Zwiebel (ca. 130 g), grob gehackt
• 1 Knoblauchzehe, zerdrückt
• ½ grüne Chilischote, entkernt und grob gehackt
• 1 ½ EL natives Olivenöl extra
• 100 g Schweinespeck ohne Schwarte, in grobe Stücke
geschnitten
• 1 x 400-g-Dose Eiertomaten
• 100 ml passierte Tomaten
• 4 EL Weißwein
• Frisch gemahlener schwarzer Pfeffer
• Penne-Nudeln und geriebener Parmesan zum Servieren
Zubereitung:
1 Das Öl in einen großen Topf geben und einige Minuten lang
erhitzen. Zwiebel, Knoblauch und Chilischote 2 - 3 Minuten lang
sanft anbraten, ohne dass sie Farbe annehmen. Dabei
gelegentlich mit einem Holzlöffel umrühren.
2 Die Speckwürfel zugeben und eine weitere Minute braten. Den
Topf mit einem Deckel abdecken und alles bei mittlerer Hitze
5 Minuten lang kochen.
3 Eiertomaten, passierte Tomaten und Wein zugeben; mit Pfeffer
abschmecken.
4 Den Topf wieder mit dem Deckel abdecken und die Sauce 25 -
30 Minuten lang (oder bis die Zwiebel weich ist) leicht köcheln
lassen. Leicht abkühlen lassen.
5 Zehn Minuten, bevor die Sauce fertig ist, die Nudeln laut
Packungsanleitung kochen.
6 Die Sauce in den Mixbehälter geben, die Abdeckung aufsetzen
und die Sauce entweder mit geringer Geschwindigkeit oder mit
der Impulsfunktion einige Sekunden lang mixen, bis die
gewünschte Konsistenz erreicht ist.
7 Die Nudeln abgießen; anschließend die Sauce unterrühren.
Die Nudeln bei Bedarf erneut erwärmen; anschließend sofort mit
Parmesankäse servieren.
Grüner Smoothie mit Kiwi und Apfel
Zubereitungszeit: 5 Minuten
Programm: Manuell
Portionen: 4 - 5
Ergibt: 1 Liter
Zutaten:
• 2 Kiwis (200 g), mit Schale
• 1 reife Banane (80 g – Gewicht nach dem Schälen), in 30 mm
breiten Stücken
• 120 g Gurke, mit Schale und in 30 mm breite Stücke geschnitten
• 65 g Baby-Spinatblätter
• 400 ml Apfelsaft, gekühlt
Zubereitung:
1 Die Kiwi halbieren, den harten Kern entfernen und in grobe Stücke
schneiden.
2 Die Stücke von Kiwi, Banane und Gurke mischen und
anschließend in den Behälter geben. Spinat und Apfelsaft
zugeben.
3 Die Abdeckung aufsetzen und beim Mixen die Geschwindigkeit
nach und nach von 1 auf 5 erhöhen. Den Drehregler nach etwa 20
- 30 Sekunden allmählich wieder auf Null drehen und
anschließend mit der Impulsfunktion zu einer geschmeidigen
Mischung verarbeiten.
4 Den fertigen Smoothie sofort servieren.
g
p
f
d
i
q
}
∂
FP403040MEE Rev1.qxp_Morphy Richards Instruction Book 11/07/2016 17:38 Page 35
Page 36

36
Ananas-Sorbet
Zubereitungszeit: 10 Minuten zuzüglich Kühl- und Gefrierzeit
Programm: Manuell
Portionen: 4 - 6
Ergibt: 600 ml
Zutaten:
• ½ große Ananas, geschält, ohne Kern und in Stücke geschnitten
(Gewicht nach Vorbereitung ca. 385 g)
• 50 ml Limettensaft
• 140 g Streuzucker
• 130 ml Wasser
Zubereitung:
1 Alle Zutaten in den Behälter geben. Mit den
Geschwindigkeitsstufen 1 - 4 mixen, anschließend mit der
Impulsfunktion zu einer geschmeidigen Mischung verarbeiten
(Gesamtdauer 1 Minute).
2 Etwa eine Stunde im Kühlschrank kühl stellen. Anschließend
umrühren, in ein flaches Gefrierbehältnis geben und mit einem
Deckel abdecken.
3 Die Mischung 3 Stunden lang einfrieren, oder so lange, bis die
Ränder fest und die Mitte wässrig sind. Das Behältnis aus dem
Gefrierschrank nehmen, das Sorbet in den Mixbehälter geben und
20 - 30 Sekunden lang bei geringer Geschwindigkeit mixen.
4 Das Behältnis erneut abgedeckt in den Gefrierschrank stellen und
mehrere Stunden lang oder über Nacht einfrieren,
bis die Mischung fest ist.
Kartoffel-Lauch-Suppe
Zubereitungszeit: 5 Minuten
Kochzeit: 35 Minuten
Programm: Manuell
Portionen: 4 - 6
Ergibt: 2 Liter
Zutaten:
• 25 g Butter
• 2 mittelgroße Lauchstangen (320 g), gewaschen und in Scheiben
geschnitten
• 1 kleine Zwiebel (ca. 125 g), geschält und in feine Stücke
geschnitten
• 560 g Kartoffeln, geschält und in dünne Scheiben geschnitten
• 1,2 l Gemüsebrühe
• 1 gestrichener EL gemischte Kräuter
• 1 gestrichener EL Salz
• Schwarzer Pfeffer
Zum Garnieren:
Etwas Schnittlauch
Zubereitung:
1 Die Butter in einem großen Kochtopf zerlassen; anschließend
Lauch und Zwiebel zugeben. Das Gemüse 5 - 10 Minuten lang
anbraten, ohne dass es Farbe annimmt. Dabei gelegentlich mit
einem Holzlöffel umrühren.
2 Kartoffeln, Brühe, Kräuter und Gewürze zugeben und alles
aufkochen. Die Suppe abdecken und 30 Minuten lang (oder bis
das Gemüse weich ist) leicht köcheln lassen.
3 Etwas abkühlen lassen; anschließend die Hälfte der Suppe
vorsichtig in einen Messbecher und den Rest in den Mixbehälter
geben.
4 Die Suppe bei geringer Geschwindigkeit einige Sekunden lang
mixen. Die Impulsfunktion mehrmals kurz hintereinander
betätigen, bis die gewünschte Konsistenz erreicht ist. Die
Gesamtdauer des Mixvorgangs liegt bei etwa 20 - 30 Sekunden.
5 Die fertig gemixte Hälfte zurück in den Topf geben und den
beschriebenen Vorgang mit der restlichen Suppe wiederholen.
Abschmecken, erneut erwärmen; anschließend mit einigen
Schnittlauchstückchen garnieren und mit knusprigem Brot
servieren.
FP403040MEE Rev1.qxp_Morphy Richards Instruction Book 11/07/2016 17:38 Page 36
Page 37

37
Kontakt
Hotline
Rufen Sie uns bei Problemen mit dem Gerät gern unter unserer
Hotline an, da wir Ihnen vermutlich besser behilflich sein
können, als das Geschäft, in dem Sie das Produkt erworben
haben.
Halten Sie bei Ihrem Anruf den Produktnamen, die Modellsowie die Seriennummer bereit, damit wir Ihre Anfrage schneller
bearbeiten können.
Weitere Kontaktmöglichkeiten
Sie haben Fragen oder Anmerkungen oder möchten ein paar
gute Tipps oder Rezeptideen, um ihr Produkt optimal
einzusetzen? Nutzen Sie unsere Online-Kontaktmöglichkeiten:
Blog: www.morphyrichards.co.uk/blog
Facebook: www.facebook.com/morphyrichardsuk
Twitter: loveyourmorphy
Internetseite: www.morphyrichards.com
GESETZLICHE GEWÄHRLEISTUNG
Für dieses Gerät gilt eine Gewährleistung von 2 Jahren.
Als Kaufnachweis sollte die Quittung des Fachhändlers
aufgehoben werden. Heften Sie Ihren Beleg an die Rückseite
dieser Unterlagen.
Sollte an diesem Gerät ein Fehler auftreten, sind immer
nachfolgende Angaben mitzuteilen. Diese Angaben sind auf der
Unterseite des Geräts zu finden.
Modellnr.
Seriennr.
Vor dem Verlassen des Werks werden alle Morphy Richards
Produkte geprüft. Sollte einmal der Fall auftreten, dass sich ein
Gerät innerhalb der Gewährleistung als fehlerhaft erweist,
wenden Sie sich bitte an unsere Service-Hotline
Falls das Gerät während der 2-jährigen Gewährleistung aus
welchem Grund auch immer ausgetauscht wird, wird zur
Berechnung der Restgarantie für das neue Gerät das OriginalKaufdatum zugrunde gelegt. Aus diesem Grunde ist es
besonders wichtig, den Original-Kaufbeleg bzw. die Rechnung
aufzubewahren, um das Datum des ursprünglichen Kaufs
nachweisen zu können.
Damit die 2-jährige Gewährleistung geltend gemacht werden
kann, muss das Gerät im Einklang mit den Anweisungen des
Herstellers benutzt worden sein. Beispielsweise muss das Gerät
entkalkt worden sein und gemäß den Anweisungen gereinigt
werden.
Morphy Richards übernimmt keine Verpflichtung zur Reparatur
oder zum Austausch der Waren im Rahmen der
Garantiebedingungen, wenn:
1 der Fehler auf einen versehentlich Gebrauch, Missbrauch,
unachtsamen Gebrauch oder auf einen Gebrauch zurückzuführen
ist, der den Empfehlungen des Herstellers entgegenwirkt oder
wenn der Fehler durch Stromspitzen oder durch Transportschäden
verursacht wurde.
2 das Gerät mit einer Spannung versorgt wurde, die nicht auf dem
Typenschild abgedruckt ist.
3 von anderen Personen als unserem Reparatur- und
Wartungspersonal (oder von einem unserer Vertragshändler)
Reparaturversuche unternommen wurden.
4 wenn das Gerät für Vermietungszwecke oder nicht allein für
private Zwecke gebraucht wurde.
5 das Gerät aus zweiter Hand stammt.
6 Morphy Richards kann nicht dafür haftbar gemacht werden,
Reparaturarbeiten im Rahmen der Gewährleistung auszuführen.
7 Verbrauchsmaterialien wie Tüten, Filter und Glaskaraffen sind von
der Gewährleistung ausgeschlossen.
8 Batterien und Schäden aufgrund undichter Batterien sind von der
Gewährleistung ausgeschlossen.
9 die Filter nicht gemäß Anleitung gereinigt und ausgewechselt
wurden
Diese Gewährleistung erkennt Ihnen ausschließlich die Rechte
zu, die ausdrücklich in den oben genannten Bestimmungen
niedergelegt sind und erstreckt sich nicht auf Forderungen
infolge eines Verlustes oder einer Beschädigung. Diese
Gewährleistung wird als zusätzliche Leistung angeboten und
greift Ihre gesetzlich zuerkannten Rechte als Verbraucher nicht
an.
g
p
f
d
i
q
}
∂
FP403040MEE Rev1.qxp_Morphy Richards Instruction Book 11/07/2016 17:38 Page 37
Page 38

38
Saúde e segurança
A utilização de qualquer aparelho elétrico exige as seguintes regras de segurança do senso comum. Leia atentamente as presentes instruções
antes de utilizar o produto.
• Este aparelho pode ser utilizado por pessoas com
capacidades físicas, sensoriais ou mentais reduzidas, com falta
de experiência
e conhecimento, contanto que sejam supervisionadas ou
mediante instrução prévia relativamente à utilização do
aparelho de forma segura e compreendendo os perigos
envolvidos.
• Este aparelho não deve ser utilizado por crianças.
• As crianças não devem brincar com o aparelho.
• Mantenha o aparelho e o cabo fora do alcance das crianças.
• CUIDADO: Certifique-se de que o liquidificador está desligado
antes de o remover do suporte ou de se aproximar das peças
móveis durante a utilização.
• Não ultrapasse os períodos de tempo de mistura
recomendados no “Diagrama operativo”.
• Evite tocar nas peças em movimento. Mantenha as mãos, o
cabelo, o vestuário e utensílios afastados das lâminas do
liquidificador durante o seu funcionamento, para impedir
ferimentos pessoais ou danos no aparelho.
• Desligue sempre o liquidificador da alimentação, se este
for deixado sem supervisão antes de montar, desmontar ou
limpar.
• Deve proceder-se com cuidado ao manusear lâminas de corte
afiadas,
esvaziando o jarro e durante a limpeza.
• Para cuidados e limpeza, consulte a página 42.
p
FP403040MEE Rev1.qxp_Morphy Richards Instruction Book 11/07/2016 17:38 Page 38
Page 39

39
Além disso, oferecemos os seguintes conselhos de segurança.
Localização
• Não utilize em exteriores nem numa casa de banho.
• Coloque o aparelho sempre afastado da extremidade da
bancada.
• Não coloque o jarro utilizado com o aparelho numa superfície de
madeira altamente polida, uma vez que a superfície pode
modificar-se.
Cabo de rede
• Não permita que o cabo de rede fique pendurado sobre a
extremidade da bancada, onde uma criança possa chegar.
• Não permita que a derivação passe por um espaço aberto, por
ex., entre a tomada baixa e uma mesa.
• Não permita que o cabo passe por cima de um fogão ou outra
área quente que possa danificar o cabo.
• O cabo de alimentação deve ir da tomada à unidade da base sem
esforçar as ligações.
• O cabo de alimentação não pode ser substituído. Para
aconselhamento, contacte a Morphy Richards.
Outras considerações de segurança
• Não utilize o aparelho para fins que não aquele a que se destina.
• A utilização de acessórios ou ferramentas não recomendados ou
vendidos pela Morphy Richards pode provocar um incêndio,
choque elétrico ou ferimentos.
• AVISO: Uma utilização indevida do aparelho pode provocar
ferimentos pessoais.
Segurança específica do produto
• IMPORTANTE: Permita que os líquidos quentes arrefeçam antes
de os adicionar ao liquidificador, certifique-se de que a tampa
encaixa sempre corretamente.
• Tenha cuidado se um líquido quente for vertido para o
liquidificador, uma vez que este pode salpicar do aparelho devido
ao vapor súbito.
• Não utilize o aparelho se o jarro ou a tampa de plástico estiverem
danificados ou possuírem fissuras visíveis.
Requisitos elétricos
Verifique se a tensão na placa de classificação do
seu aparelho corresponde à fonte de alimentação elétrica da sua
casa, que deve ser C.A. (Corrente Alternada).
Caso o fusível na ficha de corrente deva ser trocado,
deve ser colocado um fusível BS1362 de 5 amperes.
AVISO: Este aparelho deve ser ligado à terra.
Introdução
Obrigado pela sua aquisição recente deste liquidificador de mesa
Total Control da Morphy Richards
Lembre-se de visitar www.morphyrichards.co.uk para registar a
garantia de dois anos do seu produto
Índice
Saúde e segurança 38
Introdução 39
Total Control 40
Visão geral do produto 3
Antes da primeira utilização 41
Utilizar o liquidificador de mesa - controlo manual 41
Utilizar o liquidificador de mesa - programas predefinidos 41
Top de dicas 42
Cuidados e limpeza 42
Diagrama operativo 42
Receitas 43
Contacte-nos 46
Garantia 47
Funcionalidades
(1) Copo de medição
(2) Tampa
(3) Orifício de verter
(4) Bico
(5) Jarro de plástico
(6) Lâmina
(7) Unidade de base
(8) Indicador de controlo
(9) Função de impulso
(10) Armazenamento do cabo
(11) Molhos predefinidos
(12) Batidos predefinidos
(13) Trituração de gelo predefinida
(14) Sopa e molhos predefinidos
(15) Armazenamento da ficha (na traseira)
(16) Interruptor ligar/desligar
g
p
f
d
i
q
}
∂
FP403040MEE Rev1.qxp_Morphy Richards Instruction Book 11/07/2016 17:38 Page 39
Page 40

40
Capacidade de trabalho de 1,5 l
Lâminas de serrador de aço
inoxidável
Definições pré-programa
Armazenamento do cabo integrado
Dá-lhe a potência para criar com confiança
O liquidificador de mesa Total Control consiste numa fusão versátil do design
prático e de uma tecnologia de resposta inteligente, concebido para dar aos
utilizadores a potência para criar com confiança.
Graças à sua tecnologia de resposta inteligente, este liquidificador de mesa
inteligente fornece a quantidade exata de potência para uma variedade de
tarefas de preparação de alimentos. Os 4 programas predefinidos dão-lhe uma
assistência incomparável para molhos, batidos, sopas e gelo, removendo
completamente o trabalho de adivinhar durante uma mistura.
5 velocidades e uma função de impulso ajudam-no a manter o controlo total de
todo o processo.
E a capacidade extra-grande de 1,5 litros permite aos utilizadores fazer muitas
bebidas, sopas e molhos deliciosos. A ficha de armazenamento fácil do
liquidificador de mesa é uma solução de armazenamento organizada.
O liquidificador de mesa Total Control dá aos utilizadores a potência para criar
com confiança.
FP403040MEE Rev1.qxp_Morphy Richards Instruction Book 11/07/2016 17:38 Page 40
Page 41

41
Antes de utilizar pela primeira vez
• Desembale cuidadosamente o seu liquidificador de mesa, uma
vez que as lâminas de mistura são muito afiadas.
• Remova quaisquer autocolantes (exceto o da etiqueta de série na
base do produto).
• Lave cuidadosamente o jarro, a tampa e o copo de medição em
água quente com sabão. Enxague e limpe.
• Passe um pano húmido pela unidade de base.
• AVISO: Nunca submerja a unidade de base em água ou em
qualquer outro líquido. Certifique-se de que as ligações
elétricas são mantidas sempre secas. Estas podem ser
limpas com um pano húmido e limpo.
Utilizar o liquidificador de mesa Total Control -
controlo manual
1
Coloque o jarro de plástico (5) na unidade de base (7).
2
Coloque os alimentos ou o líquido frio no jarro de plástico (5). Não
ultrapasse a quantidade recomendada (ver a página 11).
3
Coloque a tampa (2) no jarro de plástico (5), pressionando
firmemente para baixo. Coloque o copo de medição (1), rodando
no sentido dos ponteiros do relógio para o bloquear na sua
posição. Para evitar derramamentos, certifique-se de que o
orifício de verter na tampa (2) está voltado para longe do bico (4).
4
Coloque a ficha do liquidificador de mesa Total Control na tomada
de corrente e ligue (16).
5
Coloque o indicador de controlo (8) em 1, para começar a
misturar. Aumente a velocidade, como requerido.
6
Para utilizar a função pulso (9), rode o indicador de controlo (8)
para P. Não utilize durante períodos prolongados de tempo.
7
Desligue (16) e retire a ficha da tomada de corrente, antes de
servir.
8
Remova o jarro de plástico (5) da unidade de base (7).
9
Para verter, remova a tampa (2) e verta pelo bico (4).
10
Para utilizar o controlo do caudal, levante a tampa (2) e
reposicione como ilustrado de seguida.
11
Rode para o filtro grande na tampa (2), para obter um caudal
abundante.
12
Rode para o filtro com grelha na tampa (2), para impedir que
pedaços grandes sejam vertidos, se existentes. Utilização de
programas predefinidos
13
Coloque o jarro de plástico (5) na unidade de base (7).
14
Coloque os alimentos ou o líquido frio no jarro de plástico (5). Não
ultrapasse a quantidade recomendada (ver a página 11).
15
Coloque a tampa (2) no jarro de plástico (5), pressionando
firmemente para baixo. Coloque o copo de medição (1), rodando
no sentido dos ponteiros do relógio para o bloquear na sua
posição.
16
Para evitar derramamentos, certifique-se de que o orifício de
verter na tampa (2) está voltado para longe do bico (4). Ver a
página 7. Coloque a ficha do liquidificador de mesa Total Control
na tomada de corrente e ligue (16).
17
Selecione o botão molhos (11) nos programas predefinidos, para
obter molhos, massas e gelados cremosos. Uma luz azul acende-
se em torno do botão. Esta luz permanece acesa até o programa
ter sido concluído. NOTA: O programa pode parar durante vários
segundos. Não remova o jarro de plástico (5) ou a tampa (2) até a
luz se apagar.
AVISO: NÃO ADICIONE INGREDIENTES NEM REMOVA A
TAMPA COM O PROGRAMA EM EXECUÇÃO.
18
Selecione o botão batidos (12) em programas predefinidos, para
fazer batidos saudáveis e deliciosos. Uma luz azul acende-se em
torno do botão. Esta luz permanece acesa até o programa ter
sido concluído. NOTA: O programa pode parar durante vários
segundos. Não remova o jarro de plástico (5) ou a tampa (2) até a
luz se apagar.
19
Selecione o botão trituração de gelo (13) em programas
predefinidos, para fazer granizados de sabores. Uma luz azul
acende-se em torno do botão. Esta luz permanece acesa até o
programa ter sido concluído. NOTA: O programa pode parar
durante vários segundos. Não remova o jarro de plástico (5) ou a
tampa (2) até a luz se apagar.
20
Selecione o botão sopa e molhos (14) nos programas
predefinidos, para fazer sopas e molhos nutritivos. Uma luz azul
acende-se em torno do botão. Esta luz permanece acesa até o
programa ter sido concluído. NOTA: O programa pode parar
durante vários segundos. Não remova o jarro de plástico (5) ou a
tampa (2) até a luz se apagar.
21
Desligue (16) e retire a ficha da tomada de corrente, antes de
servir.
22
Remova o jarro de plástico (5) da unidade de base (7).
23
Para verter, remova a tampa (2) e verta pelo bico (4).
24
Para utilizar o controlo do caudal, levante a tampa (2) e
reposicione como ilustrado de seguida.
25
Rode para o filtro grande na tampa (2), para obter um caudal
abundante.
26
Rode para o filtro com grelha na tampa (2), para impedir que
pedaços grandes sejam vertidos, se existentes.
IMPORTANTE:
NÃO ADICIONE ÁGUA A FERVER/LÍQUIDOS MUITO
QUENTES AO JARRO. PERMITA PRIMEIRO QUE
ARREFEÇAM.
Copo de medição
• O copo de medição (1) pode ser utilizado para medir quantidades
pequenas de líquido.
1 Verta o líquido através do orifício de verter (3) na tampa (2).
2 Coloque o copo de medição (1) de novo na tampa (2), rodando
para bloquear/desbloquear. De seguida, faça a sua mistura.
Trituração de gelo
• Siga o procedimento na secção “Utilizar o seu liquidificador de
mesa Total Control”, substituindo os alimentos por cubos de gelo
a serem triturados.
• Selecione o botão trituração de gelo (13) em programas
predefinidos.
• Nota: A capacidade máxima de trituração de gelo de uma só vez
é 500 ml.
g
p
f
d
i
q
}
∂
FP403040MEE Rev1.qxp_Morphy Richards Instruction Book 11/07/2016 17:38 Page 41
Page 42

42
Top de dicas
Utilize o seu liquidificador para fazer sopas, molhos, bebidas,
patés, maionese, etc.
• Não coloque ingredientes secos no liquidificador sem adicionar
outros ingredientes molhados ou líquidos.
• Ao misturar, verta os líquidos primeiro e, de seguida, adicione os
alimentos sólidos. Comece a misturar a uma velocidade mais
baixa e aumente, se necessário.
IMPORTANTE: Para garantir uma longa vida útil do seu
liquidificador, ao utilizar as definições de velocidade manual,
nunca utilize durante mais de 60 segundos, e permita que
arrefeça durante 5 minutos. Desligue mal tenha atingido a
consistência desejada.
• O aparelho não irá funcionar se a tampa de plástico (5) estiver
incorretamente encaixada.
• Não utilize o jarro de plástico como recipiente de armazenamento
Mantenha-o vazio, quando não estiver a ser utilizado.
• Nunca misture mais do que 1 litro (1 3⁄4 de caneca) - de líquidos
espumosos, como batidos de leite.
• Se utilizar um máximo de 1,5 l, não utilize uma velocidade
superior a 2.
• Ao misturar sopa, não ultrapasse a marca de 1 litro.
• Não encha o liquidificador em excesso. Isto pode provocar danos
no motor. O fusível da ficha irá estourar, se o liquidificador estiver
sobrecarregado. Substitua o fusível e não ultrapasse os volumes
máximos recomendados. Consulte o “Diagrama operativo” na
página 11.
Cuidados e limpeza
• Antes da limpeza e manutenção, desligue o aparelho e retire a
ficha da corrente, remova a tampa de plástico (5) da unidade de
base (7).
• Depois de utilizar, encha o jarro de plástico (5) com 1 l (13⁄4 de
caneca) de água quente, execute durante 30 segundos na
definição de pulso e repita, se necessário.
Nunca utilize produtos de limpeza abrasivos ou à base de creme.
• Limpe a unidade de base (7) com um pano húmido ou um rolo de
papel de cozinha.
• Existe um acessório para enrolar o cabo de alimentação em torno
da base do produto e encaixar a ficha no armazenamento da
ficha (15).
• Remonte o liquidificador de mesa Total Control, colocando
cuidadosamente a tampa de plástico (5) na unidade de base (7),
certificando-se de que encaixa corretamente.
• AVISO : Nunca submerja a unidade de base em água.
• AVISO: Se um líquido for derramado sobre a unidade de base,
desligue e retire a ficha da corrente, secando com um pano.
Diagrama operativo
Volume Velocidade (manual) Tempo Dicas
Predefinido ou manual
Sopas* 1L 1-4+ pulso 15 segundos a 1 minuto máx. Comece a velocidade baixa e
aumente para alta, se necessário
Batidos de leite 1L 1-5+ pulso 15 segundos a 1 minuto
Mistura / liquidificação
(purés, bebidas, massas) 1,5 l 1-2 pulso 15 segundos a 1 minuto Comece a velocidade baixa e
aumente para alta, se necessário
Trituração de gelo 500 ml máx Pulso 10-20 segundos
• Não processe durante mais tempo do que o recomendado.
• Não ultrapasse os volumes máximos recomendados.
• * Não adicione água a ferver e líquidos muito quentes ao jarro de
plástico, permita que seque primeiro.
Tempos de execução de programas
predefinidos
Molhos - 44 segundos
Batidos - 54 segundos
Sopas e molhos - 58 segundos
Trituração de gelo - 20 segundos
FP403040MEE Rev1.qxp_Morphy Richards Instruction Book 11/07/2016 17:38 Page 42
Page 43

43
Receitas
Receitas predefinidas
Molho de morango (para servir com gelado)
Tempo de preparação: 5 minutos (mais 5 minutos de arrefecimento)
Definição: Molhos
Volume total: 200ml
Porções: 4
Tempo de confeção: 5 minutos
Ingredientes:
• 150 g morangos descascados
• 65 g açúcar refinado
• 65 ml de água
• ½ colher de sopa de flor de sabugueiro
Método:
1 Lave e corte os morangos em metades.
2 Coloque o açúcar e a água numa panela e agite frequentemente
em lume brando, até o açúcar se dissolver.
3 Deixe ferver e, de seguida, adicione os morangos preparados.
Coza 3 -3½ minutos até amolecer.
4 Arrefeça na panela durante 5 minutos.
5 Coloque a calda de morango no jarro, adicione flor de
sabugueiro, coloque a tampa e prima o botão predefinido. Verta o
molho num jarro para servir.
6 Sirva morno com panquecas ou arrefeça e verta sobre gelado de
baunilha.
Gelado de fruta de verão
Tempo de preparação: 10 minutos
Definição: Molhos
Tempo de congelamento: durante a noite
Porções: 8
Ingredientes:
• 250 g framboesas
• 125 g morangos,
descascados e em metades
• 75 g mirtilos
• 225 g açúcar refinado, peneirado
• 1 colher de sopa de sumo de limão
• 300 ml de natas inteiras
Método:
1 Coloque a fruta no jarro, coloque a tampa e prima o botão
predefinido.
2 Adicione sumo de limão e, de seguida, açúcar refinado peneirado
num jarro, encaixe a tampa e pulse (5 vezes durante cerca de 20
segundos) até tudo estar misturado.
3 Bata as natas inteiras com uma colher de bater ou batedeira até
se formarem picos suaves. Aplique suavemente o puré de fruta
sobre as natas até ficarem misturados de forma homogénea e, de
seguida, verta para um recipiente de congelador e congele
destapado, até formar gelo nas extremidades e granizado. (2-3
horas)
4 Volte os lados para o centro com um garfo e bata até obter uma
consistência cremosa.
5 Congele destapado durante várias horas sem bater.
6 Para armazenar, cubra o recipiente com uma tampa.
Batido de leite com chocolate
Tempo de preparação: 5 minutos
Definição: Batidos
Rendimento: 1 litro
Porções: 5 (porções de 200 ml)
Ingredientes:
• 750 ml de leite parcialmente desnatado
• 250 g gelado de chocolate
• 1½ colher de sopa rasa de chocolate em pó de bebida
Método:
1 Coloque o leite e o gelado no jarro e adicione chocolate em pó de
bebida.
2 Encaixe a tampa e prima o botão predefinido.
3 Quando estiver pronto, sirva de imediato
Pistas e dicas:
Para variar, substitua por gelado de baunilha, que confere um
sabor mais leve.
Batido de banana e morango
Tempo de preparação: menos de 5 minutos
Definição: Batidos
Rendimento: 1,1 litro
Porções: 5
Ingredientes:
• 180 g de morangos lavados e partidos em metades
• 2 bananas maduras (aprox. 150 g) descascadas e cortadas em
pedaços
• 450 g iogurte de baunilha magro
• 300 ml de leite parcialmente desnatado
• 3 cubos de gelo (opcional)
Método:
1 Se utilizar, coloque os cubos de gelo no jarro.
2 Adicione os ingredientes restantes pela ordem enumerada e
encaixe a tampa
3 Prima o botão predefinido de batido.
4 Sirva imediatamente, quanto estiver pronto.
g
p
f
d
i
q
}
∂
FP403040MEE Rev1.qxp_Morphy Richards Instruction Book 11/07/2016 17:38 Page 43
Page 44

44
Granizado de manga
Tempo de preparação: 5 minutos
Definição: Trituração de gelo
Porções: 2
Rendimento 500 ml
Ingredientes:
• Gelo
• 180 g – 200 g de manga preparada picada
• Sumo de 1 laranja (60 ml)
Método:
1 Coloque o gelo no jarro até à marca de 500 ml, encaixe a tampa
e prima o botão predefinido de gelo.
2 Quando o gelo estiver pronto, adicione a manga e o sumo de
laranja, encaixe a tampa e pulse duas ou três vezes até obter a
consistência desejada.
3 Verta em dois copos e sirva de imediato.
Sopa de aipo
Tempo de preparação: 5 minutos
Definição: Sopas e molhos
Porções: 4
Tempo de confeção: 30 minutos
Rendimento: 1,6 litros
Ingredientes:
• 25 g de manteiga
• 1 cabeça de aipo, picada de forma grosseira (incluindo as folhas)
• 1 cebola (aprox. 100 g), picada
• 3 batatas pequenas (aprox. 150 g) descascadas e picadas
• 1 l de caldo de vegetais
• Sal e pimenta preta moída
• Salsa fresca para adornar
Método:
1 Coloque a manteiga numa caçarola grande e derreta em lume
médio. Certifique-se de que a manteiga não queima.
2 Adicione os vegetais, coza durante 4 – 5 minutos, agitando
ocasionalmente com uma colher de madeira.
3 Adicione o caldo de vegetais e os condimentos. Deixe levantar
fervura.
4 Coloque a tampa na caçarola, reduza o lume e deixe cozinhar em
lume brando durante 20 minutos, até os vegetais terem
amolecido.
5 Permita que a sopa arrefeça ligeiramente e, de seguida, coloque
cerca de metade no jarro, até à marca de 1 litro. Encaixe a tampa
do jarro e prima o botão predefinido de sopa.
6 Verta a sopa de novo para a caçarola e, de seguida, misture a
sopa restante como acima. Volte a aquecer, se necessário,
verifique o tempero e adorne com salsa fresca picada para servir.
Molho de massa de vegetais
Tempo de preparação: 10 minutos
Definição: Sopas e molhos
Porções: 4-6
Tempo de confeção: 1 hora e 10 minutos
Rendimento: 1,3 litros
Ingredientes:
• 2 colheres de sopa de azeite
• 1 cebola (130 g), picada
• 2 talos de aipo, (80 g) finamente picados
• 2 cenouras (160 g) descascadas e cortadas em cubos
• 1 dente de alho triturado
• 1 alho francês (120 g) cortado em discos
• 1 pimentão cortado em cubos
• 2 x 400 g latas de tomates picados
• ½ colher de sopa de vinagre balsâmico
• 2 colheres de sopa rasas de orégões
• 1 colher de sopa rasa de ervas aromáticas mistas
• Sal e pimenta
Método:
1 Aqueça o óleo numa panela grande e coza suavemente a cebola,
aipo, cenoura, alho e alho francês durante 5 minutos sem dourar,
agitando ocasionalmente. Coloque a tampa da panela e coza
durante 20 minutos, agitando ocasionalmente. Adicione pimentos
cortados em cubos e coza suavemente durante mais 10 minutos
com a tampa.
2 Coloque os tomates, vinagre, ervas aromáticas, sal e pimenta na
panela e deixe em lume brando durante 10 minutos ou até que a
cenoura e o aipo amoleçam. Arrefeça ligeiramente.
3 Verta cuidadosamente o molho para o jarro. O nível deve ser logo
acima da marca de 1 litro. Coloque a tampa.
4 Prima o botão predefinido de sopa.
5 Verifique o tempero e volte a aquecer, se necessário. Deite
esparguete enquanto agita e sirva com queijo parmesão granitado
e pão de alho à parte.
FP403040MEE Rev1.qxp_Morphy Richards Instruction Book 11/07/2016 17:38 Page 44
Page 45

45
Receitas manuais
Molho de tomate
Tempo de preparação: 5 minutos
Definição: Manual
Porções: 4-8
Ingredientes:
• 150 g de tomates cereja maduros, inteiros e pequenos,
• 1 malagueta (10 g)
• 20 g folhas de coentros
• Sumo de 1 limão (2 colheres de sopa)
• colher de sopa rasa de sal
• Pimenta preta fresca moída
Método:
1 Remova o talo da malagueta e corte-a em duas metades.
2 Coloque todos os ingredientes no jarro pela ordem referida.
3 Pulse durante 10 a 15 segundos e, de seguida, raspe os lados do
jarro com uma espátula antes de pulsar durante mais alguns
segundos até se obter a consistência desejada.
4 Verta para uma tigela de servir e deixe repousar durante 30
minutos antes de servir.
Molho de massa matriciana
Tempo de preparação: 5 minutos
Tempo de confeção: 40 minutos
Definição: Manual
Porções: 4
Rendimento: 600ml
Ingredientes:
• 1 cebola (aprox. 130g)
grosseiramente picada
• 1 dente de alho triturado
• ½ malagueta verde sem sementes e grosseiramente picada
• 1½ colher de sopa de azeite virgem
• 100 g bacon simples sem crosta, grosseiramente picado
• 1 x 400 g lata de tomates para molhos
• 100 ml de passata
• 4 colheres de sopa de vinho branco
• pimenta preta fresca moída
• Massa penne e queijo parmesão granitado para servir
Método:
1 Coloque o óleo numa panela grande e aqueça durante alguns
minutos. Frite suavemente a cebola, o alho e a malagueta durante
2 a 3 minutos sem dourar, agitando ocasionalmente com uma
colher de madeira.
2 Adicione o bacon picado e deixe fritar durante mais um minuto.
Coloque a tampa na panela e coza a lume médio durante 5
minutos.
3 Adicione tomates para molhos, a passata e o vinho, temperando
com pimenta.
4 Coloque a tampa na panela e deixe em lume brando durante 25 a
30 minutos, ou até a cebola ficar mole. Arrefeça ligeiramente.
5 Dez minutos antes de o molho estar pronto, coza a massa de
acordo com as instruções na embalagem.
6 Coloque o molho no jarro do liquidificador, coloque a tampa e
misture, utilizando uma baixa velocidade ou pulse durante alguns
segundos, apenas até ser alcançada a consistência desejada.
7 Escoe a massa e, de seguida, envolva-a no molho. Aqueça alguns
segundos, se necessário e, de seguida, sirva imediatamente com
queijo parmesão.
g
p
f
d
i
q
}
∂
FP403040MEE Rev1.qxp_Morphy Richards Instruction Book 11/07/2016 17:38 Page 45
Page 46

46
Batido de kiwi e maçã
Tempo de preparação: 5 minutos
Definição: Manual
Porções: 4-5
Volume total: 1 litro
Ingredientes:
• 2 kiwis (200 g), com pele
• 1x 80 g de banana madura (peso sem casca), pedaços de 30 mm
• 120 g de pepino com pele e cortado, pedaços de 30 mm
• 65 g de folhas de espinafre jovem
• 400 ml de sumo de maçã arrefecido
Método:
1 Corte os kiwis em metades, removendo partes duras difíceis de
picar.
2 Misture os pedaços de kiwi, banana e pepino e, de seguida,
coloque no jarro. Adicione espinafre e sumo de maçã.
3 Coloque a tampa e aumente gradualmente a velocidade de 1 a 5.
20 a 30 segundos depois, coloque o botão gradualmente no zero
e, de seguida, pulse até ficar suave.
4 Quando estiver pronto, sirva de imediato
Sorvete de ananás
Tempo de preparação: 10 minutos mais o tempo de arrefecimento e
congelamento
Definição: Manual
Porções: 4-6
Rendimento: 600ml
Ingredientes:
• ½ de ananás grande, descascado, com o núcleo removido e
picado (peso do preparado de aprox. 385 g)
• 50 ml de sumo de lima
• 140g açúcar refinado
• 130ml de água
Método:
1 Coloque todos os ingredientes no jarro. Misture utilizando as
velocidades 1 a 4 e, de seguida, pulse até estar suave. (Tempo
total de 1 minuto).
2 Refrigere durante cerca de uma hora e agite, verta para um
recipiente de congelador baixo e cubra com uma tampa.
3 Congele a mistura durante 3 horas ou até ficar com o exterior
firme mas semiderretido no centro. Remova do congelador,
coloque o sorvete no jarro do liquidificador e processe durante 20
– 30 minutos a baixa velocidade.
4 Coloque de novo no congelador tapado durante várias horas ou
durante a noite, até ficar firme.
Sopa de alho francês e batata
Tempo de preparação: 5 minutos
Tempo de confeção: 35 minutos
Definição: Manual
Porções: 4-6
Rendimento: 2 litros
Ingredientes:
• 25 g de manteiga
• 2 alhos franceses médios (320 g), lavados e picados
• 1 cebola pequena (125 g), descascada e finamente picada
• 560 g batatas descascadas, em cortes finos
• 1,2 litros de caldo de vegetais
• 1 colher de sopa rasa de ervas aromáticas mistas
• 1 colher de sopa rasa de sal
• Pimenta preta
Adorno: Alguns cebolinhos
Método:
1 Derreta a manteiga numa caçarola grande e adicione os alhos
franceses e a cebola. Cozia suavemente sem dourar durante 5 a
10 minutos, agitando ocasionalmente com uma colher de
madeira.
2 Adicione duas batatas, caldo, ervas aromáticas e tempero, deixe
ferver, tape e deixe em lume brando durante 30 minutos ou até
estar mole.
3 Permita que arrefeça ligeiramente e, de seguida, verta metade da
sopa num jarro de medição e o restante no jarro do liquidificador.
4 Utilize baixas velocidades para misturar durante alguns segundos.
Utilize a definição de pulso em explosões curtas para alcançar a
consistência desejada. O tempo de mistura deve ser de cerca de
20 a 30 segundos.
5 Verta a sopa misturada de novo na panela e repita o anterior com
a sopa restante. Verifique o tempero, volte a aquecer, adorne com
alguns cebolinhos aos bocadinhos e sirva com pão estaladiço.
Contacte-nos
Linha de ajuda
Se estiver a ter um problema com o seu aparelho, contacte a
nossa linha de ajuda, é mais provável que o consigamos ajudar
do que na loja onde adquiriu o artigo.
Tenha à mão o nome do produto, número do modelo e número
de série quando telefonar, para nos ajudar a processar mais
rapidamente o seu problema.
Fale connosco
Se tiver quaisquer questões ou comentários, ou se quiser
algumas dicas ótimas ou ideias para receitas para ajudá-lo a tirar
o máximo partido dos seus produtos, junte-se a nós online:
Blogue: www.morphyrichards.co.uk/blog
Facebook: www.facebook.com/morphyrichardsuk
Twitter: @loveyourmorphy
Website: www.morphyrichards.com
FP403040MEE Rev1.qxp_Morphy Richards Instruction Book 11/07/2016 17:38 Page 46
Page 47

47
A SUA GARANTIA DE DOIS ANOS
Este aparelho tem uma garantia de reparação ou substituição
de 2 anos.
É importante guardar o talão de compra como comprovativo de
compra. Agrafe-o ao verso deste folheto para referência futura.
Mencione a seguinte informação se o produto apresentar uma
avaria. Estes números podem ser encontrados na base do
artigo.
N.º do modelo
N.º de série
Todos os artigos Morphy Richards são testados individualmente
antes de saírem da fábrica. No caso improvável de algum
produto apresentar uma avaria no prazo de 28 dias após a
compra, o mesmo deverá ser devolvido ao local de compra,
para a sua substituição.
Se a avaria surgir passados 28 dias e dentro dos 24 meses a
partir da data de aquisição do aparelho, deverá contactar o seu
distribuidor local e referir o número do modelo e de série do
produto ou escrever ao seu distribuidor local para o endereço
abaixo citado.
Ser-lhe-á solicitado que devolva o produto (numa embalagem
segura e apropriada) para o endereço apresentado, juntamente
com uma cópia do talão de compra.
Tirando as excepções abaixo referenciadas (1-9), o artigo
avariado será reparado ou substituído e enviado, normalmente
no prazo de 7 dias úteis a contar da data de recepção.
Se por qualquer razão, este artigo for substituído durante o
período de garantia de 2 anos, a garantia do novo artigo será
calculada a partir da data original de compra. Por esta razão, é
importante guardar o talão ou factura originais de modo a
indicar a data inicial de compra.
Para ser abrangido pela garantia de 2 anos, o artigo deverá ter
sido utilizado de acordo com as instruções do fabricante. Por
exemplo, os artigos têm de ter sido escamados e os filtros
mantidos limpos, tal como indicado nas instruções.
A Morphy Richards ou o distribuidor local não serão obrigados a
substituir ou reparar artigos sob os termos da garantia quando:
1 A avaria tiver sido provocada ou for atribuída a uma utilização
inadvertida, indevida, negligente, contrária às recomendações do
fabricante ou no caso de ter sido causada por oscilações de
corrente ou danos provocados pelo transporte.
2 O aparelho tiver sido utilizado com uma voltagem diferente da
recomendada.
3 Tiverem sido efectuadas tentativas de reparação por pessoas que
não os técnicos da Morphy Richards (ou o seu representante
autorizado).
4 O aparelho tiver sido utilizado com fins de aluguer ou utilização
não doméstica.
5 O aparelho foi adquirido em segunda mão.
6 A Morphy Richards ou o distribuidor local não são responsáveis
pela execução de qualquer tipo de trabalho de manutenção, ao
abrigo da garantia.
7 A garantia não abrange consumíveis, tais como sacos, filtros e
garrafas de vidro
8 Baterias e danos causados por derrame não estão abrangidos
pela garantia.
9 Os filtros não foram limpos e substituídos de acordo com as
instruções.
Esta garantia não confere quaisquer direitos para além dos
expressamente definidos anteriormente e não abrange
quaisquer reclamações por danos ou perdas sucessivos. Esta
garantia é um benefício adicional e não afecta quaisquer direitos
estatutários do consumidor.
g
p
f
d
i
q
}
∂
FP403040MEE Rev1.qxp_Morphy Richards Instruction Book 11/07/2016 17:38 Page 47
Page 48

48
Salute e sicurezza
L'utilizzo di un qualunque apparecchio elettrico richiede i seguenti principi di buon senso. Si prega di leggere attentamente le presenti
istruzioni prima di utilizzare il prodotto.
• Il presente elettrodomestico è utilizzabile da persone con ridotte
capacità fisiche, sensoriali o mentali, o che non dispongano
dell'esperienza e della conoscenza necessaria, qualora esse
abbiano ricevuto assistenza e istruzioni relative all'utilizzo in
maniera responsabile dell'apparecchio stesso e a condizione
che abbiano compreso i possibili rischi da esso derivanti.
• I bambini non devono utilizzare il presente apparecchio.
• I bambini non devono impiegare l'apparecchio come gioco.
• Tenere l'apparecchio e il suo cavo lontani dalla portata dei
bambini.
• ATTENZIONE: Accertarsi che il frullatore sia spento prima di
spostarlo dalla sua posizione o prima di avvicinarsi a parti in
movimento durante l'uso.
• Non tenere in funzione per periodi di tempo più lunghi di quelli
indicati nella "tabella di funzionamento".
• Evitare di toccare le parti in movimento. Durante il
funzionamento tenere le mani, i capelli, il proprio vestiario e ogni
utensile a distanza adeguata dalle lame del frullatore, in modo
tale da prevenire lesioni personali e/o danni all'apparecchio.
• Scollegare sempre il frullatore dall'alimentazione elettrica
quando viene lasciato incustodito e prima delle operazioni di
montaggio, smontaggio e pulizia.
• Prestare attenzione nel maneggiare le parti taglienti e affilate,
durante lo svuotamento della caraffa e durante le operazioni di
pulizia.
• Per la manutenzione e la pulizia fare riferimento a pagina 52.
i
FP403040MEE Rev1.qxp_Morphy Richards Instruction Book 11/07/2016 17:38 Page 48
Page 49

49
In aggiunta, offriamo i seguenti consigli in materia di sicurezza.
Ubicazione
• Non utilizzare all'aperto o in una stanza da bagno.
• Posizionare sempre il proprio apparecchio a una distanza
adeguata dal bordo del piano di lavoro.
• Evitare di appoggiare la caraffa abbinata all'apparecchio su una
superficie di legno lucida per non provocare danni alla superficie
stessa.
Cavo di alimentazione elettrica
• Evitare che il cavo di alimentazione elettrica sporga dal bordo del
piano di lavoro e che risulti quindi alla portata di un bambino.
• Non stendere il filo elettrico attraverso uno spazio aperto, ad
esempio tra una presa elettrica a muro bassa e un tavolo.
• Non posizionare il cavo nelle immediate vicinanze di un fornello o
di una qualsiasi fonte di calore che possa danneggiarlo.
• Il cavo di alimentazione dovrebbe correre dalla presa elettrica alla
base dell'apparecchio senza che i collegamenti risultino in
tensione.
• Il cavo di alimentazione non può essere sostituito. Mettersi in
contatto con Morphy Richards per informazioni in merito.
Ulteriori considerazioni relative alla sicurezza
• Non utilizzare l'apparecchio per una funzione diversa da quella
prevista.
• L'utilizzo di accessori o strumenti non consigliati o venduti
direttamente da Morphy Richards può essere causa di incendi,
scosse elettriche o lesioni.
• ATTENZIONE: L'utilizzo improprio dell'apparecchio può
comportare lesioni personali.
Sicurezza specifica del prodotto
• IMPORTANTE: Consentire ai liquidi caldi di raffreddarsi prima di
versarli nel frullatore. Assicurarsi sempre che il coperchio sia
inserito correttamente.
• Fare attenzione a che il liquido non sia eccessivamente caldo al
momento di versarlo nel frullatore. Infatti, a causa dell'improvviso
sbalzo termico, il liquido stesso potrebbe fuoriuscire dal frullatore.
• Non utilizzare l'apparecchio se la caraffa di plastica o il coperchio
sono danneggiati o presentano spaccature visibili.
Requisiti elettrici
Verificare che il voltaggio riportato sulla targhetta applicata al
vostro apparecchio corrisponda alla vostra fornitura elettrica
domestica, che deve essere di tipo AC. (Corrente alternata)
Qualora si renda necessario sostituire il fusibile della presa
elettrica, dovrà essere inserito un fusibile BS1362 da 5 ampere.
ATTENZIONE: Il presente apparecchio deve essere dotato di
messa a terra.
Introduzione
Vi ringraziamo per il vostro recente acquisto di un frullatore da
tavolo Total Control Morphy Richards Si ricorda di vistare
www.morphyrichards.co.uk per registrare la garanzia di due anni
del proprio prodotto
Indice
Salute e sicurezza 48
Introduzione 49
Total Control 50
Panoramica del prodotto 3
Prima del primo utilizzo 51
Utilizzare il vostro frullatore da tavolo - Comandi manuali 51
Utilizzare il vostro frullatore da tavolo - Programmi preimpostati 51
Suggerimenti utili 52
Manutenzione e pulizia 52
Tabella di funzionamento 52
Ricette 53
Contatti 56
Garanzia 56
Caratteristiche
(1) Dosatore
(2) Coperchio
(3) Foro di riempimento
(4) Beccuccio
(5) Caraffa in plastica
(6) Lama
(7) Base dell'unità
(8) Ghiera di regolazione velocità
(9) Funzione Pulse
(10) Avvolgi cavo
(11) Funzione preimpostata Guazzetti e Salse
(12) Funzione preimpostata Frappè
(13) Funzione preimpostata Tritaghiaccio
(14) Funzione preimpostata Zuppe e Sughi
(15) Alloggiamento della presa elettrica (sul retro)
(16) Tasto On/Off
g
p
f
d
i
q
}
∂
FP403040MEE Rev1.qxp_Morphy Richards Instruction Book 11/07/2016 17:38 Page 49
Page 50

50
1.5 litri di capacità
Lame di acciaio inox Serrator
Impostazioni preconfigurate
Avvolgi cavo integrato
Scopri la sicurezza di poter creare.
Con l'arrivo del frullatore da tavolo Total Control avrai a disposizione un versatile connubio tra
praticità delle forme e tecnologia smart response, progettato per dare agli utenti la possibilità di
sperimentare con sicurezza.
Grazie alla tecnologia smart response, questo pratico frullatore da tavolo eroga con precisione
la potenza adatta a svolgere una vasta gamma di attività per la preparazione dei cibi.
I quattro programmi preimpostati garantiscono un aiuto insuperabile per la preparazione di
guazzetti, frappè, zuppe, sughi e granite, sollevandovi di quella incertezza tipica di quando si
prepara qualcosa con il frullatore.
Cinque velocità e la funzione Pulse a intermittenza vi aiutano a mantenere il controllo totale su
tutto.
E la sua capacità extra large da 1,5 litri, consente agli utenti di creare una marea di deliziose
bevande, zuppe e salse.
La presa elettrica riposizionabile nel pratico alloggiamento previsto su questo frullatore da
tavolo è poi una soluzione davvero utile.
Il frullatore da tavolo Total Control dà agli utenti la possibilità di sperimentare con fiducia.
FP403040MEE Rev1.qxp_Morphy Richards Instruction Book 11/07/2016 17:38 Page 50
Page 51

51
g
p
f
d
i
q
}
∂
Prima del primo utilizzo
• Disimballare il vostro frullatore da tavola con attenzione per la
presenza di lame molto affilate.
• Rimuovere tutti gli adesivi (a eccezione dell'etichetta con il
numero di serie sulla base del prodotto).
• Lavare a fondo la caraffa, il coperchio e il dosatore in acqua calda
e sapone. Sciacquare e asciugare
• Pulire la base dell'unità con un panno umido.
• ATTENZIONE: Non immergere mai in acqua o in altro liquido la
base dell'unità. Accertarsi sempre che i collegamenti elettrici
rimangano asciutti. La base dell'unità può essere pulita con un
panno umido pulito.
Utilizzare il vostro frullatore da tavolo -
Comandi manuali
1
Posizionare la caraffa di plastica (5) sulla base dell'unità (7).
2
Inserire l'alimento o i liquidi freddi nella caraffa di plastica (5). Non
superare il livello consigliato (vedere pagina 11).
3
Collocare il coperchio (2) sulla caraffa di plastica (5), spingendolo
saldamente. Posizionare il dosatore (1) nel suo alloggiamento
ruotandolo in senso orario per bloccarlo in posizione. Per evitare
fuoriuscite assicurarsi che il foro di riempimento nel coperchio (2)
sia girato dalla parte opposta rispetto al beccuccio (4).
4
Inserire il frullatore da tavolo Total Control nella presa elettrica e
metterlo in funzione (16).
5
Portare la ghiera di controllo (8) a velocità 1 per iniziare a frullare.
Aumentare la velocità in base alle necessità.
6
Per utilizzare la funzione Pulse (9) portare la ghiera di controllo (8)
su P. Non utilizzare per periodi di tempo prolungati.
7
Spegnere (16) e scollegare dalla presa elettrica prima di servire.
8
Rimuovere la caraffa di plastica (5) dalla base dell'unità (7).
9
Per versare, rimuovere il coperchio (2) e far uscire il liquido dal
beccuccio (4).
10
Per utilizzare il controllo del flusso, sollevare il coperchio (2) e
riposizionarlo come di seguito indicato.
11
Girarlo fino a raggiungere il filtro grande nel coperchio (2) per un
flusso abbondante.
12
Girarlo fino a raggiungere il filtro con setaccio nel coperchio (2)
per evitare che qualsiasi pezzo di dimensioni consistenti, se
ancora presente, venga versato insieme al liquido.
Utilizzare i programmi preimpostati
13
Posizionare la caraffa di plastica (5) sulla base dell'unità (7).
14
Inserire l'alimento o i liquidi freddi nella caraffa di plastica (5). Non
superare il livello consigliato (vedere pagina 11).
15
Collocare il coperchio (2) sulla caraffa di plastica (5), spingendolo
fermamente. Posizionare il dosatore (1) nel suo alloggiamento
ruotandolo in senso orario per bloccarlo in posizione.
16
Per evitare fuoriuscite assicurarsi che il foro di riempimento nel
coperchio (2) sia girato dalla parte opposta rispetto al beccuccio
(4) - vedere pagina 7. Inserire il frullatore da tavolo Total Control
nella presa elettrica e metterlo in funzione (16)
17
Selezionare il tasto "Guazzetti e Salse" (11) tra i programmi
preimpostati per raffinati guazzetti, salse, pastelle e gelati. Una
luce blu si accenderà sul bordo del tasto e rimarrà accesa fino al
completamento del programma.
SI PREGA DI FARE ATTENZIONE: Il programma può andare in
pausa per diversi secondi. Non rimuovere la caraffa di plastica (5)
o il coperchio (2) fino a che tale luce non sia spenta.
ATTENZIONE: NON AGGIUNGERE INGREDIENTI O RIMUOVERE
IL COPERCHIO MENTRE IL PROGRAMMA È IN CORSO.
18
Selezionare il tasto "Frappè" (12) tra i programmi preimpostati per
deliziosi e salutari frappè. Una luce blu si accenderà sul bordo del
tasto e rimarrà accesa fino al completamento del programma.
SI PREGA DI FARE ATTENZIONE: Il programma può andare in
pausa per diversi secondi. Non rimuovere la caraffa di plastica (5)
o il coperchio (2) fino a che tale luce non sia spenta.
19
Selezionare il tasto "Tritaghiaccio" (13) tra i programmi
preimpostati per ottenere granite di ogni gusto. Una luce blu si
accenderà sul bordo del tasto e rimarrà accesa fino al
completamento del programma. SI PREGA DI FARE
ATTENZIONE: Il programma può andare in pausa per diversi
secondi. Non rimuovere la caraffa di plastica (5) o il coperchio (2)
fino a che tale luce non sia spenta.
20
Selezionare il tasto "Zuppe e Sughi" (14) tra i programmi
preimpostati per nutrienti zuppe e sughi. Una luce blu si
accenderà sul bordo del tasto e rimarrà accesa fino al
completamento del programma. SI PREGA DI FARE
ATTENZIONE: Il programma può andare in pausa per diversi
secondi. Non rimuovere la caraffa di plastica (5) o il coperchio (2)
fino a che tale luce non sia spenta.
21
Spegnere (16) e scollegare dalla presa elettrica prima di servire.
22
Rimuovere la caraffa di plastica (5) dalla base dell'unità (7).
23
Per versare, rimuovere il coperchio (2) e far uscire il liquido dal
beccuccio (4).
24
Per utilizzare il controllo del flusso, sollevare il coperchio (2) e
riposizionarlo come di seguito indicato.
25
Girarlo fino a raggiungere il filtro grande nel coperchio (2) per un
flusso abbondante.
26
Girarlo fino a raggiungere il filtro con setaccio nel coperchio (2)
per evitare che qualsiasi pezzo di dimensioni consistenti, se
ancora presente, venga versato insieme al liquido.
IMPORTANTE
NON VERSARE ACQUA IN EBOLLIZIONE O LIQUIDI MOLTO
CALDI NELLA CARAFFA. CONSENTIRE PRIMA AI LIQUIDI DI
RAFFREDDARSI.
Dosatore
• Il dosatore (1) può essere impiegato per misurare piccole quantità
di liquido.
1 Versare il liquido nel foro di riempimento (3) sul coperchio (2).
2 Riposizionare il dosatore (1) nel coperchio (2), girandolo per
bloccarlo/sbloccarlo. Quindi iniziate a frullare.
FP403040MEE Rev1.qxp_Morphy Richards Instruction Book 11/07/2016 17:38 Page 51
Page 52

52
Tritaghiaccio
• Seguire la procedura illustrata nella sezione "Utilizzare il tuo
frullatore da tavolo Total Control" sostituendo il cibo con i cubetti
di ghiaccio da tritare.
• Selezionare il tasto "Tritaghiaccio" (13) tra i programmi
preimpostati.
• Fare attenzione: La capacità massima per l'operazione di tritatura
del ghiaccio è di 500ml alla volta.
Suggerimenti utili
Utilizza il tuo frullatore per zuppe, salse, bevande, paté, maionesi
e condimenti vari.
• Non inserire nel frullatore ingredienti secchi senza l'aggiunta di
ingredienti umidi o di liquido.
• Per frullare, versare prima i liquidi e quindi aggiungere gli alimenti
solidi. Iniziare a frullare alla velocità più bassa e aumentare
secondo le esigenze. IMPORTANTE: Per garantire al tuo frullatore
una durata massima di vita, quando si utilizzano i comandi a
velocità manuale non tenere mai in funzione per più di 60 secondi
e consentire poi all'apparecchio di raffreddarsi per 5 minuti.
Spegnere non appena raggiunta la consistenza desiderata.
• L'apparecchio non entrerà in funzione se la caraffa di plastica (5)
non è inserita in maniera corretta.
• Non utilizzare la caraffa di plastica come contenitore per
conservare i preparati. Mantenerla vuota quando non è utilizzata.
Non frullare in alcun caso più di 1 litro di liquido schiumoso, come
ad esempio i frullati di latte, alla volta.
• Qualora si raggiunga nell'utilizzo la capienza massima di 1,5 litri,
non impiegare una velocità superiore alla 2.
• Nella preparazione di zuppe non riempire oltre l'indicazione di 1
litro riportata sulla caraffa.
• Non riempire eccessivamente il frullatore.
Ciò potrebbe causare danni al motorino Il fusibile nella presa
elettrica andrà in corto circuito se il frullatore è sovraccarico.
Sostituire il fusibile e non superare i volumi massimi consigliati.
Fare riferimento alla "tabella di funzionamento" a pagina 11.
Manutenzione e pulizia
• Prima di effettuare operazioni di pulizia e manutenzione, spegnere
l'apparecchio e scollegarlo dalla rete elettrica, poi rimuovere la
caraffa di plastica (5) dalla base dell'unità (7).
• Dopo l'utilizzo, riempire la caraffa di plastica (5) con 1 litro di
acqua calda e mettere in funzione il frullatore per 30 secondi in
modalità Pulse. Ripetere se necessario. Non utilizzare in alcun
caso detergenti o creme abrasive.
• Pulire la base dell'unità (7) con un panno umido o con un foglio di
carta da cucina.
• L'apparecchio offre la possibilità di avvolgere il cavo di
alimentazione attorno alla sua base e di riporre la presa elettrica
nell'alloggiamento per questa previsto (15).
• Rimontare il frullatore da tavolo Total Control posizionando
attentamente la caraffa di plastica (5) sulla base dell'unità (7),
assicurandosi che essa si inserisca correttamente.
• ATTENZIONE: Non immergere mai in acqua la base dell'unità.
• ATTENZIONE: Qualora si verifichi una qualsiasi fuoriuscita di
liquido sulla parte superiore della base dell'unità, spegnere
l'apparecchio, scollegarlo dalla presa e asciugare con un
panno.
Tabella di funzionamento
Volume Velocità (Manuale) Tempo Consigli
Preimpostato o Manuale
Zuppe* 1L 1-4+ Pulse da 15 secondi a 1 minuto massimo Iniziare a velocità bassa e
aumentare se necessario
Frullati 1L 1-5+ Pulse da 15 secondi a 1 minuto
Frullare / per liquefare 1.5L 1-2 Pulse da 15 secondi a 1 minuto Iniziare a velocità bassa e
aumentare se necessario
Tritaghiaccio massimo 500ml Pulse 10-20 secondi
• Non tenere in funzione per un tempo superiore a quello
raccomandato.
• Non oltrepassare la capienza massima di liquido consigliata. Non
versare acqua in ebollizione o liquidi molto caldi nella caraffa di
plastica. Consentire prima ai liquidi di raffreddarsi.
Tempi di utilizzo dei programmi preimpostati
Guazzetti e Salse - 44 secondi
Frappè - 54 secondi
Zuppe e Sughi - 58 secondi
Tritaghiaccio - 20 secondi
FP403040MEE Rev1.qxp_Morphy Richards Instruction Book 11/07/2016 17:38 Page 52
Page 53

53
Ricette
Ricette preimpostate
Salsa di fragole (da servire con gelato)
Tempo di preparazione: 5 minuti (più 5 minuti di raffreddamento)
Funzione: Guazzetti e Salse
Rendimento: 200ml
Adatta per: 4 persone
Tempo di cottura: 5 minuti
Ingredienti:
• 150gr di fragole pulite
• 65gr di zucchero a velo
• 65ml di acqua
• ½ cucchiaio di cordiale di fiori di sambuco
Lavorazione:
1 Lavare e tagliare a metà le fragole.
2 Mettere lo zucchero e l'acqua in un pentolino e mescolare
frequentemente su una fonte di calore basso fino a che lo
zucchero si sia disciolto.
3 Portare tutto a ebollizione quindi aggiungere le fragole preparate.
Cuocere per 3 - 3½ minuti o fin quando il tutto non si
ammorbidisca.
4 Lasciare raffreddare nel pentolino per 5 minuti.
5 Versare ora lo sciroppo di fragole nella caraffa, aggiungere il
cordiale ai fiori di sambuco, chiudere il coperchio e premere il
tasto preimpostato. Versare la salsa in un recipiente per servire.
6 Servire caldo con pancake o freddo accompagnato da gelato alla
vaniglia.
Gelato alla frutta estiva
Tempo di preparazione: 10 minuti
Funzione: Guazzetti e Salse
Tempo di congelamento: 1 notte
Adatta per: 8 persone
Ingredienti:
• 250gr di lamponi
• 125gr di fragole, pulite e tagliate a metà
• 75gr di mirtilli
• 225gr di zucchero a velo setacciato
• 1 cucchiaio di succo di limone
• 300ml di panna intera
Lavorazione:
1 Mettere la frutta nella caraffa, inserire il coperchio e premere il
tasto preimpostato.
2 Aggiungere quindi nella caraffa il succo di limone e lo zucchero a
velo setacciato, chiudere il coperchio e premere la funzione Pulse
(4 volte o per circa 20 secondi) fino a che il composto non sia
uniformemente amalgamato.
3 Montare a neve la panna intera con una frusta o con un mixer.
Unire lentamente la purea di frutta ottenuta con la panna, fino a
che il tutto non si amalgami uniformemente. Quindi versare in un
contenitore adatto e riporre in freezer senza coperchio fin quando
non si ghiacci lungo i bordi e assuma l'aspetto di una granita. (2-3
ore)
4 Rimescolare dai lati verso il centro con una forchetta per fare
assumere una consistenza cremosa.
5 Congelare senza coperchio per alcune ore senza mescolare.
6 Per conservare, chiudere il contenitore con un coperchio.
Frullato al cioccolato
Tempo di preparazione: 5 minuti
Funzione: Frappè
Rendimento: 1 litro
Adatta per: 5 persone (200ml a porzione)
Ingredienti:
• 750ml di latte parzialmente scremato
• 250gr di gelato al cioccolato
• 1½ cucchiaio a filo di cacao in polvere solubile
Lavorazione:
1 Mettere il latte e il gelato nella caraffa, quindi aggiungere il cacao
in polvere solubile.
2 Chiudere il coperchio e premere il tasto preimpostato.
3 Appena pronto servire immediatamente.
Suggerimenti e consigli:
Per cambiare, provate a utilizzare il gelato alla vaniglia, ottenendo così
un gusto più leggero.
Frappè alla fragola e alla banana
Tempo di preparazione: meno di 5 minuti
Funzione: Frappè
Rendimento: 1,1 litro
Adatta per: 5 persone
Ingredienti:
• 180gr di fragole lavate e pulite
• 2 banane mature (150gr circa) sbucciate e fatte a pezzi
• 450gr di yogurt magro alla vaniglia
• 300ml di latte parzialmente scremato
• 3 cubetti di ghiaccio (facoltativo)
Lavorazione:
1 Se avete scelto di utilizzarli, mettete i cubetti di ghiaccio nella
caraffa.
2 Aggiungere gli altri ingredienti così come da elenco e chiudere il
coperchio
3 Premere il tasto preimpostato "Frappè".
4 Servire subito appena pronto.
g
p
f
d
i
q
}
∂
FP403040MEE Rev1.qxp_Morphy Richards Instruction Book 11/07/2016 17:38 Page 53
Page 54

54
Granita al mango
Tempo di preparazione: 5 minuti
Funzione: Tritaghiaccio
Adatta per: 2 persone
Rendimento 500ml
Ingredienti:
• Ghiaccio
• 180–200gr di mango preparato a pezzi
• Succo di 1 arancio spremuto (60ml)
Lavorazione:
1 Mettere il ghiaccio nella caraffa fino all'indicazione dei 500ml,
chiudere il coperchio e premere il tasto preimpostato per il
ghiaccio.
2 Quando il ghiaccio è pronto aggiungere il mango e il succo
d'arancio, chiudere il coperchio e utilizzare la funzione Pulse per
due o tre volte fino a raggiungere la consistenza desiderata.
3 Versare in due bicchieri e servire immediatamente.
Zuppa di sedano
Tempo di preparazione: 5 minuti
Funzione: Zuppe e Sughi
Adatta per: 4 persone
Tempo di cottura: 30 minuti
Rendimento: 1,6 litri
Ingredienti:
• 25gr di burro
• 1 gambo di sedano, tagliato a pezzi grossi (foglie incluse)
• 1 cipolla (100gr circa), tagliata a pezzi
• 3 patate di piccole dimensioni (150gr circa) sbucciate e tagliate a
pezzi
• 1 litro di brodo vegetale caldo
• Sale e pepe nero macinato
• Prezzemolo fresco per guarnire
Lavorazione:
1 Mettere il burro in una padella larga e sciogliere a fuoco medio.
Assicurarsi che il burro non si bruci.
2 Unire le verdure, e cucinare per 4-5 minuti, girando di tanto in
tanto con un cucchiaio di legno.
3 Aggiungere il brodo vegetale e i sapori. Portare a ebollizione.
4 Mettere un coperchio sulla padella, ridurre la fiamma e continuare
a cuocere a fuoco lento per circa 20 minuti o finché le verdure
non si siano intenerite.
5 Fare raffreddare leggermente la zuppa, quindi metterne più o
meno metà nella caraffa fino a raggiungere l'indicazione di 1 litro.
Chiudere il coperchio e premere il tasto preimpostato "Zuppe"
6 Versare nuovamente la zuppa nella padella e mescolarla con
quella rimanente da prima. Se necessario riscaldare, controllare i
sapori e guarnire con prezzemolo fresco sminuzzato prima di
servire.
Salsa per pasta agli ortaggi
Tempo di preparazione: 10 minuti
Funzione: Zuppe e Sughi
Adatta per: 4-6 persone
Tempo di cottura: 1 ora e 10 minuti
Rendimento: 1,3 litri
Ingredienti:
• 2 cucchiai di olio d'oliva
• 1 cipolla (130gr), tagliata a pezzi
• 2 gambi di sedano (80gr), tagliati a pezzi piccoli
• 2 carote (160gr), sbucciate e tagliate a dadi
• 1 spicchio di aglio, schiacciato
• 1 porro (120gr), tagliato a rondelle
• 1 peperone rosso, tagliato a dadi
• 2 barattoli da 400gr di pomodoro a pezzi
• ½ cucchiaio di aceto balsamico
• 2 cucchiai a filo di origano
• 1 cucchiaio a filo di miscela di spezie
• Sale e pepe
Lavorazione:
1 Scaldare l'olio in una padella larga, quindi rosolare delicatamente
cipolla, sedano, carote, aglio e porro per cinque minuti senza farli
imbrunire e mescolando di tanto in tanto. Mettere il coperchio
sulla padella e cuocere per 20 minuti mescolando di tanto in
tanto. Unire il peperone a dadi e cuocere delicatamente per altri
10 minuti a coperchio chiuso.
2 Aggiungere in padella pomodori, aceto, spezie, sale e pepe e
cuocere a fuoco lento per 40 minuti o fino a che le carote e il
sedano non si siano inteneriti. Lasciare raffreddare per un po'.
3 Versare attentamente la salsa nella caraffa.Il livello dovrebbe
trovarsi appena sopra l'indicazione di 1 litro. Posizionare il
coperchio.
4 Premere il tasto preimpostato "Zuppe".
5 Controllare i sapori e riscaldare se necessario. Unire agli spaghetti
mescolando e servire con Parmigiano grattugiato e una fetta di
pane all'aglio di accompagnamento.
FP403040MEE Rev1.qxp_Morphy Richards Instruction Book 11/07/2016 17:38 Page 54
Page 55

55
Ricette manuali
Salsa di pomodoro
Tempo di preparazione: 5 minuti
Funzione: Manuale
Adatta per: 4-8 persone
Ingredienti:
• 150g di pomodori ciliegini molto maturi
• 1 peperoncino rosso (10gr)
• 20gr di foglie di coriandolo
• Succo di un lime spremuto (2 cucchiai)
• cucchiaio a filo di sale
• Pepe nero fresco macinato
Lavorazione:
1 Rimuovere il picciolo dal peperoncino e tagliarlo a metà.
2 Mettere tutti gli ingredienti nella caraffa come da ordine riportato.
3 Utilizzare la funzione Pulse per circa 10-15 secondi, quindi pulire i
lati interni della caraffa con una spatola prima di riattivare la
funzione Pulse per pochi secondi fino al raggiungimento della
consistenza desiderata.
4 Versare in una ciotola e lasciare riposare per 30 minuti prima di
servire.
Sugo per pasta alla Amatriciana
Tempo di preparazione: 5 minuti
Tempo di cottura: 40 minuti
Funzione: Manuale
Adatta per: 4 persone
Rendimento: 600ml
Ingredienti:
• 1 cipolla (130gr circa) tagliata a pezzi grandi
• 1 spicchio di aglio, schiacciato
• ½ peperoncino verde, senza semi e tagliato a pezzi grandi
• 1½ cucchiaio di olio extra vergine di oliva
• 100gr di pancetta senza cotenna tagliata a pezzi grandi
• 1 barattolo da 400gr di pomodori pelati
• 100ml di passata di pomodori
• 4 cucchiai di vino bianco
• Pepe nero fresco macinato
• Penne e Parmigiano grattugiato da servire
Lavorazione:
1 Versare l'olio in una padella larga e far riscaldare per alcuni minuti.
Rosolare delicatamente la cipolla, l'aglio e il peperoncino per 2-3
minuti senza farli imbrunire, mescolando di tanto in tanto con un
cucchiaio di legno.
2 Unire la pancetta tagliata e fare rosolare per qualche minuto.
Mettere il coperchio sulla padella e cuocere a fuoco medio per 5
minuti.
3 Aggiungere i pelati, la passata e il vino, insaporire con il pepe.
4 Mettere il coperchio sulla padella e cuocere delicatamente a fuoco
lento per 25-30 minuti o fino a che la cipolla sia diventata tenera.
Lasciare raffreddare per un po'.
5 10 minuti prima che il sugo sia pronto, cuocere la pasta seguendo
le indicazioni riportate sulla confezione.
6 Versare il sugo nella caraffa del frullatore, posizionare il coperchio
e frullare a bassa velocità o con la funzione Pulse per alcuni
secondi quanto basta per raggiungere la consistenza desiderata.
7 Scolare la pasta, quindi condirla con il sugo mescolando a fondo.
Riscaldare brevemente se necessario quindi servire
immediatamente con Parmigiano.
Frappè di kiwi verde e mela
Tempo di preparazione: 5 minuti
Funzione: Manuale
Adatta per: 4-5 persone
Rendimento: 1 litro
Ingredienti:
• 2 kiwi (200gr) con buccia
• 1 banana matura da 80gr (peso sbucciata), tagliata in pezzi da
3cm
• 1 cetriolo da 120gr, con buccia e tagliato in pezzi da 3cm
• 65gr di foglie di spinaci novelli
• 400ml di succo di mele ghiacciato
Lavorazione:
1 Tagliare a metà il kiwi rimuovendo il torsolo e poi ridurlo in pezzi
grandi.
2 Unire il kiwi, la banana e il cetriolo, quindi mettere il tutto nella
caraffa. Aggiungere gli spinaci e il succo di mela.
3 Chiudere il coperchio e aumentare gradualmente la velocità da 1 a
5. Dopo circa 20-30 secondi, riposizionare gradualmente la ghiera
sullo zero e quindi utilizzare la funzione Pulse per amalgamare.
4 Appena pronto servire immediatamente.
Sorbetto all'ananas
Tempo di preparazione: 10 minuti più tempo di raffreddamento e di
congelamento
Funzione: Manuale
Adatta per: 4-6 persone
Rendimento: 600ml
Ingredienti:
• ½ ananas grande, sbucciata, privata del torsolo e tagliata a pezzi
(peso una volta pulita circa 385gr)
• 50ml di succo di lime
• 140gr di zucchero a velo
• 130ml di acqua
Lavorazione:
1 Mettere tutti gli ingredienti nella caraffa Frullare usando le velocità
da 1 a 4, quindi la funzione Pulse per amalgamare. (Tempo totale
g
p
f
d
i
q
}
∂
FP403040MEE Rev1.qxp_Morphy Richards Instruction Book 11/07/2016 17:38 Page 55
Page 56

56
1 minuto)
2 Raffreddare per circa 1 ora, quindi mescolare, versare in un
contenitore da freezer poco profondo e chiuderlo con un
coperchio.
3 Congelare il tutto per 3 ore o fino a che esso risulti solido sui
bordi e cremoso al centro. Tirare fuori dal freezer, mettere il
sorbetto nella caraffa del frullatore e mettere in funzione per 20-30
secondi a bassa velocità.
4 Rimettere in freezer, coperto, per alcune ore o per una notte intera
fino a completa solidificazione
Zuppa di porro e patate
Tempo di preparazione:5 minuti
Tempo di cottura: 35 minuti
Funzione: Manuale
Adatta per: 4-6 persone
Rendimento: 2 litri
Ingredienti:
• 25gr di burro
• 2 porri di media grandezza (320gr), puliti e fatti a fettine
• 1 cipolla piccola (125gr), sbucciata e sminuzzata in pezzi piccoli
• 560gr di patate sbucciate e tagliate sottili
• 1,2 litri di brodo vegetale
• 1 cucchiaio a filo di miscela di spezie
• 1 cucchiaio a filo di sale
• Pepe nero
Guarnizione: Un po' di erba cipollina
Lavorazione:
1 Squagliare il burro in una padella larga, quindi aggiungere porro e
cipolla. Cuocere delicatamente senza lasciare imbrunire per 5-10
minuti, mescolando di tanto in tanto con un cucchiaio di legno.
2 Unire le patate, il brodo vegetale, le spezie e i sapori, quindi
portare a ebollizione, coprire e cuocere a fuoco lento per 30
minuti o fino a che il tutto diventi tenero.
3 Lasciare raffreddare leggermente e quindi versare attentamente
metà della zuppa in una recipiente graduato e il rimanente nella
caraffa del frullatore.
4 Utilizzare le basse velocità per alcuni secondi. Utilizzare la
funzione Pulse a breve intermittenza per raggiungere la
consistenza desiderata. La durata dell'operazione dovrebbe
essere di circa 20-30 secondi.
5 Versare nuovamente la zuppa frullata in padella ed eseguire le
medesime operazioni con la zuppa messa da parte in
precedenza. Verificare i sapori, riscaldare, guarnire con erba
cipollina sminuzzata e servire con crostini di pane.
Contatti
Assistenza telefonica
Qualora si riscontrino problemi con il proprio apparecchio, si
prega di contattare la nostra assistenza telefonica.Con buona
probabilità vi saremo di maggior aiuto rispetto al negozio
presso il quale avete effettuato l'acquisto del prodotto.
Si prega, al momento della chiamata, di munirsi del nome del
prodotto, del numero identificativo del modello e del numero di
serie per consentirci di soddisfare celermente la vostra
richiesta.
Mettiti in contatto con noi
Per domande e commenti, consigli o per qualche favolosa idea
di ricetta che vi aiuti a tirar fuori il meglio dal vostro prodotto,
seguiteci anche online:
Blog: www.morphyrichards.co.uk/blog
Facebook: www.facebook.com/morphyrichardsuk
Twitter: @loveyourmorphy
Website: www.morphyrichards.com
GARANZIA DI DUE ANNI
Questo elettrodomestico è coperto da una garanzia di due anni
per la riparazione o la sostituzione.
È importante conservare la ricevuta del rivenditore a titolo di
prova di acquisto. Appuntare la ricevuta sulla retrocopertina del
presente manuale per futuro riferimento.
Indicare le informazioni riportate di seguito se si verifica
un’anomalia sul prodotto. Questi numeri sono riportati sulla
base del prodotto.
N. modello
N. di serie
Tutti i prodotti Morphy Richards sono testati singolarmente
prima di lasciare lo stabilimento. Nell’improbabile eventualità
della comparsa di un difetto entro 28 giorni dall’acquisto, si
consiglia di restituire il prodotto dove è stato acquistato per
richiederne la sostituzione.
Se il problema si manifesta dopo 28 giorni ed entro 24 mesi
dall’acquisto, contattare il rivenditore più vicino, citando il
numero di modello e il numero di matricola riportati sul
prodotto oppure scrivergli all’indirizzo indicato.
Verrà richiesto di rispedire il prodotto (in un imballaggio idoneo
e sicuro) unitamente alla copia della prova d’acquisto.
Fatte salve le esclusioni sotto riportate (1-9), l’elettrodomestico
difettoso viene riparato o sostituito e spedito di solito entro 7
giorni lavorativi dal ricevimento.
Se per qualsiasi motivo questo articolo viene sostituito entro il
periodo di garanzia di 2 anni, la garanzia sul nuovo prodotto
sarà calcolata a decorrere dalla data dell’acquisto iniziale. È
pertanto importante conservare la ricevuta o fattura originale
per poter dimostrare la data dell’acquisto.
Per usufruire della garanzia di due anni, l’elettrodomestico deve
essere stato usato nel modo indicato dal produttore. Ad
esempio, è necessario disincrostare l’elettrodomestico e tenere
FP403040MEE Rev1.qxp_Morphy Richards Instruction Book 11/07/2016 17:38 Page 56
Page 57

57
puliti i filtri nel modo indicato.
Morphy Richards o il rivenditore di zona non sono tenuti a
sostituire o riparare i prodotti, come indicato dalle disposizioni
di garanzia, se:
1 Il guasto è stato causato o è attribuibile a un uso accidentale,
improprio, negligente o contrario alle istruzioni del produttore
oppure il guasto è stato causato da sovratensioni momentanee o
dal trasporto.
2 L’elettrodomestico è stato utilizzato a una tensione diversa da
quella indicata su di esso.
3 Le riparazioni sono state eseguite da persone diverse dal
personale tecnico Morphy Richards (o rivenditori autorizzati).
4 L’elettrodomestico è stato noleggiato oppure non impiegato per
uso domestico.
5 L’elettrodomestico è di seconda mano.
6 Morphy Richards o il rivenditore di zona non sono tenuti ad
eseguire alcun tipo di intervento di assistenza ai sensi della
garanzia.
7 I sacchetti, i filtri e le caraffe di vetro non sono coperti dalla
garanzia.
8 Le batterie e i danni dovuti a perdite non sono coperti dalla
garanzia.
9 I filtri non sono stati puliti e sostituiti come da istruzioni.
La presente garanzia non conferisce alcun diritto diverso da
quelli sopra elencati e non copre alcuna richiesta di danni o
perdite consequenziali. La presente garanzia viene offerta a titolo
di vantaggio aggiuntivo e non incide sui diritti del consumatore
previsti dalla legge.
g
p
f
d
i
q
}
∂
FP403040MEE Rev1.qxp_Morphy Richards Instruction Book 11/07/2016 17:38 Page 57
Page 58

58
Sundhed og sikkerhed
Brugen af elektriske apparater kræver følgende sikkerhedsregler baseret på sund fornuft. Læs denne vejledning grundigt igennem, før du
tager produktet i brug.
• Dette apparat må godt benyttes af personer med nedsatte
fysiske, følelsesmæssige eller mentale evner eller med
manglende erfaring og viden, hvis de er blevet overvåget eller
har modtaget vejledning om brugen af apparatet på en sikker
måde og forstår, hvilke risici der er involveret.
• Apparatet må ikke benyttes af børn.
• Børn må ikke lege med apparatet.
• Opbevar apparatet og ledningen utilgængeligt for børn.
• FORSIGTIG: Sørg for, at blenderen er slukket, inden du fjerner
den fra holderen eller nærmer dig dele, som bevæger sig under
brug.
• Du må ikke blende i længere tid end, hvad der anbefales i
"Betjeningsoversigten".
• Undgå kontakt med bevægelige dele. Sørg for at holde
hænder, hår og tøj samt køkkenredskaber væk fra blenderens
blade under betjening for at undgå personskade og/eller
beskadigelse af apparatet.
• Husk altid at slukke for blenderen, hvis du forlader den uden
opsyn og inden samling, adskillelse eller rengøring.
• Vær forsigtig, når du håndterer skarpe blade, tømmer kanden
og under rengøring.
• Find information om pleje og rengøring på side 62.
q
FP403040MEE Rev1.qxp_Morphy Richards Instruction Book 11/07/2016 17:38 Page 58
Page 59

59
Derudover tilbyder vi følgende sikkerhedsråd.
Placering
• Du må ikke bruge apparatet udendørs eller på et badeværelse.
• Placér altid apparatet væk fra bordkanter.
• Du må ikke stille kanden til blenderen på en meget poleret
træoverflade, da der kan opstå skade på overfladen.
Lysnetledning
• Du må ikke lade lysnetledningen hænge ud over bordkanten, hvor
et barn kan nå den.
• Du må ikke lade ledningen løbe hen over en åben plads, som
f.eks. mellem en lavtsiddende stikkontakt og et bord.
• Du må ikke lade ledningen løbe hen over et komfur eller et andet
varmt område, der kunne beskadige ledningen.
• Lysnetledningen skal gå fra stikkontakten til apparatet, uden at
tilslutningerne spændes.
• Strømledningen kan ikke udskiftes. Du bedes kontakte Morphy
Richards angående råd. Andre sikkerhedshensyn
• Du må ikke bruge apparatet til andre formål end det tiltænkte
formål.
• Brugen af tilbehør eller værktøjer, som ikke er anbefalet af og ej
heller sælges af Morphy Richards, kan udgøre fare for brand,
elektrisk stød eller personskade.
• ADVARSEL: Misbrug af apparatet kan resultere i personskade.
Produktspecifik sikkerhed
• VIGTIGT: Tillad varme væsker at afkøle, inden du hælder dem i
blenderen, og sørg for, at låget sidder ordentligt fast.
• Vær forsigtig, hvis du hælder en varm væske i blenderen,
eftersom væsken kan sprøjte ud af apparatet pga. den pludselige
damp.
• Du må ikke bruge apparatet, hvis plastikkanden eller låget er
beskadiget eller har synlige revner.
Elektriske krav
Kontrollér, om spændingen på apparatets mærkeplade svarer til
husets strømforsyning, som skal være vekselstrøm. (Vekselstrøm).
Hvis du har brug for at udskifte netstikkets sikring, skal du bruge
en 5 A BS1362 sikring.
ADVARSEL: Dette apparat skal jordforbindes.
Indledning
Tak, fordi du har købt denne Morphy Richards Total Controlbordblender
Du kan besøge os på www.morphyrichards.co.uk, hvor du kan
registrere dit produkts toårige garanti
Indholdsfortegnelse
Sundhed og sikkerhed 5
8
Indledning 59
Total Control 60
Produktoversigt 3
Inden ibrugtagning 61
Betjening af din bordblender - manuel kontrol 61
Betjening af din bordblender - forudindstillede programmer 61
Toptips 61
Pleje og rengøring 62
Betjeningsoversigt 62
Opskrifter 63
Kontakt os 66
Garanti 66
Funktioner
(1) Målekop
(2) Låg
(3) Hul til at hælde op med
(4) Tud
(5) Plastikkande
(6) Blad
(7) Motordel
(8) Programvælger
(9) Pulsfunktion
(10) Ledningsoprulning
(11) Forudindstilling til dips og saucer
(12) Forudindstilling til smoothies
(13) Forudindstilling til knust is
(14) Forudindstilling til supper og saucer
(15) Opbevaring af stik (på bagsiden)
(16) Tænd/sluk knap
g
p
f
d
i
q
}
∂
FP403040MEE Rev1.qxp_Morphy Richards Instruction Book 11/07/2016 17:38 Page 59
Page 60

60
1,5 l kapacitet
Blade i rustfrit stål
Forudindstillede programmer
Indbygget rum til
ledningsopbevaring
Med mulighed for at skabe trygt
Vi præsenterer Total Control-bordblenderen, der er en alsidig blanding af praktisk design og
smart responsteknologi og er udviklet til at give brugere muligheden for at skabe trygt.
Takket være smart responsteknologi yder denne intelligente bordblender den nøjagtige
mængde kraft til en række fødevaretilberedningsopgaver.
De 4 forudindstillede programmer giver dig en formidabel hjælp til tilberedning af dips,
smoothies, supper, sauces og is, og du slipper for at skal gætte dig frem.
5 hastigheder og en pulsfunktion hjælper med hele tiden at bevare den totale kontrol.
Og den ekstrastore kapacitet på 1,5 liter gør det muligt for brugerne at lave masser af lækre
drikke,
supper og saucer.
Bordblenderens stik, der nemt kan opbevares, er en smart opbevaringsløsning.
Total Control-bordblenderen giver brugeren mulighed for at skabe trygt.
FP403040MEE Rev1.qxp_Morphy Richards Instruction Book 11/07/2016 17:38 Page 60
Page 61

61
Inden ibrugtagning
• Pak forsigtigt din bordblender ud, fordi blenderens blade er meget
skarpe.
• Fjern alle klistermærker (undtagen det med serienummeret på
produktets motordel).
• Rengør omhyggeligt kanden, låget og målekoppen i varmt
sæbevand. Skyl og aftør.
• Aftør motordelen med en fugtig klud.
• ADVARSEL: u må aldrig nedsænke motordelen i vand eller andre
væsker. Du skal altid sørge for, at de elektriske tilslutninger holdes
tørre.
Disse kan evt. aftørres med en ren og fugtig klud.
Betjening af din Total Control-bordblender -
manuel kontrol
1
Placér plastikkanden (5) på motordelen (7).
2
Hæld fødevarer eller kolde væsker i plastikkanden (5). Du må ikke
overstige den anbefalede mængde (se side 11).
3
Sæt låget (2) på plastikkanden (5), og skub det ned på plads. Sæt
målekoppen (1) på plads ved at dreje den med uret, indtil den
fastlåses på plads. For at undgå spild skal du sørge for, at hullet til
at hælde på med i låget (2) vender bort fra tuden (4).
4
Sæt stikket til din Total Control-bordblender ind i stikkontakten, og
tænd for den (16).
5
Drej programvælgeren (8) hen på 1 for at starte med at blende. Øg
hastigheden efter behov.
6
Hvis du vil bruge pulsfunktionen (9), skal du dreje
programvælgeren (8) hen på P. Du må ikke anvende den i længere
tidsrum ad gangen.
7
Sluk for apparatet (16), og træk stikket ud af stikkontakten, inden
du serverer.
8
Fjern plastikkanden (5) fra motordelen (7).
9
For at hælde skal du fjerne låget (2) og hælde ud af tuden (4).
10
For at bruge flowkontrol skal du løfte låget (2) og omplacere som
krævet nedenfor.
11
Drej hen på det store filter i låget (2) for at opnå fuldt flow.
12
Drej hen på gitterfilteret i låget (2) for at forhindre evt. store stykker
i at komme igennem.
Brug af de forudindstillede programmer
13
Placer plastikkanden (5) på motordelen (7).
14
Hæld fødevarer eller kolde væsker i plastikkanden (5). Du må ikke
overstige den anbefalede mængde (se side 11).
15
Placer låget (2) på plastikkanden (5), , og skub det ned på plads.
Sæt målekoppen (1) på plads ved at dreje den med uret, indtil den
fastlåses på plads.
16
For at undgå spild skal du sørge for, at hullet til at hælde på med i
låget (2) vender bort fra tuden (4). Se side 7. Sæt stikket til Total
Control-bordblenderen ind i stikkontakten, og tænd for den (16).
17
Tryk på knappen Dips og saucer (11) på de forudindstillede
programmer til smoothies, dips, saucer, deje og is. Et blåt lys
tænder rundt om knappen, og dette lys forbliver tændt, indtil
programmet er afsluttet. BEMÆRK: Programmet kan stoppe
midlertidigt i flere sekunder. Du må ikke fjerne plastikkanden (5)
eller låget (2), før lyset går ud. ADVARSEL: DU MÅ IKKE
TILSÆTTE INGREDIENSER ELLER FJERNE LÅGET, MENS
PROGRAMMET ER I GANG.
18
Tryk på knappen Smoothies (12) på de forudindstillede
programmer for at tilberede lækre, sunde smoothies. Et blåt lys
tænder rundt om knappen, og dette lys forbliver tændt, indtil
programmet er afsluttet. BEMÆRK: Programmet kan stoppe
midlertidigt i flere sekunder. Du må ikke fjerne plastikkanden (5)
eller låget (2), før lyset går ud.
19
Tryk på knappen Knust is (13) på de forudindstillede programmer
for at tilberede velsmagende sjapis. Et blåt lys tænder rundt om
knappen, og dette lys forbliver tændt, indtil programmet er
afsluttet. BEMÆRK: Programmet kan stoppe midlertidigt i flere
sekunder. Du må ikke fjerne plastikkanden (5) eller låget (2), før
lyset går ud.
20
Tryk på knappen Supper og saucer (14) på de forudindstillede
programmer for at tilberede nærende supper og saucer. Et blåt lys
tænder rundt om knappen, og dette lys forbliver tændt, indtil
programmet er afsluttet. BEMÆRK: Programmet kan stoppe
midlertidigt i flere sekunder. Du må ikke fjerne plastikkanden (5)
eller låget (2), før lyset går ud.
21
Sluk for apparatet (16), og træk stikket ud af stikkontakten, inden
du serverer.
22
Fjern plastikkanden (5) fra motordelen (7).
23
For at hælde skal du fjerne låget (2) og hæld ud af tuden (4).
24
For at bruge flowkontrol skal du løfte låget (2) og omplacere som
krævet nedenfor.
25
Drej hen på det store filter i låget (2) for at opnå fuldt flow.
26
Drej hen på gitterfilteret i låget (2) for at forhindre evt. store stykker
i at komme igennem.
VIGTIGT
DU MÅ IKKE HÆLDE KOGENDE VAND ELLER MEGET
VARME VÆSKER I KANDEN. LAD DET FØRST KØLE AF.
Målekop
• Målekoppen (1) kan bruges til at måle små mængder væske.
1 Hæld væsken gennem hullet til at hælde med (3) i låget (2).
2 Sæt målekoppen (1) tilbage i låget (2) ved at dreje den for at
låse/oplåse. Gå derefter i gang med at blende.
Knust is
• Følg proceduren i afsnittet "Betjening af Total Controlbordblenderen", og i stedet for fødevarer skal du bruge
isterninger, der skal knuses.
• Tryk på knappen Knust is (13) på de forudindstillede programmer.
• Bemærk: Den maksimale kapacitet for knust is er til enhver tid
500 ml.
Toptips
Brug din blender til supper, saucer, drikkevarer, patéer,
mayonnaise, dressinger m.m.
g
p
f
d
i
q
}
∂
FP403040MEE Rev1.qxp_Morphy Richards Instruction Book 11/07/2016 17:38 Page 61
Page 62

62
• Du må ikke putte tørre ingredienser i blenderen uden også at
tilsætte andre flydende ingredienser eller væske.
• Når du blender, skal du først hælde væskerne i og derefter tilsætte
de faste ingredienser. Start altid med at blende ved lav hastighed,
og øg hastigheden efter behov. VIGTIGT: For at sikre, at blenderen
har en lang levetid, må du aldrig anvende manuelle
hastighedsindstillinger i over 60 sekunder uafbrudt, men lade den
køle af i 5 minutter, inden du fortsætter. Sluk blenderen, lige så
snart du har opnået den ønskede konsistens.
• Maskinen fungerer ikke, hvis plastikkanden (5) ikke er sat korrekt
på plads.
• Du bør ikke anvende plastikkanden til opbevaring. Den bør være
tom, når den ikke er i brug.
• Du må aldrig blende mere end 1 liter frosne væsker, som f.eks.
milkshakes.
• Hvis du bruger 1,5 l, må du ikke anvende højere hastigheder end
2.
• Når du blender supper må du ikke overstige 1 l mærket.
• Du må ikke overfylde blenderen. Dette kan resultere i
beskadigelse af motoren. Stikkets sikring springer, hvis blenderen
overbelastes. Udskift sikringen, og undlad at overskride den
maksimale, anbefalede mængde. Se "Betjeningsoversigten" på
side 11.
Pleje og rengøring
• Inden rengøring og vedligeholdelse skal du slukke apparatet og
trække stikket ud, fjerne plastikkanden (5) fra motordelen (7).
• Efter brug skal du fylde plastikkanden (5) med 1 l varmt vand og
lade blenderen køre i 30 sekunder med pulsfunktionen og gentage
denne procedure efter behov. Du må aldrig bruge slibemidler eller
rengøringscremer.
• Rengør motordelen (7) med en fugtig klud eller køkkenrulle.
• Der er mulighed for at vikle ledningen rundt om produktets bund
og sætte stikket i det dertilhørende rum til opbevaring af stikket
(15).
• Total Control-bordblenderen skal samles igen ved forsigtigt at
anbringe plastikkanden (5) på motordelen (7) og sikre, at den
passer ordentligt.
• ADVARSEL : Du må aldrig nedsænke motordelen i vand.
• ADVARSEL: Hvis du spilder en væske på motordelen, skal du
straks slukke for apparatet og trække stikket ud og tørre det
af med en klud.
Betjeningsoversigt
Mængde Hastighed (manuel) Tid Gode råd
Forudindstillet eller manuel
Supper* 1 l 1-4+ pulsfunktion 15 sek. til 1 min. Start ved lav hastighed, og øg
til høj hastighed efter behov
Milkshakes 1 l 1-5+ pulsfunktion 15 sek. til 1 min.
Blendning / opløsning 1,5 l 1-2 pulsfunktion 15 sek. til 1 min Start ved lav hastighed, og øg
til høj hastighed efter behov
Knust is 500 ml maks. Pulsfunktion 10-20 sek.
• Du må ikke blende i længere end den anbefalede tid.
• Du må ikke overstige de maksimale mængder.
• * Du må ikke tilsætte kogende vand og meget varme væsker til
plastikkanden. Lad dem køle af først.
Kørselstider til forudindstillede programmer
Dips og saucer - 44 sekunder
Smoothies - 54 sekunder
Supper og saucer - 58 sekunder
Knust is - 20 sekunder
FP403040MEE Rev1.qxp_Morphy Richards Instruction Book 11/07/2016 17:38 Page 62
Page 63

63
Opskrifter
Forudindstillede opskrifter
Jordbærsauce (serveres sammen med is)
Tilberedningstid: 5 minutter (plus 5 min. afkøling)
Indstilling: Dips og saucer
Bliver til: 200 ml
Portioner: 4
Tilberedningstid: 5 minutter
Ingredienser:
• 150 g jordbær, afskallede
• 65 g strøsukker
• 65 ml vand
• ½ spsk. hyldeblomstsaftevand
Metode:
1 Vask jordbærrene, og skær dem i halve.
2 Kom sukker og vand i en gryde, og rør grundigt over lav varme,
indtil sukkeret er opløst.
3 Bring i kog, og tilsæt derefter klargjorte jordbær.
Kog i 3-3½ minutter, eller indtil de er møre.
4 Lad dem afkøle i gryden i 5 min.
5 Kom jordbærsirup i kanden, og tilsæt hyldeblomstsaftevandet.
Sæt låget på, og tryk på den forudindstillede knap. Hæld saucen
op i en serveringsskål.
6 Servér varm til pandekager, eller afkøl i køleskab, og hæld over
vaniljeis.
Sommerfrugtis
Tilberedningstid: 10 minutter
Indstilling: Dips og saucer
Frysetid: natten over
Portioner: 8
Ingredienser:
• 250 g hindbær
• 125 g jordbær, afskallede og halverede
• 75 g blåbær
• 225 g flormelis, sigtet
• 1 spsk. citronsaft
• 300 ml flødeskum
Metode:
1 Kom frugten i kanden, sæt låget på, og tryk på den
forudindstillede knap.
2 Tilsæt citronsaften og flormelis, sæt låget på kanden, og blend
med pulsfunktionen (4 gange eller i ca. 20 sekunder), indtil
blandingen er jævn.
3 Pisk piskefløden med et piskeris eller håndmixer, indtil den
begynder at blive stiv. Tilsæt forsigtigt frugtmosen til piskefløden,
indtil den er jævnt fordelt, og kom den derefter i en frysefast
beholder, og lad den fryse, indtil den er frossen på kanterne og
cremet. (2-3 timer)
4 Vend siderne mod midten med en gaffel, og rør, indtil der opnås
en cremet konsistens.
5 Frys utildækket i flere timer uden at røre rundt.
6 Hvis du ønsker at opbevare blandingen, skal du tildække med et
låg.
Chokolademilkshake
Tilberedningstid: 5 minutter
Indstilling: Smoothies
Mængde: 1 liter
Portioner: 5 stk. (200 ml portioner)
Ingredienser:
• 750 ml skummetmælk
• 250 g chokoladeis
• 1½ spsk. drikkechokoladepulver
Metode:
1 Hæld mælken og isen i kanden, og tilsæt
drikkechokoladepulveret.
2 Sæt låget på, og tryk på den forudindstillede knap.
3 Når blandingen er klar, skal den serveres omgående.
Tips og gode råd:
Du kan evt. erstatte med vaniljeis, som giver en lettere smag.
Jordbær- og banansmoothie
Tilberedningstid: under 5 minutter
Indstilling: Smoothies
Mængde: 1,1 liter
Portioner: 5
Ingredienser:
• 180 g vaskede og afskallede jordbær
• 2 modne bananer (ca. 150 g), pillede og skårede i stykker
• 450 g let vaniljeyoghurt
• 300 ml skummetmælk
• 3 isterninger (valgfrit)
Metode:
1 Hvis du vælger at bruge isterninger, kommes de i kanden.
2 Tilsæt de øvrige ingredienser i den angivne rækkefølge, og sæt
låget på
3 Tryk på den forudindstillede knap til smoothies.
4 Serveres omgående, når den er klar.
Mango-sjapis
Tilberedningstid: 5 minutter
Indstilling: Knust is
Portioner: 2
Giver 500 ml
g
p
f
d
i
q
}
∂
FP403040MEE Rev1.qxp_Morphy Richards Instruction Book 11/07/2016 17:38 Page 63
Page 64

64
Ingredienser:
• Is
• 180 g til 200 g klargjort mango, i terninger
• Appelsinjuice fra 1 appelsin (60 ml)
Metode:
1 Kom isen i kanden op til 500 ml mærket, sæt låget på, og tryk på
den forudindstillede knap til is.
2 Når isen er klar, skal du tilsætte mangoen og appelsinsaften,
sætte låget på og blende med pulsfunktion 2-3 gange, indtil den
ønskede konsistens opnås.
3 Hæld op i to glas, og server omgående.
Sellerisuppe
Tilberedningstid: 5 minutter
Indstilling: Supper og saucer
Portioner: 4
Tilberedningstid: 30 minutter
Mængde: 1,6 liter
Ingredienser:
• 25 g smør
• 1 bladselleri, groft hakket (med bladene)
• 1 løg (ca. 100 g), skårede i terninger
• 3 små kartofler (ca. 150 g), pillede og skårede i terninger
• 1 l varm grøntsagsbouillon
• Salt og stødt, sort peber
• Frisk persille til at pynte med
Metode:
1 Kom smør i en stor gryde, og smelt over mellemvarme. Sørg for,
at smørret ikke brænder på.
2 Tilsæt grøntsagerne, og kog i 4-5 minutter, rør af og til rundt med
en træske.
3 Tilsæt grøntsagsbouillon og krydderier. Bring i kog.
4 Sæt låg på gryden, sænk varmen, og lad det småkoge i ca. 20
minutter, eller indtil grøntsagerne er møre.
5 Lad suppen afkøle lidt, og hæld derefter halvdelen i kanden op til
1 liter mærket. Sæt låget på, og tryk på den forudindstillede knap
til supper.
6 Hæld suppen tilbage i gryden, og blend den resterende suppe
som angivet ovenfor. Varm op efter behov, smag til med krydderier,
og pynt med frisk skåret persille inden servering.
Grøntsagssugo
Tilberedningstid: 10 minutter
Indstilling: Supper og saucer
Portioner: 4-6
Tilberedningstid: 1 time 10 minutter
Mængde: 1,3 liter
Ingredienser:
• 2 spsk. olivenolie
• 1 løg (130 g), hakket
• 2 stk. selleri (80 g), i, finthakket
• 2 gulerødder (160 g), pillede og i terninger
• 1 fed hvidløg, knust
• 1 porre (120 g), skåret i skiver
• 1 rød peberfrugt, i terninger
• 2 x 400 g dåser hakkede tomater
• ½ spsk. balsamisk eddike
• 2 tsk. oregano
• 1 tsk. blandede urter
• Salt og peber
Metode:
1 Opvarm olien i en stor gryde, og kog forsigtigt løg, selleri,
gulerødder, hvidløg og porrer i 5 min. ved lav varme, uden at de
tager farve, og rør af og til rundt. Sæt låg på gryden, og kog i 20
minutter. Rør af og til rundt. Tilsæt peberfrugt i terninger, og kog
ved lav varme i 10 minutter med låget på.
2 Kom tomater, eddike, urter, salt og peber i gryden, og lad dem
småkoge i 40 min., eller indtil gulerødder og selleri er møre. Lad
dem afkøle lidt.
3 Hæld forsigtigt saucen i kanden. Niveauet skal gå op til 1 liter
mærket. Sæt låget på.
4 Tryk på den forudindstillede knap til supper.
5 Smag til med krydderier, og opvarm efter behov. Rør spaghettien i,
og servér med revet parmesanost og hvidløgsbrød som tilbehør.
Manuelle opskrifter
Tomatssauce
Tilberedningstid: 5 minutter
Indstilling: Manuel
Portioner: 4-8
Ingredienser:
• 150 g små hele modne cherrytomater,
• 1 lille rød chilipeber (10 g)
• 20 g korianderblade
• Citronsaft fra 1 citron (2 spsk.)
• tsk. salt
• Frisk stødt sort peber
Metode:
1 Fjern stilken fra chilipeberen, og skær den i halv.
2 Kom alle ingredienser i kanden i den angivne rækkefølge.
3 Blend med pulsfunktionen i ca. 10-15 sekunder, og skrab derefter
siderne på kanden med en spatel, inden du igen blender med
pulsfunktionen i nogle få sekunder, indtil den ønskede konsistens
opnås.
4 Hæld op i en serveringsskål, og lad den stå i 30 minutter inden
servering.
Sugo all'amatriciana
FP403040MEE Rev1.qxp_Morphy Richards Instruction Book 11/07/2016 17:38 Page 64
Page 65

65
Tilberedningstid: minutter
Tilberedningstid: 40 minutter
Indstilling: Manuel
Portioner: 4
Mængde: 600ml
Ingredienser:
• 1 løg (ca. 130 g), groft hakket
• 1 fed hvidløg, knust
• ½ grøn chilipeber, uden frø, groft hakket
• 1½ spsk. ekstra jomfruolivenolie
• 100 g bacon uden svær, groft hakket
• 1 x 400 g dåse hakkede blommetomater
• 100 ml tomatpuré
• 4 spsk. hvidvin
• Frisk stødt sort peber
• Penne-pasta og revet parmesanost til servering
Metode:
1 Kom olien i en stor gryde, og opvarm i nogle få minutter. Steg løg,
hvidløg og chilipeber i 2-3 minutter uden at de tager farve, og rør
af og til rundt med en træske.
2 Tilsæt det hakkede bacon, og steg i yderligere ét minut. Sæt låg
på gryden, og kog ved mellemvarme i 5 minutter.
3 Tilsæt blommetomaterne, passata og hvidvin, smag til med peber.
4 Sæt låg på gryden, og lad det småkoge i 25-30 minutter, eller
indtil løgene er møre. Lad dem afkøle lidt.
5 Tilberede pastaen ti minutter, før saucen er færdig, i henhold til
vejledningen på emballagen.
6 Hæld saucen op i blenderens kande, sæt låget på, og blend ved
lav hastighed i nogle få sekunder, indtil den ønskede konsistens
opnås.
7 Hæld vandet fra pastaen, og rør saucen i pastaen. Opvarm et
øjeblik efter behov, og servér omgående med parmesanost.
Grøn kiwi- og æblesmoothie
Tilberedningstid: 5 minutter
Indstilling: Manuel
Portioner: 4-5
Bliver til: 1 liter
Ingredienser:
• 2 kiwifrugter (200 g), med skræl på
• 1 x 80 g moden banan (vægt med skræl på), 30 mm stykker
• 120 g agurk, med skræl på og hakket i 30 mm stykker
• 65 g babyspinatblade
• 400 ml æblesaft, afkølet
Metode:
1 Skær kiwifrugten i halve, og fjern den hårde kerne. Hak den groft.
2 Bland kiwi, banan og agurkestykker, og kom den op i kanden.
Tilsæt spinat og æblesaft.
3 Sæt låget på, og øg gradvist hastigheden fra 1 til 5. Efter ca. 20-
30 sekunder skal du dreje programvælgeren til nul og derefter
blende med pulsfunktionen, indtil blandingen er jævn.
4 Når blandingen er klar, skal den serveres omgående.
Ananassorbet
Tilberedningstid: 0 minutter plus afkølings- og frysetid
Indstilling: Manuel
Portioner: 4-6
Mængde: 600ml
Ingredienser:
• ½ stor ananas, pillet, uden kernen og hakket (klargjort vægt på ca.
385 g)
• 50 ml citronsaft
• 140 g strøsukker
• 130 ml vand
Metode:
1 Kom alle ingredienser i kanden. Blend ved hastigheder mellem 1
og 4, og brug pulsfunktionen, indtil blandingen er jævn. (Samlet
tid 1 minut).
2 Afkøl i køleskab i ca. én time, rør rundt derefter, kom blandingen i
en lav frysebeholder, og dæk med låget.
3 Lad blandingen fryse i 3 timer, eller indtil den er fast på ydersiden
men cremet i midten. Tag den ud af fryseren, kom sorbeten i
blenderens kande, og blend i 20-30 sekunder ved lav hastighed.
4 Sæt den tilbage i fryseren tildækket i flere timer eller natten over,
indtil den er fast.
Porre- og kartoffelsuppe
Tilberedningstid: 5 minutter
Tilberedningstid: 35 minutter
Indstilling: Manuel
Portioner: 4-6
Mængde: 2 liter
Ingredienser:
• 25 g smør
• 2 mellemstore porrer (320 g), vaskede og skårede i skiver
• 1 lille løg (125 g), pillet og finthakket
• 560 g skrællede kartofler, i tynde skiver
• 1,2 liter grøntsagsbouillon
• 1 tsk. blandede urter
• 1 tsk. salt
• Sort peber
Pynt: Purløg
Metode:
1 Smelt smørret i en stor gryde, og tilsæt porrer og løg. Kog i 5-10
minutter, uden at de tager farve, rør af og til rundt med en træske.
2 Tilsæt kartofler, bouillon, urter og krydderier, bring i kog, sæt låg
på, og lad det småkoge ved lav varme i 30 minutter, eller indtil de
g
p
f
d
i
q
}
∂
FP403040MEE Rev1.qxp_Morphy Richards Instruction Book 11/07/2016 17:38 Page 65
Page 66

66
er møre.
3 Lad dem afkøle lidt, og hæld derefter forsigtigt halvdelen af
suppen i en målekop og resten af blandingen i blenderens kande.
4 Brug lav hastighed til at blende i nogle få sekunder. Brug
pulsindstillingen i korte intervaller til at opnå den ønskede
konsistens. Blendetiden er ca. 20-30 sekunder.
5 Hæld blandingen tilbage i gryden, og gentag ovenstående med
den resterende mængde suppe. Smag til med krydderier, opvarm,
pynt med purløg, og servér med frisk brød.
Kontakt os
Hjælpelinje
Hvis du oplever problemer med dit apparat, bedes du ringe til
vores hjælpelinje, idet vi bedre kan hjælpe dig end forhandleren,
hvor du købte produktet.
Du bedes have produktnavnet, modelnummeret og
serienummeret ved hånden, når du ringer, således at vi kan
hjælpe dig hurtigere.
Kontakt os
Hvis du oplever problemer eller har spørgsmål eller blot ønsker et
godt råd eller et forslag til en opskrift for at få det størst mulige
udbytte af produktet, så kan du slutte dig til os på nettet:
Blog: www.morphyrichards.co.uk/blog
Facebook: www.facebook.com/morphyrichardsuk
Twitter: @loveyourmorphy
Websted: www.morphyrichards.com
DIN TOÅRIGE GARANTI
Apparatet er dækket af en toårig reparations- eller
ombytningsgaranti.
Det er vigtigt, at du gemmer kvitteringen som dokumentation for
købet. Du kan hæfte kvitteringen til bagsiden af denne vejledning
for fremtidig reference.
Opgiv venligst følgende numre, hvis der opstår fejl ved produktet.
Du finder numrene på produktets underside.
Modelnr.
Serienr.
Alle produkter fra Morphy Richards testes individuelt, før de
forlader fabrikken. Hvis det usandsynlige skulle ske, at der opstår
fejl ved enheden inden for 28 dage efter købsdatoen, skal
enheden returneres til den forretning, hvor den er købt, og
ombyttes med en anden.
Hvis der opstår en fejl efter de første 28 dage efter købsdatoen
og inden for 24 måneder fra købsdatoen, skal du kontakte den
lokale distributør og give dem produktets modelnummer og
serienummer eller skrive til den lokale distributør på de anførte
adresser.
Du bliver bedt om at returnere produktet (forsvarligt indpakket) til
nedenstående adresse sammen med en kopi af kvitteringen.
Det defekte apparat repareres eller ombyttes derefter,
sædvanligvis inden for 7 arbejdsdage efter modtagelse, dog med
forbehold for undtagelserne som beskrevet nedenfor (1-9).
Hvis enheden af en eller anden grund ombyttes inden for
garantiperioden på to år, beregnes garantien på den nye enhed
fra den oprindelige købsdato. Derfor er det vigtigt at gemme den
originale kvittering eller faktura, så du kan dokumentere
købsdatoen.
For at være dækket af garantiperioden på to år skal enheden
have været brugt i overensstemmelse med fabrikantens
anvisninger. For eksempel skal enhederne have været afkalket,
ligesom filtrene skal have været holdt rene i henhold til
anvisningerne.
Det er ikke Morphy Richards eller den lokale distributørs ansvar
at ombytte eller reparere enheden under garantiens betingelser,
hvis:
1 Defekten er forårsaget af eller kan tilskrives uforsætlig brug,
misbrug, forsømmelig brug eller brug uden at følge fabrikantens
anbefalinger, eller hvis defekten er forårsaget af elektriske
spændingsbølger eller er opstået under transport.
2 Enheden er anvendt med en anden strømspænding end den, der
er påtrykt produktet.
3 Andre personer (ud over vores serviceafdeling eller en autoriseret
forhandler) har forsøgt at reparere enheden.
4 Enheden har været brugt til udlejningsformål eller har været
anvendt til andre formål end husholdningsbrug.
5 Enheden er købt brugt.
6 Morphy Richards eller den lokale distributør er ikke ansvarlig for
at udføre nogen form for servicearbejde under garantien.
7 Garantien omfatter ikke forbrugsvarer som poser, filtre og
glaskarafler.
8 Batterier og skade fra lækage er ikke dækket af garantien.
9 Filtrene ikke er blevet rengjorte og udskiftet som specificeret.
Denne garanti overdrager ikke nogen rettigheder ud over dem,
der udtrykkeligt er beskrevet ovenfor, og dækker ikke krav i
forbindelse med følgetab eller -skader. Denne garanti tilbydes
som en ekstra fordel og påvirker ikke dine lovbestemte
rettigheder som forbruger.
FP403040MEE Rev1.qxp_Morphy Richards Instruction Book 11/07/2016 17:38 Page 66
Page 67

67
Wskazówki dotyczące zdrowia i bezpieczeństwa użytkowania
Korzystanie z urządzeń elektrycznych wymaga przestrzegania wynikających ze zdrowego rozsądku zasad. Przed użyciem produktu należy
dokładnie zapoznać się z instrukcją.
• Urządzenie to może być używane przez osoby o ograniczonej
sprawności fizycznej, czuciowej lub psychicznej lub też przez
osoby nie mające odpowiedniego doświadczenia lub wiedzy,
jeśli odbywa się to pod nadzorem lub zgodnie z instrukcjami
dotyczącymi użytkowania urządzenia w bezpieczny sposób, a
także są świadome wynikających z tego zagrożeń.
• Urządzenie to nie jest przeznaczone dla dzieci.
• Dzieci nie powinny bawić się tym urządzeniem.
• Zarówno urządzenie jak i kabel zasilający należy przechowywać
poza zasięgiem dzieci.
• UWAGA: Należy upewnić się, że blender jest wyłączony zanim
zdejmie się go z podstawy lub zbliży się do ruchomych części.
• Nie należy mieszać składników przez czas dłuższy niż ten
wskazany w „Schemacie działania urządzenia”.
• Należy unikać kontaktu z ruchomymi częściami. Należy
trzymać ręce, włosy, elementy ubrania oraz utensylia kuchenne
z dala od ostrzy blendera w trakcie ich działania, aby zapobiec
uszkodzeniom ciała i/lub innych urządzeń.
• Należy zawsze odłączać blender od prądu, jeśli pozostaje on
nieużywany oraz przez składaniem go, rozkładaniem lub
myciem.
• Należy zachować szczególną ostrożność obchodząc się z
ostrymi ostrzami tnącymi, opróżniając kielich oraz w trakcie
czyszczenia urządzenia.
• Wskazówki dotyczące konserwacji i czyszczenia urządzenia
znajdują się na stronie 71.
}
g
p
f
d
i
q
}
∂
FP403040MEE Rev1.qxp_Morphy Richards Instruction Book 11/07/2016 17:38 Page 67
Page 68

68
Ponadto prezentujemy następujące zalecenia dotyczące
bezpieczeństwa użytkowania urządzenia.
Miejsce używania
• Urządzenia nie należy używać na zewnątrz lub w łazience.
• Należy zawsze z dala od krawędzi blatu roboczego.
• Nie należy umieszczać kielicha wraz z podstawą na drewnianych
powierzchniach wypolerowanych na wysoki połysk, gdyż
urządzenie może uszkodzić powierzchnię.
Kabel zasilający
• Nie należy pozwolić, aby kabel zasilający zwisał z krawędzi blatu
roboczego w taki sposób, żeby był dostępny dla dzieci.
• Nie należy pozwolić, żeby przewód przebiegał przez otwartą
przestrzeń, np. między gniazdkiem i stołem.
• Nie należy pozwolić, aby kabel znajdował się nad kuchenką lub
inną gorącą powierzchnią, która mogłaby uszkodzić kabel.
• Kabel zasilający powinien sięgać od gniazdka do podstawy
urządzenia bez żadnych przeszkód.
• Kabel zasilający nie może być wymieniany. W razie jakichkolwiek
dodatkowych pytań należy skontaktować się z Morphy Richards.
Inne środki ostrożności
• Urządzenia nie należy używać w celach innych niż te, do których
jest ono przeznaczone.
• Używanie końcówek i akcesoriów niezalecanych lub
niewyprodukowanych przez Morphy Richards może spowodować
pożar, porażenie prądem lub inne uszkodzenia ciała.
• UWAGA: Niewłaściwe użycie urządzenia może spowodować
uszkodzenia ciała.
Środki ostrożności dotyczące produktów
• WAŻNE: Gorące płyny powinny być ostudzone zanim wleje się je
do kielicha, zawsze należy się też upewnić , że pokrywa została
odpowiednio umieszczona.
• Należy uważać, jeśli do kielicha wlewany jest gorący płyn, gdyż
może on wydostać się w urządzenia przez nagłe nagromadzenie
pary.
• Nie należy używać urządzenia jeśli kielich lub pokrywa są
uszkodzone lub mają widoczne pęknięcia.
Wymagania dotyczące zasilania
Należy sprawdzić czy napięcie elektryczne wskazane na
tabliczce znamionowej odpowiada napięciu elektrycznemu
dostępnemu w domu, które musi odpowiadać A.C. (Prąd
przemienny).
Jeśli bezpiecznik we wtyczce będzie wymagał wymiany, należy
użyć bezpiecznika 5 amp BS1362.
UWAGA: Urządzenie musi być uziemione.
Wprowadzenie
Dziękujemy za zakupienie urządzenia Morphy Richards blendera kielichowego Zapraszamy do odwiedzenia
www.morphyrichards.co.uk , aby zarejestrować zakupiony
produkt i otrzymać dwuletnią gwarancję
Spis treści
Wskazówki dotyczące zdrowia i bezpieczeństwa użytkowania 67
Wprowadzenie 68
Całkowita kontrola 69
Przegląd produktu 3
Przed pierwszym użyciem 70
Użycie blendera kielichowego Total Control - ręczne sterowanie70
Użycie blendera kielichowego Total Control - zaprogramowane
programy 70
Najważniejsze wskazówki 71
Konserwacja i czyszczenie 71
Schemat działania urządzenia 71
Przepisy 72
Kontakt 76
Gwarancja 76
Opis urządzenia
(1) Miarka
(2) Pokrywa
(3) Otwór do wlewania płynów
(4) Dziobek
(5) Plastikowy kielich
(6) Ostrze
(7) Podstawa
(8) Pokrętło
(9) Tryb pulsacyjny
(10) Miejsce na kabel
(11) Program do przygotowywania dipów i sosów
(12) Program do przygotowywania smoothies
(13) Program do kruszenia lodu
(14) Program do przygotowywania zup i sosów
(15) Miejsce na wtyczkę (z tyłu)
(16) Włącznik i wyłącznik
FP403040MEE Rev1.qxp_Morphy Richards Instruction Book 11/07/2016 17:38 Page 68
Page 69

69
g
p
f
d
i
q
}
∂
Wydajno pracy 1,5L
Z bkowane ostrza ze stali
nierdzewnej
Zaprogramowane ustawienia
Wbudowane miejsce do przechowywania
przewodu zasilaj cego
Dajemy moc do pewnego tworzenia potraw
Przedstawiamy blender kielichowy Total Control, który stanowi uniwersalne połączenie praktycznego
designu z inteligentną technologią reagowania, zaprojektowany, żeby dać swoim użytkownikom
możliwość tworzenia potraw z pewnością.
Dzięki technologii Smart Response ten inteligentny blender kielichowy dostarcza odpowiedniej mocy
do wykonania różnorodnych czynności będących częścią procesu przygotowania posiłku.
Cztery zaprogramowane w urządzeniu programy są niezrównaną pomocą przy robieniu dipów,
smoothies, zup, sosów i lodu, sprawiając, że przy mieszaniu składników nie trzeba się nawet
zastanawiać.
Pięć stopni szybkości i tryb pulsacyjny pozwalają zachować całkowitą kontrolę przez cały proces
przygotowywania posiłku.
A super duży kielich o pojemności 1,5 litra pozwala użytkownikom na przygotowanie wielu pysznych
napoi, zup i sosów.
Łatwa w przechowywaniu wtyczka blendera kielichowego jest świetnym rozwiązaniem.
Blender kielichowy Total Control daje swoim użytkownikom moc, żeby mogli pewnie tworzyć
potrawy.
FP403040MEE Rev1.qxp_Morphy Richards Instruction Book 11/07/2016 17:38 Page 69
Page 70

70
Przed pierwszym użyciem
• Należy ostrożnie rozpakować blender kielichowy, ponieważ jego
ostrza są bardzo ostre.
• Należy następnie usunąć wszelkie nalepki (poza tą z numerem
seryjnym, znajdującą się na podstawie blendera).
• Należy ostrożnie umyć kielich, pokrywę i miarkę w gorącej wodzie
z płynem do mycia naczyń. Wypłukać i osuszyć.
• Podstawę blendera należy wytrzeć wilgotną ścierką.
• UWAGA: Nigdy nie należy zanurzać podstawy blendera w
wodzie ani w jakimkolwiek innym płynie. Zawsze należy się
upewnić, że elementy przyłączane do prądu są suche. Mogą
one zostać wytarte czystą wilgotną ścierką.
Użycie blendera kielichowego Total Control -
ręczne sterowanie
1
Należy umieścić plastikowy kielich (5) na podstawie blendera (7).
2
Należy umieścić stałe składniki lub płyny w kielichu (5). Nie należy
przekraczać zalecanej ilości (patrz strona 11).
3
Pokrywę (2) należy umieścić na plastikowym kielichu (5), dobrze ją
dociskając. Miarkę (1) należy umieścić na właściwym miejscu
przekręcając ją zgodnie z ruchem wskazówek zegara aż wskoczy
na swoje miejsce. Aby uniknąć rozlania płynów trzeba otwór
znajdujący się w pokrywie (2) umieścić z dala od dziobka (4).
4
Podłączyć blender kielichowy Total Control do gniazdka i włączyć
(16).
5
Przekręcić pokrętło sterujące (8) na 1 i rozpocząć mieszanie. W
razie konieczności, zwiększyć prędkość.
6
Aby skorzystać z trybu pulsacyjnego (9), należy przekręcić
pokrętło sterujące (8) na P. Trybu tego nie należy stosować przez
dłuższy okres czasu.
7
Wyłączyć (16) i odłączyć z gniazdka przed podaniem potrawy.
8
Należy usunąć plastikowy kielich (5) z podstawy blendera (7).
9
Aby nalać przygotowaną potrawę, należy usunąć pokrywę (2) i
nalać potrawę korzystając z dziobka.
10
Aby kontrolować przepływ należy unieść pokrywę (2) i umieścić ją
w sposób pokazany poniżej.
11
Przekręcić pokrywę (2) na duży filtr, jeśli chcemy uzyskać pełny
przepływ.
12
Przekręcić pokrywę (2) na filtr siatkowy, aby zapobiec
przedostawaniu się większych kawałków, jeśli takie znajdują się w
przygotowanej potrawie.
Stosowanie zaprogramowanych programów
13
Należy umieścić plastikowy kielich (5) na podstawie blendera (7).
14
Należy umieścić stałe składniki lub zimne płyny w plastikowym
kielichu (5). Nie należy przekraczać zalecanej ilości (patrz strona
11).
15
Pokrywę (2) należy umieścić na plastikowym kielichu (5), mocno ją
dociskając. Miarkę (1) należy umieścić na właściwym miejscu
przekręcając ją zgodnie z ruchem wskazówek zegara aż wskoczy
na swoje miejsce.
16
Aby uniknąć rozlania płynów, należy upewnić się, że otwór do
nalewania w pokrywie (2) jest umieszczony z innej strony niż
dziobek (4), patrz strona 7. Podłączyć blender kielichowy Total
Control do gniazdka i włączyć (16).
17
Należy wybrać przycisk Dipy i sosy (11) spośród
zaprogramowanych programów, aby przygotować gładkie dipy,
sosy, ciasto (np. na naleśniki) oraz lody. Przy przycisku pojawi się
niebieskie światełko, które będzie się paliło dopóki program nie
zostanie zakończony. NALEŻY ZWRÓCIĆ UWAGĘ, ŻE: Program
może zatrzymać się na kilka sekund. Nie należy zdejmować
plastikowego kielicha (5) ani pokrywy (2) dopóki nie zgasną lampki
kontrolne.
UWAGA: NIE NALEŻYDODAWAĆ ŻADNYCH SKŁADNIKÓW
ANI TEŻ USUWAĆ POKRYWY W TRAKCIE TRWANIA
PROGRAMU.
18
Wybrać program Smoothie (12) spośród zaprogramowanych
programów, aby przygotować pyszne i zdrowe smoothie. Przy
przycisku pojawi się niebieskie światełko, które będzie się paliło
dopóki program nie zostanie zakończony. NALEŻY ZWRÓCIĆ
UWAGĘ, ŻE: Program może zatrzymać się na kilka sekund. Nie
należy zdejmować plastikowego kielicha (5) ani pokrywy (2) dopóki
nie zgasną lampki kontrolne.
19
Wybrać przycisk Kruszenie Lodu (13) spośród zaprogramowanych
programów, aby przygotować koktajle typu slushie w różnych
smakach. Przy przycisku pojawi się niebieskie światełko, które
będzie się paliło dopóki program nie zostanie zakończony.
NALEŻY ZWRÓCIĆ UWAGĘ, ŻE: Program może zatrzymać się na
kilka sekund. Nie należy zdejmować plastikowego kielicha (5) ani
pokrywy (2) dopóki nie zgasną lampki kontrolne.
20
Należy wybrać przycisk Zupy i sosy (14) spośród
zaprogramowanych programów, aby przygotować odżywcze zupy
i sosy. Przy przycisku pojawi się niebieskie światełko, które będzie
się paliło dopóki program nie zostanie zakończony. NALEŻY
ZWRÓCIĆ UWAGĘ, ŻE: Program może zatrzymać się na kilka
sekund. Nie należy zdejmować plastikowego kielicha (5) ani
pokrywy (2) dopóki nie zgasną lampki kontrolne.
21
Wyłączyć (16) i odłączyć z gniazdka przed podaniem potrawy.
22
Należy usunąć plastikowy kielich (5) z podstawy blendera (7).
23
Aby nalać przygotowaną potrawę, należy usunąć pokrywę (2) i
nalać potrawę korzystając z dziobka (4).
24
Aby kontrolować przepływ należy unieść pokrywę (2) i umieścić ją
w sposób pokazany poniżej.
25
Przekręcić pokrywę (2) na duży filtr, jeśli chcemy uzyskać pełny
przepływ.
26
Przekręcić pokrywę (2) na filtr siatkowy, aby zapobiec
przedostawaniu się większych kawałków, jeśli takie znajdują się w
przygotowanej potrawie.
WAŻNE
NIE NALEŻY WLEWAĆ DO KIELICHA WRZĄCEJ
WODY/BARDZO GORĄCYCH PŁYNÓW. NAJPIERW TRZEBA
JE OSTUDZIĆ.
FP403040MEE Rev1.qxp_Morphy Richards Instruction Book 11/07/2016 17:38 Page 70
Page 71

71
Miarka
• Miarka (1) może być używana do odmierzania małych ilości
płynów.
1 Należy wlewać płyny przez otwór (3) w pokrywie (2).
2 Miarkę (1) należy umieścić z powrotem na pokrywie (2),
odpowiednio ją przekręcając, żeby wskoczyła na swoje miejsce.
Następnie można zacząć mieszać. Kruszenie Lodu
• Należy postępować zgodnie z krokami opisanymi w części
„Użytkowanie blendera kielichowego Total Control”, zastępując
jednak składniki jedzenia lodem, który ma zostać skruszony.
• Wybrać przycisk Kruszenie Lodu (13) spośród zaprogramowanych
programów.
• Uwaga: Maksymalna objętość lodu, który może zostać skruszony
na raz to 500ml.
Najważniejsze wskazówki
Blendera można użyć do przygotowania zup, sosów, napojów,
ciast, majonezu, dressingów itp.
• Nie należy umieszczać w blenderze suchych składników bez
dodatku innych wilgotnych składników lub płynów.
• W czasie mieszania należy najpierw wlać płyny, a dopiero potem
dodać składniki stałe. Mieszanie należy rozpocząć od niższych
obrotów i zwiększać je w razie potrzeby. WAŻNE: Aby sprawić, że
blender będzie sprawny przez dłuższy okres czasu, korzystając z
ręcznych ustawień szybkości mieszania, nie należy przekraczać
60 sekund, a następnie trzeba pozwolić blenderowi na ostygnięcie
przez 5 minut. Blender należy wyłączać zaraz po uzyskaniu
pożądanej konsystencji.
• Urządzenie nie będzie działało, jeśli pokrywa (2) nie została
właściwie umieszczona na swoim miejscu.
• Nie należy używać plastikowego kielicha jako pojemnika do
przechowywania potraw. Kiedy nie jest on używany, powinien być
przechowywany pusty.
• Nigdy nie należy mieszać więcej niż 1 litr (1 3/4 pinty)
spieniających się płynów, takich jak koktajle mleczne.
• Wykorzystując maksymalną pojemność kielicha, 1,5 litra, nie
należy stosować prędkości większej niż 2.
• Mieszając zupę, nie należy wlewać jej więcej niż do znacznika
oznaczającego 1 litr.
• Nie należy przepełniać blendera. Może to spowodować
uszkodzenia silnika urządzenia. W przypadku przeciążenia
blendera, bezpiecznik się przepali. Wówczas należy wymienić
bezpiecznik i nie przekraczać więcej zalecanych ilości używanych
składników. Więcej informacji znajduje się w części zatytułowanej
„Schemat działania urządzenia” na stronie 11.
Konserwacja i czyszczenie
• Przed podjęciem jakichkolwiek czynności związanych z
czyszczeniem i konserwacją urządzenia należy je wyłączyć i
odłączyć od gniazdka oraz zdjąć plastikowy kielich (5) z podstawy
blendera (7).
• Po użyciu urządzenia należy wypełnić plastikowy kielich (5) 1
litrem (1 3/4 pinty) ciepłej wody i włączyć na 30 sekund w trybie
pulsacyjnym i, jeśli będzie to konieczne, powtórzyć cały zabieg.
Nigdy nie należy stosować środków czyszczących w postaci
proszku lub mleczka.
• Podstawę blendera (7) należy wyczyścić wilgotną szmatką lub
ręcznikiem papierowym.
• Blender został zaprojektowany w taki sposób, że można owinąć
kabel zasilający wokół podstawy urządzenia, a wtyczkę umieścić
w specjalnie zaprojektowanym do tego miejscu (15).
• Należy ponownie złożyć blender kielichowy Total Control, ostrożnie
umieszczając plastikowy kielich (5) na podstawie urządzenia (7),
upewniając się, że został on prawidłowo umieszczony na swoim
miejscu.
• UWAGA : Nie należy nigdy zanurzać podstawy blendera w
wodzie.
• UWAGA: Jeśli jakikolwiek płyn zostanie rozlany na górną
powierzchnię podstawy blendera, należy wyłączyć
urządzenie, odłączyć je z gniazdka i osuszyć szmatką.
g
p
f
d
i
q
}
∂
Schemat działania urządzenia
Objętość Prędkość (Ręczna) Czas Wskazówki
Zaprogramowana lub Ręczna
Zupy* 1L 1-4+ pulsacyjna 15 sekund do Rozpocząć z małą prędkością
maksymalnie 1 minuty i zwiększyć, jeśli będzie
to konieczne.
Koktajle mleczne 1L 1-5+ pulsacyjna 15 sekund do 1 minuty
Mieszanie / rozcieńczanie 1.5L 1-2 pulsacyjna 15 sekund do 1 minuty Rozpocząć z małą
(puree, napoje, ciasta np. prędkością zwiększyć,
na naleśniki) jeśli będzie to konieczne.
Kruszenie lodu 500ml maksymalnie pulsacyjna 10-20 sekund
FP403040MEE Rev1.qxp_Morphy Richards Instruction Book 11/07/2016 17:38 Page 71
Page 72

72
• Nie mieszać dłużej niż zalecane.
• Nie przekraczać zalecanych maksymalnych ilości.
• * Nie dodawać wrzącej wody anie bardzo gorących płynów do
plastikowego kielicha, najpierw ostudzić.
Czasy trwania zaprogramowanych programów
Dipy i sosy - 44 sekundy
Smoothie - 54 sekundy
Zupy i sosy - 58 sekund
Kruszenie lodu - 20 sekund
Przepisy
Zaprogramowane przepisy
Sos truskawkowy (do podawania z lodami)
Czas przygotowania: 5 minut (plus 5 minut na ostudzenie)
Ustawienia: Dipy i sosy
Przygotowuje: 200ml
Porcje: 4
Czas przygotowania: 5 minut
Składniki:
• 150g truskawek, bez szypułek
• 65g cukru pudru
• 65ml wody
• ½ łyżeczki syropu z czarnego bzu
Sposób przygotowania:
1 Musimy umyć i przepołowić truskawki
2 Następnie umieścić cukier i wodę w rondelku, a następnie często
mieszać, gotując na małym ogniu, dopóki cukier się nie rozpuści.
3 Doprowadzamy do wrzenia i dodajemy przygotowane wcześniej
truskawki. Gotujemy przez 3-3½ minuty, dopóki truskawki nie
zmiękną.
4 Studzimy rondel przez około 5 minut.
5 Wlewamy syrop truskawkowy do kielicha, dodajemy syrop z
czarnego bzu, umieszczamy pokrywę na odpowiednim miejscu i
naciskamy przycisk start. Gotowy sos przelewamy do naczynia,
aby móc go podać.
6 Serwujemy na ciepło z naleśnikami lub schładzamy i polewamy
nim lody waniliowe.
Lody z owoców letnich
Czas przygotowania: 10 minut
Ustawienia: Dipy i sosy
Czas zamrażania: przez noc
Porcje: 8
Składniki:
• 250g malin
• 125g truskawek, bez szypułek i przepołowionych
• 75g borówek
• 225g cukru pudru, przesianego
• 1 łyżeczka soku z cytryny
• 300ml śmietany kremówki
Sposób przygotowania:
1 Umieszczamy owoce w kielichu, przykrywany pokrywą i
naciskamy przycisk start.
2 Dodajemy sok z cytryny i przesiany cukier puder, przykrywamy
pokrywą i mieszamy ruchem pulsacyjnym (4 razy po około 20
sekund) aż całość się wymiesza.
3 Ubijamy kremówkę trzepaczką lub mikserem aż nabierze
FP403040MEE Rev1.qxp_Morphy Richards Instruction Book 11/07/2016 17:38 Page 72
Page 73

73
odpowiedniej konsystencji. Delikatnie dodajemy puree z owoców
do ubitej śmietany aż równomiernie się połączą, a następnie
przekładamy masę do pojemnika i zamrażamy bez przykrycia aż
krawędzie pokryją się warstwą lodu, a całość zgęstnieje. (2-3
godziny)
4 Mieszamy masę aż nabierze kremowej konsystencji.
5 Zamrażamy bez przykrycia przez kilka godzin, bez mieszania.
6 Przechowujemy przykryte przykrywką.
Koktajl mleczno-czekoladowy
Czas przygotowania: 5 minut
Ustawienia: Smoothies
Wielkość dania: 1 litr
Porcje: 5 (jedna porcja = 200ml)
Składniki:
• 750ml mleka półtłustego
• 250g lodów czekoladowych
• 1½ łyżeczki czekolady do picia w proszku
Sposób przygotowania:
1 Umieszczamy mleko i lody w kielichu, dodajemy czekoladę do
picia w proszku.
2 Przykrywamy pokrywą i naciskamy przycisk start.
3 Gotowy koktajl podajemy zaraz po przygotowaniu.
Wskazówki i porady:
Można zamienić lody czekoladowe na waniliowe, co doda koktajlowi
lekkości smaku.
Smoothie truskawkowo-bananowe
Czas przygotowania: poniżej 5 minut
Ustawienia: Smoothies
Wielkość dania: 1,1 litra
Porcje: 5
Składniki:
• 180g umytych truskawek bez szypułek
• 2 dojrzałe banany (około 150g) obrane i pokrojone na kawałki
• 450g jogurtu waniliowego o obniżonej zawartości tłuszczu
• 300ml mleka półtłustego
• 3 kostki lodu (opcjonalnie)
Sposób przygotowania:
1 Jeśli chcemy użyć kostki lodu, umieszczamy je w kielichu.
2 Dodajemy pozostałe składniki w kolejności, w jakiej zostały
wymienione w przepisie i przykrywamy pokrywą
3 Wybieramy program Smoothie.
4 Podajemy zaraz po przygotowaniu.
Slushie mango
Czas przygotowania: 5 minut
Ustawienia: Kruszenie lodu
Porcje: 2
Wielkość dania 500ml
Składniki:
• Lód
• 180g – 200g pokrojonego mango
• sok z 1 pomarańczy (60ml)
Sposób przygotowania:
1 Umieszczamy w kielichu lód, do znacznika 500ml, przykrywamy
pokrywą i kruszymy.
2 Kiedy lód jest gotowy, dodajemy mango i sok z pomarańczy,
przykrywamy pokrywą i miksujemy ruchem pulsacyjnym dwa lub
trzy razy, aż uzyskamy pożądaną konsystencję.
3 Przekładamy do dwóch szklanek i podajemy zaraz po
przygotowaniu.
Zupa selerowa
Czas przygotowania: 5 minut
Ustawienia: Zupy i sosy
Porcje: 4
Czas gotowania: 30 minut
Wielkość dania: 1,6 litra
Składniki:
• 25g masła
• 1 seler, pokrojony (razem z liśćmi)
• 1 cebula (około 100g), pokrojona
• 3 małe ziemniaki (około 150g) obrane i pokrojone
• 1L gorącego bulionu warzywnego
• sól i zmielony czarny pieprz
• świeża pietruszka do przybrania
Sposób przygotowania:
1 Stapiamy masło w dużym rondlu na średnim ogniu. Pilnujemy,
żeby masło się nie przypaliło.
2 Dodajemy warzywa i smażymy przez około 4-5 minut, od czasu
do czasu mieszając drewnianą łyżką.
3 Dodajemy bulion warzywny i przyprawy. Doprowadzamy do
wrzenia.
4 Przykrywamy, zmniejszamy ogień i dusimy przez około 20 min
albo aż warzywa zmiękną.
5 Studzimy nieco zupę i połowę porcji umieszczamy w kielichu, do
znacznika oznaczającego 1 litr. Przykrywamy i wybieramy program
Zupy.
6 Wlewamy zupę z powrotem do rondla i w ten sam sposób
miksujemy pozostałą część zupy. Podgrzewamy jeśli to konieczne,
doprawiamy i przybieramy świeżo pokrojoną pietruszką.
g
p
f
d
i
q
}
∂
FP403040MEE Rev1.qxp_Morphy Richards Instruction Book 11/07/2016 17:38 Page 73
Page 74

74
Warzywny sos do makaronu
Czas przygotowania: 10 minut
Ustawienia: Zupy i sosy
Porcje: 4-6
Czas gotowania: 1 godzina 10 minut
Wielkość dania: 1,3 litra
Składniki:
• 2 łyżeczki oliwy z oliwek
• 1 cebula (130g), pokrojona
• 2 gałązki selera naciowego,(80g) drobno posiekane
• 2 marchewki,(160g) obrane i poszatkowane
• 1 ząbek czosnku, zmiażdżony
• 1 por,(120g) pokrojony w krążki
• 1 czerwona papryka, pokrojona w kostkę
• 2 x 400g pokrojonych pomidorów z puszki
• ½ łyżeczki octu balsamicznego
• 2 płaskie łyżeczki oregano
• 1 płaska łyżeczka mieszanki ziół
• Sól i pieprz
Sposób przygotowania:
1 Podgrzewamy oliwę w dużym rondlu i delikatnie smażymy cebulę,
selera, marchewkę i pora przez 5 minut, nie doprowadzając do
zbrązowienia, od czasu do czasu mieszając. Przykrywamy rondel
przykrywką i smażymy przez 20 minut, od czasu do czasu
mieszając. Dodajemy pokrojoną paprykę i smażymy przez
następne 10 minut pod przykryciem.
2 Dodajemy pomidory, ocet, zioła, sól i pieprz i następnie dusimy
przez 40 minut, aż marchewka i seler zmiękną. Studzimy.
3 Ostrożnie przelewamy sos do kielicha. Masa nie powinna
przekraczać poziomu 1 litra. Przykrywamy.
4 Wybieramy program Zupa.
5 Doprawiamy i podgrzewamy jeśli to konieczne. Mieszamy z
makaronem spaghetti i podajemy ze startym parmezanem oraz
grzanką czosnkową z boku.
Przepisy przygotowywane ręcznie
Salsa pomidorowa
Czas przygotowania: 5 minut
Ustawienia: Ręczne
Porcje: 4-8
Składniki:
• 150g małych dojrzałych pomidorków koktajlowych w całości,
• 1 mała czerwona papryczka chilli (10g)
• 20g liści kolendry
• sok z 1 limonki (2 łyżeczki)
• płaskiej łyżeczki soli
• świeżo zmielony czarny pieprz
Sposób przygotowania:
1 Z papryczek chilli usuwany gniazda i pestki i kroimy papryczki na
pół.
2 Po kolei umieszczamy wszystkie składniki w kielichu.
3 Mieszamy ruchem pulsacyjnym przez około 10-15 sekund, a
następnie zeskrobujemy masę ze ścianek kielicha szpatułką,
zanim znowu uruchomimy tryb mieszania pulsacyjnego, aż do
uzyskania pożądanej konsystencji.
4 Przelewamy przygotowaną salsę do miski i pozwalamy jej odstać
przez 30 minut przed podaniem.
Sos matriciana do makaronu
Czas przygotowania: 5 minut
Czas gotowania : 40 minut
Ustawienia: Ręczne
Porcje: 4
Wielkość dania: 600ml
Składniki:
• 1 cebula (około 130g) posiekana
• 1 ząbek czosnku, zmiażdżony
• ½ zielonej papryczki chilli, bez pestek, posiekanej
• 1½ łyżeczki oliwy z oliwek extra virgin
• 100g surowego boczku bez skórki, posiekany
• 1 x 400g pomidorów śliwkowych z puszki
• 100ml przecieru pomidorowego
• 4 łyżeczki białego wina
• świeżo zmielony czarny pieprz
• makaron penne i starty parmezan do podania
Sposób przygotowania:
1 Na dużą patelnię wlewamy oliwę z oliwek i podgrzewamy przez
kilka minut. Łagodnie podsmażamy cebulę, czosnek, papryczkę
chilli przez około 2-3 minuty, nie doprowadzając do zbrązowienia,
mieszając od czasu do czasu drewnianą łyżką.
2 Dodajemy pokrojony boczek i smażymy przez kolejną minutę.
Przykrywamy przykrywką i smażymy na średnim ogniu przez 5
minut.
3 Dodajemy pomidory śliwkowe, przecier i wino, doprawiamy solą i
pieprzem.
4 Przykrywamy i dusimy na małym ogniu przez 25-30 minut, aż
cebula zmięknie. Studzimy.
5 Na 10 minut zanim sos będzie gotowy gotujemy makaron zgodnie
ze wskazówkami zawartymi na opakowaniu.
6 Wlewamy sos do kielicha blendera, przykrywamy i miksujemy na
małych obrotach lub w trybie pulsacyjnym przez klika sekund, aż
do uzyskania pożądanej konsystencji.
7 Odcedzamy makaron i mieszkamy go z sosem. Podgrzewamy
przez moment i podajemy zaraz po przygotowaniu, posypane
parmezanem.
FP403040MEE Rev1.qxp_Morphy Richards Instruction Book 11/07/2016 17:38 Page 74
Page 75

75
Zielone smoothie z kiwi i jabłek
Czas przygotowania: 5 minut
Ustawienia: Ręczne
Porcje: 4-5
Przygotowuje: 1 litr
Składniki:
• 2 owoce kiwi (200g), ze skórką
• 1x 80g dojrzałego banana (bez skórki), 30mm kawałki
• 120g ogórka, ze skórą, pokrojony, 30mm kawałki
• 65g liści młodego szpinaku
• 400ml schłodzonego soku jabłkowego
Sposób przygotowania:
1 Kroimy kiwi na pół i usuwamy twardy środek, kroimy
2 Mieszamy kiwi, banana, ogórka i wkładamy wszystko do kielicha.
Dodajemy szpinak i sok jabłkowy.
3 Przykrywamy i stopniowo zwiększamy prędkość miksowania od 1
do 5. Po około 20-30 sekundach zmniejszamy prędkość
stopniowo do zera i włączamy tryb pulsacyjny, miksujemy aż
uzyskamy pożądaną konsystencję.
4 Gotowy koktajl podajemy zaraz po przygotowaniu.
Sorbet ananasowy
Czas przygotowania: 10 minut plus czas na ostudzenie i zamrożenie
Ustawienia: Ręczne
Porcje: 4-6
Wielkość dania: 600ml
Składniki:
• ½ dużego ananasa, obranego i wydrążonego (waga po
przygotowaniu około 385g)
• 50ml soku z limonki
• 140g cukru pudru
• 130ml wody
Sposób przygotowania:
1 Umieszczamy wszystkie składniki w kielichu. Miksujemy
korzystając z prędkości między 1 a 4, a następnie z trybu
pulsacyjnego aż uzyskamy gładką konsystencję. (Całkowity czas:
1 minuta).
2 Schładzamy w lodówce przez godzinę, a następnie mieszamy,
przelewamy do płaskiego pojemnika, przykrywamy i przekładamy
do zamrażalnika.
3 Mrozimy mieszankę przez 3 godziny lub do czasu, kiedy brzegi
zamarzną, a środek zgęstnieje. Wyjmujemy z zamrażalnika,
wkładamy do blendera i mieszamy przez około 20-30 sekund, na
małych obrotach.
4 Wkładamy ponownie do zamrażalnika, przykrywamy i zostawiamy
na kilka godzin lub całą noc, aż masa stężeje.
Zupa z porów i ziemniaków
Czas przygotowania: 5 minut
Czas gotowania: 35 minut
Ustawienia: Ręczne
Porcje: 4-6
Wielkość dania: 2 litry
Składniki:
• 25g masła
• 2 średnie pory (320g), umyte i pokrojone
• 1 mała cebula (125g) obrana i drobno posiekana
• 560g obranych ziemniaków, cienko pokrojonych
• 1,2 litra bulionu warzywnego
• 1 płaska łyżeczka mieszanki ziół
• 1 płaska łyżeczka soli
• czarny pieprz
Przybranie:
Szczypiorek
Sposób przygotowania:
1 Do stopionego w dużym rondlu masła dodajemy pory i cebulę.
Gotujemy na małym ogniu, nie zrumieniając, przez 5-10 minut, od
czasu do czasu mieszając drewnianą łyżką.
2 Dodajemy ziemniaki, bulion, zioła, przyprawy i doprowadzamy do
wrzenia, a następnie przykrywamy i dusimy na małym ogniu przez
30 minut aż składniki zmiękną.
3 Studzimy, a następnie delikatnie przelewamy połowę do kielicha, a
drugą do dzbanka.
4 Korzystając z niskich obrotów miksujemy przez kilka sekund.
Korzystając z trybu pulsacyjnego miksujemy krótkimi seriami aż
do uzyskania pożądanej konsystencji. Czas miksowania nie
powinien przekroczyć 20-30 sekund.
5 Przelewamy zmiksowaną zupę z powrotem do rondla, i
powtarzamy te same czynności z drugą połową. Doprawiamy do
smaku, podgrzewamy, dekorujemy szczypiorkiem i podajemy z
grzankami.
g
p
f
d
i
q
}
∂
FP403040MEE Rev1.qxp_Morphy Richards Instruction Book 11/07/2016 17:38 Page 75
Page 76

76
Kontakt
Infolinia
W razie jakichkolwiek problemów z urządzeniem, prosimy o
kontakt poprzez naszą Infolinię, ponieważ będziemy w stanie
pomóc bardziej niż sklep, w którym dokonano zakupu.
Prosimy o podanie nazwy produktu, oznakowania modelu oraz
numeru seryjnego tak, żebyśmy mogli szybciej udzielić pomocy.
Porozmawiaj z nami
Jeśli masz jakiekolwiek pytania lub uwagi, albo chcesz uzyskać
świetne wskazówki oraz przepisy, aby jak najlepiej korzystać z
zakupionych urządzeń, dołącz do nas online:
Blog: www.morphyrichards.co.uk/blog
Facebook: www.facebook.com/morphyrichardsuk
Twitter: @loveyourmorphy
Strona internetowa: www.morphyrichards.com
DWULETNIA GWARANCJA
Niniejsze urządzenie jest objęte dwuletnią gwarancją,
upoważniającą do naprawy lub wymiany.
Zachowaj paragon ze sklepu jako dowód zakupu. Aby móc
skorzystaç z niego w przyszłości, przymocuj swój paragon do
tylnej okładki tej instrukcji za pomocą zszywacza.
Jeśli urządzenie okaże się wadliwe, prosimy podaç następujące
informacje. Informacje umieszczone poniżej znajdują się na
podstawie obudowy urządzenia.
Model
Numer seryjny
Przed opuszczeniem fabryki wszystkie produkty Morphy
Richards są indywidualnie testowane. Jeżeli urządzenie okaże
się wadliwe, należy je zwróciç do punktu sprzedaży w ciągu 28
dni od daty zakupu, w celu wymiany.
Jeśli urządzenie okaże się wadliwe po 28 dniach, lecz przed
upływem 24 miesięcy od daty zakupu, należy skontaktowaç się
z lokalnym dystrybutorem, podając model i numer seryjny
urządzenia, lub napisaç do lokalnego dystrybutora, wysyłając
list na podany adres.
Zostaniesz poproszony o dostarczenie, na poniższy adres,
urządzenia (w odpowiednim opakowaniu zabezpieczającym)
wraz z kopią dowodu zakupu.
Jeśli powód wystąpienia wady urządzenia jest inny niż podane
poniżej (1-9), zostanie ono naprawione lub wymienione oraz
odesłane w ciągu 7 dni roboczych od daty otrzymania.
Jeśli z jakiegoś powodu urządzenie zostanie wymienione w
ciągu 2 lat gwarancji, gwarancja nowego urządzenia będzie
liczona od momentu nabycia oryginalnego produktu. Dlatego
też należy zachowaç oryginalny paragon lub fakturę z
umieszczoną datą zakupu urządzenia.
Aby dwuletnia gwarancja obowiązywała, urządzenie musi byç
użytkowane zgodnie z instrukcją eksploatacji wydaną przez
producenta. Na przykład niektóre urządzenia muszą byç
regularnie odkamieniane, a filtry należy utrzymywaç w czystości
według zaleceƒ producenta.
Morphy Richards lub lokalny dystrybutor nie dokona naprawy
ani wymiany urządzenia w ramach gwarancji, jeśli:
1 Wada została spowodowana lub jest związana z przypadkową,
niewłaściwą, niedbałą lub niezgodną z zaleceniami producenta
eksploatacją urządzenia albo jest wynikiem skoków napięcia lub
niewłaściwego transportu.
2 Urządzenie zostało podłączone do źródła zasilania o innym
napięciu niż oznaczono na urządzeniu.
3 Dokonano prób naprawy urządzenia przez osoby nienależące do
personelu serwisowego firmy Morphy Richards (lub
autoryzowanego sprzedawcy urządzenia).
4 Urządzenie było przedmiotem wypożyczania lub było użytkowane
w celach innych niż przewidziane w gospodarstwie domowym.
5 Urządzenie pochodzi z wtórnego rynku.
6 Firma Morphy Richards lub lokalny dystrybutor nie wykonuje, w
ramach niniejszej gwarancji, żadnych czynności serwisowych.
7 Gwarancja nie obejmuje materiałów eksploatacyjnych, np.
worków, filtrów czy szklanych karafek.
8 Baterie oraz szkody powstałe w wyniku ich wycieku nie podlegają
gwarancji.
9 Baterie oraz szkody powstałe w wyniku ich wycieku nie podlegają
gwarancji.
Niniejsza gwarancja nie nadaje żadnych praw innych niż te
wyraźnie określone powyżej oraz nie pokrywa roszczeƒ
związanych ze stratami lub uszkodzeniami wynikającymi z
eksploatacji urządzenia. Niniejsza gwarancja stanowi
dodatkową korzyśç i nie narusza praw konsumenckich
użytkownika.
FP403040MEE Rev1.qxp_Morphy Richards Instruction Book 11/07/2016 17:38 Page 76
Page 77

77
Zdraví a bezpečnost
Používání jakéhokoli elektrického přístroje vyžaduje dodržování následujících bezpečnostních pravidel vycházejících ze zdravého rozumu.
Před použitím výrobku si prosím pečlivě přečtěte návod k použití.
• Přístroj mohou používat osoby se sníženými fyzickými,
smyslovými nebo rozumovými schopnostmi nebo osoby s
omezenými zkušenostmi a znalostmi pod podmínkou, že jsou
pod dozorem jiné osoby nebo byly poučeny o tom, jak tento
přístroj bezpečně používat, a pokud rozumí rizikům spojeným s
jeho použitím.
• Přístroj nesmí používat děti.
• Děti si s přístrojem nesmí hrát.
• Uchovávejte přístroj a kabel mimo dosah dětí.
• POZOR: Před sundáním mixéru z podstavce nebo před
saháním na jeho pohyblivé části se přesvědčte, že je vypnutý.
• Nemixujte v přístroji po dobu delší, než je doporučeno v
„Provozní tabulce“.
• Nedotýkejte se pohyblivých částí mixéru. Ruce, vlasy, části
oděvu a kuchyňské náčiní musí být vždy mimo dosah čepelí
mixéru. Předejdete tak zranění či poškození přístroje.
• Odpojte přístroj od zdroje vždy, když se jej chystáte nechat bez
dozoru, rozebrat, složit anebo čistit.
• Buďte obzvláště opatrní při manipulaci s ostrými čepelemi,
vyprazdňování nádoby nebo při čištění mixéru.
• Návod na čištění přístroje a péči o něj najdete na straně 81.
∂
g
p
f
d
i
q
}
∂
FP403040MEE Rev1.qxp_Morphy Richards Instruction Book 11/07/2016 17:39 Page 77
Page 78

78
Dále předkládáme následující bezpečnostní pokyny.
Pracovní místo
• Nepoužívejte přístroj venku nebo v koupelně.
• Přístroj vždy umístěte do dostatečné vzdálenosti od okraje
pracovní plochy.
• Nádobu mixéru nepokládejte na výrazně naleštěné dřevěné
pracovní desky, mohla by je poškodit.
Síťový kabel
• Nenechávejte kabel viset dolů z pracovní desky, kde by na něj
mohly dosáhnout děti.
• Používejte mixér tak, aby kabel nevedl otevřeným prostorem, např.
mezi stolem a nízko umístěnou zásuvkou.
• Používejte mixér tak, aby kabel nevedl přes sporák nebo jiný horký
povrch, který by jej mohl poškodit.
• Mezi zásuvkou a pohonnou jednotkou by neměla být příliš velká
vzdálenost, aby nebyl síťový kabel napnutý.
• Napájecí šňůru nelze vyměnit. Pro radu kontaktujte Morphy
Richards.
Další bezpečnostní faktory
• Nepoužívejte přístroj k jiným účelům, než k jakým je určen.
• Použití jiných nástavců a nástrojů, než doporučuje nebo prodává
firma Morphy Richards, může způsobit požár, ránu elektrickým
proudem nebo zranění.
• POZOR: Nesprávné použití přístroje může způsobit zranění.
Bezpečnostní pravidla specifická pro výrobek
• DŮLEŽITÉ: Horké tekutiny nechejte nejprve vychladnout a teprve
poté je přidejte do mixéru. Vždy správně uzavřete víčko.
• Při nalévání horkých tekutin do mixéru buďte opatrní, mohly by se
dostat ven kvůli náhlému vzniku páry.
• Nepoužívejte přístroj, pokud jsou jeho plastová nádoba nebo
víčko poškozené nebo pokud mají viditelné praskliny.
Požadavky na elektrickou síť
Zkontrolujte, že napětí uvedené na výkonovém štítku
přístroje odpovídá dodávkám energie ve vašem domě, musí se
jednat o střídavý proud.
Pokud je třeba nahradit pojistku ve vaší zásuvce, musí být
použita pojistka 5 A BS1362.
POZOR: Zařízení musí být uzemněné.
Úvod
Děkujeme, že jste si zakoupili stolní mixér
Morphy Richards Total Control.
Nezapomeňte se registrovat na www.morphyrichards.co.uk a získat tak
a získat tak dvouletou záruku na výrobek
Obsah
Zdraví a bezpečnost 77
Úvod 78
Total Control 79
Základní informace 3
Před prvním použitím 80
Použití stolního mixéru – manuální ovládání 80
Použití stolního mixéru – přednastavené programy 80
Tipy 81
Péče a čištění 81
Provozní tabulka 81
Recepty 82
Kontaktujte nás 86
Záruka 86
Součásti
(1) Odměrka
(2) Víčko
(3) Otvor pro nalévání
(4) Zobáček nádoby
(5) Plastová nádoba
(6) Čepel
(7) Pohonná jednotka
(8) Otočné ovládání
(9) Funkce pulsování
(10) Navíjení kabelu
(11) Program pro omáčky a dipy
(12) Program pro smoothies
(13) Program pro drcení ledu
(14) Program pro omáčky a polévky
(15) Prostor pro ukládání zástrčky (vzadu)
(16) Tlačítko pro zapnutí/vypnutí
FP403040MEE Rev1.qxp_Morphy Richards Instruction Book 11/07/2016 17:39 Page 78
Page 79

79
g
p
f
d
i
q
}
∂
Provozní kapacita 1,5 l
Nerezové epele Serrator
Volba program
Vestav ný prostor pro ukládání kabelu
Tvořte s jistotou
Představujeme vám stolní mixér Total Control, který je všestrannou kombinací praktického designu a
chytře reagující technologie, navržený s cílem poskytnout uživatelům jistotu při přípravě pokrmů.
Díky chytré technologii citlivého reagování používá tento inteligentní mixér přesné množství energie
potřebné k rozličným úkolům při přípravě jídel.
Čtyři přednastavené programy jsou bezkonkurenčními pomocníky při výrobě dipů, smoothies,
polévek, omáček a drceného ledu a zbavují vás nutnosti řídit se pouze odhadem.
Díky pěti rychlostem a pulsovací funkci máte po celou dobu nad přípravou pokrmů naprostou
kontrolu.
Objem 1,5 litru navíc dovoluje uživatelům připravit dostatečné množství lahodných nápojů,
polévek a omáček.
Stolní mixér má prostor pro úhledné a snadné uložení kabelu.
Stolní mixér Total Control vám dává příležitost tvořit s jistotou.
FP403040MEE Rev1.qxp_Morphy Richards Instruction Book 11/07/2016 17:39 Page 79
Page 80

80
Před prvním použitím
• Vybalte stolní mixér – buďte opatrní, čepele jsou velmi ostré.
• Odstraňte všechny nálepky (kromě té se sériovým číslem na
spodní straně produktu).
• Opatrně umyjte nádobu, víčko a odměrku v teplé mýdlové vodě.
Opláchněte a osušte.
• Otřete pohonnou jednotku vlhkým hadříkem.
• POZOR: Nikdy nenořte pohonnou jednotku do vody ani jiné
tekutiny. Vždy dávejte pozor, aby se nenamočily elektrické
kontakty. Ty lze otřít čistým vlhkým hadříkem.
Použití stolního mixéru Total Control –
manuální ovládání
1
Nasaďte plastovou nádobu (5) na pohonnou jednotku (7).
2
Vložte potraviny nebo vychlazené tekutiny do plastové nádoby (5).
Nepoužívejte větší než doporučené množství (více na str. 11).
3
Nasaďte víčko (2) na plastovou nádobu (5) a pevně je zatlačte.
Umístěte odměrku (1) otáčením po směru hodinových ručiček,
dokud nezapadne. Abyste předešli vylití obsahu, ubezpečte se, že
otvor pro nalévání, který je ve víčku (2), je otočen od zobáčku
nádoby (4).
4
Zapojte stolní mixér Total Control do zásuvky a zapněte jej (16).
5
Mixér zapněte otočením kolečka otočného ovládání (8) do pozice
1. Zvyšujte rychlost podle potřeby.
6
Funkci pulsování (9) zapněte otočením kolečka otočného ovládání
(8) do pozice P. Nezapínejte tuto funkci na příliš dlouhou dobu.
7
Před servírováním vypněte mixér (16) a vytáhněte kabel ze
zásuvky.
8
Sejměte plastovou nádobu (5) z pohonné jednotky (7).
9
Pokud chcete obsah z nádoby přelít jinam, sejměte víčko (2) a lijte
obsah přes zobáček nádoby (4).
10
Množství vylévané tekutiny můžete zredukovat tak, že zvednete
víčko (2) a nasadíte jej zpět do požadované pozice.
11
Pro nalévání plným proudem otočte na velký filtr ve víčku (2).
12
Pokud chcete, aby se z nádoby nevylily případné větší kousky
obsahu, otočte na mřížkovaný filtr ve víčku (2).
Používání přednastavených programů
13
Nasaďte plastovou nádobu (5) na pohonnou jednotku (7).
14
Vložte potraviny nebo vychlazené tekutiny do plastové nádoby (5).
Nepoužívejte větší než doporučené množství (více na str. 11).
15
Nasaďte víčko (2) na plastovou nádobu (5) a pevně je zatlačte.
Umístěte odměrku (1) otáčením po směru hodinových ručiček,
dokud nezapadne.
16
Abyste předešli vylití obsahu, ubezpečte se, že otvor pro nalévání,
který je ve víčku (2), je otočen od zobáčku nádoby (4) – viz strana
7. Zapojte stolní mixér Total Control do zásuvky a zapněte jej (16).
17
Pro přípravu jemných dipů, omáček, tekutých těst a zmrzliny
stiskněte tlačítko pro program „Omáčky a dipy“ (11). Kolem
tlačítka se rozsvítí modré světlo, které zůstane rozsvícené, dokud
nebude program u konce. UPOZORNĚNÍ: Program se může na
několik vteřin zastavit. Nesundávejte plastovou nádobu (5) ani
víčko (2), dokud nezhasne modré světlo.
POZOR: V PRŮBĚHU PROGRAMU NESUNDÁVEJTE VÍČKO
ANI DO MIXÉRU NEPŘIDÁVEJTE INGREDIENCE.
18
Pro přípravu lahodných, zdravých smoothies stiskněte tlačítko pro
program „Smoothies“ (12). Kolem tlačítka se rozsvítí modré světlo,
které zůstane rozsvícené, dokud nebude program u konce.
UPOZORNĚNÍ: Program se může na několik vteřin zastavit.
Nesundávejte plastovou nádobu (5) ani víčko (2), dokud nezhasne
modré světlo.
19
Pro přípravu ledové tříště stiskněte tlačítko pro program „Drcení
ledu“ (13). Kolem tlačítka se rozsvítí modré světlo, které zůstane
rozsvícené, dokud nebude program u konce. UPOZORNĚNÍ:
Program se může na několik vteřin zastavit. Nesundávejte
plastovou nádobu (5) ani víčko (2), dokud nezhasne modré světlo.
20
Pro přípravu výživných polévek a omáček stiskněte tlačítko pro
program „Omáčky a polévky“ (14). Kolem tlačítka se rozsvítí
modré světlo, které zůstane rozsvícené, dokud nebude program u
konce. UPOZORNĚNÍ: Program se může na několik vteřin
zastavit. Nesundávejte plastovou nádobu (5) ani víčko (2), dokud
nezhasne modré světlo.
21
Před servírováním vypněte mixér (16) a vytáhněte kabel ze
zásuvky.
22
Sejměte plastovou nádobu (5) z pohonné jednotky (7).
23
Pokud chcete obsah z nádoby přelít jinam, sejměte víčko (2) a lijte
obsah přes zobáček nádoby (4).
24
Množství vylévané tekutiny můžete zredukovat tak, že zvednete
víčko (2) a nasadíte jej zpět do požadované pozice.
25
Pro nalévání plným proudem otočte na velký filtr ve víčku (2).
26
Pokud chcete, aby se z nádoby nevylily případné větší kousky
obsahu, otočte na mřížkovaný filtr ve víčku (2).
DŮLEŽITÉ
NENALÉVEJTE DO NÁDOBY VROUCÍ VODU ANI VELMI
HORKÉ TEKUTINY.
NECHEJTE JE NEJPRVE ZCHLADNOUT.
Odměrka
• Odměrku (1) můžete použít na odměření malého množství tekutin.
1 Nalijte tekutinu otvorem pro nalévání (3) ve víčku nádoby (2).
2 Nasaďte odměrku (1) zpět na víčko (2) a otočením ji zacvakněte.
Poté pokračujte v mixování.
Drcení ledu
• Postupujte podle návodu v sekci „Použití stolního mixéru Total
Control“. Místo potravin vložte do mixéru kostky ledu, které
chcete nadrtit.
• Stiskněte tlačítko pro program „Drcení ledu“ (13).
• Poznámka: Naráz je možné drtit maximálně 500 ml ledu.
FP403040MEE Rev1.qxp_Morphy Richards Instruction Book 11/07/2016 17:39 Page 80
Page 81

81
Tipy
Mixér používejte pro přípravu polévek, omáček, nápojů, paštik,
majonézy, dresinků atd.
• Nedávejte do mixéru pouze suché přísady, vždy přidejte i mokré
přísady nebo tekutiny.
• Při mixování nejprve nalijte do mixéru tekutiny a teprve poté
přidejte i pevné potraviny. Začněte mixovat na nízké rychlosti a
postupně ji zvyšujte podle potřeby. DŮLEŽITÉ: Dlouhou životnost
mixéru zajistíte tím, že jej budete při použití manuálního nastavení
rychlosti vždy zapínat nejdéle na 60 vteřin a poté jej necháte 5
minut vychladnout. Mixér vypněte ihned poté, co dosáhnete
požadované konzistence potraviny.
• Přístroj nepůjde zapnout, pokud bude plastová nádoba (5)
nesprávně nasazená.
• Nepoužívejte plastovou nádobu mixéru na skladování potravin.
Pokud ji zrovna nepoužíváte, nechejte ji prázdnou.
• Nikdy nemixujte více než 1 litr pěnivých tekutin, jako je například
mléčný koktejl.
• Pokud mixujete maximální množství 1,5 l potravin, používejte
maximálně 2. stupeň rychlosti.
• Při mixování polévky naplňte nádobu maximálně do výše 1 litru.
• Mixér nepřeplňujte. Přístroji by se mohl poškodit motor. Pokud
mixér přetížíte, vyhodí se pojistka kabelu. Vyměňte pojistku a
nepřekračujte maximální doporučené množství. Informace o
množství naleznete v „Provozní tabulce“ na str. 11.
Péče a čištění
• Před čištěním a údržbou přístroj vypněte a vytáhněte šňůru ze
zásuvky. Sundejte plastovou nádobu (5) z pohonné jednotky (7).
• Po použití naplňte plastovou nádobu (5) 1 litrem teplé vody a na
30 vteřin zapněte funkci pulsování. V případě potřeby opakujte.
Nikdy nepoužívejte pískové nebo krémové čisticí prostředky.
• Očistěte pohonnou jednotku (7) vlhkým hadříkem nebo papírovou
kuchyňskou utěrkou.
• Kabel přístroje lze omotat kolem spodní části výrobku a zástrčku
umístit do prostoru pro ukládání zástčky (15).
• Mixér Total Control pak znovu složte – umístěte plastovou nádobu
(5) opatrně na pohonnou jednotku tak (7), aby byla správně
nasazená.
• POZOR: Nikdy nenořte pohonnou jednotku do vody.
• POZOR: Pokud horní část pohonné jednotky polijete, vypněte
přístroj, odpojte jej od zdroje a otřete jednotku suchým hadříkem.
g
p
f
d
i
q
}
∂
Provozní tabulka
Objem Rychlost (manuální) Čas Postup
Přednastavený nebo manuální
Polévky* 1 l 1–4+ pulsy 15 vteřin až 1 minuta Začněte na nízké rychlosti
(maximální doba) a v případě potřeby ji zvyšte
Mléčné koktejly 1 l 1–5+ pulsů 15 vteřin až 1 minuta
Mixování /
Rozmělňování na
tekutinu (pyré, nápoje,
tekutá těsta) 1,5 l 1–2 pulsy 15 vteřin až 1 minuta Začněte na nízké rychlosti a v
případě potřeby ji zvyšte
Drcení ledu max. 500 ml pulsování 10–20 vteřin
• Nemixujte potraviny déle, než je doporučeno.
• Nepřekračujte maximální doporučený objem.
• * Nedávejte do plastové nádoby vroucí vodu ani velmi horké
tekutiny. Nechejte je nejprve zchladnout.
Délka přednastavených programů
Omáčky a dipy – 44 vteřin
Smoothies – 54 vteřin
Omáčky a polévky – 58 vteřin
Drcení ledu – 20 vteřin
FP403040MEE Rev1.qxp_Morphy Richards Instruction Book 11/07/2016 17:39 Page 81
Page 82

82
Recepty
Recepty s použitím programů mixéru
Jahodová omáčka (ke zmrzlině)
Doba přípravy: 5 minut (plus 5 minut chladnutí)
Program: Omáčky a dipy
Hotové množství: 200 ml
Počet porcí: 4
Doba vaření: 5 minut
Přísady:
• 150 g jahod bez stopek
• 65 g pískového cukru
• 65 ml vody
• ½ polévkové lžíce bezové šťávy
Postup:
1 Jahody omyjte a nakrájejte na půlky.
2 Cukr a vodu dejte do hrnce a za častého míchání zahřívejte na
mírném ohni, dokud se cukr nerozpustí.
3 Přiveďte k varu a přidejte připravené jahody. Vařte 3–3½ minuty,
dokud jahody nezměknou.
4 Nechejte v hrnci 5 minut vychladnout.
5 Přelijte jahodový sirup do nádoby mixéru, přidejte bezovou šťávu,
nasaďte na nádobu víčko a zmáčknete tlačítko programu. Nalijte
omáčku do džbánku a servírujte.
6 Podávejte omáčku teplou s palačinkami nebo ji vychlaďte a
přelijte jí vanilkovou zmrzlinu.
Zmrzlina z letního ovoce
Doba přípravy: 10 minut
Program: Omáčky a dipy
Doba mrazení: přes noc
Počet porcí: 8
Přísady:
• 250 g malin
• 125 g jahod bez stopek, nakrájených na půlky
• 75 g borůvek
• 225 g práškového cukru, prosetého
• 1 polévková lžíce citronové šťávy
• 300 ml vysokotučné smetany
Postup:
1 Dejte ovoce do nádoby mixéru, nasaďte víčko a stiskněte tlačítko
programu.
2 Přidejte citronovou šťávu a poté prosetý práškový cukr. Nasaďte
víčko a použijte funkci pulsování (4krát nebo přibližně na 20
vteřin), dokud vše není rovnoměrně rozmixované.
3 Smetanu vyšlehejte ruční nebo elektrickou metlou, dokud se
nezačnou tvořit špičky. Lehce vmíchejte ovocné pyré rovnoměrně
do smetany. Nalijte směs do nádoby vhodné k mražení a bez víka
mrazte tak dlouho, dokud se nezačnou tvořit krystalky u okrajů a
tříšť. (2–3 hodiny)
4 Vidličkou zamíchejte směs od okraje do středu a míchejte, dokud
nedosáhnete krémové konzistence.
5 Mrazte bez víka a bez míchání několik dalších hodin.
6 Pro účely skladování nádobu zakryjte víkem.
Čokoládový mléčný koktejl
Doba přípravy: 5 minut
Program: Smoothies
Výsledný objem: 1 litr
Počet porcí: 5 (1 porce = 200 ml)
Přísady:
• 750 ml polotučného mléka
• 250 g čokoládové zmrzliny
• 1½ zarovnané polévkové lžíce prášku na přípravu horké čokolády
Postup:
1 Mléko a zmrzlinu dejte do nádoby mixéru, přidejte prášek na
horkou čokoládu.
2 Nasaďte na nádobu víčko a stiskněte tlačítko programu.
3 Po rozmixování ihned servírujte.
Tipy: Pro obměnu použijte místo čokoládové zmrzliny vanilkovou, čímž
získáte lehčí chuť.
FP403040MEE Rev1.qxp_Morphy Richards Instruction Book 11/07/2016 17:39 Page 82
Page 83

83
Jahodovobanánové smoothie
Doba přípravy: Méně než 5 minut
Program: Smoothies
Výsledný objem: 1,1 litru
Počet porcí: 5
Přísady:
• 180 g jahod, omytých a bez stopek
• 2 zralé banány (asi 150 g), oloupané a nakrájené na kousky
• 450 g nízkotučného vanilkového jogurtu
• 300 ml polotučného mléka
• 3 kostky ledu (není nutné)
Postup:
1 Pokud při přípravě použijete i kostky ledu, vložte je do nádoby
mixéru jako první.
2 Přidejte ostatní ingredience v pořadí, ve kterém jsou uvedeny
výše, a nasaďte na nádobu víčko.
3 Stiskněte tlačítko pro program Smoothie.
4 Ihned servírujte.
Mangová tříšť
Doba přípravy: 5 minut
Program: Drcení ledu
Počet porcí: 2
Výsledný objem: 500 ml
Přísady:
• led
• 180 g – 200 g oloupaného, nakrájeného manga
• Šťáva z 1 pomeranče (60 ml)
Postup:
1 Vložte do nádoby mixéru led po rysku 500 ml, nasaďte víčko a
stiskněte tlačítko pro drcení ledu.
2 Když je led rozdrcený, přidejte mango a pomerančovou šťávu,
nasaďte víčko a dvakrát nebo třikrát použijte tlačítko funkce
pulsování, dokud nedosáhnete požadované konzistence.
3 Nalijte do dvou sklenic a ihned servírujte.
Celerová polévka
Doba přípravy: 5 minut
Program: Omáčky a polévky
Počet porcí: 4
Doba vaření: 30 minut
Výsledný objem: 1,6 litru
Přísady:
• 25 g másla
• 1 hlava celeru, nasekaná nahrubo (včetně listů)
• 1 cibule (asi 100 g), nakrájená
• 3 malé brambory (asi 150 g), oloupané a nakrájené
• 1 l horkého zeleninového vývaru
• sůl a mletý černý pepř
• čerstvá petržel na ozdobení
Postup:
1 Rozpusťte máslo ve větším hrnci na středním plameni. Máslo se
nesmí připálit.
2 Přidejte zeleninu a brambory a vařte 4–5 minut za občasného
míchání vařečkou.
3 Přidejte zeleninový vývar a koření. Přiveďte k varu.
4 Zakryjte hrnec pokličkou, uberte oheň a vařte asi 20 minut, nebo
dokud zelenina nezměkne.
5 Nechte mírně zchladnout. Poté nalijte asi polovinu polévky (po
rysku 1 l) do nádoby mixéru. Dejte na nádobu víčko a stiskněte
tlačítko pro program „Polévky“.
6 Nalijte zpět do hrnce a rozmixujte i zbytek polévky – použijte
stejný způsob. Pokud je to třeba, ohřejte polévku, zkontrolujte, zda
je správně dochucená a před servírováním ozdobte čerstvě
nasekanou petrželkou.
g
p
f
d
i
q
}
∂
FP403040MEE Rev1.qxp_Morphy Richards Instruction Book 11/07/2016 17:39 Page 83
Page 84

84
Zeleninová omáčka na těstoviny
Doba přípravy: 10 minut
Program: Omáčky a polévky
Počet porcí: 4–6
Doba vaření: 1 hodina 10 minut
Výsledný objem: 1,3 litru
Přísady:
• 2 polévkové lžíce olivového oleje
• 1 cibule (asi 130 g), nakrájená
• 2 celerové natě (80 g), jemně nasekané
• 2 mrkve (160 g), oloupané a nakrájené na kostky
• 1 stroužek česneku, nadrcený
• 1 pórek (120 g), nakrájený na kolečka
• 1 červená paprika, nakrájená na kostky
• 2 x 400 g krájených rajčat z plechovky
• ½ lžíce balzamikového octa
• 2 zarovnané polévkové lžíce oregana
• 1 zarovnaná polévková lžíce provensálského koření
• sůl a pepř
Postup:
1 Rozehřejte ve velkém hrnci olej a jemně osmažte cibuli, celer,
mrkev, česnek a pórek – jen asi 5 minut, aby nezačaly měnit
barvu. Přiklopte pokličkou a vařte 20 minut za občasného
míchání. Přidejte na kostky nakrájené papriky a na mírném ohni
pod pokličkou vařte dalších 10 minut.
2 Přidejte rajčata, ocet, bylinky, sůl a pepř a vařte na mírném ohni
40 minut, dokud mrkev a celer nezměknou. Nechte mírně
zchladnout.
3 Opatrně přelijte omáčku do nádoby mixéru. Měla by sahat mírně
nad 1 l. Nasaďte víčko.
4 Stiskněte tlačítko na program „Polévka“.
5 Zkontrolujte, zda je omáčka dochucená. V případě potřeby ji
přihřejte. Zamíchejte omáčku do špaget a podávejte se
strouhaným parmezánem a s česnekovou bagetou.
Recepty s použitím manuálního ovládání
Rajčatová salsa
Doba přípravy: 5 minut
Program: Manuální
Počet porcí: 4–8
Přísady:
• 150 g celých zralých cherry rajčátek
• 1 malá červená chilli paprička (10 g)
• 20 g lístků koriandru
• šťáva z 1 limetky (2 polévkové lžíce)
• zarovnané polévkové lžíce soli
• čerstvě mletý černý pepř
Postup:
1 Odstraňte z chilli papričky stopku a rozkrojte papričku na půl.
2 Dejte všechny přísady do mixéru v pořadí, v jakém jsou uvedeny
výše.
3 Použijte funkci pulsování po dobu 10–15 vteřin, poté seškrábněte
stěrkou salsu ze stěn nádoby dolů a ještě na několik vteřin
použijte funkci pulsování, dokud nedosáhnete požadované
konzistence.
4 Nalijte salsu do servírovací mísy a před podáváním nechejte asi 30
minut rozležet.
Matriciana – omáčka na těstoviny
Doba přípravy: 5 minut
Doba vaření: 40 minut
Program: Manuální
Počet porcí: 4
Výsledný objem: 600 ml
Přísady:
• 1 cibule (asi 130 g) nahrubo nasekaná
• 1 stroužek česneku, nadrcený
• ½ zelené čili papričky, zbavené semínek a nahrubo nasekané
• 1½ polévková lžíce extra panenského olivového oleje
• 100 g obyčejné slaniny bez kůže, nahrubo nakrájené
• 400 g oválných rajčat z plechovky
• 100 ml passaty
• 4 polévkové lžíce bílého vína
• čerstvě mletý černý pepř
• Těstoviny penne a strouhaný parmezán
Postup:
1 Do větší pánve dejte olej a nechte ho několik minut rozehřát.
Jemně za občasného míchání vařečkou osmahněte cibuli, česnek
a chilli papričku – jen asi 2 až 3 minuty, aby nezačaly měnit barvu.
2 Přidejte nakrájenou slaninu a smažte další minutu. Zakryjte
pánvičku pokličkou a vařte na středním ohni 5 minut.
3 Přidejte rajčata, passatu a víno, okořeňte pepřem.
FP403040MEE Rev1.qxp_Morphy Richards Instruction Book 11/07/2016 17:39 Page 84
Page 85

85
4 Přikryjte pokličkou a vařte na mírném ohni 25–30 minut, dokud
cibule nezměkne. Nechte mírně zchladnout.
5 Deset minut před koncem vaření omáčky uvařte těstoviny podle
návodu na obalu.
6 Přelijte omáčku do nádoby mixéru, nasaďte víčko a mixujte při
nízké rychlosti nebo pomocí funkce pulsování pouze několik
vteřin, dokud nedosáhnete požadované konzistence.
7 Slijte těstoviny a vmíchejte do nich omáčku. Pokud je to potřeba,
pokrm dejte ještě na chvíli ohřát a poté ihned servírujte s
parmezánem.
Smoothie z jablek a kiwi
Doba přípravy: 5 minut
Program: Manuální
Počet porcí: 4–5
Hotové množství: 1 litr
Přísady:
• 2 kiwi (200 g), se slupkou
• 1 zralý banán (80 g – hmotnost po oloupání), nakrájený na
30milimetrové kousky
• 120 g okurky, oloupané a nakrájené na 30milimetrové kousky
• 65 g lístků baby špenátu
• 400 ml vychlazeného jablečného džusu
Postup:
1 Rozkrojte kiwi napůl a v případě potřeby odstraňte tvrdé jádro.
Nakrájejte na hrubo.
2 Smíchejte kousky kiwi, banánu a okurky a nasypte vše do nádoby
mixéru. Přidejte špenát a jablečný džus.
3 Zavřete nádobu víčkem a postupně zvyšujte rychlost ze stupně 1
na 5. Po přibližně 20–30 vteřinách vraťte postupně knoflík až na
nulu, poté použijte funkci pulsování, dokud není směs jemná.
4 Po rozmixování ihned servírujte.
Ananasový sorbet
Doba přípravy: 10 minut plus chlazení a mrazení
Program: Manuální
Počet porcí: 4–6
Výsledný objem: 600 ml
Přísady:
• ½ velkého ananasu, oloupaného, s odstraněným středem,
nakrájeného (hmotnost po přípravě přibližně 385 g)
• 50 ml šťávy z limetky
• 140 g pískového cukru
• 130 ml vody
Postup:
1 Dejte všechny ingredience do nádoby mixéru. Mixujte na rychlosti
1–4, poté použijte pulsování, dokud nebude směs hladká.
(Celkový čas mixování asi 1 minuta).
2 Uložte směs asi na hodinu do chladničky. Poté ji promíchejte,
přendejte do mělké nádoby vhodné do mrazáku a zakryjte víčkem.
3 Uložte do mrazáku asi na 3 hodiny, dokud směs nebude tuhá po
okrajích, ale měkká uprostřed. Vyjměte směs z mrazáku, přendejte
ji do nádoby mixéru a mixujte 20–30 vteřin při nízké rychlosti.
4 Vraťte směs do mrazáku a zakrytou víčkem ji mrazte několik
dalších hodin, nebo i přes noc, dokud neztuhne.
Pórková polévka s bramborami
Doba přípravy: 5 minut
Doba vaření: 35 minut
Program: Manuální
Počet porcí: 4–6
Výsledný objem: 2 litry
Přísady:
• 25 g másla
• 2 středně velké pórky (320 g), omyté a nakrájené na plátky
• 1 malá cibule (asi 125 g), oloupaná a na jemno nakrájená
• 560 g oloupaných brambor, nakrájených na tenké plátky
• 1,2 l zeleninového vývaru
• 1 zarovnaná polévková lžíce provensálského koření
• 1 zarovnaná polévková lžíce soli
• černý pepř
Na ozdobu: pažitka
Postup:
1 Ve velkém hrnci rozpusťte máslo, přidejte pórek a cibuli.
2 Jemně za občasného míchání vařte 5–10 minut tak, aby zelenina
nezačala měnit barvu. Přidejte brambory, vývar, bylinky a koření,
přiveďte k varu, zakryjte pokličkou a na mírném ohni vařte 30
minut do měkka.
3 Nechejte mírně zchladit a poté opatrně přelijte polovinu polévky
do odměrky a polovinu do nádoby mixéru.
4 Při nízké rychlosti mixujte několik vteřin. V krátkých, rychlých
intervalech použijte funkci pulsování pro dosažení požadované
konzistence. Celkový čas mixování by měl být 20–30 vteřin.
5 Přelijte rozmixovanou polévku zpět do hrnce a opakujte výše
uvedené se zbytkem polévky. Zkontrolujte, zda je polévka správně
dochucená, přihřejte ji, ozdobte nasekanou pažitkou a servírujte s
křupavým chlebem.
g
p
f
d
i
q
}
∂
FP403040MEE Rev1.qxp_Morphy Richards Instruction Book 11/07/2016 17:39 Page 85
Page 86

86
Kontaktujte nás
Kontaktní linka
Pokud budete mít se zakoupeným přístrojem potíže, zavolejte
prosím na naši kontaktní linku, neboť vám nejspíše budeme
schopni pomoci lépe než obchod, ve kterém jste jej zakoupili.
Mějte prosím přichystaný název výrobku, číslo modelu a sériové
číslo. Pomůže nám to rychleji vyřídit váš dotaz.
Řekněte nám svůj názor
Pokud máte jakékoli dotazy nebo komentáře, chtěli byste skvělé
tipy nebo nápady na recepty, abyste mohli zakoupený výrobek
využít co nejlépe, zavítejte na naše stránky:
Blog: www.morphyrichards.co.uk/blog
Facebook: www.facebook.com/morphyrichardsuk
Twitter: @loveyourmorphy
Internetová stránka: www.morphyrichards.com
DVOULETÁ ZÁRUKA
Na tento spotřebič se vztahuje dvouletá záruka opravy nebo
výměny.
Musíte si uschovat stvrzenku od prodejce jako doklad o
nákupu. Stvrzenku připevněte sešívačkou na zadní obal pro
budoucí referenční účely.
Pokud se výrobek porouchá, poznamenejte si následující
informace. Tato čísla najdete na základně výrobku.
Č. modelu
Sériové číslo
Všechny výrobky Morphy Richards procházejí před opuštěním
továrny individuální kontrolou. V nepravděpodobném případě,
že se prokáže závada, se musí výrobek do 28 dnů od data
koupě vrátit do místa, kde byl zakoupen, aby se mohl vyměnit.
Pokud dojde k závadě po 28 dnech a do 24 měsíců od data
původní koupě, musíte kontaktovat místního prodejce a uvést
číslo modelu a sériové číslo výrobku nebo napsat místnímu
prodejci na uvedené adresy.
Budete požádáni, abyste vrátili výrobek (v náležitém,
bezpečném balení) společně s kopií dokladu o nákupu na níže
uvedenou adresu.
S výjimkou níže uvedených případů (1-9) bude vadný výrobek
obvykle během sedmi pracovních dnů od data přijetí opraven
nebo vyměněn a odeslán zpět.
Pokud bude výrobek z jakéhokoliv důvodu během dvouleté
záruční lhůty vyměněn, záruka na nový výrobek se bude počítat
od data původní koupě. Proto je velmi důležité, abyste
uschovali původní stvrzenku nebo fakturu s vyznačeným datem
původní koupě.
Platnost dvouleté záruky na spotřebič je podmíněna používáním
podle pokynů výrobce. Například spotřebiče se musí zbavovat
vodního kamene a filtry se musí udržovat v čistém stavu podle
pokynů.
Společnost Morphy Richards nebo místní prodejce nebudou
povinni opravit nebo vyměnit výrobek podle záručních
podmínek v následujících případech:
1 Závada byla způsobena nebo zaviněna nevhodným, chybným
nebo nedbalým používáním nebo používáním způsobem, který je
v rozporu s doporučeními výrobce, nebo proudovými nárazy v
síti či poškozením při přepravě.
2 Spotřebič byl napájen jiným napětím, než jaké je uvedeno na
výrobku.
3 Došlo k pokusu o opravu jinými osobami než naším servisním
personálem (nebo autorizovaným prodejcem).
4 Spotřebič se pronajímal nebo používal k jiným účelům než v
domácnosti.
5 Spotřebič je z druhé ruky.
6 Společnost Morphy Richards ani místní prodejce neodpovídají za
žádné opravy prováděné v záruční lhůtě.
7 Záruka se nevztahuje na spotřební zboží jako sáčky, filtry a
skleněné karafy.
8 Baterie a poškození způsobené jejich vytečením není zárukou
pokryto.
9 Filtry nebyly čištěny a měněny podle pokynů.
Tato záruka nepropůjčuje žádná jiná než výše uvedená práva a
nevztahuje se na žádné reklamace týkající se následných ztrát
nebo škod. Tato záruka je nabízena jako další výhoda a nemá
vliv na vaše zákonná práva spotřebitele.
∂
FP403040MEE Rev1.qxp_Morphy Richards Instruction Book 11/07/2016 17:39 Page 86
Page 87

87
g
p
f
d
i
q
}
∂
g Morphy Richards products are intended for household use only.
Morphy Richards has a policy of continuous improvement in product quality and design.
The Company, therefore, reserves the right to change the specification of its models at any
time.
The After Sales Division,
Morphy Richards Ltd, Mexborough, South Yorkshire, England, S64 8AJ
Helpline (office hours) UK 0845 871 0960 Republic of Ireland 1800 409119
o Glen Dimplex Australia
Unit 1, 21 Lionel Road, Mount Waverley, Victoria 3149
T : 1300 556 816
E : sales@glendimplex.com.au
www.morphyrichards.com.au
Glen Dimplex New Zealand
38 Harris Road, East Tamaki, Auckland, New Zealand
T : 09 2748265
E : sales@glendimplex.co.nz
f Les produits Morphy Richards sont conçus pour unusage exclusivement domestique.
Morphy Richards s’engage à mener une politique d’amélioration continue en termes de qualité
et de conception. Le fabricant se réserve donc le droit de modifier sans préavis la spécification
de ses modèles.
Glen Dimplex France
12 Boulevard du Mont d'Est
Immeuble MAILLE NORD 3
93160 NOISY-LE-GRAND
France
www.glendimplex.fr
T : (
0)148155363
d Morphy Richards Produkte sind nur für den Einsatz im Haushalt vorgesehen. Ständige
Verbesserungen an der Produktqualität und dem Design gehören zur Philosophie von Morphy
Richards. Aus diesem Grunde behält sich die Firma das Recht vor, die Angaben zu ihren Modellen
jederzeit zu ändern.
T : 00800 444 00 888 F : 06071 37048
E : morphyrichards-de@teknihall.com
p Os produtos Morphy Richards foram concebidos apenas para utilizaçãodoméstica.
A Morphy Richards respeita uma política de aperfeiçoamento contínuo daqualidade e design
do produto. Desta forma, a companhia reserva-se o direitode alterar as especificações destes
modelos a qualquer momento.
Imporaudio Lda
Rua D. Marcos Da Cruz 1281
4455-482 Perafita
Portugal
T : +351 22 996 67 40 F : +351 22 996 67 41
i I prodotti Morphy Richards sono concepiti esclusivamente per uso domestico.
Morphy Richards è costantemente impegnata a migliorare la qualità e il design dei propri
prodotti, pertanto si riserva il diritto di modificare le specifiche dei diversi modelli in qualunque
momento.
PER ASSISTENZA TECNICA:
HELPLINE 199.193.328 LUN-VEN 9,30-13,00 e 14,30-17,30.
Costo della chiamata 14,26 cent. di Euro al minuto IVA inclusa (da rete fissa).
E : assistenza@necchi.it F : +39-0693496270
I prodotti Morphy Richards sono distribuiti in Italia da:
Necchi Spa, Via Cancelliera 60 00040 Ariccia (RM).
q Morphy Richards produkter er kun beregnet til husholdningsbrug. Det er praksis hos
Morphy Richards at fortsætte udviklingen af produktets kvalitet og design. Firmaet forbeholder
sig derfor retten til at ændre modellernes specifikationer når som helst.
Albaline AS
Avedoreholmen 84
2650 Hvidovre
Denmark
T : (45) 3678 8083
} Produkty Morphy Richards są przeznaczone wyłącznie do użytku domowego. Morphy
Richards prowadzi politykę ciągłej poprawy jakości i wzoru produktów. Firma zastrzega sobie
prawo zmiany specyfikacji modeli w dowolnej chwili.
KuGaNa Logistics Sp. z o.o.
UL. Kleczewska 37
62-510 Konin
Poland
T : +48 63 220 60 20
∂ Výrobky Morphy Richards jsou určeny pouze k použití v domácnostech.
Morphy Richards usiluje o neustálé zdokonalování kvality a provedení.
Proto si vyhrazuje právo kdykoliv změnit specifikace svých modelů.
Solight s.r.o
Na Brne
500 06 Hradec Karlove
Czech Republic
T: +420 491512 047
g For electrical products sold within the European Community.
At the end of the electrical products useful life it should not be disposed of with
household waste.
Please recycle where facilities exist.
Check with your Local Authority or retailer for recycling advice in your country.
f Pour les appareils électriques vendus dans la Communauté européenne.
Lorsque les appareils électriques arrivent à la fin de leur vie utile, il ne faut pas les jeter
à la poubelle.
Il faut les recycler dans des centres spécialisés, s’ils existent.
Consultez la municipalité ou le magasin où vous avez acheté l’appareil pour obtenir des
conseils sur le recyclage dans votre pays.
d Für elektrische Artikel, die in der europäischen Gemeinschaft verkauft werden.
Am Ende der Nutzungsdauer sollte das Gerät nicht im regulären Hausmüll entsorgt
werden.
Bitte einer Recycling-Sammelstelle zuführen.
Informationen über geeignete Recycling-Annahmestellen erhalten Sie bei Ihrer Stadt-
bzw. Ortsverwaltung.
p Para produtos eléctricos vendidos na Comunidade Europeia.
Quando os produtos eléctricos atingirem o final da sua vida útil, não devem ser
eliminados juntamente com o lixo doméstico.
Faça a reciclagem nos locais apropriados.
Contacte as autoridades locais ou o revendedor para saber como efectuar a
reciclagem no seu país.
i Per gli elettrodomestici venduti all’interno della Comunità europea.
Al termine della vita utile, non smaltire l’elettrodomestico nei rifiuti domestici.
Riciclarlo laddove esistano le strutture.
Verificare con la Locale Autorità o con il dettagliante in merito alle possibilità di
riciclaggio nel proprio paese.
q Angående elektriske produkter, der sælges inden for EU.
Når det elektriske produkt har nået enden af sin levetid, må det ikke bortkastes
sammen med husholdningsaffaldet.
Det bedes genbrugt, hvor der er faciliteter hertil.
Bed de lokale myndigheder eller forhandleren om råd om genbrug i dit land.
} Dla produktów elektrycznych sprzedawanych na terenie Wspólnoty Europejskiej.
Po zakończeniu okresu uźywalności produktów elektrycznych, nie naleźy ich wyrzucać
wraz z odpadkami pochodzącymi z gospodarstwa domowego.
Jeźeli istnieją odpowiednie zakłady zajmujące się utylizacją, produkty naleźy poddać
recyklingowi.
W celu uzyskania porady na temat recyklingu w Twoim kraju zwróć się do miejscowych
władz lub lokalnego sprzedawcy.
∂ Pro elektrické výrobky prodávané v Evropském společenství.
Elektrické výrobky se po skončení životnosti nesmí vyhazovat do domovního odpadu.
Nechte je recyklovat v příslušných zařízeních.
Informace o recyklaci ve vaší zemi si zjistěte od místních úřadů nebo prodejce.
NZ
FP403040MEE Rev1.qxp_Morphy Richards Instruction Book 11/07/2016 17:39 Page 87
Page 88

FP403040MEE Rev 1 07/16
FP403040MEE Rev1.qxp_Morphy Richards Instruction Book 11/07/2016 17:39 Page 88
 Loading...