

Page 1

Hand Blender Pro Set
Please read and keep these instructions
o
Page 2

o
Health And Safety
The use of any electrical appliance requires the following common sense safety rules.
Please read these instructions carefully before using the product.
• This appliance can be used by persons with reduced physical,
sensory or mental capabilites, or lack of experience and
knowledge, if they have been given supervision or instruction
concerning the use of the appliance in a safe way and
understand the hazards involved.
• Children shall not play with the appliance.
• This appliance shall not be used by children.
• Keep the appliance and cord out of reach of children.
• Do not blend for longer than the time periods recommended in
the ‘Usage’ section.
• Always disconnect from the supply if left unattended and
before assembling, dissembling or cleaning.
• For care and cleaning refer to the relevant section.
• Avoid touching moving parts. Keep hands, hair and clothing,
and utensils away from the attachment blades during
operation, to prevent personal injury and/or damage to the
appliance.
• If the supply cord is damaged, it must be replaced by the
manufacturer, its service agent or similarly qualified persons in
order to avoid a hazard.
In addition, we offer the following safety advice.
Location
• Do not use outdoors or in a bathroom.
• Always locate your appliance away from the edge of the worktop.
• Do not place the beaker used with the appliance on a highly
polished wooden surface as damage may occur to the surface.
2
Mains cable
• Do not let the mains cable hang over the edge of the worktop
where a child could reach it.
• Do not let the lead run across an open space e.g.
between a low socket and a table.
• Do not let the cable run across a cooker or other hot area which
might damage the cable.
• The mains cable should reach from the socket to the base unit
without straining the connections.
Page 3
9
13
14
11
10
7
1
2
3
1
8
19
20
1
4
5
8
6
3
2
16
15
1
7
12
3
21
FP402052MAUS Rev1.qxp_Morphy Richards Instruction Book 10/08/2015 18:05 Page 3
o
Personal safety
Electrical requirements
• Care shall be taken when handling the sharp cutting blades,
Check that the voltage on the rating plate of your
emptying the beaker and during cleaning.
appliance corresponds with your house electricity supply which
must be A.C. (Alternating Current).
Other safety considerations
Should the fuse in the mains plug require changing, a 3 amp
• Do not use the appliance for anything other than its intended
BS1362 fuse must be fitted.
purpose.
Product specific safety
• WARNING: The blender blades are very sharp. Handle with
care when using and cleaning.
• Do not clean the attachments under running water while they are
in position.
• IMPORTANT: Allow hot liquids to cool before adding to the
blender.
• Be careful whilst hot liquid is blending or poured into the blender
as it can be ejected due to sudden steaming.
• Switch off the appliance and disconnect from supply
before changing accessories or approaching parts that move in
use.
3
4
5 6
87
109
4
Page 4

11
S
20
19
12
1413
o
15
16
1817
5
Page 5

Giving you the power to create with confidence.
Introducing the Total Control Hand Blender – the simple way to
bring confidence to your cooking.
The Total Control Hand Blender allows you to create delicious
smoothies and shakes, blend soups and sauces with the
confidence and reassurance that Smart Response Technology
delivers.
Smart Response Technology allows you to have Total Control of
the blending process with the simple squeeze of a button. The
Smart Response Technology gently feeds power into the
blender as you need it, so there are no sudden jerks or
splatters, giving you complete confidence in the kitchen.
Choose the speed that best suits the job at hand using the
simple twist motion Variable Speed Control, there are 8 to
choose from. Even when using a higher speed you can feel
assured that the Smart Response Technology feeds power in
gradually building to your chosen speed for the job at hand.
When you have blended to your desired consistency simply
release the button and the Total Control Hand Blender will
steadily slow down and stop, ensuring no splashing and no
suction.
Total Control Hand Blender, giving you the power to create with
confidence.
⁄
Variable Speed Control
¤
Precision Control Trigger
‹
Ergonomic Soft Grip Handle
›
650 Watt Motor
⁄
¤
‹
›
o
7
Page 6

Introduction
Thank you for your recent purchase of this Morphy Richards
Total Control Hand Blender.
Your Hand Blender has a locking connection for safety. Please
read the instructions for information on how to use your Hand
Blender thoroughly before use.
Remember to visit www.morphyrichards.co.uk to register your
product’s two year guarantee.
Contents
Health And Safety 2
Product Overview 3
Total Control 7
Introduction 8
Before First Use 8
Using Your Hand Blender 8
Using Your Chopping Bowl 9
Using Your Potato Masher 9
Using Your Balloon Whisk 9
Suitable Foods 9
Usage 9
Attachments 9
Turbo Button 9
Blending In A Saucepan 9
Hints & Tips 10
Care And Cleaning 10
Contact Us 10
Recipes 11
Guarantee 14
Features
(1) Variable Speed Control
(2) Precise Control Trigger
(3) Turbo Button
(4) Main Unit
(5) Blending Leg
(6) Serrator Blade
(7) Beaker Lid
(8) Beaker
(9) Chopping Bowl Blending Lid
(10) Chopping Bowl
(11) Chopping Serrator Blade
(12) Chopping Bowl Lid
(13) Potato Masher Gearbox
(14) Potato Masher
(15) Paddle
(16) Whisk Gearbox
(17) Balloon Whisk
(18) Attachment Release Button
(19) Heel Rest
(20) Safety Seal
Before First Use
• WARNING: Carefully unpack your Hand Blender Pro Set as
the blades are very sharp.
• Wash all parts except the Main Unit (4), Blending Leg (5),
Chopping Bowl Blending Lid (9) and Gearboxes (13), (16) with hot
soapy water before use. Dry all parts thoroughly before use.
• Do not fully submerge the Blending Leg in water. Wash only the
Serrator Blade head (6).
• Wash the Chopping Bowl Blending Lid with hot soapy water and
rinse. Do not immerse in water.
• Do not immerse the Main Unit or Chopping Bowl Lid in water.
• Wipe the Chopping Bowl Blending Lid with a hot damp cloth to
clean. Do not immerse in water.
• Wipe the Gearboxes with a hot damp cloth. Do not immerse in water.
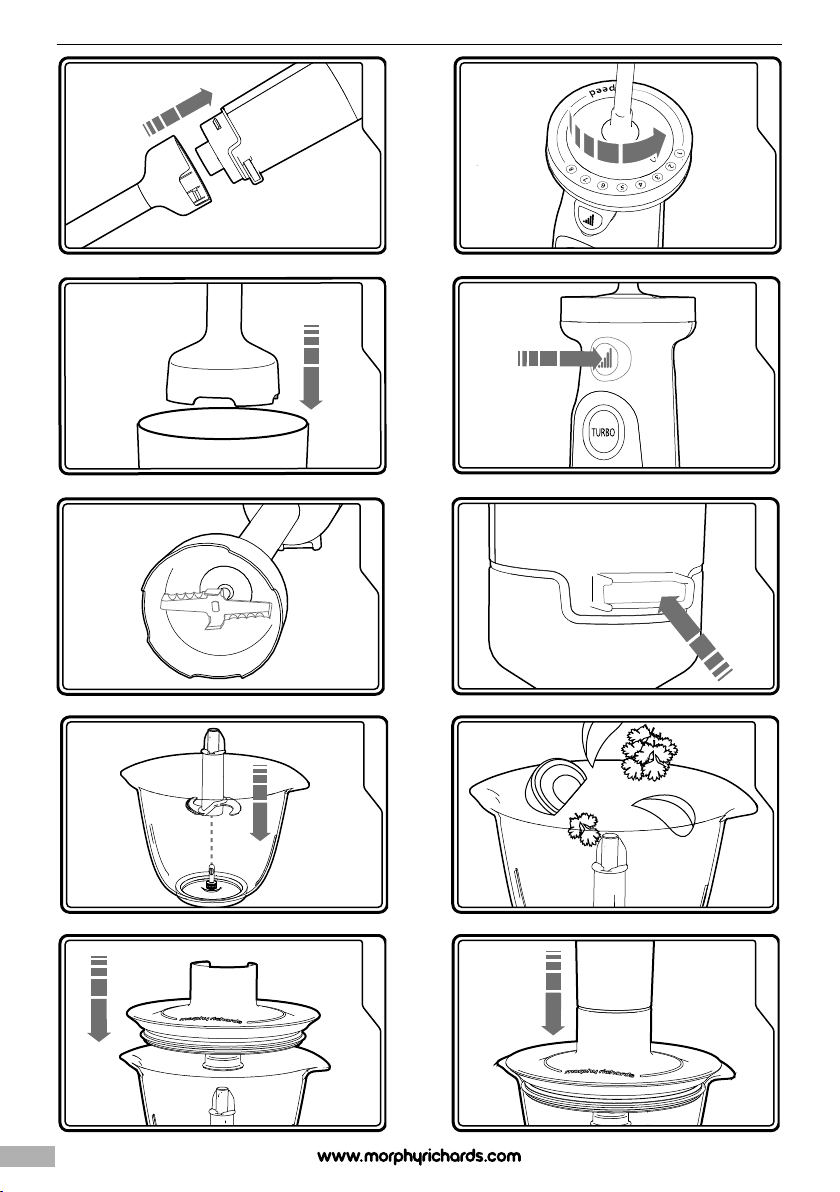
Using Your Hand Blender
1
Attach the Blending Leg (5) to the Main Unit (4) and push to lock
into place.
2
Select the speed on the Variable Speed Control (1). The Hand
Blender will not start unless the Precise Control Trigger (2) or Turbo
Button (3) is pressed.
3
Place the Blending Leg into the food to be blended. We
recommend using the Beaker (8) for the best results.
4
Press the Precise Control Trigger to begin blending. The speed will
increase the harder you
5
Release the Precise Control Trigger to stop. Allow the blades to
slow and stop BEFORE removing the Hand Blender from the
food.press the button.
6
Unplug the Main Unit from the mains. Press the Attachment
Release Button (18) and remove the Blending Leg from the Main
Unit for cleaning.
Using Your Chopping bowl
7
CAREFULLY insert the Chopping Serrator Blade (11) into the
Chopping Bowl (10). WARNING: Blades are sharp.
8
Place the food you wish to chop into the Chopping Bowl. Do not
fill more than half full.
9
Ensure the Safety Seal (20) is in place and push the Chopping
Bowl Blending Lid (9) onto Chopping Bowl. Push to secure into
place.
10
Attach the Main Unit (4) onto the Lid. The Main Unit will not lock
onto the Chopping Bowl Blending Lid for safety reasons.
11
Select a high speed on the Variable Speed Control (1) and press
and hold the Precise Control Trigger (2) to start. Do not open the
Lid while in use.
12
Allow the Hand Blender to completely stop before detaching the
Main Unit from the Chopping Bowl Blending Lid. Lift away to
remove.
13
Remove the Chopping Bowl Blending Lid from the Chopping
Bowl.
14
CAREFULLY remove the Chopping Serrator Blade before
emptying the food from the bowl.
8
Page 7

Using Your Potato Masher
15
Prepare your potatoes as normal, drain, place in a saucepan or
flat bottomed bowl (see page 10). Add any milk or butter as
required.
16
Attach your Potato Masher Gearbox (13) and Potato Masher (14)
onto the Main Unit.
17
Select speed 3 on the Variable Speed Control (1).
18
Press the Precise Control Trigger (2) to begin mashing. The speed
will vary - the harder you press the trigger - the more the speed
will increase.
19
Plunge the head of the Potato Masher (14) into the potatoes. Lift
and repeat at a different place in the pan/bowl. Continue until all
the potatoes are mashed to your liking.
20
Release the Precise Control Trigger to stop and remove the Potato
Masher from your food. Unplug your Hand Blender from the
mains. Press the Attachment Release Button (18) and remove the
Masher. The Paddle (15) can be removed for ease of cleaning (see
page 11).
Using Your Balloon Whisk
21
Push the Balloon Whisk (17) into the Whisk Gearbox (16), then
attach the Whisk Gearbox onto the Main Unit (4).
22
Select a high speed on the Variable Speed Control (1). Place the
Balloon Whisk (17) into the ingredients.
23
Press the Precise Control Trigger (2) to begin whisking. The speed
will vary - the harder you press the trigger - the speed will
increase. Release the Precise Control Trigger to stop BEFORE
removing the Balloon Whisk from the food.
24
Unplug your Hand Blender from the mains. Press the Attachment
Release Button (18) and remove the Balloon Whisk for cleaning.
Pull the Balloon Whisk body from the Whisk Gearbox for cleaning.
Suitable Foods
The amounts listed below should be used as a guide.
The Chopping Bowl (10) should not be filled more than half full.
Attachment Food Max Quantity Speed Time
Blending Leg Soup or Sauce - 4 40-60 seconds
Blending Leg* Milkshake 450ml 4-5 20-30 seconds
Blending Leg* Ice 3 cubes 8 5-15 seconds
Blending Leg* Carrots 200g/300ml 6 40-60 seconds
with water
Balloon Whisk Whipping Cream 7 90 seconds
Balloon Whisk Egg Whites 7 60-90 seconds
see recipes
Potato Masher Boiled Potatoes 3 20-30 seconds
Chopping Bowl Onion 7 5-10 seconds
Chopping Bowl Carrot 7 5-15 seconds
Chopping Bowl Herbs 7 5-15 seconds
Chopping Bowl Stewing Beef 8 25-30 seconds
Chopping Bowl Nuts 8 15-20 seconds
Usage
WARNING: Your Total Control Hand Blender Pro Set is
designed for intermittent use. Do not use the attachments
(except the Whisk) continuously for more than 60 seconds.
Do not use the Whisk for more than 90 seconds.
Attachments
Blending Leg (5)
• The Blending Leg is designed for pureeing foods such as soups,
sauces, milkshakes, smoothies, baby food or crushing ice.
• The Blending Leg is not suitable for grinding hard items such as
coffee beans.
Chopping Bowl (10)
• The Chopping Bowl is suitable for chopping nuts, vegetables,
meat, herbs, boiled eggs and dried bread. The chopping bowl
should be used on higher speeds for optimal performance.
Potato Masher (14)
• The Potato Masher is only suitable for mashing potatoes or
similar. You can add milk, butter, oil or seasoning to the potatoes
prior to mashing to combine with the potatoes.
The Potato Masher is not suitable for raw potatoes or any other
vegetables or foods.
Do not use in a hot pan direct from the stove top. Transfer the
potatoes into a cooler pan or flat bottom bowl if required.
Balloon Whisk (17)
• The Balloon Whisk is ideal for whipping cream or eggs.
• It is not suitable for stiffer mixtures such as bread dough or cake
mixtures.
Lids (7), (12)
• If you have any leftovers, use the Bowl and Beaker with the
supplied Lids to store food safely.
• WARNING: No attachments are suitable for use in a freezer,
microwave, oven or dishwasher.
Turbo Button
• Your Hand Blender has 8 different speeds utilising Total Control
technology, as well as a Turbo Button (3). Press the Turbo Button
to run the Hand Blender at high speed for intermittent bursts.
• Note: The Chopping Bowl (10) attachment works best with the
Variable Speed Control (1) set to a high speed setting or when
using the Turbo Button (3).
Blending In A Saucepan
• Do not use a non stick pan. The Blending Leg may damage
the non stick coating.
1. Remove the saucepan from the heat.
2. To avoid excessive splashing, place the Blending Leg (5) into the
food before switching your Hand Blender on.
3. Hold the pan steady with your other hand and lightly press the
Precise Control Trigger (2). Start slowly, and increase the speed as
needed using the Precise Control Trigger.
o
9
 Loading...