

Page 1

Food Processor
Please read and keep these instructions
o
Page 2

3
In addition, we offer the following safety advice.
Location
• Do not use outdoors or in a bathroom.
• Always locate your appliance away from the edge of the worktop.
Mains cable
• Do not let the mains cable hang over the edge of the worktop
where a child could reach it.
• Do not let the lead run across an open space e.g. between a low
socket and a table.
• Do not let the cable run across a cooker or other hot area which
might damage the cable.
• The mains cable should reach from the socket to the base unit
without straining the connections.
• The power cord cannot be replaced. Contact Morphy Richards for
advice.
Other safety considerations
• Do not use the appliance for anything other than its intended
purpose.
• The use of attachments or tools not recommended or sold by
Morphy Richards may cause fire, electric shock or injury.
Product specific safety
• Do not operate any appliance with a damaged cord or plug or
after the appliance malfunctions or has been damaged in any
manner.
Electrical requirements
Check that the voltage on the rating plate of your appliance
corresponds with your house electricity supply which must be
A.C. (Alternating Current).
Should the fuse in the mains plug require changing, a 3 amp
BS1362 fuse must be fitted.
o
o
Health and Safety
•
• Do not use continuously for longer than times stated in the
• This appliance can be used by persons with reduced physical,
• Children shall not play with the appliance.
• This appliance shall not be used by children.
• Keep appliance and cord out of the reach of children.
• Avoid touching moving parts. Keep hands, hair and clothing,
The use of any electrical appliance requires the following common sense safety rules.
Please read these instructions carefully before using the product.
WARNING: Misuse of appliance could cause personal injury.
‘Usage’ section. After using for this length of time, allow to cool
for 60 minutes.
sensory or mental capabilities, or lack of experience and
knowledge, if they have been given supervision or instruction
concerning the use of the appliance in a safe way and
understand the hazards involved.
and utensils away
operation, to prevent personal injury and/or damage to the
appliance.
from the Prepstar attachments during
• Switch off the appliance and disconnect from the supply
before changing accessories or approaching parts that move
in use.
• If the supply cord is damaged, it must be replaced by the
manufacturer, its service agent or similarly qualified persons in
order to avoid a hazard.
• Unplug from the outlet when not in use, or when left
unattended, and before assembling, disassembling or cleaning.
• For care and cleaning refer to the ‘Quick Cleaning’ section.
2
Page 3

In addition, we offer the following safety advice.
Location
• Do not use outdoors or in a bathroom.
• Always locate your appliance away from the edge of the worktop.
Mains cable
• Do not let the mains cable hang over the edge of the worktop
where a child could reach it.
• Do not let the lead run across an open space e.g. between a low
socket and a table.
• Do not let the cable run across a cooker or other hot area which
might damage the cable.
• The mains cable should reach from the socket to the base unit
without straining the connections.
• The power cord cannot be replaced. Contact Morphy Richards for
advice.
Other safety considerations
• Do not use the appliance for anything other than its intended
purpose.
• The use of attachments or tools not recommended or sold by
Morphy Richards may cause fire, electric shock or injury.
Product specific safety
• Do not operate any appliance with a damaged cord or plug or
after the appliance malfunctions or has been damaged in any
manner.
Electrical requirements
Check that the voltage on the rating plate of your appliance
corresponds with your house electricity supply which must be
A.C. (Alternating Current).
Should the fuse in the mains plug require changing, a 3 amp
BS1362 fuse must be fitted.
o
3
Page 4
1
5
13
14
16
17
18
9
22
21
10
Whisk stores on the
underside of the
Storage Bowl
15
20
19
Whisk stores on the underside
of the Storage Bowl.
o
2
3
4
5
7
16 17 18
6
151413
19 21 2220
8
9
10
11
12
4
Page 5
13
14
16
17
18
15
20
19
Whisk stores on the underside
of the Storage Bowl.
9
22
10
21
Whisk stores on the
underside of the
Storage Bowl
o
5
Page 6

7
43
5 6
7 8
o
6
Page 7

5 6
7 8
43
o
7
Page 8
9
Introduction
Thank you for purchasing your new Morphy Richards Prepstar
Food Processor.
Prepstar will help you take care of all your daily food
preparation tasks, slicing, shredding, chopping, beating,
whisking and grating food in seconds, making meal preparation
quick and easy.
Prepstar will not only save you time in the kitchen, but save
space in your kitchen cupboards due to its space-saving
design.
The unique design allows all the accessories to be stored inside
the appliance for compact, easy storage.
Please read the instructions thoroughly before use.
Remember to visit morphyrichards.co.uk to register your
products two-year guarantee.
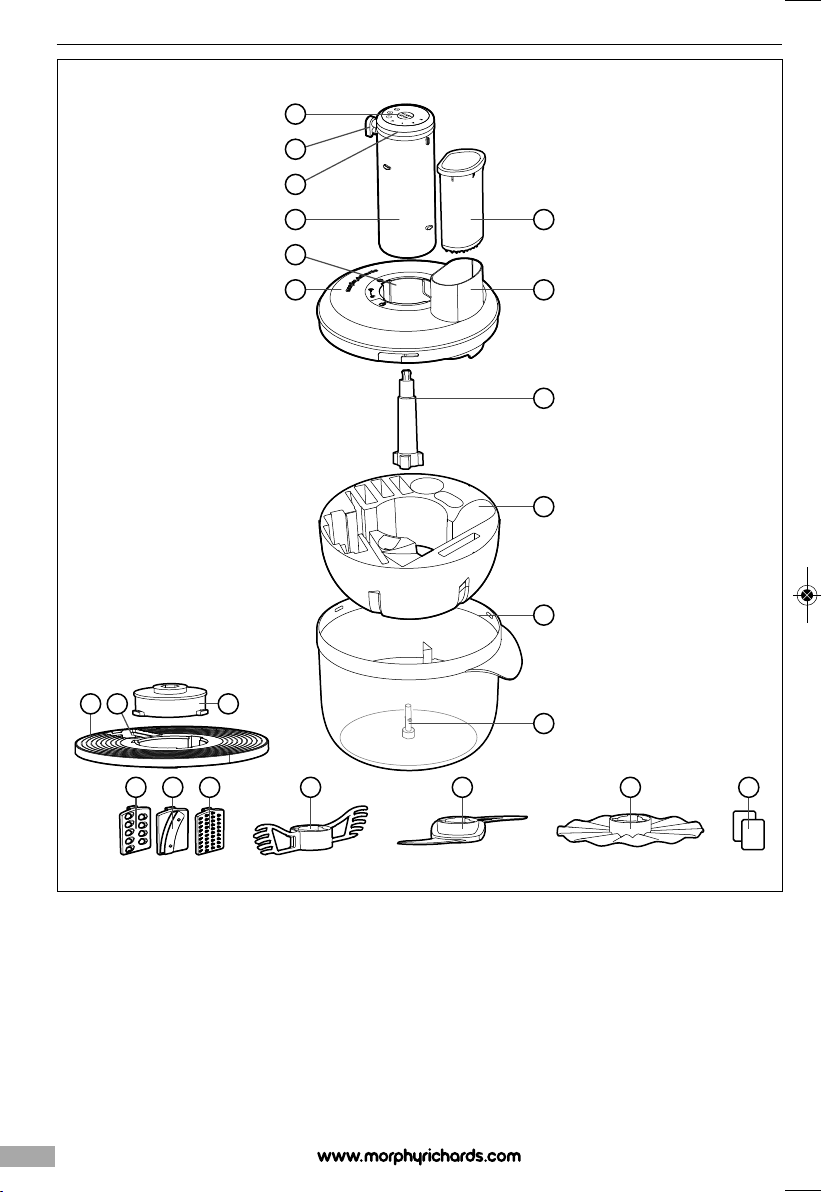
Features
(1) Start/Stop Button
(2) Cord Clip
(3) Speed Dial
(4) Motor Unit
(5) Motor Unit Locator
(6) Bowl Lid
(7) Food Pusher
(8) Food Chute
(9) Drive Shaft
(10) Storage Bowl
(11) Mixing Bowl
(12) Mixing Bowl Spindle
(13) Grater Disc
(14) Grater / Slicing Blade Holder
(15) Grater Disc Adaptor
(16) Grater Blade
(17) Slicing Blade
(18) Fine Grater Blade
(19) Beater
(20) Chopping Blade
(21) Whisk
(22) Instruction Cards
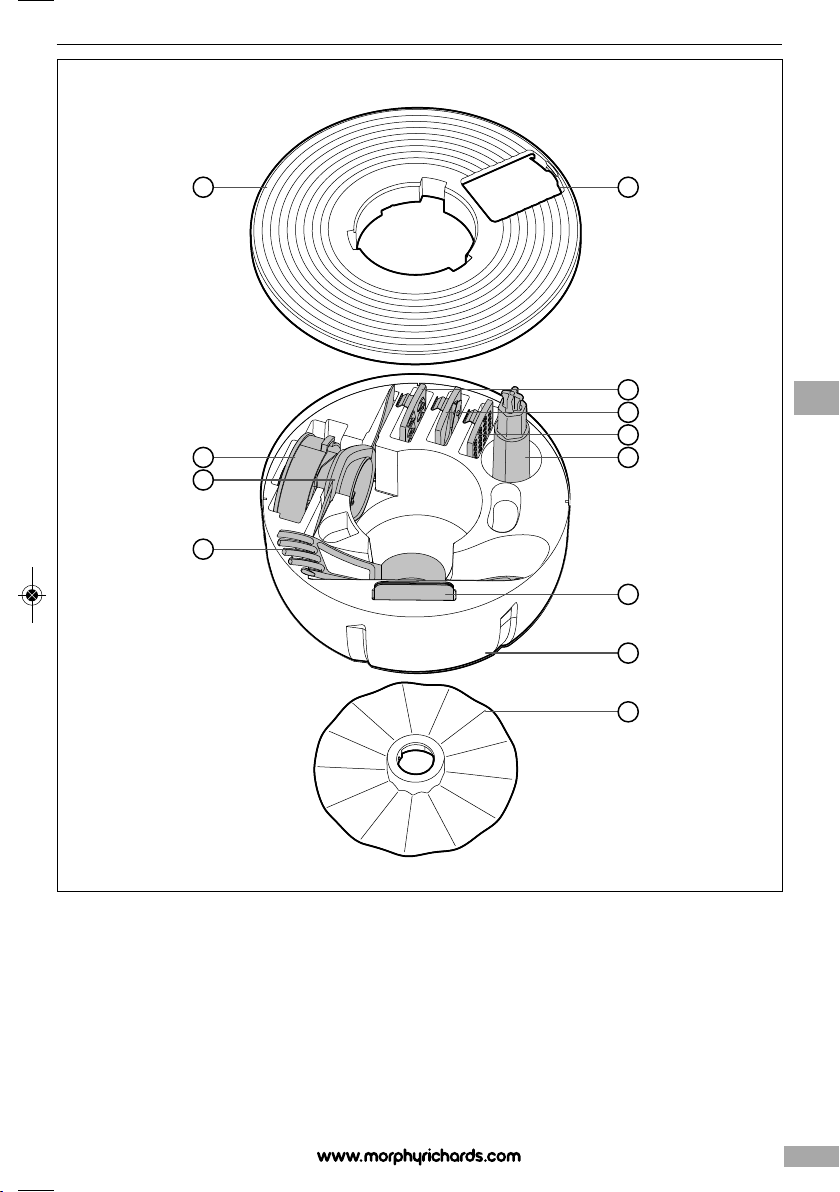
Accessories
(9) Drive Shaft
(10) Storage Bowl
(13) Grater Disc
(14) Grater / Slicing Blade Holder
(15) Grater Disc Adaptor
(16) Grater Blade
(17) Slicing Blade
(18) Fine Grater Blade
(19) Beater
(20) Chopping Blade
(21) Whisk
(22) Instruction Cards
Compact For Storage
1
With the Power Cable facing away from the Food Chute (8), align
the lower grooves on the Motor Unit (4) with the matching indents
on the Motor Unit Locator (5) and gently lower into the Mixing
Bowl (11). Twist clockwise once in place to lock.
In Use
2
With the Power Cable facing away from the Food Chute (8) as
shown above, align the lower grooves on the Motor Unit (4) with
the matching indents on the Motor Unit Locator (5) and gently
lower into the Mixing Bowl (11). Twist clockwise once in place to
lock.
o
11
13
9
10
12
14
8
Page 9

Introduction
Thank you for purchasing your new Morphy Richards Prepstar
Food Processor.
Prepstar will help you take care of all your daily food
preparation tasks, slicing, shredding, chopping, beating,
whisking and grating food in seconds, making meal preparation
quick and easy.
Prepstar will not only save you time in the kitchen, but save
space in your kitchen cupboards due to its space-saving
design.
The unique design allows all the accessories to be stored inside
the appliance for compact, easy storage.
Please read the instructions thoroughly before use.
Remember to visit morphyrichards.co.uk to register your
products two-year guarantee.
Features
(1) Start/Stop Button
(2) Cord Clip
(3) Speed Dial
(4) Motor Unit
(5) Motor Unit Locator
(6) Bowl Lid
(7) Food Pusher
(8) Food Chute
(9) Drive Shaft
(10) Storage Bowl
(11) Mixing Bowl
(12) Mixing Bowl Spindle
(13) Grater Disc
(14) Grater / Slicing Blade Holder
(15) Grater Disc Adaptor
(16) Grater Blade
(17) Slicing Blade
(18) Fine Grater Blade
(19) Beater
(20) Chopping Blade
(21) Whisk
(22) Instruction Cards
Accessories
(9) Drive Shaft
(10) Storage Bowl
(13) Grater Disc
(14) Grater / Slicing Blade Holder
(15) Grater Disc Adaptor
(16) Grater Blade
(17) Slicing Blade
(18) Fine Grater Blade
(19) Beater
(20) Chopping Blade
(21) Whisk
(22) Instruction Cards
Compact For Storage
1
With the Power Cable facing away from the Food Chute (8), align
the lower grooves on the Motor Unit (4) with the matching indents
on the Motor Unit Locator (5) and gently lower into the Mixing
Bowl (11). Twist clockwise once in place to lock.
In Use
2
With the Power Cable facing away from the Food Chute (8) as
shown above, align the lower grooves on the Motor Unit (4) with
the matching indents on the Motor Unit Locator (5) and gently
lower into the Mixing Bowl (11). Twist clockwise once in place to
lock.
o
9
Page 10

11
Usage
Amount Speed
250g 2/3
250g 2/3
250g 2
250g 2
Time Amount Speed Preset
60 secs 500ml 1/2 -
20 secs 500g Pulse -
60 secs 500ml 1/2 -
30-40 secs 300g 1/2 -
Time Amount Speed Preset
60 secs 450g 2 -
- 250g Pulse x3 3
30-40 secs 400g 1/2 -
- 200g Pulse x7 3
Time Amount Speed Preset
2 mins 200ml 2 -
60 secs 400ml 2 2
10-12 mins 300g 1 -
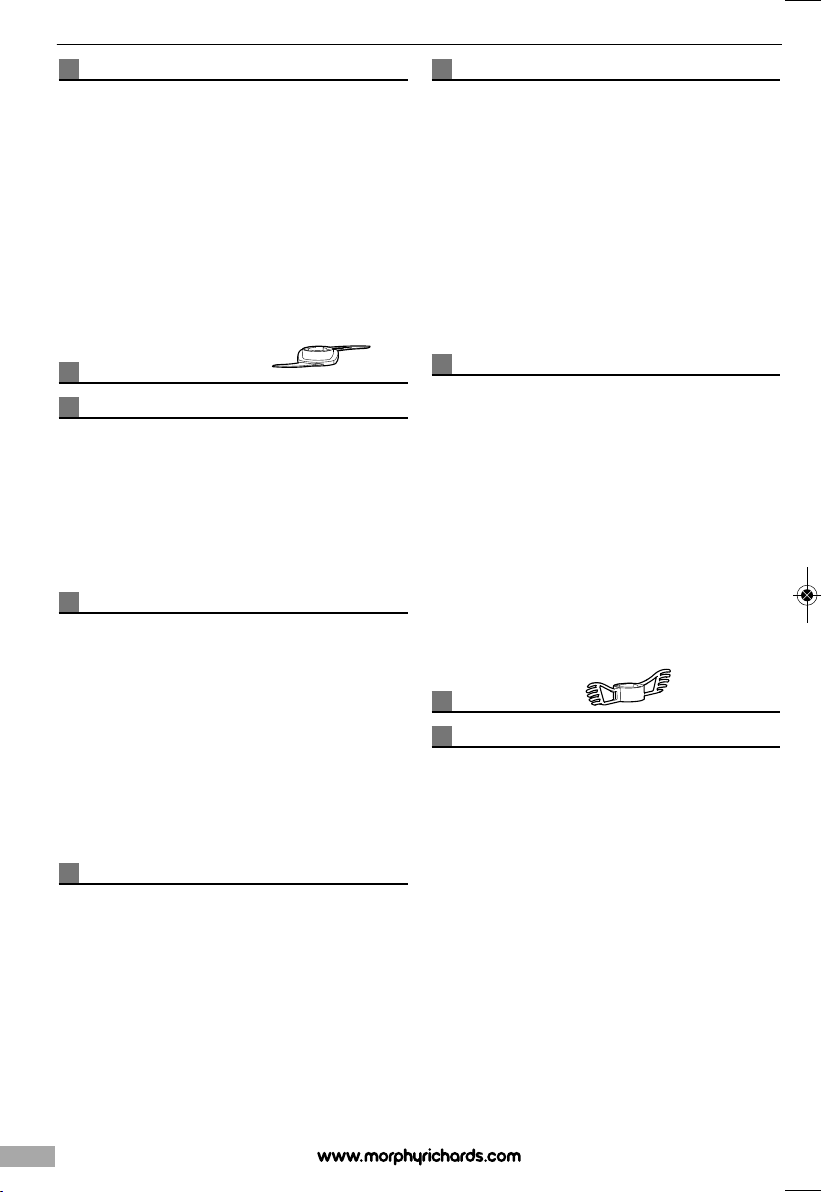
Whisk (21) Chopping bLade (20)Beater (19) Grate/Slice (16/17/18)
Bowl Spindle (12). Add the Bowl Lid (6) and Motor Unit (4) as
described in the ‘In Use’ section.
12
Alternatively, if using the Grater Disc (13), clip the relevant Grater
Blade (16/17/18) into the Grater Disc (13). To remove, press down
on the latch and push the back of the Grater Blade (16/17/18).
WARNING: The Slicing Blade is very sharp.
13
The Grater Disc Adaptor (15) locks into place with the Grater Disc
(13) in the same way that the other accessories lock onto the
Drive Shaft (9) in step 2. Once locked into place, place on top of
the Drive Shaft (9).
14
Place the Drive Shaft (9) with Grater Disc (13) onto the Mixing
Bowl Spindle (12). Add the Bowl Lid (6) and Motor Unit (4) as
described in the ‘In Use’ section.
o
Speed Dial Function
Pulse Mode
• Set the Speed Dial (3) to the ‘P’ position, then, press and hold the
Start/Stop Button (1).
• The unit will pulse at the max speed setting until the Start/Stop
button (1) is released.
• Use the Pulse Function when sudden bursts of speed are
required.
• Good for chopping sparsely to maintain a chunky consistency, eg.
for Salsas etc.
• Ideal for use with the Chopping Blade (20).
• Not recommended for use with the Grater Disc (13).
Speed Settings
• Set the Speed Dial (3) to the desired speed setting (1,2 or 3) and
press the Start/Stop Button (1) once to turn on.
• Once in use, you can cycle through the speed settings by turning
the Speed Dial (3) without having to press the Start/Stop Button
(1) again.
• To turn off the unit, press the Start/Stop button (1).
Pre-sets
• Set the Speed Dial (3) to the desired pre-set mode
and press the Start/Stop Button (1) once to turn on.
• Once in use, you can cycle through the pre-set modes and the
speed settings by turning the Speed Dial (3) without having to
press the Start/Stop Button (1) again.
• To turn off the unit, press the Start/Stop Button (1).
NOTE: Turning the Speed Dial (3) to the ‘P’ position whilst in use
stops the unit. The Start/Stop Button (1) must be held down to
use the Pulse Mode.
Presets on Speed Dial
Not recommended for use with the Grater Disc (13).
Preset 1
• Ideal for use with the Whisk (21).
• Good for mixtures that require a gradual start, such as
mayonnaise and whipped cream.
Preset 2
• Ideal for use with the Beater (19).
• Steady speed fluctuation allows for an even mixture and improved
incorporation in recipes like cake batter.
Preset 3
• Ideal for use with the Chopping Blade (20).
• Good for dry mixes, such as nuts and coffee beans, that require
the food to fall back into the bowl.
Before First Use
Before first use, carefully unpack your Prepstar Food Processor
and its attachments and remove any package material, labels or
stickers.
WARNING: Sharp blades.
Clean all the parts except the Motor Unit (4), following the
instructions in the ‘Quick Cleaning’ section.
CAUTION: Handle the blades with extreme care as they are
sharp.
Unpacking From Storage
3
Twist the Motor Unit (4) into the unlock position ( ).
4
Then lift out the Motor Unit (4).
5
Twist the Bowl Lid (6) anti-clockwise to unlock, then lift.
6
Lift off the Grater Disc (13) from the Storage Bowl (10), and pull
the Storage Bowl (10) out from the Mixing Bowl (11). The Whisk
(21) is located underneath the Storage Bowl (10).
7
When reassembling, make sure to align the grooves of the Mixing
Bowl (11) and Storage Bowl (10), then slide the Storage Bowl (10)
into the Mixing Bowl (11).
8
Place the Bowl Lid (6) onto the Mixing Bowl (11), aligning the
grooves and twist clockwise to lock. Insert the Motor Unit (4) so
that the power cable is facing away from the Food Chute (8) and
twist clockwise to lock.
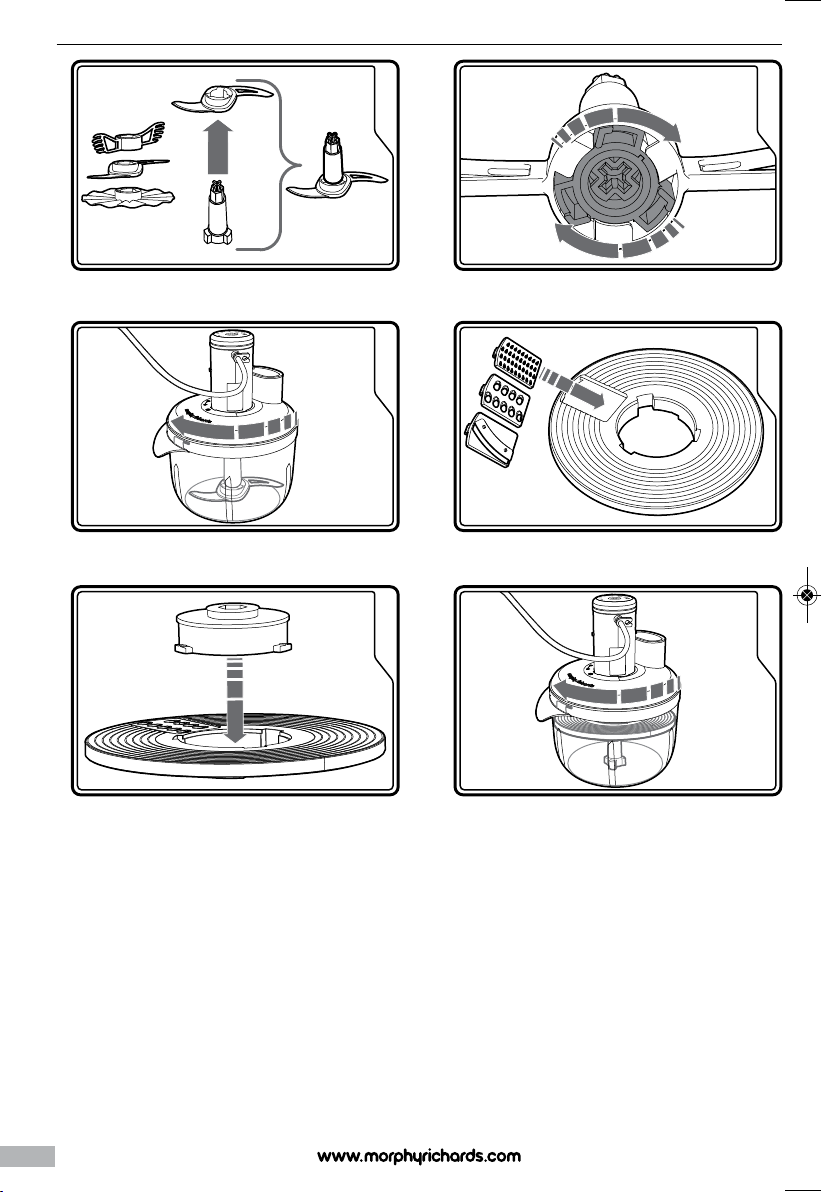
Assembly For Use
9
Push the Drive Shaft (9) up through the base of the relevant
accessory: Beater (19); Chopping Blade (20); Whisk (21).
WARNING: The Chopping Blade (20) is very sharp.
10
Lock the Drive Shaft (9) in place when in the accessory by
twisting it clockwise to attach to the accessory.
Unlock and remove the Drive Shaft (9) by twisting it anti-
clockwise and pulling it away
11
Place the Drive Shaft (9) with locked accessory onto the Mixing
from the base of the accessory.
10
Page 11

Bowl Spindle (12). Add the Bowl Lid (6) and Motor Unit (4) as
described in the ‘In Use’ section.
12
Alternatively, if using the Grater Disc (13), clip the relevant Grater
Blade (16/17/18) into the Grater Disc (13). To remove, press down
on the latch and push the back of the Grater Blade (16/17/18).
WARNING: The Slicing Blade is very sharp.
13
The Grater Disc Adaptor (15) locks into place with the Grater Disc
(13) in the same way that the other accessories lock onto the
Drive Shaft (9) in step 2. Once locked into place, place on top of
the Drive Shaft (9).
14
Place the Drive Shaft (9) with Grater Disc (13) onto the Mixing
Bowl Spindle (12). Add the Bowl Lid (6) and Motor Unit (4) as
described in the ‘In Use’ section.
Usage
Amount Speed
250g 2/3
250g 2/3
250g 2
250g 2
Time Amount Speed Preset
60 secs 500ml 1/2 -
20 secs 500g Pulse -
60 secs 500ml 1/2 -
o
30-40 secs 300g 1/2 -
Time Amount Speed Preset
60 secs 450g 2 -
- 250g Pulse x3 3
30-40 secs 400g 1/2 -
- 200g Pulse x7 3
Time Amount Speed Preset
2 mins 200ml 2 -
60 secs 400ml 2 2
Whisk (21) Chopping bLade (20)Beater (19) Grate/Slice (16/17/18)
10-12 mins 300g 1 -
11
Page 12
13
Mint Raita
Ingredients:
8 tbsp natural yogurt
2 tsp lemon juice
16 mint leaves, chopped
Pinch of salt
Method:
1 Place all ingredients in the Mixing Bowl (14).
2 Process until all ingredients are mixed together to your desired
consistency.
Speed:
Pulse.
Cream Cheese and Chive Dip (150ml)
Ingredients:
140g medium fat cream cheese
½ small clove garlic, crushed
4g chives, roughly snipped
1 tbsp soured cream
Pinch of salt
Freshly ground black pepper to taste
Finely snipped chives (to garnish)
To serve:
Breadsticks or plain tortilla chips.
Method:
1 Place all ingredients, except the garnish, in the Mixing Bowl (14).
2 Process until all ingredients are mixed together, scraping the side
of the Mixing Bowl part way through with a spatula if necessary.
3 When ready, check the seasoning.
4 Place the dip into a ramekin and garnish with a few snipped
chives.
Speed:
Pulse.
Whisk Recipes
Cream
Ingredients:
300ml / 600ml Whipping cream.
Method:
Add all cream, and process.
Speed:
2.
Grater Disc Recipes
French Onion Soup
Ingredients:
75g butter
300g onions, peeled
3 tbsp flour
1.6L beef stock
2 Bay leaves
To serve:
4 slices French bread, cheddar cheese.
Method:
1 Cut the onions into halves or so that it will fit down the feed tube
and fit the slicing disc. Slice the onion using speed 2.
2 Melt the butter in a pan, add the onions and fry for 10 minutes or
until browned.
3 Add the flour, stir gently for 1 minute, and then remove from the
heat.
4 Gradually, stirring all the time add the stock. Then add the salt and
pepper and bay leaves.
5 Bring to the boil, stirring all the time and then put a lid on the pan
and reduce the heat to a simmer for about 30 minutes.
6 Before serving, adjust the seasoning if required then put a slice of
bread in each soup bowl, ladle over the soup and then sprinkle
with grated cheese.
Asian-Style Slaw
Ingredients:
120g Savoy cabbage, washed, core removed
100g carrot, washed
50g red onion, peeled
½ small red chilli, deseeded and thinly sliced into rings
10g coriander leaves
60g cashew nuts
1 tsp fresh ginger
1½ tsp light soy sauce
1 tbsp sesame oil
2 tbsp lime juice
Method:
1 Fit the slicing disc, cut the cabbage to size so it will fit down the
feed tube and then process on speed 2.
2 Fit the coarse grating disc and process the carrot and onion on
speed 2.
3 Remove the attachments and then add all the other ingredients
into the bowl and mix well with a spatula.
4 Turn into a bowl and serve immediately.
13o13
Quick Cleaning
1 Pour some water (200ml) and a drop of washing up liquid into the
Mixing Bowl (11), fit the Bowl Lid (6) and Motor Unit (4), select
PULSE on the Speed Dial (3) for a few seconds for quick cleaning
(Chopping Blade (20) to be fitted to agitate the water).
2 Unplug from the power socket.
3 Wipe the Motor Unit (4) with a damp cloth and dry thoroughly.
Never immerse it in water. Ensure the interlock area is free from
food.
4 Empty the Mixing Bowl (11), dismantle all detachable parts and
wash with warm, soapy water and dry thoroughly.
CAUTION: Care must be taken when handling the Chopping
Blade and Grater Blades as they are very sharp.
Chopping Blade Recipes
Seeds / dry rub
Ingredients:
Various seeds, coriander seed, black pepper etc – as required,
small and large quantities (max - 400g).
Method:
Add all ingredients.
Speed:
Pulse on & off until desired consistency. Or use Pre-set 3.
Pesto
Ingredients:
50g Pine nuts
80g Basil
50g Parmesan
150ml Olive oil
2 clove garlic
Method:
Add all ingredients.
Speed:
Pulse on & off until desired consistency. Or use Pre-set 3.
Short Crust Pastry
Ingredients:
125g plain flour
Pinch of salt
55g cubed butter (soft)
30-45ml cold water
Method:
1 Mix flour & butter until it forms a thick bread crumb consistency.
2 Add water and bind together, remove and shape by hand.
1212
Salsa
Ingredients:
Bunch Coriander
250g Baby Tomatoes
1 Small onion
½ Red Pepper
3 Mild Chillies
1 Lime (Juice only)
Method:
Add all ingredients.
Speed:
2/3.
Hummus
Ingredients:
11 x 400g tinned chickpeas, drained (liquid reserved)
1 garlic clove, halved
Juice of 1.5 lemons
2 tbsp olive oil
1¼ tsp ground cumin
75ml tahini paste
Salt
Method:
1 Put all in the bowl.
2 Pulse until smooth, then used speed 2, scraping down sides as
necessary.
Beater Recipes
French Dressing
Ingredients:
8 tbsp olive oil
2 tbsp vinegar
½ level tsp sugar
½ level tsp Dijon mustard
Salt and pepper
Method:
1 Place all ingredients in the Mixing Bowl (14).
2 Process until all ingredients are mixed together.
Speed:
Pulse.
Page 13

Mint Raita
Ingredients:
8 tbsp natural yogurt
2 tsp lemon juice
16 mint leaves, chopped
Pinch of salt
Method:
1 Place all ingredients in the Mixing Bowl (14).
2 Process until all ingredients are mixed together to your desired
consistency.
Speed:
Pulse.
Cream Cheese and Chive Dip (150ml)
Ingredients:
140g medium fat cream cheese
½ small clove garlic, crushed
4g chives, roughly snipped
1 tbsp soured cream
Pinch of salt
Freshly ground black pepper to taste
Finely snipped chives (to garnish)
To serve:
Breadsticks or plain tortilla chips.
Method:
1 Place all ingredients, except the garnish, in the Mixing Bowl (14).
2 Process until all ingredients are mixed together, scraping the side
of the Mixing Bowl part way through with a spatula if necessary.
3 When ready, check the seasoning.
4 Place the dip into a ramekin and garnish with a few snipped
chives.
Speed:
Pulse.
Whisk Recipes
Cream
Ingredients:
300ml / 600ml Whipping cream.
Method:
Add all cream, and process.
Speed:
2.
Grater Disc Recipes
French Onion Soup
Ingredients:
75g butter
300g onions, peeled
3 tbsp flour
1.6L beef stock
2 Bay leaves
To serve:
4 slices French bread, cheddar cheese.
Method:
1 Cut the onions into halves or so that it will fit down the feed tube
and fit the slicing disc. Slice the onion using speed 2.
2 Melt the butter in a pan, add the onions and fry for 10 minutes or
until browned.
3 Add the flour, stir gently for 1 minute, and then remove from the
heat.
4 Gradually, stirring all the time add the stock. Then add the salt and
pepper and bay leaves.
5 Bring to the boil, stirring all the time and then put a lid on the pan
and reduce the heat to a simmer for about 30 minutes.
6 Before serving, adjust the seasoning if required then put a slice of
bread in each soup bowl, ladle over the soup and then sprinkle
with grated cheese.
Asian-Style Slaw
Ingredients:
120g Savoy cabbage, washed, core removed
100g carrot, washed
50g red onion, peeled
½ small red chilli, deseeded and thinly sliced into rings
10g coriander leaves
60g cashew nuts
1 tsp fresh ginger
1½ tsp light soy sauce
1 tbsp sesame oil
2 tbsp lime juice
Method:
1 Fit the slicing disc, cut the cabbage to size so it will fit down the
feed tube and then process on speed 2.
2 Fit the coarse grating disc and process the carrot and onion on
speed 2.
3 Remove the attachments and then add all the other ingredients
into the bowl and mix well with a spatula.
4 Turn into a bowl and serve immediately.
o
13
Page 14

15
stamped on the products.
3 Repairs have been attempted by persons other than our service
staff (or authorised dealer).
4 Where the appliance has been used for hire purposes or non
domestic use.
5 The appliance is second hand.
6 The local distributor are not liable to carry out any type of
servicing work, under the guarantee.
7 The guarantee excludes consumables such as bags, filters and
glass carafes.
8 Batteries and damage from leakage are not covered by the
guarantee.
9 The filters have not be cleaned and replaced as instructed.
This guarantee does not confer any rights other than those
expressly set out above and does not cover any claims for
consequential loss or damage. This guarantee is offered as an
additional benefit and does not affect your statutory rights as a
consumer.
AUSTRALIAN WARRANTY
This appliance is guaranteed for 2 years against faulty material,
components and workmanship.
This warranty is in addition and does not affect your statutory rights.
Proof of purchase must be produced for any warranty benefit.
In the unlikely event of any appliance proving to be faulty, securely
pack and return the item to the place of purchase accompanied by
the original receipt or invoice.
Our goods come with guarantees that cannot be excluded under
the Australian Consumer Law. You are entitled to a replacement or
refund for a major failure and for compensation for any other
reasonably foreseeable loss or damage. You are also entitled to
have the goods repaired or replaced if the goods fail to be of
acceptable quality and the failure does not amount to a major
failure.
NOT COVERED BY THIS WARRANTY
(Australian only)
• If the appliance has not been used in accordance with the
manufacturers’ recommendations or Instructions.
• If the fault is deemed to be caused by abuse, misuse, neglect,
modifications or in proper use and or care
Eg: Kettles: Excessive build up of scale.
Toasters: Excessive build up of crumbs or foreign matter etc.
• Connection to incorrect voltage to that stamped on the product.
• Unauthorised repairs.
• Appliance used other than for domestic purposes.
• Excluding bags, filters, glass, carafes, and cutting blades.
• Freight and insurance costs.
If for any reason this item is replaced during the 2 year
guarantee period, the guarantee on the new item will be
calculated from original purchase date. Therefore it is vital to
retain your original receipt or invoice to indicate the date of
original purchase.
Morphy Richards’s policy is to continually improve quality
design and product quality. The company therefore reserves the
right to change any specifications or to carry out modifications
as deemed worthy at any time.
The Australian supplier reserves the right to repair, modify,
exchange or replace the faulty appliance with the same or
similar model or product of equivalent value.
o
THIS SECTION IS ONLY APPLICABLE FOR
CUSTOMERS IN UK AND IRELAND
REGISTERING YOUR TWO YEAR GUARANTEE
Your standard one year guarantee is extended for an additional
12 months when you register the product within 28 days of
purchase with Morphy Richards. If you do not register the
product with Morphy Richards within 28 days, your product is
guaranteed for 1 year. To validate your 2 year guarantee register
with us online at www.morphyrichards.co.uk
N.B. Each qualifying product needs to be registered with
Morphy Richards individually. Please refer to the one year
guarantee for more information.
YOUR ONE YEAR GUARANTEE
It is important to retain the retailer’s receipt as proof of
purchase. Staple your receipt to this back cover for future
reference. Please quote the following information if the product
develops a fault. These numbers can be found on the base of
the product.
Model no.
Serial no.
All Morphy Richards products are individually tested before
leaving the factory. In the unlikely event of any appliance
proving to be faulty within 28 days of purchase, it should be
returned to the place of purchase for it to be replaced. If the
fault develops after 28 days and within 12 months of original
purchase, you should contact the Helpline number quoting
Model number and Serial number on the product, or write to
Morphy Richards at the address shown. You may be asked to
return a copy of proof of purchase. Subject to the exclusions
set out below (see Exclusions), the faulty appliance will then be
repaired or replaced and dispatched usually within 7 working
days of receipt. If, for any reason, this item is replaced during
the 1 year guarantee period, the guarantee on the new item will
be calculated from original purchase date. Therefore it is vital to
retain your original till receipt or invoice to indicate the date of
initial purchase. To qualify for the 1 year guarantee, the
appliance must have been used according to the instructions
supplied. For example, crumb trays should have been emptied
regularly.
EXCLUSIONS
Morphy Richards shall not be liable to replace or repair the
goods under the terms of the guarantee where:
1 The fault has been caused or is attributable to accidental use,
misuse, negligent use or used contrary to the manufacturer’s
recommendations or where the fault has been caused by power
surges or damage caused in transit.
2 The appliance has been used on a voltage supply other than that
stamped on the products.
3 Repairs have been attempted by persons other than our service
staff (or authorised dealer).
4 The appliance has been used for hire purposes or non domestic
use.
5 The appliance is second hand.
6 Morphy Richards are not liable to carry out any type of servicing
work, under the guarantee.
7 Plastic filters for all Morphy Richards kettles and coffee makers
are not covered by the guarantee.
8 Batteries and damage from leakage are not covered by the
guarantee.
9 The filters have not be cleaned and replaced as instructed.
This guarantee does not confer any rights other than those
expressly set out above and does not cover any claims for
consequential loss or damage. This guarantee is offered as an
additional benefit and does not affect your statutory rights as a
consumer.
YOUR INTERNATIONAL TWO YEAR
GUARANTEE
This appliance is covered by two-year repair or replacement
warranty.
It is important to retain the retailers receipt as proof of
purchase. Staple your receipt to this back cover for future
reference.
Please quote the following information if the product develops a
fault. These numbers can be found on the base of the product.
Model no.
Serial no.
All Morphy Richards products are individually tested before
leaving the factory. In the unlikely event of any appliance
proving to be faulty within 28 days of purchase it should be
returned to the place of purchase for it to be replaced.
If the fault develops after 28 days and within 24 months of
original purchase, you should contact your local distributor
quoting Model number and Serial number on the product, or
write to your local distributor at the addresses shown.
You will be asked to return the product (in secure, adequate
packaging) to the address below along with a copy of proof of
purchase.
Subject to the exclusions set out below (1-9) the faulty
appliance will then be repaired or replaced and dispatched
usually within 7 working days of receipt.
If for any reason this item is replaced during the 2-year
guarantee period, the guarantee on the new item will be
calculated from original purchase date. Therefore it is vital to
retain your original till receipt or invoice to indicate the date of
initial purchase.
To qualify for the 2-year guarantee the appliance must have
been used according to the manufacturers instructions. For
example, appliances must have been descaled and filters must
have been kept clean as instructed.
The local distributor shall not be liable to replace or repair the
goods under the terms of the guarantee where:
1 The fault has been caused or is attributable to accidental use,
misuse, negligent use or used contrary to the manufacturers
recommendations or where the fault has been caused by power
surges or damage caused in transit.
2 The appliance has been used on a voltage supply other than that
14
Page 15

stamped on the products.
3 Repairs have been attempted by persons other than our service
staff (or authorised dealer).
4 Where the appliance has been used for hire purposes or non
domestic use.
5 The appliance is second hand.
6 The local distributor are not liable to carry out any type of
servicing work, under the guarantee.
7 The guarantee excludes consumables such as bags, filters and
glass carafes.
8 Batteries and damage from leakage are not covered by the
guarantee.
9 The filters have not be cleaned and replaced as instructed.
This guarantee does not confer any rights other than those
expressly set out above and does not cover any claims for
consequential loss or damage. This guarantee is offered as an
additional benefit and does not affect your statutory rights as a
consumer.
AUSTRALIAN WARRANTY
This appliance is guaranteed for 2 years against faulty material,
components and workmanship.
This warranty is in addition and does not affect your statutory rights.
Proof of purchase must be produced for any warranty benefit.
In the unlikely event of any appliance proving to be faulty, securely
pack and return the item to the place of purchase accompanied by
the original receipt or invoice.
Our goods come with guarantees that cannot be excluded under
the Australian Consumer Law. You are entitled to a replacement or
refund for a major failure and for compensation for any other
reasonably foreseeable loss or damage. You are also entitled to
have the goods repaired or replaced if the goods fail to be of
acceptable quality and the failure does not amount to a major
failure.
NOT COVERED BY THIS WARRANTY
(Australian only)
• If the appliance has not been used in accordance with the
manufacturers’ recommendations or Instructions.
• If the fault is deemed to be caused by abuse, misuse, neglect,
modifications or in proper use and or care
Eg: Kettles: Excessive build up of scale.
Toasters: Excessive build up of crumbs or foreign matter etc.
• Connection to incorrect voltage to that stamped on the product.
• Unauthorised repairs.
• Appliance used other than for domestic purposes.
• Excluding bags, filters, glass, carafes, and cutting blades.
• Freight and insurance costs.
If for any reason this item is replaced during the 2 year
guarantee period, the guarantee on the new item will be
calculated from original purchase date. Therefore it is vital to
retain your original receipt or invoice to indicate the date of
original purchase.
Morphy Richards’s policy is to continually improve quality
design and product quality. The company therefore reserves the
right to change any specifications or to carry out modifications
as deemed worthy at any time.
The Australian supplier reserves the right to repair, modify,
exchange or replace the faulty appliance with the same or
similar model or product of equivalent value.
o
15
Page 16

g Morphy Richards products are intended for household use only.
Morphy Richards has a policy of continuous improvement in product quality and design.
The Company, therefore, reserves the right to change the specification of its models at any
time.
The After Sales Division,
Morphy Richards Ltd, Mexborough, South Yorkshire, England, S64 8AJ
Helpline (office hours) UK 0845 871 0960 Republic of Ireland 1800 409119
o Glen Dimplex Australia
1340 Ferntree Gully Road, Scoresby, Victoria 3179
T : 1300 556 816
E : sales@glendimplex.com.au
NZ
Glen Dimplex New Zealand
38 Harris Road, East Tamaki, Auckland, New Zealand
T : 09 2748265
E : sales@glendimplex.co.nz
FP401014MAUS Rev 1 10 /18
 Loading...