


Please read and keep these instructions
Getting the best from your
new microwave oven...
30CGR
Microwave oven
www.morphyrichards.co.uk
www.morphyrichardsindia.com
CLOCK/
WEIGHT
1S 2S 3S
C
g
POWER LEVEL
Grill/
Micro.+Grill
Rotisserie
Grill+Conv./
Micro.+Conv.
Preset/
Deodorize
Stop/Cancel
Start/
Quick Start
1.
2.
3.
4.
5.
6.
7.
Breakfast/Snacks
Rice/Nooldles
Continental
Desserts
Accompaniments
Specials
Curries/Main course
Auto Cook Menu
4 The oven should not be adjusted or
Please read these instructions carefully
repaired by anyone except Morphy
before installing and operating the oven
Richards service center.
Precautions to avoid
Before you call for service
possible exposure to
If the oven fails to operate:
excessive microwave
1. Check to ensure that the oven is plugged
energy
in securely. If it is not, remove the plug from
1. Do not attempt to operate this oven with
the outlet, wait 10 seconds, and plug it in
the door open since open door operation
again securely.
can result in harmful exposure to
2. Check for a blown circuit fuse or a tripped
microwave energy. It is important not to
main circuit breaker. If these seem to be
defeat or tamper with the safety interlocks.
operating properly, test the outlet with
2. Do not place any object between the oven
another appliance.
front face and the door or allow soil or
3. Check to ensure that the control panel is
cleaner residue to accumulate on sealing
programmed correctly and the timer is set.
surfaces.
Check to ensure that the door is securely
3. Do not operate the oven if it is damaged. It
closed engaging the door safety lock
is particularly important that the oven door
system. Otherwise, the microwave energy
is closed properly and that there is no
will not flow into the oven.
damage to the
IF NONE OF THE ABOVE RECTIFY THE
lDoor (bent),
SITUATION, THEN CONTACT MORPHY
RICHARDS SERVICE CENTER. DO NOT TRY
lHinges and latches (broken or loosened),
TO ADJUST OR REPAIR THE OVEN
YOURSELF.
lDoor seals and sealing surfaces.
2
Operation Frequency : 2450MHz
Outside Dimensions : 300mm(H)×539mm(W)×446mm(D)
Oven Cavity Dimensions : 240mm(H)×354mm(W)×358mm(D)
Oven Capacity : 30Litres
Cooking Uniformity : Turntable System
Net Weight : Approx. 18.4kg
Specifications

short circuit, grounding reduces risk of electric
Installation
shock by providing an escape wire for the
electric current. It is recommended that a
1. Make sure that all the packing materials
separate circuit serving only the oven be
are removed from the inside of the door.
provided. Using a high voltage is dangerous
2. WARNING: Check the oven for any
and may result in a fire or other accident
damage, such as misaligned or bent door,
causing oven damage.
damaged door seals and sealing surface,
WARNING: Improper use of the grounding
broken or loose door hinges and latches
plug can result in a risk of electric shock.
and dents inside the cavity or on the door. If
there is any damage, do not operate the
Note:
oven and contact Morphy Richards
service center.
1. If you have any questions about the
grounding or electrical instructions,
3. This microwave oven must be placed on a
consult Morphy Richards service center.
flat, stable surface to hold its weight and
the heaviest food likely to be cooked in the
2. Neither the manufacturer nor the dealer
oven.
can accept any liability for damage to the
oven or personal injury resulting from
4. Do not place the oven where heat,
failure to observe the electrical connection
moisture, or high humidity are generated,
procedures.
or near combustible materials.
The wires in this cable main are colored in
5. For correct operation, the oven must have
accordance with the following code:
sufficient airflow. Allow 20cm of space
Green and Yellow = EARTH
above the oven, 10cm at back and 5cm at
Blue = NEUTRAL
both sides. Do not cover or block any
openings on the appliance. Do not remove
Brown = LIVE
feet.
Radio interference
6. Do not operate the oven without glass tray,
roller support, and shaft in their proper
Operation of the microwave oven can cause
positions.
interference to your radio, TV, or similar
equipment.
7. Make sure that the power supply cord is
undamaged and does not run under the
When there is interference, it may be reduced
oven or over any hot or sharp surface.
or eliminated by taking the following
measures:
8. The socket must be readily accessible so
that it can be easily unplugged in an
1. Clean door and sealing surface of the
emergency.
oven.
9. Do not use the oven outdoors.
2. Reorient the receiving antenna of radio or
television.
Grounding instructions
3. Relocate the microwave oven with respect
This appliance must be grounded. This oven
to the receiver.
is equipped with a cord having a grounding
4. Move the microwave oven away from the
wire with a grounding plug. It must be plugged
receiver.
into a wall receptacle that is properly installed
and grounded. In the event of an electrical
3

5. Plug the microwave oven into a different C. If smoke is observed, switch off or unplug
outlet so that microwave oven and receiver the appliance and keep the door closed in
are on different branch circuits. order to stifle any flames.
D. Do not use the cavity for storage
Important safety instructions
purposes. Do not leave paper products,
cooking utensils or food in the cavity when
When using electrical appliance basic safety
not in use.
precautions should be followed, including the
following:
WARNING: Liquid or other food must not be
heated in sealed containers since they are
WARNING: To reduce the risk of burns,
liable to explode.
electric shock, fire, injury to persons or
exposure to excessive microwave energy:
lMicrowave heating of beverage can result
in delayed eruptive boiling, therefore care
1. Read all instructions before using the
has to be taken when handling the
appliance.
container.
Use this appliance only for its intended use
lDo not fry food in the oven. Hot oil can
as described in this manual. Do not use
damage oven parts and utensils and even
corrosive chemicals or vapors in this
result in skin burns.
appliance. This type of oven is specifically
designed to heat, cook or dry food. It is not
lEggs in their shell and whole hard-boiled
designed for industrial or laboratory use.
eggs should not be heated in microwave
ovens since they may explode even after
Do not operate the oven when empty.
microwave heating has ended.
Do not operate this appliance if it has a
lPierce foods with heavy skins such as
damaged cord or plug, if it is not working
potatoes, whole squashes, apples and
properly or if it has been damaged or
chestnuts before cooking.
dropped. If the supply cord is damaged,
contact Morphy Richards service center.
lThe contents of feeding bottles and baby
jars should be stirred or shaken and the
WARNING: When the appliance is operated
temperature should be checked before
in the combination mode, children should only
serving in order to avoid burns.
use the oven under adult supervision due to
the temperatures generated.
lCooking utensils may become hot
because of heat transferred from the
WARNING: Only allow children to use the
heated food. Potholders may be needed
oven without supervision when adequate
to handle the utensil.
instructions have been given so that the child
is able to use the oven in a safe way and
lUtensils should be checked to ensure that
understands the hazards of improper use.
they are suitable for use in microwave
oven.
To reduce the risk of fire in the oven
cavity
lThis appliance is not intended for use by
persons (including children) with reduced
A. When heating food in plastic or paper
physical, sensory or mental capabilities, or
container, keep an eye on the oven due to
lack of experience and knowledge, unless
the possibility of ignition.
they have been given supervision or
instruction concerning use of the
B. Remove wire twist-ties from paper or
appliance by a person responsible for their
plastic bags before placing bag in oven.
safety.
4

lChildren should be supervised to ensure
Utensils guide
that they do not play with the appliance.
1. The ideal material for a microwave utensil
Microwave cooking principles
is transparent to microwave, it allows
energy to pass through the container and
1. Arrange food carefully. Place thickest
heat the food.
areas towards outside of dish.
2. Microwave can not penetrate metal, so
2. Watch cooking time. Cook for the shortest
metal utensils or dishes with metallic trim
amount of time indicated and add more as
should not be used.
needed. Food severely overcooked can
3. Do not use recycled paper products when
smoke or ignite.
microwave cooking, as they may contain
3. Cover foods while cooking. Covers
small metal fragments which may cause
prevent spattering and help foods to cook
sparks and/or fires.
evenly.
4. Round/oval dishes rather than
4. Turn foods over once during microwaving
square/oblong ones are recommend, as
to speed cooking of such foods as chicken
food in corners tends to overcook.
and hamburgers. Large items like roasts
5. Narrow strips of aluminum foil may be
must be turned over at least once.
used to prevent overcooking of exposed
5. Rearrange foods such as meatballs
areas. But be careful don’t use too much
halfway through cooking both from top to
and keep a distance of 1 inch (2.54cm)
bottom and from the center of the dish to
between foil and cavity.
the outside.
The list below is a general guide to help you
select the correct utensils.
5
Cookware Microwave Grill Convection Combination*
Heat - Resistant Glass Yes Yes Yes Yes
Non Heat - Resistant Glass No No No No
Heat - Resistant Ceramics Yes Yes Yes Yes
Microwave - Safe Plastic Dish Yes No No No
Kitchen Paper Yes No No No
Metal Tray No Yes Yes No
Metal Rack No Yes Yes No
Aluminum Foil & Foil Container No Yes Yes No
Combination: applicable for both "microwave+grill", and "microwave+convection" cooking.
CLOCK/
WEIGHT
Grill/
Micro.+Grill
Rotisserie
Grill+Conv./
Micro.+Conv.
Preset/
Deodorize
Stop/Cancel
Start/
Quick Start
6
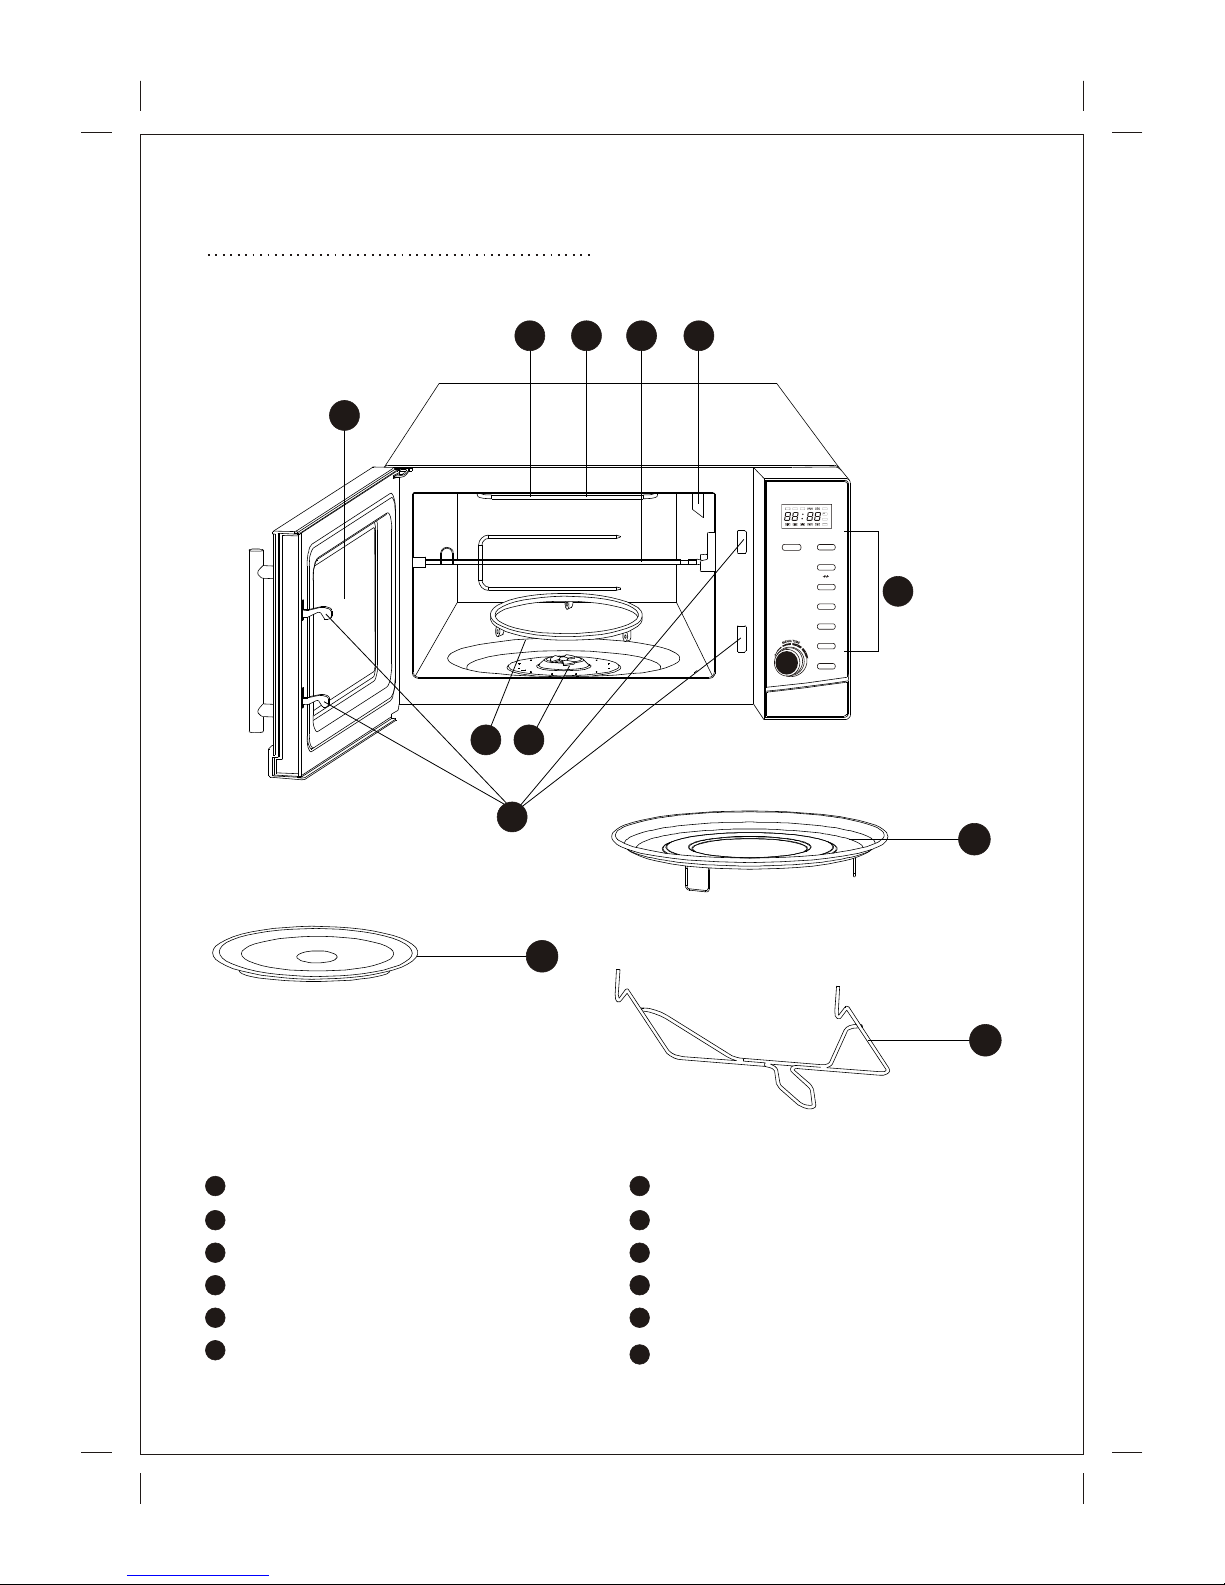
Know your MICROWAVE:
Door Safety Lock System Rotisserie Rack
Oven Window Heater1
Roller Ring Heater2
Shaft Baking Plate
Control Panel Glass Tray
Microwave Vent Rotisserie Tong
1
2
3
4
5
6
7
8
9
10
11
8 7
5
43
1
2
Parts and features:
12
9
10
11
12
6
1S 2S 3S
C
g
Power Level
1.
2.
3.
4.
5.
6.
7.
Breakfast/Snacks
Rice/Nooldles
Continental
Desserts
Accompaniments
Specials
Curries/Main course
Auto Cook Menu

Control panel
DISPLAY SCREEN
Cooking time, power, indicators and present
time are displayed.
POWER LEVEL
Press to select microwave power level.
GRILL/MICRO.+GRILL
Press to set a grill cooking program or select
one of two combination cooking program with
micro. & grill.
GRILL+CONVECTION
Press to program hot air convection cooking
GRILL+CONV/MICRO+CONV.
Press to select convection cooking or any one
of the 4 combination cooking settings with
microwave and convection.
MENU/TIME (DIAL)
Rotate to set cooking time or select automenu. START/QUICK START Press to start
cooking program or set quick start cooking
program.
CLOCK/WEIGHT
Press to set the clock or select the amount of
food.
STOP/CANCEL
Touch to stop cooking program or clear all
previous settings before cooking starts.
Touch once to stop cooking temporarily or
twice to cancel cooking program altogether.
ROTISSERIE
Press to start or stop turn-grill function during
cooking process.
PRESET/DEODORIZE
Press to select one of Preset or Deodorize
functions.
7
CLOCK/
WEIGHT
1S 2S 3S
C
g
Power Level
Grill/
Micro.+Grill
Rotisserie
Grill+Conv./
Micro.+Conv.
Preset/
Deodorize
Stop/Cancel
Start/
Quick Start
1.
2.
3.
4.
5.
6.
7.
Breakfast/Snacks
Rice/Nooldles
Continental
Desserts
Accompaniments
Specials
Curries/Main course
Auto Cook Menu

Suppose you want to cook for 5 minute at 60%
How to set the oven controls
power level.
BEEPS DURING OVEN SETTINGS
1. Press STOP/CANCEL button.
lONE BEEP: Oven accepts the entry.
2. Press POWER LEVEL button a number of
times until display P-60.
lTWO BEEPS: Oven does not accept the
entry. Please check and try again.
3. Rotate the MENU/TIME dial until the
correct cooking time (5:00) is displayed.
SETTING THE CLOCK
4. Press START/QUICK START button.
This clock can be set in 12-hour or 24-hour
cycle.
Note:
1. In standby mode of the oven, Press
1. If you want to temporarily stop a cooking
CLOCK/WEIGHT button once or twice to
session, press the STOP/CANCEL once
choose clock cycle.
and then you can restart the cooking
again by pressing START/QUICK START;
2. Rotate the MENU/TIME dial until the
or press the STOP/CANCEL twice to
correct hour is displayed.
cancel the cooking program altogether.
3. Press CLOCK/WEIGHT button once to
2. After the cooking time ends, the system
confirm.
will beep and End is displayed. Before
4. Rotate the MENU/TIME dial until the
starting another cooking session, you
correct minute is displayed.
need to clear the display and reset the
system by pressing the any button.
5. Press CLOCK/WEIGHT button to confirm.
(Notes 1 and 2 are both available in the
MICROWAVE
following cooking features.)
Maximum cooking time is 95 minutes(95:00).
GRILL
Microwave cooking allows you to customize
Maximum cooking time is 95 minutes(95:00).
cooking power and time.
Grill cooking is particularly useful for thin slices
Select power by pressing the POWER LEVEL
of meat, chops, kebabs and pieces of
button.
chicken. It is also suitable for hot sandwiches
Press times Cooking power(display)
and au gratin dishes. Suppose you want to
program grill cooking for 12 minutes.
Once 100% (P100)
1. Press STOP/CANCEL button.
Twice 90% (P-90)
3 times 80% (P-80)
2. Press GRILL/MICRO.+GRILL button
once.
4 times 70% (P-70)
5 times 60% (P-60)
3. Turn the MENU/TIME to show12:00.
6 times 50% (P-50)
4. Press START/QUICK START button.
7 times 40% (P-40)
MICROWAVE + GRILL (combination)
8 times 30% (P-30)
Maximum cooking time is 95 minutes(95:00).
9 times 20% (P-20)
This feature allows you to combine grill and
10 times 10% (P-10)
microwave cooking on two different settings.
11 times 0% (P-00)
8

COMBINATION 1 2. Press ‘GRILL+CONV/MICRO+CONV’
button a number of times to select
30% time for microwave cooking, 70% for grill
desired temperature.
cooking. Use for fish or au gratin.
3. Rotate the MENU/TIME dial until the
Suppose you want to set combination 1
correct cooking time is displayed.
cooking for 25 minutes.
4. Press START/QUICK START button.
1. Press STOP/CANCEL button.
To Preheat and Cook with Convection
2. Press GRILL/MICRO.+GRILL button
twice. Your oven can be programmed to combine
preheating and convection cooking
3. Turn MENU/TIME to 25:00.
operations.
0
4. Press START/QUICK START button.
Suppose you want to preheat to 170 C and
then cook 35 minutes.
COMBINATION 2
1. Press STOP/CANCEL button.
55% time for microwave cooking, 45% for grill
cooking. Use for pudding, omelets, baked
2. Press ‘GRILL+CONV/MICRO+CONV’
potatoes and poultry.
button a number of times to select
preheat temperature.
Suppose you want to set combination 2
cooking for 12 minutes.
3. Press START/QUICK START button.
When it reaches the programmed
1. Press STOP/CANCEL button.
temperature, beeps will sound to remind.
2. Press GRILL/MICRO.+GRILL button
4. Open the door and place container of
thrice
food at the center of the turntable.
3. Turn MENU/TIME to 12:00.
5. Rotate the MENU/TIME dial until the
4. Press START/QUICK START button.
desired cooking time is displayed.
CONVECTION
6. Press START/QUICK START button.
Maximum cooking time is 9 hours plus 30
ROTISSERIE
minutes(9H:30).
This function has the feature to turn food over
During convection cooking, hot air is
and over during cooking to make food get
circulated throughout the oven cavity to brown
better cooking effect.
and make crisp foods quickly and evenly.
For example: to use this feature during grill
To Cook with Convection
cooking:
Press ‘GRILL+CONV/MICRO+CONV’ once
1. Press STOP/CANCEL button.
to set convection t e m p e r a ture
2. Press GRILL/MICRO.+GRILL button
once.
0
Suppose you want to cook at 170 C for 40
3. Turn the MENU/TIME to set cooking time.
minutes.
4. Press START/QUICK START button.
1. Press STOP/CANCEL button.
5. Press button once.
0 0
(110 C~200 C).
ROTISSERIE
9

Note: During cooking, you can start or stop 1. Press POWER LEVEL button to set power
turn-grill function by pressing TURN button. level.
MICRO. +CONVECTION (combination) 2. Rotate the MENU/TIME dial to program
microwave cooking time.
Maximum cooking time is 9 hours plus 30
minutes.(9H:30) 3. Press ‘Grill+conv/Micro+Conv’ button
This oven has four pre-programmed settings 4. Rotate the MENU/TIME dial to program
that make it easy to cook with both convection cooking time.
heat and microwave automatically.
5. Press START/QUICK START button.
Press ‘GRILL+CONV/MICRO+CONV’ button
Note: If you want to set speed defrost
to select convection temperature:
program in a multi-stage cooking, it can be
0
Temperature( C)
only set on the first stage. Auto cook, and
Quick start functions can not be set in a multi
COMB1 110
stage cooking program.
COMB2 140
AUTO COOK
COMB3 170
For food or the following cooking mode, it is
COMB4 200
not necessary to program the duration and the
cooking power. It is sufficient to indicate the
Suppose you want to cook food for 24 minutes
type of food that you wish to cook as well as
on COMB3.
the weight of this food. The cooking duration
1. Press STOP/CANCEL button.
may be divides into several stages to do, the
user needs to operate the oven according to
2. Press ‘GRILL+CONV/MICRO+CONV’
the oven’s remind and your fondness.
button a number of times to select
desired temperature.
1. In standby mode, rotate MENU/TIME dial
anti-clockwise once, then rotate to select
3. Rotate the MENU/TIME dial to program
food code to specify the food to be
cooking time.
cooked.
4. Press START/QUICK START button to
2. Press CLOCK/WEIGHT button to specify
start.
the food weight or the number of serving.
Note: You can check the convection
3. Press START/QUICK START button to
temperature while cooking is in progress
confirm.
b y p r e s s i n g t h e
‘GRILL+CONV/MICRO+CONV’ button.
Auto cook menu
MULTI-STAGE COOKING
Rotate the Menu/Time Dial anticlockwise once
and then rotate to select any of the 200 Auto
Your oven can be programmed for up to 3
Cook Menu Recipes. For recipe selection
automatic cooking sequences. Suppose you
details, please refer to the ‘Recipes for Auto-
want to set the following cooking program.
Cook menu’ section on page 13.
Other convenient features
CHILD PROOF LOCK
The child proof lock prevents unsupervised
Microwave cooking
Convection cooking (without preheat
function)
10

operation by little children. normal.
To set the child proof lock: Press COOLING FEATURE
STOP/CANCEL button for 3 seconds, then a
The electronical controlling system of the
beep will sound and the indicator light will
microwave oven has the feature of cooling. As
come on. In the lock state, all buttons are
for any cooking mode which cooking time
disabled.
above 2 minutes, after finishing cooking, the
To cancel the child proof lock: Press oven fan will work about 3 minutes
STOP/CANCEL button for 3 seconds, then a automatically to cool the oven for prolonging
beep will sound and the indicator light will the life of the oven.
goes off.
PRESET FUNCTION
QUICK START
This function allows the oven to start a cooking
Use this feature to program the oven to program at an appointed time automatically.
microwave food at 100% power conveniently. For eg. If the present time is 09:00 (am), and
you want to cook for 20 mins. with 80% power
In standby mode, Press START/QUICK START
level beginning at 11.00am.
in quick succession to set the cooking time.
The oven will auto-start two seconds later. The lPress the ‘Power Level’ button repeatedly
maximum time can be set is 10 minutes. for 80% power.
TO STOP THE OVEN WHILE THE OVEN IS lRotate the Menu/Time dial clockwise to
OPERATING show 20:00.
1. Press STOP/CANCEL button once. You lPress the Preset/Deodorize button once.
can restart the oven by pressing
lRotate the Menu/Time dial clockwise to
START/QUICK START button once.
show 11:00.
Touch STOP/CANCEL once again to
erase all instructions.
lPress the Start/Quick Start button to
confirm.
2. Open the door.
DEODORIZE FUNCTION
You can restart the oven by closing the
door and pressing START/QUICK START
lPress ‘Preset/Deodorize’ button twice to
button.
select the deodorize function. Press
Start/Quick start button to confirm. This
Note: Oven stops operating when door is
will remove any odour of previously
opened.
cooked food from the microwave oven.
OVERHEATING PROTECTION
CLEANING AND CARE
During convection cooking, when the
1. Turn off the oven and remove the power
temperature of the cavity reaches over 300
plug from the wall socket before cleaning.
Celsius, the display will show E01 with buzzer
sounding, press the STOP/CANCEL button
2. Keep the inside of the oven clean. When
the oven will be back to normal.
food splatters or spilled liquids adhere to
oven walls, wipe with a damp cloth. Mild
SENSOR PROTECTION
detergent may be used if the oven gets
In case of short or open circuit, the system very dirty. Avoid the use of spray and other
enters into malfunction protection. The display harsh cleaners as they may stain, streak
shows E03, buzzer will sound press the or dull the door surface.
STOP/CANCEL button the oven will be back to
11

3. The outside surfaces should be cleaned or dishwasher. When removing the roller
with a damp cloth. To prevent damage to ring from cavity floor for cleaning, be sure
the operating parts inside the oven, water to replace in the proper position.
should not be allowed to seep into the
9. Remove odors from your oven by
ventilation openings.
combining a cup of water with the juice
4. Wipe the door and window on both sides, and skin of one lemon in a deep
the door seals and adjacent parts microwaveable bowl, microwave for 5
frequently with a damp cloth to minutes. Wipe thoroughly and dry with a
removeany spills or spatters. Do not use soft cloth.
abrasive cleaner.
10. The oven should be cleaned regularly and
5. Do not allow the control panel to become any food deposits removed. Failure to
wet. Clean with a soft, damp cloth. When maintain the oven in a clean condition
cleaning the control panel, leave oven could lead to deterioration of the surface
door open to prevent oven from that could adversely affect the life of the
accidentally turning on. appliance and possibly result in a
hazardous situation.
6. If steam accumulates inside or around the
outside of the oven door, wipe with a soft 11. Please do not dispose this appliance into
cloth. This may occur when the the domestic rubbish bin, it should be
microwave oven is operated under high disposed to the particular disposal center
humidity condition and it is normal. provided by the municipalities.
7. It is occasionally necessary to remove the
Power Consumption : 230V~50Hz
glass tray for cleaning. Wash the tray in
warm sudsy water or in a dishwasher.
1400W (Microwave)
1450W (Convection)
8. The roller ring and oven floor should be
cleaned regularly to avoid excessive
1050W (Grill)
noise. Simply wipe the bottom surface of
Rated Microwave Power Output : 900W
the oven with mild detergent. The roller
ring may be washed in mild sudsy water
Technical Data
12
Recipes for
Auto-cook Menu

Presenting Morphy Richards Microwave ovens that come with 200
Indian /Continental auto cook menus that make cooking simple, quick
and hassle free by just preparing the ingredients, putting them in the
microwave oven & pushing the corresponding button on the auto cook
menu to enjoy your favourite recipe.
Cooking is considered as a skill and not just a task. With a Morphy
Richards Microwave Oven it is made even more pleasurable. The 200
Auto Cook Menu allows you to reheat/ cook food without setting the
power levels / time separately, the best dishes are created by just a touch
of a button. With Morphy Richards Microwave Ovens make every day at
home like an experience at a restaurant.
Benefits of our 200 Auto cook Menu:
1. One Touch cooking solution for 200 different recipes.
2. Just follow simple pre-preparation steps and leave the rest to the
intelligence of our microwave oven.
3. With our 200 Auto cook menus, you can now prepare 200 recipes
from all across the world without even opening a recipe book.
4. Even a first time cook in your family can become an expert with our
Auto cook Menus.
5. Delight your guests with mouth watering dishes at any time of the
day.
6. Spend valuable time with your family and let your Morphy Richards
Microwave do all the cooking.
14

15
3. Roll over corn flour spread in a plate. Coat
BREAKFAST / SNACKS
well.
NORTH INDIAN RECIPES
4. Keep it in the refrigerator for 30 mins.
5. Put the rolls on a microwave safe plate
and keep it in the microwave oven.
Ingredients:
6. Set the auto cook menu(Sn2)
lWater – ½ cup
7. After the first 12 mins (when display
lMilk – ¼ cup
shows 16:00), turn over the rolls and
lSugar – 1 tsp
continue cooking.
lCardamom powder – a pinch
8. Serve hot with ketchup.
lTea bag – 1 no.
Cooking time: 28 mins
Method:
1. In a microwave safe ceramic cup (without
Ingredients:
golden or silver rims), add all the
lRoomali roti – 2
ingredients, except a tea bag.
For stuffing:
2. Put the ceramic cup in a microwave safe
lPaneer and capsicum sabzi – 1 cup
plate.
lOnion – 1 (chopped)
3. Set the auto cook menu(Sn1)
lCoriander powder – ½ tsp
4. Lastly, add the tea bag in the cup and dip
into it.
lChilli powder – ½ tsp
Cooking time: 3 mins
lButter – 1 tsp
For Paneer and capsicum sabzi: Ingredients:
lPaneer – ¾ cup (cut into thick strips)
Ingredients:
lOnion – 1 large (finely chopped)
lBoiled vegetables – 200 gms
lGarlic – 2 cloves (finely chopped)
lPotato – ½ cup
lGinger – 1 tsp (paste)
lCauliflower – ¼ cup
lCumin seed – 1 tsp (powder)
lCarrot & green peas – ¼ cup
lTurmeric powder – a pinch
lButter – 1 tbsp
lChilli powder – ¾ tsp
lCorn flour – 4 tbsp
lGaram masala – ½ tsp (powder)
lBread crumbs – 2 tbsp
lDried fenugreek leaves – ½ tsp
lChilli paste – ½ tsp
lTomato puree – 1 tbsp
lGaram masala – ¼ tsp
lCapsicum – ¼ cup (sliced)
lOnion – 1 medium size (chopped)
lFresh cream – 1 tbsp
lCoriander leaves – 1 tbsp (chopped)
lOil – 2 tbsp
lSalt to taste
lCoriander – 2 tbsp (chopped)
Method:
lSalt to taste
1. Mix and mash boiled vegetables, garam
Method for sabzi :
masala, chilli paste, onion, coriander
leaves, bread crumbs and salt together.
1. Mix the oil, onion, garlic and ginger in a
microwave glass bowl and microwave
2. Apply little butter to your palms and shape
high at 100% power level for 4 mins. Stir in
the mixture into rolls.
1. Masala Tea (Sn1)
3.Paneer Wraps (Sn3)
2.Veg Roll (Sn2)

16
between. 1. Sift besan. Mix besan, sooji, water, oil,
salt, sugar, turmeric, chilli paste, ginger
2. Add the cumin seed powder, chilli
paste to make a smooth batter of a thin
powder, garam masala, turmeric and
pouring consistency.
fenugreek leaves and microwave high for
1 min 2. Beat well, add Eno fruit salt and soda, and
sprinkle lemon juice.
3. Add the tomato puree, capsicum and mix
well. Microwave at 80% power level for 4 3. Beat well for a few seconds.
mins.
4. Immediately pour this mixture in a
. Add the paneer, cream, salt and mix microwave safe bowl and keep it in the
lightly. Cover the bowl and microwave at microwave oven.
80% power level for 4 mins.
5. Set the auto cook menu (Sn4).
5. Paneer and capsicum sabzi is ready.
6. For garnishing, sprinkle chopped
Sprinkle coriander.
coriander.
For Paneer Wraps:
Cooking time: 7 mins
1. On an open roomali roti, spread the
paneer and capsicum sabzi, onion, chilli
Ingredients:
powder, butter and coriander powder,
lPoha – 1 cup (washed and drained)
fold the sides in and roll (Take care that
lPotato – 1 (boiled and chopped)
the roll is not too thick).
lPeas – ¼ cup (boiled)
2. Put it on a microwave safe plate and keep
lTurmeric powder – 1 tsp
it in the microwave oven.
lGrated coconut - 1 tbsp
3. Set the auto cook menu(Sn3).
lRoasted peanuts – 1 tbsp
4. Serve hot.
lSalt to taste
Cooking time: 30 sec
For Tempering:
lOil – 1tbsp
Ingredients:
lOnion – 1 (chopped)
lGram flour (besan) – 1 ½ cup
lGreen chilli – ½ tsp (chopped)
lWater – 1 ¼ cup
lCurry leaves – few
lSemolina – 2 tbsp (sooji)
lMustard seeds– ½ tsp
lOil - 1 tbsp
Method:
lSoda–bi–carb – ¼ tsp
1. In a microwave safe bowl, add oil,
lEno fruit salt – ¼ tsp
mustard seeds, onion, green chilli and
lSugar – 2 tsp
curry leaves. Mix it well and microwave at
lTurmeric - ¼ tsp
80% power level for 4 mins. Stir in
lGreen chilli paste – 1 tsp
between. Keep aside.
lGinger paste – 1 tsp
2. In a microwave safe bowl, combine the
lLemon juice – 1 tsp
previously cooked ingredients with all the
lSalt to taste other given ingredients and mix well.
Keep the bowl in the microwave oven.
Method:
5. Potato Poha (Sn5)
4.Dhokla (Khaman) Dhokla (Sn4)

17
3. Set the auto cook menu (Sn5). lButter – 1 tbsp
4. Garnish with coconut and serve hot. lSalt to taste
Cooking time: 2 mins
Method:
1. In a microwave safe glass bowl add oil
and ginger – garlic paste and microwave
Ingredients:
at 100% power level for 1 min. Add onion
lCorn - ½ cup (boiled)
and microwave at 100% power level for 3
lCapsicum - cup (chopped)
mins. Stir in between and add tomato and
lOnion - cup (chopped)
microwave at 100% power level for 4
lGreen chilli - 1 (chopped)
mins. Stir again.
lTomato ketchup - 1 tsp
2. Onion, tomato gravy is ready.
lOil - 1tbsp
3. Mix the cooked paste and boiled
lOregano - ¼ tsp
vegetables with the other ingredients,
lTomato - 1 tbsp (chopped)
except for butter and coriander leaves.
lWater - only for sprinkling
4. In a microwave safe bowl, add all the
ingredients and mix well. Keep the bowl in
lCoriander leaves - 1 tbsp (chopped)
the microwave oven.
lSalt and pepper to taste
5. Set the auto cook menu (Sn7).
Method:
6. Stir in between. Serve hot with butter and
1. In a microwave safe bowl, add all the
sprinkled coriander leaves.
ingredients and mix well. Keep the bowl in
Cooking Time: 9 mins
the microwave oven. Sprinkle water.
2. Set the auto cook menu (Sn6).
Ingredients:
3. Stir in between.
lMoong sprout – 1 cup
4. Serve hot.
lCarrot – ½ cup (chopped)
lOnion – 1 (chopped)
Ingredients:
lTomato – 1 (chopped)
lMixed vegetables – 2 cups (boiled and
lGreen chilli – 1 (chopped)
mashed)
lCucumber – ½ (chopped)
lPotato – 1 cup
lChat masala powder – 1tbsp
lCauliflower – ¼ cup
lLemon juice – 1 tbsp
lCapsicum – ½ cup
lSalt and pepper to taste
lGreen peas – ¼ cup
lWater – for sprinkling
lOil – 1 tbsp
lOnion – 2 (chopped)
Method:
lTomato – 3 (chopped)
1. In a microwave safe bowl, add sprouts
and water. Keep the bowl in the
lCoriander leaves – 2 tbsp (chopped)
microwave oven.
lPav bhaji masala – 1 tbsp
2. Set the auto cook menu (Sn8).
lGinger – garlic paste – 1 tbsp
3. When the cooking is done, take it out.
lRed – chilli powder – 1 tbsp
4. In another container, add sprouted
lLemon juice – 1 tbsp
moong and other all ingredients. Mix well.
6. Spicy corn (Sn6)
8. Sprout Chat (Sn8)
7. Pav Bhaji (Sn7)

18
5. Serve as a snack. lGreen chilli – 1 (chopped)
Cooking Time: 3 mins lCoriander leaves – 1 tbsp (chopped)
lButter – 2 tbsp
lSalt to taste
Ingredients:
Method
lRoti – 2 nos.
1. In a bowl add onion, green chilli,
For Stuffing
coriander, butter, salt and horizontally cut
lPaneer – 100 gms (grated)
boiled eggs and mix well. Stuffing is
lCarrot & capsicum – ¼ cup (cut
ready.
lengthwise)
Cooking Method:
lOnion – 1 (chopped)
1. Soak the brown bread in luke warm water
lGreen chilli – 1 (chopped)
and then squeeze it to get rid of the water.
lCoriander leaves – 1 tsp (chopped)
Spread the green chutney on the breads
lVinegar – 1 tsp
slightly.
lButter – 2 tbsp
2. Stuff it with the stuffing and roll it.
lSalt to taste
3. Put it on microwave safe dish. Keep the
Method:
dish in the microwave oven.
1. In a microwave safe glass bowl add
4. Set the auto cook menu (Sn10). After the
butter, onion and green chilli. Microwave
first 12 mins (when the display shows
at 100% power level for 3 mins and stir in
18:00), turn over the bread roll & continue
between. Add capsicum and carrot and
cooking. Serve hot.
microwave at 80% power level for 4 mins.
Cooking Time: 30 mins
Stir in between and add paneer, vinegar,
salt and coriander. Mix well and
Ingredients:
microwave at 80% power level for 4 mins.
lShredded Chicken – 200 gms
2. Stuffing is ready.
lOnion – ½ (chopped)
3. Spread the entire mixture on a roti and
lOil – 1 tbsp
fold over.
lButter – 1 tbsp
4. Grease with butter.
lSalt and pepper to taste
5. Put it on microwave safe dish. Keep the
dish in the microwave oven. lRed chilli flakes – ¼ tsp
6. Set the auto cook menu (Sn9). lBread crumbs – 1 cup
7. Serve hot. lGreen chilli – 1 tsp (paste)
Cooking Time: 1 mins lMaida – ½ cup
lPepper- ½ tsp
Method:
Ingredients:
1. In a microwave glass bowl add oil, onion,
lBrown bread – 4 nos.
green chilli and microwave at 100%
lGreen chutney – 2 tbsp
power level for 4 mins. Stir in between and
For stuffing:
add shredded chicken and salt. Mix it
lBoiled eggs – 2 (cut horizontally)
thoroughly and microwave at 80% power
lOnion – 1 (chopped)
level for 10 mins and stir in between.
9.Stuffed Roti (Sn9)
11. Stuffed Chicken Roll (Sn11)
10. Egg Roll (Sn10)

2. Add chilli flakes and pepper to the bowl lMaida – 1 cup
and mix well. Microwave at 80% power
lBaking powder – ¼ tsp
level for 4 mins and bring it to r o o m
lBaking soda – ¼ tsp
temperature.
lSalt to taste
3. Add bread crumbs to the mixture.
lGhee – ¼ cup
4. Make flattened rolls and roll over maida.
lYoghurt – ¼ cup
Coat well & grease it with butter.
Samosa Filling
5. Put them on a microwave safe dish. Keep
lBoiled Potatoes – 3 large (mashed)
the dish in the microwave oven. Set the
lPeas – 100 gms (boiled)
auto cook menu. (Sn11) .
lCumin powder – 1tsp
6. After 12 mins (when the display shows
lRed chilli powder – 1tsp
18:00), turn it over & continue cooking.
lCoriander – ¼ cup (chopped)
7. Serve hot.
lSalt to taste
Cooking time: 30 mins
Method:
Pastry Dough
Ingredients:
1. Mix all the ingredients together in a large
lCauliflower – 100 gms (chopped)
bowl & knead for about 8 mins.
lGinger garlic paste – 1tsp
2. Gather dough in a bowl & keep under a
lMango powder, dried – 1tsp
clean damp cloth for 20 mins.
lDania powder – 1tsp
NOTE: Alternative readymade packet of
lSoda -bi-carb – a pinch
samosa strips (patties) is also available.
lHot oil – 1tbsp
For Filling
lGram flour – 1cup
1. Mix all the filling ingredients together to
lWater – to mix
use as stuffing.
lSalt to taste
2. Divide dough into six balls.
Method:
3. Roll a ball out into an 8” round.
1. Mix all ingredients except cauliflower. Add
4. Cut it into half with a sharp pointed knife.
1 tbsp of hot oil water to the mixture to
5. Pick up one half, making a ¼ wide
make thick batter.
overlapping seam as seen in this image.
2. Keep aside for ½ an hour.
6. Glue this seam together with few droplets
3. Put cauliflower into the batter.
of water.
4. Put in a greased baking plate. Set the
7. Fill the cone with about 2tbsp of the
auto cook menu (Sn12)
potato filling.
5. After the first 8 mins (Display will show
8. Seal the wide side of the cone by closing
8.00) turn the side and continue cooking.
the edges.
6. Serve with green chutney.
9. Lightly brush ghee onto the top surface of
Cooking time: 16 mins
the samosa.
10. Put it on a greased baking plate.
11. Set auto cook menu (Sn13).
Ingredients:
12. After first 15 mins (display will show 15.00
For Pastry
mins).
12. Veg Pakoda (Sn12)
13. Samosa (Sn13)
19

13. Turn the side & continue cooking. 8. Serve by dotting it with chilli garlic sauce.
14. Serve hot with green & tamarind chutney. Cooking time: 20 mins
Cooking time: 30 mins
Ingredients:
Ingredients:
lBrown bread - 6 slices (cut out in small
lCurd - 1 cup
rounds)
lWater - 1cup
lButter - 2tbsp
lGram flour - ¼ cup (besan)
For filling
lTurmeric powder -¾ tsp
lOil -1 tbsp
lChilli ginger paste - 1 tsp
lPotatoes - ½ cup (Boiled &mashed
lSalt to taste
coarsely)
For Tempering
lOnion - ½ cup (chopped)
lOil -1 tbsp
lCarrot- ½ cup (chopped)
lMustard seeds - 1 tsp
lCapsicum- ½ cup (chopped)
lGreen chillies - 2 (chopped)
lSoya sauce - ½ tsp
For Garnishing
lVinegar- 1tsp
lCoriander - ¼ cup (chopped)
lPepper -½ tsp
lFresh Coconut - 2 tbsp (grated)
lChilli powder-¼ tsp
Method:
lSalt to taste
1. Beat curd, water & gram flour to make a
Other Ingredients
smooth batter
lSesame seeds - 2tbsp
2. Place the mixture in a microwave safe
lChilli garlic tomato sauce - 1tbsp
bowl and set the Auto Cook Menu (Sn15).
Method:
Stir in between when the first 5 mins is
over (display will show 6.00 mins) take it
1. In a microwave safe dish add oil & onion for
out and add salt, turmeric powder, chilli
3 mins & vegetables except potatoes &
ginger paste.
sauce. Cook for 4 mins and stir in between.
3. Mix it nicely & continue cooking. Stir in
2. Add potatoes, soya sauce, vinegar, salt,
between.
pepper & chilli powder.
To Spread
3. Microwave high for 3 mins.
1. Spread it as a thin film on a thick
4. Apply butter on both sides of slices and
polythene sheet with the help of a flat
spread some potato mixture in a slight
bottom bowl.
heap on the round piece of each bread
and press.
2. Allow to cool & cut out 1”x 4” broad strips.
5. Sprinkle sesame seeds & press.
3. Roll the strips & arrange on the serving
dish.
6. Grease a baking tray.
For Tempering
7. Place gold coin on the tray. Set the Auto
cook menu (Sn14).
1. Put oil in a microwave safe dish. Add
14. Gold Coin (Sn14)
15. Khandvi (Sn15)
20

mustard seeds and green chillies. Cover lWater – ½ cup
the container and cook on microwave
lSoda-bi-carb – ½ tsp
high (100% power) for 3 mins.
lOil – 1 tsp
2. Sprinkle this tempering on khandvi.
lSalt to taste
3. Garnish it with coriander leaves & grated
lGrated coconut – 1 tbsp
coconut.
Method:
4. Serve with chutney.
1. In a bowl, mix rava, coconut, yogurt, oil
Cooking time: 11 mins
salt water and soda-bi- carb. Keep aside
for 15 mins.
SOUTH INDIAN RECIPES
2. Grease the idli stand.
3. Pour this batter into an idli stand. Keep the
Ingredients:
stand in the microwave oven.
lDaliya ( broken wheat) – ½ cup
4. Set the auto-cook menu (Sn17). Serve
lWater – 2½ cup
with coconut chutney.
lGreen peas – 1 tbsp
Cooking Time: 5 mins
lCarrot – 1 tbsp
lFrench beans – 2 tbsp
Ingredients:
lGhee – 2 tbsp
lRice – 1 cup (soaked for 30 mins)
lSalt to taste
lMoong dal – ½ cup (soaked and roasted)
lTurmeric powder – ¼ tsp
lWater – 1½ cup
lJeera powder – ½ tsp
lCoconut milk – ½ cup
lLemon juice – 1 tsp
lJaggery – ¼ cup (grated)
lPinch of hing ( asafoetida)
lGhee – 2 tbsp
Method:
lcardamom powder – a pinch
1. In a microwave safe bowl, add ghee, hing,
lRaisins – 1 tbsp
turmeric powder, jeera powder, carrot,
Method:
green peas, French beans and salt. Mix
1. In a microwave safe bowl, add rice, dal &
well.
water and mix well.
2. Keep the bowl in the microwave oven.
2. Keep the bowl in the microwave oven. Set
3. Set the auto cook menu (Sn16). Stir in
the auto cook menu (Sn18) and stir in
between.
between.
4. After the first 5 mins (when the display
3. After 5 mins (when the display shows
shows 14:00), add daliya & water and
15:00), add grated jaggery, coconut milk,
continue cooking.
ghee, cardamom powder and raisins.
5. Serve lukewarm add lemon juice into it.
Cover & continue cooking. Stir in
Cooking Time: 19 mins
between.
4. Sprinkle dry fruits and grated coconut on it.
Ingredients:
Cooking Time: 20 mins
lSemolina– 1 cup (roasted) rava (sooji)
lYogurt – 1 cup
Ingredients:
16. Porridge (Veg Daliya) (Sn16)
18. Pongal (Sn18)
17. Veg. Idli (Sn17)
19. Tomato Dosa (Sn19)
21

lGram flour (besan) – 1 cup lCoriander leaves – 1 tbsp (chopped)
lTomato – 1 (finely cut) lOil – 2 tbsp
lOnion – 2 (finely cut) lCurry leaves – few
lCoriander leaves – 1 tbsp (finely cut) lBoiled peas – 1tbsp
lTurmeric powder – ½ tsp lRoasted peanuts – 1 tbsp
lChilli powder – ½ tsp lWater – 2 cups
lSalt to taste lGreen chillies – 1 (chopped)
lGreen chilli – 1 (finely chopped) lUrud dal – 1 tsp (roasted)
lWater – to make a semi-thick consistency. lGinger – ½ tsp (chopped)
lSalt to taste
Method:
1. Mix everything except tomatoes. Make
Method:
semi-thick batter.
1. Mix all the ingredients in a microwave safe
2. Spread ¼ of this batter on a baking plate bowl.
(greased with oil) and add tomato pieces
2. Keep the bowl in the microwave oven.
in it.
3. Set the auto cook menu (Sn21). Stir in
3. Keep the plate in the microwave oven.
between.
4. Set the auto cook menu (Sn19).
4. Serve hot.
5. Serve with ketchup.
Cooking Time: 6 mins
Cooking Time: 5 mins (For 1 tomato dosa)
Ingredients:
Ingredients: (stuffing for poli)
lChana dal – 1 cup (cooked and mashed)
lOnion – 1 (finely chopped)
lNutmeg powder – ½ tsp
lGreen chilli – 1 (finely cut)
lJaggery – 1 cup (grated)
lCoriander leaves – 1 tbsp (finely cut)
lCardamom powder – ½ tsp
lThe instant idli batter (refer instant idli
lSaffron – ¼ tsp (soaked in warm milk)
recipe – Recipe No.17)
Method:
Method:
1. Mix all the ingredients in a microwave safe
1. Spread ¼ cup batter on a greased baking
bowl.
plate.
2. Keep the bowl in the microwave oven.
2. Spread onion, chilli, coriander leaves on
3. Set the auto cook menu (Sn22). Stir in
top of it.
between.
3. Keep the plate in the microwave oven.
4. Let it Cool.
4. Set auto cook menu (Sn20). Serve with
5. Make equal size balls for sweet puran
ketchup.
poli.
Cooking Time: 5 mins (For 1 onion uttapam)
Cooking Time: 15 mins
To Make Poli
Ingredients:
Ingredients:
lSemolina– 1 cup (roasted)sooji
lMaida – ½ kg
lOnion – ½ (chopped and cooked)
lOil –100 ml
lTomato – 1 (chopped)
22. Puran-Poli Stuffing (Sn22)
20. Onion Uttapam (Sn20)
21. Sooji Upma (Sn21)
22

lSalt to taste
lWater –1 cup
Ingredients:
Method:
lPrawns – ½ cup
1. In a deep container add maida, salt, oil
lPepper – 1tsp
and slowly add water. Make a smooth
lGarlic – 1tsp
dough. Keep the dough aside for ½ an
lPizza sauce – 2 tbsp
hour.
lCheese – ½ cup (shredded)
2. Prepare equal number of balls from the
lBrown bread – 4 slices
maida dough.
lButter – 2 tbsp
3. Roll out the dough ball and stuff with
lSalt to taste
puran stuffing (shaped into a ball).Make
Method:
into a ball.
1. Stir fry prawns with pepper, garlic & salt.
4. Roll out to make chapattis .It is called poli .
2. Apply little butter on both sides of bread.
5. Heat a tava and roast each poli.
3. Spread sauce on one side of the bread
6. Apply ghee on both sides when done.
and put the prawns.
7. Serve with hot cup of tea.
4. Put them on a microwave safe dish.
5. Sprinkle grated cheese on the top and
Ingredients:
keep the dish in the microwave oven.
lEggs – 2 (beaten)
6. Set the auto cook menu (Sn24).
lSalt and pepper to taste
7. Serve with ketchup.
lTomato puree – 2 tsp
Cooking Time: 20 mins
lOil – 1 tbsp
lOnion – 2 tbsp (chopped)
Ingredients:
lChilli powder – ¼ tsp
lCooked idly - 3 no (Mashed)
lTurmeric powder – ¼ tsp
lOnion - ½ (chopped & cooked)
lGaram masala – ¼ tsp (powder)
lTomato - ½ (chopped & cooked)
lCoriander leaves – 1tsp (chopped)
lCoriander leaves - 1tbsp (chopped)
Method:
lOil - 2 tbsp
1. Beat the eggs lightly.
lCurry leaves – few
2. In a microwave safe bowl, add all the
lBoiled peas - 1 tbsp
ingredients, except for the eggs and mix
lRoasted peanuts - 1 tbsp
well.
lWater – only for sprinkling
3. Keep the bowl in the microwave oven.
lGreen chillies -1tbsp
4. Set the auto cook menu (Sn23) and stir in
lUrud dal – 1 tsp
between.
lGinger – ½ tsp (chopped)
5. After the first 3 mins (when the display
shows 03:00), add the beaten eggs and
lSalt to taste
continue cooking.
Method:
6. Serve hot with toast and chapatti.
1. In a microwave safe bowl add oil, curry
Cooking Time: 6 mins
leaves, green chillies, ur a d dal a n d
24. Prawns On Toast (Sn24)
23. Egg Burji (Sn23)
25. Idli - Upma (Sn25)
23

ginger. Set the auto cook menu (Sn26).
2. Keep the bowl in the microwave oven. Cooking Time: 8 mins
3. Set the auto cook menu (Sn25). Stir in
between.
Ingredients:
4. After the first 2 mins are over (when the
lCorn – ½ cup (boiled)
display shows 04:00) add onion & tomato
lWhite sauce – ¼ cup
and continue cooking.
lBrown bread - 4
5. After 1 min (when the display show 03:00)
lButter - 2 tbsp
add mashed idli, peas & salt. Sprinkle
lChilli sauce – 1 tbsp
water, mix it nicely & continue cooking.
lTomato ketchup – 1 tbsp
6. Garnish with coriander leaves and
lSalt and pepper to taste
Roasted peanuts. Serve hot.
lCheese cubes – 2
Cooking time: 6 mins
Method:
CHINESE, THAI & WESTERN
1. Mix the boiled corn, white sauce, salt,
pepper and keep it aside.
Ingredients:
2. Apply butter on the bread slices (on one
Covering for dumpling
side).
lMaida – 1 cup
3. Spread the mixture on the other side of
the bread.
lSalt – ½ tsp
4. Put grated cheese on top.
lOil – 1 tsp
5. Put them on a microwave safe dish. Keep
For stuffing
the dish in the microwave oven.
lGrated cauliflower – ¼ cup
6. Set the auto cook menu (Sn27).
lCarrot & green peas – ¼ cup (boiled)
7. Serve hot with tomato ketchup and chilli
lGrated paneer – 50 gms
sauce.
lSalt, pepper, nutmeg powder – as per
Cooking Time: 15 mins
your taste
lSpinach – ½ cup (Finely chopped)
lButter and finely chopped garlic – 1 tbsp
Ingredients:
each
lOats – 1 cup
lPizza sauce – 4 tbsp
lMilk – 1 ½ cup
lGrated cheese – 3 tbsp
lSugar – ½ cup
Method:
lApple (grated) – 1
lSliced nuts – 1 tbsp
1. For the covering, mix the maida, oil & salt
with little water & make a soft dough.
lCardamom powder – ¼ tsp
2. Mix all the other ingredients for dumplings
Method:
together and stir fry. Roll small poories
1. Mix all the other ingredients in a
with kneaded maida. Fill with stuffing and
microwave safe bowl (except grated
shape into a ball. Keep the balls for
apple).
steaming on the idli stand.
2. Keep the bowl in the microwave oven. Set
3. Keep the stand in the microwave oven.
the auto cook menu (Sn28). Stir in
27. Creamy Corn Toast (Sn27)
26. Veg Dumpling (Sn26)
28. Oats (Oats Cooked With Milk) (Sn28)
24

between. 1. Mix the boiled moong, onion, tomato,
capsicum, panner, salt and pepper.
3. When the cooking is over, blend in the
grated apple. 2. Apply butter on both sides of bread.
4. Garnish with sliced nuts & serve. 3. Spread the above mixture on one side of
the bread.
Cooking Time: 8 mins
4. Sprinkle grated cheese on top of it. Place
another slice of bread on top of it.
Ingredients:
5. Put them in a microwave safe dish. Keep
lCream Cracker biscuit – 8
the dish in the microwave oven.
lGrated cheese – 2 tbsp
6. Set the auto cook menu (Sn30).
lBoiled rajmah – ½ cup
7. Enjoy with potato wafers and tomato
lTomato sauce – 2 tbsp
sauce.
lSalt to taste
Cooking Time: 18 mins
lRed chilli powder – ¼ tsp
lGreen chillies – 1 chopped
lOregano – ½ tsp
Ingredients:
lRoasted peanuts – few
lBurger buns – 4
lFresh cream – 2 tbsp
lMayonnaise – 1 tbsp
Method:
lTomato – 1 sliced
1. Mix all the above ingredients (except for
lOnion – 1 sliced
roasted peanuts and fresh cream)
lShredded lettuce – ½ cup
2. Spread 1 tbsp mixture on each biscuit.
lSalt and pepper to taste
3. Put them in a microwave safe dish. Keep
For the filling (for patties)
the dish in the microwave oven.
lCorn – ½ cup (boiled)
4. Set the auto cook menu (Sn29)
lPaneer – ½ cup (grated)
5. Serve with cream and then top it with the
lGreen chillies – 2 chopped
peanuts.
lCoriander leaves – 2 tbsp chopped
Cooking Time: 1 min
lBread crumbs – 2 tbsp
lCorn flour – 1 tbsp
Ingredients:
lGinger-garlic paste – 1 tsp
lBrown bread slices – 4
lSalt to taste
lTomato sauce – 2 tbsp
Method:
lMoong sprout – 1 tbsp (boiled)
For Patties:
lOnion – 1 chopped
1. In a bowl add ingredients for filling
lTomato – 1 chopped
thoroughly. Give a shape to the patties.
lCapsicum – 1 chopped
Grease baking plate with butter and place
lCheese grated – ½ cup
the patties.
lSalt and pepper to taste
2. Keep the plate in the microwave oven,
o
lCooked paneer – 2 tbsp
and preheat the oven at 220 C. When the
Method:
preheating is over set grill+convection
29. Bean Square (Sn29)
31. Burger (Paneer and Corn Burger)
(Sn31)
30. Grilled Sandwich (Sn30)
25

o
mode at 220 C for 10 mins Then turn the
lOnion – 1 slice
side again cook for 10 mins at same
lTomato – 1 slice
temperature.
lTomato ketchup – 2 tbsp
3. Patties are ready.
lMustard paste – 1 tbsp
Cooking Method:
Method:
1. Split the burger bun into 2 halves. Apply
Ingredients for sausages:
mayonnaise and then place the patty,
lChicken (without bone) – 500 gms
tomato, onion, shredded lettuce and
(grinded)
sprinkle salt and pepper. Place the other
lSalt to taste
half of the burger bun on top.
lPepper – ½ tsp (ground)
2. Put them on a microwave safe dish. Keep
lFennel seed – ½ tsp (ground)
the dish in the microwave oven.
lRed chilli flakes – ½ tsp
3. Set the auto cook menu (Sn31).
lOil – 1 tbsp
4. Serve hot with French fries.
lBread crumbs – 2 tbsp
Cooking Time: 1 min
lMaida – 3 tbsp (for coating)
Method:
Ingredients:
1. Mix the spices with the Chicken and
lCrushed corn chips – 1 cup
bread crumbs. Mix thoroughly. From the
lOnion – 2 (chopped finely)
mixture make 6 sausages and spread
lCoriander cumin powder – 2 tsp
Maida on a plate and coat the sausages.
lChilli powder – 1 tsp
2. Grease a baking plate; put the sausages
lOil – 1 tbsp
in the baking plate. Keep the plate in the
lPizza sauce – cup
microwave oven. Preheat the oven at
o
l
22 C. When the preheating is complete,
Cheese – 2 cubes
o
set grill convection mode at 220 C for 10
lSalt to taste
mins. Turn the side and cook for 10 mins.
Method:
3. Sausages are ready.
1. Heat the oil. Fry onion for 2-3 mins. Add
4. Split the hotdog rolls and spread the inner
Coriander cumin powder, chilli powder
side with mustard paste. Place a
and salt. Cover & cook till onions are soft.
sausage. Inside the hot dog roll and top it
2. Grease the flat baking dish. Spread
with onion and tomato slice.
cooked onion. On top of the onions
5. Place it on a microwave safe dish. Keep
spread crushed corn chips. Pour hot
the dish in the microwave oven.
sauce, sprinkle cheese & set the auto
6. Set the auto cook menu (Sn33).
cook menu (Sn32).
7. Drizzle with tomato sauce and serve at
Cooking time: 5 mins
once.
8. Note: In each roll, place two sausages.
Ingredients:
Cooking time :3 mins
lChicken sausages – 4 (cooked with oil)
lOil – 1 tbsp
Ingredients:
lHotdog rolls – 2
lButter – 2 tbsp
32. Baked Corn Chips (Sn32)
33. Chicken Hotdog (Sn33)
34. Country Style Omelette (Sn34)
26

lWafers – 150gms slice.
lOnion – 1 chopped 4. Sprinkle salt and pepper.
lCapsicum – 1 chopped 5. Apply cheese spread on another slice
and place it on top of the stuffed first slice
lEggs – 4
(with the cheese side facing down).
lMilk – 2 tbsp
6. Put it on a microwave safe dish. Keep the
lCoriander – 2 tbsp
dish in the microwave oven.
lCheese grated – 4 tbsp
7. Set the auto cook menu (Sn35).
lSalt to taste
Cooking time: 20 mins
Method:
1. Apply butter to a microwave proof baking
Ingredients:
dish.
lEggs – 2
2. Layer the base with the crushed wafers.
lOil – 1 tbsp
3. Sprinkle capsicum & onions and cook for
lWater – 1 tbsp,
2 mins (micro high).
lSalt and pepper – to taste
4. Beat the eggs with milk and salt in a bowl.
For toast
5. Pour the egg mixture onto the wafers and
cover with cheese.
lButter – 2 tsp
6. Keep the dish in the microwave oven.
lBrown bread slice – 2
7. Set the auto cook menu (Sn34).
lGrated cheese – 2 tbsp
8. Serve hot garnished with coriander.
lMake a toast out of it
Cooking time: 8 mins
Method:
1. In a deep plate, put oil.
Ingredients:
2. Carefully break the eggs onto the plate.
lBrown bread slices – 8 3. Egg yolk should be pierced with fork.
lTomato – 1 sliced 4. Cover with cling film.
lLettuce leaves – 4 5. Put it on a microwave safe dish. Keep the
dish in the microwave oven.
lSalt and pepper – to taste
6. Set the auto cook menu (Sn36). Sprinkle
For Filling:
salt & pepper
lChicken patties – 4 oCheese spread – ½
7. For serving, to make a toast, apply butter
cup
on both sides of the bread. Put grated
lMayonnaise – 2 tbsp
cheese on the top side. Cook on
lCelery – 2 tbsp chopped
o
convection mode at 200 C for 12 mins.
lSpring onion – 2 (finely chopped)
The toast will be ready.
lFreshly grounded pepper
8. Put poached egg on toast & serve hot.
Method:
Cooking time: 4 mins
1. Apply a generous layer of mayonnaise on
the bread slice.
Ingredients:
2. Place a lettuce leaf and spring onion on a
lLarge Cabbage – 1 (leaves separated)
slice of bread.
For Dough
3. Top it with a chicken patty, celery & tomato
36. Poached Egg (Sn36)
35. Chicken Sandwich (Sn35)
37. Momos (Sn37)
27

lFlour – 2 cups lBaking powder – 1 tsp
lWater – 175 ml lSalt to taste
lSalt – a pinch lOil –1 tbsp (for brushing)
For Filling
Method:
lPaneer – ½ cup (finely diced)
1. Combine grated potato & onion.
lMushroom - ¼ cup (finely chopped)
2. Place in a strainer to allow liquid to drain
off into a bowl. When starch has settled,
lCabbage - ½ cup (chopped)
pour water off and starch back to
lGinger –garlic paste – 1 tsp
potatoes. 3.Pour hot milk over the
lSpring Onions - ¼ cup (chopped)
potatoes, and add the beaten egg.
lSalt to taste
4. Sift together flour, seasoning and baking
lOil - 1 tbsp Method
power, then blend into potato mixture.
For Dough
5. Divide the mixture into 8 equal portions
1. Mix all the ingredients in a big bowl and
and pat it flat. Put it on a baking plate.
make smooth dough and keep aside for
6. Grease the pancakes.
20 mins.
7. Keep the baking plate in the microwave
For Filling
oven and set the auto cook menu. (Sn38)
2. In a microwave safe bowl add oil, ginger
8. After the first 10 mins (Display will show
garlic paste, spring onions and mix well.
10:00) continue cooking.
Cook on microwave high at 100% power
9. Serve with green chutney.
level for 3 mins. Stir in between.
Cooking time: 20 mins
3. Add paneer, mushroom, cabbage and
salt. Mix well and cook on high power for 3
mins.
Ingredients:
Preparation
lFrench bread -1 loaf
1. Roll out dough and cut into 2” round
lButter – 3 tbsp (softened)
pieces. Add 1 tsp of prepared filling in the
lGarlic Cloves -8 nos (crushed)
centre of each round.
Method:
2. Fold over, crimping ends with the thumb
1. Mix garlic with butter and mix thoroughly.
and forefinger to seal.
2. Cut loaf into 2” slices.
3. Arrange momos on the steaming tray.
3. Spread garlic butter on both sides of each
4. Set the auto cook menu (Sn37).
bread slice.
5. Serve with soup or chilli tomato sauce.
4. Put it on baking plate; keep the plate in the
Cooking time: 7 mins
microwave oven. Set the auto cook menu
(Sn39)
Ingredients:
5. After the first 9 mins (display will show
11.00) turn the side and continue
lGrated Potatoes – ½ cup (boiled)
cooking.
lRice flour – 3 tbsp
Cooking time: 20 mins
lOnion – 1 medium (grated)
lMilk – ¼ cup (boiled)
lEgg – 1 (beater)
Ingredients:
39. Garlic Bread (Sn39)
38. Potato pan-cakes (Sn38)
40. Caramel Popcorn (Sn40)
28

lPopped popcorn – 200 gms the auto cook menu (Sn41).
lBrown sugar – 100 gms 3. After the first 8 mins (display will show
10.00) stir in between and continue
lMargarine -75 gms
cooking.
lLight corn syrup-2 tbsp
4. When the cooking is complete, Mix all the
lSalt – tsp
powders thoroughly and sprinkle over the
lVanilla essence – ½ tsp
wedges.
lBaking soda – ½ tsp
5. Serve hot.
Method
Cooking time: 18 mins
1. In a microwave safe bowl, combine the
CURRIES / MAIN COURSE
brown sugar, margarine, corn syrup, salt
and vanilla essence and mix well.
NORTH INDIAN RECIPES
2. Keep the bowl in the microwave oven, set
Note:
the auto cook menu (Sn40), and stir in
l1 cup mixed vegetables: carrot, beans,
between.
cauliflower, peas.
3. After the first 3 mins (display will show
lHow to boil vegetables: for 1 cup
01.00), add baking soda and popcorn
vegetables, add ½ cup of water to the
and mix well. Continue cooking.
vegetables. Cook on microwave high for
4. Cool a little before serving.
9 mins and allow it to stand for some time.
Cooking time: 4 mins
lTo stir fry 1 cup vegetables: in a glass
bowl, add 1 tbsp oil & mix vegetables on
Ingredients:
microwave high for 5 mins. Stir in
lPotatoes – 4 nos (semi boiled)
between.
lOil – 3 tbsp •Coriander powder -1tsp
For Tempering:
lCumin powder -1 tsp
lIn microwave safe bowl add oil, any
lRed chilli powder – 1 tsp
spices (mentioned in recipe), ginger –
garlic paste microwave on 80% power for
lTurmeric powder – ¼ tsp
1 min, add chopped onion mix thoroughly
lPepper powder – ½ tsp
and microwave on 80% power for 4 mins.
lCinnamon powder – tsp
Stir in between, add chopped tomatoes
lCloves powder – tsp
and microwave on 80% power for 3 mins.
lSalt to taste
Tempering is ready.
Method
*NOTE: Kindly refer to page no 34 for recipes
1. Peel potatoes and cut into wedges. Add
with boiling and tempering preparation.
oil and spread out evenly on a greased
baking plate.
Ingredients:
2. Keep the plate in the microwave oven. Set
lGram flour (besan) – 1 tbsp
41. Potato Wedges (Sn41)
42. Veg Kadi (Cu1)
29

lSour curd – 1 cup lBlack pepper corn – 2 no.
lWater – 3 cups lTurmeric – ½ tsp
lTurmeric – ¼ tsp lRed chilli powder – ½ tsp
lSalt to taste lAmchoor – ¼ tsp
lChilli powder – ½ tsp lDhania powder – 1 tsp
lTempering (cooked):
Method:
lOil – 2 tbsp
1. Mix dal and water in microwave safe bowl.
lGreen chilli – 2-3
2. Keep the bowl in the microwave oven.
lCumin seeds – ¼ tsp
3. Set the auto cook menu (Cu2). Stir in
between
lMustard – ¼ tsp
4. Lastly, pour the tempering on the dal.
lDry red chillies – 1-2
Sprinkle coriander leaves and mix gently
lVegetables (boiled):
with a fork. Serve hot.
lPotato – 1
Cooking time: 40 mins
lFrench beans – 5-6 (chopped)
lLady finger – 4-5 (chopped)
Ingredients:
lPumpkin – 50gm (chopped)
lPaneer – 200 gm (cut into pieces)
Method:
lButter – 2 tbsp
1. Mix all the ingredients of kadi till its
lGhee – 2 tbsp
smooth. 2.Put them in a deep bowl and
add the cooked vegetables.
lBay leaves (tej patta) – 2
3. Keep the bowl in the microwave oven.
lHoney – 1 tbsp
4. Set the auto cook menu (Cu1). Stir in
lKasuri methi – 1 tbsp
between.
lCream – 4 tbsp
5. Lastly, pour the tempering over the kadhi.
lSalt to taste
Serve hot.
lRed chilli powder – ½ tsp
Cooking time: 12 mins
lGaram masala – ½ tsp
lTomato ketchup – 1 tspFor paste
Ingredients:
lTomato – 3Onion – 2
lBlack beans (dhuli urad dal) (split) – ¾
lGreen chilli – 2Garlic – 1 tbsp
cup (soaked in 1 ½ cup water for 2 hours)
lGinger – 1 tbspDhania jeera – 1 tsp
lWater - 4 cups
lKaju – 4 tbsp (soaked)Water – ½ cup
lFor temper (cooked):
lGreen cardamom – 2
lOnion – 1 (sliced)
Method:
lGinger – 1 tbsp (grated)
1. In a microwave safe bowl, add all the
lOil – 3 tbsp
ingredients and mix well.
lSalt to taste
2. Keep the bowl in the microwave oven.
lTomato – 1 (chopped)
3. Set the auto cook menu (cu3). Stir in
lGreen chilli – 1 (sliced)
between. Serve hot.
lHing – a pinch
Cooking time: 10 mins
lJeera powder – ½ tsp
44. Paneer Makhani (Cu3)
43. Dal Tadka (Cu2)
30

Cooking time: 10 mins
Ingredients:
For Kofta:
Ingredients:
Kabuli chana – 1 cup (soaked & boiled)
Potatoes – 4 medium sized (boiled)
l
l
lCottage cheese – 100 gms (paneer)
For paste
Tomato puree – 1/3 cup
Green chillies – 1 chopped
l
l
Ginger garlic paste – 1 tsp
Corn flour – ¼ cup
l
l
Green chilli – 2-3 (chopped)
Salt to taste
l
l
Coriander leaves – 2 tbsp (chopped)
Raisins – ¼ cup
l
l
Jeera powder – ½ tsp
Garam masala – 1 tbsp
l
l
Aniseed powder – ½ tsp
Elaichi powder – ¼ tbsp
l
l
Garam masala – 1 tsp
Hara dhania (coriander leaves) – 2 tbsp
l
l
lGhee – 1 tbsp
For masala paste:
Salt to taste
Onion – 2 (brown)
l
l
Tomato puree – ½ cup
l
l
For roasting
Onion – 2 (cut fine)
Ginger garlic & green chilli paste – 1 tbsp
l
l
lCoriander powder – 1 tbsp
Method:
lSalt to taste
1. For roasting onions, spread onion on flat
lMawa (khoya)- ½ cup
greased baking dish. Micro-high for 5
mins. Stir in between.
Other ingredients
2. In a microwave safe bowl, add ghee,
lOil – 3 tbsp
roasted onion, paste, cooked chana,
lFor garnish
garam masala & salt. Mix well.
lFresh cream – ½ cup
3. Put this bowl on microwave safe plate.
lKasuri methi – 1 tbsp
4. Set the auto cook menu (Cu5). Stir in
lRose water – ¼ tbsp
between.
Method:
5. Garnish with coriander leaves.
1. Mix mashed potatoes, paneer, green
Cooking time: 10 mins
chilli, corn flour, salt, raisins, garam
masala, elaichi powder, hara dhania.
Ingredients:
2. Mix well. Divide into equal balls. Put it in
lCapsicum – 300gms
microwave safe flat dish at 70% power
level for 5 mins or bake it.
lCheese – ½ cup grated
3. In microwave safe bowl, add oil and
lSalt to taste
masala paste.
lOil – for brushing
4. Keep the bowl in the microwave oven.
For stuffing:
5. Set the auto cook menu (Cu4). Stir in
lPotatoes – 3 medium size (boiled and
between.
mashed)
6. Place warm koftas in a serving dish and
lCottage cheese – 8-10 (grind coarsely)
pour hot gravy. Garnish with fresh cream,
lGinger – 1 tsp paste
kasoori methi and rose water.
lGreen chilli – ½ tsp paste
45. Malai Kofta (Cu4)
46. Channa Masala (Cu5)
47. Stuffed Capsicum (Cu6)
31

lAmchoor – ½ tsp
lGaram masala powder – ½ tsp
Ingredients:
lRed chilli powder – 1 tsp
lVegetables:
lCumin powder – 1 tsp
lBoiled Cauliflower, green peas, carrots,
lCoriander leaves – few
potato, beans – 300gms
lSalt and black pepper to taste
lPaneer cubes – 100gms
lOil – 1 tsp
lFor paste
lCoriander seeds – 1 tsp
Method:
lJeera – 1 tsp
1. Cut capsicum from the top. Remove the
seeds and make it hollow. Similarly, slice
lKashmiri red chillies – 1
it off from the bottom so that the capsicum
lCardamoms – 3
stands steady.
lCinnamon – 3
2. Mix the mashed potatoes, paneer, and all
lCloves – 3
the other ingredients and cook it.
lOil/ghee – 1tbsp
3. Stuff the mixture into the capsicum.
lOnion – 1
4. Keep the bowl in the microwave oven.
lCashew – 1 tbsp (soaked in 1 tsp water)
5. Set the auto cook menu (Cu6). Serve hot.
lGarlic – 1tbsp
Cooking time: 7 mins
lRed chilli powder – ½ tsp
lSalt to taste
Ingredients:
lGreen chilli – 1 tsp paste
lLadies finger– ½ kg
lKhoya – ¼ cupo Tomato puree – 2 tbsp
lGreen chilli – 1 (chopped)
lFor garnish
lGinger – 1 tsp paste
lFresh cream – 2 tbspoCoriander leaves –
lFennel seeds – ¼ tsp
1 tbsp
lOil – 2 tsp
Method:
lCumin seeds – 1 tsp
1. In a microwave safe bowl, add the oil,
lCoriander powder – 1 tbsp
masala paste & ¼ cup water to the bowl.
lDry mango powder – 1 tsp
Place the bowl in the microwave oven.
lRed chilli powder – ½ tsp
2. Set the auto cook menu (Cu8).
lGrated coconut – ½ tsp
3. After 8 mins (when display shows 07:00),
add boiled vegetables & paneer cubes.
lSalt to taste
Continue cooking.
Method:
4. Garnish with beaten fresh cream &
1. In a microwave safe bowl, add all
coriander leaves.
ingredients and mix well.
Cooking time: 15 mins
2. Sprinkle 1tsp water.
3. Keep the bowl in the microwave oven.
Ingredients:
4. Set the auto cook menu (Cu7). Stir in
lBoneless chicken pieces – 500 gms
between.
lFor marinating (1)
Cooking time: 10 mins
49. Navratna Kurma (Cu8)
48. Bhindi Sabzi (Cu7)
50. Nawabi Murg (Cu9)
32

lGinger-garlic paste – 1 ½ tbsp lAsafoetida (hing) – a pinch
lGreen chillies paste – 2 tsp, salt to taste lBlack pepper – ½ tsp
lFor marinating (2) lBlack cardamom – 1 pounded
lCurd – 1 cup lBay leaf – 1
lCold milk – ½ cup lKashmiri red chilli powder – 1
lFresh cream – ½ cup lRed chilli – 1 tsp
lFor paste lCoriander powder – 1 tbsp
lOnion – 2 (chopped) lTomato puree – 3 tbsp
lCloves – 4no lFor garnish:
lCinnamon – 4no lCoriander – 1 tbsp
lCardamom powder – ½ tsp lButter – 1 tbsp
lCashew nuts – 3 tbsp (soaked in 4tsp
Method:
water)
1. Whip the curd with salt and marinate the
lGhee – 2tbsp
meat overnight (min 8 hrs).
lOther ingredients – salt (to taste)
2. Add the paste and oil in a microwave safe
bowl.
Method:
3. Keep the bowl in the microwave oven.
1. Marinate chicken with marination (1) for ½ hr
4. Set the auto cook menu (Cu10). Stir in
2. Beat curd till its smooth. Mix with milk and
between.
fresh cream. Pour over the chicken and
keep it covered for 1 hr. 5. After the first 5 mins (when the display
shows 20:00), add the marinated meat
3. In a microwave safe bowl, add the paste.
and ½ cup of water. Continue cooking
4. Keep the bowl in the microwave oven.
and stir in between.
5. Set the auto cook menu(Cu9)and stir in
6. Serve it garnished with coriander and
between.
butter.
6. After the first 5 mins (when the display
Cooking time: 25 mins
shows 19:00), add marinated chicken, 1
cup of water & salt and continue cooking.
Stir in between.
Ingredients:
Cooking time: 24 mins
lChicken kheema – 250 gm (minced)
lPotato – 2 (boiled)
Ingredients
lGinger garlic paste – 1tsp
lBoneless meat – 500gms lChilli paste – 1tsp
lOil – 2 tbsp lFresh coriander leaves – 2 tbsp
lSalt to taste lCumin powder – 1tsp
lFor marination: lGaram masala powder – 1 tsp
lCurd – 1 cup lKashmiri red chilli powder – 1 tsp
lSalt to taste lSalt to taste
lFor the paste: lOil – 1 tsp
lOnion – 2 (chopped)
Method:
lGinger – 1 tsp
1. Mix and grind the green chilli, coriander
52. Kheema Balls With Gravy (Cu11)
51. Sukha Gosht (Cu10)
33

leaves to get a smooth mixture. lCream – 2 tbsp
2. Mix kheema, potato, ginger, garlic, chilli lOil -2 tbsp
paste, cumin powder, garam masala,
lSalt to taste
kashmiri red chilli, salt, coriander leaves
Method
and the grinded mixture.
1. In a microwave safe bowl combine oil,
3. Divide mixture into equal portions and
chopped onion, ginger and green chillies.
make balls.
2. Keep the bowl in the microwave oven, set
4. Place these balls in a greased microwave
the auto cook menu (Cu13).
safe flat dish.
3. After the first 4 mins (display will show
5. Keep the dish in the microwave oven.
06.00) stir in between.
6. Set the auto cook menu (Cu11)
4. Add spinach puree, coriander powder,
7. Serve with thick gravy.
turmeric powder, gram masala mix well
Cooking time: 30 mins
continue cooking.
5. When more 3 mins are over [display will
show 03.00] stir in between.
Ingredients:
6. Add cream, paneer and salt mix well
lPotatoes – 250 gms [boiled and
continues cooking.
chopped]
7. Serve hot.
lCumin seeds – 1 tsp [jeera]
Cooking time: 10.00 mins
lOil -2 tbsp
lSalt to taste
Ingredients:
Method
lGreen peas – 1 cup (boiled)
1. In a microwave safe boil add oil & cumin
seeds and set the auto cook menu lCloves -2 no
(Cu12).
lAsafoetida – a pinch
2. After first 3 mins [when display will show
lKhoya – ½ cup (grated)
06.00] stir in between.
lTomatoes – ¼ cup (finely chopped)
3. Add boiled and chopped potatoes and
lGreen chillies – 1 (finely chopped)
salt mix well continues cooking.
lCoriander powder – 1 tbsp
4. Serve with chapatti.
lDry ginger powder – ½ tsp
Cooking time: 9 mins
lGaram masala powder- ½ tsp
lGinger – 1 tsp (paste)
Ingredients:
lChilli powder – ½ tsp
lSpinach – 1 cup (boiled and pureed)
lGhee -1 tbsp
lPaneer- ½ cup (cut into 1” cube)
lSalt to taste
lOnion -1/2 cup (chopped)
lWater – ¼ cup
lGinger -1/2 tsp (paste)
lFor the garnish
lGreen chillies – 1 (finely chopped)
lChopped coriander – 2 tbsp
lCoriander powder – 1 tsp
Method
lTurmeric powder – ¼ tsp
1. In a microwave safe bowl combine ghee
lGram masala powder – ½ tsp
and cloves. Keep the bowl in the
53. Aloo Jeera (Cu12)
55. Khoya Mutter (Cu14)
54. Palak Paneer (Cu13)
34

microwave oven and set the auto cook brinjal, drumstick and ½ cup of water.
menu (Cu14). Keep the bowl in the microwave oven.
Micro-high (100% power) for 5 mins.
2. After the first 2 mins, stir in between
Drain the water. Keep the vegetables
[display will show 09.00]. Add asafoetida
aside.
and mix well. Continue cooking.
3. In a microwave safe bowl add Tur dal and
3. After 1 min (display will show 08.00) add
water. Set the auto cook menu (Cu15).
green chillies, coriander powder, dry
After the first 25 mins (when display
ginger powder, gram masala powder,
shows 05:00), add the boiled vegetables,
ginger, chilli powder along with water mix
jaggery, sambar powder, salt & the
well and continue cooking.
tamarind pulp. Stir in between.
4. After more 5 mins are over stir in between
4. After the sambar is done, pour the
[display will show 03.00] add tomatoes,
tempering & cover it again.
peas, mava and salt. Mix well and
continue cooking. 5. Serve hot with rice or idli.
5. Serve hot, garnished with the coriander. Cooking time: 30 mins
Cooking time -11.00 mins
Ingredients:
SOUTH INDIAN RECIPES
l1 ½ cups thick sev.
lFor paste:
Ingredients:
lOil – 1
lTur dal – ½ cup (soaked overnight)
l¾ cup tomato puree
lWater – 2 cups
l½ tsp jeera powder
lVegetables:
lHing – a pinch
lPumpkin – ½ cup (chopped)
l½ tsp ginger paste
lBrinjal – 1 small (chopped)
l¼ tsp turmeric powder
lDrumstick – 4 pieces (peeled and cut)
l½ tsp dhania powder
lOther ingredients:
l1 tsp sugar – to taste
lTamarind pulp - 2 tbsp
lRed chilli powder– 1 tsp
lSalt to taste
lSalt to taste oWater – ½ cup
lAsafoetida (hing) – ¼ tsp
lFor garnish:
lSambar powder – 2 tbsp
lCoriander – 2tsp
lOil – 1 tbsp
lThick sev – 1tsp
lOnion – 1 sliced
Method:
lMustard seeds – ½ tsp
1. In a microwave safe bowl, add all the
lCurry leaves – few
ingredients, mix well, except for the thick
lJaggery – 1 tbsp
sev.
lTomato – 1 (chopped)
2. Keep the bowl in the microwave oven.
Method:
3. Set the auto cook menu (Cu16).
1. For tempering, cook oil, mustard seeds,
4. After 4 mins (when the display shows
curry leaves & the hing together.
05:00), add ½ cup of water & continue
2. In a microwave safe bowl, add pumpkin,
cooking. 5.Serve hot & garnish with
57. Sev Tomato Curry (Cu16)
56. Sambhar (Cu15)
35

coriander and thick sev. lOil – 2 tsp
Cooking time: 9 mins lCurry leaves – 5
lRed chilli – 2 dry
lWater - 6 cups
Ingredients:
lSalt and black pepper – to taste
lMix vegetables – 150gm (carrot, raw
Method:
banana, French beans, pumpkins)
Tempering
1. In a microwave safe bowl, add all the
ingredients and mix well.
lCurry leaves – 5
2. Keep the bowl in the microwave oven.
lOil – 2 tbsp
3. Set the auto cook menu (Cu18). stir in
lSalt to taste
between.
For paste
4. Serve hot with rice.
lOnions – 2
Cooking time: 12 mins 60.
lTomatoes – 1
lCoconut – ½ cup
Ingredients:
lGinger garlic paste – 1tbsp
lMixed boiled vegetables – 250gm (carrot,
lCoriander seeds – 1 tbsp
cauliflower, french beans, green peas,
lWhole red chillies – 2
potatoes)
lGaram masala powder – 1 tbsp
lTomatoes – ½ cup (chopped)
lWater – 2 cups
lGaram masala – 1 ½ tsp
lGreen chillies - 2
lOil – 2 tbsp
Method:
lWater – ½ cup
1. In a microwave safe bowl, add masala
lCoriander – 1 tbsp (chopped)
paste & oil mix well.
lSalt to taste
2. Keep the bowl in the microwave oven.
lFor paste:
3. Set the auto cook menu (Cu17). Stir in
lDry coconut – ¼ cup
between.
lDry chillies – 1
4. After 5 mins (when the display shows
12:00), add the vegetables & stir in lGreen chillies – 1
between.
lOnion – 1
5. Lastly, pour the tempering. Garnish with
lSesame seeds (Til) - 1tbsp
coriander leaves.
lGarlic – 1 tbsp
6. Serve hot.
lKhus khus – 1 tbsp
Cooking time: 17 mins
lGinger – 1 tbsp
Method:
Ingredients:
1. Roast the ingredients for paste in little oil
lTomatoes – 5 large (cooked and pureed)
& make the paste with little water.
lTamarind pulp – 4 tsp
2. In a microwave safe bowl, add the oil,
masala paste & tomato and mix well.
lRed chilli powder – 1 tsp
3. Keep the bowl in the microwave oven.
lPowdered roasted Jeera – 1 tsp
4. Set the auto cook menu (Cu19). Stir in
lHing – a pinch
58. Veg With Coconut Curry (Cu17)
60. Veg Kolhapuri (Cu19)
59. Tomato Rasam (Cu18)
36

between. lOil – 3 tbsp
5. After 5 mins (when the display shows lBay leaf – 1
13:00), add the boiled vegetables, water,
lFennel seeds – 2 tbsp
salt & garam masala. Garnish with
lCinnamon – 2 pieces (crushed)
coriander.
lFor paste:
6. Serve hot.
lCoriander seeds - 2 tbsp
Cooking time : 18 mins
lCumin – 1 tbsp
lBlack pepper corn – ½ tsp
Ingredients
lPoppy seeds – 1tbsp
lPotatoes – 250gm (boiled)
lCoconut – ¼ cup
lOil – 1 tbsp
lCashew nuts – 2 tbsp (soaked in water)
lFor paste:
lCloves – 2
lJeera – ½ tsp
lOnion – 1 cup (chopped)
lCoriander – 1 tsp (powdered)
lGinger garlic paste – 1 tbsp
lFennel seeds – 1tsp (powdered Methi ke
lTomato puree – 2 tbsp
daane)
lSalt to taste
lFenugreek leaves – 1 tsp
lWater – 3 tbsp
lRed chilli powder – 1tsp
Method:
lHing – a pinch
1. In a microwave safe bowl add the paste
lGaram masala – ½ tsp
and mix well.
lWater – ½ cup
2. Keep the bowl in the microwave oven.
lSalt and pepper – to taste
3. Set the auto cook menu (Cu21). Stir in
lFor Garnish:
between.
lKasuri methi - 1 tbsp
4. After 8 mins (when the display shows
17:00), add the other ingredients and
Method:
continue cooking.
1. Mix the paste, oil & jeera and put it in
5. Serve hot.
microwave safe bowl.
Cooking time: 25 mins
2. Keep the bowl in the microwave oven.
3. Set the auto cook menu (Cu20). Stir in
between.
Ingredients:
4. After 3 mins (when the display shows
lPomfret – 500gm (cut into 1 ½ cm thick
05:00), add the boiled potatoes, crushed
slices)
kasuri methi , garam masala & salt, water
lOil – 1 tsp
and continue cooking.
lSalt to taste
5. Serve garnished with kasuri methi,
For marination
coriander leaves and with hot puri.
lChilli powder – 1 tsp
Cooking time: 8 mins
lTurmeric powder – ½ tsp
lPepper powder – ¼ tsp
Ingredients:
lCumin powder – ¼ tsp
lChicken pieces – 750 gms
lFenugreek seeds – ¼ tsp
61. Potato Masala (Cu20)
63. Fish Curry (Cu22)
62. Chettinad Chicken Curry (Cu21)
37

lTamarind paste – 1tsp
lFor paste
Ingredients:
lOnion – 2 chopped
lPrawns – 500gms(small sized)
lGreen chilli – 1 chopped
lOil – 2 tsp
lGinger paste – 2 tsp
lSalt and pepper – to taste
Method:
lFor paste:
1. Mix all the marinated ingredients with fish
lOnion – 1 chopped
and keep it aside for ½ hr.
lGinger, garlic paste – 1tsp
2. In a microwave safe bowl, add the paste
lGreen chilli paste – 1 tsp
ingredients.
lRed chilli powder – 1 tsp
3. Keep the bowl in the microwave oven.
lGaram masala powder – ½ tsp
4. Set the auto cook menu (Cu22).
lTomato sauce – 2 tbsp
5. After the first 5 mins (when the display
lSoya sauce – 1tbsp
shows 07:00), add the marinated fish & ½
lTomato puree – ¼ cup
a cup of water and continue cooking.
Method:
6. Serve hot with rice.
1. Wash the prawns thoroughly under
Cooking time: 12 mins
running water and then remove the
excess water. Add salt and keep aside for
Ingredients:
½ hr.
lEggs – 3 (boiled and sliced)
2. In a microwave safe bowl, put all the
lFor paste
ingredients for paste and mix well.
lOnion – 1 chopped
3. Keep the bowl in the microwave oven.
lGreen chilli – 1 chopped
4. Set the auto cook menu (Cu24). Stir in
between.
lTomato puree – 1 tbsp
5. After the first 6 mins (when display shoes
lTurmeric powder – ¼ tsp
09:00), add the prawns and continue
lOil – 2tbsp
cooking. Stir in between.
lSalt to taste
6. Serve hot with noodles.
lWater – ½ cup
Cooking time: 15 mins
Method:
1. In a microwave safe bowl, put all the
Ingredients:
ingredients except eggs. Mix well.
lSpilt green gram – ¾ cup (moo ng dal
2. Keep the bowl in the microwave oven.
dhuli soak dal for 5 hours)
3. Set the auto cook menu (Cu23). Stir in
lTurmeric powder - 1 tbsp
between.
lWater – 2 ½ cup
4. After the first 9 mins (when the display
lSpinach – ½ cup (washed and shredded )
shows 03:00), add the sliced eggs &
continue cooking.
lOil – 2 tbsp
5. Serve hot.
lAsafoetida – a pinch
Cooking time: 12 mins
lCumin seeds – 1 tbsp
65. Spicy Prawns (Cu24)
64. Egg Curry (Cu23)
66. Palak Wali Dal (Cu25)
38

lOnions – 2 medium sized (finely chopped ) lCurry leaves – 10 no
lGreen chillies – 2 no (finely chopped ) lCorn flours – 1 tsp (mixed with 1 tbsp
water)
lGinger – 1 tsp (chopped)
lOil -2 tbsp
lGarlic – 1 tsp
lSalt –to taste Method
lLemon juice – 1 tsp
1. In a microwave safe bowl add oil,
lSalt – as per taste
peppercorn, ginger and chilli and set the
Method:
auto cook menu (Cu26).
Preparation for dal
2. After the first 3 mins stir in between
1. In a microwave safe boil add moong dal
[display will show 11.00] add onions and
with turmeric powder and water, mix
curry leaves mix well and continue
thoroughly and cook on microwave high
cooking.
for 30 mins, till dal is fully cooked.
3. After 5 mins stir in between [display will
Cooking method
show 06.00] add boiled vegetables,
2. In a microwave safe bowl add oil,
coconut milk, corn flower paste and salt.
asafoetida and cumin seeds mix well,
Mix well and continue cooking. Stir in
keep the bowl in the microwave oven and
between
set the auto cook menu (Cu25).
4. Serve hot with appams or rice.
3. After the first 2mins [display will show
Cooking time: 14.00 mins
13.00], stir in between, add chopped
onions, green chillies mix well and
Ingredients:
continue cooking.
lTur dal – ½ cup (boiled and churn well )
4. After 5 mins stir in between [display will
show 08.00] addginger and garlic mix
lWater -1 cup
well and continue cooking.
lGinger and chills paste -1 tsp
5. After more 2 mins are over stir in between
lKokum – 5 pieces
[display will show 06.00] add boiled dal ,
lJaggery – 3 tbsp
shredded spinach , lemon juice and salt
lTurmeric powder – ½ tsp
mix well and continue cooking. Stir in
lSmall reddish – 2 no (cut into slices )
between.
lSalt to taste For Tempering
6. Serve hot
lGreen chilli – 1 [chopped]
Cooking time: 15.00 mins
lMustard seeds - ¼ tsp
lCumin seeds – ¼ tsp
Ingredients:
lAsafoetida– a pinch
lMixed vegetables – 1 cup [carrot,
lCurry leaves – 5 no
cauliflower, French beans (diced and
lFenugreek seeds – ¼ tsp
boiled)]
lGhee – 1 tbsp
lCoconut milk – 1 cup
Method
lPepper corn – 8 nos
1. In a microwave safe bowl add churned
lGinger – 1 tbsp (sliced)
dal, water, ginger – chilli paste, kokum,
lGreen chilli – 1 no (sliced )
jaggery, turmeric powder, radish and salt.
lOnion – ½ cup (sliced)
Mix well, set the auto cook menu (Cu27).
68. Osaman (Cu27)
67. Veg Stew (Cu26)
39

Stir in between. seeds and onions and cook at 80% power
level for 6 mins.
Cooking time: 15.00 mins
5. Mix masala potatoes with cooked onions,
For tempering
stuff the stuffing in parwal.
2. In a microwave safe bowl add ghee,
Cooking Method:
mustard seeds, cumin seeds,
methiseeds, hing, curry leaves, green 1. In a microwave safe bowl add left over
chilli and cook at 80% power for 5 mins, masala, toss stuffed parwal pieces, keep
stir in between. the bowl in the microwave oven.
3. Pour this mixture on above cooked 2. Set the auto cook menu (Cu28), stir in
Osama. between.
4. Garnish with coriander leaves and fresh Cooking time: 12.00 mins
coconut
CHINESE / THAI / WESTERN
Ingredients:
Ingredients:
lParwal - 150 gram (cut into long pieces
lMix vegetables (boiled) – 250gm (baby
and slit )
corn-4, carrots-1, Broccoli- ½ cup,
lFor stuffing
mushroom-2, basil leaves – 8-10)
lCumin seeds - 1 tsp (roasted)
lCoconut milk – 2 cups
lCoriander seeds – 1 tbsp ( roasted )
lOil – 2tsp
lFennel seeds – 1 tsp (roasted )
lLime leaves – 3-4
lDesiccated coconut – 1 tbsp (roasted)
lSalt to taste
lMango powder ,dried – 1 ½ tbsp
lFor paste:
lKashmiri chilli powder – 1 tsp
lKashmiri red chillies – 4
lAsafoetida – ¼ tsp
lOnion – 1
lTurmeric powder – ½ tsp
lGinger garlic paste – 1 tbsp
lPotatoes – 2 no (boiled and mashed )
lLemon grass – 1 stem
lOil – 1tbsp
lCoriander seed – 1 tsp
lCumin seeds – ½ tsp
lSoya sauce – ½ tsp
lOnions – 2 no (finely chopped)
lLemon juice – 1 tsp
lSalt to taste
lSugar – 1 tsp
Method:
Method:
For masala
1. Mix the oil, lime leaves & paste in a
1. Combine the cumin seeds, coriander
microwave safe bowl and mix well.
seeds, fennel seeds and desiccated
2. Keep the bowl in the microwave oven.
Coconut and grind into fine powder.
3. Set the auto cook menu (Cu29).
2. Mix in the dried mango powder, Kashmir
4. After the first 6 mins (when the display
chilli powder, turmeric powder, asafoetida
shows 11:00), add the boiled vegetables,
and salt keep aside.
salt & continue cooking.
3. Mix ¼ masala into the mashed potatoes.
5. After 8 mins of further cooking, add
4. In a microwave safe bowl add oil, cumin
coconut milk. Garnish with basil leaves.
69 Bharwan Parwal (Cu28)
70. Thai Red Curry (Cu29)
40

6. Stir in between. Serve with steam rice. lCabbage, carrot, French beans &
capsicum – 200gms
Cooking time: 17 mins
lCorn flour – 2-3 tbsp
lGinger-garlic paste – 1tsp
Ingredients:
lOil – 2tbsp
lPineapple syrup – ½ cup
lMaida – 1tbsp
lBaby corn – 3 (cut lengthwise)
lSalt to taste
lBroccoli – ½ cup
lSoya sauce – 1tsp
lMushrooms – 3 (each cut into 2 pieces)
lAjinomoto – ½ tsp
lPineapple – 2 slices (fresh or tinned)
For gravy
lCapsicum – ½ cup
lOil – 1tbsp
lSpring onions – 1 (white, cut into slices)
lGinger-garlic paste – 1tbsp
lCorn flour – 2 tbsp (mixed in ¼ cup water)
lGreen chillies – 2 (slit)
For paste:
l1 tbsp – soya sauce
lKashmir red chillies – 1
lVegetable stock – 1 cup
lGarlic – 1 tsp
lCorn flour – 1tbsp (blended)
lSpring onion – 1
Method:
lTomato ketchup – ¼ cup
1. For the Manchurian, chop the vegetables
lVinegar – 3tbsp
finely. In a bowl, heat the oil & add the
lAjinomoto – ¼ tsp
ginger garlic paste. Stir a little. Add the
lSugar – 2 tsp
chopped vegetables.
lSoya sauce – 1 tsp
2. Stir fry a little. Add salt , ajinomoto and
lVegetable stock (instant stock available in
soya sauce. Let it cool. Add corn flour &
market)– 1
maida and make small balls.
lSalt to taste
3. Arrange these on a greased baking dish.
Method:
Micro-grill (c-2) for 5 mins, turn & brush
with little oil & grill for 4 more mins.
1. Stir fry all the vegetables with 1tbsp oil.
4. For the gravy, in a microwave safe bowl,
2. In a microwave safe bowl, add oil & paste.
add all the gravy ingredients & mix well.
3. Keep the bowl in the microwave oven. Set
Set the auto cook menu (Cu31). Stir in
the auto cook menu (Cu30). Stir in
between. After 4 mins, add the
between.
Manchurian balls.
4. After the first 3 mins (when the display
Cooking time: 9 mins
shows 09:00), add the vegetable stock
and continue cooking. Stir in between.
5. After 6 mins of further cooking, add stir
Ingredients:
fried vegetables and other ingredients
For Manchurian balls
and continue cooking.
lBoneless chicken – ½ cup (boiled &
Cooking time: 12 mins
shredded)
lCabbage, Carrot, French beans,
Ingredients
capsicum – 1 cup(chopped)
l
For Manchurian balls
Corn Flour – 2 ½ tbsp
71. Sweet And Sour Vegetables (Cu30)
73. Chicken Manchurian (Cu32)
72. Veg Manchurian (Cu31)
41

lMaida – 1tbsp lChicken seasoning cube – 1
lSalt to taste lSalt to taste
lGinger-garlic paste – 1tsp lCorn flour – 3 tbsp
lAjinomoto – ½ tsp For paste:
lOil – 2tbsp lChicken stock – 1 cup
For gravy lDry red chillies – 2 (broken into bits)
lOil – 1tbsp lTomato ketchup – 3 tbsp
lGinger-garlic paste- 1tbsp lRed chilli sauce – 3 tsp
lGreen chillies – 2 lSoya sauce – 2 tsp
lSoya sauce – 1tbsp lSpring onion – 1
lChicken stock – 1 cup lPepper – ½ tsp
lBlended corn flour – 1tbsp lSugar – a pinch
lSalt to taste lAjinomoto – ¼ tsp
Method:
lVinegar – 2 tsp
1. For the Manchurian, finely chop the
Method:
vegetables and shredded chicken.
lIn a microwave safe bowl add all the
2. In a microwave safe bowl, heat the oil,
ingredients for paste and add 2 tbsp oil
add ginger-garlic paste. Stir a little and
mix well .Keep the bowl in the microwave
then add the chicken, chopped
oven, set the auto cook menu (Cu33).
vegetables. Stir fry a little & add salt,
lAfter 5 mins [display will show 19.00]. Add
ajinomoto & soya sauce.
chopped onion, capsicum, chicken
3. Let it cool. Then add corn flour & maida for
seasoning cube, blended corn flour mix
binding & make small balls.
well continue cooking, after 4 mins
[display will show 15.00], add boneless
4. Arrange these balls on a greased baking
chicken and salt mix well and continue
dish & Micro + Grill (C2) for 5 mins. Turn
cooking. Stir in between.
and brush a little oil & then again grill for 4
more mins.
lServe hot.
5. For the gravy, add the ingredients in a
Cooking time: 24 mins
microwave safe bowl. Mix well.
6. Set the auto cook menu (cu32). Stir in
Ingredients:
between. After 4 mins (when display
lBaby betki – 300gm
shows 08.00), add the Manchurian balls
lSalt & pepper – to taste
and continue cooking. Stir in between.
lLime juice – from 1 lime
Cooking time: 12 mins
lGarlic-ginger paste – 1tbsp
lRed colour – a pinch
Ingredients:
lJeera powder – 1tbsp
lChicken breast boneless – 250gm (cut
lCoriander powder – 1tbsp
into ½ inch pieces)
lRed chilli powder – 1tbsp
lOil – 4tbsp
lButter – 1tbsp
lCapsicum – 1 (cut into tiny cubes)
Method:
lSpring onion – 1 (chopped)
75. Baked Fish (Cu34)
74. Spicy Garlic Chicken (Cu33)
42

1. Wash and clean the baby betki fish & lVegetable seasoning cube – 1 (crushed)
marinate with above ingredients. Keep it
lOil -2tbsp
in the fridge for 4 hrs.
lPepper – ¼ tsp
2. Place the fish on baking tray & grease it.
lMustard paste – ½ tsp
Set the auto cook menu (Cu34).
lSoya sauce – 1 tsp
3. After the first 7 mins (when display will
lCorn flour – 1 tbsp ( dissolved in ¼ cup
show 05.00) and continue cooking, turn
water )
the side and serve hot.
lSalt to taste
Cooking time: 12 mins
Method:
1. For spring onion cut the green portion and
Ingredients:
retain the white portion.
lPrawns – 10 medium sized
2. In a microwave safe bowl add white bulbs
lOil – 2 tbsp
of spring onions, cabbage pieces,
lJaggery – tiny piece (or sugar – 1tbsp)
crushed vegetable seasoning cube,
chopped green chilli, oil, pepper, mustard
lCoconut milk – 2 cups
paste and soya sauce and mix well.
lMaggi coconut powder – 1 tbsp
3. Keep the bowl in the microwave oven. Set
lSalt to taste
the auto cook menu (Cu36), and stir in
For paste
between.
lGreen chillies – 5
4. After the first 5 mins [display will show
lSpring onion – 2 (chopped with the green
09.00] add corn flour paste mix well and
part)
continue cooking. Stir in between.
lLemon grass stalks – 4
5. After 4 mins [display will show 05.00] add
lGinger – ½ tsp
corn, green of spring onions and salt. Mix
lCumin seeds – 2 tsp
well and continue cooking.
lCoriander seeds – 3 tsp
6. Mix well before serving. Serve hot.
lCoriander leaves – 3 tbsp
Cooking time: 14.00 mins
Method:
RICE / NOODLES
1. In a microwave safe bowl, add all the
How to cook ¾ cooked Rice:
ingredients and mix well.
Ingredients:
2. Keep the bowl in the microwave oven.
lRice: 1 cup (soak rice for 30 mins)
3. Set the auto cook menu (Cu35). Stir in
lWater – 1 ¾ cup
between
lOil – 1 tsp
4. Garnish it with red chillies
lOther spices – whatever is required by
Cooking time: 10 mins
recipes
lSalt to taste
Ingredients:
Method:
lCorn – 1 cup (boiled)
1. In a microwave safe bowl add all the
lSpring onions – 6 no
ingredients and mix well.
lCabbage – ½ cup ( chopped )
2. Keep the bowl in the microwave oven,
and microwave at 100% power level for
lGreen chilli -1 ( chopped )
76. Thai Green Curry Prawns (Cu35)
77. Corn In Soya Sauce (Cu36)
43

20 mins.Stir in between. lGhee – 2 tbsp
How to cook the plain rice: lCloves – 2 no.
lCinnamon – 2 pieces
Ingredients:
lGreen chilli – 2 sliced
lBasmati Rice – 1 cup ( soak for 30 mins )
lGinger paste – 1 tsp
lWater – 2 cups ( if adding vegetable adds
½ cup water extra for vegetable )
lOnion – ¼ cup minced
lGhee – 1 tsp
lCarrot – ¼ cup chopped
lOther spices – whatever is required by
lBeans – ¼ cup chopped
recipes
lSalt to taste
lMix vegetable – Whatever is required by
For garnish
recipes
lCoriander leaves - few
Method:
lGhee – 1 tbsp
1. In a microwave safe bowl add all the
Method:
ingredients & mix well. Keep the bowl in
1. In a microwave safe bowl, add all the
the microwave oven, microwave 80%
ingredients and mix well.
power for 18 mins uncovered stir in
2. Keep the bowl in the microwave oven.
between.
3. Set the auto cook menu (ri1). Serve hot.
2. Cover the bowl and continue cooking at
4. Sprinkle coriander leaves and ghee on\
80% power for 4 mins.
top of it.
How to boil noodles
Cooking time: 21 mins
Ingredients:
lNoodles – 1 packet [ 65 gms]
Ingredients:
lWater – 2cups
lBasmati rice – 1 cup (soak for 30 mins)
lOil- 1tbsp
lGhee/oil – 2 tbsp
Method:
lGinger garlic paste – 1 tbsp
1. In a deep microwave safe bowl add
lGreen chilli paste – 1 tsp
noodles, water and oil. Keep the bowl in
lHaldi – 1 tbsp
the microwave oven, microwave at 80%
lRed chilli powder – ½ tsp
power for 15 mins, stir in between.
lSalt to taste
2. Remove, strain and place under tap
water. Put ½ tsp oil into it to avoid
lPepper corns – 1 tbsp
stickiness.
lFennel seeds – 2 tsp
NOTE: For ¾ th cooked rice, plain rice &
lGreen cardamom – 1
boiled noodle in the further recipes, refer to
lBlack cardamom – 1
page no. 67.
lCloves – 4
NORTH INDIAN RECIPES
lCinnamon – 2 sticks
lPotato – 1 ( cut into pieces)
lCauliflower – ¼ cup (cut into florets)
Ingredients:
lCarrot – 1 (cut into thin strips)
lRice – 1 cup (wash and soak for 20 mins)
lPeas – ¼ cup
lGreen gram – ½ cup (soak for 4 hrs)
79. Sabzi Pulav (ri2)
78. Moong Dal Khichadi (ri1)
44

lOnion – 1 (cut lengthwise) lGhee – 2 tbsp
lMint leaves – 1 tbsp lKewra water – few drops
lLemon juice – 1 tsp lSliced fried onions
lWater – 2 ½ cups lCoriander leaves-1tbsp
Method: Method:
1. Mix all the ingredients in a microwave safe 1. Add ghee with onion, ginger, cumin
bowl. seeds, green chilli, black cardamoms,
green cardamom, cinnamon, cloves and
2. Keep the bowl in the microwave oven.
bay leaf in a microwave safe bowl. Keep
3. Set the auto cook menu (ri2). Stir in
the bowl in the microwave oven.
between and serve.
Microwave high for 5 mins.
Cooking Time: 21 mins
2. Mix the peas, carrot, cauliflower, French
beans, tomatoes, coriander leaves,
Ingredients:
yogurt, red chilli, coriander powder,
lBasmati rice – 1 cup
turmeric powder, salt and cook on
microwave 80% power for 9 mins. Stir in
lGinger- 1 tsp (paste)
between.
lGreen chilli - 1 tsp (paste)
3. Soak saffron in milk.
lCooked vegetables
4. In a large microwave bowl, place half of
lGreen peas – ¼ cup
the vegetables and cover them with half of
lCarrot – 1
the rice. Repeat the layers.
lCauliflower – ¼ cup
5. Sprinkle saffron, sliced fried onion, ghee,
lFrench beans – 4
mint leaves and kewra water on rice.
lOnion – 1
Cover the bowl.
lTomatoes -1
6. Keep the bowl in the microwave oven.
lGhee – 3tbsp
7. Set the auto cook menu (ri3). Serve hot.
lCumin seeds – 1 tsp
Cooking time: 5 mins
lBlack cardamoms – 2
lGreen cardamoms – 1
Ingredients:
lCloves – 4
lBasmati rice – 1 cup
lCinnamon – 1 stick
lSalt to taste (for rice)
lBay leaf – 1
lWhole garam masala
lYogurt – ½ cup
lBlack cardamom-1 no.
lRed chilli powder – 1 tsp
lCloves-2 no.
lCoriander powder – 1 tbsp
lPepper corns- 2 no.
lTurmeric powder – ½ tsp
lCinnamon-1no.
lSalt to taste
lBay leaves-2no.
For garnish
lChicken pieces – 600gm
lFresh mint leaves – few (chopped)
lFor marination:
lSaffron – 4 strands
lYogurt – ½ cup
lMilk – ¼ cup
lRed chilli powder – 1 tbsp
80. Veg Biryani (ri3)
81. Handi Biryani (ri4)
45

lGarlic ginger paste – 1 tbsp that you end up with the rice layers on top
with saffron and spice.
lSalt to taste
7. Cover the bowl. Keep the bowl in the
lOther ingredients:
microwave oven.
lGhee – 1 tbsp
8. Set the auto cook menu (ri4). Serve hot
lGarlic – ½ tsp (chopped)
with raita.
lCoriander powder – 1 tbsp
Cooking time: 5 mins
lTurmeric powder – 2 tbsp
lRed chilli powder – 1tbsp
Ingredients:
lGaram masala powder – 1tsp
lBasmati rice – 1 cup
lChopped tomatoes – 1 cup (cooked with
lSalt- to taste ( for rice )
other ingredients)
lMinced meat – 250 gm
lGreen coriander – 1tbsp
lLime juice – 1tbsp
lSaffron – 1 tbsp
lGhee – 2tbsp
lMilk – ¼ cup
lOil- 2 tbsp
lGinger (cut lengthwise) – 1tsp
lOnion – ½ cup (chopped)
lMint leaves – 3 tsp
lGinger garlic paste – 1tbsp
lGolden fried sliced onions – ½ cup
lTomato puree – 2tbsp
lButter – 2tbsp (melted)
lChilli powder – 1tsp
Method:
lTurmeric powder – ¼ tsp
1. Marinate chicken with marination
lSalt to taste ( to cook minced meat )
ingredients for 2 hrs.
lMint – 2 tbsp (chopped)
2. Cook rice with whole garam masala, salt
and water. Boil till its done 3/4th.
lGaram masala powder - 1tsp
3. Cook ghee, add ginger, chopped garlic,
lCoriander – 2 tbsp (chopped)
coriander powder, turmeric powder, red
lHardboiled egg – 2 (for garnishing)
chilli powder, garam masala powder and
Method:
tomatoes on microwave 80% power for 5
1. Add lime juice in meat and keep aside for
mins. Stir in between.
½ hr.
4. Add marinated chicken on microwave
2. Cook the rice (3/4th) and keep it aside.
80% power for 15 mins. Stir in between or
3. Cook minced meat with oil, ginger, garlic,
cook till the chicken pieces are tender.
onion, tomato puree and coriander
Add chopped green coriander and mix
leaves, chilli powder, turmeric powder,
well.
salt on microwave 80% power for 15 mins.
5. Dissolve saffron in warm milk and keep
Stir in between.
aside.
4. Take a microwave bowl and add ghee and
6. In a large microwave bowl, add alternate
alternate layers of cooked minced meat
layers of cooked chicken and rice. Add
and rice. Add mint and garam masala
saffron, remaining garam masala
powder and cover the bowl.
powder, ginger, mint leaves, golden fried
5. Keep the bowl in the microwave oven.
sliced onion, coriander and butter in
6. Set the auto cook menu (ri5). Garnish with
between the layers on the top. Make sure
82. Kheema Biryani (ri5)
46

47
hardboiled egg. powder, garam masala powder and
tomatoes in microwave 80% power for 4
Cooking time: 7 mins
mins. Stir in between.
4. Add marinated chicken on microwave
Ingredients:
80% power for 15 mins. Stir in between or
lChicken pieces – 250gm (cooked)
cook till the chicken pieces are tender.
lRice – 1 cup (¾ cooked)
Add chopped green coriander and mix
lSalt to taste ( for rice)
well.
lWhole garam masala
5. In a large microwave safe bowl, add
l
alternate layers of cooked chicken and
Black cardamom - 1no.
rice, remaining garam masala powder,
lCloves - 2 no.
ginger, mint leaves, golden fried sliced
lPepper corn- 2 no.
onion and butter in between the layers on
lCinnamon -1no.
the top. Cover it and Keep the bowl in the
lBay leaves -1no.
microwave oven.
For marination
6. Set the auto cook menu (ri6). Serve hot
lCurd – 1 cup
with raita.
lGinger garlic paste – 1 tsp
Cooking time: 5 mins
lGaram masala powder – 1 tsp
lRed chilli paste – 1 tsp
Ingredients:
lSalt to taste ( for marination)
lBasmati rice -1 cup ( ¾ cooked rice )
lVinegar – 2 tbsp
lGinger – 1 tsp (paste)
lCoriander powder – 1 tsp
lYogurt – ¼ cup ( whisk)
lTurmeric powder – 1 tsp
lMint leaves – ½ cup (chopped )
lRed chilli powder – 1 tbsp
lGhee – 1 tbsp
Other ingredients:
lBay leaves – 1 no
lGaram masala powder – 1 tsp
lGreen cardamom – 2 no
lChopped tomatoes – 1 cup (cooked with
lCloves – 2 no
other ingredients)
lBlack pepper corn – 2 no
lGreen coriander – 1 tbsp
lSalt to taste
lGinger – 1 tsp (cut lengthwise)
lWater – sprinkle
lMint leaves – 3 tsp
Method:
lGolden fried sliced onions – ½ cup
1. In a microwave safe bowl add ghee, bay
lButter – 2 tbsp (melted)
leaves, green cardamom, cloves and
Method:
black pepper corn, set the auto cook
1. Marinate chicken with marination
menu (ri7), stir in between.
ingredients for 2 hrs.
2. After the first 3 mins are over [display will
2. Cook rice with whole garam masala, salt&
show 08.00] add ginger paste and yogurt
water. Boil till its ¾ done.
mix well and continue cooking. Stir in
3. Cook ghee with whole garam masala.
between.
Add ginger, garlic (chopped), coriander
3. After more 2 mins [display will show
powder, turmeric powder, red chilli
83. Chicken Biryani (ri6)
84. Pudina Pulav (ri7)

06.00] add rice, mint leaves, sprinkle lCoriandre leaves – 1tbsp ( chopped)
some water add salt mix well and
lGinger paste – 1tsp
continue cooking .Stir in between.
lGreen chlli – 1 no ( slit)
4. Serve hot, garnish with mint leaves.
lTomatoes – 1 (chopped)
Cooking time: 11.00 mins
lGhee – 2 tbsp
Whole garam masala:
Dahi - Chawal:
lCumin seeds – 1 tsp
Ingredients:
lBlack cardamoms – 1
lGreen cardamoms – 1
lLeft over rice -1 cup
lCloves – 4
lCurd – ½ cup (beaten)
lCinnamon – 1 stick
lSalt –to taste
lBay leaf – 1
lGarlic – ¼ tsp (paste)
lYogurt – ½ cup
Tempering:
Masala
lOil – 1 tsp
lRed chilli paste – 1 tsp
lMustard seeds – ¾ tsp
lCoriander powder – 1 tbsp
lGreen chilli – 1 (chopped)
lTurmeric powder – ½ tsp
lCurry leaves – 4 no
lSalt to taste
lCoriander – 1tbsp (chopped)
For garnish
Method:
lFresh mint leaves – few (chopped)
Preparation:
lSaffron – 4 strands
1. Reheat 1 cup left over rice at microwave
lMilk – ¼ cup
80% power for 1 min add beaten curd mix
with salt put it in a serving dish.
lGhee – 2 tbsp
Cooking Method:
lKewra water – few drops
1. In a microwave safe bowl add oil, mustard
lFried sliced onions – few
seed, garlic, green chilli and curry leaves
lCashews – 2 tbsp
.Keep the bowl in the microwave oven,
lRaisins – few
Set the auto cook menu (ri8).Stir in
Method:
between.
1. Step 1 : In a microwave safe bowl, add
2. Pour this on Rice, Garnish with coriander.
ghee with onion, ginger, cumin seeds,
Cooking Time: 2 mins
green chilli, black cardamoms, green
cardamom, cloves, cinnamon and bay
Ingredients:
leaf. Mix it nicely. Microwave 80% power
for 4 mins. Stir in between.
lBasmati rice – 1 cup
2. Mix peas, carrot, cauliflower, French
lVegetables
beans, tomatoes, coriander leaves,
lGreen peas – ¼ cup
yogurt, red chilli, coriander powder,
lCarrot – 2 (chopped)
turmeric powder, salt and put in a
lCauliflower – ¼ cup (chopped)
microwave safe bowl. Mix it nicely.
lFrench beans – 10 (chopped)
Microwave 80% power for 8 mins. Stir in
lOnion – 1 (cut lengthwise)
between.
85. Ways With Left Over Rice (ri8)
86. Hyderabadi Biryani (ri9)
48

3. Soak saffron in milk. lSplit gram – 1 tbsp
4. In a large microwave safe bowl, place half lFenugreek seeds – 1/2tsp
of the vegetables and cover them with half
lPeanuts – 2tbsp (roasted)
of the rice. Repeat the layers.
lMustard seeds – ½ tsp
5. Sprinkle saffron cooked with sliced onion,
lCurry leaves – 6
mint leaves, ghee, kewra water, cashews
lLemon juice – 3 tbsp
& raisins and covers the bowl.
lTurmeric powder – ½ tsp
6. Set the auto cook menu (ri9). Serve hot.
lFresh coconut – 1tbsp for garnishing
Cooking Time: 5 min
Method:
1. Add ghee, hing, red chilli, urad dal, chana
Ingredients:
dal, methi seed. Cook until dal changes
lBasmati rice – 1 cup (soak for 30 mins)
colour to light brown.
lOnion – 1 (cut length-wise)
2. Add peanuts, mustard seeds and curry
lCumin seeds roasted – 1 tsp
leaves.
lRed chilli powder – ½ tsp
3. In a microwave safe bowl, add rice, water,
turmeric powder, salt, all the other
lCurry leaves – 6
ingredients and lemon juice.
lTomato puree – ½ cup
4. Keep the bowl in the microwave oven.
lGhee – 1tbsp
5. Set the auto cook menu (ri11). Stir in
lWater – 2 cups
between. Garnish with grated coconut.
lKashmiri red chilli – 2 (cut length wise)
Cooking Time: 21 mins
lAsafoetida (hing) – a pinch
lGreen chilli paste – ½ tsp
Ingredients:
lStock cube – 1 (vegetarian)
lFresh corn – ½ cup (tender & boiled)
lSalt to taste
lCapsicum – 1 sliced
Method:
lOnion – ½ cup (chopped)
1. In a microwave safe bowl, add all the
lRice – 1 cup (soaked)
ingredients and mix well.
lCinnamon – 1 stick
2. Keep the bowl in the microwave oven.
lCloves – 2
3. Set the auto cook menu (ri10). Stir in
between. lBay-leaves – 3
Cooking Time: 21 mins lGreen chilli – 1 (chopped)
lGhee – 2tsp
lCurry leaves – 3
Ingredients:
lWater – 2 cup
lRice – 1 cup (soak for 30 mins)
lGinger – garlic paste – 1tbsp
lWater – 2 cups
lBlack cardamom – 1
lSalt – as per taste
lStock cube – 1 (vegetarian)
lGhee – 2tbsp
lSalt to taste
lHing – a pinch
lGarnish – few capsicum slices
lDried red chilli – 2
Method:
lSplit black gram – 1tbsp
87. Tomato Rice (ri10)
89. Bhutta Simla Mirch Rice (ri12)
88. Lemon Rice (ri11)
49

1. In a microwave safe bowl, add all the lMethi – 1 tsp
ingredients and mix well.
lDhaniya – 1 tsp
2. Keep the bowl in the microwave oven.
lDry red chillies – 2 (chopped)
3. Set the auto cook menu (ri12). Stir in
lCoconut – ½ cup (chopped)
between. Garnish with capsicum.
lSalt to taste
Cooking Time: 21 mins
lFor tempering
lHing – a pinch
Ingredients:
lCoriander leaves – for garnish
lBasmati rice – 1 cup (soak for 30 mins)
lRye (mustard seeds) –1 tsp
lCoconut milk – 1 cup
lOil – 1 tsp
lWater – 1 cup
lCurry leaves – 4-5
lFresh coconut grated – ¼ cup
Method:
lBay leaves – 1
1. In a vessel, add oil, coconut, dhaniya,
lOnion – 1 chopped
methi, red chillies. Shallow fry it and then
bring it to room temperature. Put it in a
lCinnamon – 2 pieces
mixer to make a powder.
lCloves – 2 no.
2. In another vessel, add everything for
lCardamom – 1 no.
tempering and keep aside.
lGhee – 1tbsp
3. In a microwave safe bowl, add all the
lSalt to taste
ingredients and powder & mix well.
Method:
4. Set the auto cook menu (ri14). Stir in
1. In a microwave safe bowl, add all the
between.
ingredients and mix well.
5. When the cooking is done, add
2. Keep the bowl in the microwave oven.
tempering. Garnish with coriander
3. Set the auto cook menu (ri13). Stir in
leaves. Pour ghee into it.
between. Serve hot.
Cooking Time: 21 mins
Cooking Time: 21 mins
Ingredients:
Ingredients:
lGhee – 2tbsp
lRice – 1 cup
lCloves – 3 no.
lTur dal – ½ cup (3/4 done)
lCinnamon – 3 no.
lTamarind pulp – 2 tsp
lCardamom – 2 no.
lCoconut milk – 1 cup
lOnion – ½ cup finely chopped
lWater – 1 cup
lGinger-garlic paste – 2tsp
lGhee – 2 tbsp
lChilli powder – 1tsp
lGreen chillies – 1 (chopped)
lCoriander powder – 1tsp
lCashew nuts – 4 tsp (soaked in ¼ cup
lSpinach – 1 cup (boiled & mashed)
water to make a paste)
lSalt to taste
lFor shallow fry and powder:
lRice – 1 cup (soak for 30 mins)
lOil – 2 tbsp
lWater – 2 cup
90. Coconut Rice (ri13)
92. Palak Rice (ri15)
91. Bisi Bele Bhath (ri14)
50

lBoneless chicken – 250 gms (boiled)
Method:
lCoconut milk – 1 cup
1. In a microwave safe bowl, add all the
ingredients and mix well.
lFresh coconut grated – ¼ cup
2. Keep the bowl in the microwave oven.
lWater – 1 cup
3. Set the auto cook menu (ri15). Stir in
lLemon juice – 3 ½ tbsp
between. Serve hot.
lTomato puree - 2 tbsp
Cooking Time: 21 mins
lGinger garlic paste – 1 tbsp
lRed chilli powder – ½ tbsp
Ingredients:
lBlack pepper powder – 1 tsp
lWhite fish fillets – 500gms
lTurmeric – 1 tsp
lTurmeric powder – ½ tsp
lCloves – 2 no.
lGreen chilli – 1tsp paste
lBay leaves – 2 no.
lGinger garlic paste – 1tbsp
lCardamom – 1 no.
lMint leaves – 3tbsp chopped
lGreen cardamom – 2 no.
lSalt to taste
lBlack pepper – 4 no.
lOil – 1tbsp
lCinnamon stick – 1 no.
lCloves – 2
lOil – 4 tbsp
lCinnamon – 2 pieces
lFor Garnishing – coriander leaves
lOnion – 1 (cut lengthwise)
lSalt to taste
l¾ th cooked rice – 1 cup
Method:
lWater – 2 cups
1. In a microwave safe bowl, add all the
ingredients and mix well.
Ghee – ½ tsp
2. Keep the bowl in the microwave oven.
Method:
3. Set the auto cook menu (ri17). Stir in
1. Cook rice with cloves, cinnamon, onion,
between. Serve hot.
ghee & water till it is ¾ th done. Keep it
aside.
Cooking Time: 21 mins
2. Cook fish with oil, ginger garlic paste,
green chilli, and turmeric powder, salt.
Ingredients:
Add chopped mint leaves on top.
lPeeled prawn – 250 gm
3. In a microwave safe bowl, add alternate
lTurmeric powder – 1 tsp
layers of cooked fish & rice. Cover the
lLime juice – from 1 lime
bowl.
lWater – 1 ½ cup
4. Keep the bowl in the microwave oven.
lCoconut milk – 1 cup
5. Set the auto cook menu (ri16). Stir in
lGhee – 2 tbsp
between. Serve hot.
lRice - 1 cup (soaked in water for 30 mins)
Cooking Time: 7 mins
lMixed vegetables (carrots, peas, beans)
– ¼ cup
Ingredients:
lHing – a pinch
lBasmati rice – 1 cup (soak rice for 30
For marination
mins)
93. Fish Pulav (ri16)
95. Prawn Khichadi (ri18)
94. Murg Pulav (ri17)
51

lDry curd – ¼ cup
Method:
lGinger garlic paster – t tbsp
1. In microwave safe bowl add all
ingredients & mix well, keep the bowl in
lChilli powder – 1 tbsp
the microwave oven.
lSalt to taste (only for marination)
2. Set the auto cook menu (ri20) stir in
Method:
between
lMarinate the prawns & keep for 30 mins.
3. Serve hot
lIn a microwave safe bowl, mix all the
Cooking Time – 22 mins
ingredients. Set the auto cook menu
(ri18). Stir in between.
Cooking Time: 21 mins
Ingredients:
lCooked rice – 1 cup (3/4 done)
lTamarind – 2 tbsp
Ingredients:
lWater – ¼ cup
lRice – 1 cup (soaked for 30 mins )
lRed chilli – 2 no
lBay leaf -1 no
lTurmeric powder – ¼ tsp
lCardamom – 1 no
lSesame seed – 1 tsp
lCinnamon – 2 no
lChanna dal – 1 tsp
lGhee – 1 tbsp
lCurry leaves – 5pcs
lMixed vegetable – ½ cup (carrot, French
bean, cauliflower, peas)
lAsafoetida – ½ tsp
lOnion – 1 (chopped )
lOil – 2tsp
lSalt –to taste
Salt to taste Method:
lShah jeera powder – 1 tsp
Preparation
lWater – 2 ½ cup
1. Soak tamarind in ¼ water for 15 mins to
remove the juice strain.
Method:
2. In a microwave safe bowl add oil from red
1. In a microwave safe bowl mix all the
chilly to asafoetida. Keep the bowl in the
ingredients, keep the bowl in the
microwave oven. Microwave at 80%
microwave oven, set the auto cook menu
power level for 4 mins and stir in between.
(ri19), and stir in between.
Add tamarind juice and cook at 80%
Cooking time: 23 mins
power level for 1 min.
3. This sauce can be refrigerated for upto
Ingredients:
10 days.
lBasmati Rice – 1 cup (soak for 30 mins)
Cooking method
lWater – 2 ½ cup
1. In a microwave wave safe bowl add rice,
lFresh corn – ½ cup
salt & sauce mix well. Sprinkle some
lPulav masala – 1 tbsp
water. Keep the bowl in the microwave
oven. 2. Set the auto cook menu (ri21) stir
lGhee – 1 tbsp
in between.
lSalt to taste
Cooking Time – 5 mins
lKaju – 1 tbsp
98. Tamarind Rice (ri21)
96. Mix-veg Rice (ri19)
97. Moti Pulav (ri20)
52

lWater – to sprinkle
CHINESE / THAI / WESTERN
Method:
1. In a microwave safe bowl, add rice and all
Ingredients:
other ingredients. Mix well.
lRice – 1 cup (soak for ½ hr)
2. Place the bowl in the microwave oven.
lWater – 2 cup
3. Set the auto cook menu (ri23). Serve hot.
lFrench beans – ¼ cup
Cooking Time: 6 mins
lCarrot – 1
lCabbage – 1 (small)
Ingredients:
lSpring onions – 5-6
lRice – 1 cup (cooked)
lCapsicum – 1
lOnions – 2 (sliced) & 1 (chopped)
lSoya sauce – 1 tbsp
lCabbage – 1 cup (shredded)
lChilli sauce – 1 tbsp
lGhee – 1 tbsp
lAjinomoto – 1 tsp
lGarlic – 3 flacks (crushed)
lOil – 2tbsp
lCapsicum – 1 slice
lSalt to taste
lTomato – ½ cup (puree)
Method:
lOil – 3 tbsp
1. Chop all the vegetables finely. Cook them
lChilli powder – 1tsp
with oil and keep aside.
lSoya sauce – 1 tsp
2. Add rice in a microwave safe bowl. Keep
lSalt to taste
the bowl in the microwave oven. Set the
Method:
auto cook menu (ri22).
1. Cook rice with ghee, crushed garlic,
3. Lastly, mix rice, vegetables, soya sauce,
chopped onion & salt. Heat oil and fry
ajinomoto and chilli sauce. Also sprinkle
onions till it turns golden. Remove and
some water on top.
keep it aside.
4. Cook on 60% power for 4 mins or till water
2. Fry cabbage for 2 mins. Remove and
& sauces dry up.
keep it aside. Also, fry capsicum for 1 min.
Cooking Time: 21 mins
Remove and keep it aside.
3. In a microwave safe bowl, add cooked
Ingredients:
rice, fried vegetables and all the other
lRice – 1 cup (kolum – ¾ th done)
ingredients and mix well.
lMix vegetables (capsicum, mushroom,
4. Keep the bowl in the microwave oven.
baby corn, carrot, French beans) –
5. Set the auto cook menu (ri24). Stir in
200gm (stir fried with oil & salt).
between. Serve hot.
lOnion – 2 (cut lengthwise)
Cooking Time: 7 mins
lParmesan cheese – ¼ cup (grated)
lOregano – 1 tsp
Ingredients:
lTabasco sauce – 1 tbsp
lRice – 1 cup (3/4th done)
lSalt – ½ tsp
lOil – 2 tbsp
lPepper powder – ½ tsp
lFrench beans – 15 (chopped)
99. Fried Rice (ri22)
101. Mexican Rice (ri24)
100. Risotto Rice (ri23)
102. Thai Rice (ri25)
53

lCapsicum – 1 (chopped)
Method:
lShallot – 2 tbsp
1. In a microwave safe bowl, add all the
ingredients and mix well.
lTomato – 1 (chopped)
2. Keep the bowl in the microwave oven.
lMushroom – ½ cup (chopped)
3. Set the auto cook menu (ri26). Stir in
lBaby corn – 6 (slit from centre)
between. Serve hot.
lSalt to taste
Cooking Time: 8 mins
lOnion – 2 cubes
lSugar – ½ tsp
Ingredients:
lRed curry paste – 1 tbsp
Rice – 1 cup (soaked for 30 mins)
Garlic – ½ tsp (chopped)
l
l
lWater – 2 ½ cups
Method:
lOil – 1 tsp
1. In a microwave safe bowl, add oil, onion
cube, garlic and microwave - high for 3
lSpring onion – 1 (chopped)
mins. Add sugar, red curry paste,
lCapsicum (green, yellow, red) – ½ cup
mushrooms, baby corn and salt. Stir fry at
(chopped)
80% powerlevel for 6 mins.
lMushroom – 1/4 cup (chopped)
2. In another microwave safe bowl, add oil,
lBaby corn – 3 (semi boiled)
French beans, capsicum, shallot, tomato
lAjinomoto – 1 tsp
and salt. Sprinkle water and cook on
lSalt to taste
micro 80% power level for 8 mins. Stir in
Method:
between.
1. In a microwave safe bowl, add all the
3. In another microwave safe bowl, add
ingredients. Place the bowl in the
cooked rice, ingredients from step 1 & 2.
microwave oven.
4. Set the auto cook menu (ri25).
2. Set the auto cook menu (ri27). Stir in
Cooking Time: 6 mins
between.
Cooking Time: 21 mins
Ingredients:
lNoodles – 1 cup boiled
Ingredients:
lSpring onions – 2 (shredded)
lRice – 1 cup (¾ th cooked)
lCarrot – 2 (shredded)
lChicken – ½ cup (boiled with salt &
lBeans – 5-6 (shredded)
pepper)
lCapsicum – 2 (chopped)
lSpring onion – 2
lDry red chillies - 2 (flaked)
lAjinomoto – a pinch
lCabbage – ½ cup (shredded)
lChilli sauce – 1 tbsp
lButter – 1tbsp
lButter – 1tbsp
lOil – 1tbsp
Method:
lTomato sauce – 2tbsp
1. In a microwave safe bowl, add rice,
lVinegar – 1 tbsp
chicken and all the other ingredients and
lAjinomoto – a pinch
mix well.
lSalt & pepper – to taste
2. Keep the bowl in the microwave oven.
104. Singapore Rice (ri27)
103. Hakka Noodles (ri26)
105. Chicken Fried Rice (ri28)
54

3. Set the auto cook menu (ri28). Stir in Green capsicum, Carrot, cabbage, peas]
between. Serve hot.
lGarlic – 2tsp (chopped)
Cooking Time: 8 mins
lOnion – ¼ cup(chopped)
lSalt - to taste :
lPaprika – 1 tsp
Ingredients:
l
Method:
Cooked rice – 1 cup
lOil – I tsp
1. In a microwave safe bowl add butter,
chopped onion, garlic and mix well .Keep
lChilli powder – ½ tsp
the bowl in the microwave oven. Set the
lRed capsicum – 1 medium sliced
auto cook menu (ri30).
lGreen capsicum – 1 medium sliced
2. After 1 min [display will show 03.00] add
lCarrot – 2 (thinly sliced)
boiled vegetable, cooked rice, salt and
lGarlic – 2tsp (chopped)
paprika mix well continue cooking. Stir in
lCabbage – ½ cup (shredded)
between.
lBesan – 1 tsp (lightly roasted)
3. Take a 7 inch ring mould. Grease the
lOnion – 1(chopped)
mould. Press rice mixture firmly into
lBlack pepper power – ½ tsp
greased mould and vegetable into centre
lTamarind paste – 4 tsp
of the mould, dot with 1 tsp butter .let it
stand for about 5 mins.
lPeas – 2 tsp (boiled)
4. Turn onto a platter .Serve hot.
lSalt to taste Method
Cooking time: 4 mins
1. In a microwave safe bowl add oil, garlic
and microwave at 80% power level for 2
mins. Stir in between. Add capsicum red
and green, carrot, cabbage and peas.
Ingredients:
Mix well and sprinkle some water.
lGlass noodle – 1 cup (boiled)
Microwave at 80 % power level for 3 mins
lSpring onion – 3
and stir in between. Add chilli powder,
lOil – 1tsp Sesame paste (grind the
roasted beans, tamarind paste, black
ingredients given below together)
pepper powder & salt. Mix well and cook
lSesame seed – 1 tsp (for soaking 5 tbsp
in microwave at 80% power level for 3
hot milk, and2 tbsp water)
mins and keep aside.
lRed chilli powder – 1 tsp
2. In a serving dish add cooked rice & pour
cooked vegetables on top and mix it well.
lSalt to taste
Keep the bowl in the microwave oven.
lGarlic – 4 flakes (chopped)
3. Set the auto cook menu (ri29). Stir in
lSoya souse – 1 tsp
between.
lSugar – ½ tsp
Cooking Time – 4 mins
Method:
1. Soak sesame seed in 5 tsp hot milk & 2
Ingredient:
tsp water for 10 minutes.
lCooked rice – 1 cup
2. Grind all the ingredients of sesame paste
to a smooth paste.
lButter– I tsp
3. Cut white spring onion into rings till they
lMixed Vegetable : 3/4 th cup [ Boiled -
106. Chilli Rice With Mix-Veg (ri29)
108. Glass Noodle With Sesame Paste
(ri31)
107. Rice Vegetable Ring (ri30)
55

turns green. lFresh bread crumbs – 2 tbsp
4. In a microwave safe bowl add oil and lCondensed milk – 2 tbsp
white of spring onion mix well. Keep the
lCorn flour – ½ tsp (mixed in 1tbsp milk)
bowl in the microwave oven.
lMilk powder – 1tsp
5. Set the auto cook menu (ri31) stir in
lKhoya – 1 tbsp (grated)
between. After 5 mins (display will show
lSugar – 2 tbsp
4.00mins) add prepared sesame mixture
lCardamom powder – ¼ tsp
and mix well. Continue cooking, after 2
Method:
mins (display will show 2.00 mins) add
1. Mix all the ingredients in a microwave safe
noodles, mix well and add spring onion &
bowl and mix well.
continue cooking.
2. Keep the bowl in the microwave oven.
6. Serve hot.
3. Set the auto cook menu (dE2). Stir in
Cooking Time – 9 mins
between. Cool and serve chilled.
DESSERTS NORTH INDIAN
Cooking Time: 12 mins
RECIPES
Ingredients:
Ingredients:
lCarrot – ½ kg (grated)
lMilk – 1 ½ cups
lSemolina – ¼ cup (roasted, with 1tbsp
ghee)
lKhoya – 1cup (grated)
lMilk – 1 cup
lSugar – ½ cup
lCondensed milk – 2 tbsp
lPure ghee – 3tbsp
lMilk powder – 1tsp
lMilk powder – 1tbsp
lCardamom powder – ¼ tsp
lCondensed milk – 2tbsp
lCorn flour - 1tbsp (blended with 1tbsp
lGreen cardamom powder – ¼ tsp
milk)
lGarnish:
lSugar – ¼ cup
lCashew nuts - 8-10 chopped
lGarnish – mixed dry fruits – 1tbsp
lAlmonds – 4 (sliced)
Method:
lRaisins - 10 (sliced)
1. In a microwave safe bowl, add all the
lSilver verk – 1 sheet
ingredients, except for the dry fruits and
Method:
mix well.
1. In a microwave safe bowl, add all the
2. Keep the bowl in the microwave oven.
ingredients and mix well.
3. Set the auto cook menu (dE1). Stir in
2. Keep the bowl in the microwave oven.
between.
3. Set the auto cook menu (dE3). Stir in
4. Cool and serve chilled. Garnish with dry
between.
fruits.
4. Garnish with almonds, cashew nuts and
Cooking Time: 12 mins
raisins. Decorate with silver verk and
serve hot or cold.
Ingredients:
NOTE: Will give best results in the carrot
season.
lMilk – 1cup
111. Carrot Halwa (dE3)
109. Suji Ki Kheer (dE1)
110. Rabdi (dE2)
56

Cooking Time: 15 mins syrup.
2. Grate khoya and mash chena murgi.
3. Mix cooking soda, flour, cardamom
Ingredients:
powder and a little milk to make soft
lPaneer – 200gms (grated)
dough.
lPowdered sugar – 50 gm
4. Divide into equal portions and shape into
lCondensed milk – ¼ cup
balls. Place them on a microwave safe
lCorn flour – 1tsp (blended in 1tbsp milk)
dish.
lRose essence – 2 drops
5. Keep the baking dish in the microwave
lSilver sheet (vark) – 1
oven.
lBadam-pista – 1tbsp
6. Set the auto cook menu (dE5). Turn the
Method:
side after first 12 mins (when display
shows 18.00). Continue cooking when
1. In a big microwave safe bowl, add paneer,
the jamun has been baked.
powder sugar, condensed milk, corn
flour, rose essence.
7. Soak in the hot sugar syrup for at least 1520 mins before serving.
2. Beat it with egg beater for smoother
texture.
Cooking Time: 30 mins
3. Put in a microwave safe bowl. Set the auto
cook menu (dE4).
Ingredients:
4. Stir in between. Grease a square tray.
lMilk – 5 cups
When the cooking is done, pour it in the
lCitric acid – ½ tsp
tray.
lSugar – ¾ cup
5. If the mixture does not get dried (if
lCorn starch – 1tsp
required), add maximum ½ tsp corn and
For Garnish:
2 tbspfresh bread crumbs until dry.
lGreen cardamom powder – 1tsp
6. Put the badam-pista & silver-vark on it
lPistachios (pista) – 5 (sliced)
and then cut it into different shapes.
Cooking Time: 5 mins
Method:
1. Place the milk in a deep microwave safe
casserole and cook it uncovered on
Ingredients:
microwave-100% for 10 mins.
lMawa – 1 ½ cup (grated)
2. Add citric acid & stir in sugar. Cook on
lCheese dumpling ( Chena murgi) - ¼ cup
microwave high for 10 mins. The milk will
lCooking soda – ¼ tsp
curdle slowly. Tiny granules will stick on
lMaida – 3tbsp
the back of the spoon on stirring.
lCardamom powder – ¼ tsp
3. Pass the curdled milk through a moist
lFor syrup:
cloth and collect the solids. Pass the milk
solids through a sieve. Add the corn
lWater – 1cup
starch.
lSugar – 1 cup
4. Spread the mixture in a microwave safe
Method:
plate. Set the auto cook menu (dE6)
1. Mix water and sugar. Prepare the sugar
5. Sprinkle with cardamom powder and
syrup. Remove any dirt floating on the
112. Malai Burfi (dE4)
114. Kalakand (dE6)
113. Kala Jamun [Baked] (dE5)
57

garnish with pistachios (pista). Allow to add 1 tbsp corn flour and 2 tbsp fresh
cool. Once it sets, cut into pieces and bread crumbs until dry.
serve.
6. Let it cool. Then knead and make a
Cooking Time: 2 mins smooth consistency. Add milk powder.
Divide it into 8 portions.
7. Garnish each sandesh with a raisin.
Ingredients:
Cooking Time: 2 mins
lWhole wheat flour (Atta) – 1 cup
lJaggery – cup (grated)
Ingredients:
lKhus-khus – ½ tsp
lMaida – 100gms
lCardamom powder – ¼ tsp
lSugar – 75 (powdered)
lGhee – 4tbsp
lGhee – 50 gm
Method:
lRava – 20 gm
1. Mix Atta, ghee, elaichi powder in
lVanilla essence – ½ tsp
microwave glass bowl.
2. Keep the bowl in the microwave oven.
Method:
3. Set the auto cook menu (dE7). Stir in 1. Mix ghee and sugar till it becomes a fluffy
between. mixture.
4. Lastly add jaggery and mix well. 2. Then add rava, maida and essence. Mix
well.
5. Grease a shallow dish and sprinkle khuskhus on it. Spread the mixture into the 3. Divide into 12 portions. Roll into small
dish and let it cool for a few minutes. balls.
6. Cut into pieces and serve. 4. Keep the dish in the microwave oven.
Cooking Time: 6 mins 5. Set the auto cook menu (dE9).
Cooking Time: 30 mins
Ingredients:
lCottage cheese mashed – 75gm
Ingredients:
lPowdered sugar – cup lPowder groundnut (roasted) – 1 cup
lRaisins – 8 nos. lJaggery – ½ cup (grated)
lRose essence – few drops lCardamom powder – 1tsp
lMilk powder – 1 tbsp
Method:
Method:
1. Mix all the ingredients & set the auto cook
menu (dE10).
1. Crumble the cottage cheese and
powdered sugar and knead i t t i l l i t s 2. Grease a shallow dish. Spread the
smooth with light hand. mixture into the dish and let it cool for few
minutes.
2. In a microwave safe bowl, mix the smooth
kneaded mixture and the rose essence. 3. Cut into piece and serve.
3. Keep the bowl in the microwave oven. Cooking Time: 3 mins
4. Set the auto cook menu (dE8). Stir it in
between.
Ingredients:
5. If the mixture does not dry (if required),
lGrated chocolate slab – ½ cup
115. Gud Papadi (dE7)
117. Nankhatai (dE9)
116. Sandesh (dE8)
118. Groundnut Chikki (dE10)
119. Chocolate Fudge (dE11)
58

lCondensed milk – ½ cup
lButter – 1 tbsp
Ingredients:
lMilk powder – 1 tbsp
lBrown bread-2 slice (cut from centre &
lCaramel – 1 tbsp
make 2 pieces out of 1)
lWalnut pieces – ¼ cup
lButter – 2 tsp
Other ingredients:
Method:
lMilk – ½ litre
1. Mix all the ingredients, except the walnuts
and put the mixture in a microwave safe
lSugar – ½ cup
bowl.
lCashew powder – ¼ cup
2. Keep the bowl in the microwave oven.
lCardamom & nutmeg powder – ½ tsp
3. Set the auto cook menu (dE11). Stir
lMava – 50 gm (grated)
continuously.
For Garnish
4. Later, add the walnut pieces and stir well.
lBadam – pista – ¼ cup slice
5. Pour the mixture into a serving dish and
lSilver vark -1 no
cool it in a refrigerator for 20 mins.
Method
6. Cut into cubes.
1. In a microwave safe bowl add milk to
Cooking Time: 4 mins
mava & mix it nicely. Keep the bowl in the
microwave oven.
Ingredients:
2. Cooks on 80% power for 10 mins & make
lAtta/Maida – 1 cup
it thick. Stir in between.
lCocoa powder – ¼ cup
3. Apply butter on one side of bread. Keep
on a baking tray. Set grill function for 7
lMargarine – ½ cup
mins.
lPowdered sugar – 1 cup
4. Place the bread on the baking plate with
lSoda-bi-carb – ½ tsp
the grilled [brown] side facing down
lMilk powder – ¾ cup
wards.
lVanilla essence – ½ tsp
5. On top of the bread apply butter and put
lMilk – ¼ cup (to get dropping
thick milk preparation on top of it. Add
consistency)
badam – pista slice on top of that. Keep
Method:
the baking plate in the microwave oven.
1. Sieve Maida, cocoa powder, soda and
Set the auto cook menu (dE13).
milk powder.
6. Garnish with silver vark.
2. Beat sugar and margarine till it’s light and
Cooking time – 7 mins
fluffy. Add essence.
3. Then slowly add the maida mixture. Keep
Ingredient:
adding milk to get the dropping
lRice – 3tsp
consistency.
lMilk – 3½ cup
4. Pour the batter in a 6 inch greased and
lMawa – ½ [greeted]
dusted tray.
lSaffron – a pinch
5. Set the auto cook menu. (dE12) Cool and
lPistachio nuts – 12 nos [sliced]
turn on a wire rack. Cut into squares.
lSugar – ¾ cup
Cooking Time: 35 mins
121. Shahi-Tukda (dE13)
120. Brownie (dE12)
122. Phirni (dE14)
59

lGreen cardamom – ½ tsp powder lBasmati rice – ¼ cup (soaked for 2-3
hours)
Method:
lMilk – 1 ¼ cup
1. Soak rice for half an hour and then grind it
to a coarse paste.
lSugar – 2 tbsp
2. Blanch pistachio nuts in hot water, cool,
lCondensed milk – 1 tbsp
remove skin & slice.
lRaisins – few
3. In a microwave safe bowl add boiled milk
lCardamom powder – ½ tsp
and rice paste and mawa dissolved in
Method:
cold milk. Keep the bowl in the microwave
1. Mix all the ingredients in a deep
oven.
microwave safe bowl.
4. Set the auto cook menu (dE14) stir in
2. Set the auto cook menu (dE16). Stir in
between. After 10 mins (display will show
between.
12.00 mins) add saffron. Mix well and
3. Let it cool & serve hot or chilled.
continue cooking. Stir in between.
Cooking Time: 15 mins
5. Pour into earthenware or china bowl and
garnish with sliced pista.
Ingredients:
6. Chill in a refrigerator for an hour before
serving.
For Pie:
Cooking time – 22 mins
lMaida – 1 cup
lChilled butter – ¼ cup
lSalt – ½ tsp
Ingredients:
For filling:
lApple – 1 cup (peeled & grated)
lApples – 2 (chopped)
lFull fat milk – 1 ½ cup
lSugar – ½ cup
lCondensed milk – 1/3 cup
lButter – 1tbsp
lSugar – 2tsp
lCinnamon powder – ¼ tsp
lNutmeg power – ¼ sp
Method:
Method:
1. For making the dough, cut the butter into
1. Combine all the ingredients except the
small pieces. Rub the butter on the maida
nutmeg powder in a microwave safe bowl
till it forms the shape of bread crumbs.
and mix well. Keep the bowl in the
Add salt, little cold water. Make soft
microwave oven.
dough. Keep covered with wet cloth for ½
2. Set the auto cook menu(dE15), stir in
hr.
between. After 12 mins (display will show
2. For filling, put all the above ingredients in
3 mins) add nutmeg powder, mix well.
a microwave safe dish and mix well. Cook
Continue cooking, stir in between.
on micro-high for 4 mins. Stir in between.
3. Serve chilled
3. Grease and dust the pie dish. Make 2
Cooking time – 15 mins
portions of Atta- 2/3rd and 1/3rd. roll the
SOUTH INDIAN RECIPES
2/3rd portion and set it on the pie dish.
Prick it with a fork. Fill with apple mixture.
Roll the left over portion and cut into small
Ingredients:
strips. Arrange it like a sheet over t h e
125. Apple Pie (dE17)
123. Apple Kheer (dE15)
124. Pal Payasam (dE16)
60

filling. Put it on the turn table. fluffy. Add this to the cold milk.
4. Set the auto cook menu (dE17). 4. Pour the mixture in the moulds.
Cooking time: 20 mins 5. Keep the bowl in the microwave oven.
6. Set the auto cook menu (dE19).
7. Keep it in the fridge so that it gets cold and
Ingredients:
sets.
lDesiccated (shreed) powder – 1 cup
Cooking time: 10 mins
lMilk powder – 2 tbsp
lCondensed milk – ½ cup
Ingredients:
lDry coconut powder – ½ cup
lPowdered Sugar – ¼ cup
Method:
lWater – ¼ cup
1. Mix all the ingredients except dry coconut
lCashew nuts – 1½ cup (powdered finely)
powder. Put in a microwave safe bowl and
then place it in the microwave oven. Set
lRose essence – ¼ tsp
the auto cook menu (dE18). Stir in
lSilver vark
between.
Method:
2. Make small balls of the mixture.
1. Mix sugar, water and leave it aside for 15
3. Roll the ladoo in the dry coconut powder.
mins.
4. Keep in the refrigerator once done.
2. Cook at 60% power level for 6 mins.
Cooking time: 3 mins
3. In a microwave bowl, add sugar syrup.
4. Keep the bowl in the microwave oven.
Ingredients:
5. Set the auto cook menu (dE20). Stir in
between.
lMilk – 2 ½ cup
6. Place the mixture on a greased surface
lSugar – 8tsp
and flatten it with the back of a greased
lMilk powder – 3tbsp
‘vessel’. Cool and cut into pieces.
lVanilla custard powder – 1tsp
Cooking time: 3 mins
lEggs – 2
lVanilla essence – 1tsp
Ingredients:
lSugar – 3tbsp (caramelized)
lDesiccated Coconut powder – 1cup
lNutmeg powder – ¼ tsp
lKhoya – ½ cup [grated]
Method:
lCardamom powder – ½ tsp
1. Melt 3tbsp sugar in a kadhai on low heat
lGhee – 1 tbsp
till it turns golden. Pour it in 6 small
individual bowls. Allow it to cool and set.
lPowder sugar – ¼ cup
2. Mix milk with sugar, milk powder and
lWater – ¼ cup
custard powder till it g e t s s m o o t h .
lSilver vark – 1
Microwave the mixture in a microwave
Method:
safe bowl for 10 mins. Stir in-between
1. In a microwave bowl, add coconut, khoya
after every 5 mins. Let it cool.
and ghee. Mix well. Cook on microwave
3. Beat the eggs and essence well with an
60% power for 4 mins. Stir in between.
egg beater till the mixture turns light and
2. Mix sugar, water and cardamom powder.
126. Coconut Ladoo (dE18)
128. Kaju Katli (dE20)
127. Caramel Custard (dE19)
129. Coconut Burfi (dE21)
61

Leave aside for 15 mins. lPowder sugar – 1 cup + 2tbsp
3. Cook at 60% power level for 6 mins. lMilk – ¼ cup
4. In a microwave bowl, add coconut lGreen cardamom powder – ½ tsp
powder and sugar syrup.
lCashew nuts – 1tbsp
5. Keep the bowl in the microwave oven.
lOil – ½ cup
6. Set the auto cook menu (dE21). Stir in
Method:
between.
1. Sift together semolina, maida, wheat
7. Spread mixture in the flat dish.
flour, soda & baking powder. Keep it
8. Decorate with silver vark sheet.
aside.
Refrigerate for 1 hr.
2. In a big bowl, combine yogurt, oil & sugar.
9. Cut it into pieces for serving.
Stir until sugar is dissolved.
Cooking time: 2 mins
3. Add semolina mixture, saffron, green
cardamom and milk to get a soft dropping
consistency. Beat it with an electric beater
Ingredients:
at medium speed for 5 mins.
lMilk – 1 ¼ cup
4. Pour batter into a baking tray. Sprinkle
lCocoa – 2 tbsp
cashew nuts.
lSugar – 1/3 cup
5. Keep the bowl in the microwave oven.
lGelatin – 2 tsp (soak in little water for 10
6. Set the auto cook menu (dE23).
mins)
Cooking time: 30 mins
lFresh cream – ½ cup
Method:
Ingredients:
1. Soak Gelatin in 2 tbsp water for 10 mins.
lMilk – 1 ¼ cup
Then heat it in microwave for 30 secs.
lSugar – 1 tbsp
2. Mix all ingredients except the fresh
lCorn flour – 1 tsp (blended with 1 tbsp
cream. Set the auto cook menu (dE22)
milk)
stir in between.
lCondensed milk – ¼ cup
3. Put this in glasses; keep it in the
refrigerator for 3-4 hours. 4.F o r l Thin coconut malai (Inside layer of
garnishing, decorate with chocolate, coconut) – from 1 coconut
cream & glazed cherries.
lGelatin – 2 tsp (soaked in 2 tbsp of water
Cooking time: 5 mins for 10 mins)
Method:
1. Put soaked gelatin in the microwave for
Ingredients:
30 sec.
lSemolina – 1cup
2. Mix all the ingredients except condensed
lWhole wheat flour – ½ cup
milk and coconut malai. Set the auto cook
lPlain flour – ½ cup
menu (dE24).
lYogurt – ½ cup
3. Cool and add condensed milk, coconut
lSaffron – ¼ tsp
maili. Serve chilled.
lBaking powder – ½ tsp
Cooking time: 5 mins
lBaking soda – ½ tsp
130. Chocolate Mousse (dE22)
132. Coconut Pudding (dE24)
131. Semoline Cake (dE23)
133. Modak (dE25)
62

mins.
Ingredients:
2. Add mixture of beaten egg, add essence
For Cover:
and keep aside for ½ hour. Pour into a pan
lModak atta – 1 cup (rice flour)
with 8 inch depth & drizzle walnut pieces
lOil – 1 tsp
on top. 3.Keep the bowl in the microwave
lWater – ¾ cup
oven. Set the auto cook menu (dE26)
lSalt – ¼ tsp
4. Cool and demould.
For stuffing:
5. Decorate with beaten fresh cream and
lShredded Coconut – 1 cup (shredded)
serve chilled.
lGrated jaggery – ½ cup
Cooking time – 26 mins
lCardamom powder – ½ tsp
lNutmeg powder – ¼ tsp
lSalt – ¼ tsp
Ingredients:
Method:
lDhoodhi – 250 gm (peeled & greeted)
1. For stuffing, mix all the stuffing
lSugar – 5tsp
ingredients & microwave for 3 mins. Keep
lCardamom powder – 1tsp
aside for 1 hr.
lFat milk – 1 cup
2. For cover, mix water and oil. Microwave
lGhee – 3tsp
high for 2 mins. Add Atta. Stir well.
lKhoya – 7tsp (grated)
3. Cover and cook on microwave at 40%
lMix dry fruit – 2 tsp (chopped)
powerlevel for 5 mins.
Method:
4. Knead rice atta and put the filling in
modak mould. Stuff it & close it at the
1. In microwave safe bowl add all
bottom with extra Atta. Remove it from the
ingredients & mix well.
mould, dip it in water & arrange it on the
2. Keep the bowl in the microwave oven. Set
steaming tray.
the auto cook menu (dE27) & stir in
5. Set the auto cook menu (dE25).
between.
Cooking time: 9 mins
Cooking time – 15 mins
Ingredients:
Ingredients:
lMilk – ½ litre
lMilk – ½ litre
lEgg – 3 nos
lPoha – 100 grams
lMava cake – 2 nos
lSugar – 150 grams
lSugar – ¾ cup powdered
lCardamom – 1 tsp
lMix fruit essence – ½ tsp
lCashew nuts – 2 tsp (slice)
lWalnut pieces – ¼ cup
lAlmonds – 2 tsp (slice)
lFor decoration
lPista – 2 tsp (slice)
lFresh cream – ½ cup
lRaisins – 2 tsp (slice)
Method:
lCondensed milk -4 tbsp
1. Beat egg & sugar. Mix well and cut cakes
Method:
into small pieces.Soak in ½ litre milk for 20
1. Wash poha drain & keep aside for 10
135. Bottle Gourd Halwa (Doodhi
Halwa) (dE27)
134. Cake Pudding (dE26)
136. Poha Kheer (dE28)
63

minutes. Using a fork, separate the poha. lBaking powder – 1tsp
In a microwave safe bowl add milk, sugar,
lCaramel – 1tbsp
cardamom and condensed milk and mix
lMix cherries, walnut, black raisins – 1 ½
well.
cup
2. Keep the bowl in the microwave oven. Set
lVanilla essence – 1tsp
the auto cook menu (dE28) stir in
lCinnamon powder – ½ tsp
between. After 15 mins (display show
lSalt – ½ tsp
5.00 mins).
lWater – to mix
3. Add poha ,mix well and continue cooking.
lCake gel – 1 tsp
4. Add nuts & serve
Method:
Cooking time – 20 mins
1. Sieve the flour and baking powder, salt &
CHINESE / THAI / WESTERN
cinnamon powder.
2. Beat the sugar, margarine and 1 egg with
beater till it gets light and fluffy.
Ingredients:
3. Add one more egg, caramel essence &
lMaida – 1 cup
cake gel & beat thoroughly.
lBaking powder - 1 tbsp
4. Add dry fruits with dry maida.
lCondensed milk - 1 tin
5. Add 1/3 portions of maida followed by two
lPowdered sugar – 1cup
tbsp of milk or water mixed with your hand
lSoda bi-carbonate – 2 tsp (Add if
lightly.
required)
6. Repeat the same procedure twice.
lVanilla essence – 2-3 tsp
7. Keep a little maida from the third portion.
lMarqarine - cup
8. Now after getting proper dropping
lMilk – 1 cup
consistency, add the left-over maida.
Method:
9. Grease a glass cake dish and dust it with
1. Seive maida, soda bi-carbonate, baking
flour. Pour the mixture in the dish.
powder. Keep it aside.
10. Keep the dish in the microwave oven.
2. Take a deep container, beat condensed
11. Set the auto cook menu (dE30).
milk and white butter. Make it light & fluffy.
Cooking time: 15 mins
3. Add sieved maida & milk simultaneously.
For eggless cake:
4. Lastly add essence into it.
lIn place of eggs, use –
5. Make a dripping consistency & keep it in
la. Curd or condensed milk – 3 ½ tsp
the microwave.
lb. Soda bi-carbonate – ½ tsp
6. Set the auto cook menu (dE29).
Cooking time: 20 mins
Ingredients:
lWheat flour – 1 cup
Ingredients:
lEggs – 2
lMaida – 1 ¼ cup
lCake gel – 1 tsp
lBrown sugar – 1 cup
lPowdered sugar – ¾ cup
lEgg – 2 nos.
lBaking powder – 1 tsp
lButter or margarine – ½ cup
137. Eggless Cake (dE29)
139. Carrot Cake (dE31)
138. Fruit Cake (dE30)
64

lGrated carrot – ¾ cup design with a marker and set the auto
cook menu (dE32).
lCondensed milk – ½ cup
Cooking time: 20 mins
lMargarine or butter – ½ cup
lWalnut – 2tbsp
lDates – 2tbs (soaked in water)
Ingredients:
lVanilla essence – ½ tsp
lButter – ½ cup softened
Method:
lCastor sugar – ½ cup
lBanana – 1
1. Beat margarine, sugar, 1 egg till it
becomes light and fluffy.
lVanilla essence - ½ tsp
2. Add another egg, cake, gel, essence and
lWalnut – ¼ cup chopped
beat again.
lMaida – ¾ cup
3. Add carrot (churned in a mixer). Fold in
lSoda-bi-carbonate – ¼ tsp
maida in three parts followed by 1tbsp
lBaking powder – ¼ tsp
water to get dropping consistency.
lSalt – ¼ tsp
4. Add the dates and walnuts. Pour it in a
lMilk – 1tbsp
greased and dusted 6 inch dish.
lSmall paper cups – 6
5. Place the container in the microwave
Method:
oven.
1. Sieve the flour with the soda-bi-
6. Set the auto cook menu (dE31).
carbonate, baking powder & salt. Keep it
Cooking time: 35 mins
aside.
2. Add butter to make it creamy.
Ingredients:
3. Add the sugar & mix well.
lMaida – 1 cup
4. Mash the banana. Add to the butter, sugar
lButter or margarine – ¼ cup
mixture and mix well.
lSugar powder – 1/3 cup
5. Add milk to make a dropping consistency.
lCondensed milk – 1tbsp
6. Add essence, walnuts & flour.
lOrange colour – ¼ tsp
7. Add 1tsp of this batter into each paper
lOrange essence – ¼ tsp
cup.
lBaking powder – ½ tsp
8. Place 6 cups on a microwave safe plate.
Method:
9. Keep the plate in the microwave oven.
1. Sieve maida & baking powder. Keep it
10. Set the auto cook menu (dE33).
aside.
Cooking time: 18 mins
2. Beat margarine, powdered sugar &
condensed milk till its light & fluffy. Add
Ingredients:
the essence & colour. Beat thoroughly.
lFlour (maida) – 100gm
3. Add maida, knead it well & use little milk if
lDrinking chocolate powder – 2tbsp
necessary. Let it rest for 1 hr.
lCocoa powder – 1tsp
4. Grease & dust the baking dish.
lButter/ghee – 50gm
5. Make small balls of kneaded Atta. Flatten
lPowdered sugar – 50gm
it and then cut it with a cutter. Mark &
141. Muffins (dE33)
140. Orange Creamy Biscuits (dE32)
142. Chocolate Cookies (dE34)
65

lBaking powder – a pinch fridge.
Cooking time: 8 mins
Method:
1. Sieve flour, drinking chocolate powder,
coco powder & baking powder. Keep it
Ingredients:
aside.
lRoasted almonds – ¼ cup
2. Beat the butter & sugar until it gets light
lDark Chocolate + milk chocolate – ½ cup
and fluffy.
slab (grated)
3. Mix all the ingredients together and knead
Method:
it into a soft dough.
1. Add the chocolate in a microwave safe
4. Roll into small balls. Flatten them & cut
bowl.
with a cutter & put into the baking dish.
2. Keep the bowl in the microwave oven.
5. Keep the dish in the microwave oven.
3. Set the auto cook menu (dE36). Stir in
6. Set the auto cook menu (dE34).
between.
Cooking time: 30 mins
4. Dip roasted almonds in melted
chocolate.
Ingredients:
5. Drop onto wax paper in the shape of
lOrange and sweet lime juice – 1 ¼ cup rocks.
lSugar – 1 ¼ cup 6. Keep it in fridge to set for 15 mins.
lWater – 1 ¼ cup Cooking time: 1 min
lGelatin – 6 tsp
lLime juice – from 2 limes (medium size)
Ingredients:
lOrange essence – ½ tsp
lMaida – 1 ¼ cup
lOrange colour – ½ tsp
lBrown sugar – 1 cup
For setting
lButter – ½ cup
lApple – 1 ( chopped)
lEggs – 2
lPineapple – 100 gms ( in cubes)
lWalnut pieces – ½ cup
lGrapes – 50 gms
lBaking powder – 1tsp
Method:
lVanilla essence – 1tsp
1. Soak gelatin in ¼ cup water for 10 mins &
lCaramel – 1tbsp
then put it in a microwave safe dish and
lCake gel – 1 tsp
put the dish into the oven.
Method:
2. Microwave-high for 30 secs.
1. Sieve maida, baking powder in a bowl,
3. Mix the juice, sugar, water & melted
add brown sugar, butter, add one egg
gelatin.
and beat well.
4. Set the auto cook menu (dE35). Once its
2. Add another egg, cake gel, essence and
done remove from the microwave.
beat well.
5. Let it Cool, add the colour & essence.
3. Add maida in three parts followed by
Also add 1 cup fruits (apple, pineapple &
water to make a dropping consistency.
grapes). Add the entire mixture in a dish
4. Pour the mixture in a greased cake tin.
greased with oil. Set the mixture in the
5. Keep the bowl in the microwave oven.
144. Almond Rocks (dE36)
143. Fruit Jelly (dE35)
145. Walnut Cake (dE37)
66

6. Set the auto cook menu (dE37). lMargarine – ½ cup
Cooking time: 15 mins lPineapple essence – ½ tsp
For topping:
lBrown sugar - 1/3 cup
Ingredients:
lGhee – ¼ cup
lMawa – 100gm (soaked in 1/3 cup of milk
lCherries for decoration
for ½ hr)
lPineapple slices -1 tin Method:
lMaida – 1 cup
1. Beat the margarine, powdered sugar &
lPowdered Sugar – 1 cup
one egg till it’s light and fluffy. Add one
lEggs – 2
more egg and beat again.
lMilkmaid – 3 ½ tsp
2. Add the 3rd egg, essence, gel & beat
lMargarine – ¼ cup
again. Fold in the maida in three parts
lBaking powder – ½ tsp
followed by pineapple syrup to get a
lMix fruit essence – ½ tsp
dropping consistency.
lMilk – 1/3 cup
3. Beat the brown sugar and ghee till it’s
Method:
creamy. Spread it on a 10 inch tray.
1. Soak mawa in milk for ½ hour.
Arrange the pineapple pieces in a circle.
Keep one cherry on each piece.
2. Beat the eggs, sugar & margarine well
with the beater.
4. Pour the cake mixture slowly. Put the tray
in the microwave oven.
3. Add powdered sugar, spoon by spoon
and beat it well till the mixture is fluffy.
5. Set the auto cook menu (dE39).
4. Beat another egg & essence till it’s light
Cooking time: 45 mins
and fluffy.
5. Sieve the flour, baking powder together.
Ingredient:
Now fold in the flour mixture carefully with
lBread – 10 slices (standard size)
a spoon.
lDry fruit – 1/3 cup (raisins, cherries, dates)
6. Lastly, fold in the mix fruit essence.
lNuts – ½ cup (almond, walnuts)
7. The mixture should be of a dropping
lMilk – 2 ½ cup
consistency.
lCocoa – 3 tsp
8. Fill in the cups.
lButter – ½ cup
9. Keep the cups in the microwave oven.
lSugar – 2/3 cup
10. Set the auto cook menu (dE38).
lEgg – 3 nos
Cooking time: 30 mins
lGrated nut Meg – ½ tsp
lCinnamon powder – ½ tsp
Ingredients:
lVanilla essence – ½ tsp
For cake:
Method:
lMaida – 2 ½ cup
1. Heat ½ cup milk with butter and mix
lPowdered sugar – 1 ½ cup
cocoa with it. Add it to rest of the milk.
lEggs – 3 (or 4 tbsp condensed milk)
Dissolve sugar in it, cool it and beat the
lCake gel – 1 tsp
egg.
lBaking Powder – 2 tsp
146. Mawa Cake (dE38)
148. Chocolate Pudding (dE40)
147. Pineapple Cake (dE39)
67

2. Mix milk with lightly beaten eggs,
Method:
cinnamon and essence.
1. For making the dough, cut the butter into
3. Remove the crust of bread slices cut into
small pieces. Rub the butter on the maida
cubes. Place them in a greased 22 cm
till it forms the shape of bread crumbs.
square microwave safe baking dish.
Add salt, little cold water. Make soft
dough. Keep covered with wet cloth for
4. Sprinkle chopped dry fruit & nuts on top.
½ hr.
5. Pour milk mixture on top of bread.
2. Place the butter in a microwave safe bowl.
6. Keep the bowl in the microwave oven. Set
Add onion, parsley and celery. Cook on
the auto cook menu (dE40). Stir in
microwave high for 5 mins. Toss in the
between.
fish. Cook on microwave high for 6 mins.
Cooking time – 22 Mins
Stir in salt and pepper and leave aside.
Continental
3. Peel the mashed potatoes. Combine with
How to boil macaroni:
butter and add salt and pepper to taste.
Ingredients:
4. Pour the above mixture over the fish and
lMacaroni – 1 cup
mix it.
lWater – 1 ½ cup
5. Grease and dust the pie dish. Make 2
lButter – 1tsp
portions of atta- 2/3rd and 1/3rd. Roll the
2/3rd portion and set it on the pie dish.
Method:
Prick it with a fork. Fill with fish mixture and
1. Mix all the ingredients in microwave safe
cheese sauce. Roll the left over portion
bowl, microwave high [100%] power for
(1/3 rd portion) and cut into small strips.
10 mins, and stir in between. Strain and
Arrange it like a sheet over the filling. Put it
add 1tsp butter on the macaroni.
on the turn table.
CONTINENTAL
6. Keep the bowl in the microwave oven.
7. Set the auto cook menu (Co1).
Ingredients:
Cooking time: 30 min
For pie:
lMaida – 1 cup
Ingredients:
lChilled butter – ¼ cup
lPizza base – 1 (12 cm)
lSalt – ½ tsp
lMozzarella cheese – 250gm (grated)
For filling:
lOnion – 1tbsp (chopped)
lButter – 2tbsp
lCapsicum – 1 (chopped)
lPotatoes – 3 (boiled)
lPaneer – 50gms (cut into half a centimeter
lOnion – ½ cup chopped
thick triangular slice)
lParsley – 2tbsp chopped
lOlives – 2tbsp (thinly slice)
lCelery – 2-3 stalks, chopped
lTomato – 1 chopped
lFish fillets – 500gm cut into cubes
lTomato puree – 1 tbsp
lSalt and pepper – to taste
lTomato ketchup – 1tbsp
lHard boiled eggs – 2 sliced
lOregano – 1tsp
lCheese sauce – 3 tbsp
lSalt and pepper – to taste
149. Fish Pie (Co1)
150. Margherita Pizza (Co2)
68

1tbsp oil,1/2tsp salt, chicken and 2 cups
Method:
of water. Mix well. Countinue cooking.
1. Mix all ingredients for topping except
4. After more 8 minutes( display will show
cheese.
8:00 minutes),stir in between.
2. Spread it on the pizza base and then
spread the grated cheese on top of that.
5. Add the above ingredients to the chicken.
Add the remaining ingredients too.
3. Keep the plate in the microwave oven.
6. Continue cooking ,stir in between.
4. Set the auto cook menu (Co2).
7. Serve hot with green leaves of spring
5. Serve hot.
onions.
Cooking time: 17 mins
Cooking time: 20 mins
Ingredients:
Ingredients:
lBoneless Chicken- 250gm(½ inch
pieces)
lSpinach – 1 bunch
lCapsicum – 1no(Cut into small cubes)
lButter – 1 tsp
lOil – 4 tbsp
lLasagna sheets – 3
lGarlic – 1 TBsp(chopped)
lSoya nuts – ½ cup (soaked in hot water
lDry red chilli – 1 no(cut into thin slices
for ½ hr, squeezeout the rest water from it )
diagonally)
lOnion – 1 (chopped)
lRed chilli paste – 1tsp
lTomato – 1 (chopped)
lSpring onion -1no (Chopped)
lOil – 1 tsp
lTomato ketchup – 3tbsp
lChilli powder – ½ tsp
lRed chilli sauce – 1tbsp
lCheese – 2 cubes
lSoya Sauce – 2 tsp
lSalt for taste
lVinegar – 1tbsp
lWhite sauce – ½ cup
lPepper – ½ tsp
Method:
lSalt – 1tsp
1. Cut and cook spinach on microwave high
lSugar – ½ tsp
for 3 mins.
lChicken soup cube– 1 no(crushed)
2. Mix Soya granules, onions, tomato, oil
lCournflour- 4tbsp(dissolved in ½ cup
and chilli powder. Again microwave high
water )
for 3-4 mins.
Method:
3. In a microwave safe flat dish, arrange the
1. In a microwave safe bowl add 3 tbsp oil,
lasagna sheet, the cooled soya mixture &
garlic, red chili paste, Dry red chili and
then the other lasagne sheet, palak
white portion of onions. Mix well.
mixture, and place the 3rd lasagne sheet
2. Keep the bowl in the microwave oven. Set
on top of it.
the auto cook menu (Co3).After the first 4
4. Spread white sauce and grated cheese.
minutes (display will show 16:00) remove
5. Put the dish into the microwave oven.
and keep the bowl aside.
6. Set the auto cook menu (Co4).
3. In another microwave safe bowl add
Cooking time: 5 mins
151. Chicken in hot garlic Sauce (Co3)
152. Veg Lasagna (Co4)
69

153. Spaghetti With Basil (Co5)
154. Chicken Stronganoff (Co6)
155. Nachos (Co7)
lKetchup – ½ tbsp
• Worcestershire sauce – 2tsp
Ingredients:
• Salt to taste
lBoiled spaghetti – ½ cup
• Pepper & chilli powder – ¼ tsp
lWhite sauce – 1 cup
• Capsicum – 1 (cut into 2 cubes)
lBoiled vegetables – 1 cup (1 green onion,
Method:
1 yellow, 2 red capsicums, 3-4 carrots,
1. In a bowl, sprinkle ½ tsp each of salt,
100 gm cabbage, 5 French beans & 2
pepper & chilli powder over the chicken
lspring onions)
pieces. Mix well and keep it aside for 4
lBasil – ¼ cup
hours.
Method:
2. In a microwave safe bowl, add 2 tbsp
1. Sprinkle little water on a microwave safe
butter, onion and mushroom. Set the auto
dish and add the vegetables. Microwave
cook menu (Co6). Stir in between.
high for 3 mins.
3. After 4 mins, add 2 tbsp butter, chicken
2. In a microwave safe bowl, take the
pieces and continue cooking. After 4
spaghetti (½ cup), add 2 cups of water.
more mins (when the display shows
Microwave high for 5 mins. Stir in
12:00), add 1 ½ cup of water, soupcube,
between. Take it out, strain and place
flour, tomato puree, tomato ketchup,
under tap water. Put ½ tsp oil into it and
Worcestershire sauce, mustard, crushed
avoid stickiness.
garlic, salt, pepper, corn flour & chilli
3. Grease a flat dish with butter and spread
powder. Continue cooking. It will become
the vegetables, spaghetti, white sauce &
slightly thick.
grated cheese. Add basil. Set the auto
4. 6 mins later, add whipped cream &
cook menu (Co5). Sprinkle chilli flakes.
yogurt. So that there are no lumps and it
Cooking time: 5 mins
becomes smooth.
5. Add cream-yogurt mixture. Mix well. Add
Ingredients:
capsicum after 2 more mins. Continue
lChicken – 400gms
cooking. 6.Serve hot with steamed rice
lButter – 2tbsp
sprinkled with chopped parsley.
lMushroom – 150gm (cut into 2 pieces)
Cooking time: 16 mins.
lMaida – 1 ½ tbsp (blended with - 1 ½ cup
water)
Ingredients:
Soup cube – 1
lCorn chips – 1 cup
lGarlic – 1tbsp
lCheese – ¼ cup (grated)
lOnion – 1
For sauce:
lCream – ¾ cup
lMilk – ½ cup
lThick yogurt – 3tbsp
lCube cheese – 2 (grated)
lCorn flour – 1tbsp
lCorn flour – 1 tsp
lMustard – 1tsp
lMustard paste – ¼ tsp
lTomato puree – 1tbsp
70

lCapsicum – 2 tbsp (chopped) Cooking time: 7 mins
• Salt to taste
Method:
1. For sauce- In a microwave safe bowl,
Ingredients:
add all the ingredients. Mix well. Put the
lSpinach – 200gm (boiled)
bowl in the microwave oven and cook it at
lBoiled Corn – ½ cup
80% power for 3 mins. Stir in between.
For paste:
2. For cooking nachos, in a microwave safe
lOil – 2tbsp
bowl, put corn chips, sauce and mix well.
lGinger paste – ½ tbsp
Sprinkle cheese on top. Set the auto cook
lSalt & pepper – to taste
menu (Co7)
lTomato sauce – 2 tbsp
Cooking Time: 30 sec
lTomato puree – ½ cup
lSoya sauce – 1 tsp
Ingredients:
lSugar – ½ tsp
lPasta – 1 cup (boiled)
lAjinomoto – ¼ tsp
lPasta sauce – ½ cup
lCorn flour – 2 tbsp (dissolve in ¼ cup
lPizza sauce
water)
lGrated cheese – ¼ cup
Method:
lOregano – 1tsp
1. In a microwave safe bowl, mix oil and
lSalt & pepper – to taste
ginger paste. 2.Keep the bowl in the
Method:
microwave oven.
1. Mix all the ingredients. 2.Keep the bowl in
3. Set the auto cook menu (Co10). Stir in
the microwave oven.
between.
3. Set the auto cook menu (Co8).
4. After 1 min (when display shows 12:00),
4. Serve with garlic bread.
add tomato sauce, puree, sugar, soya
Cooking time: 5 mins
sauce and ajinomoto. Continue cooking.
5. After 3 more mins, add 1 cup of water,
corn flour paste, boiled corn & boiled
Ingredients:
spinach. Mix well, continue cooking and
lMushrooms – 100 gms (stir fry with oil)
stir in between.
lPizza sauce – 2 tbsp
Cooking time: 13 mins.
lCheese – ¼ cup (grated)
lButter – 1tbsp
lSalt and pepper – to taste
Ingredients:
lMixed vegetables – 1 ½ cup (cauliflower,
Method:
carrot, peas, french beans- boiled)
1. Mix all the ingredients. Spread grated
lMacaroni - ½ cup (boiled)
cheese on top of it.
lPotatoes – 4-5 (boiled & mashed)
2. Keep the bowl in the microwave oven.
lWhite sauce – ½ cup
3. Set the auto cook menu (Co9). Press
lCube cheese – 3 (grated)
start.
158. Spinach And Corn In Ginger
Sauce (Co10)
156. Pasta In Red Sauce (Co8)
157. Baked Mushroom (Co9)
159. Veg Au-Gratin (Co11)
71

lSalt & black pepper – to taste
Method:
Ingredients:
1. Add salt & pepper (as per taste) to the
lLasagna – 5 sheets (broad)
mixed vegetables, macaroni & boiled
lChicken breasts – 3 boneless
potatoes.
lSalt – ½ tsp
2. In a microwave glass bowl, add
lWater – 1 cup
vegetables, macaroni, white sauce &
lCorn – ½ cup (boiled)
layer of mashed potatoes and grated
lMozzarella cheese – 100gm (grated)
cheese.
lTomato ketchup – 3 tbsp
3. Put glass bowl on the wire rack.
lTomato - 1 (chopped)
4. Keep the bowl in the microwave oven.
For sauce –
5. Set the auto cook menu (co11).
lOlive oil – 3tbsp
Cooking time: 12 mins
lMilk – 1 ½ cup •Oregano – ½ tsp
lChilli flakes – ½ tsp
lFlour – 4tbsp
Ingredients:
lChicken soup cube – 1 (crushed)
lMacaroni – ¾ cup (boiled)
lMixed herbs – ½ tsp
lOnions – 2 (cut in to ring shape )
lSalt & pepper – to taste
lCapsicum – 1 (cut in to ring shape )
lTomato puree – ½ cup
Method:
lGarlic paste – 1 tsp
1. For stock - In a microwave safe bowl add
lChilli powder – 1tsp
chicken, salt, pepper and 2 cup of water.
lBaked beans – 1 cup
Mix well. Microwave high for 10 mins. Stir
lTomato ketchup – 5 tbsp
in between reserve stock.
lCheese – ¼ cup grated
2. Cut chicken into pieces. Mix with tomato
lButter – 1tbsp
& ketchup.
lSalt to taste
3. For sauce - In a microwave safe bowl mix
olive oil with flour. Microwave for 2
Method:
minutes stir immediately. Add stock from
1. In a microwave safe bowl, add butter,
step 1. Add remaining ingredients of
garlic paste, tomato puree, chilli powder.
sauce. Microwave high for 6 mins, till
Put the bowl in the microwave oven.
thick. Stir in between.
2. Set the auto cook menu (Co12). Stir in
4. Spread 3 tbsp sauce in baking dish. Dip a
between. 3.After the first 4 mins (when the
lasagne sheet in hot water & lay it on the
display shows 05:00), add macaroni,
dish.
baked beans, tomato ketchup and salt
5. Repeat till all sheets are used.
and mix it well. Cover with the capsicum &
6. Top it up with the remaining sauce.
onion rings & sprinkle the cheese on top
7. Sprinkle cheese and corn. 8.Keep the
and continue cooking.
bowl in the microwave oven.
4. Serve hot.
Cooking time: 9 mins
9. Set the auto cook menu (Co13).
Cooking time: 5 mins
161. Chicken Lasagna (Co13)
160. Hot Pot Macaroni (Co12)
72

162. Spinach With Cheese (Co14)
163. Potato Salsa (Co15)
164. Baked Macaroni With Pineapple
(Co16)
165. Pasta In White Sauce (Co17)
min. Stir in between, add tomatoes
microwave at 80% power level for 4 mins
Ingredients:
and stir in between. 2.Add capsicum, mix
lBoiled spinach – 1 cup (puree)
well and microwave at 80% power level for
lBoiled corn – ½ cup
4.mins. Stir in between and add mint
lWhite sauce – ½ cup
leaves, coriander leaves, vinegar, sugar,
lSalt to taste
salt and lemon juice. (Blend in liquidiser to
lGrated cheese – ½ cup
a smooth puree) Mix well and microwave
lOregano - 1 tsp
at 60% power level for 3 mins. Salsa is
Method:
ready keep aside .
1. In a greased square microwave safe
3. Apply butter on both the side of potato
baking bowl add boiled spinach, corn,
slice and dip into salsa sauce. 4.Arrange
white sauce and salt .
potato slice on the baking plate, keep the
2. Mix it, spread grated cheese on top of
baking plate in the microwave oven .Set
that sprinkle oregano on top of that. 3.
the auto cook menu. After first 12 mins
Keep this dish on baking try put in the
[display will show 08.00] and turn the
microwave oven, set the auto cook menu
side. Continue cooking.
(Co14).
5. Set the auto cook menu (Co15)
Cooking time: 10.00 mins
Cooking time: 20.00 mins
Ingredients:
For potatoes:
Ingredients:
lBoiled potatoes – 3 no [sliced]
lMacaroni – 1 cup [boiled]
lPepper powder – 1 tsp
lWhite sauce – ¾ cup
l Butter – 2 tbsp •Salt to taste
lPineapple – 5 slice
For Salsa:
lSalt to taste •Pepper powder – ½ tsp
lOil – 1 tsp
lCheese – ½ cup (grated)
lGarlic paste – 1 tsp
lTomato sauce – 2 tbsp Method:
lCapsicum – ½ cup [chopped ]
1. In a greased square bowl, add boiled
lTomatoes - ¼ cup [ chopped]
macaroni and mix with salt, pepper and
lMint leaves – 1tsp [chopped]
white sauce.
lCoriander leaves – 1 tsp [chopped]
Put pineapple slices and grated cheese.
lVinegar – 1 tbsp
2. Keep this bowl on baking plate and put it
lSugar – ½ tsp
on microwave. Set the auto cook menu
lLemon juice – 1 tsp
(Co16). Serve with tomato sauce.
lSalt to taste
Cooking time – 12 mins.
Method:
1. Take oil in a microwave safe bowl and
Ingredients:
microwave high for 1 min. Stir in between,
lPasta – 1 cup (boiled)
add garlic paste and microwave high for 1
73

lWhite sauce – ½ cup Cooking time: 15mins
lGrated cheese – ¼ cup
ACCOMPANIMENTS
lOregano – 1tsp
lSalt & pepper – to taste
Ingredients:
Method:
lMix fruit pulp – 1 ½ cup (pineapple,
1. Mix all the ingredients.
banana, papaya, sweet lime orange,
2. Keep the bowl in the microwave oven.
grapes, mango)
3. Set the autocook menu (Co17)
lSugar - 1½ cup
4. Serve with garlic bread
lMix fruit essence – ½ tsp
Cooking time: 7 mins
lRed colour – ½ tsp
lLiquid glucose – 1 tsp
Ingredients:
lCitric acid – ½ tsp
lCorn chip – 1 cup
Method:
lCheese – ¼ cup (grated)
1. How to make pulp: Mix all the fruits in a
For the salsa sauceOnion – 1 (chopped)
microwave safe bowl with ¼ cup of water.
lTomatoes – 2 (chopped)
Microwave high for 5 mins. Put it in the
lCapsicum – 1 (chopped)
mixer and strain it.
lGarlic – 1 tsp (paste)
2. Take all the ingredients in a deep
Oregano – ¼ tsp
microwave safe bowl. Keep the bowl in
lChili sauce – 1tsp
the microwave oven.
lSalt to taste •Oil – 1 tsp •Butter – 1 tsp
3. Set the auto cook menu (AC1) stir in
For the salsa sauce:
between.
1. In a microwave safe bowl add oil, butter &
Cooking time: 20 mins
garlic paste. Microwave at 80% power
level for 1 min. Stir in between.
Ingredients:
2. Add onion and microwave at 80% power
lPulp – 2 ½ cup (grated pineapple – 1 cup,
level for 4 mins and stir in between. Add
banana, papaya & apple) [to make pulp
tomatoes and microwave at 80% power
see the above recipe]
level for 4 mins. Stir in between.
lSugar – 2 ½ cup
3. Add capsicum, oregano, chilli sauce, salt
lYellow Colour – ½ tsp
& pepper and mix it. Microwave at 80%
lPineapple essence – ½ tsp
power level for 4 mins and stir in between.
lCitric acid – 1 tsp
Sauce is ready. Keep aside.
lLiquid glucose – 1 tsp
4. In a square dish arrange the corn chips
Method:
put salsa sauce on top of it and add
1. Mix all the ingredients. Set the auto cook
grated cheese.
menu (AC2). Stir in between.
5. Keep this bowl on baking plate and put it
Cooking time: 20 mins
in microwave. Set the auto cook menu
(Co18).
167. Mixed Fruit Jam (AC1)
166. Nachos With Salsa Dip (Co18)
168. Pineapple Jam (Ac2)
74

169. Mexican Dip (AC3)
171. Cream Cheezy Dip (AC5)
172. Bengali Chutney (AC6)
170. Barbeque Dip (AC4)
3. Serve at room temperature.
4. Dip to go with chips, kababs.
Ingredients:
Cooking: 3 mins
lOil – 2tbsp
lOnion – ¼ cup (chopped)
lGarlic – 1 tsp (paste)
Ingredients:
Milk – ½ cup
Capsicum – ¼ cup (chopped)
l
l
Grated Cheese cubes – 3
Chilli powder – ½ tsp
l
l
Capsicum – 2tbsp (finely chopped)
Cumin powder – ½ tsp
l
l
Corn flour – 1 tsp
Coriander powder – ½ tsp
l
l
Mustard paste – ¼ tsp
Tomato – 500 gm (blanched, peeled and
l
l
Salt to taste
chopped)
l
lSalt, pepper, sugar – to taste
Method:
1. Mix all the ingredients in a microwave safe
Method:
bowl and mix well. 2.Keep the bowl in the
1. Mix all the ingredients in a microwave safe
microwave oven.
bowl and mix well.
3. Set the auto cook menu (AC5).
2. Keep the bowl in the microwave oven.
4. Serve with nachos.
3. Set the auto cook menu (AC3). Stir in
Cooking time: 2 mins
between. Make sure that the mixture is
thick.
Cooking time: 10 mins
Ingredients:
lChopped Tomato – 250gm
lGreen chilli paste – 1tsp
Ingredients:
Mustard oil – 2tbsp
Vinegar – 1tbsp
l
l
Vinegar – 1tbsp
Lemon juice – 1tbsp
l
l
Raisins – 1tbsp
Water – ½ cup
l
l
Ginger paste – 1tsp
Onion – ½ cup (chopped)
l
l
Kalonji roasted - ½ tsp
Sugar – 2tsp
l
l
Cumin seeds roasted – ¼ tsp
Butter – ¼ cup
l
l
Mustard seeds roasted – ½ tsp
Pepper – ½ tsp
l
l
Dry ginger ( saunth) roasted – ¼ tsp
Ketchup – ½ cup
l
l
Fenugreek roasted – ¼ tsp
Worcestershire sauce – 1 tbsp
l
l
Salt & pepper – to taste
Chilli flakes – ¼ tsp
l
l
Water – 1 cup
Salt to taste
l
l
lCorn flour – 1tsp (blended with 1tbsp
Method:
water)
1. In a microwave safe bowl, add all the
ingredients and mix well.
Method:
2. Keep the bowl in the microwave oven.
1. Mix all the ingredients.
3. Set the auto cook menu (AC6). Stir in
2. Keep the bowl in the microwave oven. Set
between.
the auto cook menu (AC4).
75

4. Cool & store in an airtight container. mango mixture. Keep it aside for 5 mins.
Cooking time: 16 mins 3. Mix all the ingredients in a microwave safe
bowl. 4.Keep the bowl in the microwave
oven.
Ingredients:
5. Set the auto cook menu (AC8).
lCarrots – 1 cup (peeled and cut into thin
6. Allow it to cool and then store it in an
2inch long fingers)
airtight jar.
lWhite vinegar – ½ cup
Cooking time: 9 mins
lSalt – 2tsp
lRed chilli powder – 1tsp
lTurmeric – ½ tsp
Ingredients:
lGrounded yellow mustard powder – 2tsp lFreshly grated coconut – 1cup
lSugar – 2 ½ tbsp lGreen chillies – 2-3
lGinger – 1tsp
Method:
lSalt to taste
1. Put carrots in a bowl. Sprinkle 1-2 tbsp
Tempering:
water.
lOil – 1tsp
2. Keep the bowl in the microwave oven.
lMustard seeds – ½ tsp
3. Set the auto cook menu (AC7).
lDry red chilli – 1 (broken into small pieces)
4. Remove from bowl and dry them with a
lCurry leaves – few
clean kitchen towel.
5. Rub salt, red chilli, haldi, mustard powder
Method:
on the carrots. 1. Grind coconut, green chillies and ginger
6. Transfer the carrot pieces into a jar. together, by adding enough water to
7. Add vinegar & sugar to the carrots and make a thick paste.
shake well to mix. 2. Add a little salt to taste. Remove chutney
8. The pickle is ready to eat. Store it in the into a serving bowl.
refrigerator. 3. Mix all the other ingredients for tempering
Cooking time: 4 mins in a microwave safe bowl.
4. Keep the bowl in the microwave oven.
5. Set the auto cook menu (AC9).
Ingredients:
6. Pour the tempering on the chutney. Serve
lRaw mangoes – 1 cup (grated)
with vadas Cooking t
lSalt – 1tsp
lTurmeric powder – ¼ tsp
lSugar – 1 ½ cup
Ingredients:
lChilli powder – 1tbsp
lDates – ½ cup (microwave high for 5
lRoasted cumin seeds – 1tsp (powder)
mins, with ¼ cup of water)
Method:
lTamarind – soaked with ¼ tbsp water
1. Combine the mangoes, salt & turmeric
lJaggery – ¼ cup
powder. Keep it aside for 5 mins.
lChilli powder – 1 tsp
2. Add the sugar and 1tbsp of water and
173. Carrot pickle (AC7)
175. Coconut Chutney (AC9)
174. Sweet Mango Pickle (AC8)
176. Tamarind And Date Chutney
(AC10)
76

lBlack salt – ½ tsp
lSalt – ½ tsp
Ingredients:
lJeera – 1 tsp
lDry Kashmir red chillies – 13 nos [soaked
lCinnamon (Dal chini) – 1
in warm water ]
lBlack pepper – 2
lChopped garlic – 2 tbsp
lCloves - 2
lWhite vinegar – 6 tsp
Method:
lSugar – 2tsp
1. Boil dates and make paste with little
lSesame oil – 2 tbsp
water. 2.Add roasted jeera, cinnamon,
lSalt to taste
black pepper, cloves. Roast and grind.
Method:
3. Add all the ingredients in microwave safe
1. Drain out all the water from the chillies and
bowl. Set the auto cook menu (AC10) .
discard it. Grind all ingredients except oil
Cooking time: 2 mins
in a blender to a fine paste. Keep aside. 2.
In a glass microwave safe bowl add oil.
Ingredients:
Keep the bowl in the microwave oven. Set
the auto cook menu (AC12).Stir in
For Pulp:
between.
Apple – 250 germs [chopped]
3. Pour oil over the chilli, garlic paste. Mix
Water – 100 ml
well, allow it to cool and store refrigerated
For jam
in an air tight container. Use as a dipping
lApple pulp – ½ cup
sauce. Tips Select bright red chillies for a
lSugar – ½ cup
rich flavoured sauce
lCitric acid – 1 tsp
Cooking time: 5 mins
lApple essence – 1 tsp
Method:
Preparation (How to make apple pulp)
Ingredients:
1. In microwave safe deep bowl add water
lFully ripe mangoes – 300 gms [wash and
and microwave at 80 % power level for 4
clean]
mins. Tie apple pieces loosely in a small
Method
cloth bag and put it into hot water and
1. Place thumb over the base and hold
microwave at 80% power level for 6 mins.
mango firmly between thumb and finger
Drain water from it & crush the apple &
from base to tip.
make pulp. 2.In a microwave safe bowl
2. Now soften the fruit with the other hand by
add apple pulp, sugar, citric acid (diluted)
rotating the mango and applying
in water & apple essence.
pressure at the same time.
3. Keep the bowl in the microwave oven, set
3. When fully softened, snip off base with
the auto cook menu (AC11) and stir in
hand.
between.
4. Push out and empty contents into a
Cooking time – 20 mins
microwave safe bowl. 5.Keep this bowl in
178. Schezwan Sauce (AC12)
177. Apple Jam (AC11)
179. Mango Pulp (AC13)
77

microwave oven. Set the auto cook
menu(AC13). Stir in between.
Ingredients:
For Pulp
lTomatoes – 1 (cut into quarters)
1. Bring this mixture to room temperature.
lCarrot – 1 (cut into cubes)
Run a hand mixer through to get a
lOnion – 1 (chopped)
smooth texture.
lGarlic – 1 tsp (paste)
Cooking time: 1 mins
lOil – 2tsp
lBasil leaves – 10 nos •Pepper powder – 1
Ingredients:
tsp
lTomatoes – 4 nos [big one]
lSalt to taste •Sugar – ½ tsp
Method Preparation:
Method:
1. Pierce the tomatoes with a fork .Put it in a
1. In microwave safe bowl add oil. Keep the
microwave safe bowl. Keep the bowl in
bowl in the microwave oven, set the auto
the microwave oven.
cook menu (AC16) after one minute
2. Set the auto cook Menu (AC14).Stir in
(display will show 16.00 mins) 2.Add
between. Peel and puree them in hand
carrot garlic & onion cover and continue
mixer.
cooking stir in between. After 8 mins
Cooking Time: 7 mins
(display will show 8.00 mins) 3.Add the
tomatoes, basil pepper powder salt &
sugar mix well cover the bowl and
Ingredients:
continue cooking stir in between 4.
lLime – 1 cup (cut into quarters)
Remove and let it cool For puree
lOil – 2tsp
1. Puree the mixture in a blender 2.Store in a
lChilli powder – 1 tsp
glass bottle
lSalt - to taste •Turmeric powder – ½ tsp
Cooking time – 17 mins
lFenugreek powder – ½ tsp
lAsafoetida powder – ¼ tsp
SPECIALS
Method:
1. In a microwave safe bowl toss lime in oil
Ingredients:
and cover the bowl. Keep the bowl in the
lFor tikka
microwave oven.
lPotato – 1 cup (boiled and mashed)
2. Set the auto cook menu (AC15). Stir in
lOil – 1 tbsp
between, after 8 mins (display will show
lGinger, garlic and chilli paste – 1 tsp
4.00 mins )
lCumin seeds – 1 tsp
3. Add rest of the ingredients and mix well.
lChopped Onion – ½ cup
Cover the bowl and continue cooking. Stir
lCoriander leaves – ¼ cup (chopped)
in between. 4.If kept for more than 2 days
lFor chutney
store in a refrigerator.
lCoconut – ½ cup
Cooking time – 12 mins
182. Tomato Sauce (AC16)
180. Tomato Pulp (AC14)
181. Lime Pickle (AC15)
183. Potato Chutney Tikka (Sp1)
78

lGreen chillies – 2 shaped)
lGinger garlic paste – 1 tsp lCurd tied in a cloth – ½ cup
lSalt to taste lGinger-garlic paste – 2tsp
lJeera powder – 1tsp lChilli powder – 1tsp
lFor coating lGaram masala powder – 1tbsp
lMaida – 2 tbsp (blended with 3tbsp water) lSalt to taste
lBread crumbs – 4 tbsp lOil – to brush
Method: Method:
1. To make chutney, grind all the ingredients 1. Cut paneer into rectangular slice. Cut
for chutney. Make thick chutney. vegetables to match the paneer slice.
2. For potato mixture, in a micro Add all the other ingredients & marinate
wave safe bowl, add oil, ginger garlic, and keep it aside for 1 hr. Grease the
chilli paste & onion. Cook on microwave baking try and put marinated ingredients.
high for 3 mins. Stir in between. Add 2. Keep the tray in the microwave oven.
boiled and mashed potato, salt, cumin 3. Set the auto cook menu (Sp2). Turn the
seeds. Bring it to room temperature. Add sides after 10 mins (when display shows
coriander. 23:00).
3. Divide the potato mixture into lime sized Cooking time: 33 mins
balls. Shape each ball into cup. Fill one
cup with chutney, cover with another cup.
Ingredients:
Press the edges to seal. Shape like a tiki.
lBoiled potatoes – 3-4 (medium sized)
4. Coat the tiki in blended maida and roll in
lBoiled green peas – ¾ cup
bread crumbs. Grease a baking tray and
lChopped green chillies – 1tbsp
place the cutlets on it. Brush them with oil.
lChopped green coriander – 2tbsp
5. Keep the tray in the microwave oven. Set
lChopped ginger – 1tbsp
the auto cook menu (Sp1). Turn the side
lChaat masala – 1tsp
after 10 mins (when display shows 15:00).
lSalt to taste
Continue cooking.
lCorn flour – 2tbsp
6. Serve hot with tomato sauce.
lOil – to brush
Cooking time: 25 mins
Method:
1. Mix grated potatoes, peas and all other
Ingredients:
ingredients. Add corn flour for binding.
lPaneer – 1 cup (cut into 1½" long
2. Divide the mixture into equal portions.
rectangles of ½" thickness)
Shape them into balls. Grease the baking
lCapsicum – ½ cup (cut into large square
try.
shaped)
3. Keep the tray with the kababs in the
lTomatoes – ½ cup (cut into large square
microwave oven.
shaped)
4. Set the auto cook menu (Sp3).Turn the
lOnion – ½ cup (cut into large square
side after 12 mins (when display show
185. Veg Kabab (Sp3)
184. Paneer Shaslik (Sp2)
79

18.00) lVinegar – 2tbsp
Cooking time: 30 mins lRed chilli soaked – 3 (soak for 30 mins
and make a paste)
lCournflour – 2tbsp
Ingredients:
lOil – 1 tbsp
lBoneless chicken – 500 gms
lTandoori (red colour) – a pinch
lCurd tied in a cloth – ½ cup (thickened)
lSalt to taste
lFresh cream - 4 tbsp
Method:
lMelted butter – to brush
1. Mix all the ingredients together &
lLime juice – to garnish
marinate for 3 hrs.
lGaram masala powder – to garnish
2. Brush with oil .Put it in a baking tray
For marination -
3. Keep the tray in the microwave oven.
lCurd tied in a cloth – ½ cup (thickened)
4. Set the auto cook menu (Sp5).
lGreen chilli – 2tbsp paste
Cooking time: 10 mins
lGinger garlic paste – 1 tbsp
lWhite pepper powder – 1 tsp
lVinegar – 2 tbsp
Ingredients:
lSalt to taste
lBoneless fish pieces – 500gms
l
Method:
Lime juice – 2tbsp
1. Cut chicken into 1 ½ inch tikka pieces lSalt & pepper – to taste •Green chillies – 4
(about 15 pcs.). Wash the chicken and lGarlic & Ginger – 1tsp paste
marinate with green chilli, ginger-garlic lCoriander leaves – ½ cup
paste, pepper powder, vinegar, salt and lMint leaves – ½ cup
leave aside for 1 hour. lCumin leaves – 1tsp powder
2. Beat the hung curd till smooth and mix lOil – to brush
with cream garam masala powder. Pour lLime juice, garam masala powder – for
over the chicken and mix well. Marinate garnishing
for minimum of 4 hours.
Method:
3. Put it on a baking tray and place the tray
1. Wash the fish pieces and dry them. Add
on the turn table. 4.Set the auto co
lime juice, salt & pepper, keep aside for
ok menu (Sp4). After 10 mins (when
15 mins. 2.Grind green chillies, ginger,
display shows 20:00), turn the side.
coriander, mint leaves and cumin
Continue cooking.
together. Mix with curd & add it to the fish.
5. Serve hot. Sprinkle lime juice and garam
Marinate for 1 hr.
masala.
3. Place the fish in a crusty plate or metal
Cooking time: 30 mins
rack and brush with oil.
4. Keep the plate in the microwave oven.
5. Set the auto cook menu (Sp6).
Ingredients:
6. After the first 12 mins (when display show
lPrawns – 6 •Chilli paste – 3tsp
18.00), turn over the kabab and continue
lGinger garlic paste – 4tsp
186. Malai Chicken Tikka (Sp4)
188. Fish Kabab (Sp6)
187. Arabian Prawns (Sp5)
80

cooking.
Cooking time: 30 mins
Ingredients:
lChicken legs – 400gms
l
Ingredients:
Hung curd – ½ cup
lBoneless chicken cubes – 500gm (cut
lGarlic ginger paste – 1tbsp
into 2 inch tikka pieces)
lRed colour – a pinch
lHung Curd – 1 cup •Green chillies – 2tsp
lSalt to taste
lGinger-garlic paste – 1tbsp
lJeera powder – 1tbsp
lPepper powder – 1tsp
lCoriander powder- 2tbsp
lVinegar – 2tbsp
lRed chilli powder – 1tsp
lSalt to taste
lAmchoor powder – 1tsp
lGaram masala powder – to garnish
lButter – 1tbsp
Method:
Method:
1. Combine all the ingredients. Mix with
1. Clean the chicken legs; give cuts and
chicken & keep aside for 1 hour.
then marinate with the hung curd along
2. Put the tikka in a crusty plate. Keep the
with all the spices for 4-5 hrs in the
plate with the ingredients in the
refrigerator.
microwave oven.
2. Arrange the pieces on rack.
3. Set the auto cook menu. (Sp7) After the
3. Set the auto cook menu (Sp9). After 9
first 7 mins (when display shows 07:00),
mins (when display shows 09:00), turn
turn the side and then continue cooking.
the side and continue cooking.
Serve hot. Sprinkle garam masala on it.
Cooking time: 18 mins
Ingredients:
Ingredients:
lFish – 250gm (whole)
lBoneless chicken – 600gms (stir fry)
lPudina chutney – 2-3tbsp
lGinger-garlic paste – 2tbsp
lGreen chilli paste – 2tsp
lCumin seeds – ½ tsp
lGinger garlic paste – 2tbsp
lGaram masala – 1tbsp
lLemon juice – 2tbsp
lButter – 1tbsp
lOil – 2tsp
lCoriander seeds – 1tbsp
lSalt and pepper – to taste
lPepper corn – 5-6 (powder)
lRed chilli powder – 1tbsp
Method:
lSalt – as per taste
1. In a microwave safe bowl, add all the
lHung curd – ¾ cup
ingredients and mix well. Marinate for 1 hr.
2. Put it in wire rack in the microwave oven.
Method:
3. Set the auto cook menu (Sp8). After the
1. Mix all the ingredients and marinate for 4
first 4 mins (when display shows 4:00),
hrs.
turn the sides and continue cooking.
2. Put the kababs in a crusty plate and
4. Serve hot
place it in the oven.
Cooking time: 8 mins
3. Set the auto cook menu (Sp10). After 12
191. Tandoori Chicken (Sp9)
189. Murg Tikka (Sp7)
190. Pudina Fish (Sp8)
192. Shammi Kabab (Sp10)
81

mins (when display shows 18:00), turn bowl.
the side and continue cooking. 4.Serve 2. Keep the bowl in the microwave oven.
hot with mint chutney. 3. Set the auto cook menu (Sp12).
Cooking time: 30 mins 4. Let it cool. Add 1 tsp lemon juice. Add ice
cubes and serve chilled.
Cooking time: 2 mins.
Ingredients:
• Pineapple – 100gms
Ingredients:
• Apple – 100gms
lMixed vegetable – ¾ cup (10 – 15 fresh
• Banana – 100gms
beans, carrot cubes & green peas)
• Pears – 100gms
lPineapple ring – 3 nos
• Papaya- 100gms
lMixed fruits – ½ cup (apple 1, orange 1,
• Water melon – 100gms
grapes 50gms) (cut into pieces)
For sugar syrup:
lEgg – 1 (boiled)
lCardamom – 2
lFresh cream – ½ cup
lCloves – 2
lSalt to taste For decoration:
lCinnamon stick – 2
lSalad leaves – 2 nos
lWater –½ cup
For Mayonnaise:
lSugar – 1 cup
lEgg – 1
Method:
lMustard powder – ½ tsp
1. In a bowl, put all the ingredients for sugar
lSalt – 1 tsp •Sugar – 2 tsp
syrup.
lVinegar – 2tsp •Pepper – 2tsp
2. Keep the bowl in the microwave oven.
lRefined oil – ½ cupMethod:
3. Set the auto cook menu (Sp11). Stir in
For mayonnaise:
between.
1. Mix all ingredients for mayonnaise expect
4. Cut all the fruits into cubes and add sugar
oil in mixer and start the mixer. Add oil
syrup.
little at a time. Chill and serve. Note:
5. Keep it in a plastic bag and put it in the
Alternative ready made can be used.
refrigerator.
2. In a microwave safe bowl add the
6. Cut the packet and serve in a bowl. Serve
vegetable & 1 cup water. Keep the bowl in
with melted chocolate and fresh cream.
the microwave oven. 3.Set the auto cook
Cooking time: 5 mins
menu (Sp13) stir in between. When
cooking is over, remove the excess water.
Ingredients:
Keep a vegetable aside .
lWater – ½ cup
Serving method:
lSugar – 2 tsp
1. Arrange salad leaves, add boiled
lHerbal teabag – 1 (or tea leaves – 1 tsp)
vegetable and salt & mix well. Add fruits,
lTea leaves – few
mayonnaise, fresh cream and pineapple.
Method:
Mix well and decorate with cucumber
1. Mix all the ingredients in a microwave safe
193. Vac Pack Fruit Compote (Sp11)
195. Russian Salad (Sp13)
194. Iced Tea (Sp12)
82

and boiled eggs. lTomato sauce – 1/3 cup
2. Chill & serve lSchezwan sauce – 1/3 cup
Cooking time – 9 mins
Method:
1. In a microwave safe bowl mix all the
ingredients. Set the auto cook
Ingredients:
menu(Sp15). Stir in between.
lLong grain rice – 1 cup (soak for 30 mins)
Cooking time: 30 sec
lAlmonds – 10 nos (sliced)
lCashew nuts – 6 nos (halved)
lGhee – 2 tsp
Ingredients:
lSaffron – a pinch (soak in 1 tsp milk)
lBoiled Spinach - 1 cup [puree]
lNutmeg powder – ¼ tsp
lPaneer – 100 grams
lGreen cardamom powder – ½ tsp
lSalt to taste
lSugar – ½ cup
lCorn flour - 2 tbsp
lMilk – ½ cup Raisin – 50 gms Water – 1 ½
Method:
cup
1. Wash and chop Spinach and put it into
Method:
microwave safe bowl and microwave high
1. In a microwave safe bowl add ghee, rice
for 2 mins.
and water. Keep the bowl in the
2. Blend in a liquidizer to a smooth puree
microwave oven. Set the auto cook menu
and keep aside.
(Sp14) stir in between. 2.When the first
3. Mix spinach puree flour with salt. Dip
4.00 mins are over (display will show
paneer pieces into it, Put it in a greased
16.00 mins) mix nut meg powder, green
baking tray .Keep the baking tray in the
cardamom powder, saffron, raisins and
microwave oven. 4.Set the auto cook
sugar into the rice. Add water & milk and
menu (S16). After the first 10 mins
mix well. Continue cooking and stir in
(display will show 15.00] turn the side and
between. 3.After 10 mins (display will
continue cooking.
show 6.00 mins) stir in between cover the
5. Serve hot
bowl & continue cooking.
Cooking time: 25 mins
4. Garnish with almonds & cashew nuts
serve hot.
Ingredients:
Cooking time: 22 mins
lBoiled Cauliflower – ½ cup [cut into 1 inch
sized flower]
Ingredients:
lSemi boiled broccoli – ½ cup [cut into 1
lFried Noodles – 1 cup
inch sized flower]
lSpring Onions – ¼ cup [chopped
lOnion – 1 medium size [chopped]
including the greens]
lGarlic – 6 no [chopped]
lCabbage – ¼ cup [shredded]
lPepper corn – 4no [crushed]
lCarrot – ¼ cup [grated]
lAlmonds – 2 tbsp paste [10 no of
lCapsicum – ¼ cup [thinly sliced]
almonds grind with ¼ cup water]
196. Zafrani Pulav (Sp14)
198. Crispy Spinach Paneer (Sp16)
199. Singapori Cauliflower (Sp17)
197. Veg Chinese Bhel (Sp15)
83

lButter – 3 tbsp 2. Mix all to marinate ingredients. Add baby
lRed chilli flakes – 1tsp corn. Keep covered for 1 hour in the
lTomato puree – ¼ cup fridge.
lSalt to taste 3. Place baby corn on the baking plate.
lNutmeg powder – ¼ tsp Place it inside a microwave oven. Pour 1
lWhite sauce – ½ cup tbsp melted butter on the baby corn. Set
lDried mixed herbs – ¼ tsp the auto cook menu (Sp18).
4. After the first 8 mins [display will show
Method
10.00 mins] turn the side and continue
1. In a microwave safe bowl add butter,
cooking.
onion, and garlic mix well. Keep the bowl
5. Serve hot with chat masala .
in the microwave oven. Stir in between.
Cooking time: 18 mins
2. After the first 4 mins are over [display will
show 11.00 mins] add cauliflower, red
chilli flakes and mix well. Set the auto
cook menu (Sp17) stir in between. 3.After
5 mins [display will show 06.00 mins] add
tomato puree, tomato ketchup, salt
crushed peppercorns, nutmeg powder,
white sauce, mixed herbs, almonds
paste, broccoli mix well, sprinkle the
water and continue cooking. Stir in
between.
Cooking time: 15 mins
Ingredients:
lBaby corn – 12 pcs •Salt to taste
lButter– 1 tbsp [to sprinkle]
Marination:
lHung curd - ½ cup
lGarlic paste – 2 tsp
lChilli powder -1 ½ tsp
lCumin seeds – 1 tsp [powder]
lCoriander powder – 2tsp
lCinnamon powder – 1 tsp
lDry fenugreek leaves – 1tbsp
lSalt to taste
Method
1. Rub salt and butter on baby corn keep
aside for ½ an hour.
200. Golden Baby Corn (Sp18)
84

Morphy Richards products are intended
for household use only
Morphy Richards has a policy of
continuous improvement in product quality
and design. The Company, therefore,
reserves the right to change the
specification of its models at any time.
Products & parts are indicative only, the
actual product may differ.
Morphy Richards Ltd, Mexborough,
South Yorkshire, England, S64 8AJ
85
 Loading...