

Morningstar 4.7.4 User Manual

Morningstar® Workstation 4.7.4
User Manual
Version 1.4
December 2010
©2010 Morningstar, Inc. All rights reserved.

2
TABLE OF CONTENTS
General Information..................................................................................................................6
Accessing Morningstar Workstation............................................................................................. 7
LaunchPad.................................................................................................................................7
SmartFind .................................................................................................................................... 8
Finding a fund.......................................................................................................................... 8
Selecting a fund....................................................................................................................... 8
Using your fund selection – Reports...................................................................................... 10
Using your fund selection – Charts........................................................................................ 10
Using your fund selection – Factsheet................................................................................... 11
System Update .......................................................................................................................... 11
Updating manually................................................................................................................. 12
Updating automatically .......................................................................................................... 12
Pausing an automatic update ................................................................................................ 12
Auto-update settings.............................................................................................................. 12
Download settings ................................................................................................................. 13
Run report macros................................................................................................................. 13
System copy.......................................................................................................................... 13
Email confirmation................................................................................................................. 14
System Details........................................................................................................................... 14
Contact Morningstar .................................................................................................................. 15
Reports ................................................................................................................................... 16
To Create a Report .................................................................................................................... 16
Tree Selection............................................................................................................................ 17
Selecting a Class of Fund...................................................................................................... 17
Removing a Selection............................................................................................................ 17
Report benchmarks ................................................................................................................... 18
Auto Add Indices ................................................................................................................... 19
Identify the Sector to Which a Fund Belongs ............................................................................. 19
To View the Content of Sector(s) in the Tree Selection ............................................................. 20
Report Screen............................................................................................................................ 20
To Edit your Tree Selection ....................................................................................................... 21
To Select Performance Criteria.................................................................................................. 22
Date Selection ........................................................................................................................... 22
Dates tab............................................................................................................................... 22
Regular Periods tab............................................................................................................... 23
Charges, Income and Currency Settings ................................................................................... 24
Scheme Type Selection............................................................................................................. 25
Scheme types:....................................................................................................................... 25
Report Facilities..................................................................................................................... 26
Supplementary Data .................................................................................................................. 26

3
List lookup ............................................................................................................................. 26
Sub Column Data ...................................................................................................................... 27
Sorting Report Data ................................................................................................................... 29
Filtering Report Data.................................................................................................................. 30
To Filter Funds ...................................................................................................................... 30
To Regain Funds................................................................................................................... 30
Filters Criteria on Print out..................................................................................................... 30
Report Indices............................................................................................................................ 31
Sector Statistics......................................................................................................................... 31
Collapsing Sectors into a Global Display ................................................................................... 32
Display Grouping................................................................................................................... 32
Rank Grouping ...................................................................................................................... 33
Report Headers and Footers ..................................................................................................... 35
Hiding columns in a report ......................................................................................................... 35
Formatting your Report Sheet.................................................................................................... 37
Colour Schemes.................................................................................................................... 37
Style ...................................................................................................................................... 38
Right-click on Rows Pop-up Menu............................................................................................. 39
Highlighting Funds................................................................................................................. 40
Fund Facts ............................................................................................................................ 41
Sector Chart .......................................................................................................................... 42
Index/Movement/Portfolio Size Line Charts........................................................................... 43
Creating/Adding to a Composite from the Reports module ................................................... 44
Return Sheet (Excel) ............................................................................................................. 44
Assign Benchmark to this Fund............................................................................................. 45
Right-Click on Columns Pop-up Menu....................................................................................... 46
Scatter Charts ....................................................................................................................... 47
Fund Comparison Module ..................................................................................................... 48
Market Share......................................................................................................................... 49
MPT Statistics Sheet (Excel) ................................................................................................. 52
Copy Options............................................................................................................................. 53
Export to Excel........................................................................................................................... 54
Web Links to Excel .................................................................................................................... 55
Mouse over function .................................................................................................................. 55
Find in Column........................................................................................................................... 56
Report Templates ...................................................................................................................... 57
Morningstar Workstation Standard Reports Templates ......................................................... 57
User-defined Report Templates ............................................................................................ 57
Saving a Report......................................................................................................................... 58
Opening a Saved Report....................................................................................................... 58
Printing a Report........................................................................................................................ 59
Load at Start-Up ........................................................................................................................ 60
Macros ................................................................................................................................... 61
To Create a Macro..................................................................................................................... 61
Runtime Date Substitutions ....................................................................................................... 63
Monthly reports macros......................................................................................................... 63

4
Daily or Weekly macros......................................................................................................... 63
To Edit a Macro ......................................................................................................................... 64
To Delete a Report from a Macro .............................................................................................. 65
To Delete a Macro ..................................................................................................................... 65
Private Lists ........................................................................................................................... 66
Exporting a Fund Selection to a Private List .............................................................................. 67
Chart Deck.............................................................................................................................. 68
To Create a Chart ...................................................................................................................... 68
Fund Selection ...................................................................................................................... 68
Fund Selection from a Private List......................................................................................... 69
Adding a Benchmark ............................................................................................................. 69
Reordering the Fund Selection.............................................................................................. 69
Calculation Settings............................................................................................................... 69
Style ...................................................................................................................................... 70
Dividends............................................................................................................................... 71
Date Settings......................................................................................................................... 71
Line Chart Settings................................................................................................................ 71
Scatter Chart Settings ........................................................................................................... 72
Format Settings ..................................................................................................................... 73
Text Settings ......................................................................................................................... 74
Zoom Functionality ................................................................................................................ 75
Additional Formatting Options ............................................................................................... 75
Saving a chart............................................................................................................................ 75
Export Options....................................................................................................................... 75
AutoUpdate ........................................................................................................................... 76
Embedding a ChartDeck Image into Other Documents ............................................................. 76
Chart Batching........................................................................................................................... 78
Create a Batch ...................................................................................................................... 78
Modify a Batch....................................................................................................................... 79
Private Funds ......................................................................................................................... 80
Inserting New Funds.................................................................................................................. 80
Manually Entering Data.............................................................................................................. 80
Static Data Fields .................................................................................................................. 80
Drop-down menu fields.......................................................................................................... 81
Historical Data Fields............................................................................................................. 82
Committing Private Fund data To the Database ........................................................................ 83
Deleting Funds and Data ........................................................................................................... 83
Deleting data ......................................................................................................................... 83
Deleting a fund ...................................................................................................................... 83
Editing Data ............................................................................................................................... 84
Static data ............................................................................................................................. 84
Historical data........................................................................................................................ 84
Backing Up Data........................................................................................................................ 84
Restoring Data........................................................................................................................... 84

5
Importing Data into Private Funds – File Format ....................................................................... 84
Sorting ....................................................................................................................................... 87
Filtering...................................................................................................................................... 87
Comments field.......................................................................................................................... 87
Entering a Comment.............................................................................................................. 87
Viewing a Comment .............................................................................................................. 87
Removing a Comment........................................................................................................... 88
Exporting to Excel...................................................................................................................... 88
Final Note .................................................................................................................................. 88
Composite module ................................................................................................................. 89
Creating a Composite ................................................................................................................ 89
Composite Settings ............................................................................................................... 89
Funds Settings ...................................................................................................................... 90
Return Sheet.............................................................................................................................. 91
Correlation Matrix ...................................................................................................................... 92
Index Line Charts....................................................................................................................... 93
Scatter Chart.............................................................................................................................. 94
Exporting to Excel...................................................................................................................... 96
Document Library................................................................................................................... 97

6
General Information
Workstation is an all-inclusive desktop resource for professionals researching, analysing or
marketing funds. With the flexibility to let users define their own analysis parameters and
incorporate private data into performance calculations, it provides a comprehensive toolkit for the
calculation, benchmarking, and external presentation of fund performance information.
Workstation covers 190,000 funds and 15,000 indices through a tiered classification structure that
incorporates the Morningstar Global Investment Fund Sectors system. 85 currencies and more than
85 calculation options, a range of language options and proprietary data to assess the performance
and quality of market-leading funds.
• Reports: Performance tables: multiple funds/sectors over any chosen time periods, with
rankings.
• Charts: Create powerful custom made charts for funds and indices which can then be
embedded into MS office documents and auto updated following data updates.
• Private Funds: Write your own price data into the database.
• Composites: Create your own composites for use in Reports and Charts
7
Accessing Morningstar Workstation
Morningstar Workstation modules may be accessed by the Desktop icon or from the Windows
Start menu, All Programs, Morningstar Workstation.
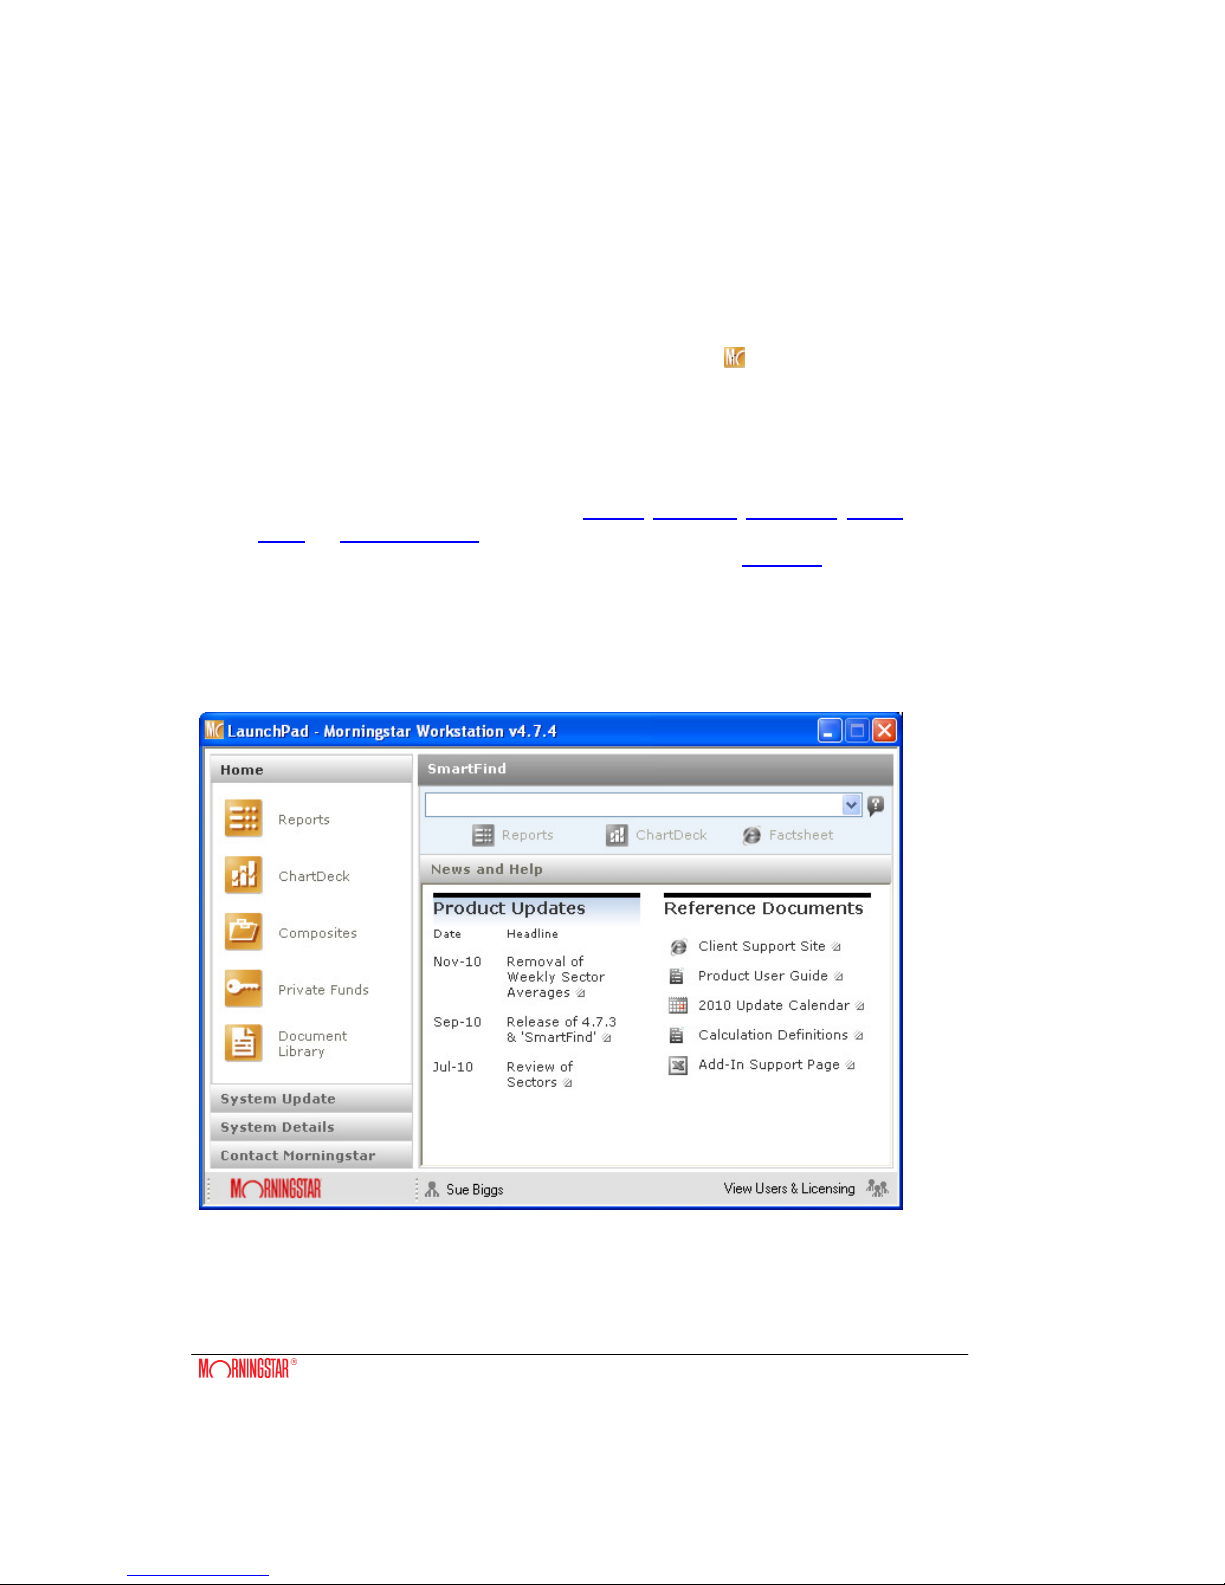
LaunchPad
A centralised user area from which you can:
• Launch all Morningstar Workstation modules: Reports, ChartDeck, Composites, Private
Funds and Document Library
• Quickly find a fund and trigger any related workstation task using the SmartFind tool
• View the latest product news
• Set up your system update preferences and manually trigger updates
• View your system status
• Carry out a number of support related tasks
• View the other users accessing the system & number of available licences.
8
SmartFind
Allows you to quickly navigate to a fund, index or currency and trigger a number of commonly used
Workstation tasks based on your selection. This is accessible from the Home section of the
Launchpad.
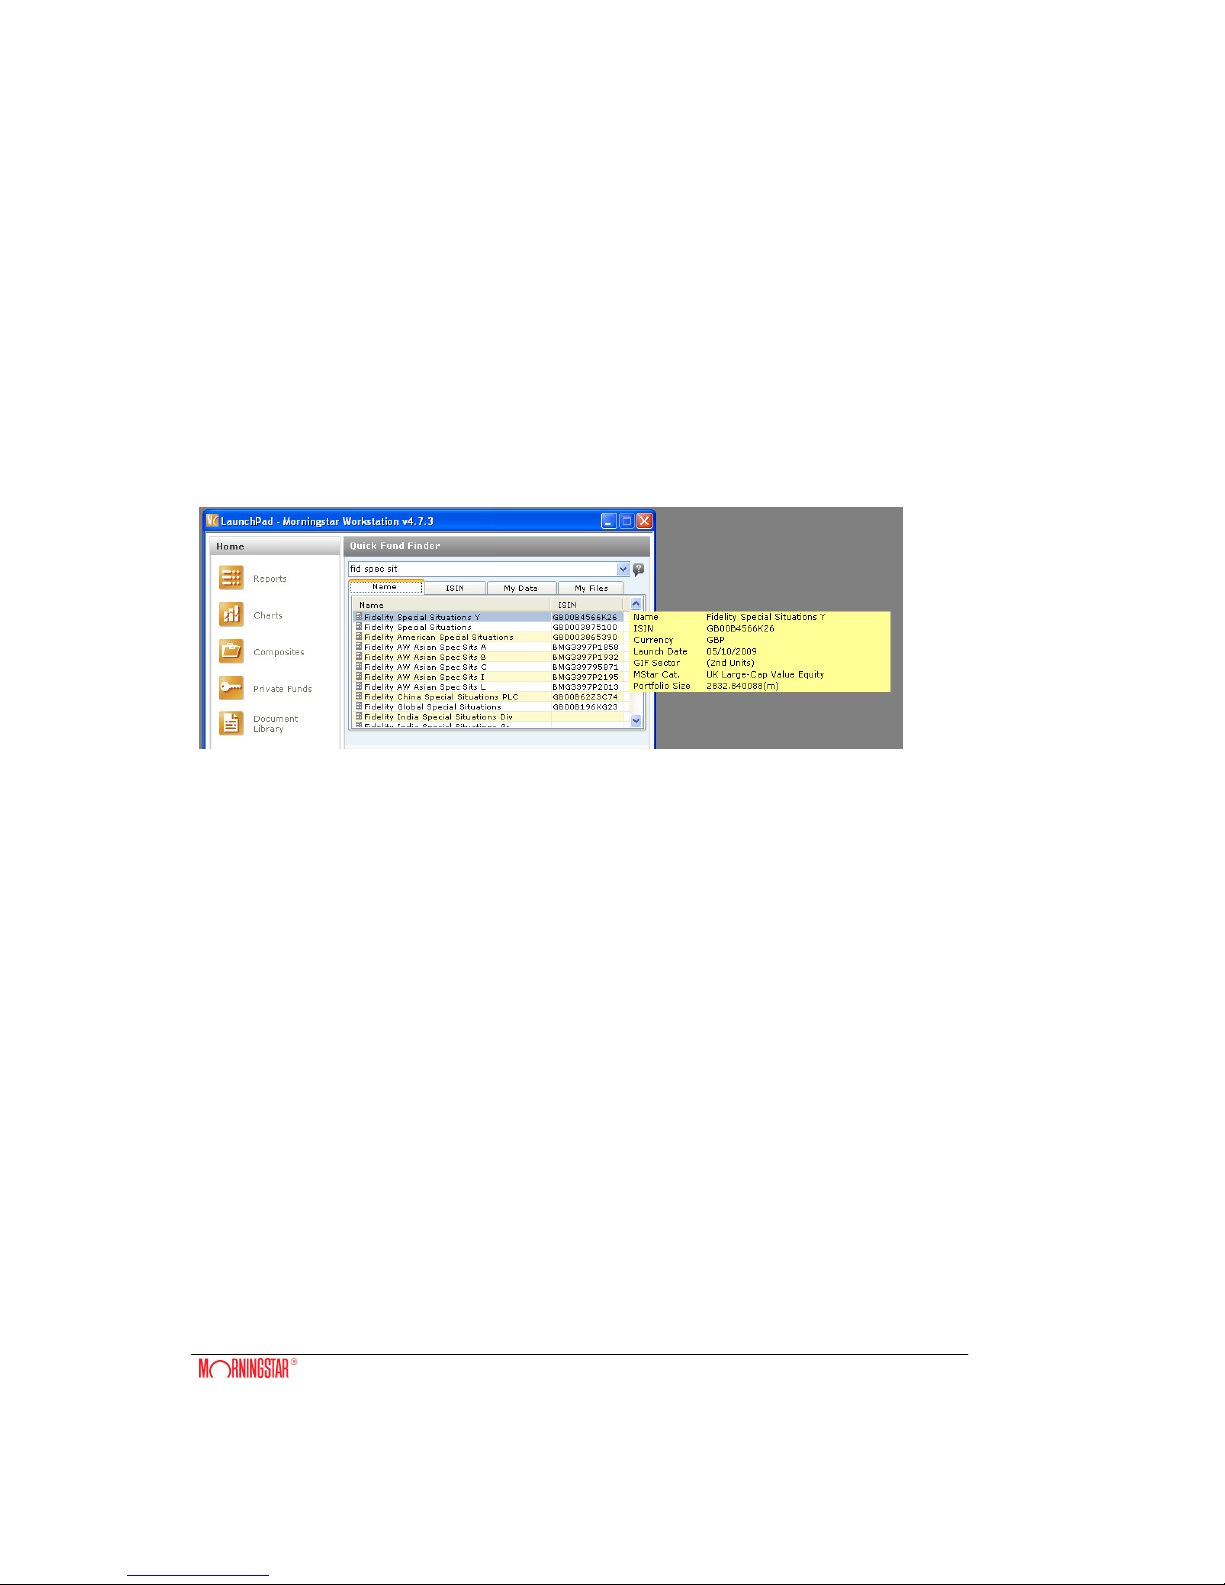
Finding a fund
Start typing in the search box to begin your search. Hovering over a fund in the results window
displays additional information to help make your selection.
4 search tabs are available:
• Name – search for funds, indices and currencies by name. Partial word searches are
accepted. The matching results displayed in the results window will narrow as you type in
more words. You can also search by full SPID code to return the name.
• ISIN - search via a partial or full ISIN code.
• My Data - search by name for any private fund or composite created and saved on the
database.
• My Files - search by filename for any saved report or chart. (Note: If your file is not listed
you will need to select its folder location using the link. This folder location will then be
stored for future reference).
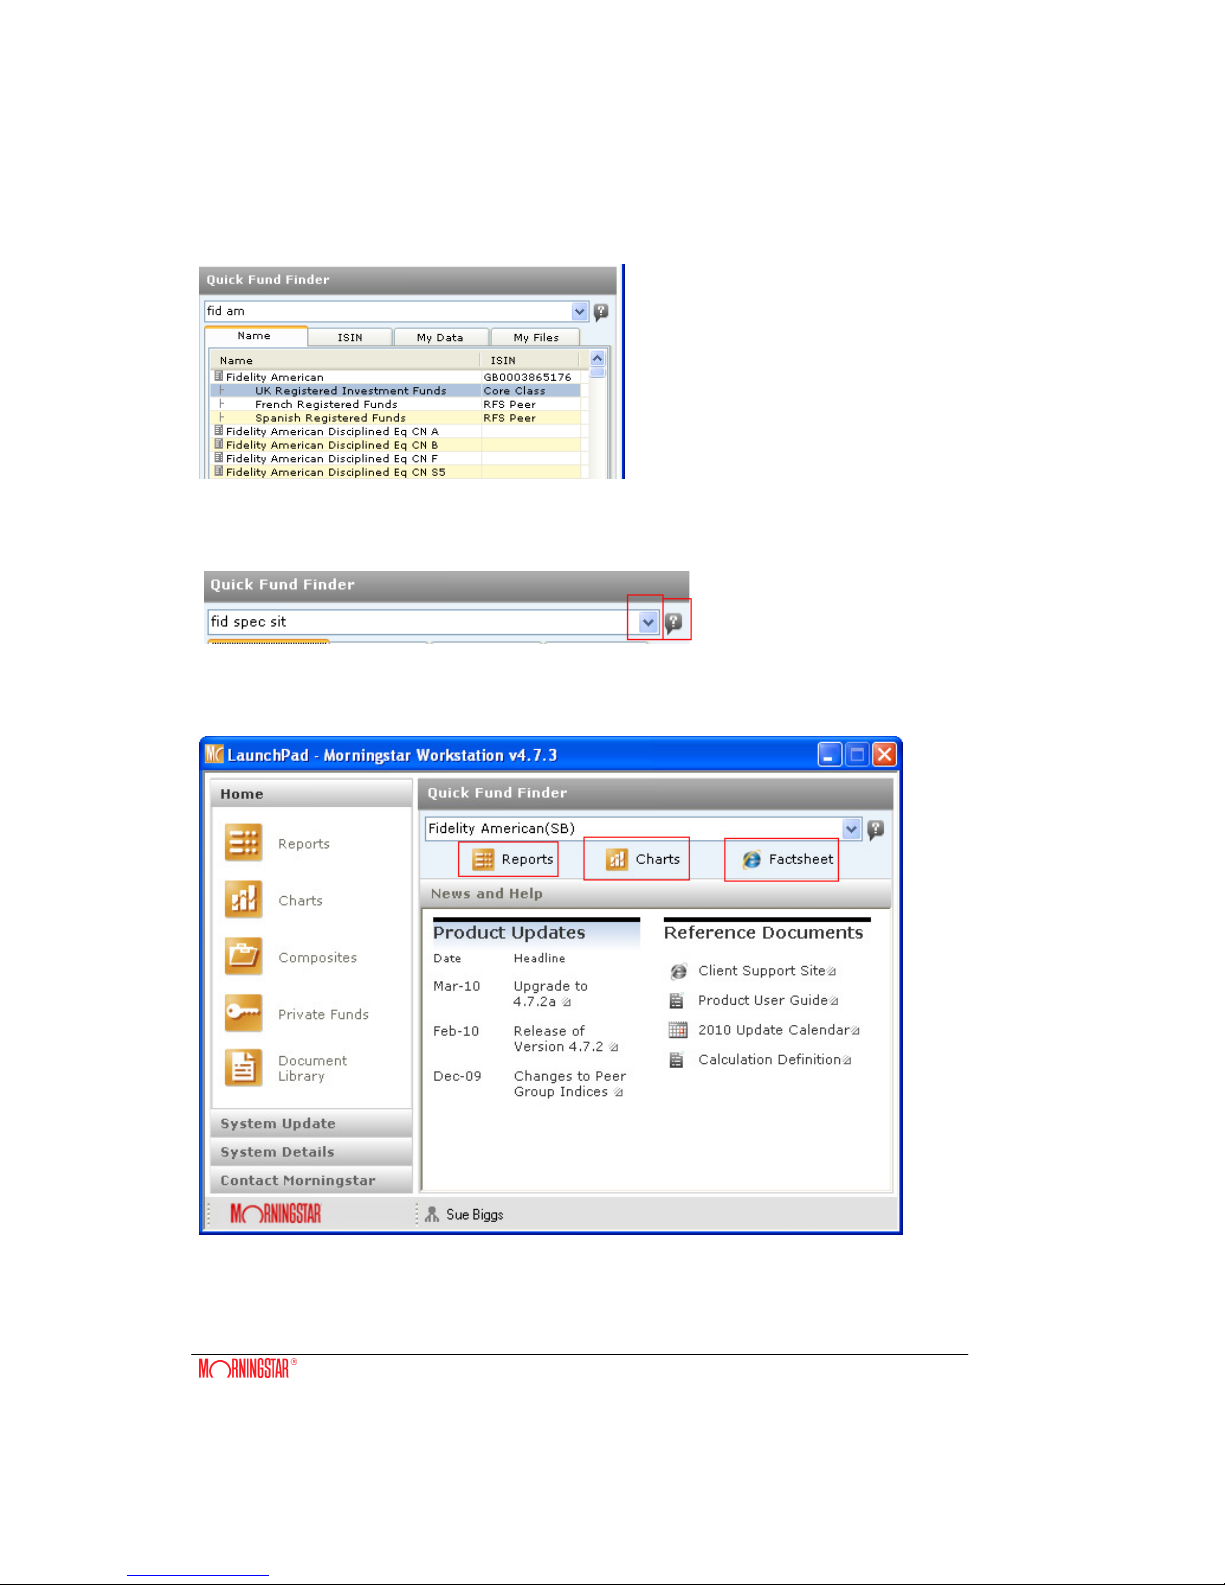
Selecting a fund
Once you have found your chosen fund click on it to select it. If the fund selected is registered for
sale in more than one market you will be asked to select a peer group from the sub listing.
9
You can access your previous searches from the drop down arrow. Further guidance notes are
available online via the “?” icon.
Once you have selected a fund three icons – Reports, Charts & Factsheet become activated
allowing you to utilise your selection within the Workstation modules.

10
Using your fund selection – Reports
Clicking on the Reports icon enables a report utilising your fund selection to be quickly created.
Firstly, select the peer group you wish to report against from the following options:
• This fund – just show this one fund in the report.
• This fund and benchmarks – compares this fund against its benchmarks. Depending on
your fund selection this may include up to 3 benchmarks:
o User Defined – this is the benchmark you have selected for the fund. This can be
set in reports.
o Group selected – this is a predefined benchmark for the fund selected by the
Management Group.
o Peer Group Average – the sector average.
• This funds GIF sector (Global Investments Funds sector) – compare this fund against
those in the same general sector e.g. Equity Europe.
• This funds category – compare this fund against those in the same Morningstar category.
• The funds local sector - compare this fund against those in the local market sectorisation
e.g. IMA, ABI
• This funds area sector – compare this fund against funds those in the same geographic
location e.g. France.
• This funds management group – compare this fund against those in the same
management group.
• This funds main sector – compare this fund against those in the same primary asset
class e.g. equity.
• This funds specialist sector – compare this fund against those in the same area with the
same investment nature. E.g. Gold & Precious Metals, Ethical, Healthcare/Pharmaceutical,
etc.
Once a peer group is defined then the columns of the report need to be chosen from the 3
predefined options:
• Standard columns – base your report columns from a number of predefined templates
• Copy from rpt – base your report columns on an existing saved report. You will be asked
to browse to the report that you wish to replicate.
• I’ll pick my own – bring up a report with just your fund selection. The report columns can
then be defined within the reports module.
Using your fund selection – Charts
Clicking on the Charts icon will quickly plot a chart from your quick find selection. Clicking on
the icon you will be asked to select from the following options:
• Price – plots a movement (raw data) chart for the fund selected based on your chosen
time period (1 year/ 3 years/ 5 years/ 10 years). All other chart settings will be in
accordance to your default settings in ChartDeck.
11
• Index – plots an index chart (rebased to a common value) for the fund selected based on
your chosen time period (1 year/ 3 years/ 5 years/ 10 years). All other chart settings will be
in accordance to your default settings in ChartDeck.
• Scatter – plots a scatter chart of the fund. You will be asked to define the peer group to
compare against and the analysis period.
• Sector Bar Chart – plots a floating bar chart allowing comparison of your chosen funds
performance against a selected peer group. All other chart settings will be based on your
default settings in reports.
Using your fund selection – Factsheet
Clicking on the Factsheet icon will allow you to quickly access a Workstation Fund report.
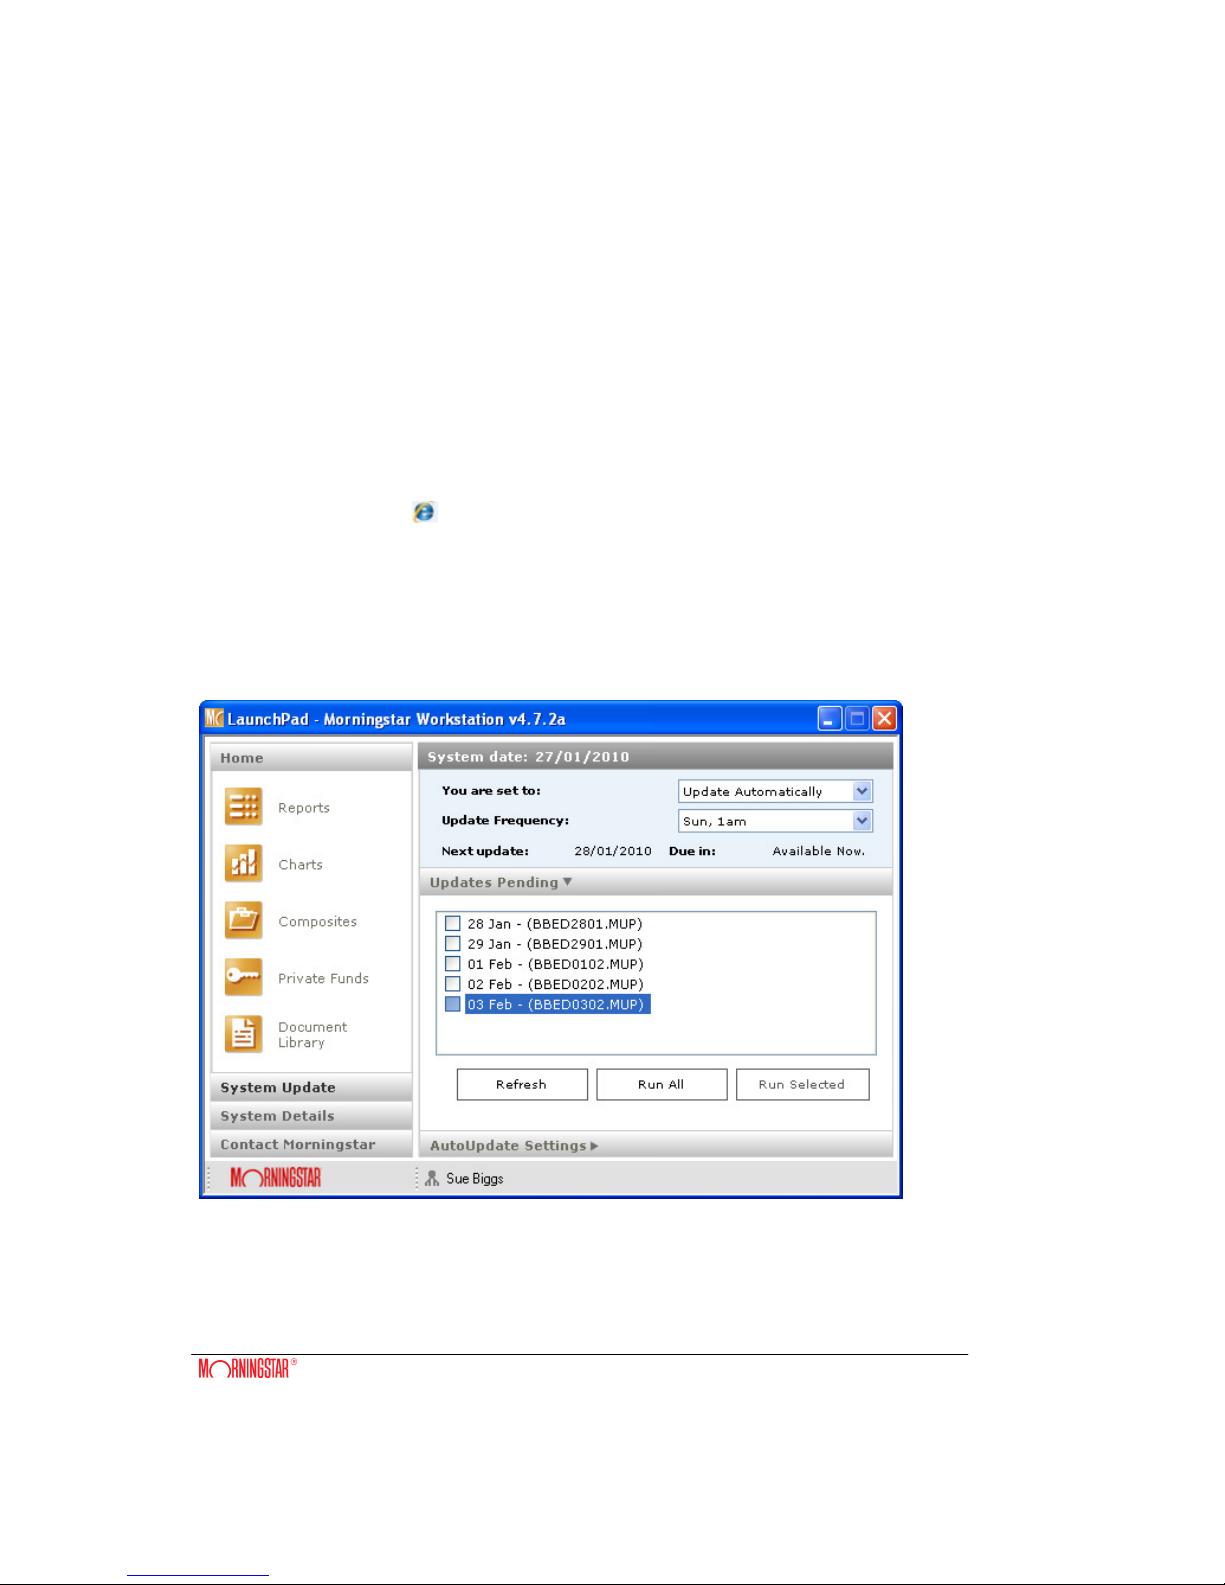
System Update
Shows the latest information regarding your system update status and settings. Any pending
updates will be listed.
Clicking on the Refresh button will update your updates pending list. When there are no updates
pending the time till the next update is due will be displayed.
12
Updating manually
By selecting the option Update Manually your system will run data updates only when triggered
by a user with update permissions.
To run a manual update simply click on the Run All button. Should you not wish to update your
system to the latest date select the update you want to update to and click Run Selected.
NB: Even if you are set to update automatically you can run any pending update manually.
Updating automatically
By selecting the option Update Automatically your system (if logged on) will run all outstanding
updates to a predefined schedule. The scheduler options are:
• When Ready – this will check each hour. (This happens in the background, if there are no
updates to run there will not be any interruptions to your system usage).
• Sunday 1am – the update will run all available updates at Sunday 1am. This update
schedule is recommended for most markets.
• Sunday and Wednesday at 1am – the update will run at Sunday and Wednesday 1am.
This schedule is designed with the availability of French prices in mind.
• Custom – this will launch Windows scheduler in order for you to derive your own custom
schedule.
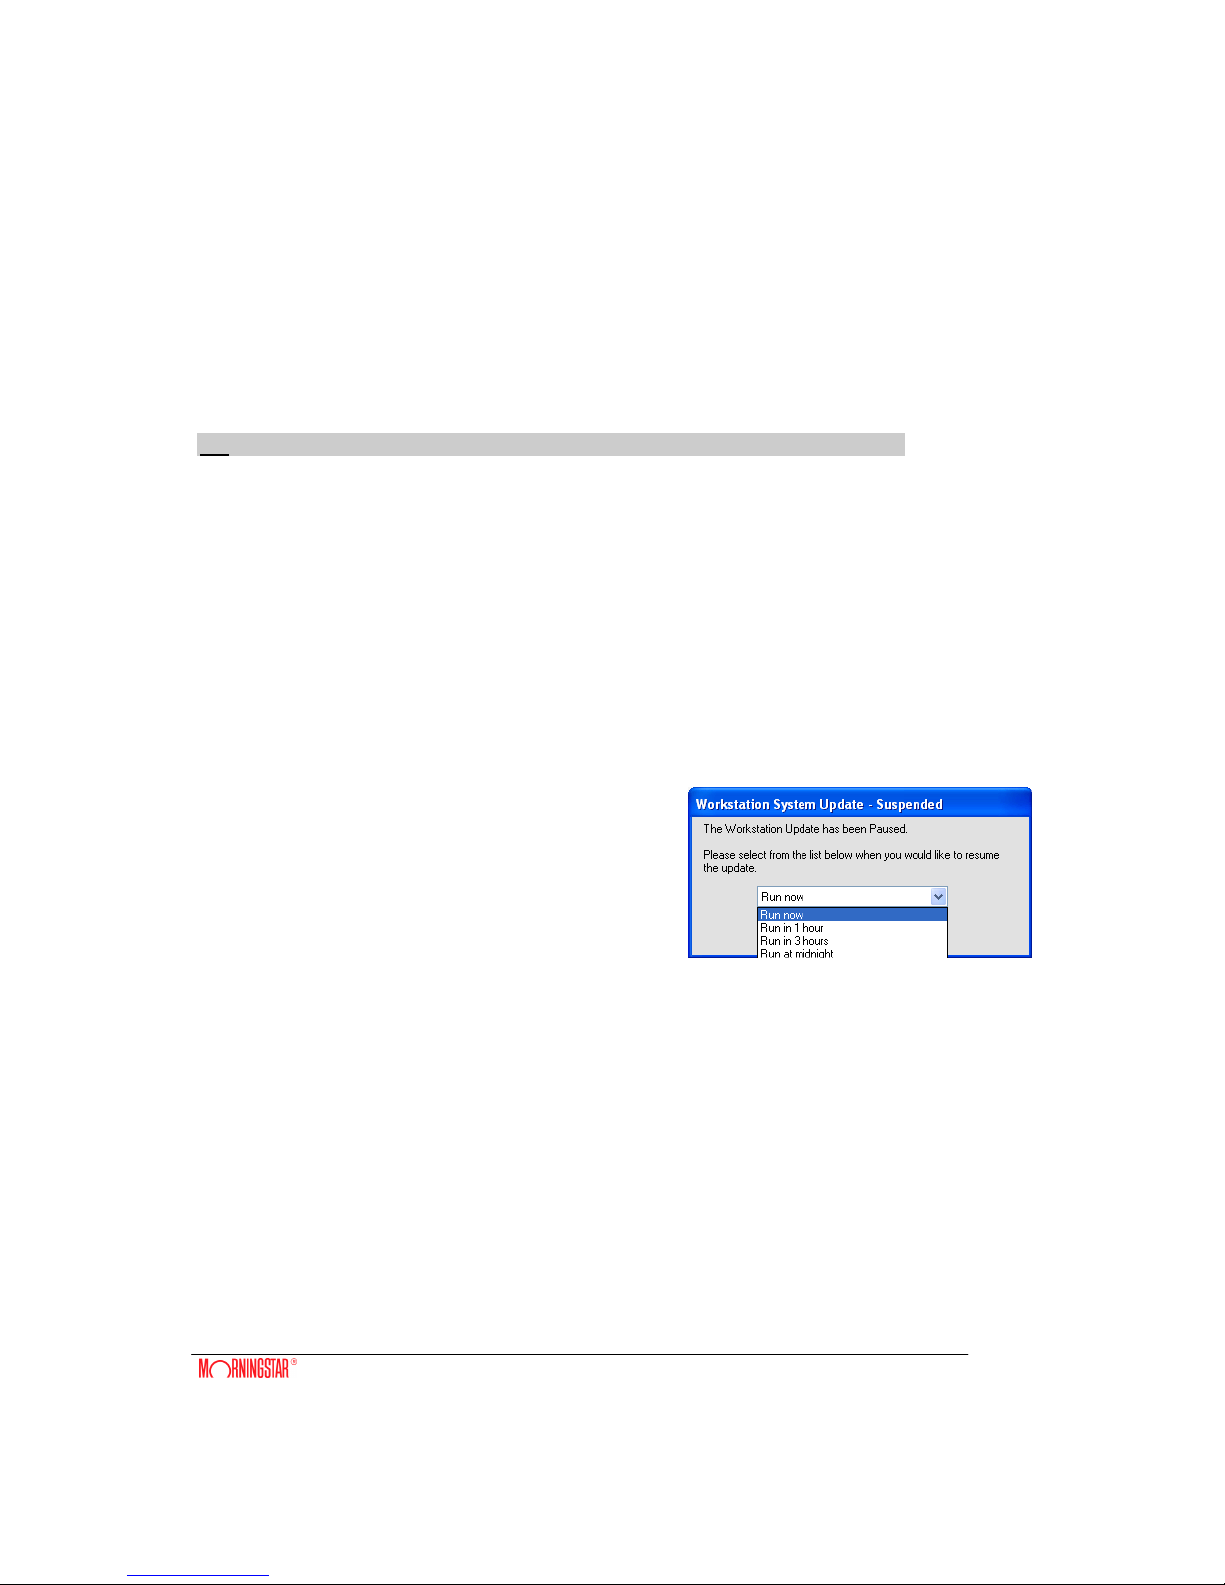
Pausing an automatic update
If the automatic scheduler is triggered and there is an update
available to run a 5 minute countdown commences.
Should you wish to pause the update select from one of the
options available in the download.
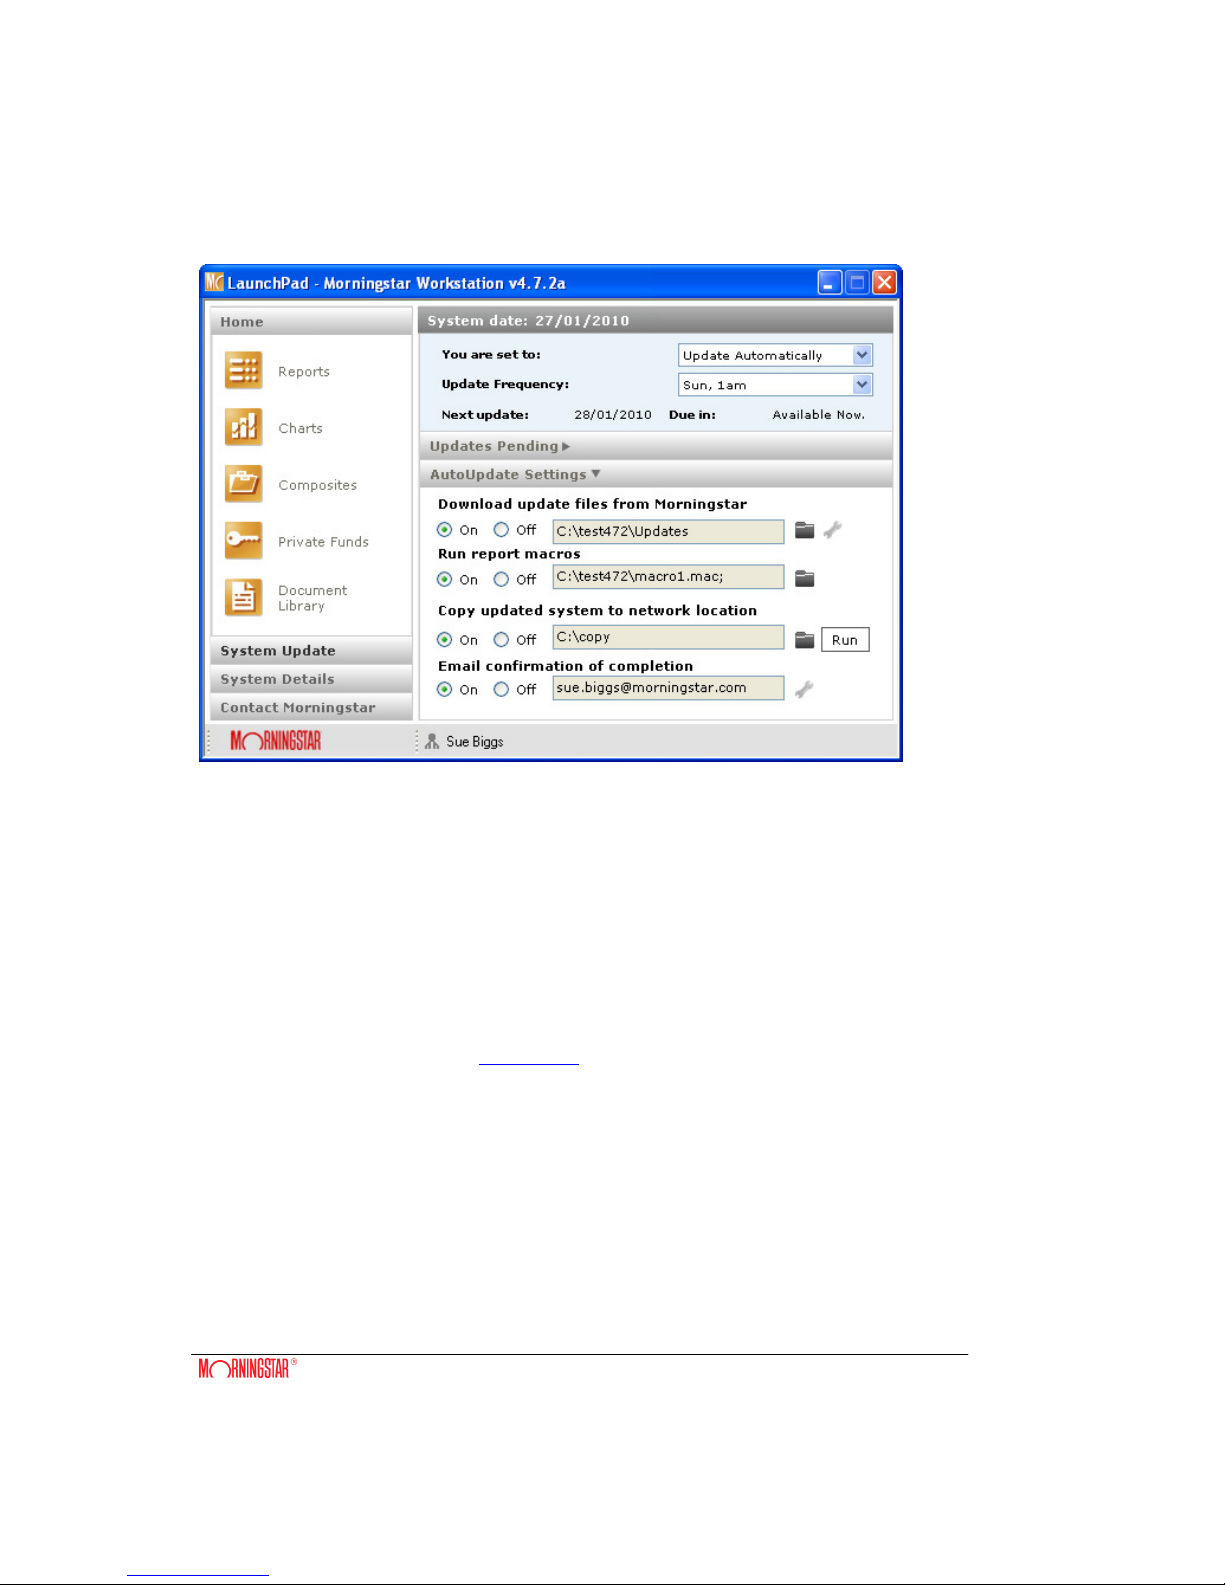
Auto-update settings
Click the arrow adjacent to AutoUpdate Settings to show the settings window. These settings
can only be edited by users with update permissions.
13
Download settings
The default setting is ON, the folder location default to the Updates subfolder within your
Workstation directory.
This feature should only be turned OFF if an IT department downloads update files separately which
are subsequently collected from a different network location and run by the updating user.
Clicking on the spanner icon gives access to update all download related settings such as download
passwords and proxy settings.
Run report macros
This function will automatically run any report macros following a successful update. Use the folder
icon to browse to the macro file(s) you wish to run.
System copy
To use the System Copy function, you must first click on the corresponding folder to set the
network location to copy to. For help with System Copy please contact your local Support team.
14
Email confirmation
This function will trigger an email to a defined distribution list following an update, indicating
whether it was successful or not. Set this up by clicking on the spanner icon.
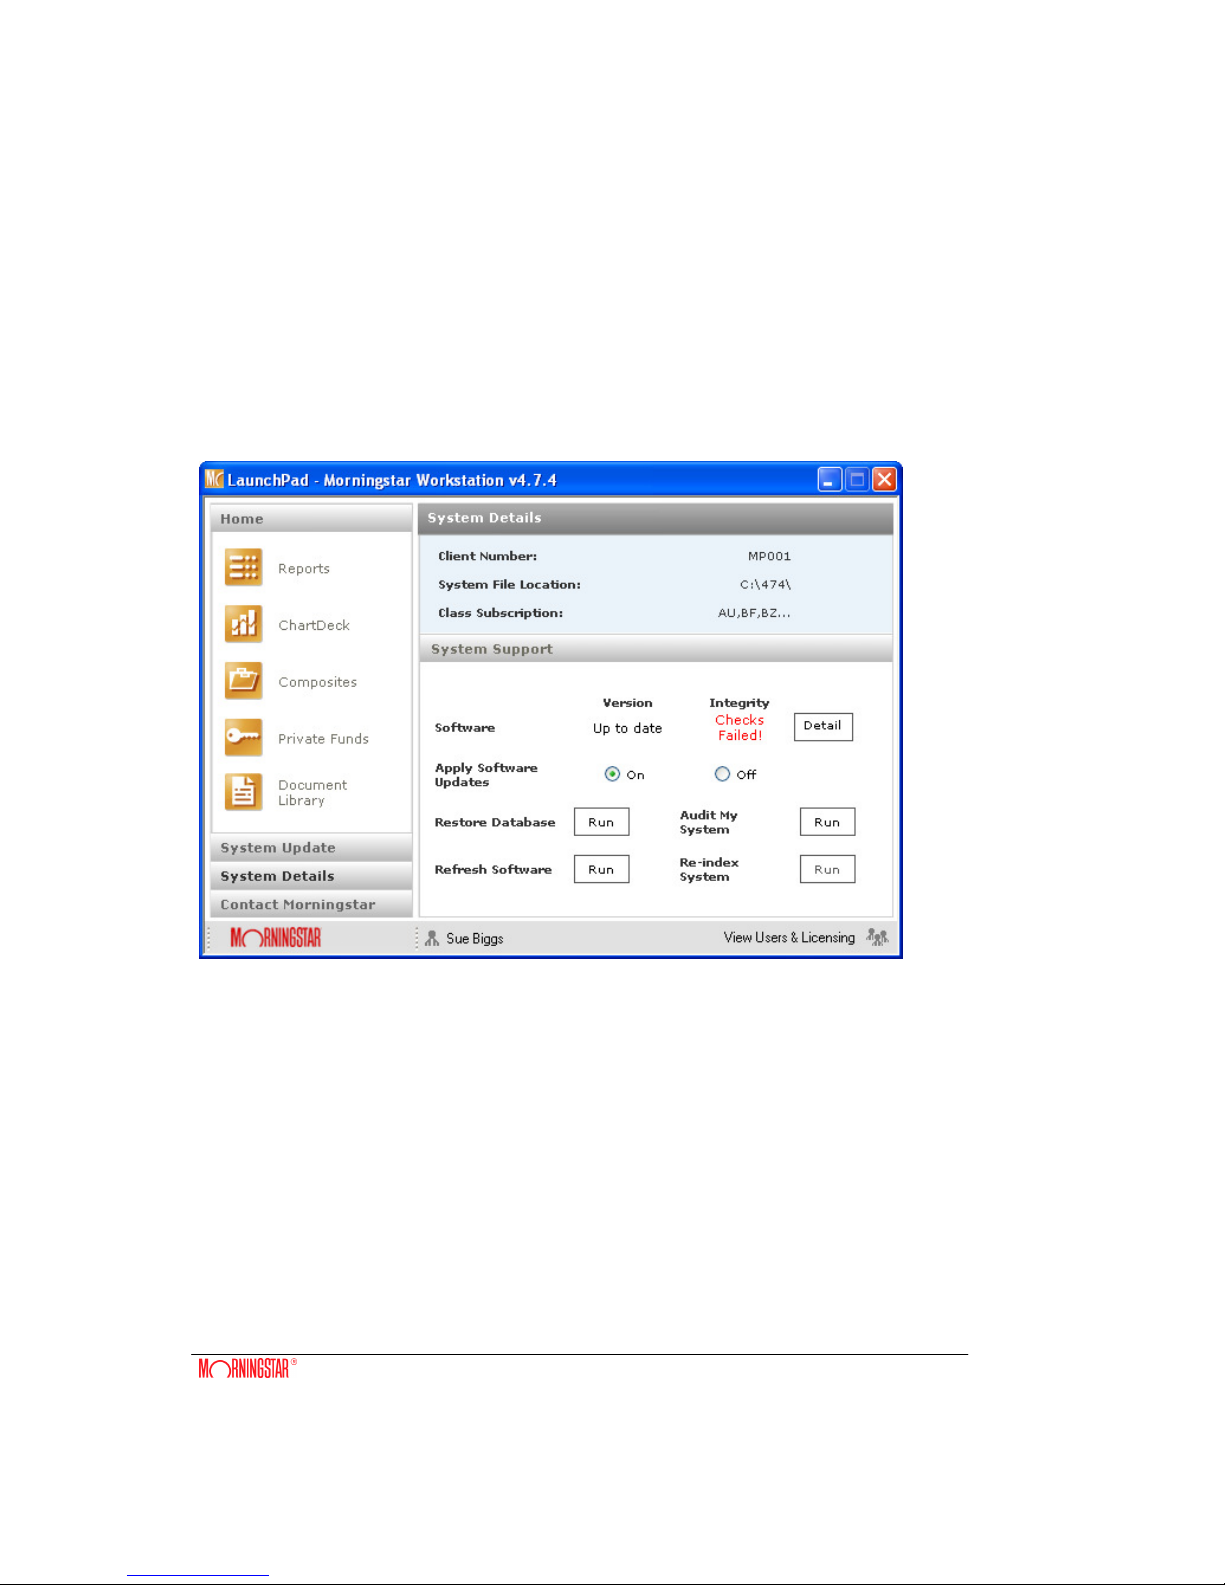
System Details
The System Details section holds details of your subscription. The System Support section
allows you to view and carry out a number of support related tasks.
• Software Version – this will indicate whether you have the latest system software
installed (“up to date”), or not (“prior version”).
• Software Integrity – this will indicate if there is an issue with the integrity of your system
software. Any issues found will be listed by clicking on the Details button.
• Apply Software Updates – This controls whether or not you apply software updates via
the update mechanism. The default option is ON.
• Restore Database – This will download and extract the latest database. You may choose
to run this if your system is very out of date or when prompted by Support to fix an issue
with your database integrity.
• Refresh Software - This will download the latest software package. You may run this to
update your software version to the latest available, or when prompted to do so to fix an
issue with your software integrity.
• System Audit – Support may ask you to run this to help diagnose support issues.
15
•
Re-index System – This will recreate a number of index files used to aid the search
functions within the Workstation system.
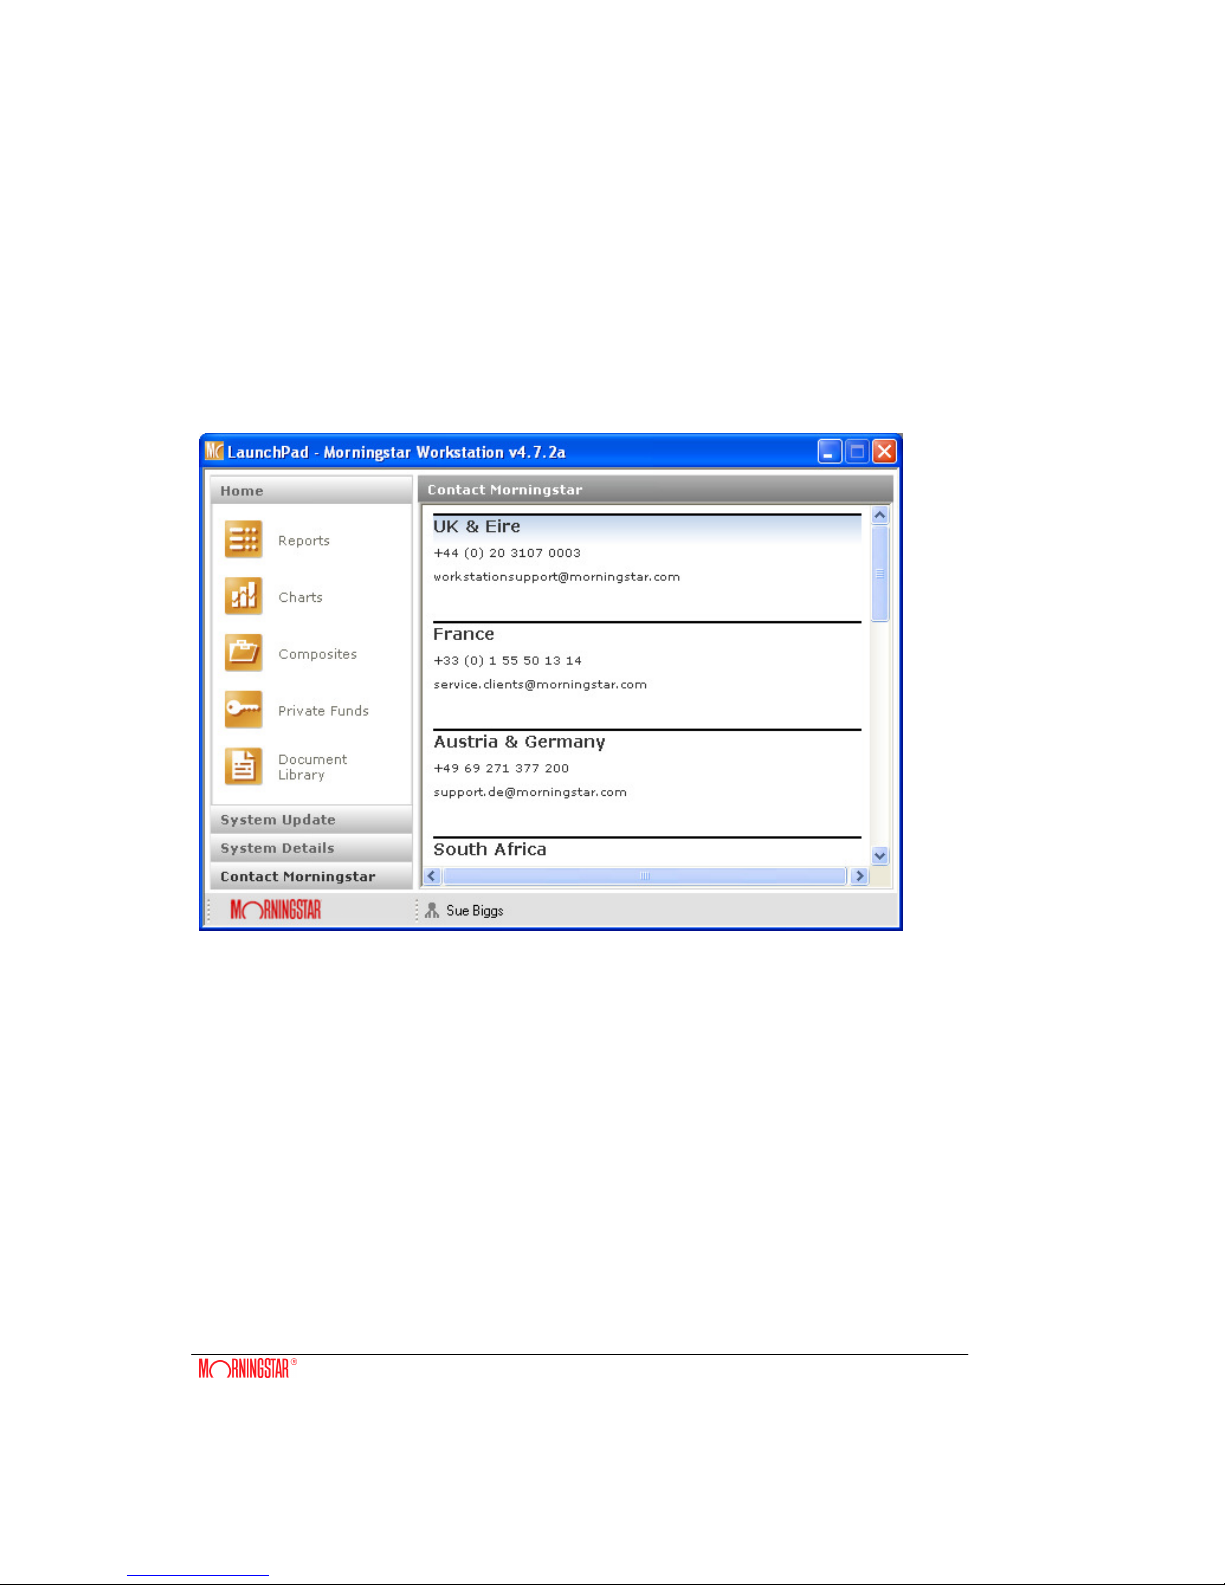
Contact Morningstar
The contact details of all Support departments are available here.
16
Reports
To Create a Report
From the LaunchPad click once on the Reports icon to launch this section
From the Menu bar select File – New or click on the new report icon
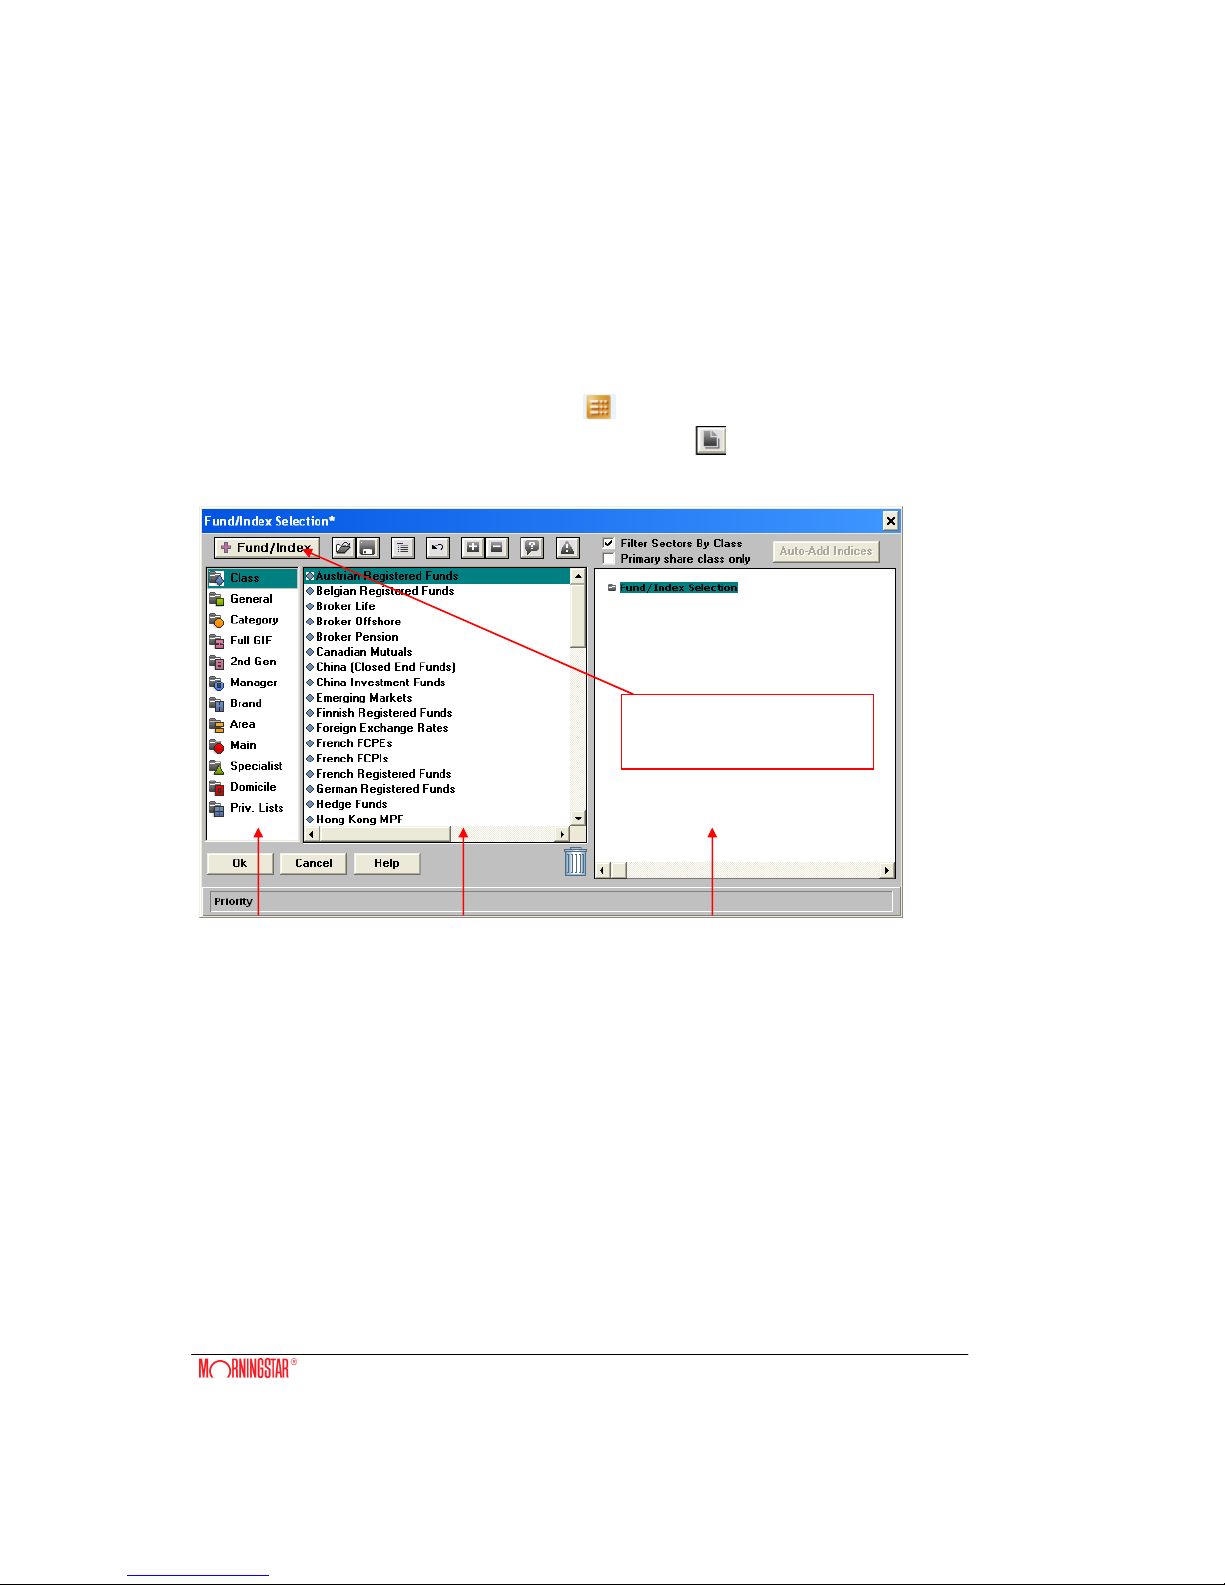
A Fund/Index Selection dialogue box appears which contains 3 main sections:
Section 1: displays a series of symbols, which allow a choice of different ways to select
funds/sectors (Class, General, Area etc.)
Section 2: displays a list of items according to the symbol selected in Section 1.
Section 3: displays the yellow Funds Selection folder.
When you first open this dialogue box the Class symbol is highlighted in Section 1 and the available
fund databases (classes of fund) are shown in Section 2.
Section 1
Section 2
Section 3
Lookup tool for searching & selecting
funds, indices and currencies

17
Tree Selection
Selecting a Class of Fund
Click on the Class symbol in Section 1 of the dialogue box, choose the class/database required from
Section 2 using one of the following methods:
• Double-click on the required class or module (it automatically attaches to the yellow folder
in the Fund/index Selection tree in Section 3).
• Right-click with the mouse on the selection required (it automatically attaches to the yellow
folder in the Fund/Index Selection tree in Section 3).
• Click and drag your selection across to the right frame (it automatically attaches to the
yellow folder in the Fund/Index Selection tree in Section 3).
NB: Selecting only a class/database presents in a report the entire fund content of that
database. E.g.: 2500+ Unit Trusts.
Removing a Selection
• Drag and drop unwanted selection(s) into the bin.
• Use the Toolbar Icon to undo last selection attached.
• Highlight your selection in the right frame and press DELETE on your keyboard.
Click on the OK button once your selection is complete.
Funds in the selected sectors are listed alphabetically in a report sheet.
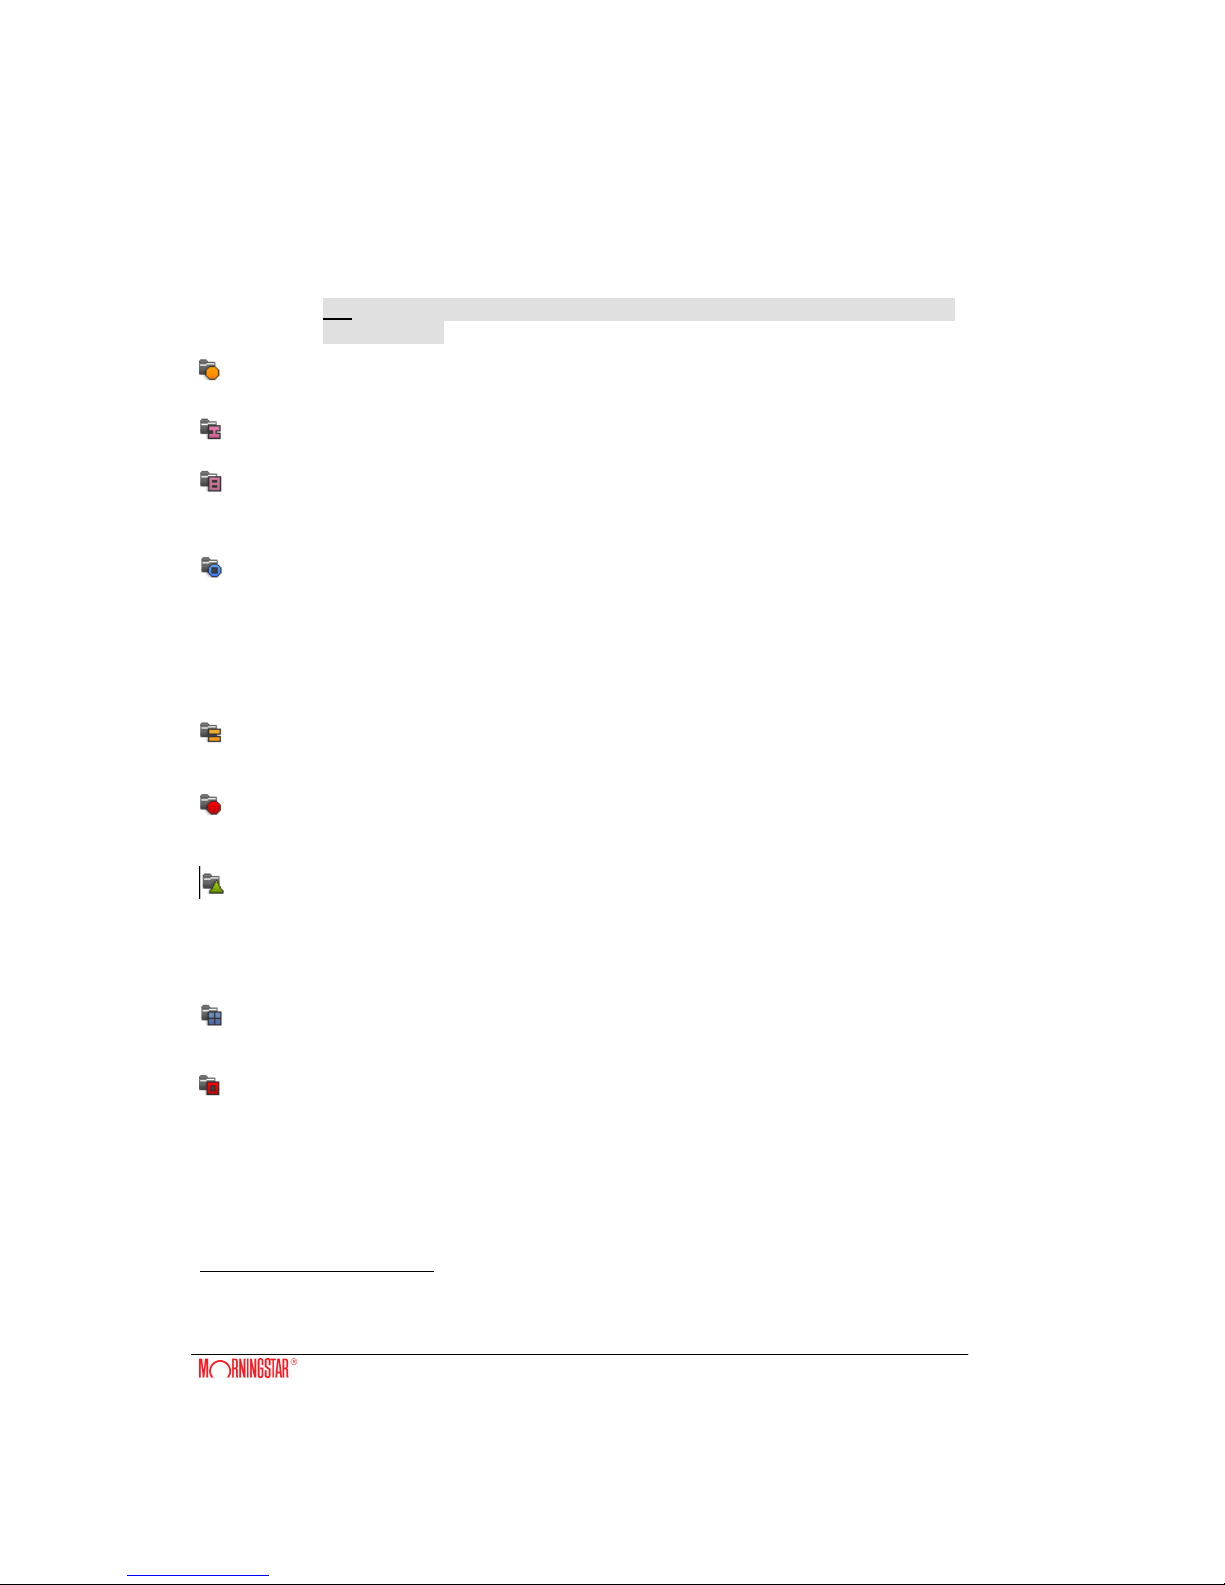
Section 1: Description
Click to highlight the Class symbol (results displayed in Section 2 of the Fund/Index Selection
dialogue box).
Class
Displays the fund modules available: Unit Trust, Offshore and International Funds, etc.
NB: In most cases you must make a class selection initially
Selecting one Class alone gives you the entire Class selection e.g.: all 3200+ Unit Trusts. To refine
your selection use the following methods:
According to the Class selected, the General Sector selection represents the GIFs (Global
18
General Investment Funds sectors), e.g. Equity Europe.
NB: for Unit Trusts/OEICs, you will find local industry sectors under General and GIFs
under 2nd General
Category
This selection presents a classification of the funds from the selected Class according to
the Morningstar Categories.
Full GIF
Full GIF (Global Investment Funds sectors) is as per General but includes all share classes
of a fund.
2nd General
2nd General Sectors is the place holder for Local sectorisation where applicable for any
given jurisdiction. Local sectors reflect local market official sectorisation mandated by that
markets fund governing body1
Manager
According to the Class of fund selected, displays a list of all the Management Groups who
manage funds within those classes. For any group(s) selected, provides list of all their
funds.
Or To refine your selection, use the following options: (Morningstar Workstation Sector
classification)
Area
This selection presents a list of geographical areas allowing you to choose specifically
which investment locations you require. E.g. France, Germany, United States of America.
Main
To refine your selection further, you can specify which type(s) of fund you wish to view in
the locations you have chosen. E.g. Equity, Fixed Income, etc (main stream sectors).
Specialist
As a further refinement you can ask for funds, in the locations chosen, with a specialist
investment nature. E.g. Gold & Precious Metals, Ethical, Healthcare/Pharmaceutical, etc.
You can also make fund selections using:
Priv. Lists
This selection allows you to access your own lists of funds that can be created in the
Private List Editor.
Domicile
View funds by Domicile. E.g. Bermuda, Scotland, etc.
Report benchmarks
1
In certain instances the 2nd General (Local) Sectors are placed in the General section and the GIF
sectorisation in the 2nd General section – US Mutuals and UK Unit Trusts
19
If you want to attach benchmarks/indices to any sectors selected, click on the following symbol
from Section 1 of the dialogue box:
Fund/Index
This option allows you to select any individual funds/indices from the database and attach
them as benchmarks to the classes/sectors you have chosen. It also displays which
class/sector/area a fund belongs to.
The Lookup text box towards the top of the dialogue box is activated. Type the SPID or ISIN code
or use the Lookup facility to find the required fund/index. Attach it to the relevant sector in the
selection tree: highlight the relevant sector first then double-click on the index to be attached or
drag and drop the index on the relevant sector.
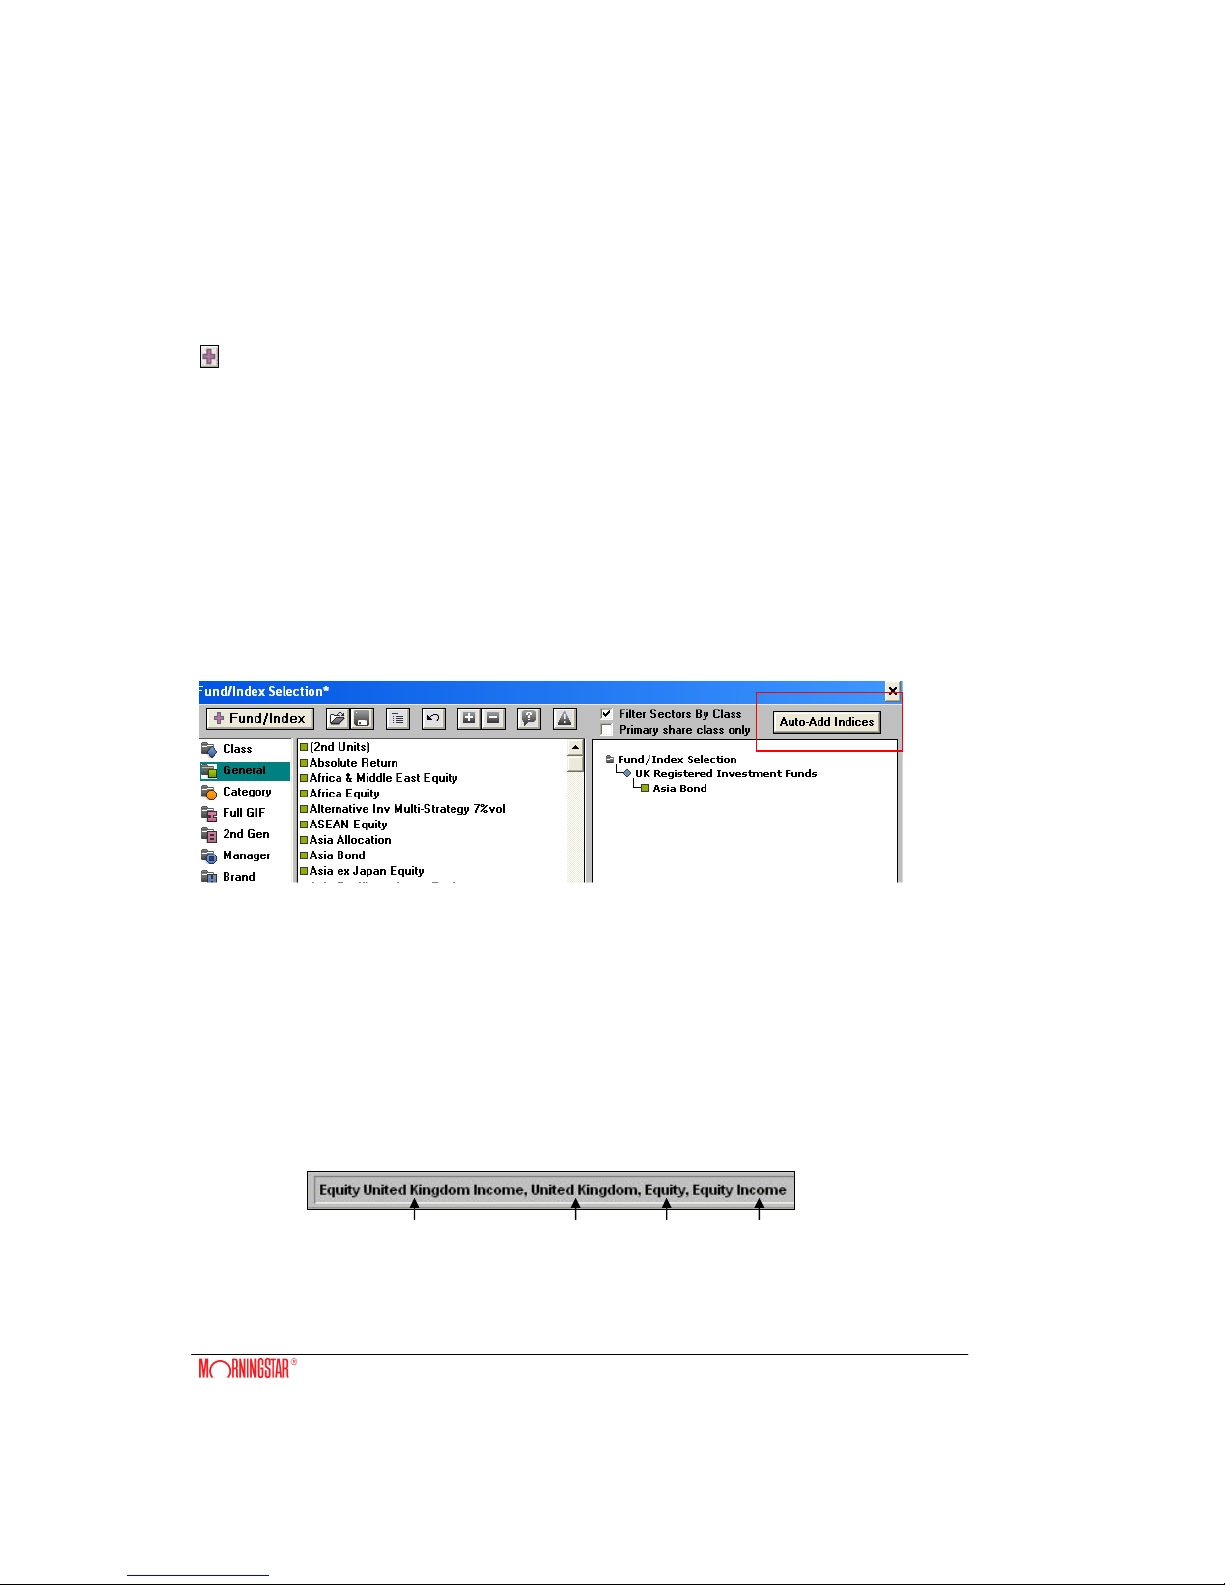
Auto Add Indices
When the auto assign indices button is active you can use this feature to automatically assign
general and 2nd general indices to the tree.
This feature is not active in the following scenarios:
• There are no “General Sectors” on the Tree
• None of the “General Sectors” on the Tree have applicable benchmarks available
• All of the “General Sectors” on the Tree, already have applicable benchmarks attached
Identify the Sector to Which a Fund Belongs
To identify a fund’s sector classification use the Fund/Index Selection dialogue box as described
above. Use the Lookup facility to find the fund; click once to highlight it and its classification
appears in the status bar at bottom of the dialogue box.
General Sector Area Sector Main Sector Specialist Sector
20
To View the Content of Sector(s) in the Tree Selection
Double-click on any sector attached to the tree and a dialogue box appears showing the contents of
the sector; thus you can check the presence of particular fund(s) in the chosen sector(s) before
continuing.
Once classes/sectors, etc., have been selected, click on OK.
Each individual sector appears on a separate report sheet. (No performance data shown).
Report Screen
• To View Funds – Use the scroll bar adjacent to the fund area of your report sheet or
keyboard PgUp/PgDn keys.
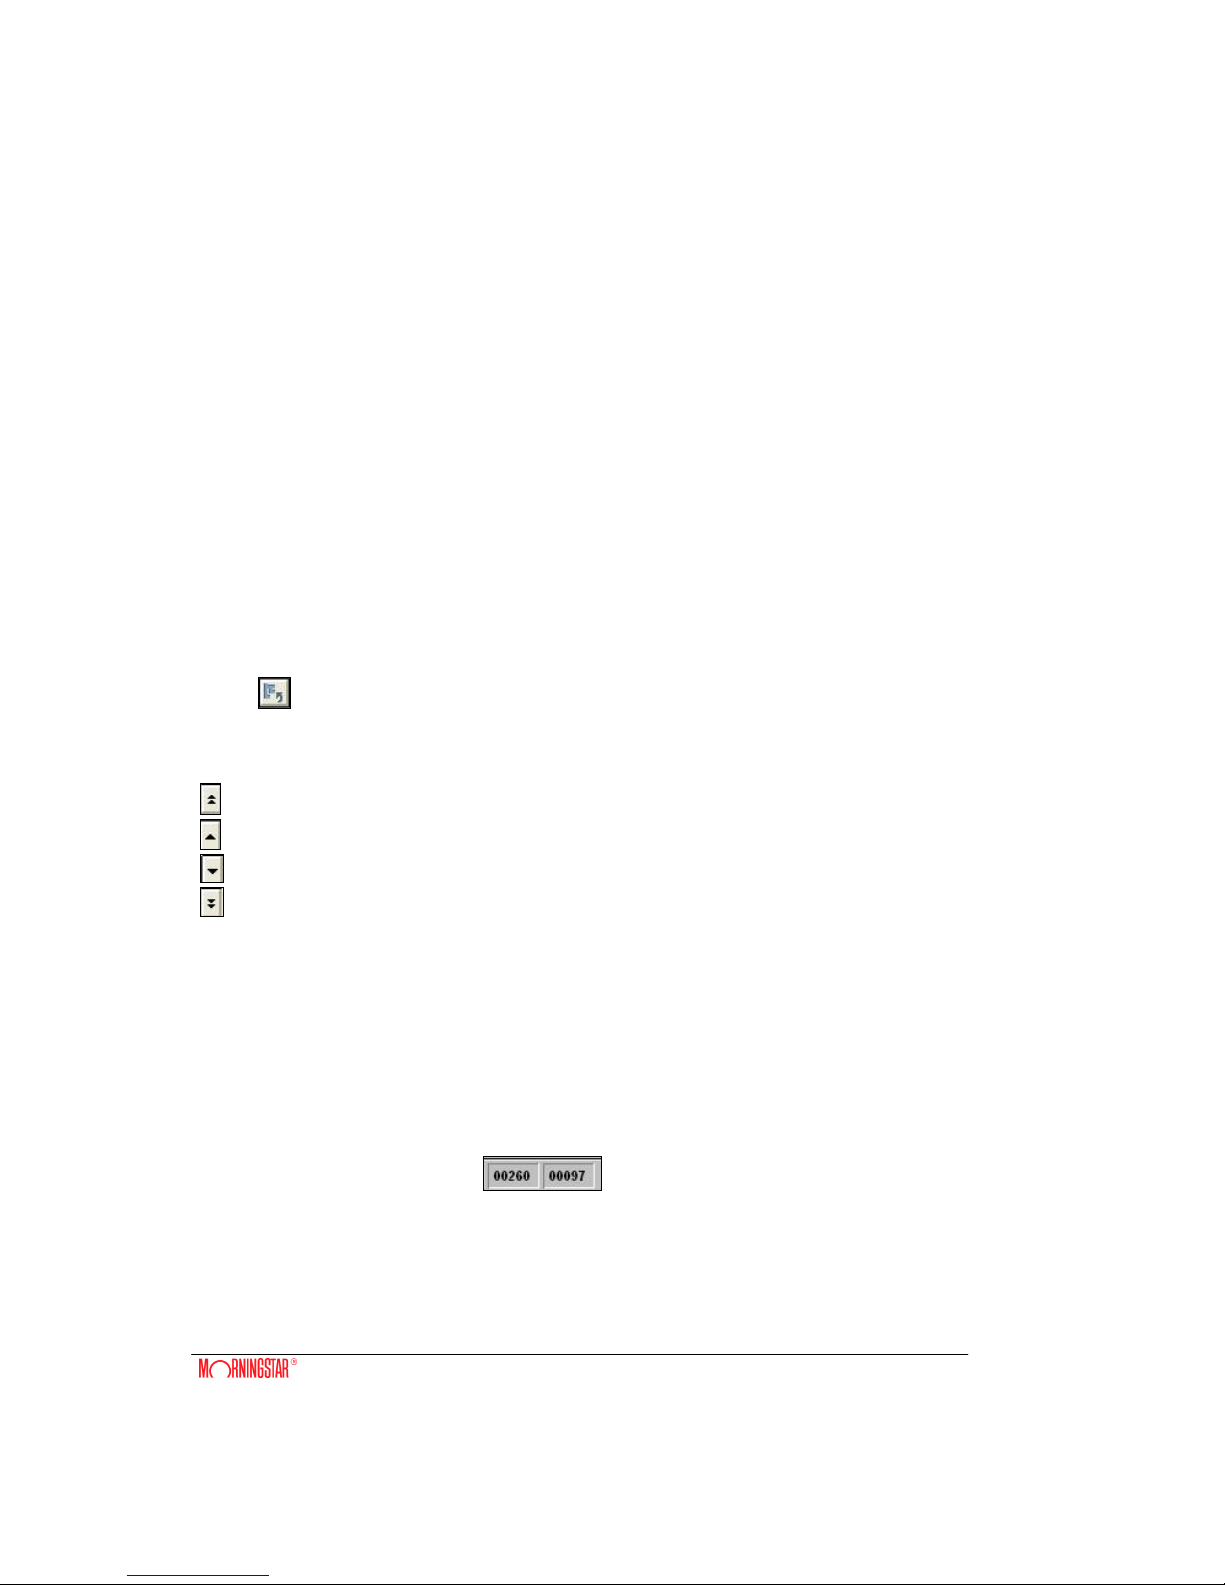
• To View Sectors – Each sector selected for viewing in a report is shown on a separate
page. From the Menu bar select Report – Go to Sector or click on the Toolbar Icon
.
Or use the buttons on the right-hand edge of the report sheet:
Go to first sector
One sector up
One sector down
Go to last sector
• Indices and Sector statistics – These areas also have their own scroll bars.
• Fund Count – If you have Count showing as one of your Sector Statistics at the bottom
of the report, this number represents the number of funds which give a performance return
in the sector on view over the given time period..
On the bottom right-hand side of the status bar are 2 number boxes
Represents the total number of funds in
the report, including indices
Represents the total number of funds in
the sector on vie
w, including indices
(after filtering).

21
To Edit your Tree Selection
From the Menu bar select Data – Fund/Index Selection or click on the Toolbar Icon . You
may also double-click on the fund list.
Make the necessary changes and click on OK to validate. Your new selection will show in your
report.

22
To Select Performance Criteria
From the Menu bar select Data – Performances or click on the Toolbar Icon .
A Performance Columns dialogue box appears.
Date Selection
The start and end date may be selected in any of the following ways:
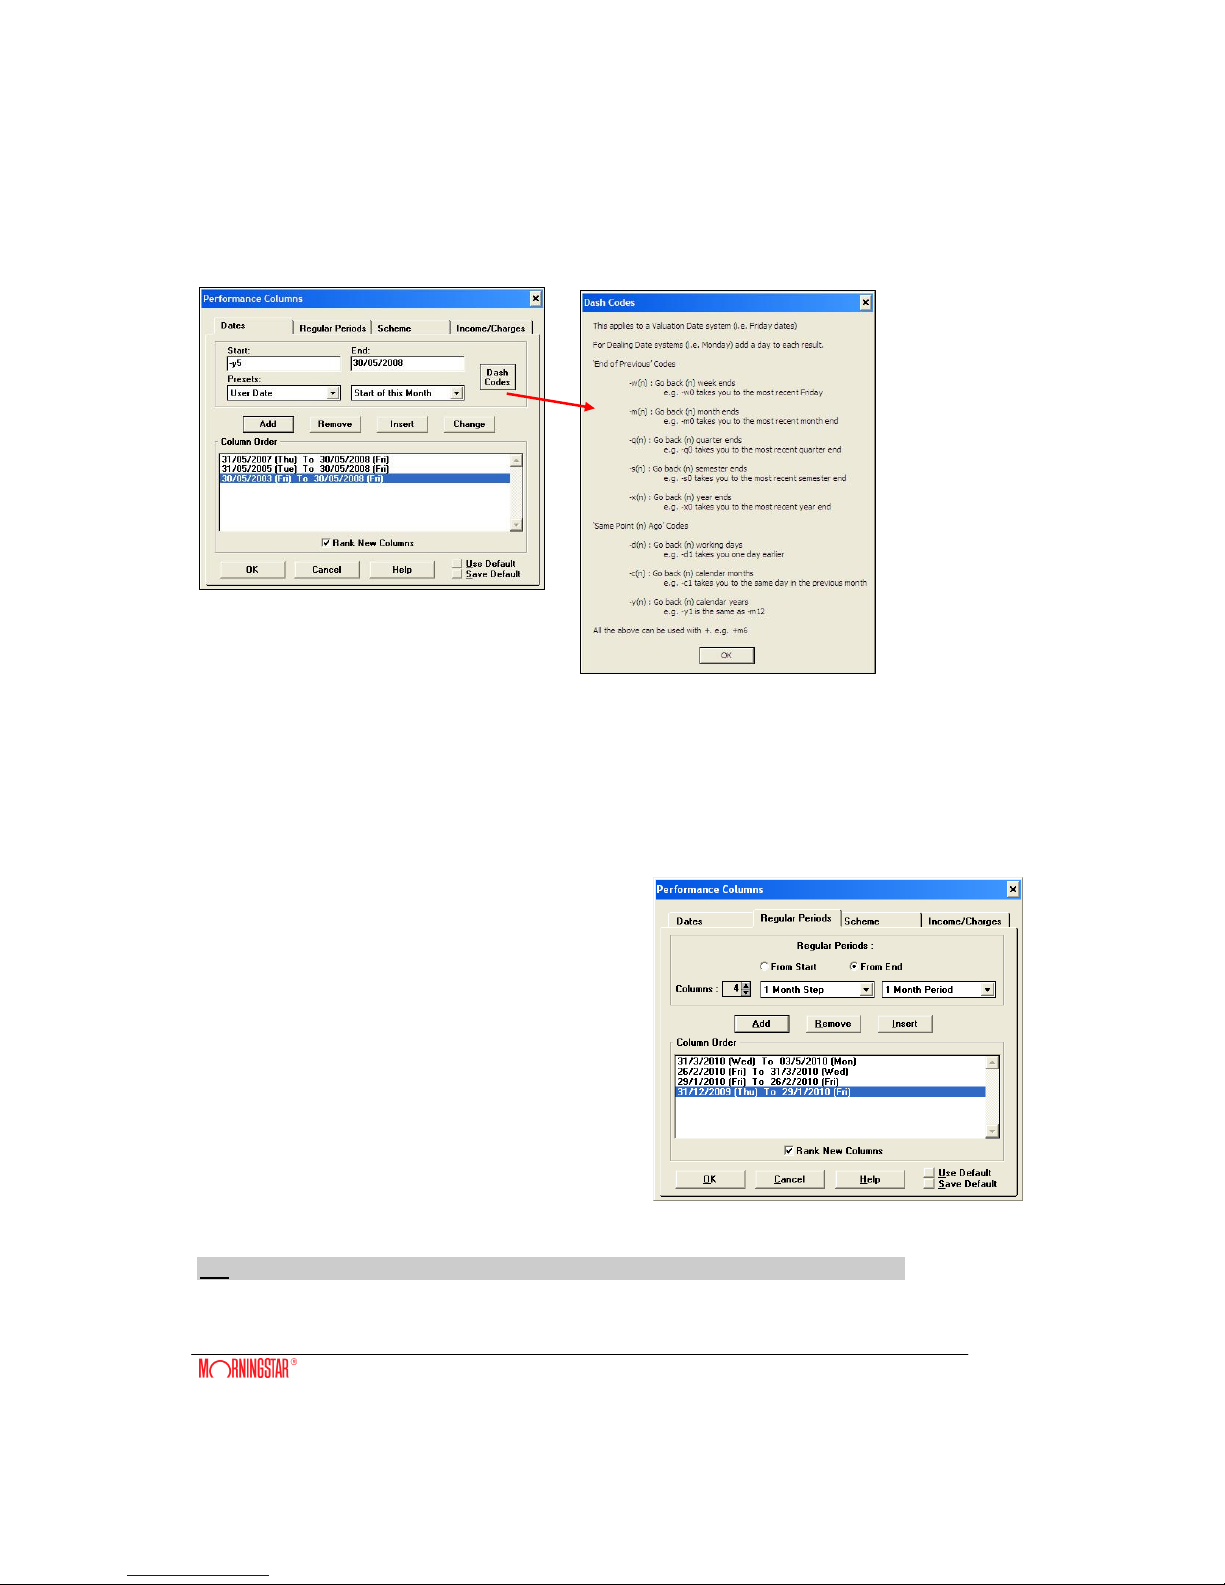
Dates tab
Choose individual date period selections
• By using the preset selections from the drop-down menus; or
• By selecting the User Date option and typing in own date e.g. 01/01/90 or 01.01.90; or
• By using the dash code facility e.g.:
-Y2 2 years back from end date shown
-Q1 1 quarter from end date shown
-M3 3 months from end date shown
-C3 3 calendar months from end date shown
-W6 6 weeks from end date shown
-Q4 4 quarters from end date shown
-X0 year to date e.g. (01/01/04 to latest)
-X1 last year start to date (01/01/03 to latest)
-G1 the date is moved to the same “day number” of the same month in the preceding year.
-S0 the date is moved to the first working day in the same Calendar Semester (and year) as the
date supplied
NB: If the day is at a weekend then it will be moved backwards to the Friday on valuation dates
or forwards to the Monday on dealing dates.
Click on Add after each selection. The most recently added time period will always appear at the
bottom of your selection.
You may also:
• Remove a time period: highlight the time period you wish to delete and click on Remove.
• Insert a time period: highlight the time period above which you want to insert a time period
(e.g. to have 18 months between 1 and 3 years, highlight 3 years), then set your new start
and end dates and click on Insert.
• Edit a time period: highlight the time period you want to apply changes to; make your
changes then click on Change for them to take effect.
The Performance Columns dialogue box also now has an extra button which will display a screen
explaining all dash codes.
23
Hunting Settings: this can be changed from the default 6 day, to increase the hunting to turn it off.
Please note this setting is applied at a report only (not system wide) level.
Regular Periods tab
For discrete date period selection, e.g. year on year, monthly
Use the Regular Periods section of the dialogue box by clicking on the regular periods tab
• Choose From Start for earliest period
presented in the first column
• Choose From End for latest period
presented in the first column
• Select the step you wish between column periods
• Select the period of each column
• Use the Columns number setting to choose the
number of periods to be added.
• Click on the Add button. The relevant series of
dates appears automatically.
NB: A commonly used set of dates may be saved as a default.
24
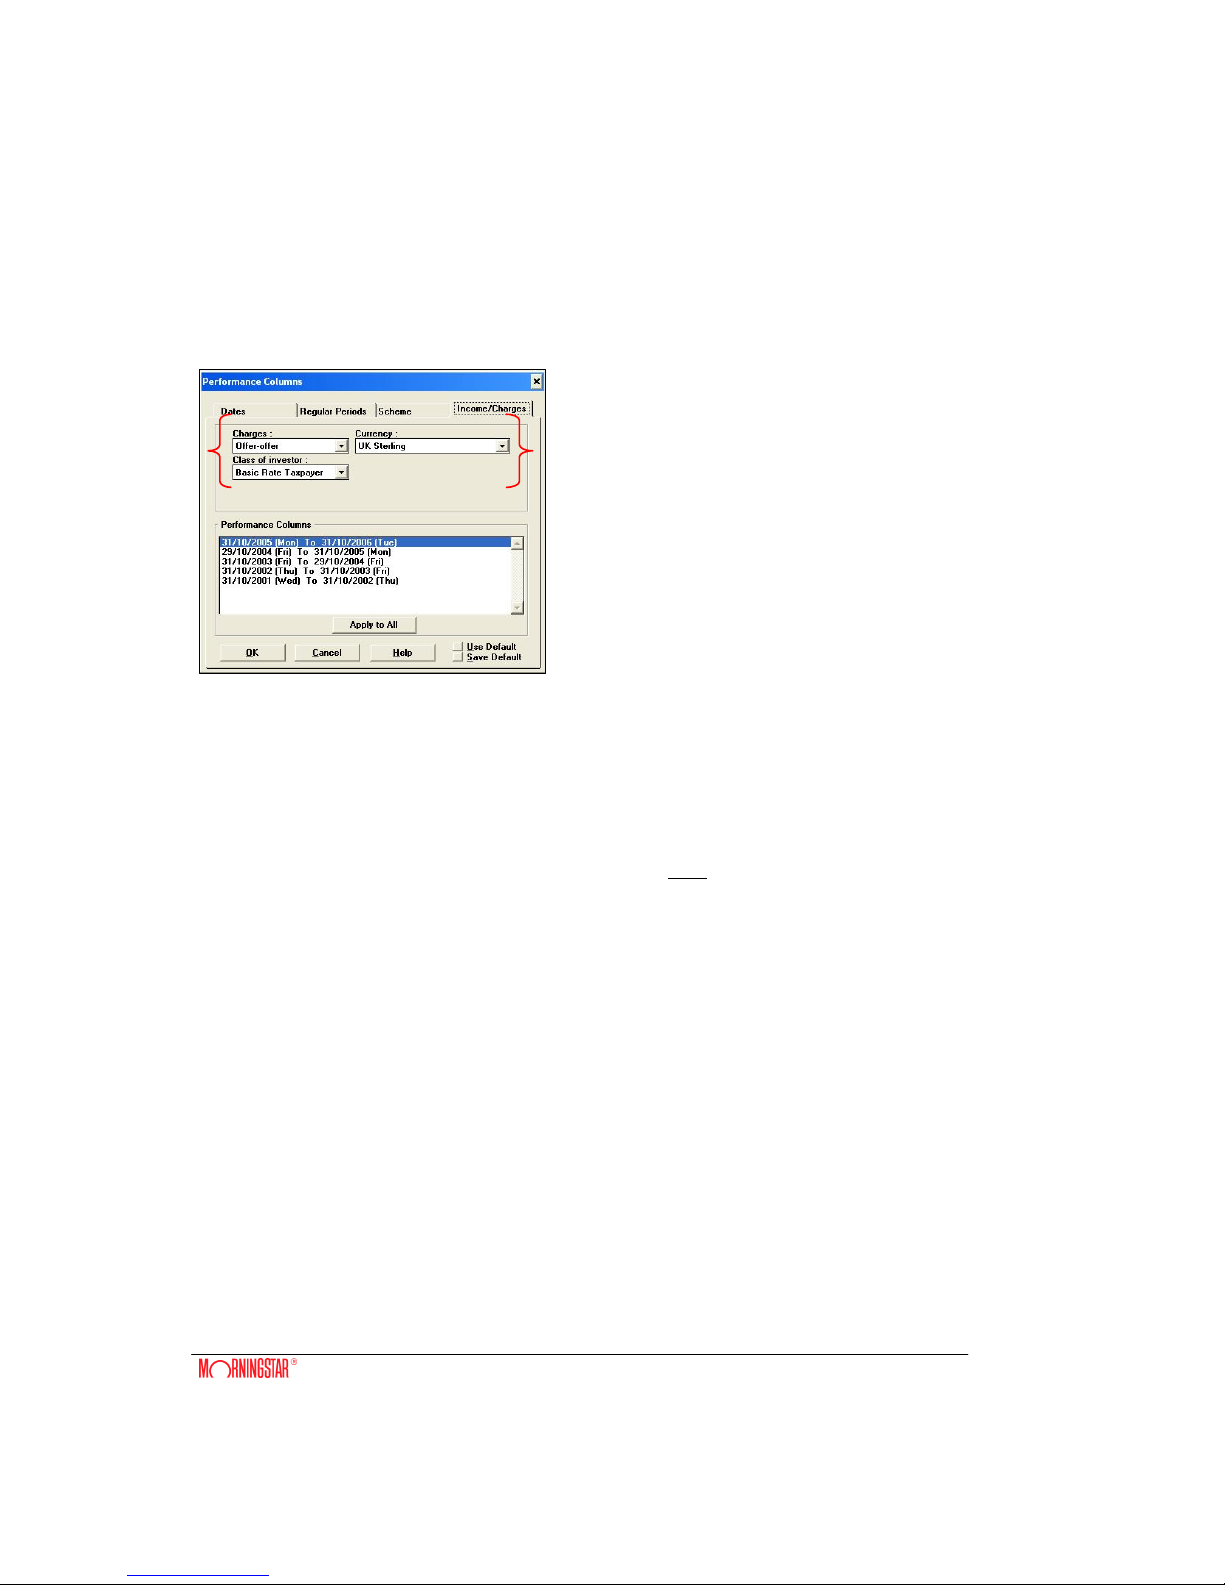
Charges, Income and Currency Settings
Once you have chosen your time periods, you need to select your calculation basis.
Click on the Income/Charges tab in the topright corner of the Performance Columns
dialogue box.
Click on the drop-down menu arrows adjacent to
the Income, Class of Investor and Currency
selections and choose the required options.
Settings apply to the highlighted time period.
Click on the Apply to All button to apply
settings to all time periods in your selection.
Charges
• Offer to offer - offer prices used throughout, thus effect of management group charge
unseen.
• Offer to bid - offer price at start subsequent prices are historical bid prices, hence
management charge included.
• Cur chg - uses bid to bid but adjusts initial price to include latest management charge.
• Bid to bid - historical bid prices used throughout (closest to NAV performance)
• Mid to mid - label for use with investment trusts/equities.
• NAV-NAV - provides the closest approximation of the investment performance of a fund
manager, measuring the movement in the net asset value of a fund, incorporating annual
management fees but not sales or redemption fees.
Class of Investor
• Net Income - income/dividend reinvested, subject to UK base rate tax.
• Gross Income - income/dividend reinvested, no tax deducted.
• No Income - income/dividend extracted, shows growth of initial capital invested only
• Unadjusted - income/dividend reinvested according to industry-recognised status. Allows
mixed items to be shown e.g. Pension funds-Grs, Insurance funds-Net.
25
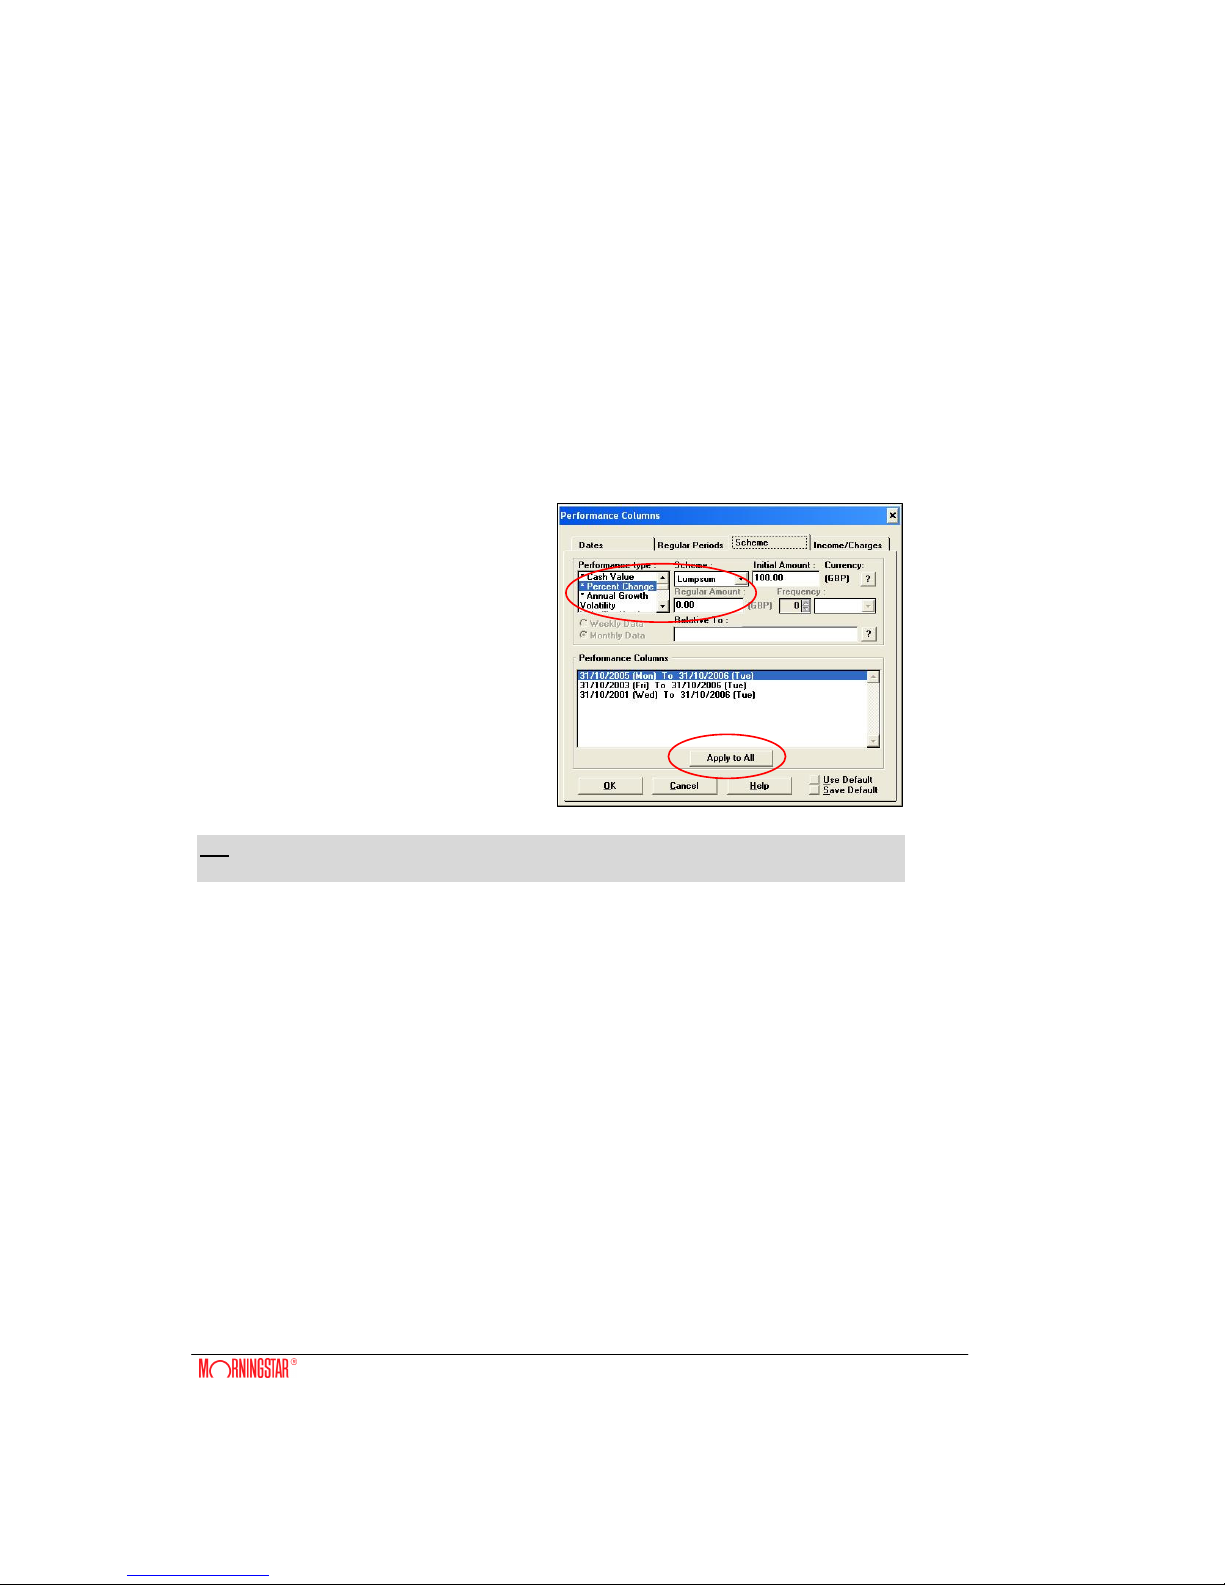
Scheme Type Selection
Click on the Scheme tab to view settings. Performance results calculated can be shown in the
following terms:
• Percentage change
• Cash Value
• Annual Growth (AGR)
• Investor Return
• 82 Modern Portfolio Theory (MPT) Statistics including Alpha, Beta, Information Ratio, etc.
Scheme types:
• Lumpsum – return on a sum invested at
the start of a time period
• Savings – return on a regular savings
investment e.g. £50 invested monthly
• Withdrawal – return on lumpsum
investment, allowing regular sums to be
withdrawn
NB: Settings apply to the highlighted time period only. To apply settings to all time periods in
your selection click on the Apply to All button.
Once all settings have been selected click on the OK button and the results will be calculated.
Calculation progress is indicated by the red bar in the bottom-left corner of the screen.
26
Report Facilities
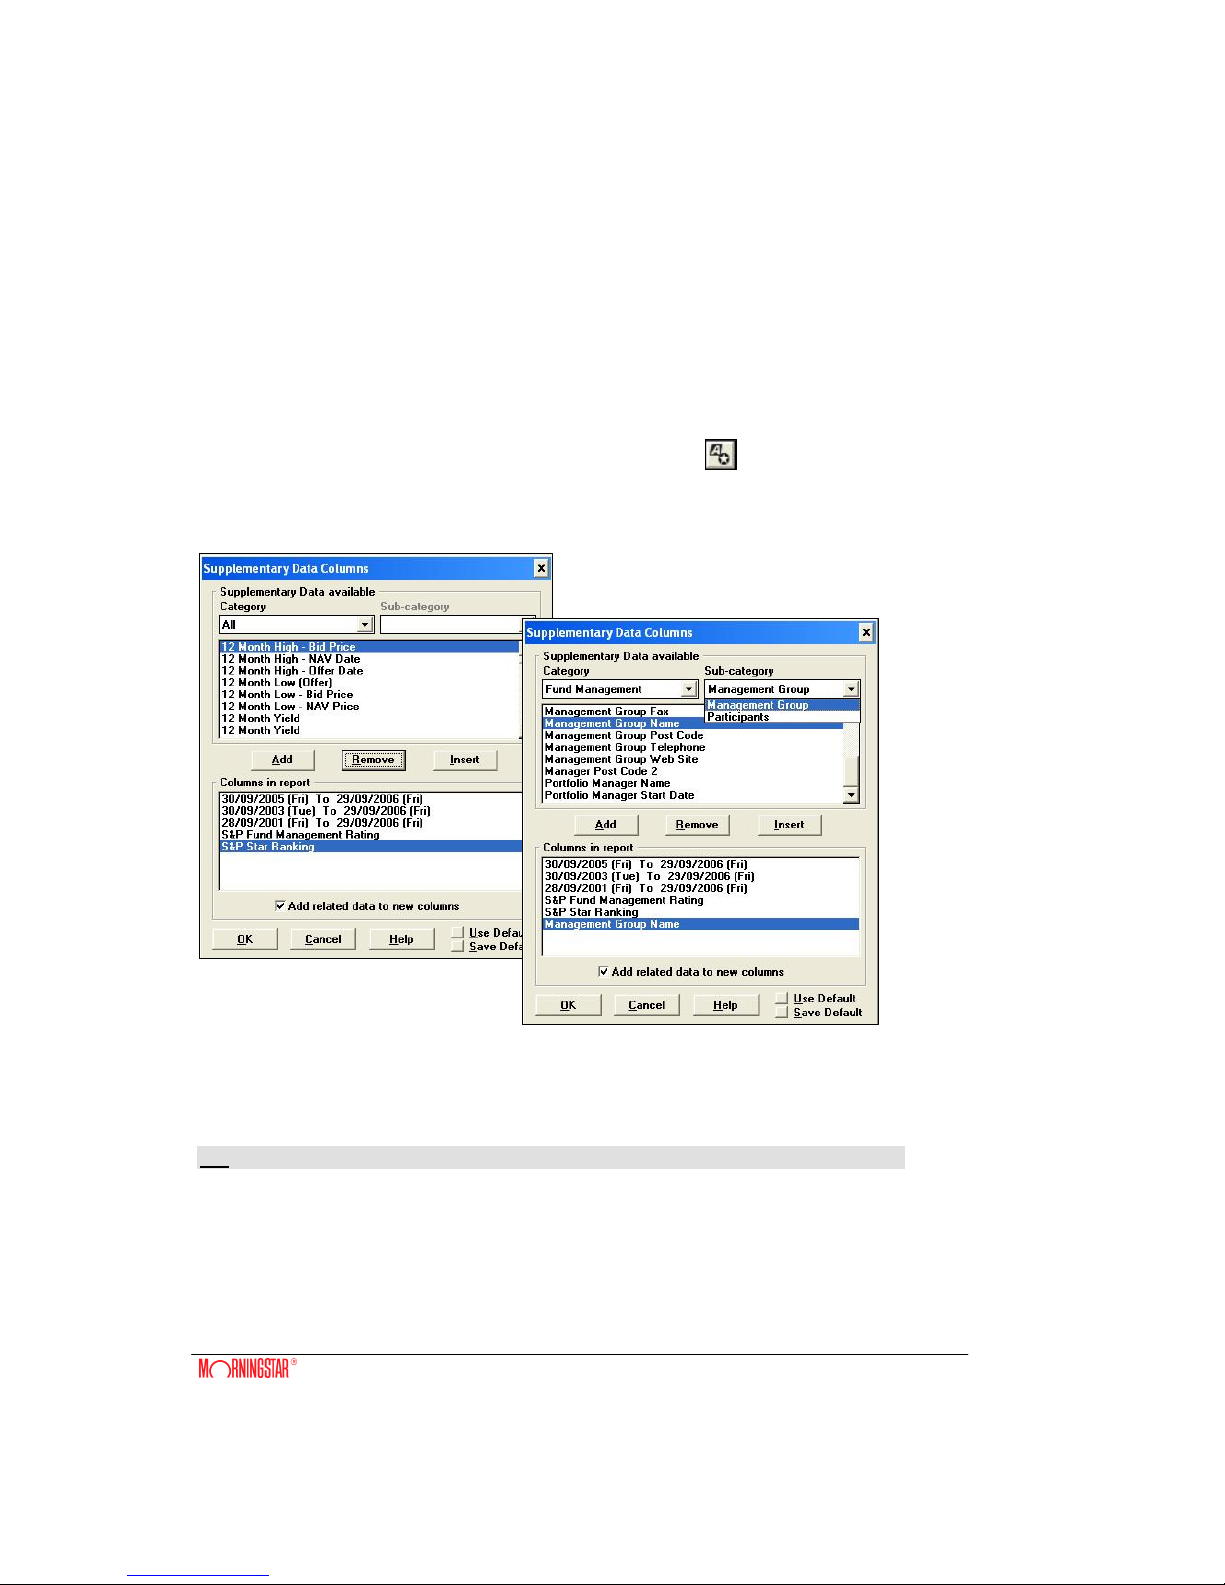
Supplementary Data
A large number of additional fund information such as Latest Fund Size, Fund Launch Date,
Bid/Offer spread and many more is held on the database. To access this data, select Data –
Supplementary Data from the Menu bar or click on the Toolbar Icon .
A dialogue box opens displaying the list of Supplementary Data items available. Highlight any
items required and click on Add; the selected items are added to the report as main column data.
Scroll down the list of data items at the top of the dialogue box or use the Fund Management
category to bring Management Group Name into view; highlight this and click on the Add button
to add it as a report column. Click on OK to return to the report.
NB: Supplementary Data items can also be added as sub columns (see next section below).
List lookup
Selecting the List lookup option will allow you to cross reference and highlight any values contained
in a text file against a selected column in your report.
27
Scroll down the list of data items at the top of the dialogue box or use the List Member Functions
category to bring List Lookup; highlight this and click on the Add button to add. Browse to the text
file you wish to cross reference against and select the report column you are referencing against.
Click on OK to return to the report.
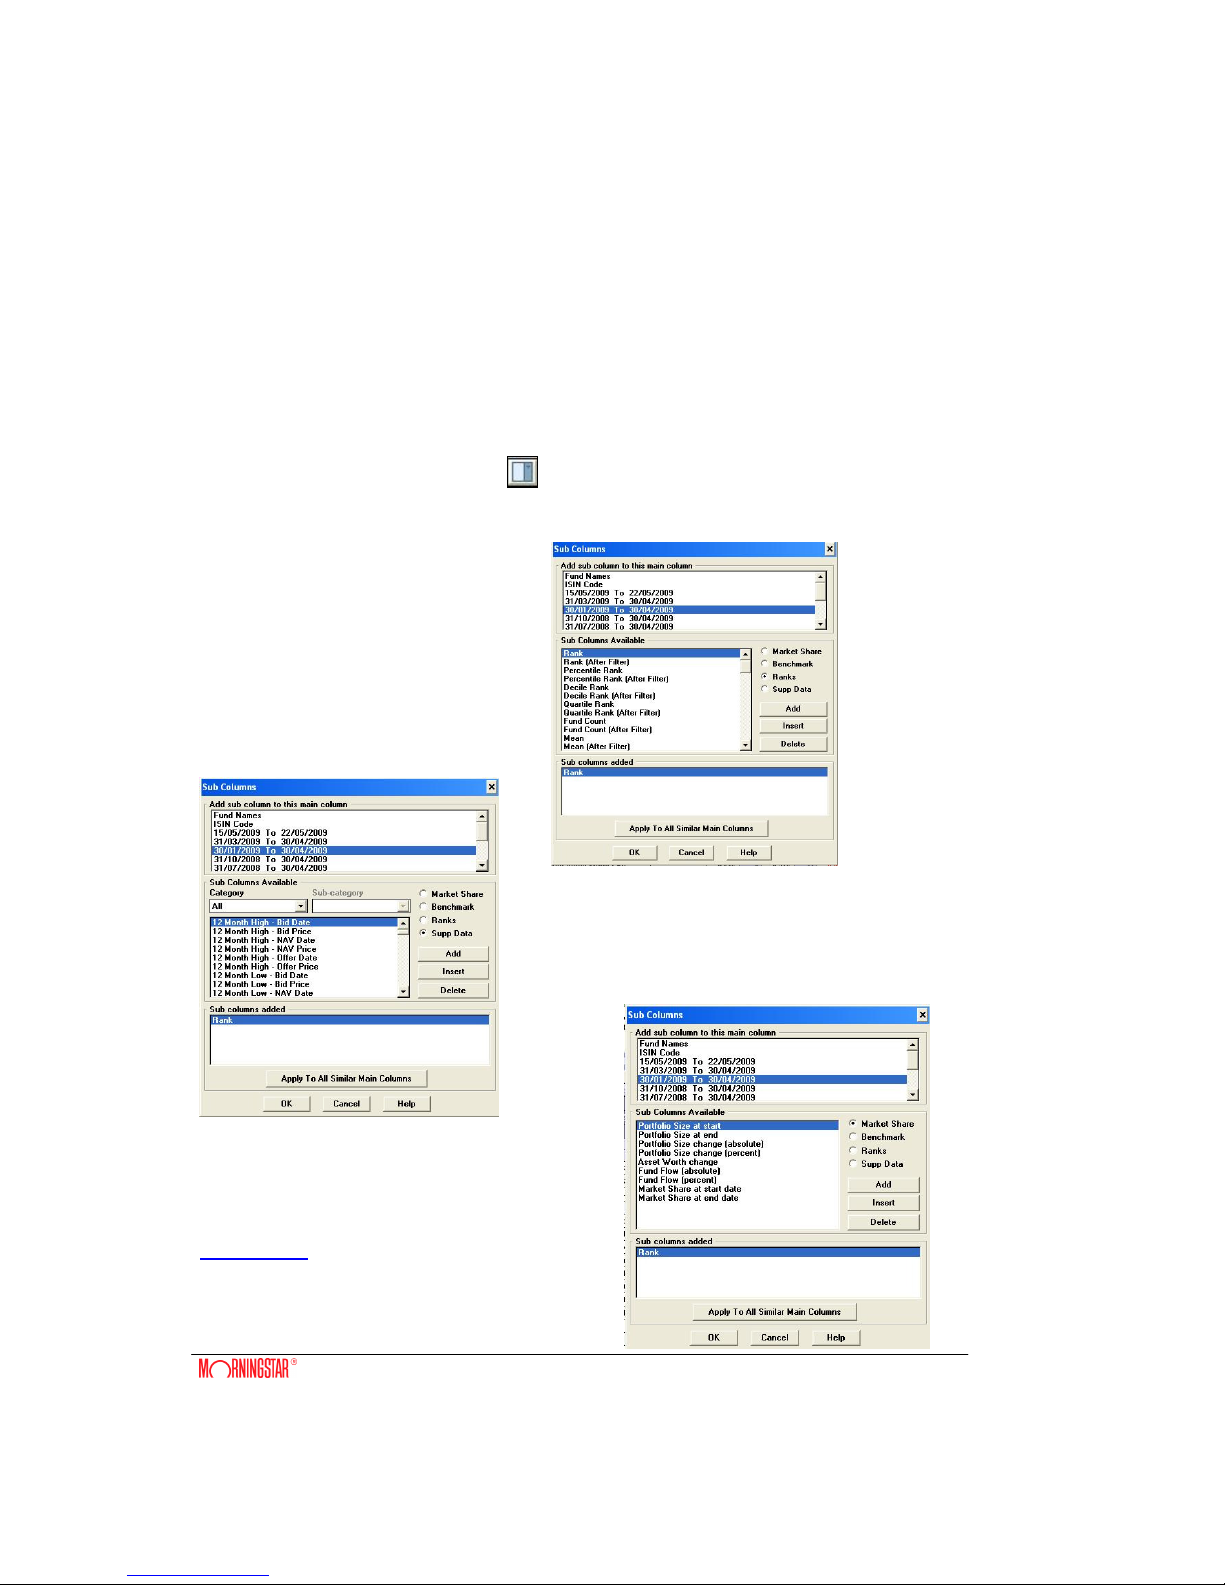
Sub Column Data
Add sub columns such as quartile ranking to a main column data. From the Menu bar select Report
–Sub columns or click on the Toolbar Icon .
A dialogue box opens; click on the relevant Radio button to select:
Ranks – Quartile, Decile, Percentile ranks
Supplementary Data – Same choice of items as
given via Data – Supplementary Data.
Market Share – show growth or shrinkage of assets
Under management adjusted by the funds performance
(i.e. indicative net inflow and outflow). More details on
Market Share are available.
28
Benchmarks - view a funds performance directly
against that benchmark. This facility can be used
to compare performances and other MPT stats.
From the Sub Columns dialogue box, choose the main column data item you wish to attach a sub
column item to; highlight the required items from the Ranks, Supplementary Data, Market
Share or Benchmark list and click on Add. Any items selected are attached as sub columns to a
main column.
NB: To remove all ranks, select a time period, delete all ranks, then click on Apply to all
Similar Main Columns.
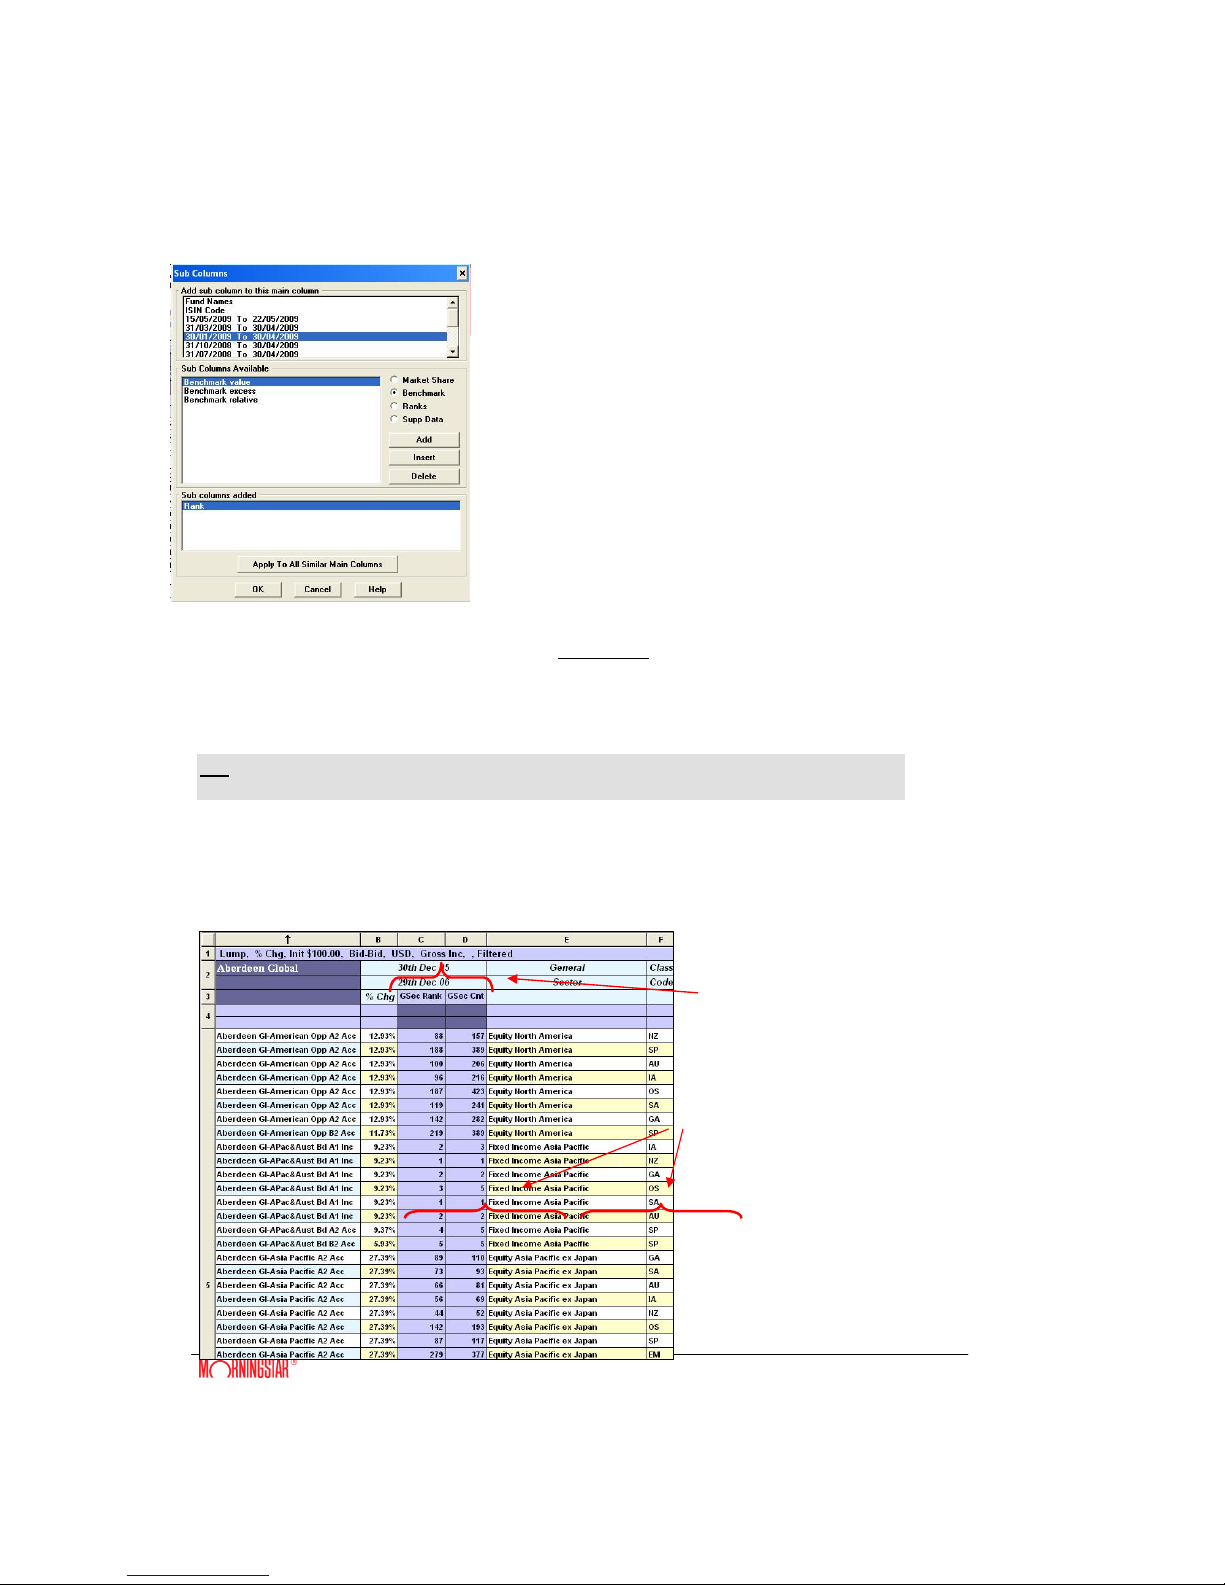
In the example below, a management group report was created and the Global Sector rank,
Global Sector Mean and Global Sector Fund Count were added as sub columns to the
performances.
The Fund Launch Date sub column was also added to the Fund Name column.
Rank-in-Sector statistics (Non Class
Specific)
Rank-in-Sector statistics (Class
Specific) 2nd and General
29
In the examples
shown above, you
will see (2nd Units
excluded):
• A non-
class
specific
managem
ent group
report with the Global Sector Rank and Count over a 1-year time period.
• A class specific management group report with the Global Sector Rank and Count as well
as the 2nd General Rank and Count over 1 and 3 years.
NB: To find out more about including or excluding funds, see Filtering Report Data
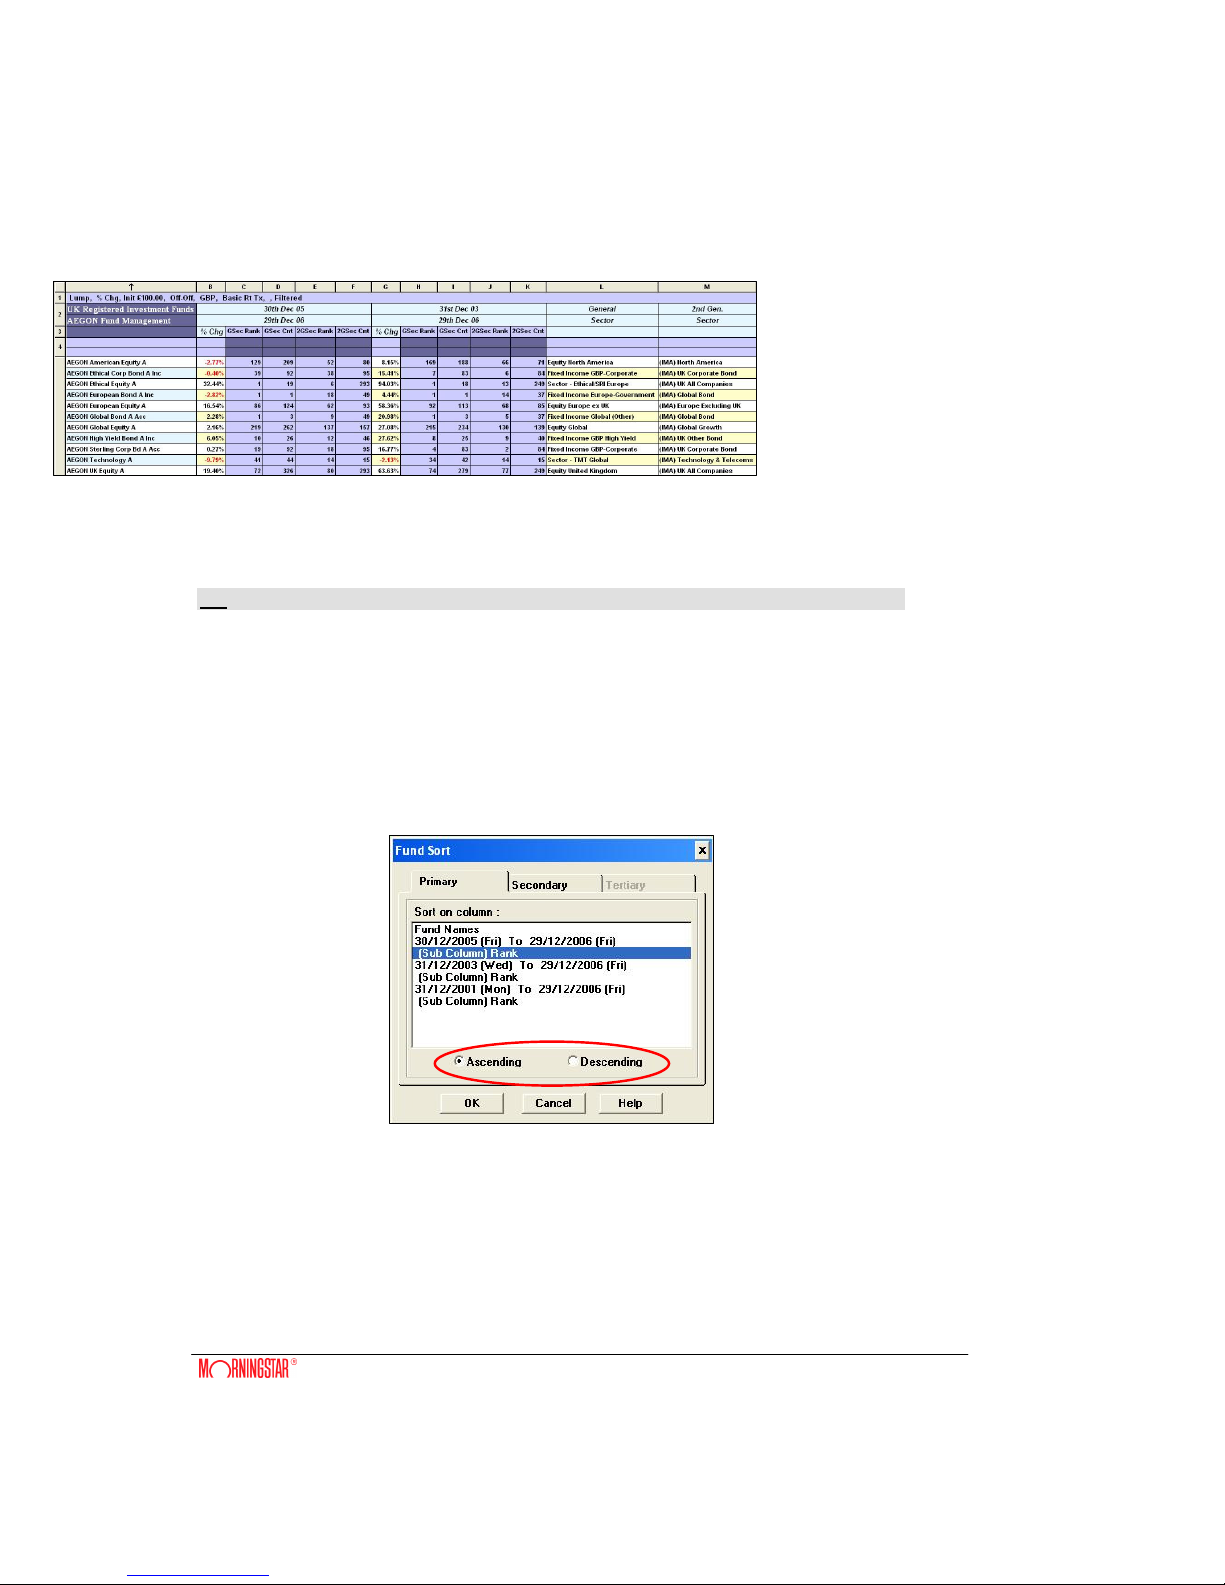
Sorting Report Data
In your Workstation report you can sort on any column (or sub column) by clicking on the lettered
cell at the top of the column.
Go to Report – Sort Funds. The Fund Sort dialogue box will appear. Highlight the column which is
to be sorted, then choose the order for sort:
You can also multi-sort on up to 3 columns (in an ascending or descending order) using the Fund
Sort dialogue box, or simply by holding down the CTRL key and clicking on the column header of
your choice (click once for ascending order, twice for descending order).
30
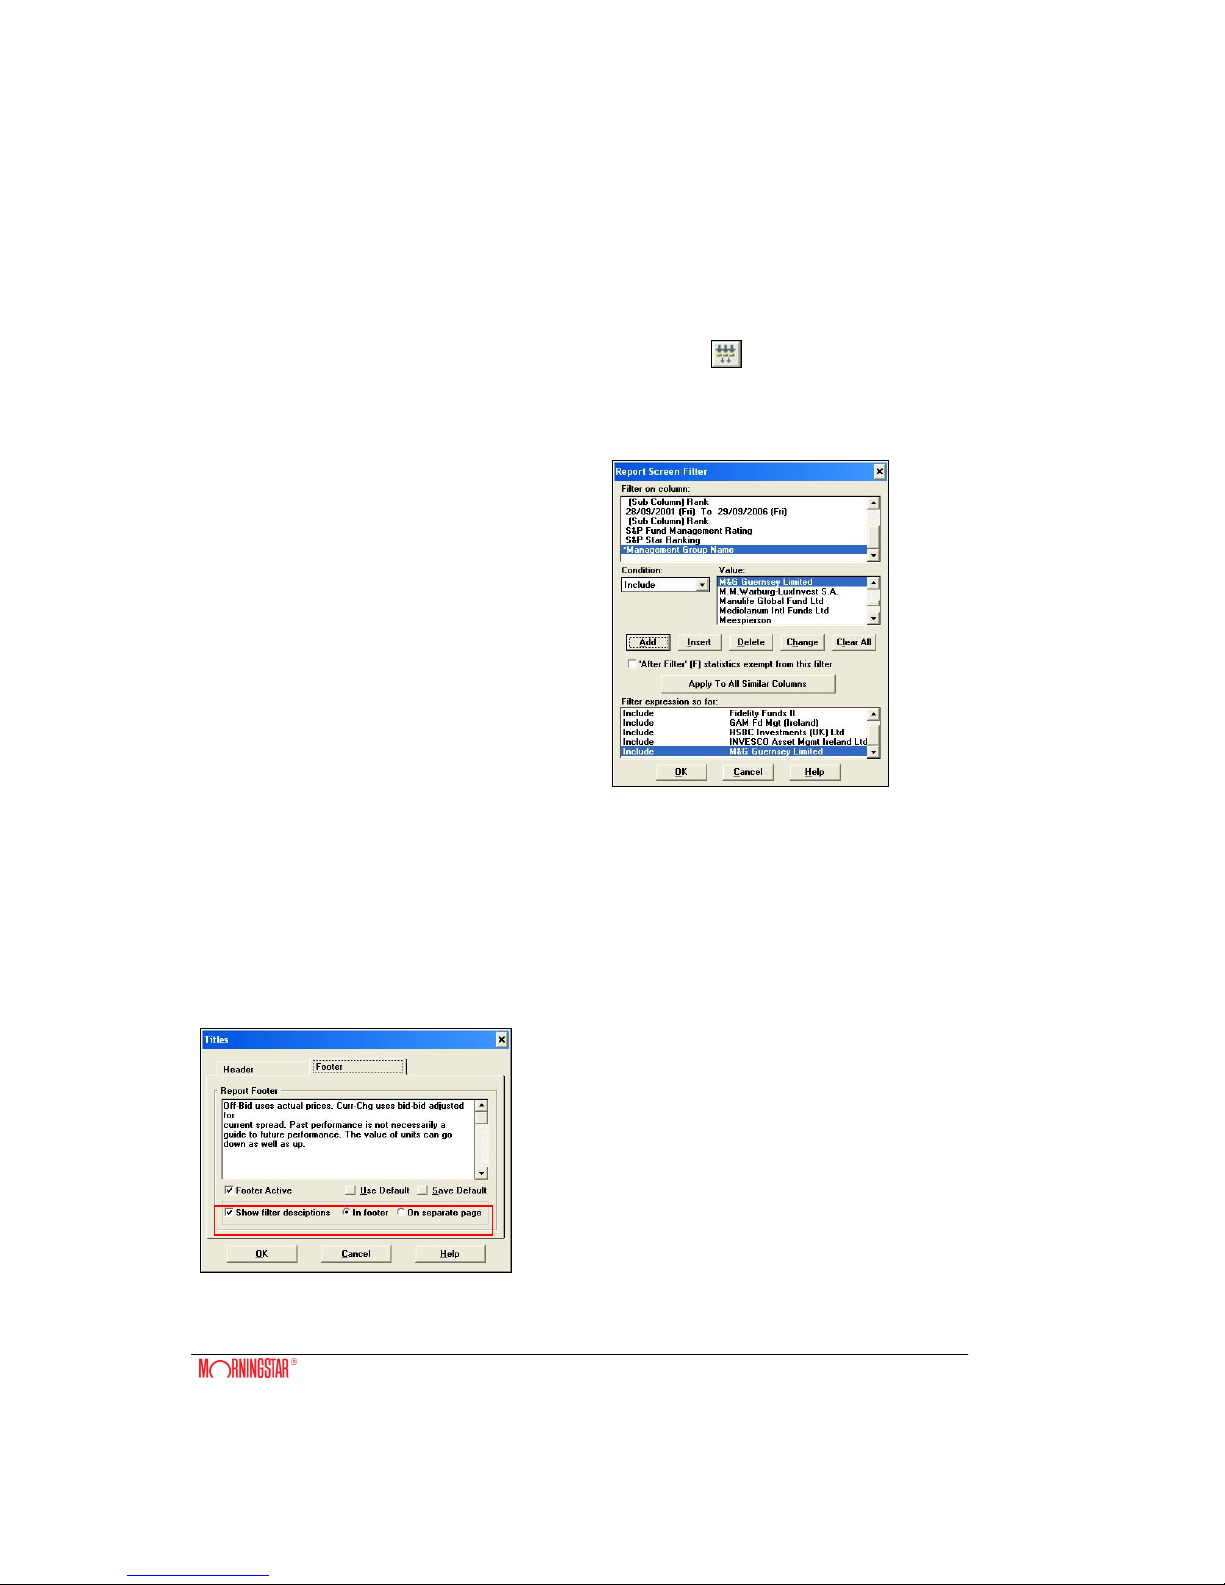
Filtering Report Data
From the Menu bar, select Report – Filter or click on the Toolbar Icon
The Report Screen Filter dialogue box appears, allowing you to retain only those funds which
meet the criteria you set. You can apply a range of filter conditions to either performance data or
supplementary data.
To Filter Funds
In the top section of the Filter dialogue box, highlight
the column to be filtered on. Choose from the list of
Conditions and Values (these vary according to the
contents of the column chosen for filter) then click on
Add. Those funds which do/do not meet criteria set will
be removed from view.
To Regain Funds
In the Filter dialogue box, highlight the column which holds the filter (columns with filters set are
indicated by *). The filters set are shown at the bottom of the dialogue box. Highlight any filter
condition to be deleted and click the Delete button; alternatively remove all filters set with the
Clear All button.
Filters Criteria on Print out
Filter criteria will show on print out. Select Report –
Titles – Footers, switch on the Show Filters
Description checkbox and choose whether you
want the listing to appear in the Footer or on a
separate page.
 Loading...