

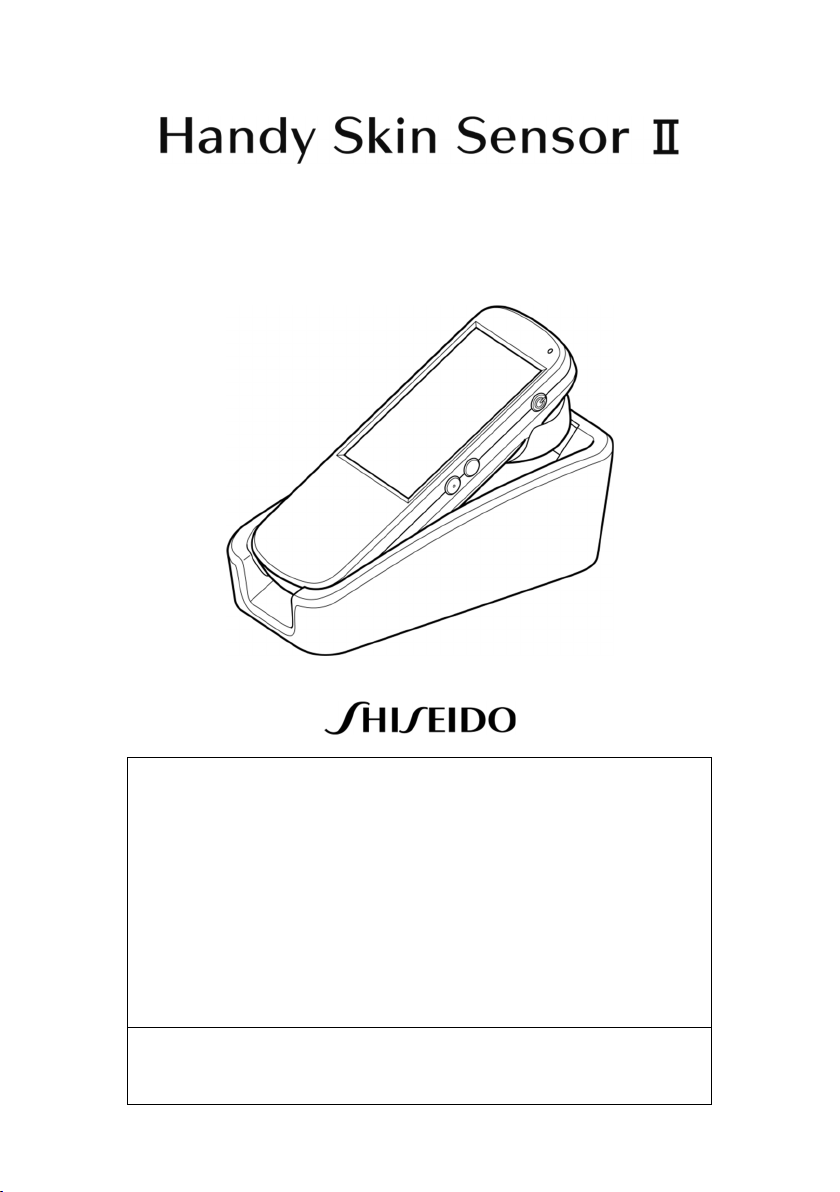
Contents
Instruction Manual
◆ For your safety
◆ Notes on use/Cleaning instructions …4
1. Components …9
2. Setting up (Sensor Stand) …12
3. Charging Sensor …14
4. Charging Rechargeable battery …15
5. Changing Rechargeable battery (Sensor) …16
◆ Troubleshooting …18
◆ USB connection with the designated device …21
◆ Specifications …22
This manual contains important information regarding the safe use of this product.
Read all the safety and operating instructions before operating the product.
…2

◆ For your safety
The precautions described in this manual are to ensure safe use of the unit and
to prevent harm or injury to you and others. The manufacturer and vendor of
this product take no responsibility for any personal injury or other accidental
damage that may occur as a result of incorrect or inappropriate use of the
product.
In particular, be sure to read the manual to ensure that you are familiar with all
aspects of safety in using this unit. After reading this manual, keep it in a safe
place for further reference when necessary.
Failure to follow the instructions will cause
Warning
Do not get this unit wet. Do not use it with your wet hand. Doing so
may cause electric shocks or malfunction.
Do not shine the light from this unit directly to the eye. Doing so may
damage eyesight.
Do not disassemble, repair or modify (e.g. by soldering) the unit.
Doing so may cause an accident, fire or electric shocks.
Do not leave the unit in places where it may be exposed to high
temperatures such as direct sunlight, a heat source and flame (e.g.,
inside a vehicle during summer). Doing so may increase the internal
temperature and cause explosion or fire.
Do not use this unit in places where it may be exposed to oil fumes,
steam, high humidity, chemicals or dust. Water, oil, grime, humidity
or dust inside the unit may damage the internal components. It may
also cause malfunction, smoking or fire.
Stop using this unit, turn off the power and remove the batteries
immediately if any of the following occurs: water or a foreign object
entering inside the unit; damage to the outer case; overheating;
smoking; odor. Failure to do so may cause fire or electric shocks.
In case of lightening, disconnect the AC adapter from the outlet and
do not touch metallic parts of this unit or the batteries. Failure to do
so may cause electric shocks from a lightning strike.
Do not place this unit near electrical equipment that uses a high-
precision control device or weak electrical signal (including electronic
medical devices in your body). Failure to do so may cause
malfunction in the other equipment.
danger which will almost certainly result in death or
serious injury.

◆ For your safety
Failure to follow the instructions may result in
Caution
If liquid crystal leaks from the screen, do not handle with bare hands.
Doing so may cause skin irritation. Should hands or clothing come in
contact, wash immediately with water.
Do not insert a finger or metal object like a wire into the unit. Doing so
may cause personal injury and damage to the unit.
Keep out of the reach of children to prevent injury.
Do not leave the lens facing directly toward the sun or other source of
strong light. It may cause fire or damage internal components.
Do not use this unit inside a vehicle such as an airplane.
Electromagnetic waves emitted by this unit may interfere with the
vehicle. Do not use near medical instrument such as inside a hospital.
personal injury or physical damage to equipment and
surroundings.

◆ Notes on use
Do not use this unit for purposes other than skin analysis.
This unit is precision equipment. Do not drop or knock it against other objects.
If this unit is subjected to any strong shocks, it may result in malfunction.
Do not place or use in a location where it will be exposed to grime or dust.
They may get inside the sensor and damage the unit.
Only use the included lithium-ion rechargeable batteries, and set them in the
correct direction. Failure to do so may cause overheating, fire and damage.
When used for an extended period of time, Sensor may feel warm. This will
not affect performance or quality. If it feels unusually hot, turn off the power
and then remove the batteries.
Remove the batteries when the unit is not in use for a long time to avoid
leakage and loose connection.
If the unit has not been used for a long time, the battery may lose power
through self-discharge. Change it or charge before use.
Do not place on an unstable surface. Dropping may result in an accident or
injury.
A rapid change in temperature may cause condensation. If condensation
occurs, do not use the unit immediately. Wait until it is dry before use.
Do not use near a cell phone or a microwave treatment device. It may not
function properly due to magnetism.
When attaching a strap, use a durable one to prevent dropping the unit.
Dropping may damage the unit.
Do not use the USB cable for devices other than the specified device. It may
result in damage or malfunction.
◆ Cleaning instructions
Remove Rechargeable batteries.
Do not clean with solvent such as benzene or paint thinner.
Use a dry cloth to wipe the display screen.
Do not clean the interior of the camera inside the tip of Sensor. It may damage
the lens or the light, and result in malfunction.
◆ About wireless LAN (IEEE802.11a,

IEEE802.11b,IEEE802.11g,IEEE802.11n)
If the radio equipment uses the above listed 2.4GHz band channels, you can
use all the bandwidth and avoid channels used by radio-frequency
identification readers. It employs DSSS modulation method and OFDM
modulation method, and the interference range is 40m.
This unit uses the same frequency band as other industrial, scientific, and
medical equipment including a microwave oven, as well as radio-frequency
identification readers (radio stations requiring the license) and specified low
power radio frequency station (requiring no license) used in factories and
manufacturing lines.
1) Before using this unit, be sure there is no specified low power radio
frequency station or radio-frequency identification reader in use
nearby.
2) If this unit interferes with a radio-frequency identification reader,
immediately stop data transmission and contact Support Center for
further instructions.
Depending on your wireless LAN environment including the structure/material
of the building, obstacles, software and signal transmission, the speed of the
connection will vary. Note the connection may also slow down or be
interrupted.
Check with the airline before carrying this unit on an airplane.
◆ About the 5GHz band channels
This unit can use the 5GHz band. It uses the following channels. Note, in
Japan (Radio Act) and some countries, laws prohibit use of 5.2GHz and
5.3GHz bands outdoor.
• W52 (5.2GHz band/36,40,44,48ch)
• W53 (5.3GHz band/52,56,60,64ch)
• W56 (5.6GHz band/100,104,108,112,116,120,124,128,132,136,140ch)
Use of Wi-Fi is subject to local laws and regulations in your country/region.
◆Directive on Waste Electrical and Electronic Equipment
[WEEE] (2012/19/EU)
This product shall be compliant with WEEE marking requirements
(2012/19/EU).
Hereinafter, the CE marking indicates that this electronic equipment shall not
be waste as household waste.
manufacturer is compliant with all applicable legal requirements of the EU
“New Approach Directives” and European Regulations.
When they are disposed of within the European community, please contact
Europe of SHISEIDO.
Make sure the electronic equipment waste should not be disposed of in the
regular trash as household waste.
HSSⅡproducts are a built-in battery type.
If you are selling them in the E.U., you are required to provide the product
data complying with the “revised Directive on Waste Electrical and Electronic
Equipment [2012/19/EU].
Since the internal batteries of HSSⅡproducts cannot be replaced, when they
are disposed of, they are collected and disassembled in accordance with the
WEEE directive. Then, the batteries shall be recycled based on the WEEE
directive.
Thus, when the HSS products are disposed of within E.U., please contact
Europe of SHISEIDO.
When you need the “Product Data Sheet” related to the internal batteries
(issued by battery manufacturer), please ask for it to Europa of SHISEIDO.

◆ FCC / IC Compliment statement
Note : This equipment has been tested and found to comply with the
limits for a Class B digital device, pursuant to part 15 of the FCC Rules.
These limits are designed to provide reasonable protection against
harmful interference in a residential installation. This equipment
generates, uses and can radiate radio frequency energy and, if not
installed and used in accordance with the instructions, may cause
harmful interference to radio communications. However, there is no
guarantee that interference will not occur in a particular installation.
If this equipment does cause harmful interference to radio or television
reception, which can be determined by turning the equipment off and on,
the user is encouraged to try to correct the interference by one or more
of the following measures:
— Reorient or relocate the receiving antenna.
— Increase the separation between the equipment and receiver.
— Connect the equipment into an outlet on a circuit different from that to
which the receiver is connected.
— Consult the dealer or an experienced radio/TV technician for help.
Cet équipement a été testé et trouvé conforme aux limites pour un appareil
numérique de Classe B, conformément à la partie 15 des règles FCC.
Ces limites sont conçues pour fournir une protection raisonnable contre
les interférences nuisibles dans une installation résidentielle. Cet
équipement génère, utilise et peut émettre une énergie de fréquence radio
et, s'il n'est pas installé et utilisé conformément aux instructions, peut
causer des interférences nuisibles aux communications radio. Cependant,
il n'y a aucune garantie que des interférences ne se produiront pas dans
une installation particulière. Si cet équipement provoque des interferences
nuisibles à la réception radio ou télévision, ce qui peut être déterminé en
éteignant l'équipement, l'utilisateur est encouragé à essayer de corriger
les interférences en prenant une ou plusieurs des mesures suivantes :
- Réorientez ou déplacez l'antenne de réception.
- Augmenter la distance entre l'équipement et le récepteur.

-
Connecter l'équipement à une prise sur un circuit différent de celui
auquel le récepteur est connecté.
-
Consulter le revendeur ou un technicien radio/télévision expérimenté.
Operation is subject to the following two conditions: (1) this device may
not cause interference, and (2) this device must accept any interference,
including interference that may cause undesired operation of the device.
L'opération est soumise aux deux conditions suivantes: (1) cet appareil
ne doit pas causer d'interférences, et (2) cet appareil doit accepter toute
interférence, y compris les interférences pouvant entraîner un
fonctionnement indésirable de l'appareil.
RF exposure compliance
This transmitter must not be co-located or operating in conjunction
with any other antenna or transmitter.
Cet émetteur ne doit pas être localisé ou fonctionner avec toute autre
antenne ou émetteur.
Caution
Any changes or modifications not expressly approved by the party
responsible for compliance could void the user's authority to operate
the equipment.
Les changements ou modifications non expressément approuvés par
la partie responsable de la conformité pourrait annuler l'autorisation
d'utilisation de l'équipement.

Battery compartment
1. Components
Sensor
(Front)
(Back)
(Side) Connector cover
LED lamp
Power switch
Mode select button
Measurement button
Tip of Sensor
cover
Strap hole
(With Battery compartment cover open)
Close-up
Serial number
*It is printed on the
inside.
Cable hole cover
(With Connector cover open) (With Cable hole cover open)
*Turn off the power when removing
the Connector cover.
*Serial number is printed on Sensor (in Battery compartment) and on Sensor stand (on the back and the back of
the skin tone calibration plate).
MicroSD card slot
Cable hole cover
Cable hole
(The cable passes
through here.)
*If you remove Cable hole cover, store safely in a
packaging box.

Skin tone calibration
1. Components
Sensor stand
(Front)
Skin tone calibration plate
(Back)
USB connector
(With Skin tone calibration plate cover open) (Seen from the top)
Serial number
Cable guide
Serial number
Close-up
plate RGB Value
*Serial number and
the value shown
here are an
example.
Battery slot
Skin tone calibration plate
LED lamp

1. Components
USB cable, miscellaneous
AC adapter (for Sensor stand)
Ⓐ Connector for Sensor stand
Ⓑ Connector for AC adopter
AC – USB adopter
USB cable (for Sensor, with a bushing)
Rechargeable battery (2 pcs)
Insert each battery to Sensor and
Sensor stand.
Locking screw
*Use when you connect the cable to Sensor
stand.
Ⓐ Connector for Sensor
Ⓑ Connector for the designated device
*Use when you connect Sensor to the
designated device. Contact Support
Center before use.
Connector stopper
Locking screw and Connector stopper
are attached to Sensor stand.
*Do not lose any parts including the packaging box.

2. Setting up (Sensor stand)
1. Connect AC adapter (for Sensor stand) to Sensor stand.
USB connector
2. Loosen Locking screw, secure USB connector with Connector stopper,
and then tighten Locking screw.
Locking screw
Connector stopper

2. Setting up (Sensor stand)
3. Insert the cable on AC adapter (for Sensor stand) through Cable guide.
*Handle with care and do not damage the cable.
Cable guide
4. Place Sensor stand on a flat surface.
Plug AC adapter into an electrical outlet.
Electrical outlet
Caution
Only use included AC adopter (for Sensor stand). Using other AC
adopters may result in damage and malfunction of Sensor and Sensor
stand.

3. Charging Sensor
1. Slide Sensor in from the top of Sensor stand to place it properly.
Caution
Sensor will not charge if it is placed in a
wrong direction or not set in place properly.
2. Sensor stand will charge the battery inside Sensor.
LED lamp
LED lamp indication
Charging - LED lamp on Sensor
turns red.
Fully
charged
- LED lamp on Sensor
turns green.
Caution
If you place Sensor on Sensor stand while it is turned off, it will still charge
but LED lamp will not turn on.

w the direction indicated by
4. Charging Rechargeable battery
1. Insert Rechargeable battery into Sensor stand in the correct direction.
Follo
the triangle.
The indentation on the left
Caution
It will not charge if it is inserted in a wrong
direction.
2. Sensor stand will charge it.
LED lamp indication
LED lamp
Charging - LED lamp on Sensor
stand turns red.
Fully
charged
- LED lamp on Sensor
stand turns green.
Caution
If Sensor is on Sensor stand at the same
time, it will charge Sensor but not the
inserted Rechargeable battery. LED lamp
on Sensor stand will blink in green.

5. Changing Rechargeable battery (Sensor)
Warning
Never use Rechargeable battery if it is inflated.
It may cause overheating, fire or explosion.
1. Remove Battery compartment cover.
Push the corners of Battery compartment
cover with your fingers and slide until a gap
opens at the bottom.
Lift Battery compartment cover to open.
Remove Rechargeable battery.
Caution
Turn off the power when removing the Battery compartment cover.

5. Changing rechargeable battery (Sensor)
2. Insert fully charged Rechargeable battery.
Be sure to insert rechargeable battery to
the battery compartment with triangle mark
on battery matches to the same mark in
the housing as shown.
Also, you may find slotted groove on the
left side on the battery.
Fully insert Rechargeable battery.
3. Close Battery compartment cover.
Follow the direction 1 in reverse order and
close tightly.
Caution
Assembly which is not specified in this chapter may cause
damage or malfunction of the products.

◆ Troubleshooting
Sensor
Symptom Solution
Check
• Is Rechargeable battery correctly inserted to Sensor?
• Is it charged?
It does not turn
on.
When it turns on,
the skin tone
calibration screen
appears.
It stopped working
during operation.
(The screen
froze.)
The screen
display does not
look right.
The screen is
blank/ the display
disappeared.
Solution
• Change to charged Rechargeable battery.
• When you turn it on, press down on Power switch for 2-3
seconds.
The Handy Skin Sensor logo will appear.
Solution
• When you first turn it on for the day, the skin tone calibration
screen appears. After the second time, the top page will
appear.
Solution
• Turn it off, and turn it back on again.
*If it does not turn off, remove Rechargeable battery.
Solution
• Turn it off, and turn it back on again.
*If it does not turn off, remove Rechargeable battery.
Check
• If the unit is left unused for a while, it automatically goes into
standby and turns off the screen. Is LED lamp blinking in
white (standby mode)?
Solution
• Press Power switch on Sensor to check if the screen comes
back on.
• Turn it off, and turn it back on again.
*If it does not turn off, remove Rechargeable battery.

◆ Troubleshooting
Sensor
Symptom Solution
Check
• Is the brightness of the screen set too low?
• Is there a strong source of light nearby?
The display is
dark.
I cannot turn it off.
Solution
• Change the brightness. (For instructions on how to change
the setup, refer to Counter Utilization Manual.)
• Try using away from the strong source of light.
Solution
• Press down on Power switch for 5 seconds.
*If it does not turn off, remove Rechargeable battery.
I cannot change
the mode with
Mode select
button.
Sensor is on
Sensor stand but
it is not charging.
Solution
• Turn it off, and turn it back on again.
*If it does not turn off, remove Rechargeable battery.
*Mode select button only works on the enlarged shooting
screen.
Check
• If you are using a power strip, is it plugged into an electrical
outlet properly?
• Is AC adapter connected to Sensor stand and an electrical
outlet properly?
• Is Sensor placed on Sensor stand properly?
• Is Rechargeable battery inserted properly in Sensor?
Solution
*If Battery compartment cover is off, Sensor will not charge.
*LED lamp turns red when Sensor is charging.

◆ Troubleshooting
Sensor
Symptom Solution
The result value
of Skin Tone
analysis is
displayed on an
extreme position
like corners of the
screen.
LED lamp on
Sensor is flashing
in red.
Sensor stand
Symptom Solution
LED lamp on
Sensor stand is
flashing in red.
Check
• Do the serial number for Sensor and the serial number for
Sensor stand match?
Solution
• Make sure to pair Sensor and Sensor stand by the serial
number and calibrate skin tone from the setup screen. (To
find the serial number, refer to p7-8 of this manual.)
Solution
• There is a problem with recharging (overloaded current,
overheating). Stop use immediately. Remove Sensor from
Sensor stand and unplug AC adopter from an electrical
outlet. Contact Support center.
Solution
• There is a problem with recharging (overloaded current,
overheating). Stop use immediately. Remove Sensor from
Sensor stand and unplug AC adopter from an electrical
outlet. Contact Support center.

◆ USB connection with the designated device
1. To connect the designated device, use USB cable (for Sensor, with a
bushing).
2. Remove Battery compartment cover, and remove Rechargeable battery
and Cable hole cover.
3. Connect the correct end of USB cable
(for Sensor, with a bushing). As
illustrated, circle once inside the
compartment and securely place the
bushing.
USB Connector
Bushing
4. Fully insert Rechargeable battery back in
place, and close Battery compartment
cover.
Rechargeable
battery
Caution
Rechargeable battery must be inserted to
connect.
5. Connect the other end of USB connector to the designated device.
Caution
Turn off the power when removing the Battery compartment cover.

◆ Specifications
Connected to wireless LAN, with
Not connected to wireless LAN,
Sensor
Measure mode Texture / Polarized / Skin Tone
Screen size Approx. 43 times (With 14-inch monitor)
CMOS Camera
Optical lens
Lighting
OS Android 5.1.1
CPU ARM Cortex A9 Dual 1GHz
Memory
LCD
Touch panel Capacitive
Wireless LAN
External interface
Power consumption Approx. 2W
Power source
Battery life
(When fully charged)
LED lamp indication
Weight Approx. 200g (without battery)
Dimensions Approx. 64 (W ) × 171 (H) × 58.6 (D) mm
Imaging element ¼ inch CMOS camera sensor
Pixel size 5.55 × 5.55 μ m
Pixel count 640 (H) × 480 (V) pixel
Element 3 group/ 4 element
F value 8.0
Optical magnification 0.58x
Lamp type Super Luminosity White LED/DIP implementation
Texture mode
Polarized mode
Skin tone mode
Main storage capacity 1GB DDR3
Internal memory Micro SD 8GB (Micro SD slot Primary)
Screen size 4.0”TFT LCD
Resolution 480 × 800
Displayable colors 260,000
Correspondence standards IEEE802.11a, b, g, n (2.4 / 5GHz)
Security WEP, WPA2/AES
Access method
USB (Micro-B type) 2-port
microSD
Lithium-ion rechargeable battery *Capacity3120mAh
(Included)
Full operation
(
lights on, and shooting)
Standby
(
with lights off)
LED off Power OFF
Red Charging
Green Power on
White Standby (Power ON/Charging/Abnormal)
Blinking in red Abnormal (Overloaded current/Overheating)
8 lights / Lamp type
8 lights / Lamp type
8 lights / Lamp type
Infrastructure
Wireless LAN access point (2.4GHz)
Approx. 70 minutes
Approx. 6 hours

◆ Specifications
Sensor stand
LED off Not connected to power
LED lamp indication
Power source Via AC adapter
Weight Approx. 330g (without AC adapter or cable)
Dimensions Approx. 82 (W ) × 62 (H) × 176 (D) mm
AC adopter (for Sensor stand)
Connector
Length 1.5m
Input voltage 100-240V
Output voltage 5VDC
Output current 1.8A
Weight Approx. 69g
Dimensions Approx. 51 (W ) × 19 (H) × 48 (D) mm
USB cable
For Sensor, with a
bushing
Rechargeable battery (Lithium-ion rechargeable battery)
Capacity 3120mAh (70 minutes in full operation)
Weight 60g
Dimensions Approx. 43 (W) × 69 (H) × 12 (D) mm
Charge time Less than 4 hours (Empty → Full charge)
Red Charging the battery in Sensor stand
Green Connected to power
Blinking in green Charging Sensor
Blinking in red Abnormal (Overloaded current/Overheating)
ⒶFor an electrical outlet: plug ⒷFor sensor: Micro B type
A type ⇔Micro B 1m
Ⓐ For Sensor: Micro B type ⒷFor PC: A type

◆ Specifications
Equipment Name: Handy Skin Sensor Ⅱ
Model Name: HSSⅡ
U.S.A
FCC ID: 2AO35-HSS2
Canada
IC: 23766-HSS2
 Loading...