

Morita Tri Auto ZX2 Quick Manual
Tri Auto ZX2 Quick Guide
Preparation
see back page
Treatment
Do not fail to read the Operation Instructions before using this instrument.
To create a smooth path
for canal shaping.
Maintenance
see back page
⹅Parts Identification
Main Switch
File Holder
Contrary Electrode
⹅Basic Operations
●Turn Power On
●Turn Power Off
●Memory Selection
Set Switches ( )
Select Switch
Hold down
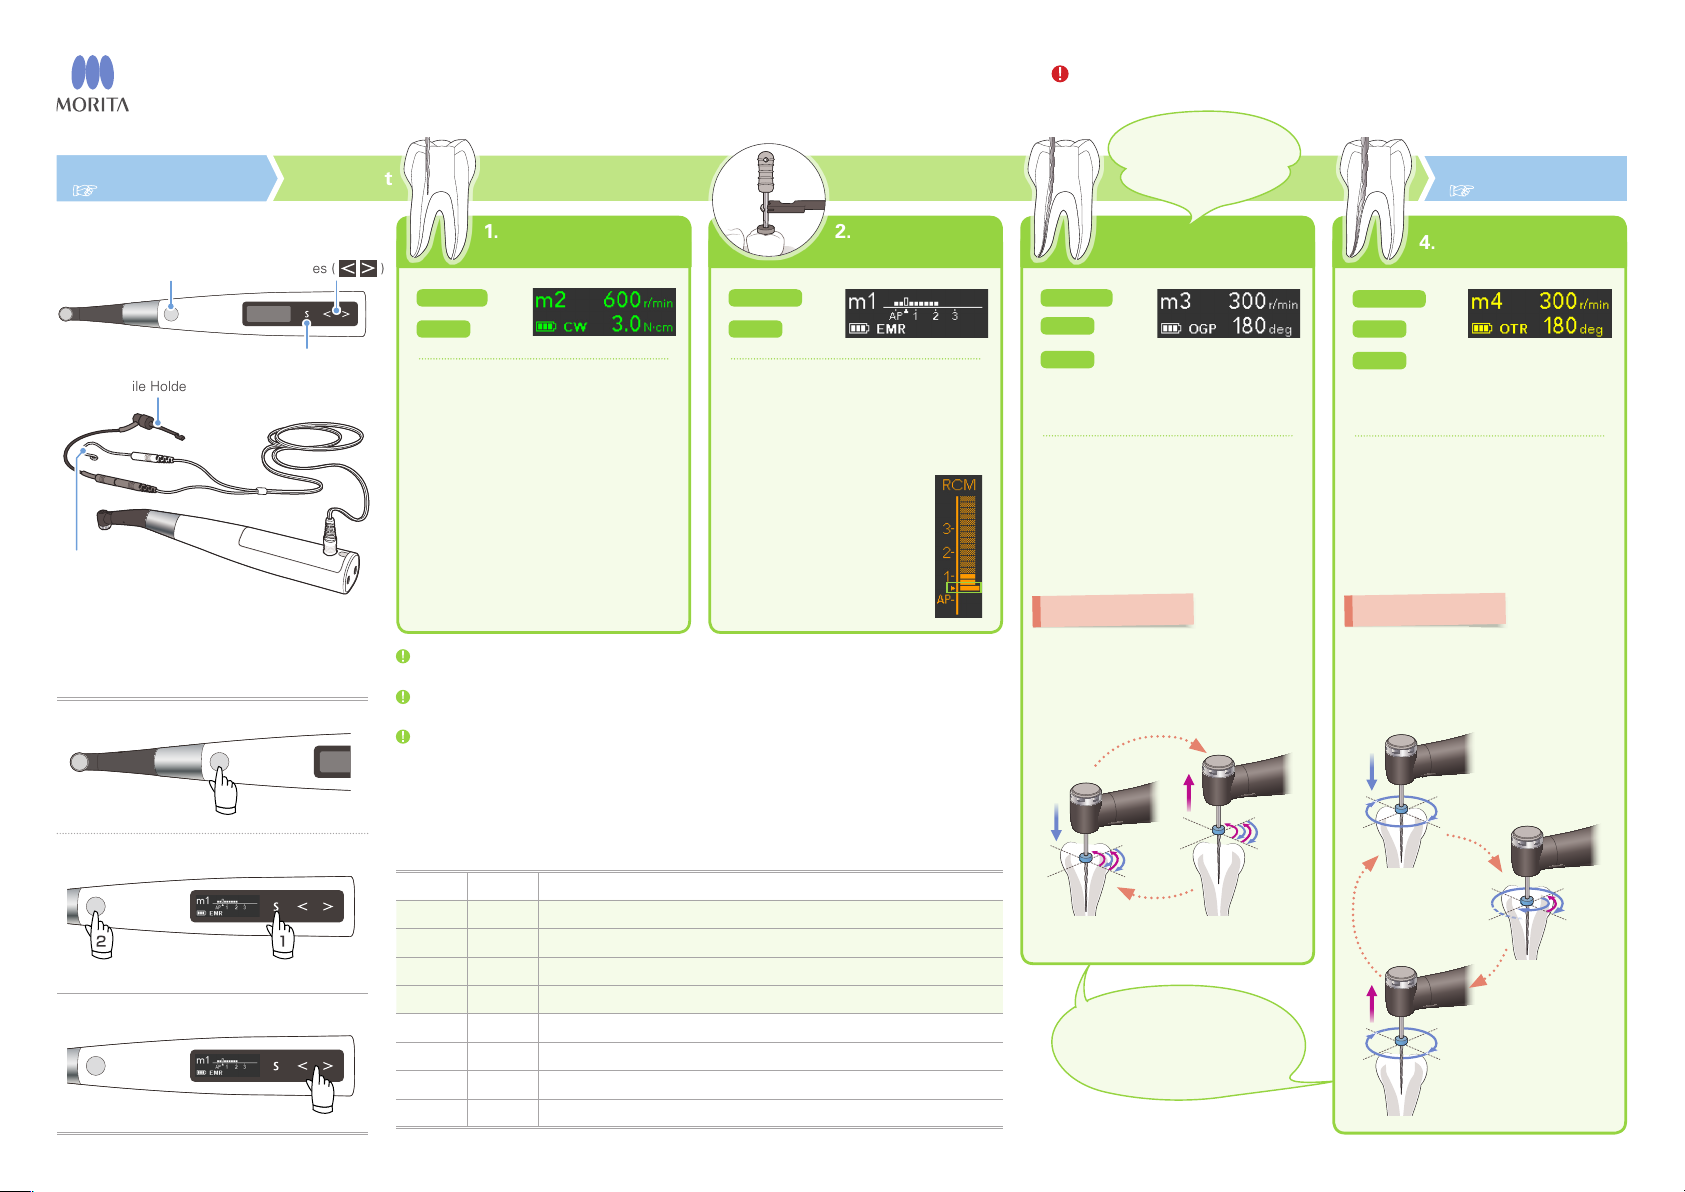
1. Shape Upper Part
of Canal
Memory
Mode
1. Turn power on.
2. Select memory “m2”.
3. Install a file.
4. Shape upper part of the canal.
m2
CW
The Main switch is used to start and stop
the motor.
Memory
Mode
1. Select memory “m1”.
2. Hook the contrary electrode in
the corner of the patient’s mouth.
3. Clip the file in the file
holder.
4. Advance the file to 0.5
meter bar, and then po-
2. Canal
Measurement
m1
EMR
sition a rubber stopper.
For canals that are hard to measure, refer to “Canal Shaping (for
Instructions.
Use only files that are designed for clockwise filing. Use files very carefully and follow all the recom-
mendations of the manufacturer.
These instructions are for the default settings. If you change the settings, use the instrument accord-
ing to your own treatment procedures.
canals)” in the Operation
complex
⹅Default Settings
Almost all canals can be treated with the memories from m1 to m4.
●Default Memory Settings and Main Uses
Memory Mode Main Uses
m1 EMR
m2 CW
m3 OGP
m4 OTR
m5 OGP
m6 OGP
m7 OTR
m8 CCW
Canal measurement
Shape the upper part of canal.
Negotiation and making a glide path for a normal canal.
Canal shaping for a normal canal.
Negotiation and making a glide path for a complex canal
Making a glide path for a complex canal
Canal shaping for a complex canal.
Injection solutions such as calcium hydroxide, etc.
3. Glide Path 4. Canal Shaping
Memory
Mode
Files
• Nickel-Titanium: #10 – 20(t02)
• Stainless Steel: #10 – 15(t02)
• Glide path files
1. Select memory “m3”.
2. Install a file.
3. Hook the contrary electrode in
4. Make the glide path.
Repeat pressing lightly for 1 second and then pulling back.
Press lightly Pull back
m3
OGP
the corner of the patient’s mouth.
Hint
●Pecking Motion (for OGP)
Thoroughly wipe off all debris
stuck to the file.
Memory
Mode
Files
m4
OTR
• Nickel-Titanium:
#20 and larger shaping files
1. Select memory “m4”.
2. Install a file.
3. Hook the contrary electrode in
the corner of the patient’s mouth.
4. Perform canal shaping.
Hint
●Pecking Motion (for OTR)
Pull back when OTR action is triggered and then repeat.
Inserted in canal
With light load
(normal CW rotations)
With heavy
load, OTR action
is triggered.
Pull back quickly
Tri Auto ZX2 Quick Guide
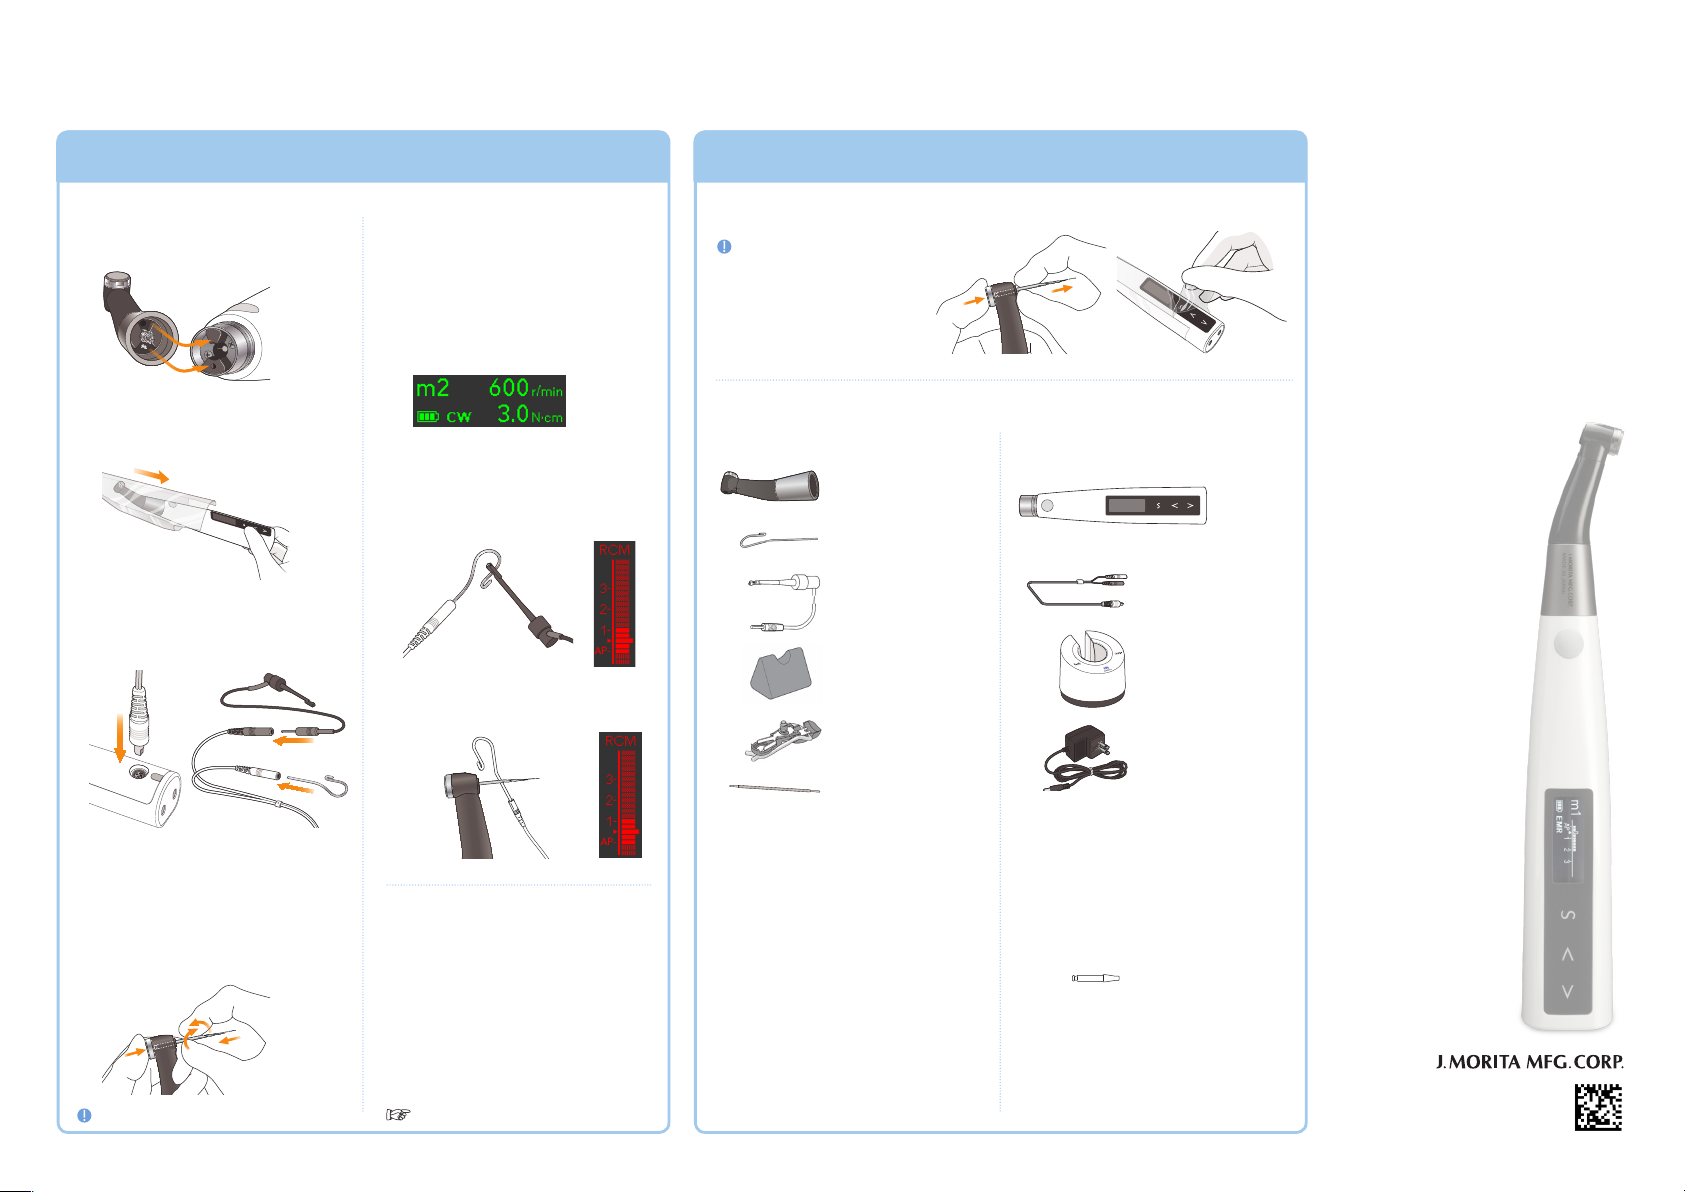
Preparation After Use and Maintenance
⹅Component Assembly ⹅Checking the Function
1. Connect the contra angle.
2. Put on a HP protective sleeve.
A new sleeve must be used for each
patient.
3. Connect the probe cord.
Connect the file holder to gray connector and the contrary electrode to
white one.
1. Turn power on.
2. Select memory “m2”.
Press the Main switch and make
sure the motor runs smoothly.
* Any memory except EMR mode may
be used.
3. Touch the contrary electrode
with the clip on the end of the
file holder and check that all the
indicator bars on the meter in
the LCD display light up.
4. Touch the contrary electrode
with the file and check in same
way.
⹅After Use
Always turn the instrument off.
1. Remove the file.
2. Take off the HP protective
sleeve.
3. Charge the battery.
⹅Maintenance
●Autoclavable Components
Contra Angle
Contrary Electrode
File Holder
Handpiece Holder
External File Electrode
(with cap)
Long File Holder
●Components Sterilized with Ethanol for Disinfection
Motor Handpiece
Probe Cord
Battery Charger
AC Adapter
4. Install a file.
Hold down the push button on the
contra angle and insert the file. Turn
the file back and forth until it is lined
up with interior latch groove and slips
into place.
Release the button to lock the file into
the contra angle.
2
1
Make sure the file will not come out.
3
⹅Calibration
Calibrate the instrument at the following
times:
• Right after purchase.
• Whenever the contra angle has been
replaced.
• Whenever, in OTR mode, the instrument
always alternates between forward and
reverse rotation and never rotates forward
continuously.
“Calibration” in the Operation Instructions.
1. Wash with running water and dry.
2. Use a threeway syringe etc. to blow
dry all moisture.
3. Wipe the components with a piece
of gauze that has been dampened
with Ethanol for Disinfection (Ethanol 70 to 80 vol%) and wrung out
thoroughly.
4. Lubricate only the contra angle with
the LS spray (LS oil).
5. Put components in individual autoclave pouches.
6. Autoclave the components.
* 134°(273.2° F) for at least 6 minutes or
121°(249.8° F) for at least 60 minutes.
1. Wipe the components with a
piece of gauze that has been
dampened with Ethanol for Disinfection (Ethanol 70 to 80 vol%)
and wrung out thoroughly.
●Component Washed and Sterilized with Ethanol for Disinfection
Guide Bur
1. Wash with running water and dry.
2. Wipe the components with a piece
of gauze that has been dampened
with Ethanol for Disinfection (Ethanol 70 to 80 vol%) and wrung out
thoroughly.
Man ufa ctu red by
Pub. No. : K316-80009-500
Printed i n Japan
 Loading...