


ISSUE 9 JULY
2006
120-101
DOCUMENT
CREASING/FOLDINGMACHINE
MorganaSystemsLimited UnitedKingdom
Website:www.morgana.co.uk
Telephone: (01908)608888 Facsimile:(01908)692399
OPERATORS MANUAL

Page2
INDEX
INTRODUCTION&SPECIFICATION
PAGE4
THEDIGIFOLD
5
THECONTROLPANEL
6
7
QUICKSTARTGUIDE8
17
17
17
18
18
18
18
19
20
21
21
22
22
22
23
THEDELIVERYUNIT
24
THEBLADEASSEMBLY
25
25
TheMorganaDigifold
LabeledPhotograph
Detaileddiagramanddescription
Featuresonthecontrolpanel
AdjustingthePapergate
SettingtheSuctionSlot
SettingtheAdjustableSideLay
SettingtheBack-Stop
SettingtheAirDistribution
SettingtheAirSeparationPressure
SettingthePositionsofDriveWheelsandHubs
SettingtheExtensionTable
SettingtheDeliveryConveyorSystem
AdjustingtheBatchCount
AdjustingtheRollerGap
StoringPrograms
ReadingStoredPrograms
ClearingStoredProgram
FeedingSheetsManually
SettingtheDeliveryConveyorSystem
Adjustingthebladepressure
Adjustingthebladealignment
OPERATINGTHEDIGIFOLD
10
12
14
16
AccessingMenus.
SetbyFold
SetbyPosition
ExampleofSetbyPosition
CREASING/FOLDING

Page3SYSTEM
INDEX
Digifold
REPLACINGCREASINGBLADESETS
PAGE27
28
‘Crunch’32
32
DISPATCHKIT(120-95-01)34
ACCESSORIESANDOPTIONS35
RECOMMENDEDSPARES36-38
Installingnewbladesets
SpareBlades
Displayreads
FoldBladerelocation.
TROUBLESHOOTING
29
29
29
29
30
30
30
31
31
‘h’31
‘ClipP’32
‘Clip1’32
‘Clip2’32
33
MACHINECALIBRATIONHISTORYSHEET39
Papercreaseoutofsquare
Paperfoldoutofsquare
PaperJamming
Machinewillnotstart
Papernotfeeding
Machinenotcounting
Crackingoftheprintedmaterialalongthecrease
Papermarkingorscratching
Nosuction
Displayreads
Displayreads
Displayreads
Displayreads
Recommendedweeklyoperatormaintenance

INTRODUCTION
INTRODUCTIONANDSPECIFICATION
must
DigiFold
DigiFold
IMPORTANT
isaregisteredtrademarkofMorganaSystemsLtd.Theuniquepatented
creasingandfoldingsystem,makesitpossibletofoldmostdelicatestocksfrom90gsm,
uptoandoftenabove300gsm.Thereducesthepossibilityofscratching,marking
orcrackingappearingonthesubstrate,asisoftenassociatedwithconventionalfolding
machinemethods.Amaximumpaperweightcannotbespecified,asthiscanbegoverned
bythehardnessofthesubstrateorthetypeoffoldrequiredtobeproduced.
Itistonotethattopreventcracking,whenusingdryinkortonerbasedprint
engines,thematerialbefullyacclimatisedforatleast48hoursbeforeputtingan
imageontothepaper.
FeedingSystem................................................Bottomsuctionfeed
Max.SheetSize................................................630mmx330mm
Min.SheetSize.................................................140mmx160mm(dependantonstiffness
ofpaperandtypeoffold).
Max.PaperWeight...........................................300gsm(variesaccordingtohardness,
typeoffold,andsubstrate).
Min.PaperWeight............................................120gsm
Max.No.CreasesperSheet............................9
Max.No.FoldsperSheet..................................2
Max.No.StoredProgrammes...........................6
Min.RepeatCreaseDistance...........................4mm(dependingonpaperweight)
Min.RepeatFoldDistance................................70
Min.CreaseDistancefromLeadingEdge........25mm
Min.FoldDistancefromLeadingEdge.............70mm(dependingonpaperweight)
SpeedperHour(A4Material)OneCreaseorOneFold..........1800sheets
SpeedperHour(A4Material)TwoCreasesorTwoFolds......1400sheets
IMPORTANT
Note:
theoperatingenvironmentshouldbecontrolledtoatemperaturebetween
16°Cand27°CMaximum.
mm(dependingonpaperweight)
Min.CreaseDistancefromTailEdge...............25mm
Min.FoldDistancefromTailEdge....................70mm(dependingonpaperweight)
Max.FoldLength..............................................560mm
Min.FoldLength...............................................70mm
SpeedperHour(A4Material)OneCrease&OneFold..........1800sheets
SpeedperHour(A4Material)TwoCreases&TwoFolds.......1400sheets
SpeedperHour(A3Material)OneCreaseorOneFold.........1440sheets
SpeedperHour(A3Material)OneCrease&OneFold..........1440sheets
SpeedperHour(A3Material)TwoCreasesorTwoFolds......1200sheets
SpeedperHour(A3Material)TwoCreases&TwoFolds......1200sheets
Dimensions.......................................................L:1830mmH:1185mmW:555mm
Weight...............................................................180Kgs(+50Kgspacking)
PowerRequirement..........................................1phase220/240v
+
Specification
Theproductionspeedvariesaccordingtothematerialsizeand
thenumberofcreasesorfoldsonthesheet.
Page4
CREASING/FOLDING

DOCUMENTCREASING/FOLDINGMACHINE
Keytophotographbelow
6Airdistributionknob11PaperGate
2Deliveryassembly7Adjustablesidelay12ExitGuard
3Suctionslotknob8Backstop13HighLevelDisplay
4Controlpanel9Fixedsidelay14Extensiontablefixing
5Airseparationknobscrews
Page5SYSTEM
14
6
7
11 13
5
4
3
2
12
9
8
Digifold
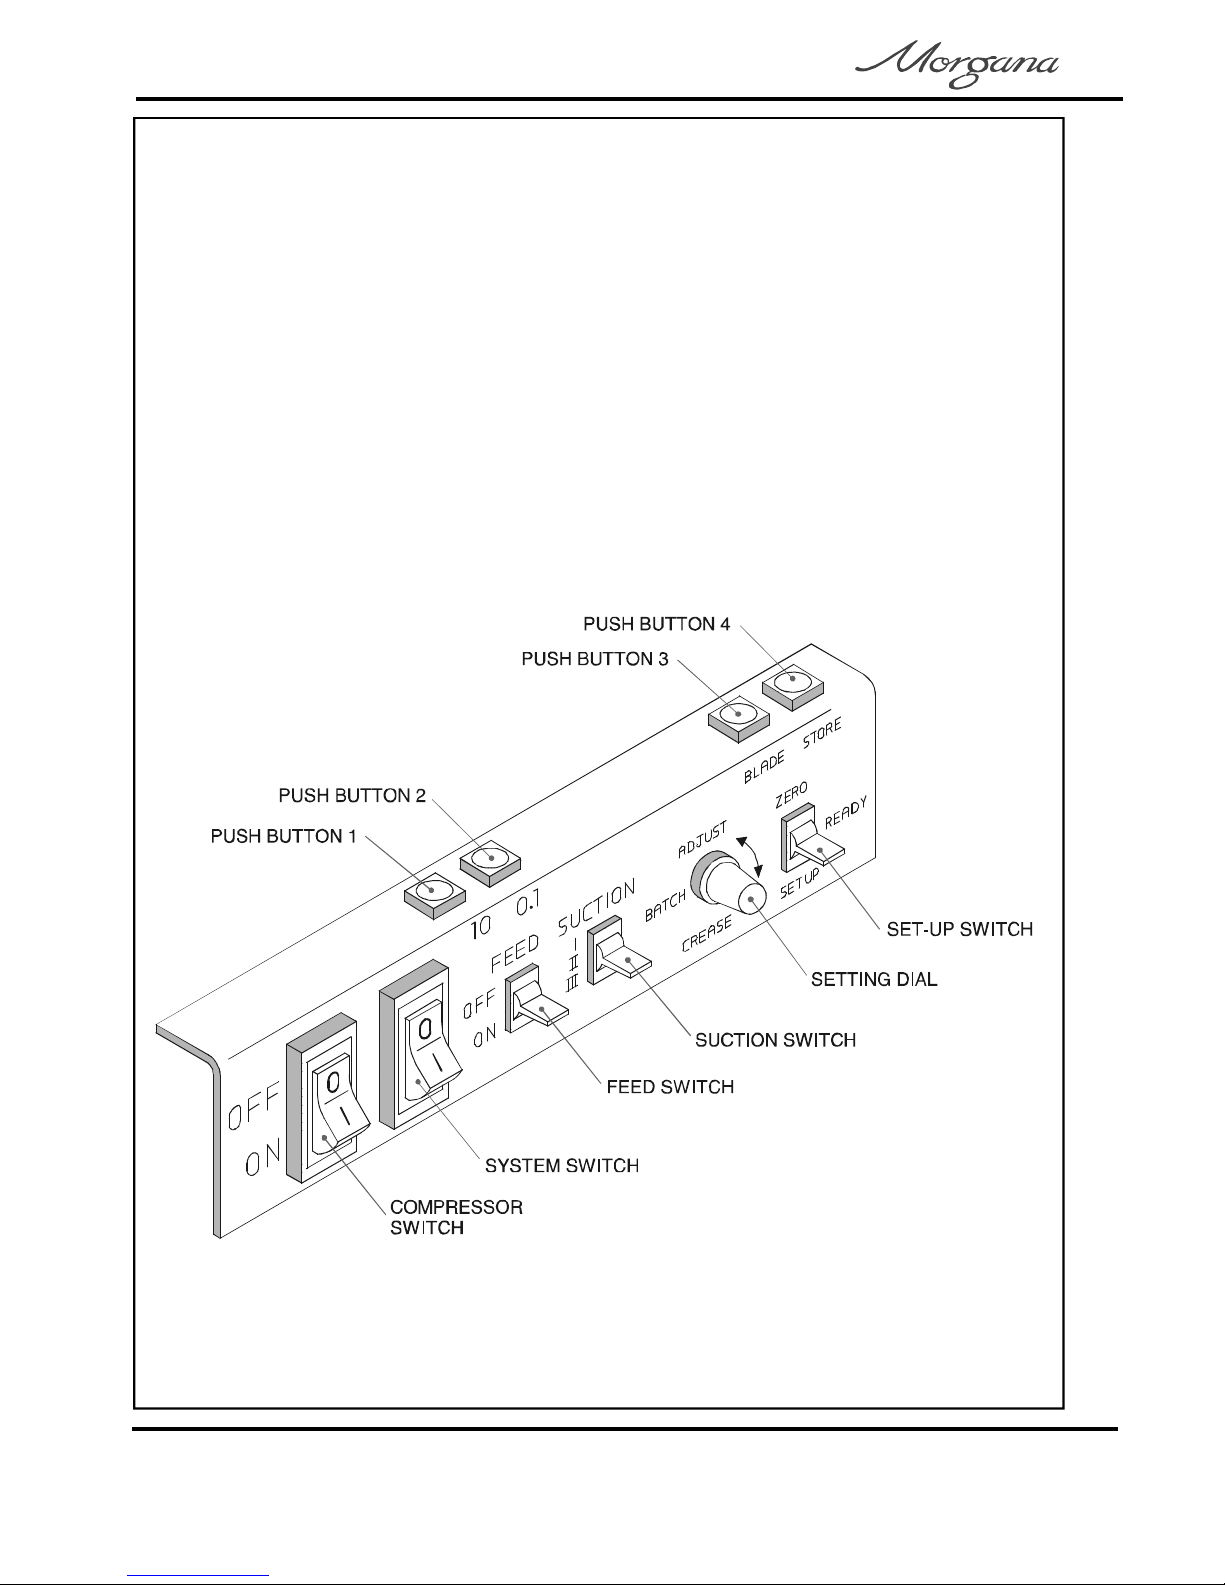
TheControlPanel
TheControlPanelontheDigifoldallowstheoperatortoread,edit,create
andinitiatenumerouscreasing/foldingprogramswithinthememory.
Thetopfaceofthecontrolpanelhousesfourpushbuttonsasshowninthe
diagrambelow.Forthepurposesoftheinstructionsthesebuttonswillbe
describedas.
ThefrontfaceofthecontrolpanelhousestheCompressorswitch,
Systemswitch,Feedswitch,Suctionswitch,SettingdialandSet-upswitch.
UnderthecontrolpanelisanindustrystandardEmergencyStopswitch
whichwillstopallpowergoingtothemachinewhenactivated.
PushButtons1,2,3,4
Page6
CREASING/FOLDING

FeaturesontheControlPanel
PushButton1
PushButton2
PushButton3
PushButton4
Set-upswitch
Settingdial
Suctionswitch
Feedswitch
Systemswitch
Compressorswitch
Usedforadjustingacrease/foldpositioninincrementsof10mmwhenusedwith
thesettingdial.
Alsousedforinchingfeedforwardwheninhandleorcrunch/Clip1orClip2
situation.
Usedforadjustingacrease/foldpositioninincrementsof0.1mmwhenusedwith
thesettingdial.
Usedforlocatingthebottombladeoranviltoits‘TopDeadCenter’positioninorder
tosetthebladepressure(whilstthesystemswitchison).
Alsousedtoreturnthecreaserbladetothe‘Home’positionaftera‘Crunch’if
required.
Allowstheoperatortosaveacreatedprogram.Whenalsousedwiththesetting
dialtheoperatorcanscrollthroughthestoredmemoryaddresses.
Alsousedforcyclingthefolderblade/feedforward.
Allowstheoperatortoenterandsubsequentlyeditorreadastoredprogram.Also
resetsthebatchquantity.
Allowstheoperatortoscrollthroughstoredmemoryaddressesandprograms,
increaseordecreasethebatchquantityandsetacrease/foldposition.
Allowstheoperatortovarythelengthofsuctiononthesheetofpaperbeingfed.
PositionIForveryshortsheets.
PositionIIForshortnon-standardsheets.
PositionIIIForallstandardsizesheets,generalpurpose.
Allowstheoperatortostartandstopfeedingsheets.
Whenactivatedthesystemswitchwilloperatethemotorsinordertobeginthe
creasing/foldingsequence.
Allowstheoperatortoswitchoffthecompressorunitinordertoutilizethemachine
tomanuallyfeedsheets.
Alsousedforinchingfeedinreversewheninhandleorcrunch/Clip1orClip2
situation.
TheControlPanel
Page7SYSTEM
Digifold

QuickStartGuide
Settingthemachinetooperateinautomaticmode.
(i.e.,SetbyFold’)
Tomanuallyfeedsheetsseeinstructionsonpage23.
T
1.Setthegapbetweenthepapergateandthevacuumrollerto
approximatelytwicethethicknessofthestocktobecreased.
(Seepage17)
2.Placethestocktobecreasedontotheloadingtableagainstthe
fixedsidelay.(Seepage17)
3.Releasetheclampsontheadjustablesidelayandslideuptothe
paperstackallowingagapofapproximately0.5mm(1/64inch)
betweenthepaperandthesidelay.(Seepage17)
4.Placethebackstopontotheadjustablesidelayandslideupto
thepaperstack,alsoallowingagap(asstatedintheabovestep)
beforeclamping.(Seepage19)
5.Nowfollowthestepbystepinstructionsshownonpage9.
o‘SetbyPosition’seeinstructionsonpage14.
Page8
CREASING/FOLDING
Step1
Step4
SETFOLD&CREASE
(’on’or‘off’)
Mid-Posn.
Step3
SETMACHINETO‘SETBYFOLD’
(’SEtFoLd’or‘SEtPos’)
SETPAPERLENGTH
Step8
Step9
Step10
Step6
Step5
SETFOLDTYPE
Step7
QuickStartGuide
TurntheEmergencyStopbuttonclockwise
toswitchthepoweron.
SettheSetUpswitchtoitsMid-position.
TurntheSettingDialclockwiseuntilthe
displayreads‘SEtFoLd’or‘SEtPos’,flick
theSetUpswitchupwardstochangefrom
onetotheother.
TurntheSettingDialanti-clockwiseuntilthe
displayreads‘CrEES’or‘FoLd’,flicktheSet
Upswitchupwardstoselect‘on’or‘oF’for
eachasrequired.
TurntheSettingDialanti-clockwiseto
selecttheMaindisplay,flicktheSetUp
switchdown,pressthepushbuttonandturn
theSettingDial.
FlicktheSetUpswitchuptoitsMidposition
SwitchtheSystemswitchon.
SwitchtheCompressorswitchon.
SwitchtheFeedswitchontobeginfeeding
sheets
Step2
OPERATION
INSTRUCTIONS
SelectTypIcal
MainDisplay
LcF10 tYPEL
Typical
Display
ToChangeFoldType
LEn100.0
Typical
Display
ToChangePaperLength
TurntheSettingDialclockwisetoselect
‘LEn’,pressthepushbuttonandturnthe
SettingDialtosetthepaperlengthin10mm
or0.1mmincrements.
Page9SYSTEM
Digifold
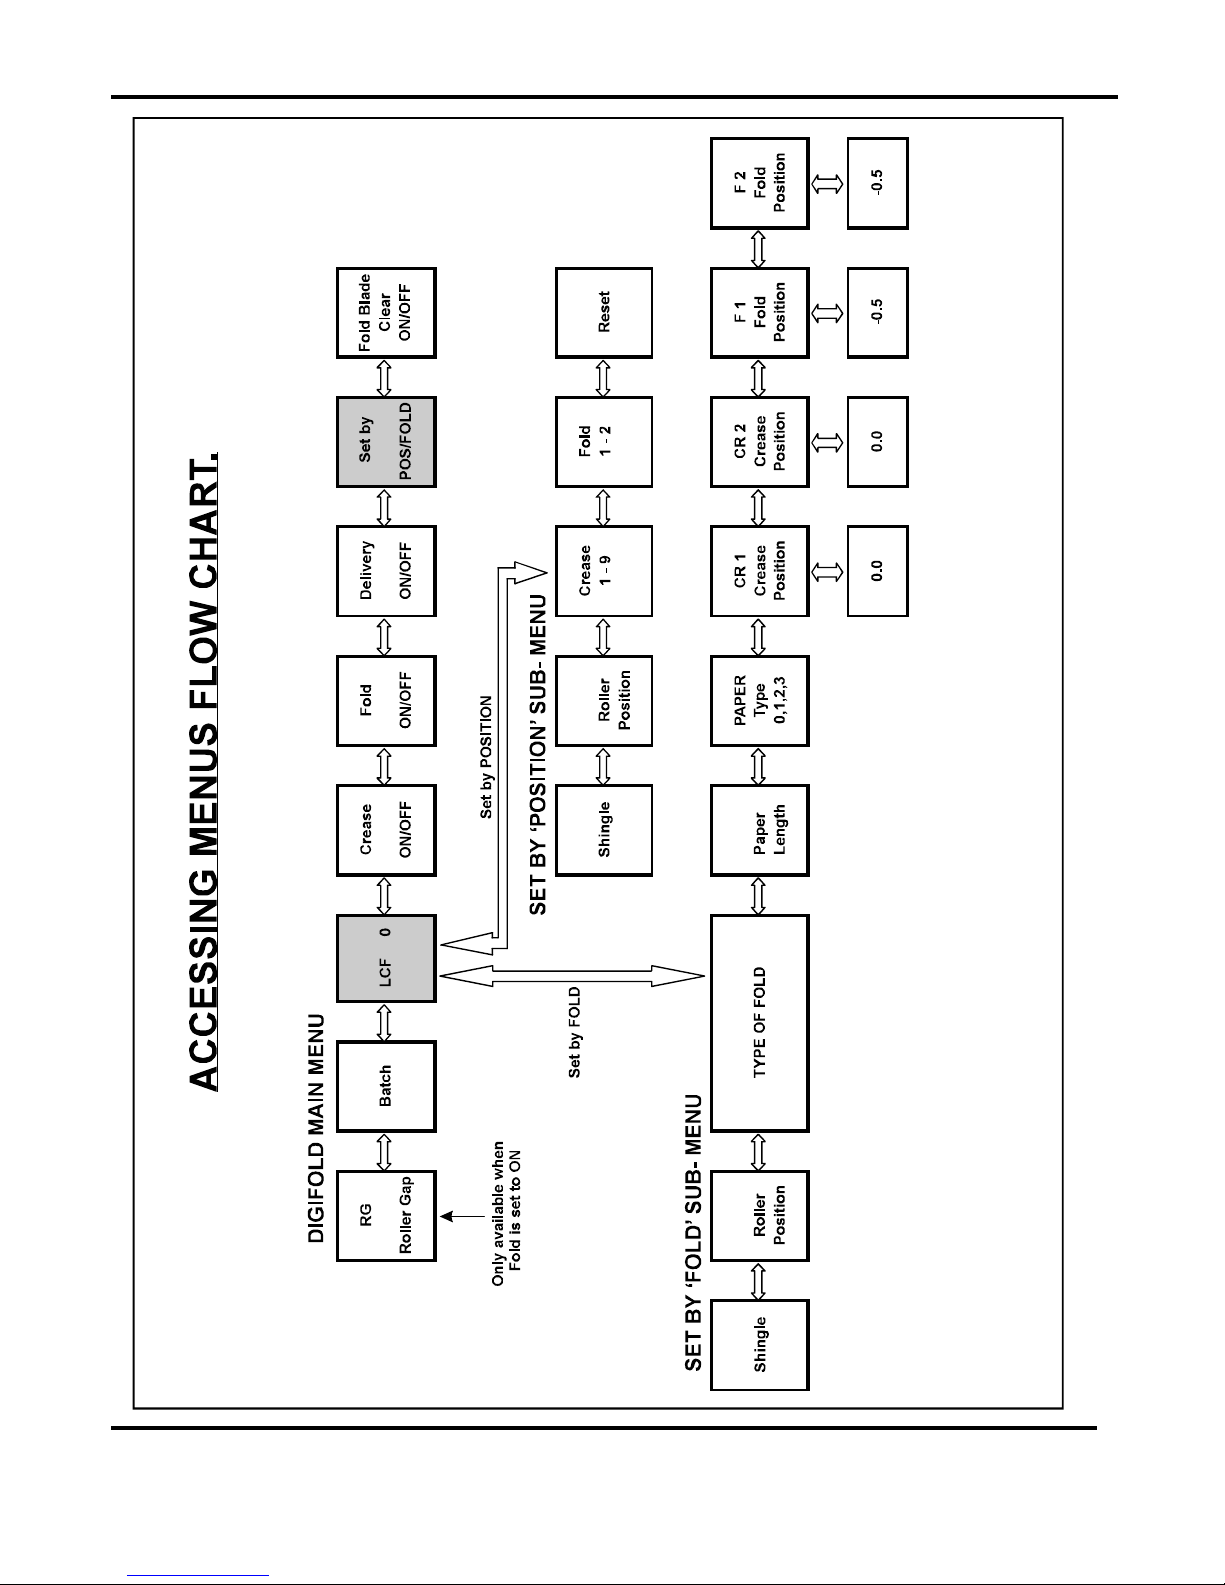
AccessingMenus.
MainMenu.
1.Themainsswitchonthemachinemustbeoff.
2.Setthetoitsmidpositionandthenturnthemainsswitchon.
3.Thefunctionscanthenbeaccessedbyturningthe
clockwiseoranti-clockwiseasshown.
Set-upSwitch
MainMenuSettingDial
CrEESon/oF=creaseonoroff
FoLdon/oF=foldonoroff
dELrYon/oF=deliveryonoroff
SEtPoS/FoLd=setbypositionorsetbyfold
bAt=batch
rG.00.00=rollergap
Sub-menus.
Set-upswitch
SettingDial
Toaccessthesub-menusflickthetothedownpositionandturnthe
clockwiseoranti-clockwise.
1Cr=creaseposition1
9Cr=creaseposition9
F1=fold1position
F2=fold2position
rPoS=deliveryrollerposition
Shin=shingle(amountdeliverywheelturns)
rESEt=reset
Sub-MenuinSetbymode(setbyposition).PoS
tYPEL=typeoffoldi.e.L=letterfold
Len100=paperlength
PAPEr3=typeofpaper(0=light3=heavy)
Cr10.0=crease1position
rPoS150=deliveryrollerposition
Shin41=shingle(amountdeliverywheelturns)
Cr20.0=crease2position
Sub-MenuinSetbymode(setbyfold)FoLd
F10.0=fold1position
F20.0=fold2position
Clockwise
Anti-clockwise
Clockwise
Anti-clockwise
Clockwise Anti-clockwise
OperatingtheDigifold
Page10
CREASING/FOLDING
F_cLron/oF=foldbladeclearofpapertoreducethepossibilityofmarkingor
scratchingsensitivepaper,onoroff
Page11SYSTEM
OperatingtheDigifold
Digifold

SETBYFOLD
1.TurntheEmergencyStopbuttonclockwisetoswitchthepoweron,andselectthe
maindisplayscreen.
2.SettheSetUpswitchtoitsMid-position.
3.TurntheSettingDialclockwiseuntildisplayreads‘SEtFoLd’or‘SEtPos’,flickthe
SetUpswitchupwardstochangefromonetotheother.(select
4.TurntheSettingDialanti-clockwiseuntilthedisplayreads‘CrEES’or‘FoLd’,flickthe
SetUpswitchupwardstoselect‘on’or‘oF’foreachasrequired.
5.TurntheSettingDialanti-clockwisetoselectthemaindisplay,flicktheSetUp
switchdown,pressandholddownthepushbuttonPB1andturn theSettingDialto
selectfoldtypei.e.hCGetc.ReleasepushbuttonPb1.
6.TurntheSettingDialclockwisetoselectpaperlength‘LEn’.
7.HolddownPB1orPB2,andturntheSettingDialclockwisetoadjustthepaper
lengthin10.0mmor0.1mmincrements.ReleasePB1orPB2.
8.TurntheSettingDialclockwisetoselectpapertype‘PAPEr’,i.e.stiffnessofpaper,
notnecessarilythepaperthickness.
9.HolddownPB1andturntheSettingDialtoadjustthepapertype.ReleasePB1.
i.e.PAPEr0isforlighteststock
PAPEr1isforlightstockof120gsmupwards
PAPEr2isforheavystockof180gsmupwards
PAPEr3isforheavieststockof200gsmupwards
‘SEtFoLd’)
10.SettheDeliveryConveyorSystemasdescribedonpage20.
11.AdjusttheBatchCountasdescribedonpage21,ifrequired.
12.Theprogramsettingscannowbestored,ifrequired,asdescribedonpage22.
NOTE: Thesepapertypesareaguideonly,allfoursettingsshouldbetried
beforeadjustingthecreaseorfoldpositions.
LcF0
foldtype
L=letter
creaseon
foldon
count
OperatingtheDigifold
TypicalmaindisplayscreenSetbyFold
Page12
CREASING/FOLDING

13.RunthejobbyswitchingtheSystemandCompressorswitcheson,then
switchtheFeedswitchon.
14.Viewtheresults,the‘microadjust’functioncanbeusedtoadjustpositions.
15.To‘microadjust’thecreaseposition,turntheSettingDialclockwiseuntilCr1is
displayed.Thiswillbethecalculatedlengthofthecreaseposition.
PressandholdPB1andthedisplayshows0.0
To‘microadjust’,holddownPB1andturntheSettingDialtoadjustineitherdirection
ie+3.1mmto-3.1mmMax.
ReleasePB1.
16.To‘microadjust’thefoldposition,turntheSettingDialclockwiseuntilF1isdisplayed.
Thiswillbethecalculatedlengthofthefoldposition.
PressandholdPB1andthedisplayshows0.0
ToadjustholddownPB1andturntheSettingDialtoadjustineitherdirection
ie+3.1mmto-3.1mmMax.
ReleasePB1.
NOTES:Ifacreasepositionis‘microadjusted’,thefoldwillmovewithit.
Ifafoldpositionis‘microadjusted’,thenonlythefoldwillmove.
‘Microadjust’afoldonlyifthefoldappearstobegivinganoutofsquareresult
orcrackingappears.
Thefoldisprobablytooclosetothecenterofthecreaseandwillbetryingto
foldfromonesideofthecreasetotheoppositesideofthecrease(seepage14
forexplanation).
OperatingtheDigifold
Page13SYSTEM
Digifold

OperatingtheDigifold
SETBYPOSITION
IMPORTANTNOTES.
1.Ifthefoldistoonear,oronthecenterlineofthecrease;thefoldwilltrytofold
diagonallyacrossthecreaseprofileandpullthefoldoutofsquaretothepaper.
Thebestfoldsquarenessisachievedwhenthefoldisonthecenterlineofthe
crease,itshouldbetoonesideofthecreasecenterlineasshownbelow.
ThusforacreasesettingofCr1=100forexample,thefoldshouldbesettoafigure
slightlysmallerorgreaterthan100.
2.Whenusingalldimensionsarefromtheleadingedgeofthepaper
asshownintheexampleonpage16.
not
SetByPosition,
centerlineofcrease
idealfoldline
idealfoldline
TypicalmaindisplayscreenSetbyPosition
2cF0
creases
creaseon
foldon
countnumberof
1.TurntheEmergencyStopbuttonclockwisetoswitchthepoweron,andselectthe
maindisplayscreen.
2.SettheSetUpswitchtoitsMid-position.
3.TurntheSettingDialclockwiseuntildisplayreads‘SEtFoLd’or‘SEtPos’,flickthe
SetUpswitchupwardstochangefromonetotheother.(select‘SEtPos’)
4.TurntheSettingDialanti-clockwiseuntilthedisplayreads‘CrEES’or‘FoLd’,flickthe
SetUpswitchupwardstoselect‘on’or‘oF’foreachasrequired.
5.TurntheSettingDialanti-clockwiseuntilthemaindisplayscreenisdisplayedand
switchdowntheSet-upswitch
Page14
CREASING/FOLDING

OperatingtheDigifold
6.TurntheSettingDialclockwisetoselect
7.HolddownPB1orPB2andturntheSettingDialtoadjustthecreasepositionin
10.0mmor0.1mmincrements.ReleasePB1orPB2.
(thiscanbedoneonallfurthercreasepositions)
11.SettheDeliveryConveyorSystemasdescribedonpage20.
12.AdjusttheBatchCountasdescribedonpage21,ifrequired.
13.Theprogramsettingscannowbestored,ifrequired,asdescribedonpage22.
14.RunthejobbyswitchingtheSystemandCompressorswitcheson,then
switchtheFeedswitchon.
to0.5forPAPEr
type1,1.0forPAPErtype2and1.5forPAPErtype3.
‘1cr’
IfthefoldoptionF2isnotrequiredforthejobbeingsetup,itmustbesetto‘0’
F1
8.TurntheSettingDialclockwisetoetc.(thereare9creasepositionsintotal)
Note:-thecreasepositionsincreaseupwards.(i.e.mustbelessthan
,mustbelessthanetc)
9.ContinueturningtheSettingDialclockwiseto.
10.HolddownPB1orPB2andturntheSettingDialtoadjustthefoldpositionin10.0mm
or0.1mmincrements.ReleasePB1orPB2andturntheSettingDialclockwise.
isthelastfoldposition.
Note:-thefoldpositionsmaybeinanyorder.(i.e.canbelargerthan)
Oncethehasbeenselected,ifreturnedtothedefault
lengthof100willbefoundandanyprevioussettingswillbe lostunlessstored.
If“foldoff”isselectedthenbothkniveswillgotothedoubledeflectsettingswhich
aredeterminedbythepapertypesetting.
Ifin“setbyfold”anddoingaHalffoldthenthe1stknifewillbesettothedeflect
positionwhichisdeterminedbythepapertypesetting.
Whenusingifonlyonefoldisrequired,setthisonand
setat0.0.Iftheleadingedgeofthesheetbucklesup,adjust
‘2cr’
‘1cr’
‘2cr’‘2cr’‘3cr’
Ifanyofthenineavailablecreaseoptions(’1cr’to‘9cr’)arenotrequiredfor
thejobbeingsetup,theymustbesetto‘0’
‘F1’
‘F2’
‘F1’‘F2’
SetbyPositionSetbyFold
SetbyPositionalwaysF2
F1
must
NOTES:-
Deflectknifeposition.
Page15SYSTEM
Digifold

PaperLength=350mm
FeedDirection
LeadingEdge
Cr1 Cr2 Cr3
F1
F2
Cr1=97.0mm
Cr2=179.0mm
Cr3=260.0mm
F1=179.0mm
F2=260mm
Alldimensionsarefromtheleadingedgeofthepaper
ExampleofSetbyPosition.
Cr2
F1
9mm
FirstFold
SecondFold
LeadingEdge
Cr3
F2
=179.0
=260.0
FinishedDocument
9mm
LeadingEdge
9mm
LeadingEdge
SETTINGS
OperatingtheDigifold
Page16
CREASING/FOLDING

OperatingtheDigifold
AdjustingthePaperGate
Thestandardsettingforhorizontaladjustmentofthepapergateis6.5mm(1/4")away
fromthemountingblock.TurndiscJtomakethisadjustment.Thissettingisonlyintended
asaguide,forinstance,sheetswithanupwardcurlwillrequirethissettingtobe
increased.SettheheightofthePaperGatetoapproximatelytwothicknessesofpaper,by
turningknobK.Anexcessivegapisamostlikelycauseofdoublesheetfeeding.
J
K
6.5mm(1/4" )
T WO T HICKNESS E S
OF PAPER
WAR NIN G.
DO NOT AD JUS T T HE
PA P E R GAT E WHILE THE
MA CHINE IS RUNNING OR
T HE SUCT I ON DRUM MAY
BECOME DA MAGE D.
Setingthesuctionslot
.
t
SettingtheAdjustableSideLay
Thesuctionslotislocatedinsidethevacuumrollerandcanbeadjustedbyreleasingand
movingthesuctionknobhorizontallyineitherdirectiontotherequiredposition.
Forlightstockssettheknobtotheleftandforheavierstockssettheknobtotheright
Placethepaperstackontotheloadingtableandslideuptothefixedsidelayandpaper
gate.Releasetheclampslocatedateachendofthesidelayandslideuptowardsthe
paperstackasshowninFIG16.1.Allowagapofapproximately0.5mm(1/64inch)between
thepaperandthesidelay.
Adjustable
SideLay
Page17SYSTEM
Digifold

OperatingtheDigifold
SettingtheBack-Stop
SettingtheAirDistribution
SettingtheAirSeparationPressure
Settingthepositionsofdrivewheelsandhubs
Placetheback-stopontotheadjustablesidelayandslideuptowardsthepaperstack
allowingagap(asspecifiedintheabovestep)beforeclamping.Whentheextensiontable
isusedforfeedinglongersheets,removeclamptypebackstopandusethemagnetic
typebackstopasshowninfig.18.2.
Dependingonthelengthofthesheettobecreased,theairdistributionknobcanbe
rotatedtovariouspositionsinordertosupplyairtodifferentports.Position1is
recommendedformostsheetsizes.However,abetterresultmaybeobtainedbyusing
thebelowsettingsorbyexperimentation.
1-ForA5sheetsor8incheslong,port1open.
2-ForA4sheetsor11incheslong,frontportandport2open.
3-ForA3sheetsor17incheslong,frontportandport3open.
0-Forlongersheetsinordertosupplyairtothecentreofthestack,port
2open
Tocontroltheamountofairsuppliedtotheports,theairseparationknobcanberotated
clockwisetodecreasethepressureoranti-clockwisetoincreasethepressure..
Itisimportantthatthedrivewheelsanddrivehubsontherollershaftsarearrangedevenly
acrossthewidthofthemediabeingcreased.Thisisdonetoensurethatthemediais
accuratelydrivenandsupportedthroughtherollers.
Thedrivewheelsandhubsarefixedtotherollersbymeansofagrubscrew.Tolocatethis
grubscrewtherollerscanberotatedbyoperatingthemotormanually.
Position
DONOTROTATETHEDRIVEROLLERSBYHAND.
Page18
CREASING/FOLDING

OperatingtheDigifold
Tooperatethemotorsmanually,switchthemachine‘on’attheEmergencyStopswitch.
WhilstholdingdownPushButton1,flicktheSet-upswitchto‘setup’.
ThedisplaywillnowreadPresstheSystemswitchto‘on’andusePushButton
1(forward)andPushButton2(reverse)tomanuallyrotatetherollersinshortpulses.
Rotatetherollersuntilthegrubscrewislocated.Lifttheexitguardandthemachinewill
switch‘off’automatically.Loosenthedrivewheelsandhubsbyusinga2mmallenkey.
ArrangethedrivewheelsandhubsasshowninFIG18.1.Inordertoavoidmarkingon
sometypesofmediaensureagapbetweenthedrivewheelsanddrivehubs.
‘hAndLE’.
Settingtheextensiontable
Theextensiontablecanbefixedtothemachineinordertofeedthroughlongersheets.
Thetablecanbesupportedbythetwofixingscrewsasshownonpage4.
ThebackstopcanbeusedtosupportthepaperstackasshowninFIG18.2below.
Theotherbackstopsuppliedwiththemachinecanbeusedasatoolholderasshownin
FIG18.3below.
Page19SYSTEM
Digifold

OperatingtheDigifold
SettingtheDeliveryConveyorSystem.
WARNING:-
TheDigifoldwillstartifthedeliveryunitisnotfittedontothemachine.not
Turningthedeliverysystem‘on’or‘off’
AdjustingtheRollerPositionandShingleLength.(SeeFIG19.1)
1.SettheSetUpswitchtoitsmid-position.
2.TurntheSettingDialuntilthedisplayreads‘dELrY’onoroff.
3.FlicktheSetUpswitchupwardstotogglebetween‘on’and‘off’.
Ifthedeliveryisturnedofftherollerwillfeedtothefarendofthebeltconveyorandpark
thereuntilturnedonagain.
Ifthedeliveryisturnedonwhenusingthe‘SetbyFold’modeofoperation;theRoller
Position(rPoS)andShingleLength(Shin)areautomaticallyset,relativetothepaper
lengthandtypeoffoldselected.
1.FlicktheSetUpswitchdown.
2.TurntheSettingDialanti-clockwiseto‘rPoS’(rollerposition),or
‘Shin’(shinglelength)asrequired.
3.PressandholdpushbuttonPB1andturntheSettingDial,thenumbers
displayedarepreselectedlengthsinmillimeters(toreducesettingtimes).
4.Whentheoptimumsettingsfor‘rPoS’and‘Shin’areachievedtheycanbe
storedwiththejob(seeStoringProgramsonpage22).
Whenusingthe‘SetbyPosition’modeofoperation;theRollerPosition(rPoS)andShingle
Length(Shin)mustbeadjustedmanuallytosuitthejob,asdescribedbelow.
‘Shin’
(ShingleLength)
‘rPoS’
(RollerPosition)
FIG19.1
Page20
CREASING/FOLDING

OperatingtheDigifold
AdjustingtheBatchCount
TheBatchCountercontrolsthefeedofthemachine.
IfforexampletheBatchCountissetto10;themachinewillfeed10sheetsofpaper,pause
forapproximately5seconds,theconveyorbeltwillfeedthe10sheetsforward(toallowthe
removalofthesheetsfromtheconveyor)andthenfeedthenext10sheetsofpaper.
Thebatchcountissetasfollows:-
1.SettheSetUpswitchtoitsmid-position.
2.TurntheSettingDialuntilthedisplayreads‘bAt’.
3.PressandholdpushbuttonPB1,andturntheSettingDialtosetthebatch
quantityrequired.(thebatchquantitychangesinmultiplesof10)
Beware, ifpushbuttonPB1isnothelddown,thedisplaywillregisterthe
adjustmenttothebatchquantitybutwillnotchangewithintheprogram.
4.TheBatchCountcanbestoredwiththejobifrequired(seeStoringPrograms
onpage22)
TheRollerGapadjuststhegapbetweenthelargefoldrollers,(seeFIG20.1).
TheRollerGapmayrequireadjustmentifthickpaperisbeingfolded,orifcrackingofthe
printisnoticeable.
TheRollerGapisadjustedasfollows:-
1.SettheSetUpswitchtoitsmid-position.
2.TurntheSettingDialuntilthedisplayreads‘rG0000’.
3.TheRollerGapsareadjustedbyturningthe‘FoldGap1’or‘FoldGap2’knobs
ontopofthefolderunit.(theRollerGapchangesinincrementsof0.05mm)
NOTE.
AdjustingtheRollerGap
RollerGap2
RollerGap1
INFEED
FIG20.1
Page21SYSTEM
Digifold

OperatingtheDigifold
StoringPrograms
ReadingStoredPrograms
ClearingStoredPrograms
Amaximumof6programs,ofcrease/foldsettings,canbestoredinthemachine.
Whenthecrease/foldsettingshavebeencorrectlyentered,theprogramcanbe
storedasfollows:-
1.FlicktheSetUpswitchdownandthenbackuptoitsmid-position,thedisplay
reads
2.TurntheSettingDialineitherdirectiontocyclethroughthe6memoryaddresses
available.
3.Tostoreaprogramtothedisplayedaddress,pressthepushbuttonPB4.
Thedisplayreads
‘StorE1’
‘StorEd’
HolddownpushbuttonPB4andturntheSettingdialineitherdirectiontocyclethrough
thememoryaddresses.Whenanyoneofthe6addressesaredisplayedreleasePB4to
viewthestoredprogramatthatmemoryaddress.
Atypicalprogramwillshowseepage14forexplanation.
Tovieworeditanyofthecreasesorfoldswithintheprogram,refertosteps4.to9.on
the‘SetByPosition’instructionsonpages14and15.
Whilstviewinganyofthestoredprograms,settheSetUpswitchdownandturnthe
SettingDialclockwiseuntilthedisplayreads
PresspushbuttonPB4toclearthestoredprogram.
‘rESEt’.
3cF100
Page22
CREASING/FOLDING

OperatingtheDigifold
Inordertofeedheavystock,verysmallorverylargesheets,embossedoreven
irregularshapedsheets,itmayberequiredtooperatethemachinemanually.
Themachinecanbeprogrammedandsetupinexactlythesamewayasexplained
whenoperatingthemachineautomatically.However,whensettingupthemachinethe
papergatemustberaisedtoitshighestpositionforthesheetstobefedfreely.
Operatingthemachinemanuallywillalsorequirethesuctionlengthtobecontinuousin
ordertoaccommodatevarioustypesofstock.Therefore,thesuctionlengthswitch
mustbepositionedat‘III’.
ThemachinecannowbestartedbyactivatingtheSystemswitchto‘on’.
FlicktheFeedswitchto‘on’andbegintoslidethe
sheetsindividuallythroughthepapergateuntiltheyaredrivenbythedrivebelts.
Tostopfeedingthesheets,flicktheFeedswitchto‘off’andthentheSystemswitchto
‘Off’.
FeedingSheetsManually
Donot
activatetheCompressorswitch.
Page23SYSTEM
Digifold

ThedeliveryunitontheDigifoldisusedtocatchthesheetsoncetheyhavebeen
creased,orfolded.
1.Hookthedeliveryunitontotheshaftinthepositionsshownbelow,beingcarefulto
alignthematingconnectors.
2.LocatetheSupportHoopintothechannelontheundersideofthedeliveryunit.
WARNING:-
TheDigifoldwillstartifthedeliveryunitisnotfittedontothemachine.not
AssemblethedeliveryunitasshowninFIG23.1.
TheDeliveryUnit
FIG23.1
DeliveryUnit
LocationHooks
HookstobeLocatedontoshaft
inthesepositions
SupportHoop
Connector
Page24
CREASING/FOLDING

Adjustingthebladepressure(nopaperrequired)
1.TurntheEmergencyStopbuttonclockwisetoswitchthemachine‘on’.
2.Activatethesystemswitchandthemotorswillbegintooperate.
3.Flickthe‘Feed’switchto‘on’andthenbackto‘off’toensurethatthelowerblade/
anvilisatitsbottomposition.
4.PressPushButton3,themachinewillautomaticallyswitchoffandthelowerblade/
anvilissettoitstoppositionwherethepressurecanbeadjusted.Raisetheexitguard.
5.Usinga6mmallenkey,unlocktheshoulderbolts(labelledwithscaletransfer)
positionedateachendofthecreasingblade.
6.Turntheadjustmentcamtoadjustthebladepressure.Increasingthegradientonthe
scalewillincreasethebladepressure.
7.Ensurethattheshoulderboltsarelockedaftersetting.
Thediagrambelowdemonstratestheadjustmentofbladepressure
Adjustingthebladealignment
Itisextremelyimportantthatthebladeandanvilassemblywithinthecreasingunitis
correctlyaligned.Misalignmentofthebladeoranvilcanleadtodamagedprofilesand
subsequentlypoorqualitycreasingsoitmust,therefore,becorrectedimmediately.
TheBladeAssembly
Page25SYSTEM
Digifold

TheBladeAssembly
Ifthebladesetismisaligned,themediabeingdrivenwillbesubjecttoscoringoreven
tearingatanypointalongthecreaseline.
Thesketchbelow
demonstrateshowthebladealignmentcanbecarriedout.
Adjustmentcanbemadeateitherofthebladeoranvil.Thetwoclearanceholes
positionedabovetherollertiltmechanismarethefrontalignment(oneforblade,onefor
anvil).Thetwoholesarerepeatedonthebackofthemachineforthebackalignment.
1.RemovethestackerunitfromtheDigifold.
2.Usinga3mmallenkey,loosenthecapheadtypelockingscrewslocatedonthe
frontfaceatboth endsoftheblade/anvilasshownbelow.
3.Usinga4mmallenkey,locatethetwofrontorbackalignmentscrewsintheside
frameinordertoadjusttheblade/anvil.
4.Theupperscrewofthetwo,willadjusttheupperblade/anvilwhereasthe
lowerscrewwilladjustthelowerblade/anvilbothinverysmallincrements.
5.Inordertoobtaintherequiredposition,adjusteitherthebladeortheanvilbya
smallamountandthenoperatethemachinetotesttheformofthecrease.
Repeattheexerciseuntilcentralisationislocated.
6.Usinga3mmallenkey,lockthecapheadtypescrews(asperstep3)onboththe
upperandlowerblade/anvil.
Pleasenotethattoavoiddamagetothe
bladeset,adjustmentshouldonlybemadeinsmallincrements.
Page26
CREASING/FOLDING
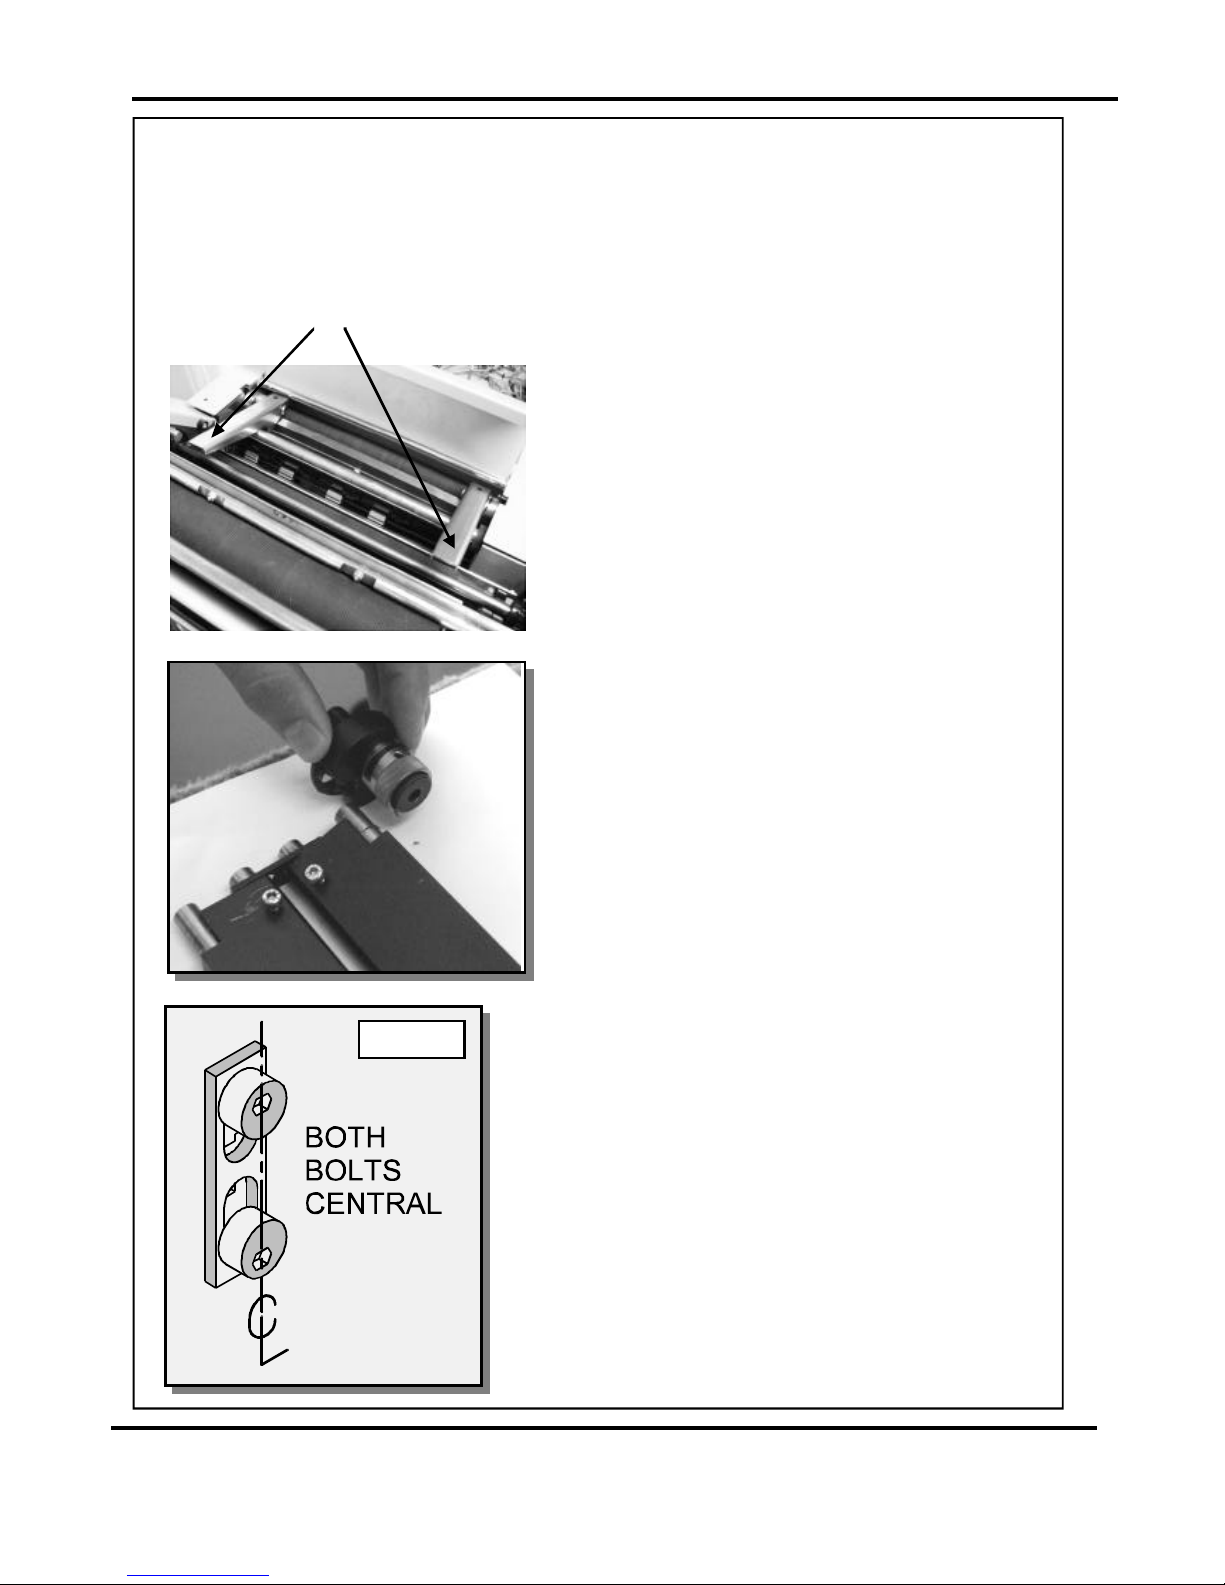
FIG26.1
1.Beforeremovingthebladeassembly,ensurethatthelowerblade/anvilis
at‘topdeadcentre’,ie.PushButton3hasnotbeenpressed.Switchthemachineoff.
2.Removethedeliveryunitandliftthetopguard.
NOT
3.Usinga6mmallenkey,loosenthesocket
headscrewslocatedinsidetheblade
adjustmentcams.Removethescrewsand
thebladeadjustmentcams.
4.Insertthebladeextractortools(70-055-01&
70-055-02)
5.Slidethebladeassemblyoutofthecreasing
unitandlayitonaflatsurface.
6.Slidetheadjustmentlinksawayfromthe
dowelslocatedintheendsoftheblades/
anvilsasshowninthephotograph(left).
7.Placethenewbladesetintoposition.
Checkthattheeccentricshoulderboltson
thelinkplateshavebeenpositionedas
showninfig26.1.
8.(Upperblade/anvilonly)
Slidetheadjustmentlinksontothedowels.
intotheholesintheadjustment
links,asshown.Pushdownwardsonthe
handlesofthebladeextractortoolsto
releasethebladeassemblyfromthepower
links.
9.Slidethenewbladesetintotheslotsofthe
creasingunitasshowninfig.27.1.
Locatethebladeextractortoolsintotheholesin
theadjustmentlinksasshown.Pullthehandles
ofthebladeextractortoolsupwardstoengage
thebladeassemblybackintothepowerlinks.
10.Setthecamgraphicsforbothendsoftheblade/
anviltotheirlowestpointonthescale(ie.When
themarkonthescalereachesthemarkoncam
holder)Fastenthesocketheadscrewsonthe
adjustmentcamsuntiltheyaretight.
ReplacingBladeSets
BladeExtractorTools
Page27SYSTEM
Digifold

ReplacingBladeSets
11.Pushtheexitguarddownandreplacethedeliveryassemblybeforeoperatingthe
machine.
12.Switchthemachineonandtestthecreaseforform.
Intheeventofanydamagedorlostcomponentswithinthebladeassembly,spareskits
areavailableonrequest.However,componentswithinthebladesetcannotbeordered
separatelyi.e.singlebladeoranvil.
Consistingofastandardbladeandanvil,bladebrushes,bladelinksandalignmentbolts.
Ifthepressureandthealignmentofthecreaseisnottoasatisfactorylevel,
seepages25and26toadjustthecreasingline.
StandardBladeset(fittedtoDigifoldasstandard)Partnumber76-213-01
‘Spares’kits
ExtraNarrowBladeset(optional)Partnumber76-213-03
Consistingofaspecialextranarrowanvil,astandardblade,bladebrushes,bladelinks
andalignmentbolts.
Page28
CREASING/FOLDING

Papercreaseoutofsquare
Paperjamming
!
!
!
!
!
Checkthatthesheetsareallsquareandexactlythesamesizebeforeloadingthe
stackontothetable.
Checkthattheadjustablesidelayhasbeencorrectlypositionedie.Nofurtherthan
0.5mmfromthepaperstack.
Checkthatthebladeisaslidefitinthesideplateslots,adjustifnecessary,see
adjustingbladealignment.
Checkthattheleadingedgeofthepaperisnotbeingdamagedbythepapergate.If
thisisoccurring,checkthatthesuctionslotandthepapergatehavebeencorrectly
set.
Checkthatthefirstcrease/foldpositionisnottooclosetotheleadingedgeofthe
paper.Aminimumdistanceof40mmisrecommended.
Paperfoldoutofsquare
Machinewillnotstart
Note:-thebestfoldsquarenessisachievedwhenthefoldisnotonthecenterofthe
crease,buttoonesideortheother.
Checkthatthefoldistoonesideofthecreasecenterline.
Checkthattherollergapisnottootightandsquashingthecrease.
Checkthattherollergapisnottoolargeandallowingthepapertoslide(especially
soonglossypaper).
Checkthattherollersarenotwornononeend.
Ifjammingisoccurringintheoutfeedrollers,openuptherollergap.(Seepage21)
Checkthepowersupplytothemachine.
Checkthattheemergencystopbuttonhasbeenreleased.
Checkthatthetwotopguardsaredown.
Checkthatthedeliveryunitisfitted,andlocatedcorrectly,(themachinewillnotstart
ifthedeliveryunitisnotfitted).
Checkthatthelowerblade/anvilisconnectingtothehomeswitch(mountedbelow
thelowerblade/anvil).
!
!
!
!
!
!
!
!
!
!
TroubleShooting
Page29SYSTEM
Digifold

TroubleShooting
Papernotfeeding
!
!
!
!
Checkthatthepaperstackisnottoohighortooheavyforthefeeder.Theheightof
thepaperstackshouldbedefinedbytheweightandthesizeofthestockbeing
creased.
Ensurethattheadjustablesidelayisnotpressedagainstthepaperstack.However,
iftheclearancebetweentheadjustablesidelayandthepaperstackistoogreat,the
airsupplywillescapeinsteadofblowingthroughthepaperthusmakingitdifficultto
feed.
Checkthattheclearancebetweenthepapergateandthesuctionrollerisnotsettoo
low.
Ondigitalmedia,thefeedingperformancemaybeimprovediftheleadingedgeof
thestackistrimmedbeforeloadingontotheDigifold.
!
!
!
Checkthattheairdistributionhasbeencorrectlyset.
Checkthattheairseparationhasbeensethighenoughtofeedthesheets.
Forheavystocks,verysmallorverylargesheets,embossedorevenirregularstock,
itmaybenecessarytofeedthesheetsmanually-seepage23
Machinenotcounting
! Openthetopandremovethebladeset
(seepages27-28)toaccessthedual
sensorpostlocatedinbetweenthedrive
rollers.Usingasoftbrush,cleanthe
visiblesensorontheendofthepost.
Usethebrushtocleanthesensors
betweenthepostandthebottompaper
guidewhicharenotvisible.
Photograph(left)showsthedualsensor
postcontainingthesensors.
CrackingofthePrintedMaterialalongtheCrease.
Crackingofthematerialalongthecreasemaybecausedbythefollowing:Pressuretooheavyonthetopblade-reducepressure.
Creasetoonarrowforheavystock-changethebladetothestandardbladeset(part
number).
Crackingononeedgecausedbymisalignmentoftheanvilandblade-realignblades
usingcamsatsides(seeFIG26.1onpage27).
!
!
!
76-213-01
Page30
CREASING/FOLDING

TroubleShooting
CrackingofthePrintedMaterialalongtheCrease.(continued)
Papermarkingorscratching.
Setting‘F_cLr’tothe‘on’position.
Nosuction
DisplayWindowReads
!
!
!
!
Whenusingdryinkortonerbasedprintengines,thematerialbefully
acclimatisedforatleast48hoursbeforeputtinganimageontothepaper.
s
must
IMPORTANTNOTE.
Ifthepaperismarkingorscratchingset‘F_cLr’to‘on’,asdescribedbelow.
Thisfunctionisusedtowithdrawthetopfoldbladefromthenipposition,whenpaper
isinthefoldroller.Thisreducesthepossibilityofmarkingorscratchingsensitive
paper.Oncertainfolds,gatetypesforinstance,‘F_cLr’shouldbesetto‘off’because
thetrailingedgeofthepaperwillcatchonthewithdrawnblade.
IfF_cLr’hasbeensetto‘on’,anysubsequentchangetotheprogrammesettingswill
automaticallyreturn‘F_cLr’backtoitsdefaultsettingof‘off’;anditmustthereforebe
etbackto‘on’again.
1.Selectthemaindisplayscreen(seepages11and13toidentifymaindisplay).
2.SettheSetUpswitchtoitsMid-position.
3.TurntheSettingDialclockwiseuntilthedisplayreads‘F_cLr’.
4.FlicktheSetUpswitchupwardstoselect‘on’.
Iftherollersaremarkingthemedia,opentherollergap(seepage21).
Ifthesuctiondrumisnotrotating,checkallofthedrivebeltsforcleanlinessandsplits
(includingthebottomin-feedrollerdrivebelt).
! ‘h’
Ifatanytimeduringthecreasing/foldingprocessthedisplaywindowreads,itis
indicatingthatthelowerblade/anvilhasnotmadecontactwiththeHOMEswitch.
i.e.Bladestillintopposition.Switchthemachineoffandremovethebladeset,
ensurethattheareaisfreefromobstructions.Returnthebladesettothecreasing
unitandswitchthemachineon.Operatethemachineinthenormalsequence,ifthe
lettercontinuestoappearitisadvisedtocontactaServiceEngineerimmediately.
‘h’
’h’
Page31SYSTEM
Digifold

TroubleShooting
!
!
!
!
’Crunch’(PaperJamming)
Intheeventofapaperjamoccurringwhilstthemachineisoperatingthedisplay
windowwillread
Inordertoremovethepapercausingthejam:PushButton1andPushButton2canbeusedtomanuallyoperatethemotor.
PushButton1willdrivepaperforward,inshortpulses.
PushButton2willdrivepaperinreverse,inshortpulses.
PushButton4willcyclethefoldknivesanddrivetherollerforward.
Whenpressed,thepushbuttonwillactivatetherollersforashortmovement.For
continuousmovement,pressandreleasethepushbuttonrepeatedly.
Ifthesheetremainsjammed,checkthatthelower blade/anvilisnotclampingthe
sheet.Ifso,pressPushButton3tolowertheblade/anviltoreleasethejammed
sheet.Whenthepaperjamhasbeenremoved,makesurethefeedswitchisoffand
thenpresstheSetUpswitchuptoclearfromthedisplaywindow.
Whenthepaperjamhasbeen
removed,makesurethattheFeedswitchisoffandthenpresstheSetUpswitchup
toclearfromthedisplaywindow.
Whenthepaperjamhasbeenremoved
makesurethattheFeedswitchisoffandthenpresstheSetUpswitchuptoclear
fromthedisplaywindow.
Whenthepaper
jamhasbeenremoved,makesurethattheFeedswitchisoffandthenpresstheSet
Upswitchuptoclearfromthedisplaywindow.
‘crunch”.
‘crunch’
‘cLiPP’
‘cLiP1’
‘cLiP2’
Note.-Asasafetydevicetooverloading,thefoldkniveswillbeejectedfromtheirdrive/
locationlugs.
usingtworedhandledallenkeys(2.5mmassupplied)
aligntheholesinthebladedrivegears(blackluggedgears)withthebrackets
attachedtothemechanismsideplates,eachside.Thegearsmaybeturnedby
hand.Inserttheallenkeythroughtheslotsinthetopcovertolockthemechanism
andalignthebladedrivepinsbothsideswiththelugsonthegears,withasmall
amountofpressureontherearfaceofthebladeitwillclipintoposition.
IftheFeedswitchisturnedoffwhileapieceofpaperisstillfeeding(buthasnot
reachedthefirstfoldroller),themachinewillstopandthedisplaywindowwillread
.UsePushButtons1,2,and4toremovethepapercausingthejam;as
describedaboveundertheheading.
Ifthemachinestopsandthedisplaywindowreadsthisindicatesthatpaper
hasjammedintherollers.UsePushButtons1,2,and4toremovethepaper
causingthejam;asdescribedaboveundertheheading.Ifthejammed
papercanonlyberemovedbyinchingthepaperforward,thejammedpaperwillbe
foundontheundersideofthedeliveryunit.
Ifthemachinestopsandthedisplaywindowreadsthisindicatesthatpaper
hasjammedintherollers.UsePushButtons1,2,and4toremovethepaper
causingthejam;asdescribedaboveundertheheading.
Toreplacefoldknives.-
‘cLiPP’
‘crunch’
‘cLiP1’
‘crunch’
‘cLiP2’
‘crunch’
‘cLiPP’
’cLiP1’
’cLiP2
Page32
CREASING/FOLDING

Recommendedweeklyoperatormaintenance
TechnicianMaintenance
!
!
!
!
Cleanallsensors
CleaninfeedrollersandoutputdrivehubsusingtheMorganacleaningkit
(Morganacleaningkitpartnumber90-018)
Removeandcleanthebladeassembly
Withthebladeassemblyremoved,cleantheslotsandsurroundingareawithinthe
creasingunit;addasmallamountofgreasetotheslideways.
ItisrecommendedthatyourMorganaDigifoldisfullyservicedatleastonceeverysix
monthsbyafactorytrainedServiceEngineer.
TroubleShooting
Page33SYSTEM
Digifold

DISPATCHKIT
120-95-01
ITEM PART NUMBER QTY DESCRIPTION
1
120-101 1 OPERATORSMANUAL-DIGIFOLD
2 90-018 1 ROLLER CLEANING KIT
3 121-006 1 TILTLEVER
4 613-316 1 POWER CORD CE UK 3Pin
5 617-004 4 GLASSBALL-Ø20
8
9
10 620-004 1 ALLENKEY4mm
11
12 620-028 1 BONDUS L WRENCH 3mm
13 620-033 1 BONDUS L WRENCH 6mm
14 624-018 1 DISPATCH BOX
6
620-007 1 HEXAGONBALLDRIVER2mm
620-026 1 BONDUS L WRENCH 4mm
620-020 HEXAGONBALLDRIVER2.5mm
7
403-01-030-006
409-01-040-004
12 SCREW-SOCKETCAPHEAD-M3x6LG
1 SCREW-SKT.SETFLATPT.-M4x4LG
2
15 70-055-01 1 BLADEEXTRACTIONTOOL-OPSIDE
16 70-055-02 1 BLADEEXTRACTIONTOOL-LAYSIDE
Page34
CREASING/FOLDING

ACCESSORIES....
your dealer and fitted to your
machine using the instructions
supplied, or by reading your
operators manual.
OPTIONS....
....Mayalsobeobtainedand
fittedbyyourdealer.Youshould
not attempttofitoptionsas
specialist tools and knowledge are
required.
....Maybeobtainedfrom
ITEM PART NUMBER DESCRIPTION
1 76-213-03 BLADESET-320Wide-ExtraNarrow
ACCESSORIESANDOPTIONS
Page35SYSTEM
Digifold

RECOMMENDEDSPARES
PARTNO.QUANTITY DESCRIPTION
607-1461TimingBelt-132XL037
607-0401TorqueDisk-White
607-0421TimingBelt160XL
607-0381TwinGripTimingBelt-200DXL
607-0412TimingBelt-110XL037
607-046 2TimingBelt-540XL037
607-047 2TimingBelt-564XL037
606-0281Foot-Black
607-0451MultiBeamCouplerSize13
608-0191ShoulderBolt-AdjustmentCams
609-0111‘O’RingØ20
609-0141‘O’RingØ15
609-0131‘O’RingØ25
613-1371PlungerandSpring
613-2551SolenoidCoil
613-2371Cap-Ø15
613-3651EmergencyStopSwitch
613-3851KnobØ15
609-0221‘O’RingØ32
606-0351Knob-RollerTilt
613-3511MicroSwitch-GuardCircuit
613-1911MicroSwitch-HomeCircuit
652-0111SystemSwitch
681-0071Fuse-3.15A-Time-Delay-(20x5mm)
75-1001SwitchAssembly-Set-up
75-0981SwitchAssembly-Feed
75-1011SwitchAssembly-RotarySettingDial
75-0771ControlPCBAssembly-Digifold
76-0581Anti-StaticBrush-Autocreaser
76-1091PowerLinkBearing
75-0821DisplayPCBAssembly
75-0401StackerSwitchAssembly
76-0421DriveBelt-FeedBed-Ø4Polycord
76-0821Perforator-DriveHubAssembly
76-0831Perforator-DriveWheel
Page36
CREASING/FOLDING

PARTNO.QUANTITY DESCRIPTION
RECOMMENDEDSPARES
124-01-271RollerPotLead
76-203-011InputRollerAssy-Upper
76-203-021InputRollerAssy-Lower
76-2041OutputShaftAssembly
76-2301PaperGuideAssembly-BottomSensor
76-2291PaperJamSensorAssembly
76-2281UpperSensorAssembly
76-213-011BladeSet-320Wide-Standard
93-0211FeedBelt
93-0221DriveBelt-VacuumRoller
94-0281LockPinAssembly-SideLay
95-0171Hose-Vacuum
95-0181Hose-SeperationAir
95-0311Hose-Evacuation
95-0321Hose-Exhaust
95-0201Lens-Display
124-01-011Pot&LeadAssy-GapSet1
124-01-081Pot&LeadAssy-GapSet2
124-01-021KnifePositionSensor
124-01-161ToroidalTransformerAssembly
124-01-171ToroidalTransformerAssembly
125-01-081BlackBox-StepperDriver+DaughterBoard
125-05-011RuntimePCBAssembly
125-12-021StepperDriver+DaughterBoard
126-06-011AccessUnit-1stFold
126-02-011FoldInputRoller
126-03-013FoldRoller-Standard
126-06-031AccessUnit-3rdFold
126-06-041AccessUnit-2ndFold
126-07-011SupportUnit-1stFold
126-07-021SupportUnit-2ndFold
126-07-031SupportUnit-3rdFold
126-12-0111stBladeAssembly
126-12-0212ndBladeAssembly
126-17-011InputRoller-Upper
126-17-041InputRoller-Lower
Page37SYSTEM
Digifold

RECOMMENDEDSPARES
PARTNO.QUANTITY DESCRIPTION
NOTE.....
The items listed above represent parts which are subject to wear, loss, or accidental
damage, and is included for your guidance only.
Section and item numbers refer to the illustrations and tables in this manual.
Replacement of parts fitted to your machine require specialist knowledge and should
therefore be entrusted to your dealer.
128-026-021Belt-PaperTransport
126-0594Link-PaperGuide
126-0532BladeGuide
126-053-022BladeGuide-Long
126-060-011PaperSensor-EdgeDetectRX
126-060-021PaperSensor-EdgeDetectTX
126-060-031PaperSensor-Sync2RX
126-060-041PaperSensor-Sync1RX
126-063-011SensorBar-Sync2TX
126-063-021SensorBar-Sync1TX
Page38
CREASING/FOLDING

MACHINECALIBRATIONHISTORY
Etch
dEtr
FECh
dEtF
gAPF
cEn
Date:-
TotalCount:-
SerialNumber:-
Date:-
TotalCount:-
Date:-
TotalCount:-
Etch
dEtr
FECh
dEtF
gAPF
cEn
Etch
dEtr
FECh
dEtF
gAPF
cEn
Page39SYSTEM
Digifold

Page40
CREASING/FOLDING
 Loading...