


USER MANUAL
Portable Air
Conditioner
MAC-10PA Titanium
E-mail: electrical.appliance@dksh.com
www.morgan.my
Market Expansion
Services by
www.dksh.com.my
facebook.com/morganappliances
MAC-10PATitanium(IM)071014_Layout 1 10/30/14 12:52 PM Page 1
3
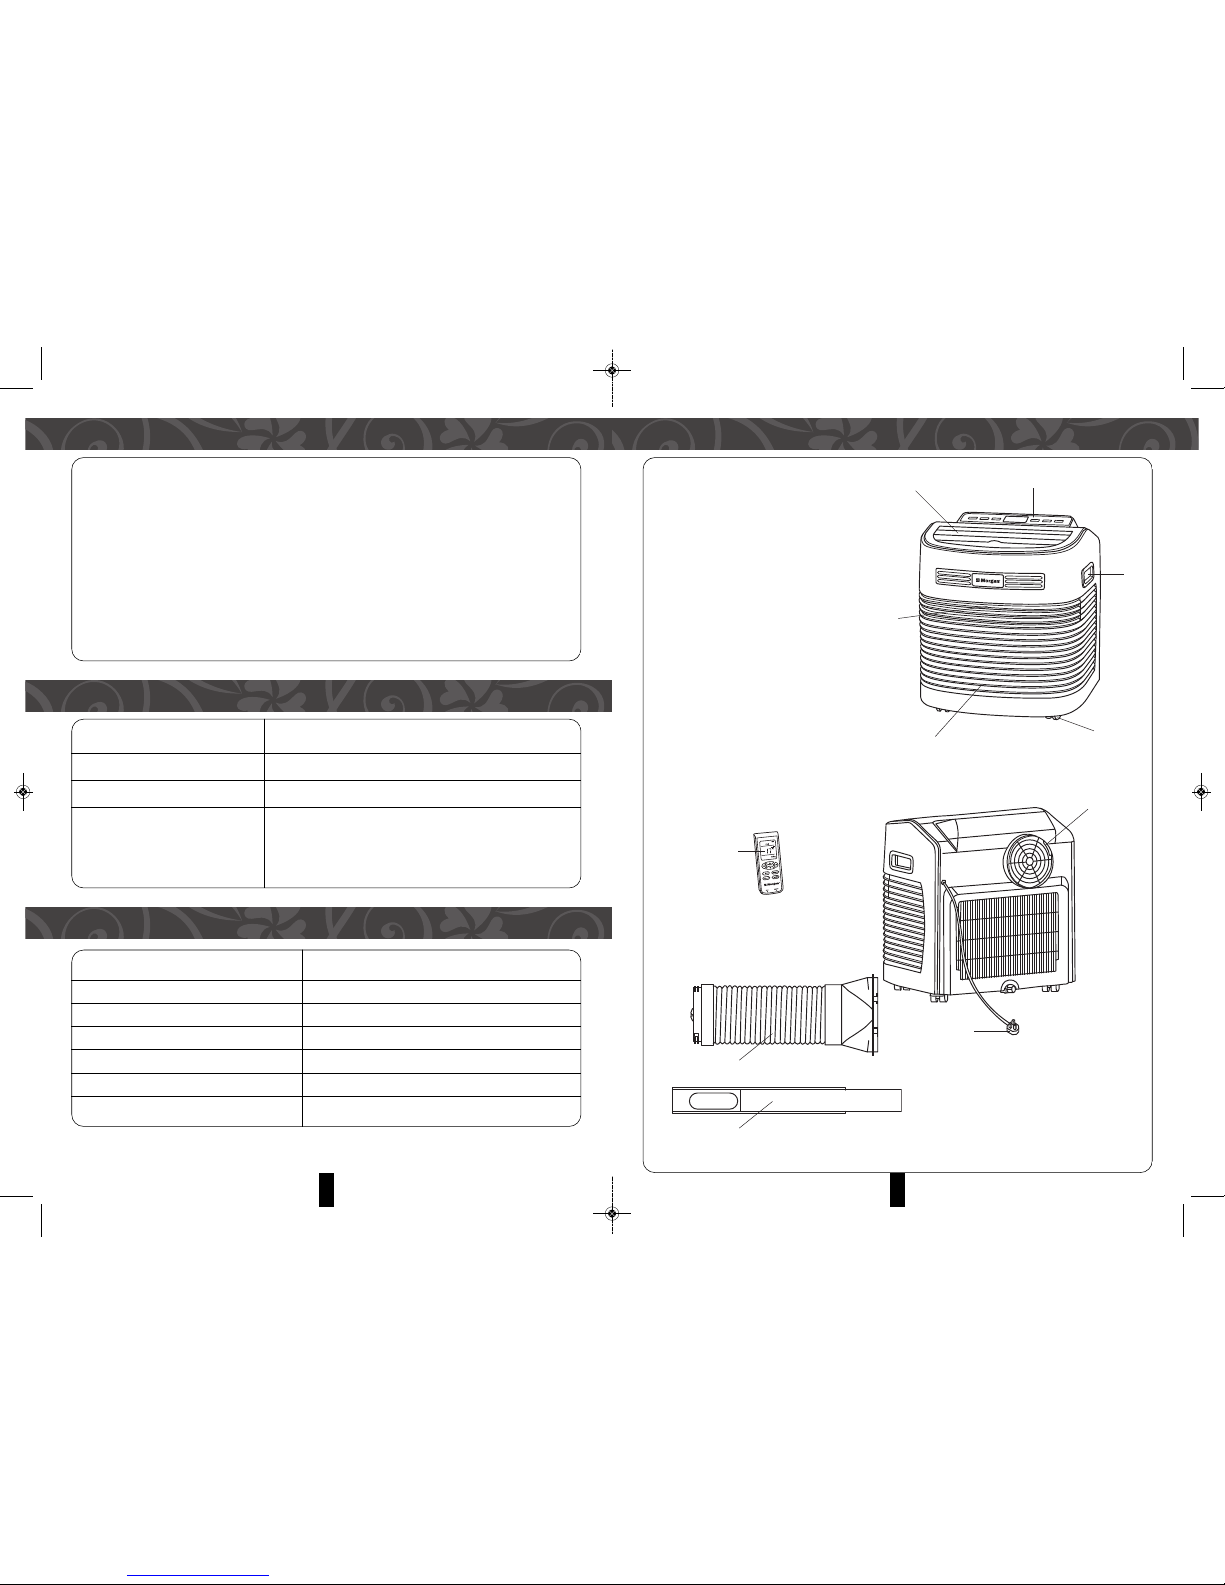
PARTS IDENTIFICATION
PARTS IDENTIFICATION
1. Caster
2. Handle
3. Control panel
4. Wind louver
5. Air inlet grille
6. Air inlet
7. Remote control
8. Air outlet
9. Plug
10. Exhaust pipe assembly
11. Window sealing plate assembly
1
2
3
4
5
6
8
9
7
10
11
10
MAINTENANCE
PERIODIC CLEANING
If the A/C will not be used for a long time:
• Pull out the water plug to drain residual water.
• Run the A/C under fan mode for 2 hour until its interior is dry.
• Turn off the A/C and unplug from power supply.
• Wash the filters and reassemble them.
• Remove the exhaust pipe and store it properly.
• Cover the A/C unit with a plastic bag and store it in a dry place.
INTELLIGENT ERROR DETECTION
SPECIFICATIONS
ERROR-DETECTING CODE MULTI-FUNCTIONAL DEFECTION
E1 Coil temperature sensor Error
E2 Indoor temperature sensor Error
E4 Anti-freezing protection: temperature of the coil is
too low and the A/C is off. When temperature
decreases to 8, anti-freezing protection will be
activated.
MODEL MAC-10PA TITANIUM
RATING VOLTAGE / FREQUENCY 220-240V~ 50Hz
RATED WATTAGE 1050W
MAX AIR FLOW 360m³/h
COOLING CAPACITY 10000Btu/hr
NET WEIGHT 27kg
DIMENSIONS(W x H x D) 480 X 510 X 430mm
MAC-10PATitanium(IM)071014_Layout 1 10/30/14 12:52 PM Page 2
5
SAFETY PRECAUTIONS
Please read the Manual carefully before operating the machine:
• This machine is intended for household use only.
• This machine is for indoor use only. Please place and operate it in dry environment.
• Inspect the power cord periodically. DO NOT operate the A/C unit if power cord,
power plug or A/C unit is damaged in any manner.
• Use a power extension cable if the power cord is not long enough.
• The A/C unit should be away from heat sources. Avoid placing it in direct sunlight.
• Turn off the A/C unit before unplugging it from the power supply.
• Turn off and unplug the A/C unit from the power supply before removing or cleaning
it, or replacing its parts or when it is not used.
• Clean the A/C unit according to the User Manual.
• Ensure that the voltage of the A/C unit meet your home’s power requirements. Any
damage incurred by incorrect power requirement will void your warranty.
• This appliance is not intended for use by persons (including children) with reduced
physical, sensory or mental capabilities, or lack of experience and knowledge,
unless they have been given supervision or instruction concerning its use by a
person responsible for their safety. Children should be supervised to ensure that
they do not play with the appliance.
• DO NOT station the A/C unit where there is water or other liquid. Always take
precautions to prevent water or liquid from entering the A/C.
• DO NOT insert your fingers or any hard objects into the wind louvers or air outlets of
the A/C unit.
• DO NOT attempt to repair the A/C unit by yourself. Any possible hazard incurred by
doing so will void the warranty. Even the power cord MUST be replaced by
professional maintenance personnel or similarly qualified person(s).
• ALWAYS use the recommended accessories provided by the A/C manufacturer to
prevent damage to the unit.
• Recommended operation temperature:17°C~35°C,relative humidity RH10~80%
8
OPERATING INSTRUCTIONS
COOLING MODE
• When the A/C enters cooling mode automatically or cooling mode is selected after
it is turned on, the cooling indicator lamp will illuminate.
• Press Up/Down key to adjust setting temperature (17°~30°).
• Press Fan speed key to select High/Low fan speed.
FAN MODE
• When pressing mode key or choosing fan mode with the remote control, the wind
indicator lamp will illuminate, and the unit will operate under fan mode.
• Press Speed key to choose High/Low fan speed.
• NOTE: Temperature cannot be set.
AUTO-MODE
• Press mode key from control panel or choose auto-mode using the remote control
to select auto-mode. The indicator lamp will illuminate when under auto-mode.
• After choosing auto-mode, operation is determined by ambient temperature: when
ambient temperature is higher than 25°, the unit will operate in cooling mode; when
it is lower than 25°, the unit will operate in fan mode.
MAX COOL MODE
• Under cooling mode press TIMER and UP buttons at the same time to select Max.
cool mode.
• In Max. cool mode, the A/C will cool regardless of temperature restriction/presets.
• In Max. cool mode, fan speed is high, and is not adjustable.
SLEEP MODE
• Press both TIMER and DOWN button at the same time under cooling mode to enter
sleep mode.
• Under this mode, the set temperature increases by 1 after the unit has operated
for 2 hours. After 2 hours later temperature will increase by another 1 and remain
unchanged.
• Under this mode, the fan will blow at low speed and fan speed is not adjustable.
TIMER MODE
• In standby mode, press the key to set TURN ON time. Press Up and Down keys to
select TURN ON time (0~24H), and the timer indicator lamp will illuminate.
• Press timer key to set TURN OFF time when the unit is on. Press Up and Down keys
to set TURN OFF time (0~24H), and the timer indicator lamp will illuminate.
MAC-10PATitanium(IM)071014_Layout 1 10/30/14 12:52 PM Page 3
6 7
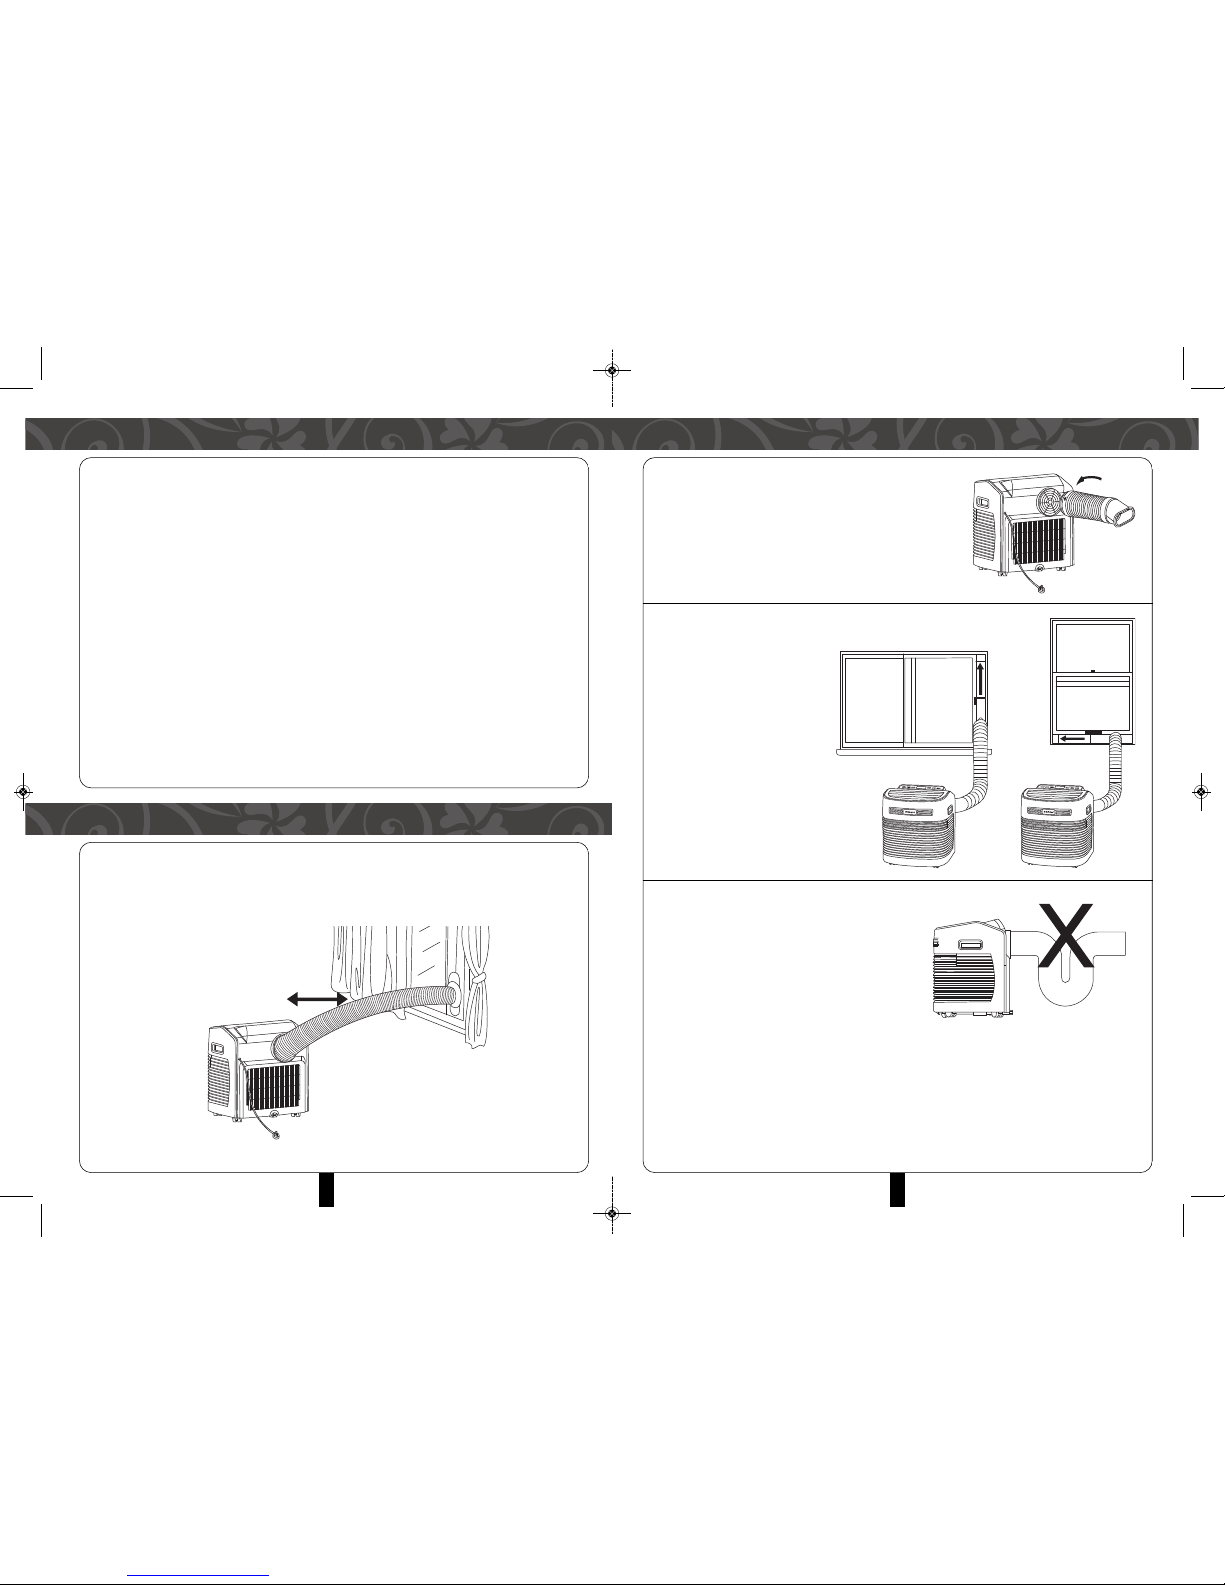
SAFETY PRECAUTIONS PLACEMENT AND INSTALLATION
INCORRECT INSTALLATION
• It is important to keep the exhaust pipe
smooth. Incorrect installation will affect the
proper functioning of the A/C unit.
• Prevent the exhaust pipe from bending.
• Ensure air can flow unobstructed inside the
pipe.
INSTALLATION
• Secure the exhaust pipe assembly to the air
outlet in the back panel (anti-clockwise).
WARNING: The exhaust duct is designed especially for this model. DO NOT attempt to
replace or lengthen it to prevent a malfunction.
NOTICE: Maximum length of the exhaust pipe is 1,500mm. It is advisable to shorten it
and keep it in a horizontal position during installation.
INSTALLATION
• Insert the air exhaust hose
into the window sealing
plate, adjust opening width
of window so that the
window and sealing plate
corresponds correctly. The
length of the sealing plate
is adjustable.
SPECIAL WARNING
• Always operate the unit in an upright position and place it on a flat, level surface to
ensure optimal compressor operation.
• The A/C unit should be stationed at least 50cm away from surrounding objects.
Keep air inlets and outlets unobstructed.
• DO NOT operate the A/C unit near gasoline or any other inflammable liquids.
• DO NOT use spraying agent and other solvent or flammable substances directly
onto the A/C unit to prevent damaging the electrical components or deforming the
unit’s plastic exterior.
• If the power cord is damaged, it must be replaced by an electrician or specialized
technician authorized by the manufacturer in order to prevent a fire hazard.
• Insert the power cord into the power supply first, and then press the power key to
operate the A/C.
KEEP THIS USER MANUAL IN A SAFE PLACE FOR FUTURE REFERENCE.
PLACEMENT AND INSTALLATION
PLACEMENT
• Place it on an even and dry surface, and keep it at least 50cm away
from surrounding object(s).
50cm
MAC-10PATitanium(IM)071014_Layout 1 10/30/14 12:52 PM Page 4
9
DRAINAGE METHOD
This product is equipped with automatic water
evaporative system. The condensing water is used
recycle to cool condenser, which improves cooling
efficiency while conserving energy.
• If the internal vessel is full of water, the display
Screen will display “FL”, and the compressor
stops working automatically. After powering off,
unscrew the water cover, pull and drain out water.
Restart.
MAINTENANCE
Notice: Turn off the A/C unit and unplug from the power supply before carrying out
maintenance or repair works to prevent electric shocks.
CLEANING
• Unplug before cleaning.
• Wipe with soft semi-dry cloth. DO NOT use chemical cleaning agents, such as
benzene, alcohol, gasoline and so forth to prevent damaging the A/C unit’s surface
and other components.
• Ensure water is not spattered into the A/C unit.
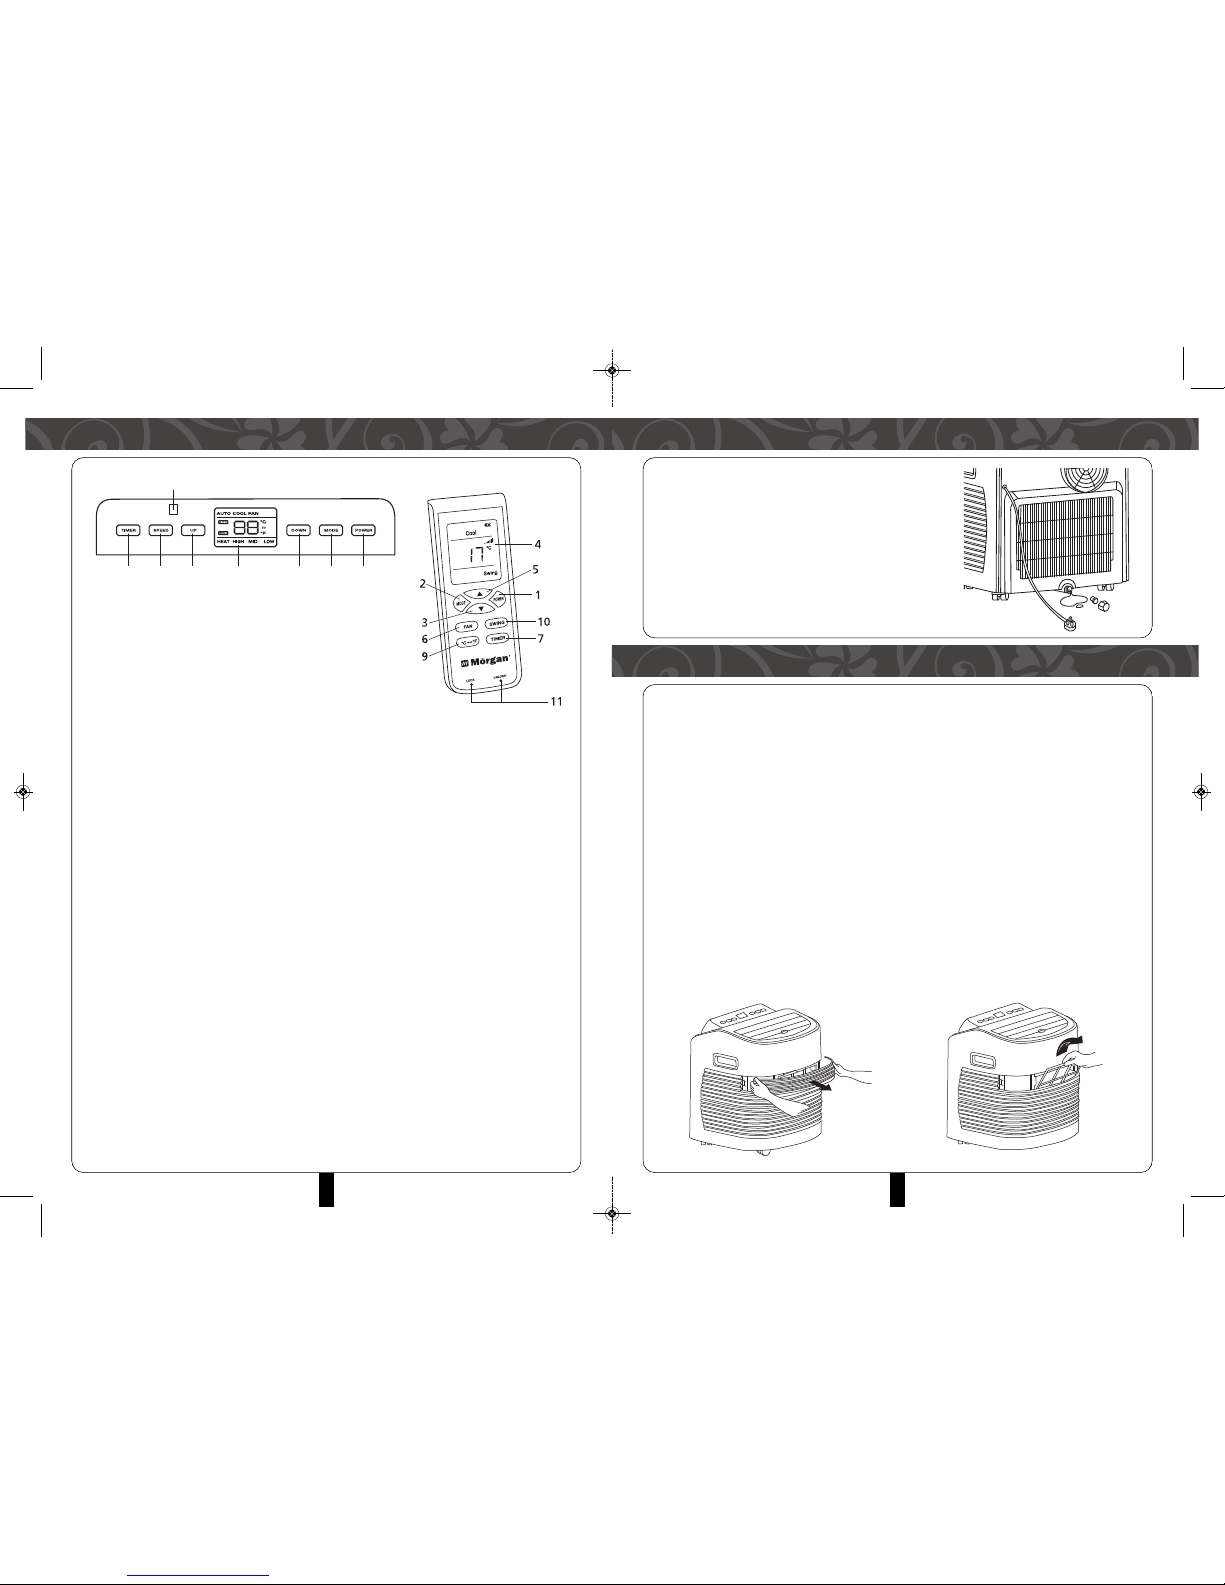
FILTER
• Wash and clean the filter once every two weeks. If it is obstructed by dust,
efficiency of the A/C will be reduced.
• To clean, remove both bigger and smaller filters as shown in the picture below.
• Immerse the filters into warm water (about 40°C) added with neutral detergent.
Allow to dry naturally.
4
1. Power key
Press the power key to turn ON/OFF the A/C.
2. Mode key
Press the key to choose cooling, fan and
auto-modes.
3. “DOWN” key
Press the key at cooling mode to reduce the temperature settings. Press the
timing mode to adjust timing ON/OFF times. Press “Up” and “Down” keys
simultaneously to switch between Fahrenheit (°F) and Centigrade (°C) degree
temperature.
4. Temperature/ time display window
This window displays the adjusted temperature and time.
5. “UP” key
Press the key at cooling mode to increase the temperature setting. Press the
timing mode to adjust timing ON/OFF times.
6. Fan Speed key
Press the Fan speed key to select from high/ mid/low fan speeds.
7. Timer key
Press the key at standby mode to set TURN-ON time. Press this key set TURNOFF time when the unit is on.
8. Remote controller receiving window
This window displays the adjusted temperature.
9. ºC/ºF switching key
Press the key to switch between (centigrade) and (Farenheit).
10. Auto-swing key
Press this key at any time after turning on the A/C unit to swing the wind louvers
automatically.
11. Lock Key
Press this key to lock /unlock the control panel button.
CONTROL PANEL & REMOTE CONTROL UNIT
1235 4
8
67
MAC-10PATitanium(IM)071014_Layout 1 10/30/14 12:52 PM Page 5

11
TROUBLESHOOTING
In case of any of the following trouble, please contact professional maintenance personnel in time.
PROBLEM CAUSE SOLUTION
The air conditioner does No power supply. Connect to power supply and switch on.
not function. “FL” flashes on the display screen Drain water.
Timer-off is in operation. Turn on the unit three minutes later.
The air conditioner Unit is placed under sunlight. Close curtains.
restarts frequently Windows or doors open, too many Close doors and windows, remove the heat
people or a heat source is in the room. source.
Dirty/Clogged filter. Clean or replace the filter(s).
Air inlet or air outlet blocked. Remove the blockage.
The unit is too noisy Unit stands uneven. Place on an even, solid surface (less vibration).
Compressor not Compressor shuts down to protect Wait for 3 minute and restart again after the
operating from power surge temperature descends.
CAUTION
• Switch off the unit and unplug it immediately if anything abnormal happens. Then
contact a qualified electrician.
•
The manufacturer reserves the right to alter/modify data without advance notice
for product improvement.
THE DISPOSAL OF ELECTRICAL AND ELECTRONIC EQUIPMENT WASTE PRODUCTS ON THE PART OF
FINAL USERS IN THE EUROPEAN UNION
This symbol on the product or on the container indicates that this product cannot be eliminated with the general waste.
The user is responsible for eliminating this kind of waste by throwing them away at a “recycling point” specifically for
electrical and electronic waste. Selective collection and electrical equipment recycling contribute to preserve natural
resources and warrant waste recycling to protect environment and health. In order to receive further information about
electrical and electronic waste collecting and recycling, contact your Local Council, the service of household waste or the
establishment where the product was acquired.
2
C O N T E N T S
3
4
5-6
6-7
8
9
9-10
10
10
11
PARTS IDENTIFICATION
CONTROL PANEL AND REMOTE CONTROL
SAFETY PRECAUTIONS
PLACEMENT AND INSTALLATION
OPERATING INSTRUCTIONS
DRAINAGE METHOD
MAINTENANCE
INTELLIGENT ERROR DETECTION
SPECIFICATIONS
TROUBLESHOOTING
MAC-10PATitanium(IM)071014_Layout 1 10/30/14 12:52 PM Page 6
 Loading...