

Page 1
USER MANUAL
Portable Air
Conditioner
MAC-09PA Feather
E-mail: [email protected]
www.morgan.my
Market Expansion
Services by
www.dksh.com
facebook.com/morganappliances
MAC-09PAFeather(IM)OP110414_Layout 1 4/17/14 9:57 AM Page 1
Page 2
3
C O N T E N T S
4
5-6
7
8
9
9
10
11
IMPORTANT SAFEGUARDS
PLACEMENT AND INSTALLATION
PARTS IDENTIFICATION
CONTROL PANEL
OPERATING INSTRUCTIONS
WATER DRAINAGE
MAINTENANCE
TROUBLESHOOTING
10
MAINTENANCE
Note: in order to avoid electric shocks, power-off the machine and remove the power plug from the power
supply before carrying out maintenance or repairs.
CLEANING
• Remove the power plug from the power supply before cleaning.
• Use only soft semi-dry cloth to clean the machine. Don’t use chemical agents, such as benzene, alcohol, gasoline and
so forth to prevent damage to the machine’s finishing or the machine itself.
• Do not splash water into the machine.
FILTER
• Clean the filters once every two weeks. If filters are blocked by dust, machine efficiency will be reduced .
• Clean the filters in warm water using neutral detergent, then air dry the cleaned filters.
WARNING:
Do not operate the machine without filters.
PERIODICAL CLEANING
If the machine is to be unused for a long time, do the following:
• Pull out drainage plug upper / lower to drain residual water.
• Let the machine run under fan mode for 2 hours to dry out the machine internally
• Turn off machine and remove the power plug from the power supply.
• Clean and dry filters, then reinstall them.
• Pull out the exhaust pipe for safekeeping.
• Cover the machine and store it in dry place.
MAC-09PAFeather(IM)OP110414_Layout 1 4/17/14 9:57 AM Page 2
Page 3
5
PLACEMENT AND INSTALLATION
PLACEMENT
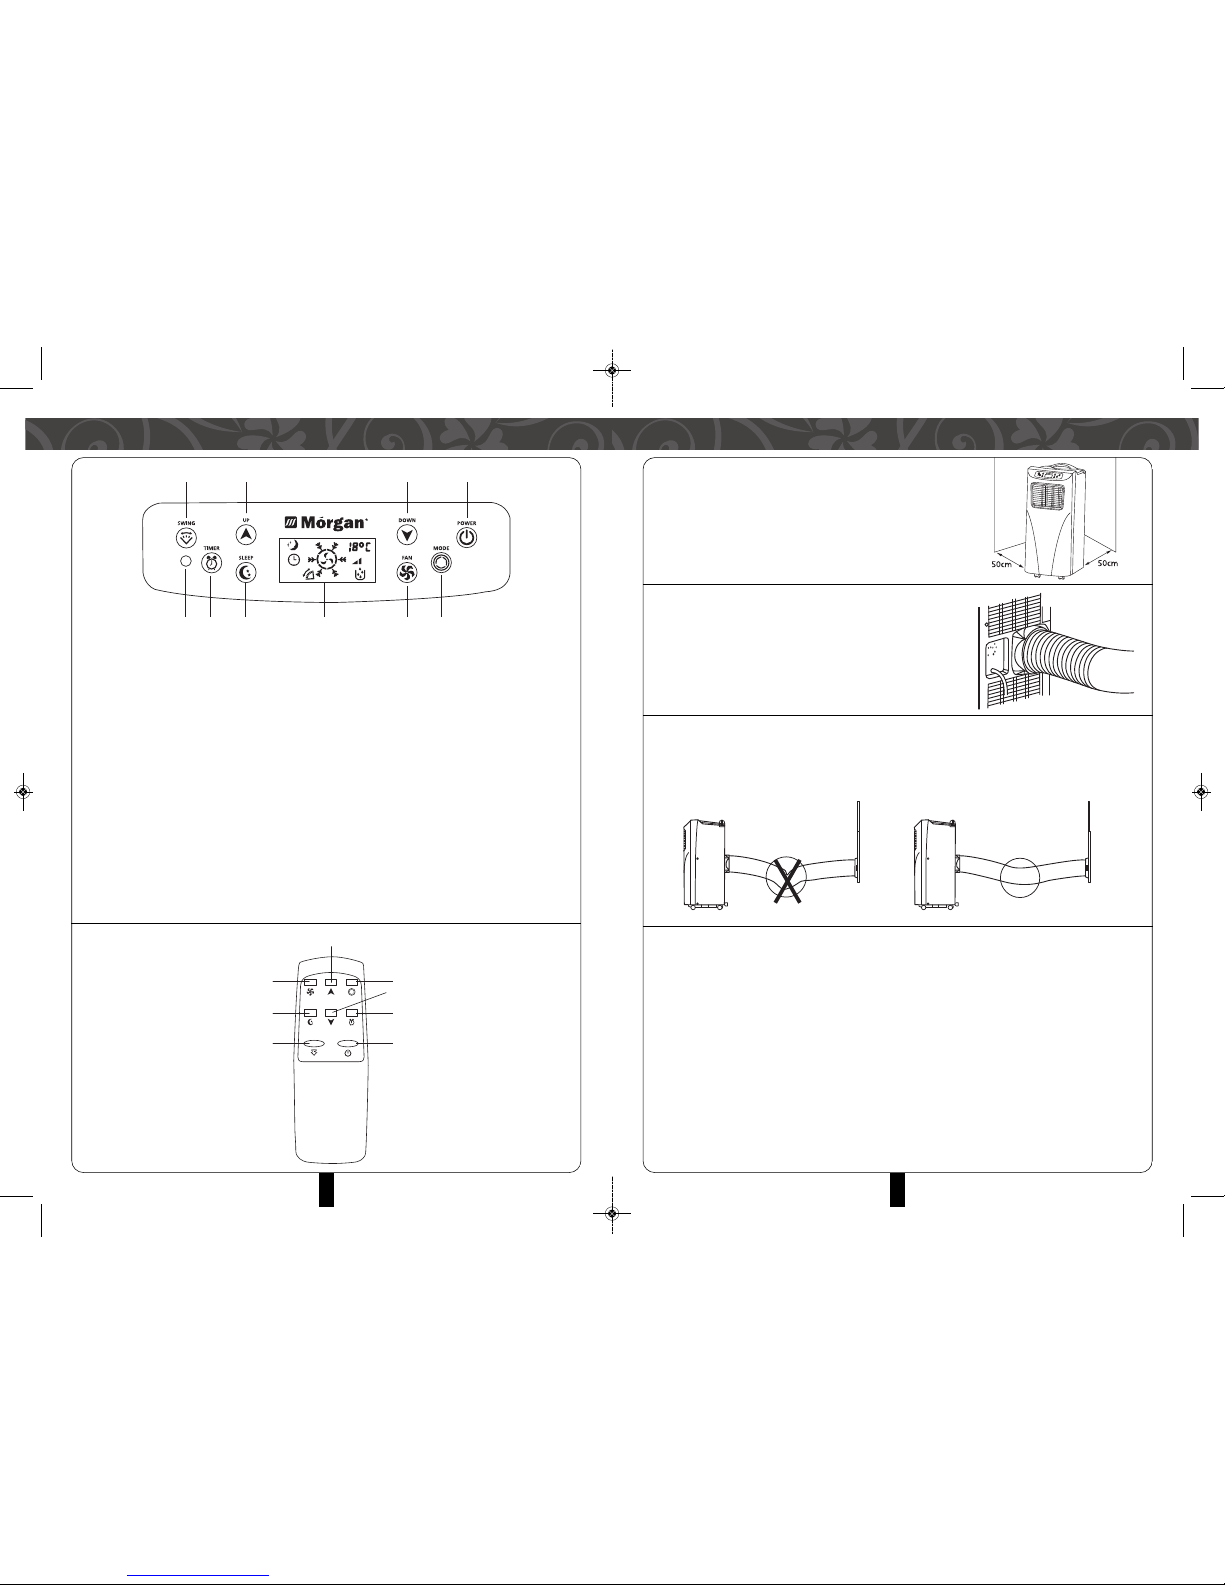
• Place the machine on flat and dry ground, and leave an allowance
of at least 50cm from other objects.
INSTALLATION
• Spin adapter into exhaust pipe first, then spin the exhaust pipe into
the exhaust connector (counter-clockwise)
• Put the adapter into window sealplate, adjust window opening
width in order to match the sealplate with the
window opening. The length of the sealplate is adjustable.
INSTALLATION ERRORS
• Free access of exhaust pipe is important. Installation errors will affect the machine’s performance.
• Ensure exhaust-pipe is free from sharp bends.
• Ensure air inside the exhaust pipe can flow smoothly .
WARNING
1. The length of the exhaust pipe is specially designed according to the specification of this appliance. Do not replace
or extend it with a non-recommended hose as this could cause serious malfunction.
ATTENTION:
Maximum developed length of the exhaust pipe is 1500mm. Use the shortest possible length. When
mounting, it is advisable to keep the exhaust pipe in a horizontal position.
8
CONTROL PANEL
1.
POWER:
press this key to turn on/off machine. After machine turns on, default value is cooling mode with low fan
speed.
2.
MODE:
after machine turns on, press this key to select cooling, dehumidifying and fan mode.
3.
FAN:
after machine turns on, press this key to select fan speed (high and low).
4.
DOWN:
under cooling mode, press this key to downward temperature setting from 16~31.
5.
UP:
under cooling mode, press this key to upward temperature setting from 16~31.
6.
SLEEP:
under cooling mode, press this key to turn on/off sleeping function.
7.
TIMER:
under power-on or standby mode, press this key to setup on/off time from 1~24.
8.
SWING
(air flow): after machine turns on, press this key, the louver will swing continuously left and right. Press the
button again to stop the movement and for the louver to remain in that position.
REMOTE CONTROL
1. Power
2. Timer
3. Down
4. Mode
5. Up
6. Fan
7. Sleep
8. Swing
1. ON/OFF (power) button
2. Mode (function) button
3. Speed (ventilation) button
4. “Temperature down” button
5. “Temperature up” button
6. Sleep function button
7. Timer function button
8. Swing function button
9. Receiver for remote control
10. Display window
12
3
4
85 41
2310679
1
2
3
4
5
6
7
8
MAC-09PAFeather(IM)OP110414_Layout 1 4/17/14 9:57 AM Page 3
Page 4
6 7
PLACEMENT AND INSTALLATION PARTS IDENTIFICATION
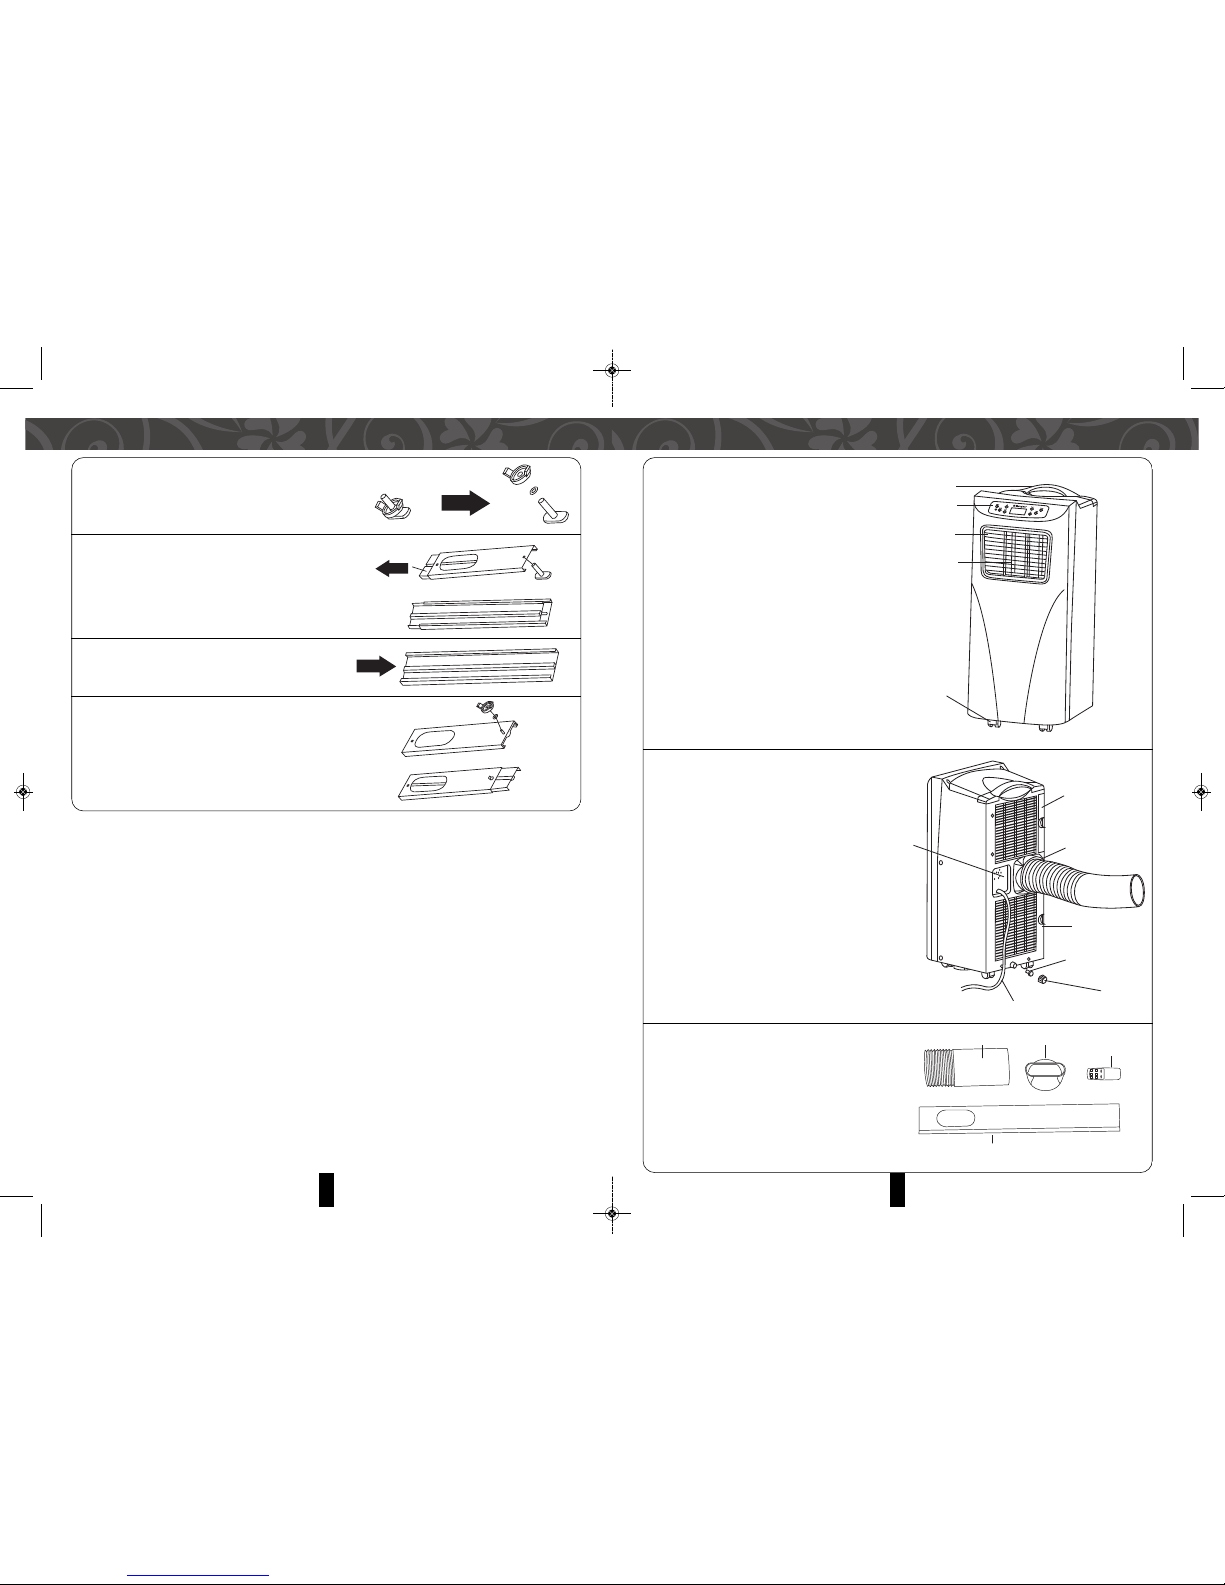
HOW TO FIX THE SCREW OF ADJUSTABLE SLIDE BAR
1. Disassemble the screw, washer and nut.
2. Separate 2 pieces of the slide bar and insert the screw into the
screw-hole.
3. Assemble the slide bar.
4. Tighten the washer and nut.
6. Upper Filter frame
7. Exhaust Connector
8. Power Cord Location
9. Lower Filter frame
10. Rubber plug
11. Plug cap
12. Power Supply Cord
INSPECT PACKING ACCESSORIES
Please read user’s manual for installation steps.
1. Exhaust Pipe
2. Adapter
3. Remote control
4. Sealplate
1. Handle
2. Control Panel
3. Air-outlet
4. Fan blade
5. Castor
1
2
3
4
5
1
2
3
4
5
6
7
9
10
11
12
8
12
3
4
MAC-09PAFeather(IM)OP110414_Layout 1 4/17/14 9:57 AM Page 4
Page 5
9
OPERATING INSTRUCTIONS
COOLING MODE
• After machine turns on, default value is cooling mode with 22ºC and low fan speed.
• Press “MODE” to select cooling mode, cooling mode indictor turns on.
• Press “UP” or “DOWN” to adjust temperature ( from 16ºC to 31ºC).
• Press “FAN” to select high or low fan speed.
FAN MODE
• Press “MODE” to select fan mode, fan mode indicator turns on.
• Press “FAN” to select high speed or low speed.
• Temperature and sleep function cannot be altered.
TIMER MODE
• Under standby mode, press “TIMER” to setup the power-on time. Timer indicator turns on.
• Under power-on mode, press “TIMER” to setup power-off timer. Timer indicator turns on.
DEHUMIDIFYING MODE
• Press “MODE” to select dehumidifying mode, dehumidifying mode indicator turns on.
• Under dehumidifying mode, sleep function cannot be altered, and fan speed is low.
SLEEP MODE
• Press key “SLEEP” enter into sleeping mode, default value of fan speed is low.
• On sleep mode and cooling mode, Pre-set temperature will go up by 1ºC in the first one hour and another 1ºC in the
next hour and then maintained.
• Sleep mode is not available under dehumidifying and fan modes. If the inner water tank is full, or in machine standby
and mode conversion, sleep mode will be disabled.
COMPRESSOR PROTECTION
• The compressor will function 3 minutes after power on / restart.
WATER DRAINAGE
This machine uses an auto-water-evaporating system. Condensed-water cycle helps to cool down the
condenser, which will not only improve cooling efficiency, but also conserve energy.
• If inner water tank is full, the warning light will illuminate the screen and 8 seconds later the machine will enter into
standby mode. The buzzer will sound, compressor will stop functioning and all function keys will be disabled until the
problem is rectified.
• Power off the machine and remove the power plug from the power supply before draining out water. After that
restart the machine and it will operate normally.
4
Please read following safeguards carefully before using the machine:
• This machine just for domestic & indoor use only.
• Place and operate this machine in a dry environment.
• Do not operate the machine with a damaged power cord, plug or malfunction in the machine.
• IMPORTANT: Please request for technical assistance with regards to machine malfunctions or if you need to lengthen
the power cord. You may use an extension power cord, but care must be taken to avoid scattering the power cord in
a haphazard manner.
• Place the machine away from heat sources, direct sunlight and other power supply.
• IMPORTANT: Turn off the power before pulling out the power plug. When the machine is being cleaned,
repaired, and serviced or left unused.
• Clean the machine based on the steps listed in the user’s manual.
• Ensure that the machine conforms to the approved voltage requirements. Any damages arising from improper voltage
connection will void your warranty.
• Keep this machine away from young children.
• Do not leave the machine running even when no one is around. Always unplug it from the power supply.
• Do not yank the power cord when removing it from the power supply or moving the machine.
• Do not place the machine on in a damp place or immerse it in water or other liquids.
• Do not splash water or oil into the machine.
• Do not insert hard objects between fan blades.
• Do not attempt to repair the machine by yourself. Dealing with problems by non-professional person may result in
hazards. Even power cord replacement must be carried out by qualified electricians.
• Use only approved accessories from suppliers to prevent hazards and damage to the machine.
IMPORTANT:
• Place the machine on flat surfaces with air intake of at least 50cm from other objects.
• Make sure the power supply is easily accessible from the machine location.
• Place the machine standing upright so that the compressor can function properly.
• Do not use in the following locations:– Next to a source of fire.
– An area where oil is likely to splash.
– An area exposed to direct sunlight.
– An area where water is likely to splash
– Near a bath, shower or a swimming pool
• Ensure sufficient ventilation for air-inlet and outlet.
• Do not spray pesticides, paint or other flammable materials to prevent plastic deformation and other electrical
hazards
POWER SUPPLY
• Ensure the power plug is free from damage.
• Use a power plug instead of a connector
• Insert the power plug into the power supply first, then turn on power and press key “POWER” to operate the machine.
Please keep this user’s manual in a safe place for future reference.
IMPORTANT SAFEGUARDS
MAC-09PAFeather(IM)OP110414_Layout 1 4/17/14 9:57 AM Page 5
Page 6
11
TROUBLESHOOTING
Before contacting professional service, check it first yourself referring to the followings:
PROBLEM CAUSE SOLUTION
The air conditioner does No power supply. Connect to power supply and switch on.
not function. “FL” flashes on the display screen Drain water.
Timer-off is in operation. Turn on the unit three minutes later.
The air conditioner Unit is placed under sunlight. Close curtains.
restarts frequently Windows or doors open, too many Close doors and windows, remove the heat
people or a heat source is in the room. source.
Dirty/Clogged filter. Clean or replace the filter(s).
Air inlet or air outlet blocked. Remove the blockage.
The unit is too noisy Unit stands uneven. Place on an even, solid surface (less vibration).
Compressor not Compressor shuts down to protect Wait for 3 minute and restart again after the
operating from power surge temperature descends.
CAUTION
• Switch off the unit and unplug it immediately if anything abnormal happens. Then
contact a qualified electrician.
•
The manufacturer reserves the right to alter/modify data without advance notice
for product improvement.
THE DISPOSAL OF ELECTRICAL AND ELECTRONIC EQUIPMENT WASTE PRODUCTS ON THE PART OF
FINAL USERS IN THE EUROPEAN UNION
This symbol on the product or on the container indicates that this product cannot be eliminated with the general waste.
The user is responsible for eliminating this kind of waste by throwing them away at a “recycling point” specifically for
electrical and electronic waste. Selective collection and electrical equipment recycling contribute to preserve natural
resources and warrant waste recycling to protect environment and health. In order to receive further information about
electrical and electronic waste collecting and recycling, contact your Local Council, the service of household waste or the
establishment where the product was acquired.
2
MAC-09PAFeather(IM)OP110414_Layout 1 4/17/14 9:57 AM Page 6
 Loading...