

Moree ORA HOME LED PRO, 28-16-01 Instruction Manual
Instruction Manual (EN)
Mod. 28-16-01
ORA HOME LED PRO
Version 1.0 EN © 2014 Moree Ltd.
Disposal/ Ecology
Packaging material and appliance are made from recyclable
materials. Separation of the remaining waste materials into
different types facilitates the recycling of valuable raw materials.
When the appliance is to be no longer used please dispose of it
in the proper manner.
This Symbol on the product indicates that it should not be
disposed in the normal household waste. Please take it to
a recycling point for electrical and electronic appliances
to be recycled in a proper manner.
Also rechargeable batteries which are dead or defective should
not be disposed of in the household rubbish; always take them
to a special waste disposal and make an important contribution
to protecting our environment.
Please obtain information on disposal from your local
authority.
Distribution
Original Packaging
The device can be safely transported in the original
packaging. If insufficient protective packaging is
used, the customer is liable for any damages during
transportation.
PLEASE KEEP THE ORIGINAL PACKAGING AND USE IT,
IF POSSIBLE, IN CASE OF WARRANTY OR RETURN OF
THE EQUIPMENT.
www.moree.de
Moree Ltd.
Kaiserswerther Markt 11
40489 Düsseldorf
Germany
Designed and produced by Moree in Germany ©2014
Design Patented. Products are subject to change.
DESIGNED IN GERMANY
Please read the instruction manual fully, before using the product.
Keep the manual for the entire life of the product.
•
Storage
APP
WIFI
Instruction Manual
SAFETY PRECAUTIONS - LED PRODUCT
Dear customer,
we are delighted that you have chosen a Moree product.
EN
• Before using the product, please read the manual fully and
keep it for the entire life of the product.
• The product may only be used after correct installation.
• Make sure your socket voltage corresponds to the voltage
printed on the product.
• Disconnect the product from the mains supply before opening.
Never pull on the cable! Always pull on the plug.
• Caution! When disassembling do not look directly into the
operating light source.
• IMPORTANT:
THE PRODUCT MAY ONLY BE USED IN DRY ROOMS.
• The product may only be used when positioned horizontally,
with the top upwards.
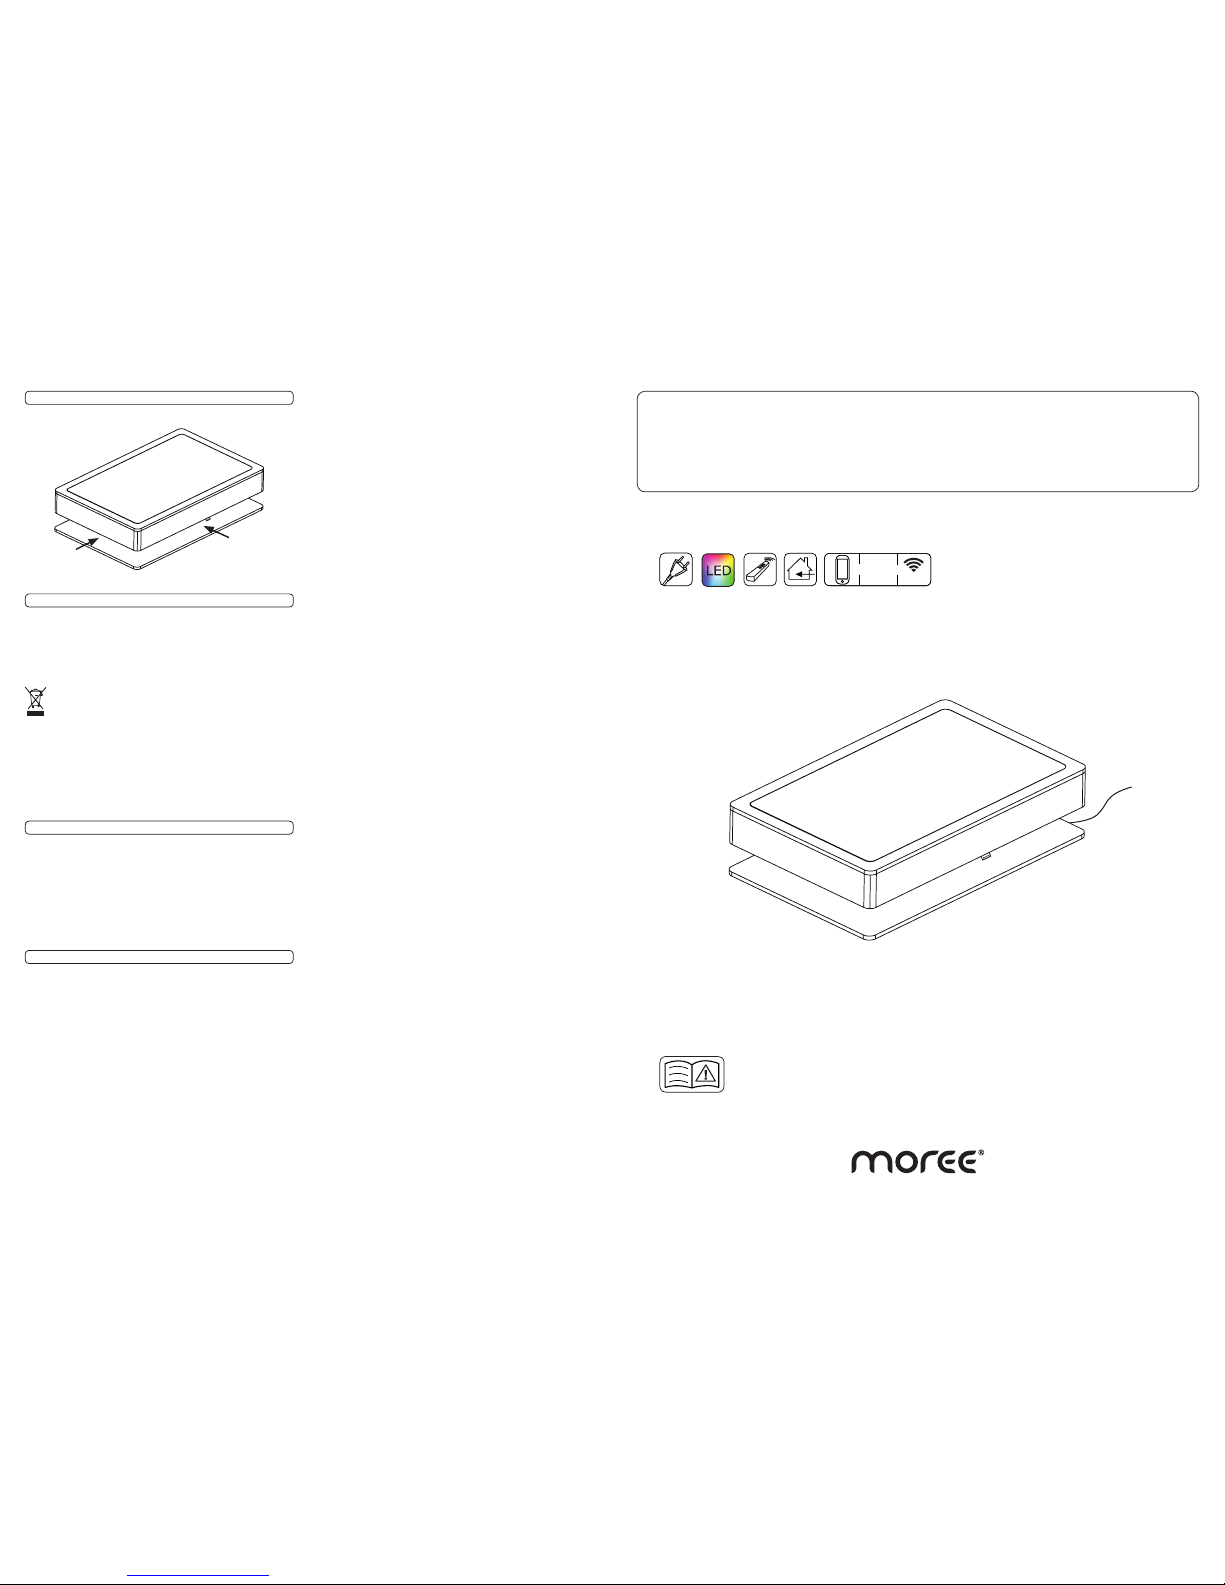
• Place the glass top with the white side facing down.
• Avoid dropping or subjecting the product to severe impact.
• Do not sit/ stand on the product. Max. load is up to 12 kg.
• If the appliance shows any defect, stop using it.
• Do not alter the product in any way. Faulty or unqualified
repair work may cause injury to the user.
• Replace damaged components only with specic ones that are
available from the manufacturer. Repairs & replacements must
be performed by qualified personnel.
• Keep product, batteries and packaging away from children and
infants. Risk of accidents, choking or suffocation may occur.
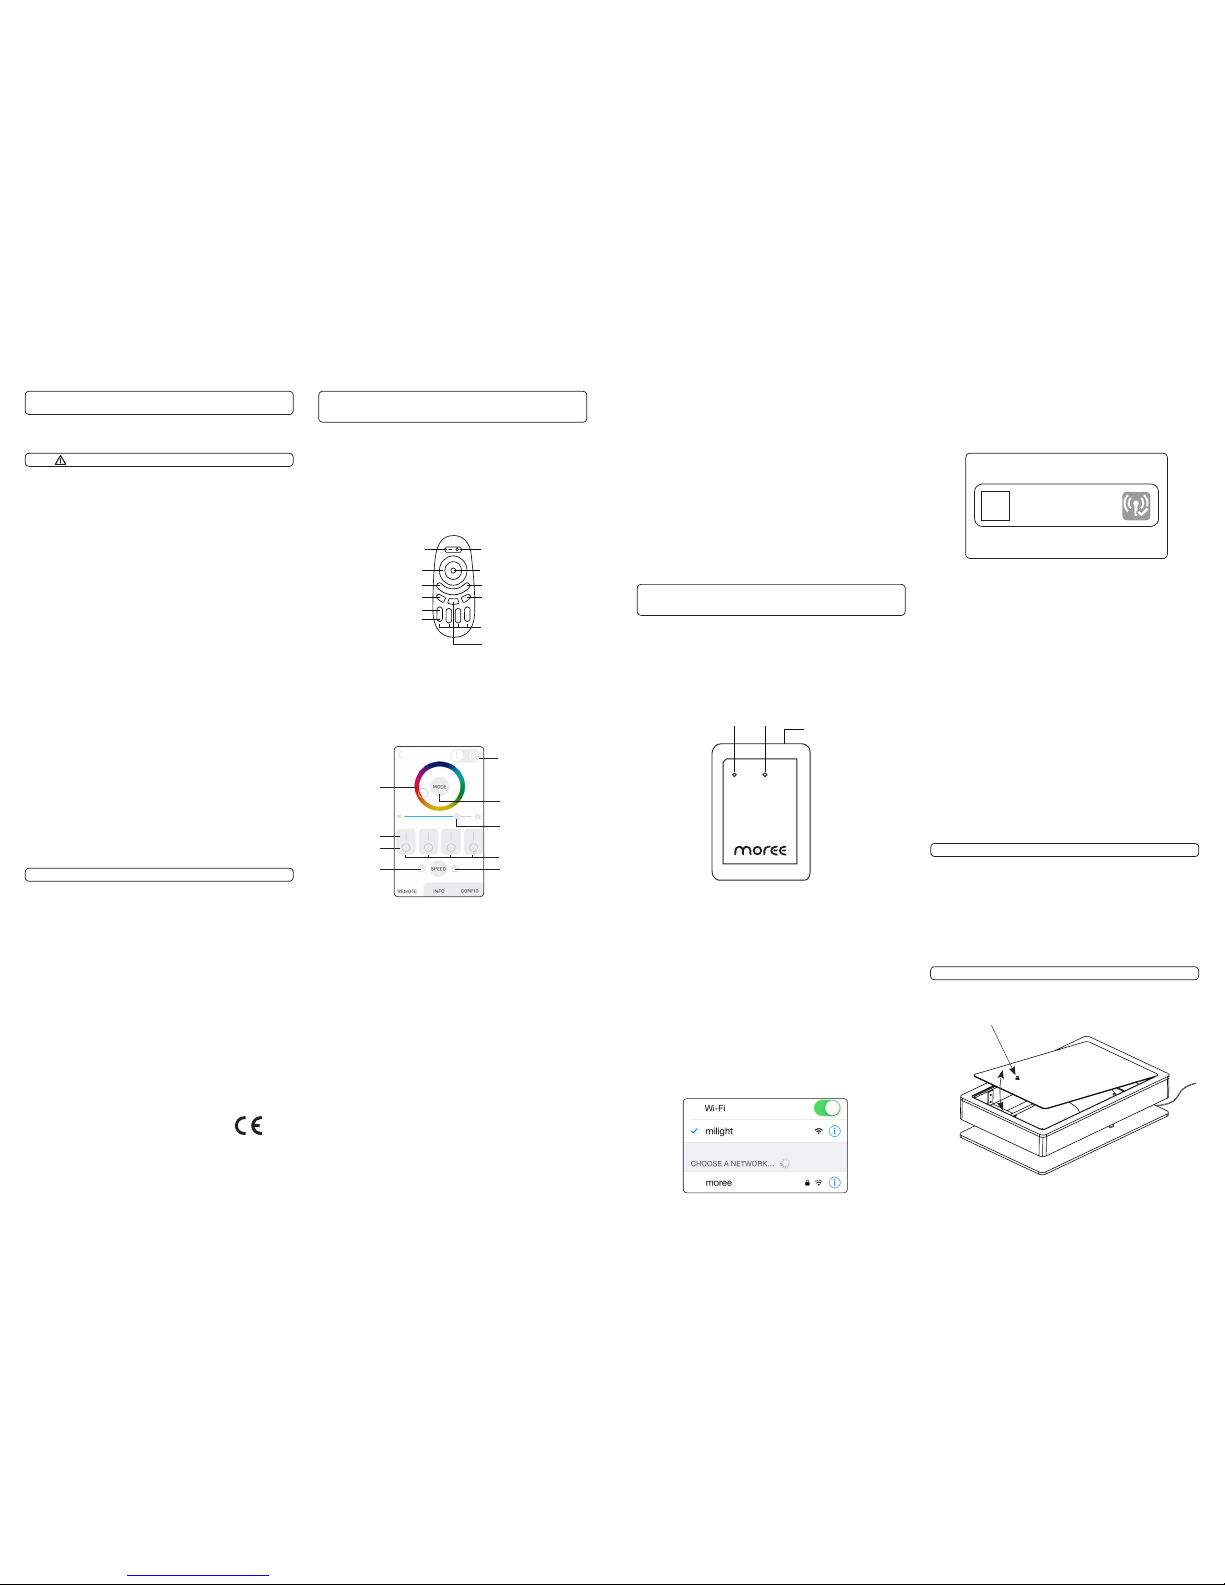
• Use suction cup near edge of glass top to remove it.
Dimensions: L 110 x W 70 x H 29 cm
Material/ Colour: Wood, spray painted, white satin
Weight: 28,2 kg
Illuminant: Multicolor LEDs MAX 24 W
LED Unit: This product includes built-in LEDs, which
c cannot be replaced.
This LED unit itself can be replaced.
Energy Class: A
Life Span: 35.000 h
Luminous Flux: Max. 522 lm
Light Colour: Multicolour
Voltage: 200 V/ 240 V~ 50 Hz
Cable: Approx. 3 m
Protection Class: II
Use: For indoor use
Moree product appliances meet
European safety standards.
Specifications - Mod. 28-16-01 Ora Home LED Pro (white)
1. Linking a remote or Smartphone/ Tablet to
control your Ora Home (2.4 GHz LED Pro Product)
2. Connecting the WIFI Controller to a
Smartphone/ Tablet
2.1 Introduction
In this section, you will be instructed on how to set up
your WIFI Controller (Mod. 20-02-03).
2.2 WIFI Controller Illustration
Please see the illustration below to become familiar
with the indicators and buttons on the WIFI Controller.
2.6 Reconnect to your WIFI Network
• Now, select the ‘Configuration’ tab at the bottom of
the app screen.
• Select the name of the initial wifi network you were
connected to, before connecting to the WIFI Controller.
• When this is complete, return to the ‘device list’ page.
• Refresh the ‘device list’ then select the ‘milight’ WIFI
Controller. Your device is now connected to the WIFI
Controller.
• If you wish to change the name/ image of the WIFI
Controller visible on the ‘Device List’ you can do so on
the ‘information’ tab.
2.7 Linking the Application with the Ora Home/ Moree
2.4 GHz Products
Now that your smartphone/ tablet is connected with
the WIFI Controller, you need to link your smartphone/
tablet to the Ora Home. Select the bottom left panel
remote, then refer to section 1.2 to continue.
1.3 Linking with the Ora Home/ Moree 2.4 GHz Products
First, you must turn off the Ora Home with the power
switch.
Turn it back on, and within 2 seconds press and hold
‘Zone On’ on the Zone number that you wish the Ora
Home to be a part of. When you have succesfully synced
the remote control to the Ora Home, it will flash 3 times.
Please see section 1.5 for grouping multiple 2.4 GHz
products/ bulbs together.
1.4 Unlink with the Ora Home/ Moree 2.4 GHz Products
If you wish to unlink the Remote Control with the Ora
Home, follow the same steps a section 1.3, but select
the Zone the Ora Home is currently on. The successful
unlinking with the Ora Home will result in the product
flashing 6 times. You must do this before you can relink
to a new zone.
1.5 Grouping Multiple Ora Homes/ Moree 2.4 GHz Products
If you wish to control multiple Ora Homes/ Moree 2.4 GHz
products at the same time, you can link them to 4 zones.
Repeat section 3.3 for each product/ bulb under the zone
of your choice.
1.6 Controlling various Ora Homes/ 2.4 GHz Products
Now you have various Ora Homes/ 2.4 GHz Products
linked to different zones. Press ‘Zone On’ button to
control the selected zone only. To return control to all
zones press ‘Master On’.
milight
Device
1.1 Remote Control (Mod. 20-02-02)
1.7 Functions
• To turn all lights white, press and hold ‘Master On’
• To turn a selected light zone white, press and hold your
chosen ‘Zone On’
• Scroll the colour ring to select any colour.
• Press the Mode button (1-9 times) to start one of nine light
programmes.
• Use the +/- speed buttons to adjust the programmes.
• Make sure that the power supply is disconnected
before cleaning.
• Clean the product with a soft, damp cloth only. Do
not use abrasives, alcohol or solvent based cleaners.
• Clean the glass top with glass cleaner. Use suction cup
near edge of glass top to remove it.
Maintenance
Suction Cup for Glass Top
• Use suction cup near edge
of glass top to remove it.
Master ON
Colour Wheel
Brightness
Speed -
Zone ON
Zone OFF
(Mode) Programme
selection (9 programmes)
Indicator
Zone 1-4
Speed +
Brightness +
Master OFF
Link App
Reset
The Ora Home LED Pro comes with the Remote Control
(Mod. 20-02-02) as standard.
However you can upgrade to the WIFI Controller (Mod.
20-02-03), which allows you to control Moree 2.4 GHz
products on your Apple or Android smartphone/ tablet
via the Moree App within your WIFI-Network.
Colour Wheel
Speed -
Zone On
Zone Off
Zone 1-4
Speed +
Master ON/ OFF
2.3 Download the Moree Application
Download the free application ‘Moree Remote’ from the
App Store or Android Google Play.
2.4 Power the WIFI Controller
Power the WIFI Controller via USB (DC 5V, 0,5/1A).
Once successfully powered, the ‘App’ Indicator should
illuminate.
If the WIFI Controller has been used previously, reset the
unit by pressing the reset button on the side of the WIFI
Controller for 3 seconds until the light flashes.
2.5 Connect your device to the WIFI Controller
Go to your wifi settings on your device. You must search
for the network ‘milight’. Connect to this network. The
‘Link’ indicator should illuminate.
Now open the ‘Moree’ application. The first page you will
be taken to is the ‘device list’.
Select the device named ‘milight’.
1.2 Moree Remote for Smartphone/ Tablet
Insure you have sucessfully installed your WIFI Controller
(section 2). On the Moree app, please choose the bottom
left remote, then look at the image below to become
familiar with the basic controls of the application.
Brightness +/-
Programme
selection (9 programmes)
 Loading...