

Page 1
Page 1
© 2011 Maka Technologies Group. All Rights Reserved.
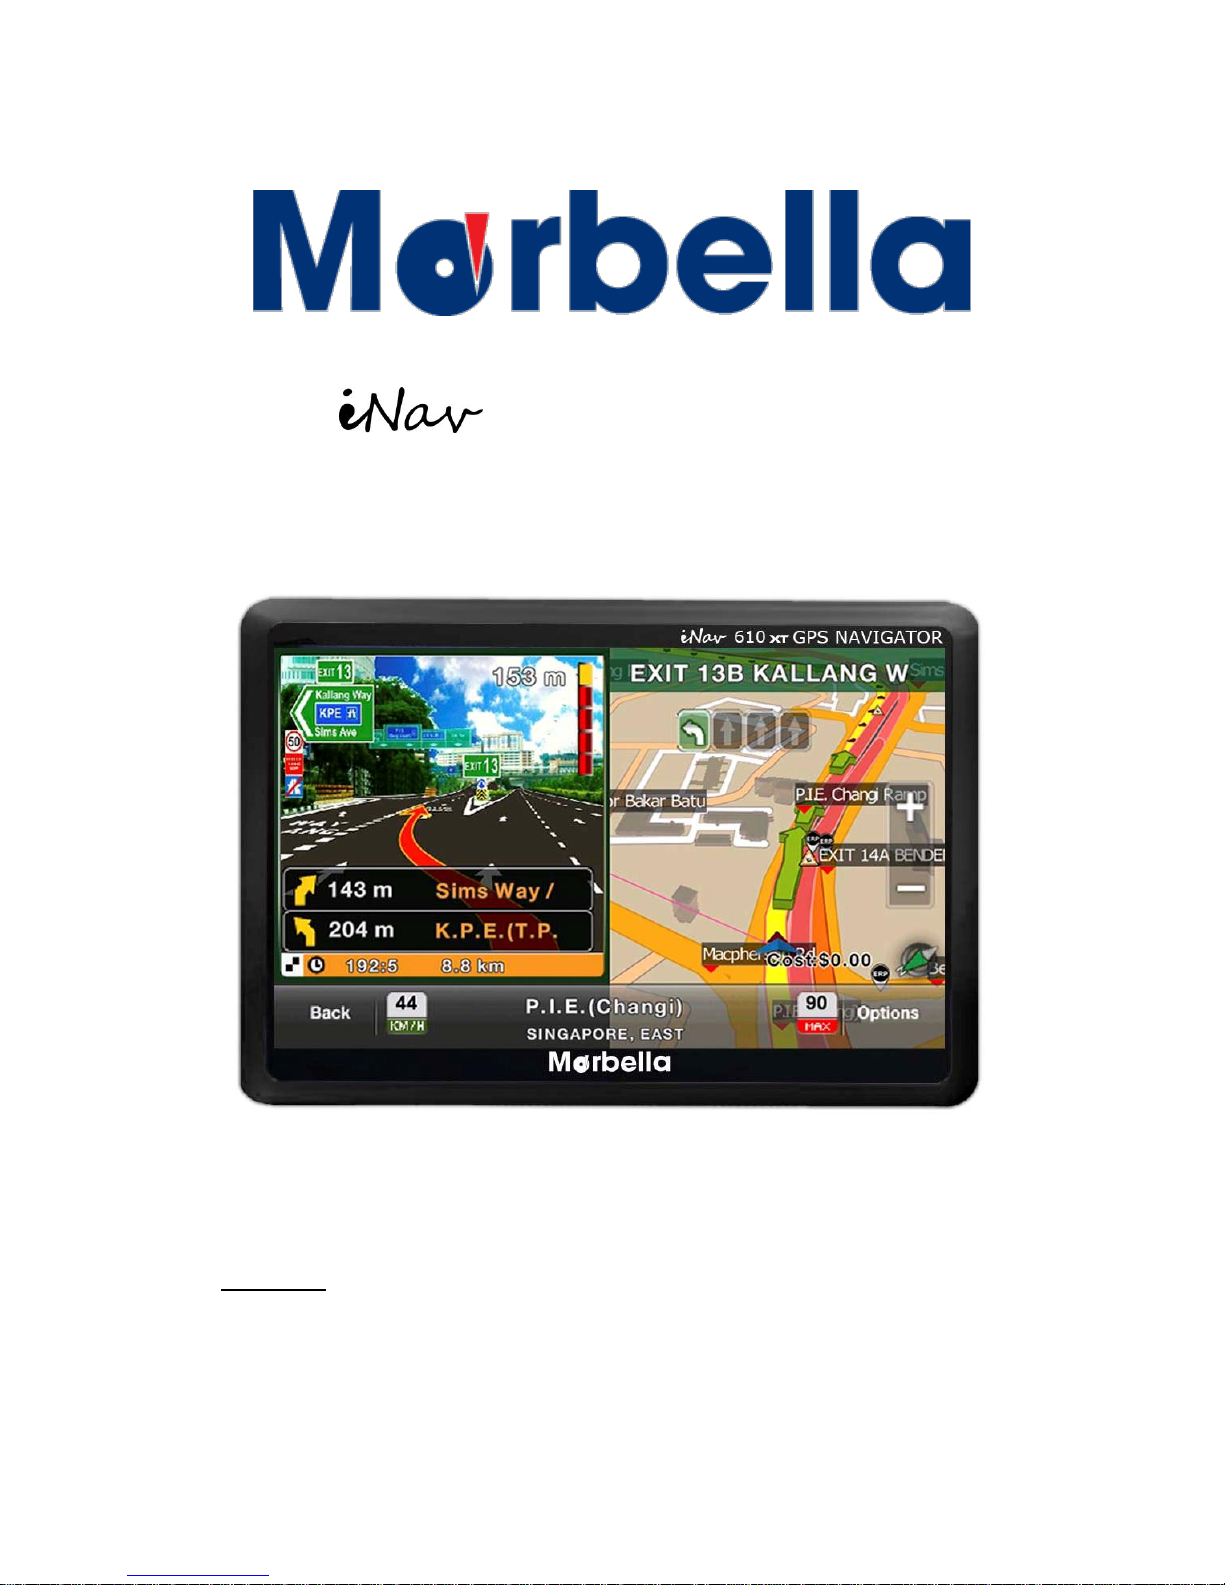
610XT Sleek 5-inch
Navigator
User’s Manual
R05
March 2012
Trademarks
All brand and product names are trademarks or registered trademarks of G-Sol
Technology Co., Limited. In association with Maka GPS Technologies Private Limited
(Singapore), Maka GPS Technologies Sdn. Bhd. (Malaysia) & Maka Technologies Group
(H.K.) Limited
The information in this manual is subject to change without notice.
Page 2

Page 2
© 2011 Maka Technologies Group. All Rights Reserved.
Before You Start
※ Precautions and Notices
※ DO NOT ADJUST THE “NAVI PATH” UNDER “SETTINGS” UNLESS YOU
NEED TO SWITCH IT TO OVERSEAS MAP.
※ Use this product prudently. The product is designed to be use only as a
navigation aid. It is not for precise measurement of direction, distance, location
or topography.
※ The calculated route is for reference only. It is the user’s responsibility to follow
the traffic signs and local regulations along the roads.
※ When you get off the car, do not leave your device on the dashboard that is
subject to direct sunlight. The overheating of the battery can cause malfunction
and/or danger.
※ GPS is operated by the United States government, which is solely responsible
for the performance of GPS. Any change to the GPS system can affect the
accuracy of all GPS equipments.
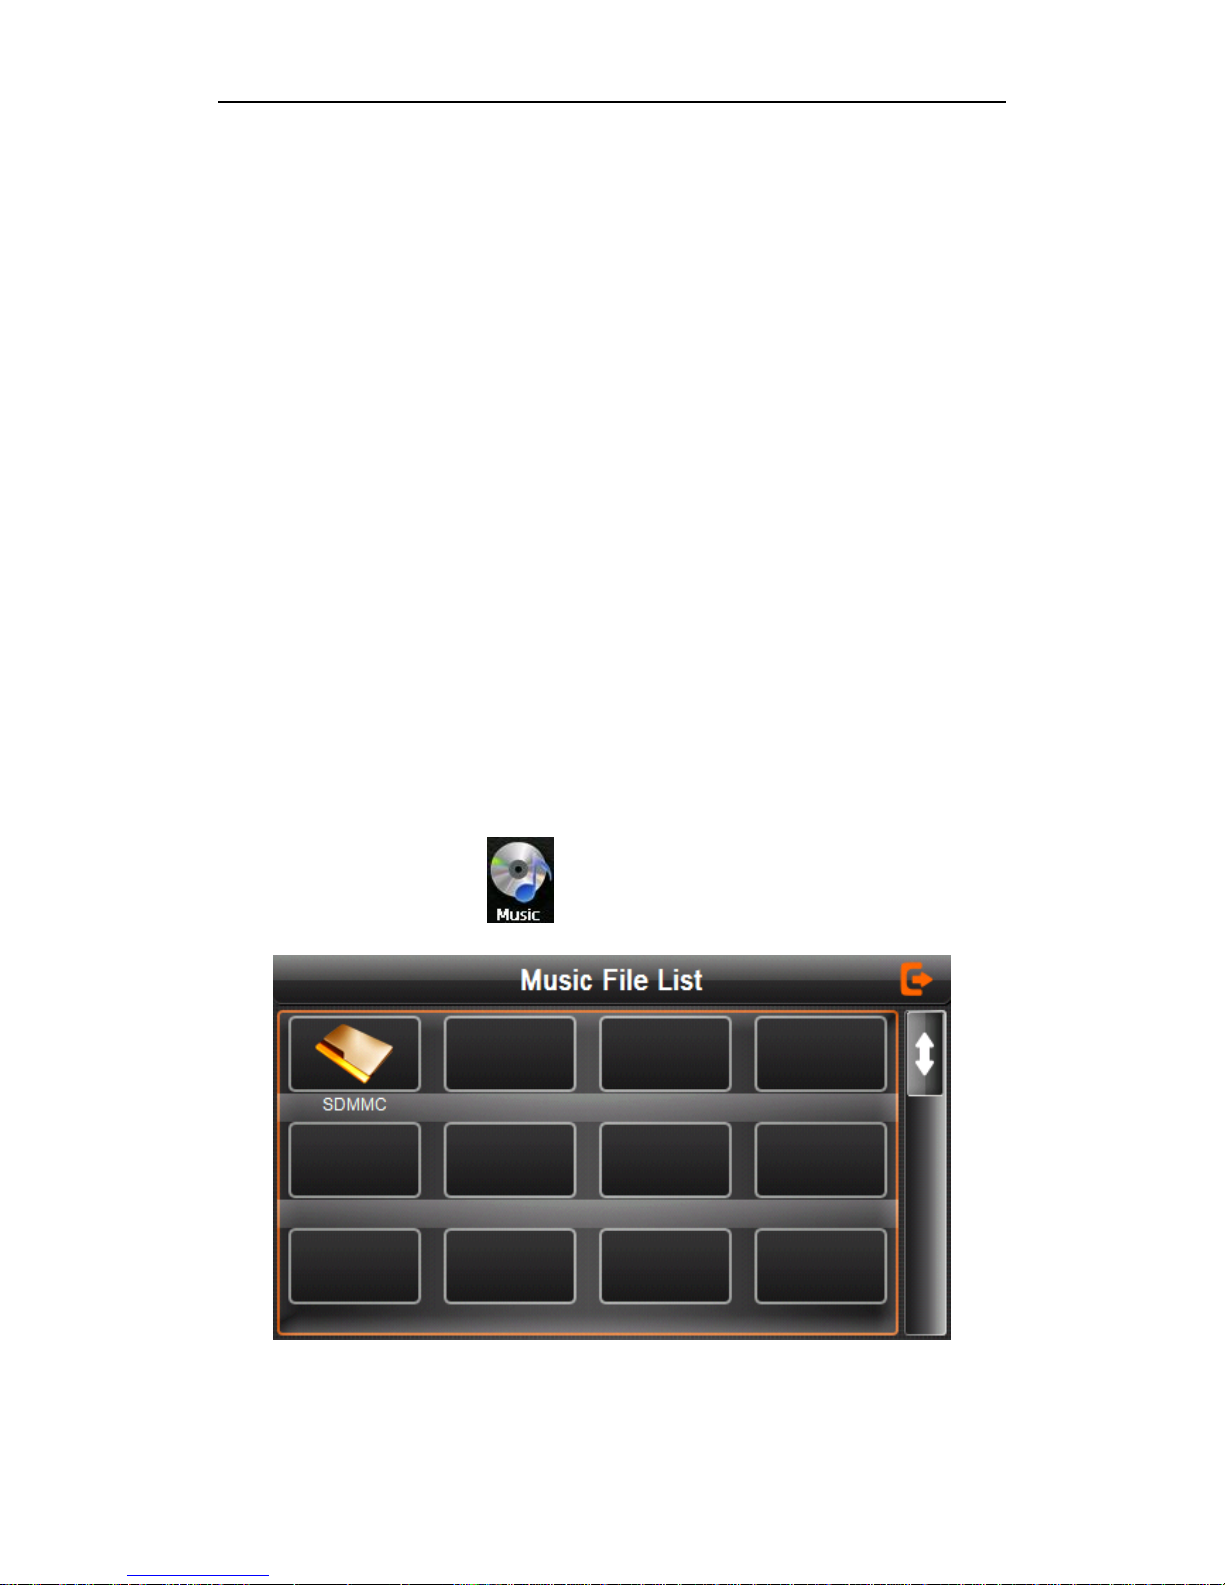
※ GPS satellite signals cannot pass through solid materials (except glass). When
you are inside a tunnel or building, GPS positioning is not available. Tinted
window, solar film or any form of sticker on the front windscreen will affect the
performance of the GPS satellite reception. It will take slightly longer time than
usual to fix your position.
※ A minimum of 4 GPS satellite signals is needed to determine current GPS
position. Signal reception can be affected by situations such as bad weather or
dense overhead obstacles (e.g. trees and tall buildings).
※ GPS signal will be affected under bad weather condition.
※ A car holder is needed when using the device in a car. It is recommended that
you place the device in an appropriate place, so as not to obstruct the driver’s
view, or deployment of airbags.
※ When battery run out, the device will automatically turn off the power. Kindly
plug the cigarette car charger to power it up.
Page 3

Page 3
© 2011 Maka Technologies Group. All Rights Reserved.
※ Overview
GPS Navigation Features
※ Preloaded with Galactio SLA (Singapore Land Authority) and Malfreemaps
West Malaysia & East Malaysia, Thailand, Brunei provided by Malfreemaps and
Indonesia Maps provided by Navigasi Maps.
※ GPS positioning
※ Optimal route calculation and trip plan
※ Friendly and efficient navigation with turn-by-turn, voice, and visual guidance
※ Various ways for searching a location on the map
- Using a known “Road” (e.g. Alexandra Road, Hougang Avenue 8, Jalan Bukit
Bintang, )
- Using a POI
(point of interest, including Postal Code, Full address search – e.g. 159919,
Blk 13 Holland Drive, 271013 and etc…)
- Search using Malfreemaps for a much more detail map in both West and East
Malaysia. For an example, If you are looking for Hotel, KLCC, Shopping
Centre please search under “Find POI”. If you are looking for a street in
Malaysia, please take away the “Jalan” word when you enter under “Find
Road”
- Using POI icon such “Restaurant”, “Building”, “Shopping” to locate the nearest
point of interest near your current location.
- Using Favorites (personal stored locations)
- Using History (previous destinations)
※ Please refer to “Galactio Software User Instruction Manual” stored inside
the CD or you may download it from our website for a detail instruction on
using the navigation software.
※ Viewing modes for different needs and situations:
- 2D or 3D (3D Landmark and Junction View)
- Daytime or night-time view
Page 4

Page 4
© 2011 Maka Technologies Group. All Rights Reserved.
Other Features
※ Audio Player
※ Photo Viewer
※ Movie Player
※ Bluetooth Handsfree Communication (Receive / Dial Calls)
※ FM Transmitter
※ Calculator
※ Game Player
※ Av-input (Reverse Camera support)
About this Manual
This manual is divided into four major parts:
※ Part I “Basic Operations” tell you how to get your device running and
customize system settings.
※ Part II “Media” introduces Music Player, Photo Viewer, Video Player,
Bluetooth Communication, FM Transmitter” and etc...
※ Part III “Maintenance and Troubleshooting”
※ Part IV “Service Centre Location”
※ How to use the navigation? Please refer to Navigation Manual found
from either CD (if available) or inside the SD card.
You may download our both hardware and software instruction
manual from online @ www.makagps.com.sg > Support > Download
Instruction Manual for Marbella and choose your Marbella model.
Page 5

Page 5
© 2011 Maka Technologies Group. All Rights Reserved.
Part I. Basic Operations
Part I guides you through the process of getting your device running,
familiarizes you with the external components, and tells you how to customize
system settings
1. Getting Start
This chapter tells you step by step how to perform the initial start-up and
introduces you to the external components of your device.
1.1 Understanding Hardware Features
The Marbella 610XT Sleek 5inch GPS Navigator equipped with the
features as follows;
◆ High performance, low-power consumption MediaTek MT3351 CPU;
◆ High performance memory RAM – 128MB DDRAM
◆ High performance Internal NAND memory ROM – 4GB NAND Flah
◆ Simple and easy operate user interface
◆ Bluetooth Handsfree Communication (Receive / Dial Calls)
◆ SMART Power management: Smart Auto On/Off
◆ Data transmitting is strongly recommended to use a Micro-SD card reader
to ensure secure and fast data transmission.
◆ Excellent in receiving signal: accurate position fixing provides you the
satisfied navigating service;
◆ Entertainment: MP3 and MP4 function can relieve your fatigue;
◆ FM Transmitter is the unique feature that allows you to transmit the sound
from your GPS speaker wirelessly to your car speaker. Please refer to pg. 33
for detail information.
Page 6
Page 6
© 2011 Maka Technologies Group. All Rights Reserved.
◆ Install a rear view reverse camera at the back of your car and monitor the
rear view situation via our Marbella 610XT once you are reversing or
parking your car.
You can use it when driving, walking, riding, or waiting for a meeting; the
perfect “GPS + entertainment” function can make your life and work more
splendid.
1.2 Package
The packing box contains the following accessories, please contact Maka GPS
Technologies if there is any missing of accessories mentioned below;
1. GPS navigator
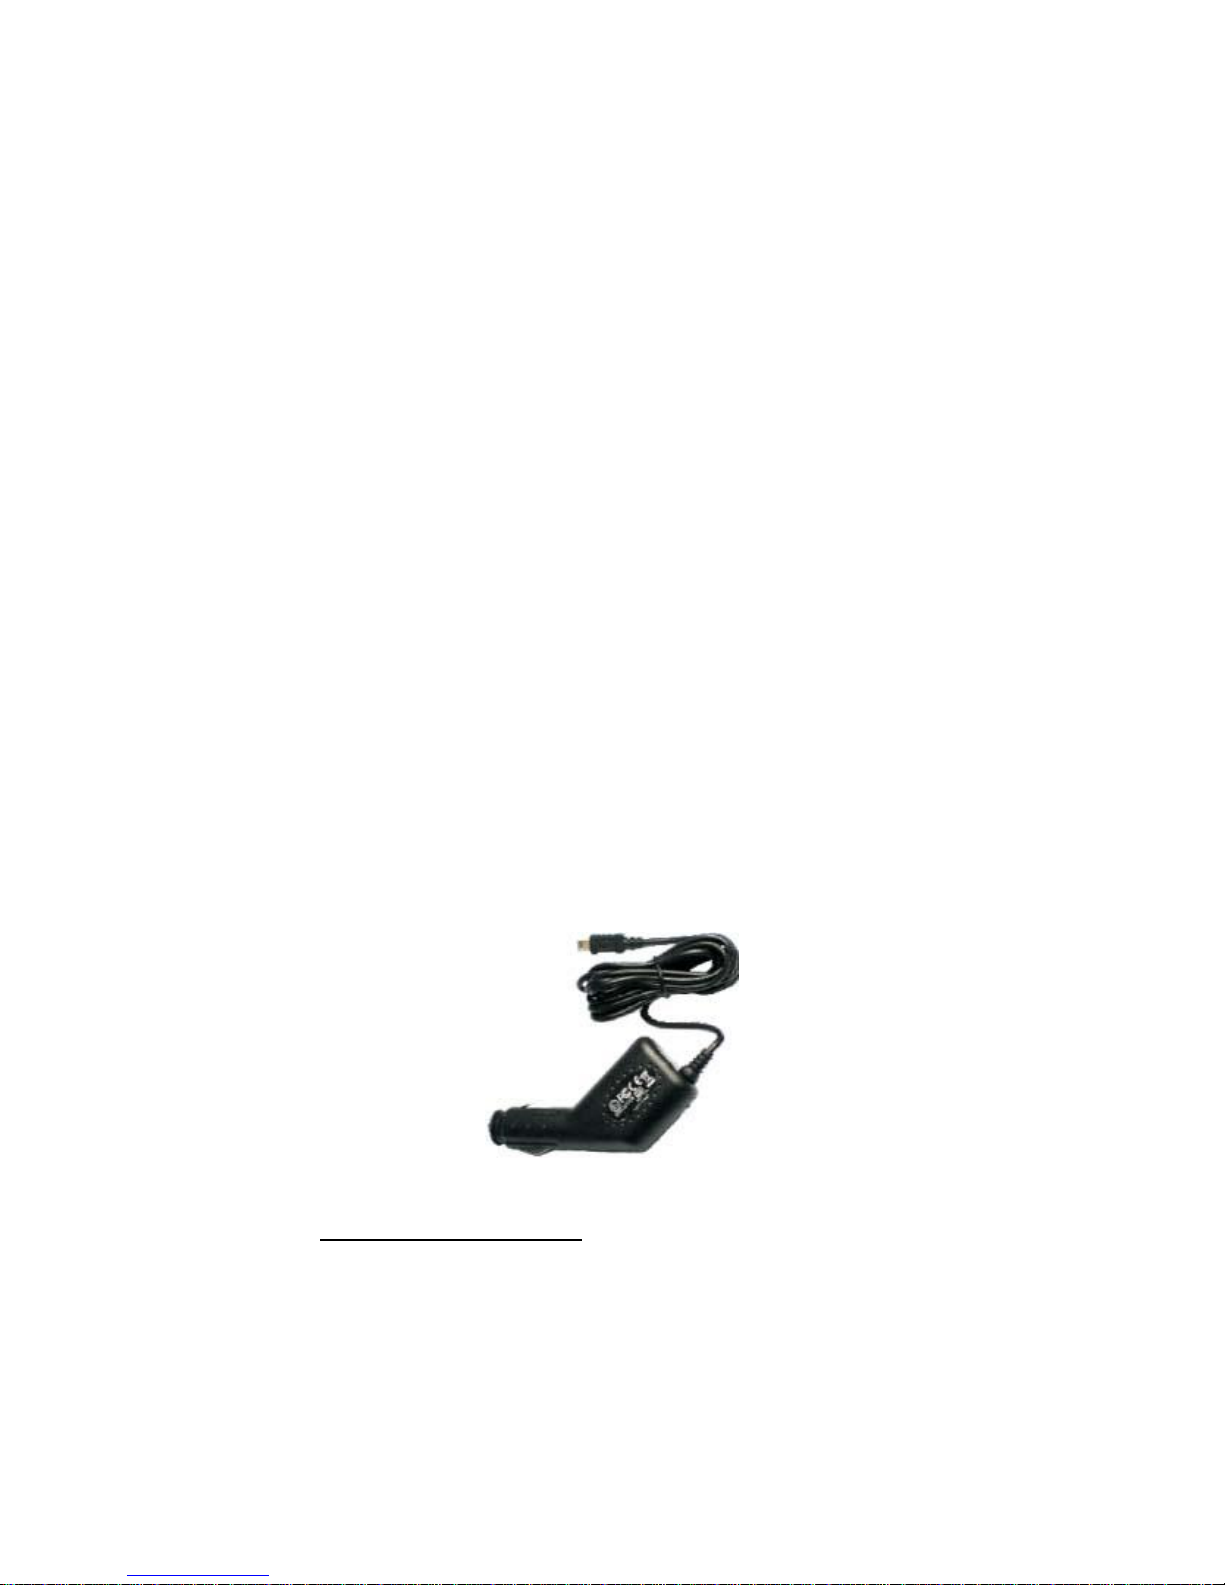
2. Car charger
3. CD (Hardware and Software Instruction Manual found inside)
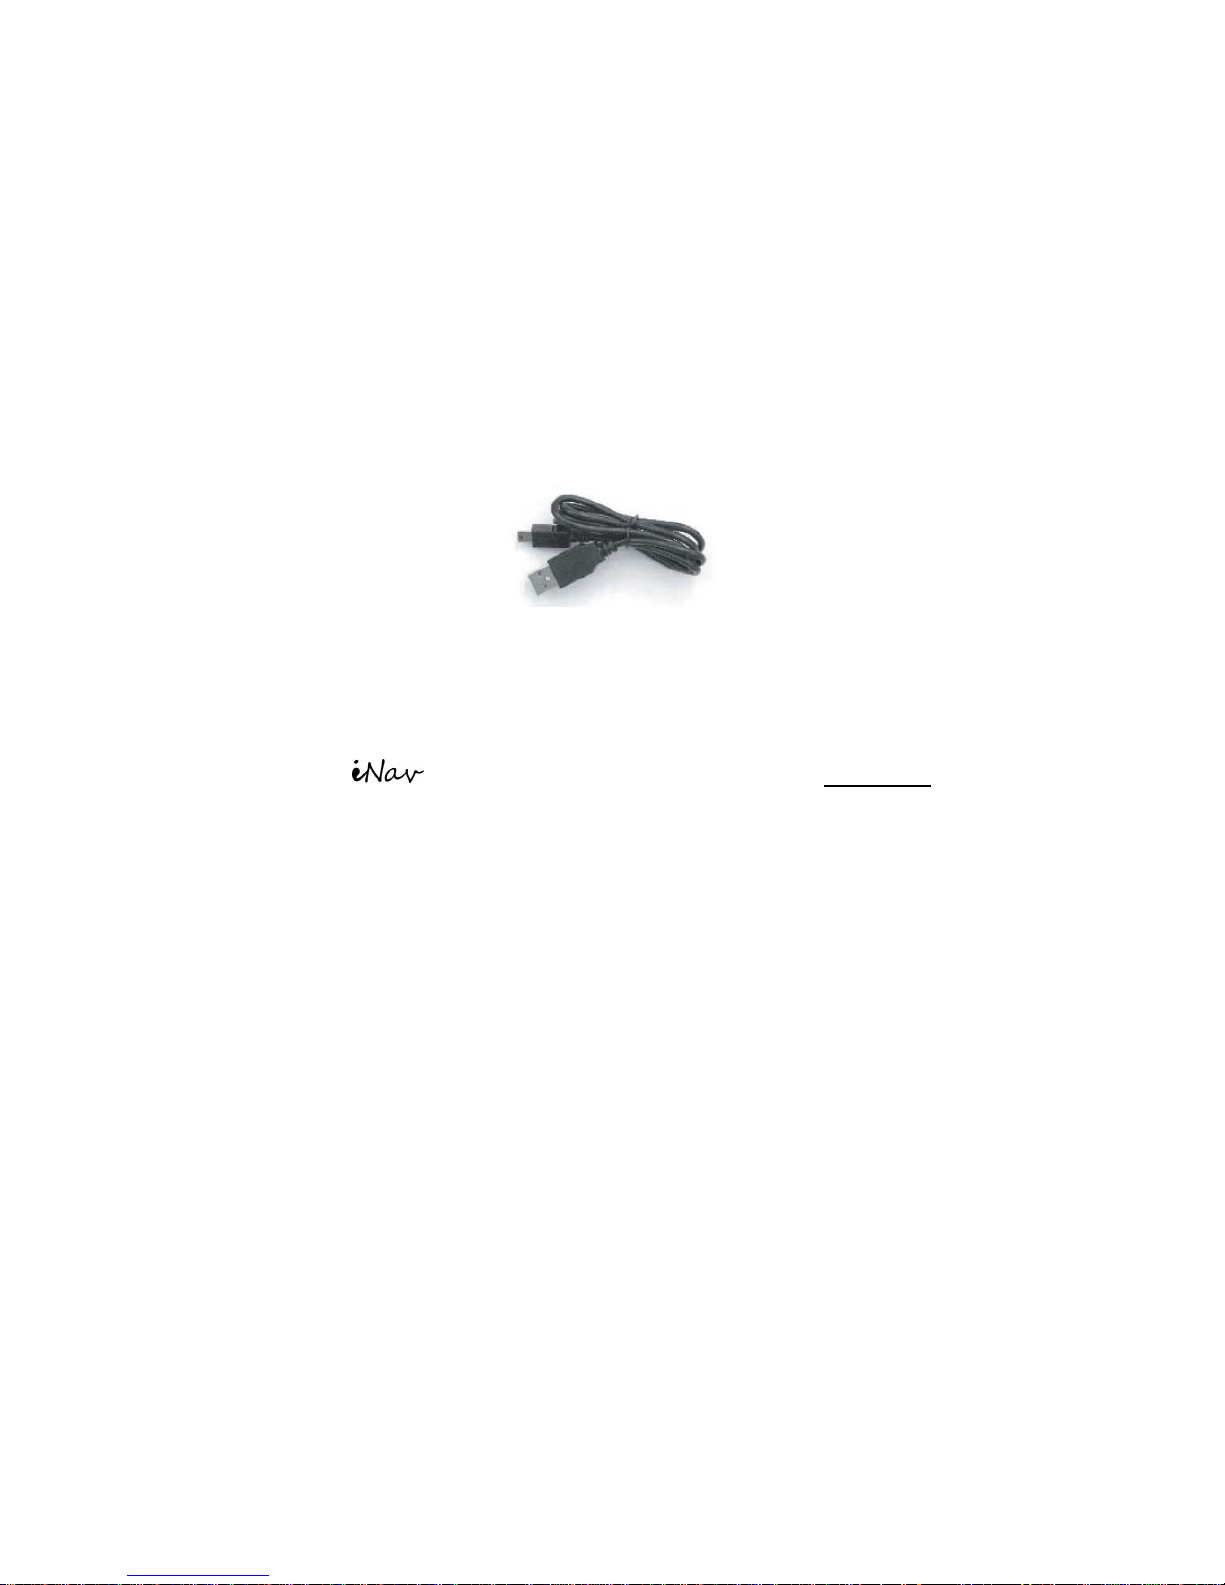
4. MINI USB cable
5. Car bracket / Window mounting
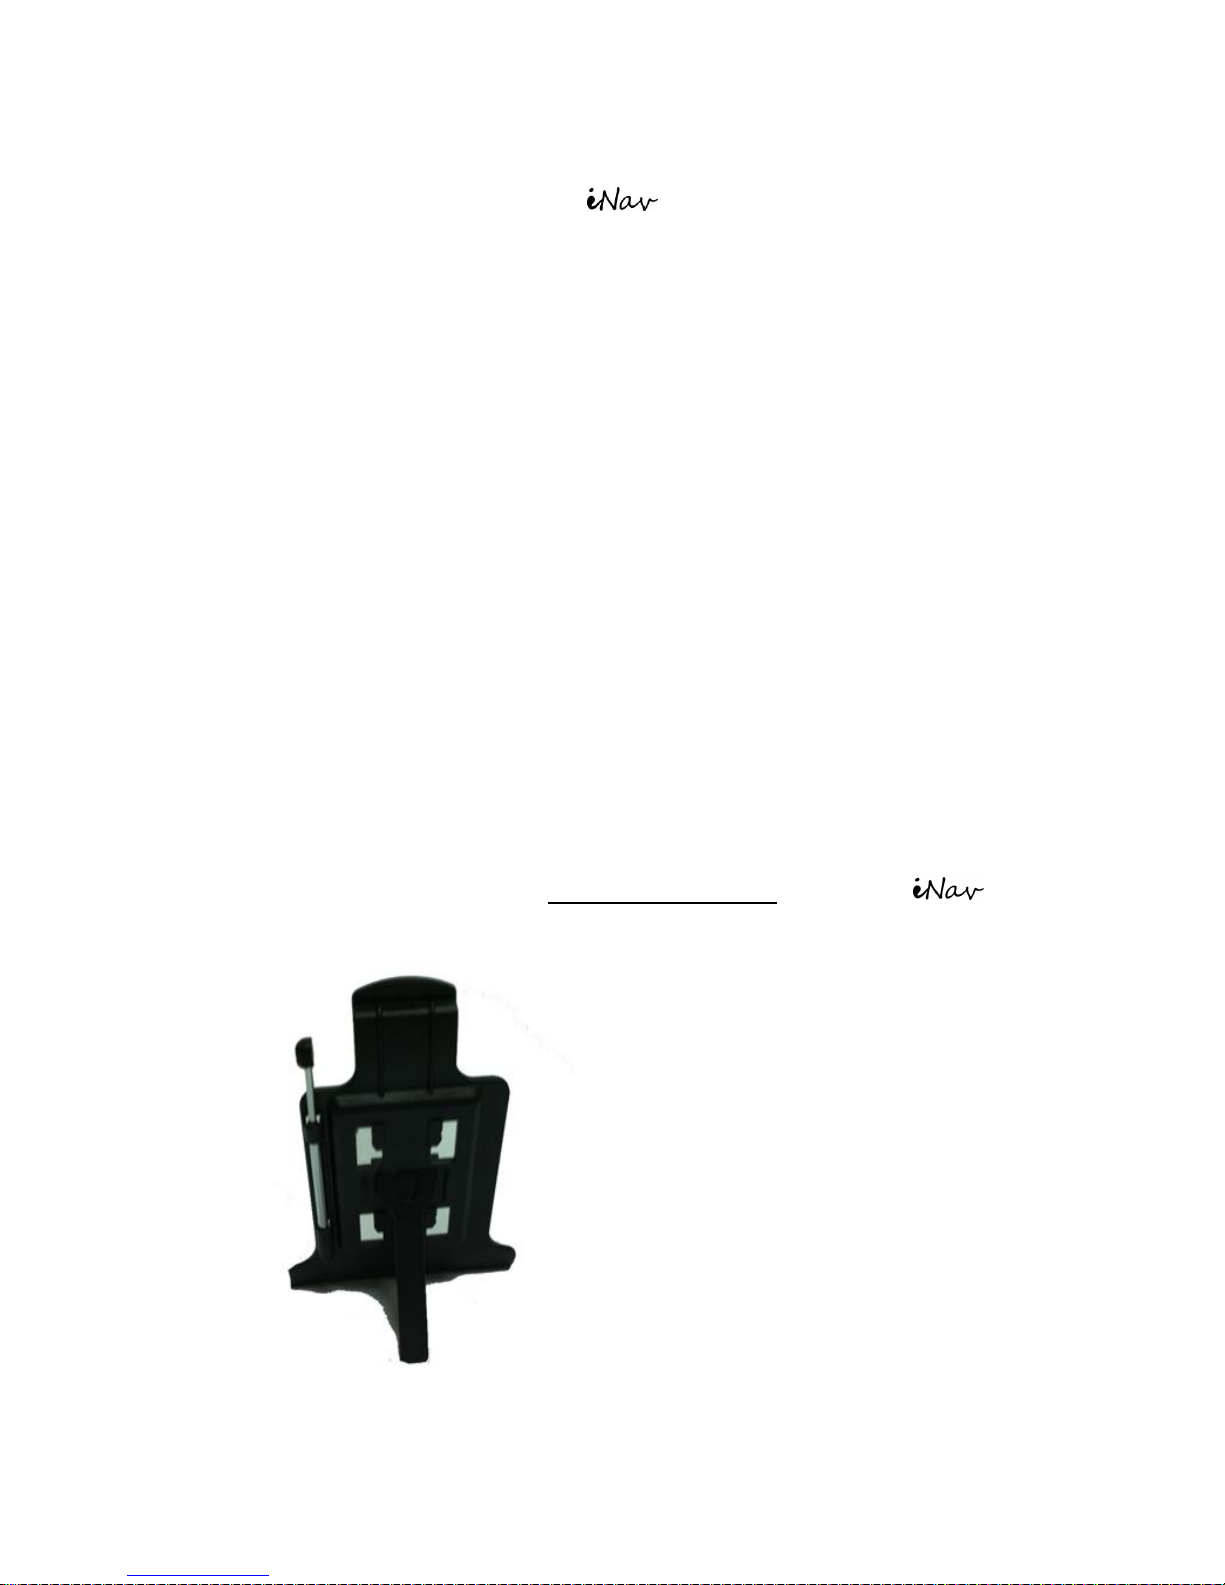
6. Stylus will be located at the back of the car bracket for Marbella
610XT (please refer to the image below)
Page 7
Page 7
© 2011 Maka Technologies Group. All Rights Reserved.
1.3 Connecting to Car Power and Charging the
Battery
Connect the adapter cable to your device and plug into a car charging slot or
charge the device via connecting AC adopter (optional) to Wall plug. When
charging the battery for the first time, you should charge it for a couple of
hours.
NOTE:
● Depending on your region of purchase, the connector converter may not
look exactly the same as the picture shown.
● Marbella 610XT Sleek 5inch will automatically switch ON during
charging.
1. If you will not use the product for a long period of time, be sure to fully
charge the battery at least once every two weeks. Over discharge of the
battery can affect the charging performance.
2. Standard battery life will last from 1 hour to 2 hours after a complete full
charge. However, it is also depends on the Brightness of the screen, level
of the volume and etc... Please go to “Settings” under Backlight and adjust
the backlight.
3. Car charger is always an ideal tool to keep it standby with you just in case
the battery goes out.
Page 8
Page 8
© 2011 Maka Technologies Group. All Rights Reserved.
1.4 Using Your Device in a Vehicle
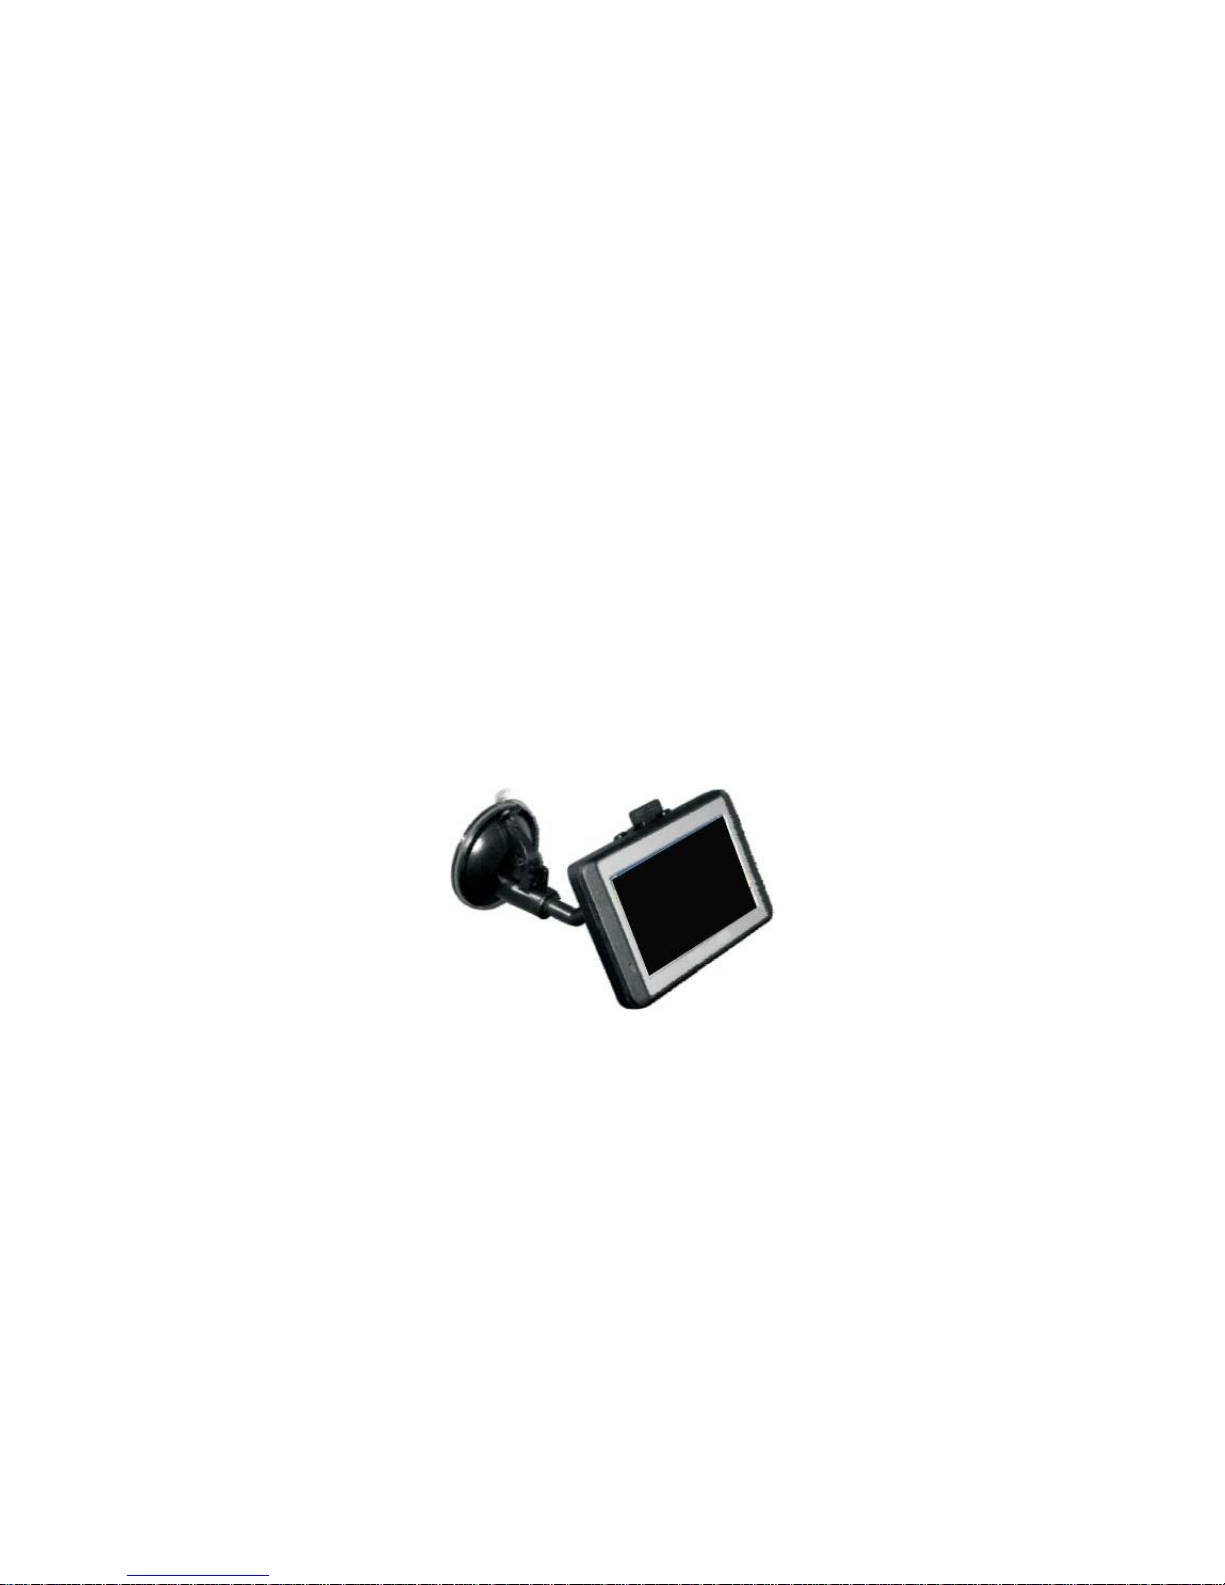
Using the Car Holder
※CAUTION:
1. Select an appropriate location for the car holder. Never place the holder
where the driver’s field of vision is blocked.
2. If the car’s windshield is tinted with a reflective coating, an external
antenna (optional) may be needed to route the antenna to the top of the
car through a window. When closing the car window, be careful not to
pinch the antenna cable. (Cars with an anti-jam window design may
automatically leave adequate space as needed.)
NOTE: Depending upon the specific model purchased, the car holder
supplied with your device may not look exactly the same as the
picture shown.
Important Notes for Use in a Vehicle
● Take care that the holder does not present any risk to safety, even in the
case of an accident, when installing it.
● Take care that the holder does not impede any safety components.
● The display of your navigation system may show “light re-flexions”. Please
take care of not being “blinded” during operation.
● Do not mount the components within the operating range of any airbags.
● Check the secure adherence of the suction cup at regular intervals.
● The power plug will consume power, even if no device is connected.
Page 9
Page 9
© 2011 Maka Technologies Group. All Rights Reserved.
Remove it when not in use to avoid draining the battery.
● Check all safety equipment in your car after installation.
Connecting the Car Charger
The car charger supplies power to your device when you are using the device
in a car.
※CAUTION : To protect your device against sudden surges in current,
connect the car charger only after the car engine has been started.
NOTE: Depending upon the specific model purchased, the car holder
supplied with your device may not look exactly the same as the picture
shown.
1. Connect one end of the car charger to the power connector of your
device.
2. Connect the other end to the cigarette lighter in the car to power and
charge your device and ensure that it will not lose contact while driving.
This could cause a malfunction.
● Hint: Remove the car adapter from the cigarette lighter socket when
ending a trip or when parking the car for an extended period of time (even
parking for a couple of hours is advise to do so).
Page 10

Page 10
© 2011 Maka Technologies Group. All Rights Reserved.
IMPORATANT CLAUSE
● The voltage of the car engine will normally shoot up very high after parking
the car for a period of time (even a couple of hours). We strongly advise our
customer to remove the car charger from their cigarette lighter after parking
the vehicle or before switch on the engine. Such faults caused damage to
Marbella GPS Navigator short circuited or any damages will be exempted
from the warranty for such case.
Page 11

Page 11
© 2011 Maka Technologies Group. All Rights Reserved.
2. Features & Specification
This chapter guides you through the process of using your device and
familiarizes you with the basic operations such as using the stylus pen and
navigation pad.
2.1 Main features
◆ Operating system: Microsoft Windows CE 6.0;
◆ Only 9.99mm Sleek
◆ High performance, low-power consumption MediaTek MT3351 CPU;
◆ High performance memory RAM – 128MB DDRAM
◆ High performance Internal NAND Flash – 4GB ROM
◆ 5〞TFT LCD display with resolution of 480*272 pixels;
◆ Hi-Fi stereo earphone and built-in Hi-Fi speaker, volume adjustable;
◆ Button and touch-screen operation;
◆ Built-in sensitive GPS antenna;
◆ Built-in sensitive Bluetooth Handsfree Communication
◆ FM Transmitter
◆ The navigating software could run from the internal memory directly;
◆ Video format supported: ASF, AVI, WMV, 3GP, MP4, FLV;
◆ Photo format supported: BMP, JPG, PNG;
◆ E-book format supported : TXT;
◆ MINI USB port;
◆ Built-in rechargeable Li-battery which can be powered by travel and car
charger.
◆ Built-in AV-input Support (Reverse Camera Support)
◆ Smart Auto On/Off
Page 12

Page 12
© 2011 Maka Technologies Group. All Rights Reserved.
2.2 Specification
CPU
MediaTek MT3351
RAM memory
128 MB
LCD display
5” TFT LCD display,
Resolution :480RGB(H)x272(V)
Touch-screen
High-accuracy, endurable
touch-screen
USB
USB Client 2.0, MINI USB port
External Storage
Micro-SD/TF card slot , the
maximum capacity of Micro-SD
Card supported maximum up to
16GB
Audio
A: Built-in high fidelity speaker
B: High fidelity stereo earphone
GPS
Cold start: <42s
Hot start: <3s(in the open area)
Warm start <36s
Battery
Built-in rechargeable Li-battery
Battery Charging
port
DC 5V port
Bluetooth
Bluetooth V1.2
FM Transmitter
Active
Car Charger
DC9-24V, 5V/1.5A
Status of the LCD
light
When charging, the red light is on;
when charge finished, the blue light
is on.
Operating
System
Microsoft Windows CE 6.0
Navigation
Software
Preloaded and Encrypted into
Internal 4GB NAND Flash
Video Player
ASF,AVI,WMV,3GP,MP4,FLV;
Audio Player
MP3 and WMA
Photo viewer
E-Album, JPG, GIF, BMP, PNG
EBook Viewer
TXT
Temperature
Operating Temperature : 0℃ to
60℃
Storage Temperature : -20℃ to
60℃
Working humidity
range
45% to 80%RH
Page 13
Page 13
© 2011 Maka Technologies Group. All Rights Reserved.
3. Basic Function
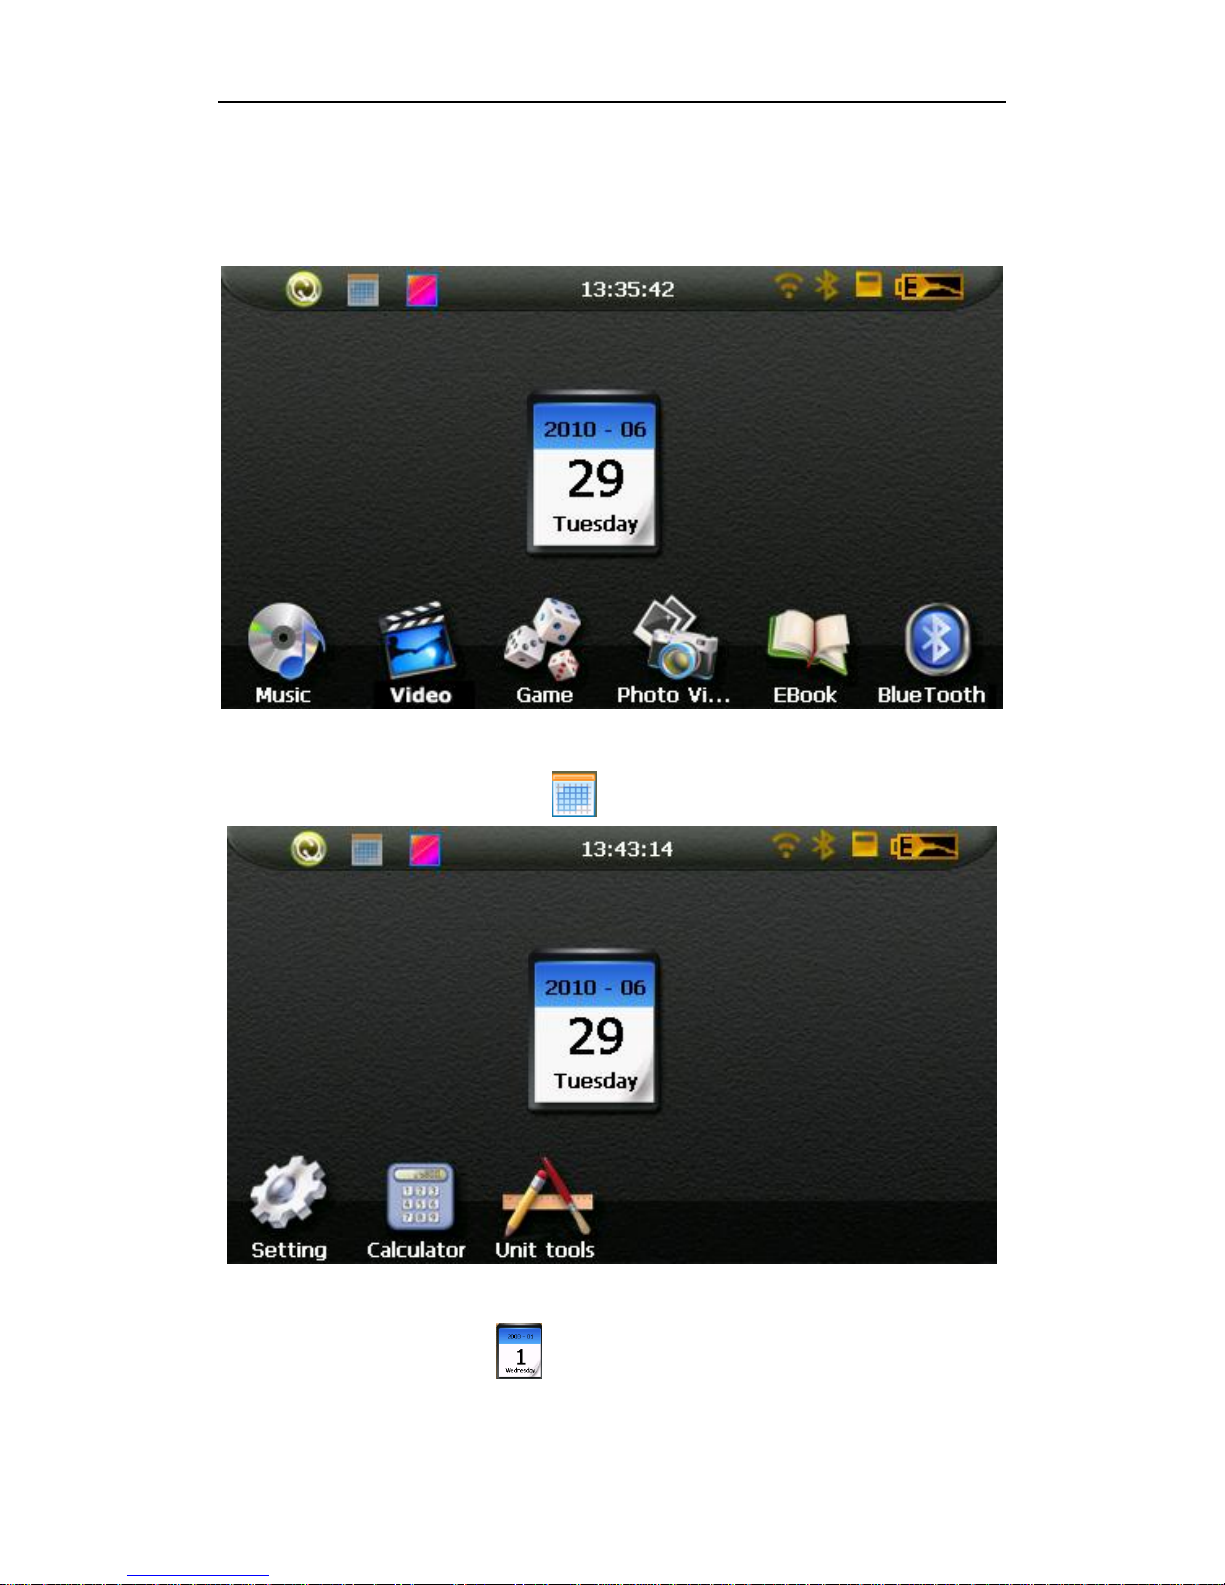
3.1.1. Main menu
3-1
Click the top left corner of the interface Desktop display the date, show in Figure3-2
4-2
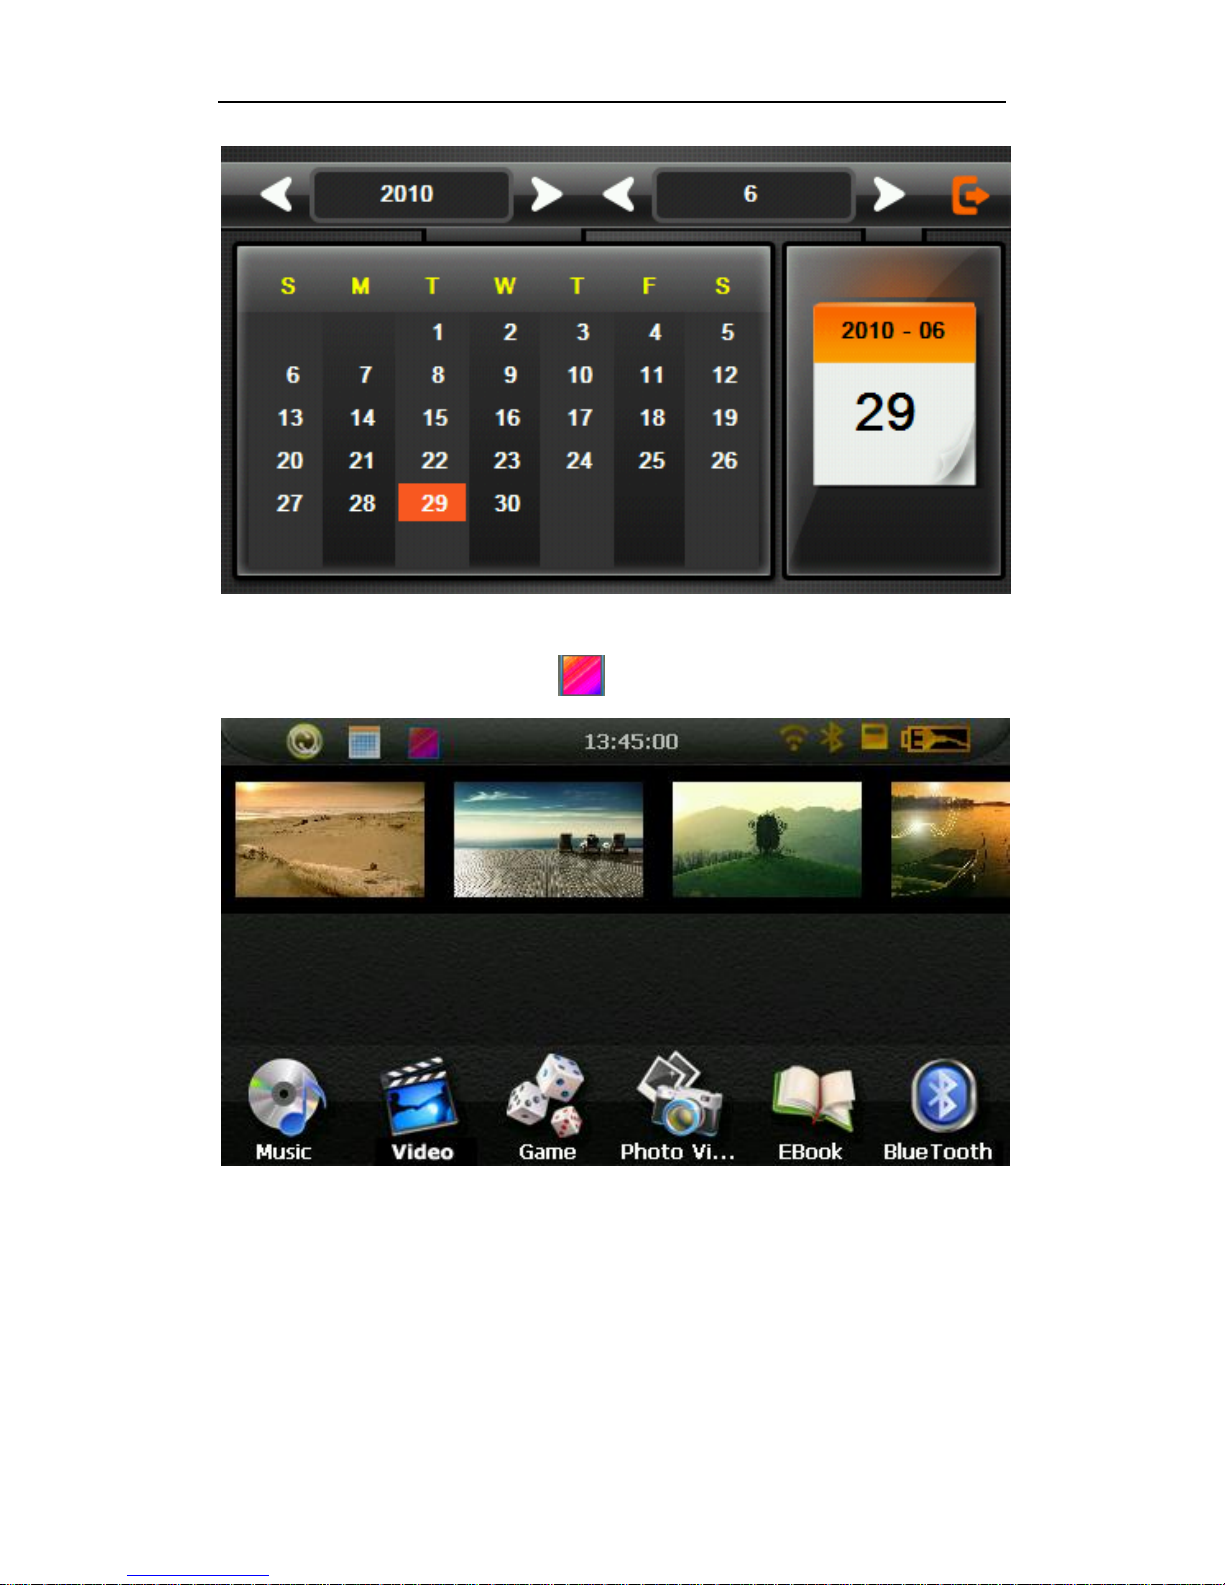
Double-click the date icon enter the date setting interface,show in Figure3-3
Page 14
Page 14
© 2011 Maka Technologies Group. All Rights Reserved.
3-3
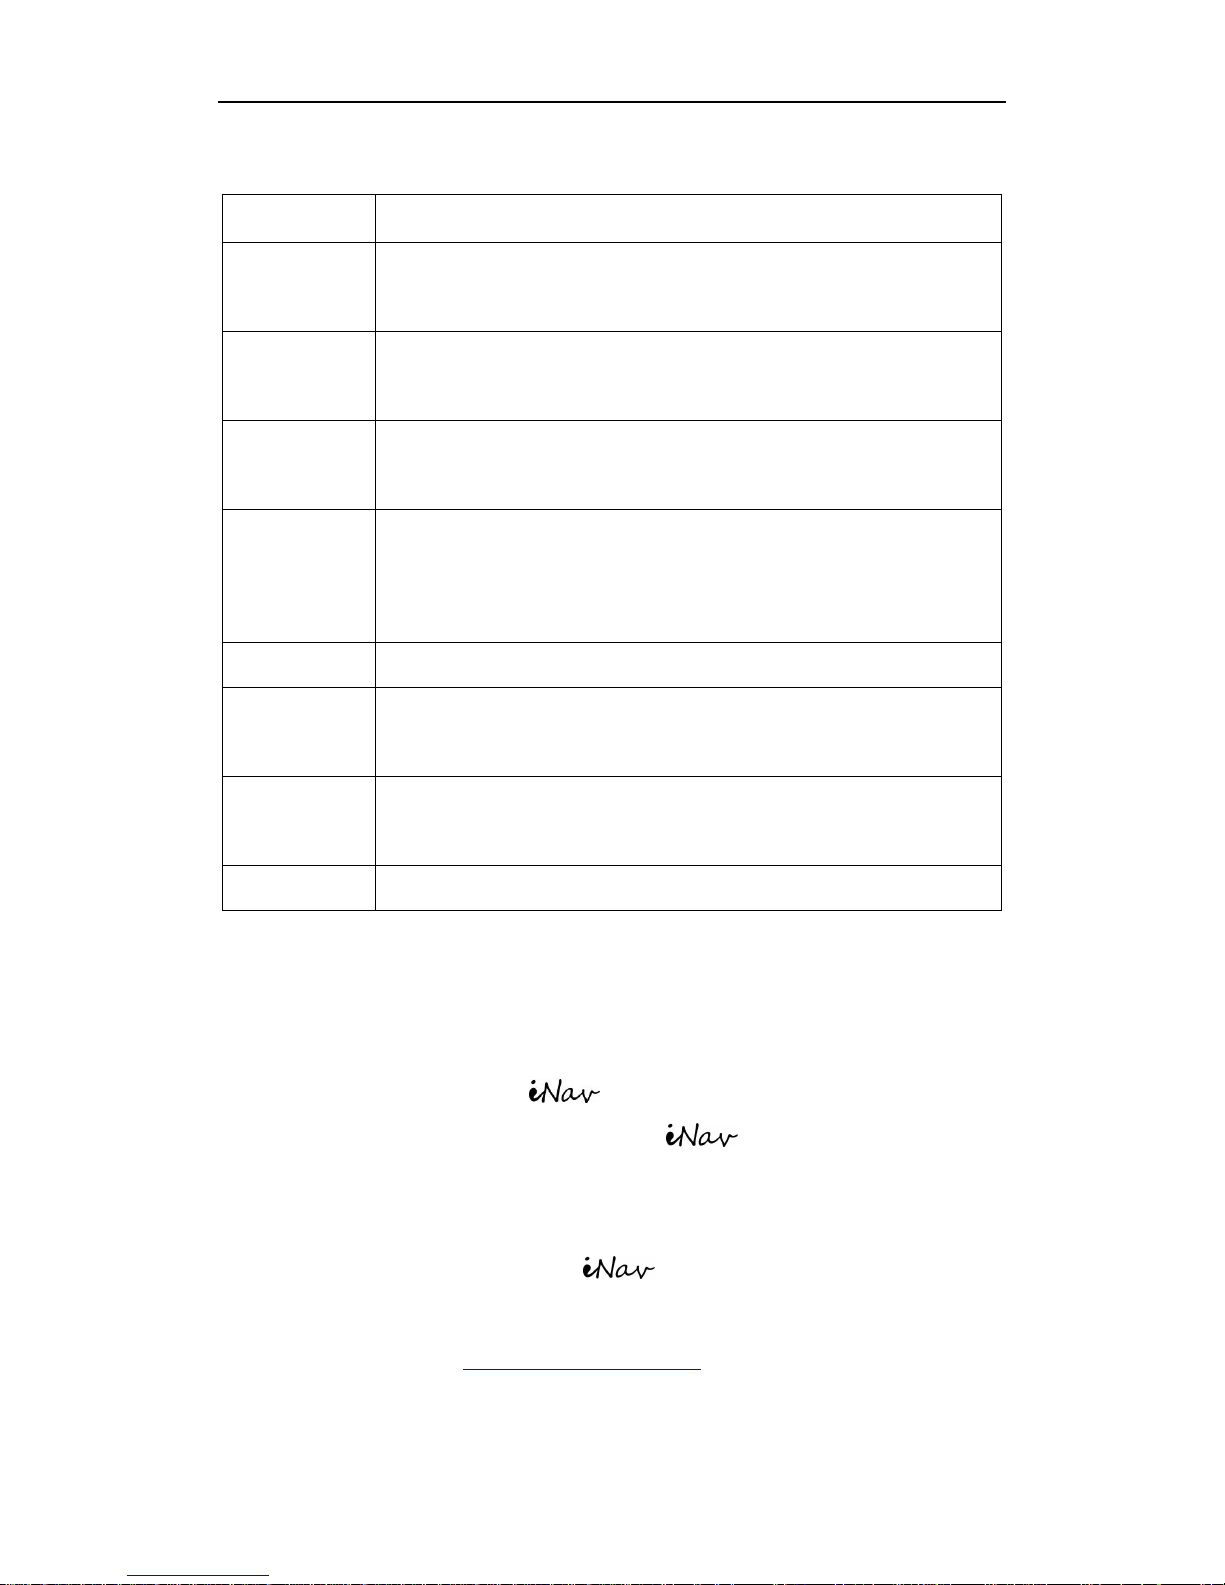
Click the top left corner of the interface change the desktop theme,show in Figure3-4
3-4
Page 15
Page 15
© 2011 Maka Technologies Group. All Rights Reserved.
3.1.2 Function introduction
Navigation
Provide navigation service
Video player
Support ASF, AVI, WMV, 3GP, MP4 and FLV format.
Support progress adjust, pause and full screen play
Photo viewer
Support JPG、BMP and PNG format. Support photo rotate,
enlarge/shrink pictures, automatic play and so on
E-book
Text format: txt.
Support page selection
Music
Audio playing format: WMA, MP3.
Support random playing, sequential playing, repeat playing,
pause, previous/next, volume
Game
7 Different Fun Games to keep you entertained
Setting
Brightness, Volume, Languages, Power, Time, System,
Default, GPS Info, Navi-Path. Activation of FM Transmitter
Bluetooth
Established Bluetooth communication with your beloved
while driving on the road.
Unit Tools
A useful application allow you convert unit measurement.
3.1.3 Background/Theme Introduction
To prevent potential cases of system corruption and avoid complicated
recovery procedure, Marbella 610XT Sleek 5inch will not allow users
to upload their own theme into our Marbella 610XT Sleek 5inch.
However, if you have a good background theme which you think it will be
suitable to upload into our Marbella 610XT Sleek 5inch series. Please
kindly upload a low resolution image to facebook.com/MAKAGPS or
alternatively email it to [email protected] and we will consolidated the
theme and uploaded it selectively every quarter. New firmware and theme will
Page 16

Page 16
© 2011 Maka Technologies Group. All Rights Reserved.
be available after firmware upgrade done quarterly.
Our Marketing team will conduct marketing campaign or Marbella theme
contest occasionally on our Facebook Portal. For more information and details,
please stay tune in our via
http://www.facebook.com/MAKAGPS
Page 17
Page 17
© 2011 Maka Technologies Group. All Rights Reserved.
3.2 Navigation functions and features
Please refer to “Galactio Instruction Manual” found inside CD found inside
the package.
1. Navigation
The navigator offers the route for the reference; determine the route by
yourself, the driver may be more familiar with the route than GPS navigator.
2. Receiving signal
Many factors such as high, dense buildings (in the tunnel, between the high
building, underground parking, under the trestle), various weather condition,
and closure of the satellite will affect the ability to receive signal so as to result
in inaccurate position, inefficiency of navigation operation and system function.
Page 18
Page 18
© 2011 Maka Technologies Group. All Rights Reserved.
Part II. Media
Part II introduces Music Player, Picture Viewer and Movie Player.
3.3 Audio player operation interface
This chapter introduces how to use the GPS video player to play your favorite
music, and let it be your personal MP3.
3.3.1 Functions and features
The audio player supports MP3 and WAV format, you could set the playing
sequence as you wish.
Before using the audio player, please copy the files to any folder.
3.3.2 Operation method
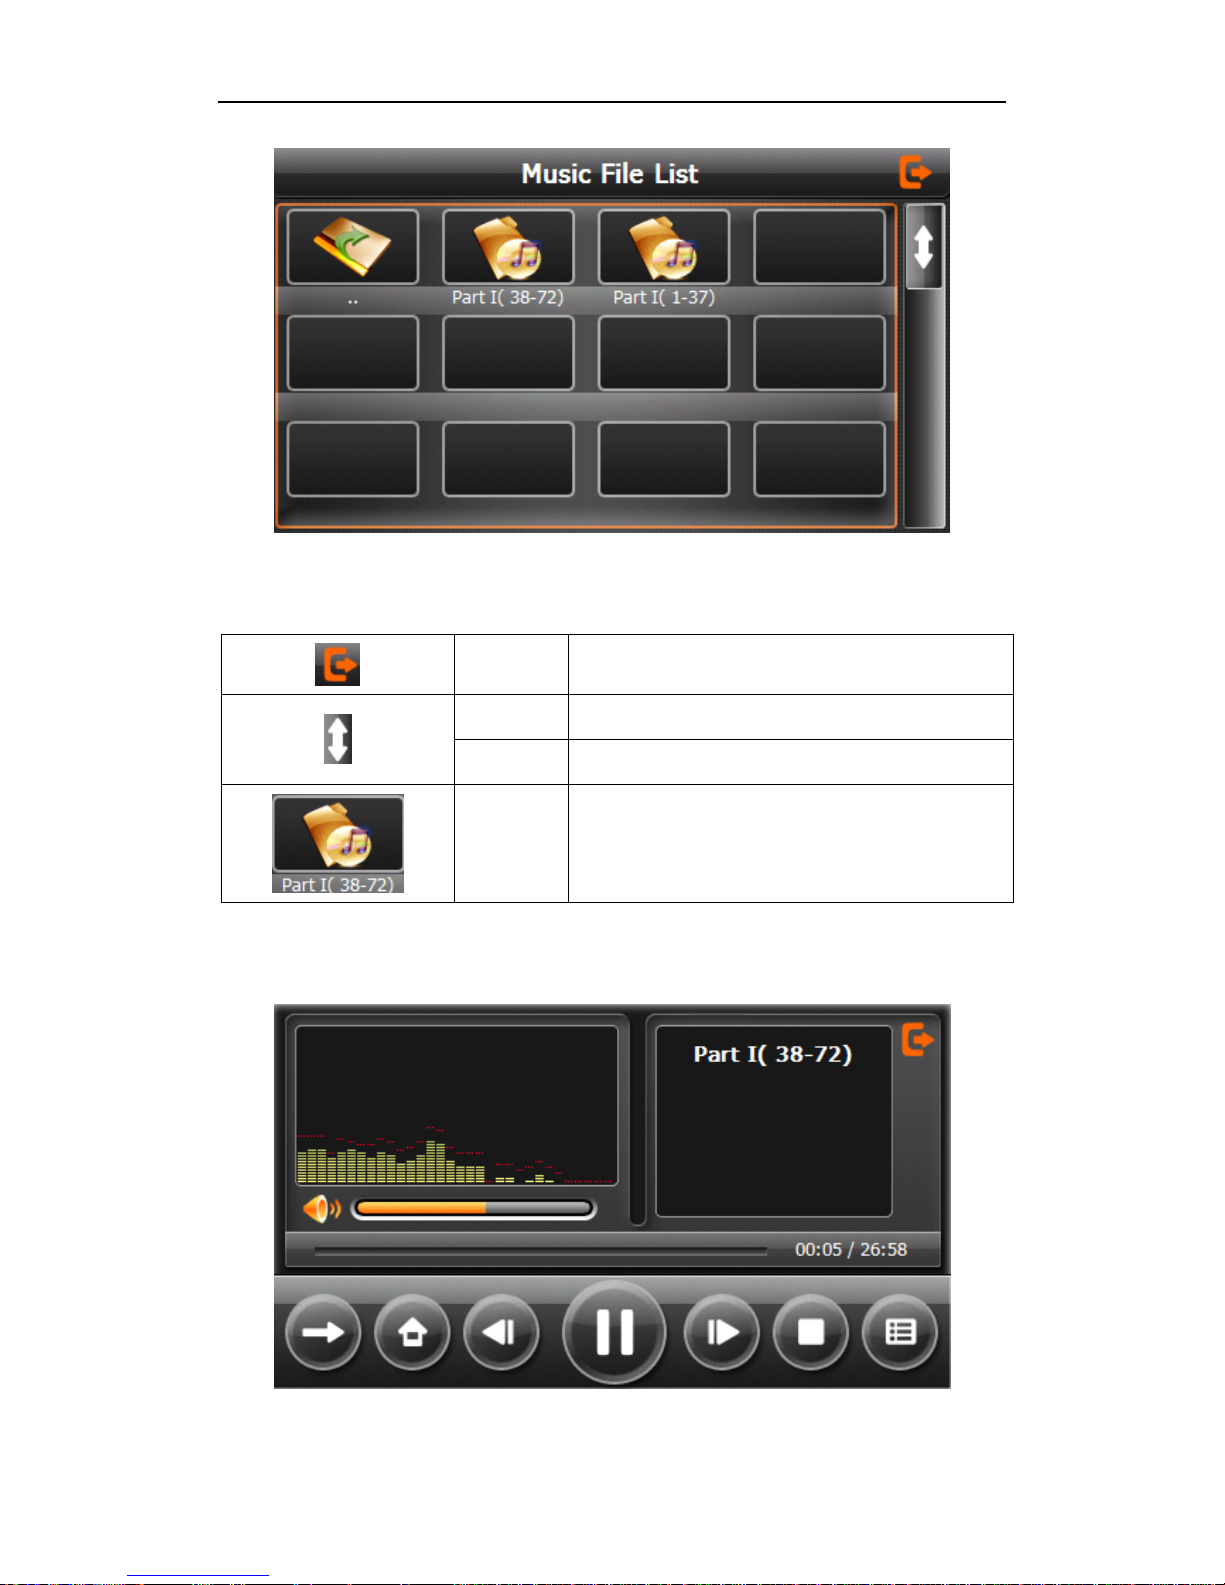
1.Single click the button to enter Music file list as 3-21
3-21
Page 19
Page 19
© 2011 Maka Technologies Group. All Rights Reserved.
3-22
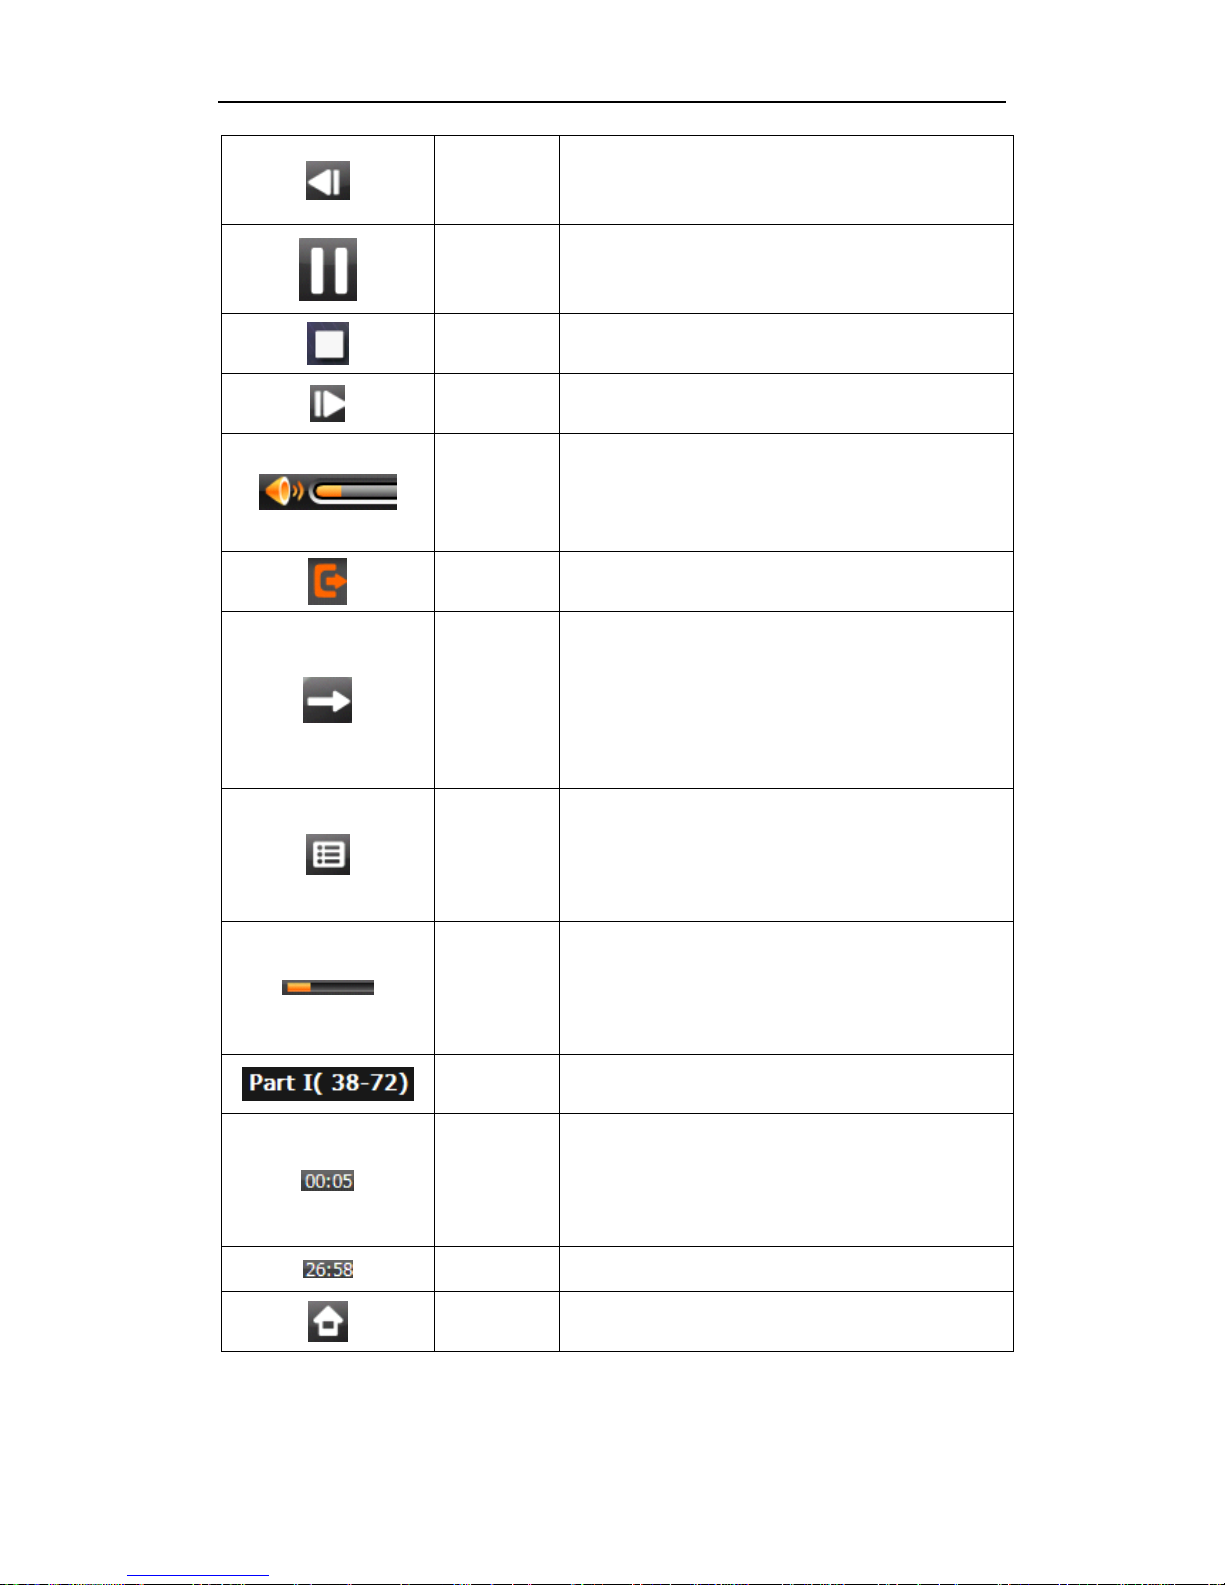
Function instruction
Close
Close current file
Last
Show last page
next
Show next page;
Song
name
Show song name
Choose the song to enter the playing interface as 3-22
3-23
Page 20
Page 20
© 2011 Maka Technologies Group. All Rights Reserved.
Previous
song
Play the previous song;
Play/paus
e
To play and pause, single click to pause,
click again to play continuously;
Stop
Single click to stop playing;
Next song
Play the next song;
Volume
Adjust volume. It shows volume is
decreased when it shift toward left. While
volume is increase when it is shifted toward
right.
Close
Single click to close the audio player;
Setting
the
playing
mode
Support sequential playing, loop playing,
repeat playing and random playing.
Open the
play list
Single click to display the play list, and
choose your favorite as picture 3-22
shows;
Playing
progress
Adjust the progress by slide the
progress-displaying bar; go left for
backwards, go right for forwards;
Song title
Show the song title
Time
consumpti
on
Show the time progress;
Total time
Show the total time for playing the song;
Homepage
Page 21
Page 21
© 2011 Maka Technologies Group. All Rights Reserved.
3.4 Video operation Interface
This chapter introduced how to use the GPS video player.
3.4.1 Functions and features
1. Support ASF, AVI, WMV, 3GP, MP4 and FLV
2. Support full-screen playing, progress choosing and file selection;
Before using the Video player, please copy your video file(ASF, AVI, WMV,
3GP, MP4 and FLV)to any folder.
3.4.2 Operation
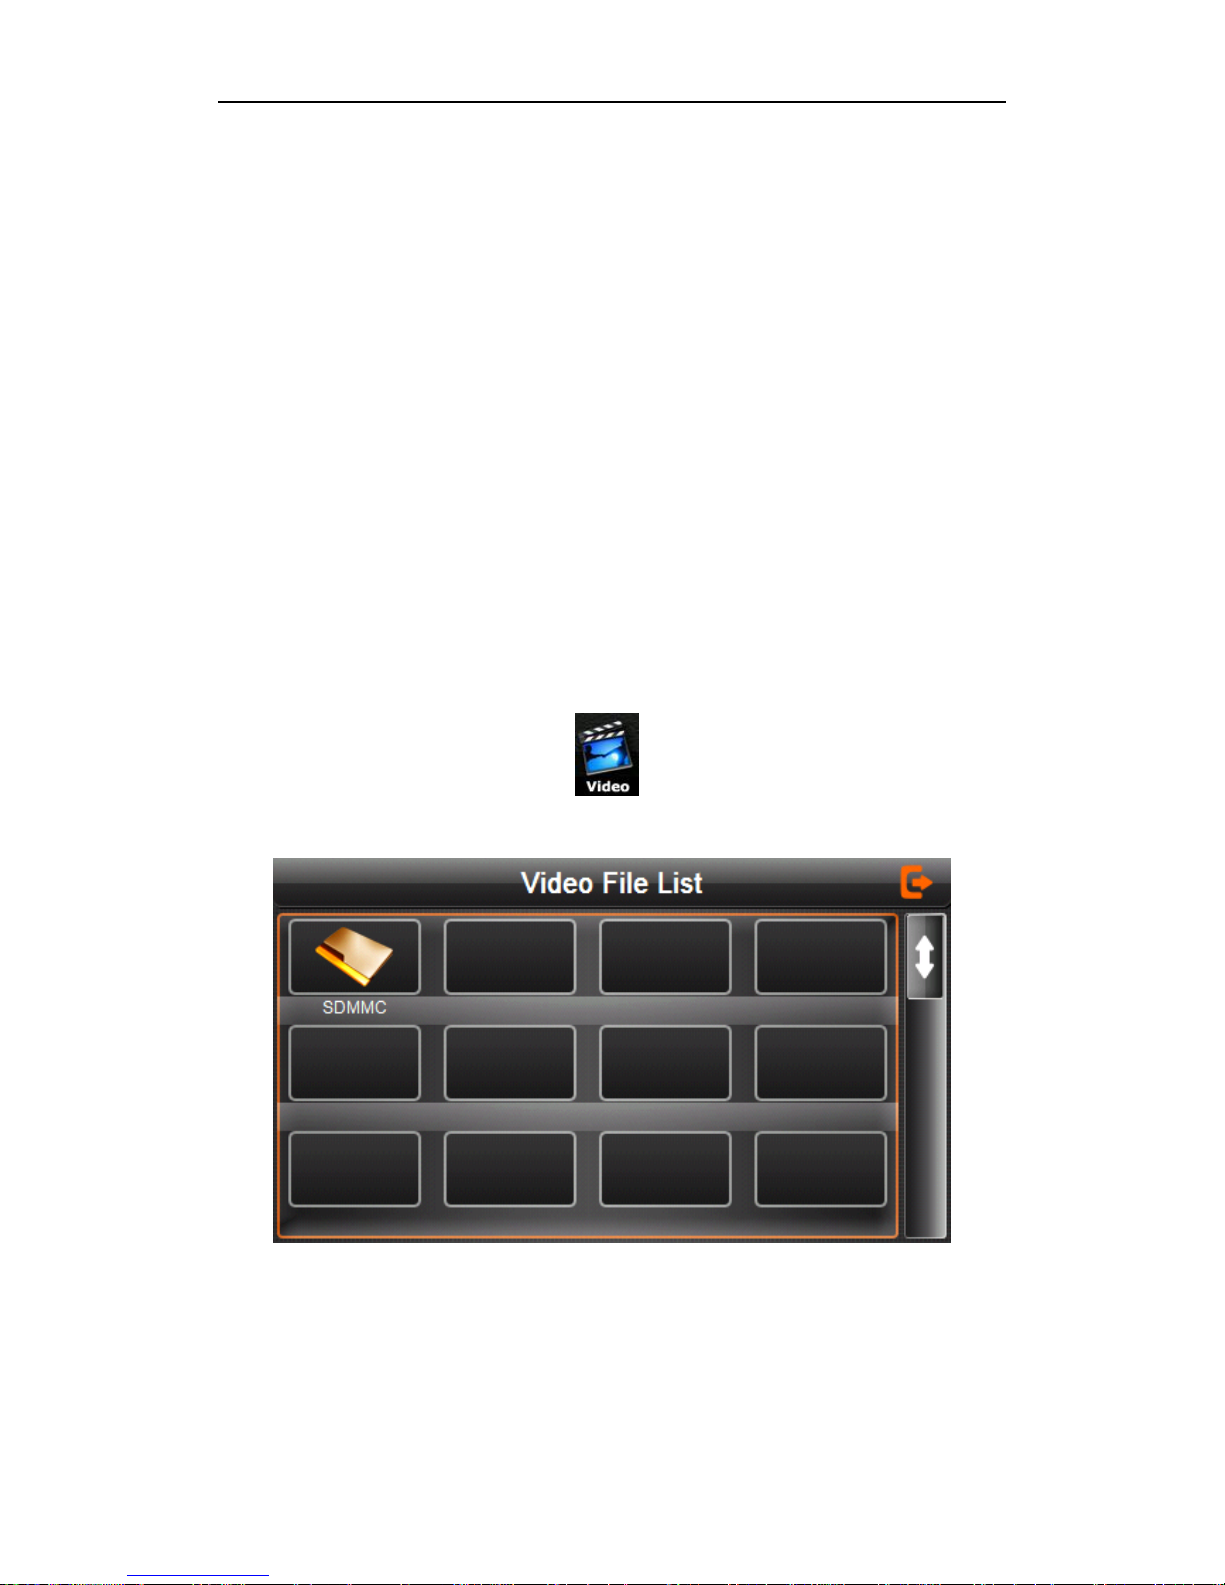
1. Single click the Video button to enter the video file list as the
picture 3-24
3-24
Page 22
Page 22
© 2011 Maka Technologies Group. All Rights Reserved.
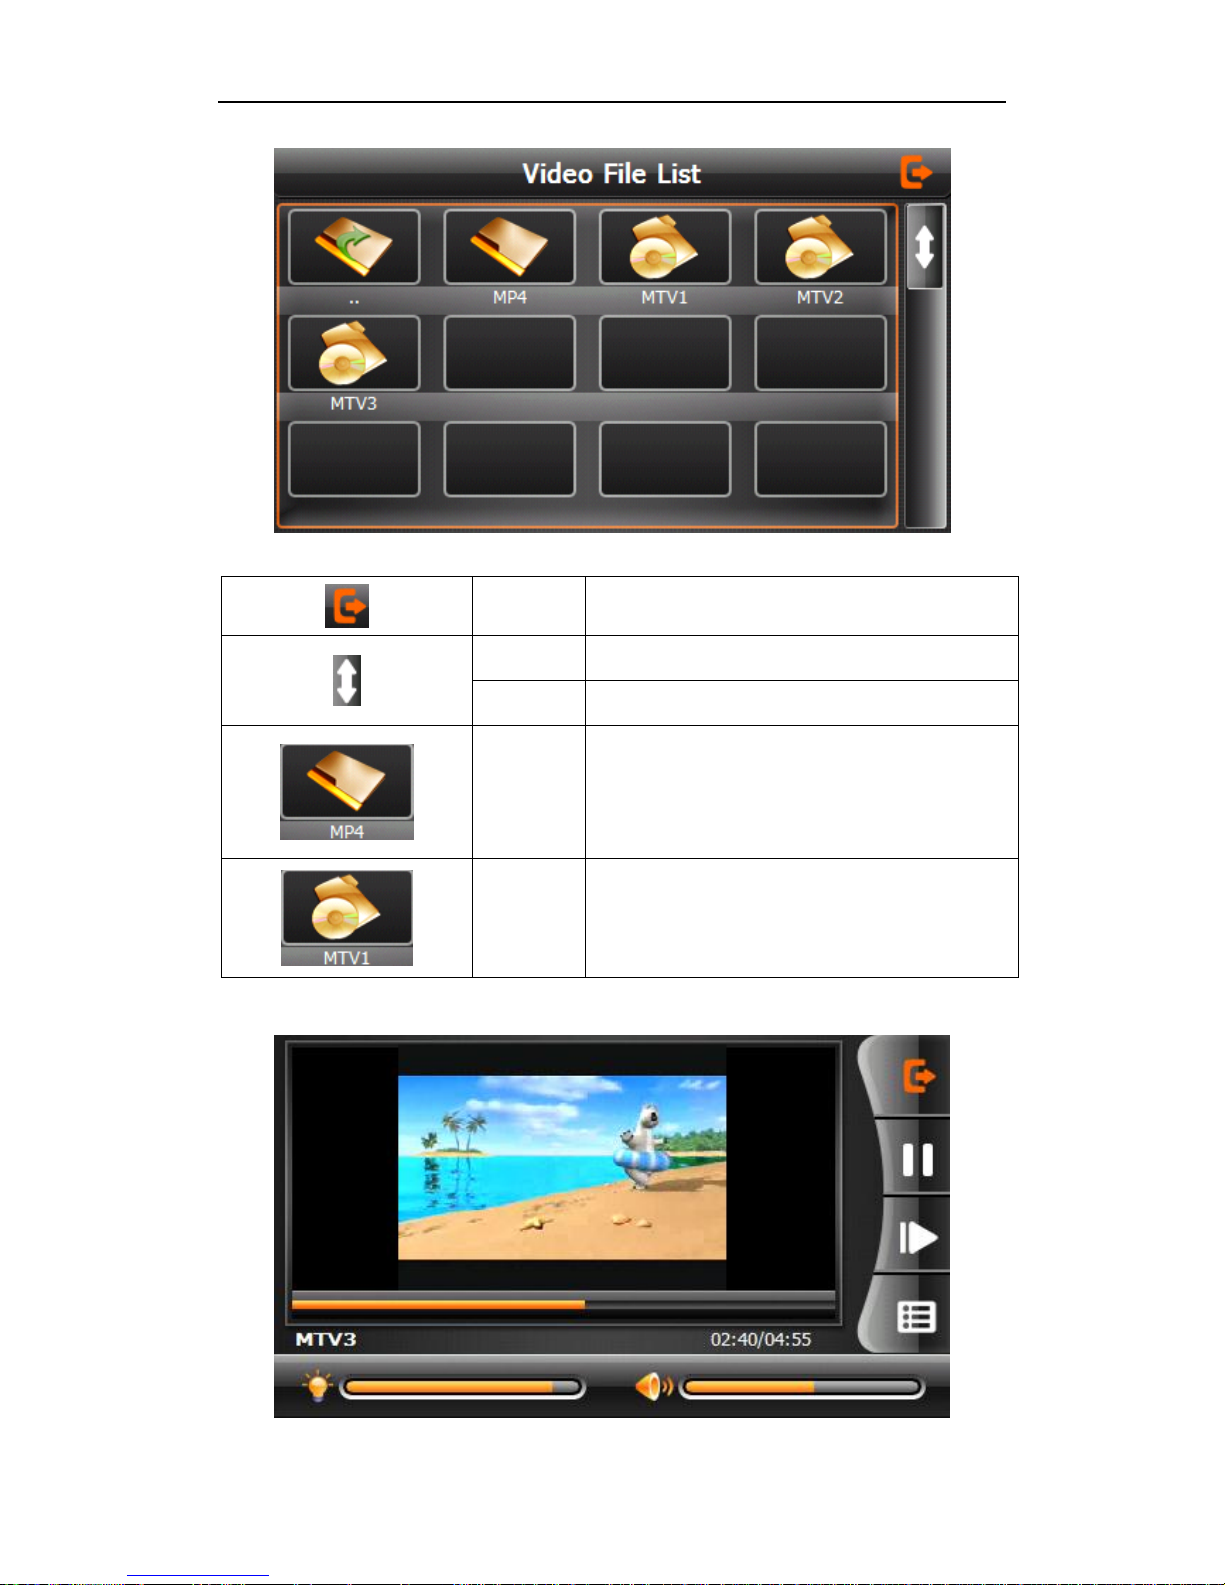
3-25
Close
Single click to close current file.
Last
Show last page
next
Show next page
Video
folder
name
Video folder name
Video
name
Show video name
Choose the video to enter the playing interface as 3-26
Page 23
Page 23
© 2011 Maka Technologies Group. All Rights Reserved.
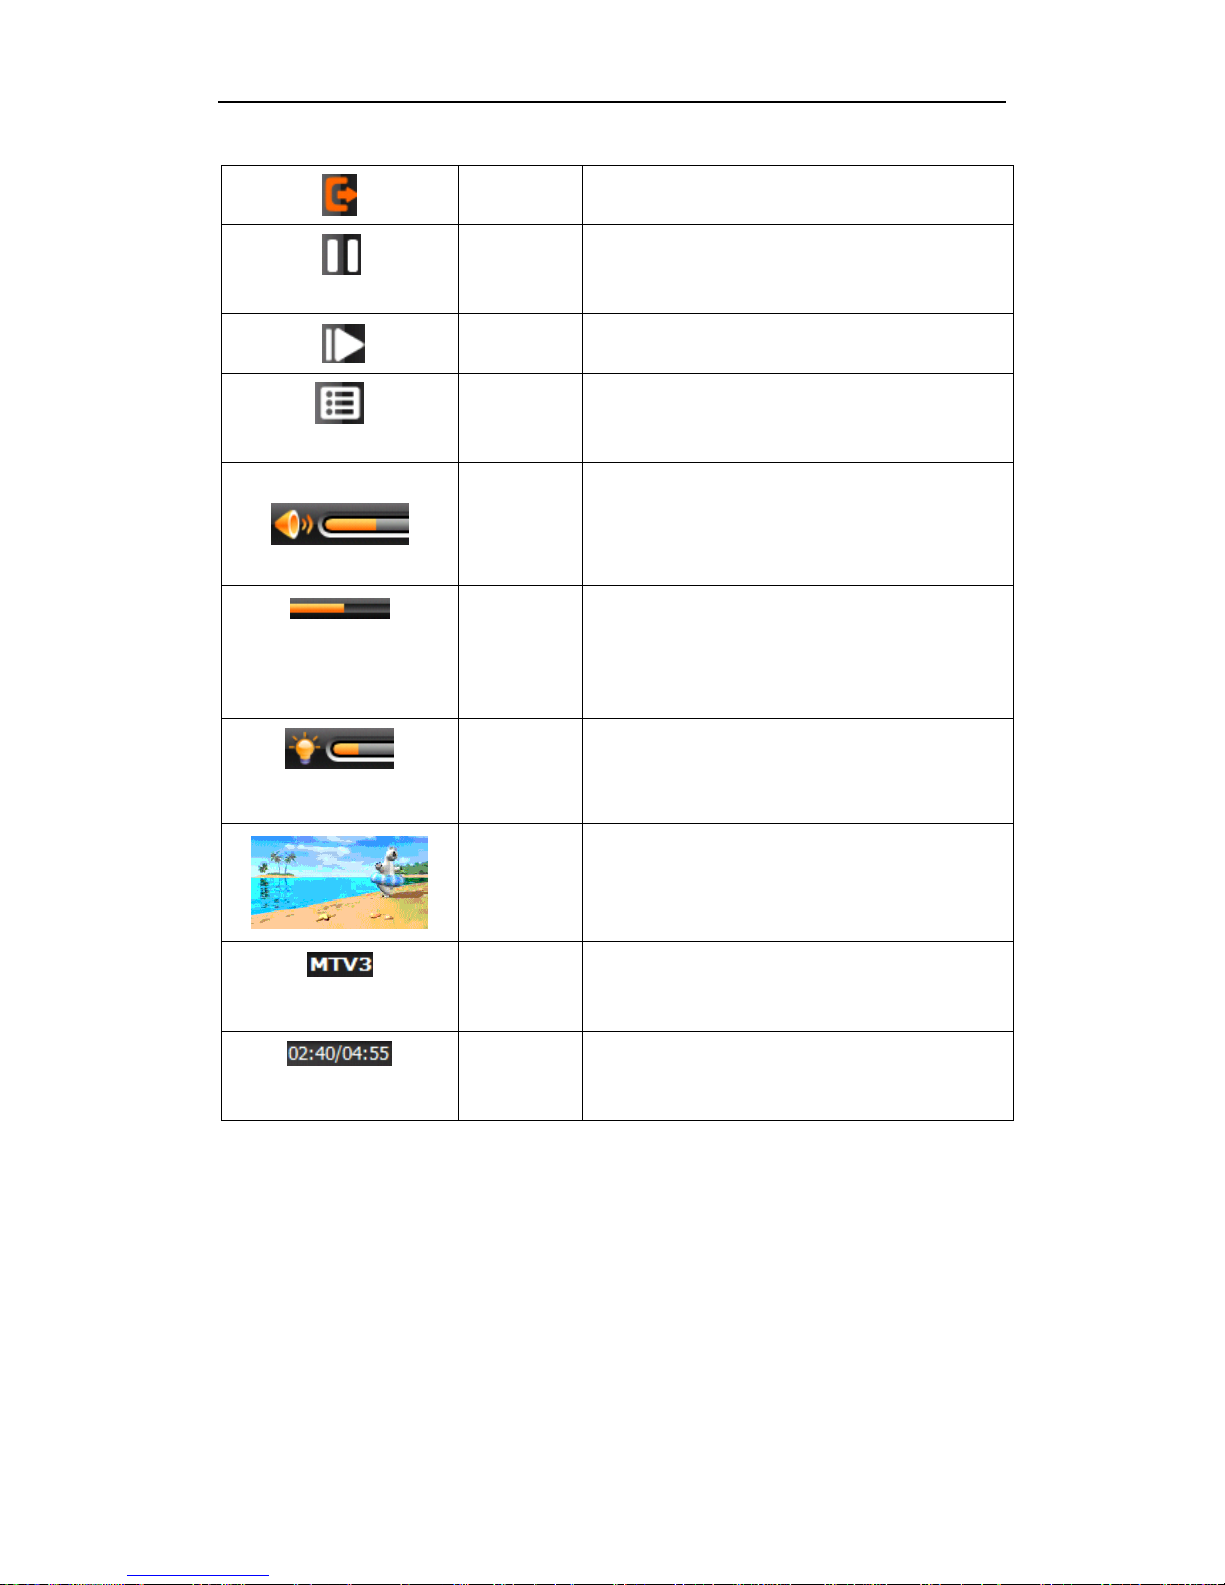
3-26
Close
Click to close the video list;
Play
It shows stop playing. Single click will
continue to play.
Next
Play next video.
File list
Single click and shift to video file list, and
then choose your favorite video.
Volume
Single click volume. It shows volume is
decreased when it shift toward left. While
volume is increase when it is shifted
toward right.
Playing
progress
Adjust the progress by slide the
progress-displaying bar; go left for
backwards, go right for forwards;
Brightnes
s adjust
Adjust brightness with stylus while
moving toward left and right. Turn right
means turn brighter.
Play
interface
Full screen play. Double click to return
normal play status.
Video
name
Show current Video name
Time
Show the time consumed / The total time
of the video
Page 24
Page 24
© 2011 Maka Technologies Group. All Rights Reserved.
3.5 Photo viewer operation interface
This chapter introduces how to use the photo viewer to browse pictures.
3.5.1 Function features:
1.Supports JPG、BMP and PNG
2.Support picture rotate, picture enlarge/shrink and automatic play.
Before using the photo viewer, please copy your photos to any folder.
3.5.2 Operation method
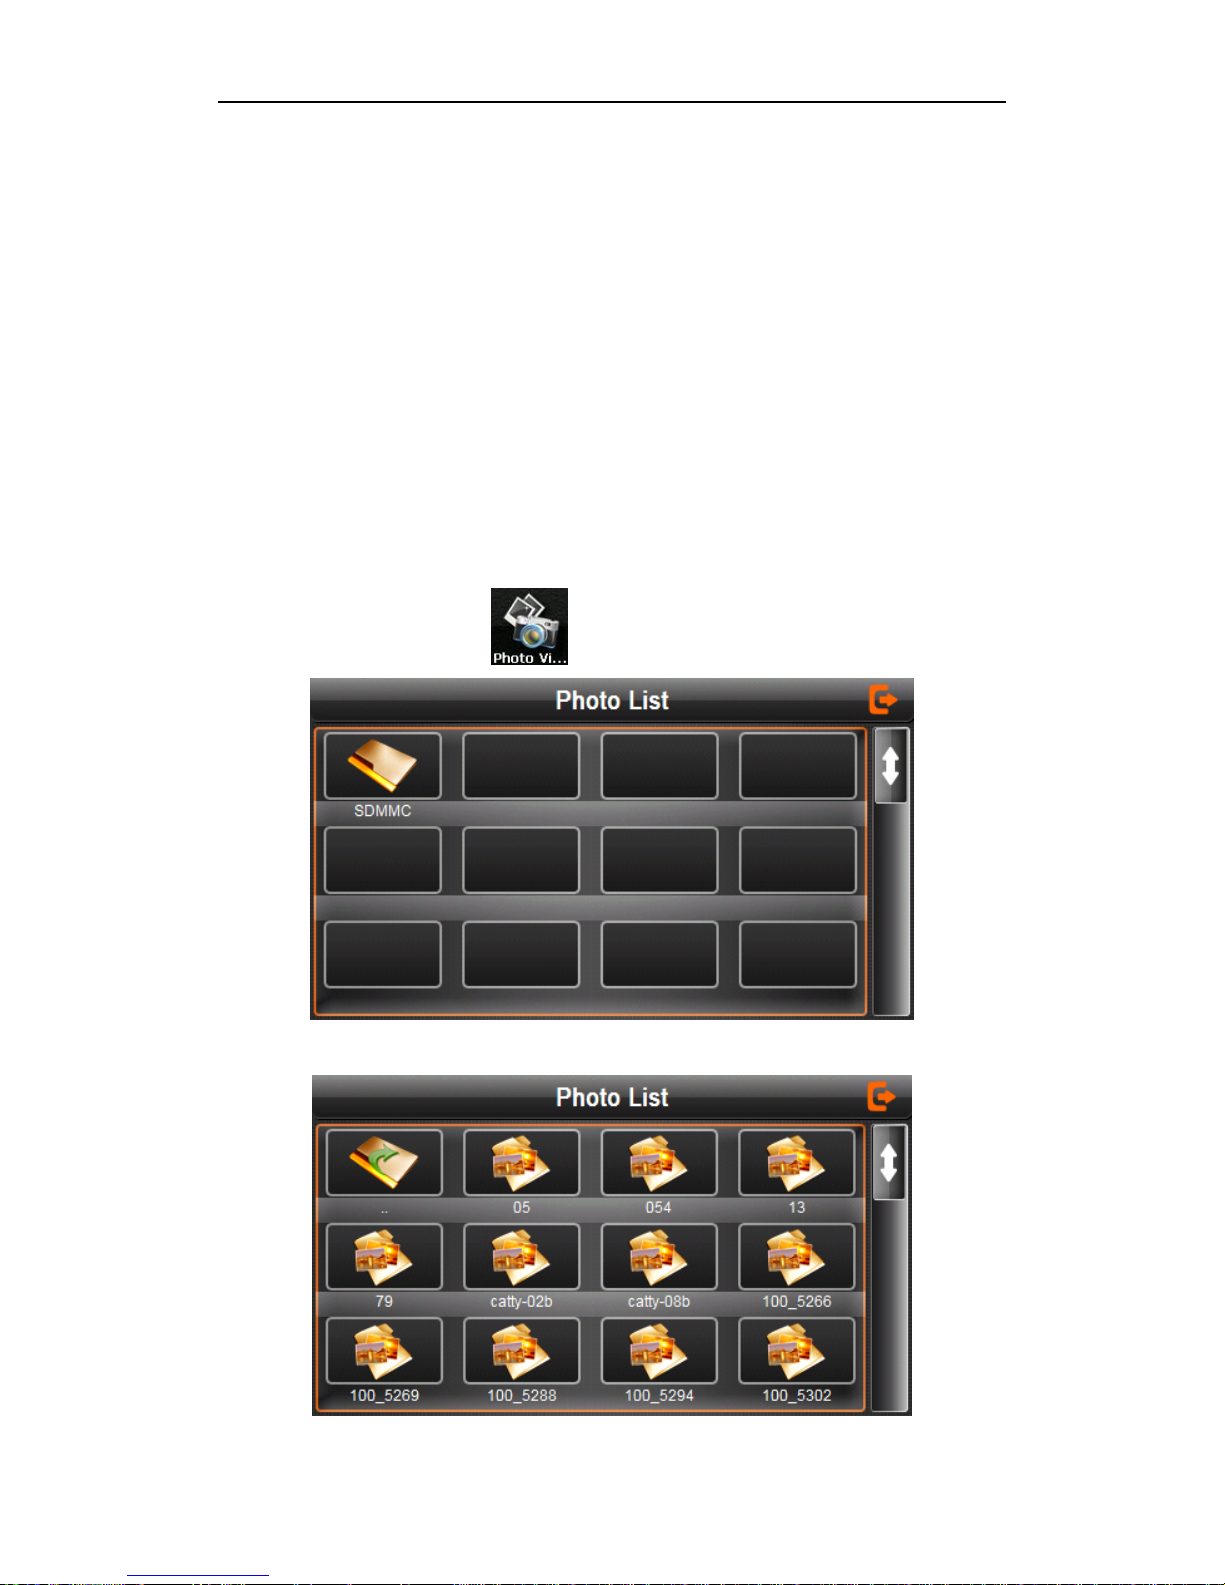
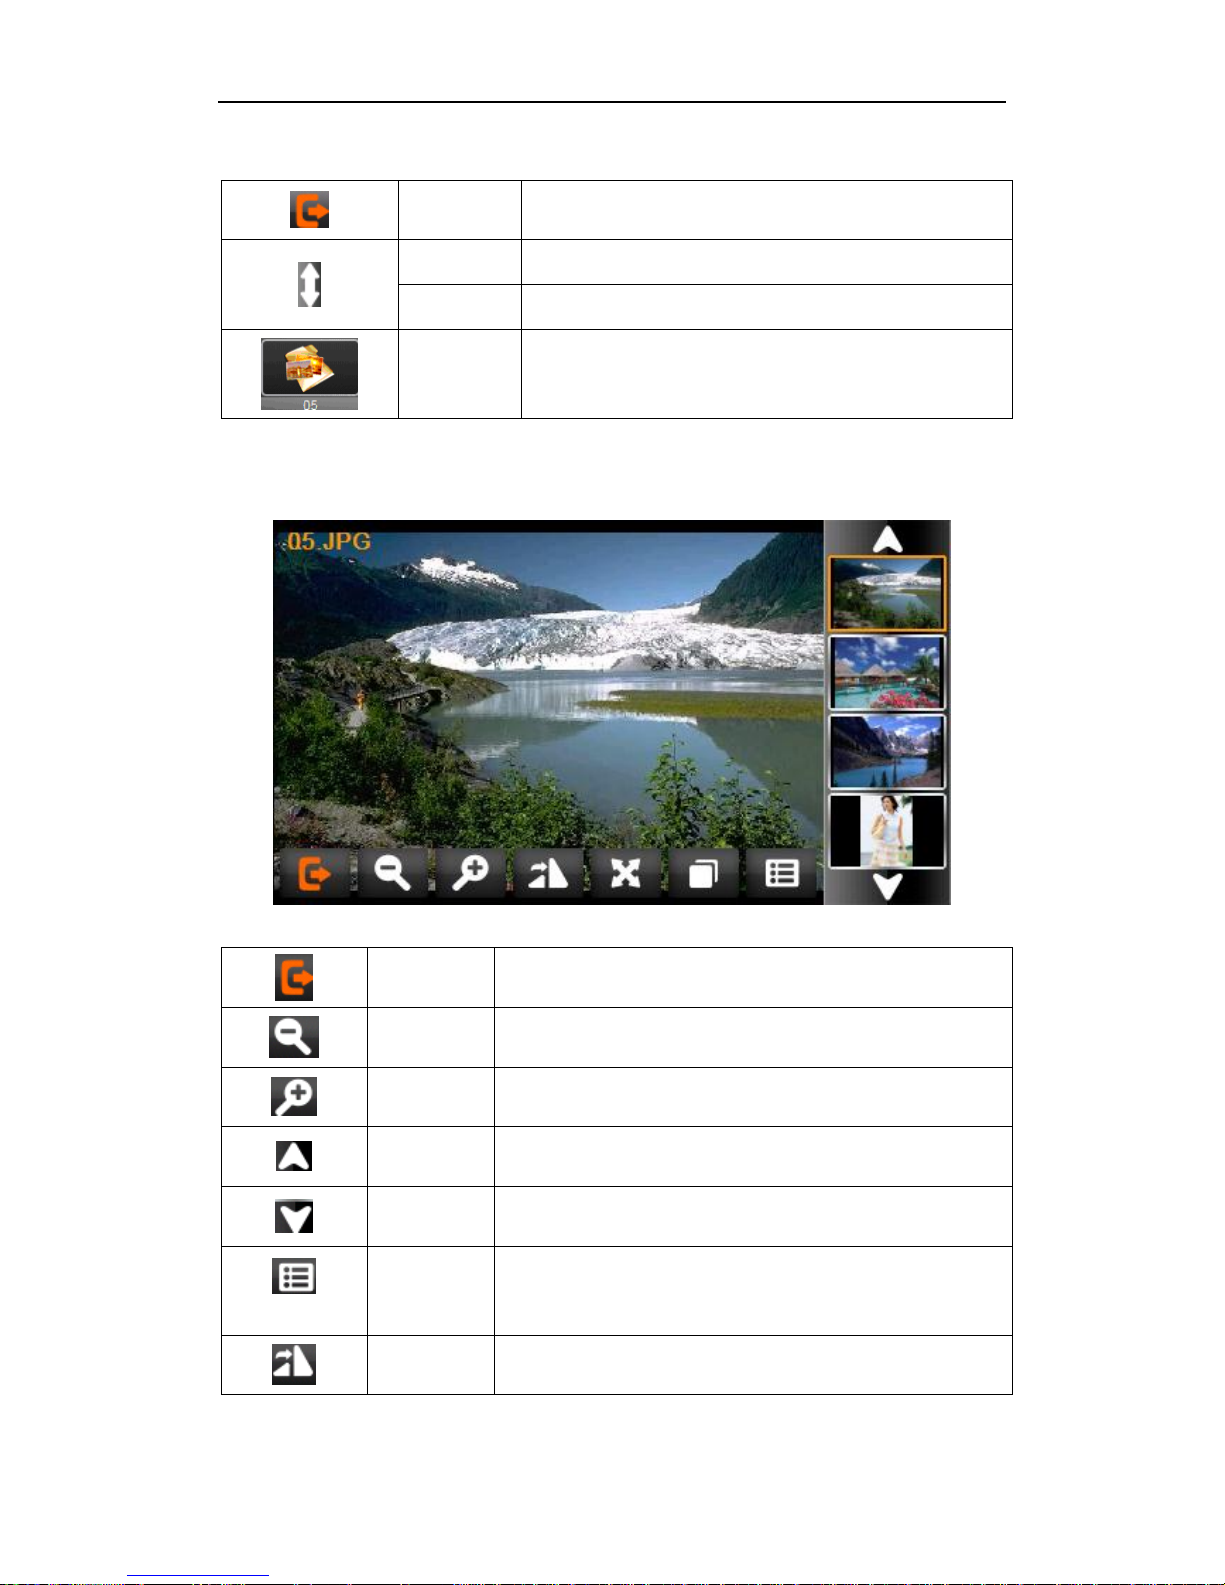
1. Single click the button to open the photo list as picture 3-27
3-27
Page 25
Page 25
© 2011 Maka Technologies Group. All Rights Reserved.
3-28
Close
Click to close the photo list;
Last page
Show the last page
Next page
Show the next page
File
Single click to enter the photo file;
Choose the picture to enter play interface as 3-29
3-29
Close
Click to close the viewer
Shrink
Shrink current picture in proportion
Enlarge
Enlarge current picture in proportion
Previous
Show the previous picture
Next
Show the next picture
File list
Single click and shift to video file list, and then
choose your favorite picture
Rotate
Click to rotate the picture by 90 degree
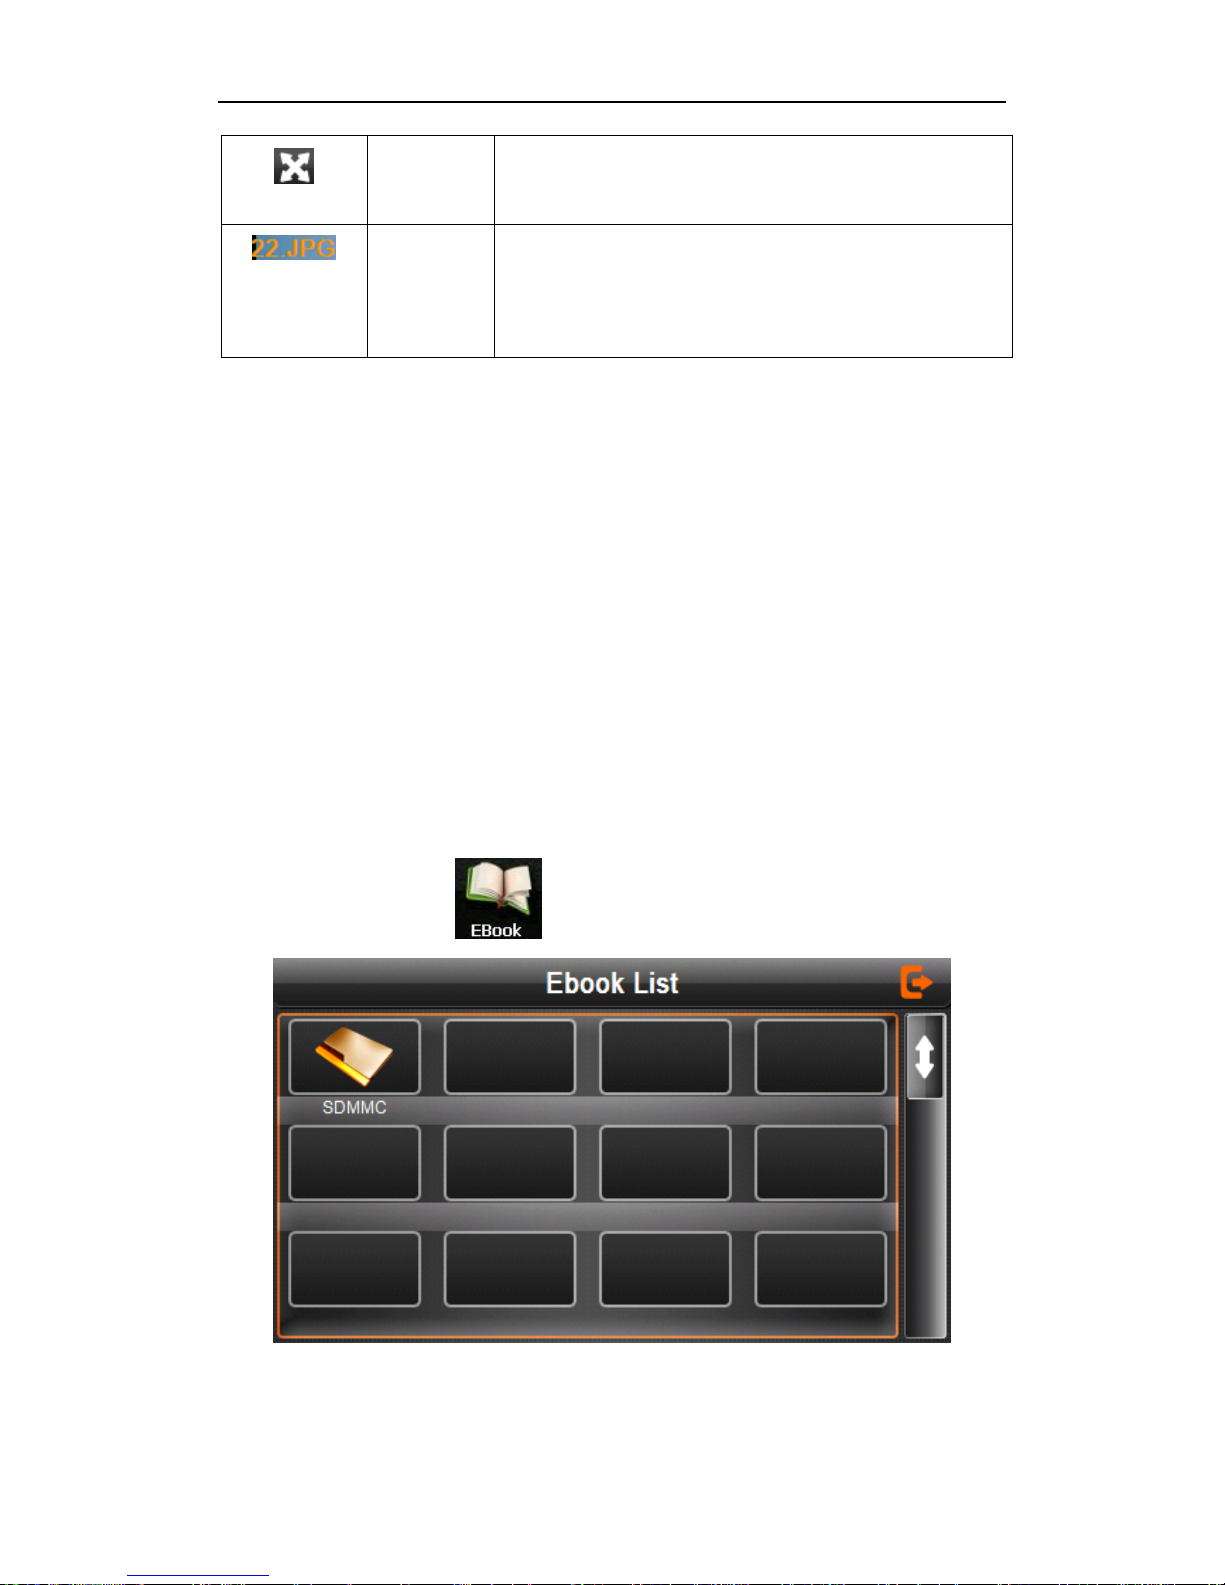
Page 26
Page 26
© 2011 Maka Technologies Group. All Rights Reserved.
Automatic
Play
Play all the pictures circularly on full screen from
the current picture
Photo
name and
format
Show the photo name and format
3.6 E-book reader interface and operation
This chapter introduces how to use GPS to read e-book.
3.6.1Function
1. Support TXT
2. Support turning over page, page browse, and file choosing.
Before using e-book function, please copy your TXT file and save it to any
folder.
3.6.2Operation
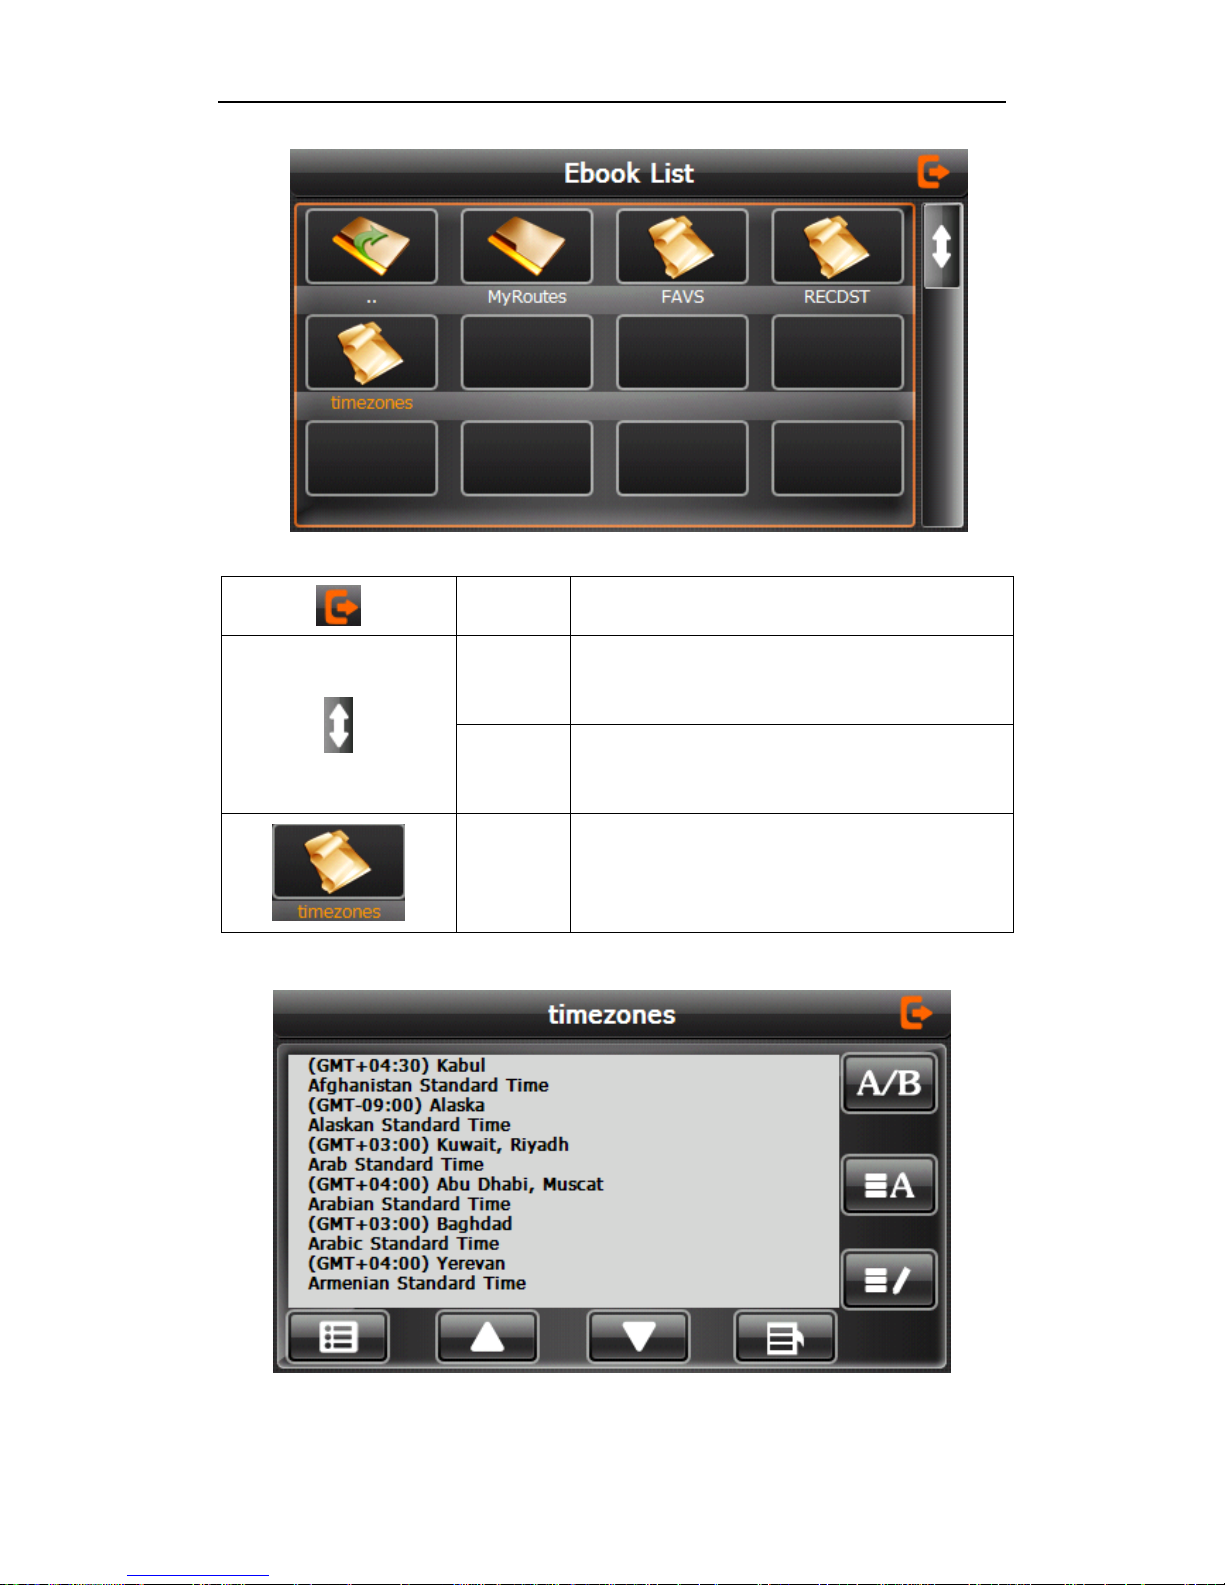
1. single click button to enter Ebook list as 3-30
3-30
Page 27
Page 27
© 2011 Maka Technologies Group. All Rights Reserved.
3-31
Close
Click to close current file
Last
page
Show the last page;
Next
page
Show the next page;
Name of
file
Show name of file
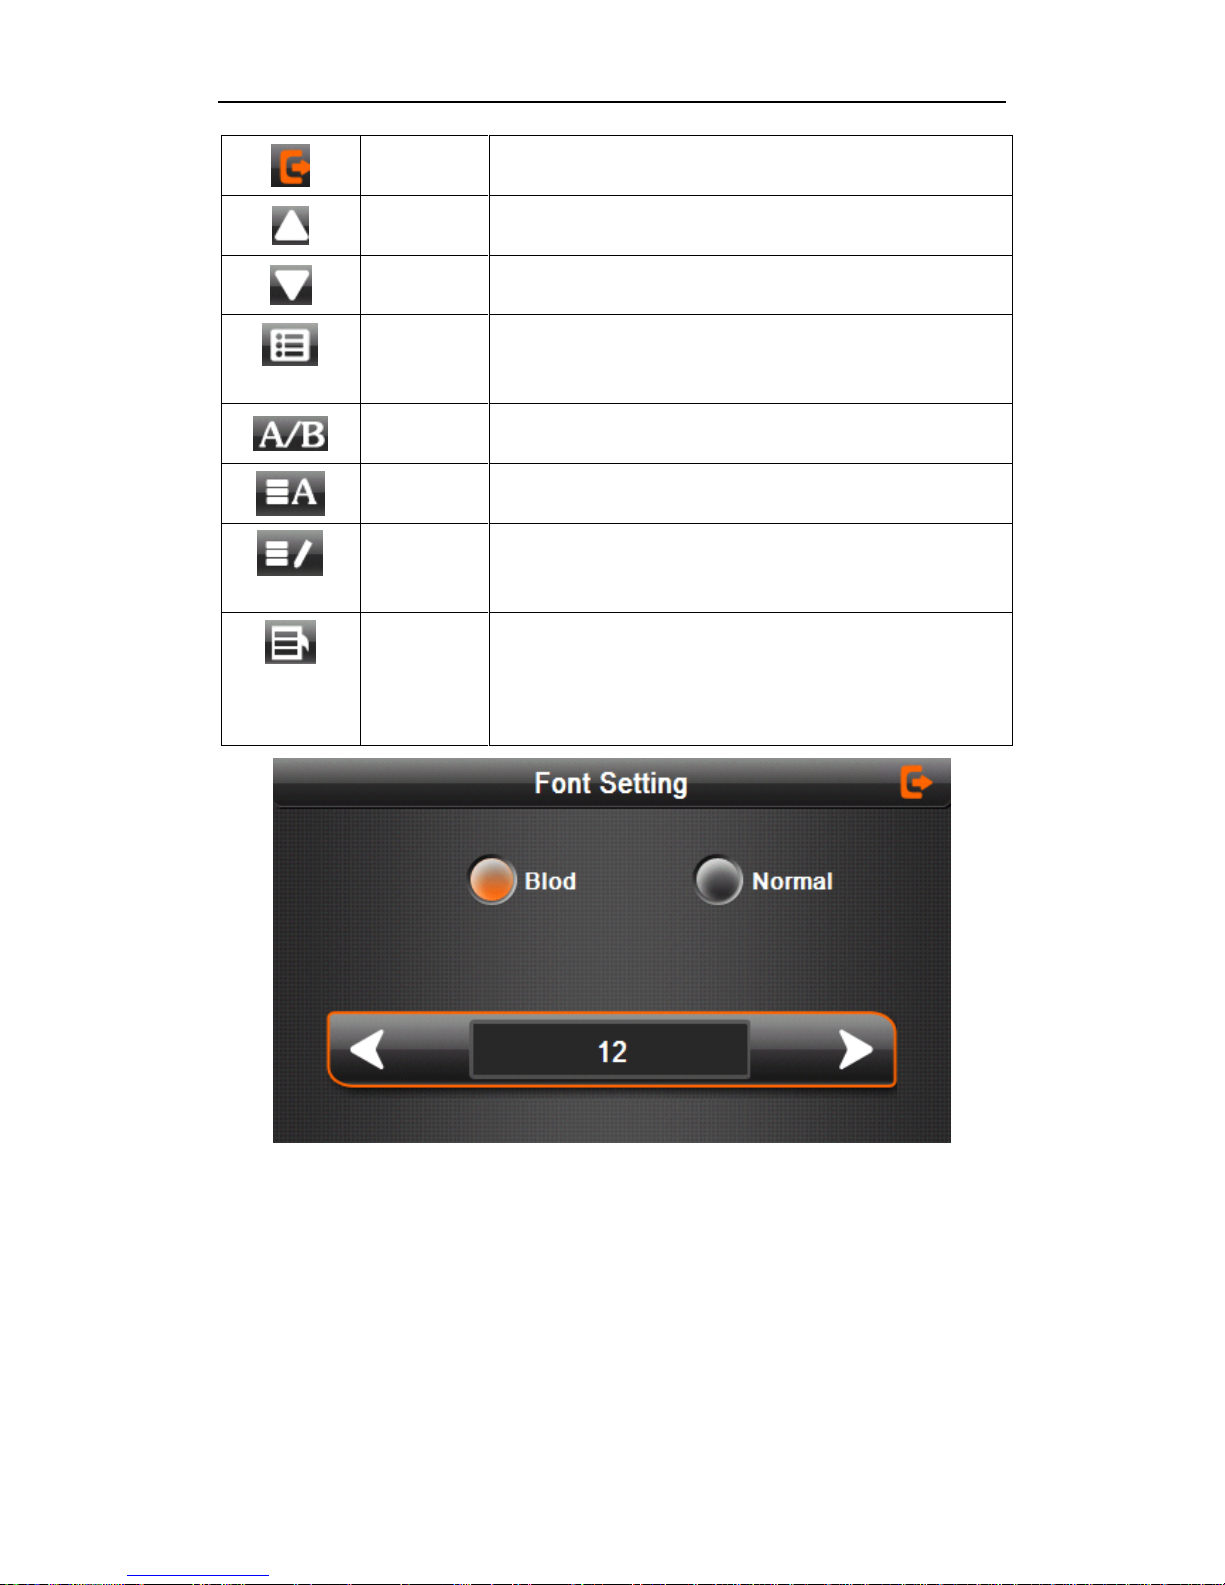
2. Choose file name to enter e-book reader as 3-32
3-32
Page 28
Page 28
© 2011 Maka Technologies Group. All Rights Reserved.
Close
Single click and close e-book reader
Last page
Read last page
Next page
Read next page
File
Single click to enter Ebook list to choose favorite
book
Font set
As 3-33
Color set
As 3-34
Add book
mark
It needs open e-book and choose TXT.
Open
book mark
list
As 3-35
Page 29
Page 29
© 2011 Maka Technologies Group. All Rights Reserved.
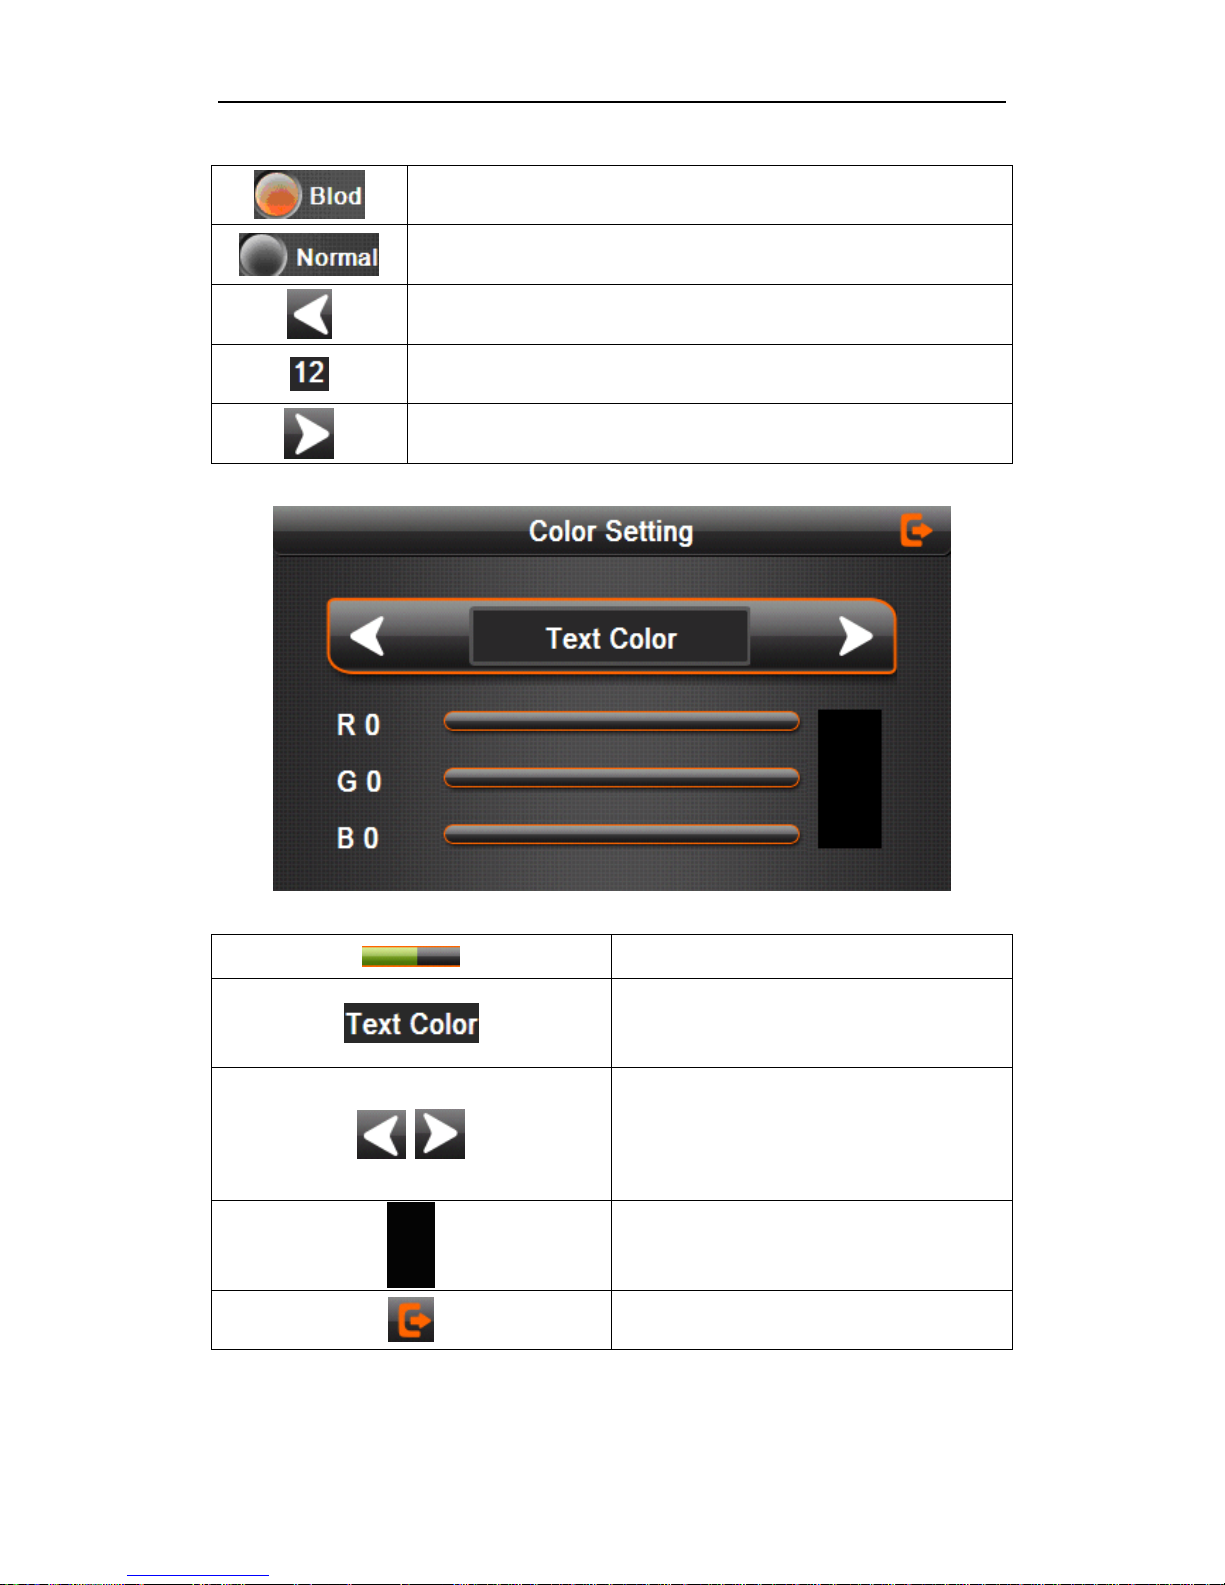
3-33 Font set interface
Set font as bold
Set font as normal
Decrease font size
Font size indicator
Increase font size
3-34
Set color RGB
Choose background color, font color
or set background color
Choose background color, font color
or set background color with reverse
order or sequential order
Color review
Return to e-book homepage
Page 30
Page 30
© 2011 Maka Technologies Group. All Rights Reserved.
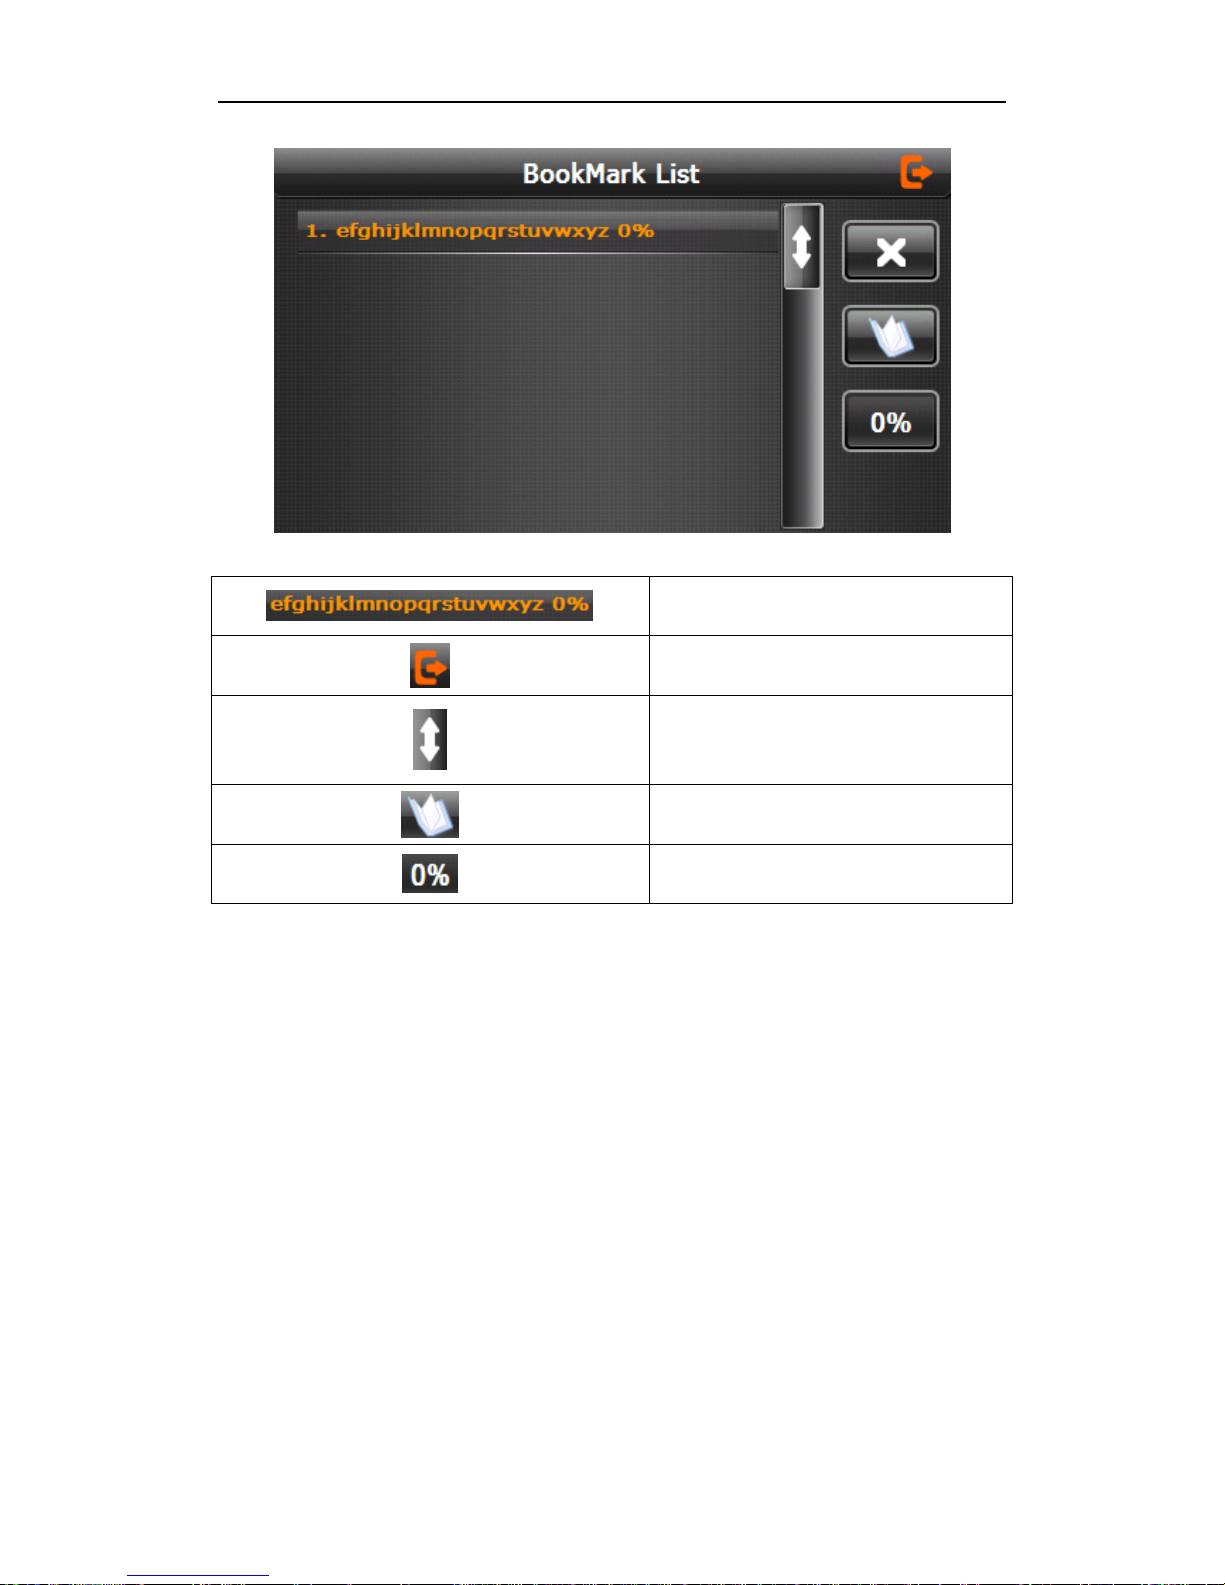
3-35
Single click and choose book
mark
Return e-book interface
Rolling book mark list
Return e-book homepage.
Showing current reading ratio
Page 31
Page 31
© 2011 Maka Technologies Group. All Rights Reserved.
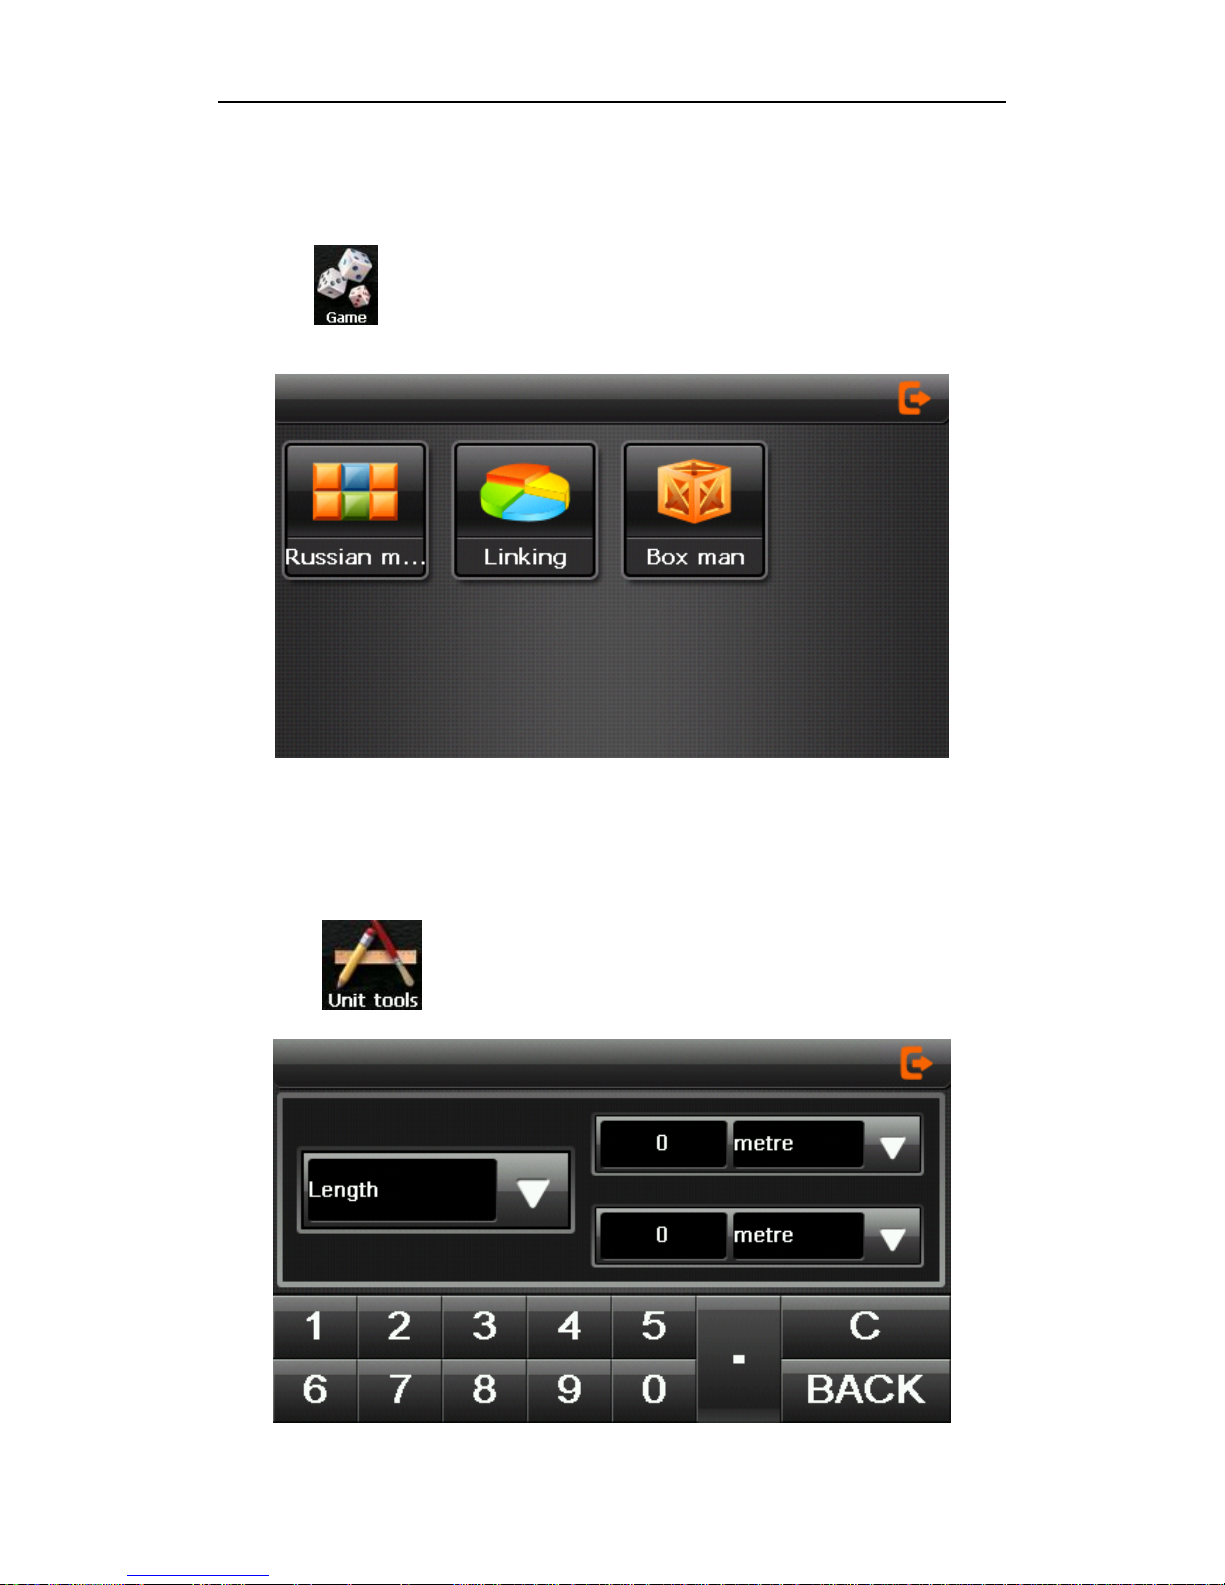
3.7 Game interface and operation
Single click to choose different games as 3-36
3-36
3.8 Tool
Single click to choose different tools as 3-37
Page 32
Page 32
© 2011 Maka Technologies Group. All Rights Reserved.
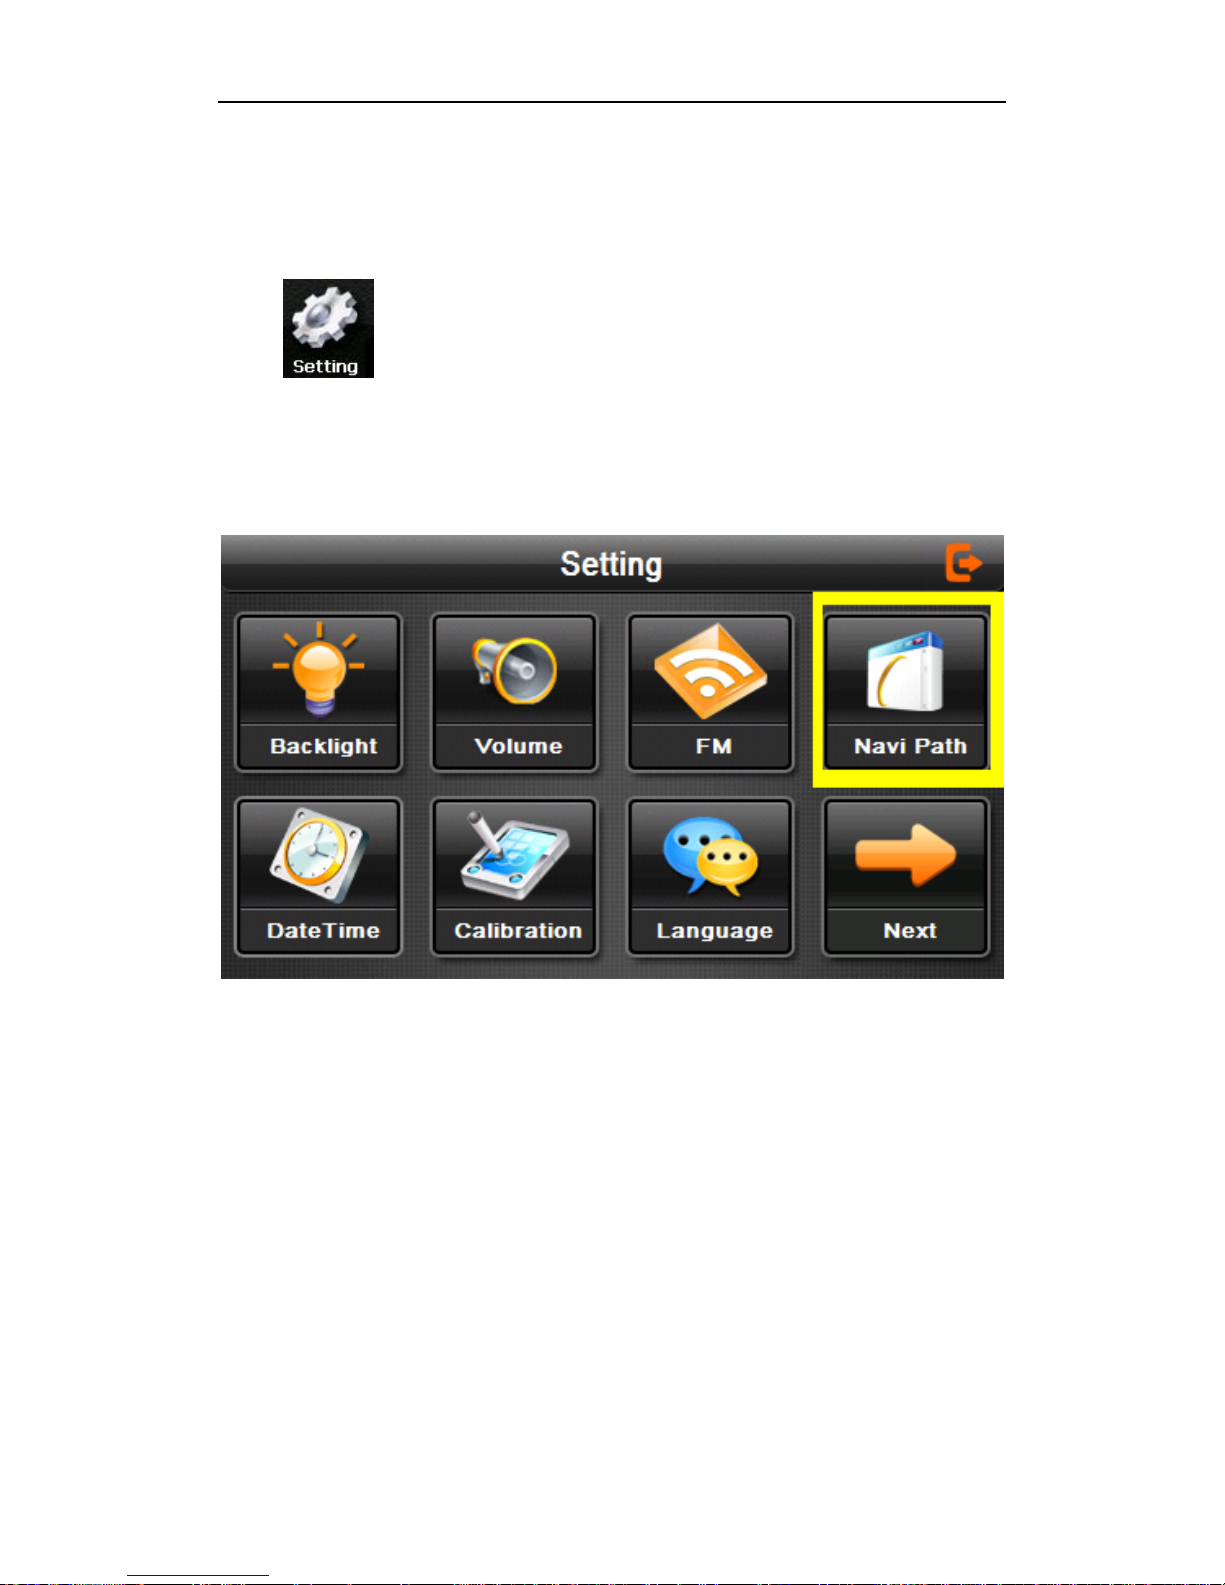
3-37
3.9 System setting Interface and operation
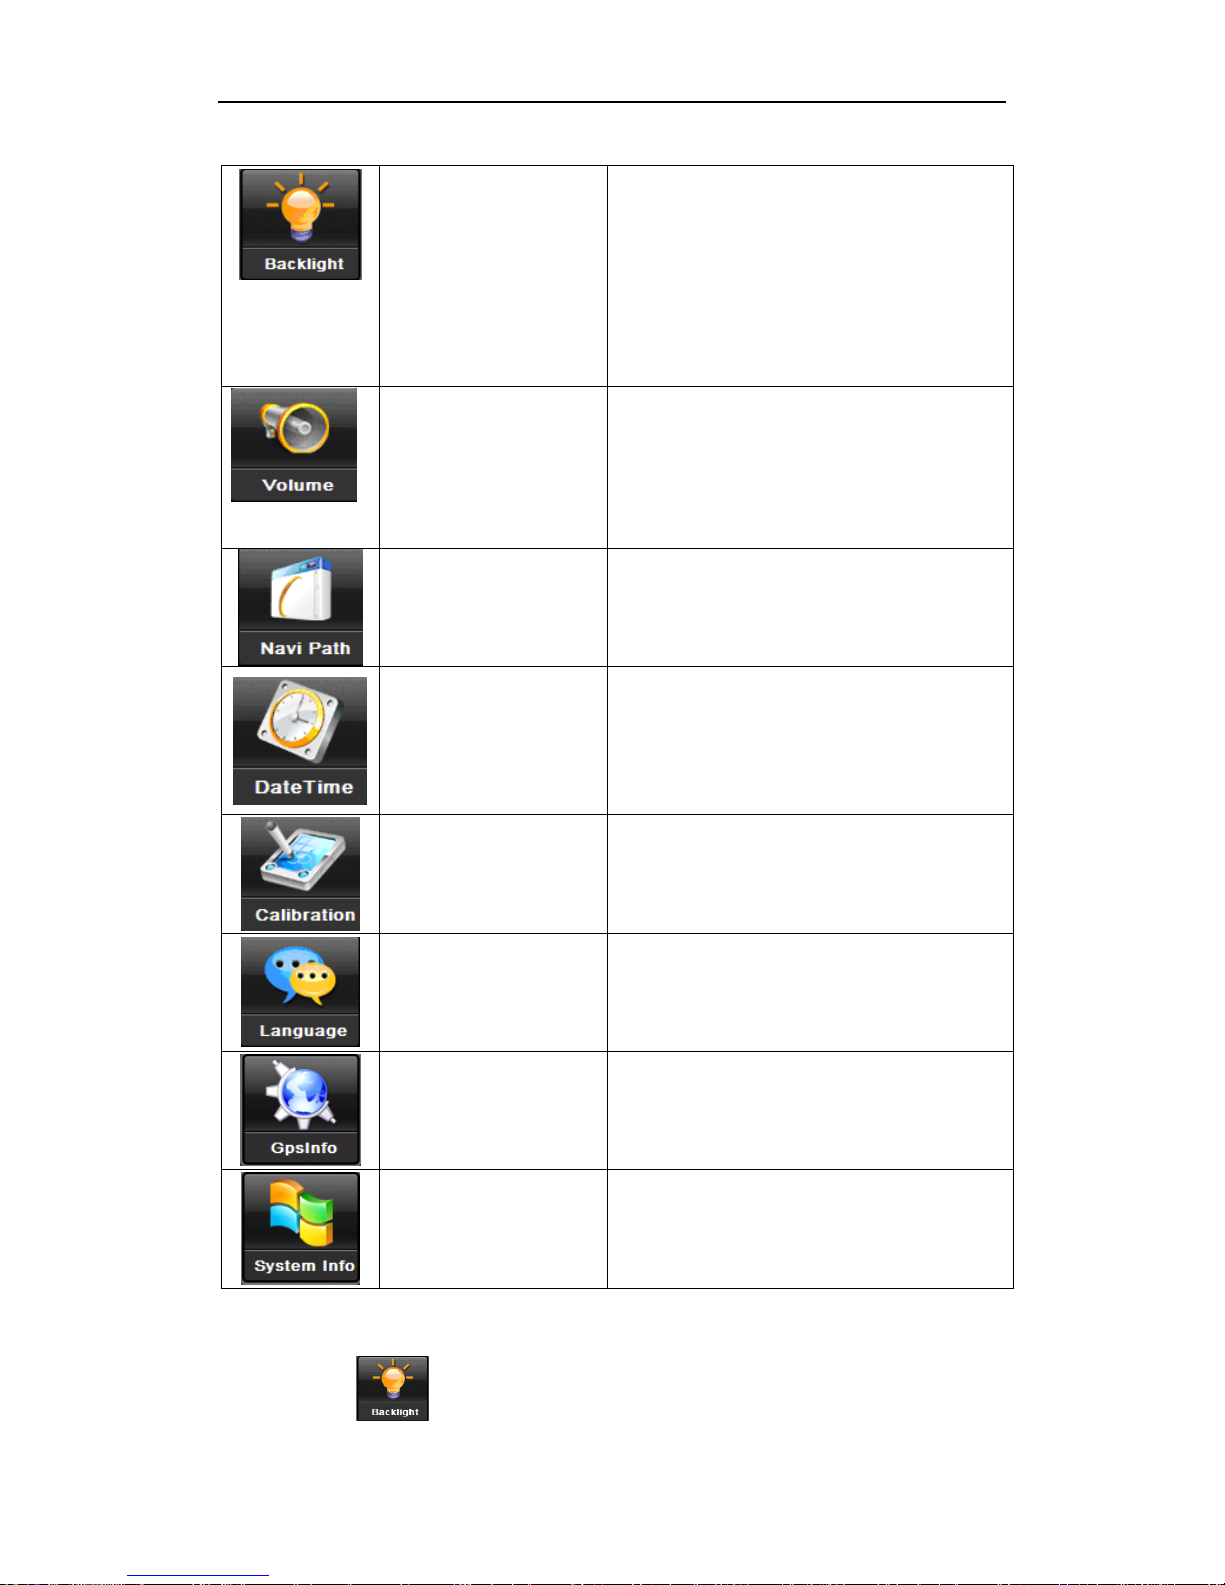
Click to enter “Setting” menu, then you can set the relevant
functions. There are backlights, volume, languages, time, calibration, system
info and default etc.
※ We’d like to highlight the importance of avoiding changing any command
setting under “NAVI-PATH” as it’s often the cause of file corruption in the
execution of Galactio Navigation Software.
This function icon cannot be remove as we have to ease the switching function
for our customer travelling overseas as their Micro SD card might contain other
country maps.
Page 33
Page 33
© 2011 Maka Technologies Group. All Rights Reserved.
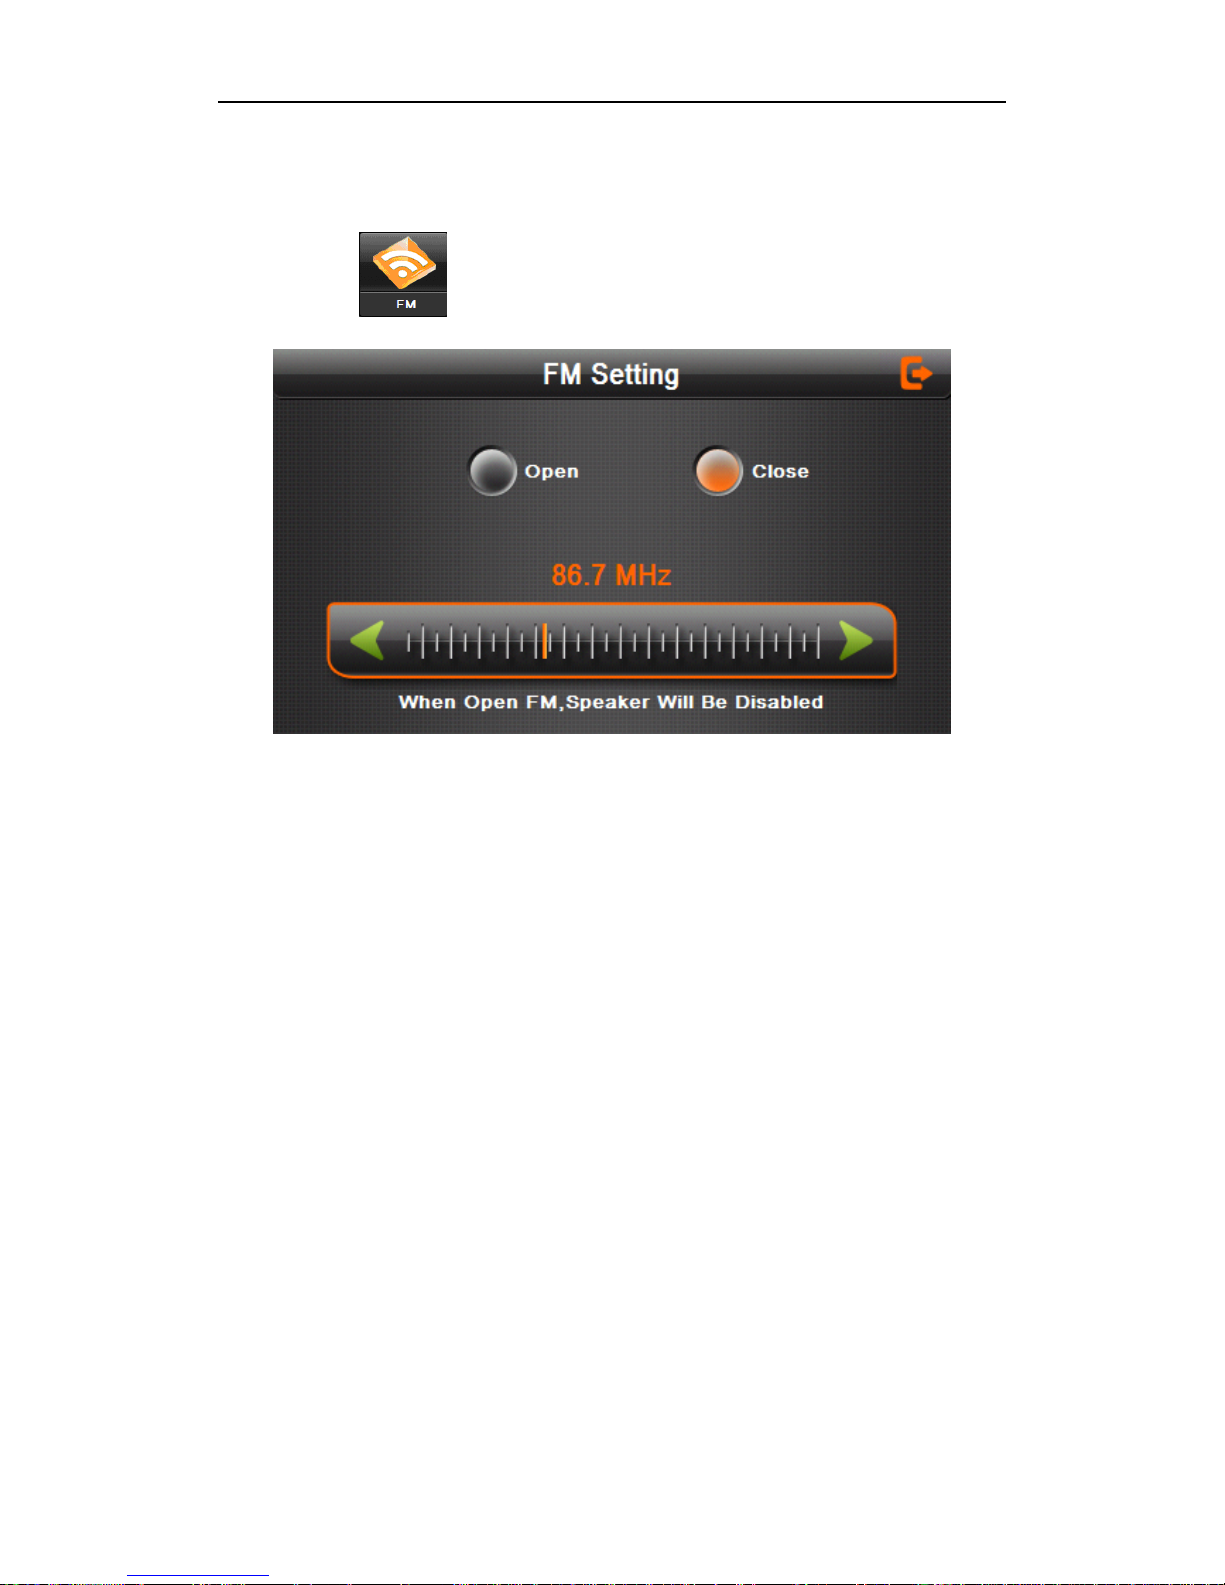
3.9.1 FM Transmitter
Single click to enter the FM setting as 3.9
3-9
FM Transmitter will send out the audio signal to the radio devices. Take
92.0MHZ frequency for example (the recommended FM frequency in
Singapore and Malaysia), both the GPS transmitting frequency and the
received frequency of the radio suggested to be tune at 92.0MHZ, then all the
sounds of the GPS will be input through the amplifier system of the radio.
However, please kindly take note that FM transmitter function need to be
enable before the sound can voice through your car speaker wirelessly. Once
the FM is enabled, the GPS speaker will be disabling as it will be sending the
voice signal to the car speaker.
Page 34
Page 34
© 2011 Maka Technologies Group. All Rights Reserved.
3-38
Back
light
Adjust the screen backlight;
Backlight turn off time interval under
battery power supply
Backlight turn off time interval under
external power supply
Volume
Adjust the volume;
Turn on / off “screen click tone”
Navigation path
Set navigation path
Time and date
Time set
Date set
Time zone set
Calibrate the screen
Calibrate the screen
Language
Select the language for the system
GPS info
Display GPS receiving signals data
System info
Show the system version and serial
number etc.
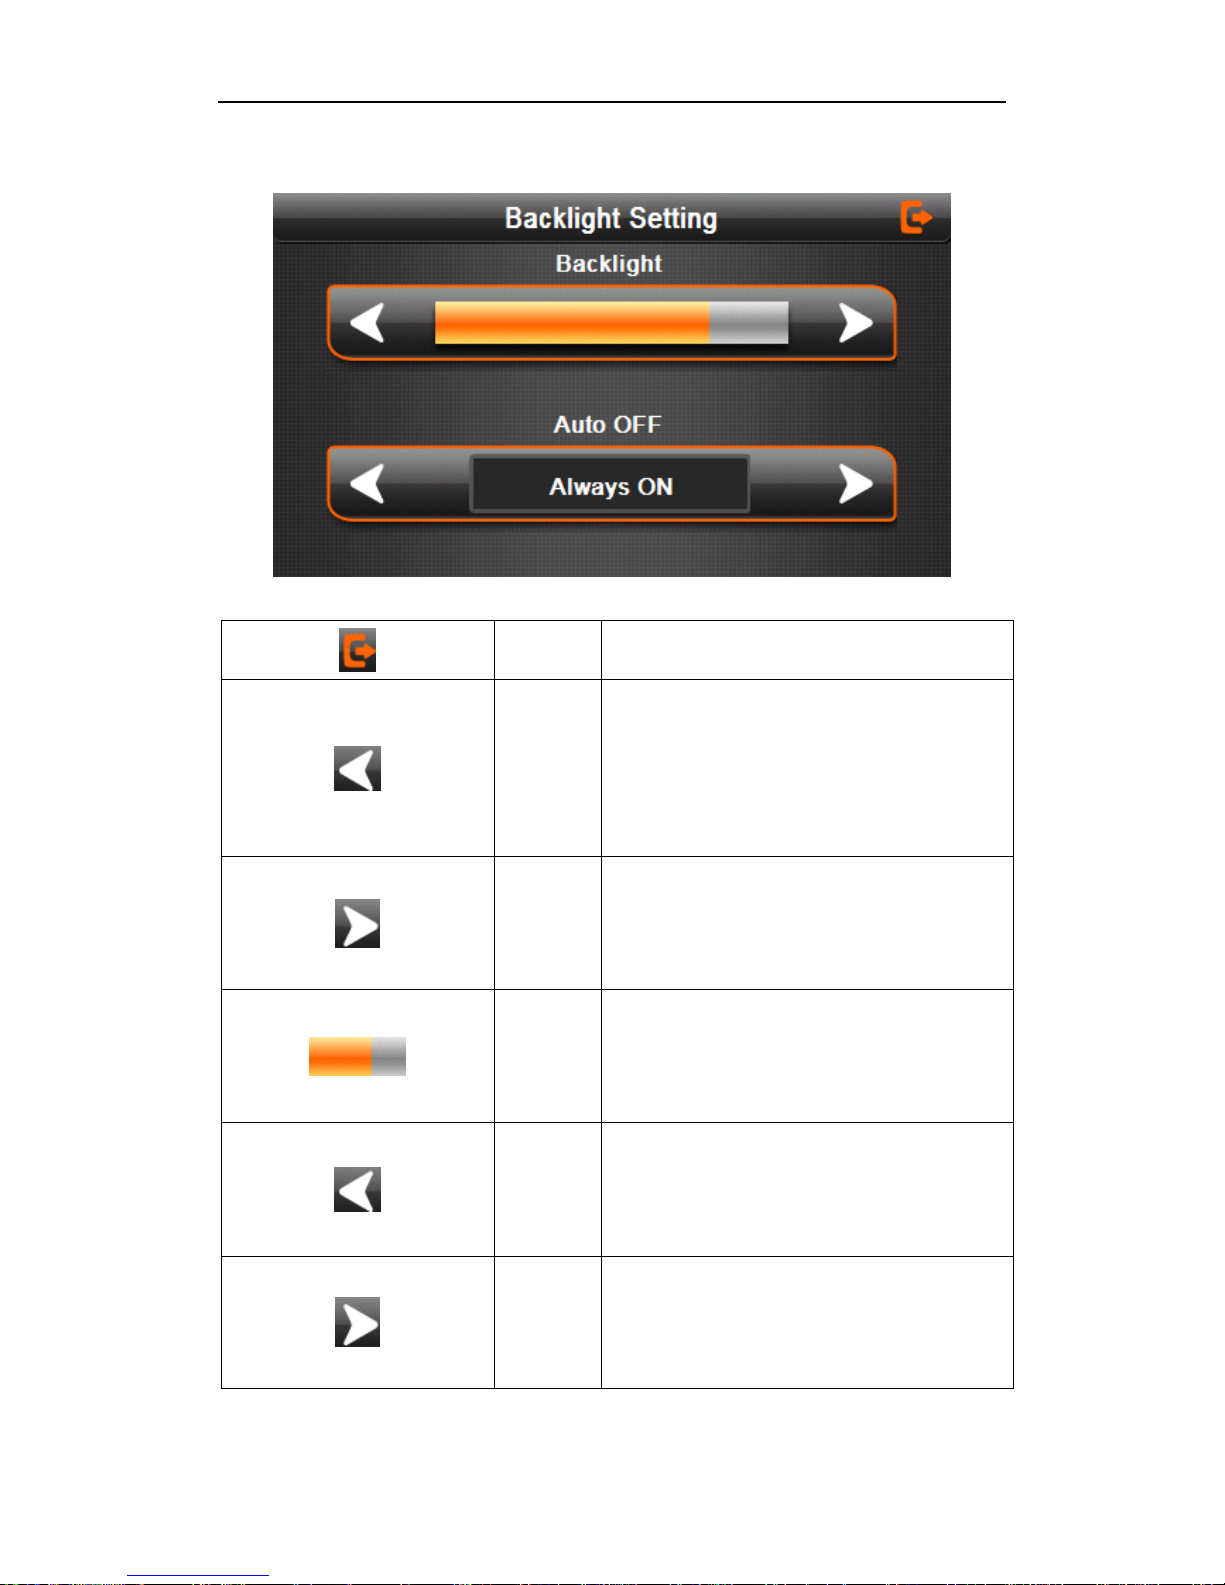
3.9.2 Backlight setting
Single click to enter backlight setting interface as 3-98
Page 35
Page 35
© 2011 Maka Technologies Group. All Rights Reserved.
3-39
Close
Exit “backlight setting” interface;
Brightne
ss
decreas
e
Click to decrease backlight gradually to
the lowest level;
Brightne
ss
increase
Click to increase backlight gradually to
the highest level
Present
Brightne
ss
Red blank shows the present
brightness
Shift left
Single click and it will shift left, and it
will show last column. This display is in
circle.
Shift
right
Single click and it will shift right and it
will show last column. This display is in
circle.
Page 36
Page 36
© 2011 Maka Technologies Group. All Rights Reserved.
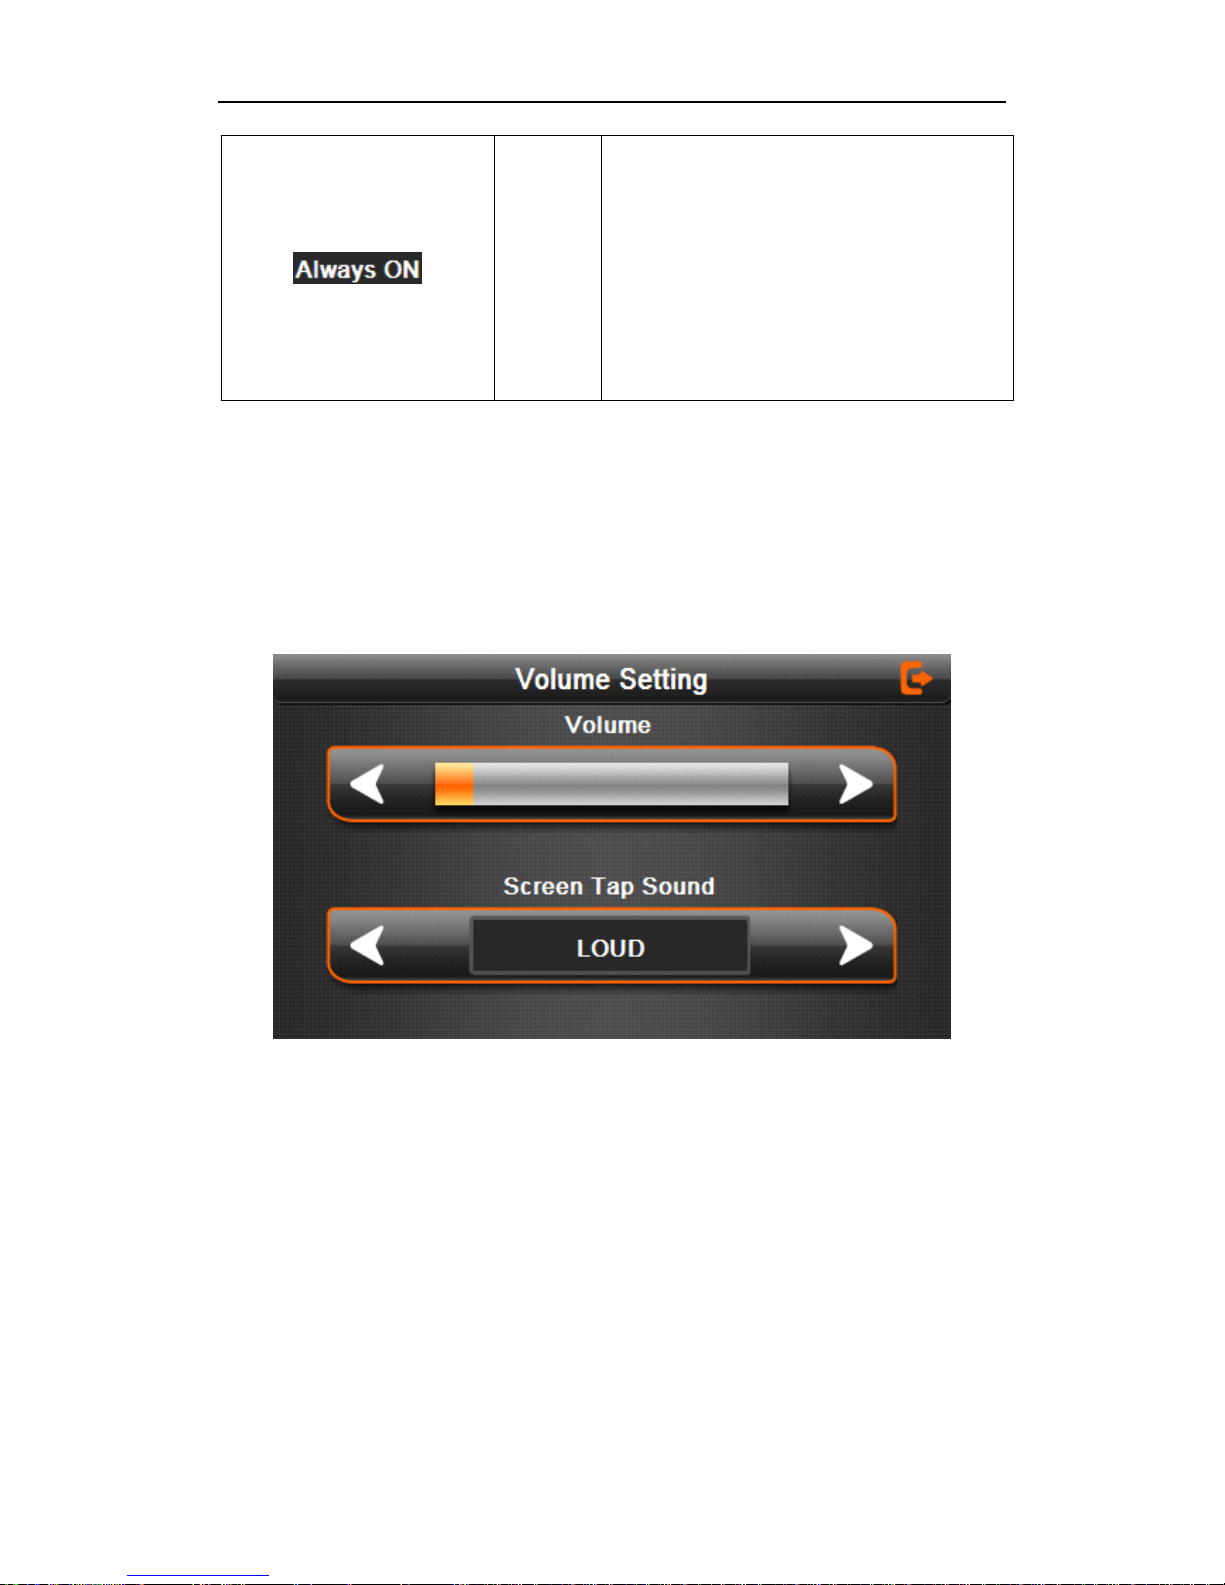
Time
interval
System backlight will be closed
automatically when no operation for a
period time to save power. There are
several time interval choice for you:
never, 3 min, 2min, 1min, 30second
later, 10second later.
3.9.3 Volume adjust
“Volume adjustment” includes:
1. Speaker volume adjustment
2. “Screen click tone” setting
Page 37
Page 37
© 2011 Maka Technologies Group. All Rights Reserved.
3-40
Close
Exit “volume setting” interface;
Volume -
Single click to decrease the
volume gradually; there are 10
ranks for volume from mute to
maximum. Single click will
decrease one rank.
Volume +
Single click to increase the
volume gradually; there are 10
ranks for volume from mute to
maximum. Single click will
increase one rank.
Turn left
Turn on/ off screen click tone;
Turn right
Turn on/ off the screen click
tone;
Present
volume
Yellow blanks shows the present
volume level;
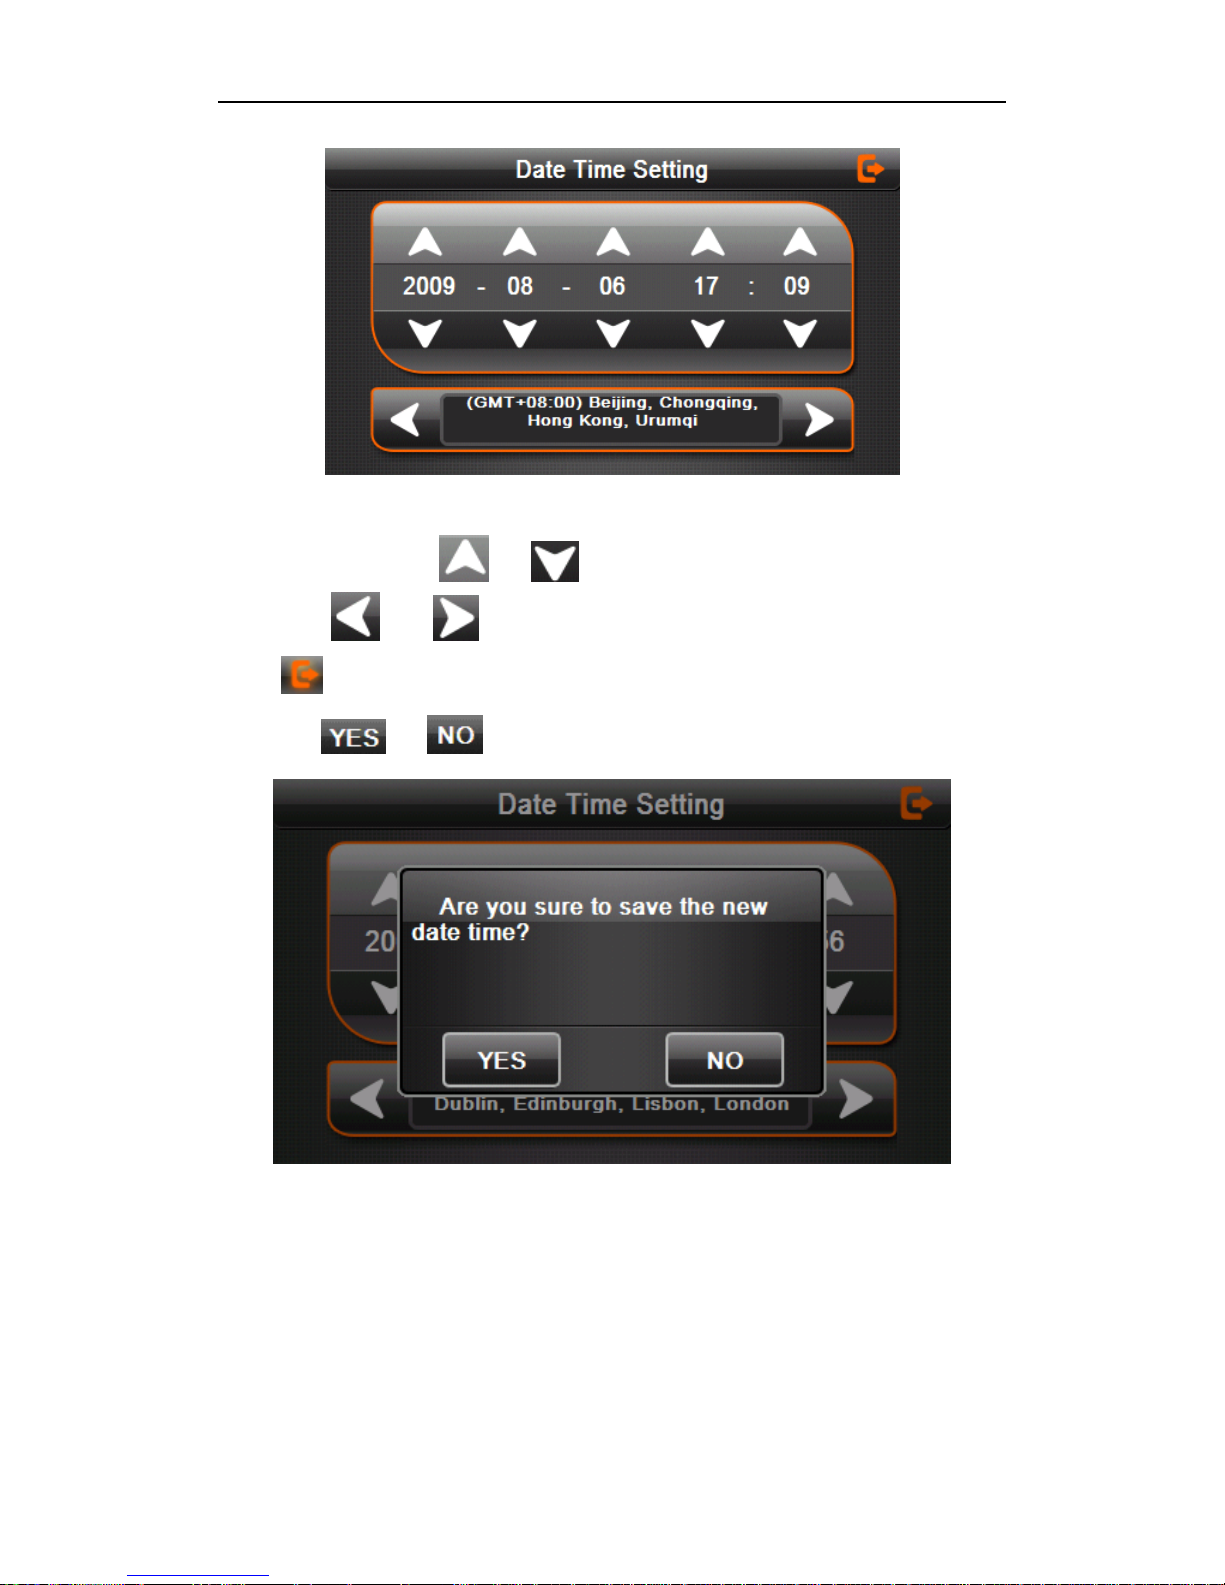
3.9.4 Date and time setting:
Date and time include:
1. System time set;
2. System date set;
3. System time zone set.
*Please take note the date and time of GPS navigation software – Galactio will
make automatic time and date adjustment when your GPS is connected with
the satellite. No manual adjustment is required.
Page 38
Page 38
© 2011 Maka Technologies Group. All Rights Reserved.
3-43
1. Single click button or to set time and date.
2. Single or to choose time area。
Click to exit current interface after setting,and then it will show as 3-44.
Choose or to exit current interface.
3-44
Page 39
Page 39
© 2011 Maka Technologies Group. All Rights Reserved.
3.9.5 Screen Calibration
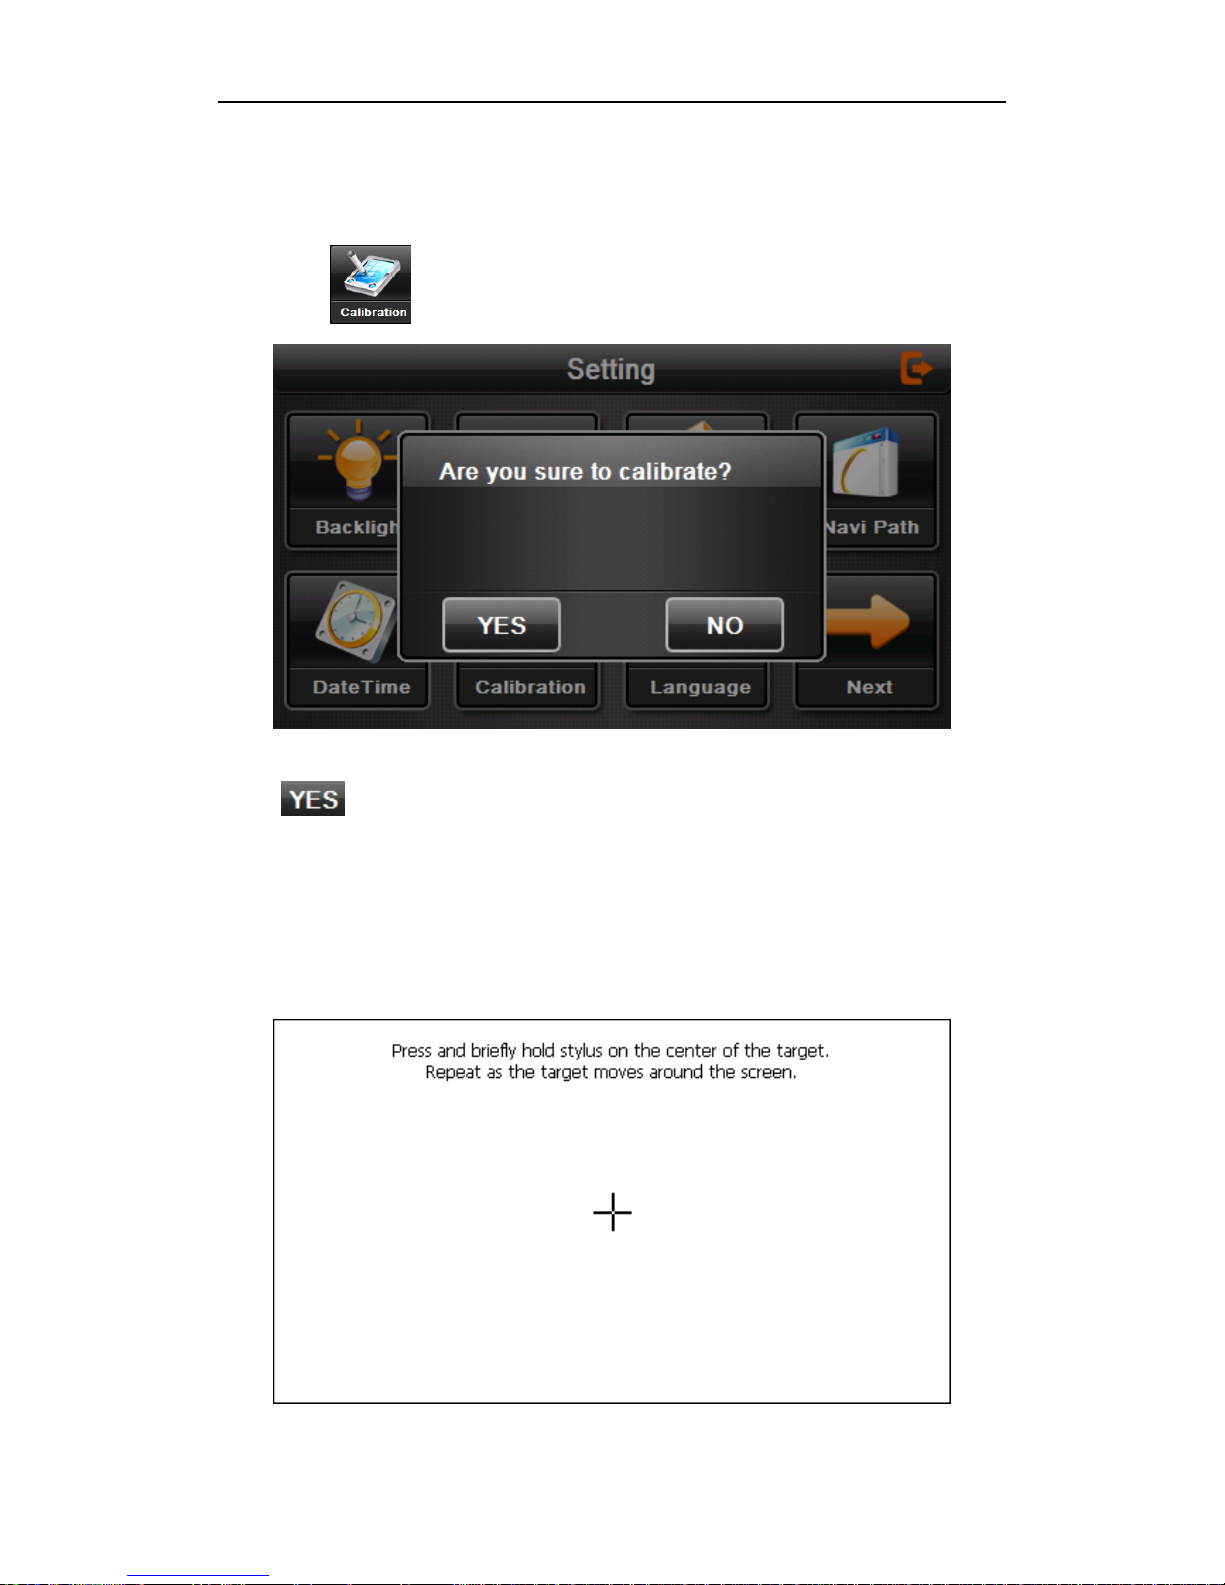
Click the to enter the screen calibration as 3-45
3-45
Click it will move from in the sequence of the center, left up, left down,
right down and right up till the calibration succeed, then click any where on the
screen to save the calibration and exit to the main interface automatically. If not
save the information, please wait 30 seconds and it will exit from current
interface automatically.
3-46
Page 40
Page 40
© 2011 Maka Technologies Group. All Rights Reserved.
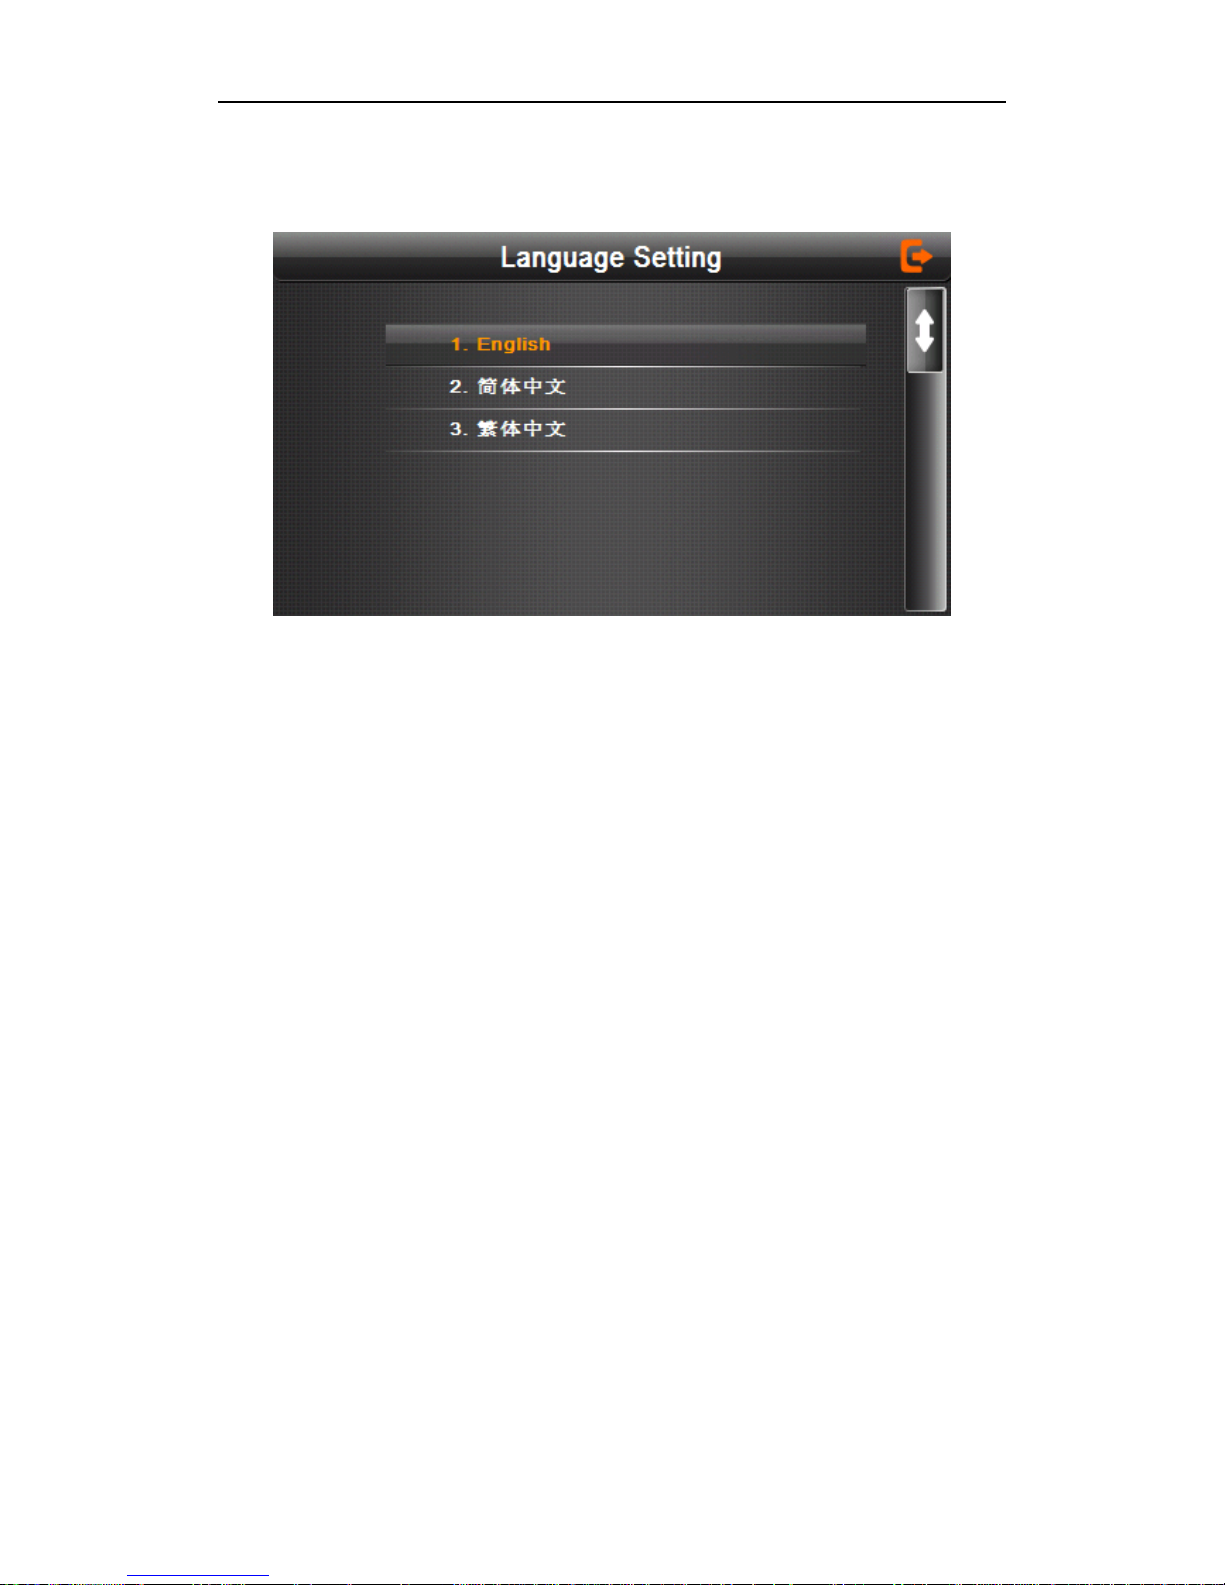
3.9.6 Language setting
3-47
Single click your preferred language and then exit. This is the system language.
Galactio software provides a wide selection of language in Malay, English,
Simplify Chinese, Japanese, Indonesian, Arabic and Traditional Chinese.
There are also wide selections of voice selection available under the
navigation software.
Page 41
Page 41
© 2011 Maka Technologies Group. All Rights Reserved.
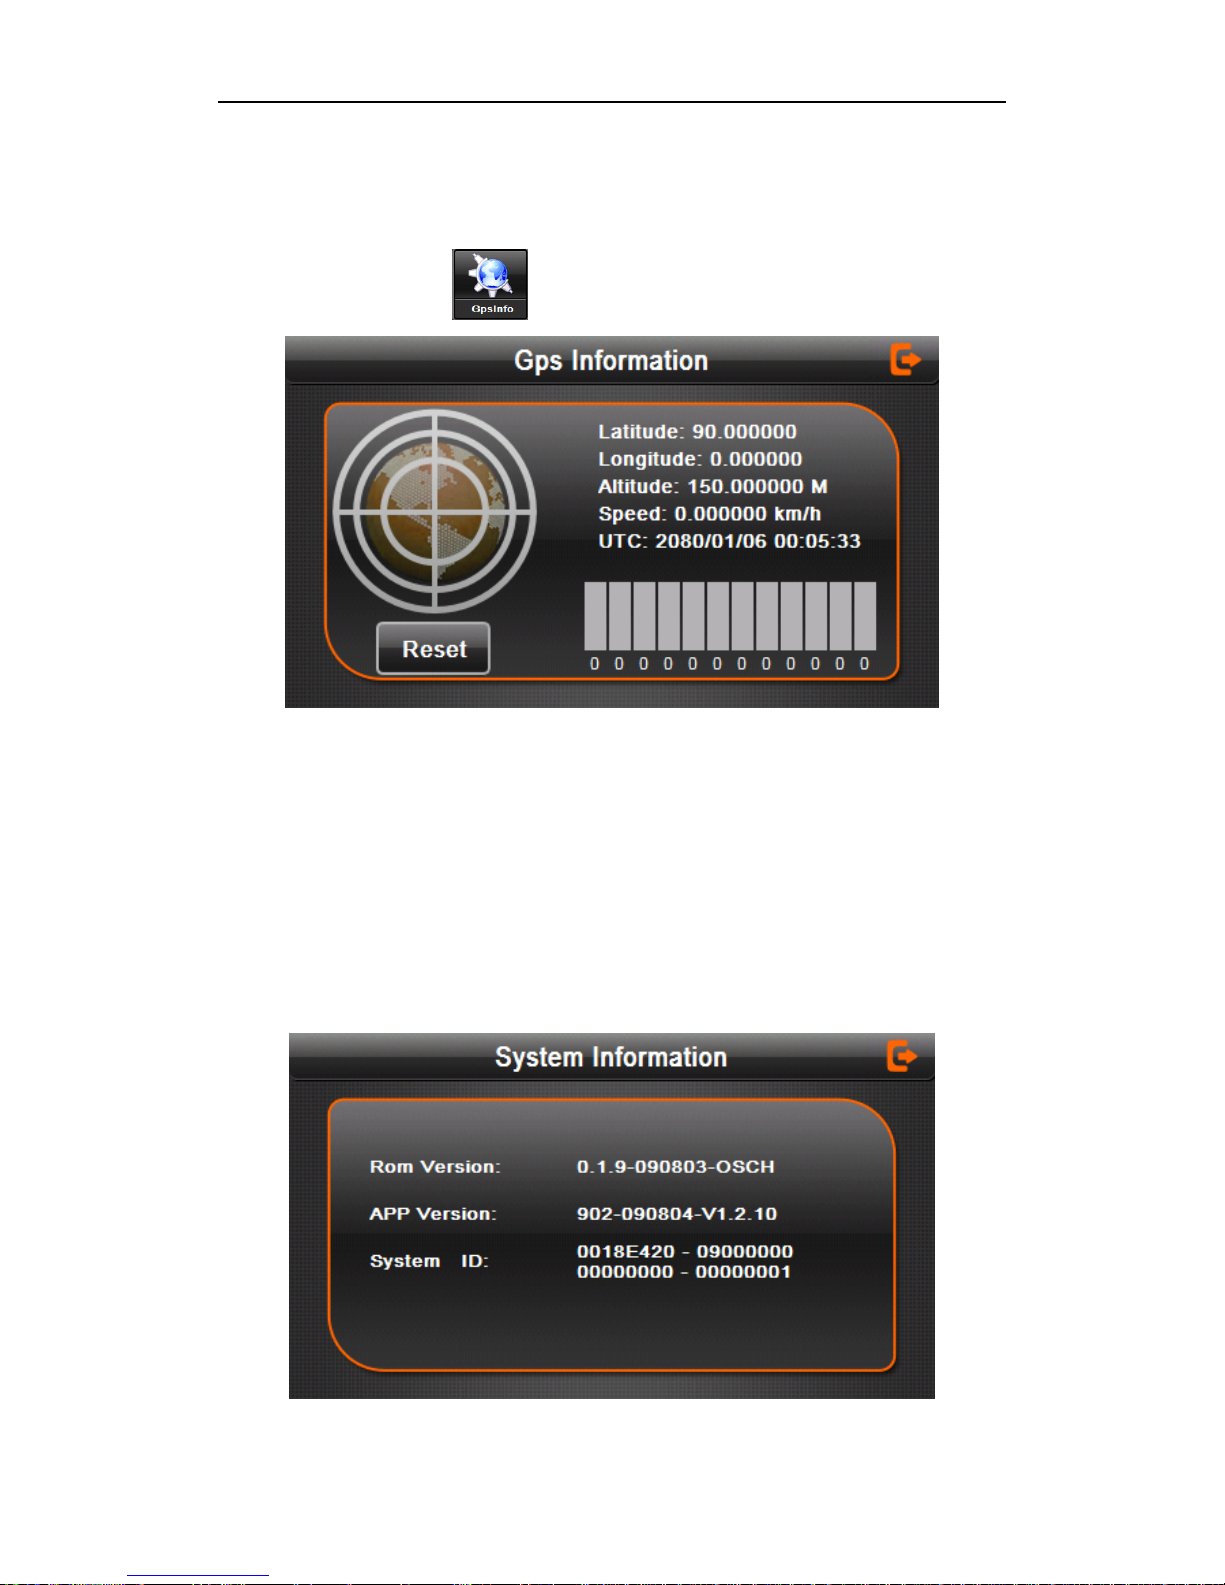
3.9.7 GPS Information
Single click the button and enter GPS information interface as 3-49
3-49
3.9.8 System information
System information includes:
4. Firmware version;
5. APP version;
6. System ID.
3-50
Page 42

Page 42
© 2011 Maka Technologies Group. All Rights Reserved.
Exit system information
Show ROM version
Show the APP version;
Show the system ID.
Page 43
Page 43
© 2011 Maka Technologies Group. All Rights Reserved.
4. Bluetooth Handsfree Communication
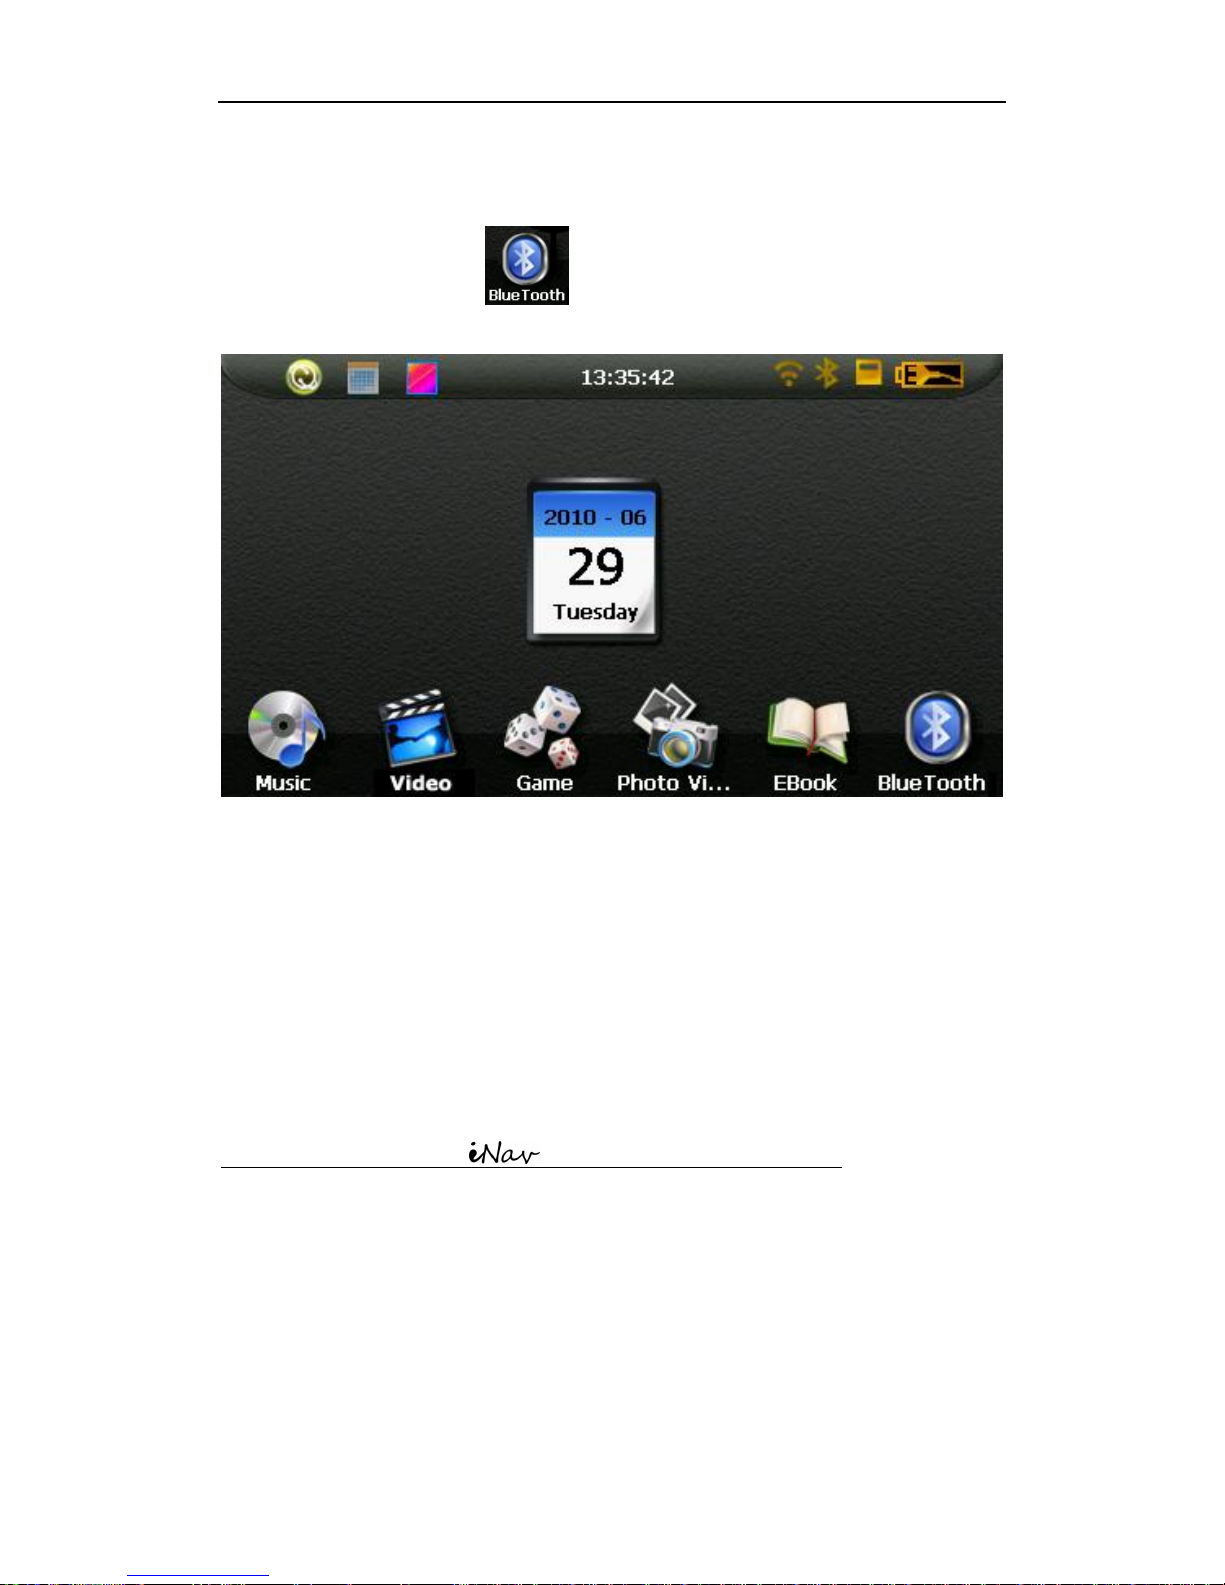
4.3.1 Single click the button in main menu to open the Bluetooth interface as
the following picture 4-1;
4-1
4.1 Bluetooth
Bluetooth is designed for handsfree communication. This is the replacement of
your Bluetooth handsfree earpiece if you have any. Bluetooth feature will be
solely available for communication purposes. Data or file transfer will not be
available here.
Advantages of Marbella 610XT Sleek 5inch Bluetooth
- Automatic connection/re-connection when you enter your vehicle
- Phone Book sync
- Able to pair with Multiple-mobile phone (but only connect 1 phone per
time)
- Clear and user friendly telephone menu
Page 44
Page 44
© 2011 Maka Technologies Group. All Rights Reserved.
4.2 Bluetooth Pairing
Different phone has different application and steps in pairing with Marbella
610XT Sleek 5inch. Due to various model and brand mobile phone
model in the market, we will not be able to provide any support for Bluetooth
pairing over the phone or email. However, we’d be more than happy to assist
you if you could bring the phone down to our Service Centre.
Bluetooth handsfree should be compatible with most of mobile phones in the
market, but however we are taking Apple iPhone as an example and here are
some steps as follows;
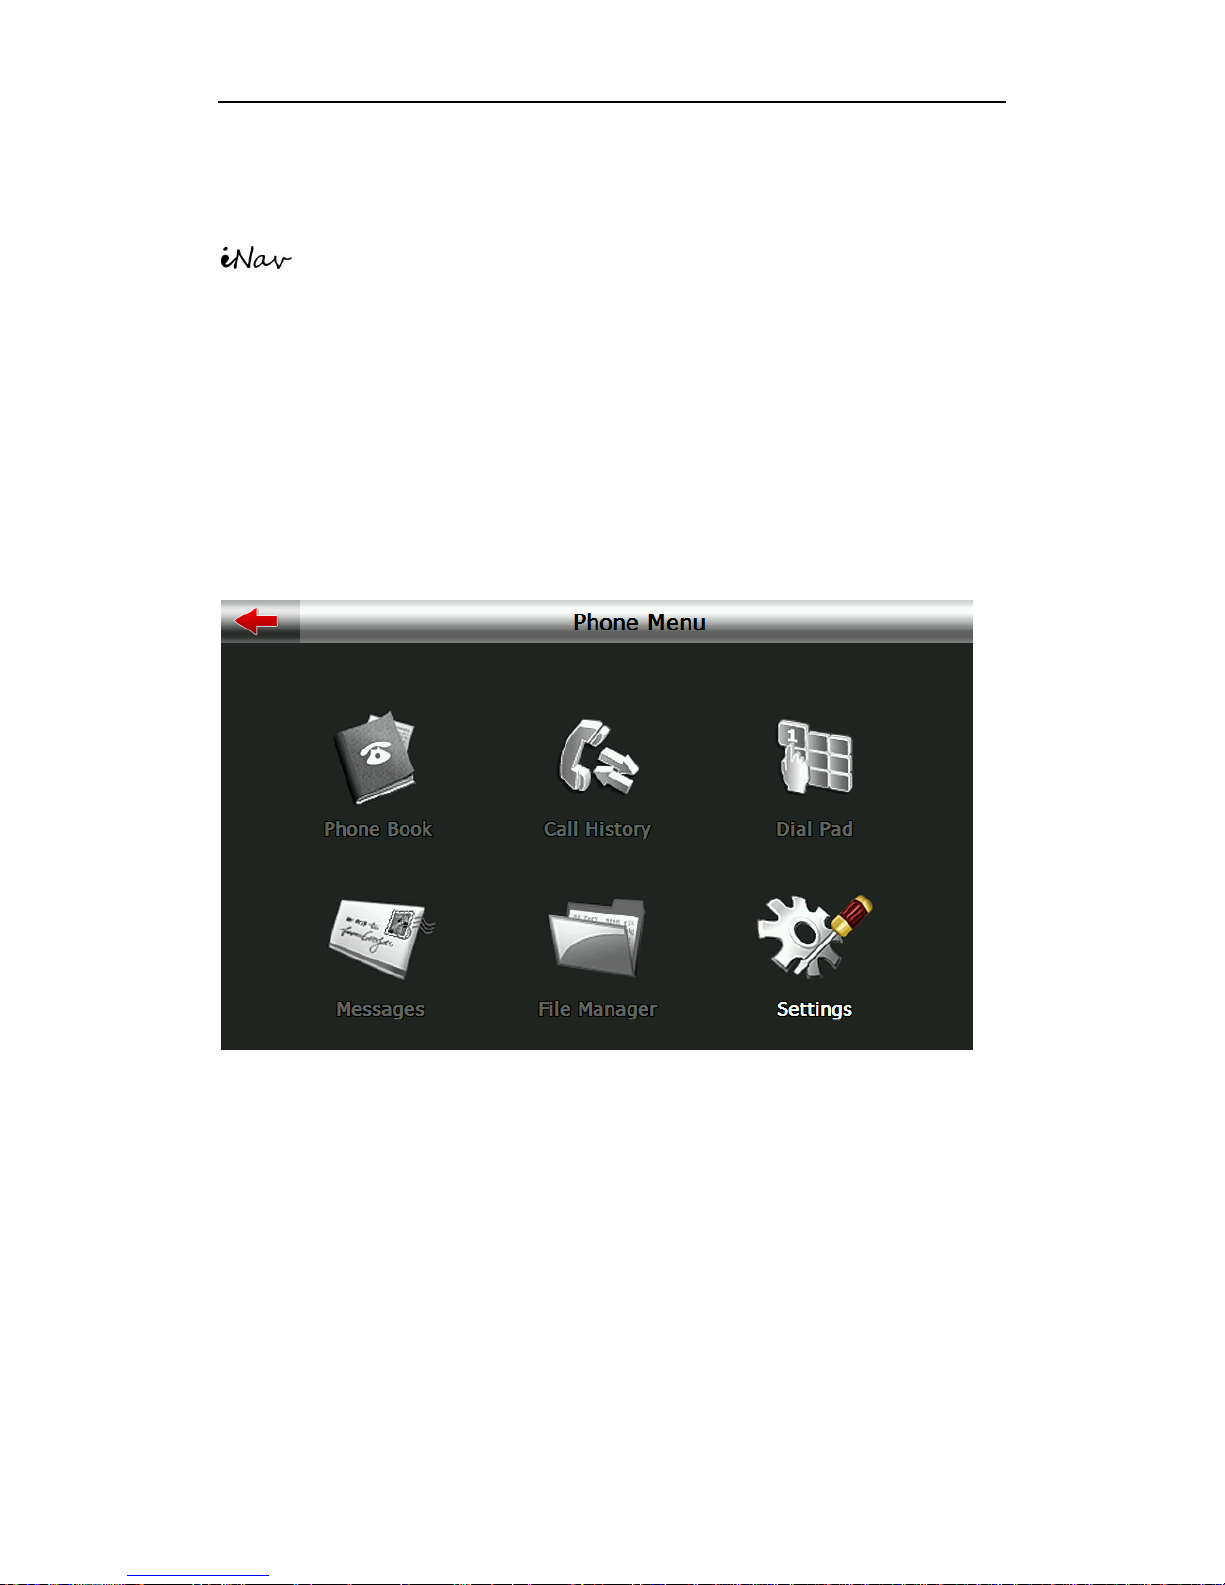
<Step 1>
Click on Settings once you enter the Bluetooth page. Other icons remain
unavailable until a device has been paired successfully with your mobile
phone.
Page 45
Page 45
© 2011 Maka Technologies Group. All Rights Reserved.
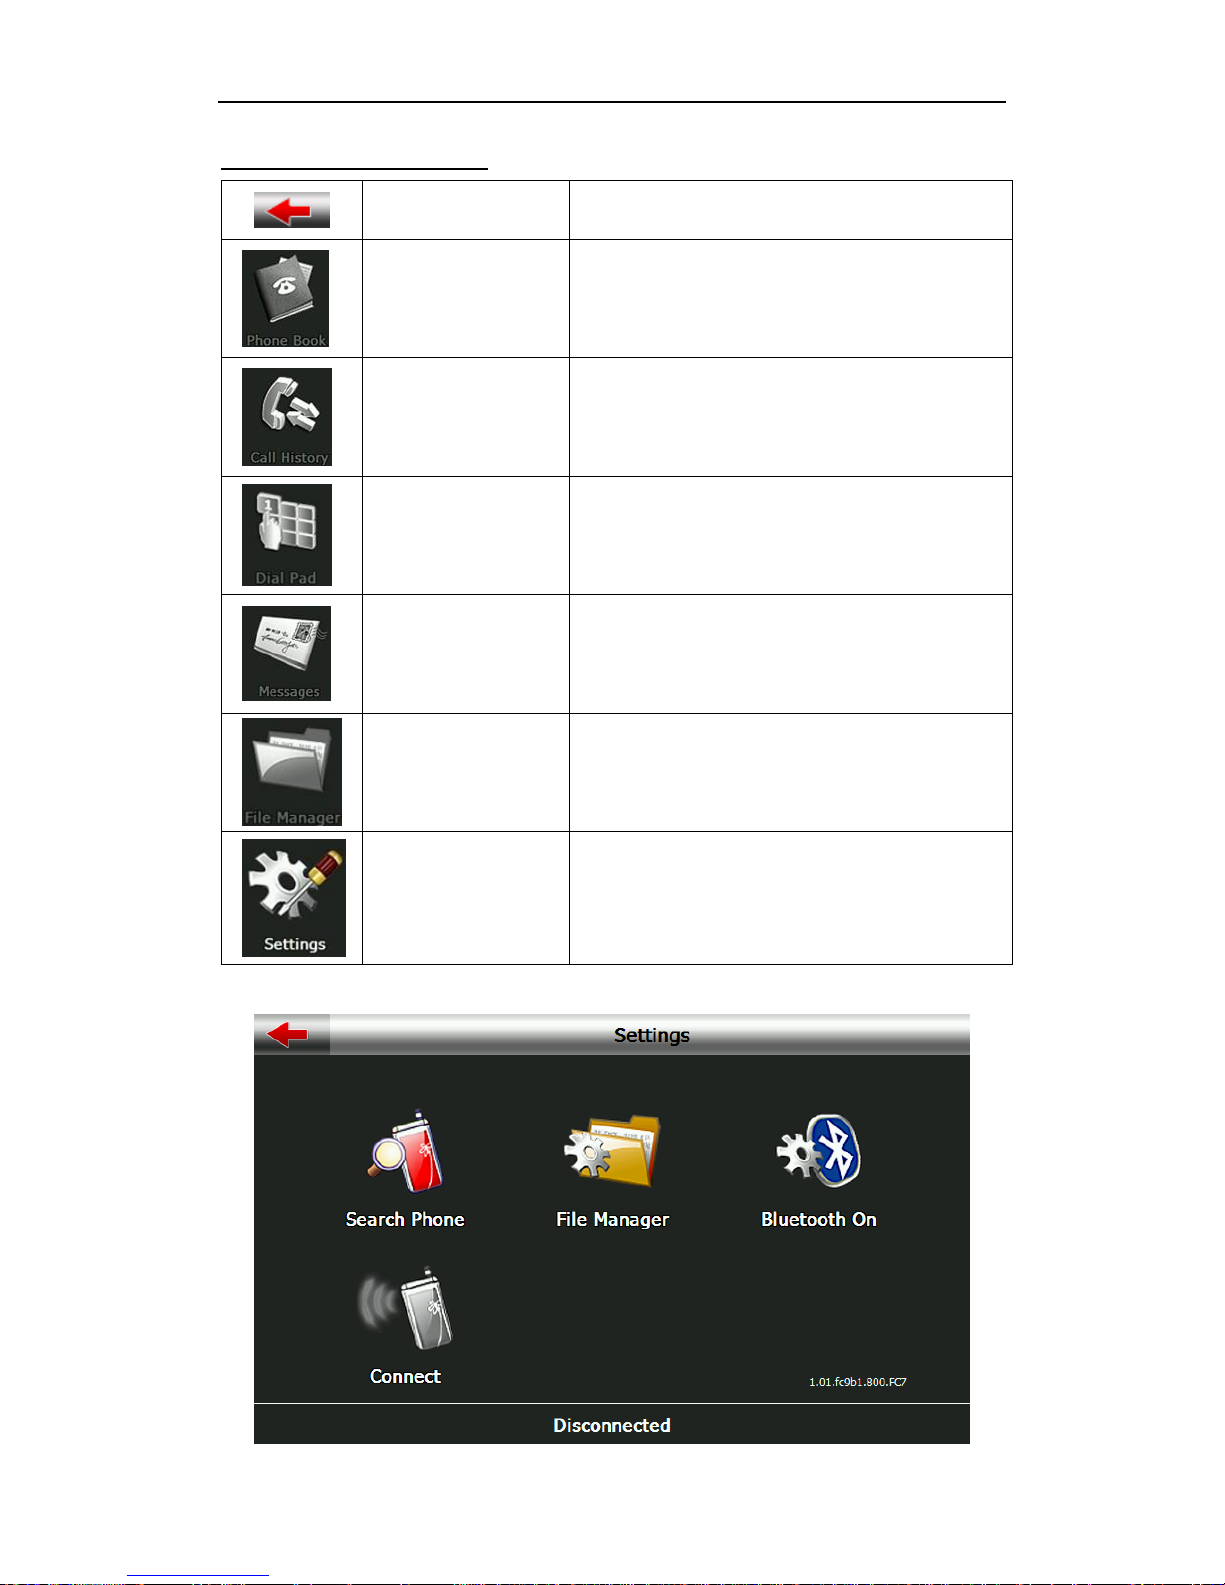
Bluetooth Icon Summary
Close
Single click to close the current interface
Phone book
Display contact list of paired cell phone
Call history
Display current call history
Dial pad
Phone number dialing
Message
Download SMS of paired phone
File manager
Download files of paired phone
Bluetooth setting
Cell phone searching, profile
management, Bluetooth switched on and
disconnect
<Step 2>
Page 46
Page 46
© 2011 Maka Technologies Group. All Rights Reserved.
<Step 3>
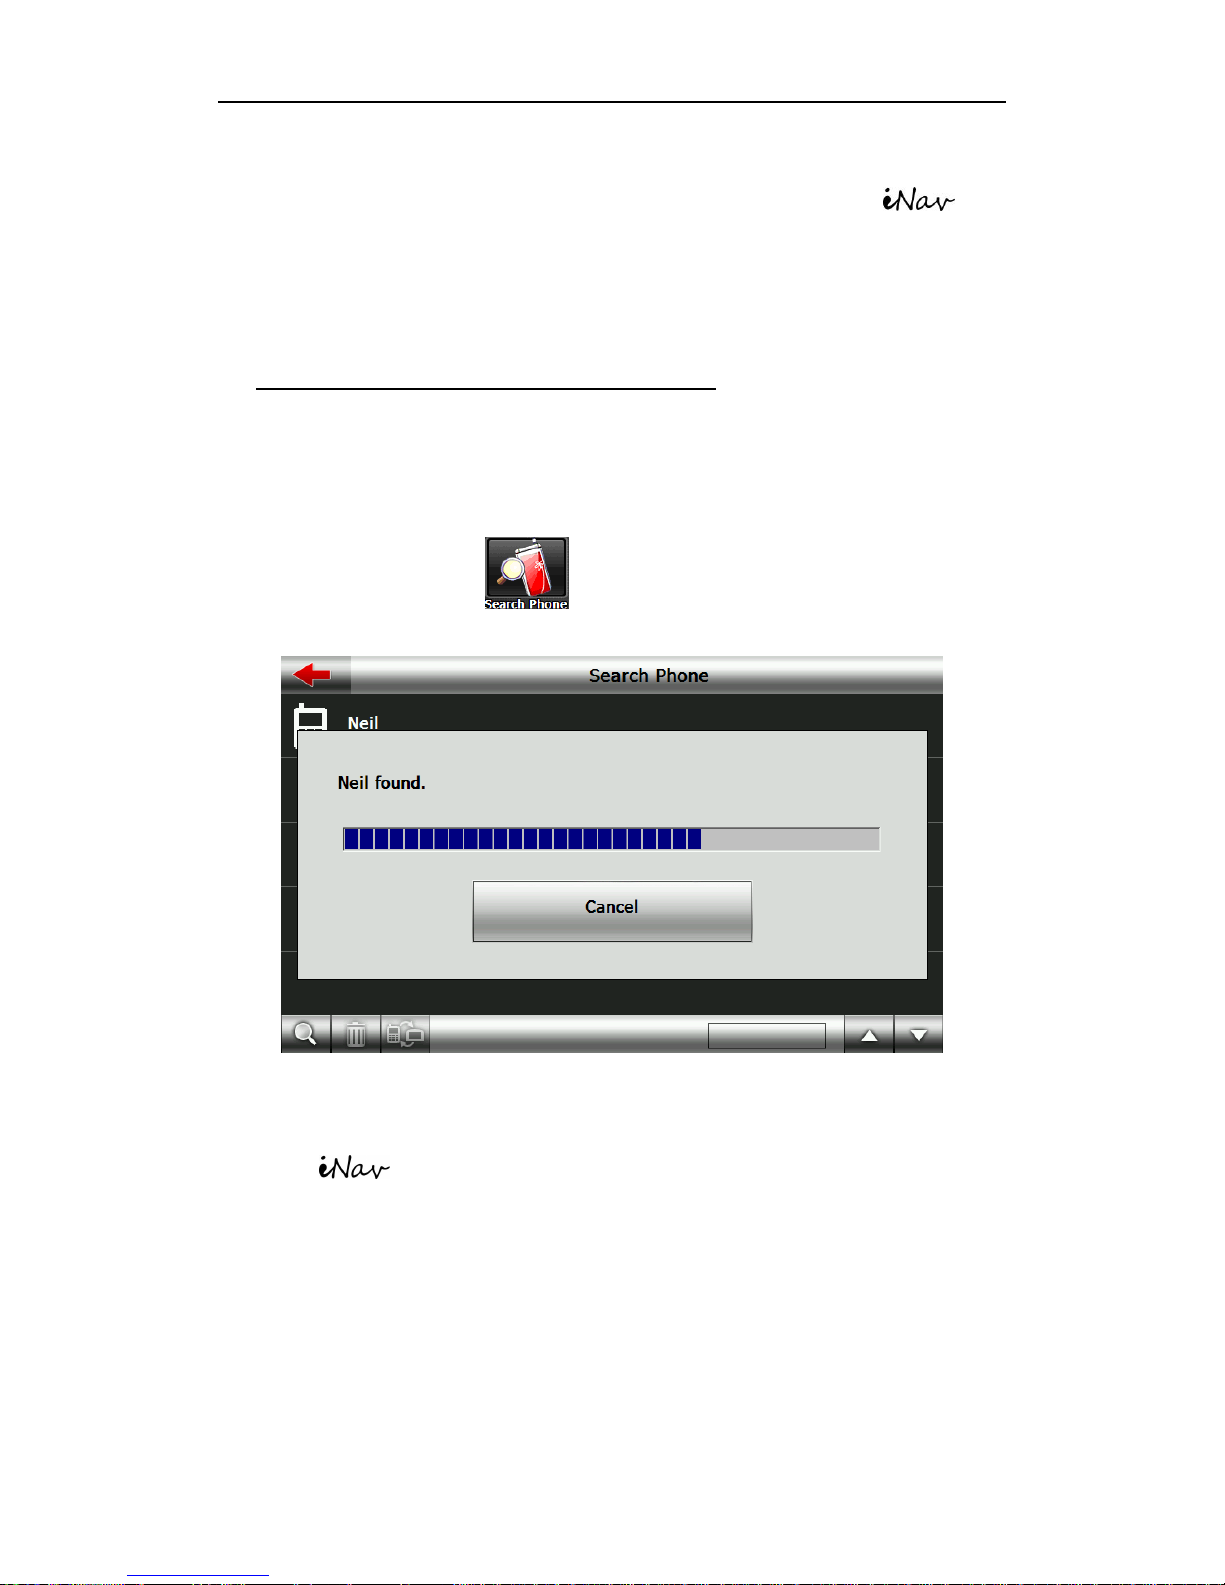
Please kindly click on “Search Phone” and allow the Marbella 610
Sleek 5inch to commence searching to pair with your mobile phone. Please
kindly also ensure you have switched “ON” the Bluetooth from your mobile
phone.
※ PLEASE TAKE NOTE, “BLUETOOTH OFF” refers to “Turn OFF your
Bluetooth”. It does not mean currently the Bluetooth is disabled. However, the
Bluetooth will be disabled if you see the message “BLUETOOTH ON”.
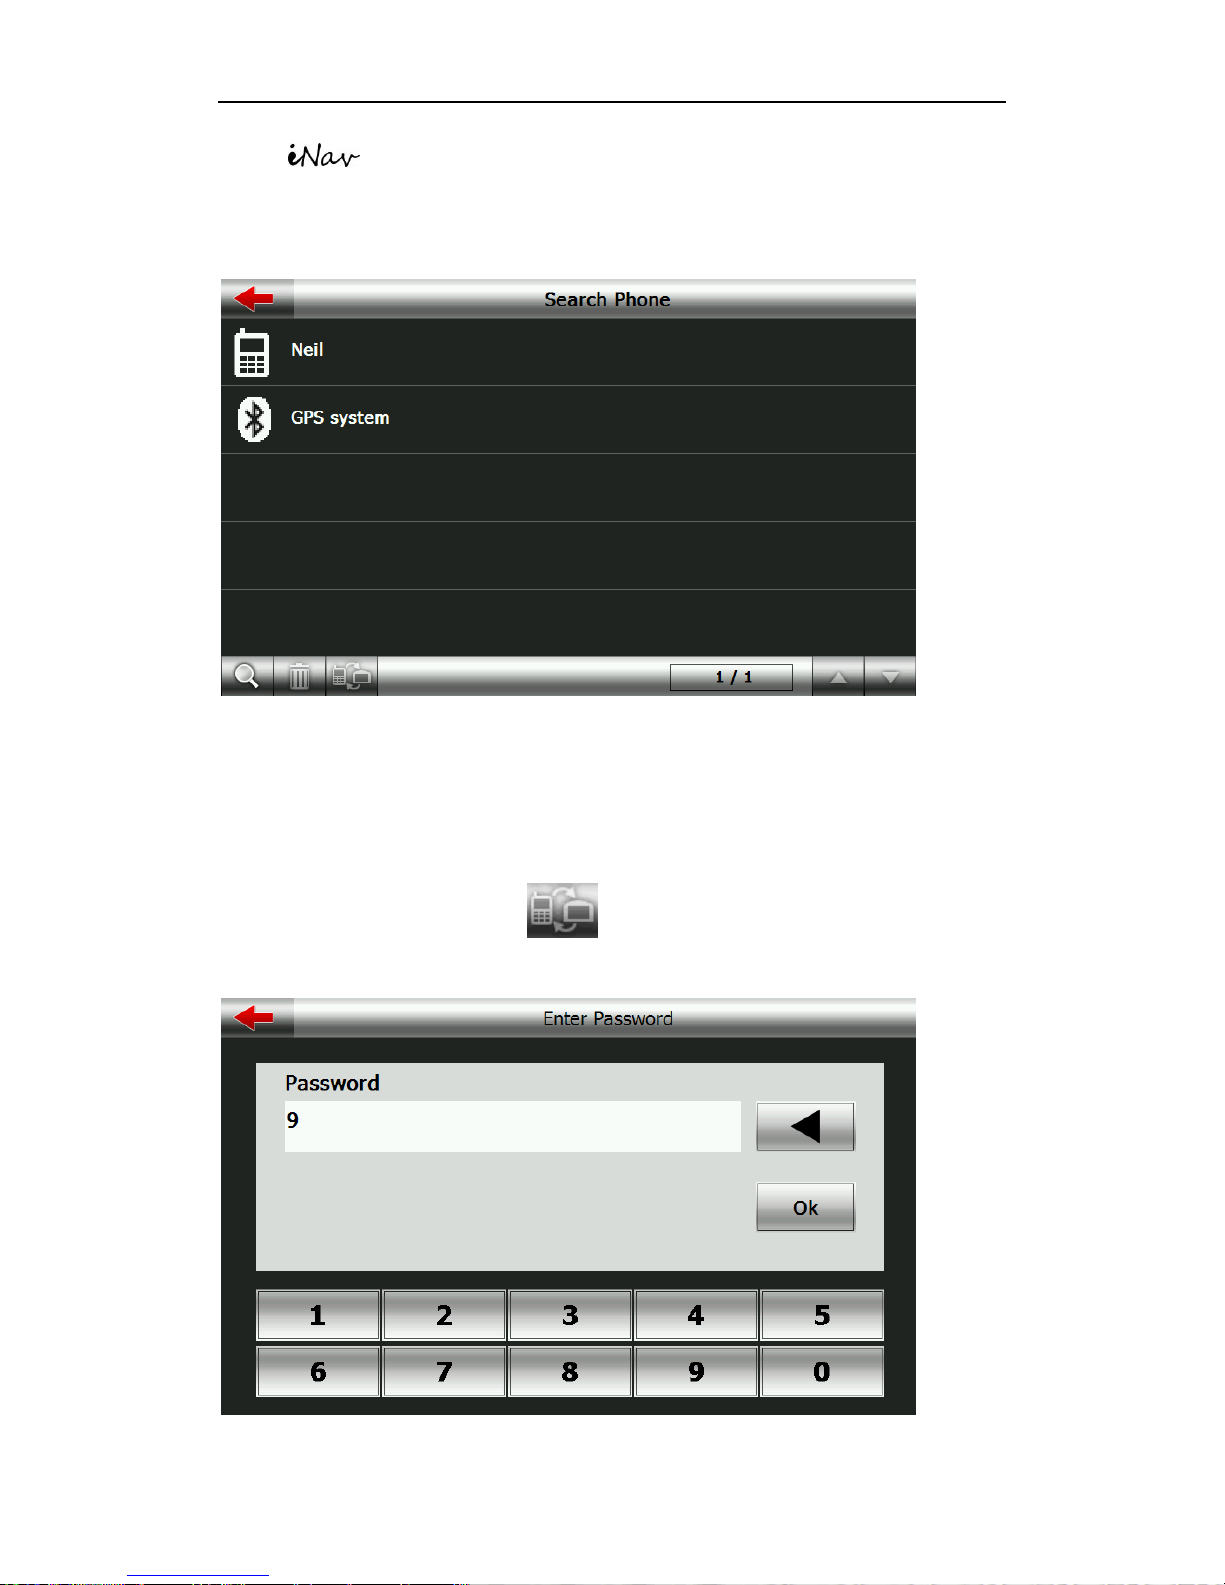
4.3.3 Single click button you will get the following two pictures: the
one is in searching and the next one is the searching result.
<Step 4>
Marbella 610XT Sleek 5inch will search for your mobile phone now. If
your phone is not able to be discover, please kindly make some
troubleshooting attempt;
1) Try to search for few more times, try to minimize the number of
Bluetooth devices surround you.
2) Please use your mobile phone and enter the Bluetooth, see if you can
“add” or “Search” for a new Bluetooth devices at the same time Marbella
Page 47
Page 47
© 2011 Maka Technologies Group. All Rights Reserved.
610XT Sleek 5inch is searching for your mobile phone. It may
be easier with 2-way attempt.
<step 5>
1. Click & select on the mobile phone which was discovered through this
search
2. Click on the “Pairing” Icon to make a connect attempt. Single click the device
you want to connect and click to pair as the following pictures
<Step 6>
Page 48
Page 48
© 2011 Maka Technologies Group. All Rights Reserved.
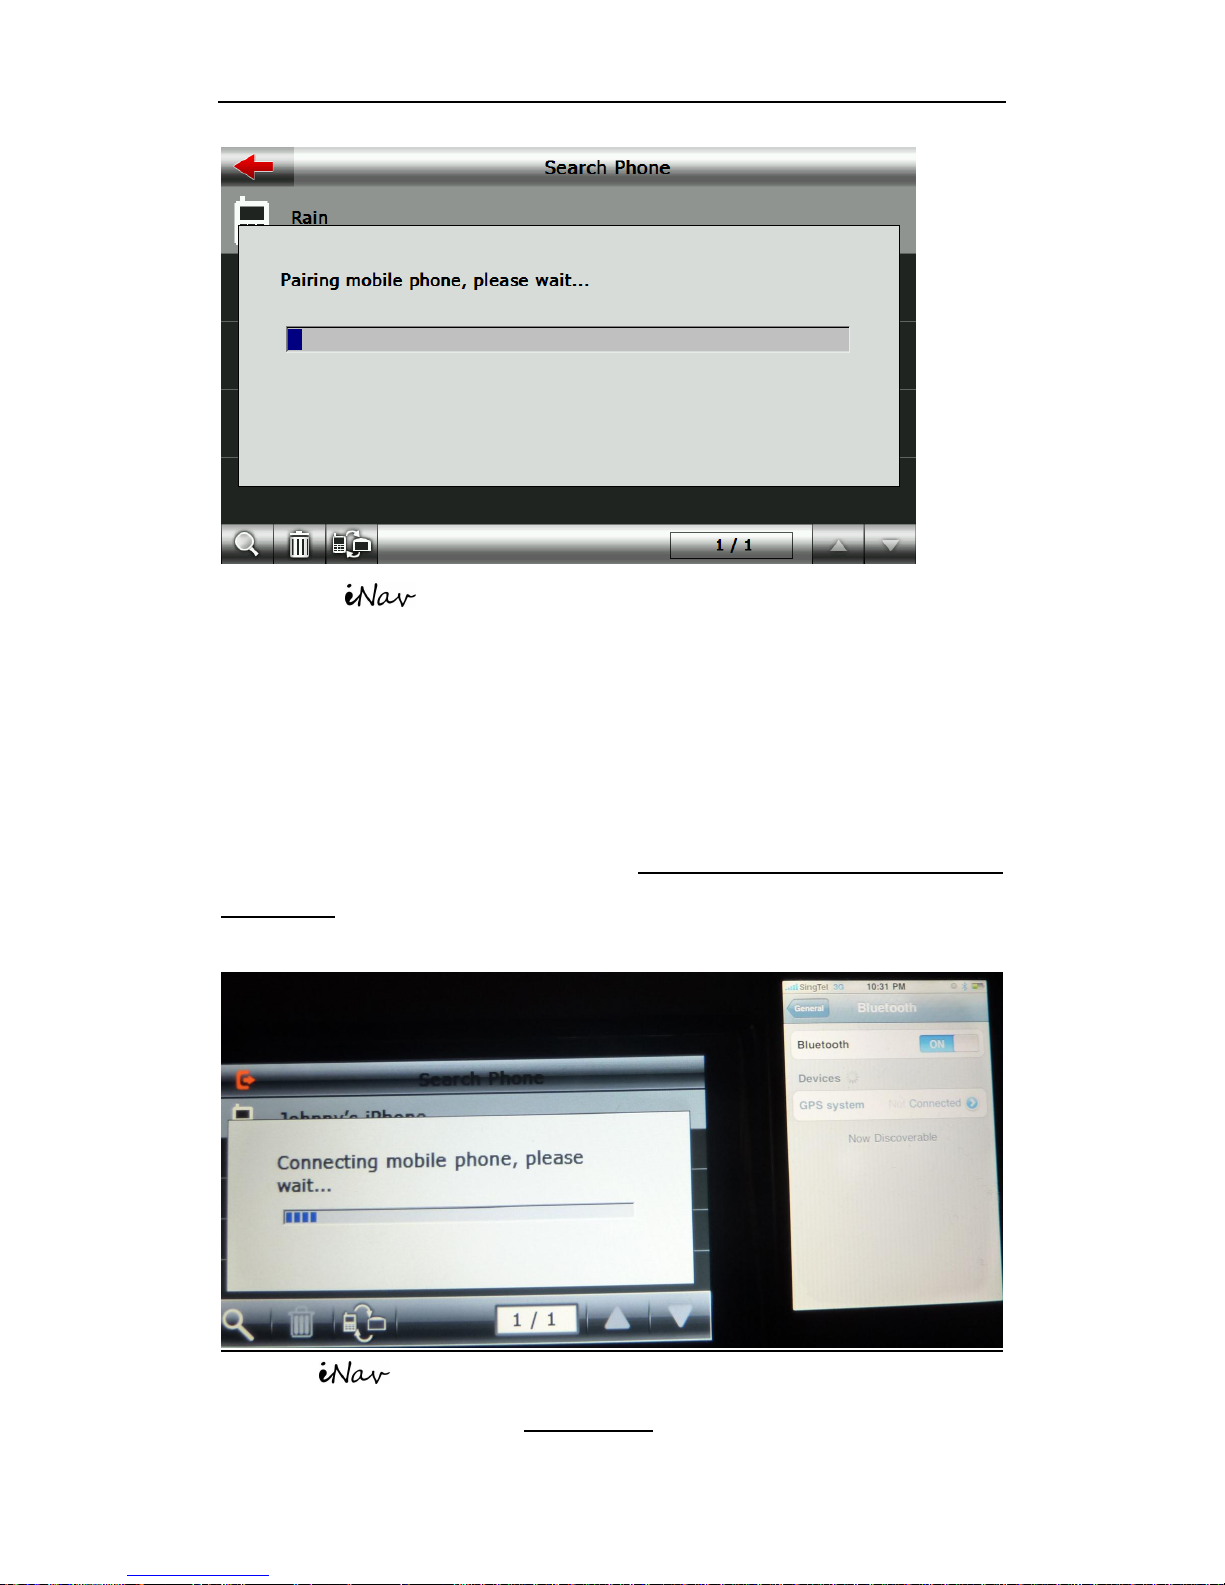
1) Marbella 610XT Sleek 5inch will request a password of your choice
to confirm the Bluetooth pairing is authenticated. A simple password can be
“1234” which is shown as our example here.
2) Once you enter your preferred password and press “OK”. Your mobile
phone end should prompt you to enter a PIN/Password.
3) Please enter the same “PIN Number” as per your previous step and click on
“Connect” or “Accept” once after the SAME PIN NUMBER HAS BEEN
ENTERED.
<Step 7>
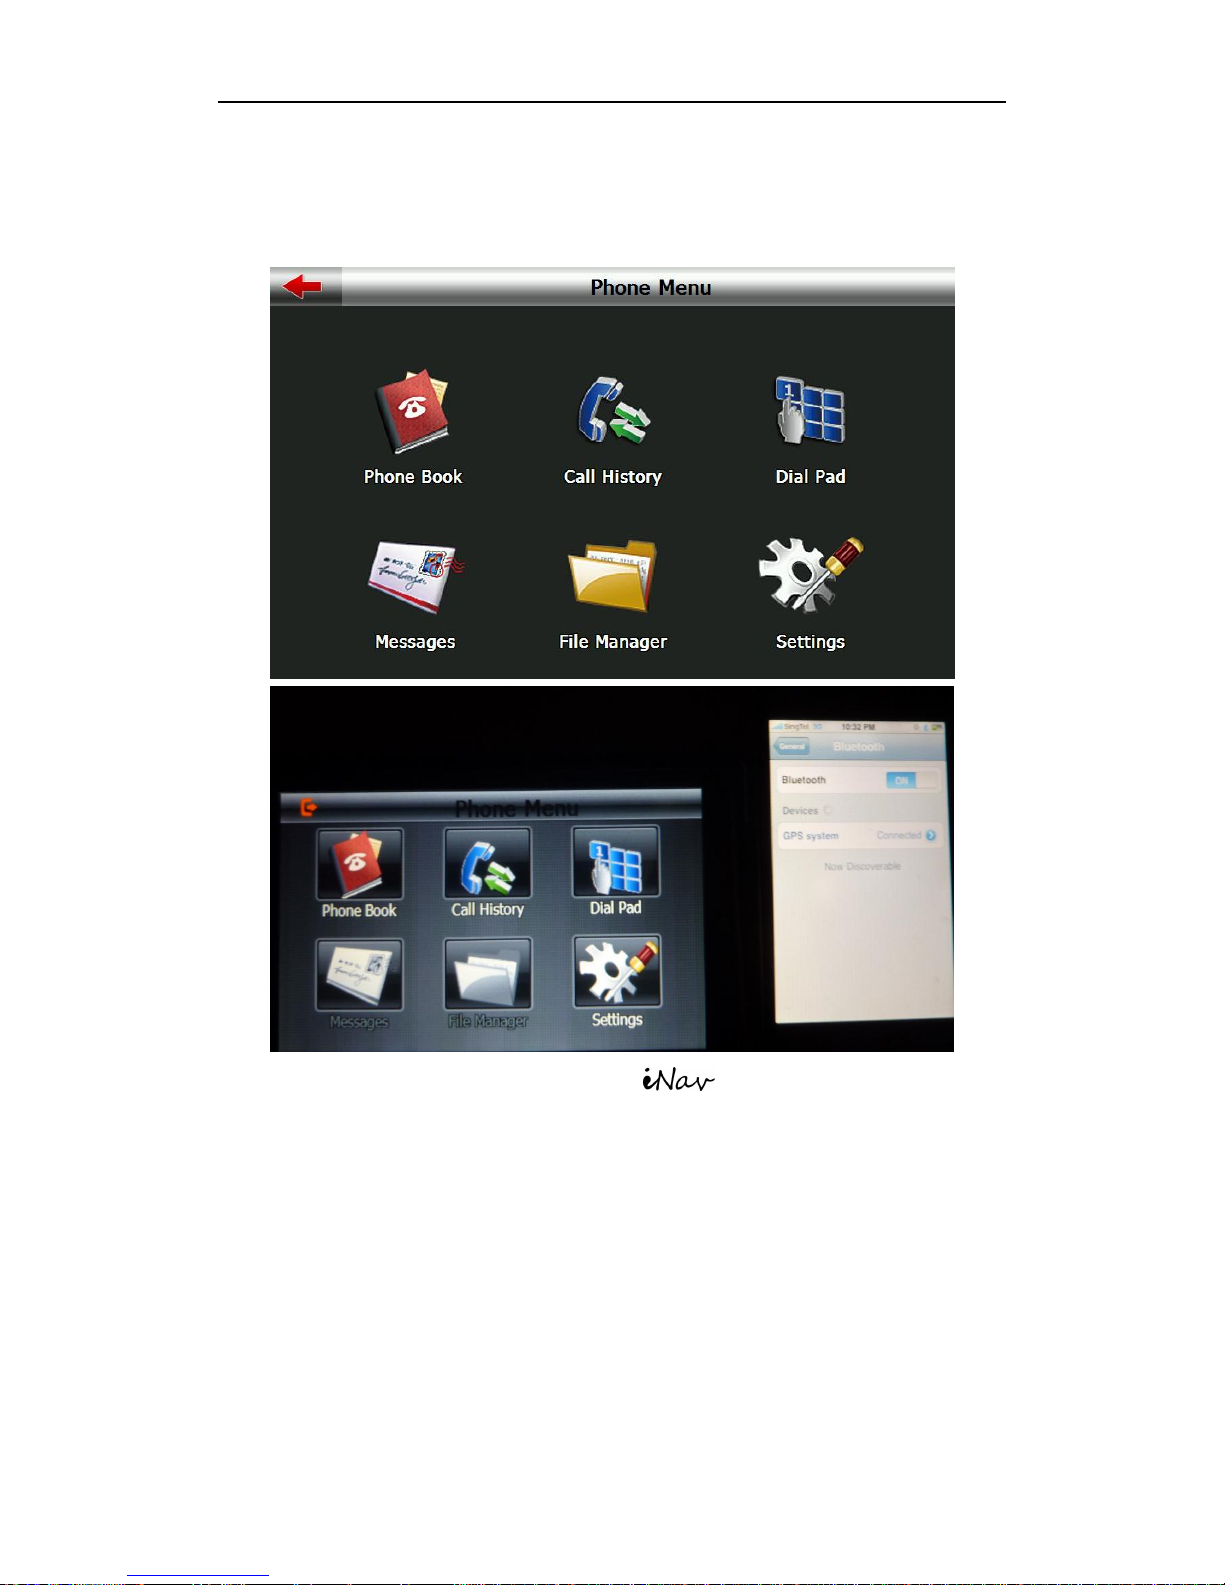
Marbella 610XT Sleek 5inch is now trying to connect with your mobile
phone now. PLEASE KINDLY BE PATIENT IN THIS STEP as it can take up to
Page 49
Page 49
© 2011 Maka Technologies Group. All Rights Reserved.
5 minutes. Even though our sample iPhone is showing “Connected” status, but
it will still take a couple minutes more to complete the pairing process.
<step 8 - Complete>
Upon completion of pairing, Marbella 610XT Sleek 5inch GPS
Navigator will bring the page back as shown above. Features such as “Phone
Book”, “Call History” and “Dial Pad” have been enabled and you may utilize our
advantage of wireless communication now.
Page 50
Page 50
© 2011 Maka Technologies Group. All Rights Reserved.
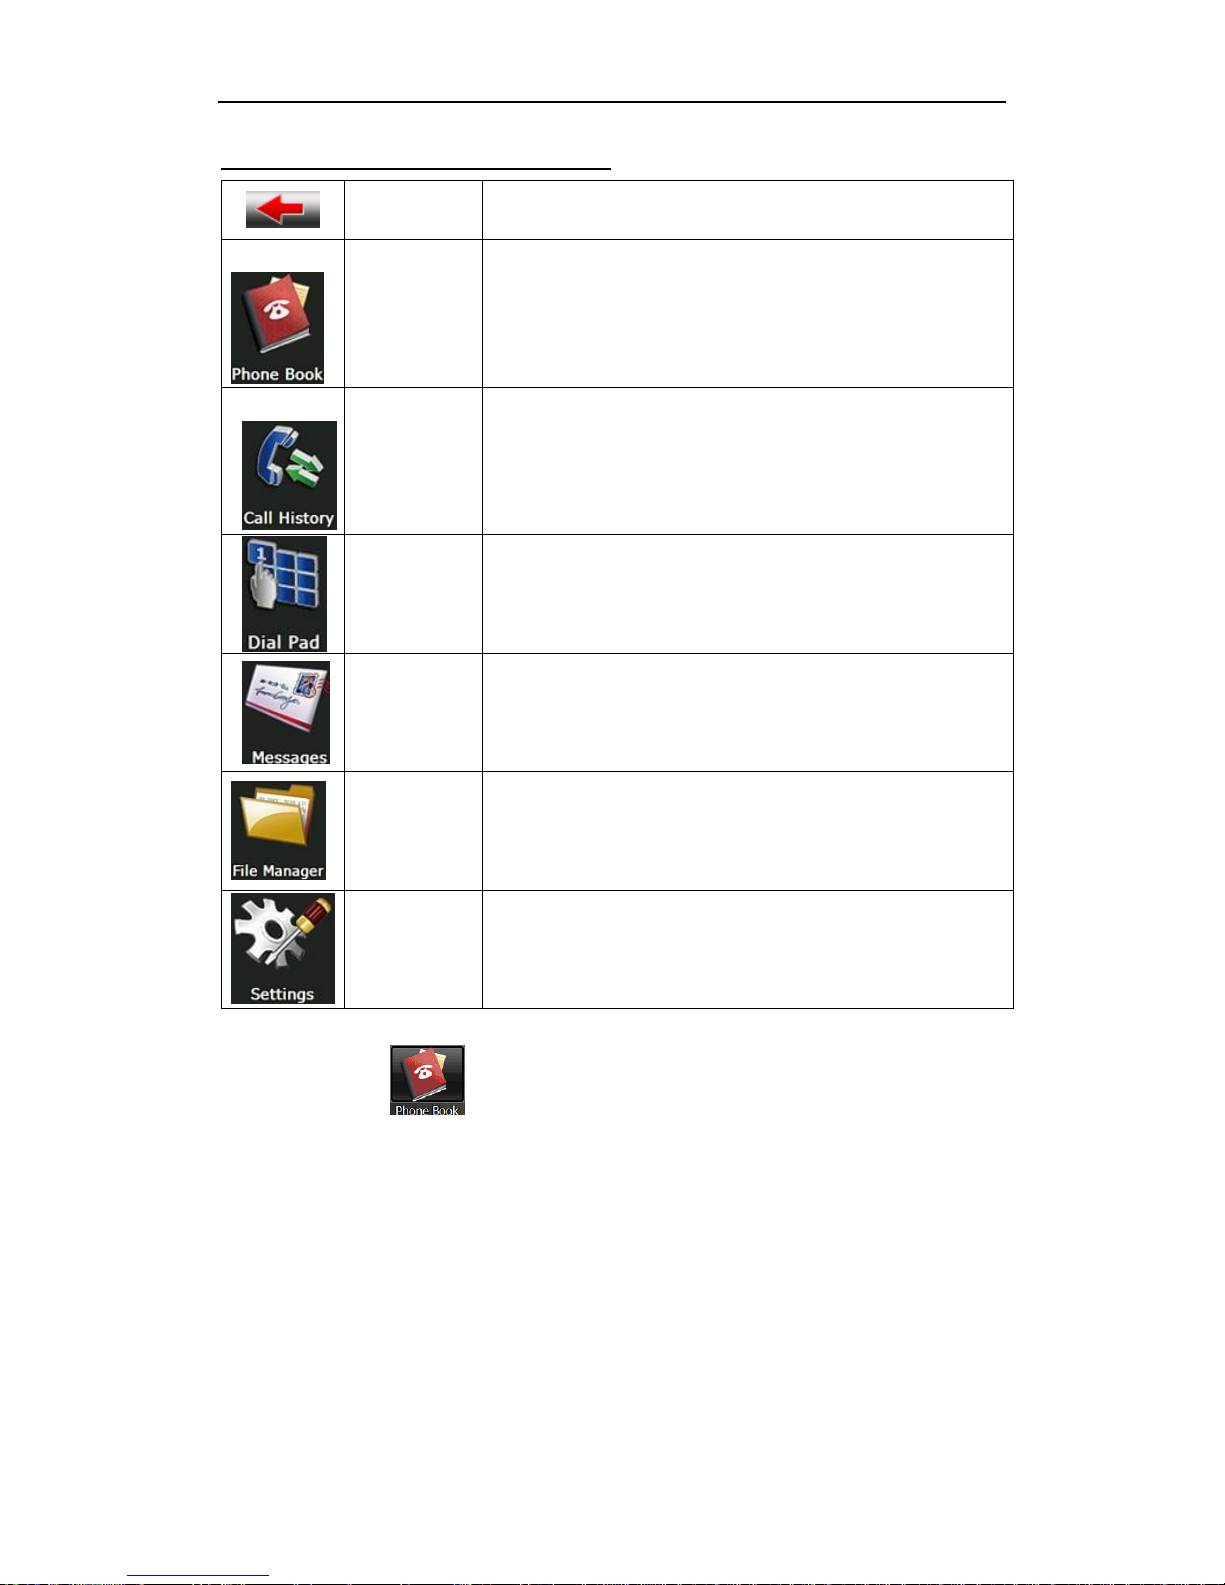
Bluetooth Menu Icon Once activated
Close
Single click to close current interface
Phone
book
Display contact list of paired cell phone
Call history
Display call history
Dial pad
Dial phone number
Message
Download SMS of paired phone
File
manager
Download files of paired phone
Setting
Cell phone searching, profile management,
Bluetooth switched on and disconnect
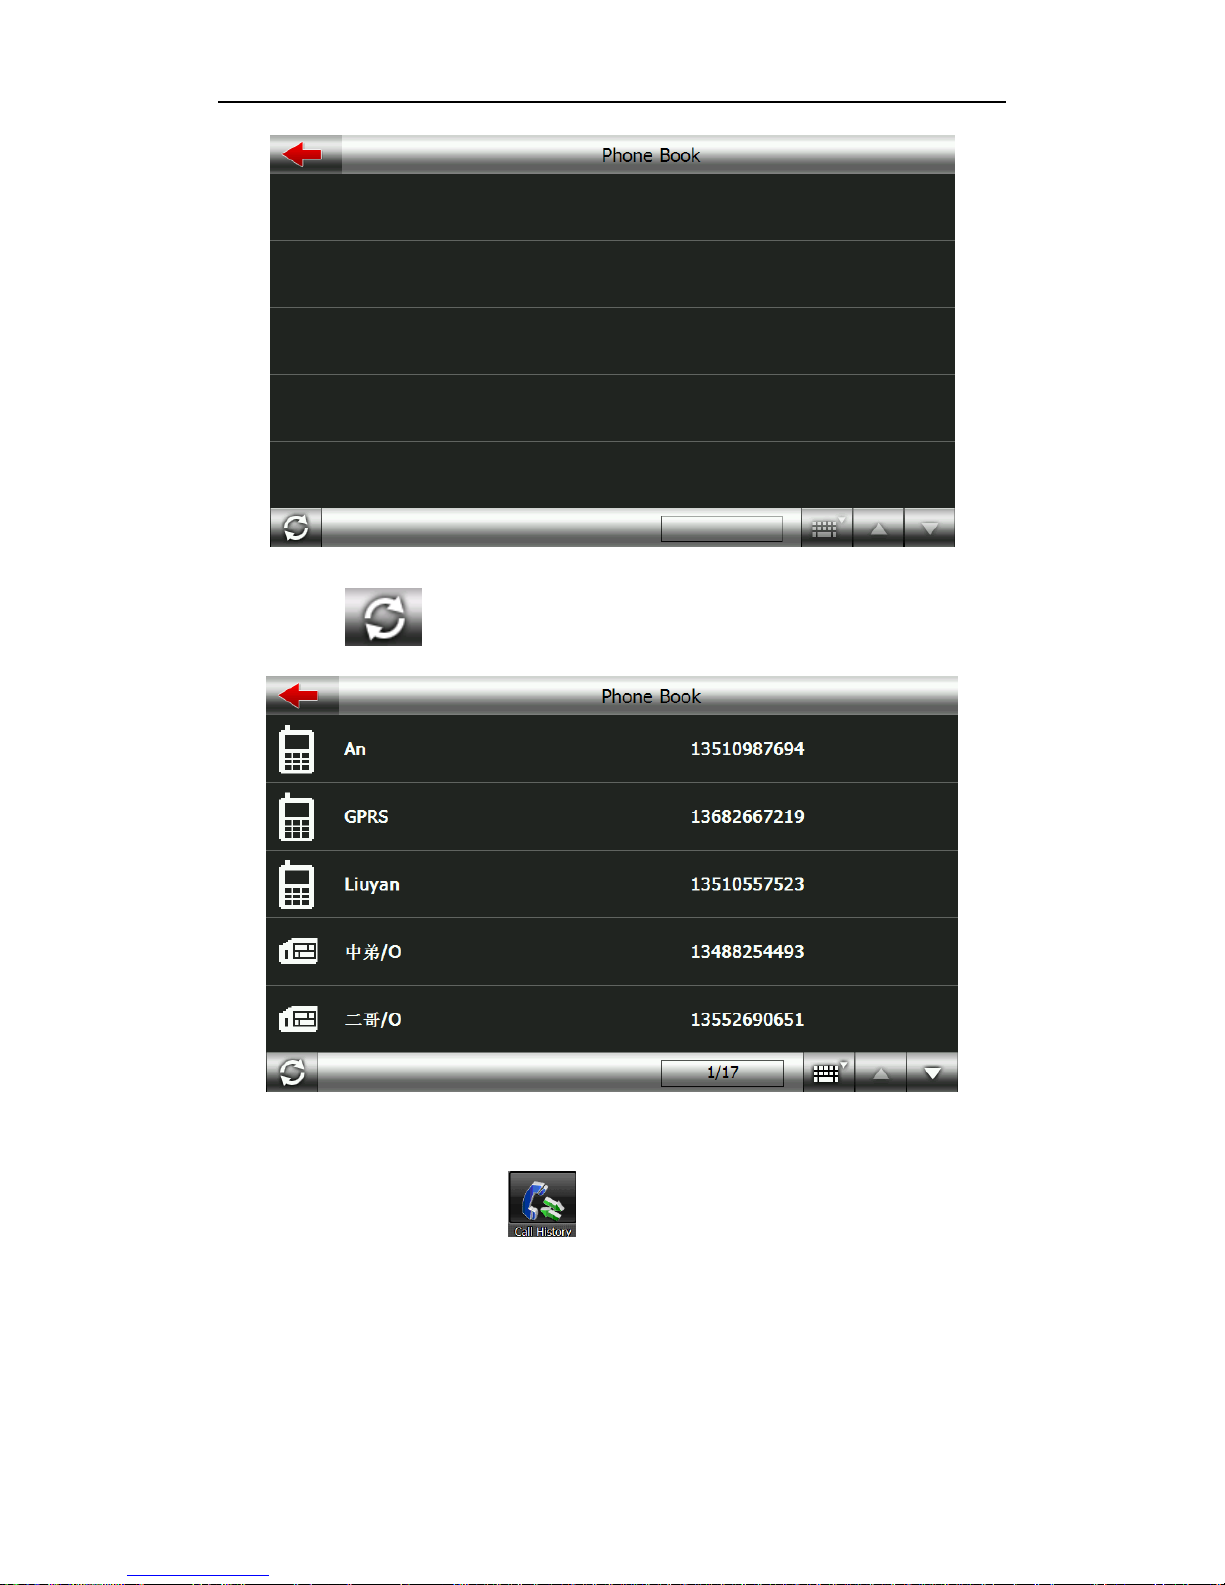
4.3.4 Click the button to open the phone book interface as 4-12
Page 51
Page 51
© 2011 Maka Technologies Group. All Rights Reserved.
4-12
Single click and enter phone book as 4-13
4-13
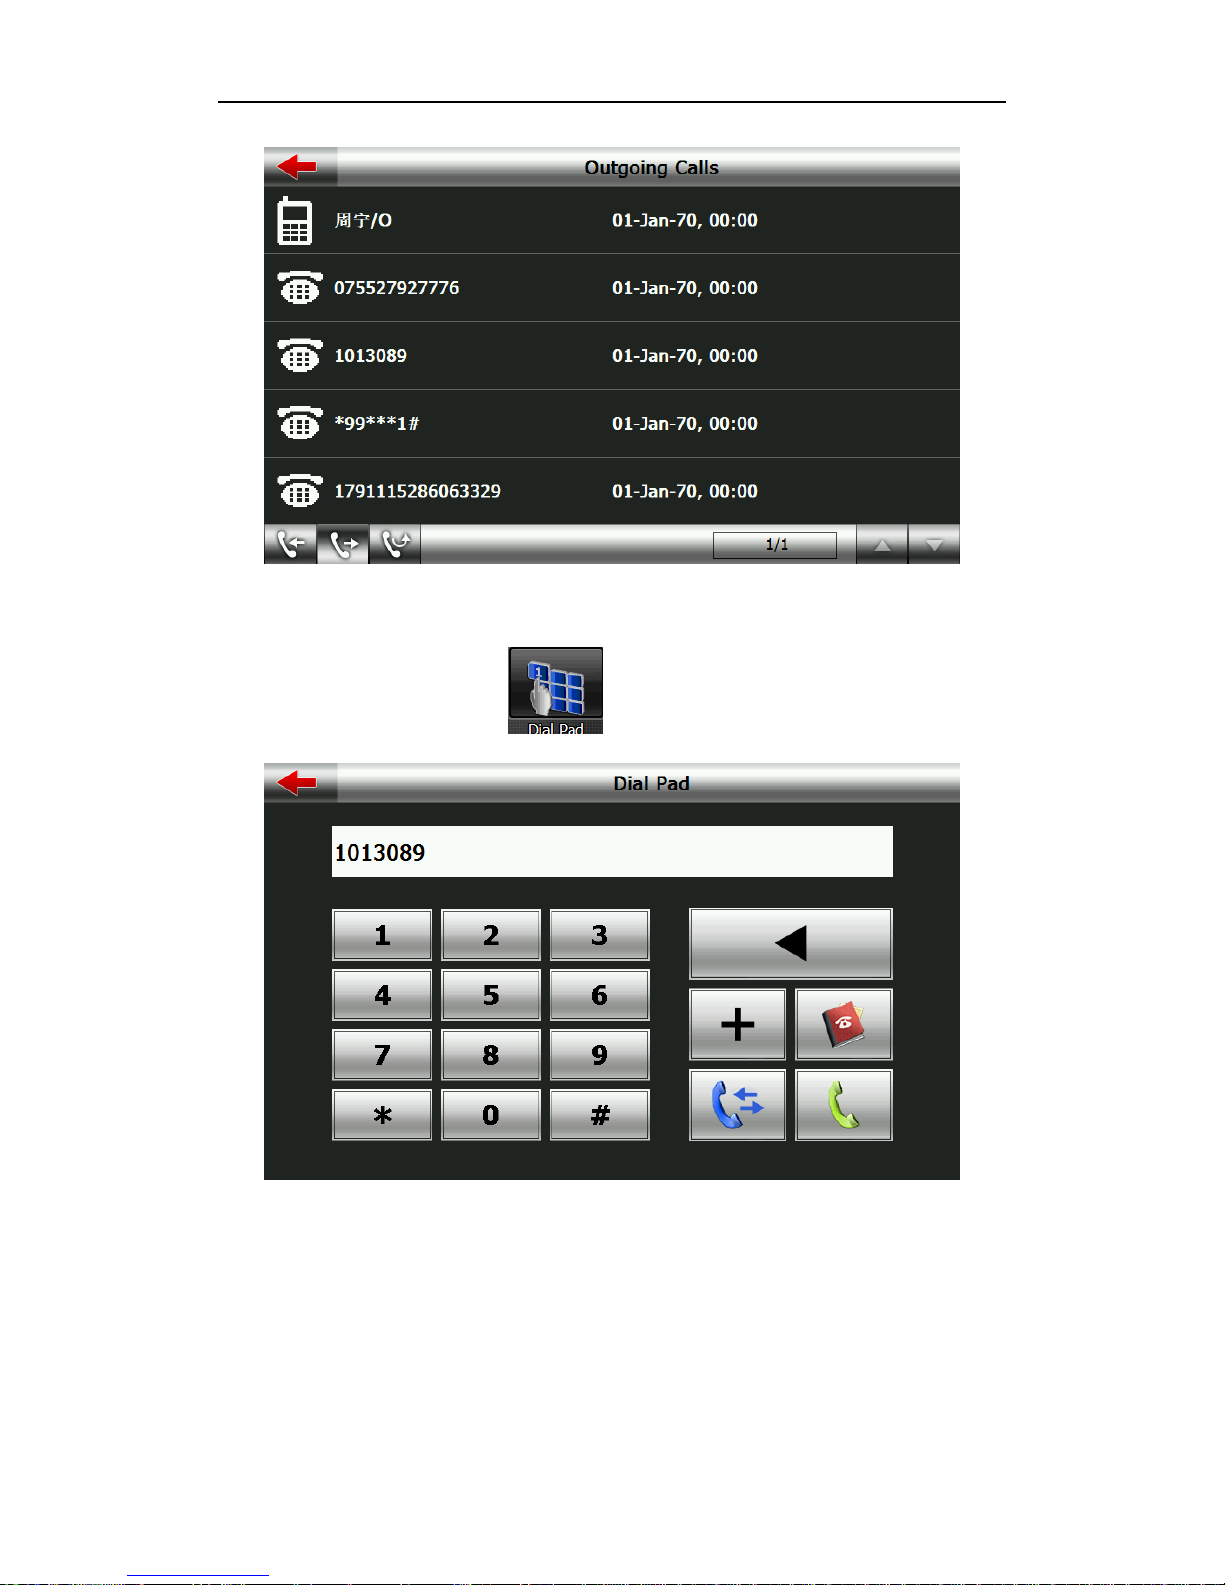
4.3.5 Single click the button to open call history as 4-14
Page 52
Page 52
© 2011 Maka Technologies Group. All Rights Reserved.
4-14
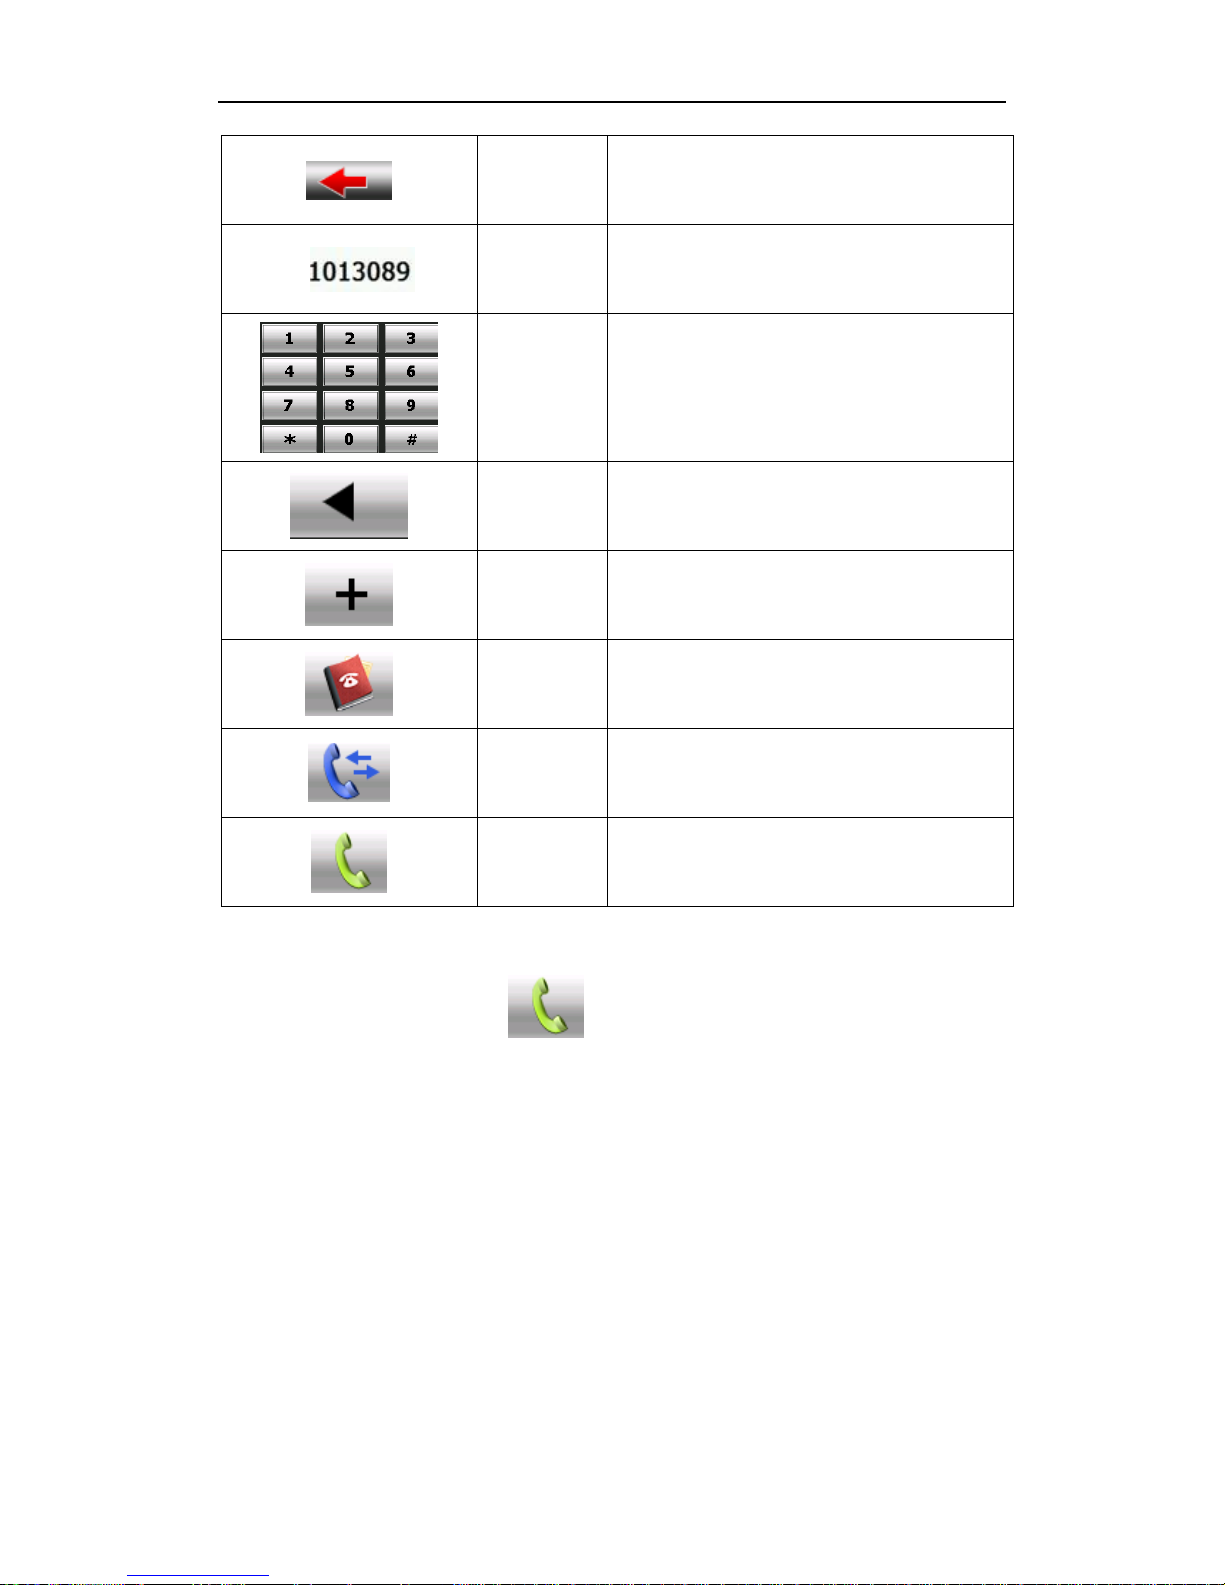
4.3.6 Single click the button to open dial pad as 4-15
4-15
Page 53
Page 53
© 2011 Maka Technologies Group. All Rights Reserved.
Close
Single click to close the current
interface
Number
display
Display current number input
key
It made up of 10 numbers from 0 to 9
and “*”“#”.
Backspace
Single click will delete the last number
“+”
input“+”
Phone
book
Single click to select phone number
from phone book
Phone
record
Single click to select phone number
from call history
Dial phone
Single click to make call
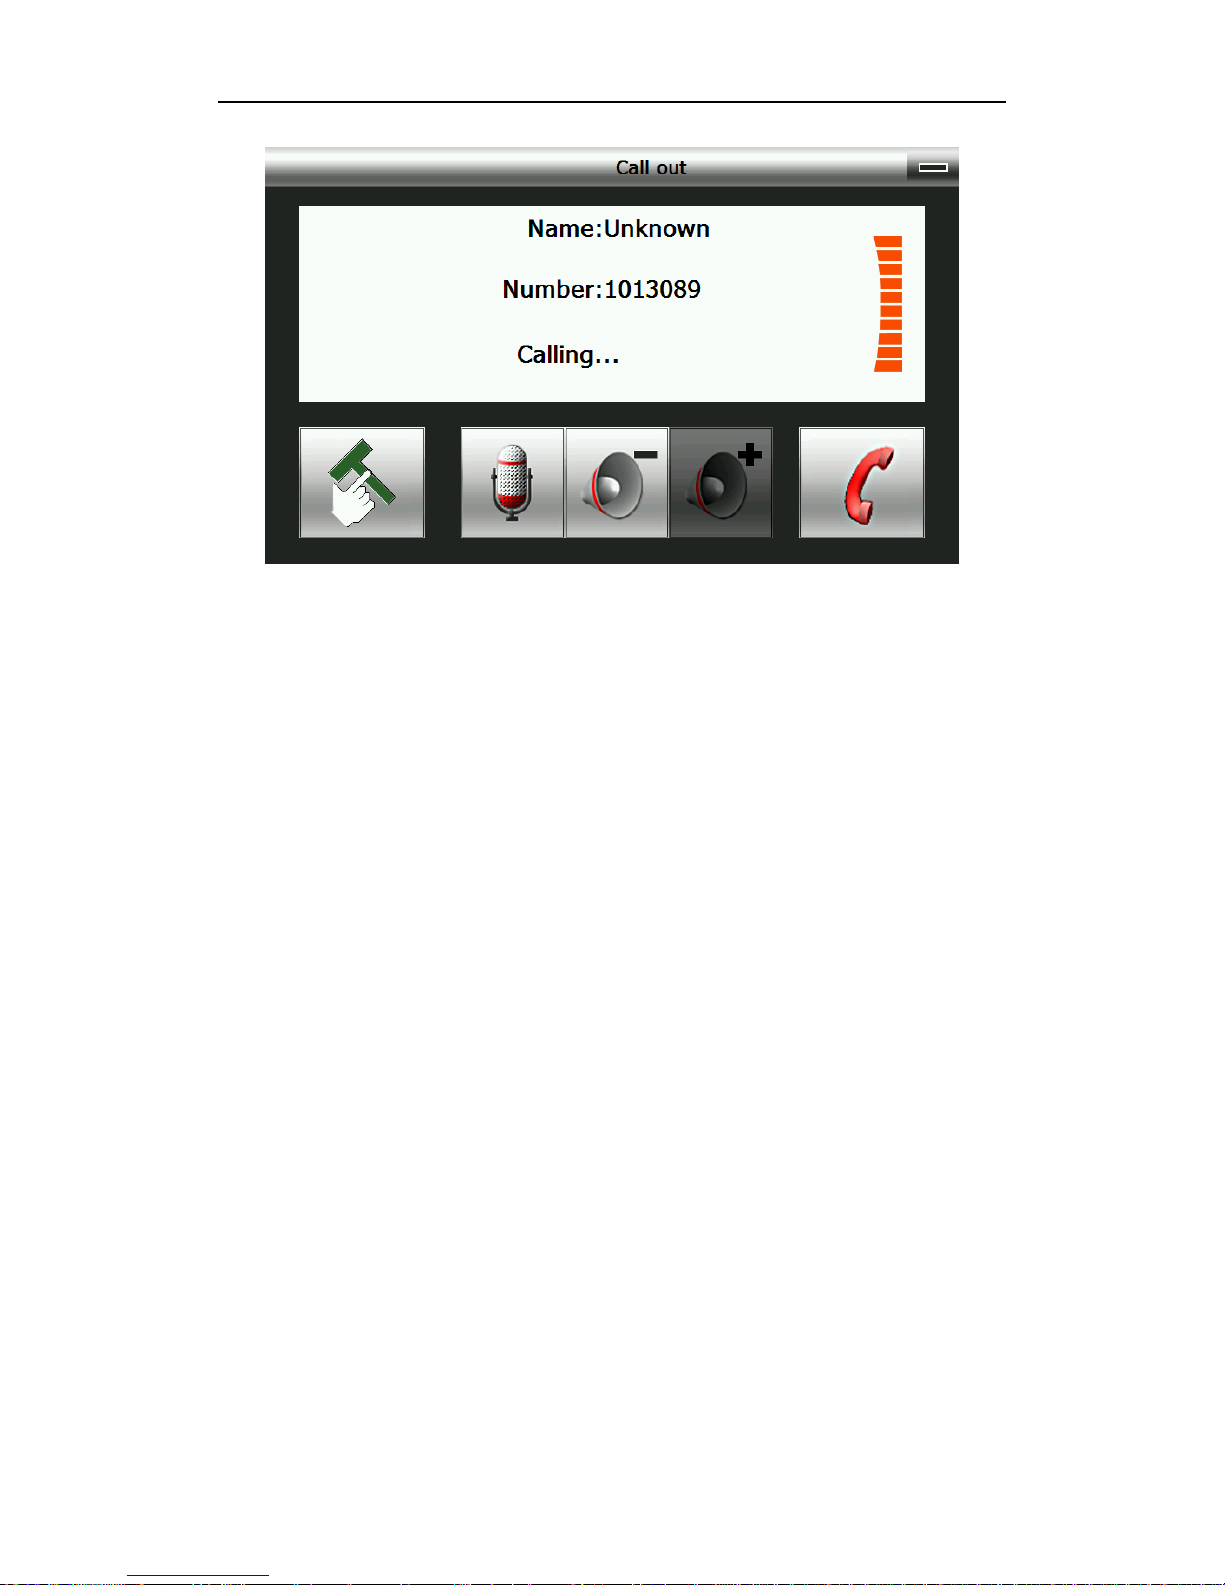
4.3.7 Single click the button and then it will be in dialing as 4-16
Page 54
Page 54
© 2011 Maka Technologies Group. All Rights Reserved.
4-16
Page 55
Page 55
© 2011 Maka Technologies Group. All Rights Reserved.
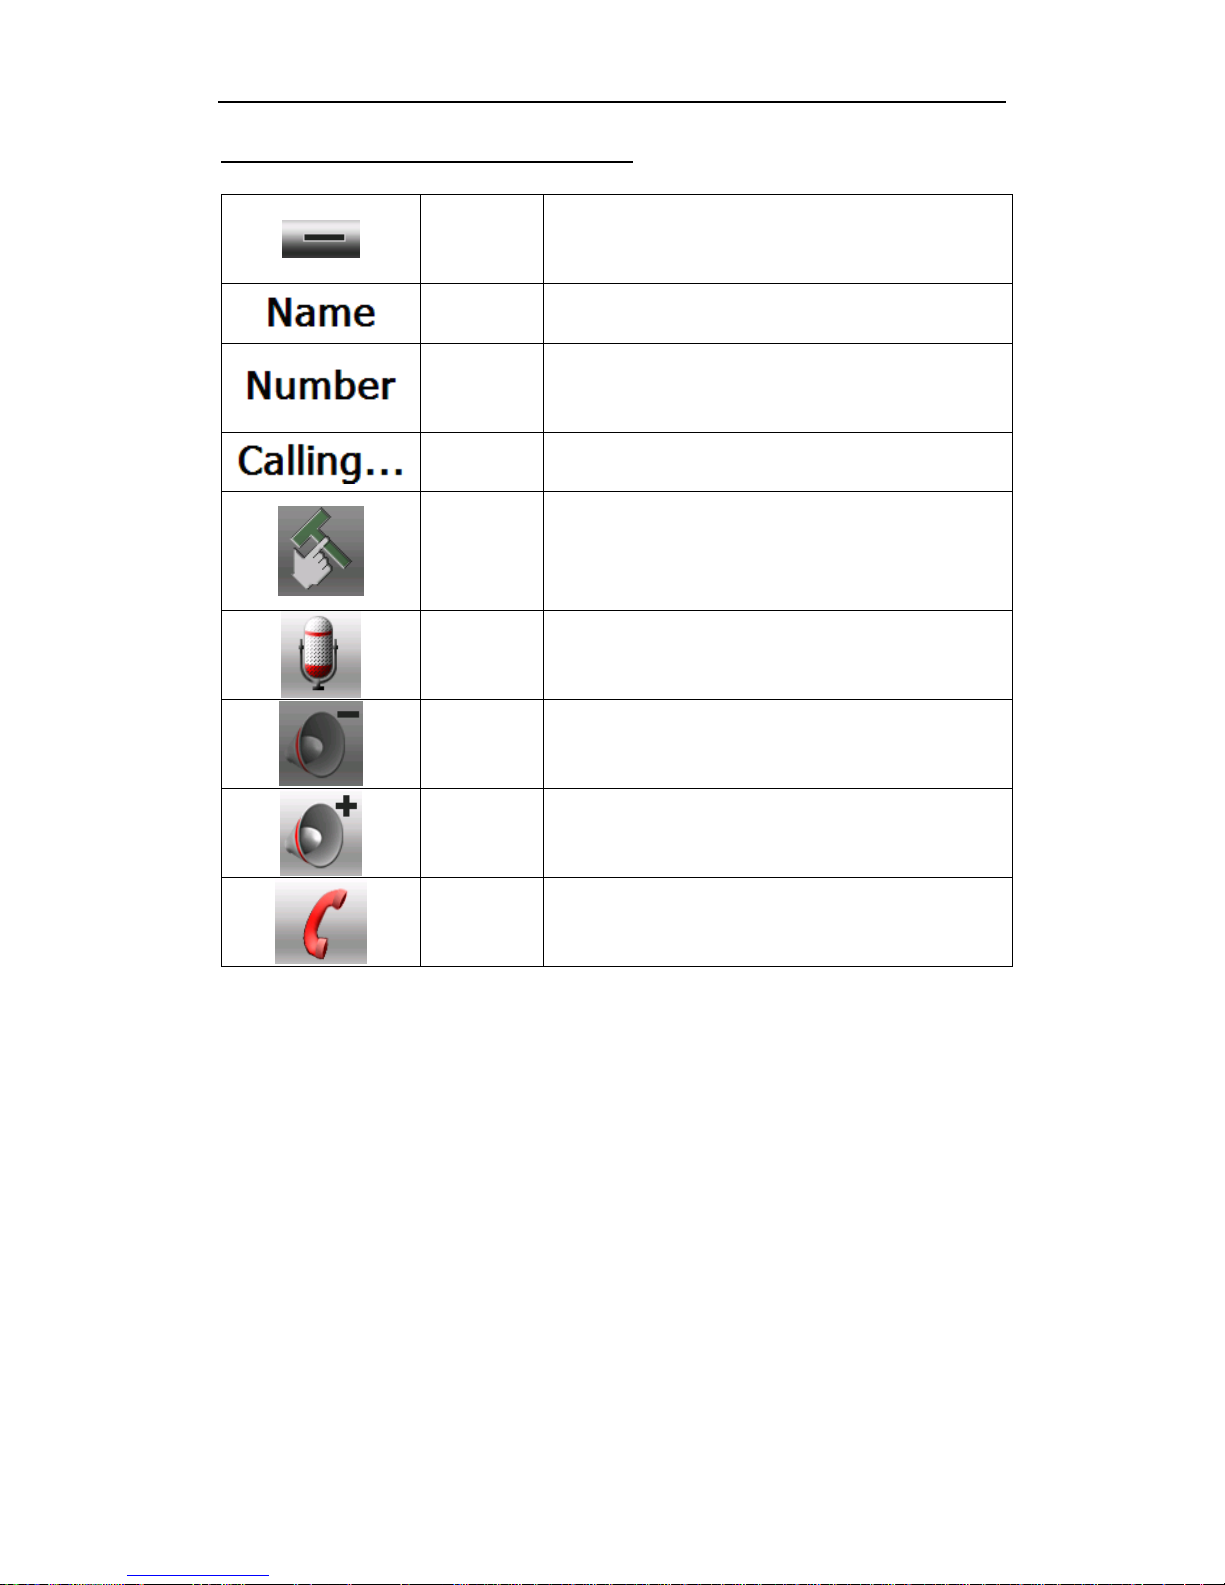
Button Syllabus – During Calling Page
Return
Keep call state and return to main
interface/navigation interface
Name
Show the name you’re dialing
Number
display
Show the number you’re dialing
Calling
Show current call state
Dial
Including extension, sound shift, call shift,
conference call and so on.
Mute
Mute the microphone while keeping the call
Volume -
Single click to decrease the volume
gradually;
Volume +
Single click to increase the volume gradually;
Hang up
Single click and hang up
Page 56
Page 56
© 2011 Maka Technologies Group. All Rights Reserved.
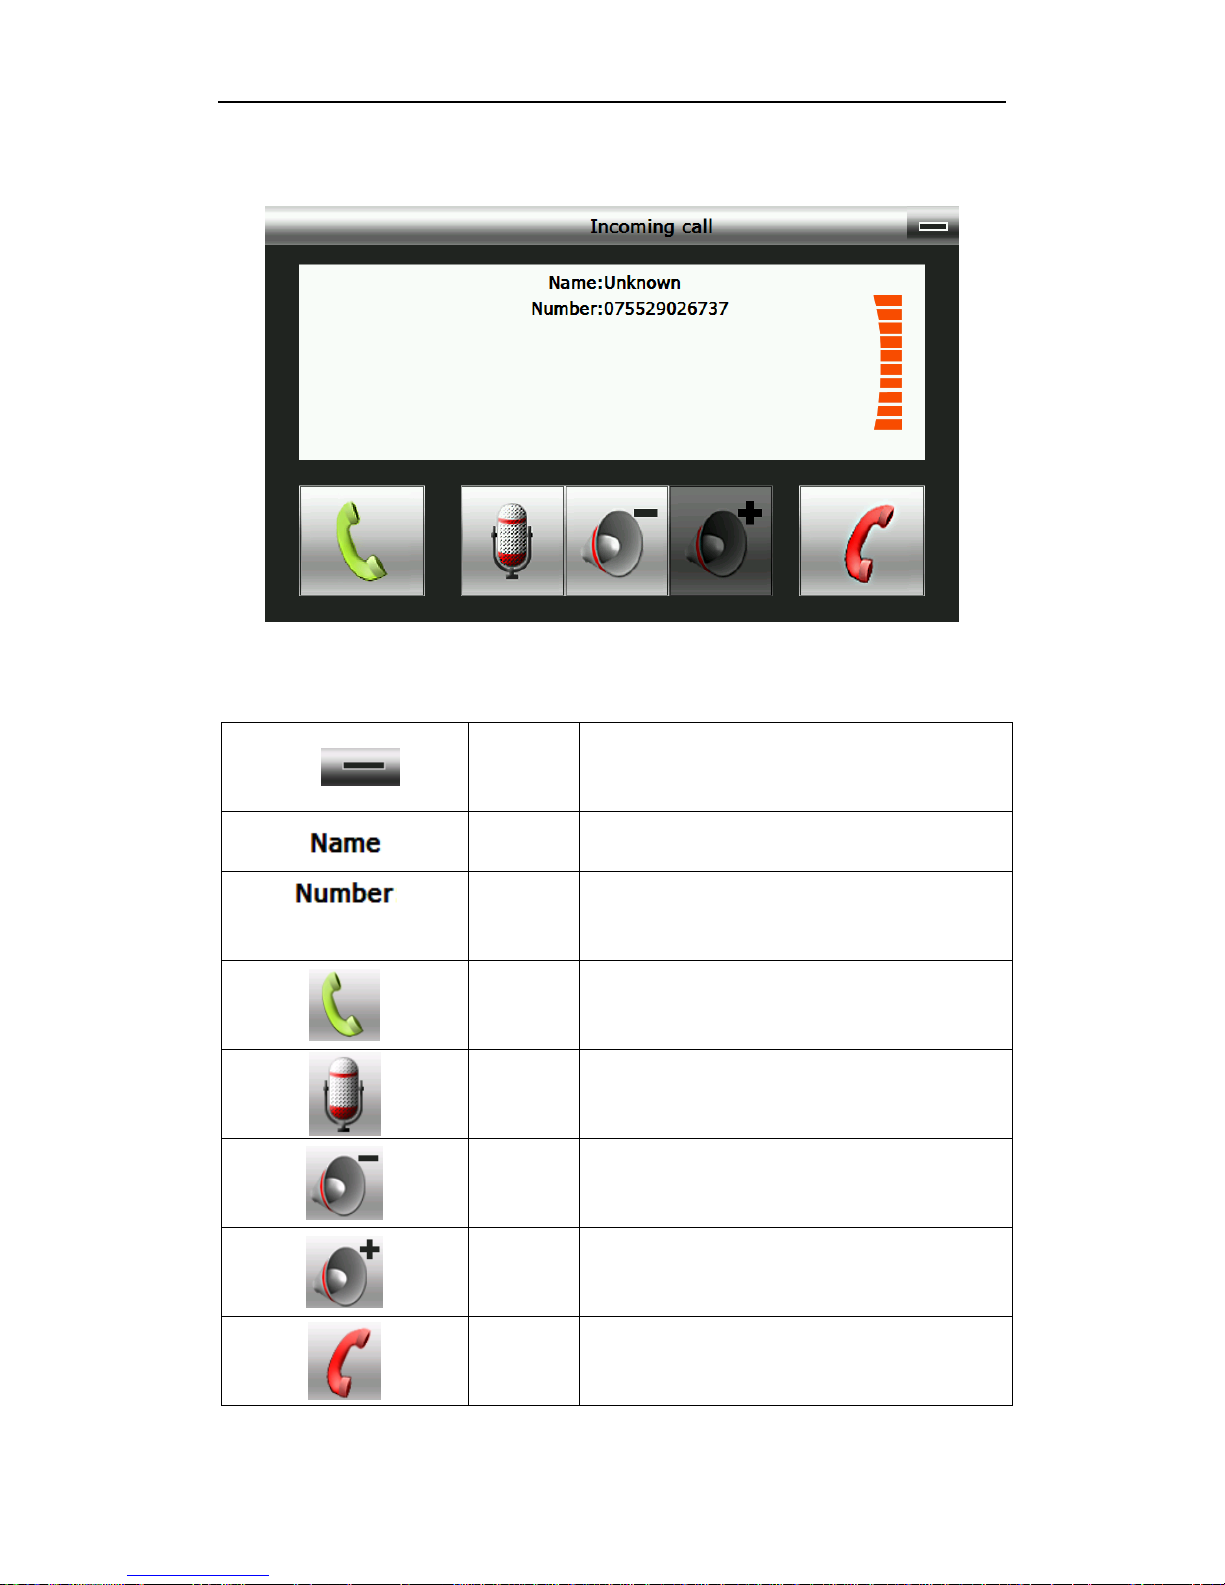
4.3.8 If there is an incoming call, it will show the caller ID and its number as
4-17
4-17
Minimise
Keep call state and return to main
interface or resume Navigation
Caller ID
Show caller ID
Number
display
Show the incoming call number
Answer
call
Single click to answer the call
Mute
Mute the microphone while keeping the
call
Volume -
Single click to decrease the volume
gradually;
Volume
+
Single click to increase the volume
gradually;
Reject
Single click to reject the call
Page 57
Page 57
© 2011 Maka Technologies Group. All Rights Reserved.
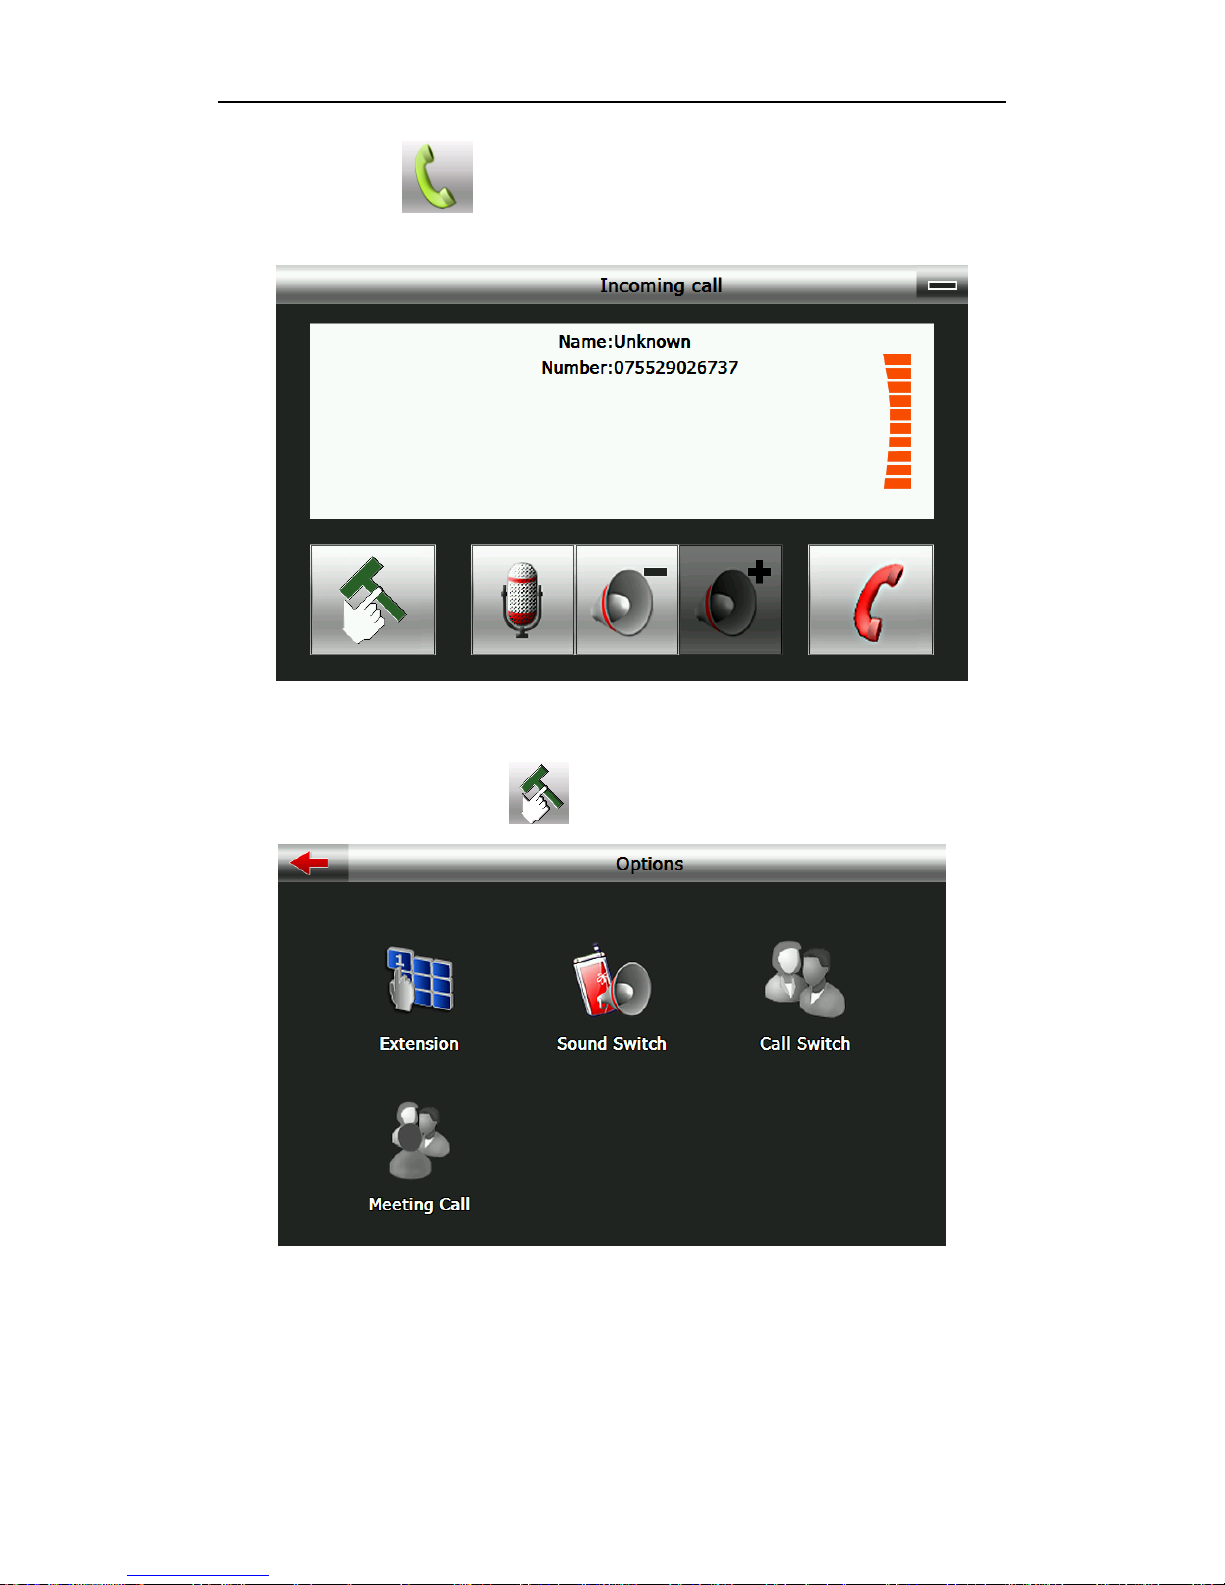
4.3.9 Single click and it will display connected. You can talk with each
other as 4-18
4-18
4.3.10 Single click the button as 4-19
4-19
Page 58
Page 58
© 2011 Maka Technologies Group. All Rights Reserved.
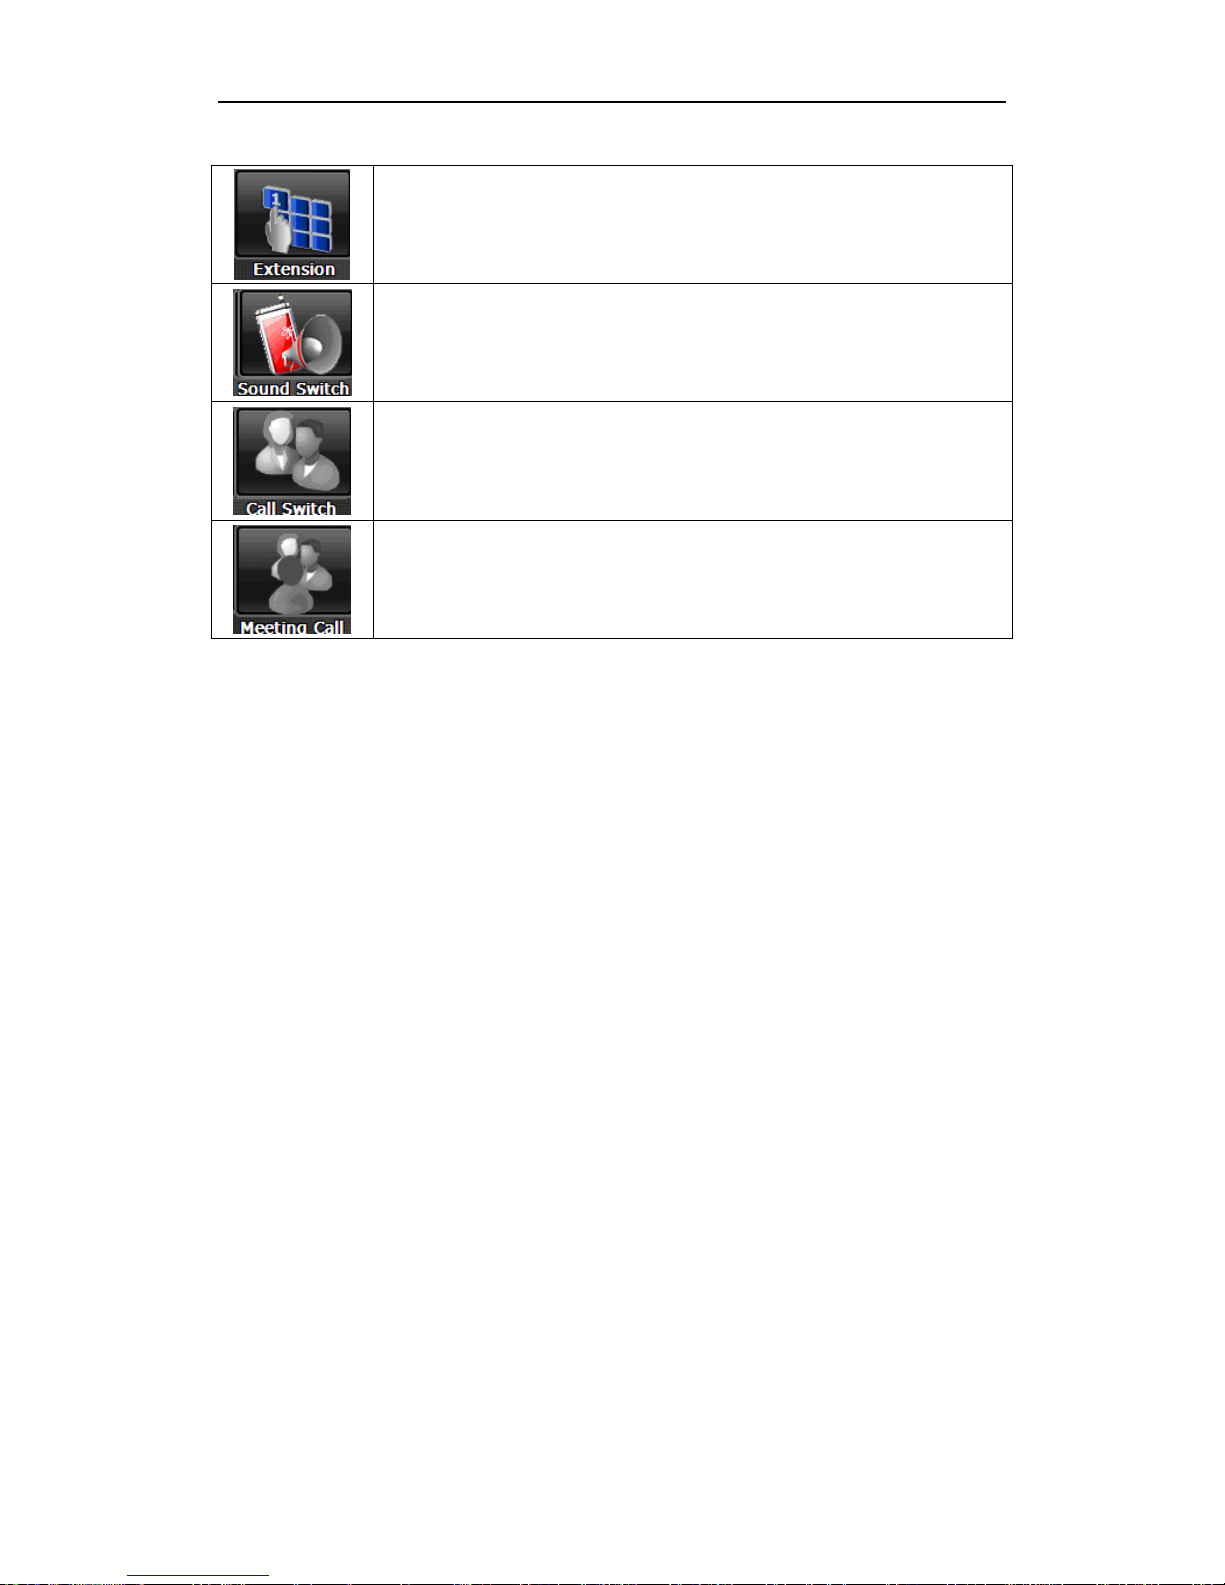
Dial extension number
Single click to shift the voice to mobile phone
Currently not available
Currently not available
Page 59

Page 59
© 2011 Maka Technologies Group. All Rights Reserved.
Part III. Troubleshooting
IF your GPS navigator cannot work normally, please check it as follows. If you
cannot solve the problem, please contact our service center.
Reason
Reason
Solution
Can not turn on the
navigator
Lack of power
Charge the battery
The device turn off
suddenly
Low battery
Charge the battery
Can not display
clearly
The back light is not
bright enough
Adjust the backlight
The back light has
been turned off
Click the LCD; the screen will
turn bright again.
No response when
clicking the button
The touch-screen is
not calibrated
Calibrate the touch-screen
Without sound
The volume is at the
lowest condition
Increase the volume
The earphone is not
connected well
Connect the earphone
Can not
communicate with
computer
The USB cable is
not connected well
Connect USB cable
No signal
The signal is weak, it need more
than 3 minutes to receive the
signal
The map data is lost
Contact Maka GPS
Technologies
PLEASE SET
“NAVI-PATH”
NAVI-PATH has
been adjusted.
Contact Maka GPS
Technologies
Page 60

Page 60
© 2011 Maka Technologies Group. All Rights Reserved.
Maintenance of GPS navigator
GPS navigator will be a reliable navigation and entertainment companion if
protected by right methods. Please follow the instructions below to ensure your
GPS run smoothly for a long time.
Protect screen: Don’t press the screen with strength or you will destroy it.
Please use the stylus to operate the navigator and spray a little glass cleaner
on the soft cloth to clean the screen, don’t spray on the screen directly.
【Note】 Be sure to turn off the GPS navigator before cleaning.
√ Drop or strike will cause damage to high-precision components.
【Note】Accidental damage is beyond our responsibilities.
√ Don’t use it under such environment: Temperature change abruptly (high
temperature above 60°, low temperature under-10°), high voltage, dusty,
electrostatic interference, avoid any corrosive liquid and dip into any liquid.
√ Avoid radiated interference: The radiated interference from other electronic
products will affect the display and it will be normal after suppressing the
interference source.
【Note】If you carry the unit by air, please put the GPS together with your
luggage to pass the X-ray detection system. Avoid scanning by the magnetic
head detector (at the passage used for passing) or the magnetic bar (held by
the security checker), or it will destroy the system date in the unit. We will take
no responsibility for it.
Avoid direct, intense light: Don’t use the GPS navigator in high light and
ultraviolet radiation in order to increase the using life.
Page 61

Page 61
© 2011 Maka Technologies Group. All Rights Reserved.
Part IV. Service Location
4.1 Local Service Centre – Singapore
Service Location in Singapore
Maka GPS Technologies Private Limited
2 Alexandra Road
Unit #02-03, Delta House
Singapore 159919
Tel:
Fax:
24Hrs Hotline
(65) 6276 0889
(65) 6270 7123
(65) 6100 1239
Opening Hours: 9am – 6pm (Monday to Friday) Close 12pm – 1:30pm for
lunch
4.2 Local Service Centre – Malaysia
Service Location in Johor Bahru
Maka GPS Technologies Sdn. Bhd.
8A, Jalan Harmonium 23/13
Taman Desa Tebrau
Johor Bahru, Johor
Tel:
Fax:
(60) 7359 7804 – 24HRs Hotline
(60) 7359 7805
Opening Hours: 9:30am – 6:30pm (Monday to Friday)
Close 12:30pm – 2pm for lunch
4.3 Local Service Centre – Oceania Pacific
Service Location in Australia & New Zealand
ProSat Technology Limited
Email: [email protected]
 Loading...