

Page 1
RHR NAVIGATION KIT
Click on the desired vehicle to take you directly to the vehicle specific
instructions.
2011 - RAM
2011 - WRANGLER
2011 - AVENGER
2011 - SEBRING
2011 - LIBERTY
2011 - NITRO
2011 - CHALLENGER
2011 - MINIVAN
2011 - GRAND CHEROKEE/DURANGO
Dec 31, 2010 K6861192
Page 2
1
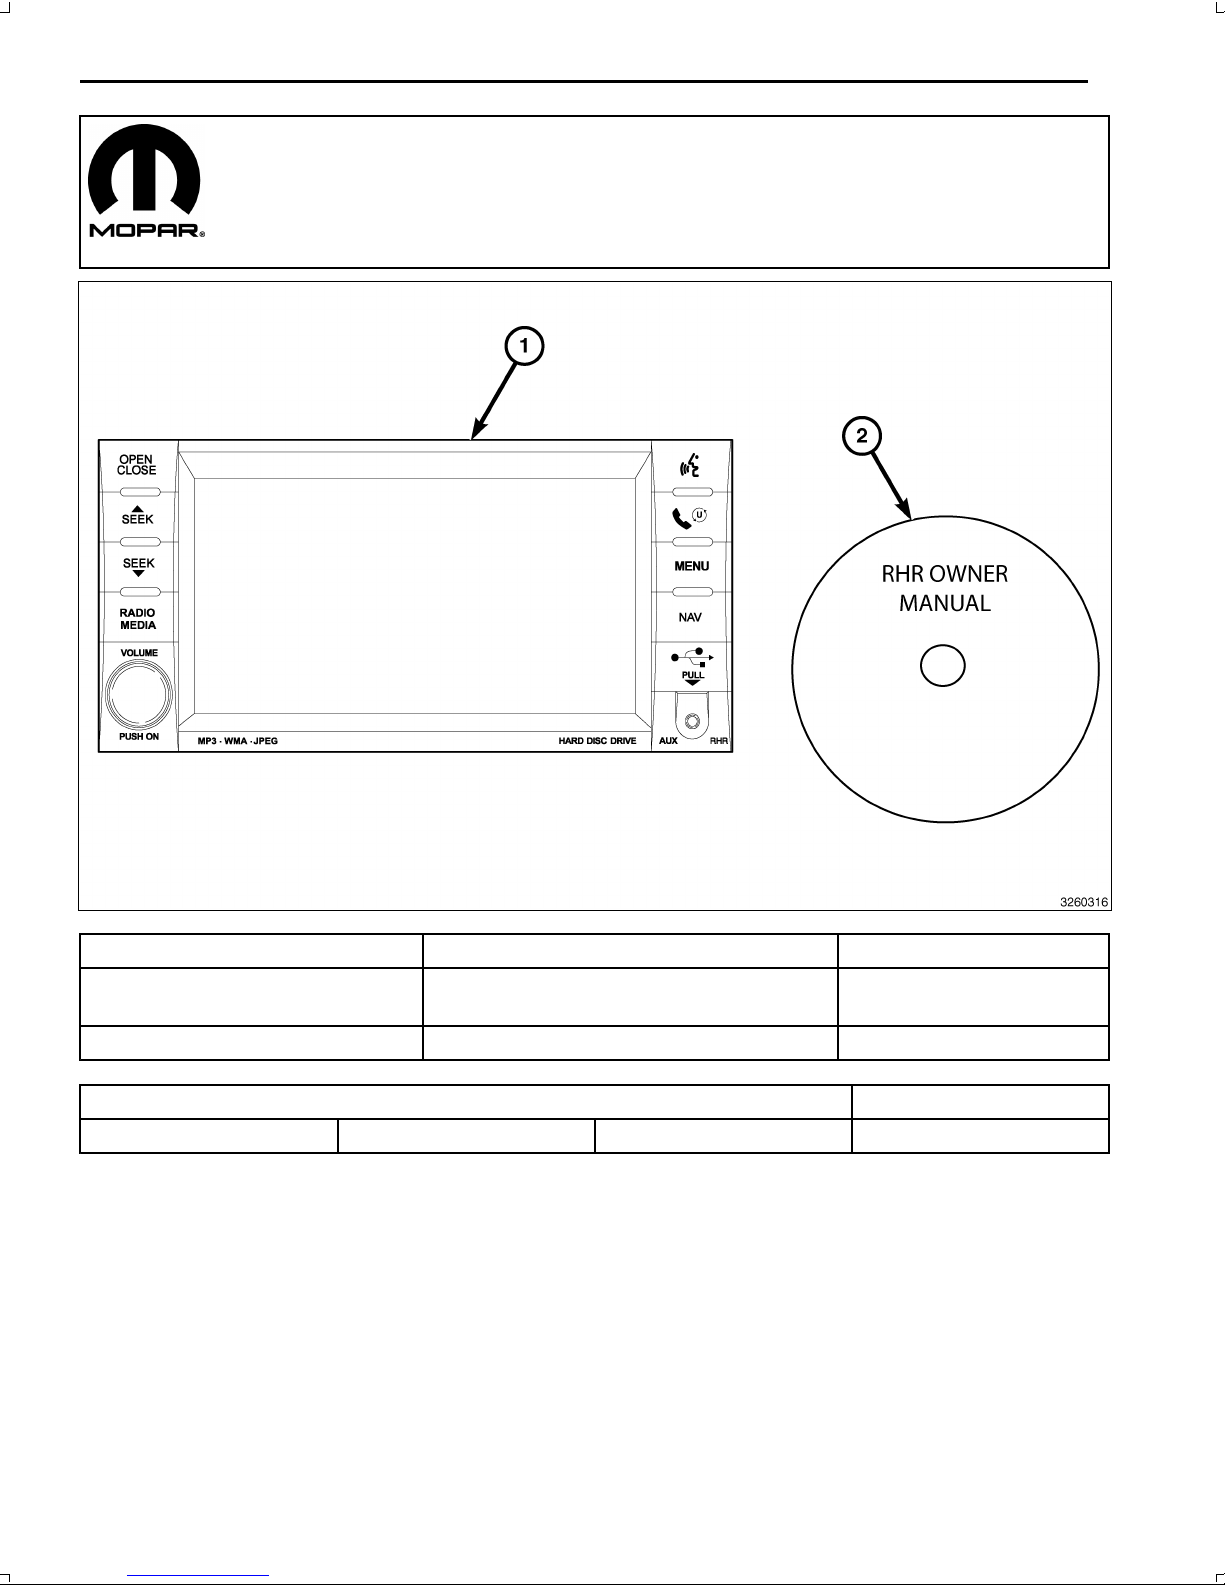
RHRNAVIGATIONRADIOKIT
RAM
CALLOUTDESCRIPTIONQUANTITY
1
RHRRadio(AM/FM/CD/DVD/HDD/MP3/
NAV)
1
2
RHROwnerManualDVD
1
TOOLSREQUIRED
PhillipsHeadScrewDriverFiberTrimStickScanToolT25TorxScrewDriver
Dec31,2010K6861192
Page 3
2
1.Disconnectandisolatethenegativebatterycable.
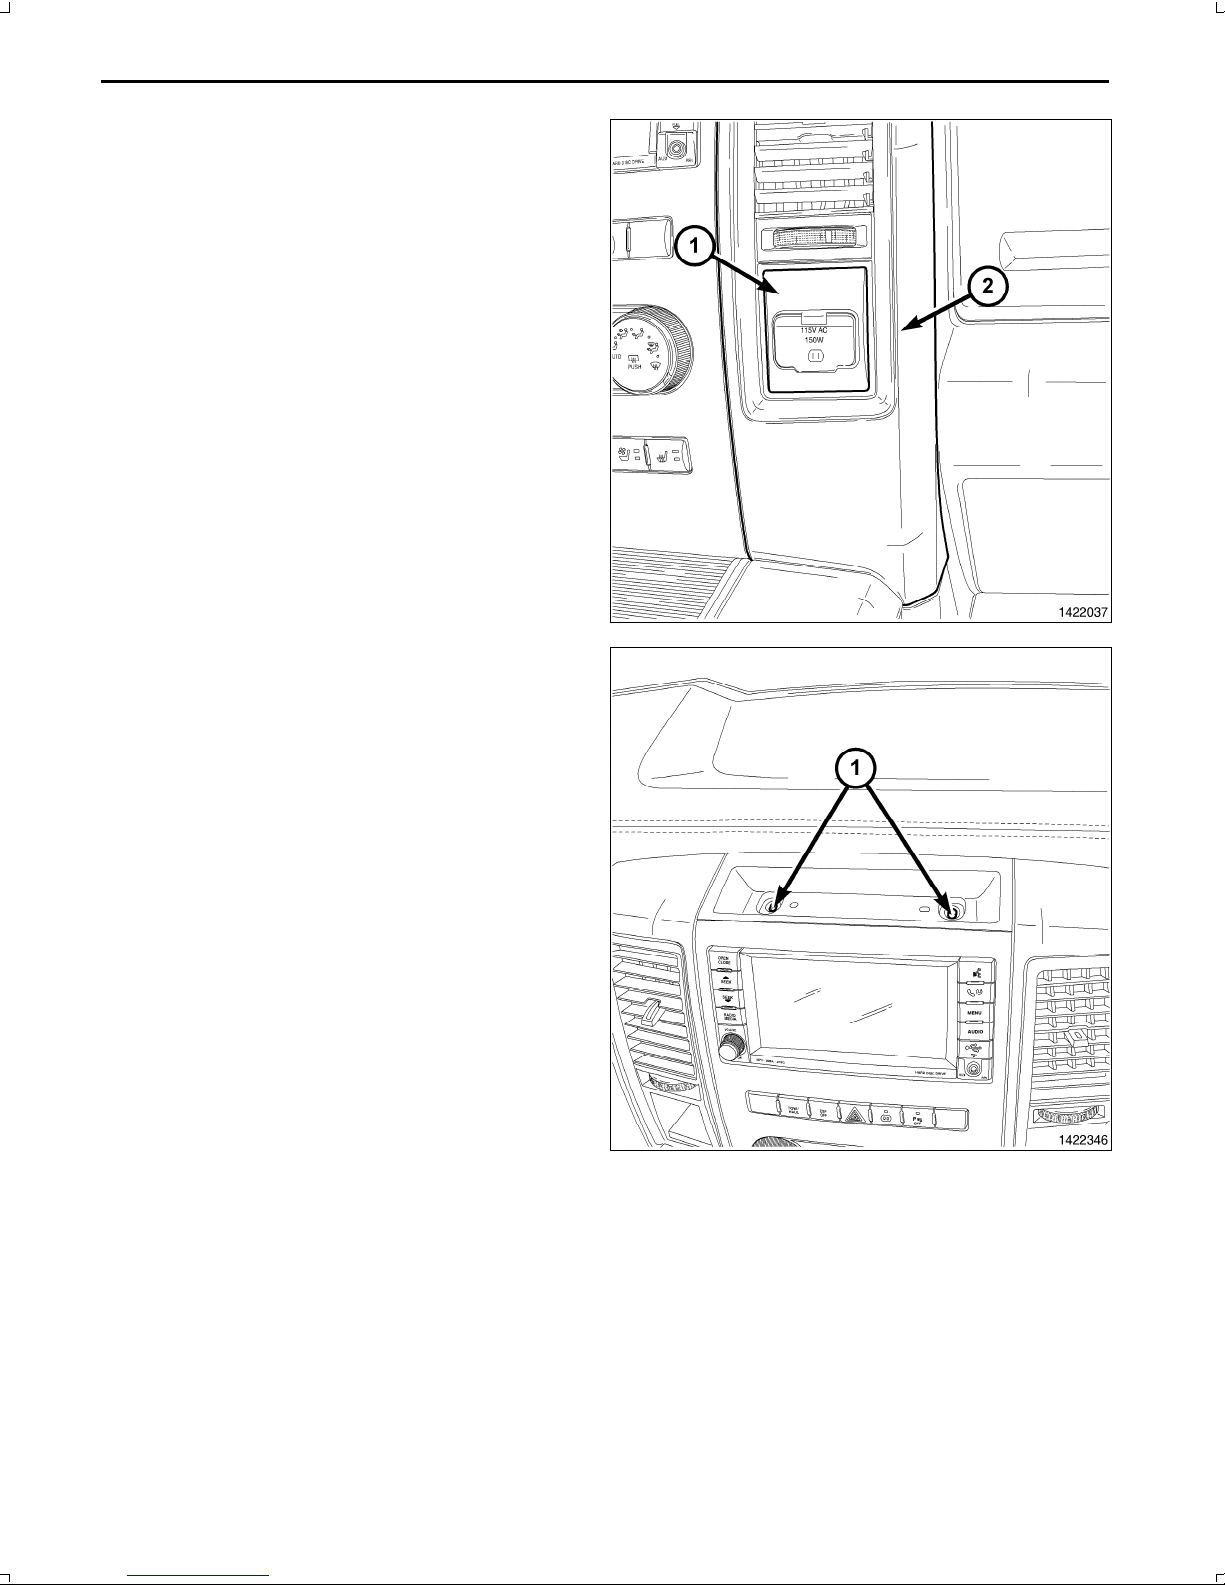
2.UsingatrimstickC4755orequivalent,disengagethe
retaineclipsthatsecurethepoweroutlettrimbezel(1)
tothecenterbezel(2).
3.Removetheuppercenterbezelbintrayliner.
4.Removetheretainersfromthebinabovetheradio(1).
Dec31,2010K6861192
Page 4
3
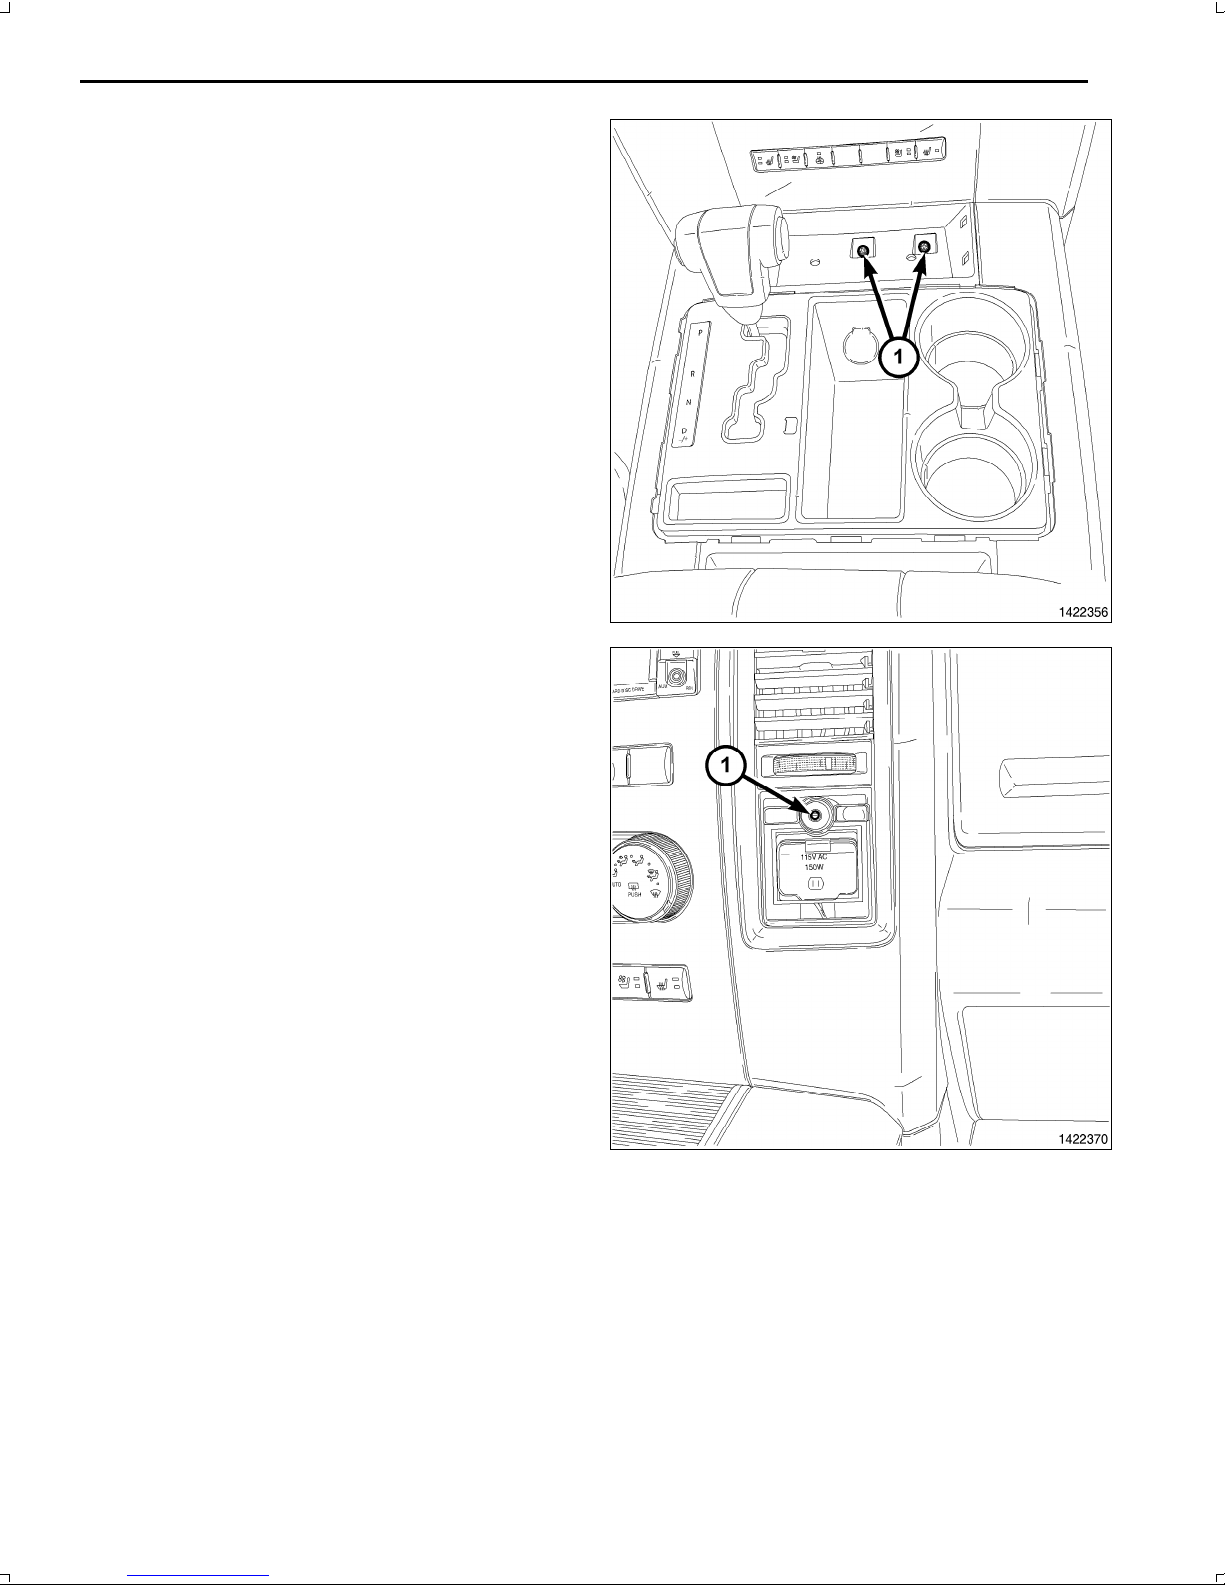
5.Removethelowercenterbezelbintraylinerfromthe
centerconsole.
6.Removetheretainersfromthecenterconsolebin(1).
7.Removetheretainer(1)fromabovethepoweroutlet.
Dec31,2010K6861192
Page 5
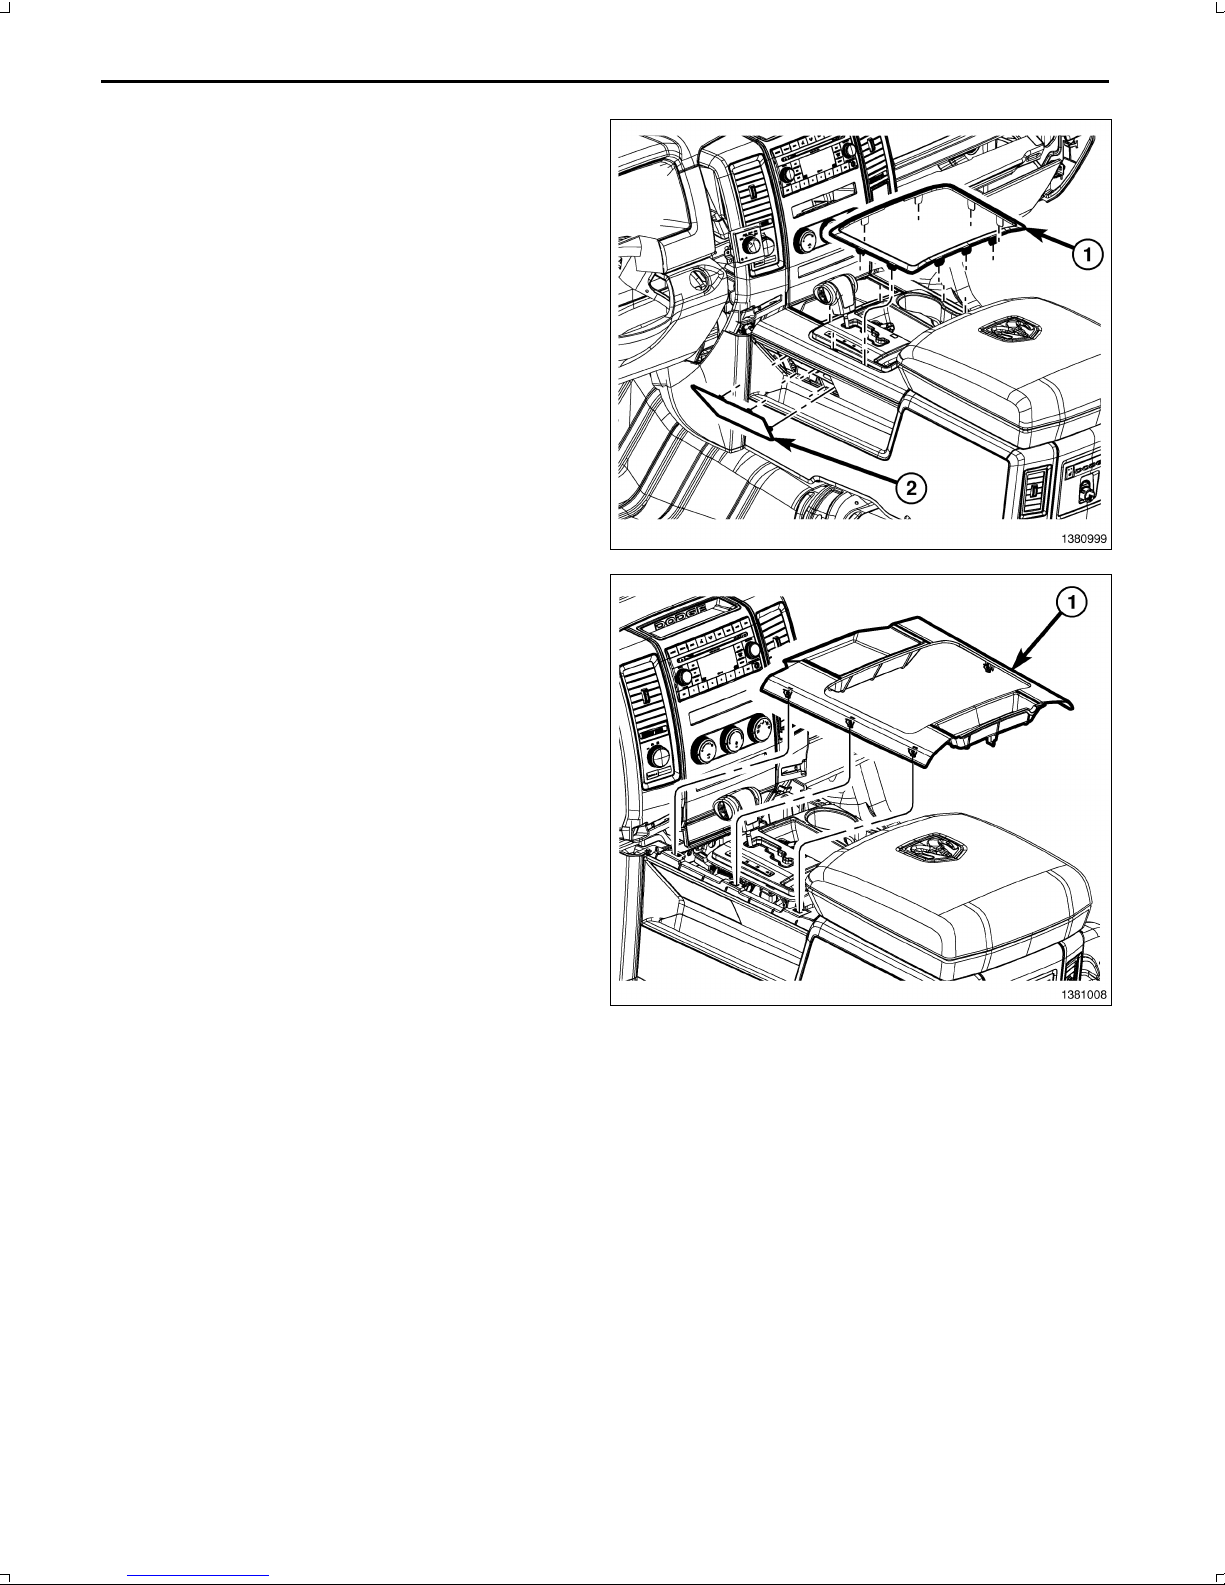
4
8.UsingatrimstickC4755orequivalent,disengagethe
retainerclipsthatsecurethetrimringtothefloorcon
sole(1).
9.UsingatrimstickC4755orequivalent,disengagethe
retainerclipsthatsecuretheshifterbezeltothefloor
console(1).
Dec31,2010K6861192
Page 6
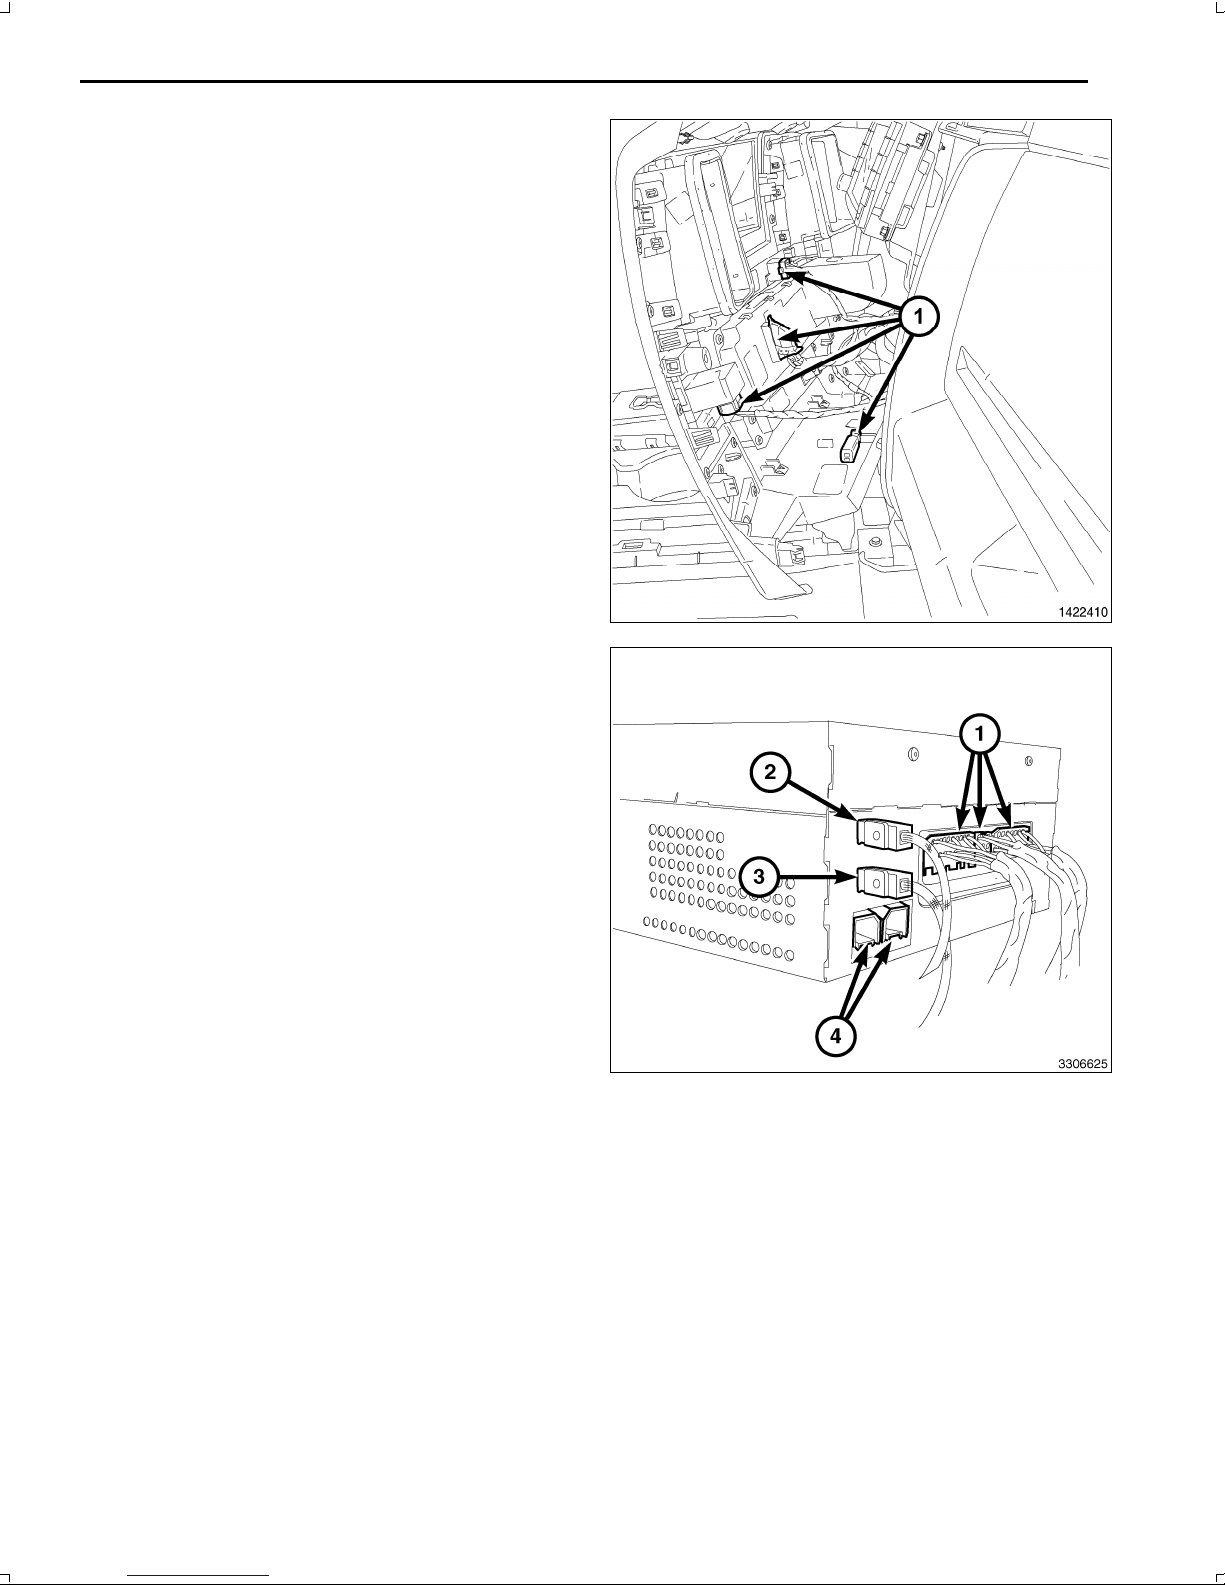
5
10.UsingatrimstickC4755orequivalent,disengagethe
retainerclipsthatsecuretheinstrumentpanelcenter
bezeltotheinstrumentpanel.
11.Disconnectthewireharnessconnectors(1)andre
movethecenterbezelfromthevehicle.
12.Removetheradiomountingfasteners.
CAUTION:Pullingtheantennacablestraightoutofthe
radiowithoutpullingonthelockingantennaconnec
torcoulddamagethecableorradio.
13.Pulltheradiooutfarenoughtoaccessthebackofthe
radio.
14.DisconnecttheAM/FMantenna(2)andelectricalcon
nectors(1).
15.Ifequipped,disconnectthenavigationantenna(3).
16.Ifequipped,disconnecttheUSBconnectors(4).
17.Removetheradiofromtheinstrumentpanel.
18.Positionthenewradiototheinstrumentpanel.
19.ConnecttheAM/FMantenna(2)andelectricalcon
nectors(1).
20.Connectthesatellite/navigationantenna(3).
21.Ifequipped,connecttheUSBconnectors(4).
Dec31,2010K6861192
Page 7
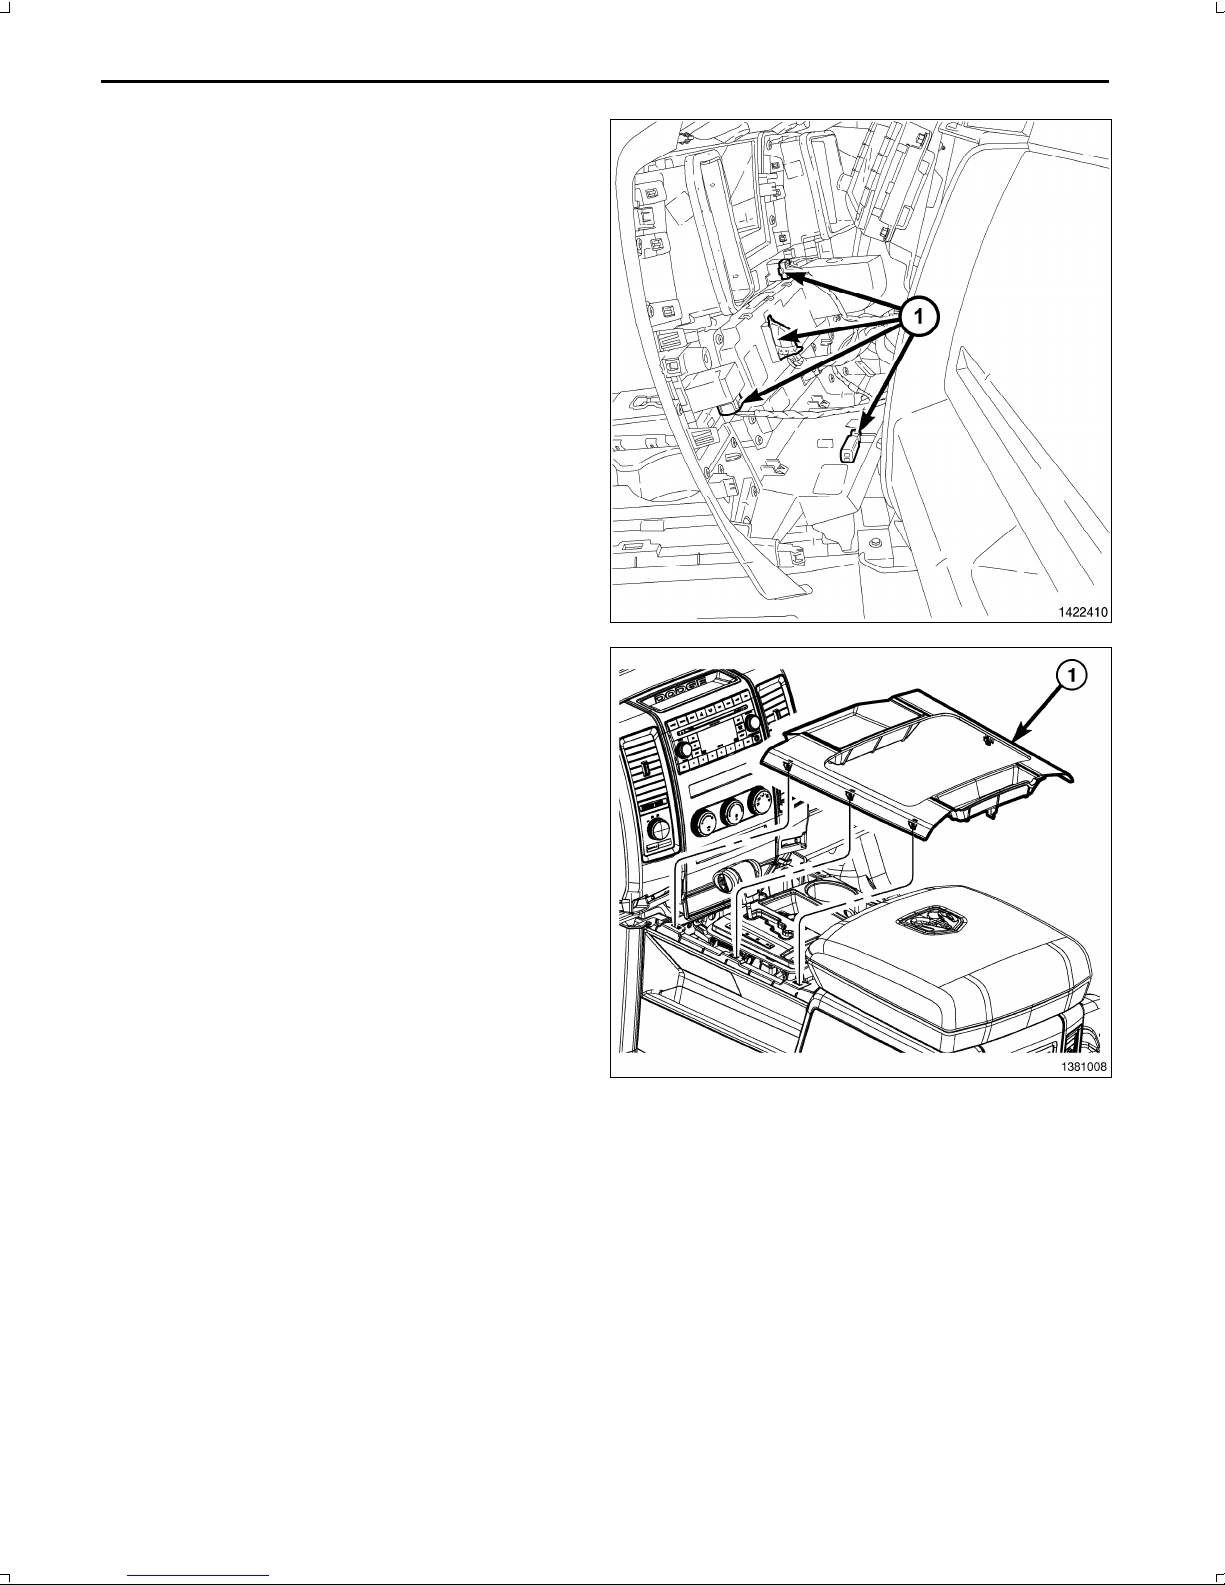
6
22.Positiontheinstrumentpanelcenterbezelnearthe
instrumentpanelandconnectthewireharnesscon
nectors(1).
23.Installtheinstrumentpanelcenterbezelontothein
strumentpanelandfullyengagetheretainerclips.
24.Installtheshifterbezeltothefloorconsole(1)andfully
engagetheretainerclips.
Dec31,2010K6861192
Page 8
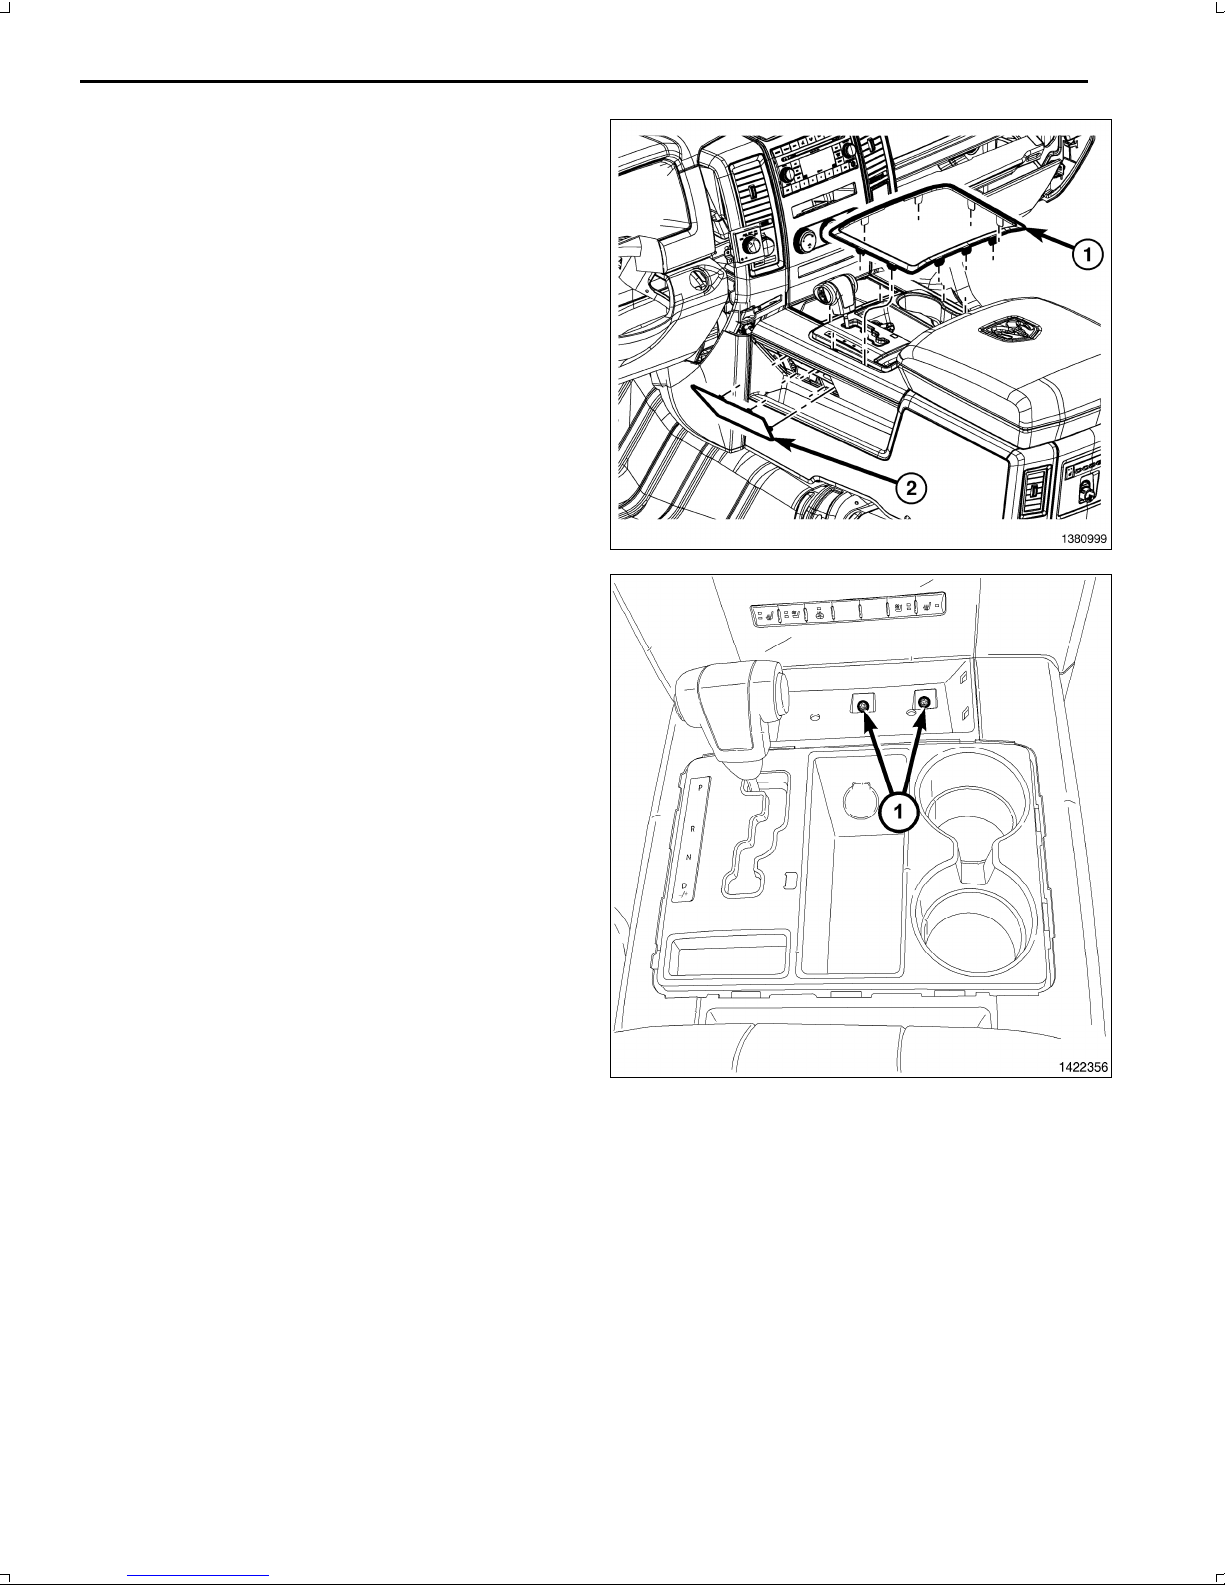
7
25.Installtheshifterbezeltrimring(1)andfullyengage
theretainerclips.
26.Installtheretainersfromthecenterconsolebin(1).
27.Installthelowercenterbezeltrayliner.
Dec31,2010K6861192
Page 9
8
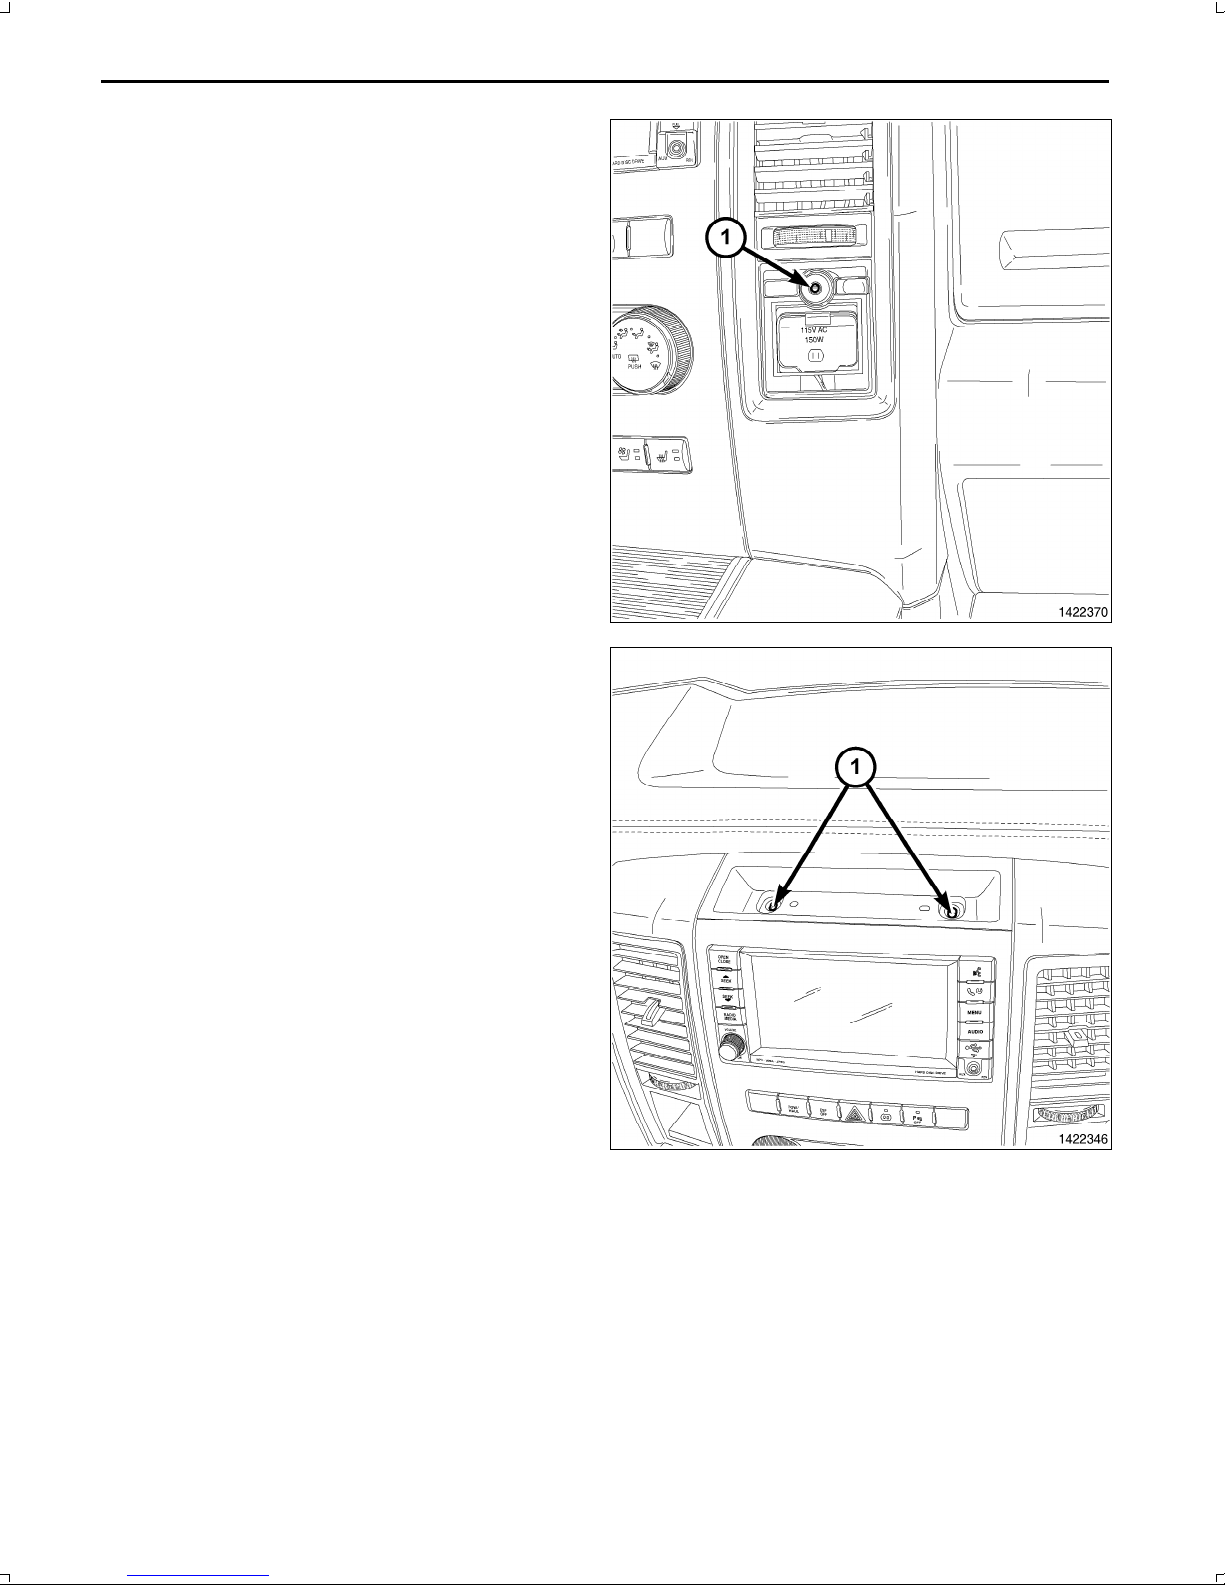
28.Installtheretainer(1)fromabovethepoweroutlet.
29.Installtheretainerstothebinabovetheradio(1).
30.Installtheupperbintrayliner.
Dec31,2010K6861192
Page 10
9
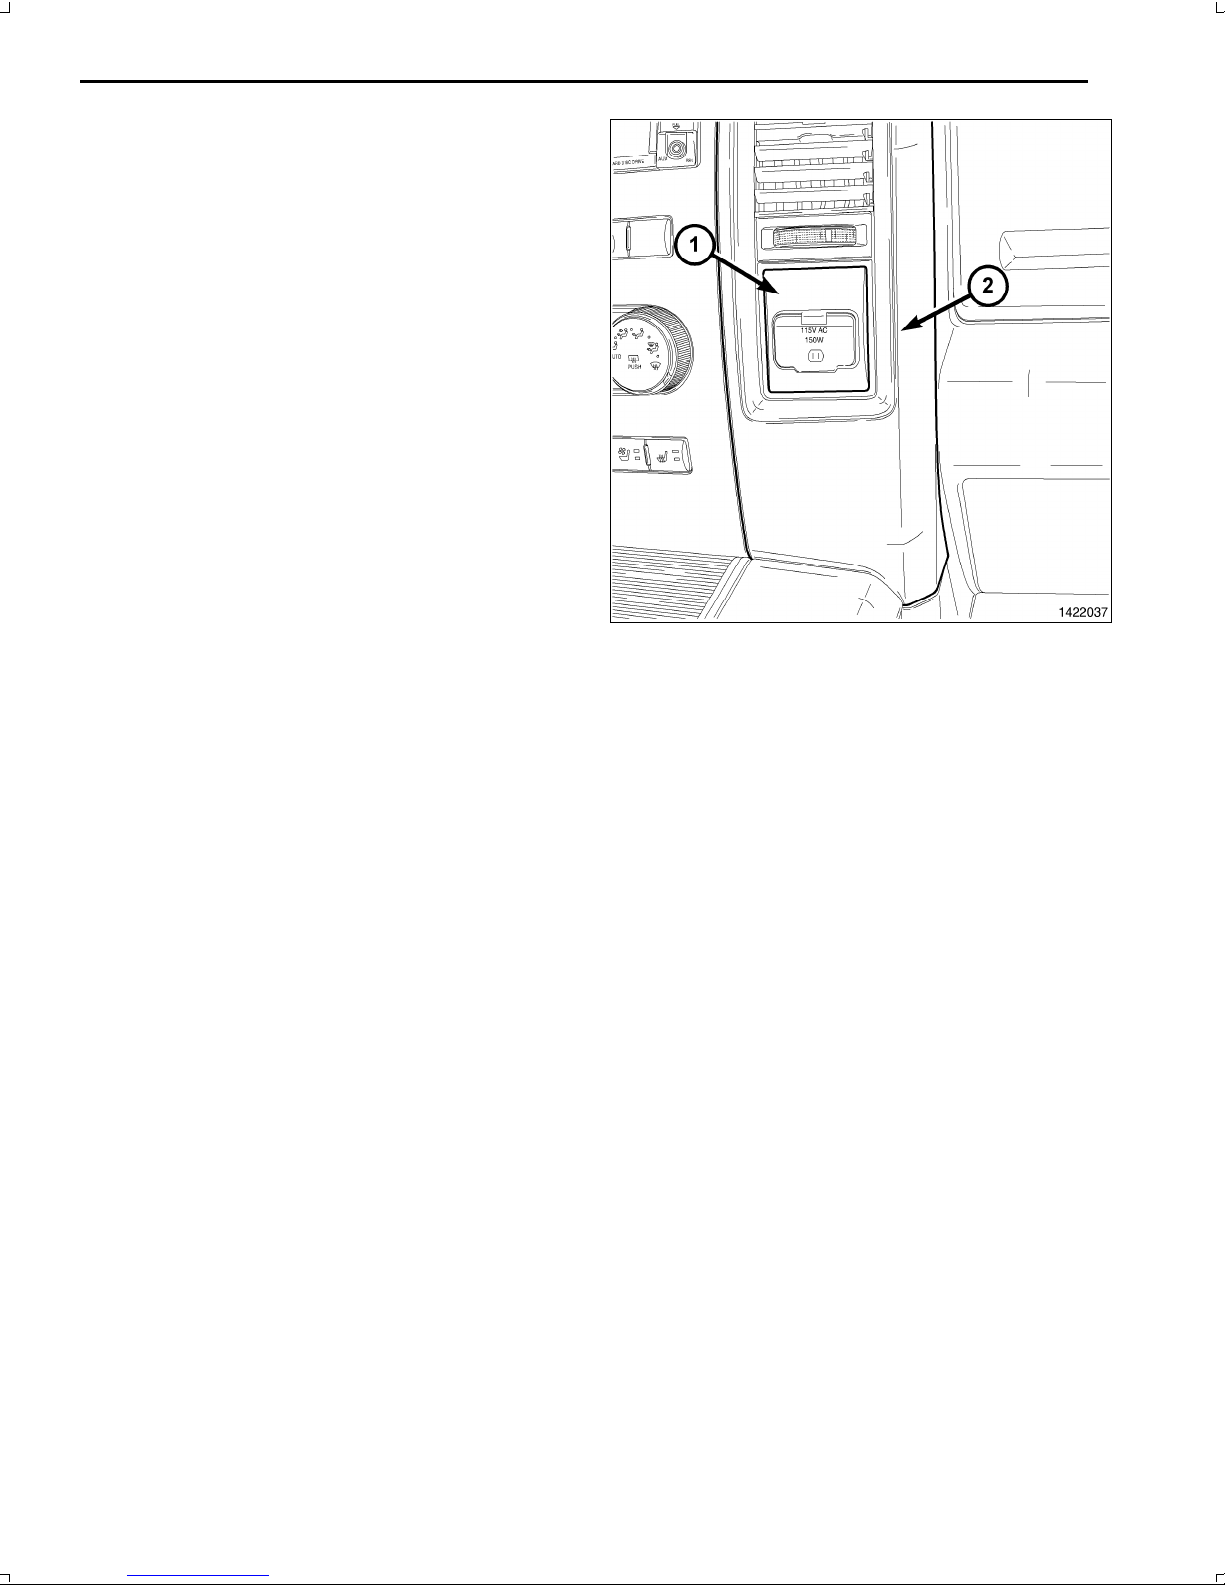
31.Installthepoweroutlettrimbezel(1),tothecenter
bezel(2),fullyengagingtheretainerclips.
32.Connectthenegativebatterycable.
UPDATEVEHICLECONFIGURATION
NOTE:ThewiTECHsoftwarelevelmustbeatthelatestreleasetoperformthisprocedure.
1.VINmustbeupdatedwiththesalescodeoftheaddedaccessoryinordertoenablesystemfunctionality.Usingthe
DealerCONNECTwebsiteandthewiTECHdiagnosticapplication,completethevehicleconfiguration.
2.Logontohttps://dealerconnect.chrysler.com.
3.Inthe"VehicleOption"screenunderthe"GlobalClaimsSystem"categoryinthe"Service"tab,enterthevehicle
VIN,fourdigitpinnumberobtainedfromthedealershippartsdepartmentandaddsalescode(s)notedbelowasa
"DealerInstalledOption".
RHR(AM/FM/DVD/HDDwithSDARS)
4.ConfirmthatthenewsalescodehasbeensuccessfullyaddedtotheVIN.
5.WiththewiTECHdiagnosticapplication,performthefollowingstepsformtheInitialStartUpScreen:
•Selectthe"DIAGNOSTICPROCEDURES"tab
•Select"RESTOREVEHICLECONFIGURATION"
•Selectthe"RunDiagnostic"button
•Select"CONTINUE"
•VerifythatthevehicleVINnumberiscorrect
•Onceverified,selectthe"CorrectVIN"button
•NoteOnScreeninstructionsandselectthe"Close"button
Dec31,2010K6861192
Page 11
1
RHRNAVIGATIONRADIOKIT
WRANGLER
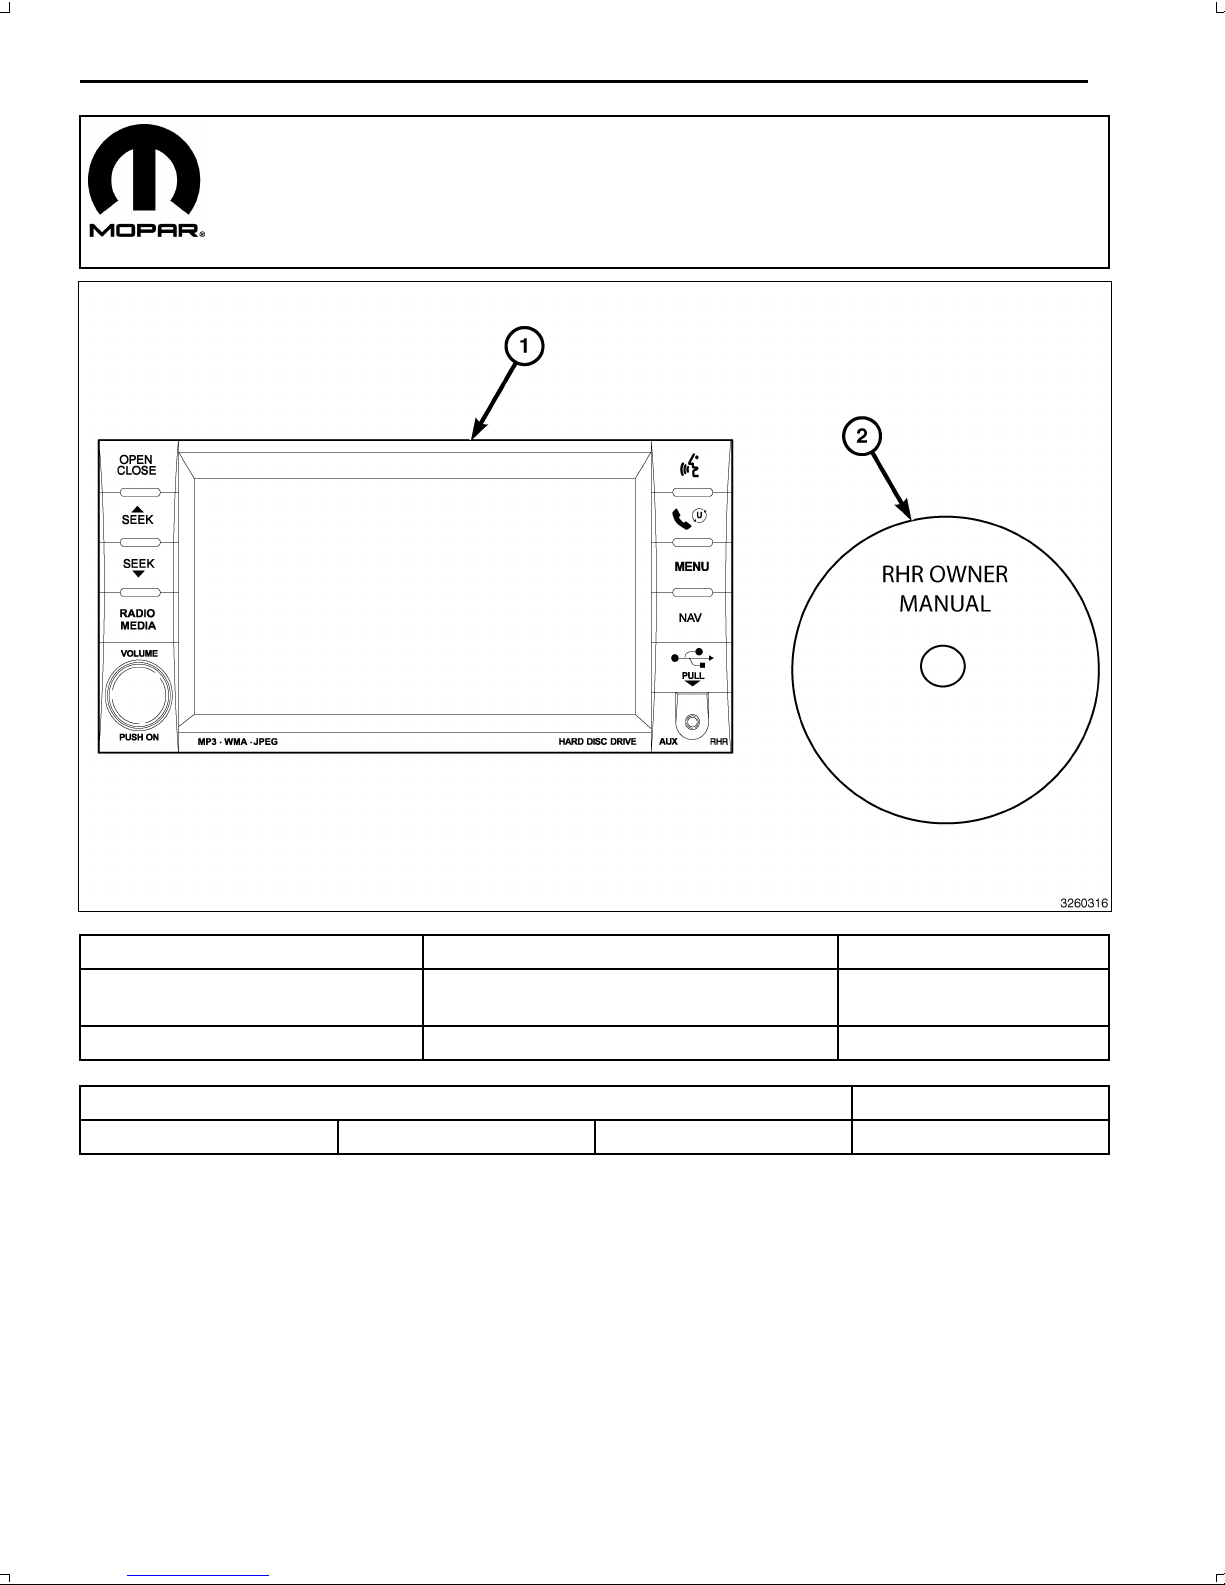
CALLOUTDESCRIPTIONQUANTITY
1
RHRRadio(AM/FM/CD/DVD/HDD/MP3/
NAV)
1
2
RHROwnerManualDVD
1
TOOLSREQUIRED
PhillipsHeadScrewDriverFiberTrimStickScanToolT25TorxScrewDriver
Dec30,2010K6861192
Page 12
2
PROCEDURESTEPS:
1.Disconnectandisolatethenegativebatterycable.
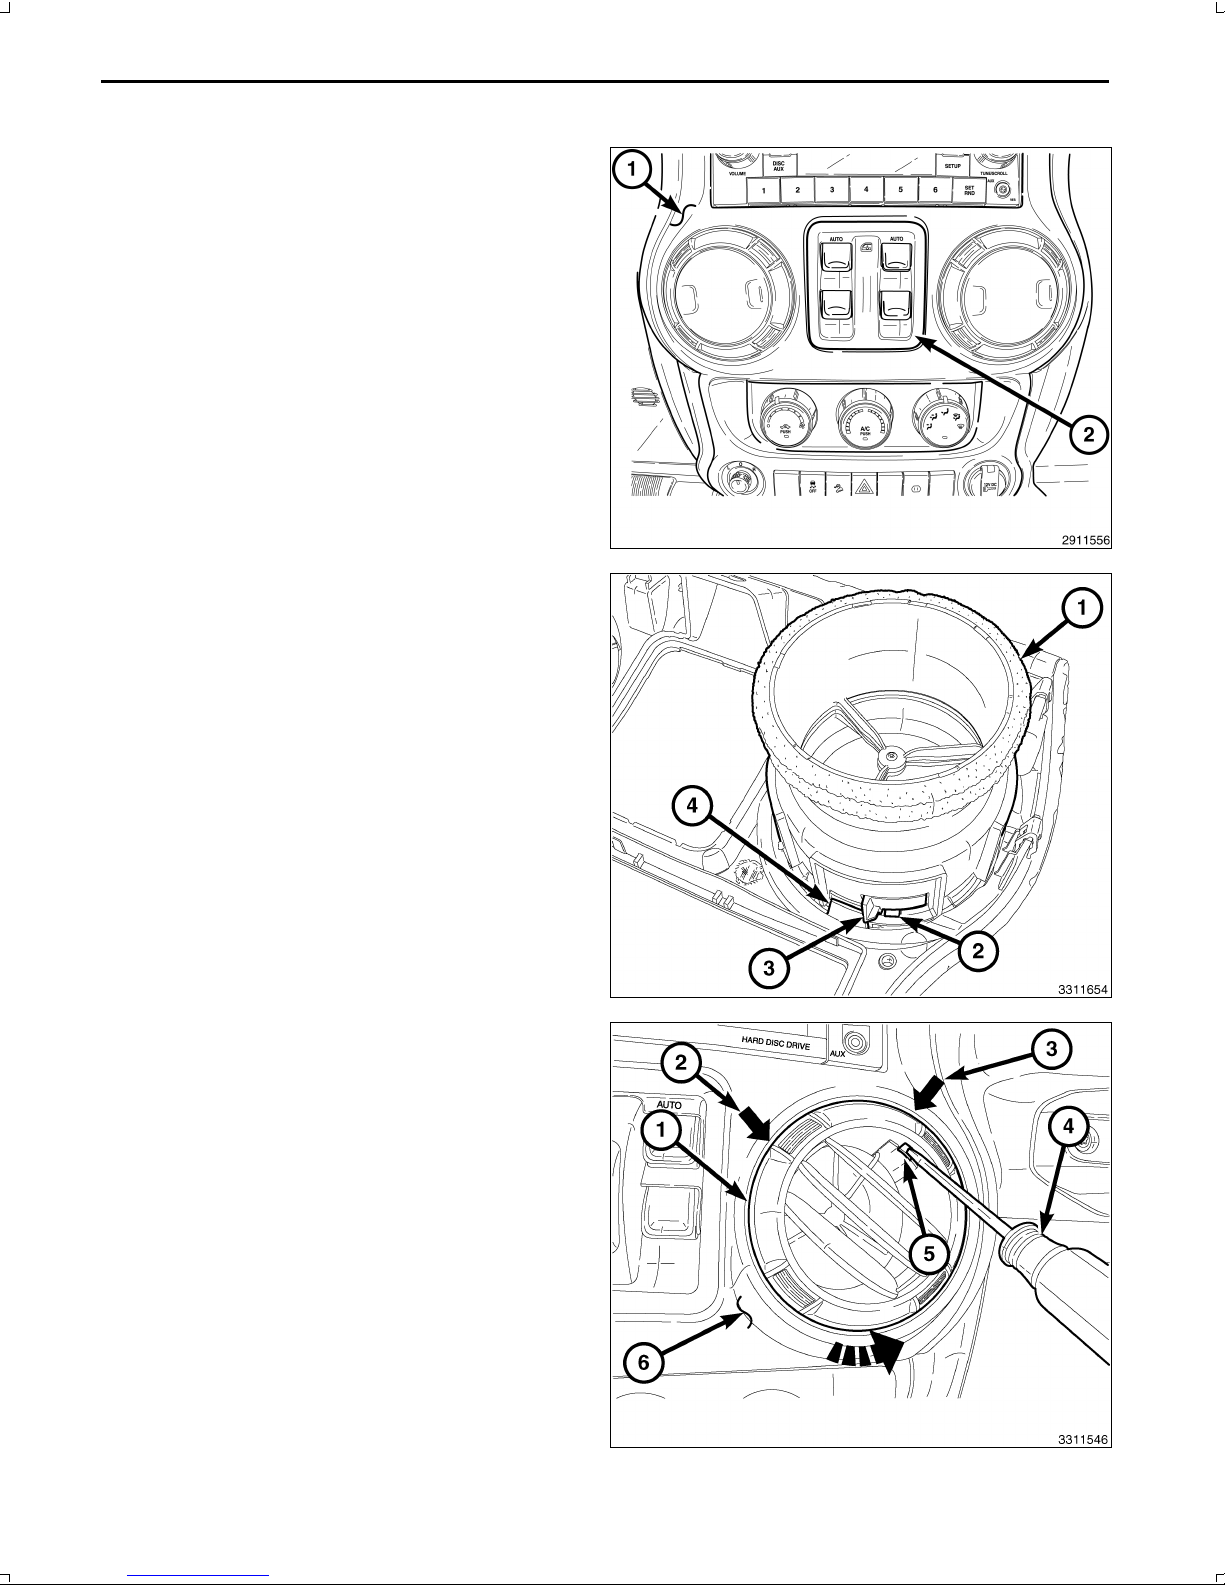
2.Ifequippedwithpowerwindows,usingafibertrim
stick,gentlyprytheswitchassembly(2)awayfrom
thetrimpanel(1),disconnecttheelectricalconnector
andremovetheswitch.
3.Forvehicleswithoutpowerwindows,usingafibertrim
stick,gentlyprythestoragebinassemblyawayfrom
thebezelandremovethebin.
4.Eachairoutlet(1)issecuredbyaretainingtab(3)lo
catedontheoutlet,andastoptab(4)locatedonthe
backofthetrimpanel.Accesstheretainingtabfrom
theinsideoftheairoutlet,throughthesquareopen
ings(2)provided.
NOTE:Centerrightoutletshown.Otheroutletsimilar.
5.Rotatethelouversofbothairoutlets(1)inthecenter
oftheinstrumentpanel(6)totheelevenoclockposi
tion(2).
6.Placeasmallscrewdriver(4)orequivalentthroughthe
squareopening(5)insideofeachairoutlet,locatedat
thetwelvethirtyposition(3).
7.Carefullyprytheretainingtab(3,showninprevious
illustration)towardthecenteroftheairoutletandro
tatetheoutletscounterclockwise.
8.Removetheairoutletsfromthetrimpanel.
Dec30,2010K6861192
Page 13
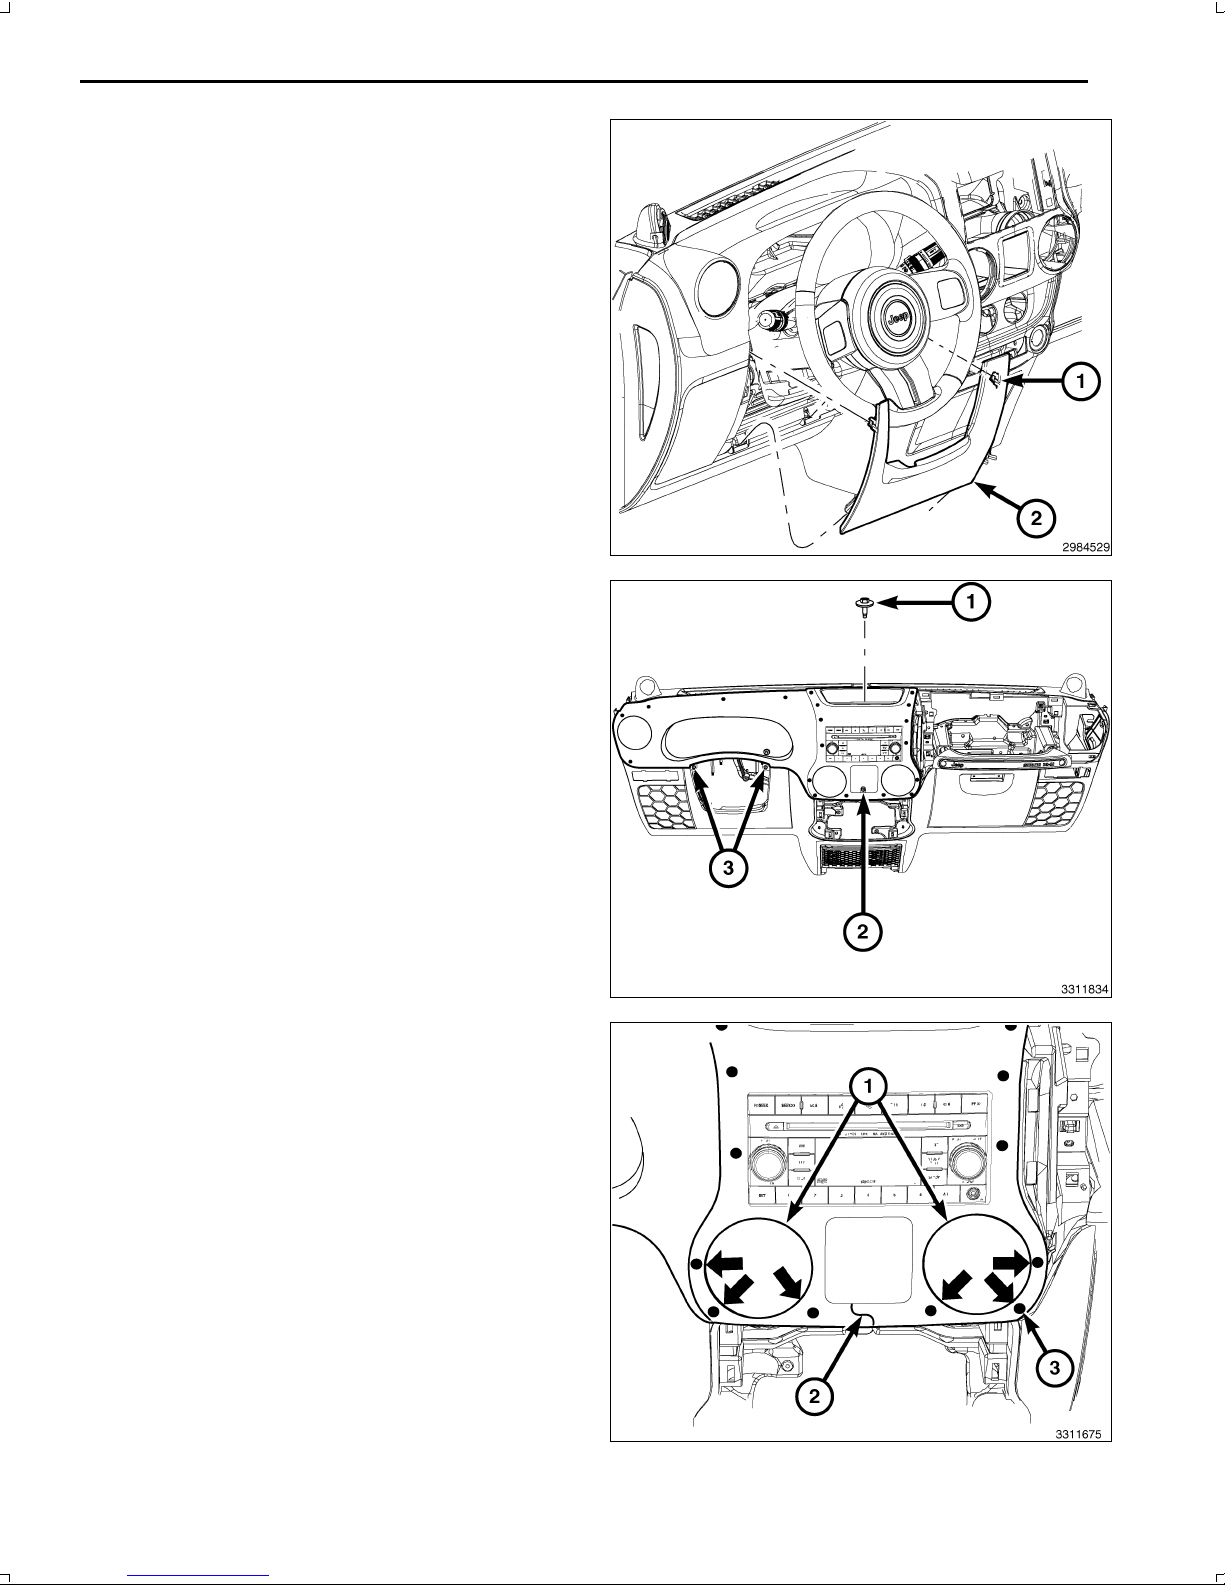
3
9.Usingafibertrimstick,disengagethetworetaining
clips(1)thatsecurethetopofthesteeringcolumn
openingcover(2)totheinstrumentpanel.
10.Disengagethetwolowerretainingtabsandremove
thesteeringcolumnopeningcover.
11.Removethestoragebinmatandthescrew(1),lo
catedatthetopoftheinstrumentpanel.
12.Removethescrew(2)throughthecenteropeningof
thetrimpanel.
13.Removethetwoscrews(3)thatsecurethetrimpanel
totheinstrumentpanel,locatedatthesteeringcolumn
opening.
CAUTION:Donotuseanytoolstoreleasethelower
trimpanelretainingclips.Failuretofollowthesein
structionscanresultindamagetothetrimpaneland
reinforcement.
14.Releasethesixlowerretainingclips(3)withoutthe
useoftools.Reachintotheinstrumentpanelthrough
theventopenings(1),firmlygraspthereinforcement
locatedbehindthetrimpanel(2)andcarefullypullthe
reinforcementandtrimpanelassemblyrearward.
Dec30,2010K6861192
Page 14
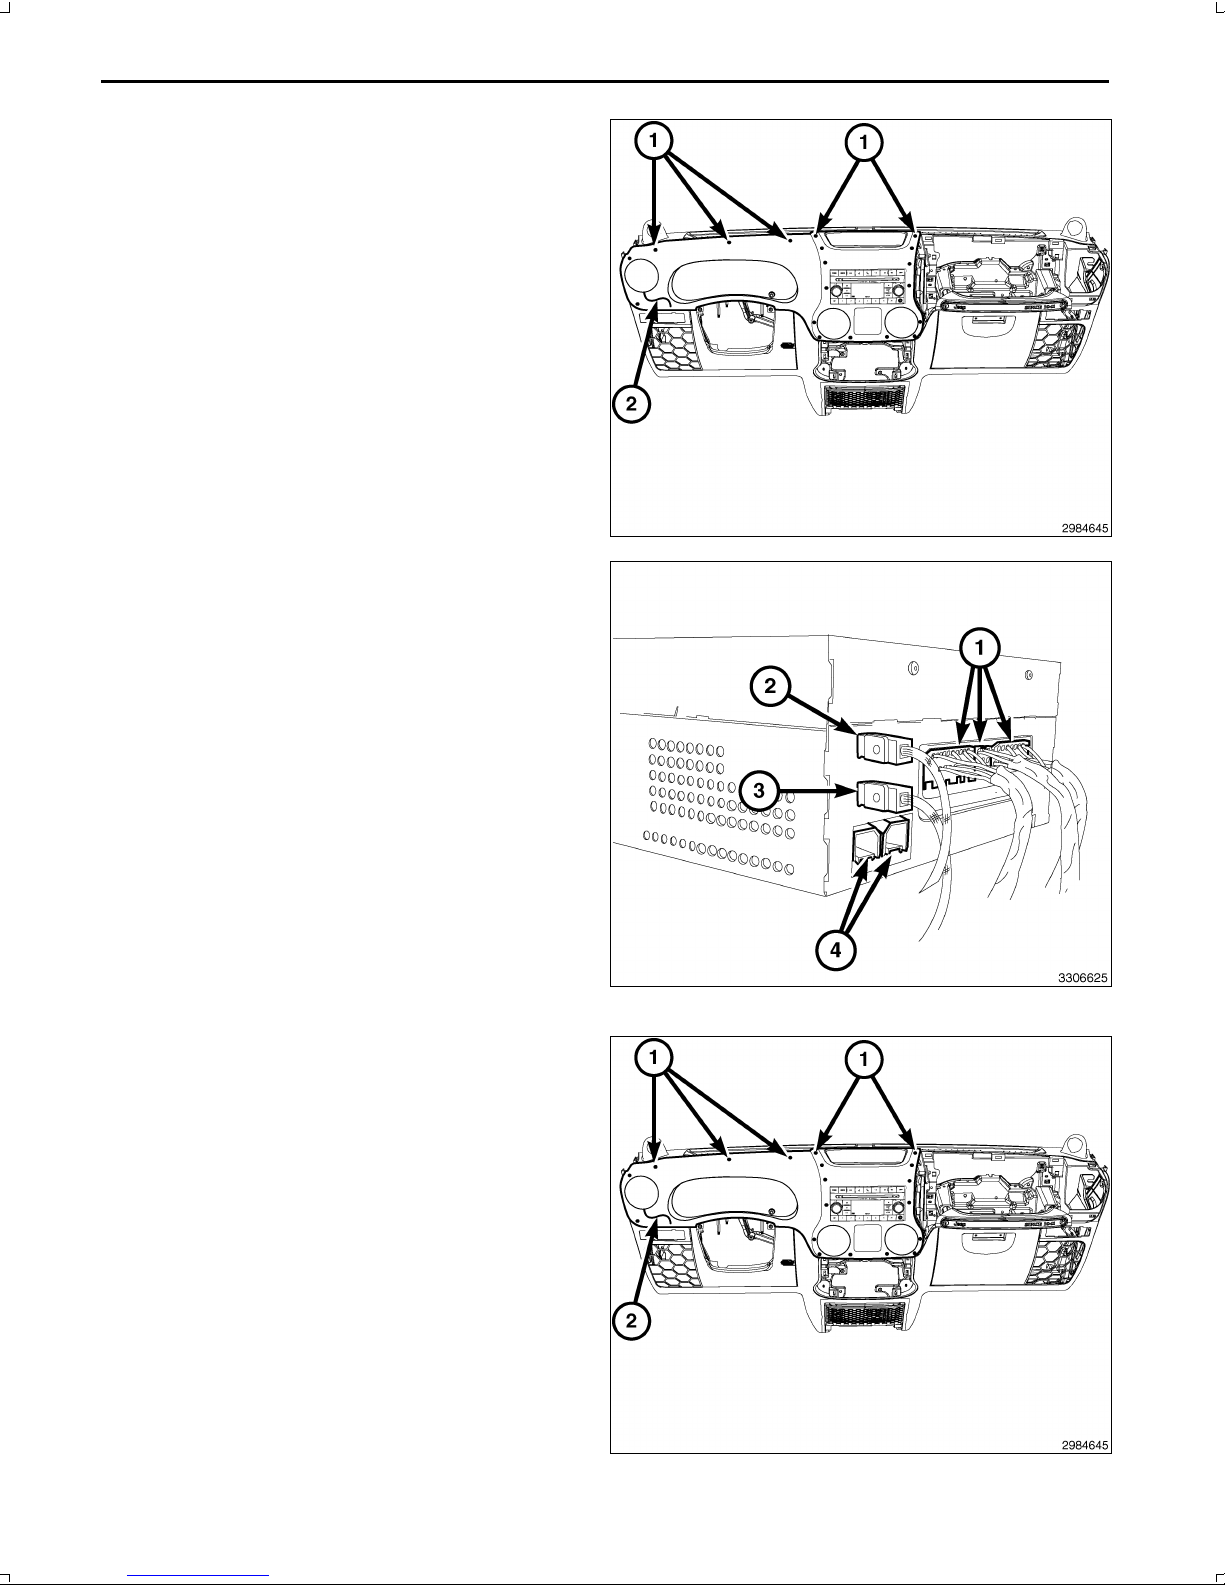
4
15.Releasetheremaining13retainingclips(1)andre
movethetrimpanel(2).
CAUTION:Pullingtheantennacablestraightoutofthe
radiowithoutpullingonthelockingantennaconnec
torcoulddamagethecableorradio.
16.Removetheradiomountingscrews.
17.Pulltheradiooutfarenoughtoaccessthebackofthe
radio.
18.DisconnecttheAM/FMantenna(2)andelectricalcon
nectors(1).
19.Ifequipped,disconnectthenavigationantenna(3).
20.Ifequipped,disconnecttheUSBconnectors(4).
21.Removetheradiofromtheinstrumentpanel.
22.Positionthenewradiototheinstrumentpanel.
23.ConnecttheAM/FMantenna(2)andelectricalcon
nectors(1).
24.Connectthesatellite/navigationantenna(3).
25.Ifequipped,connecttheUSBconnectors(4).
26.Installtheradiomountingscrews.
27.Positionthetrimpanel(2)intoplaceandfullyseatall
19retainingclips(1).
Dec30,2010K6861192
Page 15
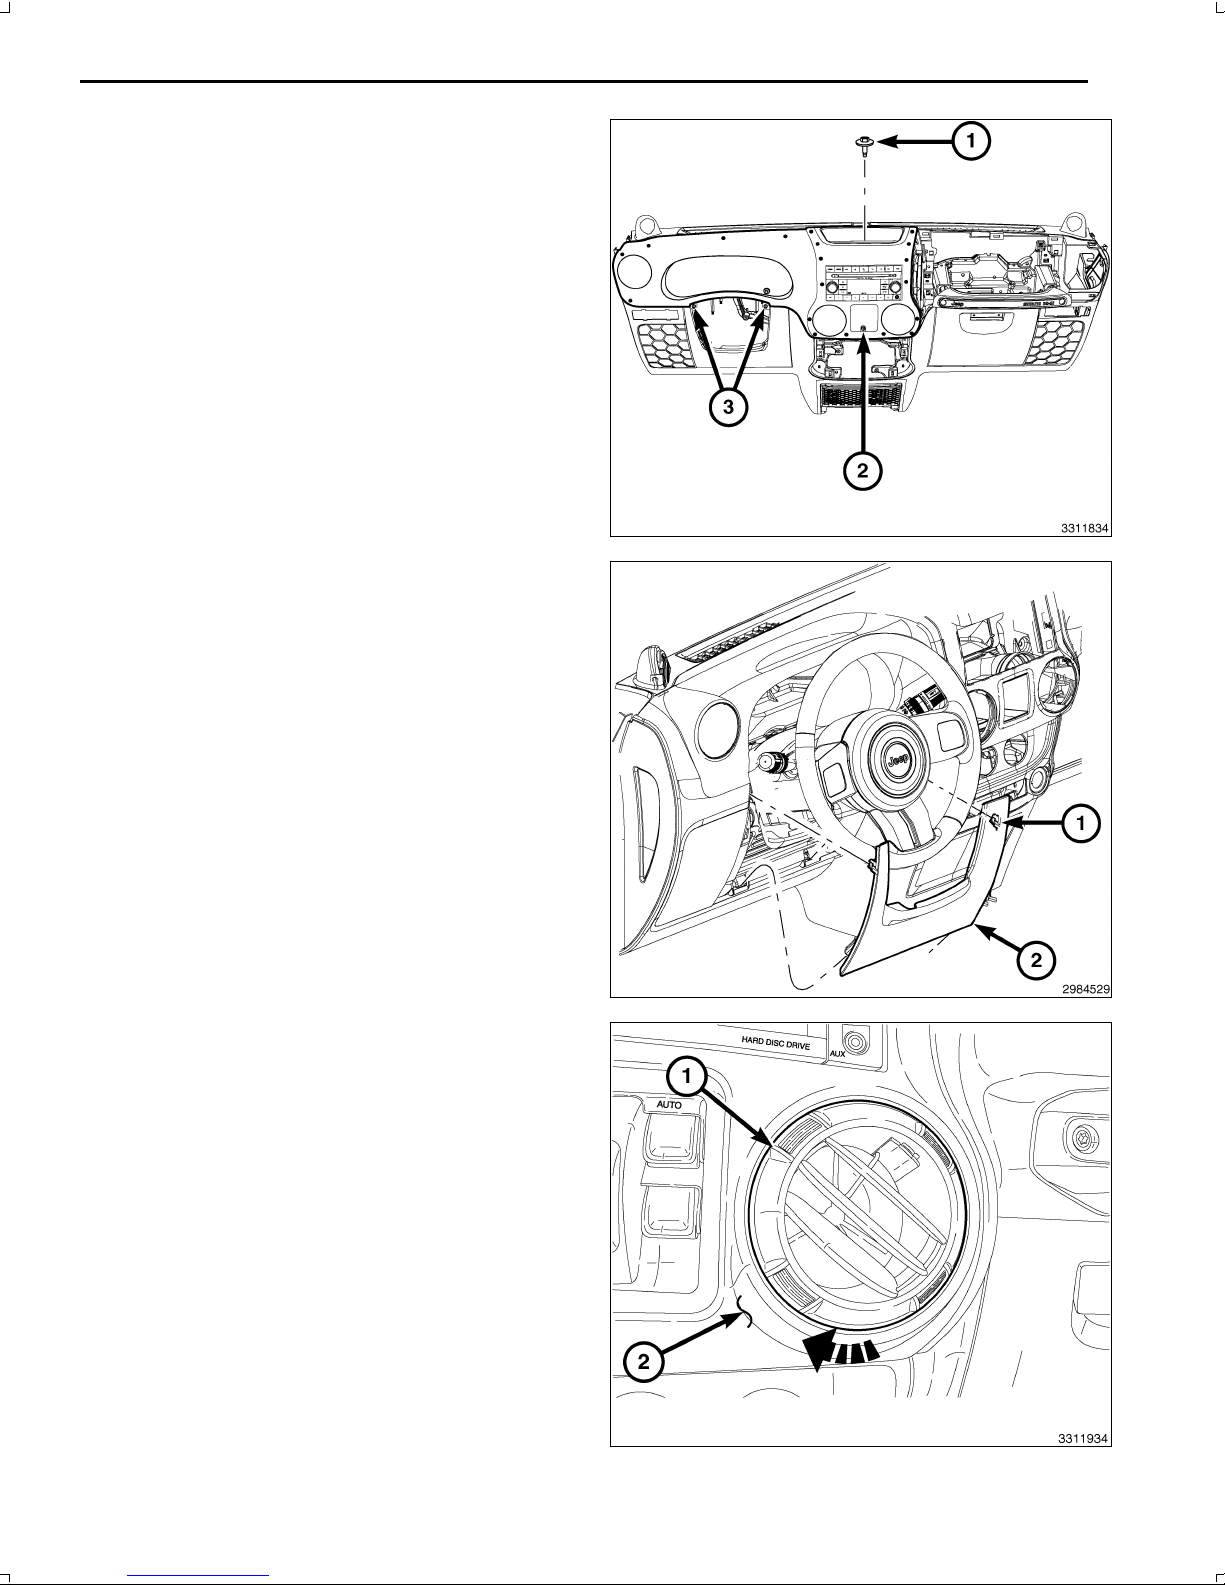
5
28.Installthetwoscrews(3)thatsecurethetrimpanelto
theinstrumentpanel,locatedatthesteeringcolumn
opening.
29.Installthescrew(2)throughthecenteropeningofthe
trimpanel.
30.Installthescrewandthestoragebinmatatthecenter
oftheinstrumentpanel.
31.Positionthesteeringcolumnopeningcover(2)tothe
instrumentpanelandengagethetwolowerretaining
tabs.
32.Engagethetworetainingclips(1)thatsecurethetop
ofthesteeringcolumnopeningcovertotheinstrument
panel.
NOTE:Centerrightoutletshown.Otheroutletsimilar.
NOTE:Ifafoamsealonanairoutletisdeformedor
damaged,thesealmustbereplaced.
33.Installtheairoutlets(1)intothetrimpanel(2)andro
tatetheairoutletsclockwiseuntilfullyengaged.
Dec30,2010K6861192
Page 16
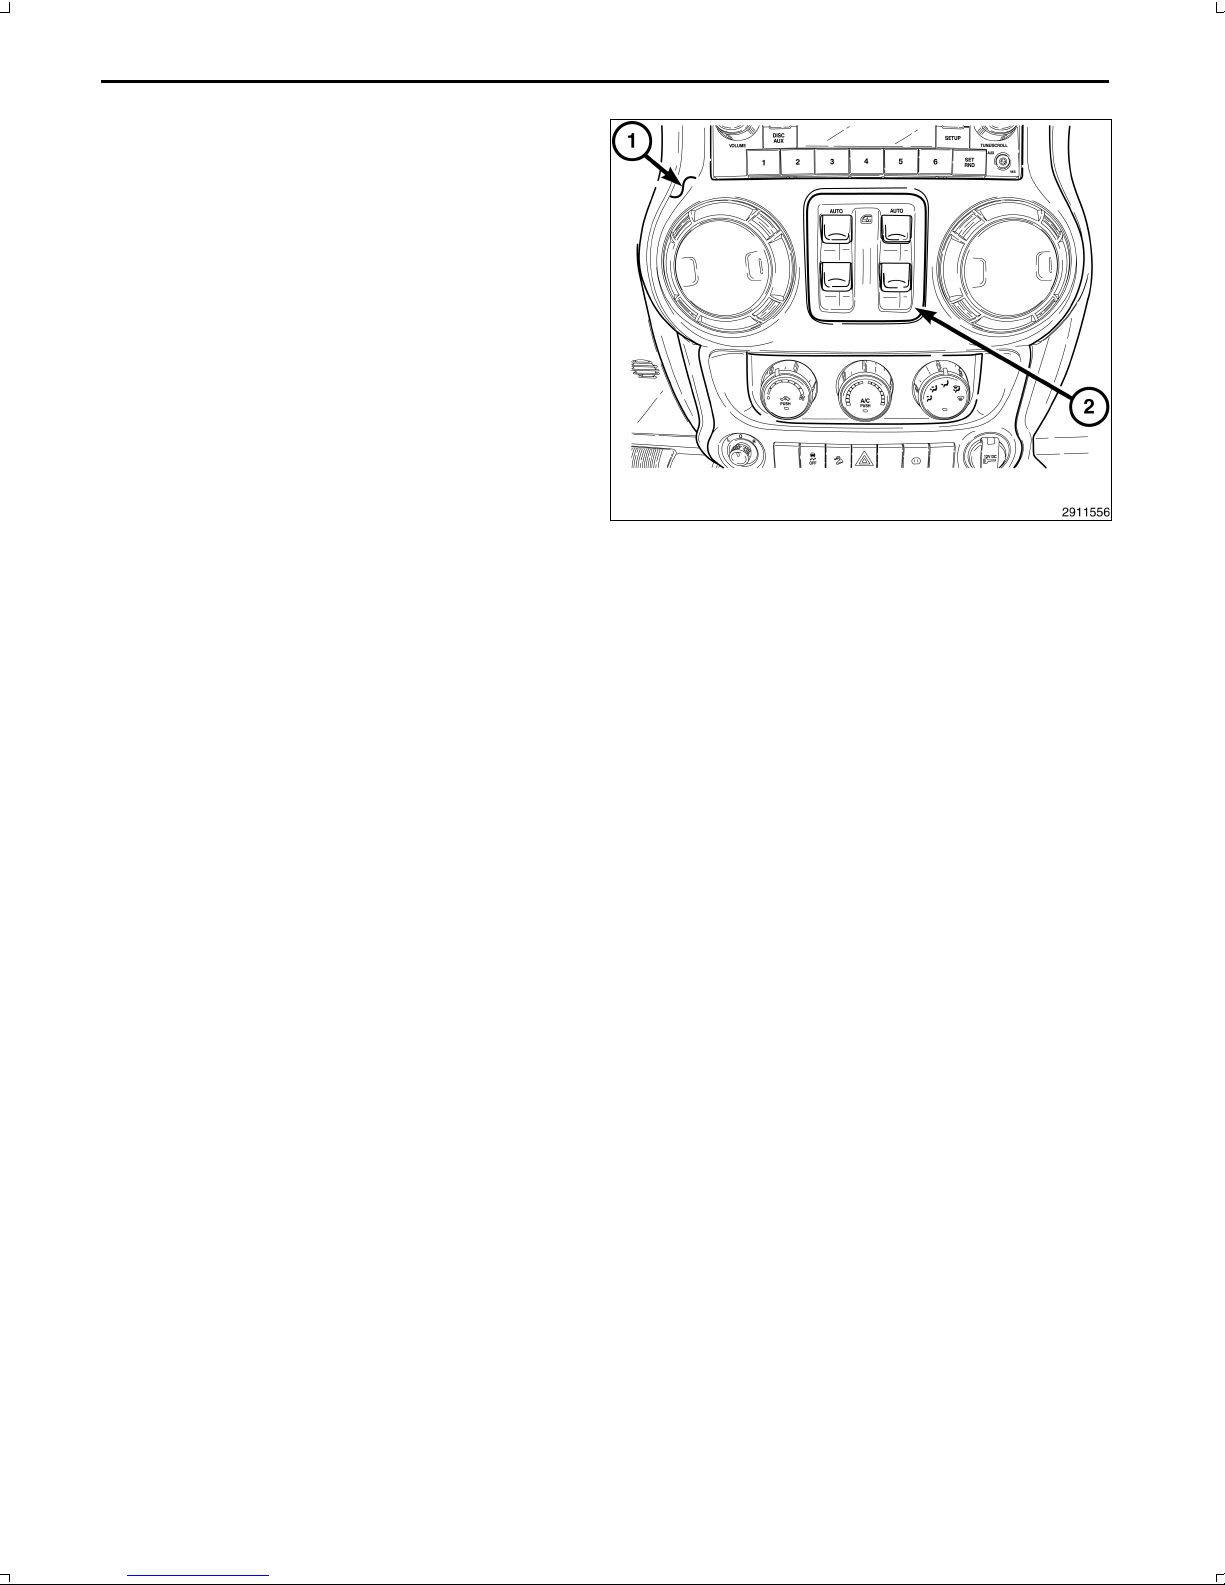
6
34.Ifequippedwithpowerwindows,positiontheswitch
assembly(2)tothetrimpanel(1),connecttheelectri
calconnectorandinstalltheswitch.
35.Forvehicleswithoutpowerwindows,installthestor
agebinassembly.
36.Reconnectthenegativebatterycable.
UPDATEVEHICLECONFIGURATION
NOTE:ThewiTECHsoftwarelevelmustbeatthelatestreleasetoperformthisprocedure.
1.VINmustbeupdatedwiththesalescodeoftheaddedaccessoryinordertoenablesystemfunctionality.Usingthe
DealerCONNECTwebsiteandthewiTECHdiagnosticapplication,completethevehicleconfiguration.
2.Logontohttps://dealerconnect.chrysler.com.
3.Inthe"VehicleOption"screenunderthe"GlobalClaimsSystem"categoryinthe"Service"tab,enterthevehicle
VIN,fourdigitpinnumberobtainedfromthedealershippartsdepartmentandaddsalescode(s)notedbelowasa
"DealerInstalledOption".
RHR(AM/FM/DVD/HDDwithSDARS)
4.ConfirmthatthenewsalescodehasbeensuccessfullyaddedtotheVIN.
5.WiththewiTECHdiagnosticapplication,performthefollowingstepsformtheInitialStartUpScreen:
•Selectthe"DIAGNOSTICPROCEDURES"tab
•Select"RESTOREVEHICLECONFIGURATION"
•Selectthe"RunDiagnostic"button
•Select"CONTINUE"
•VerifythatthevehicleVINnumberiscorrect
•Onceverified,selectthe"CorrectVIN"button
•NoteOnScreeninstructionsandselectthe"Close"button
Dec30,2010K6861192
Page 17
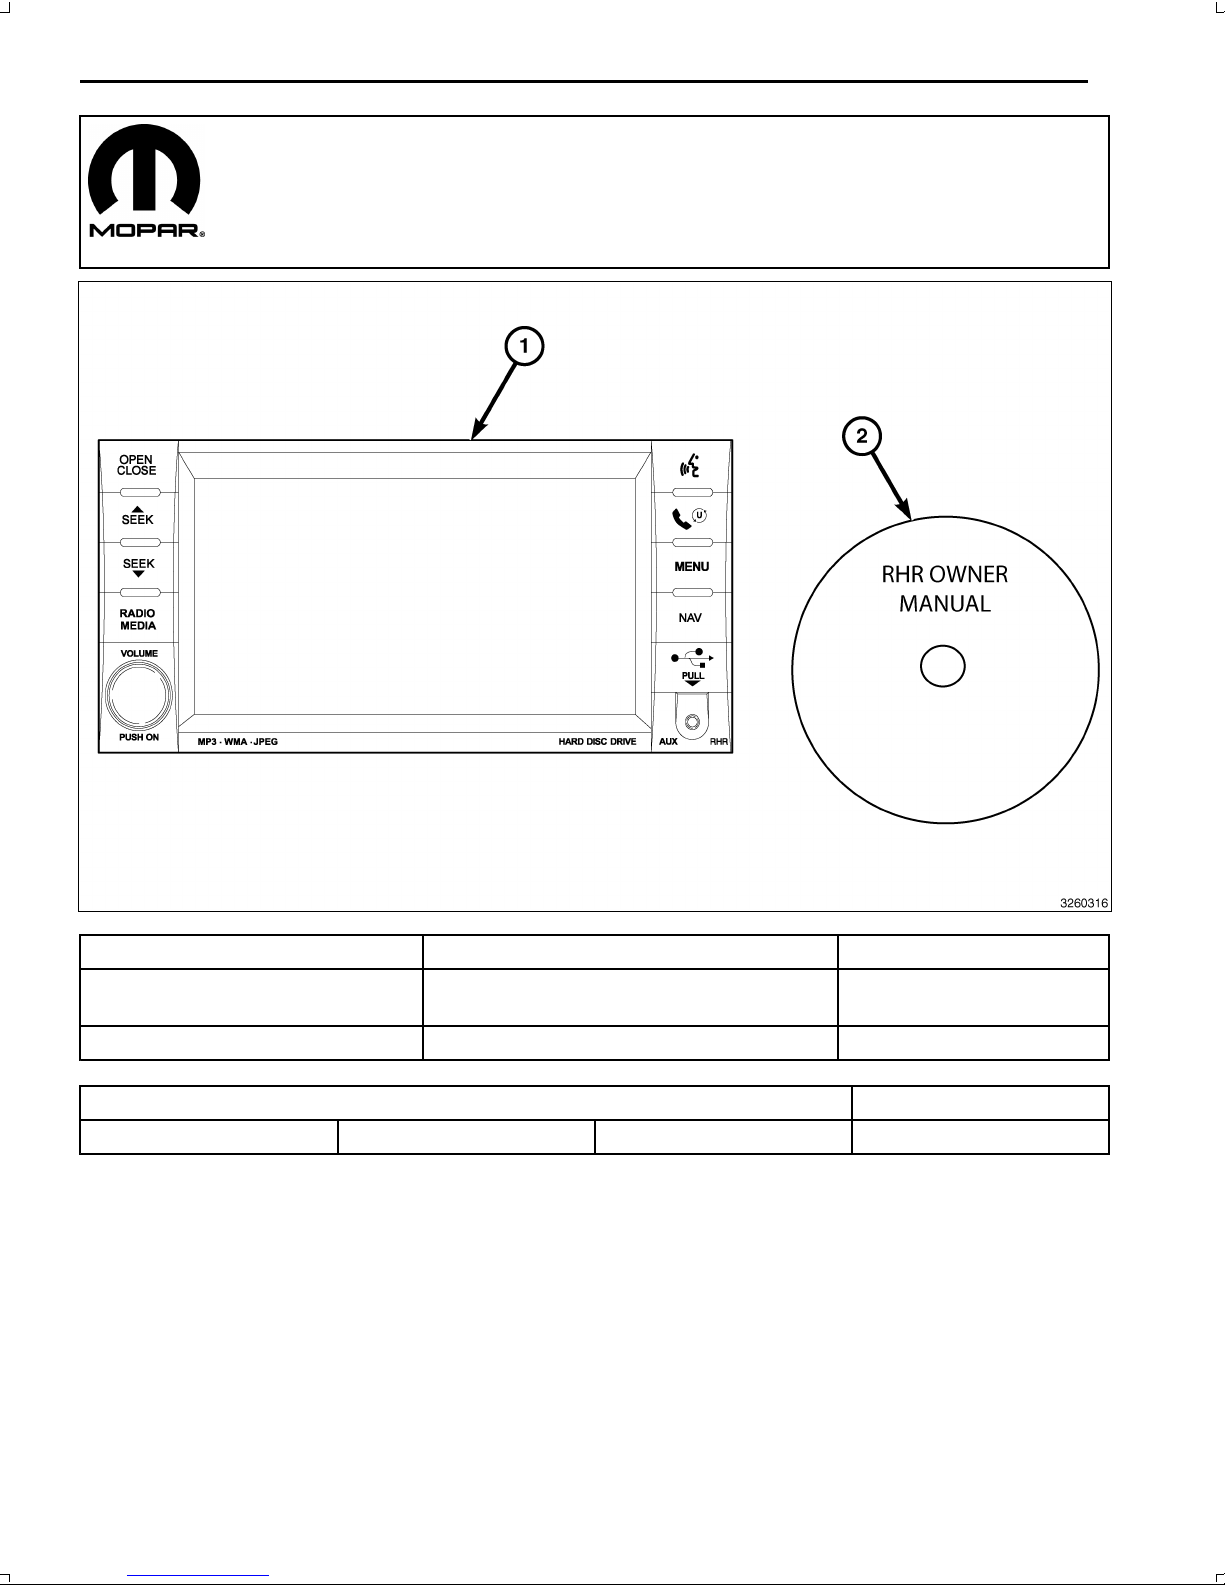
1
RHRNAVIGATIONRADIOKIT
AVENGER
CALLOUTDESCRIPTIONQUANTITY
1
RHRRadio(AM/FM/CD/DVD/HDD/MP3/
NAV)
1
2
RHROwnerManualDVD
1
TOOLSREQUIRED
PhillipsHeadScrewDriverFiberTrimStickScanToolT25TorxScrewDriver
PROCEDURESTEPS:
Dec31,2010K6861192
Page 18
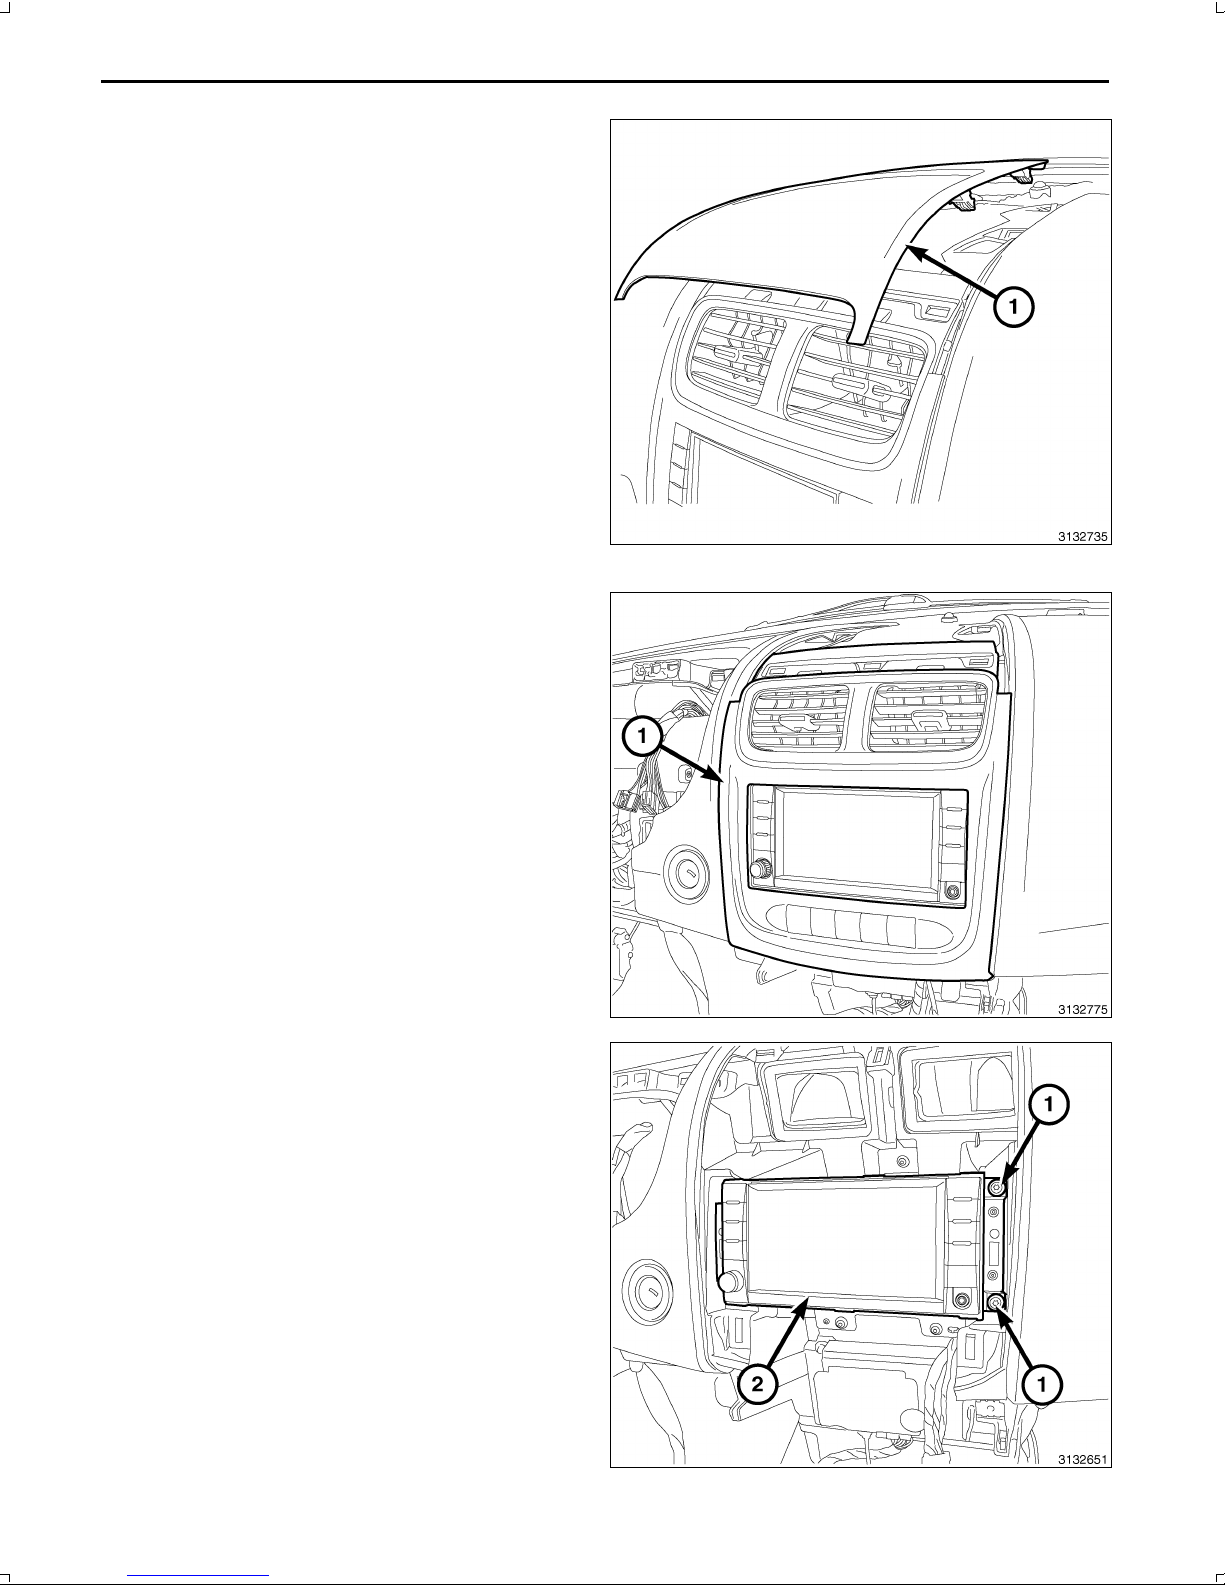
2
1.Disconnectandisolatethenegativebatterycable.
2.UsingtrimstickC4755orequivalent,pullupwardto
disengagetheretainingclipsandremovethecenter
bezelhood(1).
3.UsingtrimstickC4755orequivalent,disengagethe
centertrimbezel(1)retainingclips.
4.Reachbehindthebezelanddisconnectallelectrical
connections.
5.Removethecenterbezelfromtheinstrumentpanel.
6.Removetheradiomountingfasteners(1).
7.Pulltheradio(2)outfarenoughtoaccessthebackof
theradio.
Dec31,2010K6861192
Page 19
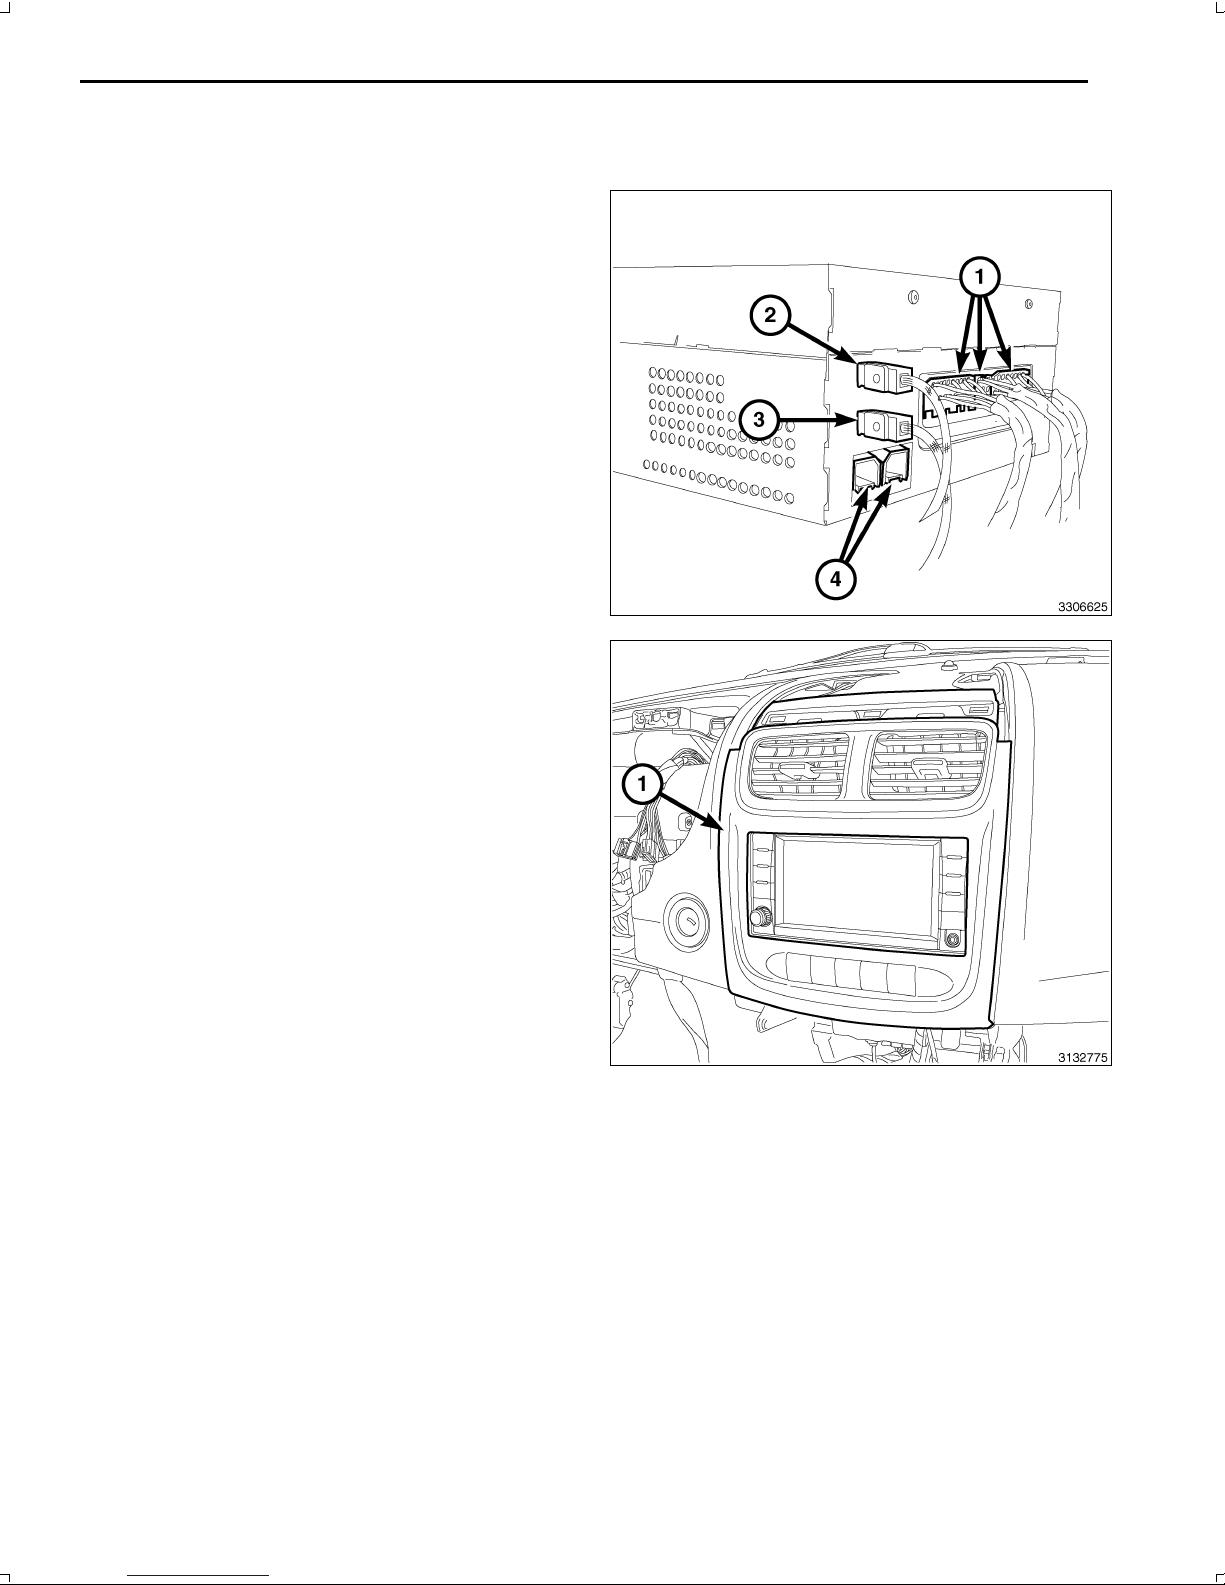
3
CAUTION:Pullingtheantennacablestraightoutoftheradiowithoutpullingonthelockingantennaconnector
coulddamagethecableorradio.
8.DisconnecttheAM/FMantenna(2)andelectricalcon
nectors(1).
9.Ifequipped,disconnectthenavigationantenna(3).
10.Ifequipped,disconnecttheUSBconnectors(4).
11.Removetheradiofromtheinstrumentpanel.
12.Positionthenewradiototheinstrumentpanel.
13.ConnecttheAM/FMantenna(2)andelectricalcon
nectors(1).
14.Connectthesatellite/navigationantenna(3).
15.Ifequipped,connecttheUSBconnectors(4).
16.Installandtightentheradiomountingfasteners.
17.Positionthecenterbezel(1)totheinstrumentpanel.
18.Reachbehindthebezelandconnectallelectricalcon
nections.
19.Pressfirmlyandevenlyaroundtheperimeterofthe
bezeltoengagetheretainingclips.
Dec31,2010K6861192
Page 20
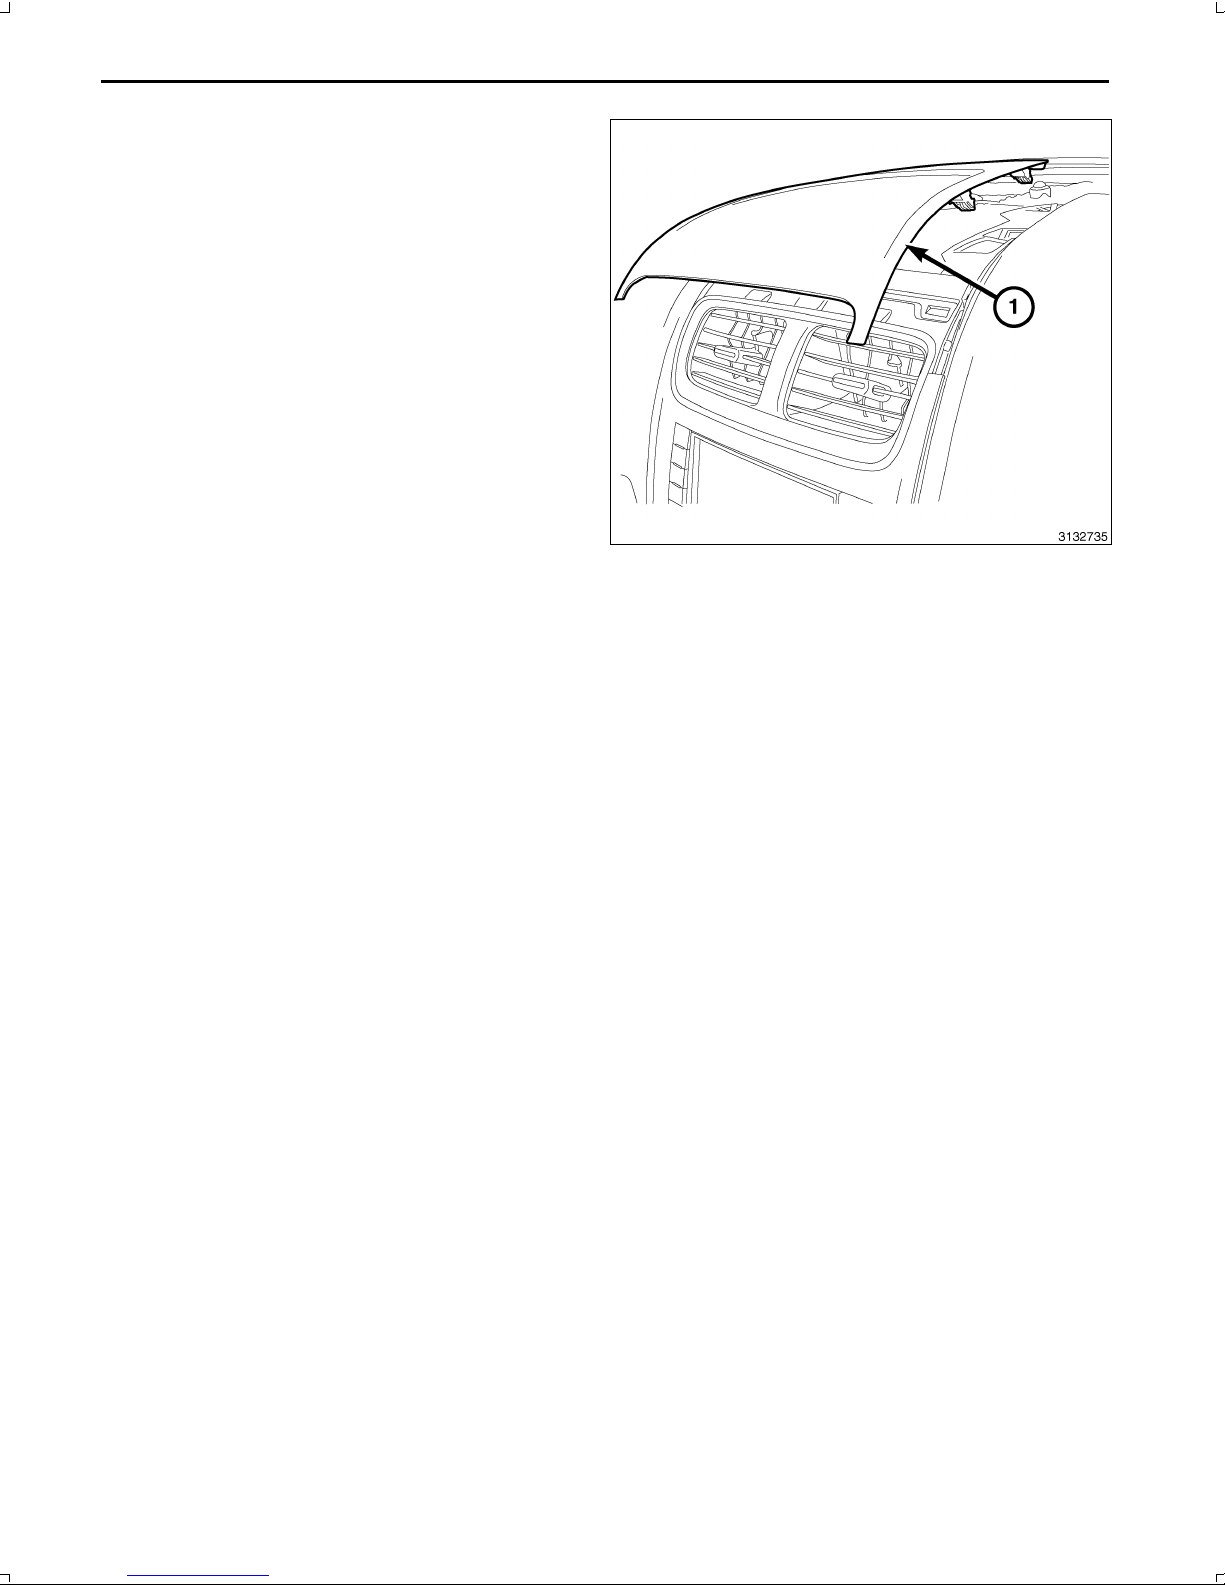
4
20.Positionthecenterbezelhood(1)andpressfirmlyand
evenlyaroundtheperimetertoengagetheretaining
clips.
21.Connectthenegativebatterycable.
UPDATEVEHICLECONFIGURATION
NOTE:ThewiTECHsoftwarelevelmustbeatthelatestreleasetoperformthisprocedure.
1.VINmustbeupdatedwiththesalescodeoftheaddedaccessoryinordertoenablesystemfunctionality.Usingthe
DealerCONNECTwebsiteandthewiTECHdiagnosticapplication,completethevehicleconfiguration.
2.Logontohttps://dealerconnect.chrysler.com.
3.Inthe"VehicleOption"screenunderthe"GlobalClaimsSystem"categoryinthe"Service"tab,enterthevehicle
VIN,fourdigitpinnumberobtainedfromthedealershippartsdepartmentandaddsalescode(s)notedbelowasa
"DealerInstalledOption".
RHR(AM/FM/DVD/HDDwithSDARS)
4.ConfirmthatthenewsalescodehasbeensuccessfullyaddedtotheVIN.
5.WiththewiTECHdiagnosticapplication,performthefollowingstepsformtheInitialStartUpScreen:
•Selectthe"DIAGNOSTICPROCEDURES"tab
•Select"RESTOREVEHICLECONFIGURATION"
•Selectthe"RunDiagnostic"button
•Select"CONTINUE"
•VerifythatthevehicleVINnumberiscorrect
•Onceverified,selectthe"CorrectVIN"button
•NoteOnScreeninstructionsandselectthe"Close"button
Dec31,2010K6861192
Page 21
1
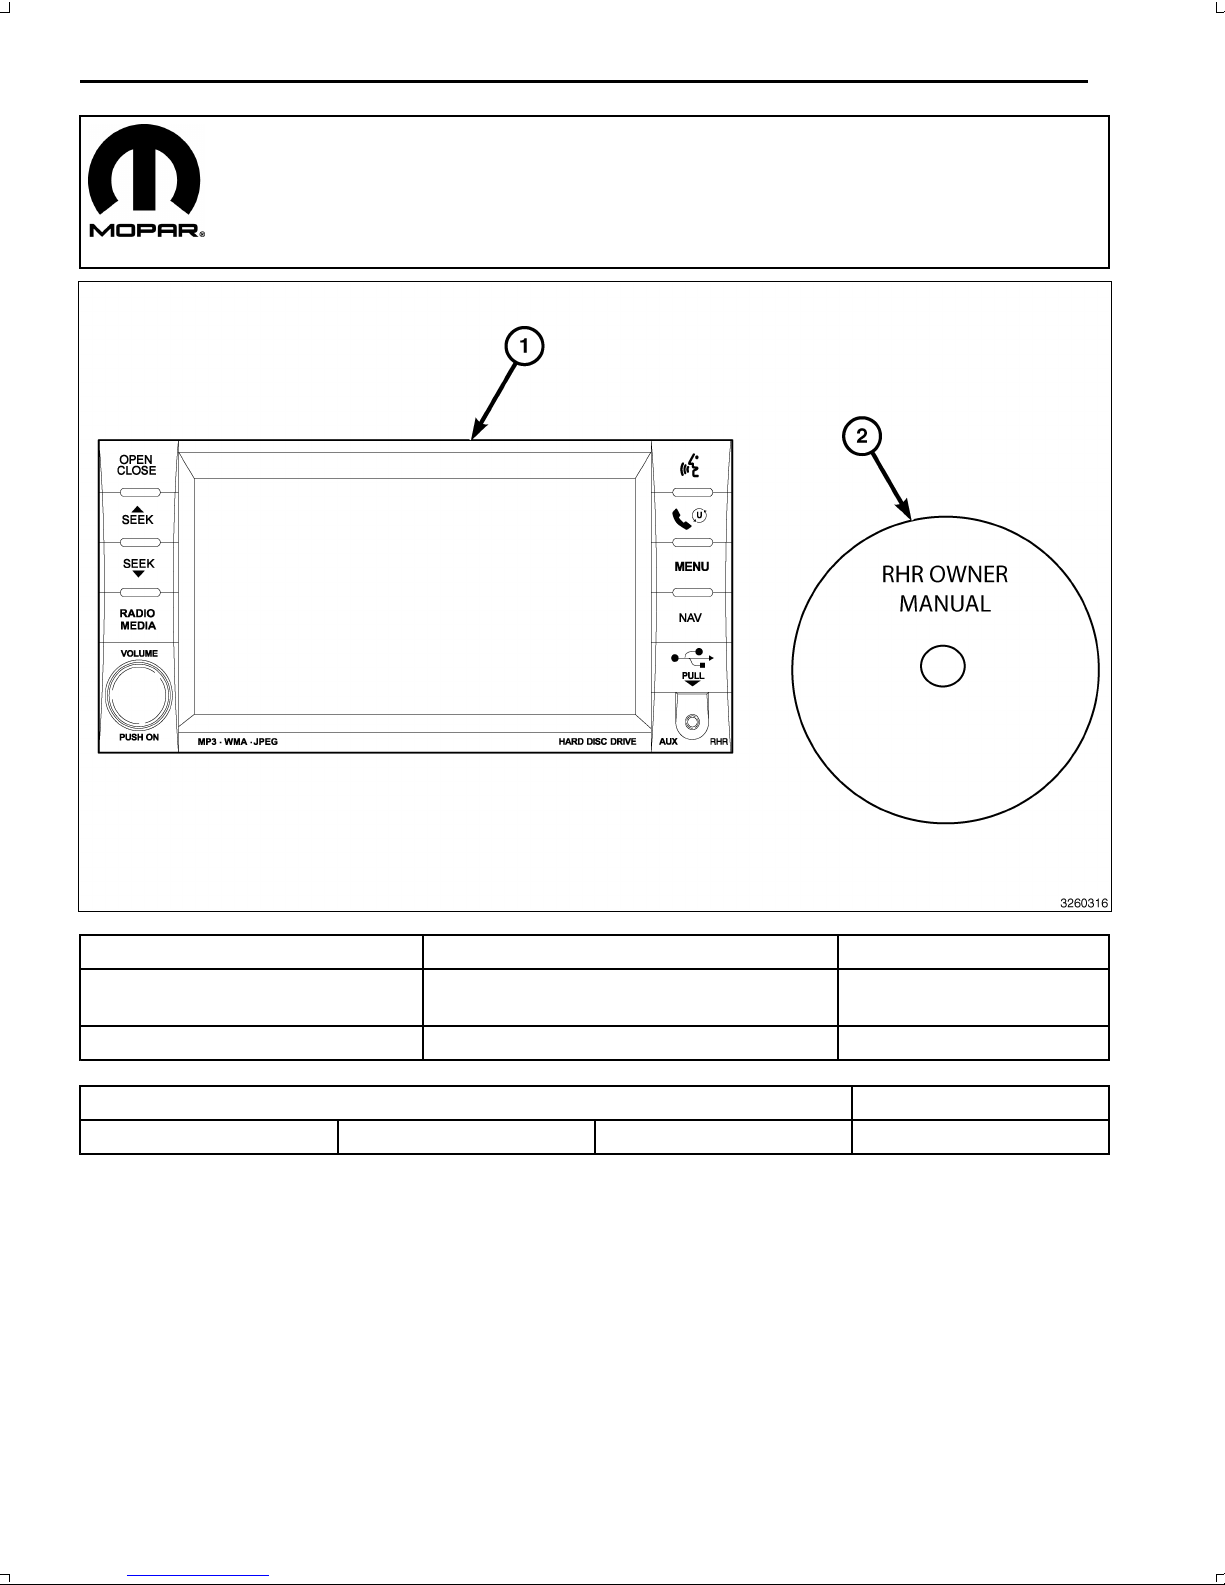
RHRNAVIGATIONRADIOKIT
SEBRING
CALLOUTDESCRIPTIONQUANTITY
1
RHRRadio(AM/FM/CD/DVD/HDD/MP3/
NAV)
1
2
RHROwnerManualDVD
1
TOOLSREQUIRED
PhillipsHeadScrewDriverFiberTrimStickScanToolT25TorxScrewDriver
PROCEDURESTEPS:
Dec31,2010K6861192
Page 22
2
1.Disconnectandisolatethenegativebatterycable.
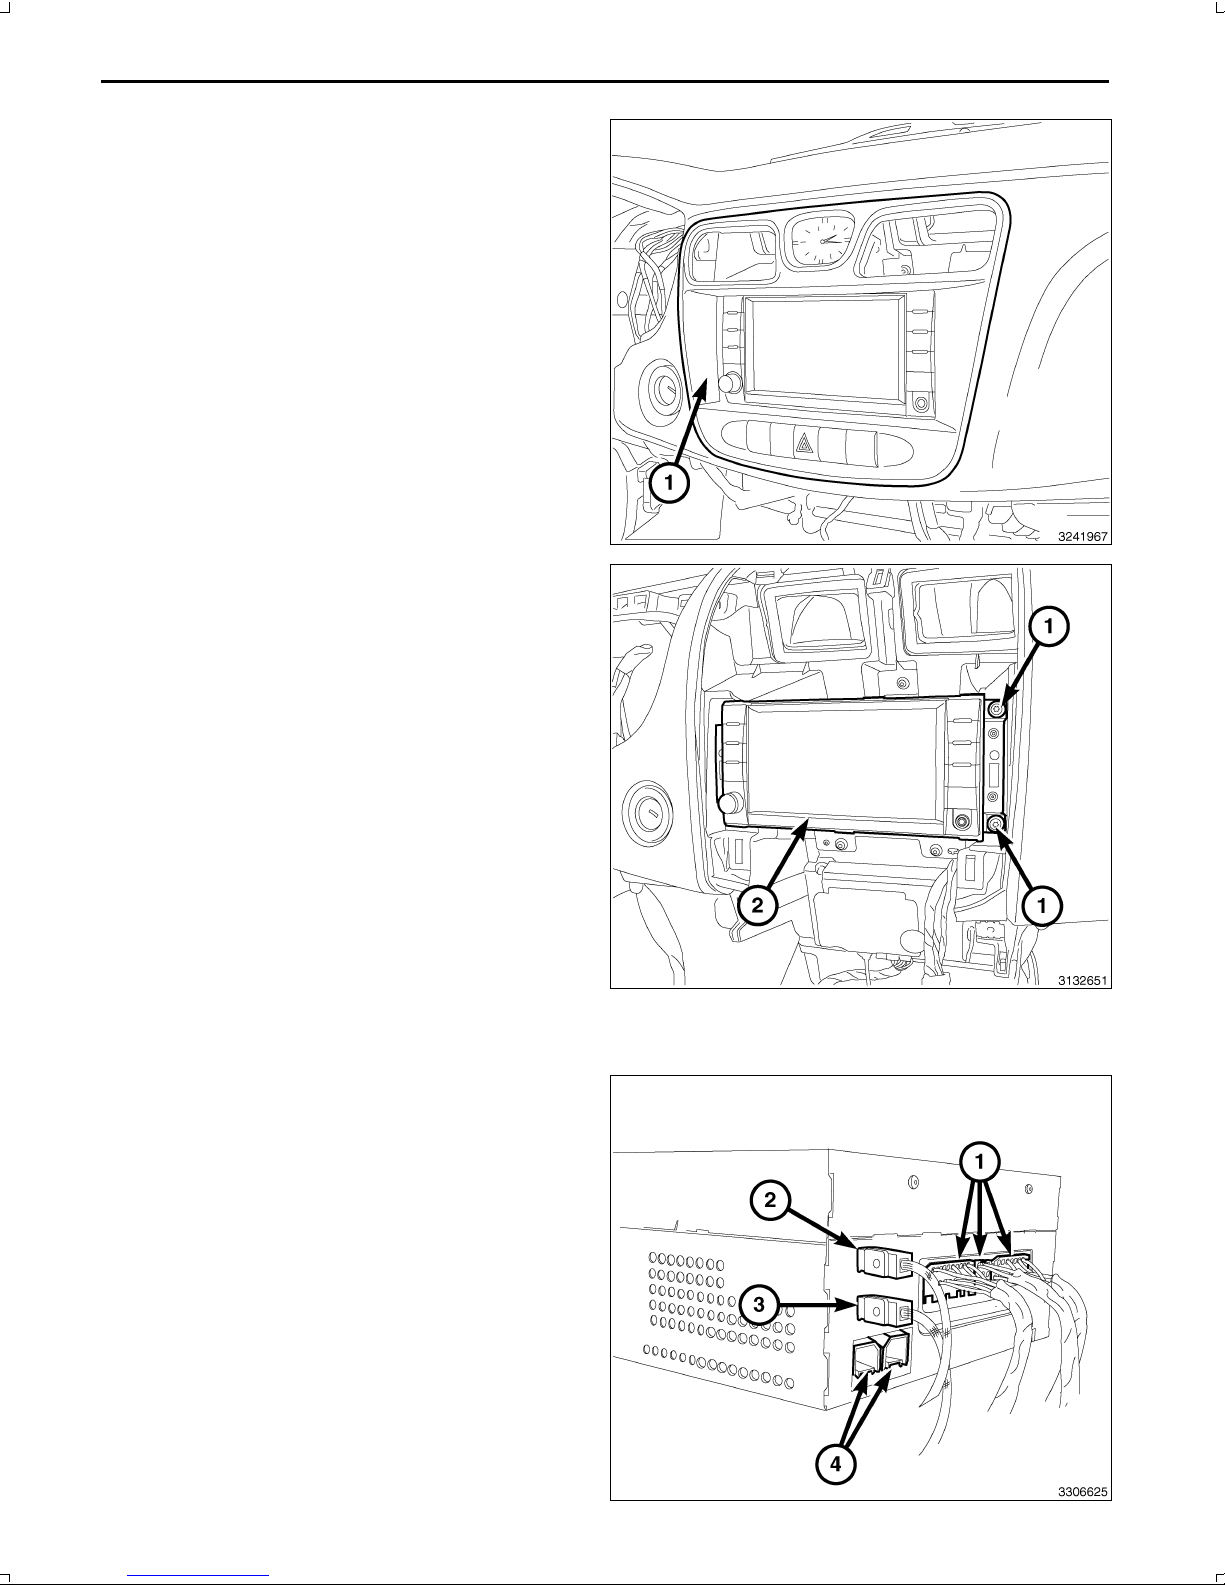
2.UsingtrimstickC4755orequivalent,disengagethe
centertrimbezel(1)retainingclips.
3.Reachbehindthebezelanddisconnectallelectrical
connections.
4.Removethecenterbezelfromtheinstrumentpanel.
5.Removetheradiomountingfasteners(1).
6.Pulltheradio(2)outfarenoughtoaccessthebackof
theradio.
CAUTION:Pullingtheantennacablestraightoutoftheradiowithoutpullingonthelockingantennaconnector
coulddamagethecableorradio.
7.DisconnecttheAM/FMantenna(2)andelectricalcon
nectors(1).
8.Ifequipped,disconnectthenavigationantenna(3).
9.Ifequipped,disconnecttheUSBconnectors(4).
10.Removetheradiofromtheinstrumentpanel.
11.Positionthenewradiototheinstrumentpanel.
12.ConnecttheAM/FMantenna(2)andelectricalcon
nectors(1).
13.Connectthesatellite/navigationantenna(3).
14.Ifequipped,connecttheUSBconnectors(4).
Dec31,2010K6861192
Page 23
3
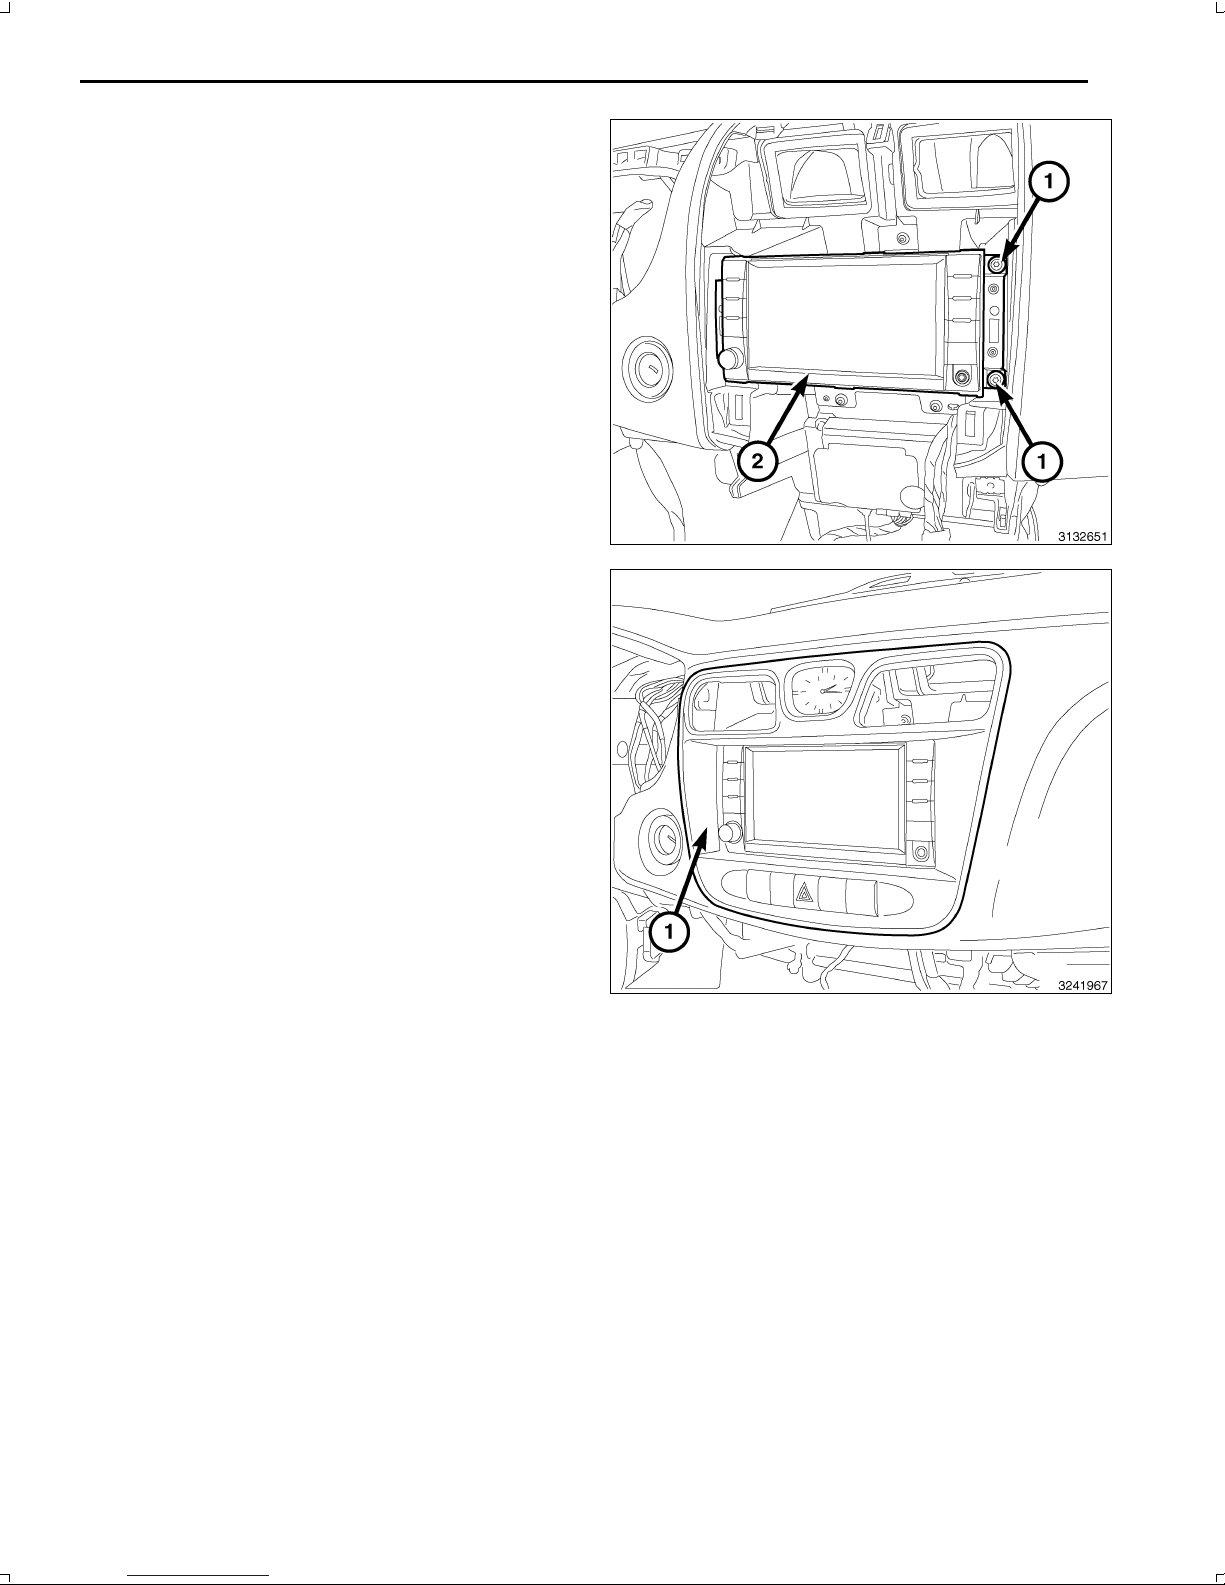
15.Installandtightentheradiomountingfasteners(1).
16.Positionthecenterbezel(1)totheinstrumentpanel.
17.Reachbehindthebezelandconnectallelectricalcon
nections.
18.Pressfirmlyandevenlyaroundtheperimeterofthe
bezeltoengagetheretainingclips.
19.Connectthenegativebatterycable.
UPDATEVEHICLECONFIGURATION
NOTE:ThewiTECHsoftwarelevelmustbeatthelatestreleasetoperformthisprocedure.
1.VINmustbeupdatedwiththesalescodeoftheaddedaccessoryinordertoenablesystemfunctionality.Usingthe
DealerCONNECTwebsiteandthewiTECHdiagnosticapplication,completethevehicleconfiguration.
2.Logontohttps://dealerconnect.chrysler.com.
3.Inthe"VehicleOption"screenunderthe"GlobalClaimsSystem"categoryinthe"Service"tab,enterthevehicle
VIN,fourdigitpinnumberobtainedfromthedealershippartsdepartmentandaddsalescode(s)notedbelowasa
"DealerInstalledOption".
RHR(AM/FM/DVD/HDDwithSDARS)
4.ConfirmthatthenewsalescodehasbeensuccessfullyaddedtotheVIN.
5.WiththewiTECHdiagnosticapplication,performthefollowingstepsformtheInitialStartUpScreen:
•Selectthe"DIAGNOSTICPROCEDURES"tab
•Select"RESTOREVEHICLECONFIGURATION"
•Selectthe"RunDiagnostic"button
•Select"CONTINUE"
•VerifythatthevehicleVINnumberiscorrect
•Onceverified,selectthe"CorrectVIN"button
Dec31,2010K6861192
Page 24

4
•NoteOnScreeninstructionsandselectthe"Close"button
Dec31,2010K6861192
Page 25
1
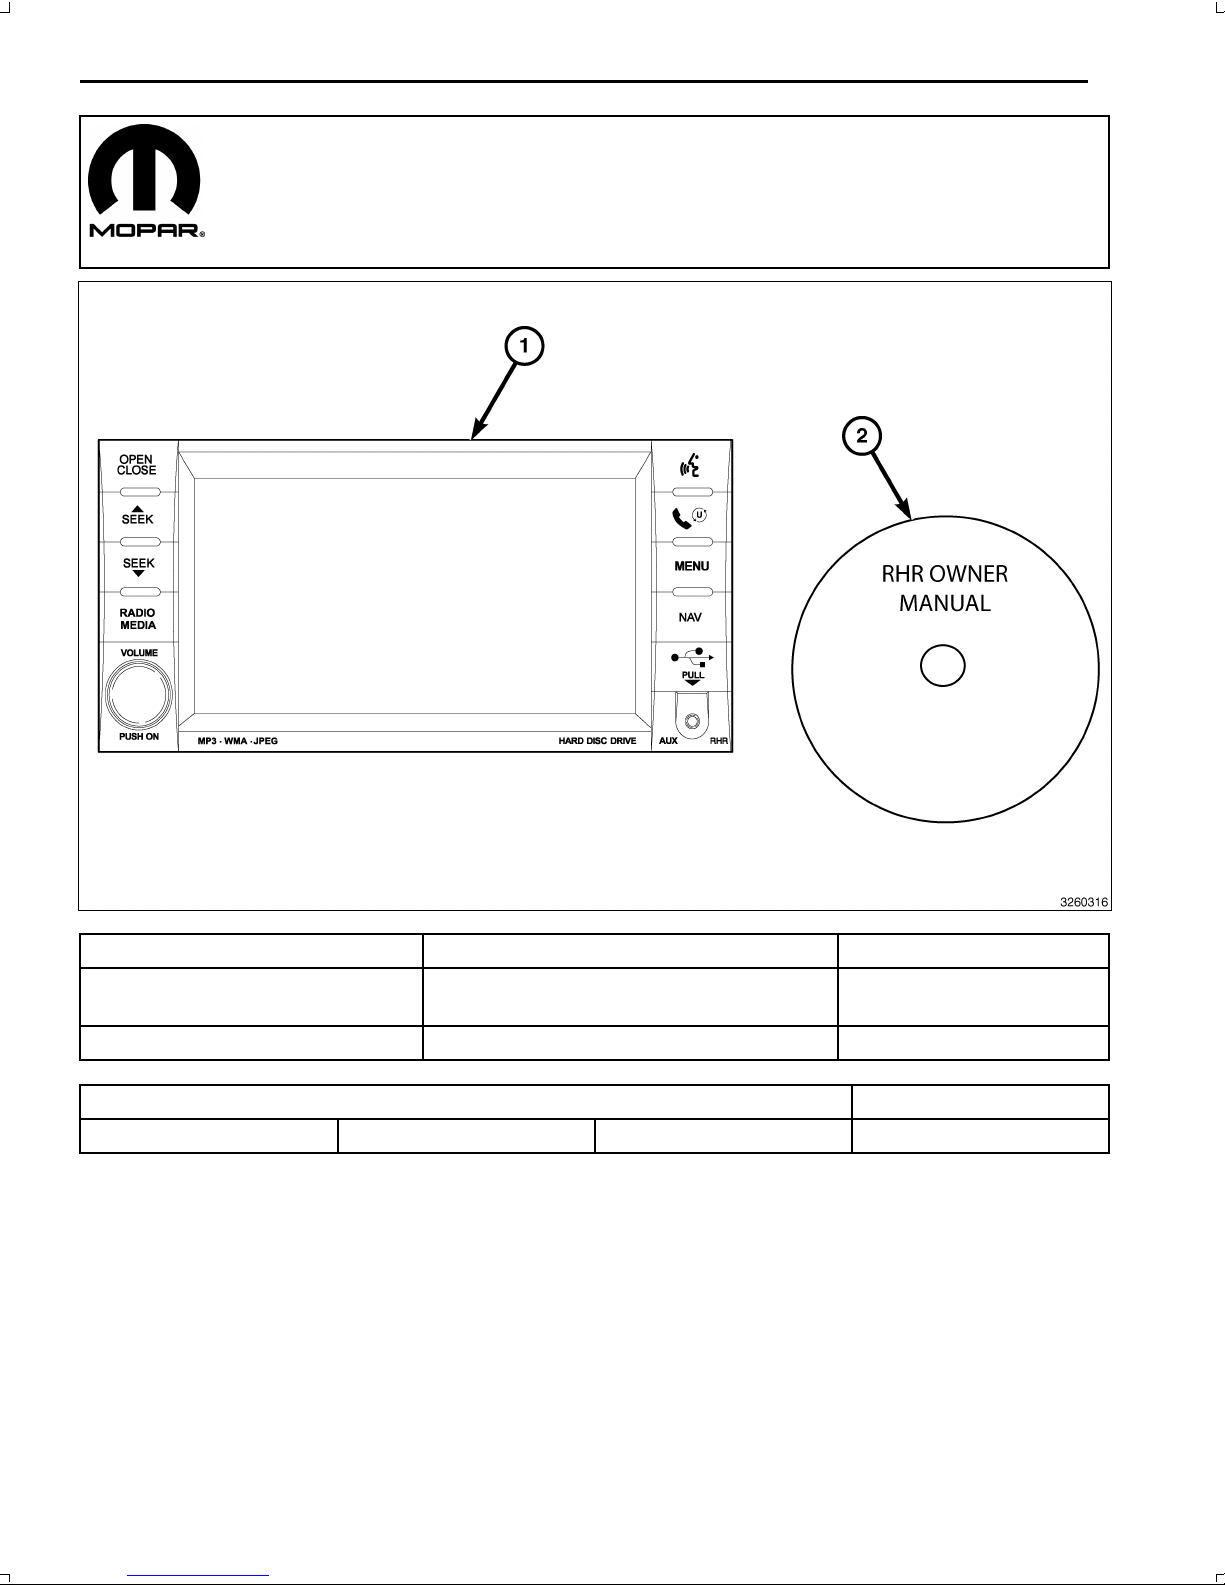
RHRNAVIGATIONRADIOKIT
LIBERTY
CALLOUTDESCRIPTIONQUANTITY
1
RHRRadio(AM/FM/CD/DVD/HDD/MP3/
NAV)
1
2
RHROwnerManualDVD
1
TOOLSREQUIRED
PhillipsHeadScrewDriverFiberTrimStickScanToolT25TorxScrewDriver
PROCEDURESTEPS:
Dec31,2010K6861192
Page 26
2
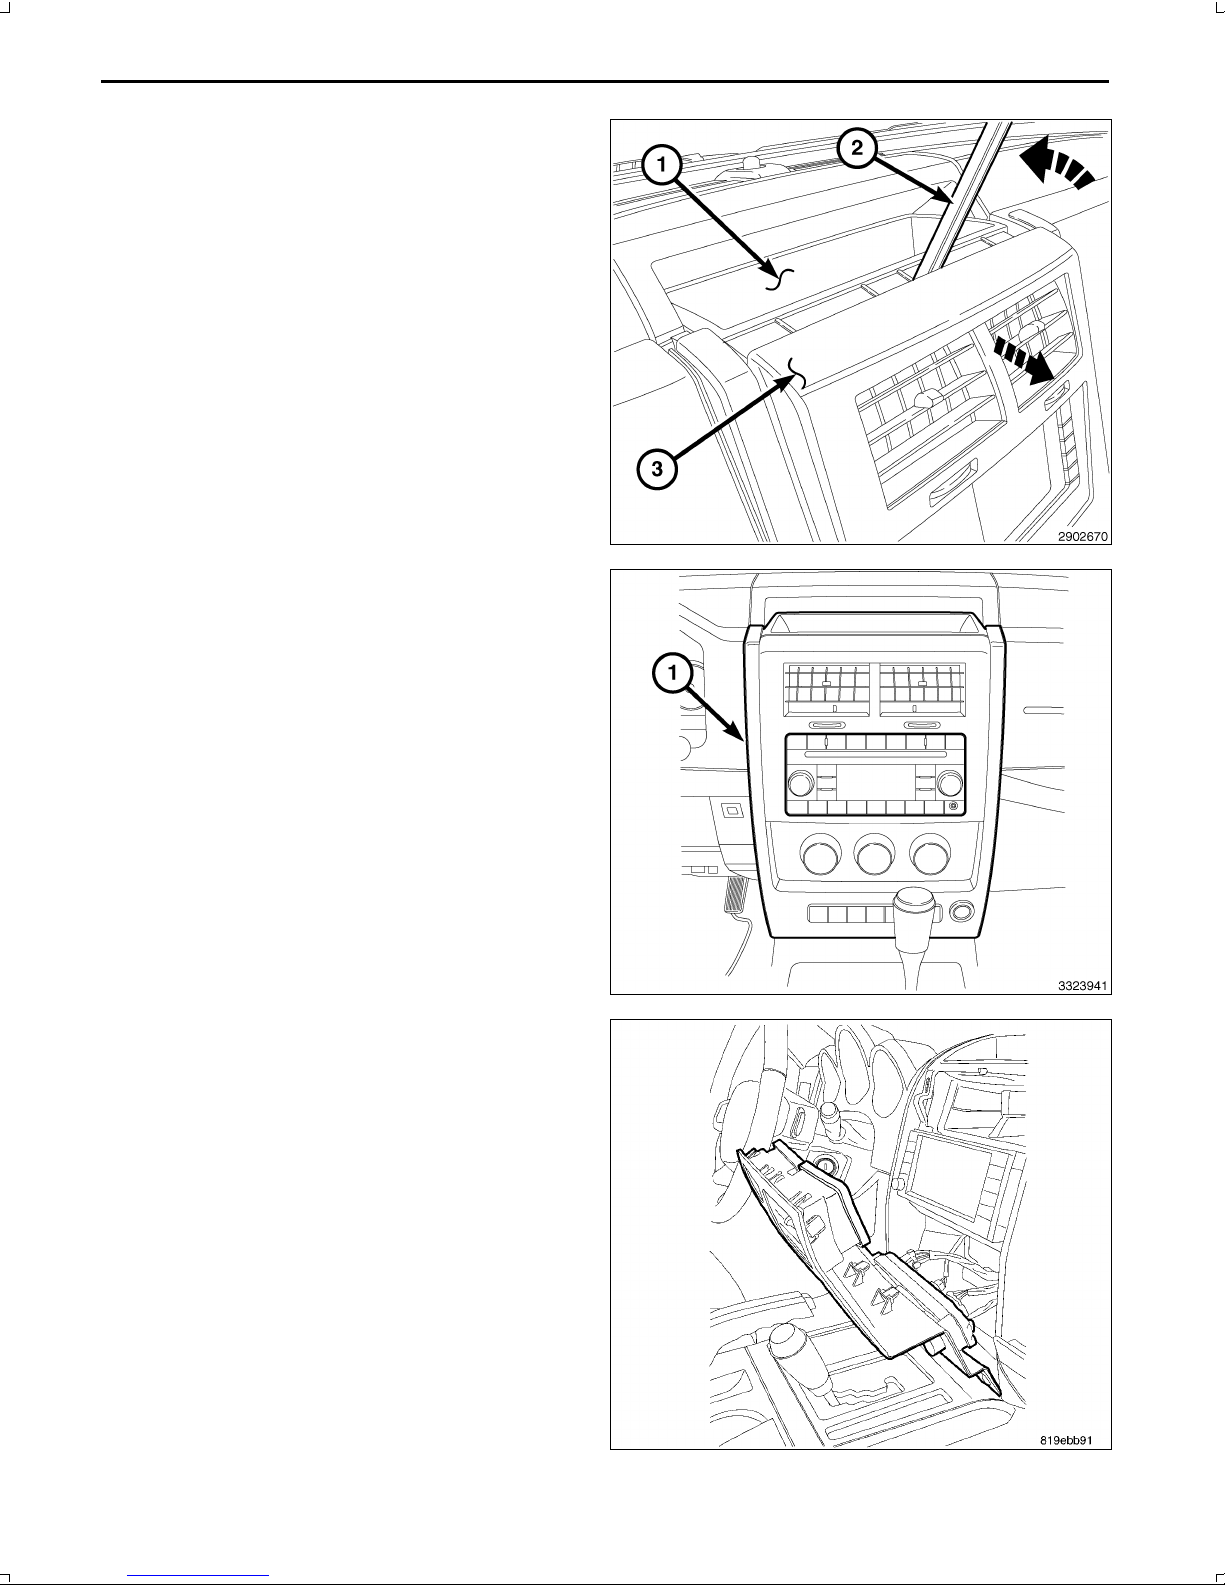
1.Disconnectandisolatethenegativebatterycable.
2.Usingatrimstick(2)C4755orequivalent,work
aroundtheperimeterofthebezel(3)andacrossthe
middlereleasingtheretainingclipsandseparatethe
bezelfromtheinstrumentpanel(1).
3.Pulltheupperpartofthecenterbezel(1)downand
releasetheclips.
4.Liftthelowerpartofthecenterbezelupandrelease
thelowerhooktypeclips.
5.Reachbehindthebezelanddisconnectallelectrical
connections.
6.Removethecenterbezelfromtheinstrumentpanel.
Dec31,2010K6861192
Page 27
3
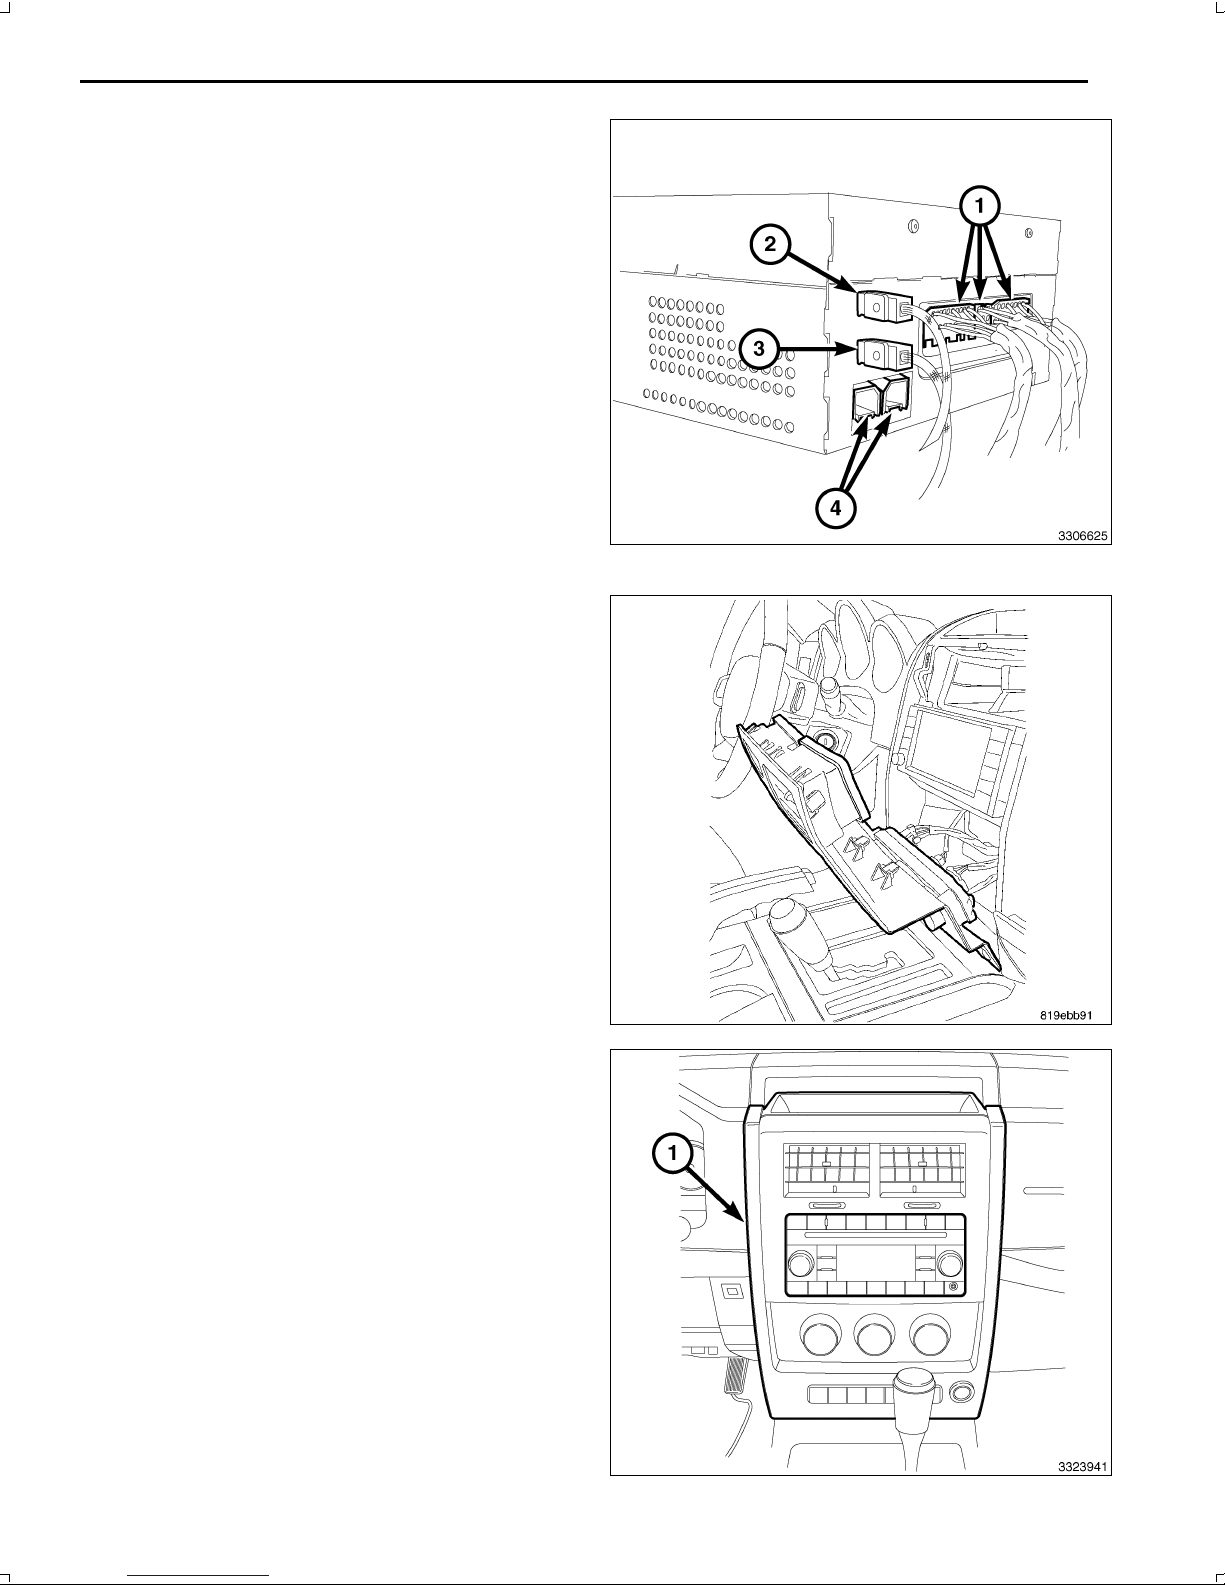
CAUTION:Pullingtheantennacablestraightoutofthe
radiowithoutpullingonthelockingantennaconnec
torcoulddamagethecableorradio.
7.Removetheradiomountingfasteners.
8.Pulltheradiooutfarenoughtoaccessthebackofthe
radio.
9.DisconnecttheAM/FMantenna(2)andelectricalcon
nectors(1).
10.Ifequipped,disconnectthenavigationantenna(3).
11.Ifequipped,disconnecttheUSBconnectors(4).
12.Removetheradiofromtheinstrumentpanel.
13.Positionthenewradiototheinstrumentpanel.
14.ConnecttheAM/FMantenna(2)andelectricalcon
nectors(1).
15.Connectthesatellite/navigationantenna(3).
16.Ifequipped,connecttheUSBconnectors(4).
17.Installandtightentheradiomountingfasteners.
18.Positionthecenterbezeltotheinstrumentpanel.
19.Reachbehindthebezelandconnectallelectricalcon
nections.
20.Lowerthecenterbezel(1)intopositionandengage
thelowerhooktypeclips.
21.Pressfirmlyandevenlyaroundtheperimeterand
acrossthemiddleofthebezeltoengagetheretaining
clips.
22.Connectthenegativebatterycable.
Dec31,2010K6861192
Page 28

4
UPDATEVEHICLECONFIGURATION
NOTE:ThewiTECHsoftwarelevelmustbeatthelatestreleasetoperformthisprocedure.
1.VINmustbeupdatedwiththesalescodeoftheaddedaccessoryinordertoenablesystemfunctionality.Usingthe
DealerCONNECTwebsiteandthewiTECHdiagnosticapplication,completethevehicleconfiguration.
2.Logontohttps://dealerconnect.chrysler.com.
3.Inthe"VehicleOption"screenunderthe"GlobalClaimsSystem"categoryinthe"Service"tab,enterthevehicle
VIN,fourdigitpinnumberobtainedfromthedealershippartsdepartmentandaddsalescode(s)notedbelowasa
"DealerInstalledOption".
RHR(AM/FM/DVD/HDDwithSDARS)
4.ConfirmthatthenewsalescodehasbeensuccessfullyaddedtotheVIN.
5.WiththewiTECHdiagnosticapplication,performthefollowingstepsformtheInitialStartUpScreen:
•Selectthe"DIAGNOSTICPROCEDURES"tab
•Select"RESTOREVEHICLECONFIGURATION"
•Selectthe"RunDiagnostic"button
•Select"CONTINUE"
•VerifythatthevehicleVINnumberiscorrect
•Onceverified,selectthe"CorrectVIN"button
•NoteOnScreeninstructionsandselectthe"Close"button
Dec31,2010K6861192
Page 29
1
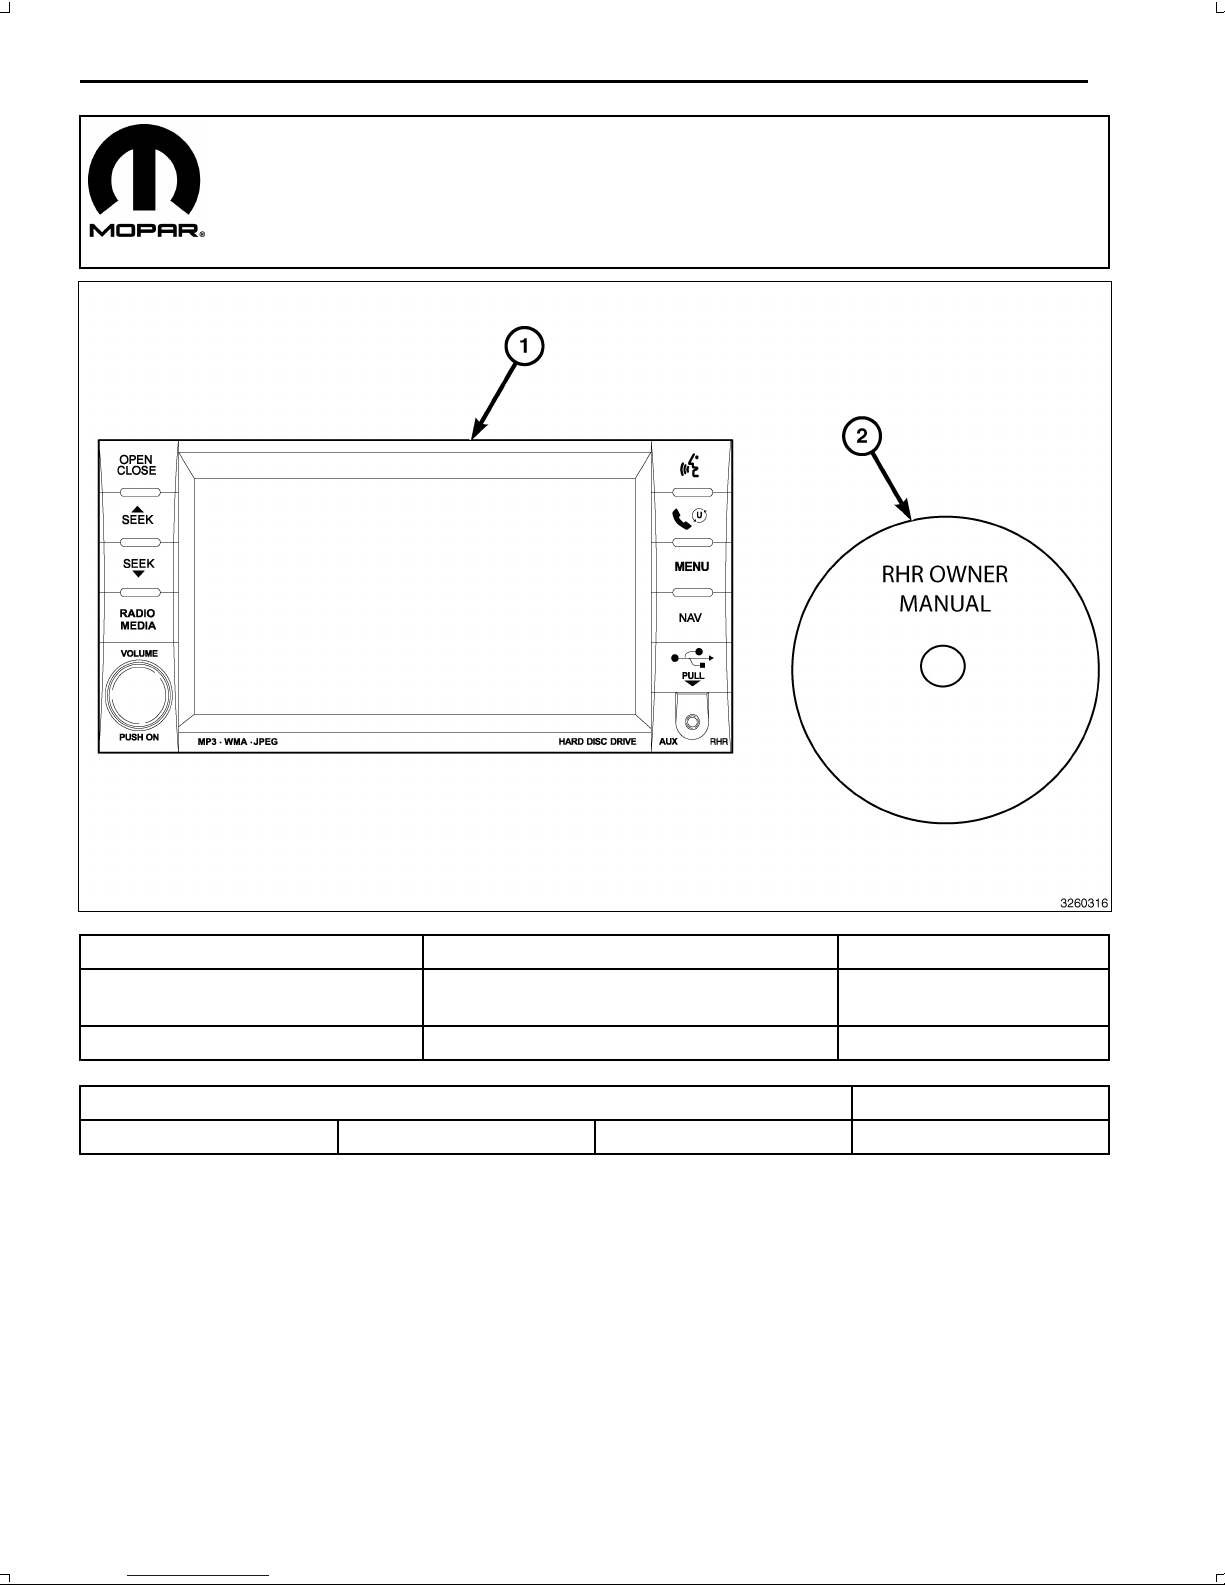
RHRNAVIGATIONRADIOKIT
NITRO
CALLOUTDESCRIPTIONQUANTITY
1
RHRRadio(AM/FM/CD/DVD/HDD/MP3/
NAV)
1
2
RHROwnerManualDVD
1
TOOLSREQUIRED
PhillipsHeadScrewDriverFiberTrimStickScanToolT25TorxScrewDriver
PROCEDURESTEPS:
Dec31,2010K6861192Rev.1
Page 30
2
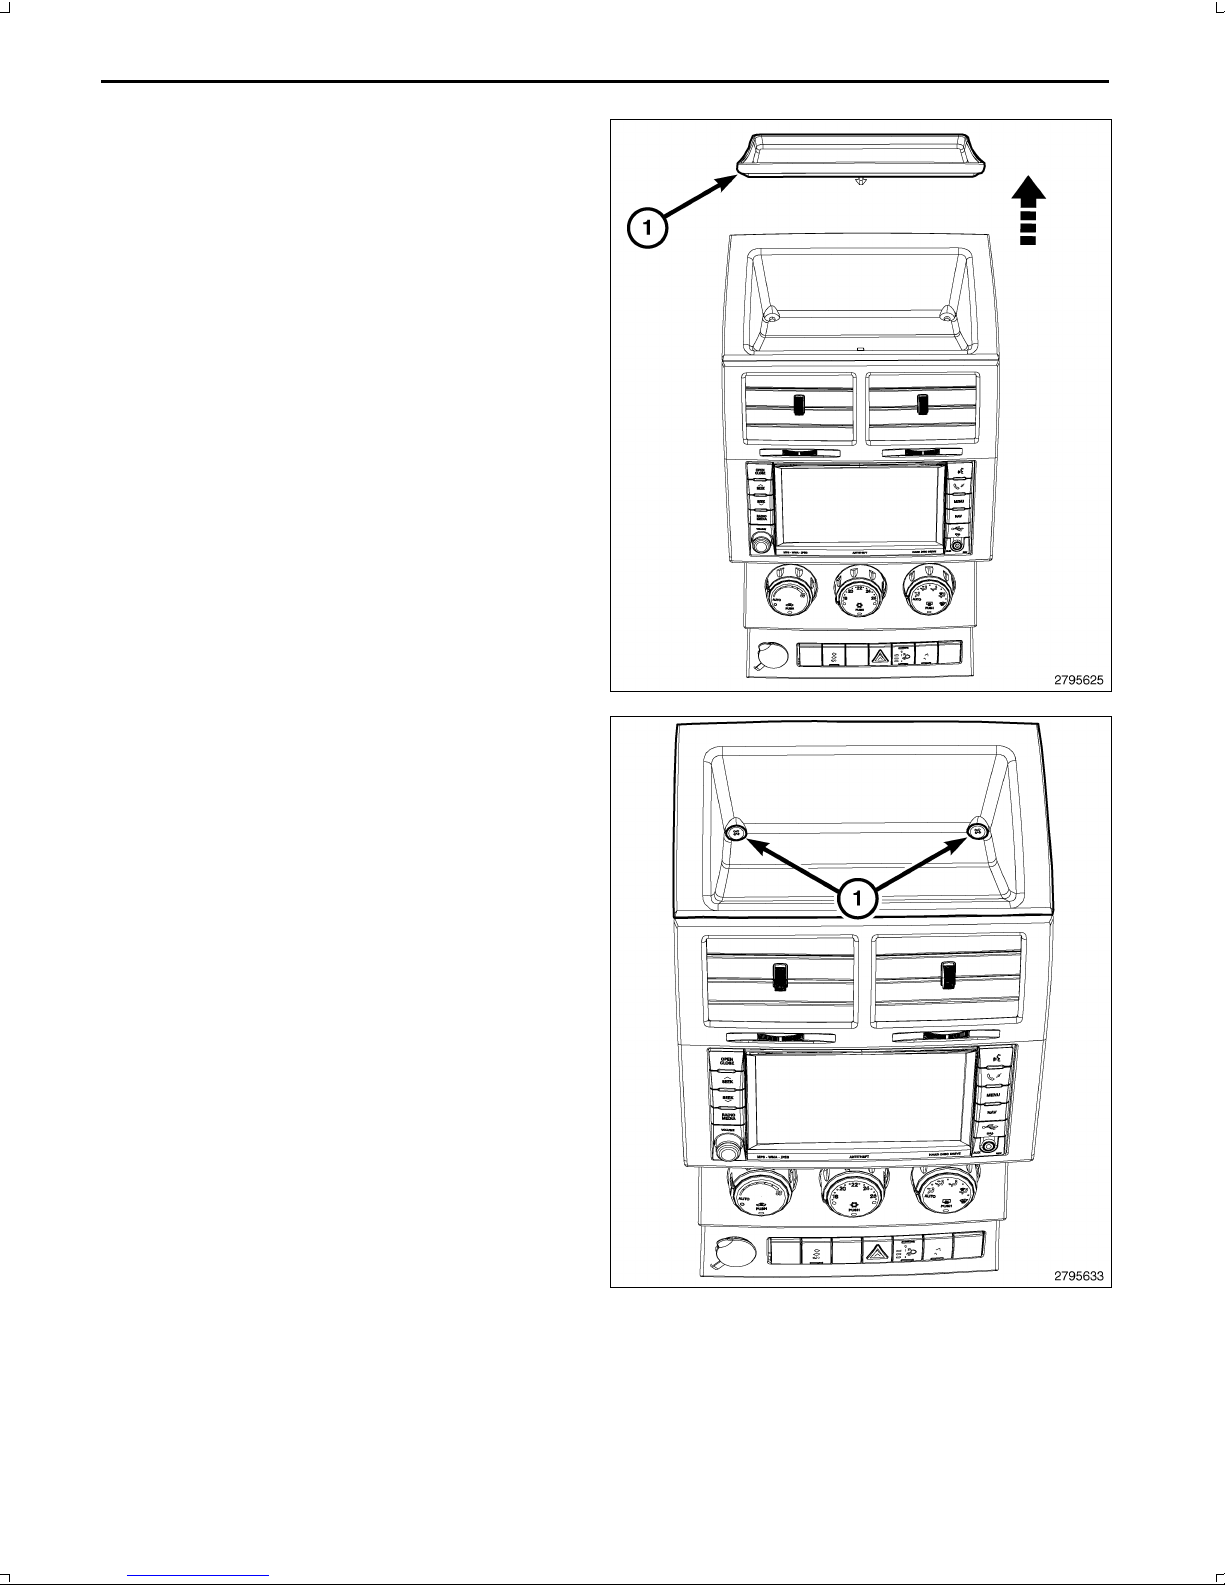
1.Disconnectandisolatethebatterynegativecable.
2.Settheparkbrakeandmovethetransmissiongear
selectorintothemostrearwardposition.
3.Removethestoragebinmat(1).
4.Removethescrews(1).
Dec31,2010K6861192Rev.1
Page 31
3
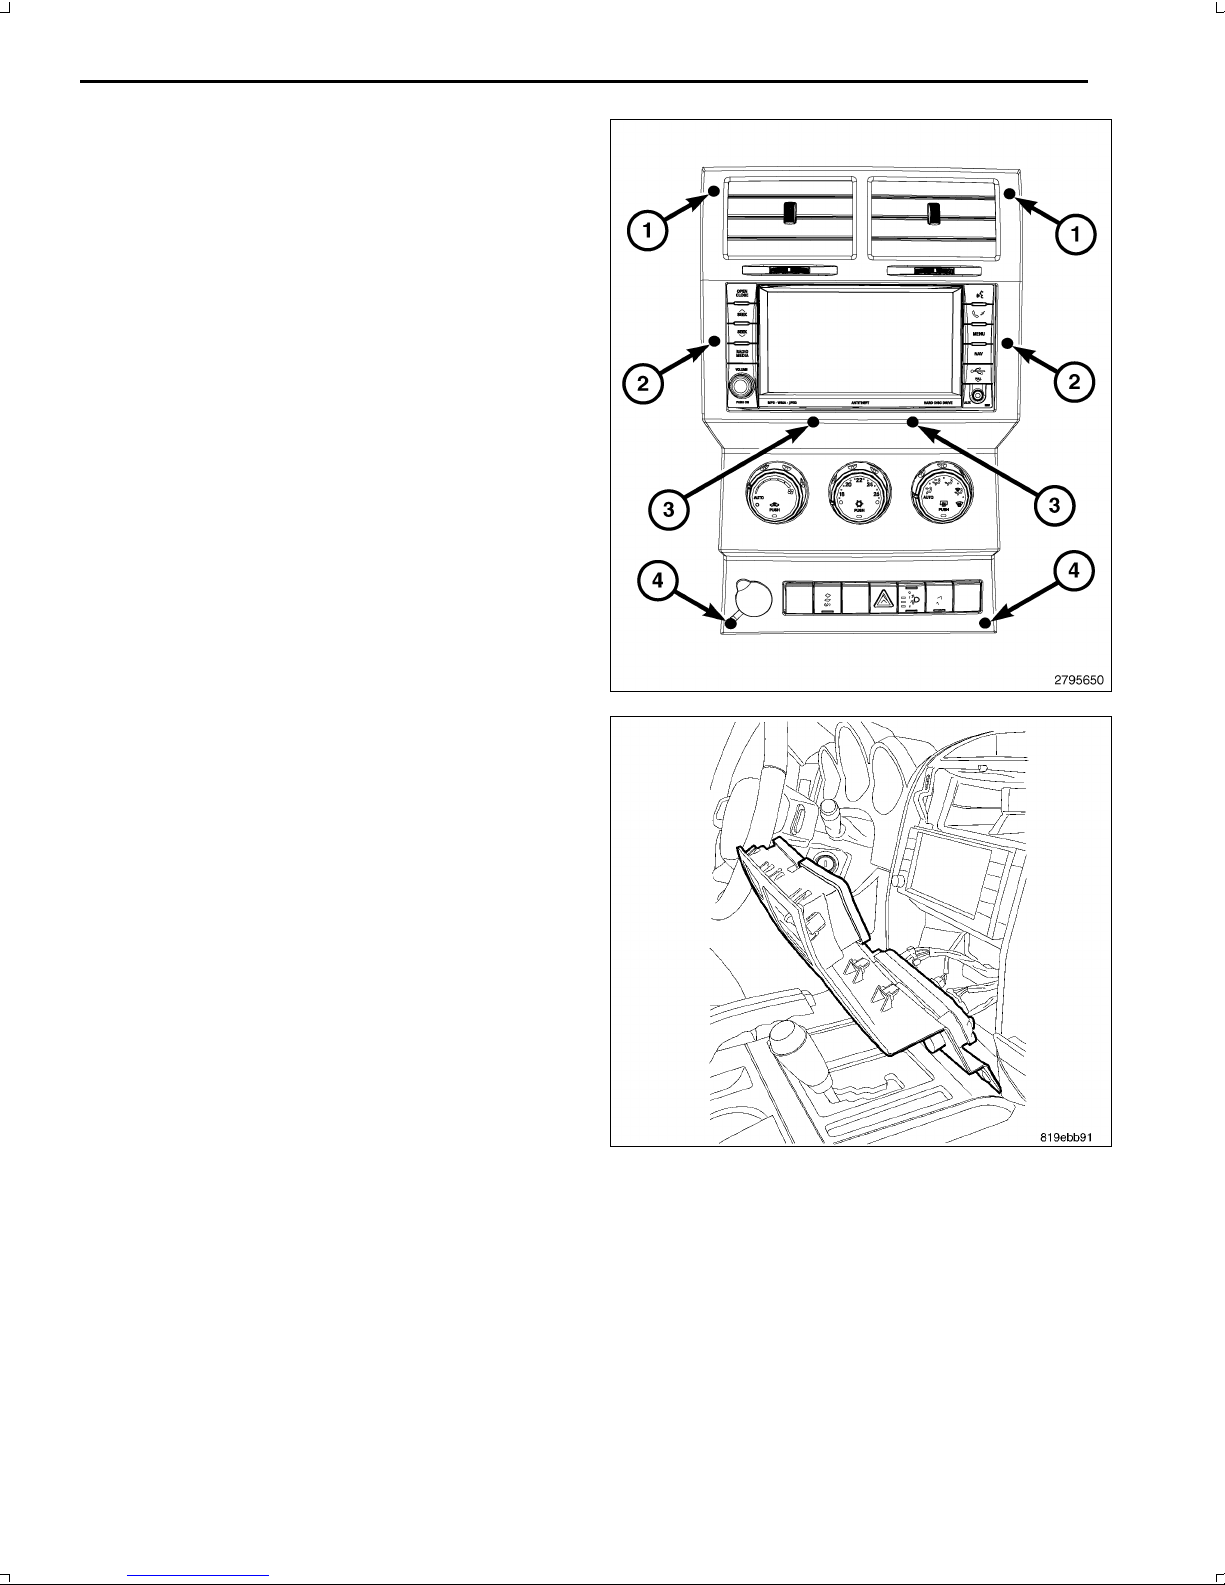
5.UsingatrimstickC4755orequivalent,releasethe
topmostretainingclips(1)
CAUTION:Toavoiddamagetothebezeldonotpull
onthebezeltoreleasetheretainingclips(2).
6.UsingatrimstickC4755orequivalent,carefullyre
leasetheretainingclips(2).
7.Releasetheremainingretainingclips(3and4)and
separatethebezelfromtheinstrumentpanel.
8.Reachbehindthebezelanddisconnectallelectrical
connections.
9.Removethecenterbezelfromtheinstrumentpanel.
CAUTION:Pullingtheantennacablestraightoutoftheradiowithoutpullingonthelockingantennaconnector
coulddamagethecableorradio.
Dec31,2010K6861192Rev.1
Page 32
4
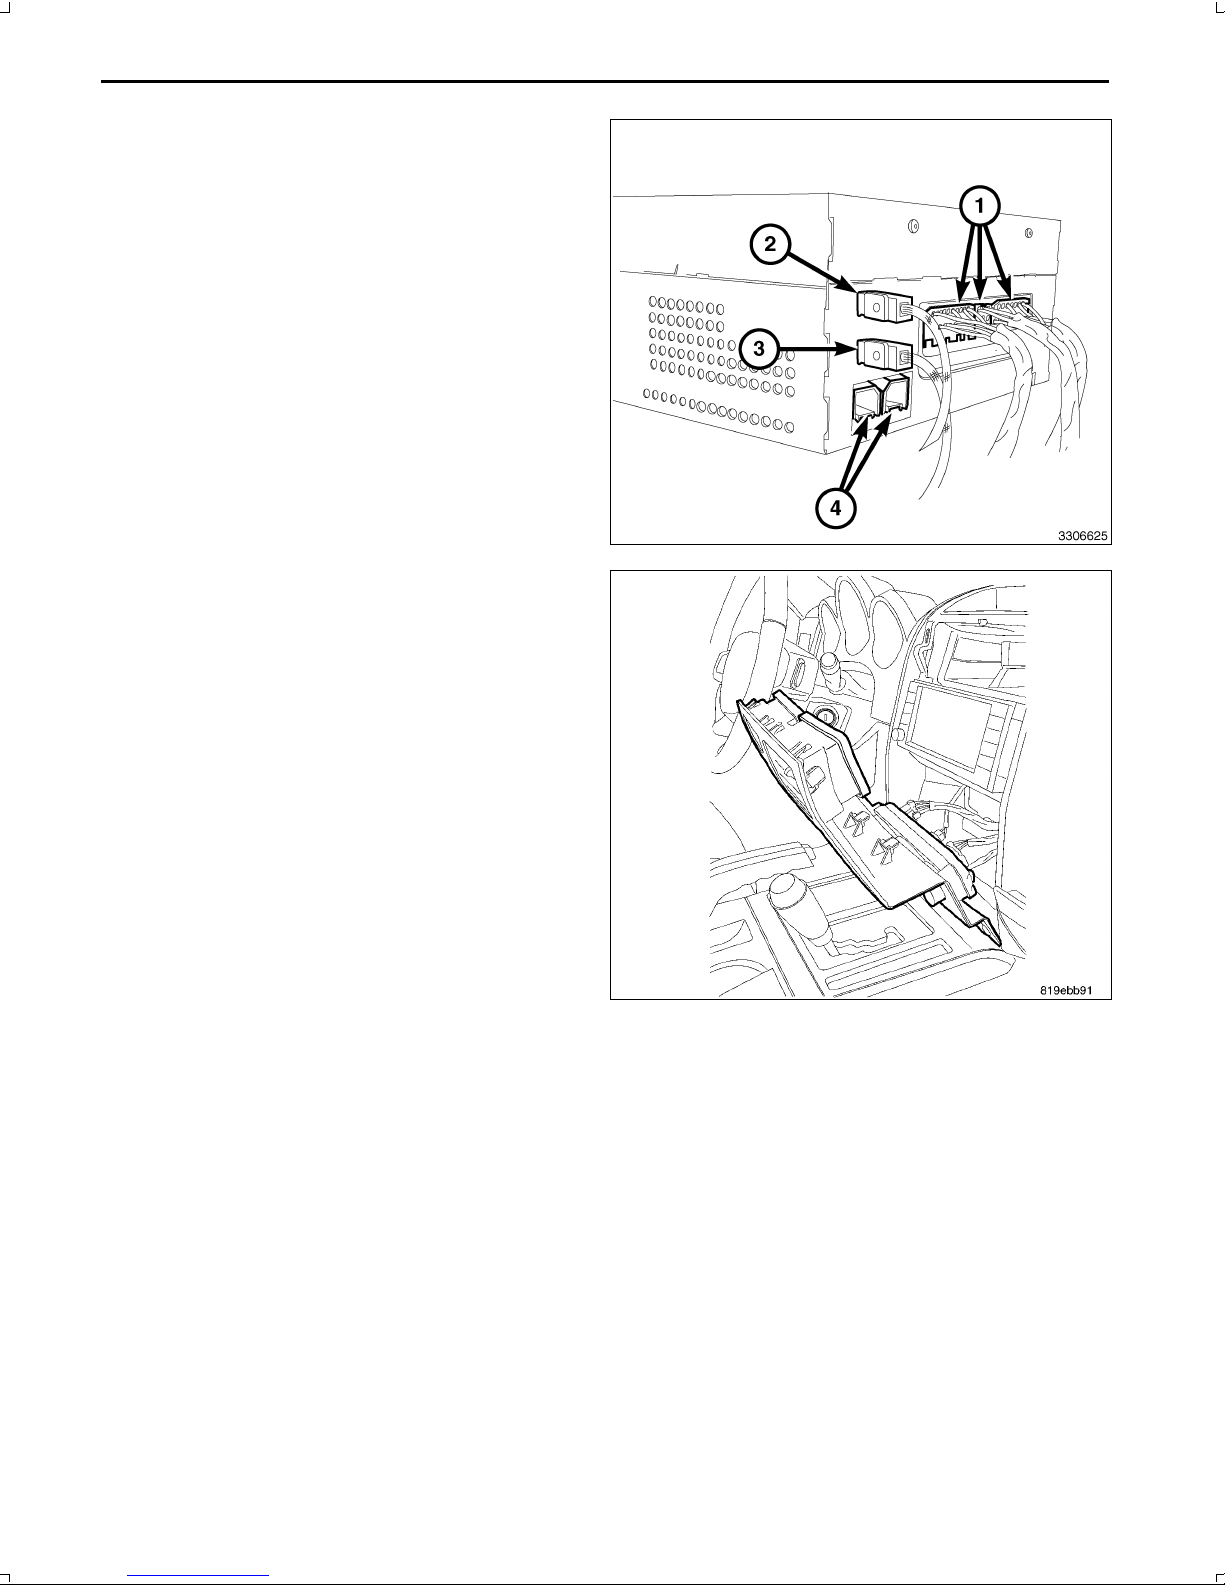
10.Removetheradiomountingfasteners.
11.Pulltheradiooutfarenoughtoaccessthebackofthe
radio.
12.DisconnecttheAM/FMantenna(2)andelectricalcon
nectors(1).
13.Ifequipped,disconnectthenavigationantenna(3).
14.Ifequipped,disconnecttheUSBconnectors(4).
15.Removetheradiofromtheinstrumentpanel.
16.Positionthenewradiototheinstrumentpanel.
17.ConnecttheAM/FMantenna(2)andelectricalcon
nectors(1).
18.Connectthesatellite/navigationantenna(3).
19.Ifequipped,connecttheUSBconnectors(4).
20.Installandtightentheradiomountingfasteners.
21.Positionthecenterbezeltotheinstrumentpanel.
22.Reachbehindthebezelandconnectallelectricalcon
nections.
Dec31,2010K6861192Rev.1
Page 33
5
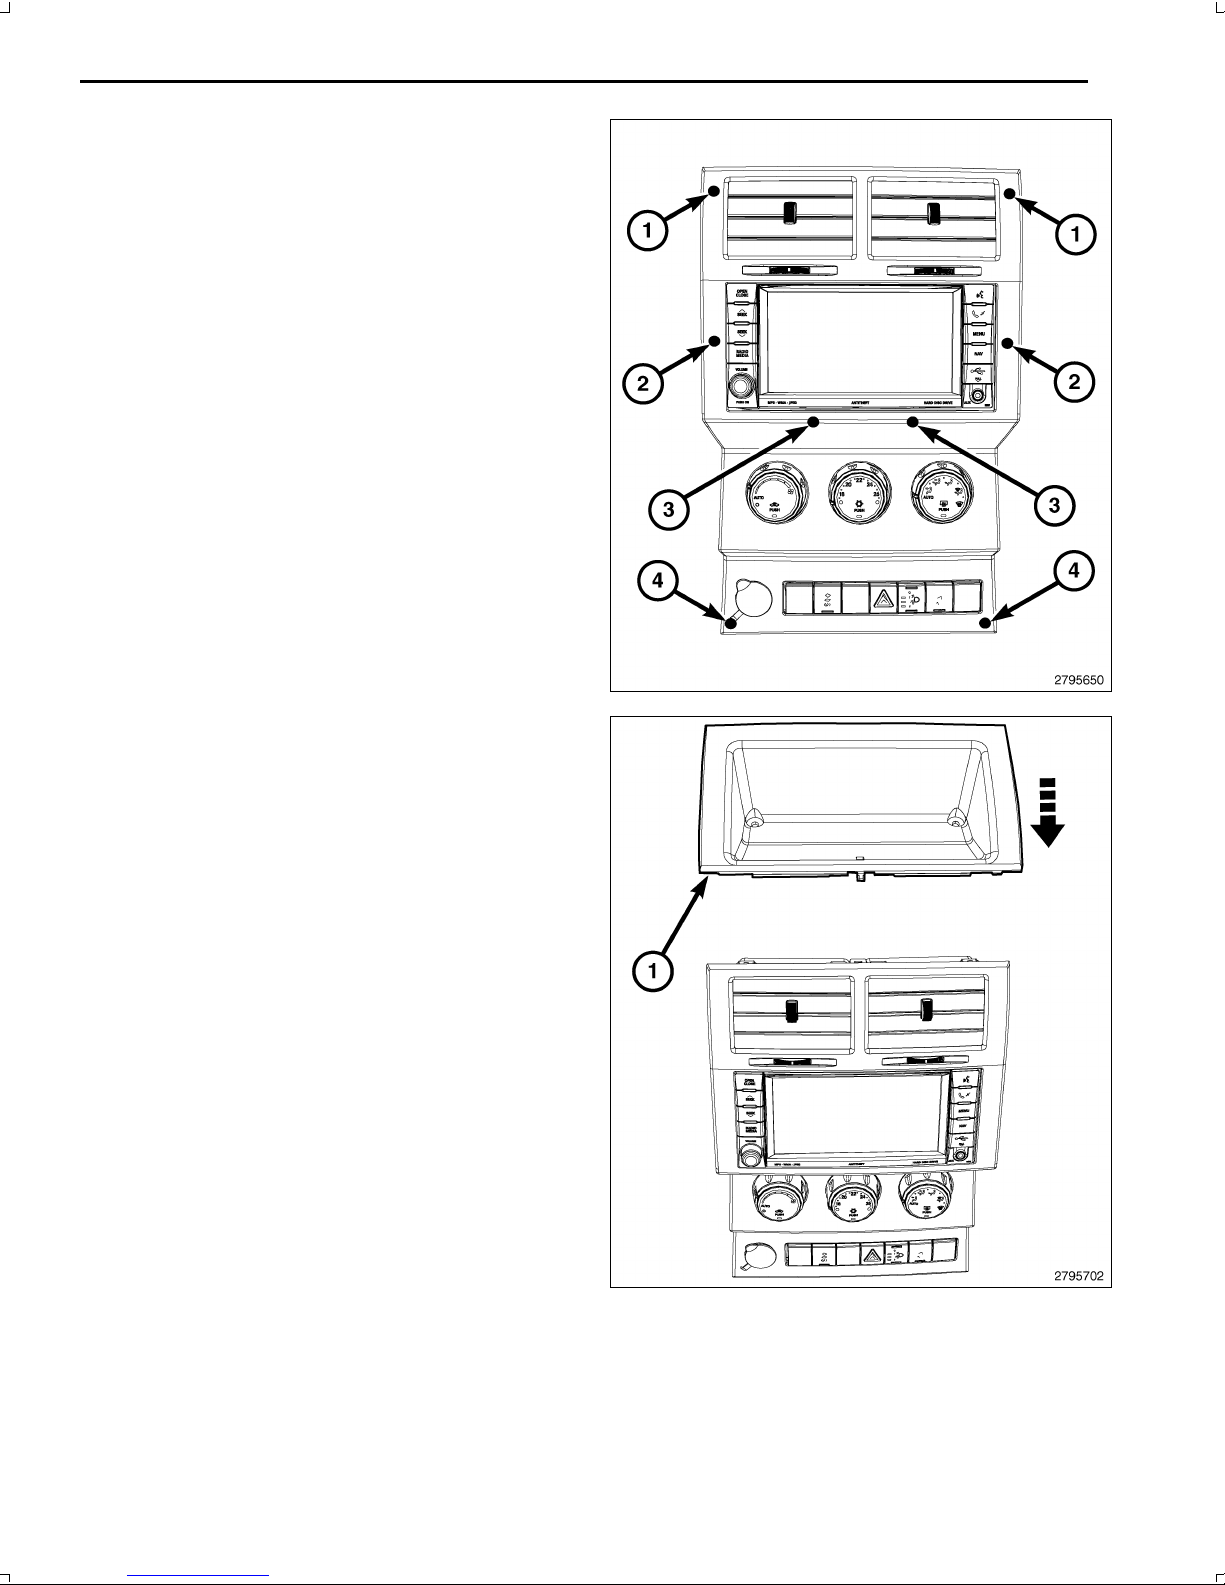
23.Positionthebezelupovertheradioandseatthere
tainingclips(14)fully.
24.Positionthestoragebin(1)intoplaceandseatfully.
Dec31,2010K6861192Rev.1
Page 34
6
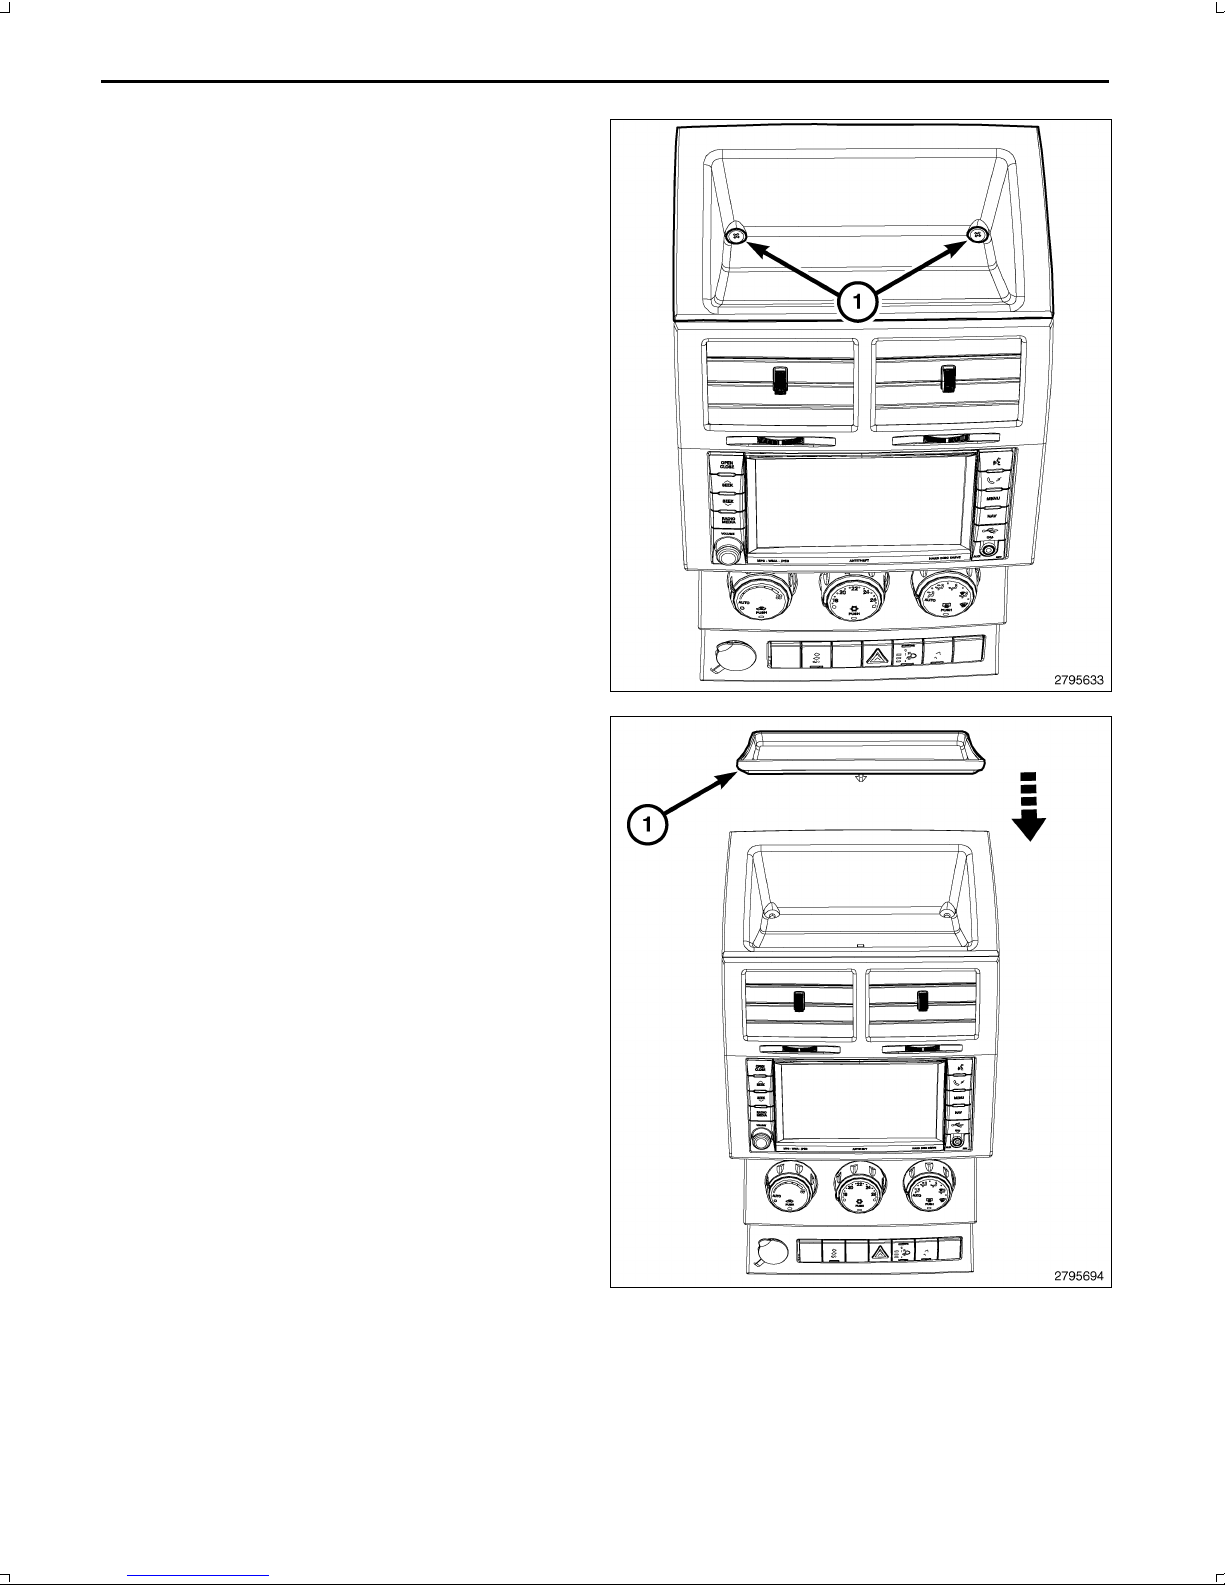
25.Installthestoragebinscrews(1).
26.Installthestoragebinmat(1)andseatfully.
27.Connectthenegativebatterycable.
UPDATEVEHICLECONFIGURATION
NOTE:ThewiTECHsoftwarelevelmustbeatthelatestreleasetoperformthisprocedure.
1.VINmustbeupdatedwiththesalescodeoftheaddedaccessoryinordertoenablesystemfunctionality.Usingthe
DealerCONNECTwebsiteandthewiTECHdiagnosticapplication,completethevehicleconfiguration.
2.Logontohttps://dealerconnect.chrysler.com.
Dec31,2010K6861192Rev.1
Page 35

7
3.Inthe"VehicleOption"screenunderthe"GlobalClaimsSystem"categoryinthe"Service"tab,enterthevehicle
VIN,fourdigitpinnumberobtainedfromthedealershippartsdepartmentandaddsalescode(s)notedbelowasa
"DealerInstalledOption".
RHR(AM/FM/DVD/HDDwithSDARS)
4.ConfirmthatthenewsalescodehasbeensuccessfullyaddedtotheVIN.
5.WiththewiTECHdiagnosticapplication,performthefollowingstepsformtheInitialStartUpScreen:
•Selectthe"DIAGNOSTICPROCEDURES"tab
•Select"RESTOREVEHICLECONFIGURATION"
•Selectthe"RunDiagnostic"button
•Select"CONTINUE"
•VerifythatthevehicleVINnumberiscorrect
•Onceverified,selectthe"CorrectVIN"button
•NoteOnScreeninstructionsandselectthe"Close"button
Dec31,2010K6861192Rev.1
Page 36
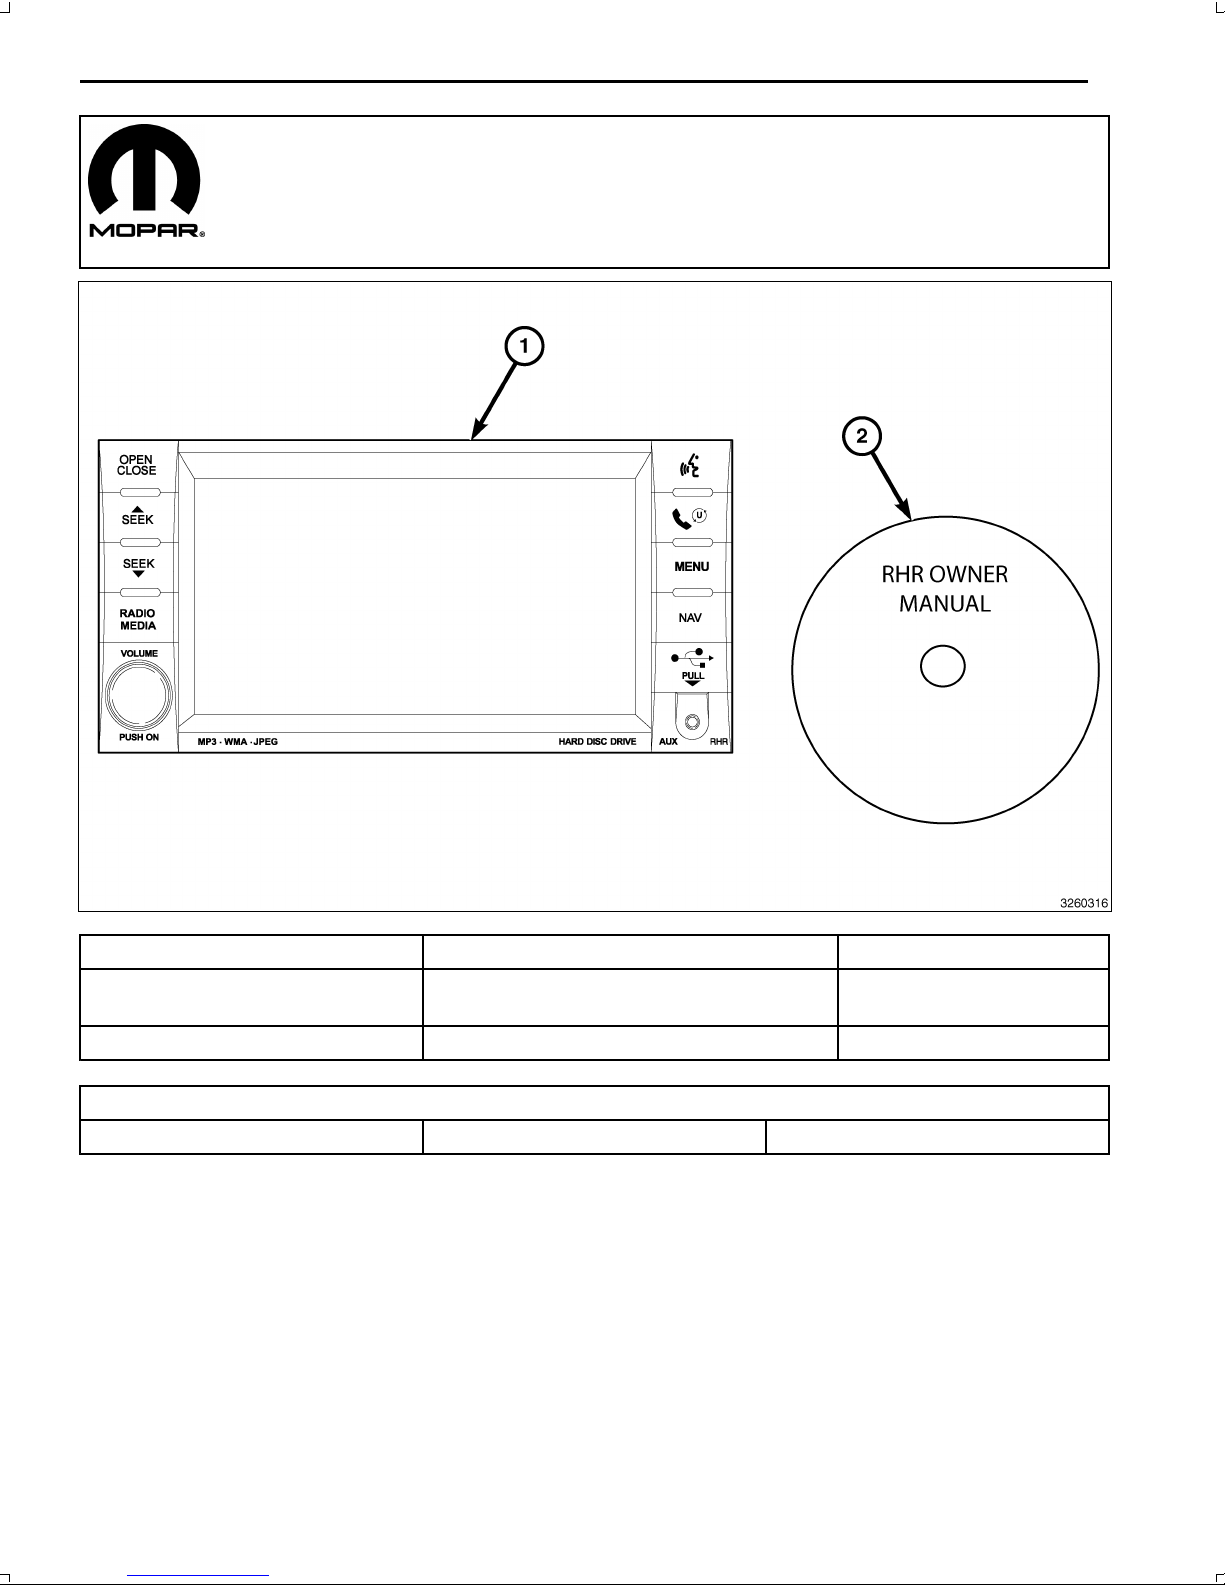
1
RHRNAVIGATIONRADIOKIT
CHALLENGER
CALLOUTDESCRIPTIONQUANTITY
1
RHRRadio(AM/FM/CD/DVD/HDD/MP3/
NAV)
1
2
RHROwnerManualDVD
1
TOOLSREQUIRED
PhillipsHeadScrewDriverFiberTrimStickScanTool
Dec31,2010K6861192
Page 37
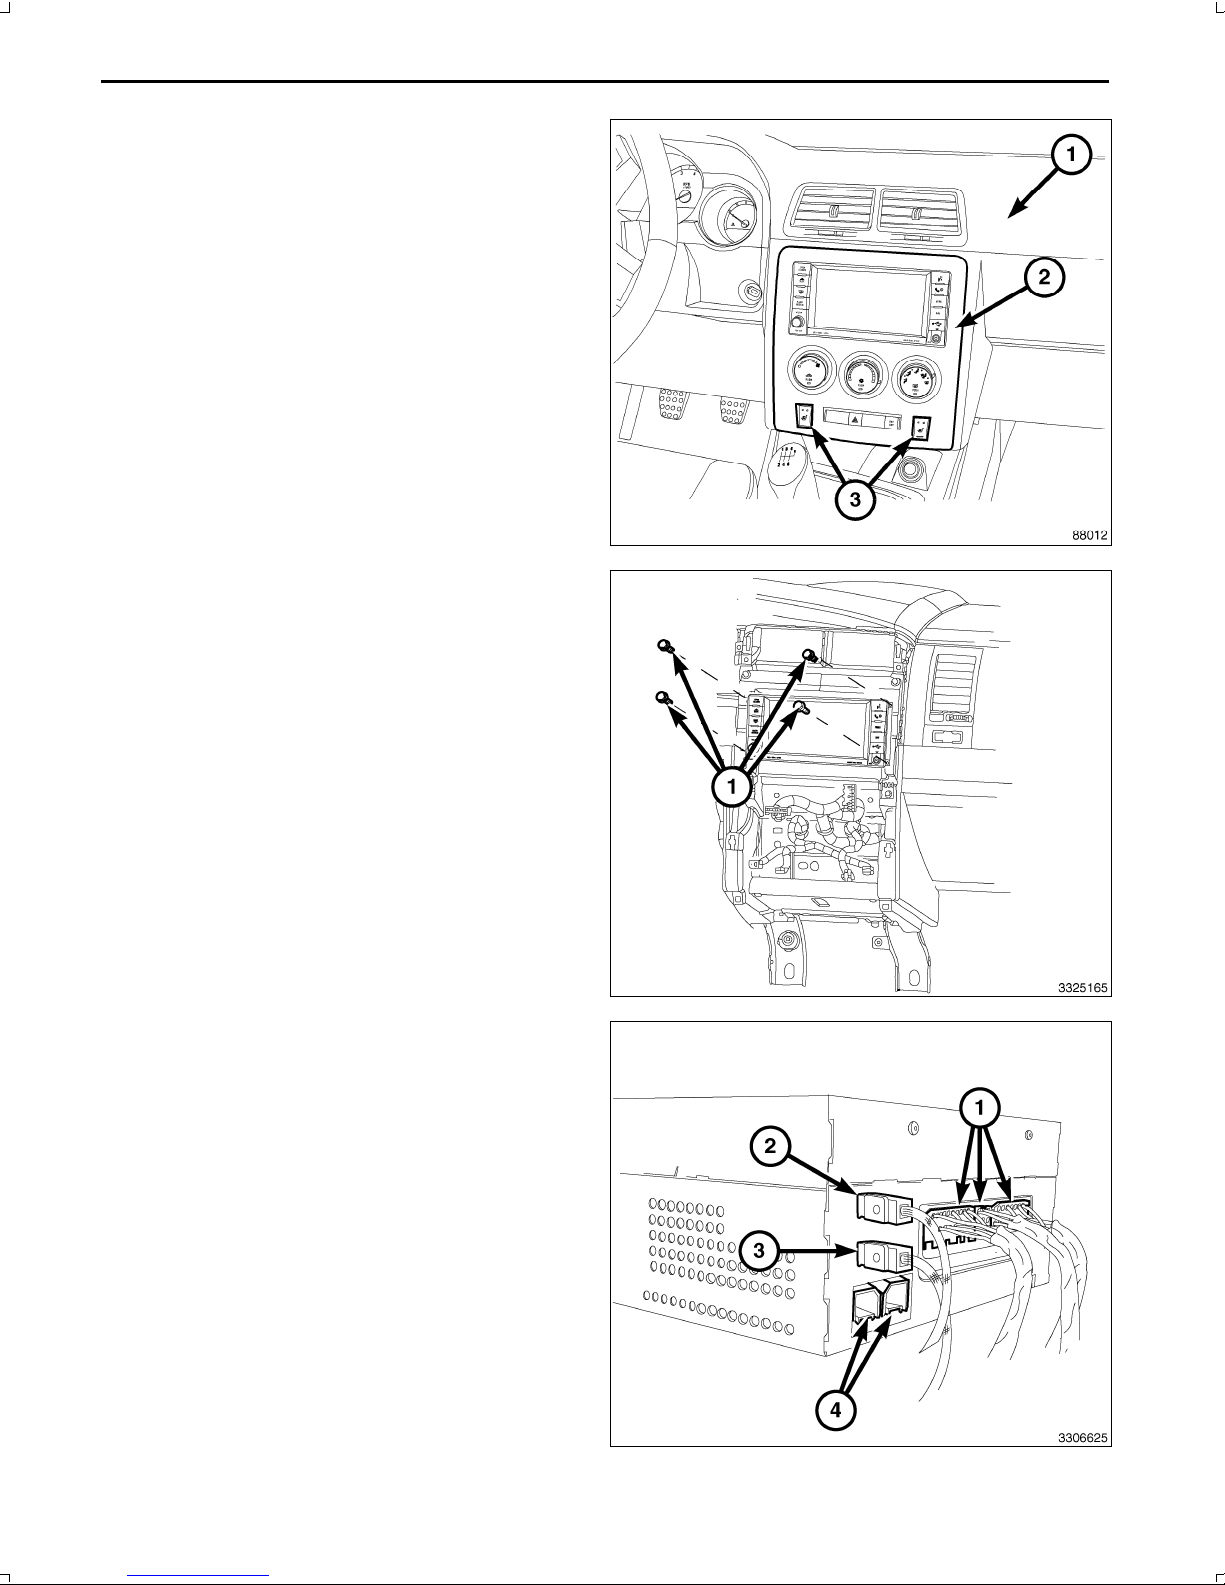
2
1.Disconnectandisolatethebatterynegativecable.
2.UsingtrimstickC4755orequivalent,removethecen
terbezel(2)fromtheinstrumentpanel(1)byreleasing
thesnapretainersfromtheinstrumentpanel.
3.Disconnecttheelectricalconnectors.
4.Removethecenterbezelfromthevehicle.
5.Removetheradiomountingfasteners(1).
CAUTION:Pullingtheantennacablestraightoutofthe
radiowithoutpullingonthelockingantennaconnec
torcoulddamagethecableorradio.
6.Pulltheradiooutfarenoughtoaccessthebackofthe
radio.
7.DisconnecttheAM/FMantenna(2)andelectricalcon
nectors(1).
8.Ifequipped,disconnectthenavigationantenna(3).
9.Ifequipped,disconnecttheUSBconnectors(4).
10.Removetheradiofromtheinstrumentpanel.
11.Positionthenewradiototheinstrumentpanel.
12.ConnecttheAM/FMantenna(2)andelectricalcon
nectors(1).
13.Connectthesatellite/navigationantenna(3).
14.Ifequipped,connecttheUSBconnectors(4).
Dec31,2010K6861192
Page 38
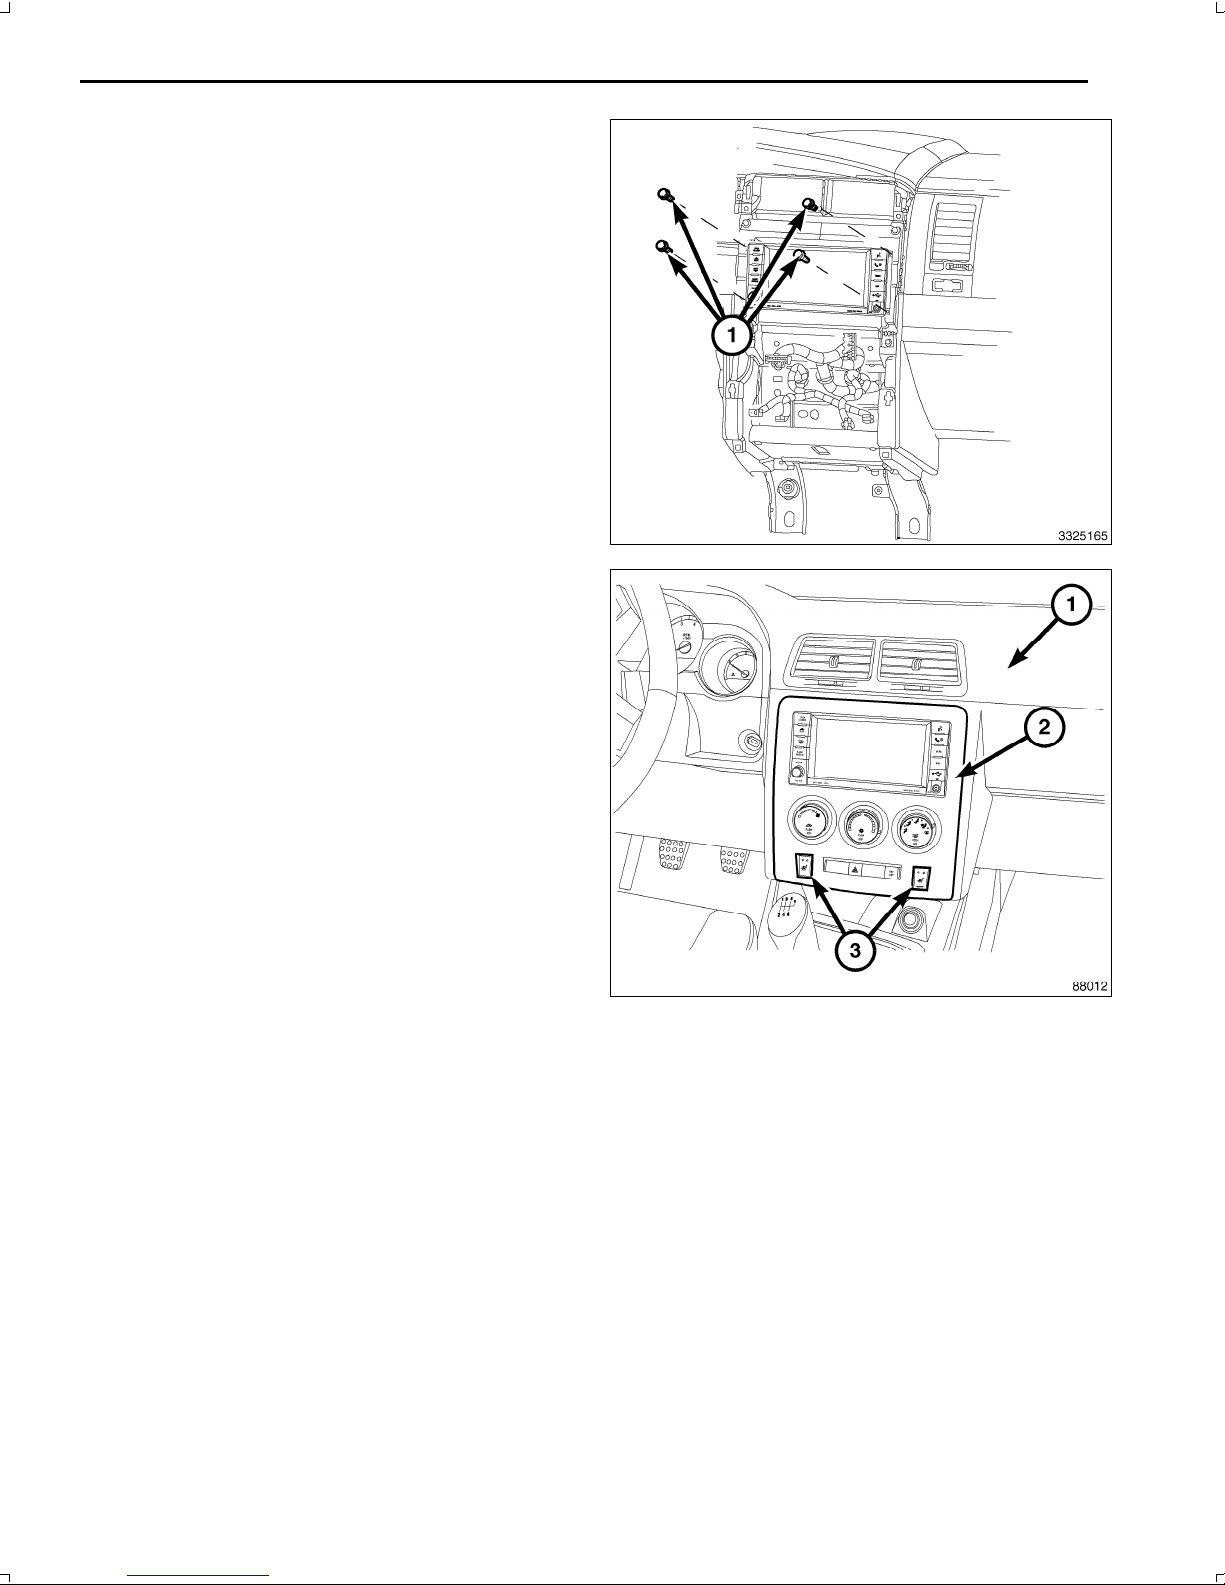
3
15.Installtheradiomountingfasteners.
16.Positionthecenterbezel(2)neartheinstrumentpanel
(1).
17.Connecttheelectricalconnectors.
18.Installthecenterbezelontotheinstrumentpaneland
carefullypushontheoutsideedgesofthecenterbezel
tofullyseatthesnapclipretainers.
19.Connectthenegativebatterycable.
UPDATEVEHICLECONFIGURATION
NOTE:ThewiTECHsoftwarelevelmustbeatthelatestreleasetoperformthisprocedure.
1.VINmustbeupdatedwiththesalescodeoftheaddedaccessoryinordertoenablesystemfunctionality.Usingthe
DealerCONNECTwebsiteandthewiTECHdiagnosticapplication,completethevehicleconfiguration.
2.Logontohttps://dealerconnect.chrysler.com.
3.Inthe"VehicleOption"screenunderthe"GlobalClaimsSystem"categoryinthe"Service"tab,enterthevehicle
VIN,fourdigitpinnumberobtainedfromthedealershippartsdepartmentandaddsalescode(s)notedbelowasa
"DealerInstalledOption".
RHR(AM/FM/DVD/HDDwithSDARS)
4.ConfirmthatthenewsalescodehasbeensuccessfullyaddedtotheVIN.
5.WiththewiTECHdiagnosticapplication,performthefollowingstepsformtheInitialStartUpScreen:
•Selectthe"DIAGNOSTICPROCEDURES"tab
•Select"RESTOREVEHICLECONFIGURATION"
•Selectthe"RunDiagnostic"button
•Select"CONTINUE"
•VerifythatthevehicleVINnumberiscorrect
•Onceverified,selectthe"CorrectVIN"button
Dec31,2010K6861192
Page 39

4
•NoteOnScreeninstructionsandselectthe"Close"button
Dec31,2010K6861192
Page 40
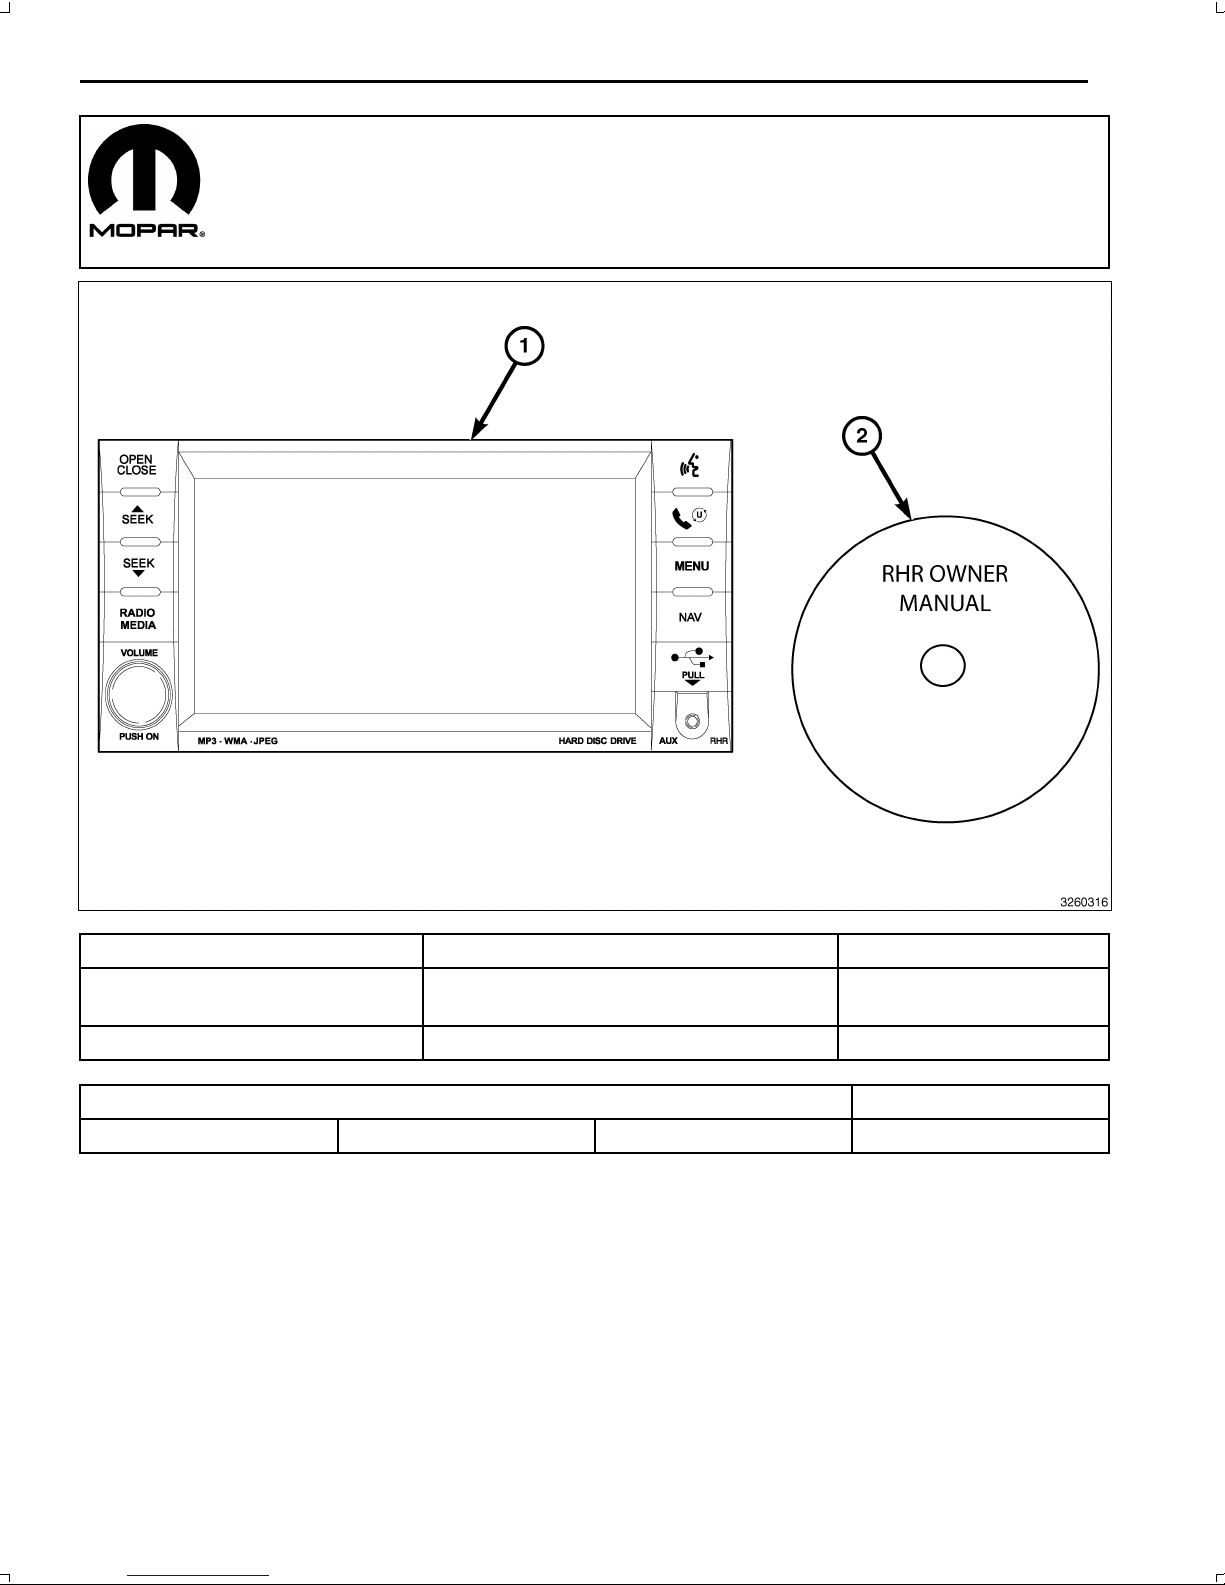
1
RHRNAVIGATIONRADIOKIT
MINIVAN
CALLOUTDESCRIPTIONQUANTITY
1
RHRRadio(AM/FM/CD/DVD/HDD/MP3/
NAV)
1
2
RHROwnerManualDVD
1
TOOLSREQUIRED
PhillipsHeadScrewDriverFiberTrimStickScanToolT25TorxScrewDriver
PROCEDURESTEPS:
Dec31,2010K6861192
Page 41
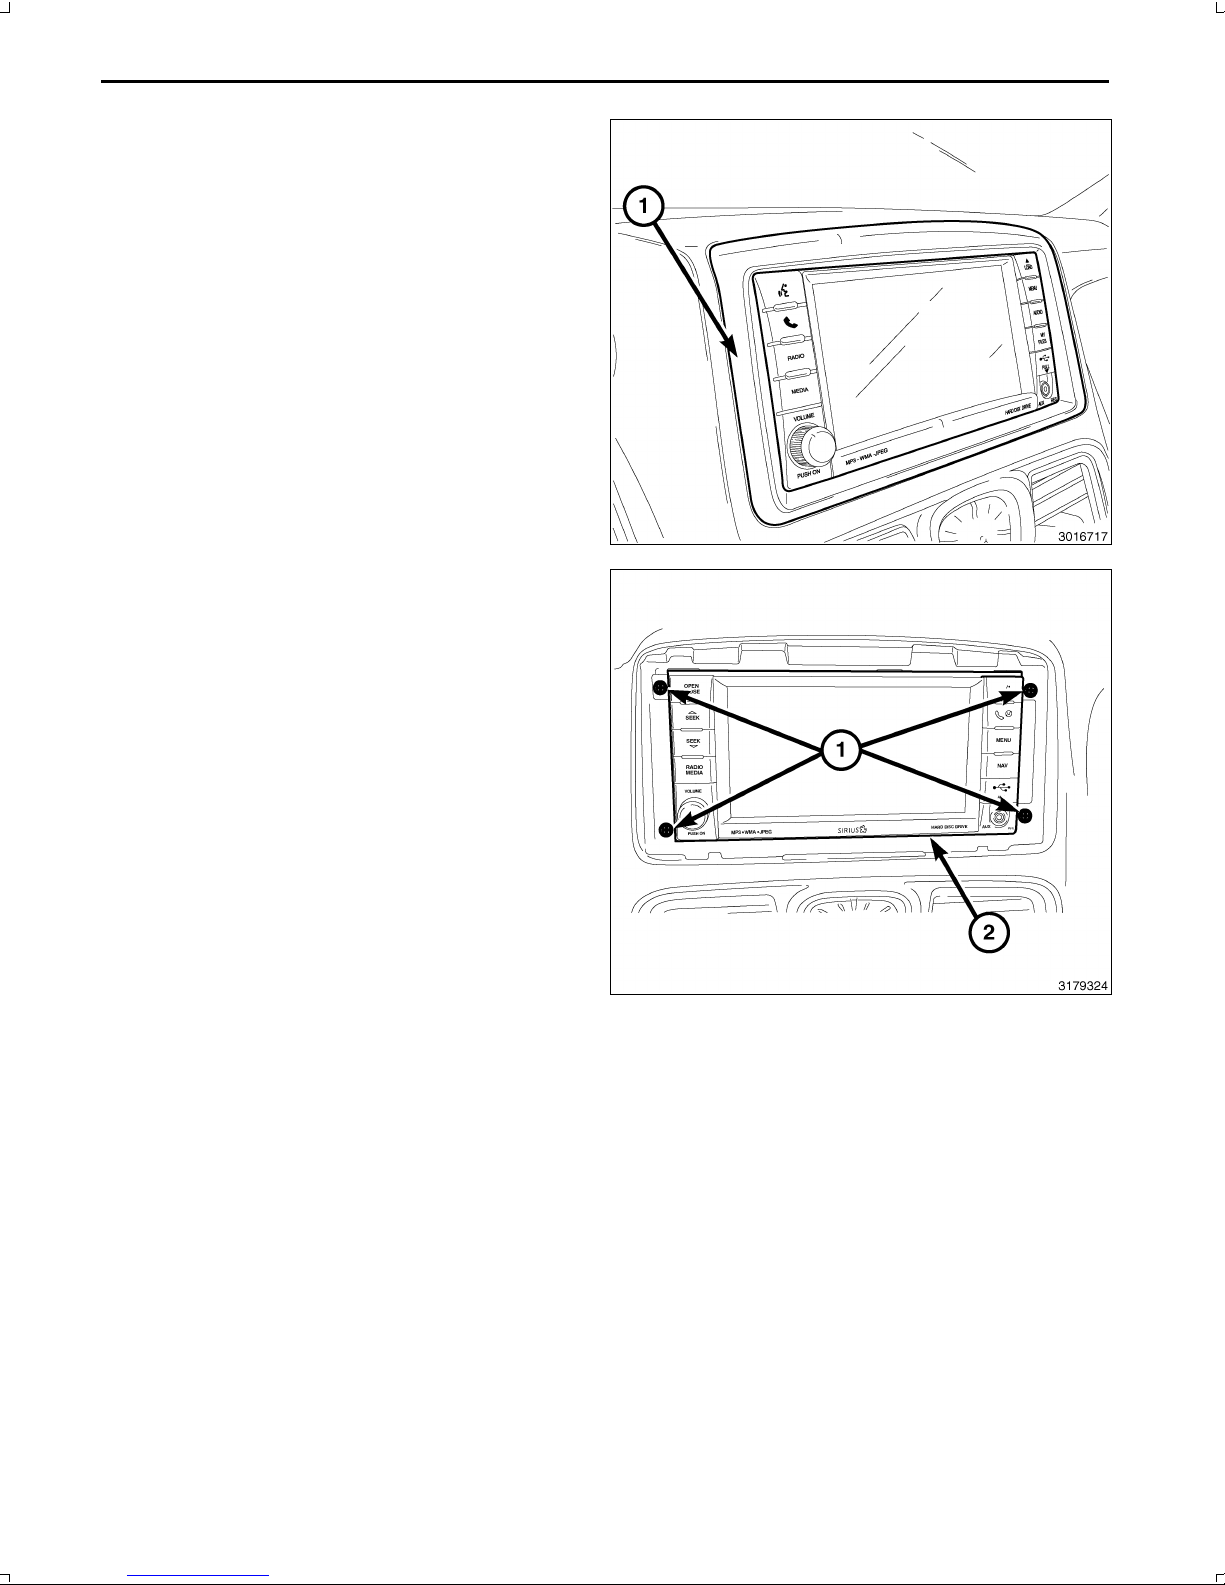
2
1.Disconnectandisolatethenegativebatterycable.
2.UsingTrimStickC4755orequivalent,workaround
theperimeterofthebezel(1)releasingtheretaining
clipsandseparatethebezelfromtheinstrument
panel.
3.Removetheradio(2)mountingfasteners(1).
CAUTION:Pullingtheantennacablestraightoutoftheradiowithoutpullingonthelockingantennaconnector
coulddamagethecableorradio.
Dec31,2010K6861192
Page 42
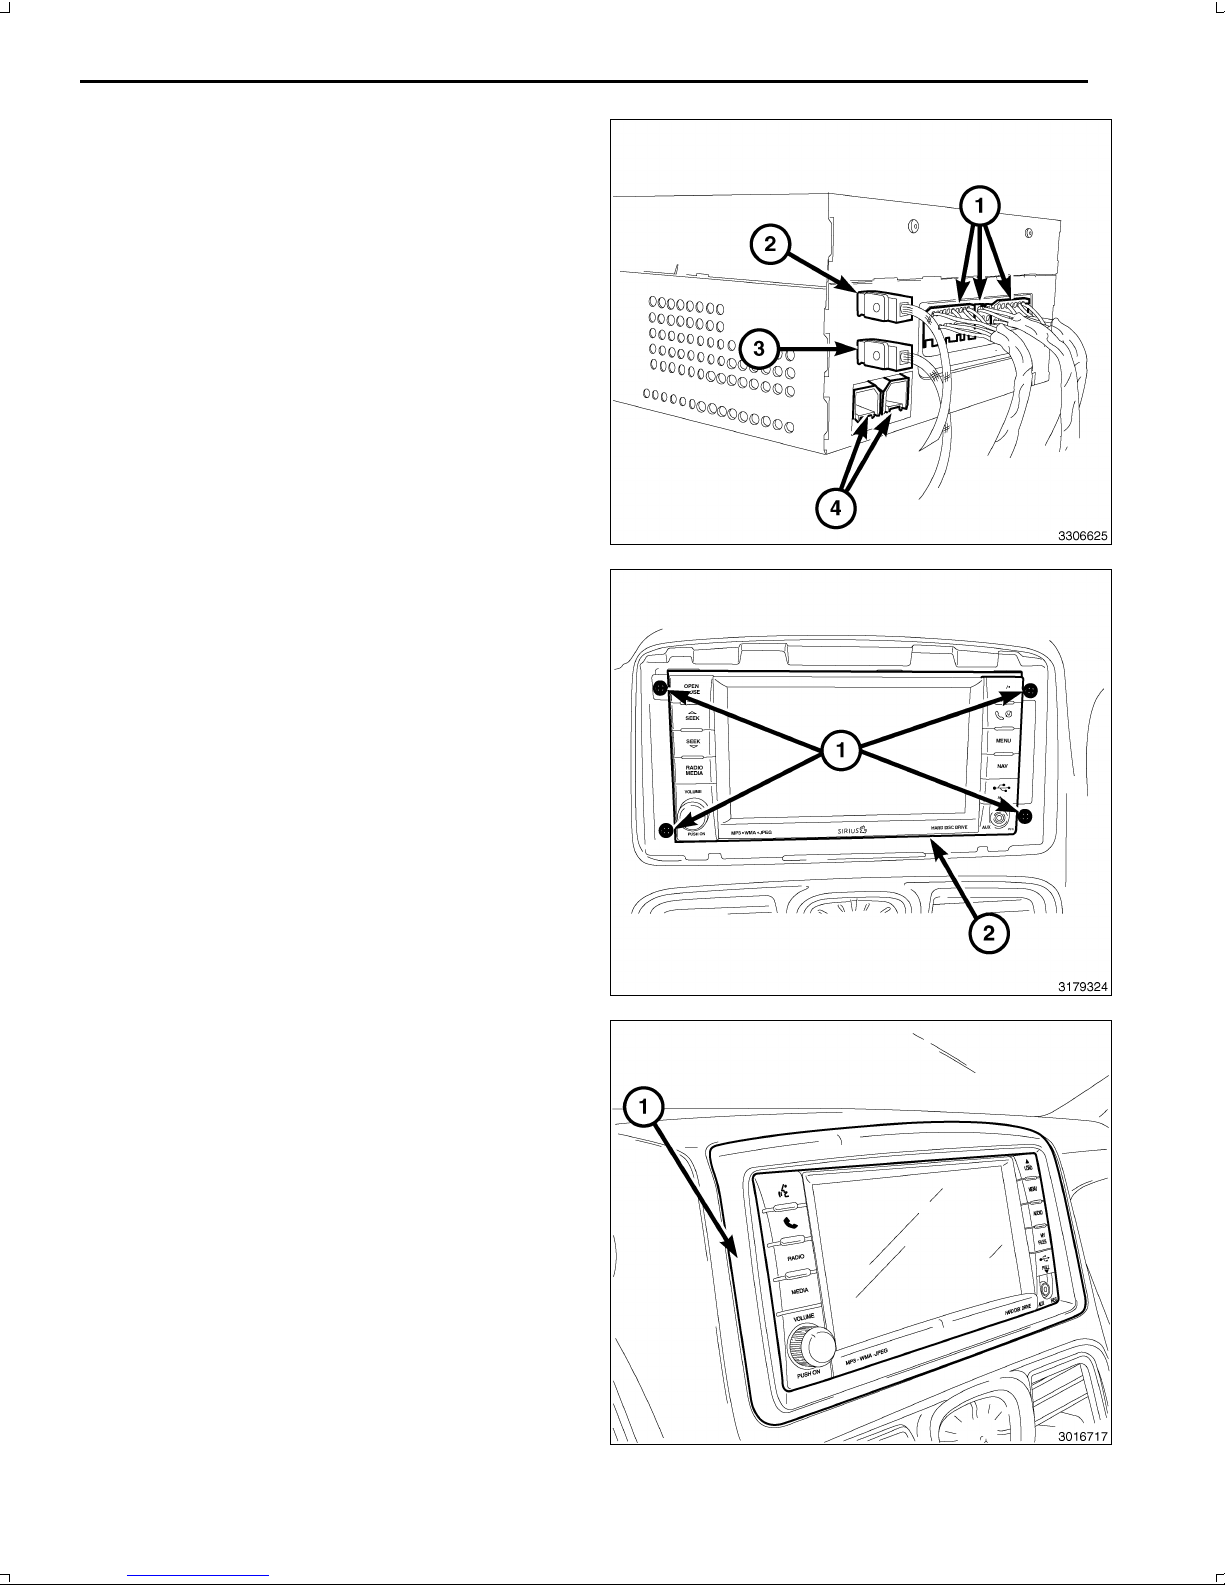
3
4.Pulltheradiooutfarenoughtoaccessthebackofthe
radio.
5.DisconnecttheAM/FMantenna(2)andelectricalcon
nectors(1).
6.Ifequipped,disconnectthenavigationantenna(3).
7.Ifequipped,disconnecttheUSBconnectors(4).
8.Removetheradiofromtheinstrumentpanel.
9.Positionthenewradiototheinstrumentpanel.
10.ConnecttheAM/FMantenna(2)andelectricalcon
nectors(1).
11.Connectthesatellite/navigationantenna(3).
12.Ifequipped,connecttheUSBconnectors(4).
13.Installtheradio(2)mountingfasteners(1).
14.Positionthecenterbezel(1)overtheinstrumentpanel
andpressfirmlyandevenlyaroundtheperimeterof
thebezeltoseattheretainingclips.
15.Connectthenegativebatterycable.
Dec31,2010K6861192
Page 43

4
UPDATEVEHICLECONFIGURATION
NOTE:ThewiTECHsoftwarelevelmustbeatthelatestreleasetoperformthisprocedure.
1.VINmustbeupdatedwiththesalescodeoftheaddedaccessoryinordertoenablesystemfunctionality.Usingthe
DealerCONNECTwebsiteandthewiTECHdiagnosticapplication,completethevehicleconfiguration.
2.Logontohttps://dealerconnect.chrysler.com.
3.Inthe"VehicleOption"screenunderthe"GlobalClaimsSystem"categoryinthe"Service"tab,enterthevehicle
VIN,fourdigitpinnumberobtainedfromthedealershippartsdepartmentandaddsalescode(s)notedbelowasa
"DealerInstalledOption".
RHR(AM/FM/DVD/HDDwithSDARS)
4.ConfirmthatthenewsalescodehasbeensuccessfullyaddedtotheVIN.
5.WiththewiTECHdiagnosticapplication,performthefollowingstepsformtheInitialStartUpScreen:
•Selectthe"DIAGNOSTICPROCEDURES"tab
•Select"RESTOREVEHICLECONFIGURATION"
•Selectthe"RunDiagnostic"button
•Select"CONTINUE"
•VerifythatthevehicleVINnumberiscorrect
•Onceverified,selectthe"CorrectVIN"button
•NoteOnScreeninstructionsandselectthe"Close"button
Dec31,2010K6861192
Page 44
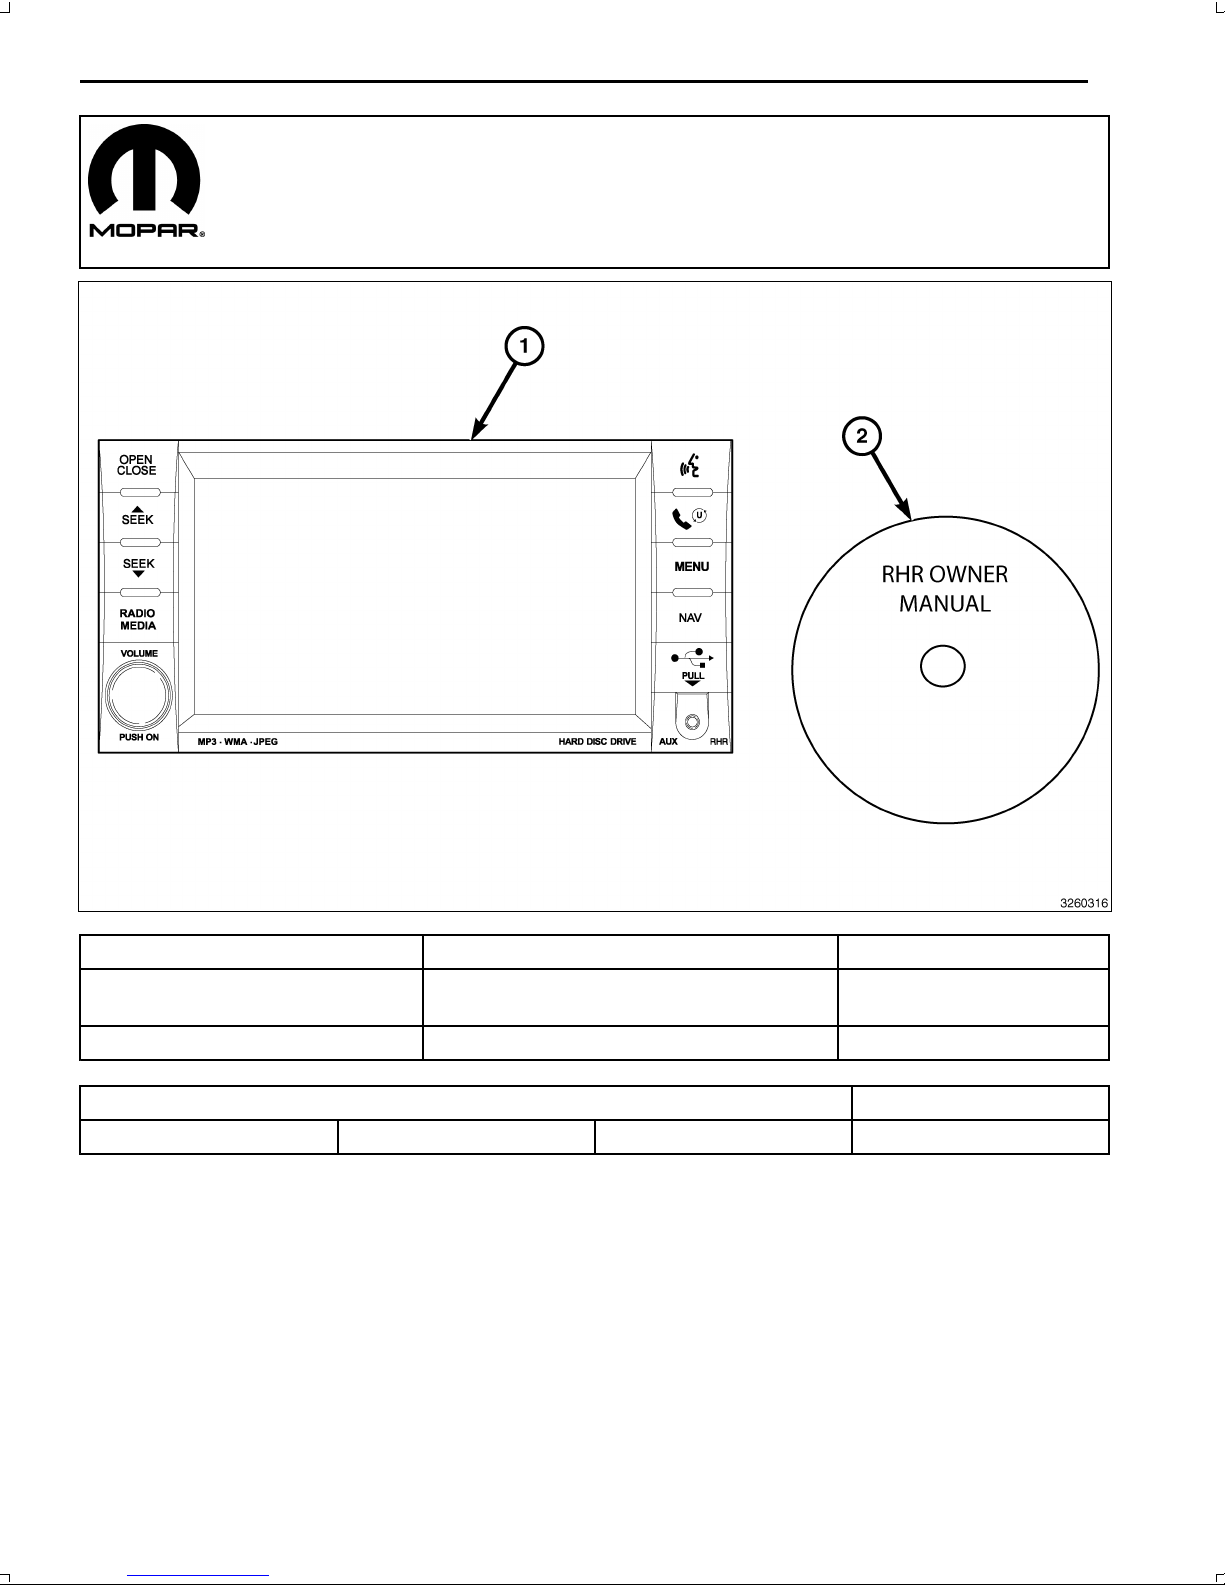
1
RHRNAVIGATIONRADIOKIT
GRANDCHEROKEE/DURANGO
CALLOUTDESCRIPTIONQUANTITY
1
RHRRadio(AM/FM/CD/DVD/HDD/MP3/
NAV)
1
2
RHROwnerManualDVD
1
TOOLSREQUIRED
PhillipsHeadScrewDriverFiberTrimStickScanToolT25TorxScrewDriver
PROCEDURESTEPS:
Dec31,2010K6861192
Page 45
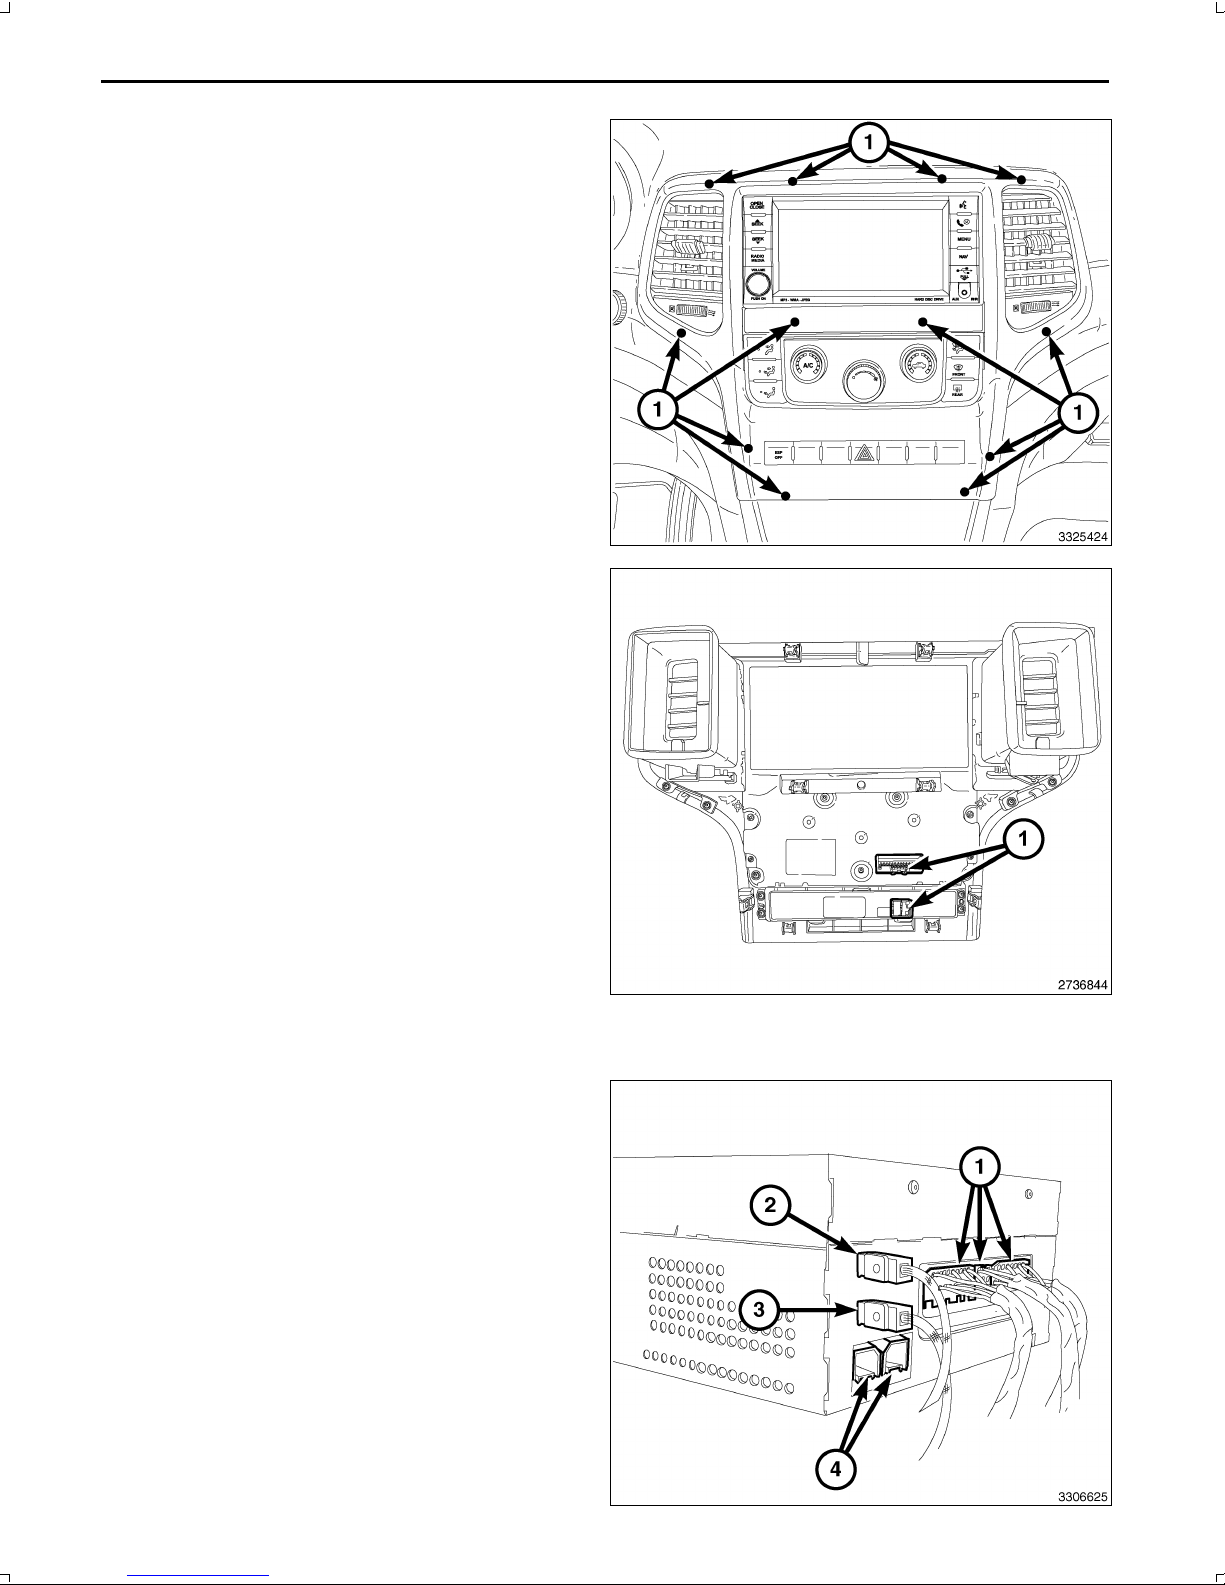
2
1.Disconnectandisolatethebatterynegativecable.
2.UsingatrimstickC4755orequivalent,workaround
theperimeterofthebezel,andacrossthemiddlere
leasingtheretainingclips(1)andseparatethebezel
fromtheinstrumentpanel.
3.Disconnecttheelectricalconnectors(1)andremove
thebezel.
4.Removetheradiomountingfasteners.
CAUTION:Pullingtheantennacablestraightoutoftheradiowithoutpullingonthelockingantennaconnector
coulddamagethecableorradio.
5.Pulltheradiooutfarenoughtoaccessthebackofthe
radio.
6.DisconnecttheAM/FMantenna(2)andelectricalcon
nectors(1).
7.Ifequipped,disconnectthenavigationantenna(3).
8.Ifequipped,disconnecttheUSBconnectors(4).
9.Removetheradiofromtheinstrumentpanel.
10.Positionthenewradiototheinstrumentpanel.
11.ConnecttheAM/FMantenna(2)andelectricalcon
nectors(1).
12.Connectthesatellite/navigationantenna(3).
13.Ifequipped,connecttheUSBconnectors(4).
14.Installtheradiomountingfasteners.
Dec31,2010K6861192
Page 46
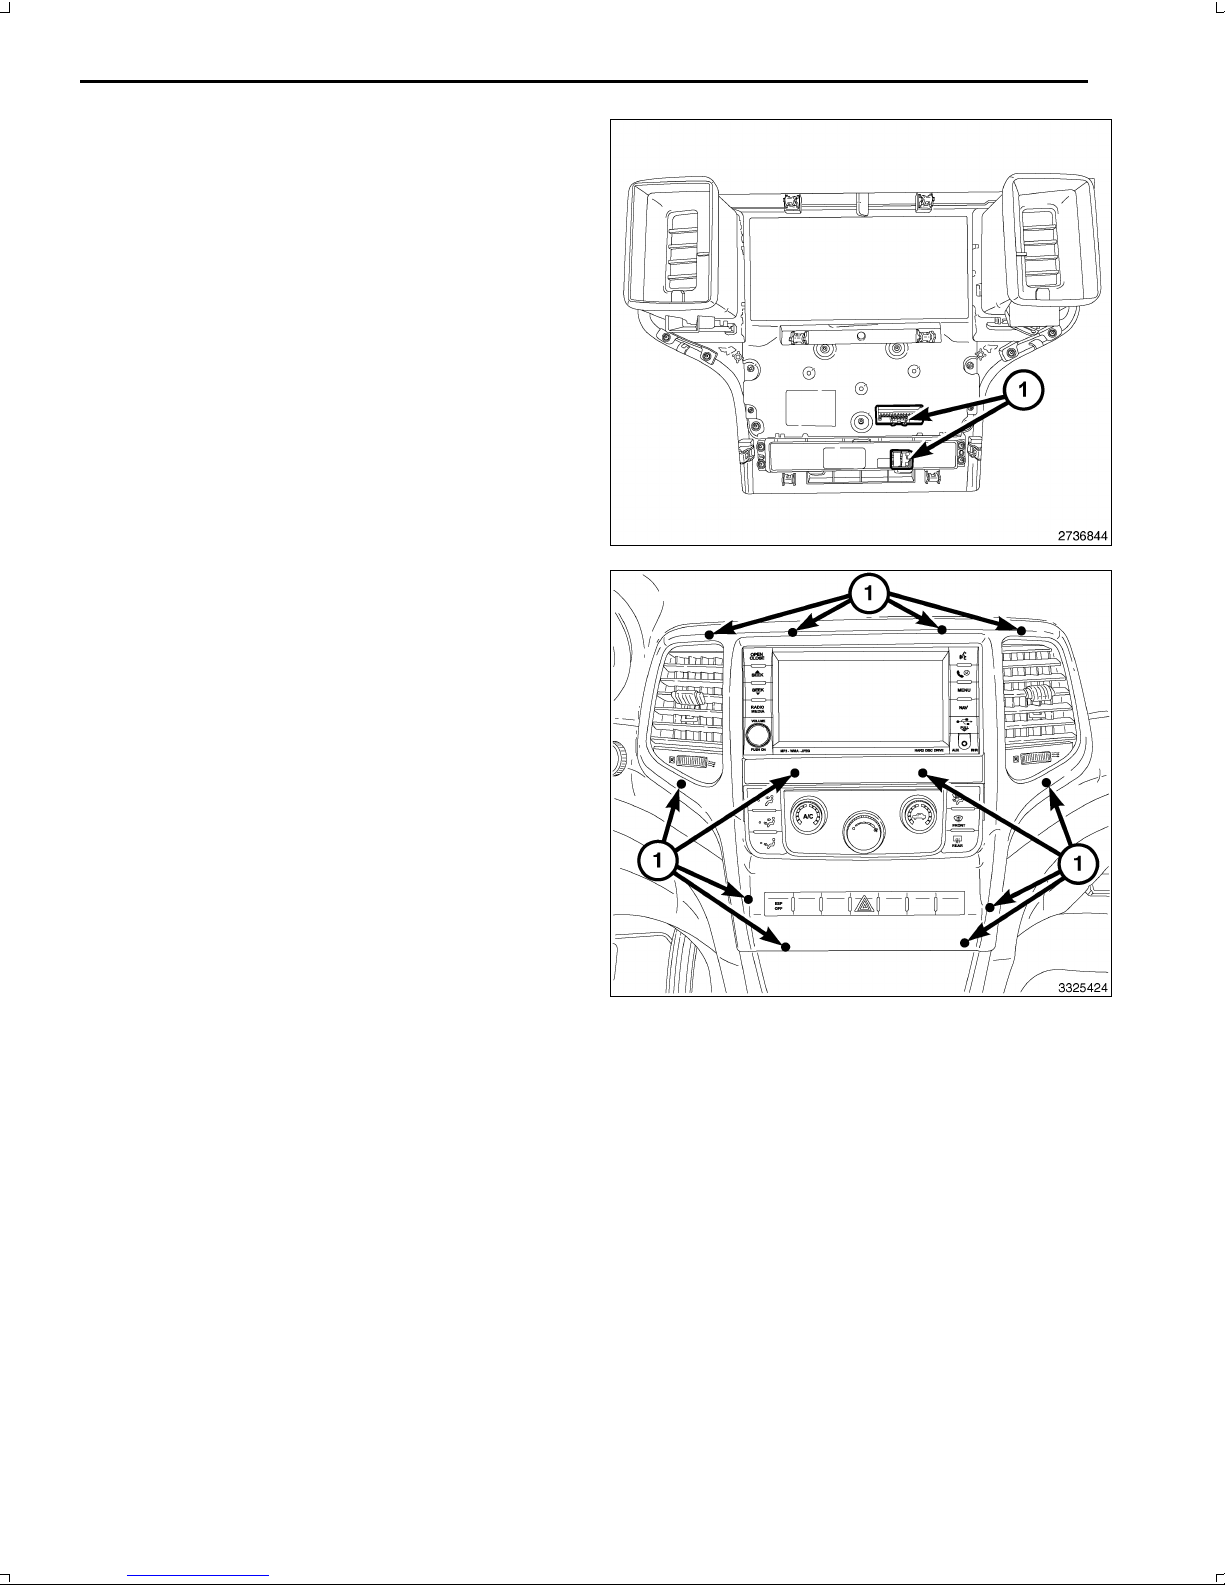
3
15.Positiontheinstrumentpanelcenterbezeloverthein
strumentpanelandconnecttheelectricalconnectors
(1).
16.Pressfirmlyandevenlyaroundtheperimeterand
acrossthemiddleofthebezeltoseattheretaining
clips(1)andinstallthecenterbezel.
17.Connectthenegativebatterycable.
UPDATEVEHICLECONFIGURATION
NOTE:ThewiTECHsoftwarelevelmustbeatthelatestreleasetoperformthisprocedure.
1.VINmustbeupdatedwiththesalescodeoftheaddedaccessoryinordertoenablesystemfunctionality.Usingthe
DealerCONNECTwebsiteandthewiTECHdiagnosticapplication,completethevehicleconfiguration.
2.Logontohttps://dealerconnect.chrysler.com.
3.Inthe"VehicleOption"screenunderthe"GlobalClaimsSystem"categoryinthe"Service"tab,enterthevehicle
VIN,fourdigitpinnumberobtainedfromthedealershippartsdepartmentandaddsalescode(s)notedbelowasa
"DealerInstalledOption".
RHR(AM/FM/DVD/HDDwithSDARS)
4.ConfirmthatthenewsalescodehasbeensuccessfullyaddedtotheVIN.
5.WiththewiTECHdiagnosticapplication,performthefollowingstepsformtheInitialStartUpScreen:
•Selectthe"DIAGNOSTICPROCEDURES"tab
•Select"RESTOREVEHICLECONFIGURATION"
•Selectthe"RunDiagnostic"button
•Select"CONTINUE"
•VerifythatthevehicleVINnumberiscorrect
•Onceverified,selectthe"CorrectVIN"button
Dec31,2010K6861192
Page 47

4
•NoteOnScreeninstructionsandselectthe"Close"button
Dec31,2010K6861192
 Loading...