

Page 1
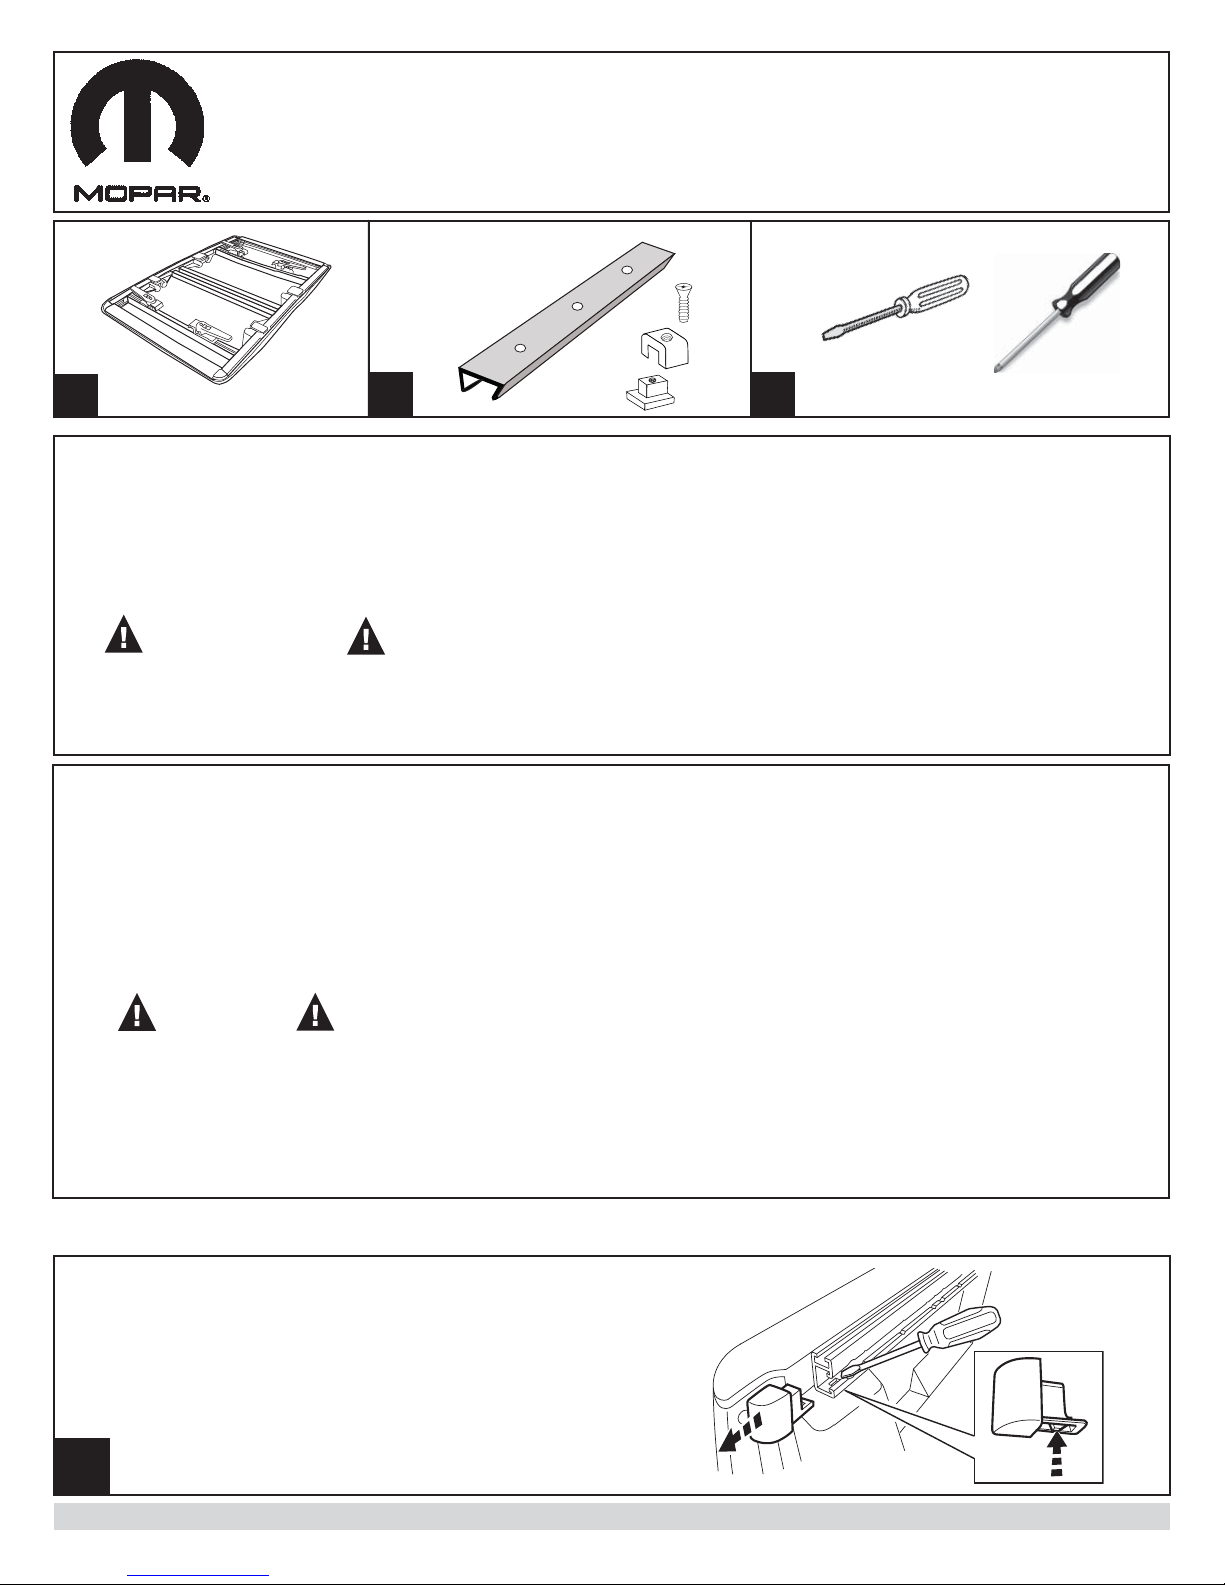
Folding Tonneau Cover
Installation Instructions, Operating Instructions,
Product Use and Care
Each rail comes
preassembled
with three screws,
spacers and
inserts
1X
A
PREVENTIVE MAINTENANCE AND CUSTOMER CARE
After a setting period (500 mile maximum), it may be necessary to re-adjust the clamp load after foam isolators take a set to maintain the
uniform gap between the Tonneau Cover and bed rails to prevent the lids from scratching them.
Check the bracket clamp loads every 3 months or 5,000 miles. The cover may need to be periodically adjusted to fi t the box bed.
• Wash only with mild soap & dry with a clean cloth.
• Avoid the use of automatic “brush-styleroller-type” car washes; only use ‘soft-wipe’ type systems
• Do not use cleaning solvents of any kind.
• Pressure car washes are okay as long as you hold the wand no closer than two feet from the cover.
• We recommend the same quality products normally used for vinyl tops to keep your cover clean. When using a protectant, be sure that it is
water based.
WARNING AND CAUTION
The Tonneau Cover must be totally closed and secured with clamps, or if folded into stowed position, it must be secured with straps provided.
Do not load any measurable weight onto to the top of the Tonneau Cover. This will damage the Tonneau Cover frame.
• Serious personal injury and property damage can occur if vehicle is driven without both black buckles at the front of cover fastened.
• Prior to vehicle operation, clamps must be secured such that the clamps’ lips tightly grip the inner bedwall structure.
• Do not use any part of this tonneau cover as a tie down.
B
2X
6X
6X
6X
C
MANTENIMIENTO PREVENTIVO
Luego de un período (de 500 millas como máximo), es posible que se deba reajustar la carga de abrazadera después de que los aisladores
de esponja se ajusten para mantener una separación uniforme entre la Cubierta Tonneau y los largueros de la caja para evitar que las tapas
los raspen.
Inspeccione las cargas de abrazaderas cada 3 meses o 5000 millas. Es posible que se deba ajustar la cubierta de vez en cuando para que se
quepa con la caja.
• Lave solamente con el jabón suave y seque con un paño limpio.
• Evite el uso auto-lavados automáticos con cepillos.
• No utilice los disolventes limpiadores de ningún tipo.
• Los auto-lavados de la presión son aceptables mientras usted sostenga la varita no más cerca de dos pies de la cubierta.
• Se recomienda usar los productos de la misma calidad que se usan normalmente para las tapas del vinilo para mantener
su cubierta limpia. Al usar un producto protector, sea seguro que es a base de agua.
USO Y CUIDADO
La Cubierta Tonneau debe estar cerrada o atada con correas cuando el vehículo está en movimiento.
No cargue ningún peso signifi cativo sobre la Cubierta Tonneau. Podría torcer el bastidor.
No utilice auto-lavados con cepillos: utilice sólo auto-lavados con limpiadores suaves.
• Heridas graves a las personas o el daño a las propiedades se pueden ocurrir si se maneje el vehículo sin que las dos hebillas negras de la
parte delantera de la cubierta se abrochen.
• Antes de manejar el vehículo, se debe asegurar que las bordes de las abrazaderas se sujeten fi jamente con la parte interior de la caja.
• No use ninguna parte de esta Cubierta Tonneau para atar cosas a la caja.
• Desabroche las hebillas sólo cuando se instala o se quita la cubierta.
Remove End Cap Assembly from Utility Track.
Save for re-use.
Repeat for other side.
1
For Service Replacement Parts and Technical Support Call: 1-800-773-3110
K6860665
Page 2
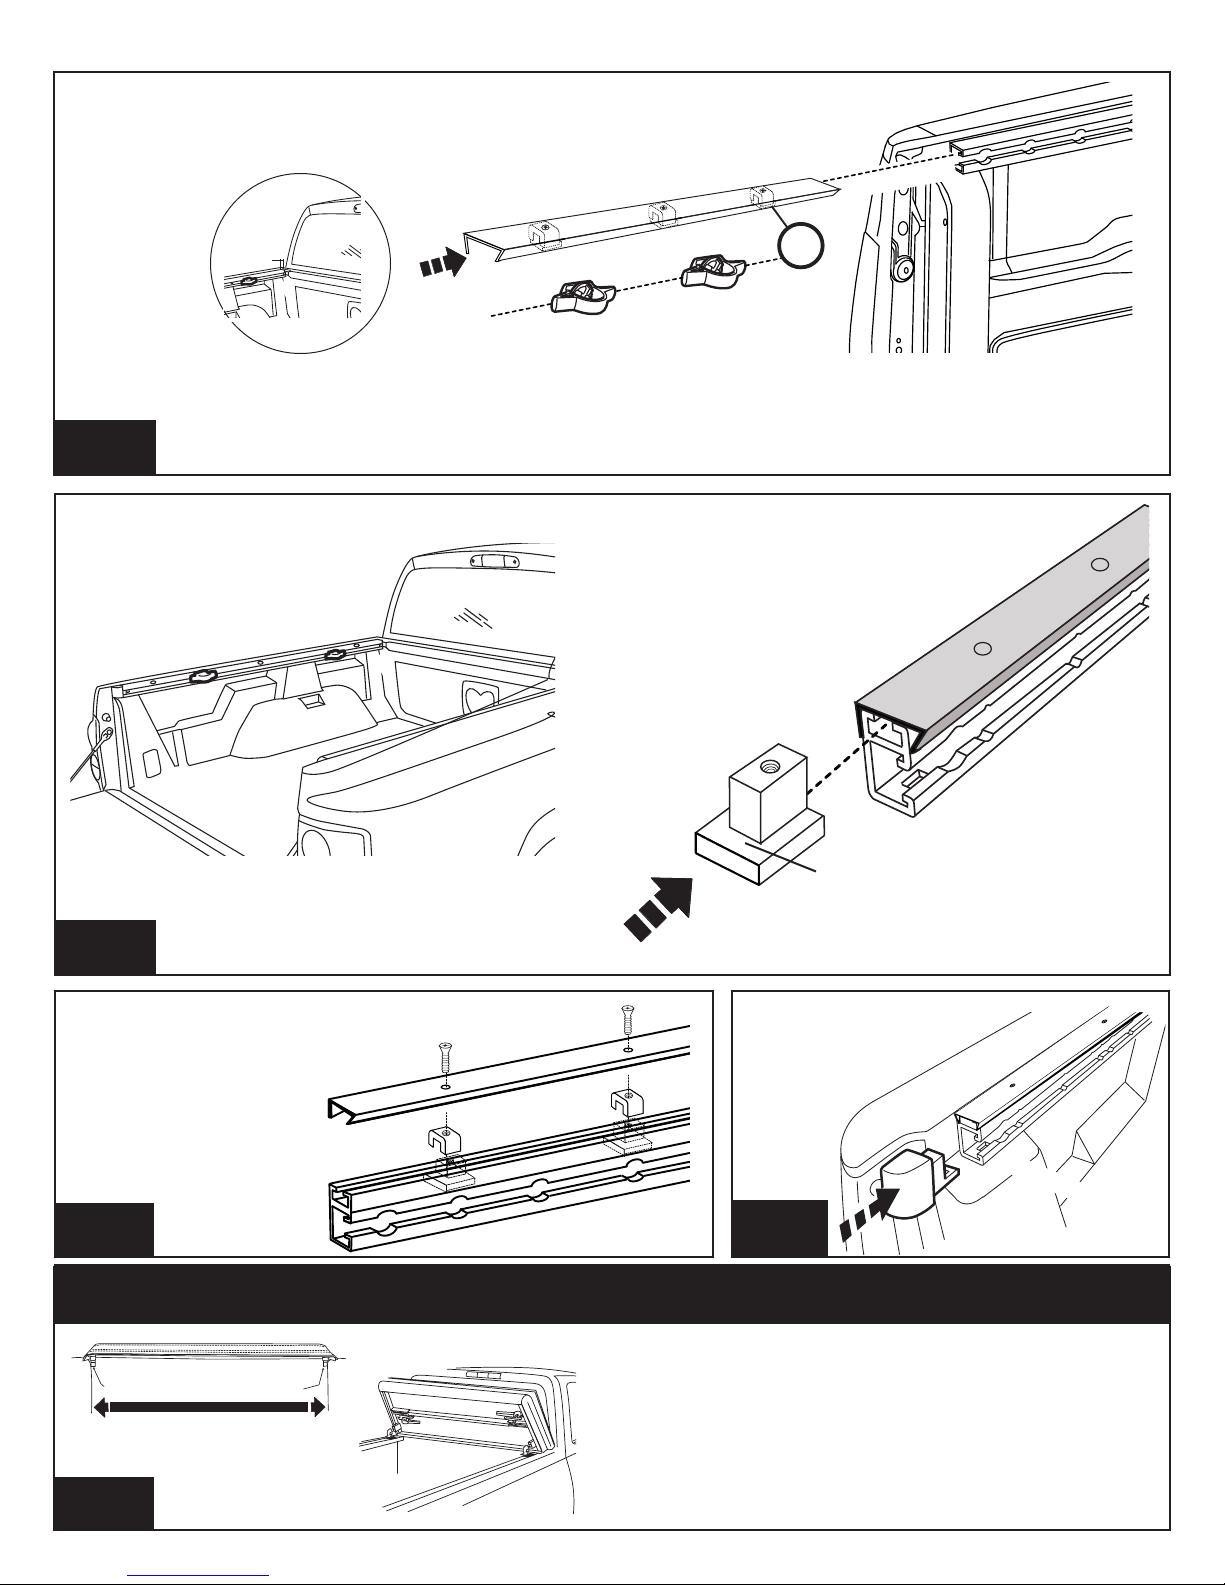
Position tie downs toward bed center. Insert Item B into the
Utility Track as shown. Repeat for other side.
Slide black track
to a position about
1-3mm from
front of truck
1-3mm
B
If the track assembly can not be slid into the utility track easily (due to metal
burrs in the track), disassemble Item B by removing the screws and the
2A
3 sets of nylon adaptors and spacers per side and proceed to Steps 2B, 2C, 2D.
Slide lower
adaptors into
utility tracks.
3x
3
V
2B
Reposition black
metal rail over lower
utility track with the
three inserts in line
with the holes in
the black metal rail.
Insert screws and
tighten.
3x
Replace
end caps,
both sides.
2C 2D
Installing the tonneau cover on the vehicle
Attach the front clamps to the cargo rail
This end must face the
tailgate on all 3 pieces,
both sides
Center tonneau cover over the side rails
on inside of pickup truck bed
3A
1. Position tonneau cover onto the top of the pickup box.
See Figure at left.
2. Align the front edge of the cover even with the front
edge of the front bed rail and evenly position the cover
so that it is centered on the truck bed from side to side
3. Lower the front clamp from its storage position.
4. Proceed to 3B for the correct way to latch tonneau to
cargo rails.
K6860665
Page 3
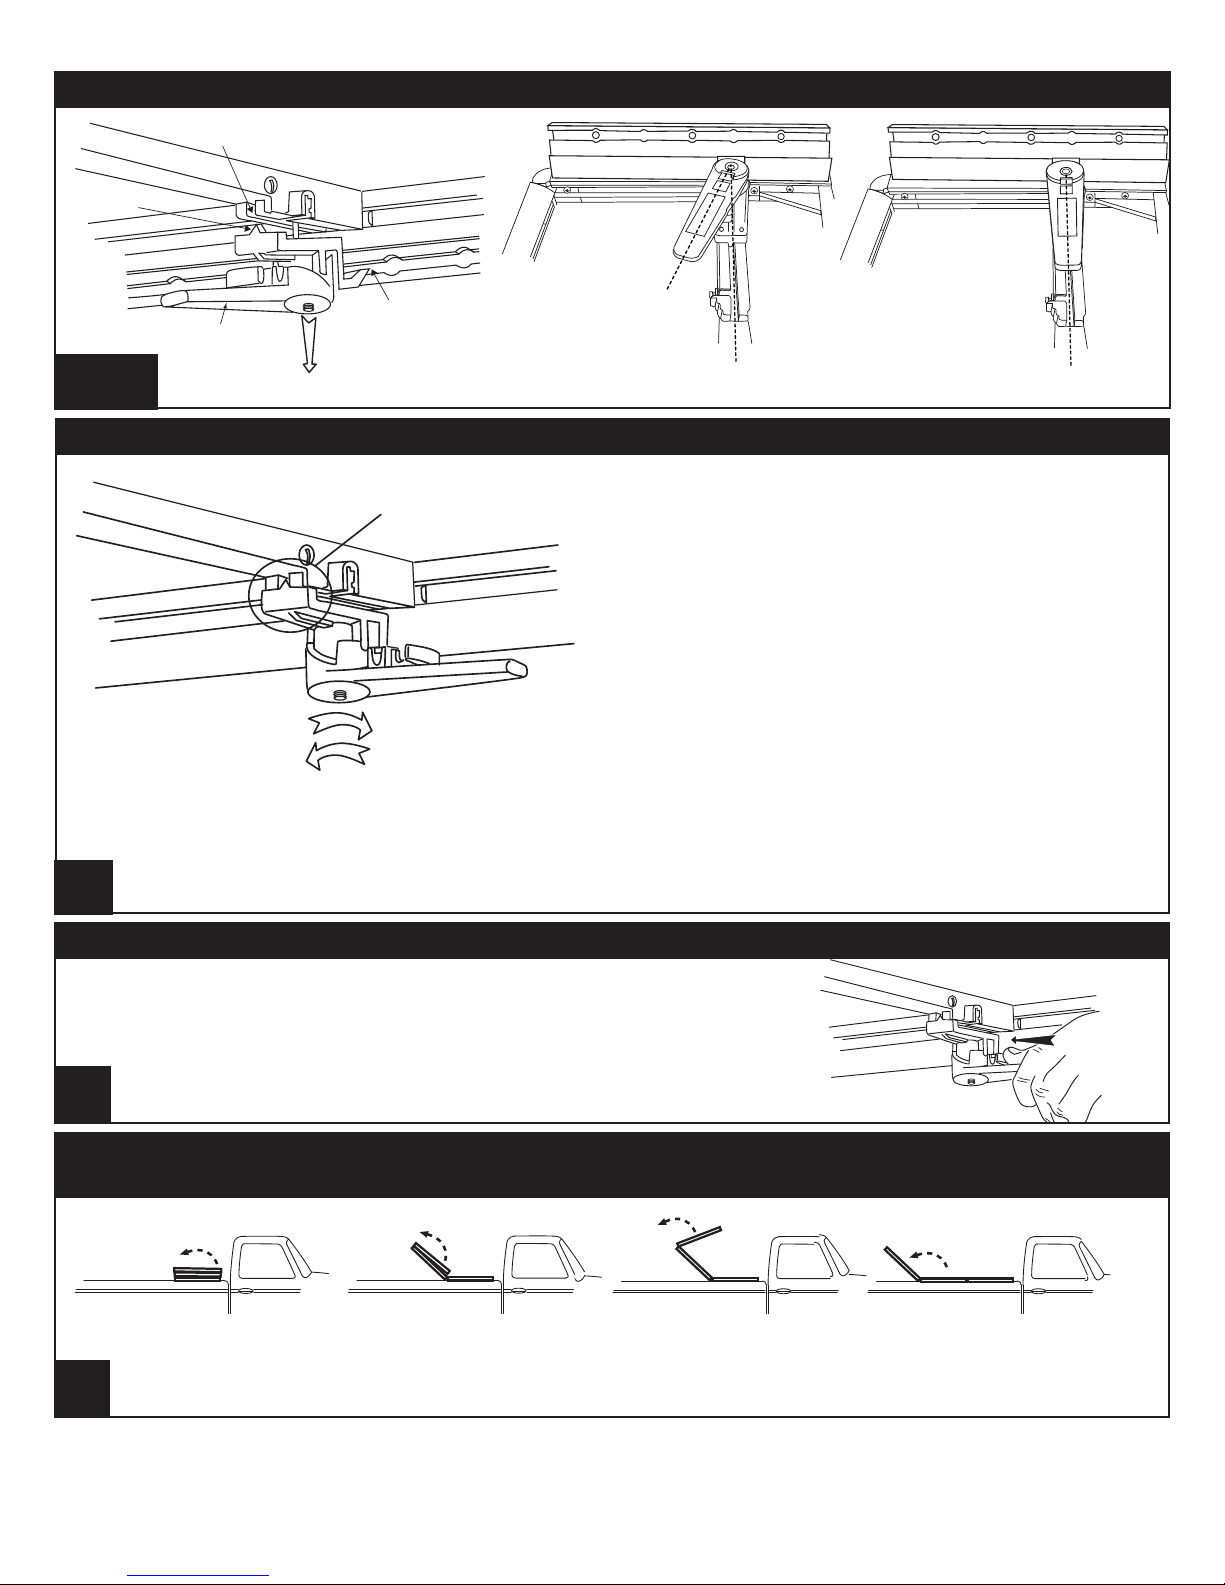
Installing the tonneau cover on the vehicle (continued)
Slot
Locator
Handle
Put handle in
lowest position
3B
Fig. 3-a
Tip of clamp is 1-2 mm
from slot opening of
rail on side of vehicle.
Fig. 3-b
Correct Angle
This angle will put
handle at lowest
position.
Handle must be at lowest position when inserting clamp into rail.
Be sure the handle is approximately 150 from center.
Wrong Angle
Securing the FRONT clamps to cargo rail and clamp adjustment procedure
POINTED TIP MUST
BE IN GROOVE
TIGHTEN
LOOSEN
1. Properly adjust handle assembly so the clamp is 1-2 mm
beneath the cargo rail opening (Fig. 3-a and Fig. 3-b).
2. Tilt the handle slightly to insert the locator into the slot of
the bow support (Fig 3-a).
3. Secure the clamp to the cargo rail by pulling the
4
handle rearward (Fig. 5-a).
Double check that the locator is in the slot and that the tonneau
has compressed the side seals to the bedrail covers. If the
handle seems loose or the tonneau can be moved/shifted easily ,
follow procedure below.
1a. If clamp is too loose
1. Push handle forward to release from clamped position.
2. Disengage clamp from inner lip of bed rail and slide
assembly inboard.
3. Adjust clamp height on bolt by rotating the entire
clamp/handle assembly CLOCKWISE (as
viewed from the top).
4. Re-attach clamps as indicated in steps 3 and 4.
1b. If the handle can’t be fully pulled rearward (as shown):
1. Return handle to the fully disengaged position.
2. Disengage clamp from inner lip of bed rail and slide
assembly inboard.
3. Adjust the clamp height by rotating the entire clamp/
handle assembly COUNTER-CLOCKWISE.
4. Re-attach clamps as indicated in steps 3 and 4.
Tonneau locking feature (front clamps only)
1. There are locking features on front clamps only. With the handle engaged (clamped position), push the locking tab on the handle to engage
lock. See Fig. 5-a.
2. Repeat clamp attachment steps 3B thru 5 for the opposite side.
5
Unfolding tonneau and completing the installation
Attach the rear clamps to the cargo rail
Fig. 6-a
1. Unfold cover (Fig. 6-a).
2. Repeat Steps 3B and 4 for rear clamps.
6
Fig. 5-a
K6860665
Page 4
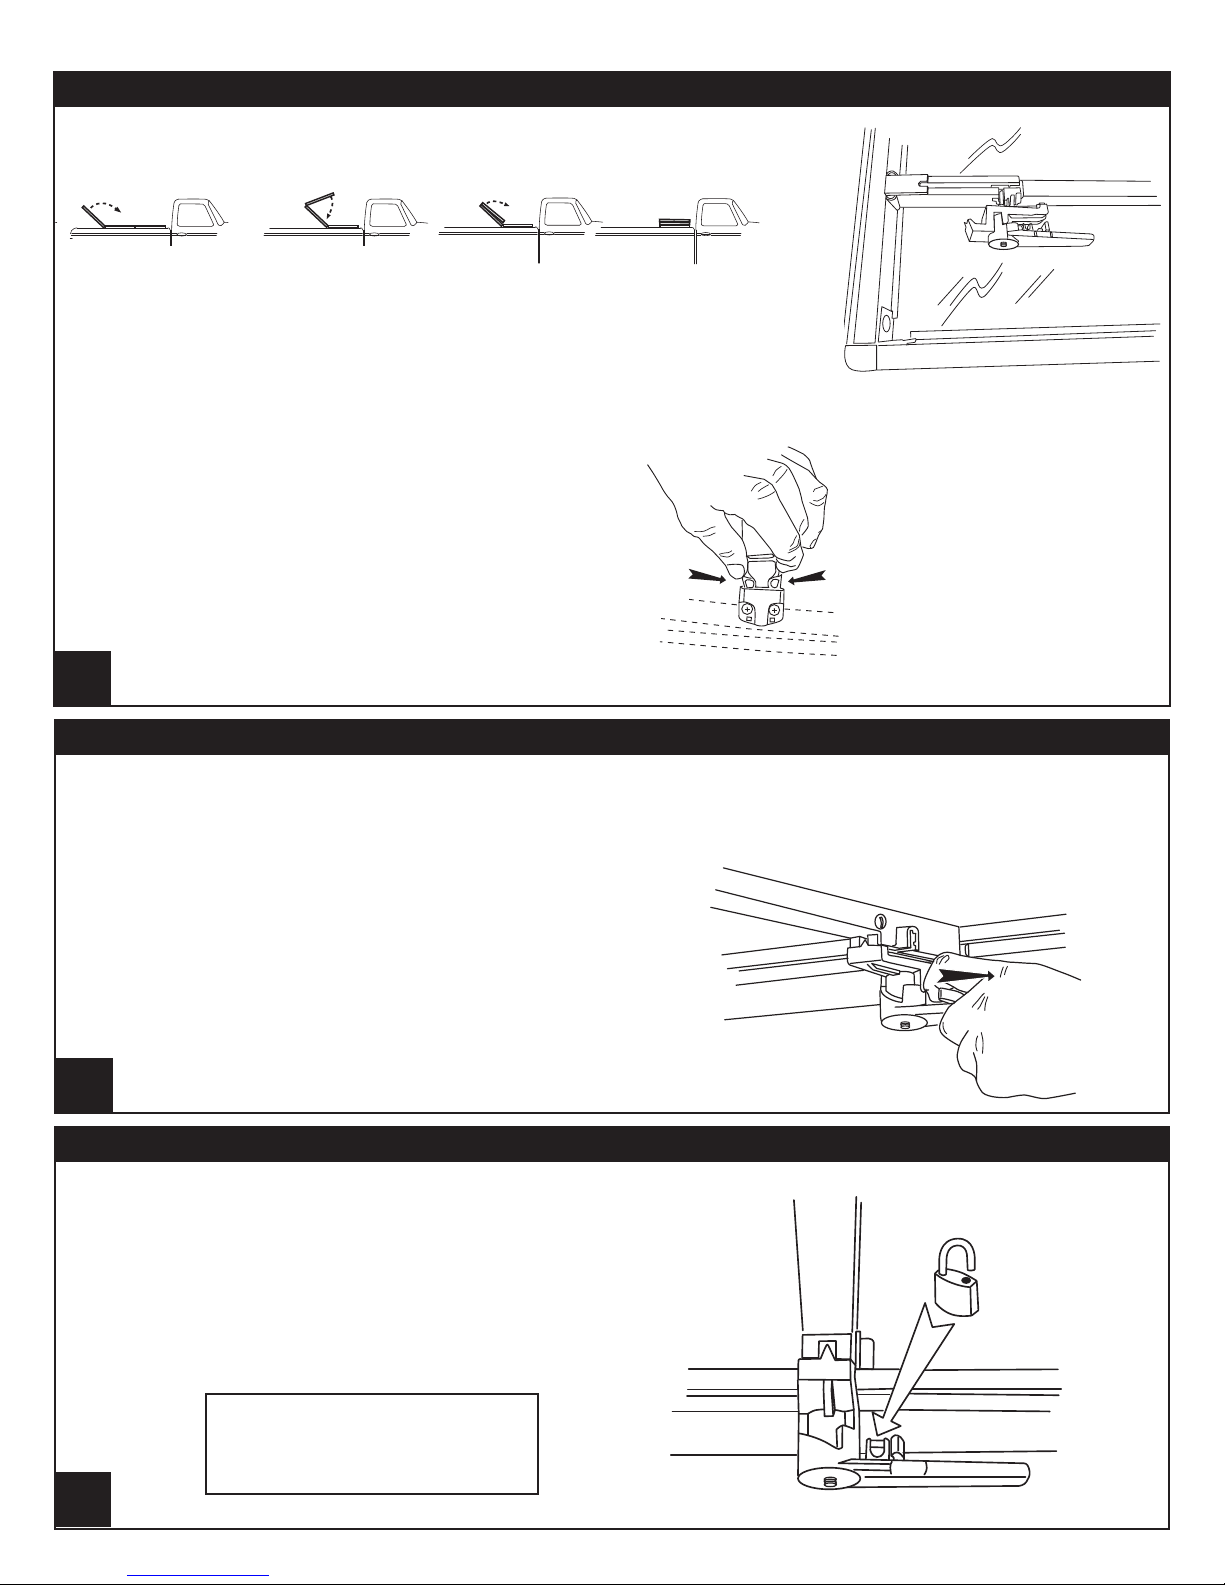
Folding tonneau to the stowed position
1. Unlatch rear clamps and place in stowed position. See Fig 7-a.
2. Fold cover forward. See Fig. 7-b.
Fig. 7-b
3. Unsnap the retaining strap from the front bow and insert the male end into
the female end of the front retention buckle. See Fig. 7-c
4. Verify both buckles are attached by pulling on the strap.
WARNING: Damage to personal property and possible injury
may occur, if; vehicle is operated without both retaining
straps fastened securely when the cover is in open position,
or if the attachment clamps are not fi rmly secured to the box
lip, or if the clamps are not properly stowed using the retention feature. See Fig. 7-a.
USO Y CUIDADO: La cubierta de la capota posterior
debe estar cerrado o sujetado con cinturón el vehículo
está en movimiento. No cargue ningún peso signifi ca-
tivo sobre la cubierta de la capota
posterior. Podría torcer el bastidor.
Fig. 7-c
7
Fig. 7-a
NOTE : If stowing cover
completely, failure to do this
step WILL result in damage to the cover surface,
from handle to cover outer
surface contact !!!
How to remove the tonneau cover
1. Follow the procedure in Step 7, Folding tonneau to the
stowed position.
2. Before rotating the front handles, disengage the locking
tabs by pulling them rearward on both front handles.
See Fig. 8-a
3. Rotate handles inboard release compression.
4. Pull clamp down and rotate assembly to disengage it
from the lip of the truck box.
5. Rotate cover to expose handles.
6. Align the clamp assembly bolt (shaft of the handle) with
the retention feature and rotate handle assembly fl at
onto the panel and press fi rmly to secure. See Figure
7-a.
8
Other items
SECURITY- CARGO PROTECTION
If extra cargo security is desired and your vehicle does not
have a locking endgate. See your truck accessory reseller
for endgate lock options.
COVER SECURITY
For additional theft prevention of the tonneau cover, the front
handle is equipped with an eyelet that will accept a ¼” pad
lock. See Fig. 9.
7. Remove the tonneau cover off the vehicle.
8. Exercise caution when lifting due to the cover’s weight.
9. It is suggested that two people lift cover to avoid damage to cover and truck.
Fig. 8-a
(¼” lock not included)
Fig. 9
NOTE: Prior to operating vehicle,
check all four clamps to make
sure they are engaged.
9
K6860665
 Loading...