


MOOVYOO
TAPIS ROULANT
MIRACLE V396
!
Read all instructions carefully before assembly
and using this product. Retain this owner’s
manual for future reference:

1. Plug the power cord of the treadmill directly into a dedicated grounded circuit.
This product must be grounded well. If it has breakdown, grounding provides a path of least resistance for
electric current to reduce the risk of electric shock.
2. Position the treadmill on a clear, level enough surface with a 2m*1m area. Do not place the treadmill on
thick carpet as it may interfere with proper ventilation. Also, do not place the treadmill near water or
outdoors.
3. Position treadmill so that the wall plug is visible and accessible.
IMPORTANT SAFETY PRECAUTIONS
4. NEVER start the treadmill while you are standing on the walking belt. After turning the power on and
adjusting the speed control, there may be a pause before the walking belt begins to move, ALWAYS stand
on the foot rails on the sides of the frame until the belt is moving.
5. Wear appropriate clothing when exercising on the treadmill. Do not wear long, loose fitting clothing that
could become caught in the treadmill. Always wear running or aerobic shoes with rubber soles.
6. Always unplug the power cord before removing the treadmill motor cover.
7. Keep small children away from the treadmill during operation.
8. Always hold the handrails when initially walking or running on the treadmill, until you are comfortable with
the use of the treadmill.
1

IMPORTANT SAFETY PRECAUTIONS
9. Always attach the safety pull pin rope to your clothing when using the treadmill. If the treadmill should
suddenly increase in speed due to an electronics failure or the speed being inadvertently increased, the
treadmill will come to a sudden stop when the pull pin is disengaged from the console.
10. When the treadmill is not being used, the power cord should be unplugged and the safety pull pin
should be removed.
11. Before starting any exercise program, consult with your physician or health professional. He or she can
help to establish the exercise frequency, intensity (target heart zone) and time appropriate to your particular
age and physical condition. If you have any pain or tightness in your chest, an irregular heartbeat,
shortness of breath, feel faint or have any discomfort while you exercise, STOP IMMEDIATELY! Consult
your physician before continuing.
12. If you observe any damage or wear on the mains plug or on any section of the mains lead then please
have these replaced immediately by a qualified electrician – do not attempt to change or repair these
yourself.
13. If the supply cord is damaged, it must be replaced by the manufacturer, its service agent or similarly
qualified persons in order to avoid a hazard.
14. Put your feet on the side rail before using the treadmill, and always attach the safety pull pin
rope to your clothing. Hold the handle bar before the running belt moving well ( feel the running
speed by your single foot before using it). To avoid loss balance, please slow down the speed to the
lowest or take off the safety. And hold the handle bar to jump to the side rail when emergency or the
safety key is not attached.
2

NO
ASSEMBLY INSTRUCTIONS
Caution: Read the assembly instruction carefully, and follow the instruction while
assembling.
When you open the carton, you will find the below spare parts
Spare parts list:
NO.
1
3
18
50
68
81
93
97
121
DESCRIPTION SPEC QTY
Main frame 1
Left upright 1
Upright cover L 1
Left bottom cover 1
Socket head wrench S=13、14、15 1
screw ST4.2*13 8
bolt M10*25 8
Lock washer 8 4
5# Allen wrench 5mm 1
DESCRIPTION SPEC QTY
2 computer 1
4 Right upright 1
19
51
71
91
94
98
Upright cover R 1
Right bottom cover 1
6# Allen wrench 6mm 1
Lock washer 10 8
Assembly tools
Socket head/Allen wrench: 5mm 1pcs 6mm 1pcs
screw ST4.2*12 6
bolt M8*52 4
、
Screw driver :S=13
、14、、、、15 1pcs
、、
3
wrench (71), Bolt M10*25(93)
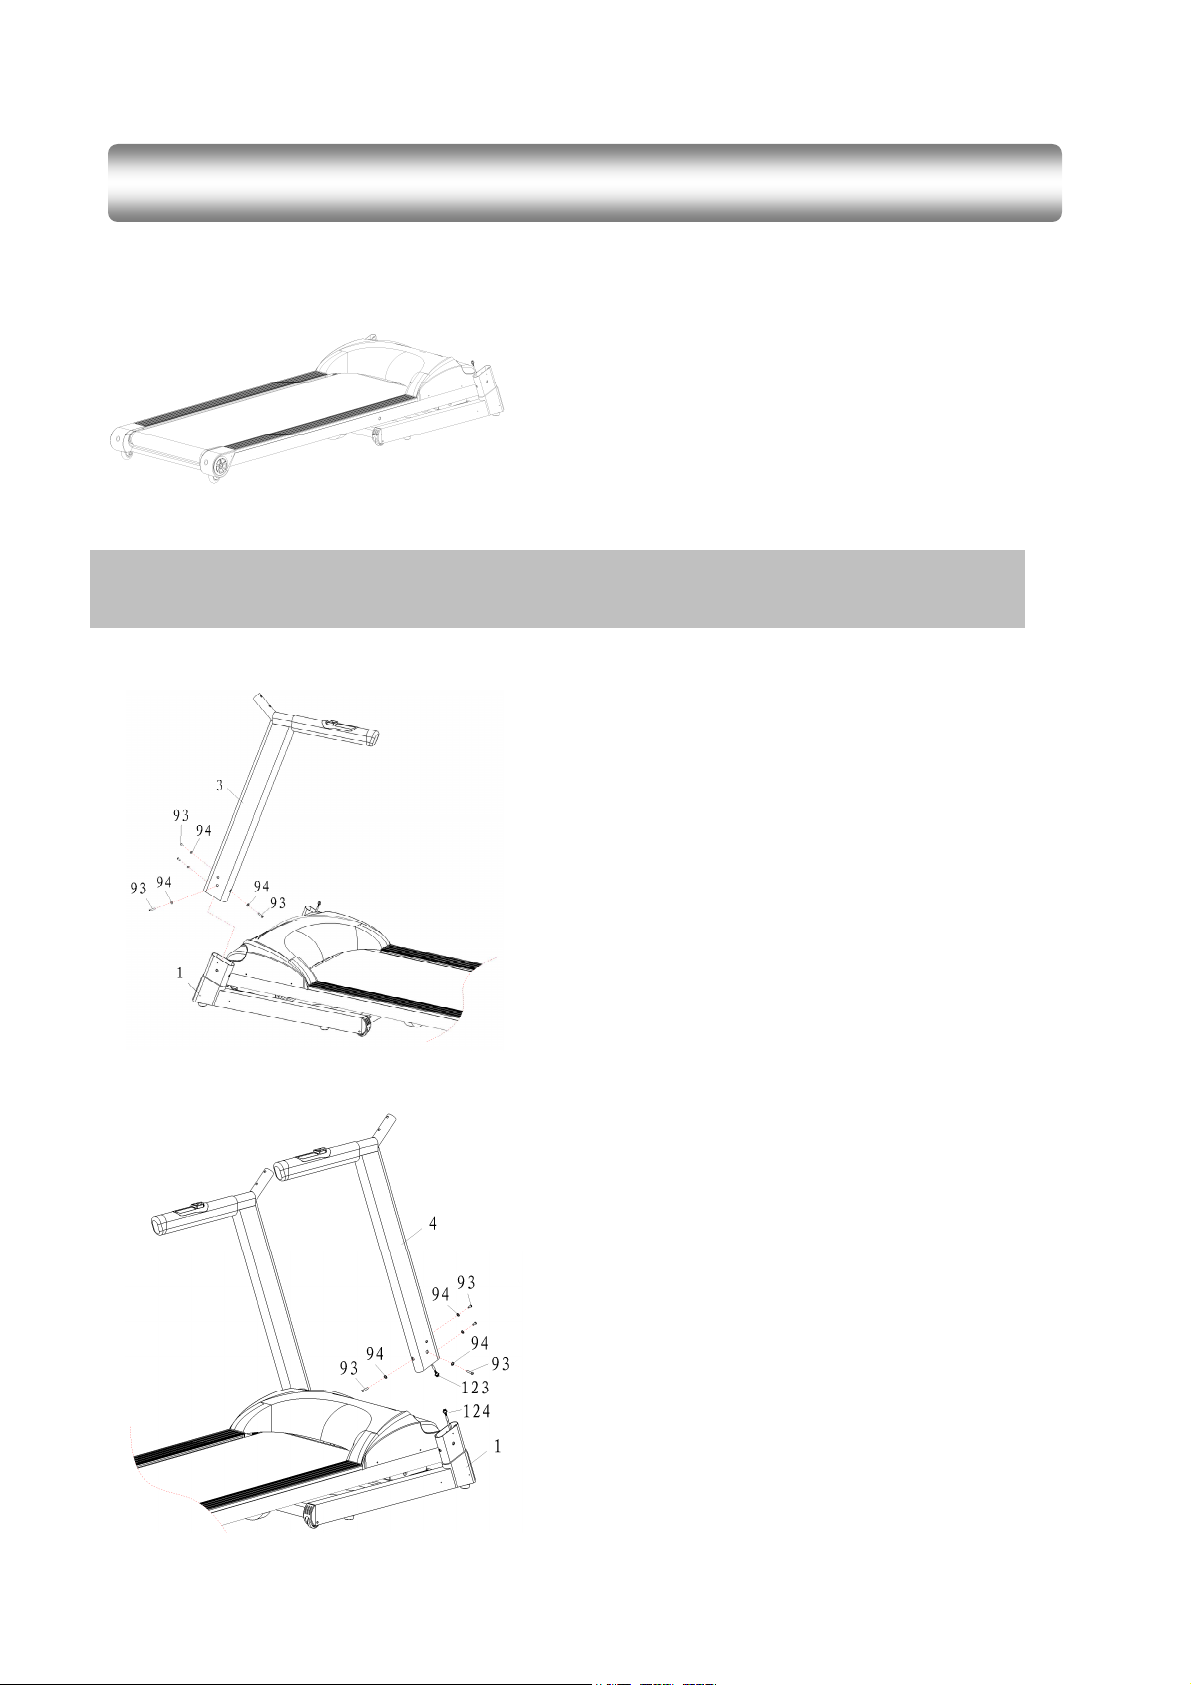
ASSEMBLY STEPS
Notice: Do not turn power on before assembly is done.
Step 1:
Attention: Before assemble the back cover, make sure all the above procedures finished strictly and all the
bolts locked tightly
Step 2:
Step 3:
Open the carton,get out the above
spare parts,put the MAIN FRAME on
the ground.
Insert the left upright (3) into the
main frame and use 6# Allen
and lock washer(94) to lock left
upright onto the main frame
Connect the middle wire(123) in
the upright(4) to the lower
wire(124) in the main frame(1).
Then insert the right upright (4)
into the main frame and use 6#
Allen wrench (71), Bolt
M10*25(93) and lock washer(94)
to lock right upright onto the main
frame
4

Step 4:
Connect the computer up wire
(122) to the middle wire (123a) in
the right upright(4). Then use the
5# Allen wrench (121), bolt M8*52
(98)and lock washer (97) to lock
the computer onto the upright
(3)(4)
Caution: make sure all the steps be finished strictly and then you can turn
Caution: make sure all the steps be finished strictly and then you can turn
Caution: make sure all the steps be finished strictly and then you can turn Caution: make sure all the steps be finished strictly and then you can turn
on the power. Read the operation guide below carefully before using
on the power. Read the operation guide below carefully before using
on the power. Read the operation guide below carefully before using on the power. Read the operation guide below carefully before using
Step 5:
Step 6:
Step 7:
Use screw driver and screw
ST4.2*12(91) to lock the left back
cover(50) onto the main frame (1)
Use screw driver and screw
ST4.2*12(91) to lock the right back
cover(51) onto the main frame (1)
Use screw driver and screw
ST4.2*13(81) to lock the upright
(18、19) onto the computer (2)
5
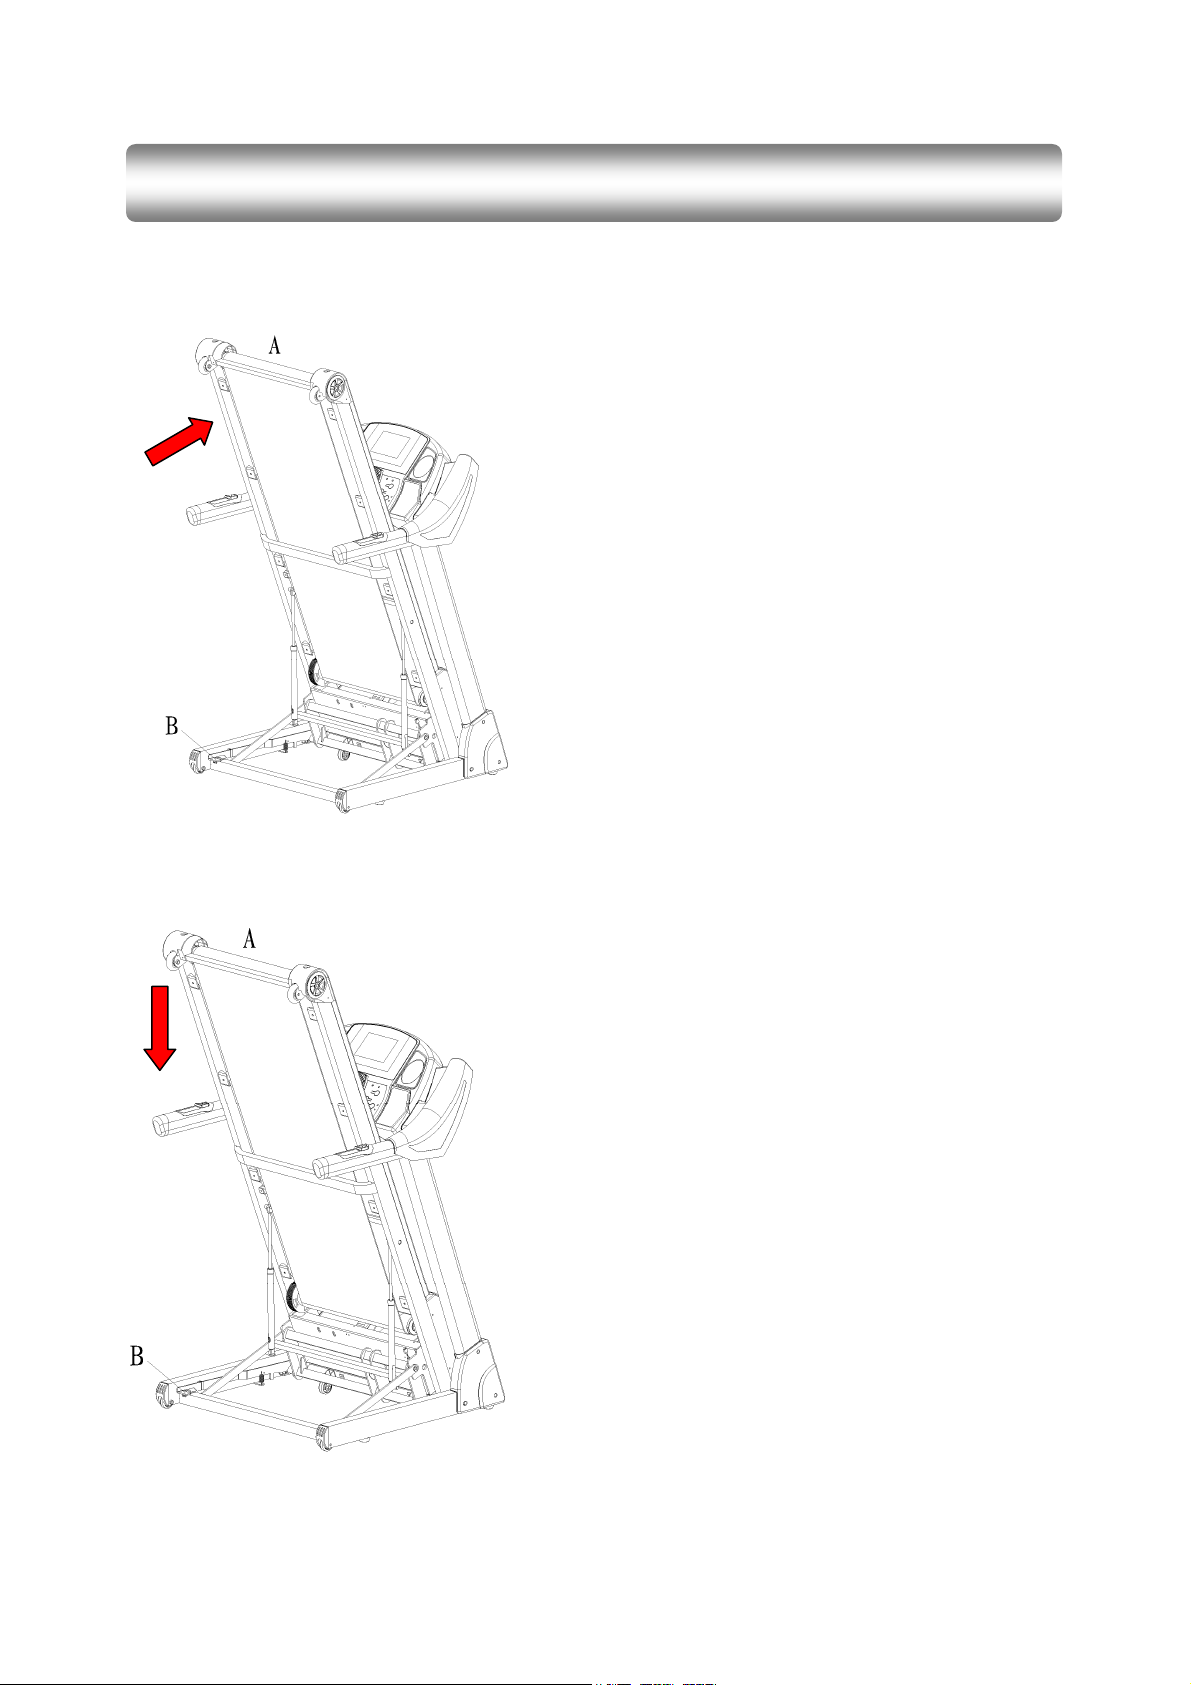
Pulling up:
FOLDING INSTRUCTION
1、Hold the place A, and pull up the
main frame as the arrow showing
till you hear the sound from pedal
hook
Pulling down:
2. Hold place A, and trample the
pedal hook (place B), then the main
frame will decline automatically
6

BUILT UP
SIZE(mm)
TECHNICAL PARAMETER
1990*920*1350 POWER AS ORDER REQUIRE
FOLDABLE
960*920*1770
SIZE(mm)
RUNNING
1520*510 INPUT CURRENT
BOARD(mm)
NET WEIGHT 116KG SPEED RANGE 1.0-20KM/h
INCLINE LEVELS
ONE LCD
DISPLAY
WINDOW
20 SECTIONS
SPEED TIME DISTANCE CALORIES PULSE INCLINE
MAX OUTPUT
AS ORDER REQUIRE
POWER
AS ORDER REQUIRE
MAX USE’S
125KG
WEIGHT
GROUND GUIDE
This product must be grounded. If it should malfunction or breakdown, grounding provides
a path of least resistance for electric current to reduce the risk of electric shock. This
product is equipped with a cord having an equipment-grounding conductor and a
grounding plug. The plug must be plugged into an appropriate outlet that is properly
installed and grounded in accordance with all local codes and ordinances.
DANGER
–
Improper connection of the equipment-grounding conductor can result in
a risk of electric shock. Check with a qualified electrician or serviceman if you are in doubt
as to whether the product is properly grounded. Do not modify the plug provided with the
product – if it will not fit the outlet, have a proper outlet installed by a qualified electrician.
This product is for use on a nominal 220-volt circuit and has a grounding plug that
looks like the plug illustrated in sketch A in following figure. Make that the product is
connected to an outlet having the same configuration as the plug. No adapter should be
used with this product
.
7

OPERATION GUIDE
WINDOW DISPLAY:
1. This product is with touch-screen operation way, the operation interface is very convenient for the
user to do the function operation.
2. Turn on the power, attach the safety key onto the keypress board to enter the system into the
stand-by status.
3. The system is internally with prre-set Media Playing Function and externally with SD card, USB
connector and MP3 connectors.
4. In case of emergency, pull up the safety key and the the treadmill will stop immediately.
CAUTION
○ When doing operation, please not touch the screen by sharp articles, such as pencil,
finger nail or press the screen too firmly. If so, it will break the treadmill or damage
the touch-screen.
8

1,
“SPEED” window: Speed range: 1.0-20KM/H;
2.“TIME”Window: Show running time. Turn data per 5 seconds, and relevant direction light will light .Display
the exercise time positive direction clock from 0:00-99:59,To 99:59 spill over from 0:00 to reset,count
down from the setting time to 0:00,When It to 0:00, then the actual exercise time from the positive
direction to start to count down.
3.“INCL” Window: Show incline .The default show is incline, the range: 1-20.
4.“PULSE” Window: Show pulse. When touching the handle pulse slice with both hands, it will show the
pulse data in the window, the range is 50-200 per hypo/min. (The data is just for reference, do not use as
the medical data)
5. “DIST” window: Show the running distance , count from 0 to 999, to 999 will spill over to clear 0; it will
count down from setting data to 0, then the machine will stop smoothly and show ‘End’, enter the beginning
state after 5 seconds.
6. “CAL” window: Display runner calories. When show calories, count from 0 to 999, to 999 will spill over to
clear 0; when calories count down, it will count down from setting data to 0, then the machine will stop
smoothly and show ‘End’, enter the beginning state after 5 seconds.
BUTTON FUNCTION:
1. Music Playing Button: Press this button to enter into the music playing window. The system
accepts audio file format as MP3、WMA、WAV、PLAC、APE, and ect.
2. Video Playing Button: Press this button to enter into the video playing window. The system accepts
video format as 480P,720P,1080, and also accepts video file format as RM、RMVB、AVI、WMV、MPEG、
3GP、DAT、MP4、DTA、M2TS and so on.
Attention:
(1). Some special file is not able to be played ( the audio format is non-standard, the video format is
non-standard or the size of the file is too big).
(2). When playing the high definition video, the response will be slower while touching the screen
key-press.
3. Photo Playing Button: Press this button to enter into the photo playing window. The system accepts
picture format as JPG、BMP、PNG and so on. (Attention: When playing the photos, the response speed will
be different according to the different resolution of the photos. The higher the resolution is, the slower the
display speed will be).
9

4. Program Manual Button: Press this button to enter into the pre-set program window. There are 15
pre-set programs P1-P15, 3 user’s manual programs U1-U3, 3 heart rate control programs HRC1-HRC3
and 3 count down mode MODE1-MODE3 (MODE1: Time count-down mode, MODE2: Distance
count-down mode, Calorie count- down mode MODE3).
5. Start Button: Press START button,the system will start to count down from 3 seconds and
the counting data of the second will be displayed on the computer. After counting-down is finished, the
treadmill will start by the speed of 1KM/H.
Running Status Display Window
6. “SPEED+”,“SPEED-” Speed Button: After starting the treadmill, pressing “SPEED” button can adjust the
speed and the adjustment range is 0.1km per time. When pressing “SPEED” button for more than 0.5
seconds, the speed will be continuously increased or decreased.
7. “INCLINE+”,“INCLINE-” Incline Button:After starting the treadmill, pressing “INCLINE” button can adjust
the level of incline and the adjustment range is 1 section per time. When pressing “INCLINE” button for
more than 0.5 seconds, the incline level will be continuously increased or decreased. This system is with
the “SPEED+”,“SPEED-”, “INCLINE+”, “INCLINE-”touch-screen key-press, and also with
“SPEED+”,“SPEED-”, “INCLINE+”,
“INCLINE-” key-press on the handle bars.)
8. Incline, Speed Quick Access Button: Press this button to enter into the Incline & Speed quick
access display window to choose the incline (1、3、5、7、9、11、13、15%) and speed (1、3、5、7、9、
11、13、15KM/H) as the below diagram:
10

9. STOP Button: While running the treadmill, press this button at any to stop the treadmill and
return all the data back to 0.
10. Go Back Button: Press this button to go back the previous display interface.
11. Display window switch button: This button has the following 2 functions:
a, Press this button till you hear the sound “Bi” to stop the treadmill immediately when using the treadmill.
b, Press this button till you hear the sound “Bi” and then keep pressing it for 3 seconds to close the
display window. With the display window closed, press this button till you hear the sound “BI” and then keep
pressing it for 3 seconds to open the display window again.
PROGRAM OPERATION INSTRUCTION:
Program Display Window
Press the Program Manual Button at the first display window to enter the program display window
shown as above picture. Then you can choose the pre-set program P1-P15, 3 user’s manual program
U1-U3, 3 heart rate control program HRC1-HRC3 and 3 count-down mode MODE1-MODE3 (MODE1:
Time count-down mode, MODE2: Distance count-down mode, MODE3: Calories count-down mode).
11

1. COUNT-DOWN PROGRAM OPERATION INSTRUCTION:
(1).”MODE1”: Press this button to enter the Time count-down mode, and the “TIME” window will display
15:00 and glitter. Press “+”’ “-“ to set the running time. The range is 5:00 --- 99:00.
(2).”MODE2” Press this button to enter the Distance count-down mode, and the “DISTANCE” window will
display “1.0” and glitter. Press “+”’ “-“ to set the distance. The range is 1.0 --- 99.9.
(3).”MODE3” Press this button to enter the calories count-down mode, and the “CAL” window will display
“20” and glitter. Press “+”’ “-“ to set the calories. The range is 20 --- 999.
(4).Choose one of the 3 count-down mode and then press the “START” button to start after 3 seconds.
Press ”INCLINE+”, ”INCLINE -”, ”SPEED+”, ”SPEED -” to adjust the incline and speed you want. Press
“STOP” button to stop the treadmill.
2. PROGRAM CHART:
Each program is to divide the setting exercise time into 16 equal sections, and each time section has both
the preset speed and incline level.
PROGRAM CHART
Each exercise time=the setting time/16 TIME
PROGRAM
P1
SPEED 1 3 3 7 7 5 5 5 7 7 5 5 5 5 3 2
INCLINE 0 2 6 6 8 8 6 6 4 4 4 6 6 2 2 0
P2
SPEED 2 3 3 6 5 5 8 5 5 6 8 8 8 5 4 3
INCLINE 0 3 9 9 9 2 2 8 8 4 1 1 4 4 4 0
P3
SPEED 2 3 5 5 7 7 8 5 5 5 3 3 8 8 4 3
INCLINE 0 2 3 4 5 5 7 7 4 4 4 4 6 3 2 0
P4
SPEED 2 2 3 5 5 5 8 8 8 8 5 5 5 3 2 2
INCLINE 0 3 6 6 6 9 9 9 9 9 9 6 6 6 2 0
P5
SPEED 3 4 5 6 7 8 9 10 10 10 9 8 7 5 4 3
INCLINE 0 2 4 4 8 8 6 6 6 6 8 7 6 5 1 0
P6
SPEED 3 4 5 5 6 6 7 7 7 9 9 10 10 11 5 3
INCLINE 0 8 8 8 8 8 7 7 7 7 7 5 5 3 3 0
P7
SPEED 3 4 9 4 11 4 10 4 9 4 8 4 11 5 3 2
INCLINE 0 1 4 4 4 6 6 6 8 8 8 10 10 10 6 0
P8
SPEED 3 5 8 3 5 7 9 3 5 7 10 3 5 7 11 5
INCLINE 0 3 8 8 3 3 7 7 3 3 6 6 3 3 5 0
P9
SPEED 3 7 9 4 7 10 4 7 11 5 7 12 4 7 12 6
INCLINE 0 6 6 3 7 7 3 8 8 3 9 9 3 3 7 0
1 2 3 4 5 6 7 8 9 10 11 12 13 14 15 16
P10
SPEED 3 5 6 6 6 9 10 6 6 9 10 6 6 6 11 3
INCLINE 0 7 7 7 5 5 5 8 8 8 8 8 8 4 4 0
P11
SPEED 4 5 7 9 10 11 9 6 8 9 10 10 11 9 6 5
INCLINE 0 6 6 6 3 3 3 7 7 4 4 4 4 6 6 0
P12
SPEED 4 6 10 10 7 10 10 10 7 7 10 10 10 10 6 5
INCLINE 0 8 8 6 9 9 5 5 8 8 8 4 4 4 4 0
P13
SPEED 1 2 3 4 5 6 7 8 9 10 12 10 8 6 4 2
INCLINE 0 1 2 3 4 5 6 8 7 6 5 4 3 2 1 0
12

P14
SPEED 2 4 6 8 10 12 12 11 12 11 10 9 8 7 5 3
INCLINE 0 3 9 10 9 2 2 8 8 4 1 1 4 5 4 0
SPEED 2 3 5 5 7 12 8 5 9 5 3 3 8 6 4 3
P15
INCLINE 0 2 3 4 5 5 7 7 4 4 8 4 6 3 2 0
(1).The system is with 15 pre-set programs P1 – P15. On the program interface, you
can choose the program as you like. When you see “TIME” glittering, press “+” & ” -” over the preset
time 15:00 to set up the time that you need, then press “START” to start the treadmill. After that, the
inferface to go back to the first display window and you can see the chosen program data shown on the
top left corner. For example, if Progam 1 is shown on the top left corner, it means that the system will
be running with Program 1 operation status. The preset program is divided into 16 sections, and each
exercise time=the setting time/16. When the system enters into the next section, it will make 3
“Bi-Bi-Bi” sound, the speed and the incline level will change according to the preset data. During the
same section course, you can press “INCLINE+”,
”INCLINE-”, “SPEED+”, “SPEED-” to change the incline level and the speed. When the system goes
into the next section, it will recover to the preset data of the speed and the incline. When the program is
completely operated, the system will make 3 “Bi-Bi-Bi” sound.
(2). When the program is finished, the treadmill will stop and enter into STAND BY status after 5
seconds.
3. USER PROGRAM OPERATION INSTRUCTION:
USER1, USER2, USER3: Besides the 15 preset programs, you can also set up another 3 user’s
programs as your need: USER1, USER2, USER3.
(1). User’s program setting:
After entering into the program display window, choose the program USER 1, USER2 or USER3 and then
the “TIME” will glitter. Press “Tab” to change the “TIME”, “SPEED” & “INCLINE” setting, press “+”, “-“ to
adjust the “TIME”, “SPEED” & “TIME” data, and press “START” dicectly after finishing the setting. The
preset time of the system is 15:00. After the treadmill starts to work, the window will enter into the first
display window, and the display of “USER1, USER2 or USER3 means that the system is working under the
User’s PROGRAM.
(2).
The USER setting data can be saved when you use the treadmill next time.
4. HRC PROGRAM OPERATION INSTRUCTION (OPTION):
(1).Under the STANDBY state, Press program manual keypress “ ” to enter into the program
choosing window which is with 3 HRC programs. When using it, just press HRC1, HRC2 or HRC3 to
choose the one you like:
“HRC1” program: the highest speed is 8.0km/h; age: 30; default pulse: 124/minute;
“HRC2” program: the highest speed is 9.0km/h; age: 30; default pulse: 143/minute;
“HRC3” program: the highest speed is 10.0km/h; age :30; default pulse:162 /minute;
(2).After you choose the HRC program, press “+”, “-“ to adjust the “Age”, then press “TAB” to save and
enter into the “Pulse” set-up. When it is finished, press “TAB” again to enter into the “Time” set-up. The
time range is: 10:00 – 99:00 and the preset Time is : 15:00. (After press “TAB”, the system will save the
parameter that you set automatically. And the Age and Pulse range are shown as the attached table.)
(3).After finishing “Time” set-up, press “START” to start the treadmill. The display window will enter into
13

the main operation display window, and HRC1, HRC2, or HRC3 will be shown on the left of the window
which means that the system is working under the HRC program.
(4).Under the HRC program, you can press “INCLINE+”, “INCLINE –“, “SPEED+”, “SPEED –” button to
change the speed and incline level, but the system will still do adjustment of the speed and incline level
automatically to meet with your target heart rate.
(5).The first one minute after the exercise is the warm-up phase, in which the system won’t change the
speed and incline level automatically, so the change can only be done manually. After one minute, the
system will increase the speed automatically with 0.5KM/ML every time according your current pulse.
when the speed reaches the highest speed of the HRC program, if it still cannot reach your target pulse,
the system will increase the incline level ( 1 section each time) to increase the exercise level in order to
reach the target pulse. When it comes to the target pulse, the speed and incline level will keep the
same level and won’t change.
Attention: The HRC program must use chest belt to test your heart rate. Make sure that the
chest belt must be attached closely to the chest and the skin.
HRC PROGRAM CHART
Age HRC1-Target zone (L-H) Age HRC2- Target zone (L-H) Age HRC3- Target zone (L-H)
Lowest Default Highest
15
16
17
18
19
20
21
22
23
24
25
26
27
28
29
30
31
32
33
34
35
36
37
38
39
128 133 138 15
128 133 138 16
127 132 137 17
126 131 136 18
126 131 136 19
125 130 135 20
124 129 134 21
124 129 134 22
123 128 133 23
122 127 132 24
122 127 132 25
121 126 131 26
120 125 130 27
120 125 130 28
119 124 129 29
119 124 129 30
118 123 128 31
117 122 127 32
117 122 127 33
116 121 126 34
115 120 125 35
115 120 125 36
114 119 124 37
113 118 123 38
113 118 123 39
Lowest Default Highest
149 154 159 15
148 153 158 16
147 152 157 17
147 152 157 18
146 151 156 19
145 150 155 20
144 149 154 21
144 149 154 22
143 148 153 23
142 147 152 24
141 146 151 25
141 146 151 26
140 145 150 27
139 144 149 28
138 143 148 29
138 143 148 30
137 142 147 31
136 141 146 32
135 140 145 33
135 140 145 34
134 139 144 35
133 138 143 36
132 137 142 37
132 137 142 38
131 136 141 39
Lowest Default Highest
169 174 179
168 173 178
168 173 178
167 172 177
166 171 176
165 170 175
164 169 174
163 168 173
162 167 172
162 167 172
161 166 171
160 165 170
159 164 169
158 163 168
157 162 167
157 162 167
156 161 166
155 160 165
154 159 164
153 158 163
152 157 162
151 156 161
151 156 161
150 155 160
149 154 159
14

40
41
42
43
44
45
46
47
48
49
50
51
52
53
54
55
56
57
58
59
60
61
62
63
64
65
66
67
68
69
70
71
72
73
74
75
76
77
78
79
80
112 117 122 40
111 116 121 41
111 116 121 42
110 115 120 43
109 114 119 44
109 114 119 45
108 113 118 46
107 112 117 47
107 112 117 48
106 111 116 49
106 111 116 50
105 110 115 51
104 109 114 52
104 109 114 53
103 108 113 54
102 107 112 55
102 107 112 56
101 106 111 57
100 105 110 58
100 105 110 59
99 104 109 60
98 103 108 61
98 103 108 62
97 102 107 63
96 101 106 64
96 101 106 65
95 100 105 66
94 99 104 67
94 99 104 68
93 98 103 69
93 98 103 70
92 97 102 71
91 96 101 72
91 96 101 73
90 95 100 74
89 94 99 75
89 94 99 76
88 93 98 77
87 92 97 78
87 92 97 79
86 91 96 80
130 135 140 40
129 134 139 41
129 134 139 42
128 133 138 43
127 132 137 44
126 131 136 45
126 131 136 46
125 130 135 47
124 129 134 48
123 128 133 49
123 128 133 50
122 127 132 51
121 126 131 52
120 125 130 53
120 125 130 54
119 124 129 55
118 123 128 56
117 122 127 57
117 122 127 58
116 121 126 59
115 120 125 60
114 119 124 61
114 119 124 62
113 118 123 63
112 117 122 64
111 116 121 65
111 116 121 66
110 115 120 67
109 114 119 68
108 113 118 69
108 113 118 70
107 112 117 71
106 111 116 72
105 110 115 73
105 110 115 74
104 109 114 75
103 108 113 76
102 107 112 77
102 107 112 78
101 106 111 79
100 105 110 80
148 153 158
147 152 157
146 151 156
145 150 155
145 150 155
144 149 154
143 148 153
142 147 152
141 146 151
140 145 150
140 145 150
139 144 149
138 143 148
137 142 147
136 141 146
135 140 145
134 139 144
134 139 144
133 138 143
132 137 142
131 136 141
130 135 140
129 134 139
128 133 138
128 133 138
127 132 137
126 131 136
125 130 135
124 129 134
123 128 133
123 128 133
122 127 132
121 126 131
120 125 130
119 124 129
118 123 128
117 122 127
117 122 127
116 121 126
115 120 125
114 119 124
15

PROGRAM RANGE:
PROGRAM BEGIN SET UP RANGE DISPLAY RANGE
TIME(MIN:SECOND) 0:00 15:00 5:00-99:00
INCLINE(%) 0 0 0-20 0-20
SPEED(K/h) 1.0 1.0 1.0-20 1.0-20
DISTANCE(K) 0 1.0 1.0-99.9
PULSE(hypo/min) P N/A N/A 50-200
CALORIE(THERM) 0 20 20-999
MEDIA OPERATION INSTRUCTION:
1, Music Playing Operation:
Music Playing Display Window
0:00-99:59
0.00-99.9
0-999
Internal Saver
External SD Card Saver
External USB Saver
Music File Name
BACK
Keypress
(Return to
previous
menu)
The system offers 3 storage options:Internal Saver, External SD Card Saver and External USB Saver. You
can touch the SAVER symbol to choose the SAVER that you want, and the
SAVER Symbol will shine when you chose it. : Previous, : Play/Pause, : Next. When you want to
play the music that you choose, just double click the file name.
Press this keypress to stop
the treadmill at any time
Volume Adjustment
(Touch directly)
16

Video Playing Display Window
Video operation is the same as the music operation. Press the playing symbol after you chose the
Video file that you want to play, and then enter into the Video Window shown as below:
The color of the file will
change into red color
after it is chosen.
Full Screen Playing
Keypress
: Previous, : Next, : Pause, : Play
Picture Browse Window
:Picture Left Movement, :Picture Right Movement, : Playing, :Stop
When the picture is playing, the system will display each picture with every 2 seconds.
17

Attention:
1. Some special Music & Video files are not able to be played, such as non-standard Audio
and Video formats, or the size of the file is too big.
2. When playing the picture, the playing reaction speed will be different according to the
resolution of the picture. The higher the resolution is, the slower the reaction speed will be.
3. USB & SD Card Storage should be with good quality, otherwise it will occur playing
standstill or sudden exit.
4. When playing the file, just double click the file name.
SAFETY LOCK FUNCTION:
Pull out the safety pulling rope, then the treadmill will stop immediately. All the windows display“―――”,the
buzzer will make 3 sound “Bi-Bi-Bi”, and the treadmill become stopped. Attach the magnet end of the safety
pulling rope to the computer, the treadmill will be at the beginning of running.
MP3 FUNCTION:
When Mp3 is connected, the computer is able to play music. The volume is controlled on the Mp3. Please
pay attention adjust the volume properly for having better timbre and protecting the inner voice-frequency
circuit.
TURN OFF:
Turn off the power: You can turn off the power to stop the treadmill, so that the treadmill won’t be damaged
at any time.
CAUTION:
1. We recommend that you maintain a slow speed at the beginning of a session and hold on to the
handrails until you become comfortable and familiar with the treadmill.
2. Attach the magnet end of the safety pulling rope to the computer and also attach the clip of the safety
pulling rope to your clothing.
3. To end your workout safely, press the STOP button or pull out the safety pulling rope, then the treadmill
will stop immediately.
TROUBLE SHOOTING GUIDE
1. No display on the console after the power is started:
The probable reason is that the wire from the console to the bottom control board is not connected well
or the transformer is burnt out. Take off the upright frame tubes and check every single connection part
of the wires from the console to the bottom control board and make sure that all the wires are
connected well. If the problem is caused by the defective wires or the defective transformer, please do
the replacement by the new wires or transformer.
18

2. E01—Communication failure:
The probable reason is that the communication from the console to the bottom control board is stuck.
Check every single connection part of the wires from the console to the bottom control board and
make sure that all the wires are connected well. If the problem is caused by the defective wires, do the
replacement by the new wires.
3. E02—Burst clash protection:
Check if the voltage is lower than 50% of the normal voltage and do the testing again by the correct
voltage. Check if the control board has strange smell, if it is, please use a new control board to do the
replacement. Check if the motor wires are connected well, and re-connect the motor wires well.
4. E03—No sensor signal:
The probable reason is that the speed sensor signal has not been received during 10 minutes, check if
the sensor signal light of the bottom control board is flashing, if not, please use the new part to do the
replacement. Check if the sensor plug is connected well or if the magnetic sensor is broken,
re-connect the sensor plug or change the magnetic sensor with the new one.
5. E04—Incline leaning failure:
Check if the VR wire of the incline motor is connected well, re-connect the VR wire plug. Check if the
AC wire of the incline motor is connected well, connect the AC wire of the incline motor with the correct
position of the control board. Check if the motor connection wires are broken, if yes, do the change by
the new wires or the new incline motor. Press the button of the bottom control board to re-work after all
the checkings are done well.
6. E05—Current overload protection:
The probable reason is that the user’s weight is over limit loading and causes too much current, so the
unit starts self-protection system. If a certain part of the treadmill is stuck, it may also cause the
problems that the motor can not rotate, the loading is over the limit and the current is too much. Adjust
the treadmill well and restart the unit power. In addition, check if the motor has the overloading current
sound or the burning smell, if yes, change the motor by the new one. Check if the control board has
the burning smell, if yes, change the control board by the new one. Check if the voltage is normal or
too low, do re-testing by the correct voltage.
7. If the motor doesn’t rotate after pressing the START button, check if the motor wires are broken, the
fuses of the bottom control board are damaged or come off, the motor wires are connected well, and
the IGBT of the bottom control board is burnt. Check if all the motor wires are connected well, the
fuses of the control board are okay, if not, re-assemble it or change the part with the new one. Check if
the motor is getting loose, and connect the motor wires well. Use the Multimeter to test if the IGBT of
the bottom control board is burnt out, change either the IGBT or the whole bottom control board.
19

EXERCISE INSTRUCTIONS
1. The Warm Up Phase
This stage helps get the blood flowing around the body and the muscles working properly. It will also
reduce the risk of cramp and muscle injury. It is advisable to do a few stretching exercises as shown below.
Each stretch should be held for approximately 30 seconds, do not force or jerk your muscles into a stretch if it hurts, STOP.
2. The Exercise Phase
This is the stage where you put the effort in. After regular use , the muscles in your legs will become
Stronger. Work to your but it is very important to maintain a steady tempo throughout. The rate of work
should be sufficient to raise your heart beat into the target zone shown on the graph below.
This stage should last for a minimum of 12 minutes though most people start at
about 15-20 minutes
3. The Cool Down Phase
This stage is to let your Cardio-vascular System and muscles wind down. This is a repeat of the warm
up exercise e.g. reduce your tempo, continue for approximately 5 minutes. The stretching exercises should
now be repeated, again remembering not to force or jerk your muscles into the stretch.
As you get fitter you may need to train longer and harder. It is advisable to train at least three times a week,
and if possible space your workouts evenly throughout the week.
20

To tone muscle while on your Treadmill you will need to have the resistance set quite high. This will put
more strain on our leg muscles and may mean you cannot train for as long as you would like. If you are also
trying to improve your fitness you need to alter your training program. You should train as normal during the
warm up and cool down phases, but towards the end of the exercise phase you should increase resistance,
making your legs work harden than normal. You may have to reduce your speed to keep your heart rate in
the target zone.
The important factor here is the amount of effort you put in. The harder and longer you work the more
calories you will burn. Effectively this is the same as if you were training to improve your fitness, the
difference is the goal.
MAINTENANCE INSTRUCTIONS
WALKING BELT CENTERING AND TENSION ADJUSTMENT
DO NOT OVERTIGHTEN the walking belt.
This may cause reduced motor performance and excessive roller
wear.
TO CENTER WALKING BELT:
● Place treadmill on a level surface
● Run treadmill at approximately 3.5 mph
● If the belt has drifted to the right, turn the right adjusting bolt 1/2 turn clockwise and the left adjusting bolt
1/2 turn counterclockwise
● If the belt has drifted to the left, turn the left adjusting bolt 1/2 turn clockwise and the right adjusting bolt
1/2 turn clockwise and the right adjusting bolt 1/2 turn counterclockwise
Picture A If the belts has drifted to the LEF
T
Picture
B
If the belts has drifted to the RIGHT
WARNING: ALWAYS UNPLUG THE TREADMILL FROM THE ELECTRICAL OUTLET BEFORE
CLEANING OR SERVICING THE UNIT.
21

CLEANING
General cleaning or the unit will greatly prolong the treadmill. Keep treadmill clean by dusting regularly. Be
sure to clean the exposed part of the deck on either side of the walking belt and also the side rails. This
reduces the build up of foreign material underneath the walking belt.
The top of the belt may be cleaned with a wet, soapy cloth. Be careful to keep liquid away from inside the
motorized treadmill frame or from underneath the belt. Warning::::Always unplug the treadmill from the
electrical outlet before removing the motor cover. At least once a year remove the motor cover and
vacuum under the motor cover.
WALKING BELT AND DECK LUBRICATION
This treadmill is equipped with a pre-lubricated, low maintenance deck system. The belt/
deck friction may play a major role in the function and life of your treadmill, thus requiring
periodic lubrication. We recommend a periodic inspection of the deck.
We recommend lubrication of the deck according to the following timetable:
Light user (less than 3 hours/ week) annually
Medium user (3-5 hours/ week) every six months
Heavy user (more than 5 hours/ week) every three months
22

EXPLODED DRAWING
23

PARTS LIST
NO.
1 COMPUTER ASSEMBLY 1 39 MOTOR FRONT COVER 1
2 LEFT UPRIGHT 1 40 DC MOTOR 1
3 RIGHT UPRIGHT 1 41 MOTOR SEAT 1
4 ADJUST SUBASSEMBLY 1 42 SLIDE PIECE 2
5 SUPPORT FRAME SUBASSEMBLY
6 BASE FRAME 1 44 TUBE STOPPER 4
7 PEDAL SUBASSEMBLY 1 45 TAPER CUSHION MAT 2
8 MAIN FRAME 1 46 SLIDE RAIL AXIS 1
9 STRENGTH TUBE ASSEMBLE 1 47 LOCATION CONTROL AXIS
10 COMPUTER BOTTOM COVER 1 48 CYLINDER 2
11 FLAT MAT 4 49 AXIS COVER 2
12 OVERLAY 1 50 LEFT UPRIGHT COVER 1
13 COMPUTER TOP COVER 1 51 RIGHT UPRIGHT COVER 1
14 FAN TOP COVER 1 52 RING PROTECTOR STOPPER
15 COOLING SWITCH 1 53 EXTEND SPRING 1
16 COMPUTER BOARD 1 54 WHEEL CAP BUSHING 4
17 LEFT HANDLE COVER 1 55 WHEEL 4
18 LEFT HANDLEBAR COVER 1 56 WHEEL CAP 2
NAME SPEC. QUAN NO.
1 43 PLASTIC BEARING 2
NAME SPEC. QUAN
1
1
19 RIGHT HANDLEBAR COVER 1 57 EVA PAD 1
20 RIGHT HANDLE COVER 1 58 MAGNETIC SENSOR 1
21 TFT CONTROL BOARD 1 59 ROUND CUSHION 8
22 TOUCH SCREEN 1 60 CUSHION FOR SIDE RAIL 8
23 LEFT MOTOR COVER 1 61 WHEEL 2
24 RIGHT MOTOR COVER 1 62 END CAP COVER 2
25 MOTOR COVER 1 63 LEFT END CAP 1
26 PULSE WITH SPEED BUTTON 1 64 RIGHT END CAP 1
27 PULSE WITH INCLINE BUTTON 1 65 ELECTRICAL OUTLET 1
28 FOAM 2 66 SWITCH 1
29 END CAP 2 67 OVERLOAD PROTECTOR 1
30 INCLINE MOTOR 1 68
31 TFT TOUCH SCREEN 1 69 STANDARD POWER WIRE 1
32 CONTROL BOARD 1 70 SAFETY KEY 1
33 BELT J220-8 1 71 6#SCREW DRIVER 1
34 FRONT ROLLER 1 72 MAGNETIC CORE 1
35 SIDE RAIL 2 73 MAGNETIC RING 1
36 BOLT M10*45 1 74 AC SINGLE WIRE 1
37 RUNNING BOARD 1 75 SINGLE WIRE 1 350 YELLOW 1
38 RUNNING BELT 1 76 SINGLE WIRE 2 350 BULE 2
ALLEN WRENCH
1
24

IRON SHEET OF THE
77
78 SPRING BALL 1 113 BOLT M10*30 4
79 SAFETY KEY SENSOR 1 114 BOLT M10*90 1
80 SCREW ST2.9*9.5 18 115 PEDAL BUSHING 1
81 SCREW ST4.2*12 36 116 BOLT M8*40 1
82 COOLING FAN 1 117 BOLT M6*22 8
83 SCREW ST2.9*6.5 18 118 BOLT M8*65 2
84 BUTTON OVERLAY 1 119 REAR ROLLER 1
85 SCREW ST2.9*8 2 120 BOLT M5*8 4
86 NUT M10 6 121 5# Allen wrench 1
87 SCREW ST4.2*19 4 122 COMPUTER UP WIRE 1
SAFETY KEY 1 112 PULSE UPWIRE 1
88 BOLT M5*12 4 123 COMPUTER MIDDLE WIRE
89 BOLT M5*6 2 124 COMPUTER LOW WIRE
90 BOLT M10*62 1 125 NUT M6 8
91 SCREW ST4.2*12 25 126 INCLINE UP WIRE 1
92 BOLT M6*16 4 127 SPEED UP WIRE 1
93 BOLT M10*25 8 128 SCREW ST3.5*9.5 4
94 LOCK WASHER 10 11 129 BOLT M6*40 2
95 BOLT M8*25 7 130
96 WASHER C 8 2 131
97 WASHER 8 15 132
98 BOLT M8*52 4 133 WASHER
99 NUT M8 8 134
100
101
102
103
104
105
106
107 SPRING LOCK WASHER 10 4 142 REACTANCE
108
109
110 SPRING LOCK WASHER 8 2 145
111
HANDPULSE UP WIRE 1 141 INDUCTANCE
BOLT M8*50 2 135
BOLT M6*12 2 136
BOLT M8*42 2 137
BOLT M8*35 2 138
BOLT M3*10 2 139
NUT M3 2 140
FLAT WASHER C 10 8 143 BOLT
FLAT WASHER C 8 3 144 CONTROL BOARD
BOLT M8*30 2 146
TOUCH SREEN HOLDER
LEFT AUDIO NETWORK
CONNECTING BOARD
RIGHT AUDIO NETWORK
CONNECTING BOARD
HEART RATE RECEIVER
AC LINE 120 1
GROUND LINE 350 1
KEY BOARD 1
LEFT AUDIO
SPEAKER 2
RIGHT AUDIO
MP3 CONNECTOR
CHEST BELT OPTION
1
1
1
2
1
1
1
OPTION
OPTION
OPTION
OPTION
OPTION
2
1
1
1
1
2
1
1
25
 Loading...