

Page 1
MOON intelligent Network Device
MiND Setup Guide
OR
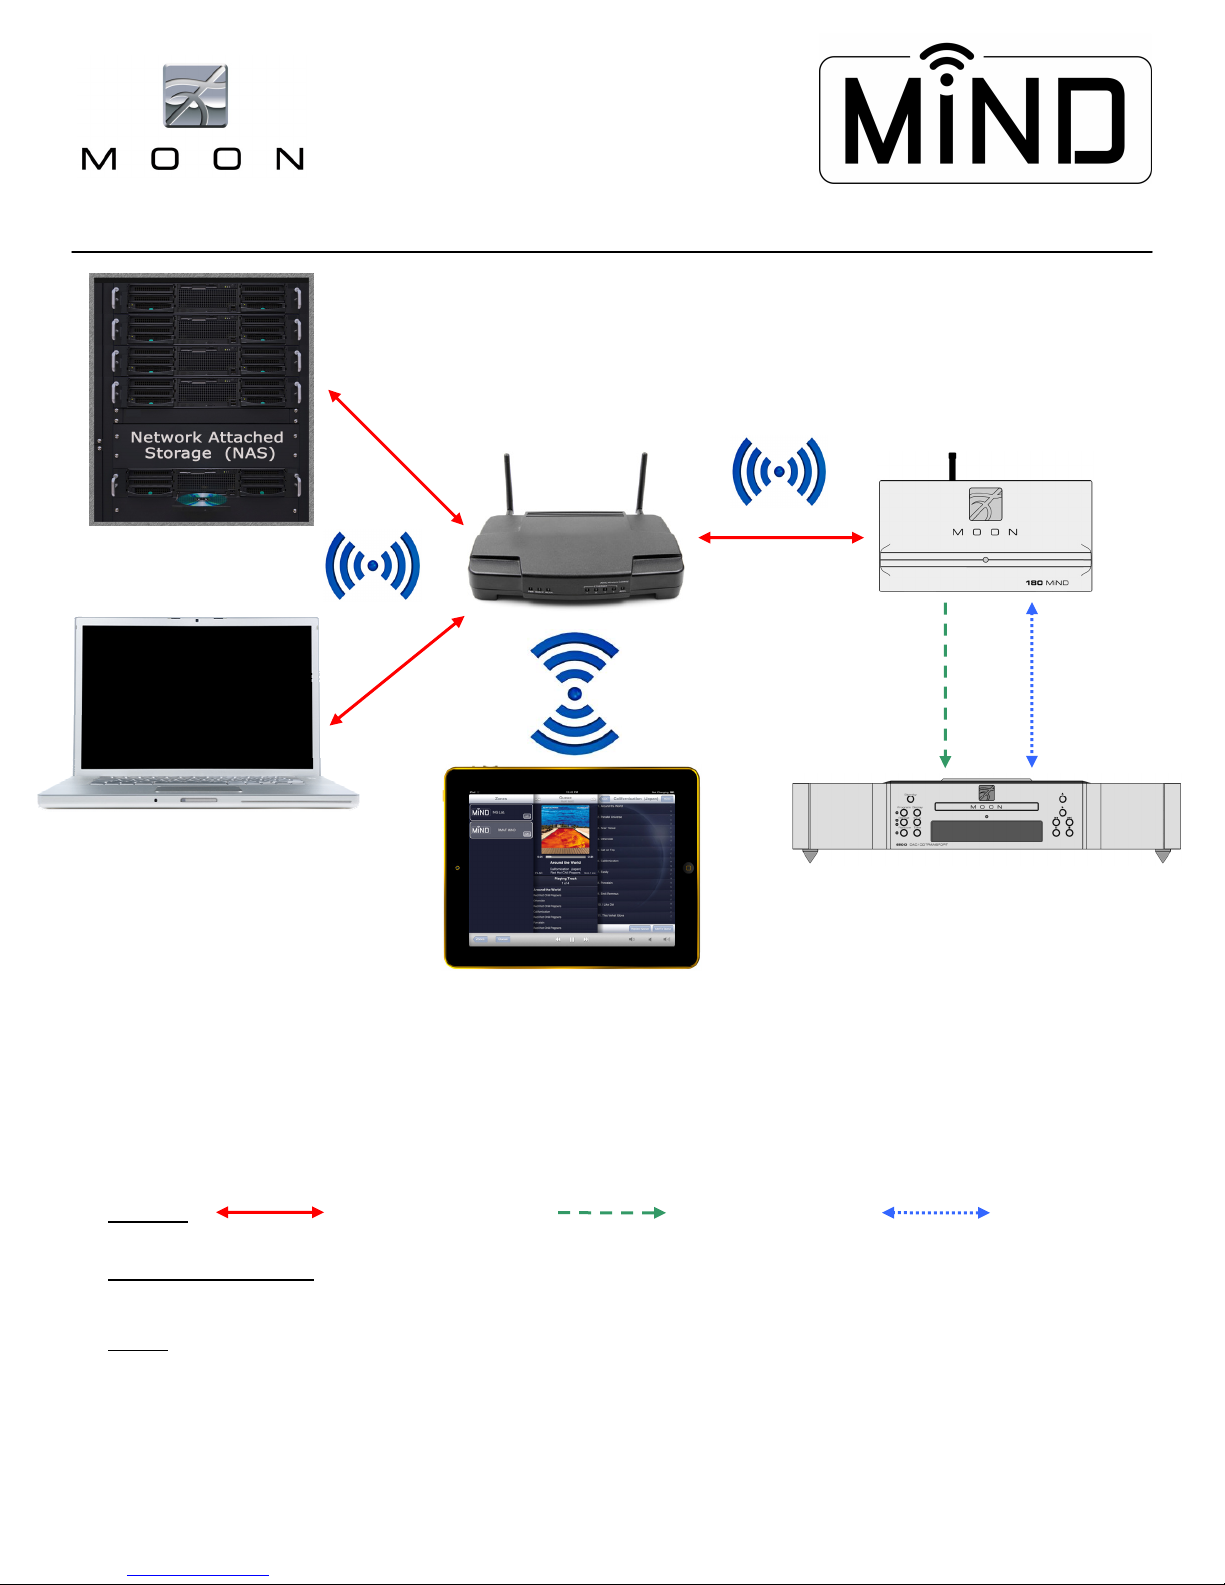
The above diagram depicts the various components that are required and how they must be connected for proper
operation of the MiND 180 Music Streamer; You will need the following:
A router with wireless (Wi-Fi) capability
Computer based music files stored on a “Network Attached Storage” (NAS) device or a computer
An iPad, iPhone or iPod Touch (Android device functionality coming soon)
A Digital-to-Analog Converter with S/PDIF, AES/EBU or Toslink inputs (MOON 650D shown)
Legend: Ethernet connection Digital Audio Signal SimLink
Warranty Information: Canada & USA ONLY: 1 year upon purchase, 5 years upon online registration.
Elsewhere: contact your distributor for details; registration with Simaudio not required.
NOTES: This unit contains Transmitter Module FCC ID : ZUCSEDMP3. This device complies with part 15 of the FCC Rules. Operation is
The Wi-Fi protocol doesn’t support hi-resolution audio (anything higher than CD format’s 16-bit depth). As a result, you may
subject to the following two conditions: (1) This device may not cause harmful interference, and (2) this device must accept any
interference received, including interference that may cause undesired operation.
encounter issues when attempting to wirelessly stream hi-res audio. This not an issue caused by your MiND hardware or MiND app.
V1.05 2014.07.17
Page 2

How it all works:
Like any computer-based network, the router acts as the hub for the entire network. The main reason why it is
mandatory that your router be Wi-Fi capable is for the tablet - Apple or Android (coming soon) to communicate
and control the MiND. A tablet cannot connect to a network any other way. However, if you wish (or if you have
no choice) to maintain a wireless connection between the computer or NAS and the router, this may have an
effect in steady and proper signal transmission of music files, depending on the distance between the router and
the computer/NAS, physical obstructions such as thick walls, and other factors. A wireless connection is especially
likely to have an effect if listening to high-resolution (24-bit) music, whereby dropouts may be noticed. It is
therefore strongly recommended to have a wired connection between the computer/NAS and your router.
Before starting the setup, verify the following:
(i) Your tablet can connect to the network broadcasted by your wireless router. (ii) Music server software exists
on your NAS (or computer) and is correctly set up for the music on the hard drive; You should use Asset UPnP
from illustrate for both Windows based (
based (
http://www.dbpoweramp.com/beta/Asset%20UPnP.dmg) computers. In the future, we will provide our
http://www.dbpoweramp.com/asset-upnp-dlna.htm) and Apple MAC OS
own “MOON Music Server Software”. (iii) Your music files have been properly tagged with accurate meta-data
information. (iv) Your iPad has the latest version of the “MOON MiND HD” app installed; The “MOON MiND” app
is intended for users with iPhone or iPod Touch. Both of these “MOON MiND” apps are
free of charge
and
available only at the “Apple App Store”.
Connecting all the components together:
Referring to the diagram, connect your computer/NAS to one of the RJ45 ethernet connectors on your router,
unless you plan on using a wireless connection. Ensure that this connection is properly discovered and configured
by your computer/NAS (your network administrator may be required for this). Install the wi-fi antenna to the rear
connector of the MiND (install it regardless if your goal is to stream music wired or wirelessly). Now connect the
MiND to the router using an ethernet cable. Power up the MiND using the included wall-wart power supply
(NOTE: It is critical that you power up the MiND after
the Ethernet cable is connected, not before!). Also note
that even if your plan is to stream over a wireless connection (Wi-Fi), you will need to first set up in wired mode,
then reboot the MiND – see below for details on a wireless setup. Finally, connect the digital output of the MiND
to the digital input of your DAC. You can use more than one digital output simultaneously, if desired, depending
on your system setup.
Using the MiND wired via Ethernet:
Once the above connections are made, under most circumstances, you should be ready to stream music. Start up
the MiND app, and wait until the app discovers your MiND on the network (may take up to 30 seconds). Next,
tap on the “MiND” you see in the zone view; then you will see the name of your computer/NAS. Tap on that and
you can then browse your music. You can give the MiND a name (the characters you see next to the word MiND
refer to the last six characters of your specific unit’s MAC address). You can change the name in the network
settings, described below. Regarding LL other features of the app, please consult the MiND App User Guide.
Using the MiND wirelessly via Wi-Fi:
You need to have your SSID, passphrase (network key) and encryption method (type of security) handy to set
this up.
network administrator.
We cannot help you determine these parameters if you do not have them – you will have to contact your
(1) Your MiND must be is plugged into your router – mandatory. (2) Launch the MOON MiND app on your
hand-held device. (3) Tap on the edit button before selecting the “MiND zone”. (4) Select the MiND zone to
configure. (5) A new window will open; Tap on “Network”. (6) A new screen appears. The first field is called
“Name”. Enter the name you wish to give the zone. For example “Living Room” or “Den”. Alternately, you can
leave it as is. (7) We strongly recommend that you do not tamper with the settings under “IP address” unless
otherwise required by your network administrator. (8) Under “Wireless”, enter the SSID (the default is either
blank or “MiND”), remove whatever is there and type in your SSID. (9) Select the “security type” your network
is set up for. (10) Enter your passphrase. (11) Tap “Save” on the top right side, and then tap settings to go
back. Now tap “Done” in the zone view. (12) Close down the MiND app. (13) Power down the MiND by
removing the power connector (14) Remove the Ethernet cable. You will not need it any more. (15) Now
reconnect the power connector only and allow the MiND to boot up (typically under a minute). (16) Start the
app. Your MiND unit should be discovered and if you changed the name, it will now appear with its new name.
(17) Tap on it to get into your music library just like described in the wired connection above.
For a copy of the MOON MiND App User Guide, which explains how to use the MiND app, visit our website at:
http://www.simaudio.com
 Loading...