

Page 1
®
XP-USC
Optional
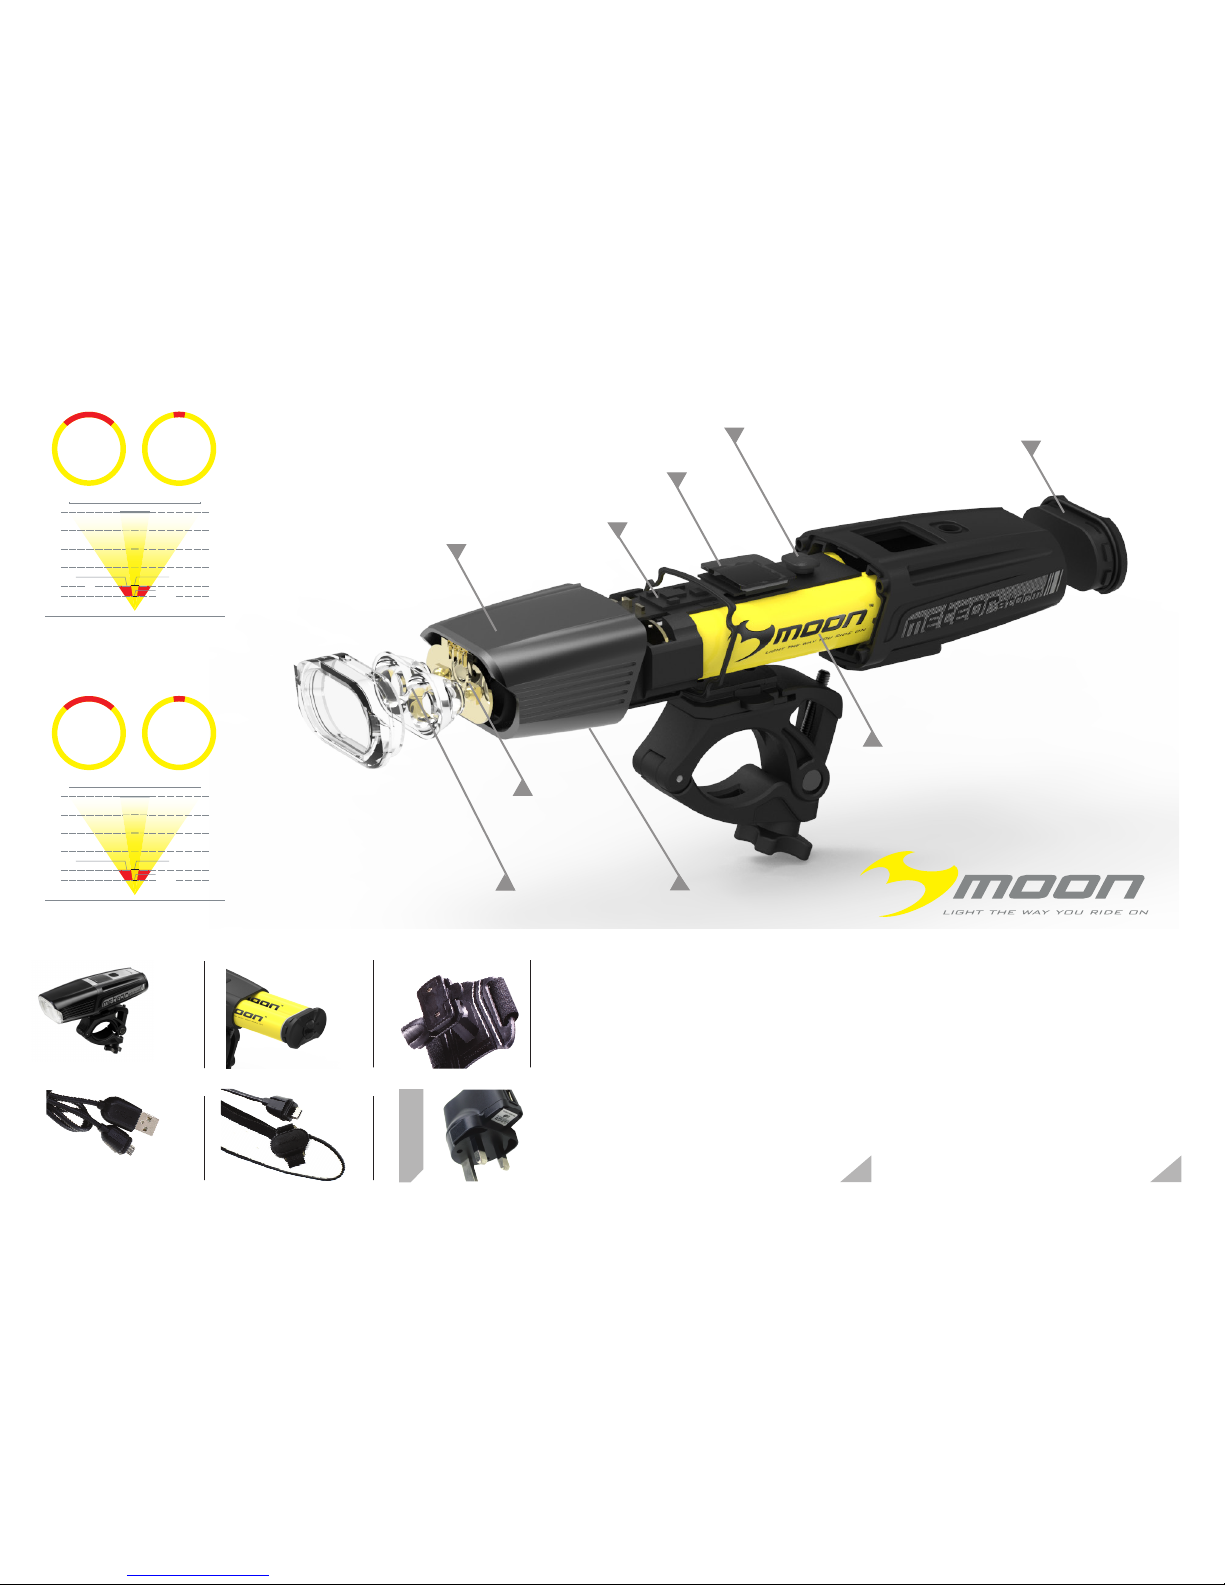
84°
TOTAL ANGLE
17°
SPOT ANGLE
Emax (LUX) Distance (M)
10M
13900
3400
140
0.3 M
0.6 M
1 M
2 M
18 M
3 M
1700
LUMENS
METEOR STORM PRO
112 lux
Side light
84°
TOTAL ANGLE
17°
SPOT ANGLE
10M
9280
2310
95
0.3 M
0.6 M
1 M
2 M
18 M
3 M
1300
LUMENS
METEOR STORM
80 lux
Side light
Distance (M)
Emax (LUX)
2 PCS
CREE XM-L2
HIGH
PRECISION
OPTICAL LENS
ALUMINIUM
HEAT SINK
LIGHT CAP
PRINTED
CIRCUIT BOARD
MATRIX
LED DISPLAY
POWER
BUTTON
MAGNECTIC
QUICK RELEASE
BATTERY COVER
LITHIUM ION
BATTERY
WATER
RESISTANT
USB PORT
CONTENTS INCLUDEDSPECIFICATION
Meteor Storm Pro Meteor Storm
* Meteor Storm
* RB-26 (Handlebar bracket)
* RB-16 (Helmet bracket)
* USB-WP (Water resistant USB cable)
* USB-RM-350 (USB remote control 350 mmL)
* LX-BAT-2600
SAMSUNG Li-ion battery 2600mAh x 2
* MS-BC (Magnetic cover)
10 modes: Mode 1/ Mode 2 / Mode 3 /
Mode 4 / Mode 5 / FL 1 / FL 2 / FL 3 /
Day FLASH / SOS
Boost Mode
Matrix LED Display
2 pcs Cree XM-L 2 (U2) high brightness LEDs
CNC aluminium heat sink casing
Quick release SAMSUNG lithium ion battery
(3.7V 2600 mAh)
Quick release handlebar mount
(ts 22-35mm)
Quick release helmet mount
Magnetic battery cover design
Water resistant (IPX 4)
Water resistant USB port
Over heat protection system
Low battery, charging and fully charged
indicator
Automatic fully charged cut-off system
USB remote control system
Side visibility
10 modes: Mode 1/ Mode 2 / Mode 3 /
Mode 4 / Mode 5 / FL 1 / FL 2 / FL 3 /
Day FLASH / SOS
Boost Mode
Matrix LED Display
2 pcs Cree XM-L 2 (U2) high brightness LEDs
CNC aluminium heat sink casing
Quick release PANASONIC lithium ion battery
(3.6V 3200 mAh)
Quick release handlebar mount
(ts 22-35mm)
Quick release helmet mount
Magnetic battery cover design
Water resistant (IPX 4)
Water resistant USB port
Over heat protection system
Low battery, charging and fully charged
indicator
Automatic fully charged cut-off system
USB remote control system
Side visibility
*
*
*
*
*
*
*
*
*
*
*
*
*
*
*
*
*
*
*
*
*
*
*
*
*
*
*
*
*
*
*
*
*
*
USB-RM-350
LX-BAT-
2600/3200 w/
MX-BC
RB-16
USB-WP
Meteor Storm Pro/
Meteor Storm w/
RB-26
SPECIFICATION CONTENTS INCLUDED
Optional accessories Optional accessories
* XP-USC (Wall charger) * XP-USC (Wall charger)
* Meteor Storm Pro
* RB-26 (Handlebar bracket)
* RB-16 (Helmet bracket)
* USB-WP (Water resistant USB cable)
* USB-RM-350 (USB remote control 350 mmL)
* LX-BAT-3200
PANASONIC Li-ion battery 3200 mAh x 2
* MS-BC (Magnetic cover)
Page 2
clic
k
Thank you for choosing MOON Meteor Storm series headlight!
Please read this manual before using. Please refer to online manual for any update of information.
The light is not fully charged for shipment, please make sure to charge the light fully before use.
USER GUIDELINE
Quick Start
WEEE aims to ensure that products
can be easily broken down for
reuse, recycle or treatment at the
end of the life cycle. A “Crossed Out
Wheeled Bin” symbol and a unique
identication of the product (such as
a product registration number), and
information such as reuse centres,
treatment and recycling facilities
are required on the product. Apart
from product design, a robust system
from logistic ow of the materials to
production lines is also a matter of
concern under WEEE.
MOON warrants to the original purchaser of this
product that the product is free from defects in
material and workmanship for a period of one year.
This warranty does not apply to damage due to heat,
physical damage resulting from abuse, neglect,
improper repair, improper t, or alterations of the
xture. This warranty is in lieu of all other agreements
and warranties, general or specic, express or
implied and no representative or person is authorized
to assume liability on behalf of MOON in connection
with the sale and use of this product.
MOON reserves the right to request the return of
any product submitted for warranty consideration.
All customers should contact the local dealer or
regional distributor for warranty service.
To make a claim, rst call local dealer or regional
distributor. Some issues may be resolved upon the
initial call. If return of the product is necessary, please
refer to the following instructions:
*We recommend that items be sent by a traceable
method (such as FedEx or UPS). MOON is not
responsible for lost or misdirected packages.
*Please include your full contact information (name,
address, phone number, and email [if applicable]),
and a description of the issue.
*Address items to: local dealer or regional distributor
What is not covered: MOON Lights are covered by
a ONE YEAR LIMITED WARRANTY from the date of
purchase. This covers the lights and cables only. It
does not cover the battery or battery internals.
Batteries are covered by 120 days warranty.
For more information please contact us at
cs@moon-sport.com
Keep away from ammable objects while charging
as this may lead to re or battery explosion.
Do not smoke while charging as the battery may
release hydrogen gas. Always charge your battery in
a well-ventilated space.
Never connect or disconnect the plug or cord
with wet hands whilst charging. Do not connect or
disconnect the plug or cord when they are wet, it
may lead to electric shock.
Carrying a ash light is recommended.
Use caution when handing, the light may get hot.
Do not look at light drectly.
Do not leave the light on and unattended.
Do not store head light when hot or straightway after
use.
Unplug the light , charger and cable once the
battery is fully charged.
The headlight cannot be turned on with remote switch.
The headlight cannot be turned on.
Install remote control
Remote switch mounting
The headlight turns off over rough terrain.
Make sure th e USB remote is properly plugged.
Make sure the battery is fully charged.
Make sure the power button was rmly pressed.
Make sure battery is installed correctly.
Make sure the battery is fully charged.
Check if the battery is fully inserted.
*
*
*
*
*
*
*
*
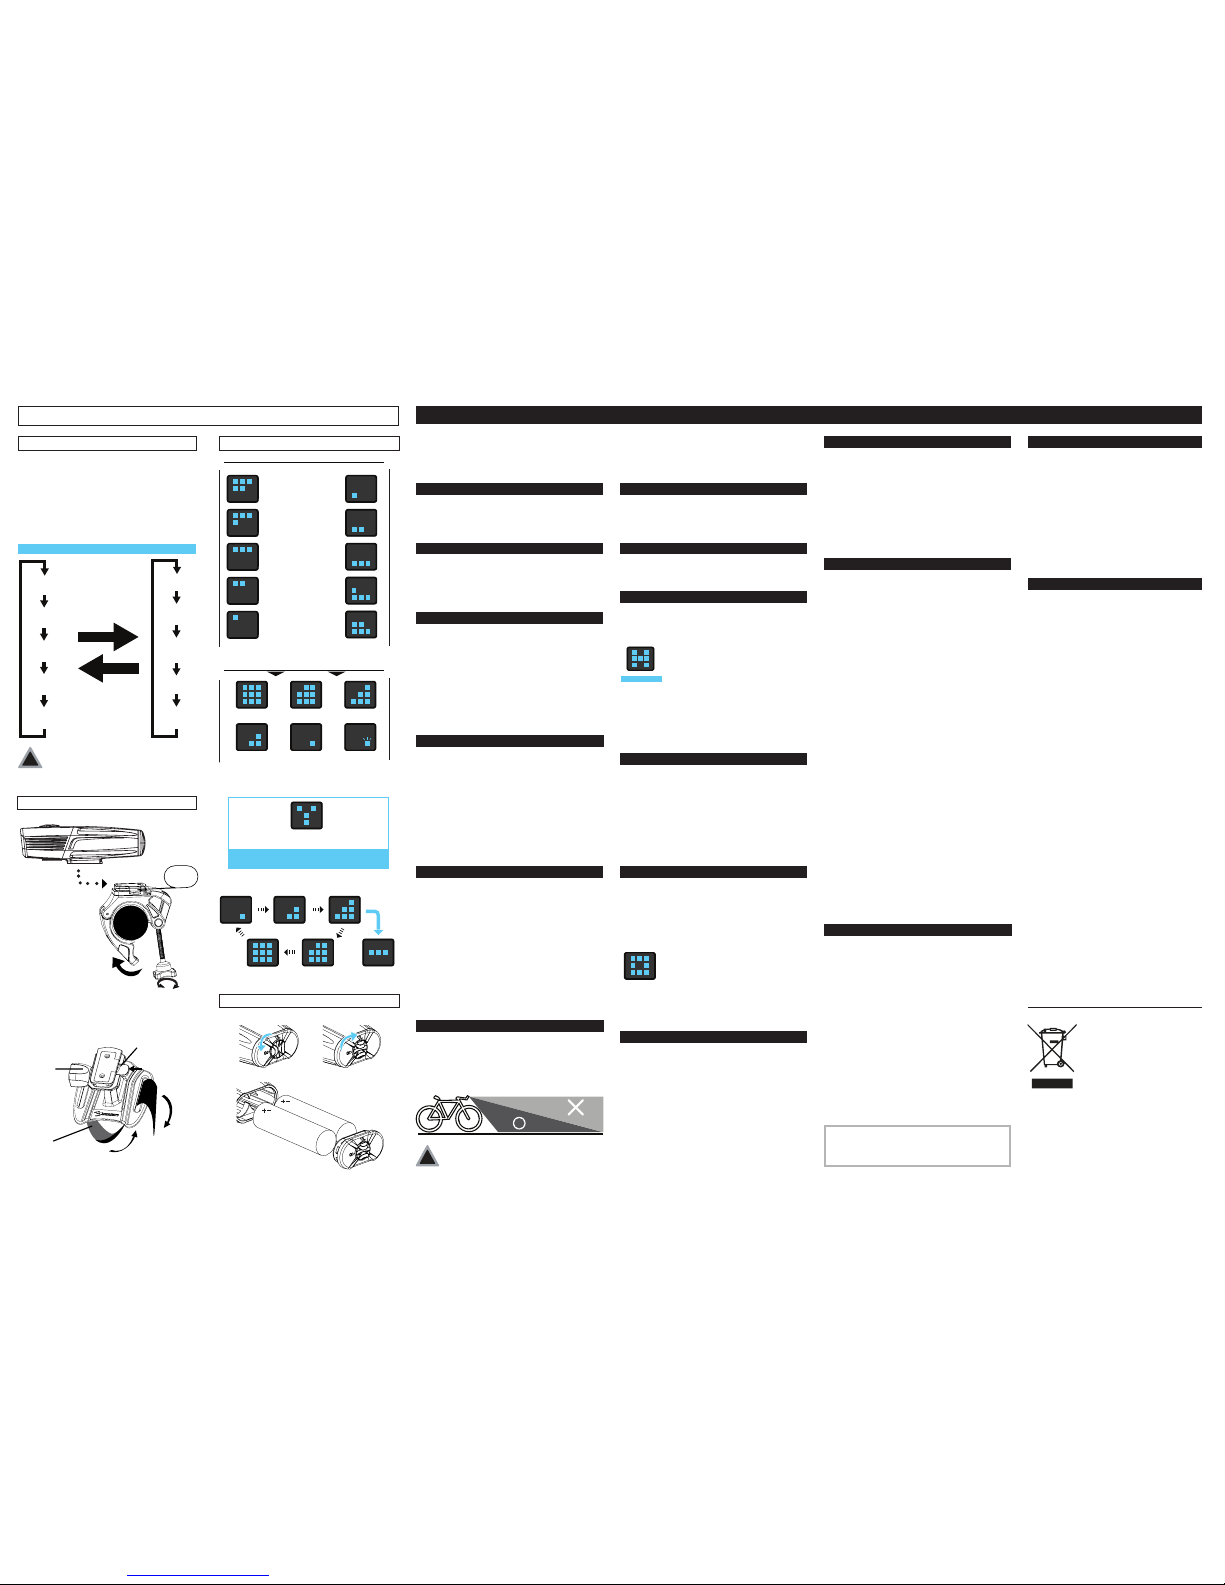
COOLING SYSTEM
BOOST MODE
DAY FLASH MODE MODE MEMORY
MATRIX DISPLAY
OVER HEAT PROTECTION
TROUBLESHOOTING
CAUTION
CLEAN AND CARE
BATTERY
MATRIX LED DISPLAYLIGHT OPERATION
LIGHT INSTALLATION
The high brightness LED will heat up the light body while
working, that is a high temperate light. A better cooling
system can increase the running time, also increase 15%30% brightness of the LED performance. To reduce the
heat generated by the running LEDs, METEOR Storm Pro &
Meteor Storm are designed with aluminum heat sink alloy
body.The light side adopts novel shape design with high
heat dissipation efciency. It sufciently disperse the heat
away through the light.
By double clicking the power button, it instantly activates
the highest output for 10 seconds. It resumes to previous
mode after 10 seconds.
Day Flash Mode is the high output mode for daytime
riding. Its high visibility alternative ashing enhances
every rides by both seeing the road and being seen by
others clearly.
When turning on the light, will be in the mode as the last
usage.
Matrix LED Display is a multifunctional display provides
operational information including modes, battery status
and charging status.
The over heat protection device can ensure the bicycle
light in a good running temperature condition, so
that to protect the LEDs without burning case. When
the bicycle light is running and without
adequate air ow, this protection device
will automatically start to dim the light to
standard brightness mode, it can reduce
the heat of the light and ensure the LEDs won't get
damage due to over heat. Once the air ow condition of
the light is improved, the running temperature of the light
will go down, then the over heat protection device will
cut, the brightness of the bicycle light will get back to the
beginning of the selected mode.
Remove the belt from one side of the helmet mount.
Place the helmet mount into the suitable location on
helmet.
Wrap belt around helmet and attach the end of the
belt to itself tightly.
Insert the headlight into the helmet mount until it clicks
into place.
Press down release lever to remove.
1/
2/
3/
4/
5/
1/
2/
3/
4/
5/
Insert the handlebar bracket into the bottom slot of
the light.
Spin the below part of the bracket counter-clockwise
to loosen the screw.
Unlock the bracket and put the light in suitable place
of your handle bar.
Twist the screw clockwise to lock the bracket.
The bracket ts 22 - 32mm handle bar. Additional shims
are included and you can use them when necessary.
To adjust the vertical beam angle when mounted on the
helmet, loosen the screw knob and rotate the light up or
down to your desired angle, then tighten the screw knob
to hold the light in place.
HELMET BRACKET
HANDLEBAR BRACKET
WARRANTY
HEADLIGHT
REMOTE
To adjust the horizontal beam, spin the headlight left to
right for your best side to side beam angle. To adjust the
vertical beam angle, loosen the mounting and rotate the
light up and down to your best vertical beam angle, then
tighten the mounting.
!
The beam is widely dispersed, besides its high brightness.
To prevent from blinding the oncoming vehicles on the
public roads, you’d better adjust the angle downward.
BEAM ADJUSTMENT
!
Press power button to turn on the light.
Press power button to choose modes.
Press 2 sec to toggle between Steady and
Flashing modes.
Double click the power button to toggle to
boost mode.
Press and hold the power button about 1 sec
to switch off.
1/
2/
3/
4/
5/
* Remote switch operation same as above
Never use the SOS sign unless there is a real
emergency or dangerous occurring. The SOS
signal is visible for several miles.
RB-26 (Handlebar bracket)
SCREW
KNOB
RELEASE
LEVER
PRESS
BELT
OPEN LOCK
RB-16 (Helmet bracket)
100%
0-10%
Steady
100%
0-10%
MODE 1
100%
0-10%
MODE 2
100%
0-10%
MODE 3
100%
0-10%
MODE 4
100%
0-10%
MODE 5
100%
0-10%
100%
100% 100% 100%
0- 0- 0-10% 10%
100%
0-10%
BATTERY INSTALLATION
Align the battery cover to the point “O” to open.
Release or insert batteries.
Cover the batteries with the battery cover.
Align the battery cover to the point “L” to lock.
Install or release the battery
1/
2/
3/
4/
*
Light can be run with one battery as backup. Please
install battery into the right battery housing only.
Runtime is vary from the standard one.
* Matrix LED display showing batteries
installed correctly.
100%
0-10%
10%
100%
0-10%
1
100%
0-10%
40%
100%
0-10%
FULLY
CHARGED
100%
0-10%
60%
3
4
100%
0-10%
80%
2
100%
0-10%
20%
5
Battery Status
Charging
(Defaulf Display)
Selecting Mode
Double click to switch on
Boost Mode for 10 sec
BATTERY INSTALLATION
100%
0-10%
FL 1
100%
0-10%
FL 2
100%
0-10%
FL 3
100%
0-10%
DAY FL
100%
0-10%
SOS
Flashing
Boost Mode
100%
0-10%
Over Heat
100%
0-10%
0-10%
1/
2/
3/
4/
5/
6/
7/
8/
9/
1/
2/
3/
1/
2/
3/
4/
5/
6/
7/
8/
Find the USB port under the head part of the light.
Lift the rubber cover and you’ll see the charging port.
If using USB cable, connect it to your computer USB port.
If using wall charger, connect it to the wall outlet.
(100 to 240 volts)
Charge time may depend on computer or wall charger.
When the battery is fully charged, please unplug the USB
cable or wall charger. Then replace the rubber cover.
Find the USB port under the head part of the lights.
Lift the rubber cover.
Plug in the remote control USB cable.
Make sure it has been completely plugged in.
Put one end of the belt go through the cycle handle bar
or helmet hole.
Align to the controller button and pass through.
Please pull the Velcro ends tightly.
CHARGING
REMOTE CONTROL
1/
2/
3/
4/
5/
6/
1/
2/
3/
4/
1/
2/
3/
Press and hold
2sec
Mode1
Mode3 3
Mode4
Mode5
Mode2
Day FL
FL 1
FLFL 2
SOS
METEOR Storm Pro & METEOR Storm are designed to
be used on bikes in some of the most extreme outdoor
conditions. Ensure light is cleaned with a damp cloth
after every ride.
The Cree XM-L high-brightness LEDs have extensive life
so bulb replacement is not required.
Water resistant is for rain water only. Do not submerge
the battery or the whole light into water when
cleaning.
Please use batteries with same mAh.
It is normal that the light may get high temperatures
during charging (up to 104°F/40°C), as the chemical
in battery is in reaction. If the battery is not drained
completely before charging, it may also get warm.
Please use two 2600mAh/ two 3200mAh batteries in
the same time. Do not mix batteries with different mAh
in one light.
Several factors can inuence the battery’s durability:
type of cell strain, the maintenance routine, the
temperature and number of charges etc. Normally
speaking, the higher the battery capacity, the longer
the burn time.
The batte ry capac ity may bec ome ineff ective
about 80 % of its value a fter 30 0-50 0 charge/
discha rge cycles. The bat tery may have 3 yea rs life
span und er good care.
The batte ry voltag e and capac ity decrea se
apparently at low temperatures, especially near or
below ice po int. The capacit y decreases 5% -10% at
freezing ( burn time d ecrease s 50%). At -20°C , the
capacit y decreas es 30% (bu rn time decr eases 70%).
The batte ry perfo rmance wi ll return no rmal when
the tempe rate gets up to 70 °F/20°C. The ba ttery
will los e around 1% of its ca pacity p er day when
you store the b attery at norma l room temperature.
Battery temperate should never exceed 104°F/40°C,
it will los e about 5% of its ca pacity per d ay.
If you do not use the battery for a long time, be sure to
fully recharge every 3 months. Please store the battery
in a cool and dry place.
Do not charge over 5V the battery will result in
damage.
 Loading...