

Page 1
®
2. Fast press two times the power button to change into the strobe
and flashing modes. Fast press two times back to the first cycle.
Release
Thank you for choosing MOON light!
USER GUIDELINE
*For using this product safely and conveniently and keeping it
well-preserved, please read this manual carefully before using.
Please save this manual for future reference.
*Due to the improvement of the product, the product you bought may
not be exactly in accordance with the introduction of this manual. We
apologize for that.
SPECIFICATION
*1 pc (15 chips) COB high brightness red LED
*CR 2032 battery x 2
*5 modes: High / Over drive /
50% Flashing / 100% Flashing / Strobe
*Quick release universal bracket RB-22
(fits all round bars and AERO style bars)
*2 O-rings for mounting: RS-G (fits 20-35mm diameters)
RS-H (fits 35-52mm diameters)
*Side visibility
*Water resistant (IPX 4)
*Belt clip design
(can be installed either on saddle bag, jersey back pocket, etc.)
CONTENTS INCLUDED
Ccntents:
LUNAR
*CR2032 battery x 2
*RB-22 (Universal bracket)
*2 O-rings for mounting:
RS-G (fits 20-35mm diameters)
RS-H (fits 35-52mm diameters)
*BK-21 (Belt clip)
Optional acessoires:
*RB-19 (Rear rack mount bracket)
*RB-21 (Saddle rail bracket)
*RB-23 (Helmet bracket)
LIGHT OPERATION
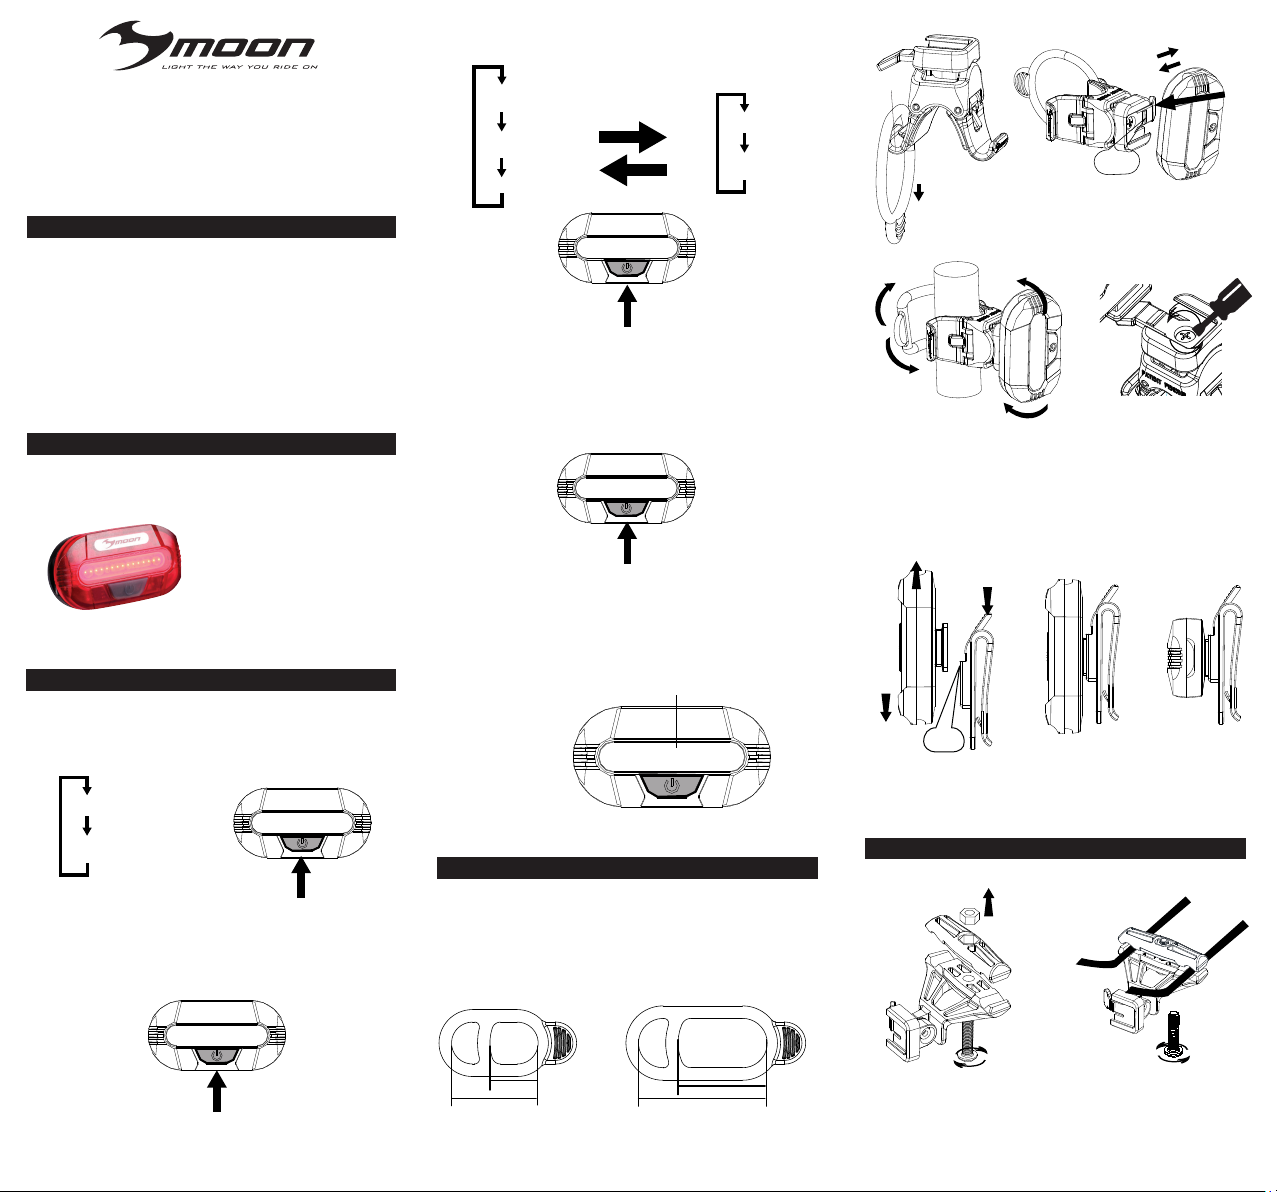
1. Press the power button to choose the modes:
In this method two modes are cycled.
Power button
Standard
High beam
PRESS
2. Fast press two times the power button to change into the strobe
and flashing modes. Fast press two times back to the first cycle.
Power button
50% Flashing
Fast press
2 times
Standard
100% Flashing
High beam
Strobe
Power button
PRESS
Fast press
2 times
4. Press and hold the on / off button around 0.5 seconds to turn off.
Power button
PRESS
Hold 0.5 sec
5. When the LED is not bright enough, it means the batteries are low.
You'd better change the batteries right now.
Dim
* Change the batteries
HOW TO MOUNT THE LIGHT
1. Choose the strap to fit in the bar.
2. Make sure the strap is click in place of the hook.
3. Hold the light on the seat post.
4. Wrapping rubber strap around bar and stretching strap around hook to secure.
5. Slide the light forward onto bracket until it clicks into place.
6. Press down release lever to remove.
Install
Install
Press
click
Pull
Release
Wrapping
7. Adjust the vertical beam angle when mounted on the seatpost, loosen
the screw knob band the light up or down for your preferred angle, then
tighten the screw knob to secure the light in place.
Adjust
Release
Press
Install
1.Slide tail light forward onto belt clip until it clicks into place.
2.Press down release lever to remove.
click
Method 1
Method 2
HOW TO MOUNT THE LIGHT
Method 1
RELEASE
PRESS
Fast press
2 times
20-26 mm
26-35 mm
35-52 mm
RS-G RS-H
35-52 mm20-35 mm
26-35 mm
1. 2.
clockwise
anticlockwise
Page 2
ADJUST
INSTALL
3. 4.
Method 2
1. Loosen the screws in the saddle bracket with the Allen key.
2. Clamp the bracket onto the saddle rail.
3. Align the screw holes, using the Allen key to tighten the bracket.
4.Slide light forward onto bracket until it clicks into place.
5.Press down release lever to remove.
6.Twist the light body to adjust the vertical angle.
click
ADJUST
ADJUST
INSTALL
ADJUST
INSTALL
HOW TO CLEAN AND CARE THE LIGHT
*Make sure to clean the dust and dirt on the light with soft damp cloth
after every ride.
*Water resistant is for rain water only. Do not submerge the battery or
the whole light into water when cleaning.
*Once you start using the light, you’d better keep using it.
!
CAUTION: When riding at night, please follow the guidelines below:
*Carrying a flash light is recommended.
*Unplug the light if no use.
*Do not dismantle the light.
*Do not control any part of the system under water.
*Do not look directly at light.
*Do not leave the light on and unattended.
*Do not mix brands batteries.
*Do not mix new and old batteries.
*Remove the batteries from the light for storage.
*Keep the light away from fire and combustible materials.
*Do not store head unit when hot or straightway after use.
*This light is for bicycle use only.
LUNAR R RUN TIME
MOON warrants to the original purchaser of this product that the
product is free from defects in material and workmanship for a period of
one year. This warranty does not apply to damage due to heat, physical
damage resulting from abuse, neglect, improper repair, improper fit, or
alterations of the fixture. This warranty is in lieu of all other agreements
and warranties, general or specific, express or implied and no
representative or person is authorized to assume liability on behalf of
MOON in connection with the sale and use of this product.
MOON reserves the right to request the return of any product submitted
for warranty consideration. All customers should contact the local dealer
or regional distributor for warranty service.
To make a claim, first call local dealer or regional distributor. Some
issues may be resolved upon the initial call. If return of the product is
necessary, please refer to the following instructions:
*We recommend that items be sent by a traceable method (such as
FedEx or UPS). MOON is not responsible for lost or misdirected
packages.
*Please include your full contact information (name, address, phone
number, and email [if applicable]), and a description of the issue.
*Address items to: local dealer or regional distributor
What is not covered: MOON Lights are covered by a ONE YEAR
LIMITED WARRANTY from the date of purchase. This covers the lights
and cables only. It does not cover the battery or battery internals.
Batteries are covered by 120 days warranty.
For more information please contact us at cs@moon-sport.com.
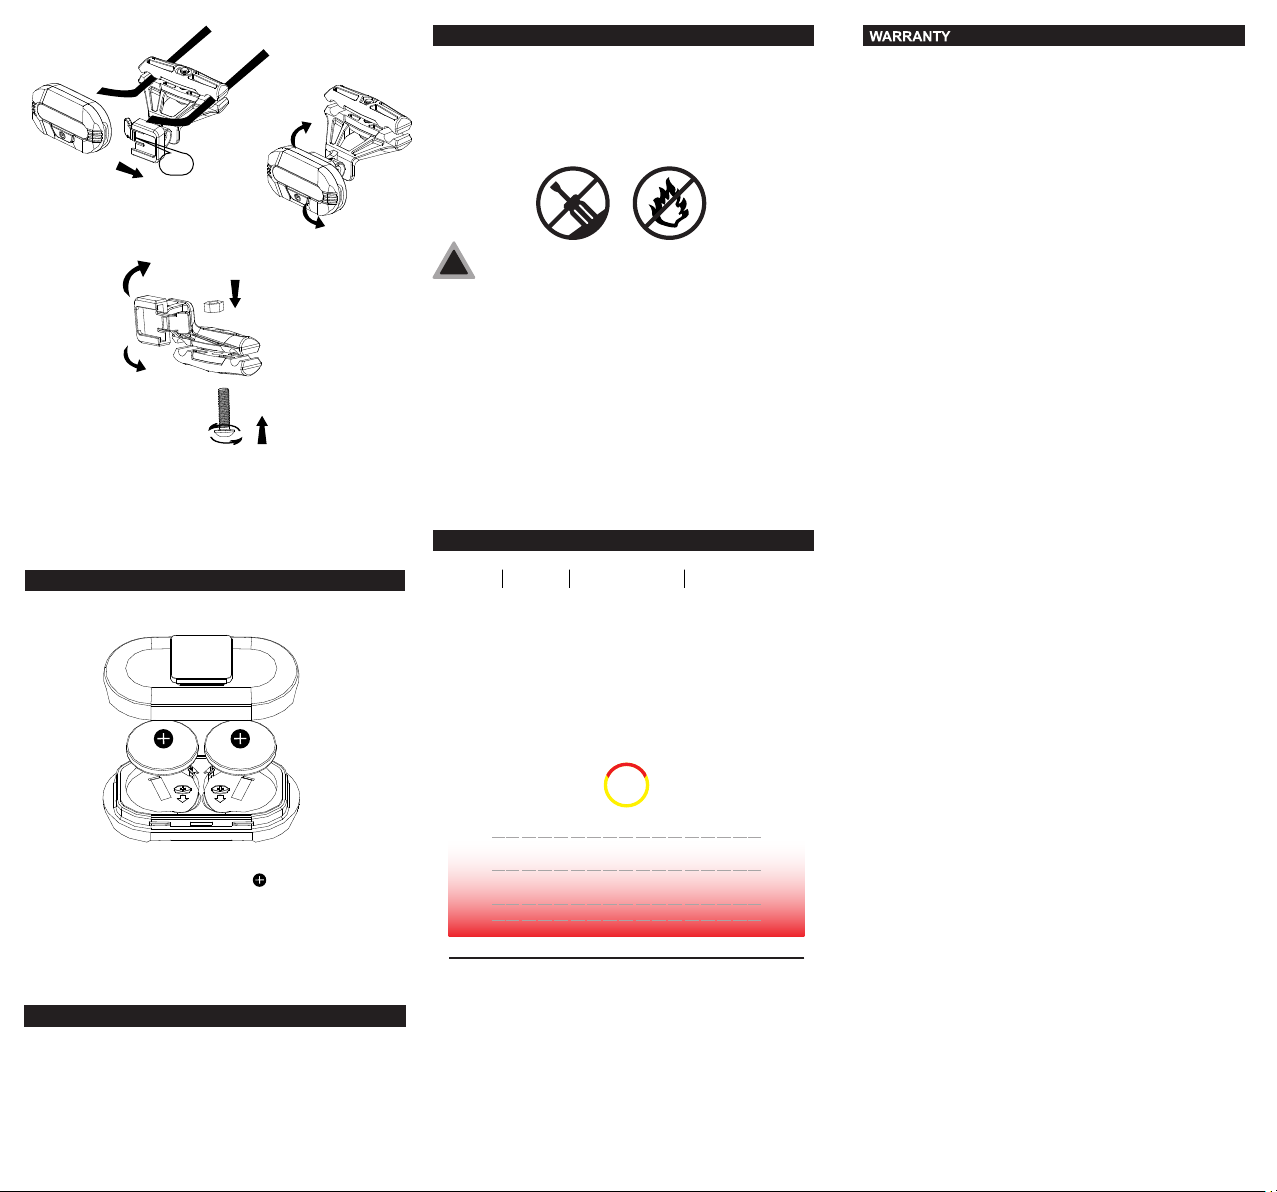
HOW TO CHANGE BATTERIES
1. Install batteries , click open the bottom case cover.
2. Carefully install batteries with positive “ ” pole facing upwards.
3. For best performance, do not mix the new and old batteries.
4.The batteries must be inserted correctly .If one battery is reversed , a
chemical reaction is produced in minutes that releases explosive
gasses and extremely corrosive liquid. In this moment, turn off the light
immediately. If the skin is affected by the liquid from the batteries, rinse
affected area immediately with clear water.
SIMPLE PROBLEMS ANALYSIS AND SOULUTION
1. Problem: The light is not on
Solution: Check if the batteries still has power
Check if the power button is pressed hard
Check if the batteries install correct
Mode Lumen Runtime
Standard 8 Up to 70 hours
High Up to 67 hours 15
50% Flashing Up to 75 hours 8
100% Flashing Up to 71 hours 15
Strobe Up to 67 hours15
180°
TOTAL ANGLE
Weight
14 g
0.04
2
4
Emax (LUX) Distance (M)
LUNAR
15
10M
2M
1M
LUMENS
WA-MOON-LUNAR EN
Page 3

®
BEDIENUNGSANLEITUNG
gut zu erhalten, lesen Sie bitte die Anleitung sorgfältig durch. Bitte
Anleitung sorgfältig aufbewahren.
Wir entschuldigen dies.
*Hohe Sichtbarkeit
*
*Gürtelclip Design
Inhalt:
LUNAR
*
*
*2 O-Ringe für die Befestigung
*
Optionales Zubehör:
*
*
*
3. Durch zweimalig schnelles des Drücken An-/Ausknopfes,
Wechsel in den Blitz-/Blinkmodus. Durch zweimalig schnelles
Drücken zurück zum Kreislauf.
Schnelles zweimaliges
Drücken
Standard
Starker Lichtstrahl
Blitzlicht
An-/Ausknopf
Drücken
Schnelles zweimaliges
Drücken
4.
auszuschalten.
An-/Ausknopf
Drücken
5. Wenn die LED nicht hell genug ist, ist der Batteriestand zu niedrig.
Laden Sie die Batterie sofort.
Dim
Lösen
Befestigen
Befestigen
Klick
Ziehen
Lösen
Umwickeln
7. Passen Sie den vertikalen Abstrahlwinkel an wenn das Licht an der
Sattelstütze befestigt ist, indem Sie den Drehknopfs lockern und
bewegen Sie das Licht nach oben und unten um den gewünschten
Winkel zu erhalten, dann festigen Sie den Drehknopf um das Licht zu
sichern.
Richten
Lösen
Drücken
Drücken
1.Drücke des An-/Ausknopfes um die Einstellung auszuwählen
An-/Ausknopf
Standard
Starker Leuchtstrahl
Drücken
2. Durch zweimalig schnelles des Drücken An-/Ausknopfes,
Wechsel in den Blitz-/Blinkmodus. Durch zweimalig schnelles
Drücken zurück zum Kreislauf.
An-/Ausknopf
Drücken
Schnelles zweimaliges
Drücken
* Batteriewechsel
LICHTBEFESTIGUNG
1. Passende Halterung wählen.
2. Vergewissern Sie sich, dass die Halterung am Haken eingerastet ist.
3. Halten Sie das Licht an der Lenkstange/Sattelstütze fest.
4. Schlingen Sie das Gummiband um die Stange und dehnen Sie das Band bis
zum Sicherungshaken.
5. Führen Sie das Licht in die Halterung bis am richtigen Ort einrastet.
6. Nach unten drücken um es zu entfernen.
20-26 mm
26-35 mm
26-35 mm
35-52 mm
RS-G RS-H
35-52 mm20-35 mm
Befestigen
1. Rücklicht auf Gürtelclip schieben bis es einrastet
2. Für Entfernung Lösehebel drücken
Klick
Methode 1
LICHTBEFESTIGUNG
Methode 1
1.
Lösen
im Uhrzeigersinn
2.
Methode 2
Gegen den Uhrzeigersinn
Page 4

Richten
Befestigen
3. 4.
Methode 2
1. Lösen Sie die Schraube der Sattelhalterung mit dem Allen
Schlüssel.
2. Klemmen Sie die Halterung an die Sattelstange.
Passen Sie die Schraubenlöcher an, benutzen Sie den Allen
Schieben Sie das Licht in die Halterung bis es einrastet.
Lösehebel drücken um Halterung zu lösen.
Drehen Sie den Lichtkörper um den vertikalen Winkel einzustellen
Klick
Richten
Richten
Befestigen
Richten
Befestigen
BATTERIEWECHSEL
REINIGUNG UND WARTUNG DES LICHTS
*Vergewissern Sie sich, dass Staub und Schmutz mit einem weichen
feuchten Lappen weggeputzt werden nach jeder Fahrt.
*Wasserfestigkeit besteht nur für Regenwasser. Tauchen Sie weder
die Batterie noch das komplette Licht unter Wasser während des
Reinigens
*Sobald sie anfangen das Licht zu nutzen, sollten Sie es
weiternutzen.
!
Vorsicht: Beim Fahren in der Nacht, befolgen Sie folgende
aufgelistete Richtlinien:
*Tragen eines Vorderlichts ist empfohlen.
*Stecken Sie das Licht aus wenn es nicht genutzt wird.
*Zerlegen Sie nicht das Licht.
*Schaffen Sie genügend Luftzufluss für das Licht während der Nutzung um
es zu kühlen.
*Benutzen Sie oder tauchen Sie keine Teile des Systems unter Wasser.
*Schauen Sie nicht direkt in das Licht.
*Lassen Sie das Licht nicht an und unbeobachtet.
*Mischen Sie keine Batteriemarken.
*Mischen Sie nicht neue und alte Batterien.
*Entfernen Sie die Batterien bevor Sie das Licht aufräumen.
*Halten Sie das Licht fern von Feuer und entflammbaren Materialien.
*Stecken Sie das USB Kabel aus wenn Batterie vollständige geladen ist.
*Das Licht ist nur für den Fahrradgebrauch.
LUNAR R LAUFZEIT
Modus
LUMEN LAUFZEIT
Standard 8
Stark Bis zu 67 Stunden
50% Blinklicht Bis zu 75 Stunden
100% Blinklicht
Blitzlicht Bis zu 67 Stunden
15
Bis zu 70 Stunden
15
8
Bis zu 71 Stunden
15
GEWICHT
14 g
MOON garantiert dem Erstbesitzer des Produkts, dass das Produkt frei
von jeglichen Schäden im Material und Verarbeitung ist für einen
Zeitraum von einem Jahr. Diese Garantie trifft nicht zu bei Schäden
durch Hitze, physische Schäden hervorgerufen durch Missbrauch,
Verwahrlosung, nicht korrekte Reparatur, nicht korrekte Anbringung
oder Änderung der Vorrichtung. Diese Garantie ist an Stelle von allen
anderen Abkommen und Garantien, allgemein oder spezifisch,
veräußert oder indirekt angedeutet und kein Vertreter und keine Person
ist berechtigt Haftung zu übernehmen zu Gunsten von MOON in
Verbindung mit dem Verkauf und Nutzung dieses Produktes.
MOON behält sich das Recht der Anfrage auf Rücksendung des
eingereichten Produkts wegen Garantiebetrachtung vor. Alle Kunden
sollten den lokalen Händler oder den regionalen Zulieferer für
Garantieservice kontaktieren.
Um eine Beschwerde einzureichen, kontaktieren Sie erst den lokalen
Händler oder den regionalen Zulieferer. Einige Sachverhalte können
nach dem ersten Anruf gelöst werden. Sollte die Rückgabe eines
Produktes nötig sein, bitte beziehen Sie sich auf folgende
Anweisungen:
*Wir empfehlen, dass die Ware via (wie FedEX oder UPS). MOON ist
nicht verantwortlich für die verlorenen oder falsch zugestellten
Päckchen.
*Bitte fügen Sie Ihre vollständigen Kontaktdaten bei (Name, Adresse,
Telefonnummer, und E-Mail Adresse (wenn möglich)), und eine
Beschreibung des Sachverhalts.
*Adressieren Sie die Ware an: lokalen Händler oder regionale Zulieferer
Was ist nicht inbegriffen: MOON Lichter sind mit einer EINJÄHRIG
BEFRISTETEN GARANTIE ab dem Kaufdatum. Dies deckt nur die
Lichter und Kabel ab. Es umfasst nicht die Batterie oder
Batterieeinbauten.
Die Batterien sind mit einer 120 Tage Garantie abgedeckt.
Für mehr Informationen kontaktieren Sie uns unter cs@moon-sport.com
1. Um Batterien einzusetzen, unteren Gehäusedeckel öffnen.
2. Vorsichtig die Batterien einsetzen mit dem positiven Pol nach
oben.
verkehr herum ist, ist eine chemische Reaktion in Minuten ausgelöst
Schalten Sie das Licht sofort aus in diesem Moment. Wenn die Haut
mit der Batterieflüssigkeit in Kontakt kam, reinigen Sie sofort die
betroffene Stelle mit klarem Wasser.
SIMPLE PROBLEMANALYSEN UND LÖSUNGEN
1. Problem: Das Licht ist nicht an.
kräftig gedrückt wurde.
eingesetzt ist.
180°
TGesamtausleuchtung
0.04
2
4
10M
2M
1M
Emax (LUX) Entfernung (M)
15
LUNAR
LUMEN
WA-MOON-LUNAR DE
 Loading...