

moon CP-8 Owner's Manual

Owner’s Manual
MOON
Evolution Series
CP-8
Reference Surround Preamplifier / Processor

MOON CP-8 Surround Preamplifier / Processor
Important Safety Instructions
1. Read these instructions.
2. Keep these instructions.
3. Heed all warnings.
4. Follow all instructions.
5. Do not use this apparatus near water.
6. Clean only with a dry cloth.
7. Do not block ventilation openings. Install in accordance with the manufacturer’s instructions.
8. Do not install near any heat sources such as radiators, heat registers, stoves or another apparatus that produces
heat.
9. Do not defeat the safety purpose of the polarized or grounding type plug. A polarized plug has two blades with one
wider than the other. A grounding-type plug has two blades and a third grounding prong. The wide blade or the third
prong is provided for safety. If the provided plug does not fit into the outlet, consult an electrician for replacement of
the obsolete outlet.
10. Protect the power cord from being walked on or pinched, particularly at plugs, convenience receptacles, and the
point where they exit from the apparatus.
11. Only use attachments and accessories specified by the manufacturer.
12. Use only with the cart, stand, tripod, bracket, or table specified by the manufacturer or sold with the
apparatus. When a cart is used, use caution when moving the cart/apparatus combination to avoid injury
from tip over.
13. Unplug this apparatus during lightning storms or when unused for long periods of time.
14. Refer all servicing to qualified service personnel. Servicing is required when the apparatus has been damaged in any
way, such as when the power cord or plug has been damaged; liquid has been spilled or objects have fallen into the
apparatus; or the apparatus has been exposed to rain or moisture, does not operate normally, or has been dropped.
15. No naked flame sources, such as candles, should be placed on the apparatus.
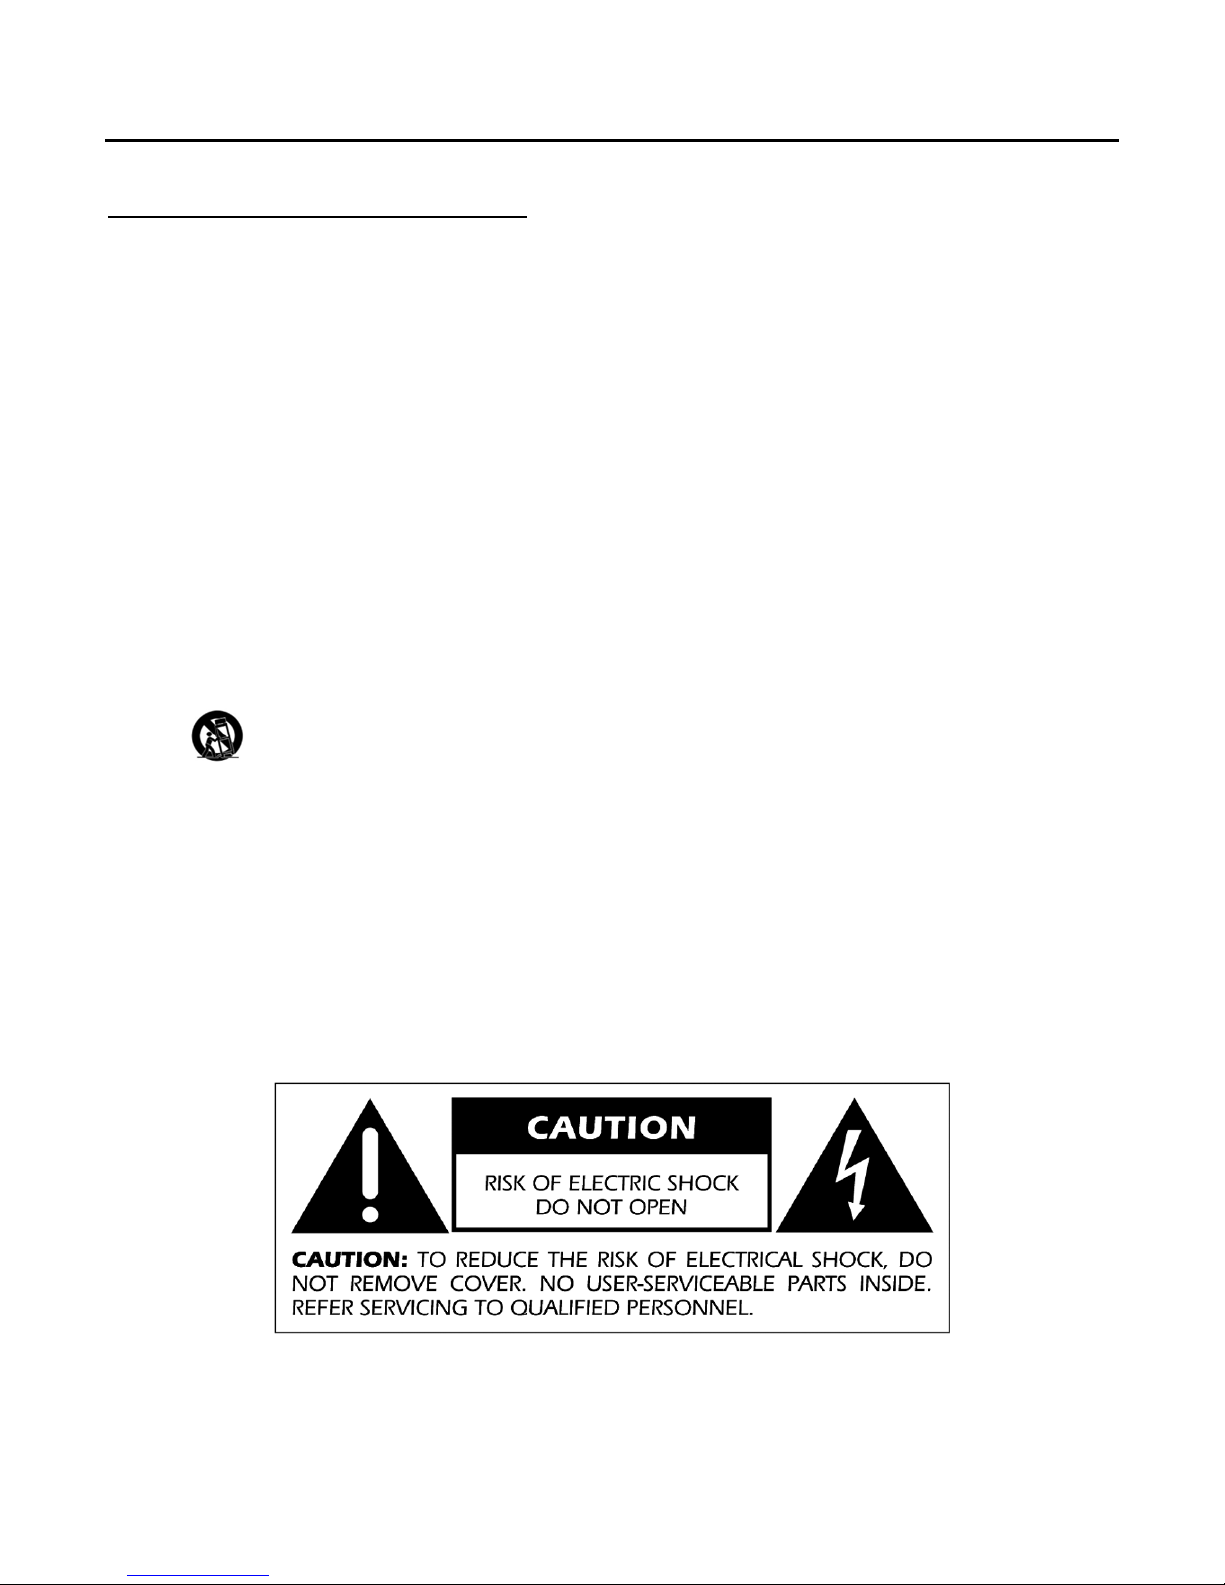
WARNING: TO REDUCE THE RISK OF FIRE OR ELECTRIC SHOCK,
DO NOT EXPOSE THIS APPLIANCE TO RAIN OR MOISTURE.
____________________________________________________________________________________
MOON CP-8 Surround Preamplifier / Processor
Important Safety Instructions (cont’d)
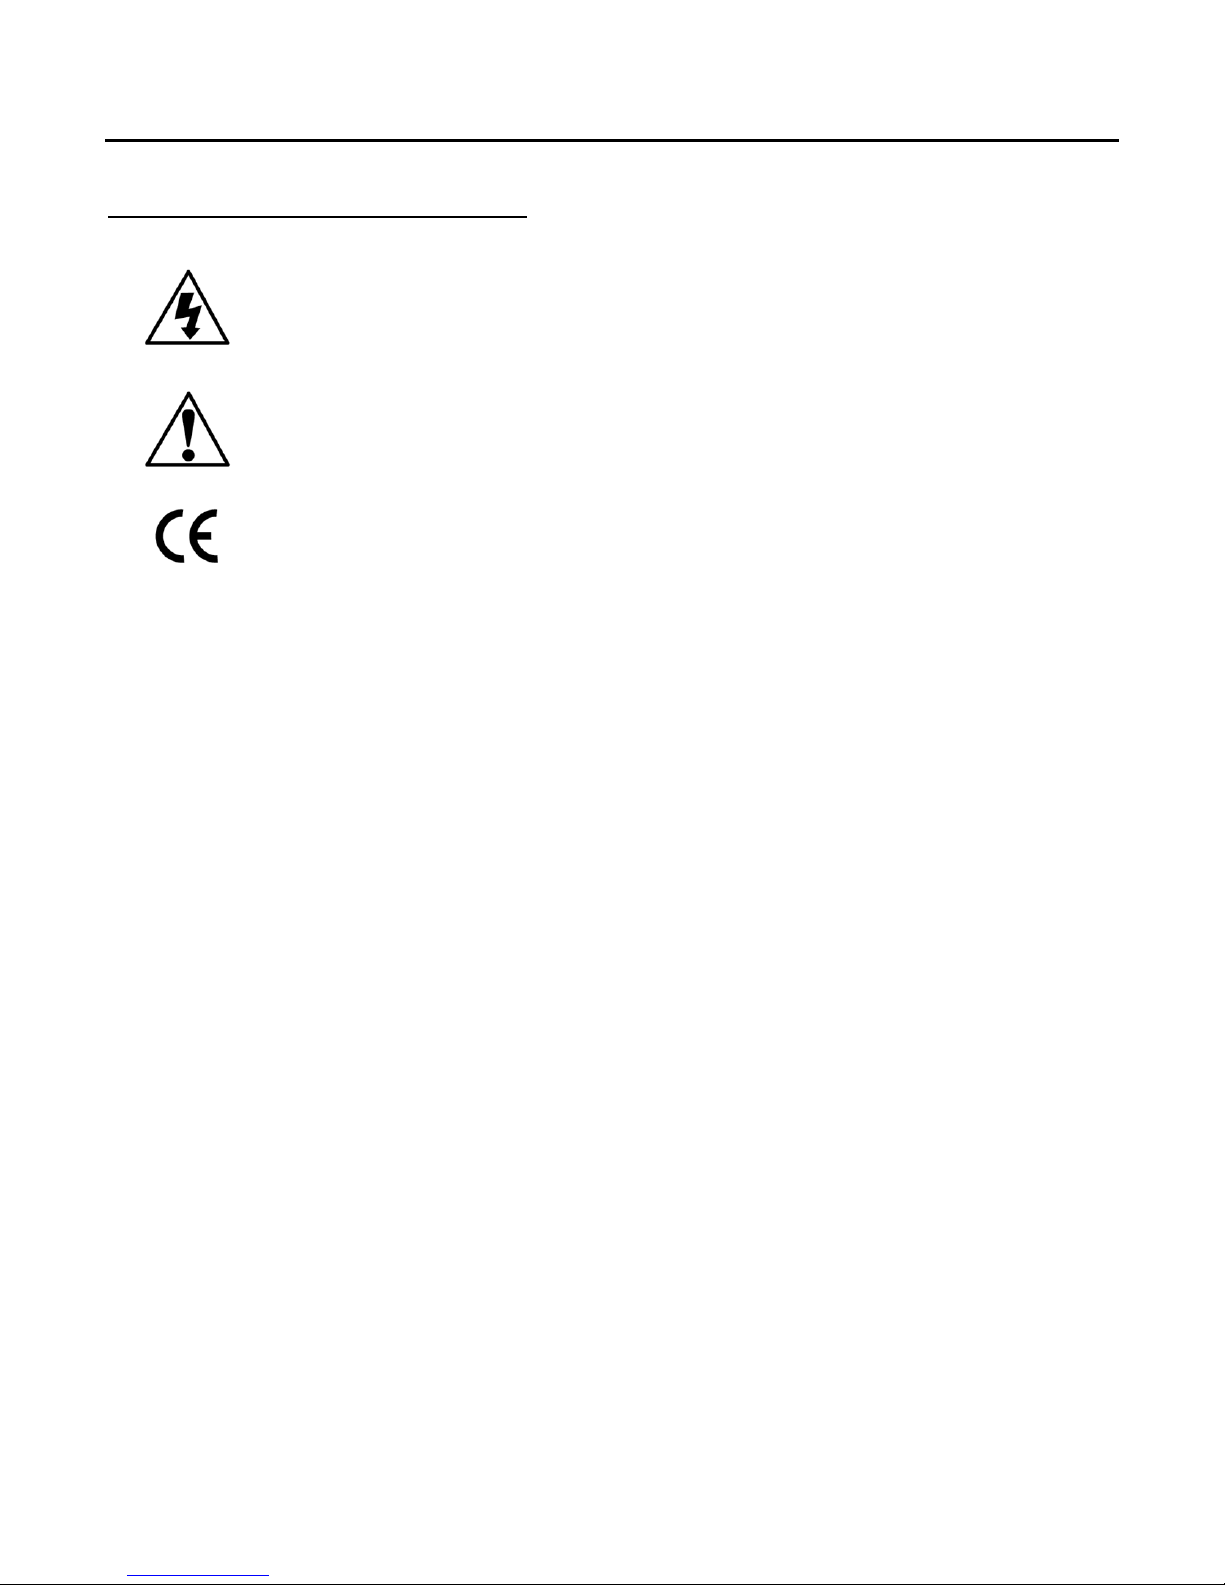
The lightning flash with the arrowhead symbol, within an equilateral triangle, is
intended to alert the user to the presence of uninsulated “dangerous voltage” within
the product’s enclosure that may be of sufficient magnitude to constitute a risk of
electric shock to persons.
The exclamation point within an equilateral triangle is intended to alert the user to the
presence of important operating and maintenance (servicing) instructions in the
literature accompanying the appliance.
Marking by the “CE” symbol (shown left) indicates compliance of this device with the
EMC (Electromagnetic Compatibility) and LVD (Low Voltage Directive) standards of the
European Community
Please read all instructions and precautions carefully and completely before
operating your Simaudio MOON CP-8 Surround Preamplifier / Processor
1. ALWAYS disconnect your entire system from the AC mains before connecting or disconnecting any cables,
or when cleaning any component.
2. The MOON CP-8 must be terminated with a three-conductor AC mains power cord which includes a
protective earthing connection. To prevent shock hazard, all three connections must ALWAYS be used.
Connect the MOON CP-8 only to an AC source of the proper voltage; Both the shipping box and rear panel
serial number label will indicate the correct voltage. Use of any other voltage will likely damage the unit and
void the warranty
3. AC extension cords are NOT recommended for use with this product.
4. NEVER use flammable or combustible chemicals for cleaning audio components.
5. NEVER operate the MOON CP-8 with any covers removed. There are no user-serviceable parts inside. An
open unit, especially if it is still connected to an AC source, presents a potentially lethal shock hazard. Refer
all questions to authorized service personnel only.
6. NEVER wet the inside of the MOON CP-8 with any liquid. If a liquid substance does enter your MOON CP-8,
immediately disconnect it from the AC mains and take it to your MOON dealer for a complete check-up.
7. NEVER expose the MOON CP-8 to dripping or splashing of liquids and no objects filled with liquids, such as
vases, shall be placed on top.
8. NEVER block air flow through ventilation slots or heatsinks.
9. NEVER bypass any fuse.
10. NEVER replace any fuse with a value or type other than those specified
11. NEVER attempt to repair the MOON CP-8. If a problem occurs contact your MOON dealer.
12. NEVER expose the MOON CP-8 to extremely high or low temperatures.
13. NEVER operate the MOON CP-8 in an explosive atmosphere.
14. ALWAYS keep electrical equipment out of reach of children.
15. ALWAYS unplug sensitive electronic equipment during lightning storms.
____________________________________________________________________________________

Table of Contents
Congratulations..................................................... 6
Unpacking ............................................................ 6
Introduction ......................................................... 7
Installation & Placement .......................................7
Front Panel Layout ............................................... 8
Front Panel Display Layout ................................... 9
Rear Panel Layout .............................................. 10
Remote Control Layouts ......................................11
Video Conversion Feature.................................... 12
HDMI Connections............................................... 13
Connecting a Monitor .......................................... 14
Connecting Playback Components ....................... 15
Connecting Recording Devices............................. 18
Connecting to Other Devices .............................. 21
Menu Operations ................................................ 26
Front Panel Display / On Screen Display ............. 27
Menu Map............................................................ 28
Auto Setup ......................................................... 29
Preparation ...................................................... 29
Start Menu ...................................................... 30
Option ............................................................ 30
Parameter Check............................................... 31
Manual Setup ..................................................... 32
Speaker Setup ................................................. 32
HDMI Setup...................................................... 34
Audio Setup...................................................... 35
Zone Setup ...................................................... 37
Option Setup .................................................... 38
Input Setup ........................................................ 41
Settings Related to Playing Input Source .............. 41
Surround Modes ................................................. 45
Standard Playback ............................................ 45
Playback in Pure Direct Mode ............................. 46
Parameters ......................................................... 47
Surround Parameter ......................................... 47
Tone Control..................................................... 49
MultEQ XT ....................................................... 50
Dynamic EQ ..................................................... 50
Dynamic Volume .............................................. 51
Setting ........................................................... 51
Restorer .......................................................... 52
Night Mode....................................................... 52
Audio Delay ..................................................... 52
____________________________________________________________________________________
Table of Contents 4

Table of Contents (cont’d)
Information......................................................... 53
Status ............................................................ 53
Audio Input Signal ............................................ 53
HDMI Information.............................................. 53
Auto Surround Mode .......................................... 54
Quick Select ..................................................... 54
Preset Stations.................................................. 54
Playback ............................................................. 55
Preparations ..................................................... 55
Playing Video & Audio Equipment......................... 55
Listening to AM/FM Broadcasts ........................... 56
Listening to XM Satellite Radio ........................... 56
Listening to SIRIUS Satellite Radio ...................... 58
Other Operations and Functions ......................... 61
Other Operations .............................................. 61
Convenient Functions ........................................ 62
Remote Control Operations ................................. 63
Main Remote Control Unit................................... 63
Presetting ....................................................... 63
Functions by Component Type ............................ 64
Learning Function ............................................. 66
System Call Function ........................................ 67
Punch Through Function .................................... 68
Remote Backlight Settings .................................. 68
Resetting the Main Remote Control ..................... 68
Amplifier Assign / Multi-zone ............................. 69
Multi-Zone settings w/ Amp Assign Function ......... 69
Multi-Zone settings w/ Zone Pre-out Output ......... 70
Other Information ............................................... 71
Speaker Installation .......................................... 71
Surround Modes ............................................... 72
Audyssey MultEQ XT ......................................... 73
HDMI............................................................... 74
Troubleshooting ................................................. 75
Specifications ..................................................... 78
www.simaudio.com
IMPORTANT: Please read this entire manual before using this product.
Installation and operating instructions inside.
____________________________________________________________________________________
Table of Contents 5
Revision no.: 20100607

MOON CP-8 Surround Preamplifier / Processor
Congratulations!
Thank you for selecting the MOON CP-8 Surround Preamplifier / Processor as a part of your Home-theater system. This
Surround Preamplifier / Processor has been designed to offer state-of-the-art high-end performance in an elegant package,
while retaining all the sonic hallmarks on which Simaudio has made its reputation. We have spared no effort to ensure that it
is among the finest available. We have been building high-performance audio equipment for over 25 years, and the know-how
gained through our cumulative experience is an important reason why MOON components are so musically satisfying.
The performance of your CP-8 will continue to improve during the first four to six weeks of use. This is the result of a “break-
in” period required for the numerous high quality electronic parts used throughout this Processor.
Before setting up your new MOON CP-8, we encourage you to please read this manual thoroughly to properly acquaint
yourself with its features. We hope you enjoy listening to the MOON CP-8 Surround Preamplifier / Processor as much as the
pride we have taken in creating this fine audio product. We understand the power and emotion of music and build our
products with the goal of faithfully capturing these elusive qualities.
Unpacking
The MOON CP-8 Surround Preamplifier / Processor is a large and heavy component that should be removed from its box
with care.
The following accessories should be included inside the box with your amplifier:
9
9
9
9
9
9
9
9
9
As soon as the component is safely removed from its box and placed down, perform a thorough physical inspection and report
any damage to your dealer immediately. We suggest that you keep all of the original packaging, storing it in a safe, dry place
in the event that you’re required to transport the amplifier. The customized packaging is specially designed to protect the
MOON CP-8 Surround Preamplifier / Processor from potential damage that may occur during shipping.
Please write the serial number of your new Simaudio MOON CP-8 in the space provided below for future reference.
____________________________________________________________________________________
Congratulations / Unpacking 6
This owner’s manual
AC power cable
Full-Function Remote Control + batteries
Secondary WRM-2 Remote Control + batteries
Indoor FM Antenna
Indoor AM Loop Antenna
Microphone for Setup
Remote Control Preset Codes List
Warranty and product registration information (USA and Canada only)
Serial No.: ________________

MOON CP-8 Surround Preamplifier / Processor
Introduction
Your MOON CP-8 Surround Preamplifier / Processor incorporates many significant design features to achieve its “world class”
level of performance. This is an abbreviated list of the more important features:
7.1 Channels with up-to-date HD audio and video decoding • HDMI 1.3a inputs and output • Three-zone
multiple source capability
trigger outputs
includes Faroudja DCDi
upscaling
transformers including 1 proprietary toroidal specifically for analog audio circuitry
includes 20 stages of i
remote control for basic operation
control
outputs
calibration and "Audyssey Mult EQ XT"
24dB steps
paths for a faster transient response
• 10 DSP simulation playback Modes • Auto Surround Mode for Digital & Analog inputs • 2 subwoofer
• Three user-selectable muting levels • "Auto Setup Calibration" (w/ microphone), Auto & Manual room
• HD Video Circuitry using 12-bit/216MHz encoders/decoders with NSV Precision Video that
• Full-function programmable remote-control with touch-screen • An over-sized power supply with 2
• Built-in AM/FM Tuner and RIAA Phono Section (MM) • XM Satellite Radio ready • Short signal
• RS-232C and serial IR ports for full custom external control • Dual assignable 12 Volt
• video processing, 1080p video pass-through, and up to 1080p analog-video-to-HDMI
• Power supply voltage regulation
2
DCf (Independant Inductive DC Filtering) • 6 assignable digital audio inputs • Secondary
• Hidden control panel allows for full operation and setup without a remote
• Crossover points at 40, 60, 80, 100, 120, 150 & 250Hz in either 12 dB or
• Designed to remain powered up at all times for optimal performance
Installation & Placement
The MOON CP-8 Surround Processor / Preamplifier should be placed on a rigid surface to prevent any accidents such as
falling over. It is highly recommended that it sits on its own dedicated shelf. You should never place another component on
top of this Surround Processor. As well, you should avoid placing it near a heat source or inside a closed cabinet that is not
well ventilated. This could compromise the CP-8’s performance and reliability.
In the event that you intend to place your CP-8 in a rack mount type installation, Middle Atlantic Products, Inc. offers a rack
& enclosure specifically tailored to the MOON CP-8. If you choose to use another rack mounting system, please refer to
specifications section at the end of this owner’s manual for the CP-8’s exact dimensions
By default, the MOON CP-8 is configured for 5.1 channel operation. To activate 7.1 channel operation, please refer to the
section entitled Manual Setup – “Amp Assign” (page 38).
Finally, you should make all of your audio and video signal connections prior to making the AC connection between the CP-8
and the AC wall outlet.
____________________________________________________________________________________
Introduction / Installation & Placement 7
MOON CP-8 Surround Preamplifier / Processor
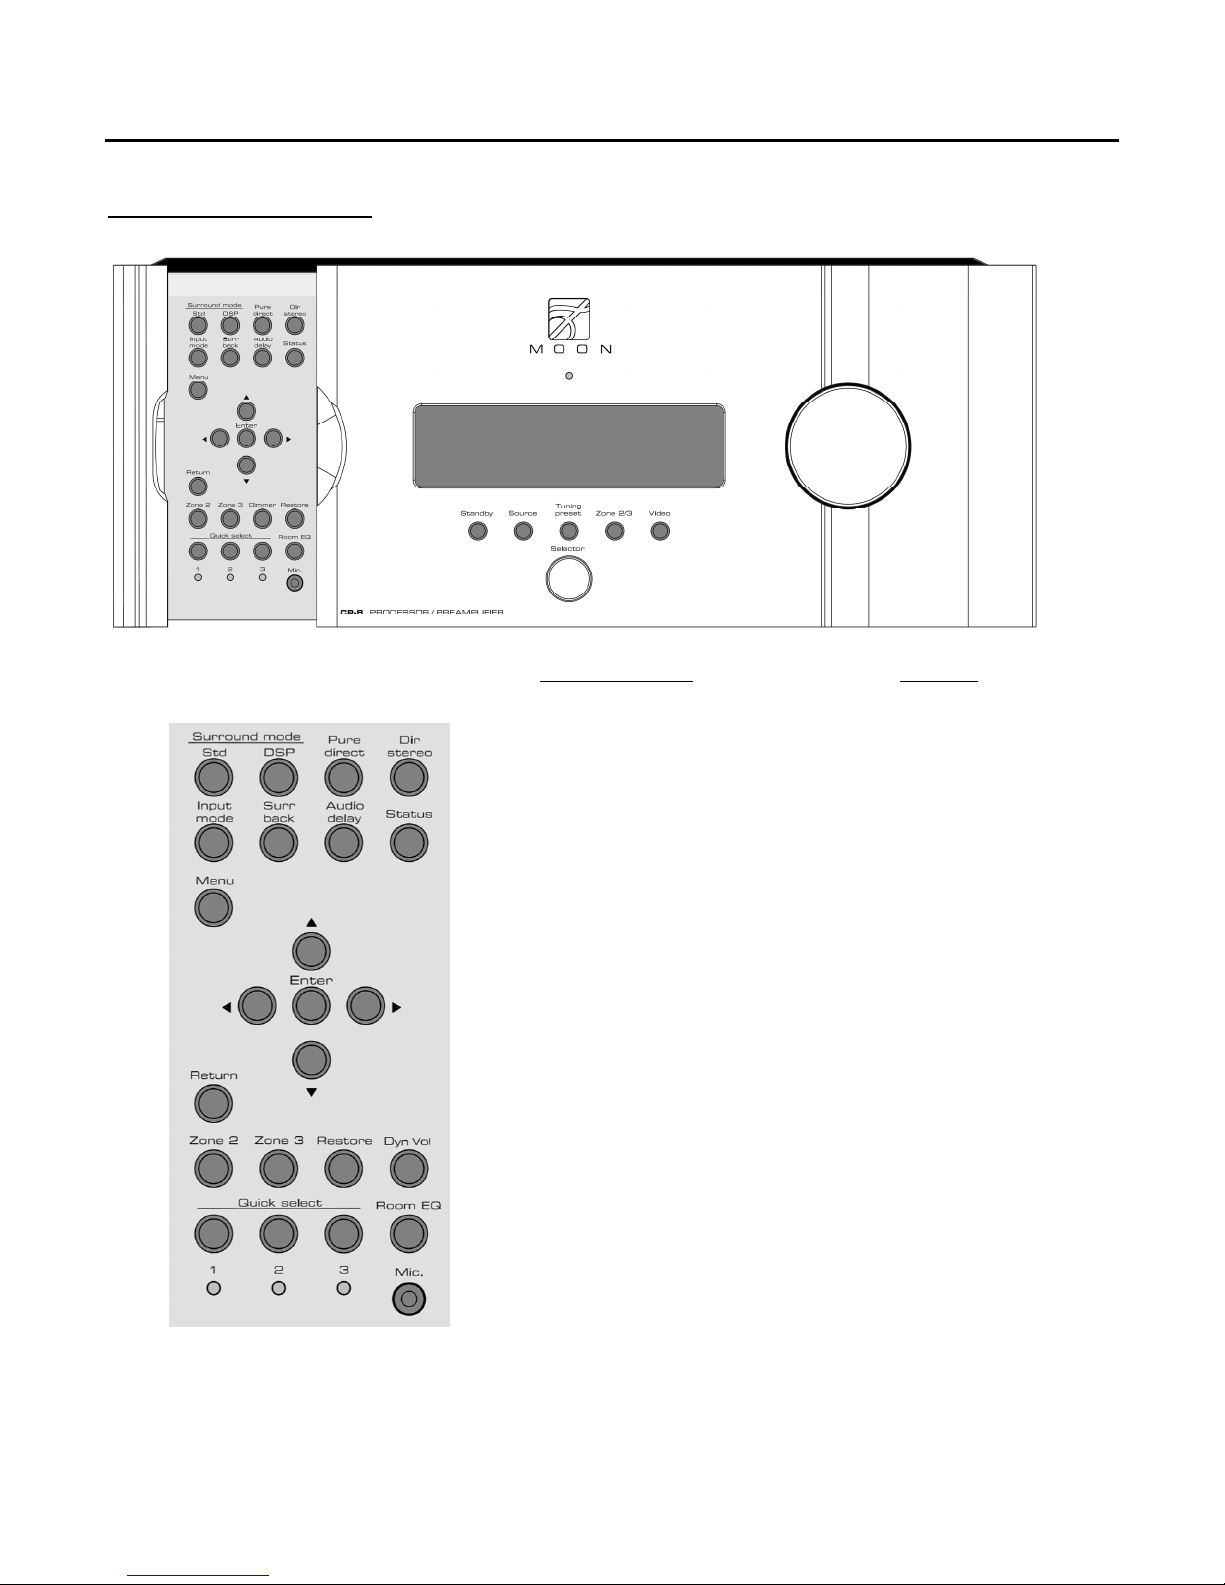
Front Panel Layout
Front Panel Item Page no.
Display Window .......................................... 9
Standby ..................................................... 55
Source ...................................................... 55
Tuning Preset ............................................ 56
Zone 2/3 .................................................... 61, 70
Selector Knob ............................................ 55
Video ........................................................ 44
Master Volume Knob .................................. 55
Surround Mode Std .................................... 45
Surround Mode DSP ................................... 46
Pure direct ................................................. 46
Dir Stereo .................................................. 46
Input Mode ................................................ 21, 41-43, 61
Surr back ................................................... 49
Audio Delay ............................................... 52
Status ....................................................... 53, 54, 57, 59
Menu .................................................... 26
◄ ▲ ► ▼ ................................................ 26
Enter .................................................... 26
Return .................................................... 26
Zone 2 .................................................... 70
Zone 3 .................................................... 70
Restore .................................................... 52
Dyn Vol .................................................... 50, 51
Quick Select 1, 2, 3 .................................... 62
Room EQ ................................................... 50
Mic. (jack input for Auto Setup) .................. 29
____________________________________________________________________________________
Front Panel Display Layout 8
MOON CP-8 Surround Preamplifier / Processor
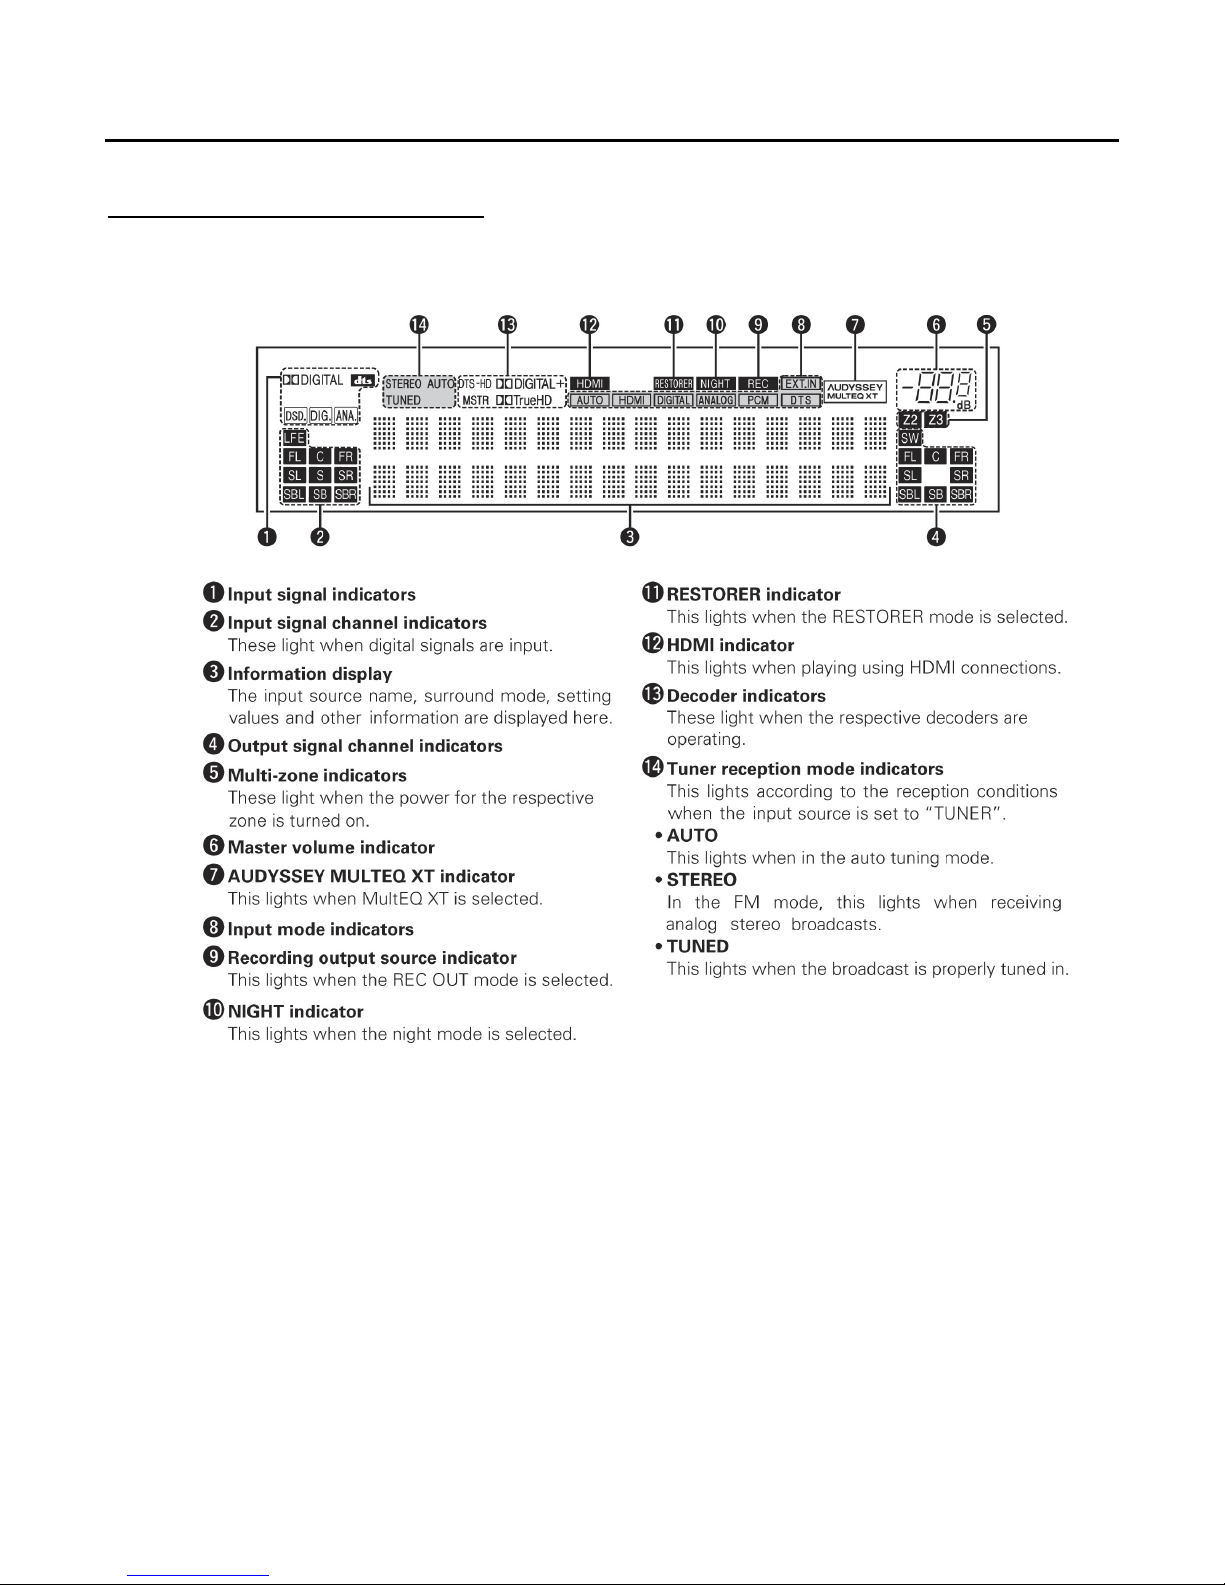
Front Panel Display Layout
____________________________________________________________________________________
Front Panel Display Layout 9
MOON CP-8 Surround Preamplifier / Processor
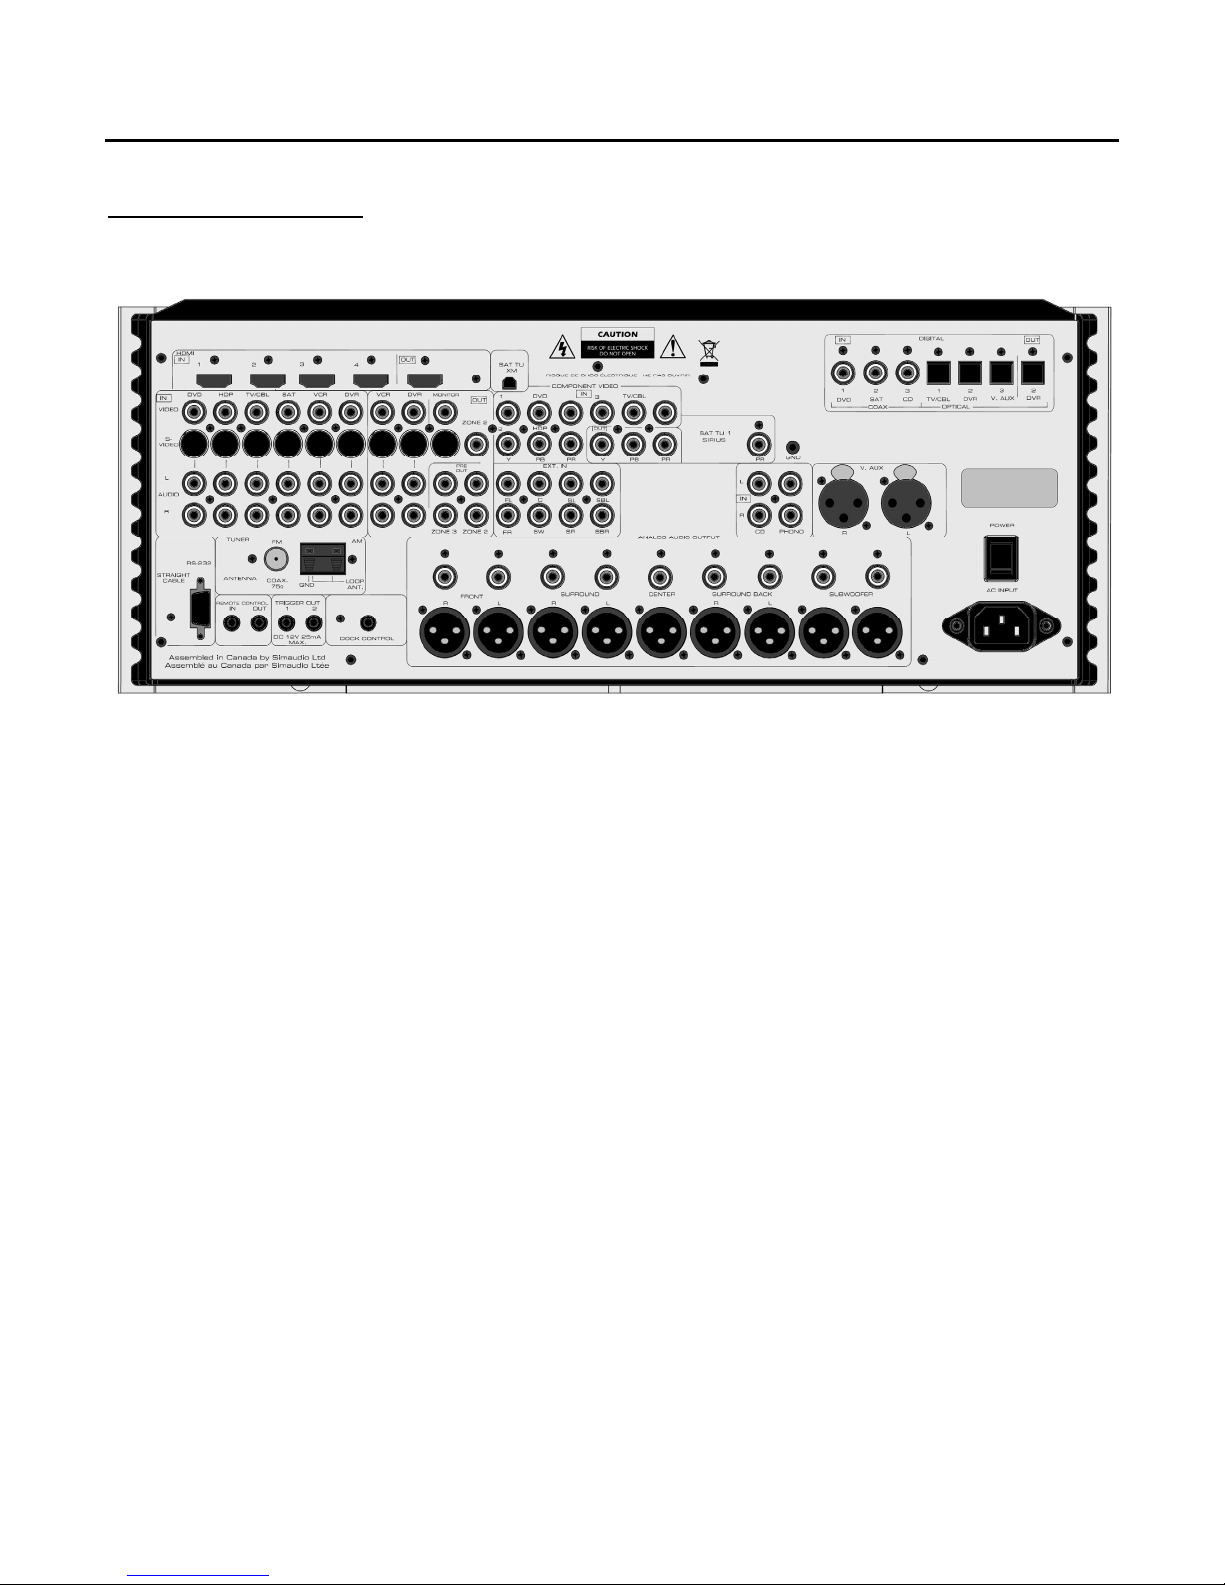
Rear Panel Layout
The above image is an exact representation of the CP-8’s rear panel. Throughout this manual, specific sections of this rear
panel will be referenced to describe various methods of connecting other components to the CP-8.
The rear panel is divided into different sections in a logical manner; Moving from left to right and top to bottom, HDMI inputs
(4) and output (1); XM Satellite Radio connector (USA & Canada only); Digital audio inputs (3 coaxial, 3 optical) and output (1
optical); standard video inputs (6 with S-Video, CVBS & 2-ch. audio), standard video outputs (2 with S-Video, CVBS & 2-ch.
audio and 1 with S-Video & CVBS); Zone-2 output (CVBS & 2-ch. audio); Zone-3 output (2-ch. audio); Component video
inputs (3) and outputs (1); Sirius Satellite Radio connector (USA & Canada only); 7.1 analog audio input; audio only 2-ch
inputs (CD and Phono); Auxiliary balanced XLR audio 2-ch input (1); Control signal connections (RS-232C, IR input/output and
two 12V trigger outputs); AM & FM tuner antenna terminals; analog audio outputs – balanced XLR and single-ended RCA Front L/R, Surround L/R, Center, Rear Surround L/R and subwoofer (2); the main power switch (“0”=off, “1”=on) and finally
the IEC receptacle for the included AC power cord.
____________________________________________________________________________________
Rear Panel Layout 10
MOON CP-8 Surround Preamplifier / Processor
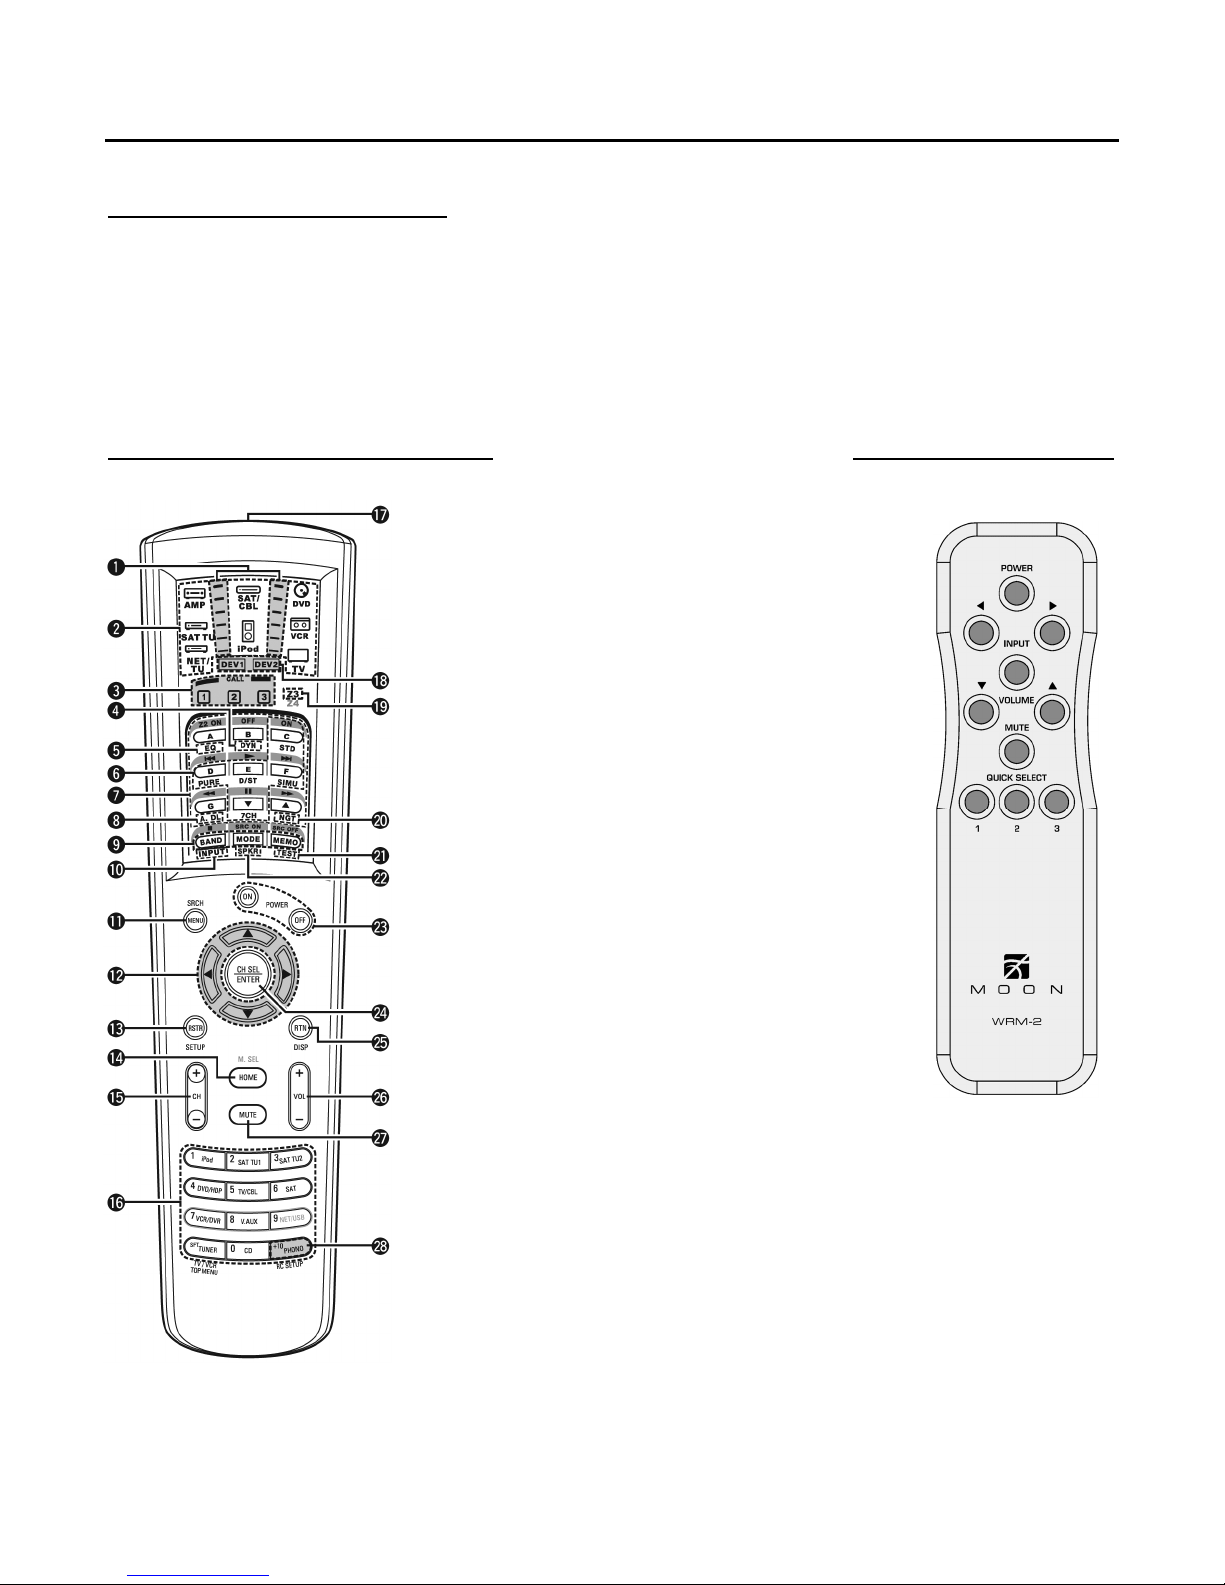
Remote Control Layouts
The MOON CP-8 comes with two (2) remote control units; The full-function (or main) remote control allows for access to all
setup menus and normal operation of the CP-8. The secondary remote control (or WRM-2) allows for basic everyday
operation of the CP-8. We recommend that, once you have performed the complete setup procedure for the CP-8, you
should store the full-function remote in a safe and easily accessible place. This remote control unit has a backlight feature for
ease-of-use in darkened rooms. Both the amount of time that the backlight stays on and its brightness level can be adjusted.
Refer to page 68 for further details. The following buttons cannot be used with the CP-8: M.SEL, DTU, NET/USB as well as
the Zone4 mode.
Full-Function Main Remote Control WRM-2 Remote Control
1 Signal transmission indicator .................... 63 - 66
2 Mode select buttons ................................. 63 - 66
3 Quick select / System call buttons ............. 62, 67
4 Dynamic Volume button (DYN) ................. 50
5 MultEQ XT button ..................................... 50
6 Surround mode buttons· ........................... 45 - 46
7 System buttons ....................................... 64 - 66
8 Audio delay button (A. DL) ....................... 52
9 Tuner system buttons .............................. 56
10 Input mode button (INPUT) ..................... 41 - 42
11 Menu/Search button (MENU/SRCH) ........... 26
12 Cursor buttons▲▼◄► ........................... 26
13 RESTORER button (RSTR) ........................ 52
14 HOME button ........................................... 63
15 Channel buttons (CH) .............................. 55
16 Input source select / Number buttons ....... 55
17 Remote control signal transmitter ............. 11
18 Device select indicators (DEV1/DEV2) ....... 63 - 66
19 ZONE3 select indicators (Z3) .................... 63 - 66
20 Night button (NGT) .................................. 52
21 Test tone button (TEST) .......................... 33
22 Front speaker select button (SPKR) ........... 55
23 POWER buttons ....................................... 55
24 Channel select (CH SEL)/ENTER button ..... 26, 62
25 Return button (RTN) ................................ 26
26 Master volume buttons (VOL) ................... 55
27 Muting button (MUTE) ............................. 55, 70
28 Main remote setup button (RC SETUP) ...... 63 - 66
Power ………………. 55
◄ Input ► ………. 41 - 42
Input ……………….. HDS-8 input
Volume▲▼ …..…. 55
Mute ………………… 55, 70
Quick Sel 1,2,3 ….. 62, 67
For further details on each of these remote contols’ specific functions,
please refer to the page numbers shown in parentheses.
____________________________________________________________________________________
Remote Control Layouts 11
MOON CP-8 Surround Preamplifier / Processor
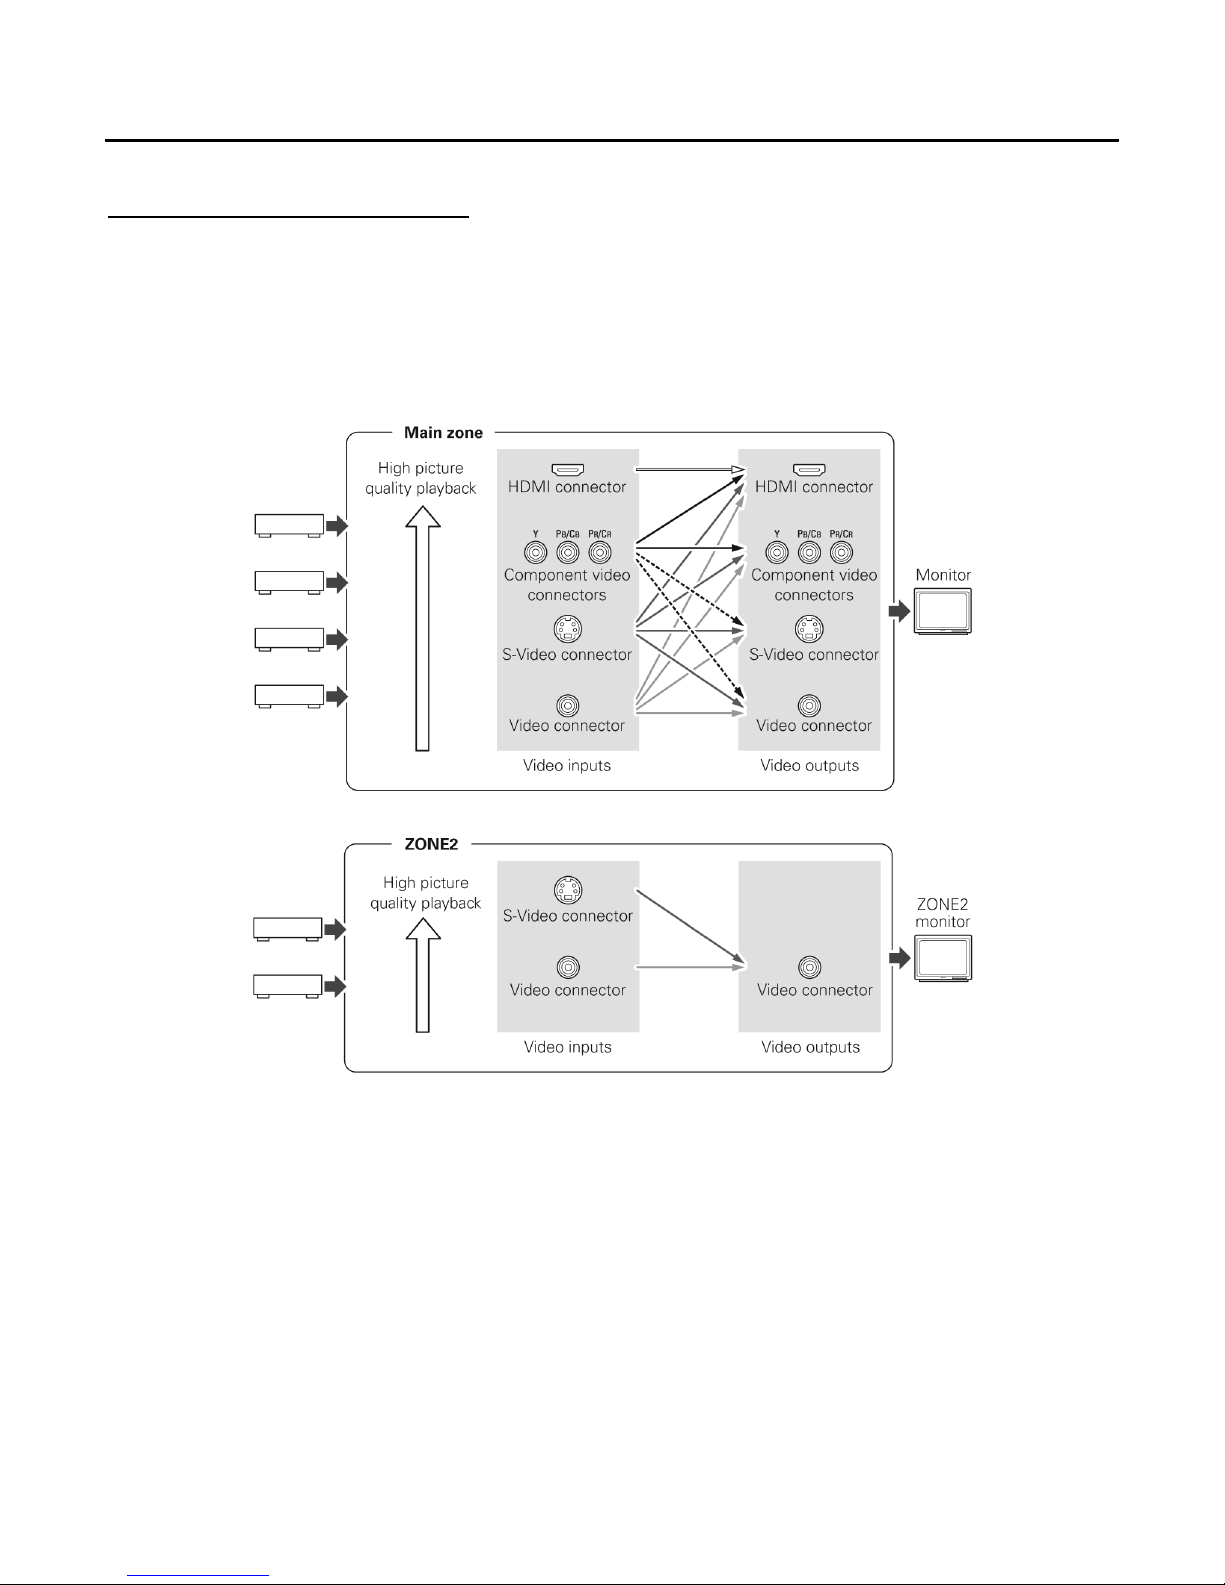
Video Conversion Feature
This feature automatically converts various formats of video signals input to the CP-8 into the format used to output the
video signals from the CP-8 to a monitor. The CP-8’s video input/output circuitry is compatible with the following four types
of video signals:
Digital video signals: HDMI
Analog video signals: Component Video, S-Video and Composite Video
When not using this feature, connect a monitor output with the same type of connector as the video input connector. The
resolution of the HDMI input-compatible monitor connected to the CP-8 can be checked at MENU “Information” – “HDMI
Signal Information” – “HDMI Monitor Information” (page 53).
• HDMI signals cannot be converted into analog signals.
• 1080p component input video signals cannot be output to anything other than component video connectors.
• 480p/576p, 720p and 1080i component video input signals can’t be converted into S-Video or Composite Video format.
When viewing HDMI or component video signals via the CP-8, the on-screen display appears when the MENU button or the
main remote control unit´s PARA button is operated. As well, when only HDMI or component video signals are input to the
CP-8, the characters of the onscreen display are not displayed over the picture.
____________________________________________________________________________________
Video Conversion Feature 12

MOON CP-8 Surround Preamplifier / Processor
HDMI Connections
With HDMI connections, the video and audio signals can be transferred with a single cable. The CP-8 is equipped for HDMI
version 1.3a. This version is backward compatible with previous versions, allowing the connection to all components equipped
with an HDMI connector. As well, the CP-8 is compatible with both 30-bit and 36-bit Deep Color formats.
By default, the HDMI audio signals are output to the amplifier(s) connected to the CP-8. To output the sound from the TV,
make the settings at MENU “Manual Setup” – “HDMI Setup” – “HDMI Audio Setup” – “HDMI Audio Out” “TV” (page 34).
• Use a CPPM-compatible DVD player to play DVD-Audio discs that are copyright-protected by CPPM.
• The CP-8 cannot be controlled from another device via the HDMI cable.
• The audio signals output from the HDMI connector (sampling frequency, bit rate, etc) may be restricted by the connected device.
• Video signals are not output properly when using devices that are not HDCP-compatible.
• Video signals are not output if the input video signals do not match the monitor’s resolution. In this case, switch the DVD player’s
resolution to a resolution with which the monitor is compatible.
• If the MENU “Manual Setup” – “HDMI Setup” – “HDMI Audio Setup” setting (page 34) is set to “AMP”, the sound may be
interrupted when the monitor’s power is turned off.
• Use a cable on which the HDMI logo is indicated (a certified HDMI product) for connection to the HDMI connector. Normal
playback may not be possible when using a cable that is non-HDMI-certified.
• If the monitor or DVD player does not support deep color, deep color signal transfer is not possible.
• If the monitor or DVD player does not support xvYCC, xvYCC signal transfer is not possible.
• If the monitor does not support “Auto Lipsync Correction” function, this function will not work.
• When the CP-8 and DVD player are connected using an HDMI cable, also connect the CP-8 and monitor using an HDMI cable.
• If the connected monitor or DVD player only has a DVI-D connector, use an HDMI/DVI converter cable.
• When using a DVI cable, no audio signals are transmitted.
• Use a Deep Color compatible cable for connection to Deep Color compatible devices.
In the event that you are using an HDMI/DVI converter cable (or adapter):
• HDMI video signals are theoretically compatible with the DVI format. When connecting to a monitor, etc., equipped with a DVI-D
connector, connection is possible using an HDMI/DVI converter cable, but depending on the combination of components in some
cases the video signals will not be output.
• When connecting using an HDMI/DVI converter adapter, the video signals may not be output properly due to poor connections
with the connected cable, etc.
____________________________________________________________________________________
HDMI Connections 13
MOON CP-8 Surround Preamplifier / Processor
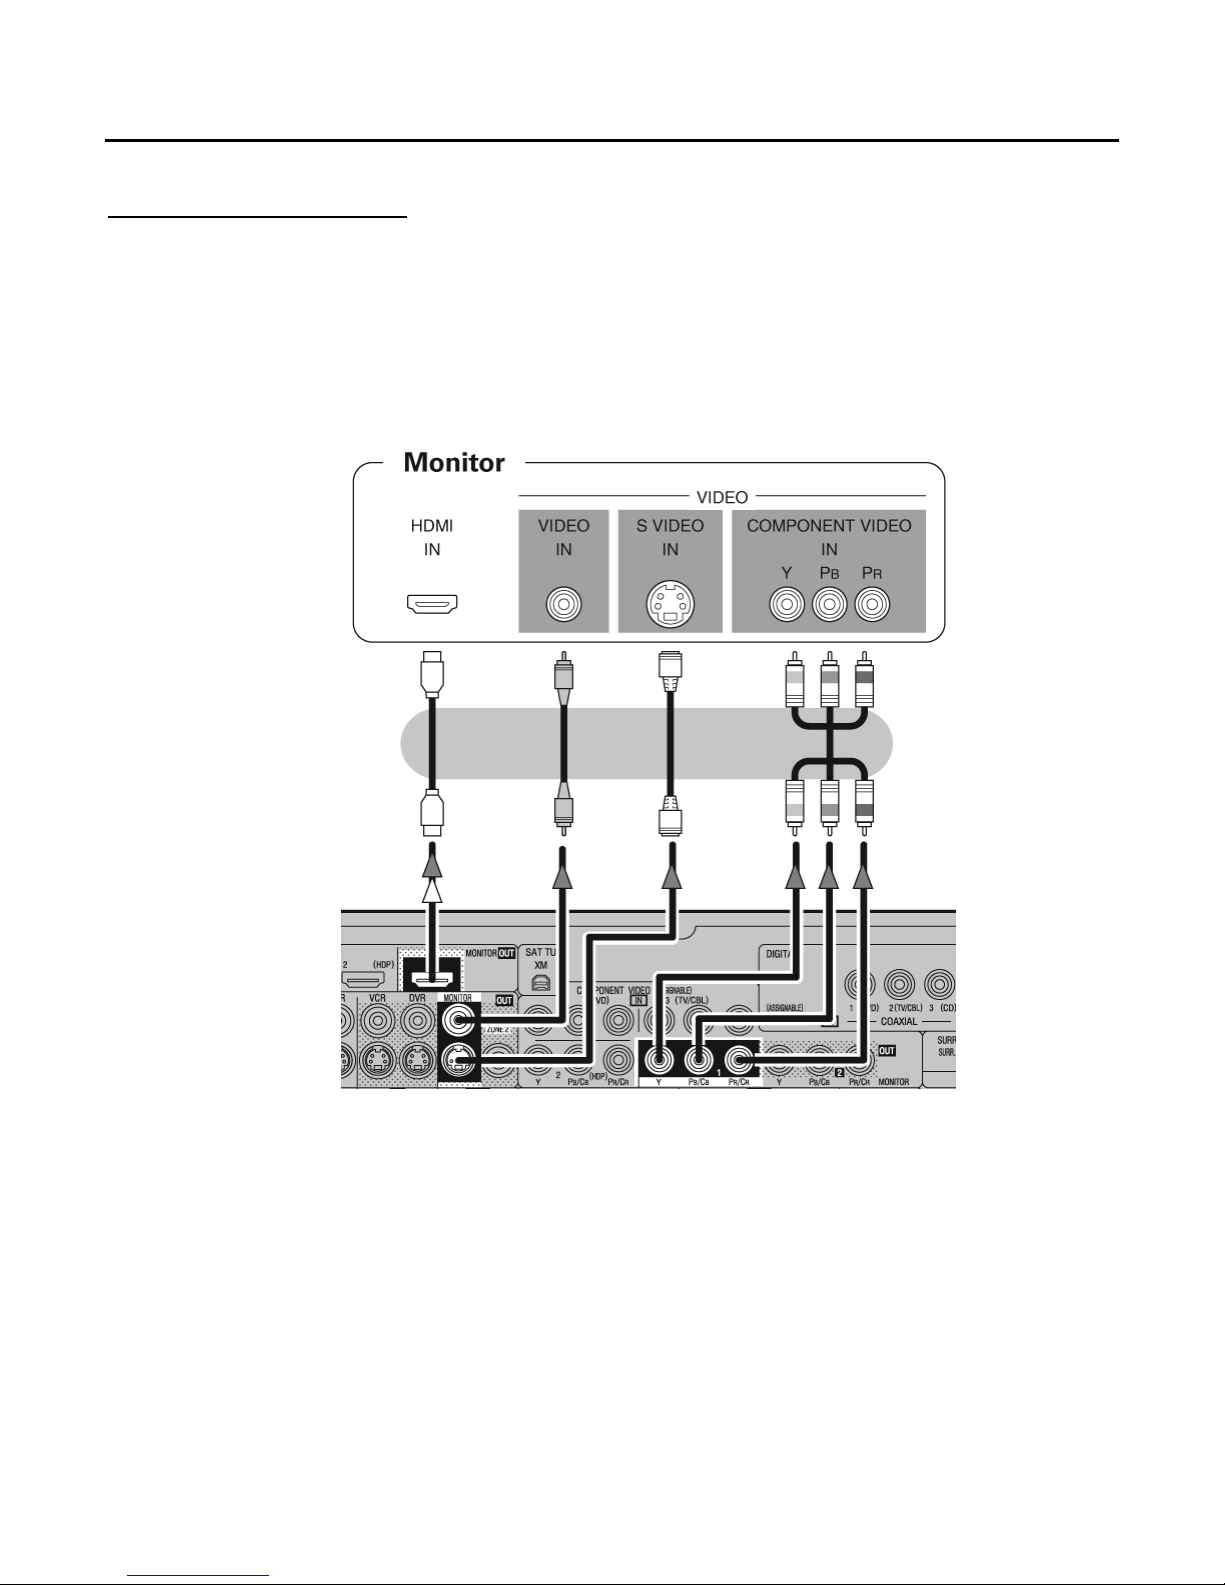
Connecting a Monitor
• Connect the video cables to be used (refer to page 12 “Video Conversion Feature”).
• By using the CP-8’s HDMI connection, both the video and audio signals can be transferred with a single cable.
• To output the audio signals to the monitor with HDMI connections, set MENU “Manual Setup” – “HDMI Setup” – “HDMI
Audio Setup” – “HDMI Audio Out” “TV” (page 34).
____________________________________________________________________________________
Connecting A Monitor 14
• The component video connectors may appear differently on your monitor. For details, refer to the monitor’s owners manual.
• The audio signals output from the HDMI connectors are only from the HDMI input signals. Video-converted HDMI signals
are not included in the audio signals. To play the audio signal over your monitor, make the analog or digital audio output
connections from the CP-8 to your monitor’s audio input connectors.
MOON CP-8 Surround Preamplifier / Processor
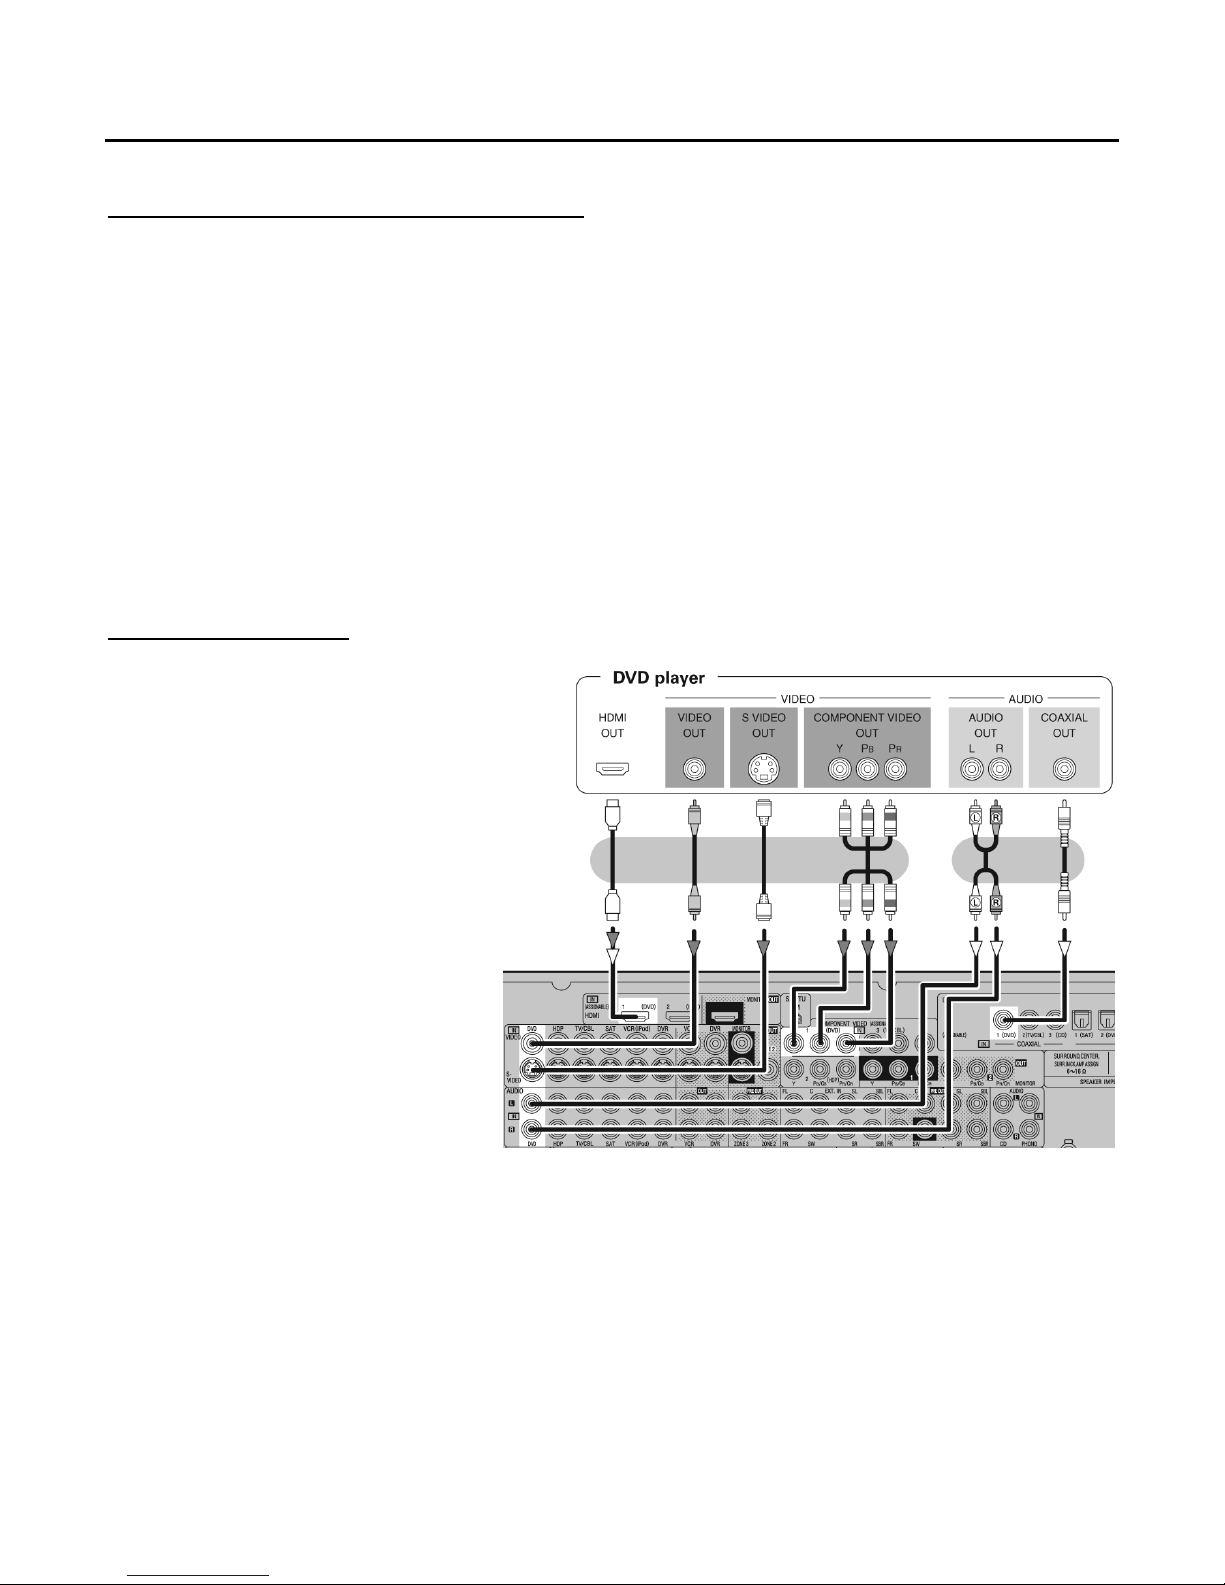
Connecting Playback Components
The following subsections explain how to connect various playback components to the CP-8 such as a DVD player, Turntable,
CD Player, TV/Cable tuner and Satellite receiver.
When connecting a playback component to the CP-8, always ensure that the left and right channel audio input connections of
the CP-8 are properly matched to the left and right channel audio output connections of the playback component. As well,
don’t hesitate to use high quality interconnect cables. Poor quality interconnect cables can degrade the overall sonic
performance of your system.
All rear panel connectors have been chosen because they provide excellent connections for your unit. A poor contact will
degrade the signal substantially, and plugs and sockets should all look clean and free of dirt and corrosion. The easiest way to
clean them is to remove the cables from their sockets and push them back in again. This procedure requires that your
integrated amplifier and the rest of your components be completely turned off.
DVD or Blu-ray Player
• With HDMI connections, the video and audio
signals can be transferred with a single cable.
• When using the optical digital audio onnection
(instead of the coaxial digital audio connection)
make the settings at MENU “Input Setup” –
“Assign” – “Digital In” (page 43).
___________________________________________________________________________________
Connecting Playback Components 15
MOON CP-8 Surround Preamplifier / Processor
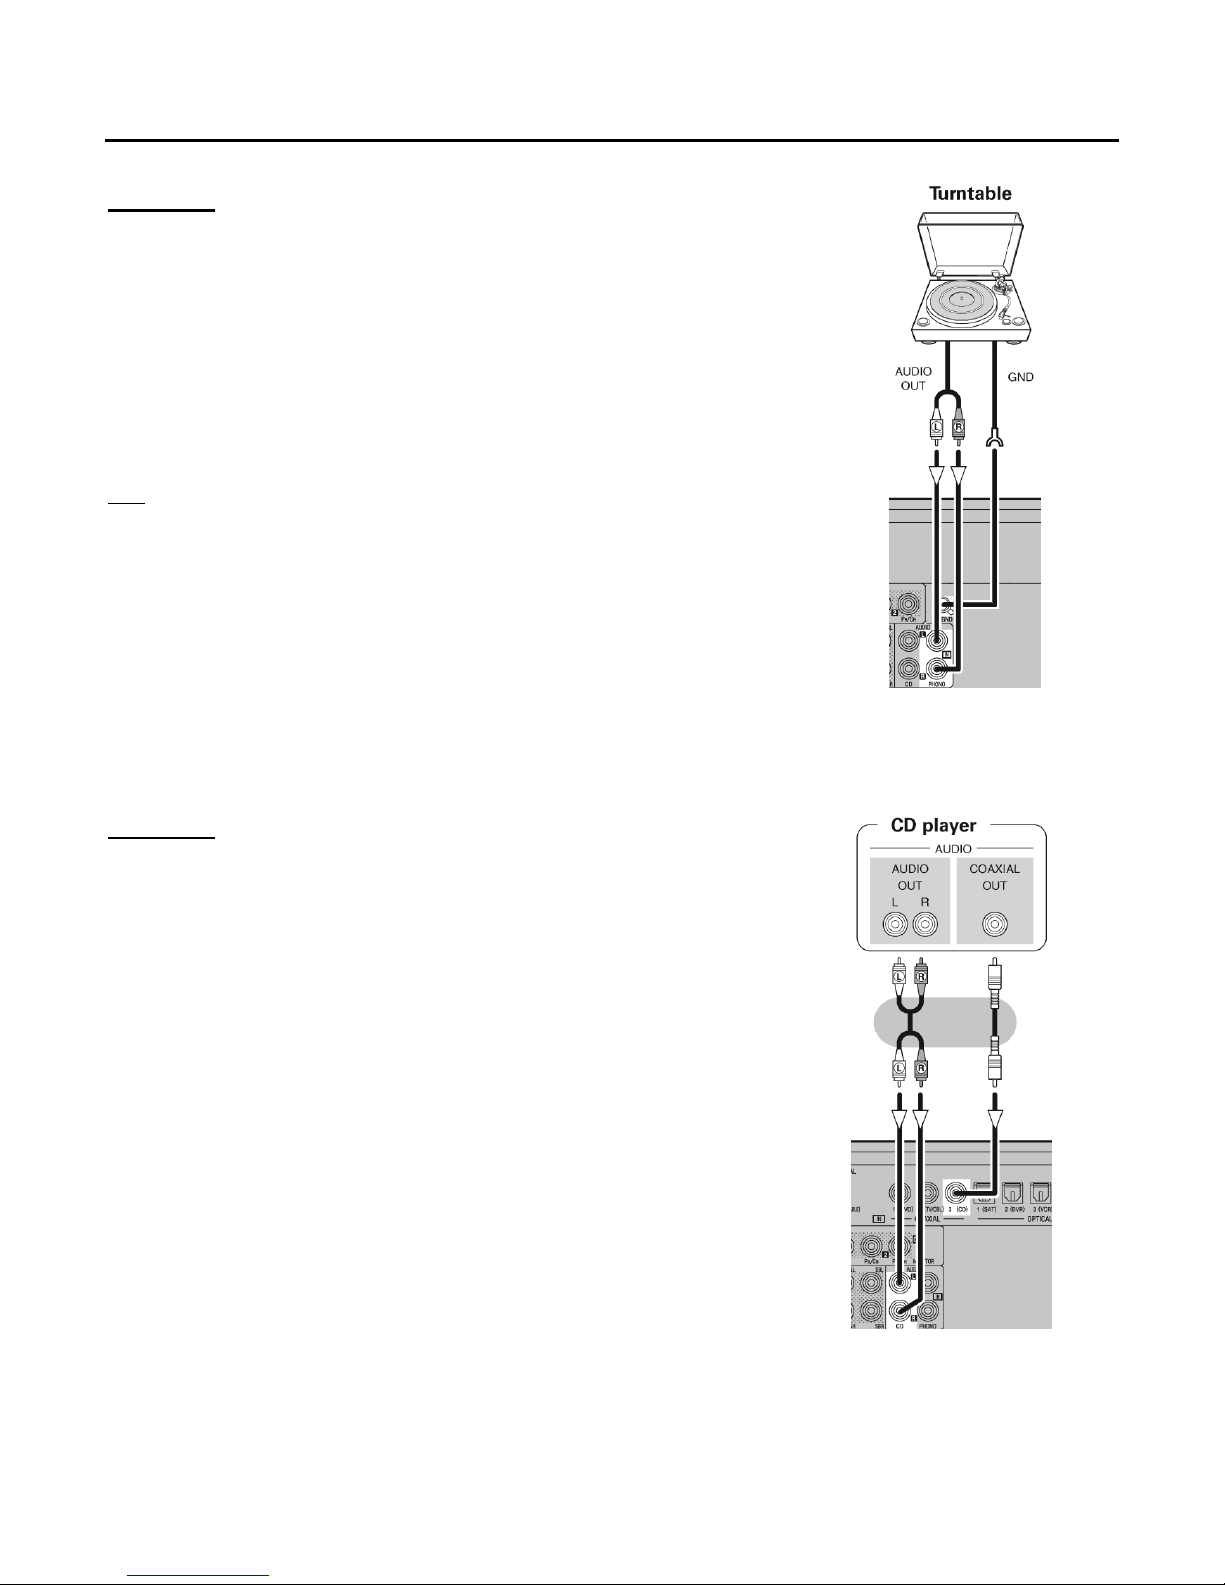
Turntable
• When connecting a record player with an MC cartridge, use a commercially available
MC head amplifier or a step-up transformer.
• Induction humming (a booming sound) may be produced from the speakers if the
volume is raised with no record player connected.
• With some record players, noise may be generated when the ground wire is connected.
If so, disconnect the ground wire.
Note
: The CP-8’s SIGNAL GND terminal is meant to reduce noise when a
record player is connected. This is not a safety ground terminal.
CD Player
• When using the optical digital audio connection (instead of the coaxial
digital audio connection), make the settings at MENU “Input Setup” –
“Assign” – “Digital In” (page 43).
____________________________________________________________________________________
Connecting Playback Components 16
MOON CP-8 Surround Preamplifier / Processor
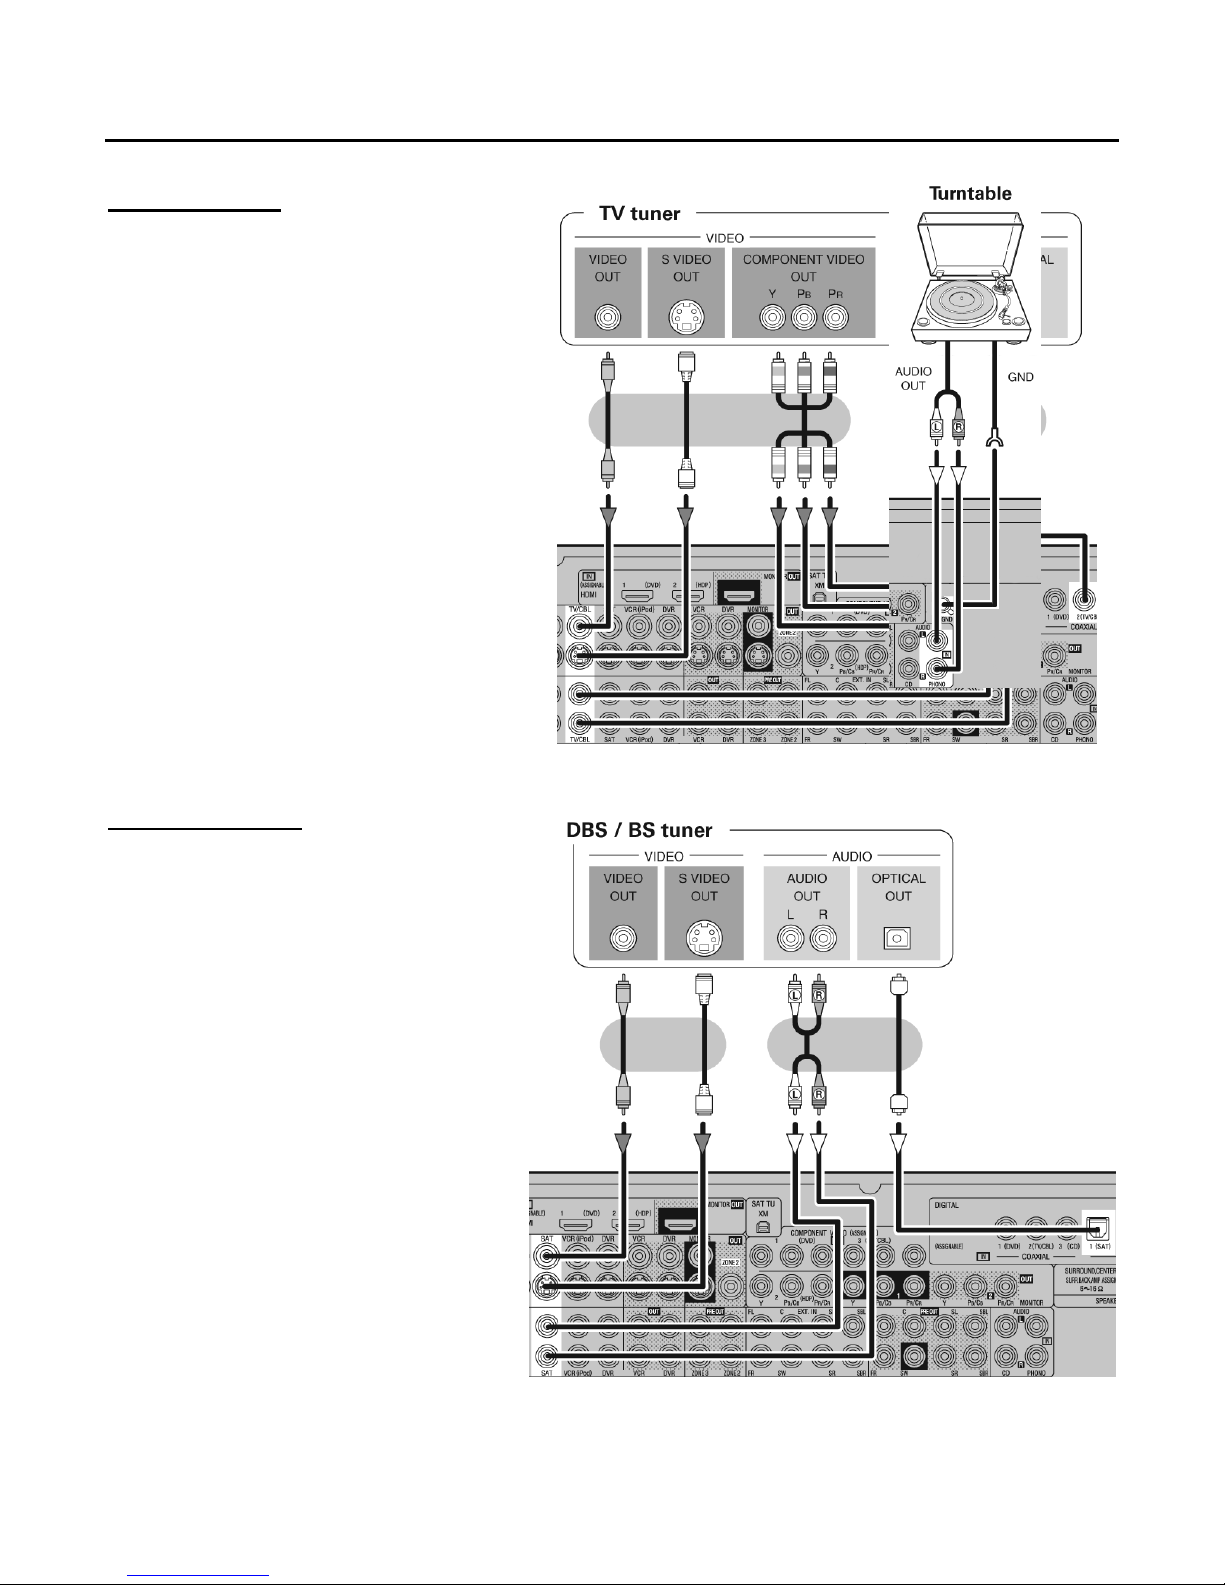
TV/Cable Tuner
• When using a optical digital cable for the digital
audio connection (instead of the coaxial digital
audio connection) make the settings at MENU
“Input Setup” – “Assign” – “Digital In” (page 43).
• When using a component video cable for the video
connection, make the settings at MENU “Input
Setup” – “Assign” – “Component In” (page 43).
Satellite Receiver
• When using a coaxial digital cable for the digital
audio connection(instead of the coaxial digital
audio connection), make the settings at MENU
“Input Setup” – “Assign” – “Digital In”
(page 43).
• When using a component video cable for the
video connection, make the settings at MENU
“Input Setup” – “Assign” – “Component In”
(page 43).
____________________________________________________________________________________
Connecting Playback Components 17
MOON CP-8 Surround Preamplifier / Processor
Connecting Recording Components
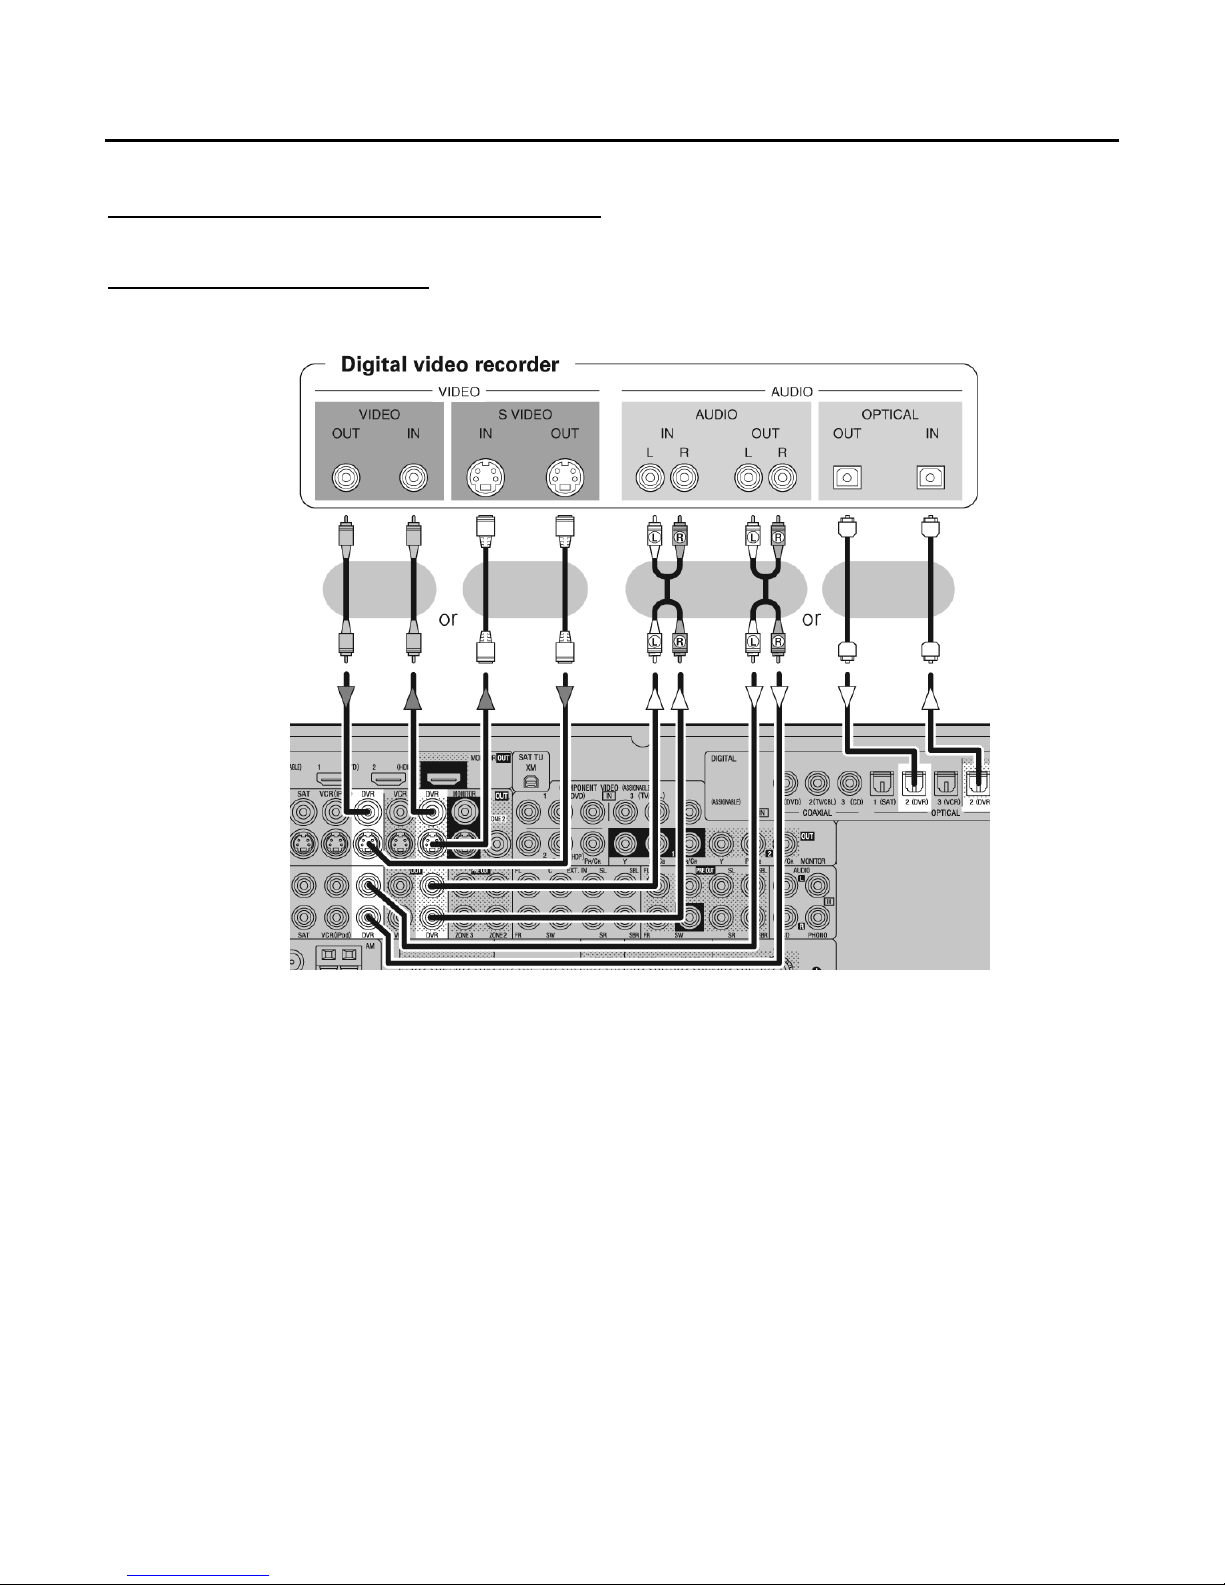
Digital Video Recorder (DVR)
• Make analog connections if you want to record analog audio signals.
• When recording via the CP-8, the playback device´s cable must be the same type as the cable used to connect the
CP-8´s DVR OUT connector:
TV IN S-Video cable and DVR OUT S-Video cable
or
• When using a component video cable for the video connection, make the settings at
MENU “Input Setup” – “Assign” – “Component In” (page 43).
• If you are using the optical digital audio connection, you must use the DVR-2 input and DVR-2 output between the
CP-8 and your DVR device.
____________________________________________________________________________________
Connecting Recording Components 18
TV IN Composite Video cable and DVR OUT Composite Video cable
MOON CP-8 Surround Preamplifier / Processor
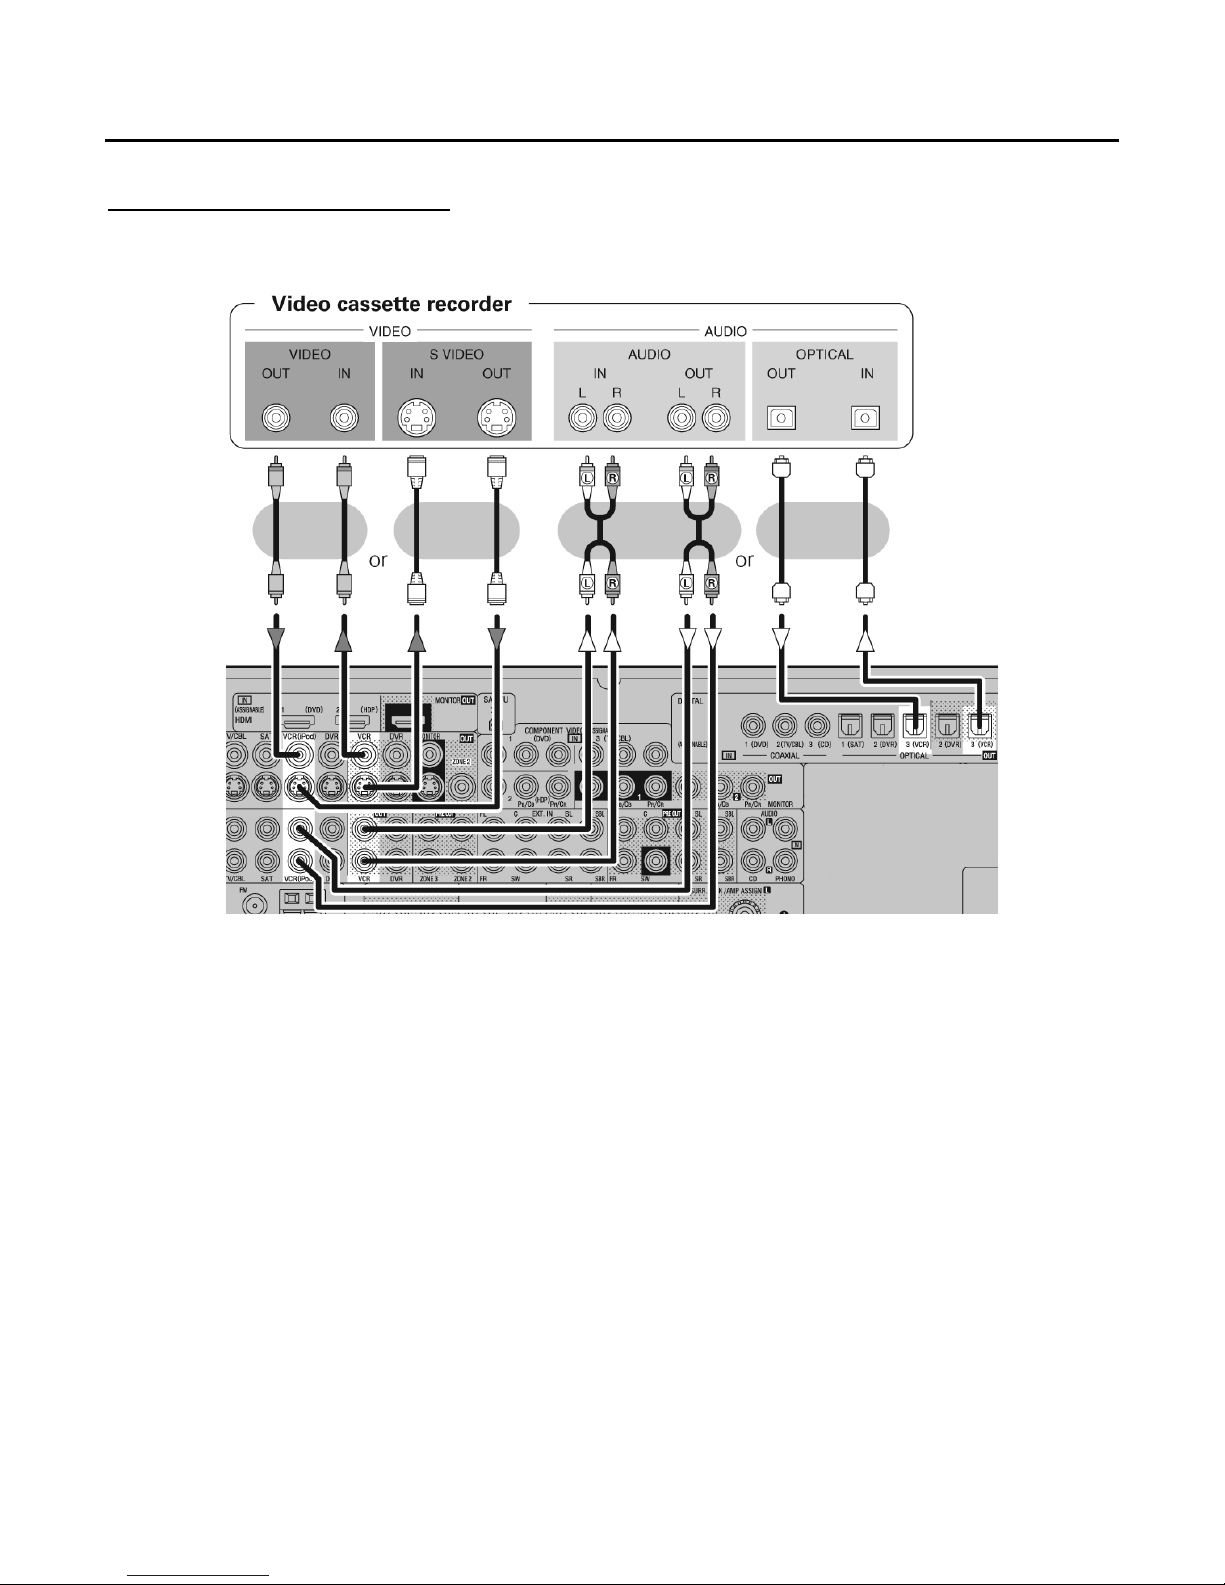
Video Cassette Recorder (VCR)
• Connect the cables to be used.
• When recording via the CP-8, the playback device´s cable must be the same type as the cable used to connect the CP-8´s
VCR OUT connector:
TV IN S-Video cable and DVR OUT S-Video cable
or
• When using a component video cable for the video connection, make the settings at
MENU “Input Setup” – “Assign” – “Component In” (page 43).
• If you are using the optical digital audio connection, you must use the VCR-3 input and VCR-3 output between the
CP-8 and your VCR.
____________________________________________________________________________________
TV IN Composite Video cable and DVR OUT Composite Video cable
Connecting Recording Components 19
MOON CP-8 Surround Preamplifier / Processor
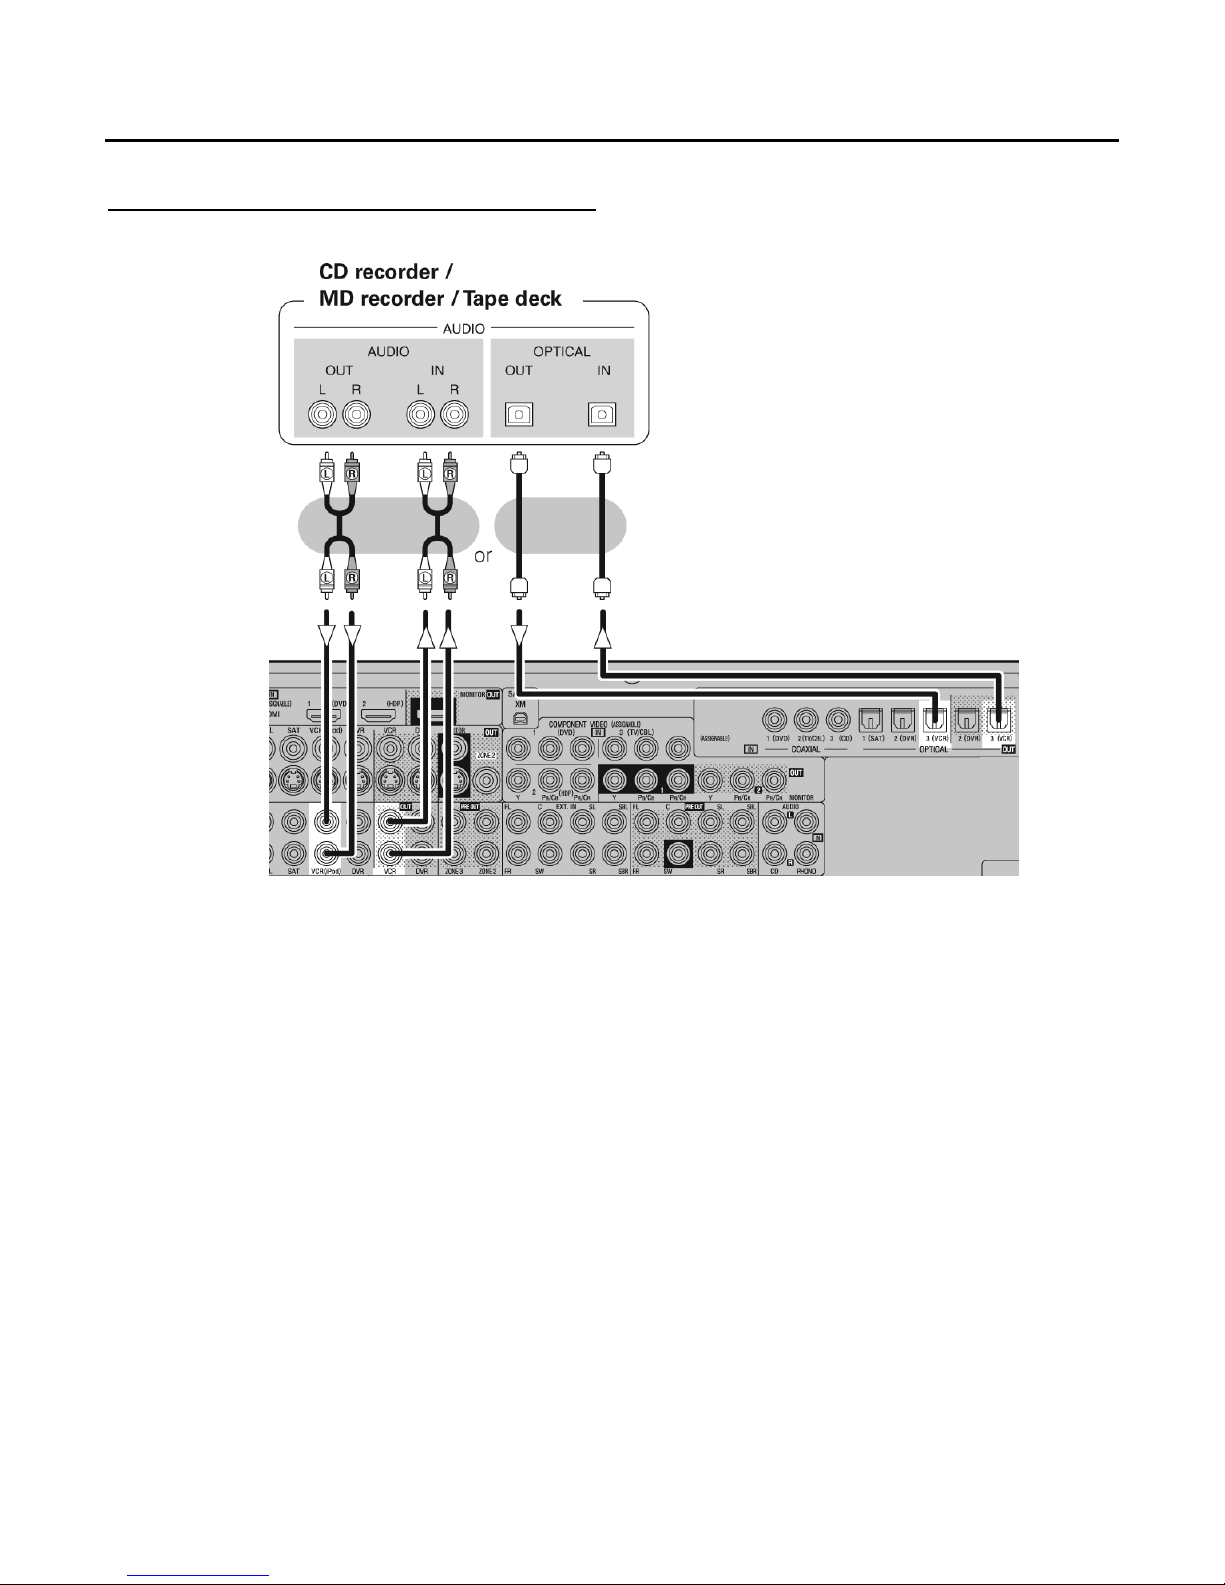
CD Recorder / MD Recorder / Cassette Deck
• Make analog connections if you wish to record analog audio signals, or digital connections if you wish to record digital
audio signals, depending on the types of connectors on the components being used.
• If you are using the optical digital audio connection, you must use the VCR-3 input and VCR-3 output between the CP-8
and your VCR.
____________________________________________________________________________________
Connecting Recording Components 20
MOON CP-8 Surround Preamplifier / Processor
Connecting to Other Devices
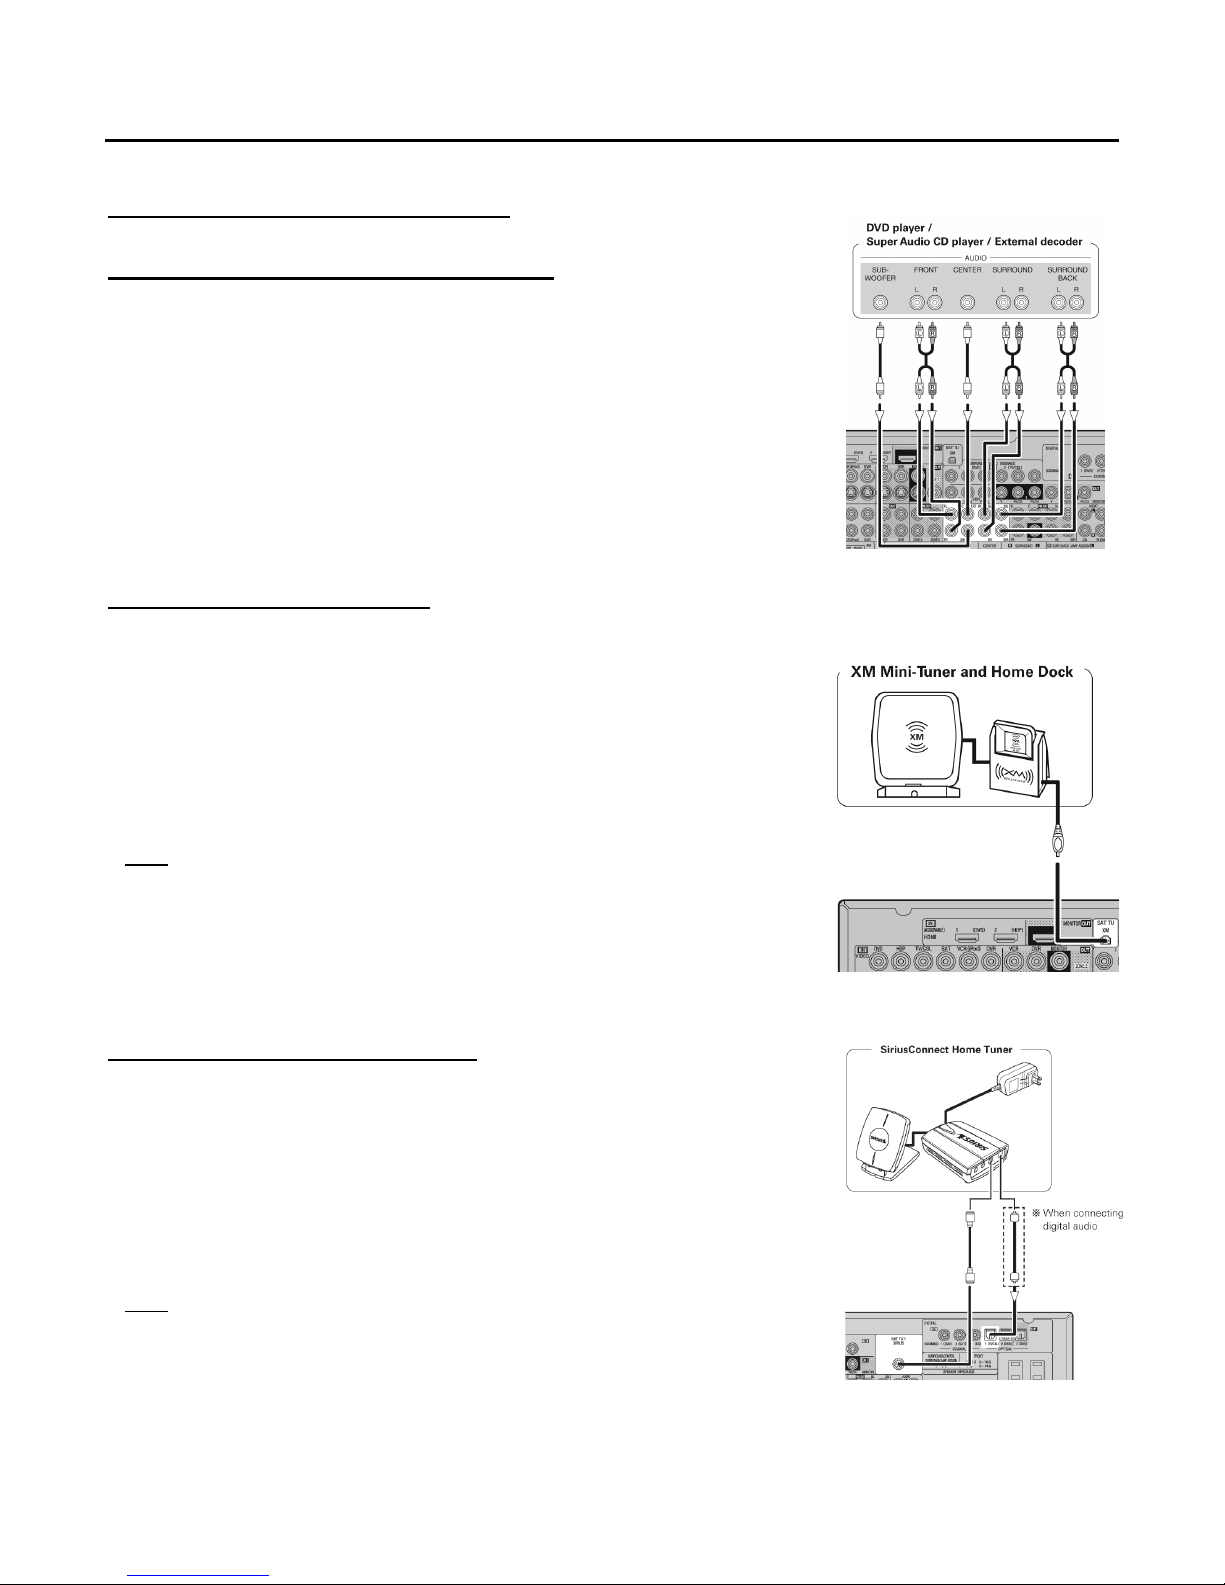
Components with multi-channel outputs
• To play the analog input signals input to the EXT. IN connectors, press the INPUT
MODE button on the main unit or INPUT button on the main emote control and
select “EXT. IN” or make the settings at MENU “Input Setup” – “Input Mode” –
“Input Mode” – “EXT. IN” (page 41).
• The video signal can be connected in the same way as a DVD player (page 43).
• To play copyright-protected discs, connect the CP-8’s EXT. IN connector with the
DVD player’s analog multi-channel output connector.
XM Satellite Radio Connector
• The CP-8 is an XM Ready® receiver. You can receive XM® Satellite Radio by
connecting to the XM Mini-Tuner and Home Dock (includes home antenna, sold
separately) and subscribing to the XM service.
• Plug the XM Mini-Tuner and Home Dock into the XM connector on the rear panel.
• Position the Home Dock antenna near a south-facing window to receive the best
signal. For details, see “Listening to XM Satellite Radio Programs” (page 56).
Note: Keep the power cord unplugged until the XM Mini-Tuner and Home Dock
connection have been completed.
The XM name and related logo are registered trademarks of XM Satellite Radio Inc.
•
All rights reserved.
• XM Ready is a registered trademark of XM Satellite Radio Inc. All rights reserved.
SIRIUS Satellite Radio Connector
• The CP-8 is a SIRIUS Satellite Radio Ready® receiver. You can receive SIRIUS®
Satellite Radio by connecting to the SiriusConnect Home Tuner and subscribing to
the SIRIUS service.
• Plug the SIRIUS connector on the rear panel.
• Position the Home Tuner antenna near a south-facing window to receive the best
signal. For details, see “Listening to SIRIUS Satellite Radio Programs” (page 58).
Note:
connection have been completed.
____________________________________________________________________________________
Connecting To Other Devices 21
Keep the power cord unplugged until the XM Mini-Tuner and Home Dock
• ©2006 SIRIUS Satellite Radio Inc. “SIRIUS”, the SIRIUS dog logo, and channel
names and logos are trademarks of SIRIUS Satellite Radio Inc.
MOON CP-8 Surround Preamplifier / Processor
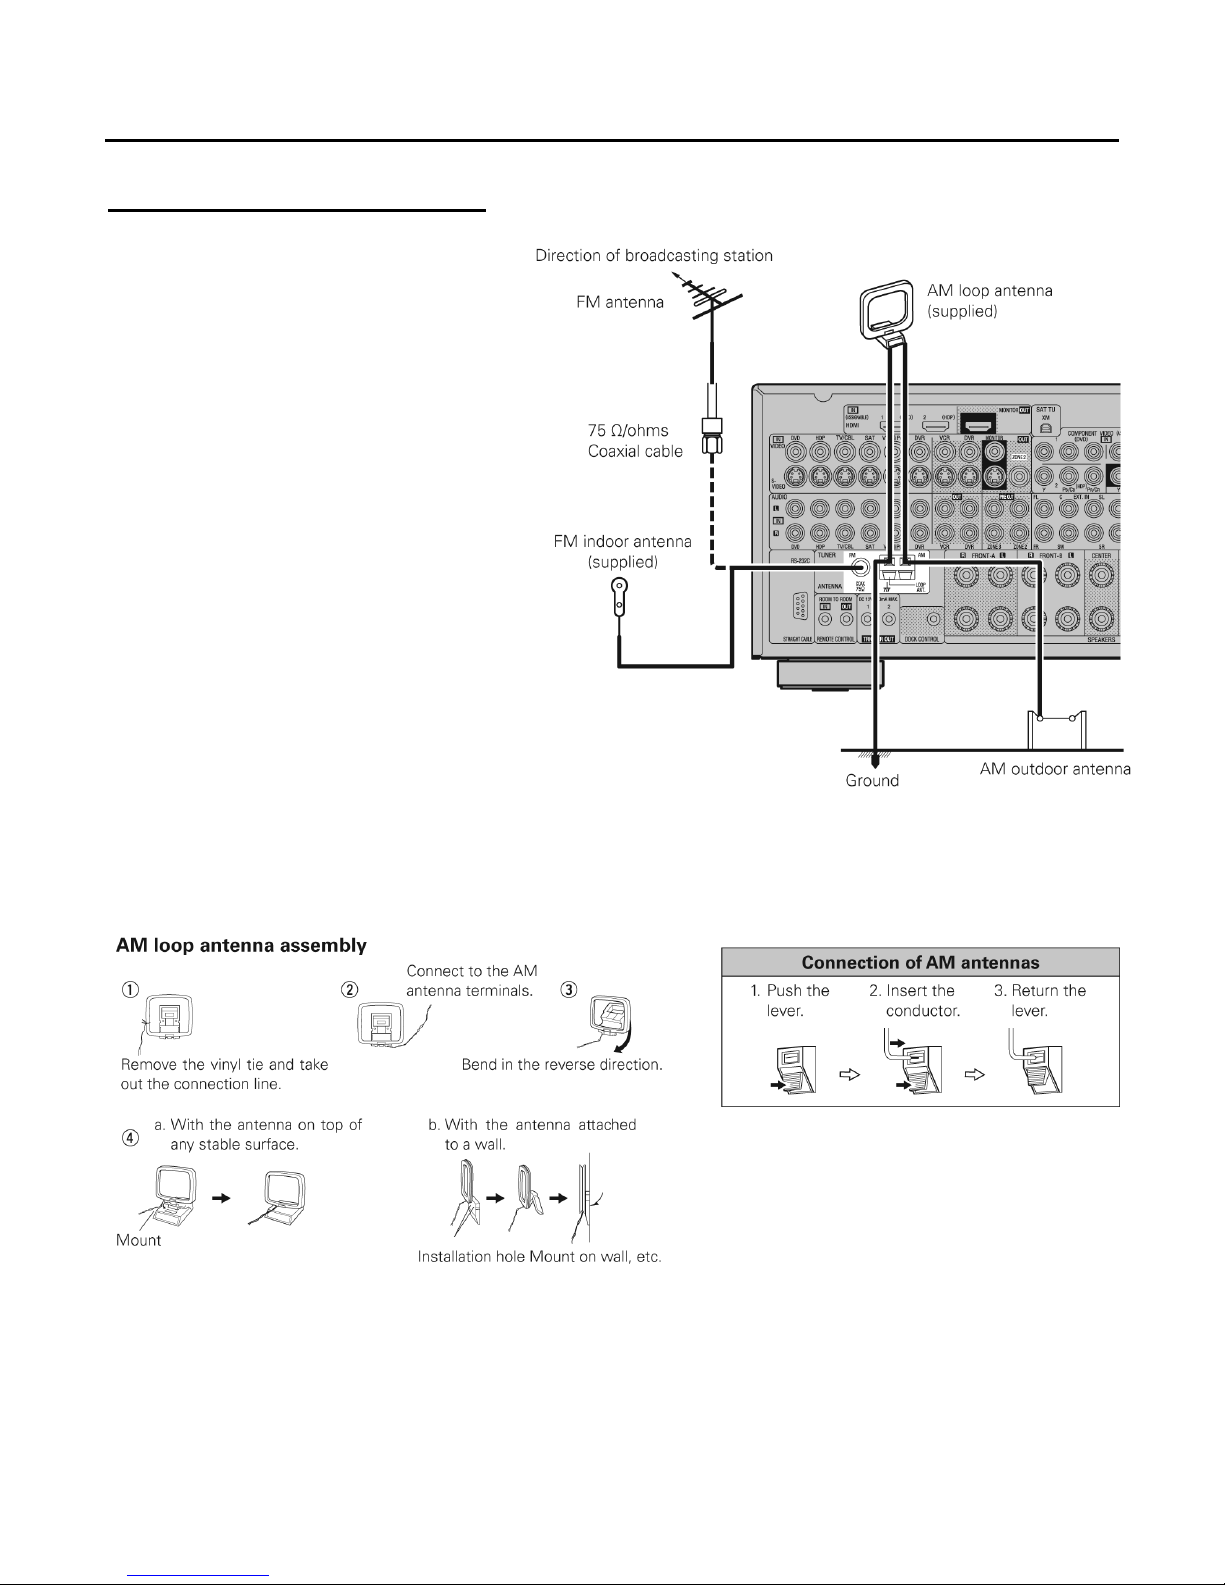
AM / FM Tuner Antenna Terminals
• An F-type FM antenna cable plug can be
connected directly to the CP-8.
• Never connect 2 FM antennas simultaneously.
• Even if an external AM antenna is used, do not disconnect the AM loop antenna.
• Make sure the AM loop antenna lead terminals do not touch metal parts of the rear panel.
____________________________________________________________________________________
Connecting To Other Devices 22
MOON CP-8 Surround Preamplifier / Processor
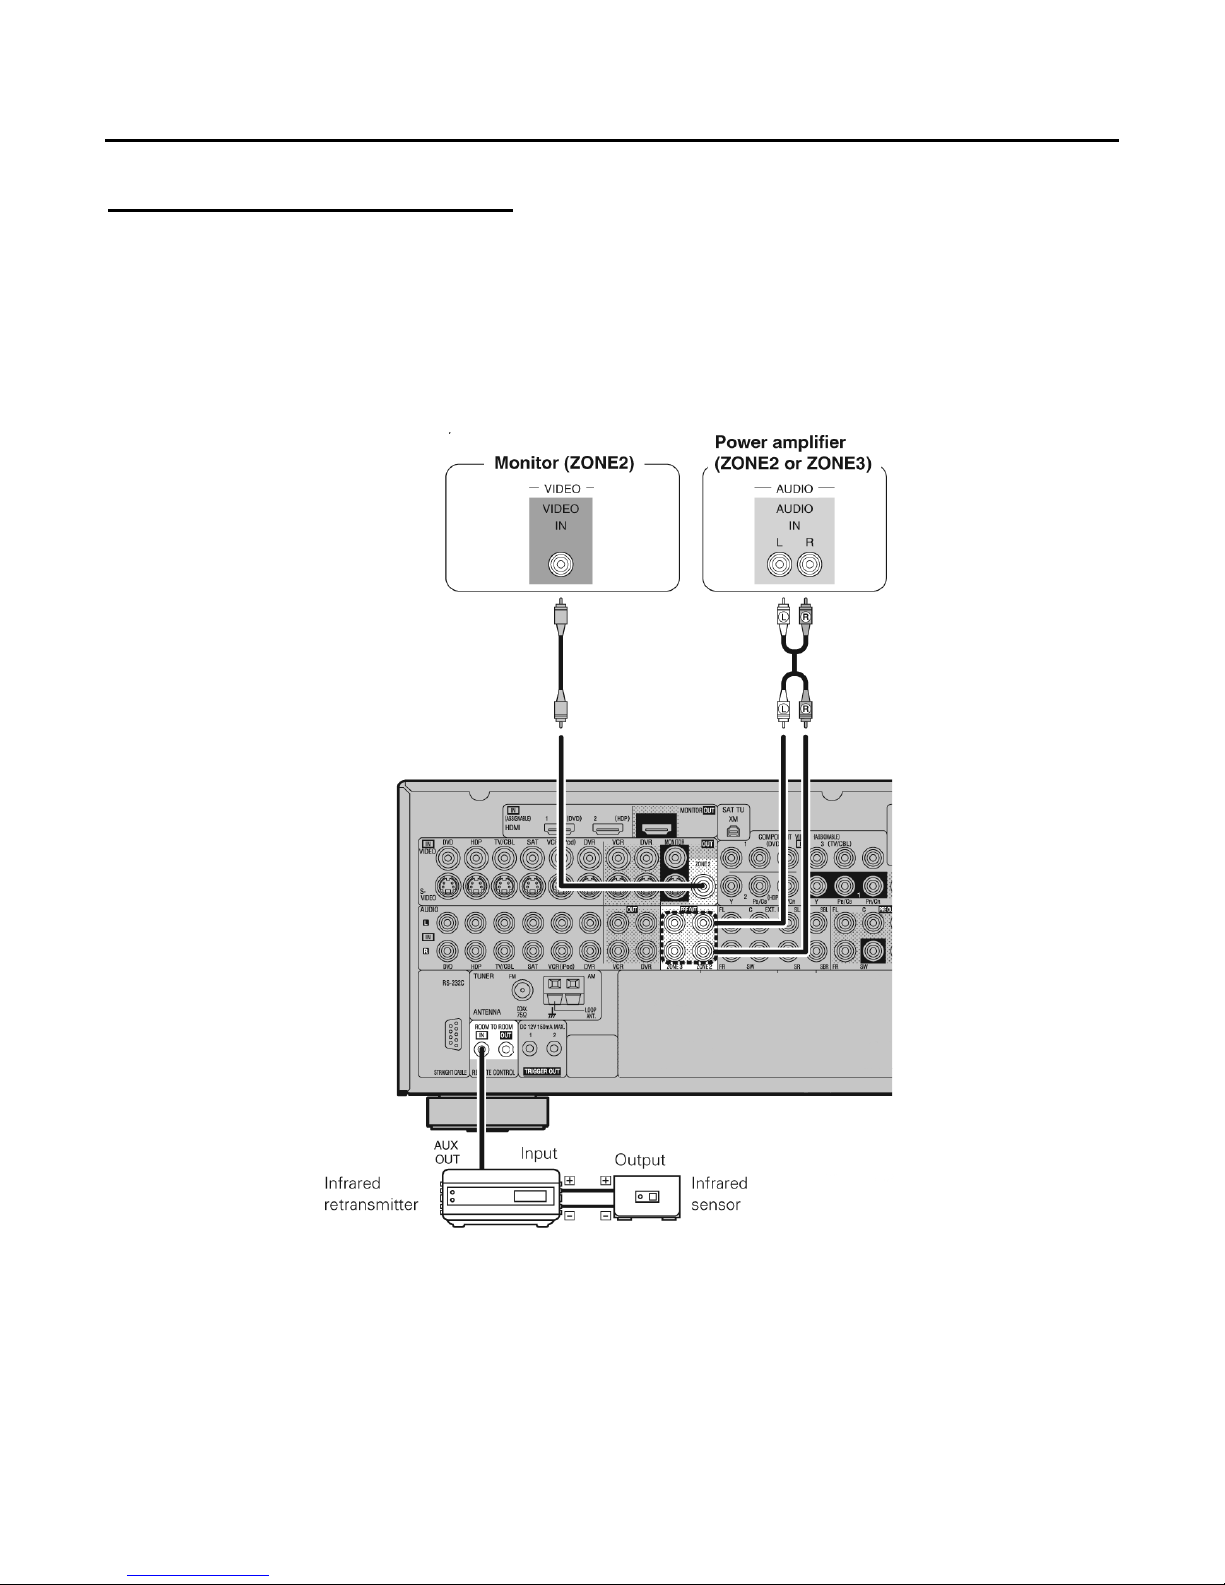
Zone2 or Zone3 Pre-out Connections
• If another power amplifier or integrated amplifier is connected to the CP-8, the ZONE2 or ZONE3 pre-out (variable or fixed
level) connectors can be used to play a different program source in ZONE2 or ZONE3 at the same time (page 69-70).
• When using an S-Video cable or a composite video cable for connection between the CP-8 and an input device, connect
to the video connectors.
• The ZONE2 video out is only for ZONE2.
• For instructions on installing and operating separately sold devices, refer to the respective devices’ operating instructions.
• To conduct multi-zone playback, see “Amp Assign / Multi-zone Connections and Operations” (page 38).
____________________________________________________________________________________
Connecting To Other Devices 23
 Loading...