

Moomba Outback LS (2003), Kamberra (2003), Outback LSV (2003), Mobius LSV (2003), Mobius V (2003) Owner's Manual
...
5820 Hwy 411 South, Maryville, T ennessee 37801 — 865-856-3035
Kamberra, Mobius, Mobius LS, and Mobius V are registered trademarks of Skier’s Choice, Inc.
All other product names are copyright and registered trademarks/trade names of their respective owners.
© 2003 Skier’s Choice, Inc.
Moomba, the Moomba Logo, Outback, Outback LS, Outback LSV ,
Trademarks
© 2003 Skier’s Choice, Inc.
1

Table of Contents
Section I Introduction 3
Section II Boating Safety 5
Section III Boating Rules 9
Section IV Boat Specificatioins 13
Section V Operating Information 17
Section VI Starting & Operation 19
Section VII Instrument Panel 23
Sectioin VIII Equipment & Options 31
Sectiion IX Service & Maintenance 45
Section X Cleaning, Care & Storage 51
Section XI Winterization & Dry Storage 53
Section XII Technical Information 55
Section XIII Trailering Your Boat 57
Section XIV Moomba Warranty 61
Section XV Index 65
Boat Information
Hull Identification Number:______________________________________
Date of Purchase:_____________________________________________
Dealer’s Phone Number:________________________________________
Registration Number:__________________________________________
Engine Serial Number:_________________________________________
Trailer Serial Number:__________________________________________
2
© 2003 Skier’s Choice, Inc.

Section I
Introduction
Introduction
Moomba inboard ski boats are manufactured by Skier’s Choice, Inc. in Maryville, Tennessee
and distributed throughout the United States and the world.
This manual provides an overview for operating your Moomba boat. It should be considered
a permanent part of your Moomba boat, and contains important information on Safety, Boating
Rules, Proper Operation and Maintenance of your boat. Should the boat be sold, this manual
will provide the same important information to the next owner.
Be sure to read and understand all aspects of Boating Safety and Operation before using your
boat. If you have any questions, your dealer can provide the information you need to have a
safe and pleasurable boating experience.
All information, illustrations and specifications
in this manual are based on the latest product
information available at the time of printing.
Moomba may discontinue models and
equipment or change specifications and
designs without any notice and without
incurring obligation.
This manual contains information about several Moomba models. Some information may not
apply to your boat since standards and optional equipment may vary from model to model.
As you read through this manual, you will find CAUTION, WARNING and DANGER symbols
which require special attention. Please read them carefully! They may tell you how to avoid
problems and/or endangering yourself, your passengers, and other boaters. PLEASE REVIEW
ALL SAFETY INFORMA TION.
A maintenance schedule and accessory information are included to assure trouble-free
operation of your boat. Should service problems arise, remember that your Moomba dealer
knows your boat best and is interested in your total satisfaction.
Thank you for purchasing a Moomba boat. We hope your ownership results in an enjoyable
and rewarding boating experience. Be safe and enjoy the fun!
© 2003 Skier’s Choice, Inc.
3

4
© 2003 Skier’s Choice, Inc.
Section II
Boating Safety
Important Safety Information!
Y our safety, as well as the safety of others with and around
you, is a direct result of how you operate and maintain your
boat. Read and comprehend this manual. Make sure that
you understand all the controls and operating instructions
before attempting to operate the boat. Improper operation
is extremely dangerous.
The basic safety rules are outlined in this section of the
manual. Additional precautions throughout the manual are
noted by the following symbols.
This symbol indicates a potentially hazardous circumstance,
which, if not avoided, may result in minor or moderate injury .
It may also be used to alert against unsafe practices.
This symbol indicates a potentially hazardous situation, which,
if not avoided, could result in death or serious injury .
This symbol indicates an imminently hazardous situation,
which, if not avoided, will result in death or serious injury.
This is limited to the most extreme situations.
The precautions listed in this manual and on the boat
are not all-inclusive. If a procedure, method, tool or
part is not specifically recommended by Skier’s Choice,
you must satisfy yourself that it is safe for you and
others, and that the boat will not be damaged or made
unsafe as a result of your decision.
REMEMBER: ALWAYS USE COMMON SENSE WHEN
OPERATING, SERVICING OR REPAIRING THE BOAT!
In addition to everyday safety, failure to observe safety
recommendations may result in severe personal injury or
death to you or to others. Use caution and common sense
when operating your boat. Don’t take unnecessary chances!
Be certain that all boat passengers are aware of this
information and conform to boat safety principles.
Boating Safety
Boating Safety starts with a thorough understanding of your
equipment and its proper operation. In addition to careful
review of this manual, you should be aware as well that there
are many sources of information available. Skier’s Choice
urges you to pursue additional training, such as safety and
seamanship courses offered by the U.S. Coast Guard
Auxiliary and the U.S. Power Squadron.
The following is a listing of just some of the agencies and
organizations that offer safety training or information:
- American Red Cross, National HQ
17th & D Streets NW
Washington, DC 20006
(202) 639-3686
www.redcross.org
- USA Waterski
799 Overlook Drive
Winter Haven, FL 33884
(941) 324-4341
www .usawaterski.org
- Boat Owners Association of the United S tates (BOA T/US)
880 South Pickett Street
Alexandria, V A 22304
(703) 823-9550
www.boatus.com
- National Safe Boating Council
2550 M Street NW, Suite 425
Washington, DC 20037
(202) 296-4588
www.safeboatingcouncil.org
- U.S. Coast Guard Auxiliary Commandant (G-NAB)
2100 Second Street SW
Washington, DC 20593-0001
(800) 336-2628
www .cgaux.org
- U.S. Power Squadron
www.usps.org
- On-Line Basic Boating Safety Course available
at:www.boatsafe.com
© 2003 Skier’s Choice, Inc.
Federal law requires certain safety equipment to be on-board
at all times. In addition, responsible boaters carry other
equipment in case of emergency. Check with the local
boating authorities for any additional requirements over and
above the federal stipulations.
5
Safety Equipment
General Safety Precautions
Your Moomba has been equipped at the factory with most
of the federally required safety equipment for
(Class 1, 16’-to-26’). This equipment includes:
- UL-approved Marine Fire Extinguisher, T ype A-BC (2 lbs.),
good for solids, liquids, and electrical fire
- ABYC-approved Marine Mufflers with water injection
- USCG-approved Marine Flame Arrestor
- USCG-approved Engine Box Ventilation with sp ark-less
power blower
- ABYC-approved Electric Horn sound warning device
- USCG-approved inland lighting
Federal law also requires at least one Type I, II or III Personal
Flotation Device (PFD)
towed on water skis or other recreational equipment. In
addition, one throwable T ype IV PFD must also be on board.
As the owner, obtaining the appropriate PFDs is your
responsibility. Y our Moomba dealer can—and will be happy
to assist you.
NOTE: Requirements for coastal waters and inland
waters differ. Check with the local authorities for more
information.
for each person on board or being
inland waters
Failure to adhere to these precautions may result
in severe injury or death to you and/or others.
- Improper operation is extremely dangerous. Operators
must read and understand all operating manuals supplied
with the boat before operation.
- On-board equipment must always conform to the
governing federal, state, and local regulations.
- Children in the bow of the boat should be
accompanied by an adult at all times.
- Never stand or allow passengers to stand while the boat
is moving. You or others may be thrown from the boat.
- Never operate the boat while under the influence of alcohol
or other drugs.
- Gasoline vapors can explode. Before starting engine,
open engine box, check engine compartment for gasoline
vapors, and operate blower for at least 4 minutes. Run
blower below cruising speed.
- Leaking fuel is a fire and explosion hazard. Inspect system
regularly. Examine fuel t anks for leaks or corrosion at
least annually .
A smart owner will avoid potential problems on an outing by
having additional equipment on board. Normally, this
equipment is dependent on the body of water and the length
of the trip.
We suggest the following—as a minimum. Your Moomba
dealer can also assist you with additional recommendations.
- An anchor with at least 75-feet of line
- A manual bailing device for removing water
- A combination oar/boat hook
- A day-and-night visual distress signal
- A first aid kit and manual
- An airway breathing tube
- A waterproof flashlight
- A set of local navigation chart s
- Mooring lines and fenders
- Extra engine oil
- A tool kit
- A port able AM/FM radio or weather radio
Boating-related accidents are generally caused by the
operator’s failure to follow basic safety rules or written
precautions. Most accidents can be avoided if the operator
is completely familiar with the boat, its operation, and can
recognize potentially hazardous situations before an accident
occurs.
- Never override or modify the engine safety shut-off switch
or engine neutral starting safety switch in any way .
- Never remove or modify components of the fuel system
in any way except for maintenance by qualified personnel.
T ampering with fuel components may cause a hazardous
condition.
- Never allow any type of spark or open flame on board. It
may result in fire or explosion.
- It is the owner’s responsibility to check tightness of the
Rad-A-Cage Tower bolts BEFORE each use.
- The Rad-A-Cage Tower is designed to pull a single (1)
individual. DO NOT climb or sit on the Rad-A-Cage T ower .
Rope may loop on inverted tricks. DO NOT sit behind
the pulling point of the Rad-A-Cage Tower.
- T o avoid serious personal injury, DO NOT be on or about
the swim platform while engine is running and keep away
from rear of boat while engine is running.
- T o avoid serious personal injury , DO NOT operate engine
while anyone is on or about the swim platform or in the
water near the boat.
6
© 2003 Skier’s Choice, Inc.
General Safety Precautions (continued)
- The tow bar is not designed for vertical extensions. Any
modifications to the tow bar or its mountings may result in
damage to the boat and injury to the user.
Skiing Safety
Skiers are obligated to be as aware of the fundamental safety
rules as well as the boat operator. If you are new to water
skiing, seek certified training before starting. You will find it
especially helpful to join a local ski club and USA Waterski
when possible.
- Rear storage area is located above the gas tank and is
not designed for ballast. Weight limit is 150 lbs. equally
distributed.
- The Rad-A-Cage Tower may strike low objects. Check
clearance height around docks, shore, overhanging
objects, bridges and power lines.
- DO NOT pull past 45 degrees of the centerline of the
boat. Failure to follow this rule could result in the boat
capsizing.
- It is the driver’s responsibility to ensure all passengers
are seated when boat is underway .
Failure to adhere to these warnings may result in severe
injury or death to you and/or others.
- This boat is a high-performance boat and capable of quick
and tight turns and changes in direction. It is the driver’s
responsibility to operate the boat in a manner to ensure
the safety of all passengers.
Always remember that the majority of water skiing injuries
are the result of impacts with other objects, so always look
where you are going and be aware of what is going on around
you.
Failure to adhere to these warnings may result in severe
injury or death to you and/or others.
- Every skier must always wear a USCG-approved personal
flotation device.
- Maintain a distance of at least 100 feet from all other
objects, including other boats, piers, raft s, mooring and
navigational buoys, pilings, abutments, or any other items.
- Always have an experienced driver and observer in the
boat when skiing.
- Never ski in shallow water, close to shore, or in water where
you do not know the depth or what is beneath the surface.
- Never put your arm, head, or any other part of your body
through the handle-bridle of the ski line nor wrap the line
around any part of the body at any time.
Boaters must continuously be aware of weather
conditions.
- Sudden storms, wind, lightning, etc., can unexpectedly put
boaters in grave danger. Always check the local weather
report before going boating.
It is the driver’s responsibility to determine if weather
or other factors have created an unsafe boating
environment.
- The driver is solely responsible for the consequences of
their actions.
© 2003 Skier’s Choice, Inc.
- Never ski at night, or directly in front of other boats.
- Never jump from a boat that is moving at any speed, nor
enter or exit the water when the engine is running (ON).
- Make sure that everyone knows and uses approved skiing
hand signals and common skiing courtesy .
Ski Pylon Extensions
The use of a ski pylon extension or extensions in excess of
7-feet vertical is not recommended by Moomba on our
products. If you elect to use merchandise such as these, be
aware that they could create excessive stress on your boat
and subjectively cause damages not covered by the warranty.
7

Warning Plates and Labels
Read and note ALL warning plates and labels from bow to
stern that appear on the boat, including these!
8
© 2003 Skier’s Choice, Inc.
Section III
Boating Rules
Basic Boating Rules
You should be aware of these rules and follow them
whenever you encounter another vessel on the water.
The rules presented in this manual are condensed and have
been provided as a convenience only. Consult your local
U.S. Coast Guard Auxiliary (USCGA) or Department of Motor
Vehicles (DMV) for a complete set of rules governing the
waters in which you will be using your boat. If you plan to
travel—even for a short trip—you would be well served to
contact the regional USCGA or DMV in the area where you
will be boating.
Review and understand all local and state laws.
Any time two vessels on the water meet one another, one
vessel has the right-of-way . It is called the stand-on vessel.
The vessel which does NOT have the right-of-way is called
the give-way or burdened vessel.
These rules determine which vessel has the right-of-way,
and accordingly , what each vessel should do.
The vessel with the right-of-way has the duty to continue its
course and speed, except to avoid an immediate collision.
When you maintain your direction and speed, the other vessel
will be able to determine how best to avoid you.
Encountering Other Vessels
There are three main situations in which you may encounter
other vessels and you must observe the Steering Rules in
order to avoid a collision. These are:
- Meeting (you are approaching another vessel head-on)
- Crossing (you are traveling across the other vessel’s path)
- Overtaking (you are passing or being p assed by another
vessel)
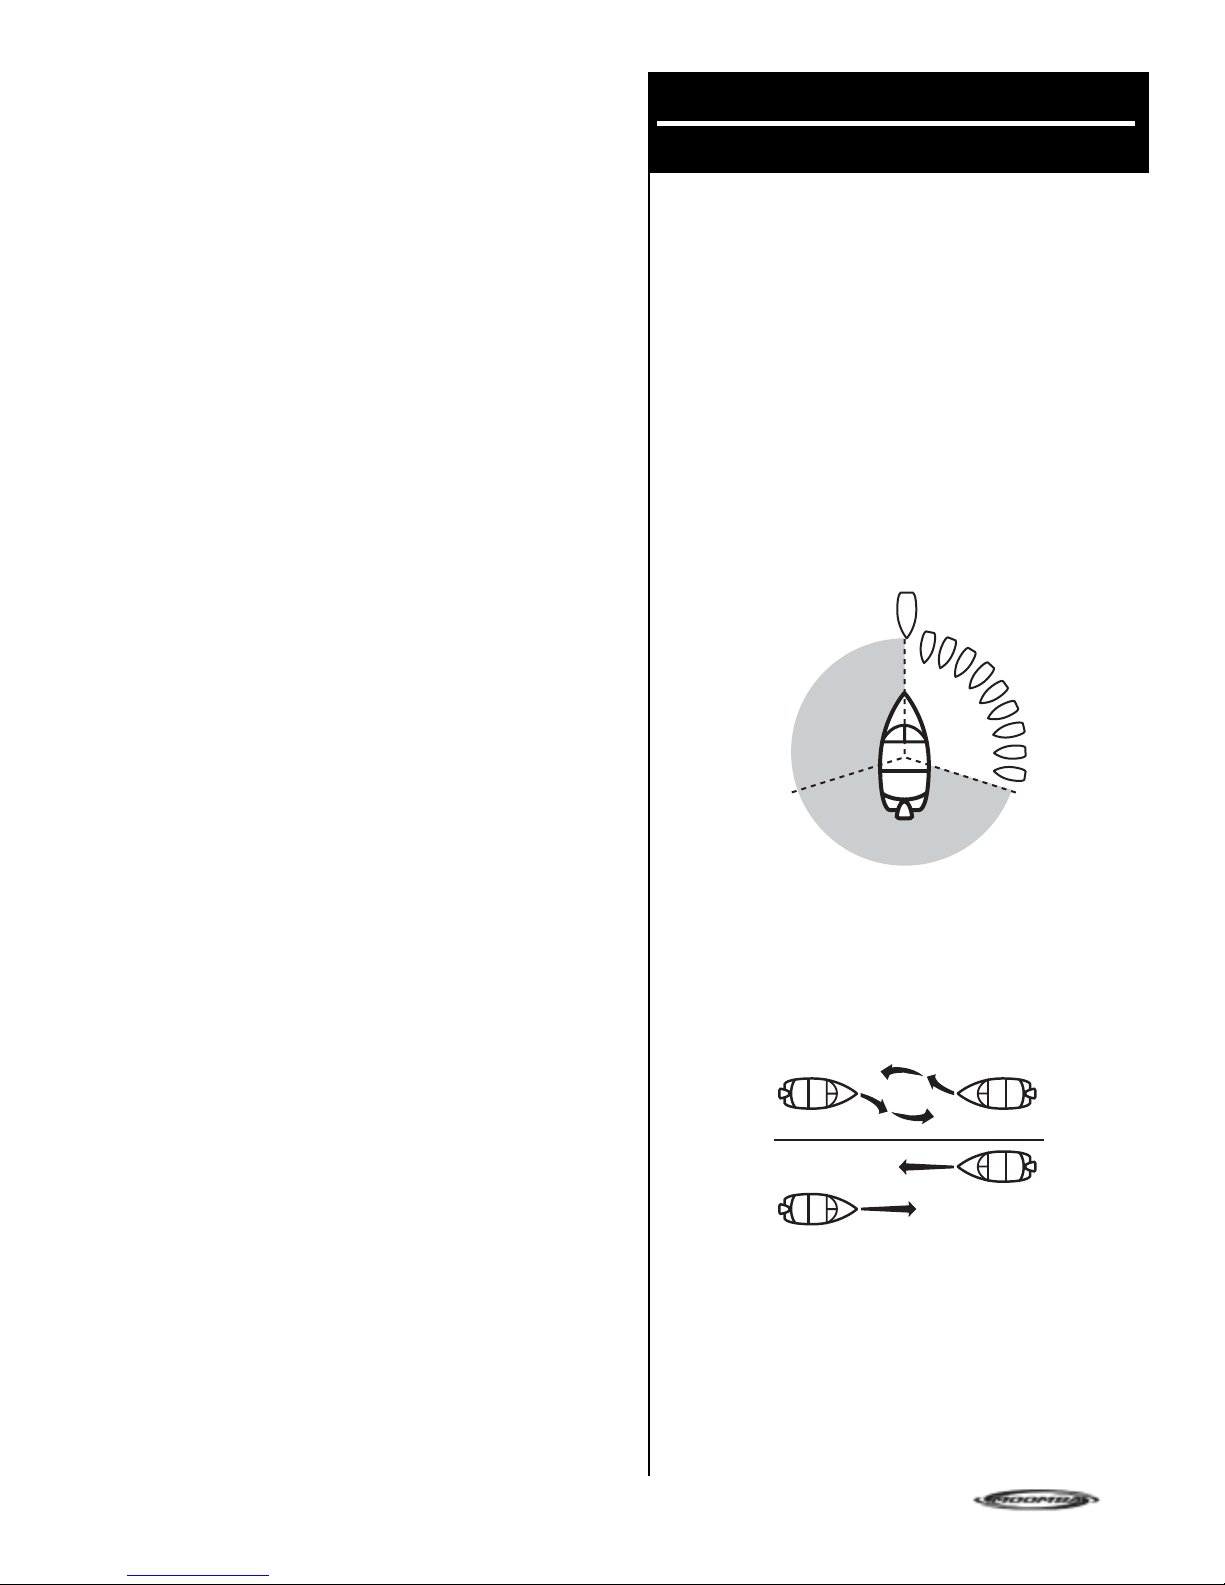
Using the following illustration in which you are the boat in
the center, you should give right-of-way to all vessels shown
in the white area. In this instance, you are the give-way
vessel. All vessels in the shaded area must yield to you as
you are the stand-on vessel. Both you and the meeting vessel
must alter course to avoid each other.
The vessel which does not have the right-of-way has the
duty to take positive and timely action to stay out of the way
of the stand-on vessel. Normally , the give-way vessel should
not cross in front of the stand-on vessel. Slow down or
change directions briefly and pass behind the other vessel.
You should always move in such a way that the stand-on
operator can see what you are doing.
This rule is called Rule 2 in the International Rules and says,
“In obeying and construing these rules due regard shall be
had to all dangers of navigation and collision, and to any
special circumstances, which may render a departure from
the above rules necessary in order to avoid immediate
danger.”
If you are meeting another power vessel head-on, and you
are close enough to run the risk of collision, neither of you
has the right-of-way . Both of you should alter course to avoid
an accident. Y ou should keep the other vessel on your port
(left) side. This rule doesn’t apply if both of you can clear
each other by continuing your set course and speed.
© 2003 Skier’s Choice, Inc.
9
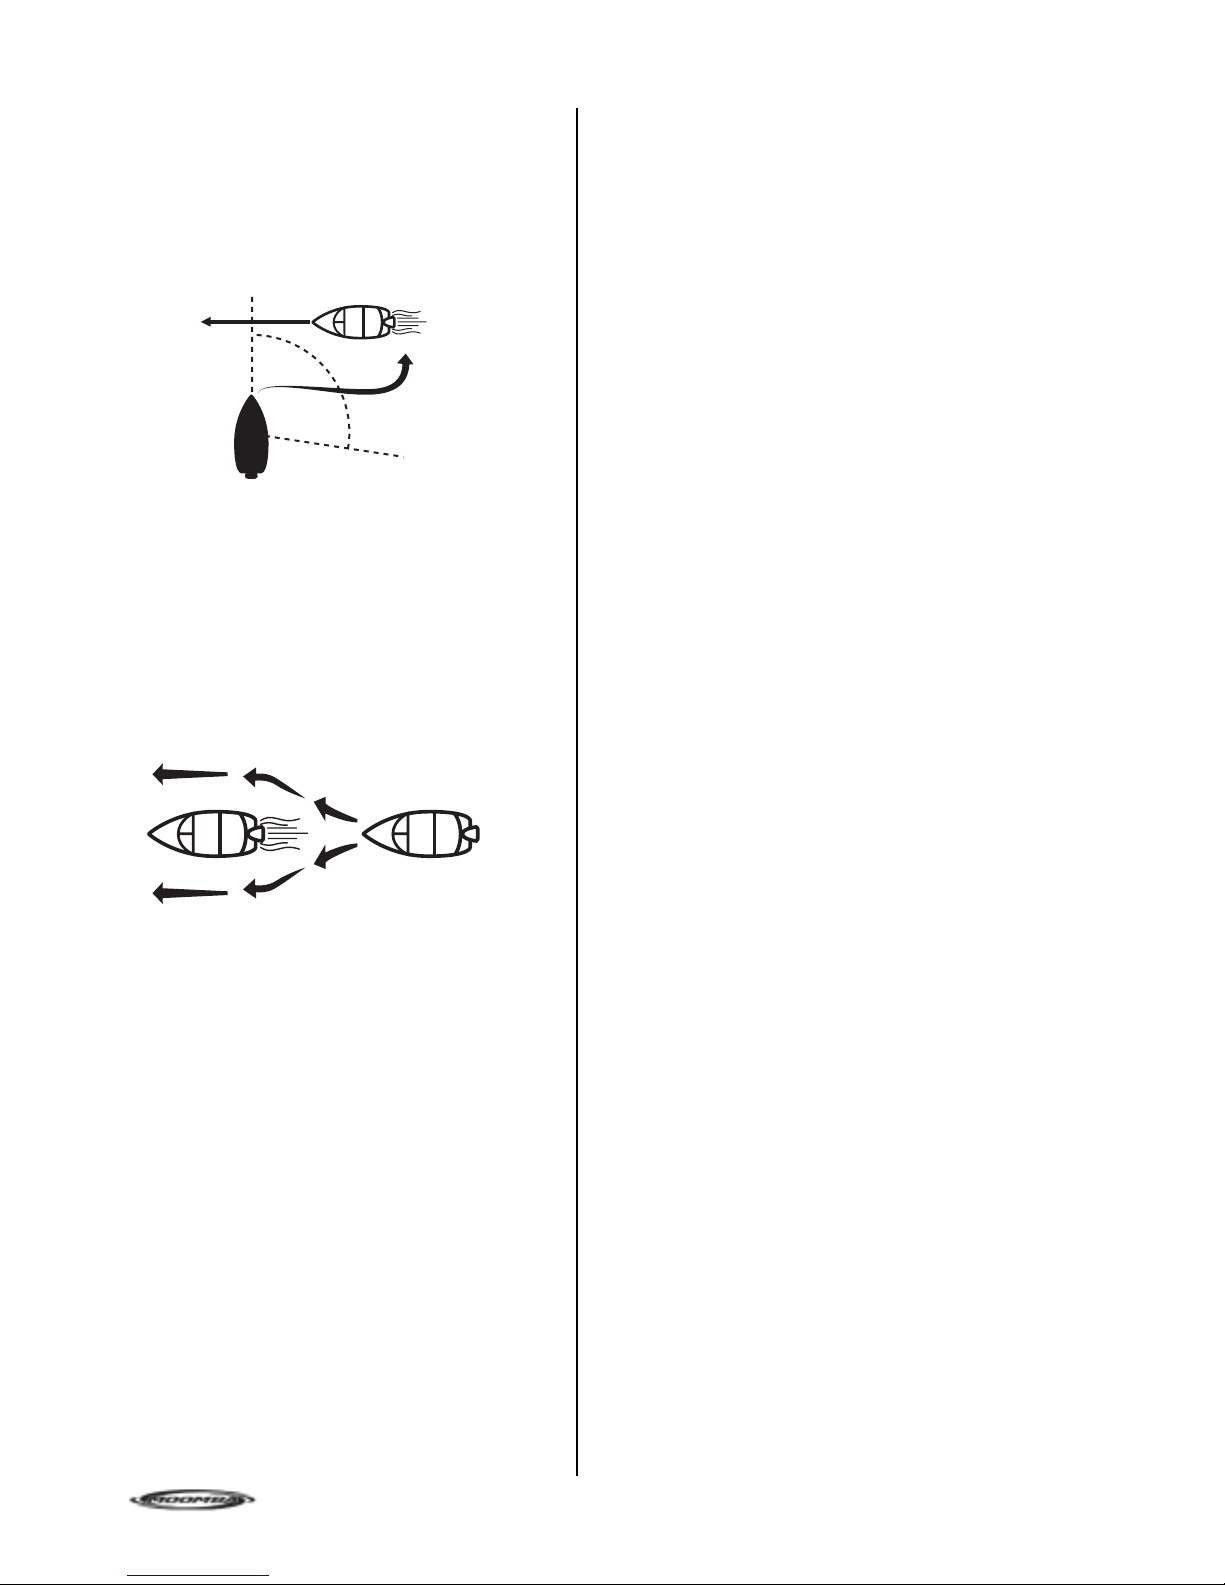
When two power-driven vessels are crossing each other’s
path close enough to run the risk of collision, the vessel
that views the crossing vessel to the starboard (right) side
must give-way .
If the other vessel is to the port (left) side, maintain your
course and direction, provided the other vessel gives you
the right-of-way as it should.
If you are passing another vessel, you are the give-way
vessel. This means that the other vessel is expected to
maintain its course and speed. You must stay out of its
way as you clear it, altering course and speed as
necessary .
Conversely , if you are being passed by another vessel,
you should maintain your speed and direction so that the
other vessel can steer itself around you.
All vessels which are fishing with nets, lines or trawls are
considered under International Rules to be fishing vessels.
Boats with trolling lines are not considered fishing vessels.
Fishing vessels have the right-of-way , regardless of
position. These vessels, however , cannot impede the
passage of other vessels in narrow channels.
Sailing vessels should normally be given the right-of-way .
The exceptions to this are:
- When the sailing vessel is overtaking the power-driven
vessel, the power-driven vessel has the right-of-way .
- Sailing vessels should keep clear of any fishing vessel.
- In a narrow channel, a sailing vessel should not hamper
the safe passage of a power-driven vessel which can
navigate only in such a channel.
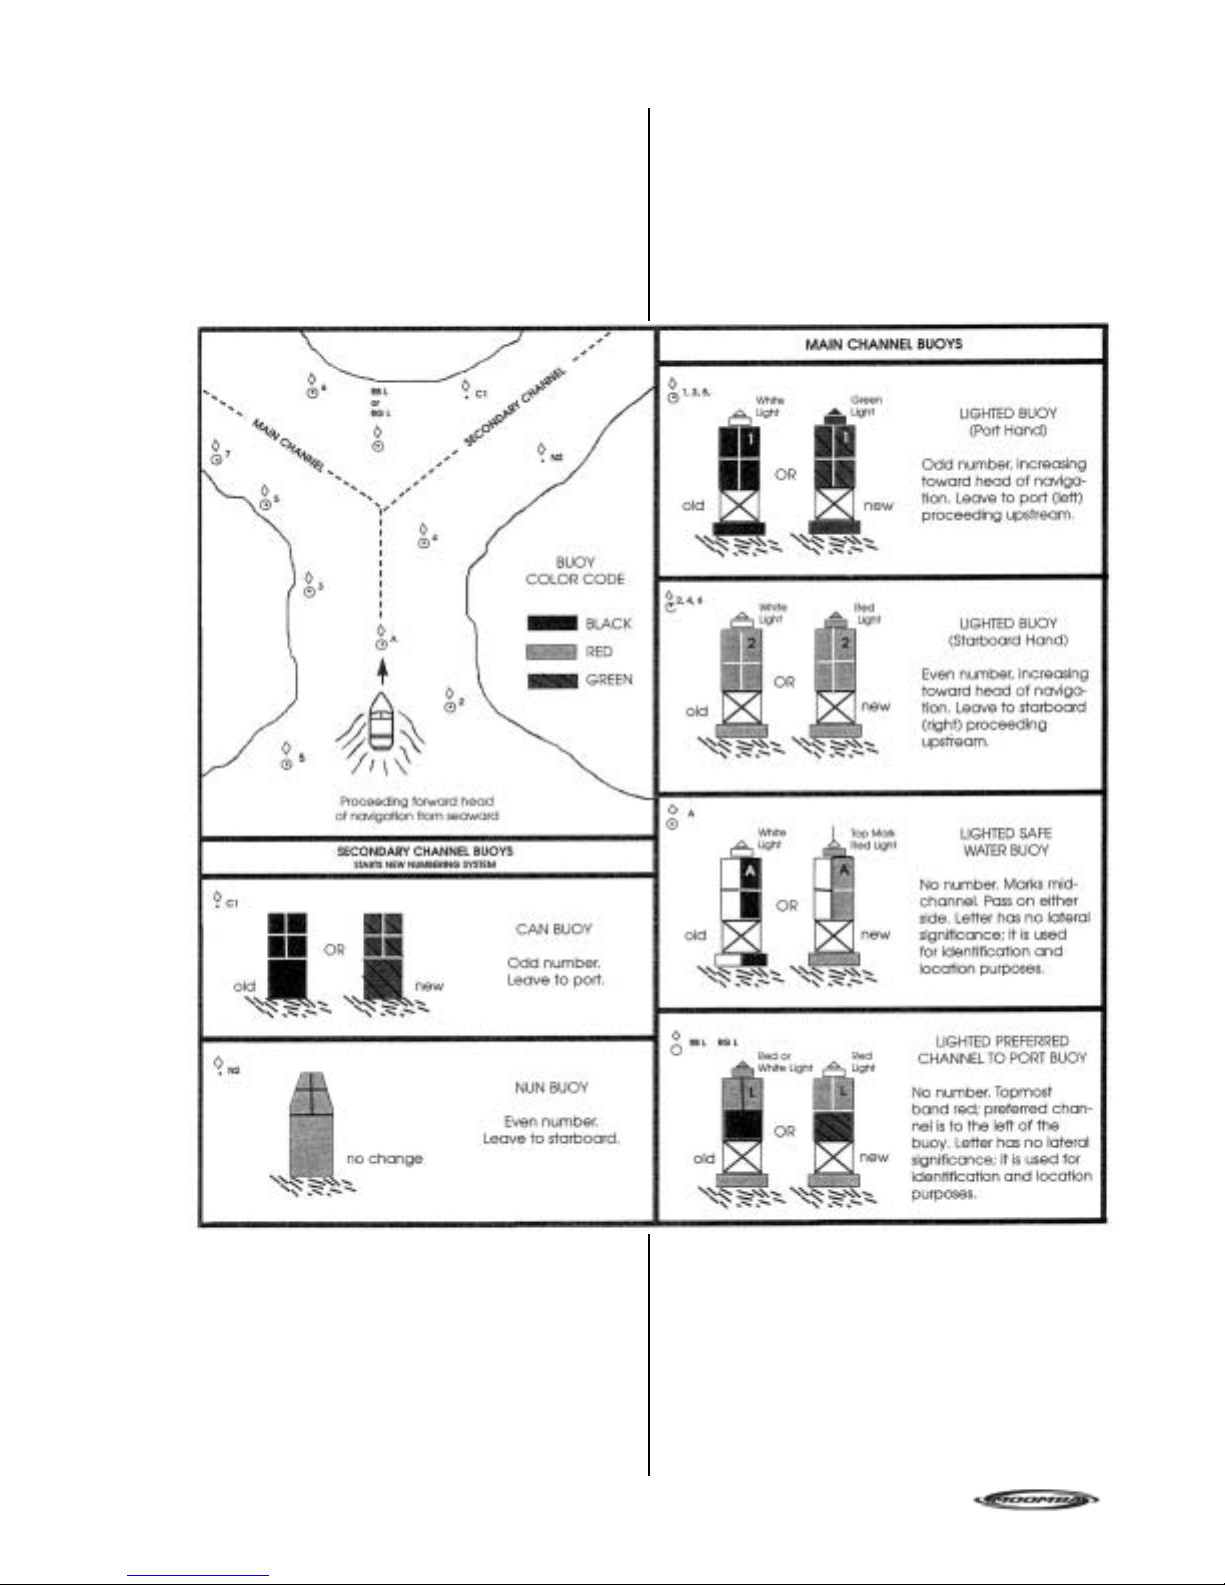
The waters of the United States are marked for safe
navigation by the lateral system of buoyage. The markers
and buoys you will encounter have an arrangement of
shapes, colors, numbers and lights to show which side of
the buoy a boater should pass when navigating in a
particular direction.
The markings on these buoys are oriented from the
perspective of being entered from seaward while the
boater is going towards the port. This means that red
buoys are passed on the starboard (right) side when
proceeding from open water into port, and black buoys
are to port (left) side. When navigating out of port, your
position to the buoys should be reversed: red buoys to port
and black buoys to starboard.
There are three other rules to always remember when
driving your boat around other vessels.
When navigating in narrow channels, you should keep to
the right when it is safe and practical to do so. If the
operator of a power-driven vessel is preparing to go
around a bend that may obstruct the view of other water
vessels, the operator should sound a prolonged blast on
the whistle or horn—four to six seconds.
If another vessel is around the bend, it too should sound
the whistle or horn. Even if no reply is heard, however, the
vessel should still proceed around the bend with caution.
If you navigate these type of waters, you should carry a
portable air horn, which are available from local marine
supply stores.
10
Many boating bodies of water are entirely within the
boundaries of a single state. The Uniform S t ate Waterway
Marking Systems has been devised for these waters. This
system uses buoys and signs with distinctive shapes and
colors to show regulatory or advisory information.
These markers are white with black letters and orange
borders. The information signifies speed zones, restricted
areas, danger areas and general information.
Remember: Markings may vary by geographic location.
Always consult local boating authorities before driving your
boat in unfamiliar waters.
(See examples of buoys and markers next page.)
© 2003 Skier’s Choice, Inc.
© 2003 Skier’s Choice, Inc.
11

12
© 2003 Skier’s Choice, Inc.
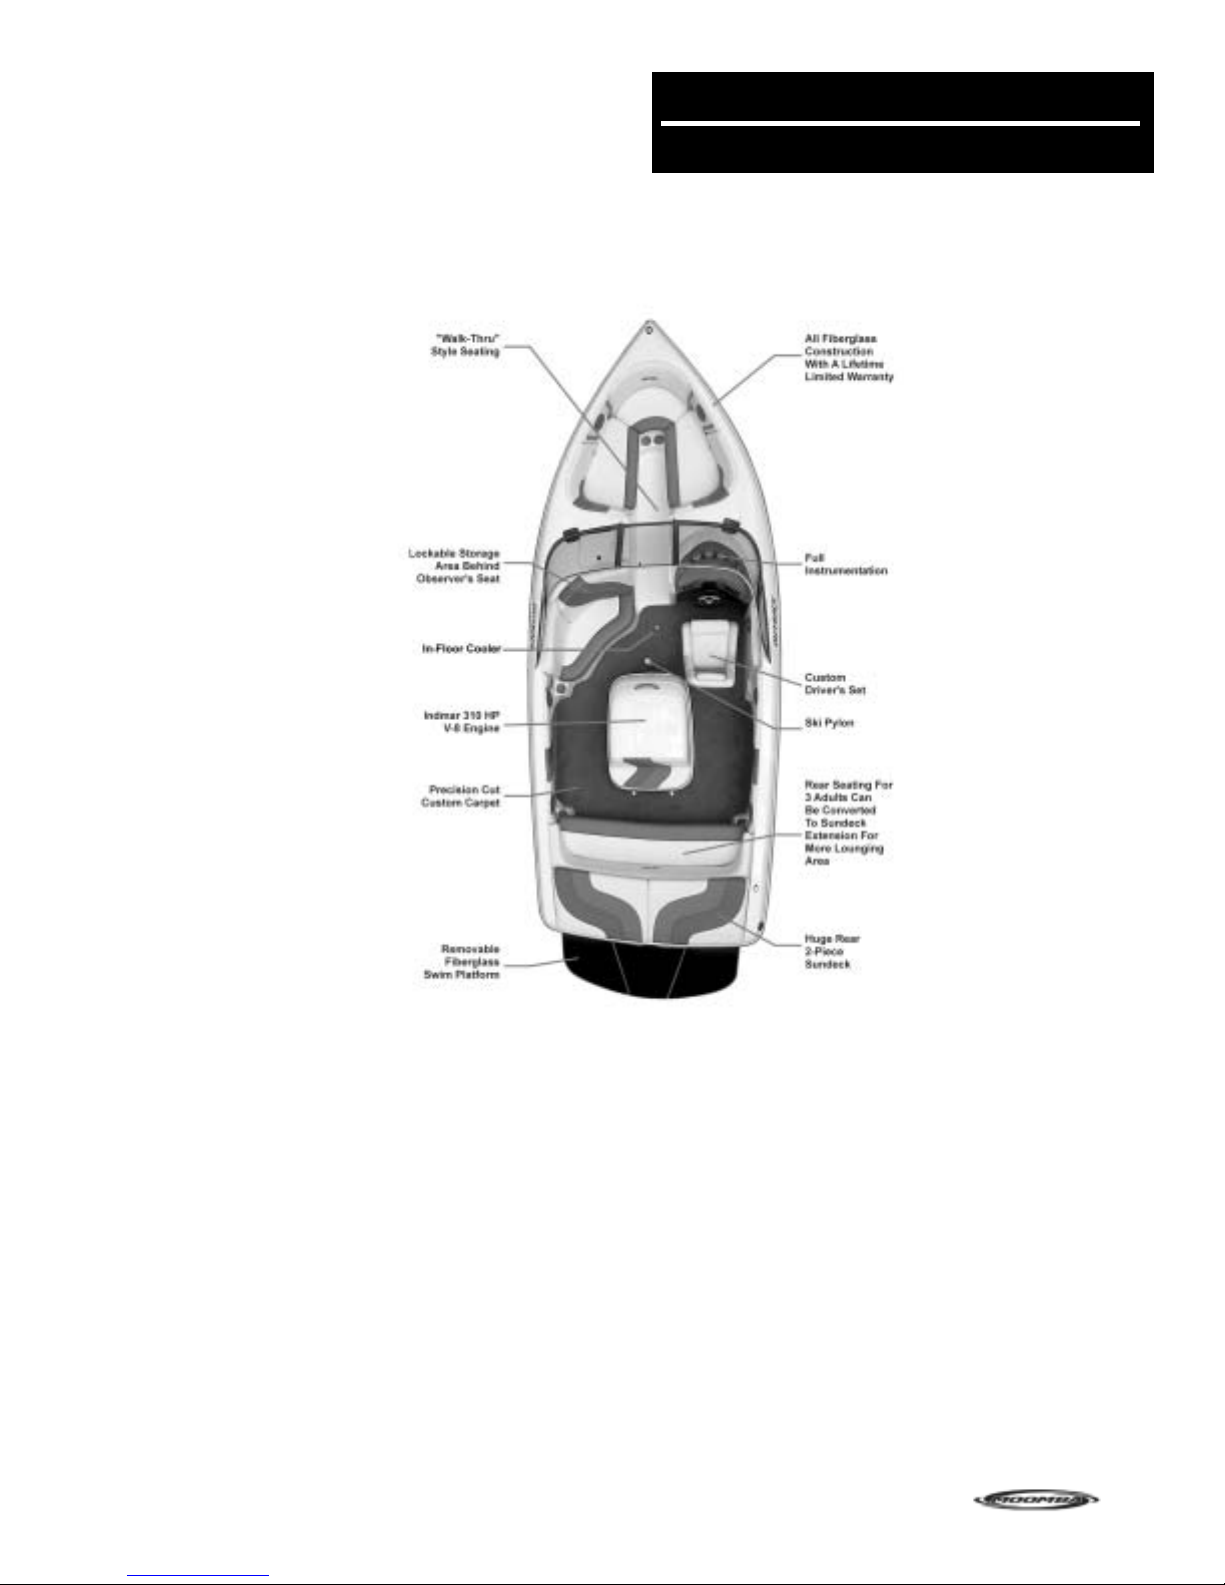
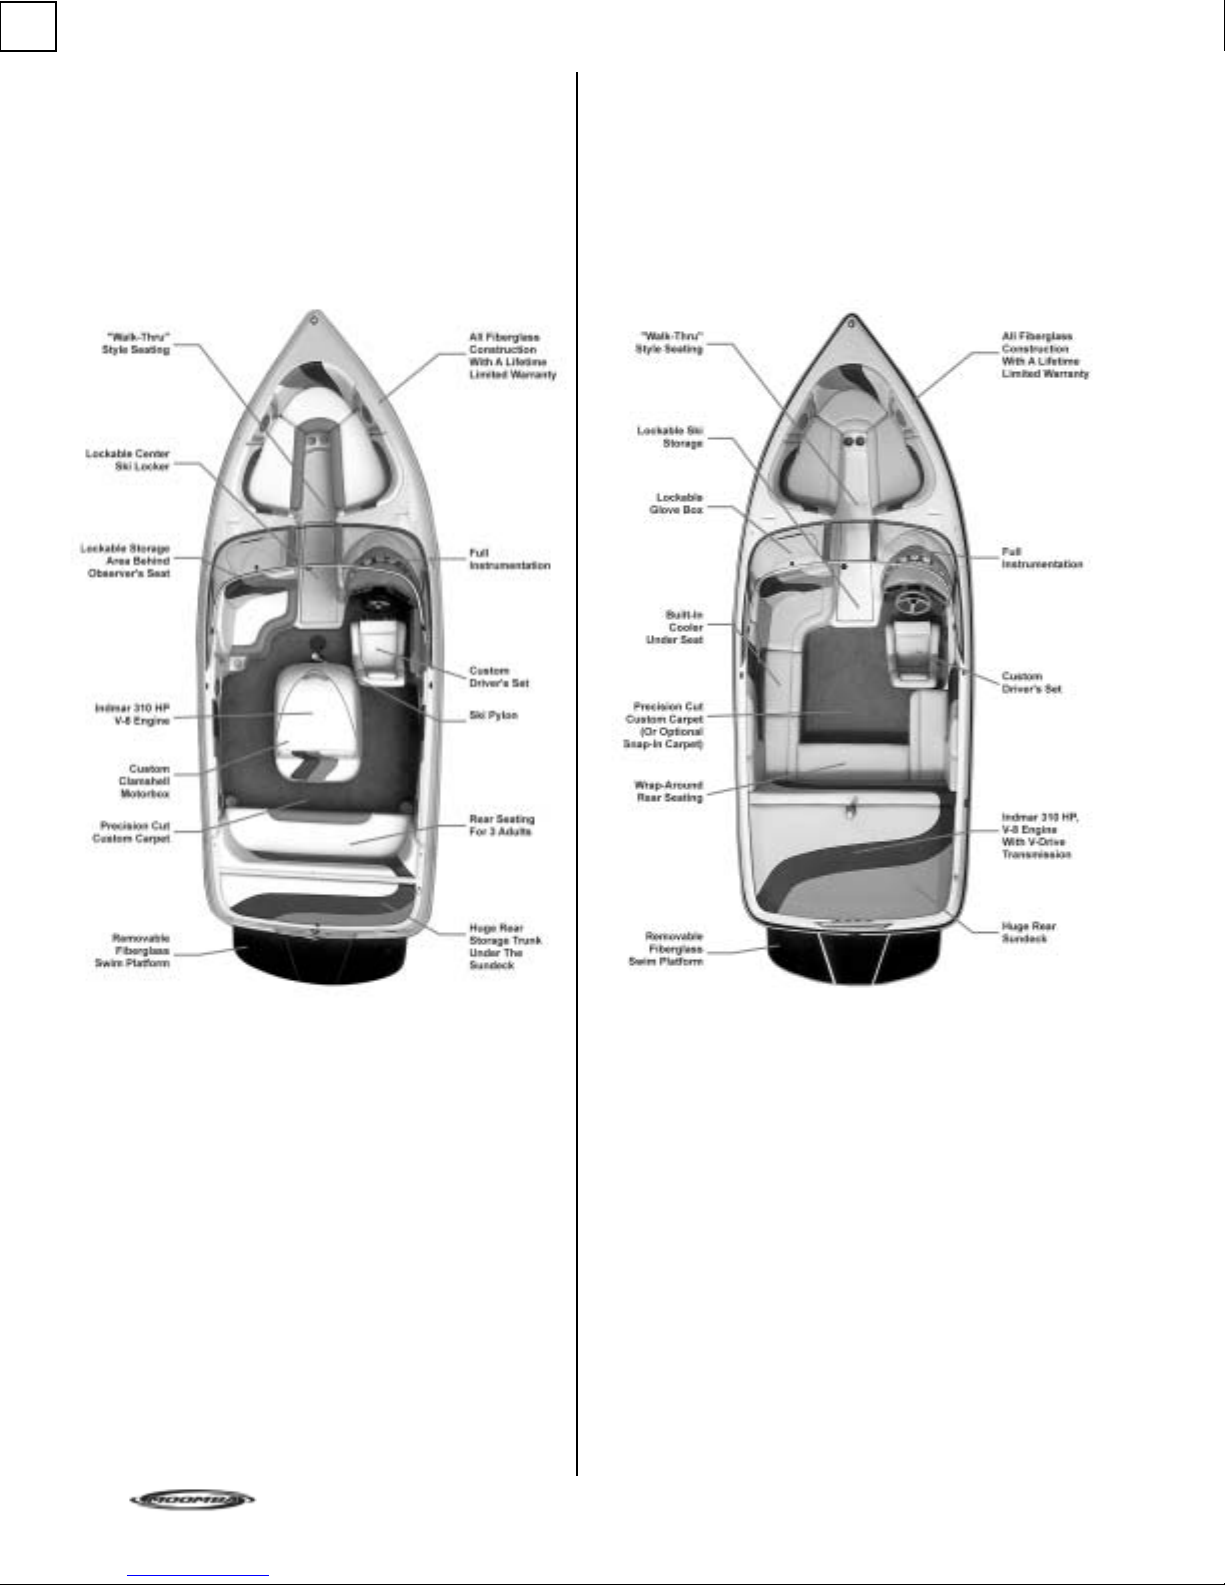
Outback
Section IV
Boat Specifications
Specifications:
Length without Platform: 20’ 6”
Length with Platform: 22’ 4”
Length with Trailer: 23’ 10”
Width (Beam): 95”
Overall Width with Trailer 102”
Draft: 22”
Weight (Boat Only): 2,450 lbs.
Weight (Boat & Trailer) 3,250 lbs.
Capacity - Passenger 10 persons
Capacity - Weight 1,450 lbs.
Capacity - Fuel: 28 gals.
Standard power: 310 HP, V-8
© 2003 Skier’s Choice, Inc.
13
Outback LS
Outback LSV
Specifications:
Length without Platform: 20’ 8”
Length with Platform: 22’ 8”
Length with Trailer: 24’ 5”
Width (Beam): 95”
Overall Width with Trailer 102”
Draft: 22”
Weight (Boat Only): 2,650 lbs.
Weight (Boat & Trailer) 3,400 lbs.
Capacity - Passenger 10
Capacity - Weight 1,350 lbs.
Capacity - Fuel: 34 gals.
Standard power: 310 HP, V-8
14
Specifications:
Length without Platform: 20’ 8”
Length with Platform: 22’ 8”
Length with Trailer: 24’ 5”
Width (Beam): 95 ”
Overall Width with Trailer 102”
Draft: 24”
Weight (Boat Only): 3,000 lbs.
Weight (Boat & Trailer) 4,000 lbs.
Capacity - Passenger 10
Capacity - Weight 1,350 lbs.
Capacity - Fuel: 40 gals.
Standard power: 310 HP, V-8
© 2003 Skier’s Choice, Inc.
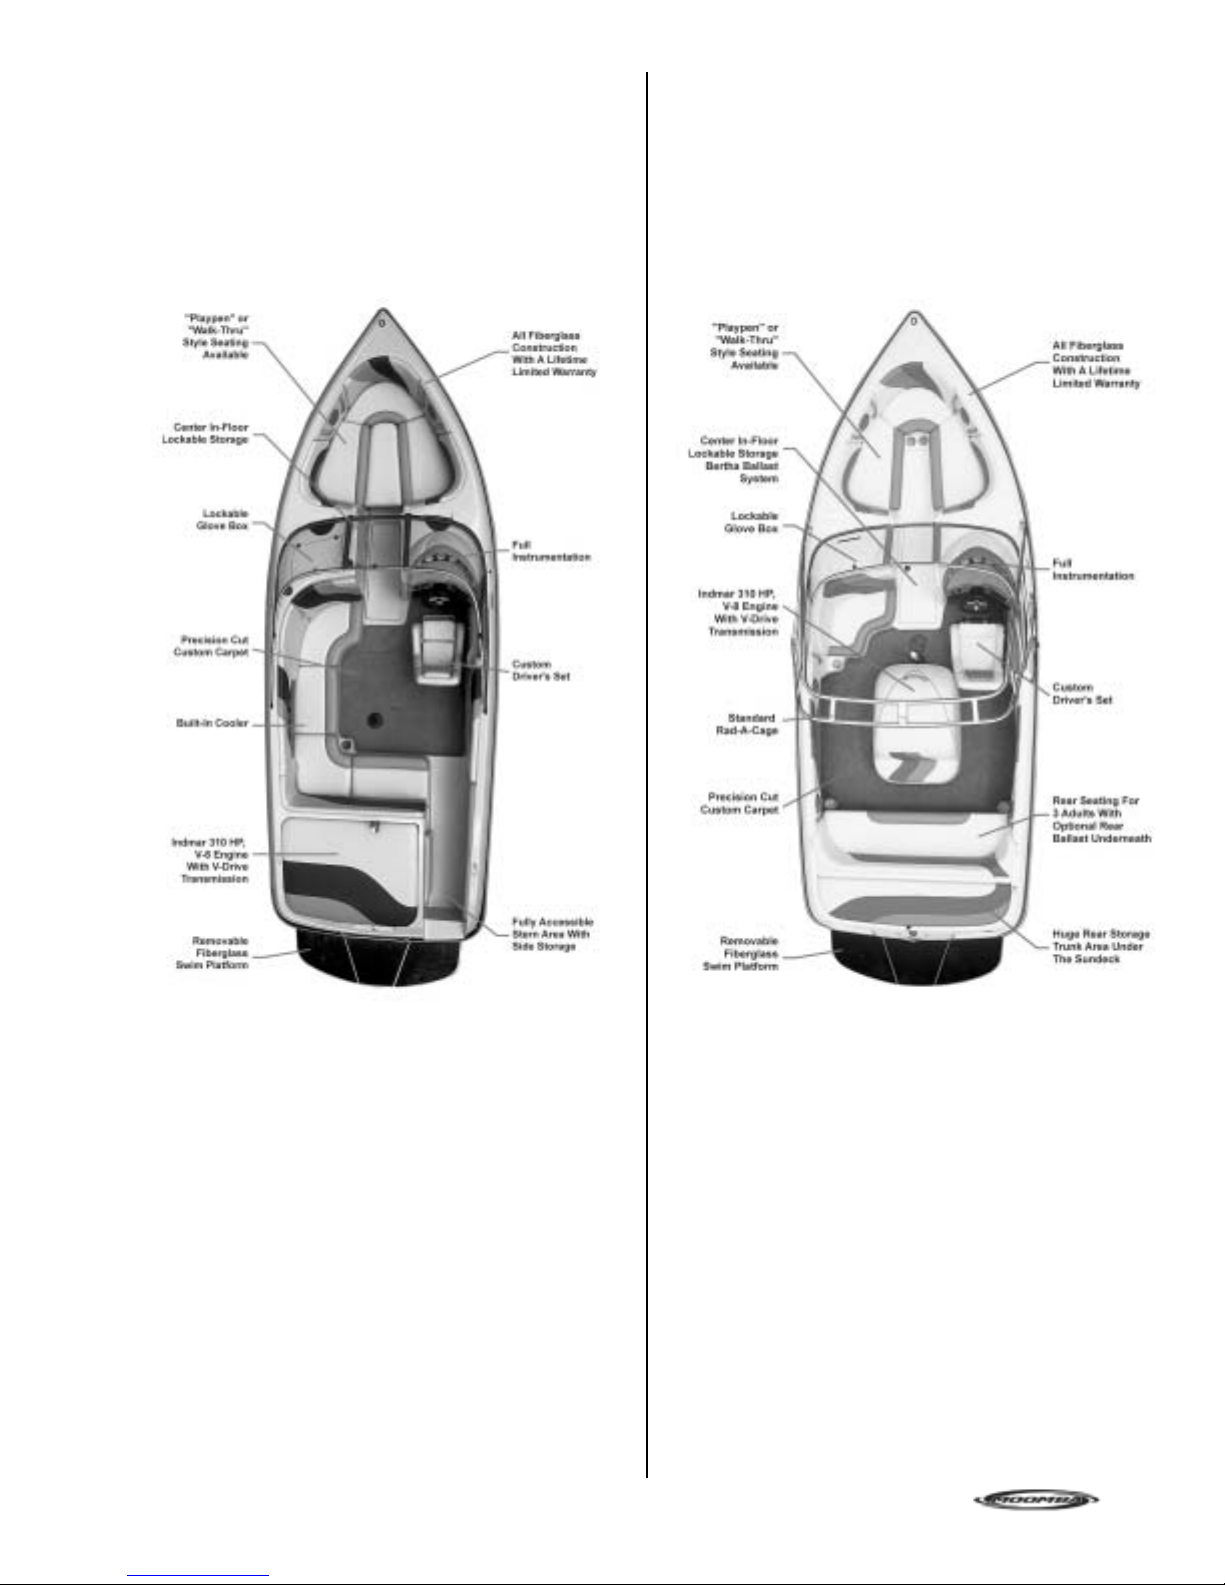
Kamberra Walkabout
Mobius
Specifications:
Length without Platform: 22’
Length with Platform: 2 4’
Length with Trailer: 26’
Width (Beam): 95”
Overall Width with Trailer 102”
Draft: 24”
Weight (Boat Only): 3,250 lbs.
Weight (Boat & Trailer) 4,350 lbs.
Capacity - Passenger 11
Capacity - Weight 1,575 lbs.
Capacity - Fuel: 40 gals.
Standard power: 310 HP, V-8
© 2003 Skier’s Choice, Inc.
Specifications:
Length without Platform: 20’ 8”
Length with Platform: 22’ 8”
Length with Trailer: 24’ 5”
Width (Beam): 95”
Overall Width with Trailer 102”
Draft: 22”
Weight (Boat Only): 2,650 lbs.
Weight (Boat & Trailer) 3,400 lbs.
Capacity - Passenger 10
Capacity - Weight 1,350 lbs.
Capacity - Fuel: 34 gals.
Standard power: 310 HP , V - 8
15

Mobius LSV
Mobius V
Specifications:
Length without Platform: 20’ 8”
Length with Platform: 22’ 8”
Length with Trailer: 24’ 5”
Width (Beam): 95”
Overall Width with Trailer 102”
Draft: 24”
Weight (Boat Only): 3,000 lbs.
Weight (Boat & Trailer) 4,000 lbs.
Capacity - Passenger 10
Capacity - Weight 1,350 lbs.
Capacity - Fuel: 40 gals.
Standard power: 310 HP, V-8
16
Specifications:
Length without Platform: 22’
Length with Platform: 24 ’
Length with Trailer: 26’
Width (Beam): 95”
Overall Width with Trailer 102”
Draft: 24”
Weight (Boat Only): 3,250 lbs.
Weight (Boat & Trailer) 4,350 lbs.
Capacity - Passenger 12
Capacity - Weight 1,725 lbs.
Capacity - Fuel: 40 gals.
Standard power: 310 HP, V-8
© 2003 Skier’s Choice, Inc.
BREAK IN
Section V
Operating Information
T aking care to properly break in your new engine will pay off
in the long run. In our years of field testing, we have proven
that an Indmar engine, when properly broken in according
to our simple procedures, will last longer, run better and have
fewer repairs over its lifetime.
Your new engine does not require an elaborate break-in
procedure. Just follow these simple instructions and you
are off to a great start.
The three (3) most important aspects of new engine breakin are:
1.Avoid running engine at high speeds.
2.Do not carry a heavy load (passengers, gear, etc.).
3.V ary your boat speed during break-in, do not run at the
same RPM for a long period of time.
BREAK-IN STEPS
- For the first hour, do not exceed 2,000 RPM.
- For the second hour, do not exceed 3,000 RPM.
- For the next five hours, do not exceed 4,000 RPM.
BREAK-IN TIPS
- Avoid fast accelerations and do not carry (or pull) a heavy
load during this period.
- Always let engine warm up gradually before acceleration.
- Check oil frequently . During the first 50 to 100 hours, an
engine can use more oil than usual. Maintain oil at a proper
level at all times (do not overfill).
- Monitor transmission fluid levels.
- Report abnormal noises or vibrations to your dealer.
- Keep an eye out for loose mountings, fittings, nuts, bolts,
and clamps.
During the BREAK-IN process, engine temperature should
be carefully monitored and speed should be reduced if
overheating is evident. ALSO, PLEASE REFER TO
ENGINE OWNER’S MANUAL FOR BREAK-IN
INFORMA TION.
NOTICE: PLEASE REFER TO ENGINE OWNER’S
MANUAL for maximum RPM and engine break-in
procedure.
After the first 10 to 20 hours of operation, take your boat to
the dealer for its first oil and filter change, as well as an
engine checkup. Remember to keep a sharp eye on all
gauges and warning lights during these first hours of
operation. Report anything unusual to your dealer.
After the break-in procedure is over, your boat may be
operated continuously at any speed.
Do not exceed maximum RPM recommended for your
engine. Exceeding the maximum RPM may result in
damage to the engine.
Before starting your engine you must open the engine
box and check engine compartment and bilge for
gasoline and oil vapors.
© 2003 Skier’s Choice, Inc.
17
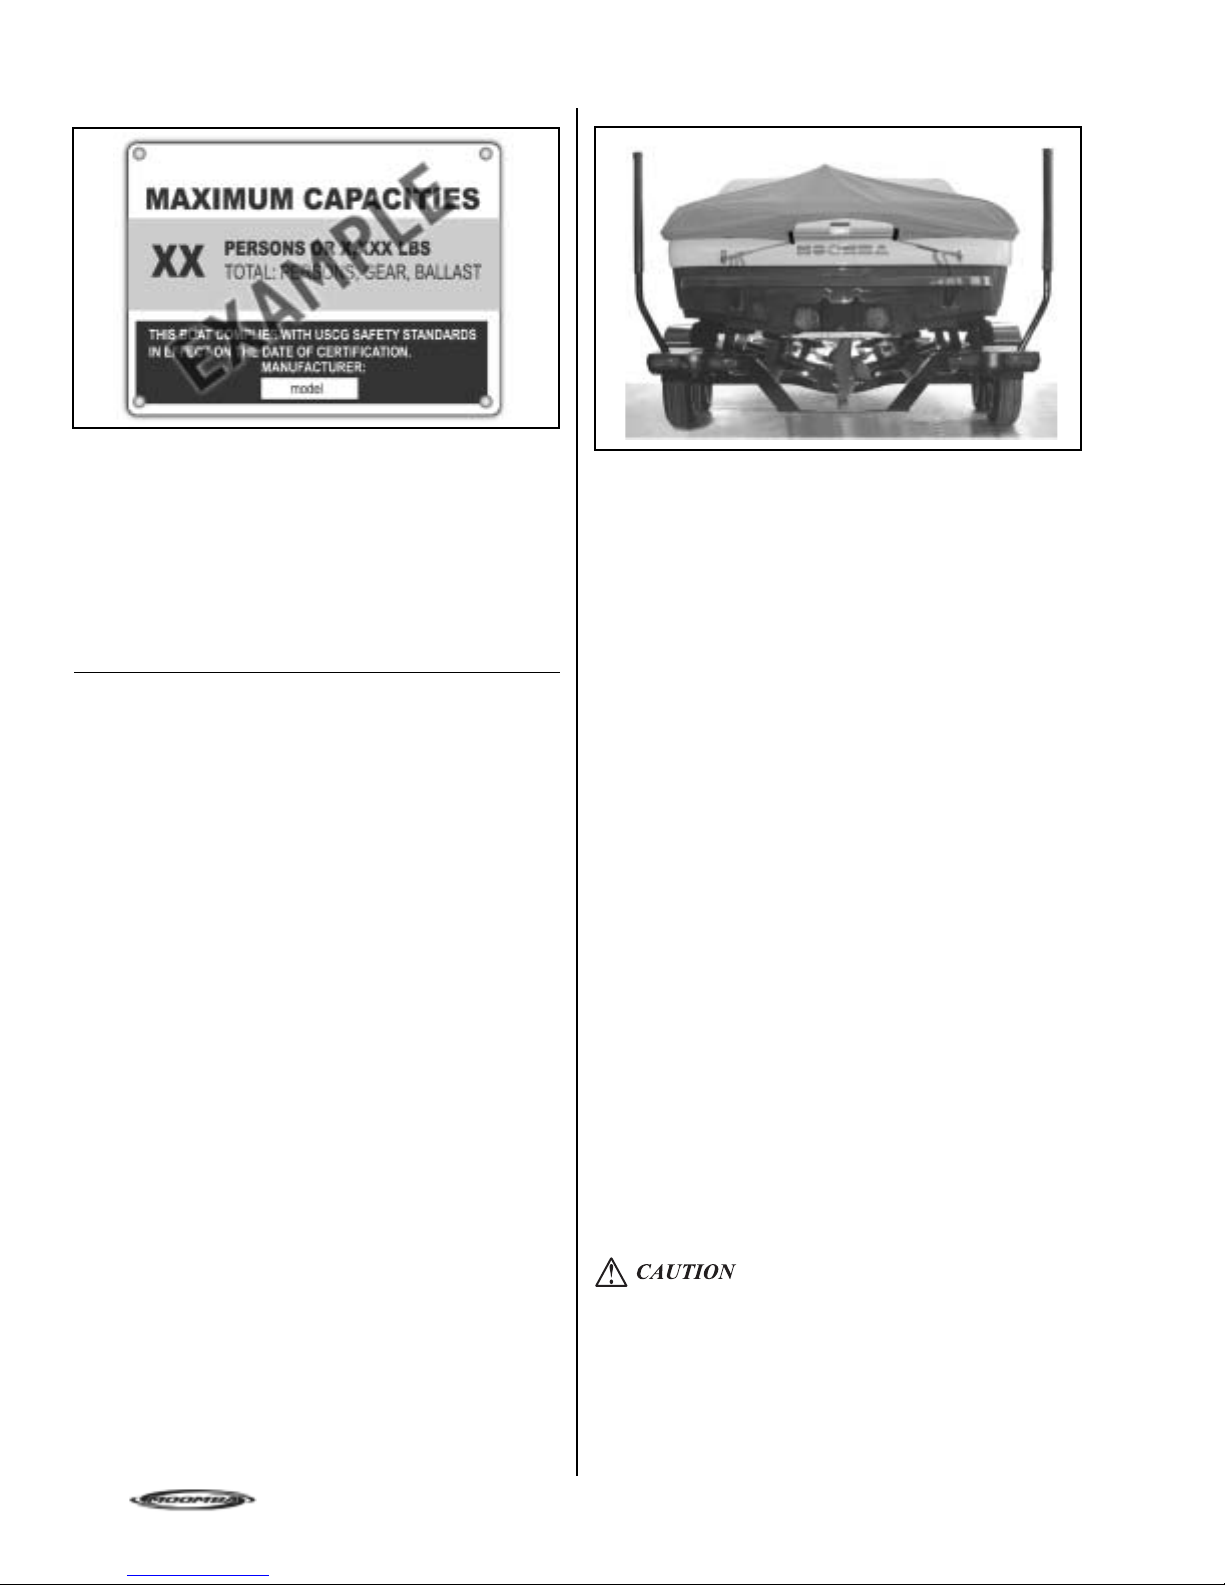
Maximum Capacities
In compliance with United St ates Coast Guard Regulations,
Moomba Boats meet or exceed all safety standards designed
for recreational boats. To ensure safe handling and
performance, each Moomba boat displays a maximum
capacity sticker (see sample), stating the maximum
passenger weight load allowable.
NOTICE: Refer to the Maximum Capacity Sticker on
your boat for allowable loading.
Canvas Cover
Your Moomba boat cover is made from the finest canvas
and webbing to ensure that your boat will be protected in
the off season. The cover has been designed to fit securely
around each boat. If your new cover does not seem to be
snug, a shrinkage allowance has been sized in.
Use the following procedure when covering the boat:
Coast Guard Regulations
The United States Coast Guard boating regulations prescribe
minimum standards of safety to be met and maintained by
all watercraft. It is necessary that your boat remain in
compliance with these regulations.
The staff at Skier’s Choice, Inc. recommend that all boat
operators complete a Coast Guard approved boating safety
course.
1.Be sure that the cover fits snugly at the bow then unfold
from front to back.
2.Be sure to install cover pole(s) and adjust to proper height,
using set screw on pole(s). This will keep water from
gathering in the center, which can damage the cover.
3.Secure all fastening straps around the trailer frame.
4.Pull the draw cord equally from both sides and tie off to
the lifting eyes on the stern in accordance with the
illustration.
Folding Cover
When folding the cover for storage, be sure the cover is dry .
Take care not to scratch the canvas finish against rough
surfaces. Store in a dry location.
Cover Repair
If the cover becomes damaged, immediately patch and
reseal the area. Use a tent seam sealer to reseal any new
stitches. Spray fabric guard on scraped or worn surfaces.
Canvas tears should be repaired professionally and stitches
sealed to prevent leakage.
18
Y our mooring cover is not designed for trailering. T railering
with your cover installed may cause premature cover failure
and boat damage. This damage is not warrantable.
© 2003 Skier’s Choice, Inc.
Section VI
Starting & Operation
A standard pre-st arting procedure should be always be followed before the first start-up of the day.
1.Check the engine oil level.
2.Check for gasoline fumes in bilge or engine compartment.
3.Operate engine blower for 4 minutes to remove any fumes.
4.Check manual operation of bilge pump. Make sure bilge areas are empty .
Other items might also be inspected, depending on the boat and its use. It is advisable to formulate a check list particular
to the equipment and operation of your boat.
REFER TO THE BOATMAN’S CHECKLIST OF THIS MANUAL.
Consult the local Coast Guard Auxiliary or Power Squadron for full det ails on boating safety .
NOTE: Add-on electrical accessories should never be connected to the ignition terminal or ignition circuit.
IMPORTANT: DO NOT continue to operate the starter for more than 30 seconds at a time without pausing to
allow the starter motor to cool down for at least 2 minutes. This will also allow the battery to recover between
starting attempts. PLEASE REFER T O ENGINE OWNER’S MANUAL FOR ADDITIONAL DETAILS.
BEFORE STARTING ENGINE, BE SURE THAT THE SHIFT SELECTOR IS IN NEUTRAL.
The correct starting procedure depends upon the type of engine. Please refer to the engine manual before starting.
To Start Electronic Fuel Injection
(EFI) Engine
1.Place shift selector in Neutral with the throttle in the upright
(zero) position. (If throttle is not in the idle position, the
throttle position sensor will not allow the engine computer
to proceed with a normal starting procedure).
2.Turn Ignition Key to S tart Position to operate the st arter .
3.Release the Key when engine starts (key will return to run
position).
4.Allow the engine to establish a good idle (30 to 60 seconds)
before getting underway .
5.Shift slowly into forward or reverse, allowing the
transmission time to engage before powering up.
NOTE: It is normal for the idle to speed up in cold start
conditions.
DO NOT continue to operate the starter for more than
30 seconds at a time without pausing to allow the starter
motor to cool down for at least 2 minutes. This will
also allow the battery to recover between starting
attempts. PLEASE REFER TO ENGINE OWNER’S
MANUAL FOR ADDITIONAL DET AILS.
NOTE: Should the EFI engine become “flooded” use
the following procedure to start:
1. Place shift selector in Neutral and disengage the
transmission by pushing the transmission lockout button
located at the bottom of the lever.
2. With the transmission disengaged push the lever forward
to full throttle position. (This will cause the computer to
shut off the fuel injectors which will allow the engine to
clear of excess fuel during starting).
3. T urn the Ignition Key to S tart Position and operate the
starter for no more than 15 seconds at a time until the
engine starts.
4. When the engine starts, back of f the throttle and allow
the engine to establish a good idle (30 to 60 seconds).
5. Return the throttle to idle position and the transmission
lockout will automatically reengage the transmission in
neutral position.
6. When ready to get underway, shift slowly into forward
or reverse, allowing the transmission time to engage
the gearing before powering up.
To Start Carburetor Engine
1.Place shift selector in Neutral with the throttle in the upright
(zero) position and push the transmission lockout button
at the bottom of the lever to disengage the transmission.
2.Turn the ignition key to the start position to operate the
starter.
3.When the engine starts, release the key and it will return
to the run position.
4.With the transmission disengaged, push the throttle lever
forward to increase the engine idle to 1200 to 1500 RPM.
5.When the engine idle smooths out, return the throttle to
idle position and the transmission lockout will automatically
reengage the transmission in neutral position.
6.When ready to get underway , shift slowly into forward or
reverse, allowing the transmission time to engage the
gearing before powering up.
© 2003 Skier’s Choice, Inc.
19
If Carburetor Engine Does Not Start
1B. Place shift selector in Neutral with the throttle in the
upright (zero) position and push the transmission lockout
button at the bottom of the lever to disengage the
transmission.
2B. With the transmission disengaged, push the throttle lever
forward about one/fourth (to slow run position).
3B. Turn ignition key to start position to operate st arter .
4B. When the engine starts operate the throttle lever to
establish an engine idle of 1200 to 1500 RPM.
5B. When the engine idle smooths out, return the throttle to
idle position and the transmission lockout will
automatically reengage the transmission in neutral
position.
6B. When ready to get underway , shift slowly into forward
or reverse, allowing the transmission time to engage
the gearing before powering up.
If Carburetor Engine Still Does Not Start
1C. Place shif t selector in Neutral with the throttle in the
upright (zero) position and push the transmission lockout
button at the bottom of the lever to disengage the
transmission.
2C. With the transmission disengaged, move the throttle
lever back and forth from one/fourth to one/third throttle.
3C. While moving the throttle lever turn the ignition key to
Start Position to operate the st arter .
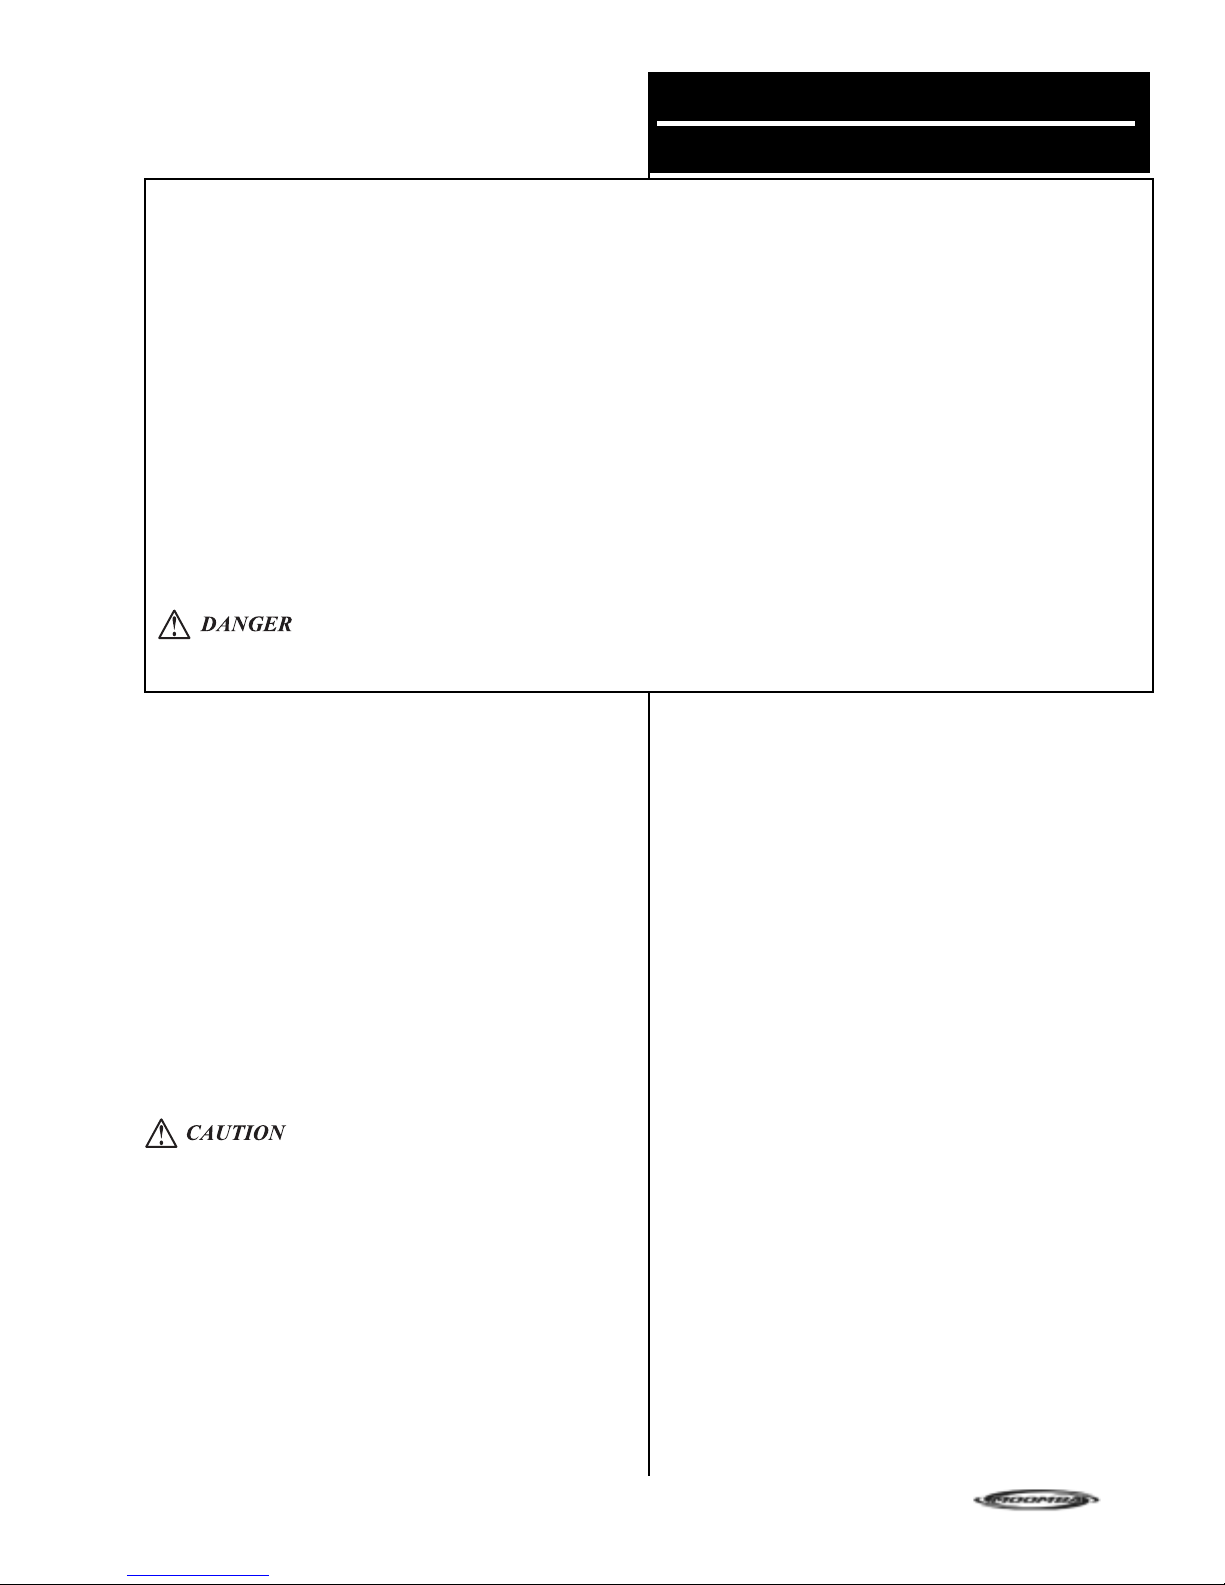
Throttle Lever
The throttle lever controls both the throttle and the
transmission. The idle position (normally vertical) is the zero
throttle position and the neutral position for the transmission.
A safety ring (umbrella) keeps the lever from being
accidentally moved to engage the transmission.
To place the transmission into gear, with your hand placed
over the lever ball, pull up on the safety ring (umbrella) and
slowly push the lever into forward gear or slowly pull the
lever back into reverse gear.
NOTE: Do not operate the starter for more than 15
seconds at a time. Allow the starter to rest for a full
minute before attempting this starting procedure again.
4C. When the engine st arts, operate the throttle lever to
establish an engine idle of 1200 to 1500 RPM.
If Carburetor Engine Floods
1D. Place shif t selector in Neutral with the throttle in the
upright (zero) position and push the transmission lockout
button at the bottom of the lever to disengage the
transmission.
2D. Push the throttle lever to the full throttle (wide open)
position.
3D. T urn Ignition Key to operate starter .
NOTE: Do not operate the starter for more than 15
seconds at a time. Allow the starter to rest for a full
minute before attempting this starting procedure again.
4D. When the engine st arts, back off the throttle, but allow
the engine to idle at 1500 RPM until it smooths out.
Never shift the lever directly from the neutral (vertical) position
into a speed position.
- T o prevent damage to the transmission always allow the
transmission time to engage before accelerating the
engine.
- Once the transmissions engaged, you may accelerate as
quickly as you like.
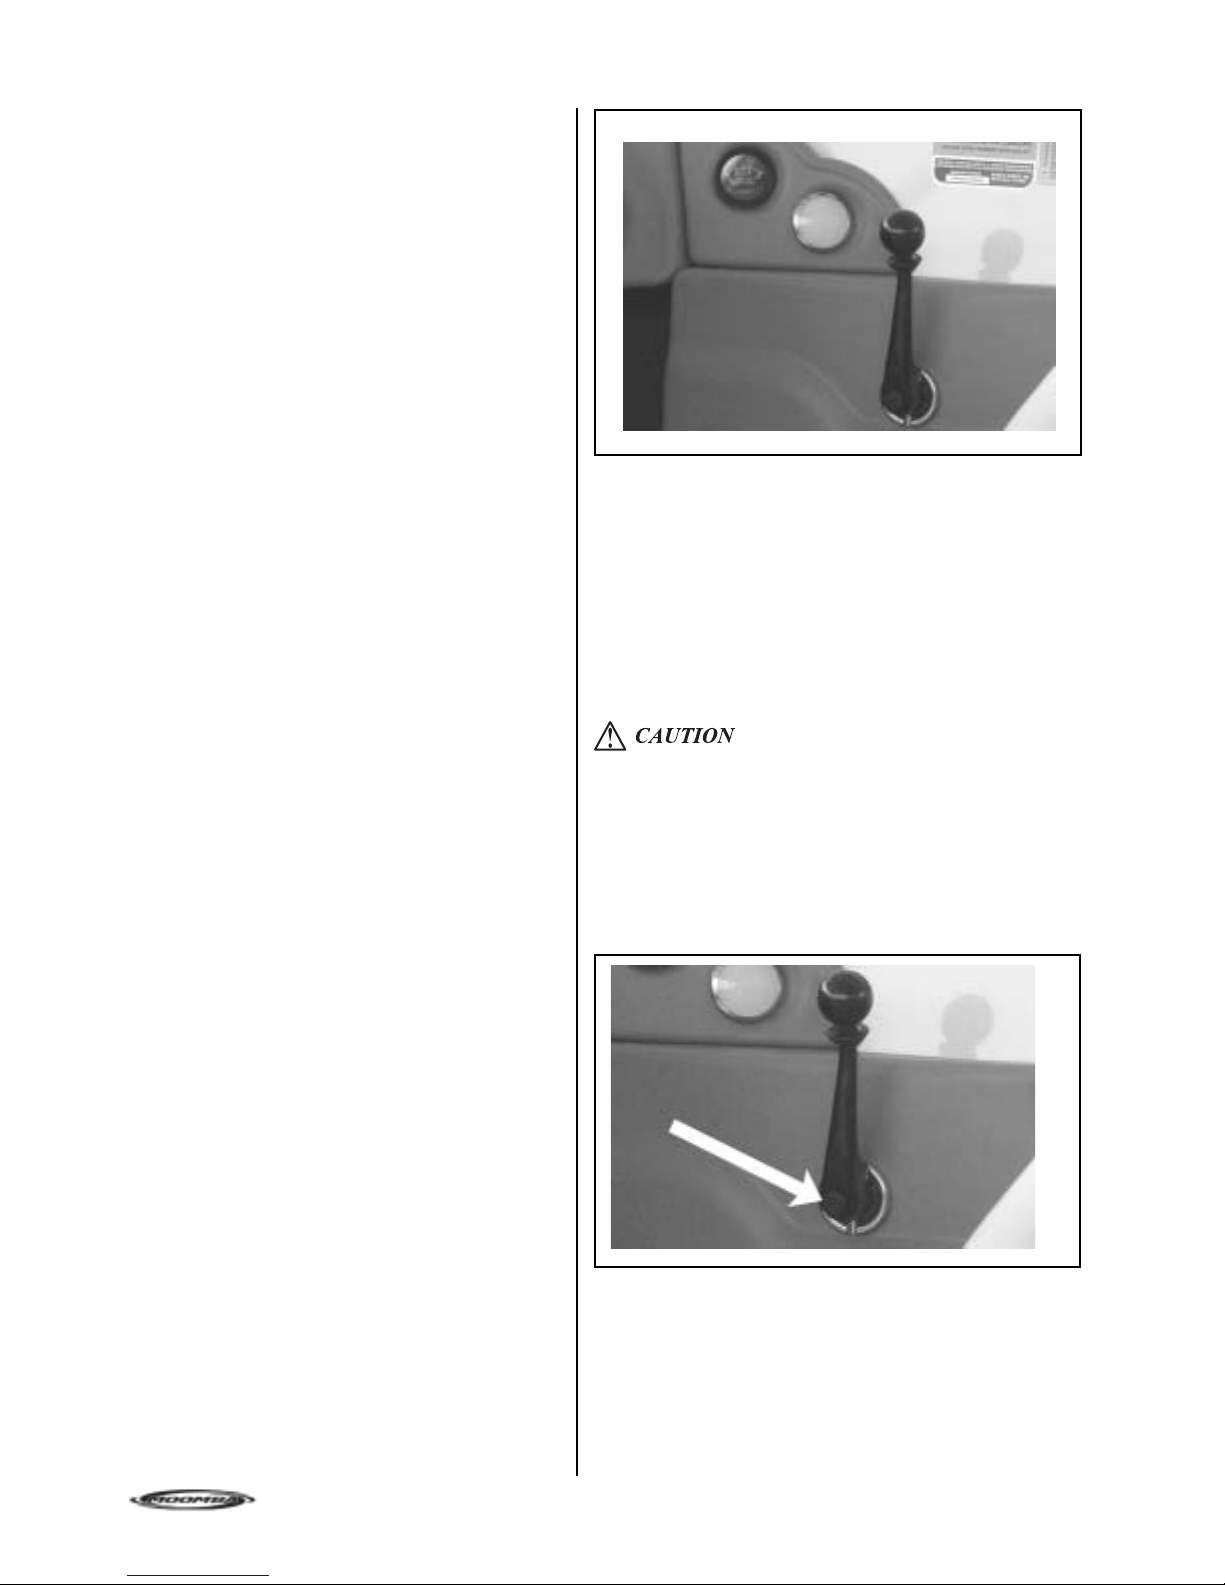
Transmission
Lockout
Button
The Transmission Lockout button allows the transmission to
be disengaged while giving the throttle full operating range.
With the lever in the idle position (normally vertical) push the
button located at the bottom of the lever to disengage the
transmission. The throttle may then be operated in any open
position (forward of neutral or back of neutral upright
position). Return the throttle to idle position, and the
transmission lockout will automatically reengage the
transmission in neutral position.
20
© 2003 Skier’s Choice, Inc.
Bilge Area Drain Plug
The bilge area drain plug is located at the front of the motor
well, in the center under the engine.
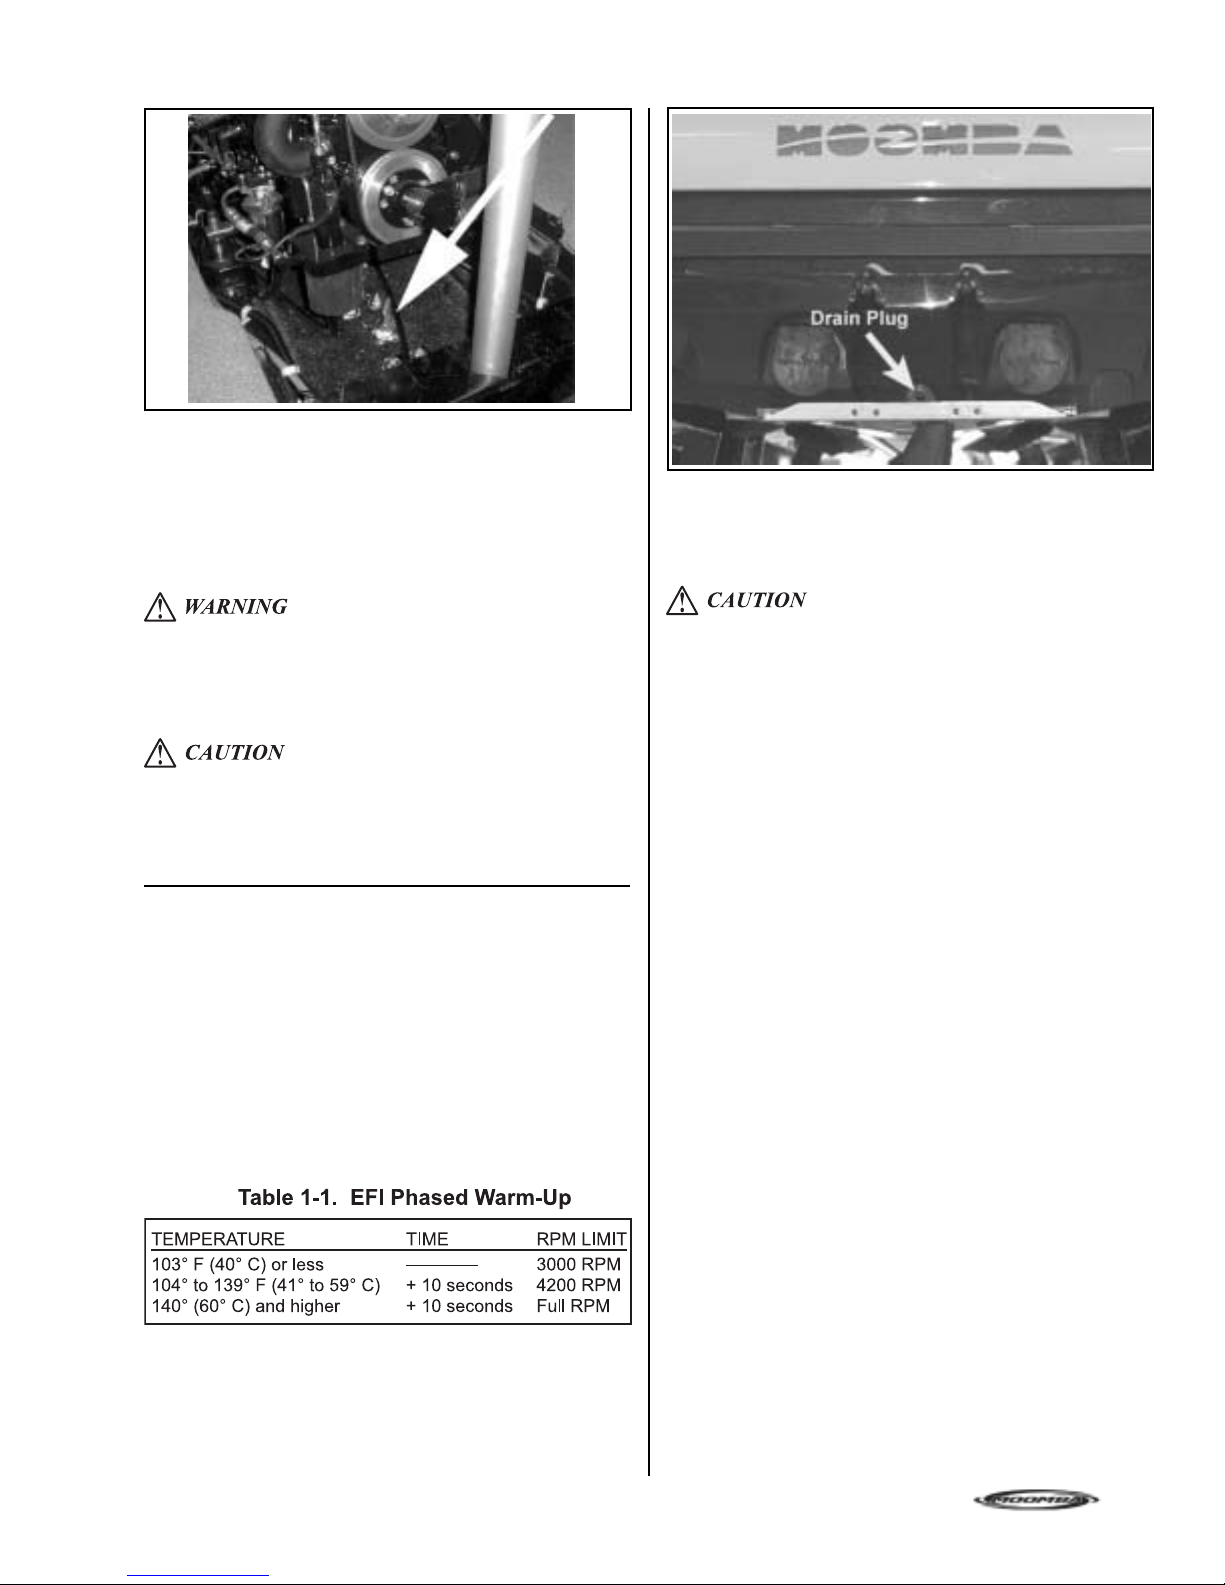
Rear Drain Plug (if applicable)
It is extremely important that the drain plug is always checked
before starting the engine. The drain plug should be secured
in place using a wrench.
DO NOT start engine until center drain plug is checked
and secured in place. DO NOT try to install center drain
plug while engine is running.
Some Moomba models DO NOT have mechanical devices
to hold the motor box cover in the open position. Please
use caution to prevent accidental closing.
EFI Phased Warm-Up
Always let engine warm up to normal operating temperature
before accelerating. EFI engines are programmed with a
phased warm up to ensure that the engine is warm before
full RPM is possible; refer to Table 1-1.
The rear drain plug is located at the back of the boat, near
the bottom of the transom. It is extremely important that the
drain plug is always checked before starting the engine. The
drain plug should be secured in place using a wrench.
DO NOT start the engine until the drain plug is checked
and secured in place.
DO NOT try to install the drain plug while the engine is
running!
© 2003 Skier’s Choice, Inc.
21
 Loading...