

Page 1
© 2009, Videolarm, Inc. All Rights Reserved
RM7
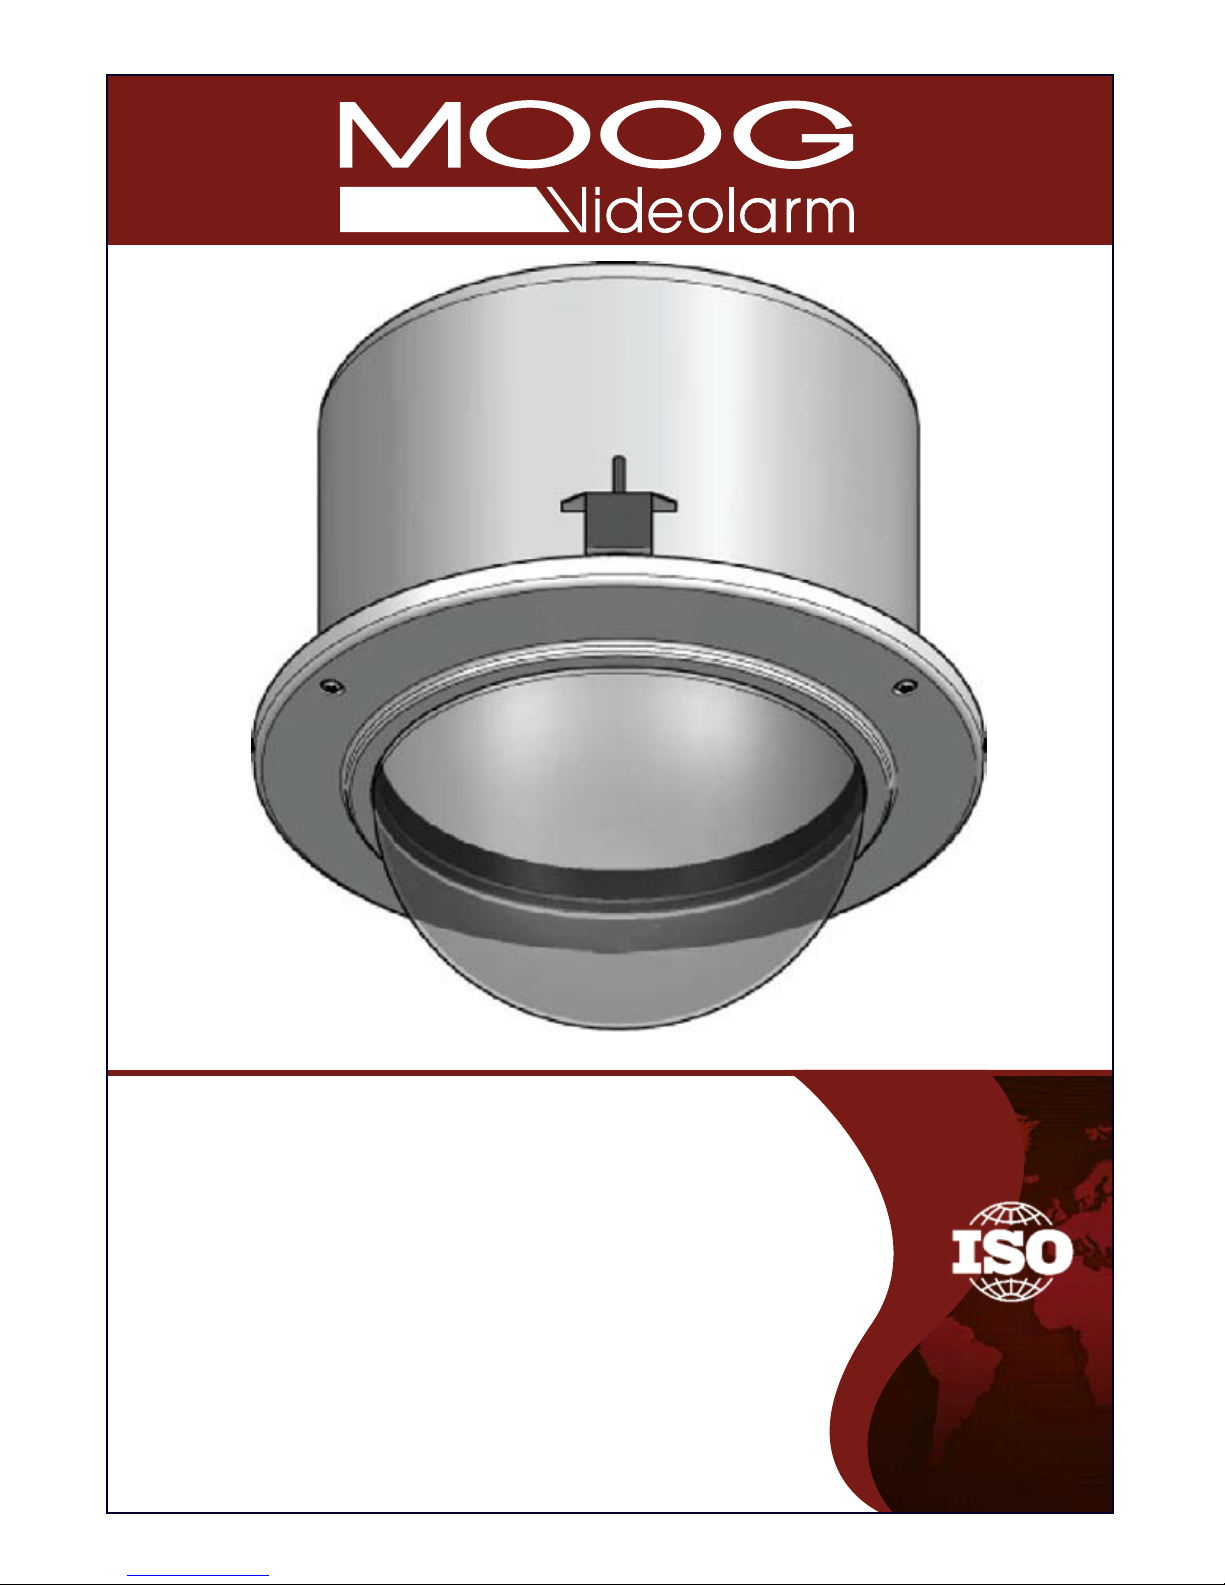
Vandal-Resistant Recessed Ceiling Dome Housing
Installation and Operation Instructions for the following models:
RM7C2N
dome housing, with recessed ceiling mount, clear dome, with
24Vac transformer
RM7T2N IP Network Ready 7” Vandal-Resistant Outdoor Recessed dome
housing, with recessed ceiling mount, tinted dome, with 24Vac
transformer
IRM7C2N IP Network Ready 7” Vandal-Resistant Indoor Recessed dome
housing, with recessed ceiling mount, clear dome, with 24Vac
transformer
IRM7T2N IP Network Ready 7” Vandal-Resistant Indoor Recessed dome
housing, with recessed ceiling mount, tinted dome, with 24Vac
transformer
Before attempting to connect or operate this product,
please read these instructions completely.
IP Network Ready 7” Vandal-Resistant Outdoor Recessed
www.videolarm.com
CERTIFIED
81-IN5394
01-15-2009
Page 2
IMPORTANT SAFEGUARDS SAFETY PRECAUTIONS
UNPACKING
SERVICE
1 Read these instructions.
2 Keep these instructions.
3 Heed all warnings
4 Follow all instructions.
5 Do not use this apparatus near water.
6 Clean only with damp cloth.
7 Do not block any of the ventilation openings. Install in accordance with the
manufacturers instructions.
8 Cable Runs- All cable runs must be within permissible distance.
9 Mounting - This unit must be properly and securely mounted to a supporting
structure capable of sustaining the weight of the unit.
Accordingly:
a. The installation should be made by a qualified installer.
b. The installation should be in compliance with local codes.
c. Care should be exercised to select suitable hardware to install the unit, taking into
account both the composition of the mounting surface and the weight of the
unit.
10 Do not install near any heat sources such as radiators, heat registers, stoves, or other
apparatus ( including amplifiers) that produce heat.
11 Do not defeat the safety purpose of the polarized or grounding-type plug. A
polarized plug has two blades with one wider than the other. A grounding type
plug has two blades and a third grounding prong. The wide blade or the third
prong are provided for your safety. When the provided plug does not fit into your
outlet, consult an electrician for replacement of the obsolete outlet.
12 Protect the power cord from being walked on or pinched particularly at plugs,
convenience receptacles, and the point where they exit from the apparatus.
13 Only use attachment/ accessories specified by the manufacturer.
14 Use only with a cart, stand, tripod, bracket, or table specified by the manufacturer,
or sold with the apparatus. When a cart is used, use caution when moving the cart/
apparatus combination to avoid injury from tip-over.
15 Unplug this apparatus during lighting storms or when unused for long periods of time.
16 Refer all servicing to qualified service personnel. Servicing is required when the
apparatus has been damaged in any way, such as power-supply cord or plug is
damaged, liquid has been spilled of objects have fallen into the apparatus, the
apparatus has been exposed to rain or moisture, does not operate normally, or
has been dropped.
Be sure to periodically examine the unit and the supporting structure to make sure that the
integrity of the installation is intact. Failure to comply with the foregoing could result in the
unit separating from the support structure and falling, with resultant damages or injury to
anyone or anything struck by the falling unit.
Unpack carefully. Electronic components can be
damaged if improperly handled or dropped. If an item
appears to have been damaged in shipment, replace
it properly in its carton and notify the shipper.
Be sure to save:
1 The shipping carton and packaging material.
They are the safest material in which to make
future shipments of the equipment.
2 These Installation and Operating Instructions.
If technical support or service is needed, contact us
at the following number:
The lightning flash with an arrowhead
symbol, within an equilateral triangle, is
intended to alert the user to the presence
of non-insulated “dangerous voltage”
within the product’s enclosure that may be
of sufficient magnitude to constitute a risk
to persons.
Este símbolo se piensa para alertar al usuario a la
presencia del “voltaje peligroso no-aisIado” dentro del
recinto de los productos que puede ser un riesgo de
choque eléctrico.
Ce symbole est prévu pour alerter I’utilisateur à la
presence “de la tension dangereuse” non-isolée dans la
clôture de produits qui peut être un risque de choc
électrique.
Dieses Symbol soll den Benutzer zum Vorhandensein der
nicht-lsolier “Gefährdungsspannung” innerhalb der
Produkteinschließung alarmieren die eine Gefahr des
elektrischen Schlages sein kann.
Este símbolo é pretendido alertar o usuário à presença
“di tensão perigosa non-isolada” dentro do cerco dos
produtos que pode ser um risco de choque elétrico.
Questo simbolo è inteso per avvertire I’utente alla
presenza “di tensione pericolosa” non-isolata all’interno
della recinzione dei prodotti che può essere un rischio di
scossa elettrica
.
The exclamation point within an equilateral
triangle is intended to alert the user to
presence of important operating and
maintenance (servicing) instructions in the
literature accompanying the appliance.
Este símbolo del punto del exclamation se piensa para
alertar al usuario a la presencia de instrucciones
importantes en la literatura que acompaña la
aplicación.
Ce symbole de point d’exclamation est prévu pour
alerter l’utilisateur à la presence des instructions
importantes dans la littérature accompagnant
l’appareil.
Dieses Ausruf Punktsymbol soll den Benutzer zum
Vorhandensein de wichtigen Anweisungen in der
Literatur alarmieren, die das Gerät begleitet.
Este símbolo do ponto do exclamation é pretendido
alertar o usuário à presença de instruções importantes
na literatura que acompanha o dispositivo.
Questo simbolo del punto del exclamaton è inteso per
avvertire l’utente alla presenza delle istruzioni importanti
nella letteratura che accompagna l'apparecchio.
TECHNICAL SUPPORT
AVAILABLE 24 HOURS
1- 800 - 554 -1124
RISK OF ELECTRIC SHOCK
DO NOT OPEN
CAUTION
CAUTION: TO REDUCE THE RISK OF
ELECTRIC SHOCK, DO NOT REMOVE
COVER ( OR BACK). NO USER- SERVICE-
ABLE PARTS INSIDE. REFER SEVICING TO
QUALIFIED SERVICE PERSONNEL.
Page 3
LIMITED WARRANTY
FOR VIDEOLARM INC. PRODUCTS
VIDEOLARM INC. warrants this Product to be free from defects in material or workmanship, as follows:
PRODUCT CATEGORY PARTS LABOR
All Enclosures and Electronics Three (3) Years Three (3) Years
Pan/Tilts Three (3) Years **6 months if used in autoscan Three (3) Years **6 months if used in autoscan
Poles/PoleEvators Three (3) Years Three (3) Years
Warrior/Q-View/I.R. Illuminators Five (5) Years Five (5) Years
Controllers Three (3) Years Three (3) Years
Power Supplies Three (3) Years Three (3) Years
Accessory Brackets Three (3) Years Three (3) Years
During the labor warranty period, to repair the Product, Purchaser will either return the defective product, freight prepaid, or deliver it to Videolarm Inc.
Decatur GA. The Product to be repaired is to be returned in either its original car
ton or a similar package an equal degree of protection with a
RMA # (Return Materials Authorization number) displayed on the outer box or packing slip. To obtain a RMA# you must contact our Technical Support
Team at 800.554.1124, extension 101.Videolarm will return the repaired Product freight prepaid to Purchaser.Videolarm is not obligated to provide
Purchaser with a substitute unit during the warranty period or at any time. After the applicable warranty period, Purchaser must pay all labor and/or
parts charges.
The limited warranty stated in these product instructions is subject to all of the following terms and conditions:
1. NOTIFICATION OF CLAIMS: WARRANTY SERVICE: If Purchaser believes that the Product is defective in material or workmanship, then written notice
with an explanation of the claim shall be given promptly by Purchaser toVideolarm but all claims for warranty service must be made within the
warranty period. If after
investigation Videolarm determines that the reported problem was not covered by the warranty, Purchaser shall payVideolarm
for the cost of investigating the problem at its then prevailing per incident billable rate. No repair or replacement of any Product or part thereof shall
extend the warranty period as to the entire Product. The
warranty on the repaired part only shall be in for a period of ninety (90) days
following the repair or replacement of that part or the remaining period of the Product parts warranty, whichever is greater.
2. EXCLUSIVE REMEDY: ACCEPTANCE: Purchaser’s exclusive remedy and Videolarm’s sole obligation is to supply (or pay for) all labor necessary to repair
any Product found to be defective within the warranty period and to supply, at no extra charge, new or rebuilt replacements for defective parts.
3. EXCEPTIONS TO LIMITED WARRANTY:Videolarm shall have no liability or obligation to Purchaser with respect to any Product requiring service
during the warranty period which is subjected to any of the following: abuse, improper use: negligence, accident, lightning damage or other acts
of God (i.e., hurricanes, earthquakes),
failure of the end-user to follow the directions outlined in the product instructions, failure of the
end-user to follow the maintenance procedures recommended by the International Security Industry Organization, written in product instructions,
or recommended in the service manual for the Product. Furthermore, Videolarm shall have no liability where a schedule is
for regular
replacement or maintenance or cleaning of certain parts (based on usage) and the end-user has failed to follow such schedule; attempted repair by
personnel; operation of the Product outside of the published environmental and electrical parameters, or if such Product’s original
(trademark, serial number) markings have been defaced, altered, or removed. Videolarm excludes from warranty coverage Products sold
AS IS and/or WITH ALL FAULTS and excludes used Products which have not been sold by Videolarm to the Purchaser. All software and accompanying
documentation furnished with, or as part of the Product is furnished “AS IS”(i.e., without any warranty of any kind), except where expressly provided
otherwise in any documentation or license agreement furnished with the Product.
4. PROOF OF PURCHASE: The Purchaser’s dated bill of sale must be retained as evidence of the date of purchase and to establish warranty eligibility.
DISCLAIMER OF WARRANTY
EXCEPT FOR THE FOREGOINGWARRANTIES,VIDEOLARM HEREBY DISCLAIMS AND EXCLUDES ALL OTHER WARRANTIES, EXPRESS OR IMPLIED,
INCLUDING, BUT NOT LIMITEDTO ANY AND/OR ALL IMPLIED WARRANTIES OF MERCHANTABILITY, FITNESS FOR A PARTICULAR PURPOSE AND/OR ANYWARRANTY WITH
REGARD TO ANY CLAIM OF INFRINGEMENTTHAT MAY BE PROVIDED IN SECTION 2-312(3) OF
THE UNIFORM COMMERCIAL CODE AND/OR IN ANY OTHER COMPARABLE
STATE STATUTE. VIDEOLARM HEREBY DISCLAIMS ANY REPRESENTATIONS OR WARRANTY THAT THE PRODUCT IS COMPATIBLE WITH ANY COMBINATION OF NON-VIDEOLARM
PRODUCTS OR NON-VIDEOLARM RECOMMENDED PRODUCTS PURCHASER CHOOSES TO CONNECT TO PRODUCT.
LIMITATION OF LIABILITY
THE LIABILITY OF VIDEOLARM, IF ANY, AND PURCHASER’S SOLE AND EXCLUSIVE REMEDY FOR DAMAGESFOR ANY CLAIM OF ANY KIND
WHATSOEVER, REGARDLESS OFTHE LEGAL THEORY AND WHETHER ARISING IN TORT OR CONTRACT, SHALL NOT BE GREATERTHAN THE ACTUAL PURCHASE PRICE OF
Index
Specific Camera Instructions:
Axis 213: Block 15
Axis 214: Block 16
Axis 231D/232D: Blocks 17-21
Axis 233D: Blocks 22-26
Canon VB-C10R: Block 27
Canon VB-C50IR: Block 28
Canon VC-C4R/VC-C50IR: Block 29
Elmo PTC 200C: Block 30
Elmo PTC 201: Block 31
Elmo PTC 400C: Block 32
Elmo PTC 401: Block 33
JVC VN-C30U: Block 34
JVC VN-625U/TK-625U: Block 35
JVC VN-C655U: Block 36
Panasonic BB-HCM381/KX-HMC280: Block 37
Pixord 261/262: Block 38
Sony SNCRZ25: Block 39
Sony SNCRZ30: Block 40
Sony SNCRZ50: Block 41
Toshiba IK-WB21A: Block 42
LIMITED WARRANTY FOR VIDEOLARM INC. PRODUCTS
VIDEOLARM INC. warrants this Product to be free from defects in material or workmanship,as follows:
PRODUCTCATEGORY PARTS LABOR
All Enclosures and Electronics Five (5) Years Five (5) Years
Pan/Tilts Three (3) Years **6 months if used in autoscan Three (3) Years **6 months if used in autoscan
Poles/PoleEvators Three (3)Years Three (3) Years
Warrior/Q-View/I.R. Illuminators Five (5) Years Five (5) Years
Controllers Five (5) Years Five (5) Years
Power Supplies Five (5)Years Five (5) Years
Accessory Brackets Five (5) Years Five (5) Years
During the labor warranty period, to repair the Product, Purchaser will either return the defective product, freight prepaid, or deliver it to Videolarm Inc.
Decatur GA. The Product to be repaired is to be returned in either its original carton or a similar package
an equal degree of protection with a
RMA # (Return Materials Authorization number) displayed on the outer box or packing slip. To obtain a RMA# you must contact our Technical Support
Team at 800.554.1124, extension 101.Videolarm will return the repaired Product freight prepaid to Purchaser. Videolarm is not obligated to provide
Purchaser with a substitute unit during the warranty period or at any time. After the applicable warranty period, Purchaser must pay all labor and/or
parts charges.
1. NOTIFICATIONOFCLAIMS: WARRANTYSERVICE:If Purchaser believes that the Product is defective in material or workmanship, then written notice
with an explanation of the claim shall be given promptly by Purchaser toVideolarm but all claims for warranty service must be made within the
warranty period. If after investigation Videolarm determines that the reported problem was not covered by the warranty, P
urchaser shall pay Videolarm
for the cost of investigating the problem at its then prevailing per incident billable rate. No repair or replacement of any Product or part thereof shall
extend the warranty period as to the entire Product. The
warranty on the repaired part only shall be in for a period of ninety (90) days
following the repair or replacement of that part or the remaining period of the Product parts warranty, whichever is greater.
2. EXCLUSIVE REMEDY: ACCEPTANCE:Purchaser’s exclusive remedy and Videolarm’s sole obligation is to supply (or pay for) all labor necessary to repair
any Product found to be defective within the warranty period and to supply, at no extra charge, new or rebuilt replacements for defective parts.
3. EXCEPTIONS TO LIMITED WARRANTY: Videolarm shall have no liability or obligation to Purchaser with respect to any Product requiring service
during the warranty period which is subjected to any of the following: abuse, improper use: negligence, accident, lightning damage or other acts
of God (i.e., hurricanes, earthquakes),
failure of the end-user to follow the directions outlined in the product instructions, failure of the
end-user to follow the maintenance procedures recommended by the International Security Industry Organization, written in product instructions,
or recommended in the service manual for the Product. Furthermore, Videolarm shall have no liability where a schedule is
for regular
replacement or maintenance or cleaning of certain parts (based on usage) and the end-user has failed to follow such schedule; attempted repair by
personnel; operation of the Product outside of the published environmental and electrical parameters, or if such Product’s original
(trademark, serial number) markings have been defaced, altered, or removed. Videolarm excludes from warranty coverage Products sold
AS IS and/or WITH ALL FAULTS and excludes used Products which have not been sold by Videolarm to the Purchaser. All software and accompanying
documentation furnished with, or as part of the Product is furnished “AS IS”(i.e., without any warranty of any kind), except where expressly provided
otherwise in any documentation or license agreement furnished with the Product.
4. PROOF OF PURCHASE: The Purchaser’s dated bill of sale must be retained as evidence of the date of purchase and to establish warranty eligibility.
DISCLAIMEROF WARRANTY
EXCEPT FOR THE FOREGOINGWARRANTIES,VIDEOLARM HEREBY DISCLAIMS AND EXCLUDES ALL OTHER WARRANTIES, EXPRESS OR IMPLIED,
INCLUDING, BUT NOT LIMITED TO ANY AND/OR ALL IMPLIED WARRANTIES OF MERCHANTABILITY, FITNESS FOR A PARTICULAR PURPOSE AND/OR ANY WARRANTY WITH
REGARD TO ANY CLAIM OF INFRINGEMENTTHAT MAY BE PROVIDED IN SECTION 2-312(3) OF
THE UNIFORM COMMERCIAL CODE AND/OR IN ANY OTHER COMPARABLE
STATE STATUTE. VIDEOLARM HEREBY DISCLAIMS ANY REPRESENTATIONS ORWARRANTY THAT THE PRODUCT IS COMPATIBLEWITH ANY COMBINATION OF NON-VIDEOLARM
PRODUCTS OR NON-VIDEOLARM RECOMMENDED PRODUCTS PURCHASER CHOOSES TO CONNECT TO PRODUCT.
LIMITATION OFLIABILITY
THE LIABILITY OF VIDEOLARM, IF ANY, AND PURCHASER’S SOLE AND EXCLUSIVE REMEDY FOR DAMAGES FOR ANY CLAIM OF ANY KIND
WHATSOEVER, REGARDLESS OFTHE LEGAL THEORY AND WHETHER ARISING IN TORT OR CONTRACT, SHALL NOT BE GREATER THANTHE ACTUAL PURCHASE PRICE OF THE
PRODUCT WITH RESPECT TO WHICH SUCH CLAIM IS MADE. IN NO EVENT SHALL VIDEOLARM BE LIABLE TO PURCHASER FOR ANY SPECIAL, INDIRECT, INCIDENTAL, OR
CONSEQUENTIAL DAMAGES OF ANY KIND INCLUDING, BUT NOT LIMITED TO, COMPENSATION, REIMBURSEMENT OR DAMAGES ON ACCOUNT OF THE LOSS OF PRESENT
OR PROSPECTIVE PROFITS OR FOR ANY OTHER REASON WHATSOEVER.
/tour operation
/tour operation
**6 months if used in autoscan
/tour operation
**6 months if used in autoscan
/tour operation
SView Series Five (5) Years
Five (5) Years
The limited warranty stated in these product instructions is subject to all of the following terms and conditions:
TERMS AND CONDITIONS
Page 4
RM7C2N
RM7C2 (OUTDOOR ONLY
)
24 VAC
1.8 Amps
54 Watts
Total Power: 54 Watts
Accessories: Heater: 25 Watts/Blower: 1 Watt
Camera Power: 28 Watts
Tools Required: .100” Flat Head Screwdriver
Phillips Head Screwdriver
Note: IRM7CN includes no accessories
24 VAC
1.8 amperios
54 vatios
Energía Total: 54 vatios
Accesorios: Calentador: 25 Watts/Blower: 1 vatio
Energía De la Cámara fotográfica: 28 vatios
Las Herramientas Requirieron: Destornillador Principal Plano Del 100"
Destornillador Principal Phillips
Nota: IRM7CN no incluye ningún accesorio
24 VCA
1.8 ampères
54 watts
Puissance Totale : 54 watts
Accessoires : Réchauffeur : 25 Watts/Blower : 1 watt
Puissance D'Appareil-photo : 28 watts
Les Outils besoin : Tournevis Principal Plat De 100"
Tournevis Principal Phillips
Note : IRM7CN n'inclut aucun accessoire
24 VAC
1.8 Ampere
54 Watt
Gesamtenergie: 54 Watt
Zusatzgeräte: Heizung: 25 Watts/Blower: 1 Watt
Kamera-Energie: 28 Watt
Werkzeuge Erforderten: 100"Flacher Hauptschraubenzieher
Kreuzkopfhauptschraubenzieher
Anmerkung: IRM7CN schließt keine Zusatzgeräte mit ein
24 VAC
1.8 ampères
54 watts
Poder Total: 54 watts
Acessórios: Calefator: 25 Watts/Blower: 1 watt
Poder Da Câmera: 28 watt
As Ferramentas Requereram: Chave de fenda Principal Lisa Do 100"
Chave de fenda Principal Phillips
Nota: IRM7CN não inclui nenhum acessório
24 VAC
1.8 ampère
54 watt
Alimentazione Totale: 54 watt
Accessori: Riscaldatore: 25 Watts/Blower: 1 watt
Alimentazione Della Macchina fotografica: 28 watt
Attrezzi Richiesti: Cacciavite Capo Piano Del 100"
Cacciavite Capo "phillips"
Nota: IRM7CN non include accessori
Electrical Specifications
IRM7C2N (INDOOR ONLY)
Power 24VAC
Class 2 Only
24 VAC
No power options provided.
Power required for camera only.
24 VAC
Ningunas opciones de la energía proporcionaron.
Energía requerida para la cámara fotográfica solamente.
24 VCA
Option de puissance n'a pas fourni.
Puissance requise pour l'appareil-photo seulement.
24 VAC
Keine Energie Wahlen stellten zur Verfügung.
Energie erfordert für nur Kamera.
24 VAC
Nenhumas opções do poder fornecidas.
Poder requerido para a câmera somente.
24 VAC
Nessun'opzione di alimentazione ha fornito.
Alimentazione richiesta per la macchina fotografica soltanto.
!!
Français
Deutsch
Italiano
Portuguese
Español
English
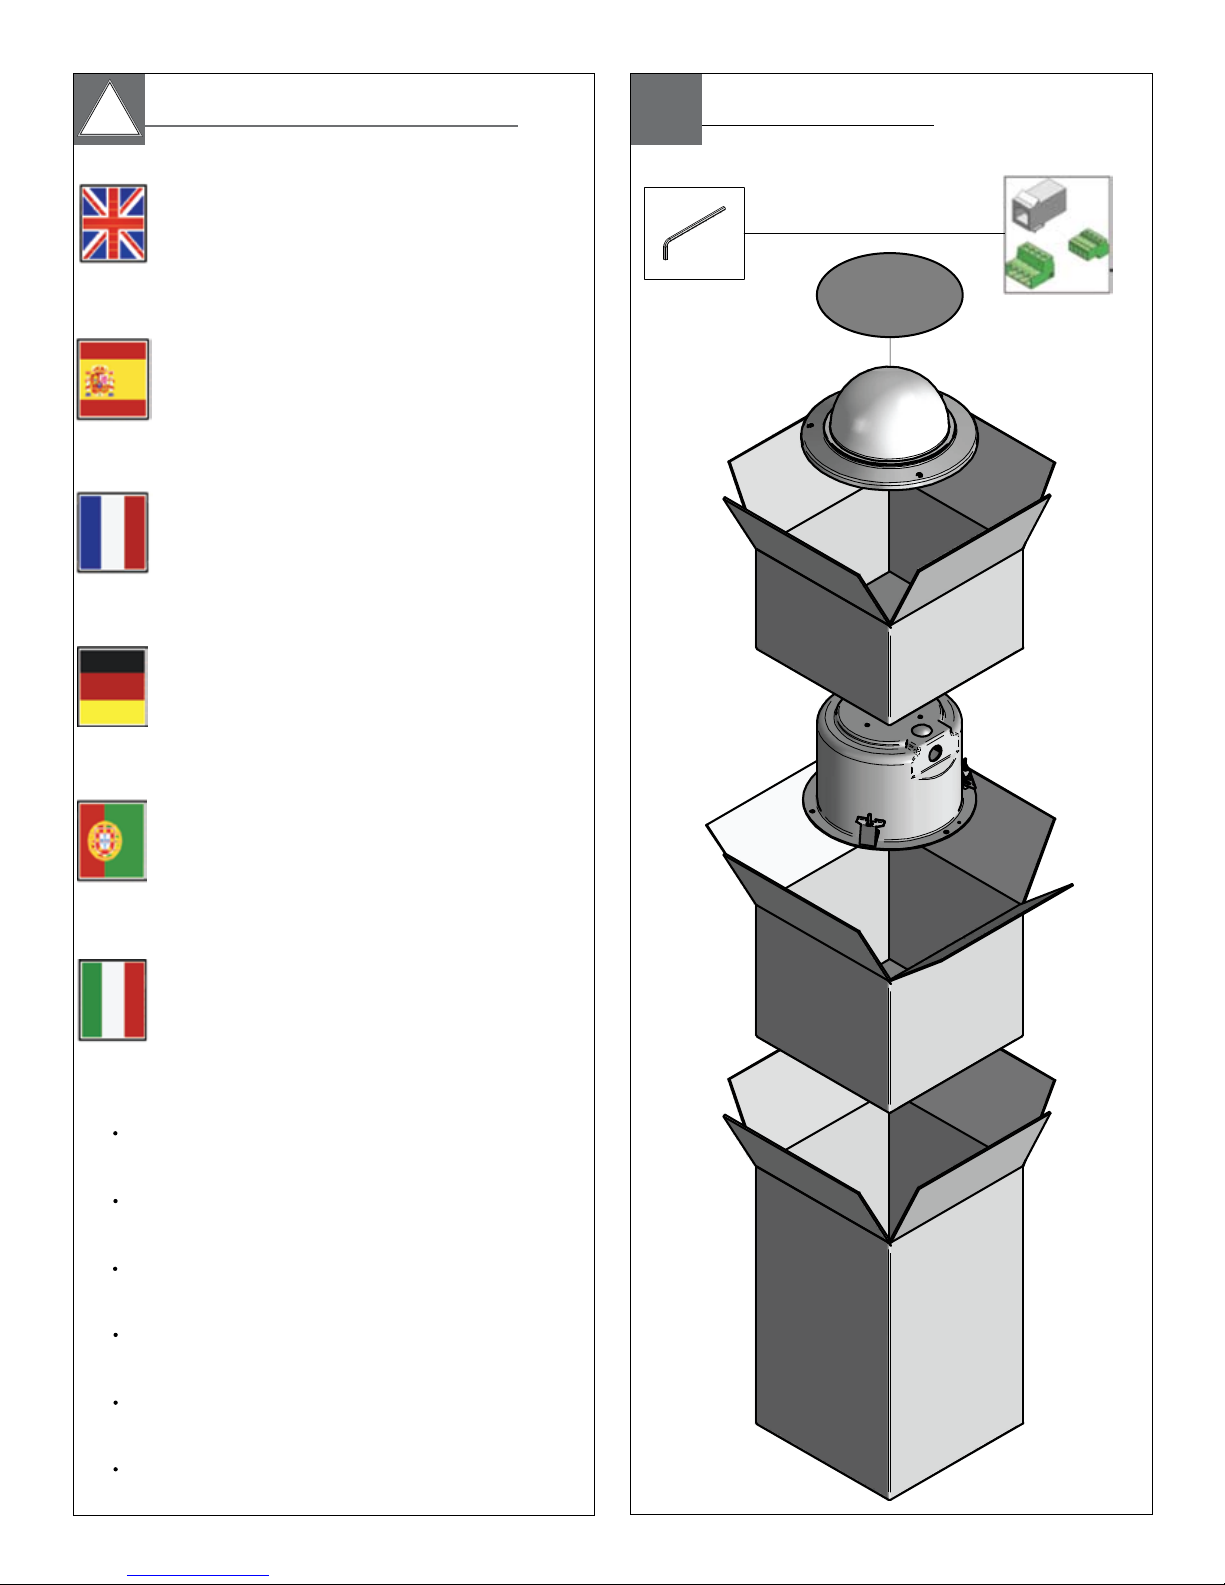
Contents of Box
Page 5
11
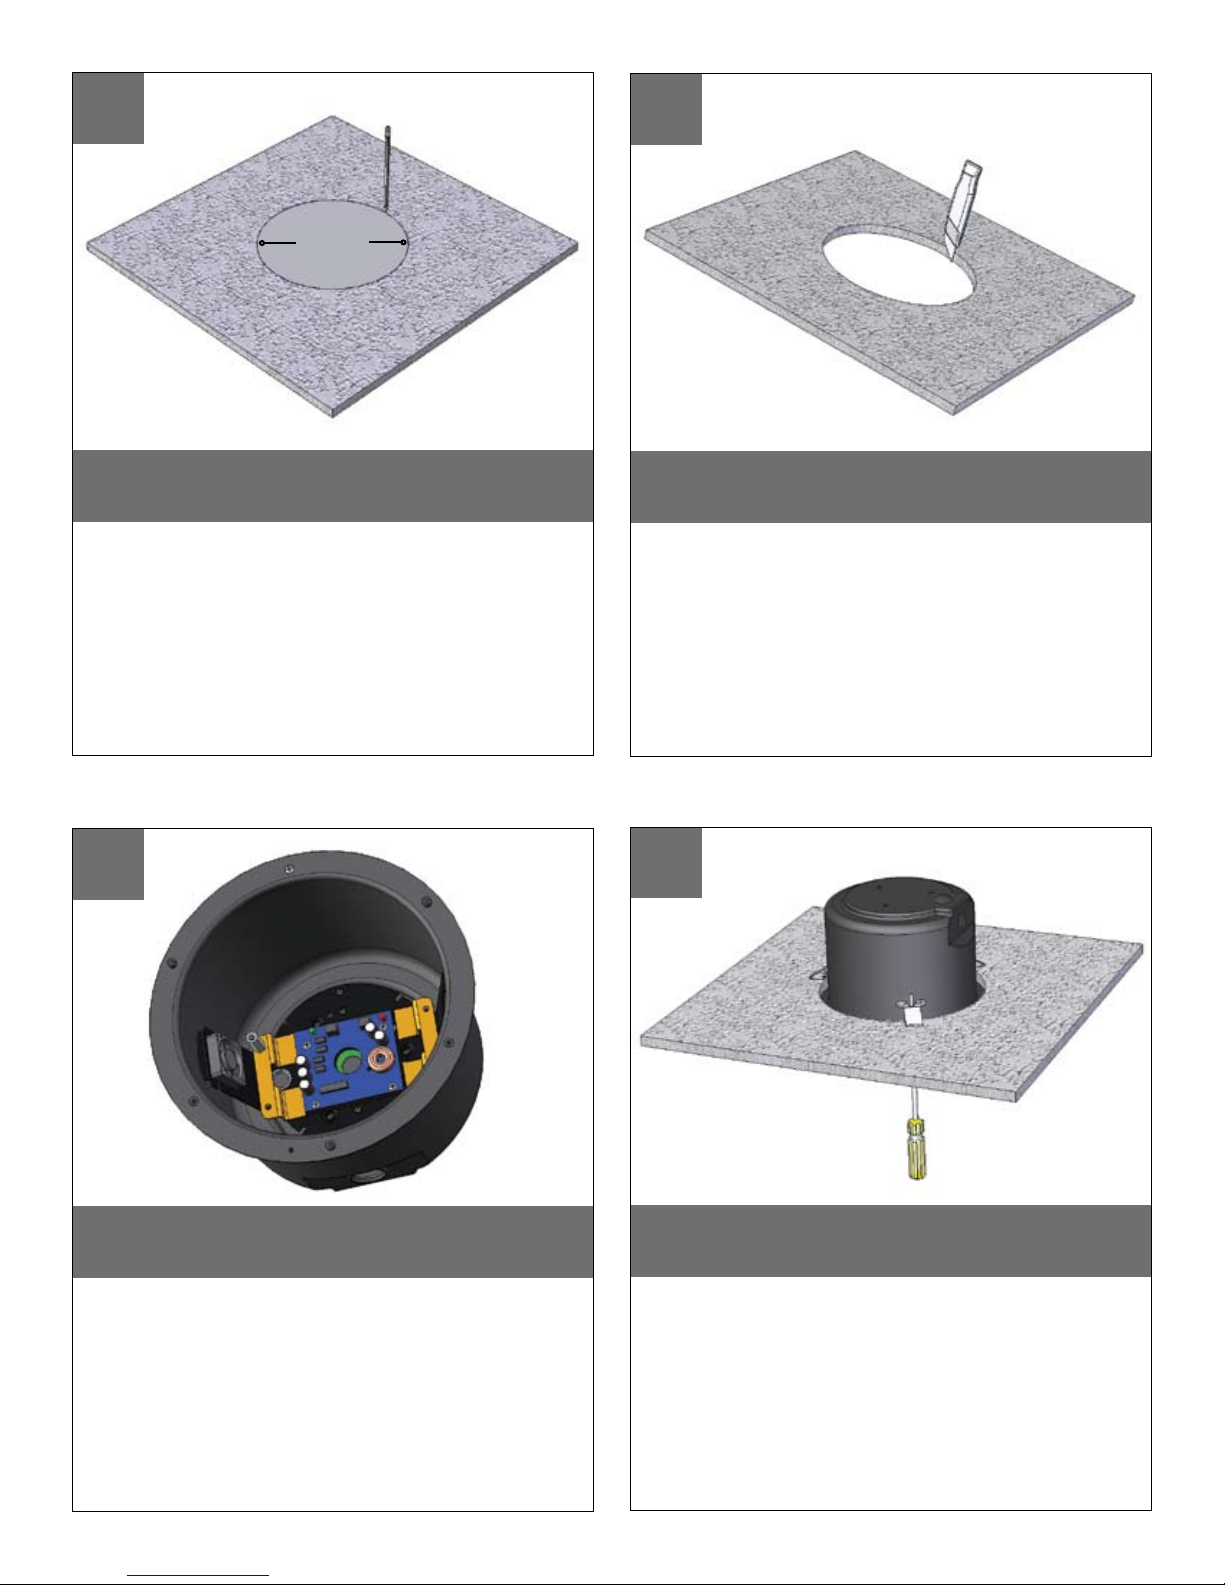
Using the provided template, mark the
ceiling tile for the cutout.
• Con la plantilla proporcionada, cortar el azulejo del
techo para el agujero.
• En utilisant le calibre fourni, marquez la tuile de
plafond pour le coupe-circuit.
• Mit der zur Verfügung gestellten Schablone
kennzeichnen Sie die Decke Fliese für den Ausschnitt.
• Usando o molde fornecido, marque a telha do teto
para o entalhe.
• Usando la mascherina fornita, contrassegni le
mattonelle del soffitto per il ritaglio.
10.375”
2
A box cutter or jigsaw can be used for
cutting the circle.
• Un cortador o un rompecabezas de la caja se
puede utilizar para cortar el círculo.
• Un coupeur ou une scie sauteuse de boîte peut
être utilisé pour couper le cercle.
• Ein Kastenscherblock oder -tischlerbandsäge
können für den Schnitt des Kreises benutzt werden.
• Um cortador ou um jigsaw da caixa podem ser
usados cortando o círculo.
• Una taglierina o un jigsaw della scatola può essere
utilizzato per il taglio del cerchio.
3
Add spacers to the plate in order to appropriately position the camera, see specific camera.
• Agregue los espaciadores a la placa para colocar apropiada-
mente la cámara fotográfica, vea la cámara fotográfica
específica.
• Ajoutez les entretoises au plat afin de placer convenablement
l'appareil-photo, voyez l'appareil-photo spécifique.
• Fügen Sie Distanzscheiben der Platte hinzu, um die Kamera
passend in Position zu bringen, sehen Sie spezifische Kamera.
• Adicione espaçadores à placa a fim posicionar apropriada-
mente a câmera, veja a câmera específica.
• Aggiunga i distanziatori alla piastra per posizionare giusta-
mente la macchina fotografica, veda la macchina fotografica
specifica.
4
Place the housing in the tile and secure the
outer tabs.
• Coloque la cubierta en el azulejo y asegure las
lengüetas externas.
• Placez le logement dans la tuile et fixez les étiquettes
externes.
• Legen Sie das Gehäuse in die Fliese und sichern Sie
die äußeren Vorsprünge.
• Coloque a carcaça na telha e fixe as abas exteriores.
• Disponga l'alloggiamento nelle mattonelle ed assicuri
le linguette esterne.
Page 6
6
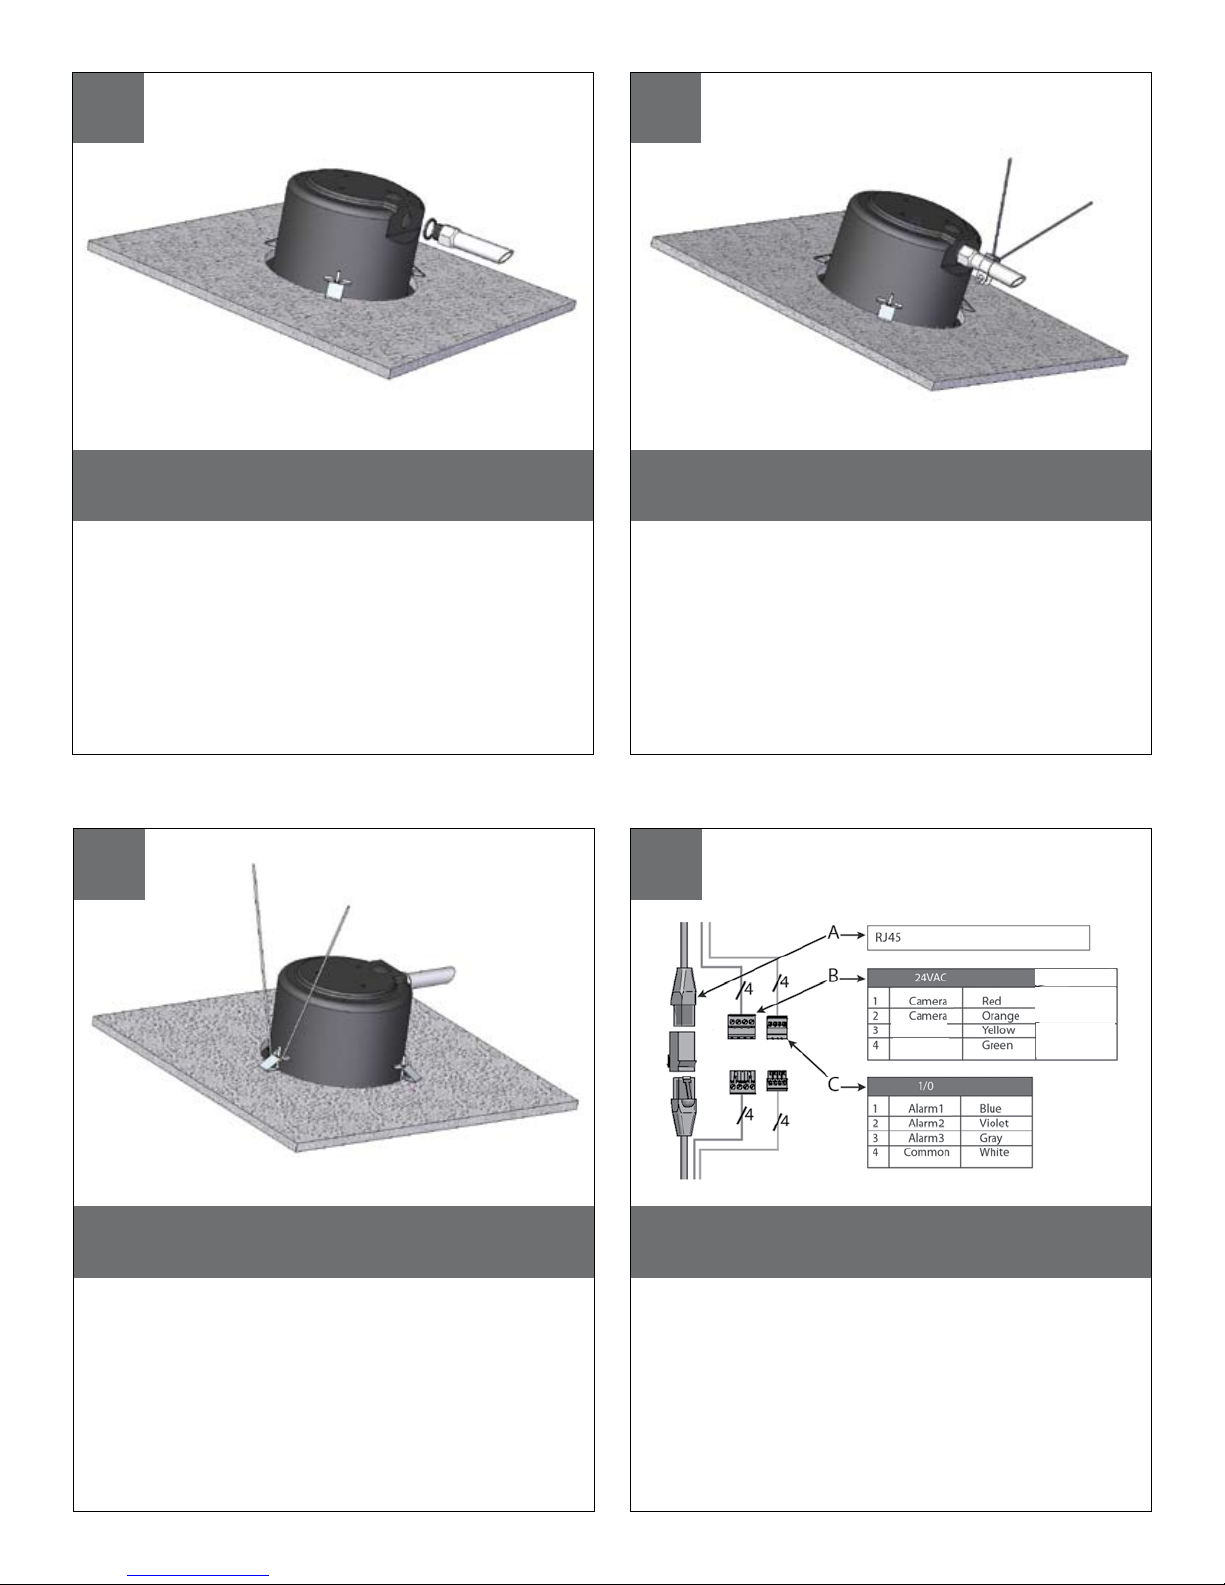
Add the safety wire to the flex conduit or
continue to the next step.
• Agregue el alambre de seguridad al conducto de la
flexión o continúe al paso siguiente.
• Ajoutez le fil de sûreté au conduit de câble ou
continuez à la prochaine étape.
• Fügen Sie die Sicherheit Leitung dem Flexrohr hinzu
oder fahren Sie zum folgenden Schritt fort.
• Adicione o fio de segurança à canalização do cabo
flexível ou continue à etapa seguinte.
• Aggiunga il legare di sicurezza al condotto della
flessione o continui al punto seguente.
7
The alternate location to attach the safety
wire is on the housing secure tab.
• La localización alterna para unir el alambre de seguridad
está en la lengüeta segura de la cubierta.
• L'endroit alternatif pour attacher le fil de sûreté est sur
l'étiquette bloquée de logement.
• Die wechselnde Position, zum der Sicherheit Leitung
anzubringen ist auf dem sicheren Vorsprung des
Gehäuses.
• A posição alterna para unir o fio de segurança está na
aba segura da carcaça.
• La posizione alternata per fissare il legare di sicurezza è
sulla linguetta sicura dell'alloggiamento.
5
Connect the flex conduit to the housing.
• Conecte el conducto de la flexión con la
cubierta.
• Reliez le conduit de câble au logement.
• Schließen Sie das Flexrohr an das Gehäuse an.
• Conecte a canalização do cabo flexível à
carcaça.
• Colleghi il condotto della flessione
all'alloggiamento.
8
Heater/ Blower
Heater/ Blower
Power
28 Watts
26 Watts
Wiring the dome can be completed by
referring to the diagram.
• Atar con alambre la bóveda puede ser terminada
refiriendo al diagrama.
• Le câblage du dôme peut être accompli en se
rapportant au diagramme.
• Das Verdrahten der Haube kann durchgeführt
werden, indem man auf das Diagramm sich bezieht.
• Wiring a abóbada pode ser terminado consultando
ao diagrama.
• Legare la cupola può essere completato riferendosi
allo schema.
Page 7
MM
2
AWG
,5 ,75 1,0 1,5 2,5 4 6
22 20 18 16 14 12 10
The beam angle may be adjusted on the
bottom of the unit.
• Éstos se recomiendan las distancias máximas para
24VAC con una gota del voltage del 10%.
• Ceux-ci sont recommandés des distances maximum
pour 24VAC avec une baisse de volatage de 10%.
• Diese werden maximale Abstände für 24VAC mit einem
das 10% volatage Tropfen empfohlen.
• Estes são recomendados distâncias máximas para
24VAC com uma gota do volatage de 10%.
• Questi sono suggeriti distanze massime per 24VAC con
una goccia di volatage di 10%.
10
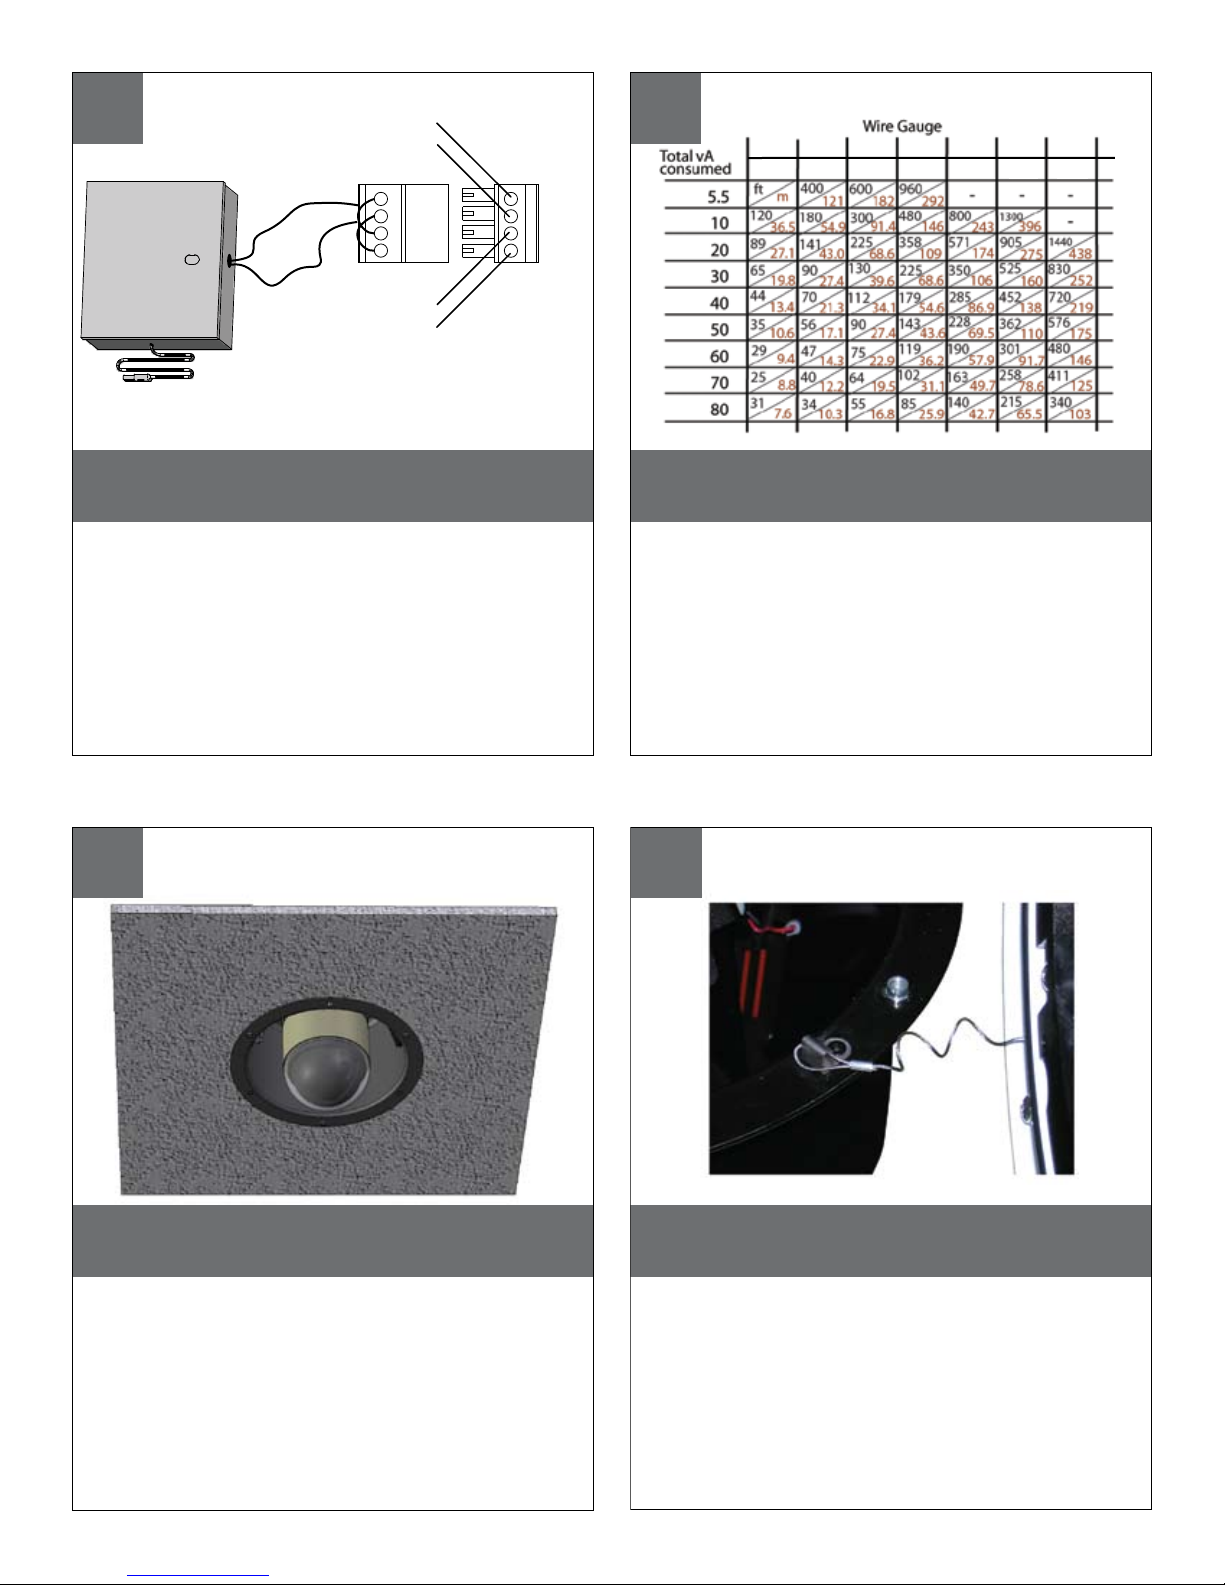
These are recommended maximum distances
for 24VAC with a 10% voltage drop.
Green
Yellow
Orange
Red
Camera
Power
Accessory
Power
Camera = red & orange wires to terminal
Heater/Blower = yellow & green wires to terminal
• Cámara fotográfica = alambres rojos y anaranjados al
terminal Heater/Blower = alambres del amarillo y del verde
al terminal
• Appareil-photo = fils rouges et oranges à la borne
Heater/Blower = fils de jaune et de vert à la borne
• Kamera = rote u. orange Leitungen zum Anschluß
Heater/Blower = Gelb- u. Grünleitungen zum Anschluß
• Câmera = fios vermelhos & alaranjados ao terminal
Heater/Blower = fios do amarelo & do verde ao terminal
• Macchina fotografica = legare rossi & arancioni al terminale
Heater/Blower = legare di verde & di colore giallo al termi-
nale
The beam angle may be adjusted on the
bottom of the unit.
• Enganche el acollador de la bóveda a la cubierta
según lo demostrado.
• Accrochez la lanière du dôme au logement comme
montré.
• Spannen Sie die Abzuglinie von der Haube zum
Gehäuse an, wie gezeigt.
• Enganche o colhedor da abóbada à carcaça
como mostrada.
• Agganci la cordicella dalla cupola all'alloggiamento
come indicato.
12
Hook the lanyard from the dome to the
housing as shown.
The beam angle may be adjusted on the bottom of the unit.
• Instale la cámara fotográfica en la cubierta y termine los usos del
cableado. Vea las especificaciones de la cámara fotográfica.
• Installez l'appareil-photo dans le logement et accomplissez les
applications de câblage. Voir les caractéristiques d'appareilphoto.
• Bringen Sie die Kamera in das Gehäuse an und führen Sie Verdrahtung Anwendungen durch. Sehen Sie Kameraspezifikationen.
• Instale a câmera na carcaça e termine aplicações da fiação.
Veja especificações da câmera.
• Installi la macchina fotografica nell'alloggiamento e completi le
applicazioni dei collegamenti. Veda le specifiche della macchina
fotografica.
11
Install the camera in the housing and complete
wiring applications. See camera specifications.
9
Page 8
13
beam angle may be adjusted on the bttom
o the unit.
• Asegure la bóveda con los tornillos ya en la bóveda.
• Fixez le dôme avec des vis déjà dans le dôme.
• Sichern Sie die Haube mit Schrauben bereits in der
Haube.
• Fixe a abóbada com parafusos já na abóbada.
• Fissi la cupola con le viti già nella cupola.
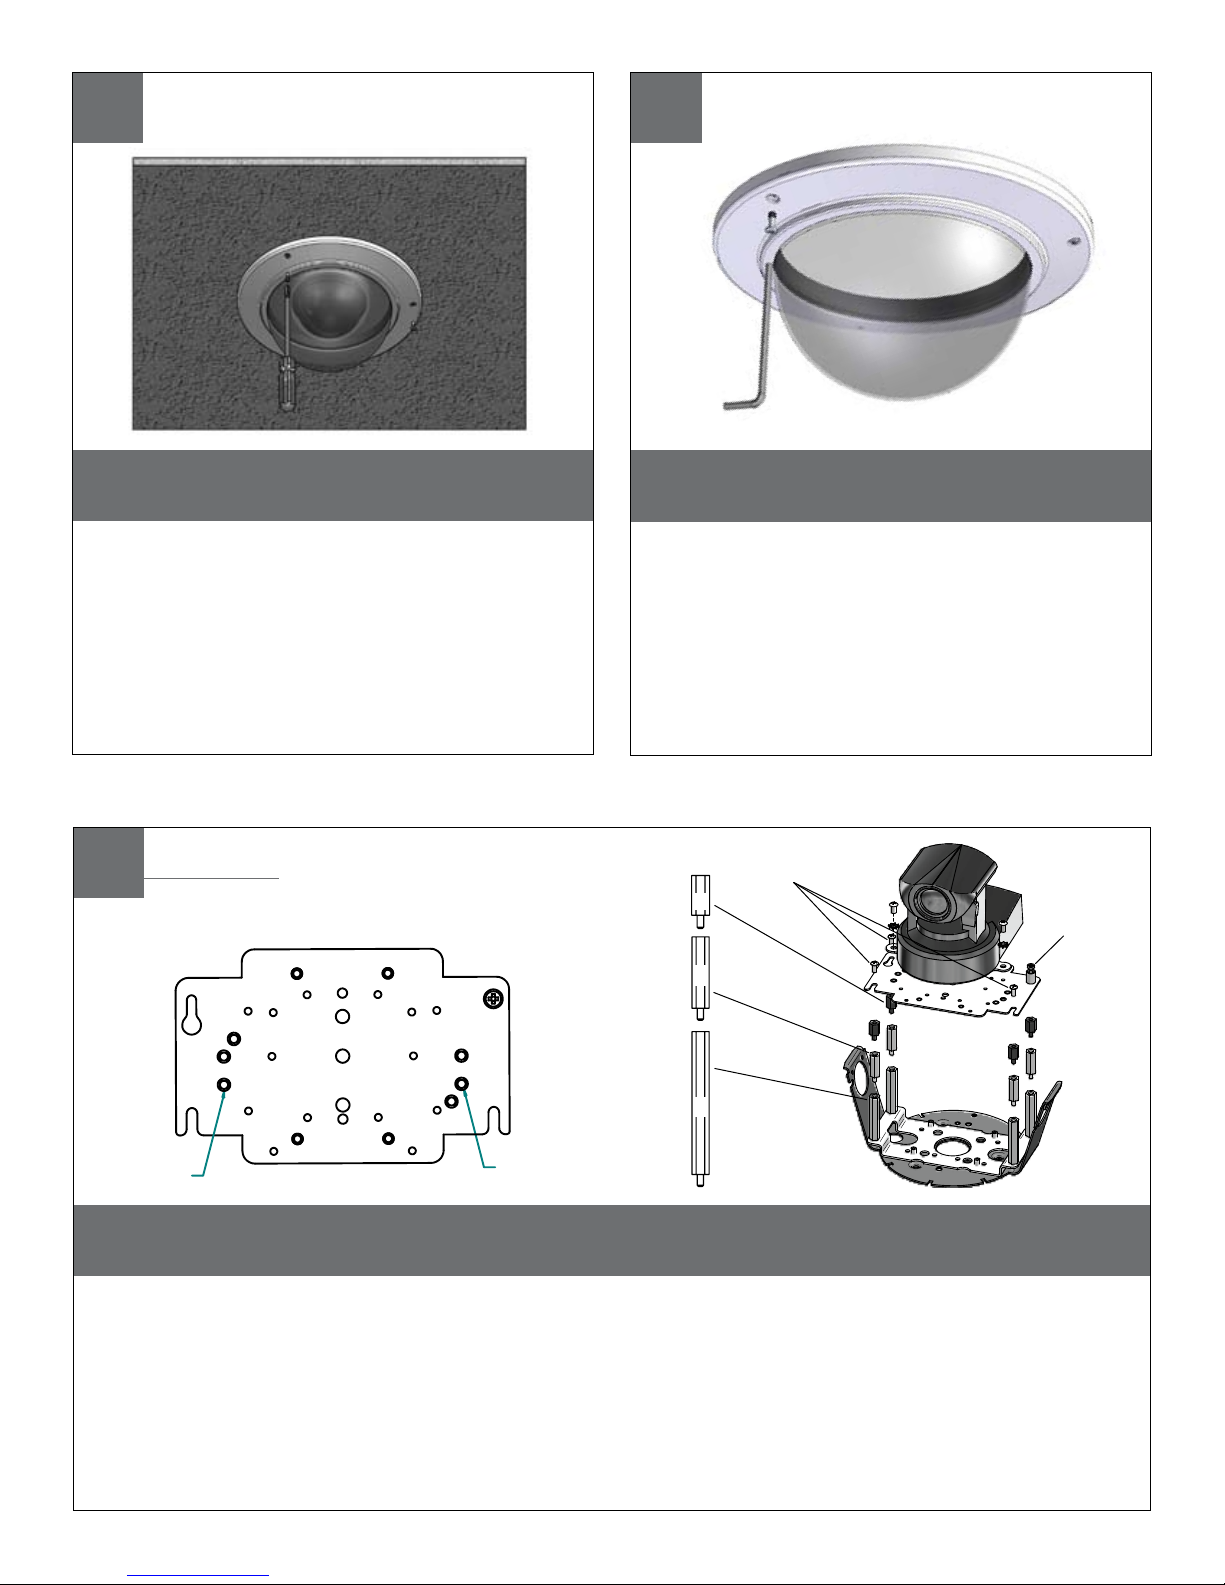
Secure the dome with screws already
in the dome.
• Los tornillos de la seguridad proporcionados se pueden
también utilizar para unir la bóveda.
• Les vis de sécurité fournies peuvent également être
utilisées pour attacher le dôme.
• Die bereitgestellten Sicherheit Schrauben können auch
benutzt werden, um die Haube anzubringen.
• Os parafusos da segurança fornecidos podem
também ser usados unir a abóbada.
• Le viti di sicurezza fornite possono anche essere
utilizzate per fissare la cupola.
14
The security screws provided can also be used
to attach the dome.
17
Install the camera to the mounting plate with (2) #10 screws and lock washers provided. Place (3)
#8x3/8” screws on the spacers and align the mounting slots. Slide on plate and camera then secure.
• Instale la cámara fotográfica a la placa de montaje con (2) los tornillos #10 y las arandelas de cerradura proporcionadas. Coloque los
tornillos de (3) del # 8x3/8"en los espaciadores y alinee las ranuras de montaje. Resbale en la placa y la cámara fotográfica entonces
seguras.
• Installez l'appareil-photo sur le plat de support avec (2) les vis #10 et les rondelles de freinage fournies. Placez les vis de (3) # de 8x3/8"
sur les entretoises et alignez les fentes de support. Glissez du plat et de l'appareil-photo puis bloqués.
• Bringen Sie die Kamera zur Montageplatte mit (2) den bereitgestellten Schrauben #10 und Federringen an. Setzen Sie (3) # 8x3/8"die
Schrauben auf die Distanzscheiben und richten Sie die Befestigungsschlitze aus. Schieben Sie auf die sichere Platte und Kamera dann.
• Instale a câmera à placa de montagem com (2) os parafusos #10 e as arruelas de fechamento fornecidas. Coloque os parafusos de
(3) # de 8x3/8"nos espaçadores e alinhe os entalhes de montagem. Deslize na placa e na câmera então seguras.
• Installi la macchina fotografica al giunto di supporto con (2) le viti #10 e le ranelle di bloccaggio fornite. Disponga le viti di 8x3/8"# di (3)
sui distanziatori ed allinei le scanalature di montaggio. Faccia scorrere sulla piastra e sulla macchina fotografica allora sicure.
2539 Mounting Plate
Mounting
Hole
Mounting
Hole
Axis 213
(26mm) 1"
(52
mm
) 2"
(13mm) ½"
Captive
Screw
(3) #8x3/8”
15
Page 9
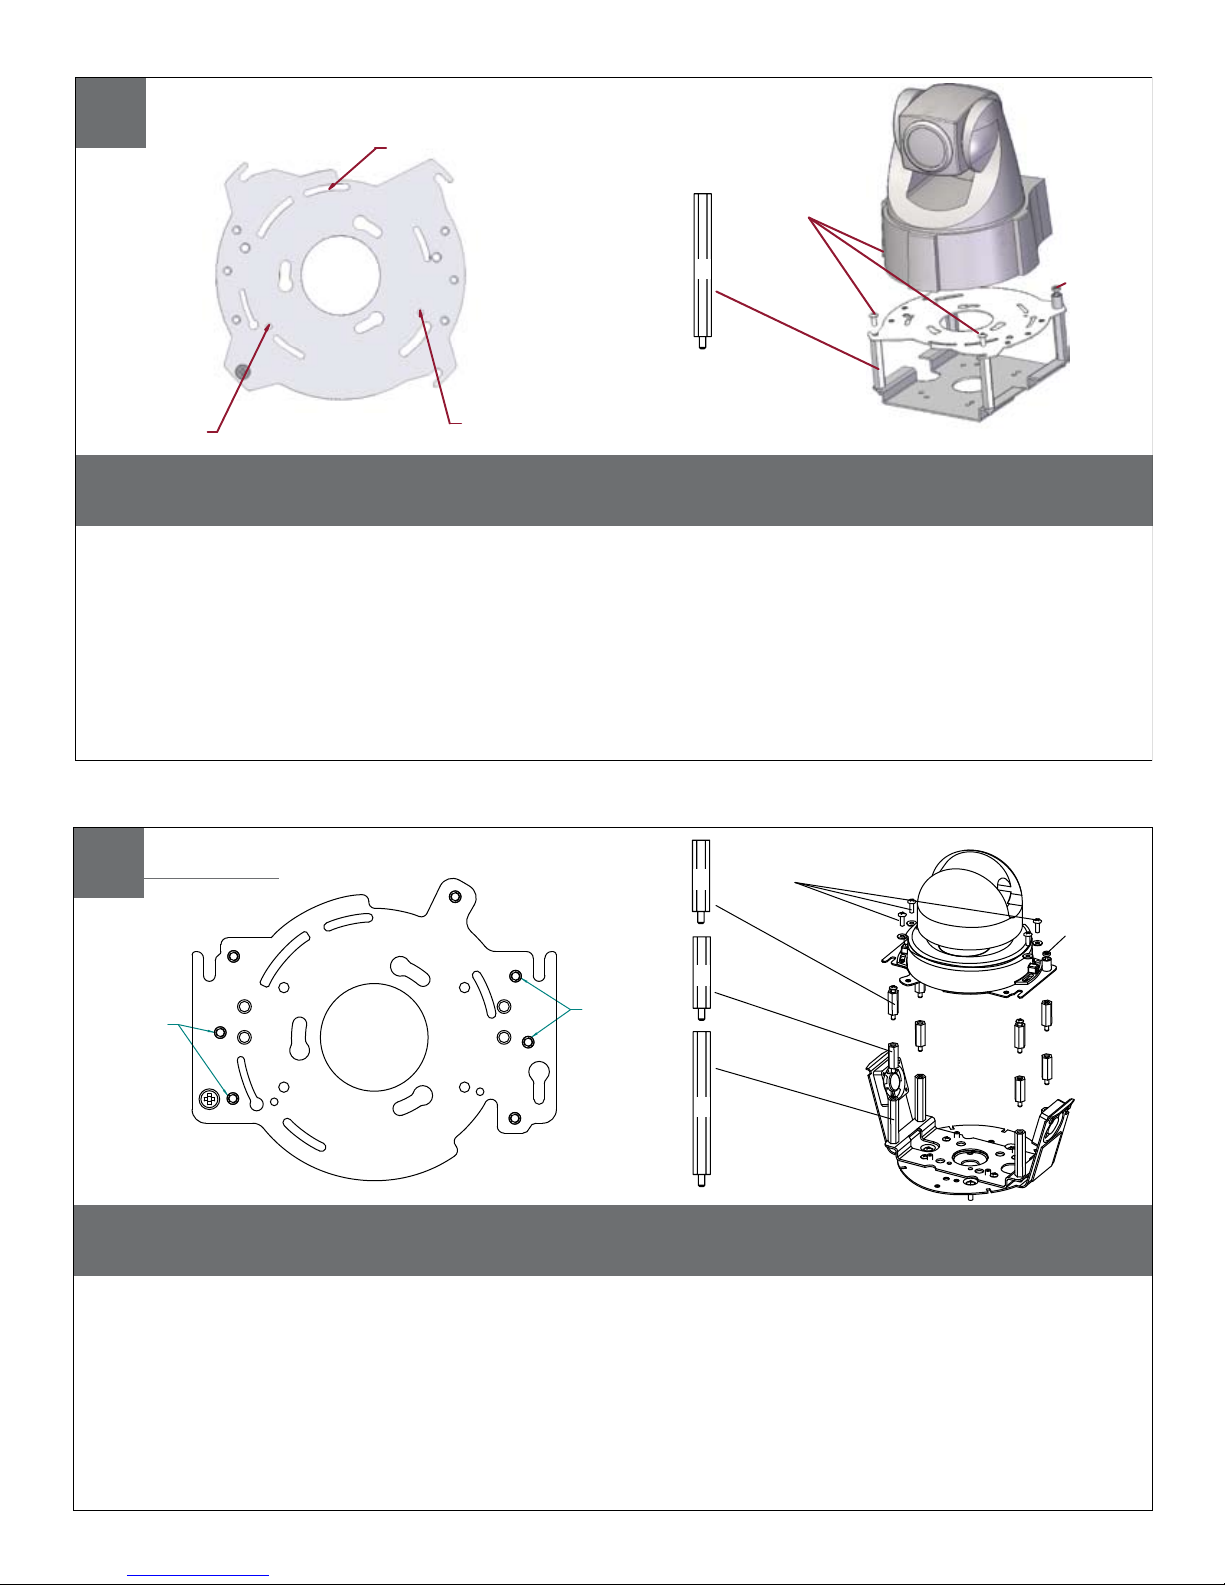
18
3026 Mounting
Plate
Mounting
Hole
Mounting
Hole
Mounting Hole
Axis 214
(52mm) 2"
Captive
Screw
(3) #8 x 3/8”
Install the camera to the mounting plate using (3) 3mm x 12mm bolts and lock washers. Place (3) #8x3/8”
screws on the spacers and line up the mounting slots. Slide plate in and secure.
• Instale la cámara fotográfica a la placa de montaje usando (3) los pernos de 3m m x de 12m m y las arandelas de cerradura.
Coloque los tornillos de (3) del # 8x3/8"en los espaciadores y alinee las ranuras de montaje. Resbale la placa adentro y
asegúrela.
• Installez l'appareil-photo sur le plat de support en utilisant (3) des boulons de 3mm x de 12mm et des rondelles de freinage.
Placez les vis de (3) # de 8x3/8"sur les entretoises et alignez les fentes de support. Glissez le plat dedans et le fixez.
• Bringen Sie die Kamera zur Montageplatte mit (3) 3mm x 12mm den Schraubbolzen und den Federringen an. Setzen Sie (3) #
8x3/8"die Schrauben auf die Distanzscheiben und richten Sie die Befestigungsschlitze aus. Schieben Sie Platte innen und sichern
Sie.
• Instale a câmera à placa de montagem usando (3) os parafusos de 3mm x de 12mm e as arruelas de fechamento. Coloque os
parafusos de (3) # de 8x3/8"nos espaçadores e alinhe-os acima dos entalhes de montagem. Deslize a placa dentro e fixe-a.
• Installi la macchina fotografica al giunto di supporto usando (3) i bulloni di 12mm x di 3mm e le ranelle di bloccaggio. Disponga
le viti di 8x3/8"# di (3) sui distanziatori ed allinei le scanalature di montaggio. Faccia scorrere la piastra dentro e fissi.
16
17
Install the camera to the mounting plate with (4) #8 screws and lock washers provided. Place (3)
#8x3/8” screws on the spacers and align the mounting slots. Slide on plate and camera then secure.
• Instale la cámara fotográfica a la placa de montaje con (4) los tornillos #8 y las arandelas de cerradura proporcionadas. Coloque los
tornillos de (3) del # 8x3/8"en los espaciadores y alinee las ranuras de montaje. Resbale en la placa y la cámara fotográfica entonces
seguras.
• Installez l'appareil-photo sur le plat de support avec (4) les vis #8 et les rondelles de freinage fournies. Placez les vis de (3) # de 8x3/8"
sur les entretoises et alignez les fentes de support. Glissez du plat et de l'appareil-photo puis bloqués.
• Bringen Sie die Kamera zur Montageplatte mit (4) den bereitgestellten Schrauben #8 und Federringen an. Setzen Sie (3) # 8x3/8"die
Schrauben auf die Distanzscheiben und richten Sie die Befestigungsschlitze aus. Schieben Sie auf die sichere Platte und Kamera dann.
• Instale a câmera à placa de montagem com (4) os parafusos #8 e as arruelas de fechamento fornecidas. Coloque os parafusos de
(3) # de 8x3/8"nos espaçadores e alinhe os entalhes de montagem. Deslize na placa e na câmera então seguras.
• Installi la macchina fotografica al giunto di supporto con (4) le viti #8 e le ranelle di bloccaggio fornite. Disponga le viti di 8x3/8"# di (3)
sui distanziatori ed allinei le scanalature di montaggio. Faccia scorrere sulla piastra e sulla macchina fotografica allora sicure.
Axis 215
(26mm) 1"
(52
mm
) 2"
Captive
Screw
(3) #8x3/8”
(26mm) 1"
MOUNTING HOLE
AXIS215-VL3026
MOUNTING HOLE
17
Page 10

17
Axis 231D/232D
Use the (3) keyhole slots indicated above.
• Utilice (3) las ranuras del ojo de la cerradura indicadas
arriba.
• Employez (3) les fentes de trou de la serrure indiquées
ci-dessus.
• Benutzen Sie die (3) Schlüssellochschlitze, die oben
angezeigt werden.
• Use (3) os entalhes do buraco da fechadura indicados
acima.
• Usi (3) le scanalature del buco della serratura indicate
sopra.
Mounting
Hole
Mounting
Hole
Mounting Hole
Tab
Loosen
Screw
AXIS 231-232D
18
Loosen the screw to the right of the tab by
approximately (5) turns.
• Afloje el tornillo a la derecha de la lengüeta aproximadamente (5) vueltas.
• Desserrez la vis à la droite de l'étiquette approximativement (5) aux tours.
• Lösen Sie die Schraube auf der rechten Seite des
Vorsprunges durch ungefähr (5) Umdrehungen.
• Afrouxe o parafuso à direita da aba aproximadamente (5) por voltas.
• Allenti la vite alla destra della linguetta circa (5) dalle
girate.
18
19
Page 11
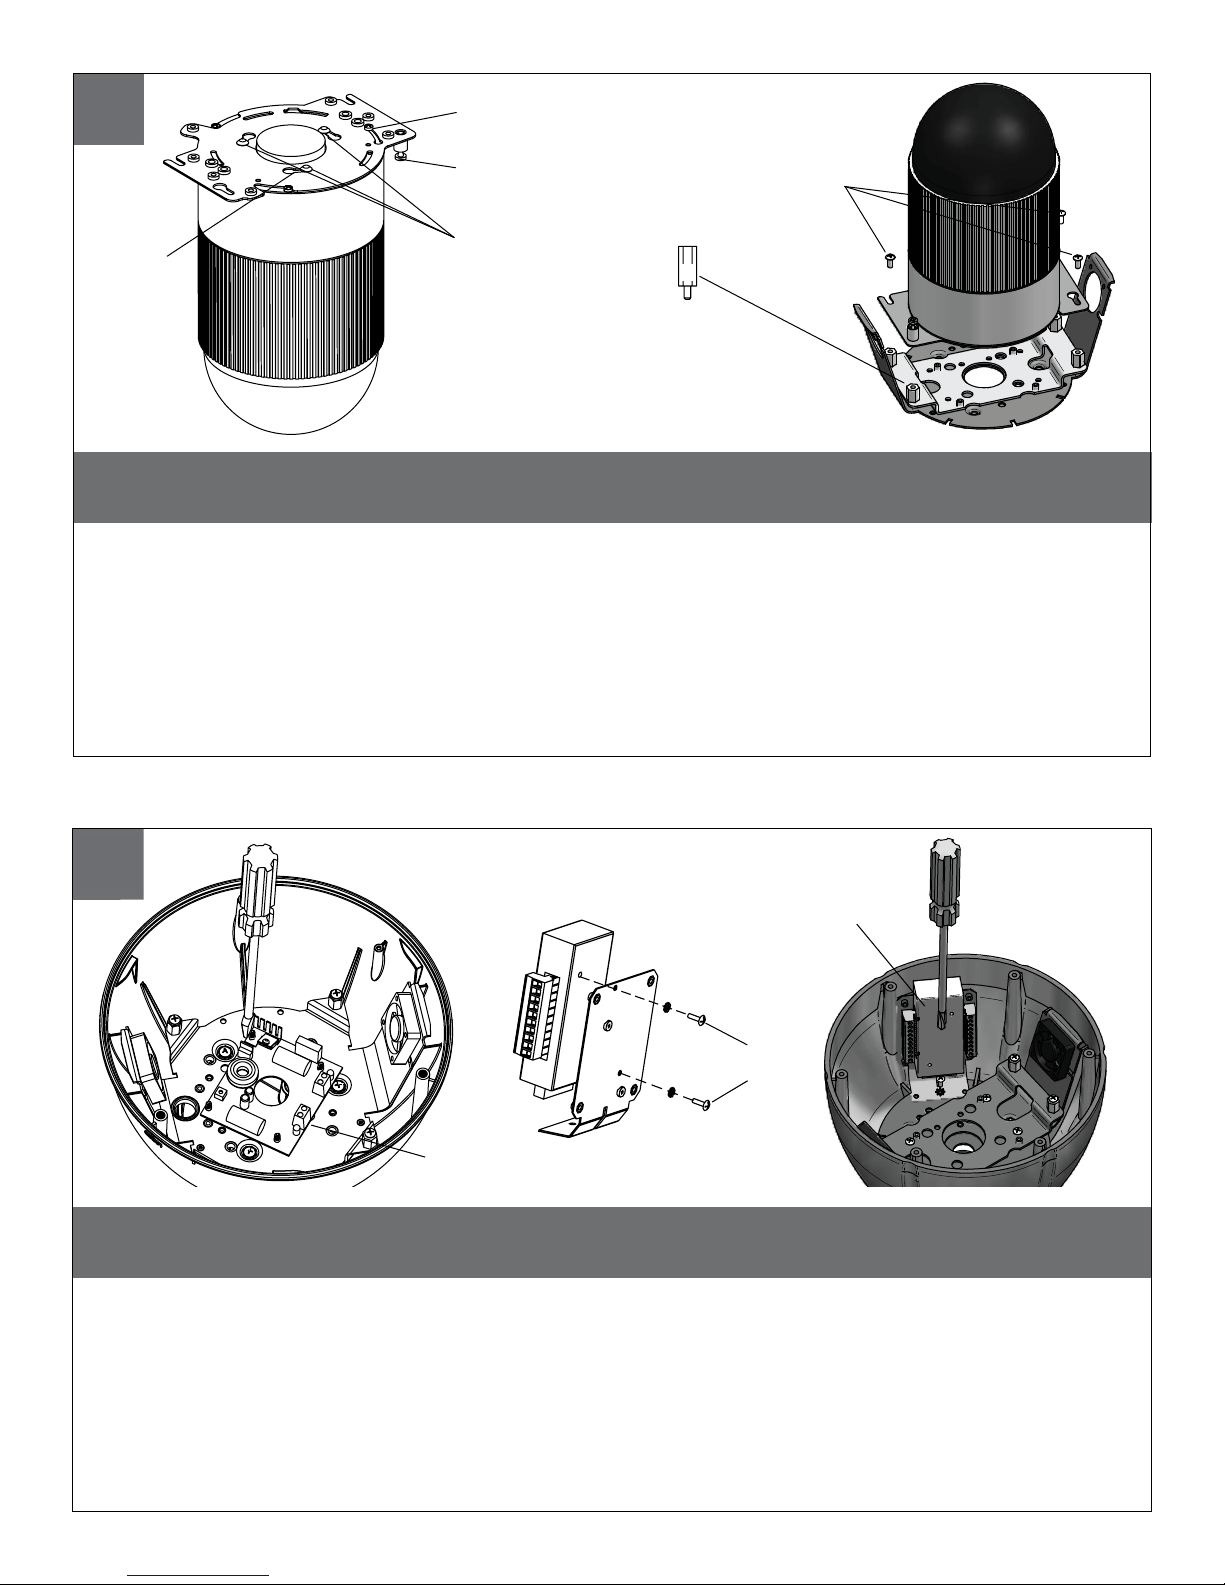
19
Captive
Screw
(3) #8 x 3/8”
Locking Screw
Locking
Pins
Keyhole
Slot (3)
(13mm) ½"
Position locking pins and locking screw over slots and turn clockwise; secure the screw. Place (3)
#8x3/8” screws on the spacers and line up mounting slots. Slide on plate and camera then secure.
• Coloque los pernos de fijación y el tornillo de fijación sobre ranuras y dé vuelta a la derecha; asegure el tornillo. Coloque los tornillos de
(3) del # 8x3/8"en los espaciadores y las ranuras de montaje de la formación. Resbale en la placa y la cámara fotográfica y asegure.
• Placez les chevilles de verrouillage et la vis de blocage au-dessus des fentes et tournez dans le sens des aiguilles d'une montre ; fixez la
vis. Placez les vis de (3) # de 8x3/8"sur les entretoises et les fentes de support de ligne. Glissez du plat et de l'appareil-photo et fixez.
• Bringen Sie Sicherungsstifte und Sicherungsschraube über Schlitzen in Position und drehen Sie nach rechts; sichern Sie die Schraube.
Setzen Sie (3) # 8x3/8"die Schrauben auf die Distanzscheiben und die Anordnungbefestigungsschlitze. Schieben Sie auf Platte und
Kamera und sichern Sie.
• Posicione os pinos travando e o parafuso travando sobre entalhes e gire-os no sentido horário; fixe o parafuso. Coloque os parafusos
de (3) # de 8x3/8"nos espaçadores e alinhe-os acima dos entalhes de montagem. Deslize na placa e na câmera e fixe.
• Posizioni i perni di bloccaggio e la vite di bloccaggio sopra le scanalature e giri in senso orario; fissi la vite. Disponga le viti di 8x3/8"# di
(3) sui distanziatori e sulle scanalature di montaggio dell'allineamento. Faccia scorrere sulla piastra e sulla macchina fotografica e fissi.
3mm
Screw
Power
Board
Connection
Module
20
This is what the typical path of illumination will look like with the setting at 30 degrees.
• Quite a tablero de energía situado dentro de la cubierta. Una el módulo de la conexión según lo demostrado. Una
a esta asamblea a la cubierta usando (1) "arandela del tornillo 6-32x3/8 y de la estrella.
• Enlevez carte d'alimentation situé à l'intérieur du logement. Attachez le module de raccordement comme montré.
Attachez cette assemblée au logement en utilisant (1) la "vis 6-32x3/8 et tenez le premier rôle la rondelle.
• Entfernen Sie das Energie Brett, das innerhalb des Gehäuses befunden wird. Bringen Sie das Anschlußmodul an, wie
gezeigt. Bringen Sie diese Versammlung zum Gehäuse mit (1) "Schraube 6-32x3/8 und Sternunterlegscheibe an.
• Remova a placa de poder situada dentro da carcaça. Una o módulo da conexão como mostrado. Una este
conjunto à carcaça usando (1) do "arruela parafuso 6-32x3/8 e da estrela.
• Rimuova il bordo di alimentazione situato all'interno dell'alloggiamento. Fissi il modulo del collegamento come
indicato. Fissi questo complessivo all'alloggiamento usando (1) "rondella della vite 6-32x3/8 e della stella.
Remove the power board located inside the housing. Attach the connection module as shown.
Attach this assembly to the housing using (1) 6-32x3/8” screw and star washer.
20
21
Page 12
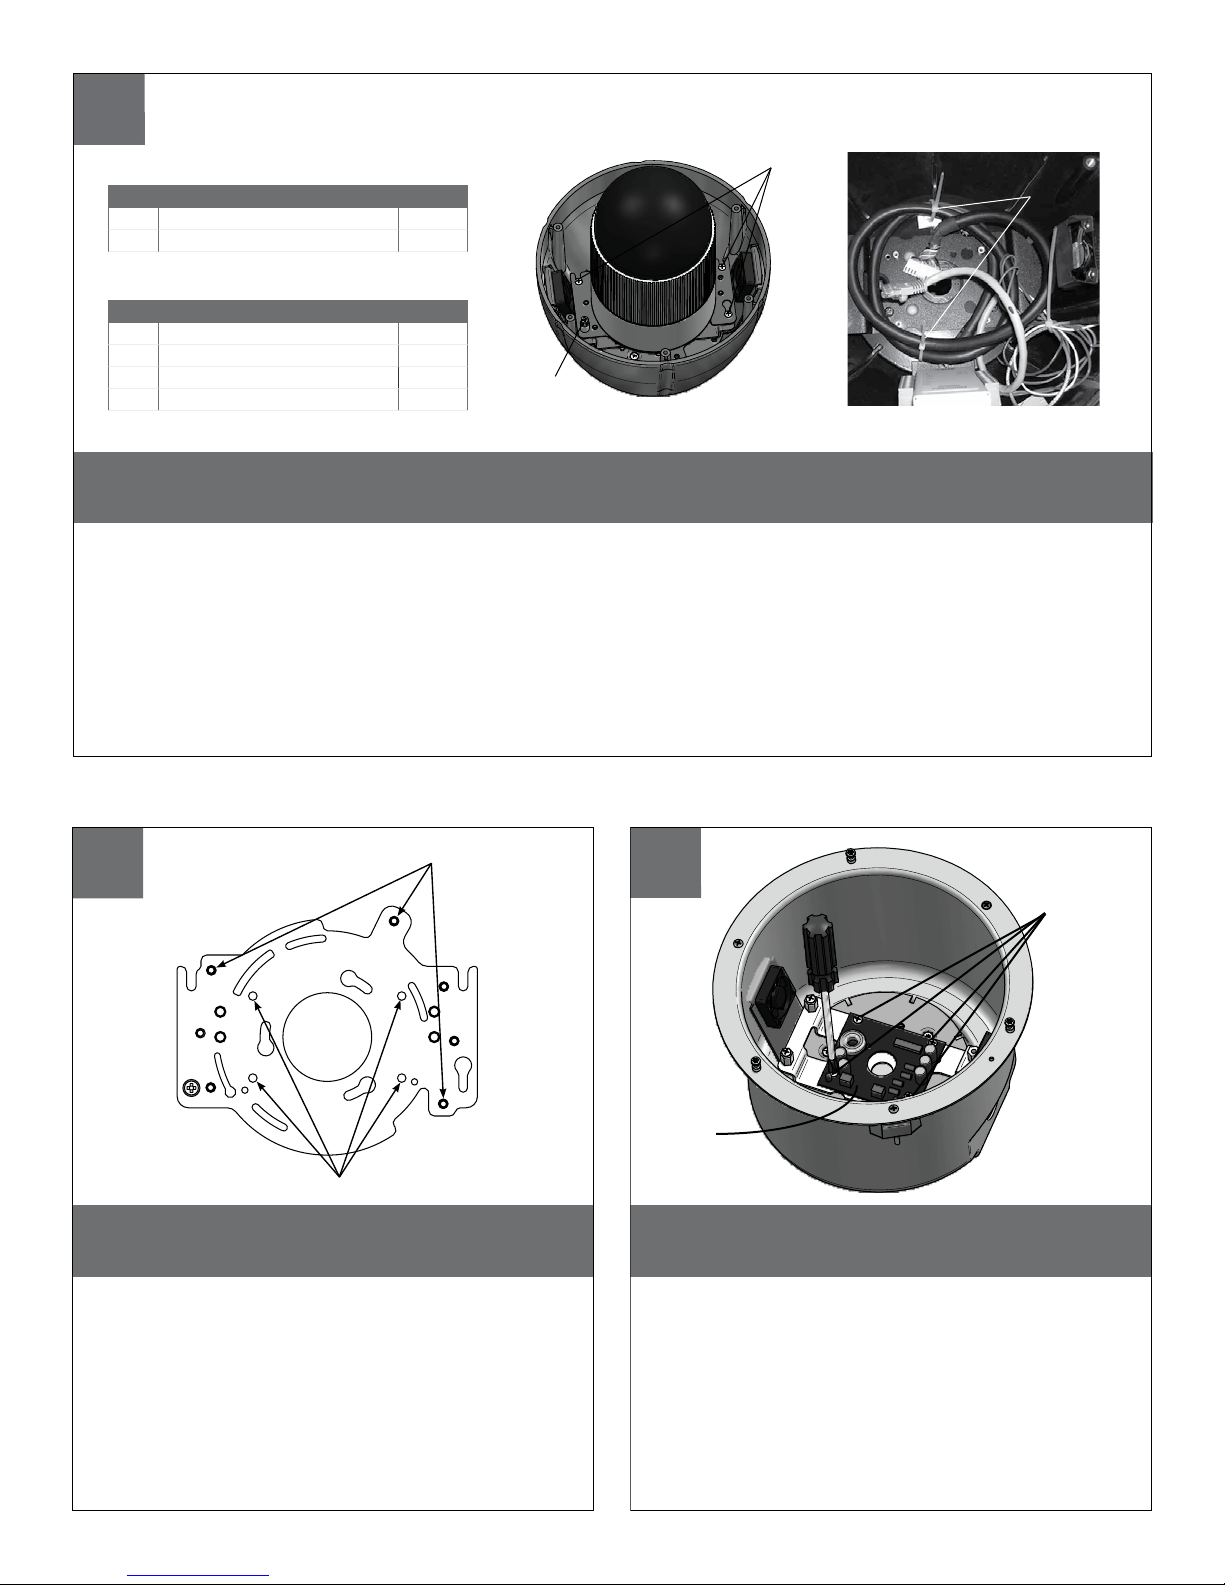
This is what the typical path of illumination will look like with the setting at 30 degrees.
• Termine el cableado a la cámara fotográfica. Una el montaje de la cámara fotográfica a la cubierta resbalando
(3) las ranuras abiertas del tornillo sobre los tornillos en la cubierta; apriete los sujetadores en el soporte.
• Accomplissez le câblage à l'appareil-photo. Attachez l'appareil-photo au logement en glissant (3) les fentes
ouvertes de vis au-dessus des vis dans le logement ; serrez les attaches sur la parenthèse.
• Führen Sie die Verdrahtung zur Kamera durch. Bringen Sie die Kamera zum Gehäuse an, indem Sie die (3) geöffneten Schraube Schlitze über den Schrauben im Gehäuse schieben; ziehen Sie die Befestiger am Haltewinkel fest.
• Termine a fiação à câmera. Una o conjunto da câmera à carcaça deslizando (3) os entalhes abertos do parafuso
sobre os parafusos na carcaça; aperte os prendedores no suporte.
• Completi i collegamenti alla macchina fotografica. Fissi il complessivo della macchina fotografica all'alloggiamento
facendo scorrere (3) le scanalature aperte della vite sopra le viti nell'alloggiamento; stringa i fermi sulla staffa.
21
CONTROL
RJ45 Ethernet Connector
ALARMS
1 Alarm 1 Blue
2 Alarm 2 Violet
3 Alarm 3 Gray
4 Common White
POWER
1 Camera Power (24VAC) Red
2 Camera Power (24VAC) Orange
Captive
Screw
Open Screw
Slots
Cable
Ties
Complete the wiring to camera. Attach the camera assembly to the housing by sliding the (3)
open screw slots over the screws in the housing; tighten the fasteners on the bracket.
Axis 233D
Use the holes indicated above to mount
the camera.
• Utilice los agujeros indicados arriba para montar la
cámara fotográfica.
• Employez les trous indiqués ci-dessus pour monter
l'appareil-photo.
• Benutzen Sie die Bohrungen, die oben angezeigt
werden, um die Kamera anzubringen.
• Use os furos indicados acima para montar a
câmera.
• Usi i fori indicati sopra per montare la macchina
fotografica.
Mounting Hole
Mounting Hole
Machine
Screws
Disconnect the orange, red, and black wires. Remove the
power board in the housing by loosening screws on the
terminal block and the (4) machine screws.
• Desconecte los alambres anaranjados, rojos, y negros. Quite a tablero de
energía en la cubierta aflojando los tornillos en el bloque de terminales y (4)
los tornillos de la máquina.
• Débranchez les fils oranges, rouges, et noirs. Enlevez carte d'alimentation
dans le logement en desserrant des vis sur le TB et (4) les vis de machine.
• Trennen Sie die orange, roten und schwarzen Leitungen. Entfernen Sie das
Energie Brett im Gehäuse, indem Sie Schrauben am Klemmenblock und an
den (4) Maschine Schrauben lösen.
• Desconecte os fios alaranjados, vermelhos, e pretos. Remova a placa de
poder na carcaça afrouxando os parafusos no bloco terminal e (4) nos
parafusos da máquina.
• Stacchi i legare arancioni, rossi e neri. Rimuova il bordo di alimentazione
nell'alloggiamento allentando le viti sul blocchetto terminali e (4) sulle viti
della macchina.
Power
Board
22
23
24
Page 13
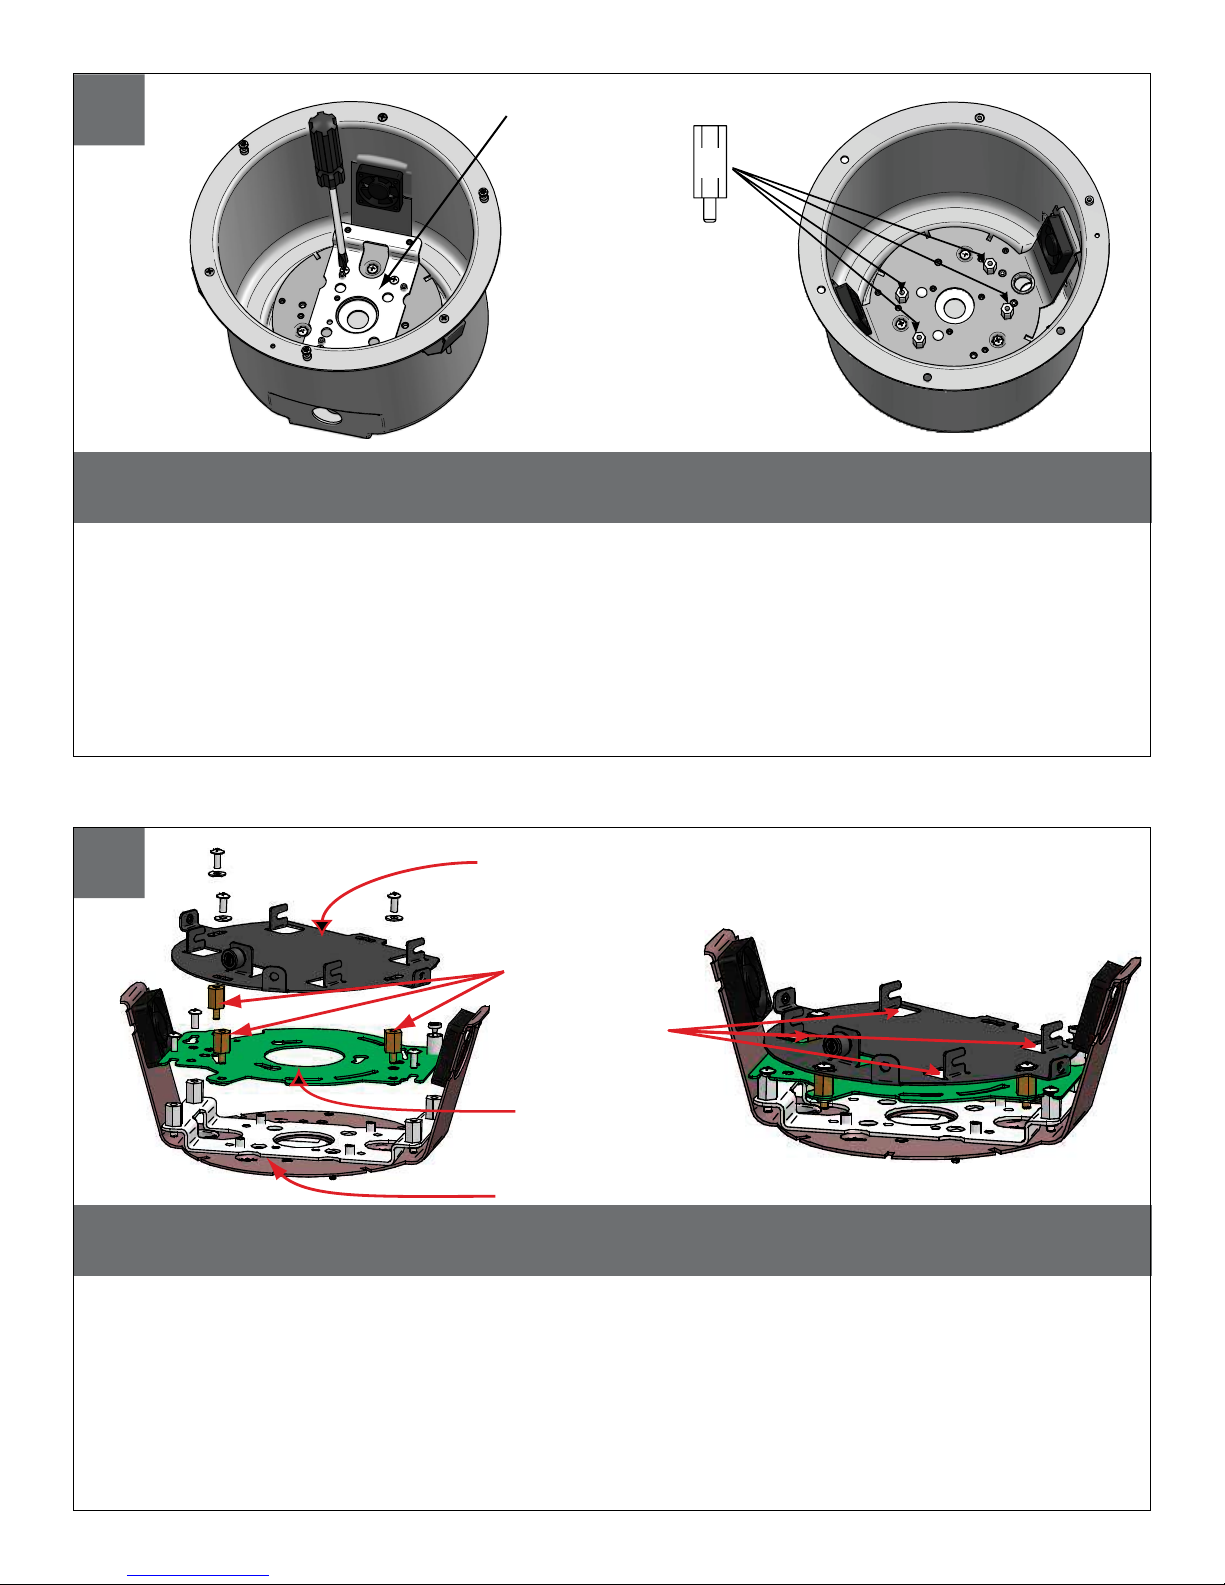
Now remove the mounting bracket and attach (4) 1/2” spacers (located in the packet that came
with the housing) to the base bracket.
• Ahora quite el soporte de montaje y una (4) los espaciadores del 1/2"(situados en el paquete que vino con la cubierta)
al soporte bajo.
• Maintenant enlevez le support et attachez (4) les entretoises de 1/2"(situées dans le paquet qui est venu avec le
logement) à la parenthèse basse.
• Jetzt entfernen Sie die Schienenplatte und bringen Sie (4) die 1/2"Distanzscheiben (gelegen im Paket, das mit dem
Gehäuse kam), zum niedrigen Haltewinkel an.
• Agora remova o suporte de montagem e una (4) os espaçadores de 1/2"(situados no pacote que veio com a
carcaça) ao suporte baixo.
• Ora rimuova il supporto di attacco e fissi (4) i distanziatori di 1/2"(situati nel pacchetto che è venuto con
l'alloggiamento) alla staffa bassa.
Mounting
Bracket
½"
Quick Release
Plate
Base Bracket
Camera
Bracket
Additional
Spacers
Keyhole
Slots
This is what the typical path of illumination will look like with the setting at 30 degrees.
• Monte el soporte de la cámara fotográfica del eje 233D y la placa rápida del lanzamiento usando los espaciadores
adicionales del paquete del hardware.
• Montez la parenthèse d'appareil-photo de l'axe 233D et le plat rapide de dégagement en utilisant les entretoises
additionnelles du paquet de matériel.
• Bringen Sie den Mittellinie 233D Kamerahaltewinkel und schnelle die Freigabeplatte mit den zusätzlichen Distanzscheiben vom Kleinteilpaket an.
• Monte o suporte da câmera da linha central 233D e a placa rápida da liberação usando os espaçadores adicionais do pacote da ferragem.
• Monti la staffa della macchina fotografica di asse 233D e la piastra rapida del rilascio usando i distanziatori supplementari dal pacchetto dei fissaggi.
Mount the Axis 233D camera bracket and quick release plate using the additional spacers from
the hardware packet.
25
26
Page 14
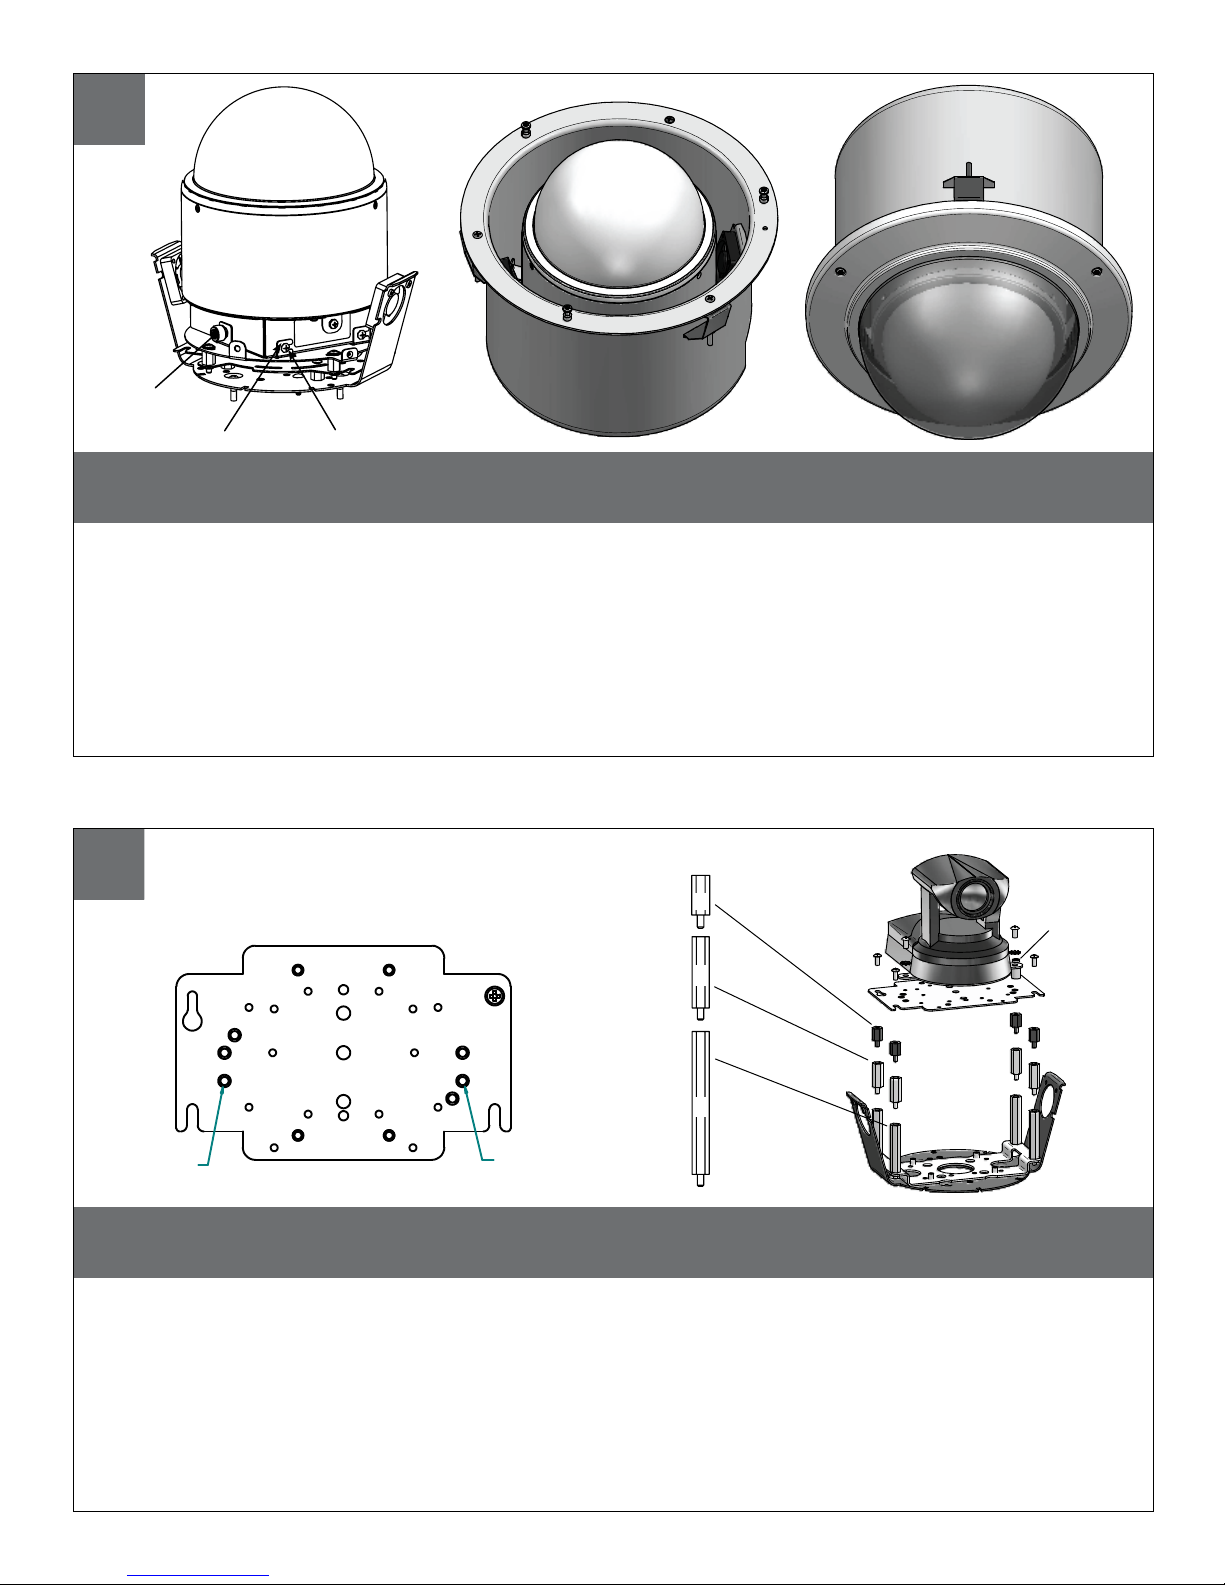
This is what the typical path of illumination will look like with the setting at 30 degrees.
• Coloque la placa rápida del lanzamiento sobre el fondo de la cámara fotográfica. Alinee los tornillos de fijación de la cámara fotográfica y las
ranuras del ojo de la cerradura. Resbale la cámara fotográfica dentro de las ranuras del ojo de la cerradura hasta que los botones de fijación
golpean el extremo, y apriete el tornillo de fijación.
• Placez le plat rapide de dégagement sur le fond de l'appareil-photo. Alignez les vis de blocage d'appareil-photo et les fentes de trou de la
serrure. Glissez l'appareil-photo dans les fentes de trou de la serrure jusqu'à ce que les boutons de fermeture frappent l'extrémité, et serrez la vis de
blocage.
• Setzen Sie schnelle Freigabeplatte auf der Unterseite der Kamera. Richten Sie die Sicherungsschrauben der Kamera und die Schlüssellochschlitze
aus. Schieben Sie Kamera in die Schlüssellochschlitze, bis die verriegelntasten das Ende schlagen, und ziehen Sie die Sicherungsschraube fest.
• Coloque a placa rápida da liberação no fundo da câmera. Alinhe os parafusos travando da câmera e os entalhes do buraco da fechadura.
Deslize a câmera nos entalhes do buraco da fechadura até que as teclas travando batam a extremidade, e aperte o parafuso travando.
• Disponga la piastra rapida del rilascio sulla parte inferiore della macchina fotografica. Allinei le viti di bloccaggio della macchina fotografica e le
scanalature del buco della serratura. Faccia scorrere la macchina fotografica nelle scanalature del buco della serratura fino a che i tasti di
bloccaggio non colpiscano l'estremità e stringa la vite di bloccaggio.
Place quick release plate onto the bottom of the camera. Align the camera locking screws and the keyhole
slots. Slide camera into the keyhole slots until the locking buttons hit the end, and tighten the locking screw.
Keyhole Slots
Thumb Screw
Locking Screw
22
2539 Mounting Plate
Mounting
Hole
Mounting
Hole
Canon VB-C10R
Captive
Screw
(26mm) 1"
(52
mm
) 2"
(13mm) ½"
Mount the camera to the 2539 plate using the provided hardware. Place (3) 8 x 32 x 3/8 Phillips
head screws on the top of the spacer as shown above. Slide plate in and secure.
• Monte la cámara fotográfica a la placa 2539 usando el hardware proporcionado. Coloque (3) 8 x 32 x 3/8 de los
tornillos principales Phillips en la tapa del espaciador según lo demostrado arriba. Resbale la placa adentro y
asegúrela.
• Montez l'appareil-photo au plat 2539 à l'aide du matériel fourni. Placez (3) 8 x 32 x 3/8 de vis principales Phillips sur le
dessus de l'entretoise comme montré ci-dessus. Glissez le plat dedans et le fixez.
• Bringen Sie die Kamera zur Platte 2539 mit den zur Verfügung gestellten Kleinteilen an. Setzen Sie (3) 8 x 32 x 3/8 Kreuz-
kopfhauptschrauben auf die Oberseite der Distanzscheibe, wie oben gezeigt. Schieben Sie Platte innen und sichern Sie.
• Monte a câmera à placa 2539 usando a ferragem fornecida. Coloque (3) 8 x 32 x 3/8 dos parafusos principais Phillips
no alto do espaçador como mostrado acima. Deslize a placa dentro e fixe-a.
• Monti la macchina fotografica alla piastra 2539 per mezzo dei fissaggi forniti. Disponga (3) 8 x 32 x 3/8 delle viti cape
"phillips" sulla parte superiore del distanziatore come indicato sopra. Faccia scorrere la piastra dentro e fissi.
27
28
Page 15
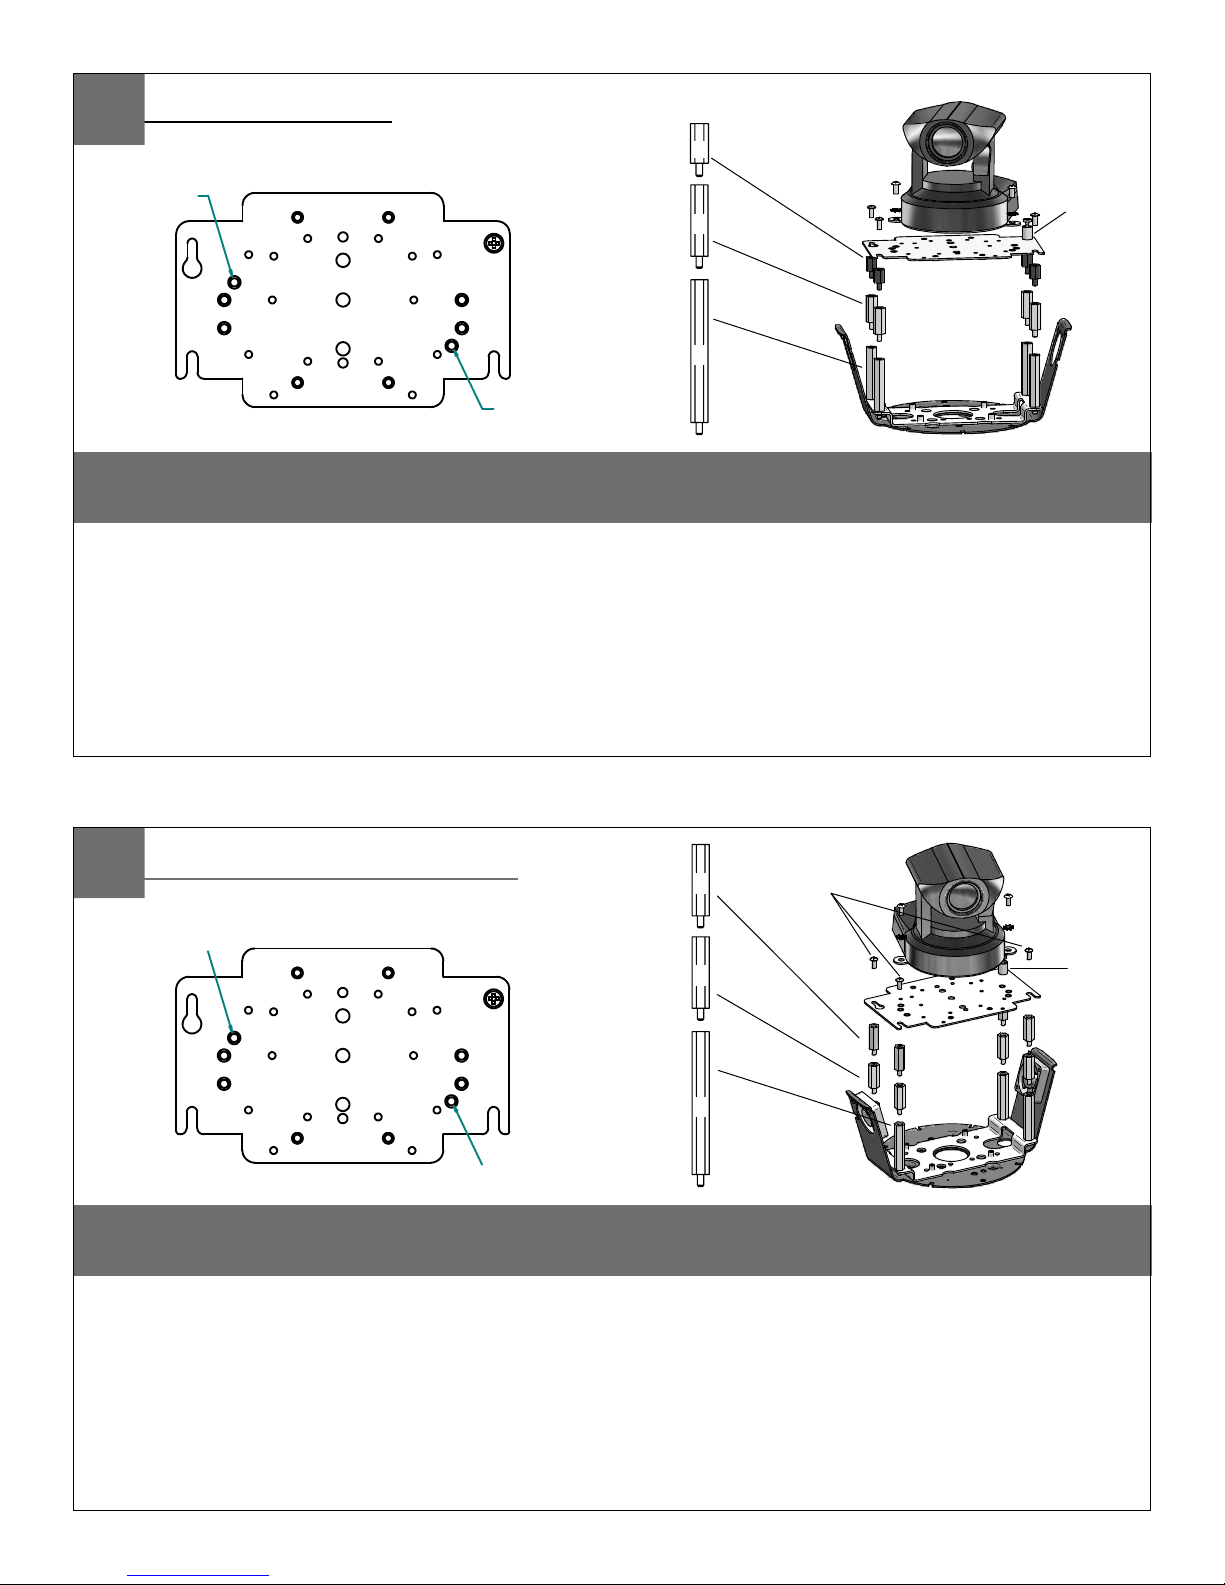
23
2539 Mounting Plate
Mounting
Hole
Mounting
Hole
Canon VB-C50IR
Captive
Screw
(26mm) 1"
(52
mm
) 2"
(13mm) ½"
Mount the camera to the 2539 plate using the provided hardware. Place (3) 8 x 32 x 3/8
Phillips head screws on the top of the spacer as shown above. Slide plate in and secure.
• Monte la cámara fotográfica a la placa 2539 usando el hardware proporcionado. Coloque (3) 8 x 32 x 3/8 de los
tornillos principales Phillips en la tapa del espaciador según lo demostrado arriba. Resbale la placa adentro y
asegúrela.
• Montez l'appareil-photo au plat 2539 à l'aide du matériel fourni. Placez (3) 8 x 32 x 3/8 de vis principales Phillips sur le
dessus de l'entretoise comme montré ci-dessus. Glissez le plat dedans et le fixez.
• Bringen Sie die Kamera zur Platte 2539 mit den zur Verfügung gestellten Kleinteilen an. Setzen Sie (3) 8 x 32 x 3/8 Kreuz-
kopfhauptschrauben auf die Oberseite der Distanzscheibe, wie oben gezeigt. Schieben Sie Platte innen und sichern Sie.
• Monte a câmera à placa 2539 usando a ferragem fornecida. Coloque (3) 8 x 32 x 3/8 dos parafusos principais Phillips
no alto do espaçador como mostrado acima. Deslize a placa dentro e fixe-a.
• Monti la macchina fotografica alla piastra 2539 per mezzo dei fissaggi forniti. Disponga (3) 8 x 32 x 3/8 delle viti cape
"phillips" sulla parte superiore del distanziatore come indicato sopra. Faccia scorrere la piastra dentro e fissi.
24
2539 Mounting Plate
Mounting Hole
Mounting Hole
Canon VC-C4R/VC-C50IR
(3) 8 x 32 x 3/8
Captive
Screw
(26mm) 1"
(52
mm
) 2"
(26mm) 1"
Mount the camera to the 2539 plate using the provided hardware. Place (3) 8 x 32 x 3/8 Phillips
head screws on the top of the spacer as shown above. Slide plate in and secure.
• Monte la cámara fotográfica a la placa 2539 usando el hardware proporcionado. Coloque (3) 8 x 32 x 3/8 de los tornillos
principales Phillips en la tapa del espaciador según lo demostrado arriba. Resbale la placa adentro y asegúrela.
• Montez l'appareil-photo au plat 2539 à l'aide du matériel fourni. Placez (3) 8 x 32 x 3/8 de vis principales Phillips sur le
dessus de l'entretoise comme montré ci-dessus. Glissez le plat dedans et le fixez.
• Bringen Sie die Kamera zur Platte 2539 mit den zur Verfügung gestellten Kleinteilen an. Setzen Sie (3) 8 x 32 x 3/8 Kreuzkopfhauptschrauben auf die Oberseite der Distanzscheibe, wie oben gezeigt. Schieben Sie Platte innen und sichern Sie.
• Monte a câmera à placa 2539 usando a ferragem fornecida. Coloque (3) 8 x 32 x 3/8 dos parafusos principais Phillips no
alto do espaçador como mostrado acima. Deslize a placa dentro e fixe-a.
• Monti la macchina fotografica alla piastra 2539 per mezzo dei fissaggi forniti. Disponga (3) 8 x 32 x 3/8 delle viti cape
"phillips" sulla parte superiore del distanziatore come indicato sopra. Faccia scorrere la piastra dentro e fissi.
29
30
Page 16
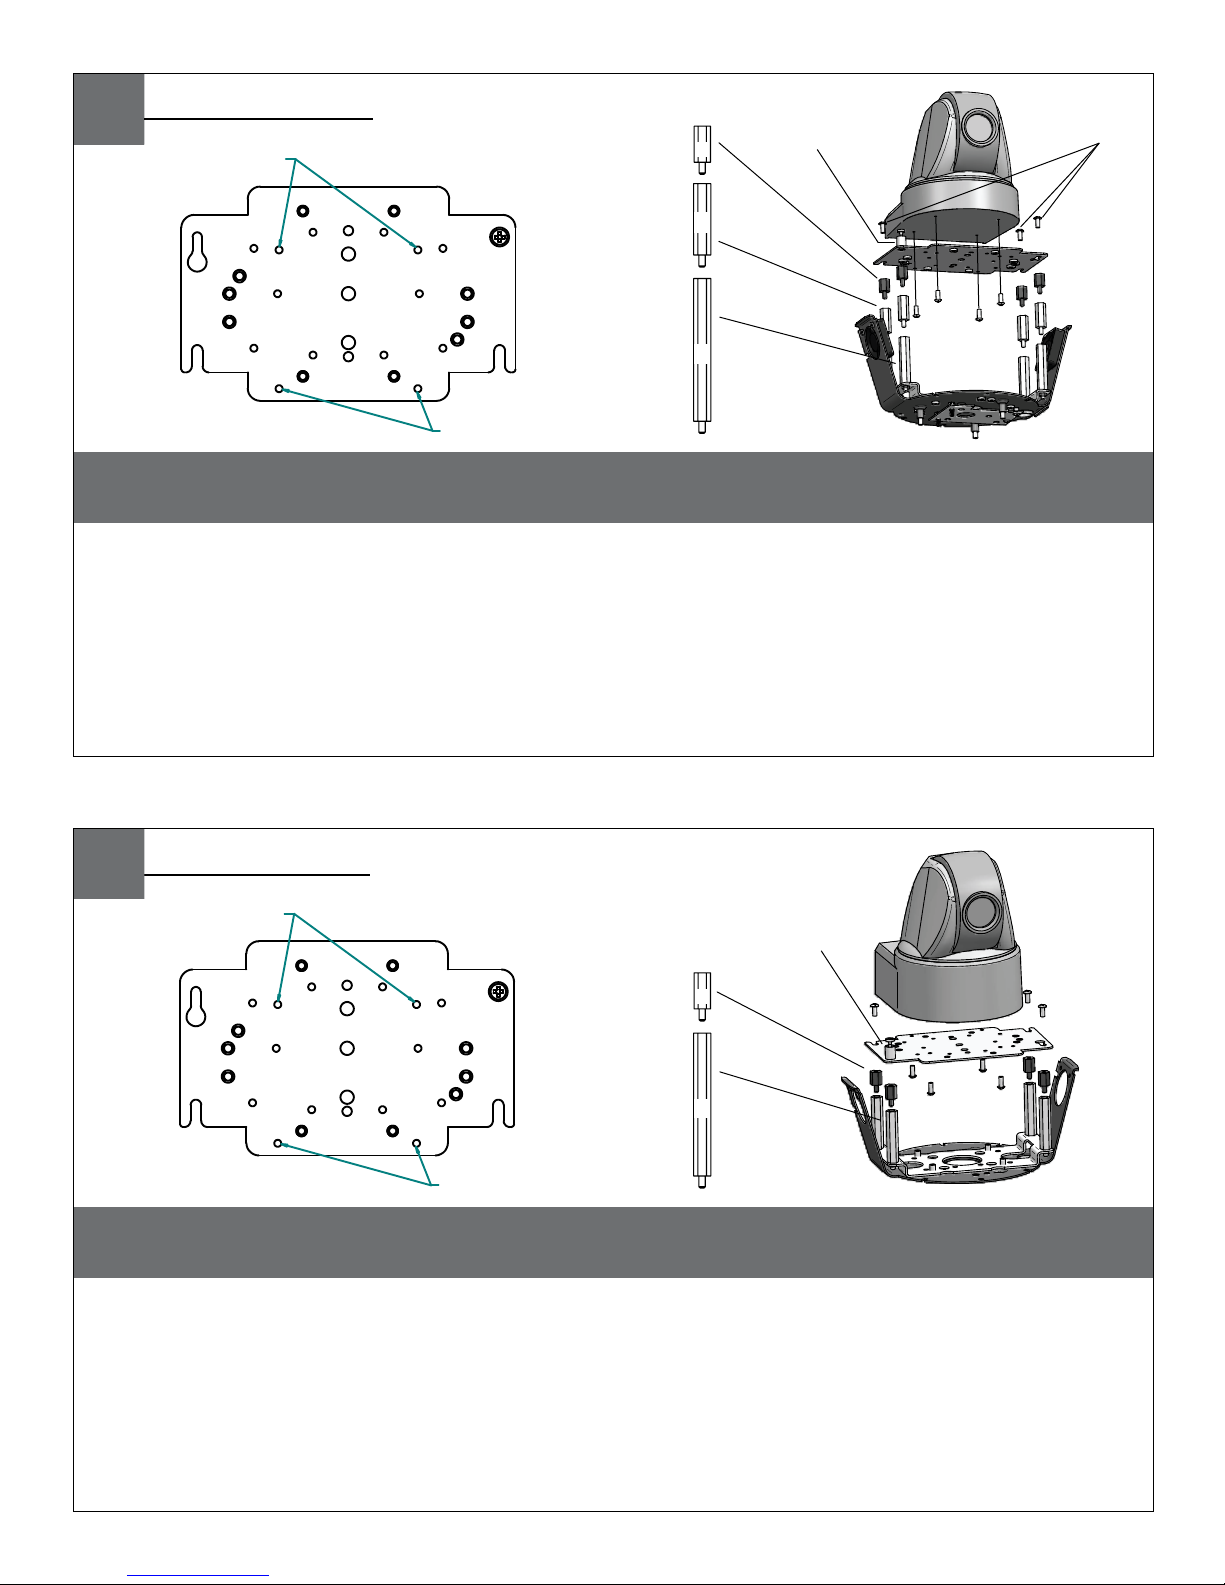
25
2539 Mounting Plate
Mounting Hole
Mounting Hole
Elmo PTC-200C
(26mm) 1"
(52
mm
) 2"
Captive
Screw
(13mm) ½"
(3) 8 x 32 x 3/8
Place the camera onto the quick release bracket using the (4) metric 3M Phillips head screws
provided. Place the screws on the spacers. Slide on the plate and camera then secure.
• Coloque la cámara fotográfica sobre el soporte rápido del lanzamiento usando (4) los tornillos principales los 3M Phillips
métricos proporcionados. Coloque los tornillos en los espaciadores. Resbale en la placa y la cámara fotográfica entonces
seguras.
• Placez l'appareil-photo sur la parenthèse rapide de dégagement à l'aide (4) des vis principales 3M Phillips métriques fournies.
Placez les vis sur les entretoises. Glissez du plat et de l'appareil-photo puis bloqués.
• Setzen Sie die Kamera auf dem schnellen Freigabehaltewinkel mit den (4) metrischen 3M bereitgestellten Kreuzkopf-
hauptschrauben. Setzen Sie die Schrauben auf die Distanzscheiben. Schieben Sie auf die sichere Platte und die Kamera dann.
• Coloque a câmera no suporte rápido da liberação usando (4) os parafusos principais 3M Phillips métricos fornecidos. Coloque
os parafusos nos espaçadores. Deslize na placa e na câmera então seguras.
• Disponga la macchina fotografica sulla staffa rapida del rilascio per mezzo (4) delle viti cape "phillips" 3M metriche fornite.
Disponga le viti sui distanziatori. Faccia scorrere sulla piastra e sulla macchina fotografica allora sicure.
2539 Mounting Plate
Mounting Hole
Mounting Hole
Elmo PTC-201
(52mm) 2"
(13mm) ½"
Place the camera onto the quick release bracket using the (4) metric 3M Phillips head screws
provided. Place the screws on the spacers. Slide on the plate and camera then secure.
Captive
Screw
• Coloque la cámara fotográfica sobre el soporte rápido del lanzamiento usando (4) los tornillos principales los 3M Phillips
métricos proporcionados. Coloque los tornillos en los espaciadores. Resbale en la placa y la cámara fotográfica entonces
seguras.
• Placez l'appareil-photo sur la parenthèse rapide de dégagement à l'aide (4) des vis principales 3M Phillips métriques fournies.
Placez les vis sur les entretoises. Glissez du plat et de l'appareil-photo puis bloqués.
• Setzen Sie die Kamera auf dem schnellen Freigabehaltewinkel mit den (4) metrischen 3M bereitgestellten Kreuzkopf-
hauptschrauben. Setzen Sie die Schrauben auf die Distanzscheiben. Schieben Sie auf die sichere Platte und die Kamera dann.
• Coloque a câmera no suporte rápido da liberação usando (4) os parafusos principais 3M Phillips métricos fornecidos.
Coloque os parafusos nos espaçadores. Deslize na placa e na câmera então seguras.
• Disponga la macchina fotografica sulla staffa rapida del rilascio per mezzo (4) delle viti cape "phillips" 3M metriche fornite.
Disponga le viti sui distanziatori. Faccia scorrere sulla piastra e sulla macchina fotografica allora sicure.
31
32
Page 17
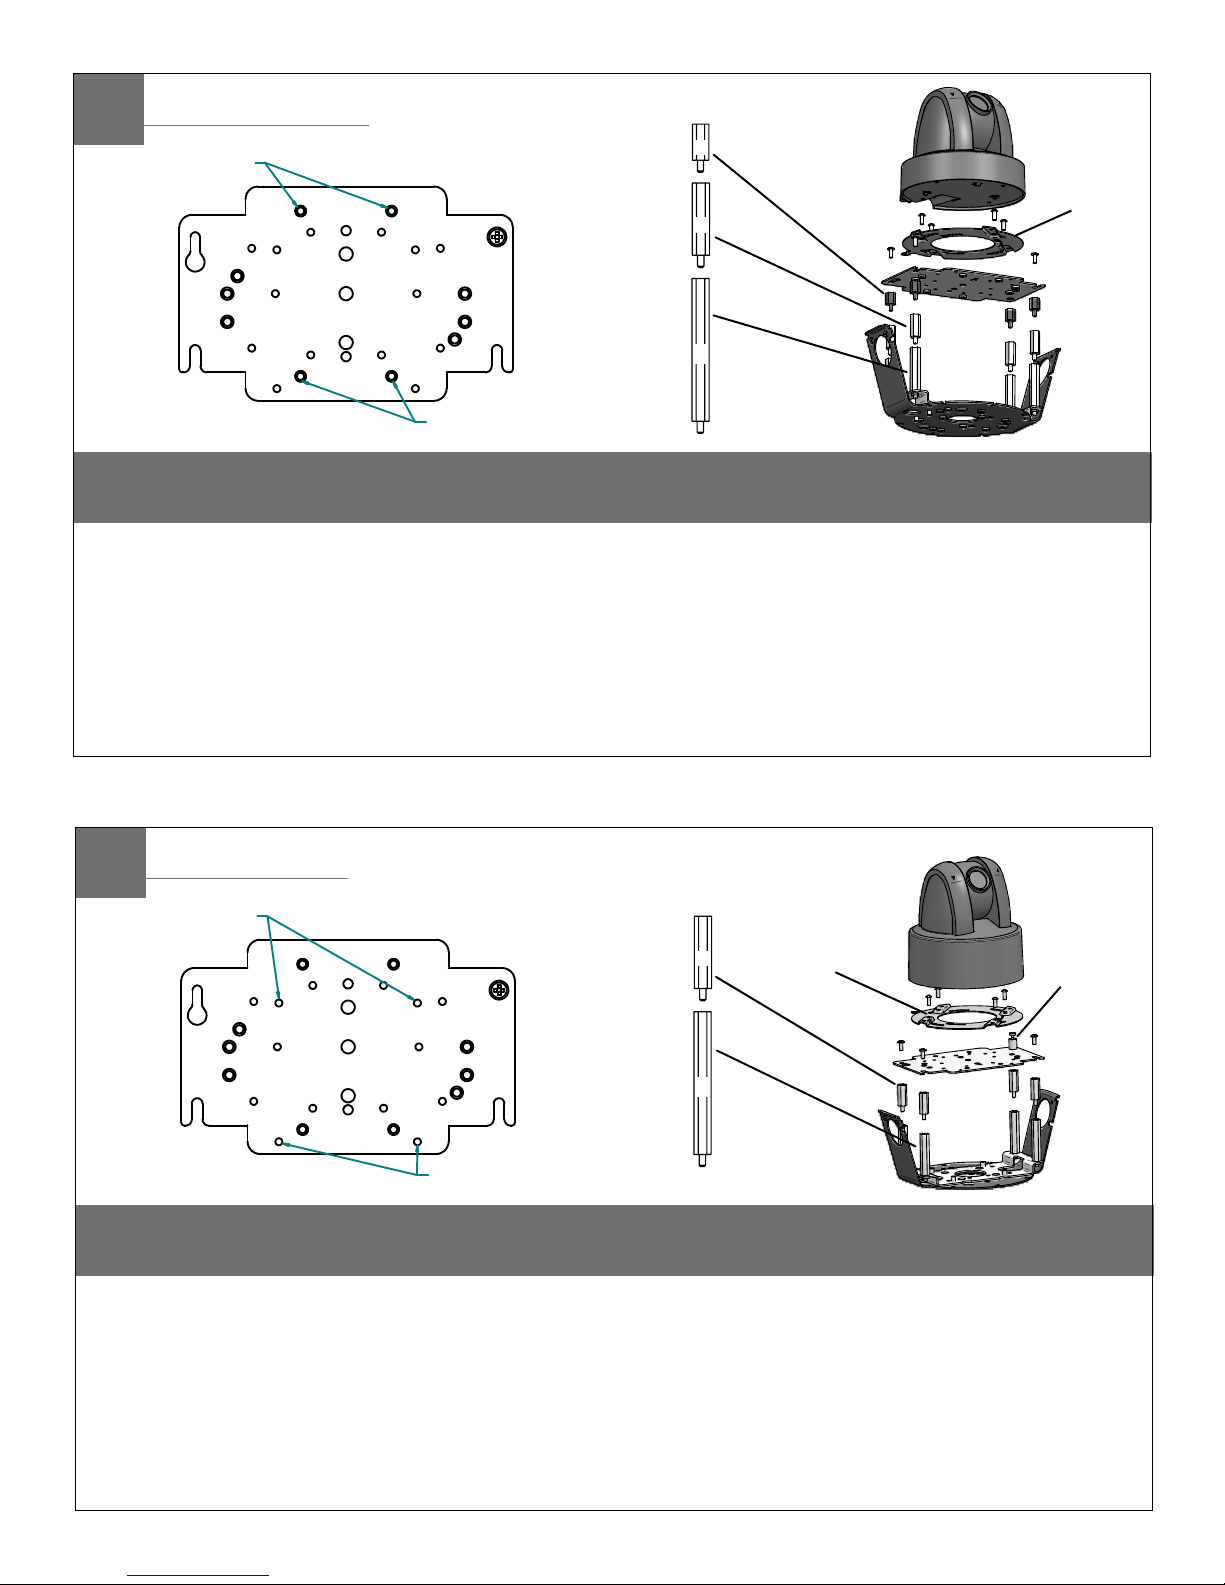
27
2539 Mounting Plate
Mounting Hole
Mounting Hole
Elmo PTC-400C
(52mm) 2"
(13mm) ½"
Attach quick release bracket to mounting plate using (4) #8 screws and star washer. Complete
assembly as shown, then secure camera to the quick release plate.
(26mm) 1"
• Una el soporte rápido del lanzamiento a la placa de montaje usando (4) los tornillos #8 y la arandela de la estrella.
Termine a asamblea como cámara fotográfica demostrada, después segura a la placa rápida del lanzamiento.
• Attachez la parenthèse rapide de dégagement au plat de support à l'aide (4) des vis #8 et tenez le premier rôle la
rondelle. Accomplissez l'assemblée en tant qu'appareil-photo montré et puis bloqué au plat rapide de dégagement.
• Bringen Sie schnellen Freigabehaltewinkel zur Montageplatte mit (4) Schrauben #8 und Sternunterlegscheibe an. Führen
Sie Versammlung als gezeigte, dann sichere Kamera zur schnellen Freigabeplatte durch.
• Una o suporte rápido da liberação à placa de montagem usando (4) os parafusos #8 e a arruela da estrela. Termine o
conjunto como a câmera mostrada, a seguir segura à placa rápida da liberação.
• Fissi la staffa rapida del rilascio al giunto di supporto usando (4) le viti #8 e la rondella della stella. Completi il complessivo
come macchina fotografica indicata e quindi sicura alla piastra rapida del rilascio.
Quick release
plate
28
2539 Mounting Plate
Mounting Hole
Mounting Hole
Elmo PTC-401
(52mm) 2"
Attach quick release bracket to mounting plate using (4) #8 screws and star washer. Complete
assembly as shown, then secure camera to the quick release plate.
(26mm) 1"
Captive
Screw
• Una el soporte rápido del lanzamiento a la placa de montaje usando (4) los tornillos #8 y la arandela de la estrella.
Termine a asamblea como cámara fotográfica demostrada, después segura a la placa rápida del lanzamiento.
• Attachez la parenthèse rapide de dégagement au plat de support à l'aide (4) des vis #8 et tenez le premier rôle la
rondelle. Accomplissez l'assemblée en tant qu'appareil-photo montré et puis bloqué au plat rapide de dégagement.
• Bringen Sie schnellen Freigabehaltewinkel zur Montageplatte mit (4) Schrauben #8 und Sternunterlegscheibe an. Führen
Sie Versammlung als gezeigte, dann sichere Kamera zur schnellen Freigabeplatte durch.
• Una o suporte rápido da liberação à placa de montagem usando (4) os parafusos #8 e a arruela da estrela. Termine o
conjunto como a câmera mostrada, a seguir segura à placa rápida da liberação.
• Fissi la staffa rapida del rilascio al giunto di supporto usando (4) le viti #8 e la rondella della stella. Completi il complessivo come macchina fotografica indicata e quindi sicura alla piastra rapida del rilascio.
Quick release
plate
33
34
Page 18
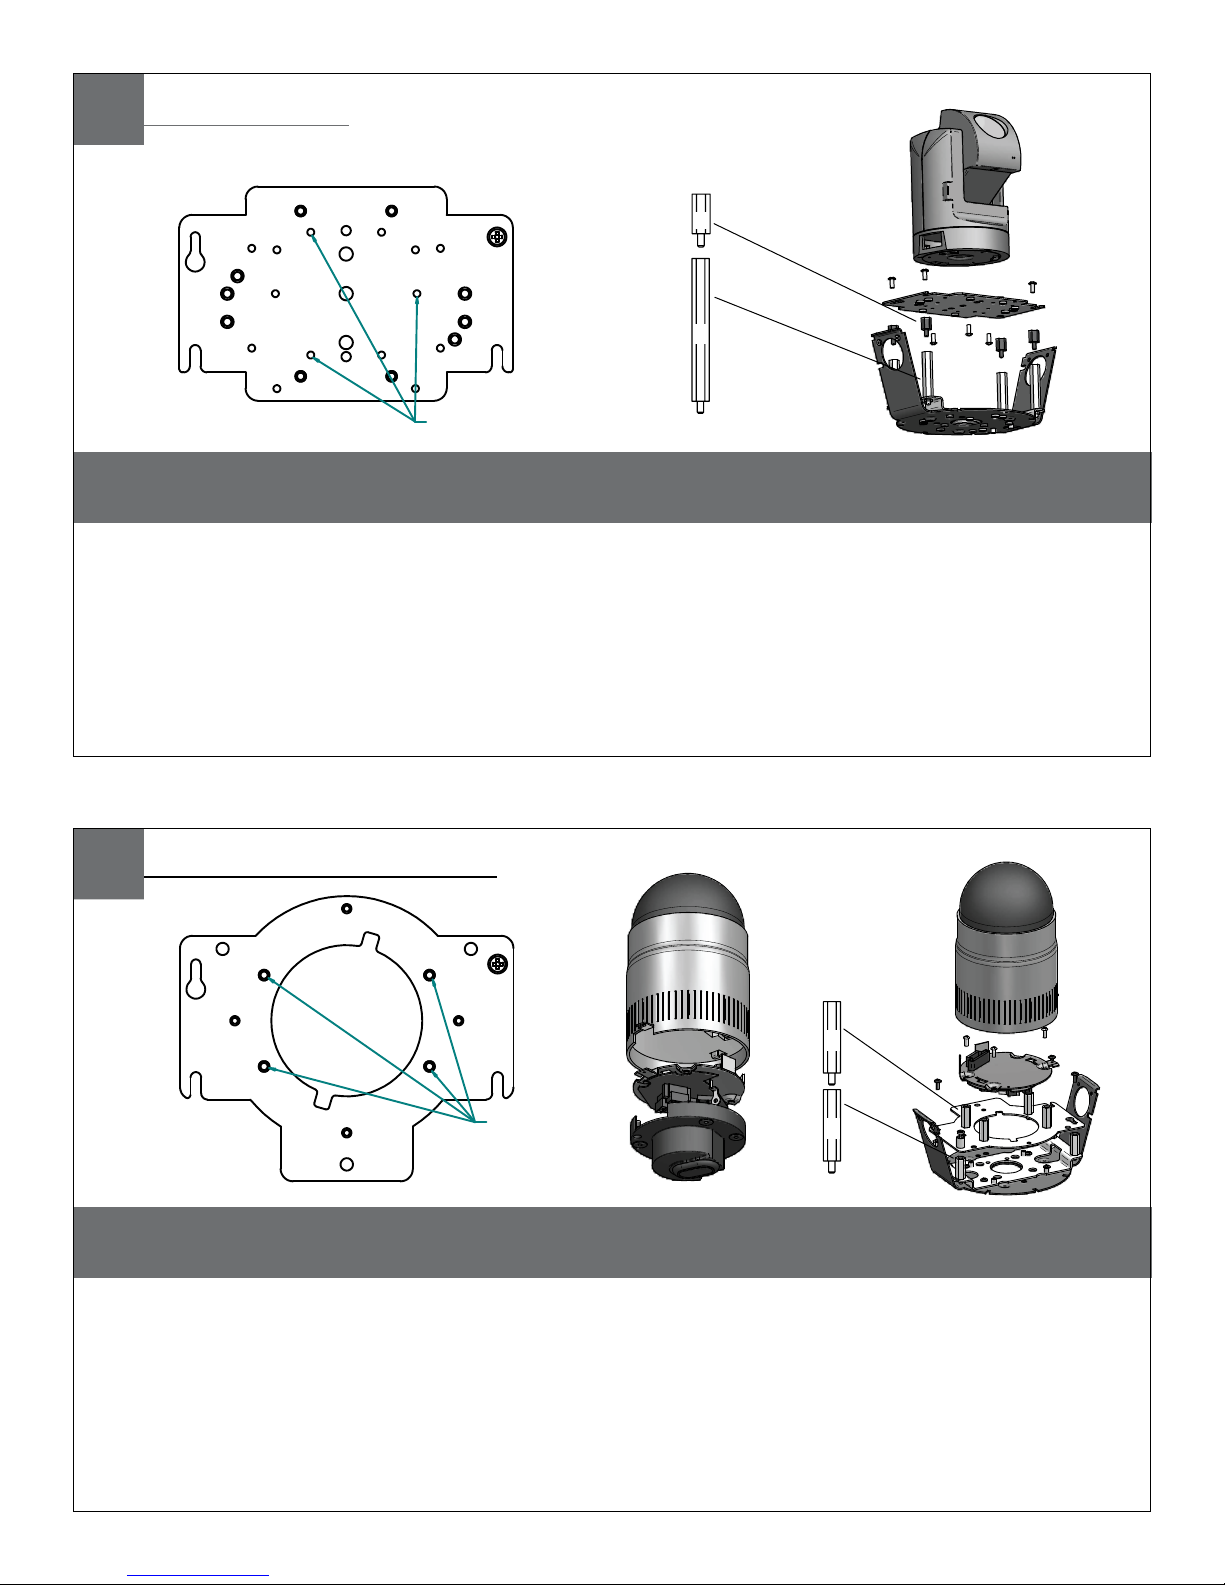
29
2539 Mounting Plate
Mounting Hole
JVC VN-C30U
(52mm) 2"
Remove the camera plate and mount to the bracket using the (3) metric 3M Phillips head screws.
Reattach plate back to the camera. Place the screws on the spacers. Secure the plate and camera.
(13mm) ½"
• Quite la placa y el montaje de la cámara fotográfica al soporte usando (3) los tornillos principales los 3M Phillips métricos. Reate
la placa de nuevo a la cámara fotográfica. Coloque los tornillos en los espaciadores. Asegure la placa y la cámara fotográfica.
• Enlevez le plat et le bâti d'appareil-photo sur la parenthèse à l'aide (3) des vis principales 3M Phillips métriques. Rattachez le plat
de nouveau à l'appareil-photo. Placez les vis sur les entretoises. Fixez le plat et l'appareil-photo.
• Entfernen Sie die Kameraplatte und -einfassung zum Haltewinkel mit den (3) metrischen 3M Kreuzkopfhauptschrauben. Befesti-
gen Sie Platte zurück zu der Kamera wieder. Setzen Sie die Schrauben auf die Distanzscheiben. Sichern Sie die Platte und die
Kamera.
• Remova a placa e a montagem da câmera ao suporte usando (3) os parafusos principais 3M Phillips métricos. Reate a parte
traseira da placa à câmera. Coloque os parafusos nos espaçadores. Fixe a placa e a câmera.
• Rimuova la piastra ed il supporto della macchina fotografica alla staffa per mezzo (3) delle viti cape "phillips" 3M metriche.
Riattacci la piastra di nuovo alla macchina fotografica. Disponga le viti sui distanziatori. Fissi la piastra e la macchina fotografica.
30
2630 Mounting
Plate
Mounting
Hole
JVC VN-C625U / TK-625U
Remove the cover and detach bracket. Attach (4) 1” spacers to the 2630 mounting plate and (4) to
the main bracket. Place (3) 8x32x3/8” Phillips screws onto the spacers. Secure plate and camera.
(26mm) 1"
(26mm) 1"
•
Quite la cubierta y separe el soporte. Una (4) los espaciadores del 1"a la placa de montaje 2630 y (4) al soporte principal.
Coloque (3) los tornillos Phillips del 8x32x3/8"sobre los espaciadores. Asegure la placa y la cámara fotográfica.
•
Enlevez la couverture et détachez la parenthèse. Attachez (4) les entretoises de 1"au plat de support 2630 et (4) à la parenthèse principale. Placez (3) les vis Phillips de 8x32x3/8"sur les entretoises. Fixez le plat et l'appareil-photo.
•
Entfernen Sie die Abdeckung und trennen Sie Haltewinkel ab. Bringen Sie (4) die 1"Distanzscheiben zur 2630 Montageplatte und
(4) zum Haupthaltewinkel an. Setzen Sie (3) 8x32x3/8"die Kreuzkopfschrauben auf den Distanzscheiben. Sichern Sie Platte und
Kamera.
.
•
Remova a tampa e destaque o suporte. Una (4) espaçadores de 1"à placa de montagem 2630 e (4) ao suporte principal.
Coloque (3) os parafusos Phillips de 8x32x3/8"nos espaçadores. Fixe a placa e a câmera.
•
Rimuova la copertura e stacchi la staffa. Fissi (4) i distanziatori di 1"al giunto di supporto 2630 e (4) alla staffa principale.
Disponga (3) le viti "phillips" di 8x32x3/8"sui distanziatori. Fissi la piastra e la macchina fotografica.
35
36
Page 19
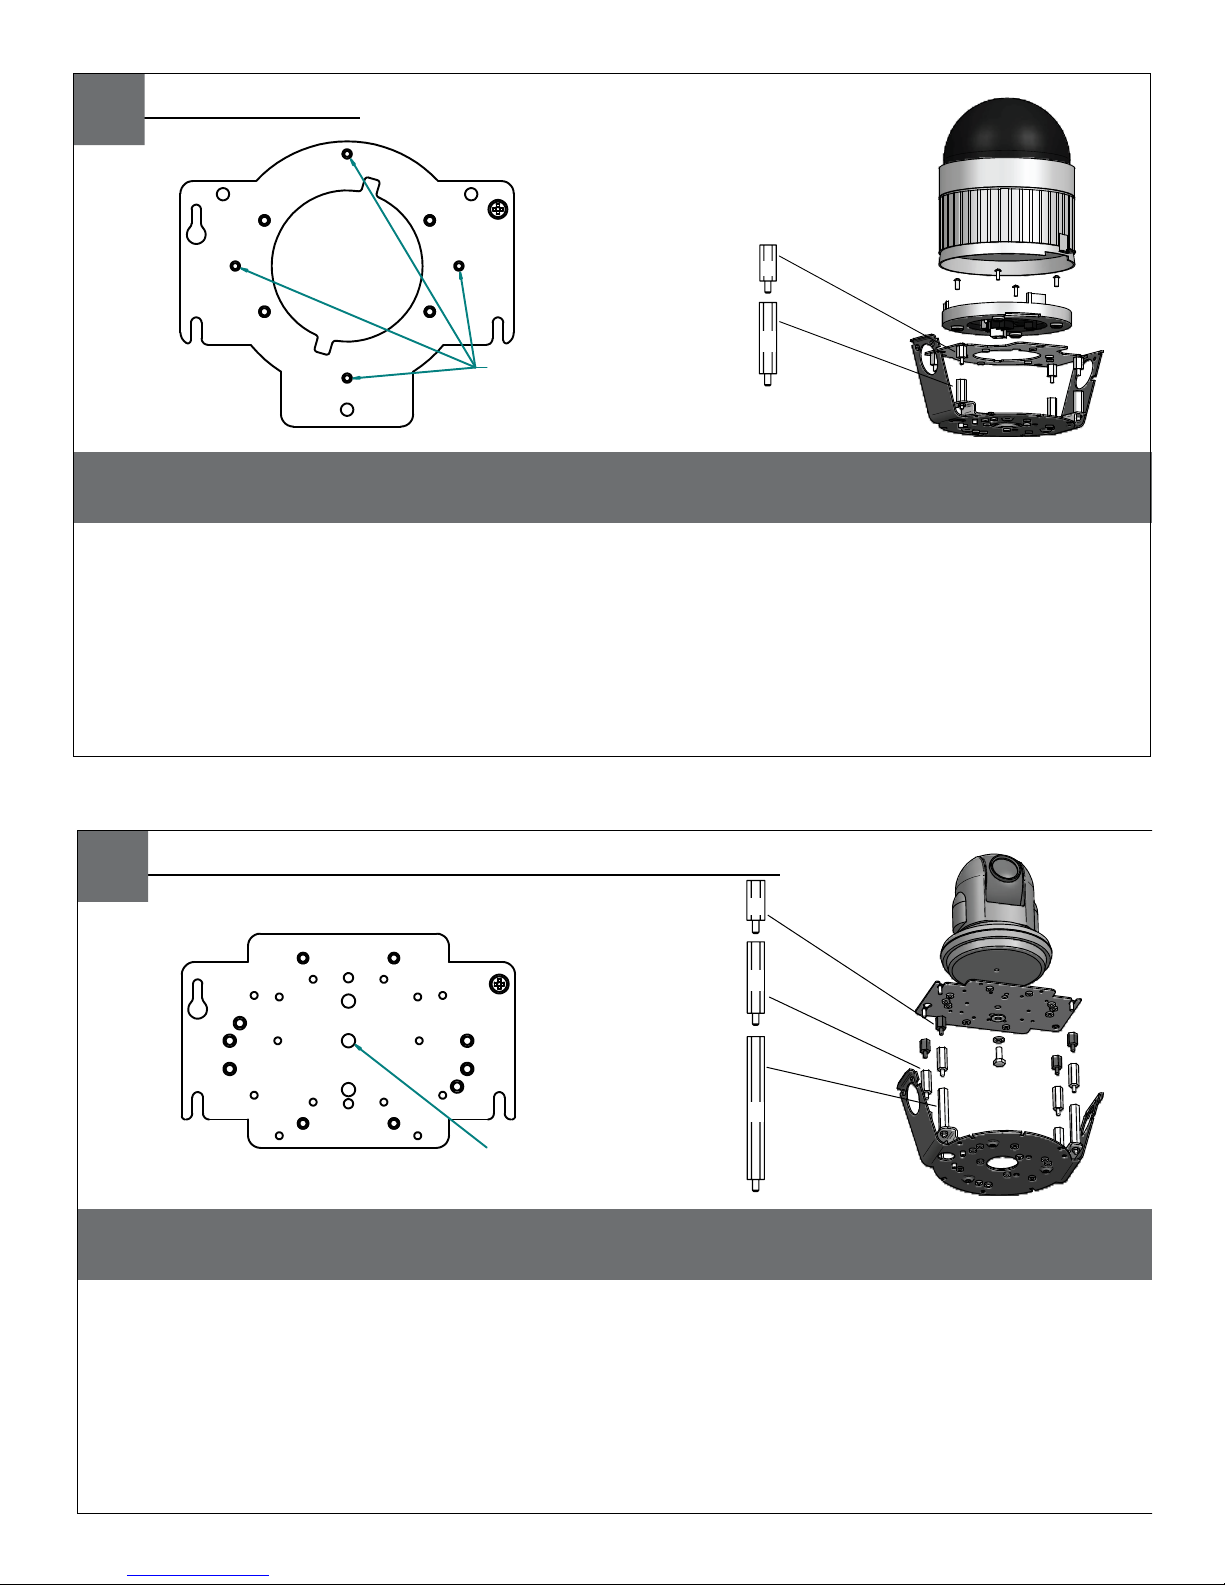
31
2630 Mounting
Plate
Mounting
Hole
JVC VN-C655U
Place the camera on the bracket with the (4) phillips head screws. Use (4) 1” spacers and (4) 1/2”
spacers provided. Place the screws on the spacers. Slide on the plate and camera then secure.
(26mm) 1"
(13mm) ½"
• Coloque la cámara fotográfica en el soporte con (4) los tornillos principales Phillips. Utilice (4) los espaciadores del 1"y (4) 1/2"
spacers proporcionados. Coloque los tornillos en los espaciadores. Resbale en la placa y la cámara fotográfica entonces seguras.
• Placez l'appareil-photo sur la parenthèse avec (4) les vis principales Phillips. Employez (4) les entretoises de 1"et (4) le 1/2" spacers
fournis. Placez les vis sur les entretoises. Glissez du plat et de l'appareil-photo puis bloqués.
• Setzen Sie die Kamera am Haltewinkel mit den (4) Kreuzkopfhauptschrauben. Verwenden Sie (4) die 1"Distanzscheiben und (4) 1/2"
spacers, die bereitgestellt werden. Setzen Sie die Schrauben auf die Distanzscheiben. Schieben Sie auf die sichere Platte und die
Kamera dann.
• Coloque a câmera no suporte com (4) os parafusos principais Phillips. Use (4) os espaçadores de 1"e (4) o 1/2"spacers fornecidos.
Coloque os parafusos nos espaçadores. Deslize na placa e na câmera então seguras.
• Disponga la macchina fotografica sulla staffa con (4) le viti cape "phillips". Usi (4) i distanziatori di 1"e (4) 1/2"spacers forniti. Disponga
le viti sui distanziatori. Faccia scorrere sulla piastra e sulla macchina fotografica allora sicure.
31
(26mm) 1"
(52
mm
) 2"
(13mm) ½"
Panasonic BB-HCM381/580/581 & KX-HMC280
Install the camera to the bracket with the 1/4x20” washer and lock washer. Place (3) 8x32x3/8”
screws on the spacers. Slide on the camera and plate then secure.
• Instale la cámara fotográfica al soporte con la arandela del 1/4x20"y la arandela de cerradura. Coloque (3) los tornillos
del 8x32x3/8" en los espaciadores. Resbale en la cámara fotográfica y platee entonces seguro.
• Installez l'appareil-photo sur la parenthèse avec la rondelle de 1/4x20"et la rondelle de freinage. Placez (3) les vis de
8x32x3/8" sur les entretoises. Glissez sur l'appareil-photo et plaquez alors bloqué.
• Bringen Sie die Kamera zum Haltewinkel mit der 1/4x20"Unterlegscheibe und Federring an. Setzen Sie (3) die 8x32x3/8"
Schrauben auf die Distanzscheiben. Schieben Sie auf die Kamera und überziehen Sie dann sicheres.
• Instale a câmera ao suporte com a arruela de 1/4x20"e a arruela de fechamento. Coloque (3) os parafusos de
8x32x3/8" nos espaçadores. Deslize na câmera e chapeie então seguro.
• Installi la macchina fotografica alla staffa con la rondella di 1/4x20"e la ranella di bloccaggio. Disponga (3) le viti di
8x32x3/8"sui distanziatori. Faccia scorrere sulla macchina fotografica e placchi allora sicuro.
Mounting
Hole
2539 Mounting Plate
37
38
Page 20
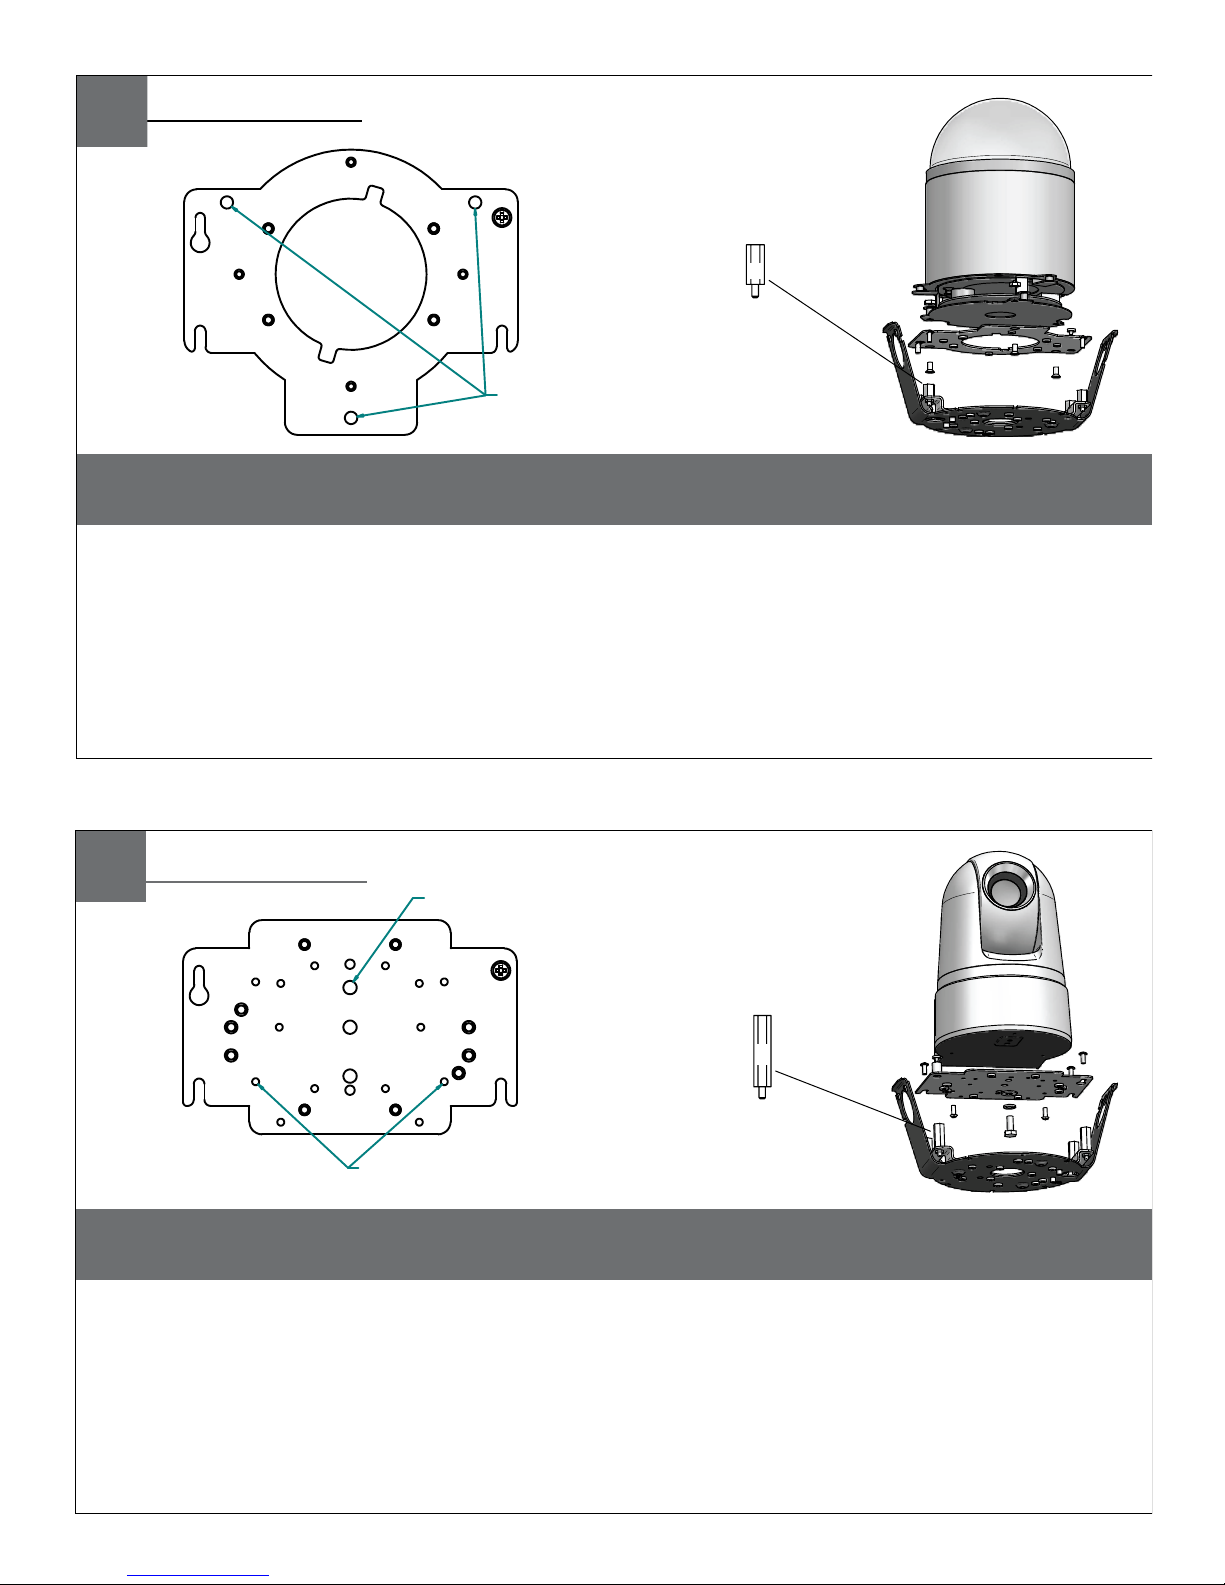
33
2630 Mounting
Plate
Mounting
Hole
Pixord 261/262
Install camera to the bracket with (3) 8x32x.5” flat head screws, nuts and washers. Place (3)
8x32x3/8”screws on the spacers. Slide on the plate and camera then secure.
(13mm) ½"
• Instale la cámara fotográfica al soporte con (3) los tornillos, las tuercas y las arandelas principales el 8x32x.5"planos.
Coloque (3) 8x32x3/8"screws en los espaciadores. Resbale en la placa y la cámara fotográfica entonces seguras.
• Installez l'appareil-photo sur la parenthèse avec (3) les vis, les écrous et les rondelles principaux 8x32x.5"plats. Placez (3)
8x32x3/8"screws sur les entretoises. Glissez du plat et de l'appareil-photo puis bloqués.
• Bringen Sie Kamera zum Haltewinkel mit (3) 8x32x.5"flachen Hauptschrauben, Nüssen und Unterlegscheiben an. Setzen
Sie (3) 8x32x3/8"screws auf die Distanzscheiben. Schieben Sie auf die sichere Platte und die Kamera dann.
• Instale a câmera ao suporte com (3) os parafusos, as porcas e as arruelas principais 8x32x.5"lisos. Coloque (3)
8x32x3/8"screws nos espaçadores. Deslize na placa e na câmera então seguras.
• Installi la macchina fotografica alla staffa con (3) le viti, i dadi e le rondelle capi piani 8x32x.5". Disponga (3)
8x32x3/8"screws sui distanziatori. Faccia scorrere sulla piastra e sulla macchina fotografica allora sicure.
34
2539 Mounting
Plate
Mounting Hole
Mounting Hole
Sony SNCRZ25
Attach bracket with (1) 1/4x20 bolt, washer and lock washer and (2) 3mm x 8mm Phillip head screws
and lockwashers. Place the screws on the spacers. Slide on the plate and camera then secure.
(26mm) 1"
• Instale la cámara fotográfica al soporte con (3) los tornillos, las tuercas y las arandelas principales el 8x32x.5"planos.
Coloque (3) 8x32x3/8"screws en los espaciadores. Resbale en la placa y la cámara fotográfica entonces seguras.
• Installez l'appareil-photo sur la parenthèse avec (3) les vis, les écrous et les rondelles principaux 8x32x.5"plats. Placez (3)
8x32x3/8"screws sur les entretoises. Glissez du plat et de l'appareil-photo puis bloqués.
• Bringen Sie Kamera zum Haltewinkel mit (3) 8x32x.5"flachen Hauptschrauben, Nüssen und Unterlegscheiben an. Setzen
Sie (3) 8x32x3/8"screws auf die Distanzscheiben. Schieben Sie auf die sichere Platte und die Kamera dann.
• Instale a câmera ao suporte com (3) os parafusos, as porcas e as arruelas principais 8x32x.5"lisos. Coloque (3) 8x32x3/8"
screws nos espaçadores. Deslize na placa e na câmera então seguras.
• Installi la macchina fotografica alla staffa con (3) le viti, i dadi e le rondelle capi piani 8x32x.5". Disponga (3) 8x32x3/8"
screws sui distanziatori. Faccia scorrere sulla piastra e sulla macchina fotografica allora sicure.
39
40
Page 21
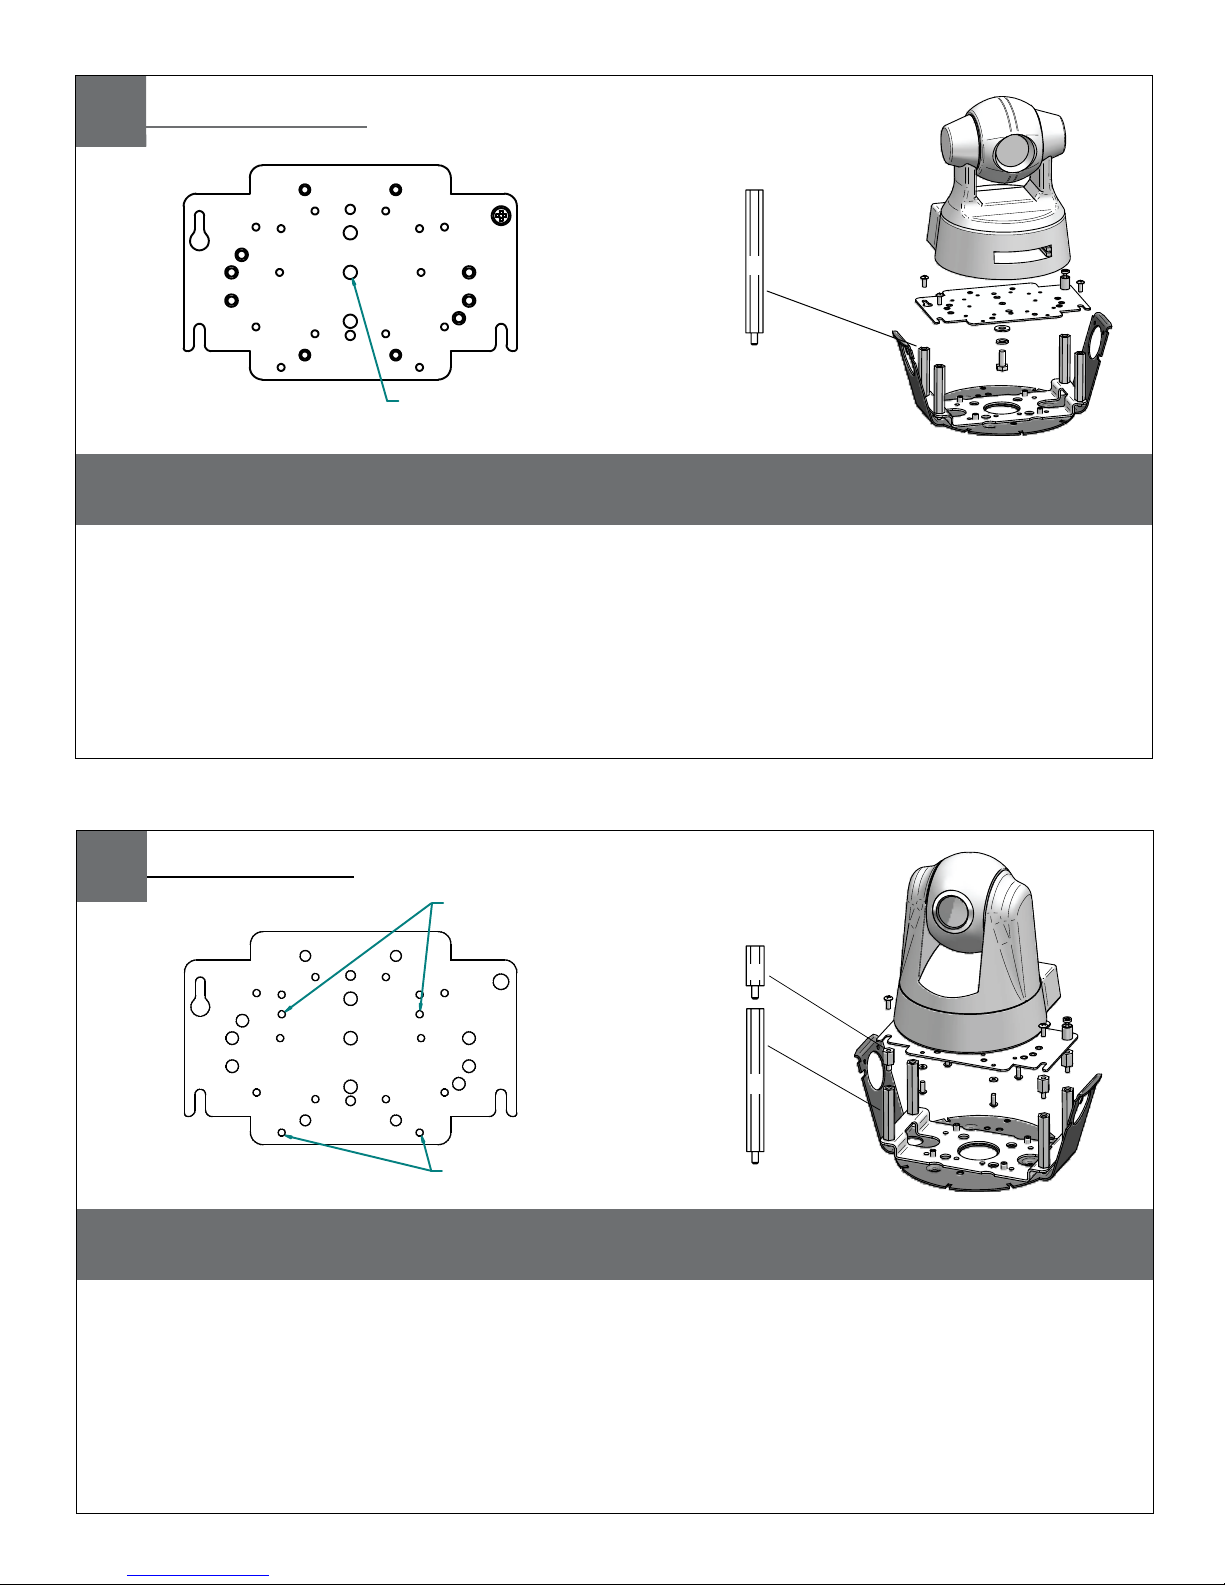
35
2539 Mounting
Plate
Mounting Hole
Sony SNCRZ30
Attach bracket with (1) 1/4x20 bolt, washer and lock washer. Place (3) 8x32x3/8”screws on the
spacers. Slide on the plate and camera then secure.
(52mm) 2"
• Una el soporte con (1) el perno 1/4x20, la arandela y la arandela de cerradura. Coloque (3) 8x32x3/8" screws en los
espaciadores. Resbale en la placa y la cámara fotográfica entonces seguras.
• Attachez la parenthèse avec (1) le boulon 1/4x20, la rondelle et la rondelle de freinage. Placez (3) 8x32x3/8" screws sur
les entretoises. Glissez du plat et de l'appareil-photo puis bloqués.
• Bringen Sie Haltewinkel mit (1) Schraubbolzen 1/4x20, Unterlegscheibe und Federring an. Setzen Sie (3) 8x32x3/8" screws
auf die Distanzscheiben. Schieben Sie auf die sichere Platte und die Kamera dann.
• Una o suporte com (1) parafuso 1/4x20, arruela e arruela de fechamento. Coloque (3) 8x32x3/8" screws nos espaçadores. Deslize na placa e na câmera então seguras.
• Fissi la staffa con (1) il bullone 1/4x20, la rondella e la ranella di bloccaggio. Disponga (3) 8x32x3/8" screws sui distanziatori. Faccia scorrere sulla piastra e sulla macchina fotografica allora sicure.
36
2539 Mounting
Plate
Mounting Hole
Mounting Hole
Sony SNCRZ50
Attach bracket with 3mm x 8mm bolts and lock washers. Place (3) 8x32x3/8”screws on the spacers.
Slide on the plate and camera then secure.
(52mm) 2"
(13mm) ½"
• Una el soporte con los pernos de 3m m x de 8m m y las arandelas de cerradura. Coloque (3) 8x32x3/8"screws en los
espaciadores. Resbale en la placa y la cámara fotográfica entonces seguras.
• Attachez la parenthèse avec des boulons de 3mm x de 8mm et des rondelles de freinage. Placez (3) 8x32x3/8"screws sur
les entretoises. Glissez du plat et de l'appareil-photo puis bloqués.
• Bringen Sie Haltewinkel mit 3mm x 8mm den Schraubbolzen und den Federringen an. Setzen Sie (3) 8x32x3/8"screws auf
die Distanzscheiben. Schieben Sie auf die sichere Platte und die Kamera dann.
• Una o suporte com parafusos de 3mm x de 8mm e arruelas de fechamento. Coloque (3) 8x32x3/8"screws nos espaçadores. Deslize na placa e na câmera então seguras.
• Fissi la staffa con i bulloni di 8mm x di 3mm e le ranelle di bloccaggio. Disponga (3) 8x32x3/8"screws sui distanziatori.
Faccia scorrere sulla piastra e sulla macchina fotografica allora sicure.
41
42
Page 22
37
2539 Mounting
Plate
Mounting Hole
Mounting Hole
Toshiba IK-WB21A
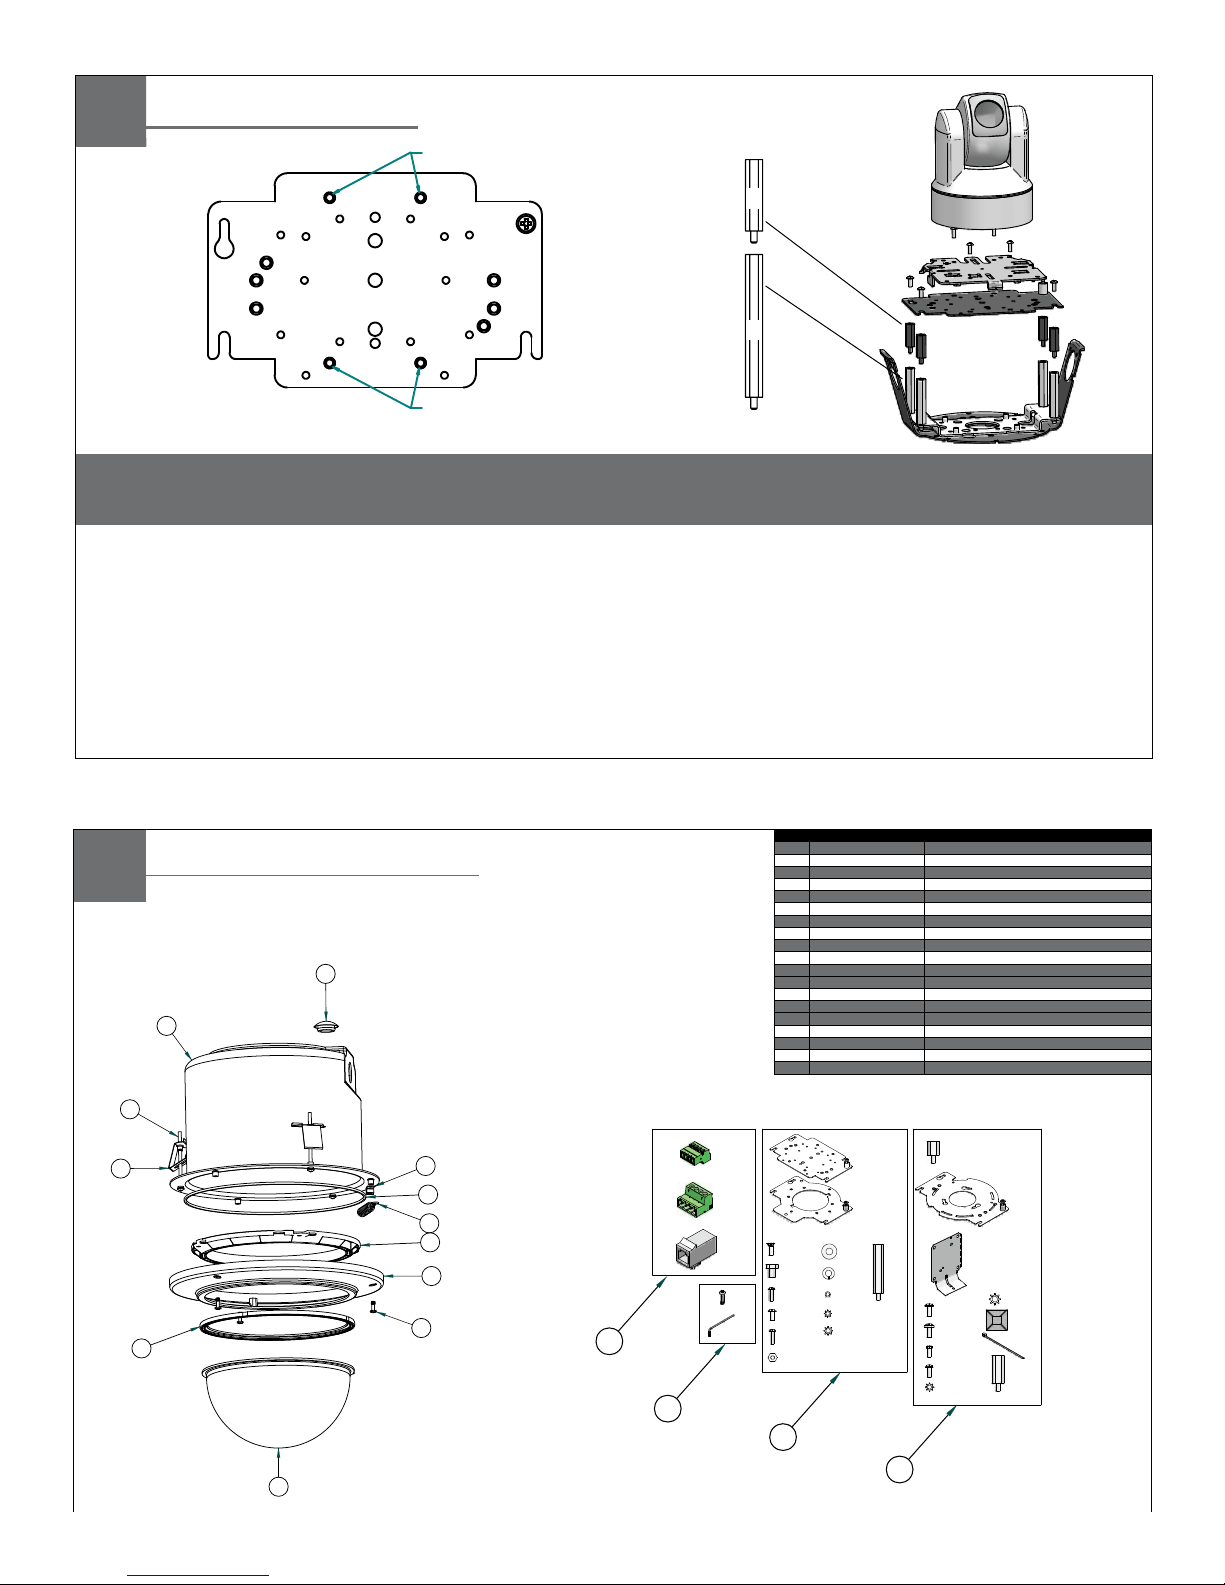
Remove camera bracket and attach to the 2539 plate with (4) 8x32x3/8 bolts and star washers.
Place (3) 8x32x3/8”screws on the spacers. Slide on the plate and camera then secure.
(26mm) 1"
(52
mm
) 2"
• Quite el soporte de la cámara fotográfica y únalo a la placa 2539 con (4) los pernos 8x32x3/8 y las arandelas de la estrella.
Place(3) 8x32x3/8"screws en los espaciadores. Resbale en la placa y la cámara fotográfica entonces seguras.
• Enlevez la parenthèse d'appareil-photo et l'attachez au plat 2539 avec (4) les boulons 8x32x3/8 et tenez le premier rôle les
rondelles. Place(3) 8x32x3/8"screws sur les entretoises. Glissez du plat et de l'appareil-photo puis bloqués.
• Entfernen Sie Kamerahaltewinkel und bringen Sie zur Platte 2539 mit (4) Schraubbolzen 8x32x3/8 und Sternunterlegscheiben an.
Place(3) 8x32x3/8"screws auf den Distanzscheiben. Schieben Sie auf die sichere Platte und die Kamera dann.
• Remova o suporte da câmera e una-o à placa 2539 com (4) parafusos 8x32x3/8 e arruelas da estrela. Place(3) 8x32x3/8"screws
nos espaçadores. Deslize na placa e na câmera então seguras.
• Rimuova la staffa della macchina fotografica e fissi alla piastra 2539 con (4) i bulloni 8x32x3/8 e le rondelle della stella. Place(3)
8x32x3/8"screws sui distanziatori. Faccia scorrere sulla piastra e sulla macchina fotografica allora sicure.
RM7C2N
(
OUTDOOR ONLY
)
IRM7C2N
(
INDOOR ONLY
)
Replacement Parts List
9
13
12
3
1
10
11
5
4
2
8
6
(1)
(1)
(1)
(4)
(1)
(3)
(4)
(3)
(3)
(1)
(1)
(4)
(4)
(1)
(1)
(4)
(4)
(3)
(1)
17
14
16
(1)
(1)
(1)
(1)
(4)
(3)
(2)
(2)
(2)
(8)
(4)
(2)
15
1 RP30VL2873 Metal Housing Top
2 RP ½” Rubber Conduit Plug
3 RP30VL2733 Lanyard Clip
4 RP90BTRP61 8 x 32 x 3’” Bolt (3)
5 RPVL2204 Ceiling Spring Clips (3)
6 RP96RSORG11 Trim Ring O-Ring
7 N/S
8 RP95FSSL05 Spring Lanyard
9 RPFD703 Dome Clamping Ring
10 RP30VL2884 Aluminum Trim Ring
11a RP90B T3007 Captive Phillips Screws (3)
11b RP90B T2975 Captive Security Screws (3)
12 RP96GK2558 Dome Gasket
13a RPFD7C Clear Polycarbonate Dome and Gasket
13b RPFD7T Tinted Polycarbonate Dome and Gasket
14 RPPKE1100 Electrical Packet
15 RPPKH2090 Housing Hardware Packet A
16 RPPKH2071 Housing Hardware Packet B
17 RPPKH2110 Security Tool and Screw Packet
95FSVP05
DESCRIPTION REPLACEMENT PART NUMBER
43
Page 23
Product Registration/Warranty
Thank you for choosing Videolarm. We value your patronage and are solely committed to
providing you with only the highest quality products available with unmatched customer service
levels that are second-to-none in the security industry.
Should a problem arise, rest assure that Videolarm stands behind its products
by offering some of the most impressive warranty plans available: 3 Years
on all Housings, Poles, Power Supplies, and Accessories and 5 Years on
all camera systems (SView, QView, Warriors), and InfraRed Illuminators.
Register Your Products
Option 1: Online Option 2: Mail-In
Take a few moments and validate your purchase with our Online Product Registration Form
at
www.videolarm.com/productregistration.jsp
or complete and mail-in the bottom portion of this flyer.
Register your recent Videolarm purchases and benefit from the following:
Simple and Trouble-Free RMA process•
Added into customer database to receive product updates / news•
Eliminate the need to archive original purchase documents: •
Receipts, Purchase Orders, etc…
Cut at the dotted Line
Place in envelope, affix stamp and mail to:
Main Contact Info
First Name: Last Name:
Professional Title: Company:
Address 1: Address 2:
City: State / Province/Country:
Zip / Postal Code: Phone Number: E-mail Address:
Please Circle One: Business Personal
Videolarm ATTN: Warranty
2525 Park Central Ave.
Decatur, GA 30035
Product Information
Name & Location of Company / Store where Purchased:
(City, State, Country)
Videolarm Product ID Product Description
Serial #
(Available only for Camera Systems, IR Illuminators, Wireless Devices)
PO#
 Loading...