

Moog Videolarm Deputy2, D2BW1, D2BB1, D2LK1B, D2LK2B Installation And Operation Instructions Manual

© 2011, Moog Videolarm, Inc. All Rights Reserved
D e p u t y 2
Customizable Vandal-Resistant City Surveillance System
Installation and Operation Instructions for the following models:
D2BW1 Deputy2 Box with wall mount, support for up to 3 cameras. 110Vac input surge
protection, H&B system and 24Vac output to the camera. Space for user
installed electronics
D2BB1 Deputy2 battery backup kit for a 12Vdc cameras
D2LK1B Deputy2 ashing light kit, 1 long lasting Blue LED ashing light with mounting bar
for Deputy2 Box
D2LK2B Deputy2 ashing light kit, 2 long lasting Blue LED ashing light with mounting bar
for Deputy2 Box
Before attempting to connect or operate this product, please read these instructions completely.
www.videolarm.com
81-IN5436
12-21-2011

IMPORTANT SAFEGUARDS SAFETY PRECAUTIONS
1- 800 - 554 -1124
1 Read these instructions.
2 Keep these instructions.
3 Heed all warnings
4 Follow all instructions.
5 Do not use this apparatus near water.
6 Clean only with damp cloth.
7 Do not block any of the ventilation openings. Install in accordance with the
manufacturers instructions.
8 Cable Runs- All cable runs must be within permissible distance.
9 Mounting - This unit must be properly and securely mounted to a supporting
structure capable of sustaining the weight of the unit.
Accordingly:
a. The installation should be made by a qualied installer.
b. The installation should be in compliance with local codes.
c. Care should be exercised to select suitable hardware to install the unit, taking into
account both the composition of the mounting surface and the weight of the unit.
10 Do not install near any heat sources such as radiators, heat registers, stoves, or other
apparatus ( including ampliers) that produce heat.
11 Do not defeat the safety purpose of the polarized or grounding-type plug. A
polarized plug has two blades with one wider than the other. A grounding type
plug has two blades and a third grounding prong. The wide blade or the third
prong are provided for your safety. When the provided plug does not t into your
outlet, consult an electrician for replacement of the obsolete outlet.
12 Protect the power cord from being walked on or pinched particularly at plugs,
convenience receptacles, and the point where they exit from the apparatus.
13 Only use attachment/ accessories specied by the manufacturer.
14 Use only with a cart, stand, tripod, bracket, or table specied by the manufacturer,
or sold with the apparatus. When a cart is used, use caution when moving the cart/
apparatus combination to avoid injury from tip-over.
15 Unplug this apparatus during lighting storms or when unused for long periods of time.
16 Refer all servicing to qualied service personnel. Servicing is required when the
apparatus has been damaged in any way, such as power-supply cord or plug is
damaged, liquid has been spilled of objects have fallen into the apparatus, the
apparatus has been exposed to rain or moisture, does not operate normally, or
has been dropped.
Be sure to periodically examine the unit and the supporting structure to make sure that the integrity
of the installation is intact. Failure to comply with the foregoing could result in the unit separating
from the support structure and falling, with resultant damages or injury to anyone or anything struck
by the falling unit.
CAUTION: TO REDUCE THE RISK OF
ELECTRIC SHOCK, DO NOT REMOVE
COVER ( OR BACK). NO USER- SERVICE-
ABLE PARTS INSIDE. REFER SEVICING
TO QUALIFIED SERVICE PERSONNEL.
The lightning ash with an arrowhead symbol,
within an equilateral triangle, is intended to
alert the user to the presence of non-insulated
“dangerous voltage” within the product’s
enclosure that may be of sufcient magnitude
to constitute a risk to persons.
Este símbolo se piensa para alertar al usuario a la presencia
del “voltaje peligroso no-aisIado” dentro del recinto de los
productos que puede ser un riesgo de choque eléctrico.
Ce symbole est prévu pour alerter I’utilisateur à la presence
“de la tension dangereuse” non-isolée dans la clôture de
produits qui peut être un risque de choc électrique.
Dieses Symbol soll den Benutzer zum Vorhandensein der
nicht-lsolier “Gefährdungsspannung” innerhalb der
Produkteinschließung alarmieren die eine Gefahr des
elektrischen Schlages sein kann.
Este símbolo é pretendido alertar o usuário à presença “di
tensão perigosa non-isolada” dentro do cerco dos produtos
que pode ser um risco de choque elétrico.
Questo simbolo è inteso per avvertire I’utente alla presenza
“di tensione pericolosa” non-isolata all’interno della
recinzione dei prodotti che può essere un rischio di scossa
elettrica
.
The exclamation point within an equilateral
triangle is intended to alert the user to
presence of important operating and
maintenance (servicing) instructions in the
literature accompanying the appliance.
UNPACKING
Unpack carefully. Electronic components can be
damaged if improperly handled or dropped. If an item
appears to have been damaged in shipment, replace
it properly in its carton and notify the shipper.
Be sure to save:
1 The shipping carton and packaging material.
They are the safest material in which to make future
shipments of the equipment.
2 These Installation and Operating Instructions.
Este símbolo del punto del exclamation se piensa para
alertar al usuario a la presencia de instrucciones importantes
en la literatura que acompaña la aplicación.
Ce symbole de point d’exclamation est prévu pour alerter
l’utilisateur à la presence des instructions importantes dans
la littérature accompagnant l’appareil.
Dieses Ausruf Punktsymbol soll den Benutzer zum
Vorhandensein de wichtigen Anweisungen in der Literatur
alarmieren, die das Gerät begleitet.
Este símbolo do ponto do exclamation é pretendido alertar o
usuário à presença de instruções importantes na literatura
que acompanha o dispositivo.
Questo simbolo del punto del exclamaton è inteso per
avvertire l’utente alla presenza delle istruzioni importanti nella
letteratura che accompagna l'apparecchio.
SERVICE
CAUTION
RISK OF ELECTRIC SHOCK
DO NOT OPEN
If technical support or service is needed, contact us at
the following number:
TECHNICAL SUPPORT
AVAILABLE 24 HOURS

Limited Warranty for Moog Videolarm Products
Moog Videolarm warrants these products to be free from defects in material or workmanship as follows:
PRODUCT CATEGORY PARTS \ LABOR
All Enclosures and Electronics* Five (5) Years
Poles/PolEvators™/CamEvator Three (3) Years
Warrior Series™/Q-View™/IR Illuminators Five (5) Years
SView Series™ Five (5) Years **6 months if used in auto scan/tour operation
Controllers Five (5) Years
Power Supplies Five (5) Years
EcoKit Three (3) Years
Accessory Brackets Five (5) Years
Liberty Dome Three (3) Years
*DeputyDome™, NiteTrac™, Igloo Dome, PurgeDome™ Three (3) Years **6 months if used in auto scan/tour operation
During the labor warranty period, to repair the Product, Purchaser will either return the defective product, freight prepaid, or deliver it to Moog Videolarm
Inc. Decatur GA. The Product to be repaired is to be returned in either its original carton or a similar package affording an equal degree of protection with
a RMA # (Return Materials Authorization number) displayed on the outer box or packing slip. To obtain a RMA# you must contact our Technical Support
Team at 800.554.1124, extension 101. Moog Videolarm will return the repaired Product freight prepaid to Purchaser. Moog Videolarm is not obligated to
provide Purchaser with a substitute unit during the warranty period or at any time. After the applicable warranty period, Purchaser must pay all labor and/or
parts charges.
The limited warranty stated in these product instructions is subject to all of the following terms and conditions.
TERMS AND CONDITIONS
1. NOTIFICATION OF CLAIMS: WARRANTY SERVICE: If Purchaser believes that the Product is defective in material or workmanship, then written notice with an
explanation of the claim shall be given promptly by Purchaser to Moog Videolarm. All claims for warranty service must be made within the warranty period.
If after investigation Moog Videolarm determines the reported problem was not covered by the warranty, Purchaser shall pay Moog Videolarm for the cost of
investigating the problem at its then prevailing per incident billable rate. No repair or replacement of any Product or part thereof shall extend the warranty period
of the entire Product. The speci c warranty on the repaired part only shall be in effect for a period of ninety (90) days following the repair or replacement of that
part or the remaining period of the Product parts warranty, whichever is greater.
2. EXCLUSIVE REMEDY: ACCEPTANCE: Purchaser’s exclusive remedy and Moog Videolarm’s sole obligation is to supply (or pay for) all labor necessary to repair any
Product found to be defective within the warranty period and to supply, at no extra charge, new or rebuilt replacements for defective parts.
3. EXCEPTIONS TO LIMITED WARRANTY: Moog Videolarm shall have no liability or obligation to Purchaser with respect to any Product requiring service during the
warranty period which is subjected to any of the following: abuse, improper use, negligence, accident, lightning damage or other acts of God (i.e., hurricanes,
earthquakes), modi cation, failure of the end-user to follow the directions outlined in the product instructions, failure of the end-user to follow the maintenance
procedures recommended by the International Security Industry Organization, written in product instructions, or recommended in the service manual for the
Product. Furthermore, Moog Videolarm shall have no liability where a schedule is speci ed for regular replacement or maintenance or cleaning of certain parts
(based on usage) and the end-user has failed to follow such schedule; attempted repair by non-quali ed personnel; operation of the Product outside of the
published environmental and electrical parameters, or if such Product’s original identi cation (trademark, serial number) markings have been defaced, altered,
or removed. Moog Videolarm excludes from warranty coverage Products sold AS IS and/or WITH ALL FAULTS and excludes used Products which have not
been sold by Moog Videolarm to the Purchaser. All software and accompanying documentation furnished with, or as part of the Product is furnished “AS IS”
(i.e., without any warranty of any kind), except where expressly provided otherwise in any documentation or license agreement furnished with the Product. Any
cost associated with removal of defective product and installation of replacement product is not included in this warranty.
4. PROOF OF PURCHASE: The Purchaser’s dated bill of sale must be retained as evidence of the date of purchase and to establish warranty eligibility.
DISCLAIMER OF WARRANTY
EXCEPT FOR THE FOREGOING WARRANTIES, Moog Videolarm HEREBY DISCLAIMS AND EXCLUDES ALL OTHER WARRANTIES, EXPRESS OR IMPLIED,
INCLUDING, BUT NOT LIMITED TO ANY AND/OR ALL IMPLIED WARRANTIES OF MERCHANTABILITY, FITNESS FOR A PARTICULAR PURPOSE AND/OR
ANY WARRANTY WITH REGARD TO ANY CLAIM OF INFRINGEMENT THAT MAY BE PROVIDED IN SECTION 2-312(3) OF THE UNIFORM COMMERCIAL
CODE AND/OR IN ANY OTHER COMPARABLE STATE STATUTE. Moog Videolarm HEREBY DISCLAIMS ANY REPRESENTATIONS OR WARRANTY THAT
THE PRODUCT IS COMPATIBLE WITH ANY COMBINATION OF NON-Moog Videolarm PRODUCTS OR NON-Moog Videolarm RECOMMENDED PRODUCTS
PURCHASER MAY CHOOSE TO CONNECT TO THE PRODUCT.
LIMITATION OF LIABILITY
THE LIABILITY OF Moog Videolarm, IF ANY, AND PURCHASER’S SOLE AND EXCLUSIVE REMEDY FOR DAMAGES FOR ANY CLAIM OF ANY KIND
WHATSOEVER, REGARDLESS OF THE LEGAL THEORY AND WHETHER ARISING IN TORT OR CONTRACT, SHALL NOT BE GREATER THAN THE ACTUAL
PURCHASE PRICE OF THE PRODUCT WITH RESPECT TO WHICH SUCH CLAIM IS MADE. IN NO EVENT SHALL Moog Videolarm BE LIABLE TO PURCHASER
FOR ANY SPECIAL, INDIRECT, INCIDENTAL, OR CONSEQUENTIAL DAMAGES OF ANY KIND INCLUDING, BUT NOT LIMITED TO, COMPENSATION,
REIMBURSEMENT OR DAMAGES ON ACCOUNT OF THE LOSS OF PRESENT OR PROSPECTIVE PROFITS OR FOR ANY OTHER REASON WHATSOEVER.
Electrical & Mechanical Specifications
!!
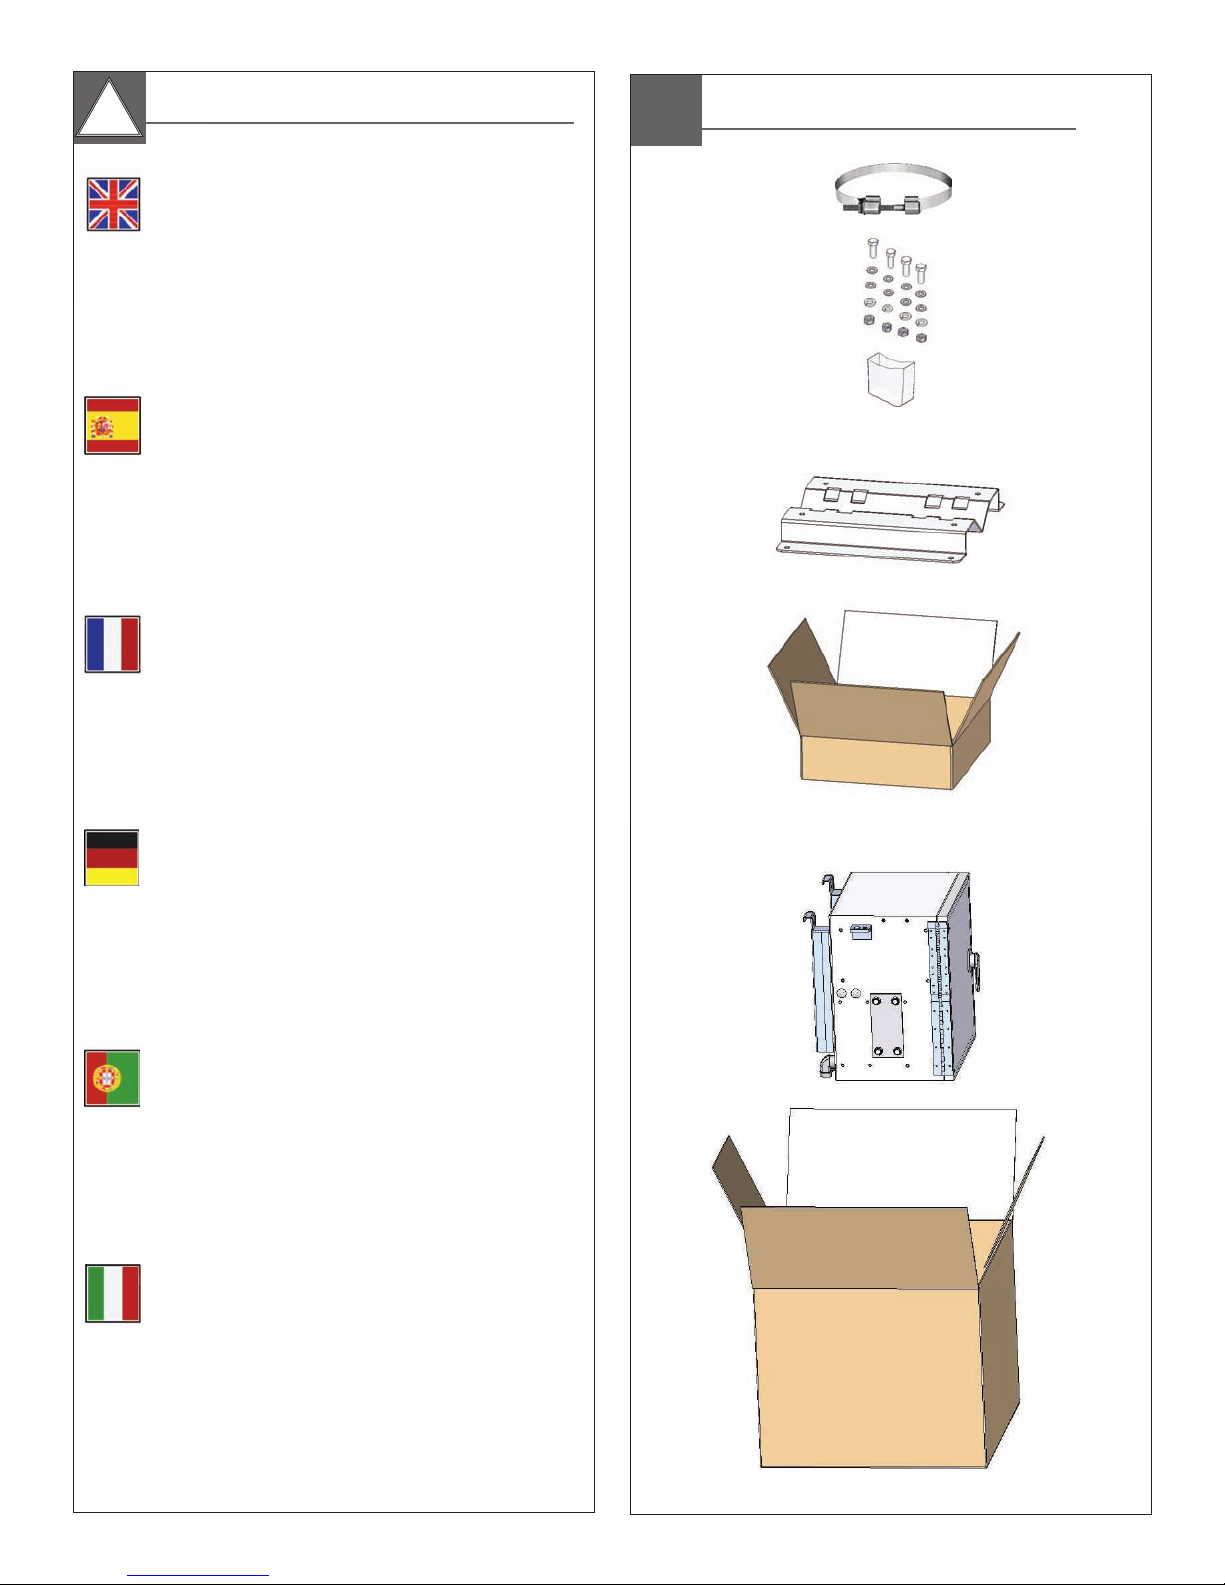
Content of Box
Deputy2
Power 120 VAC
English
Energía 120 VAC
Español
Puissance 120 VAC
Français
(X) 4
Deutsch
Portuguese
Italiano
Energie 120 VAC
Poder 120 VAC
Alimentazione 120 VAC
Note: Additional products may be included based around your purchase order
The Deputy2 can be mounted either on a pole or
surface
• El Deputy2 se puede montar en un poste o una superficie
• Le Deputy2 peut être monté sur un poteau ou une surface
• Das Deputy2 kann entweder an einem Pfosten oder an einer
Oberfläche angebracht werden
• O Deputy2 pode ser montado em um pólo ou em uma superfície
• Il Deputy2 può essere montato su un palo o su una superficie
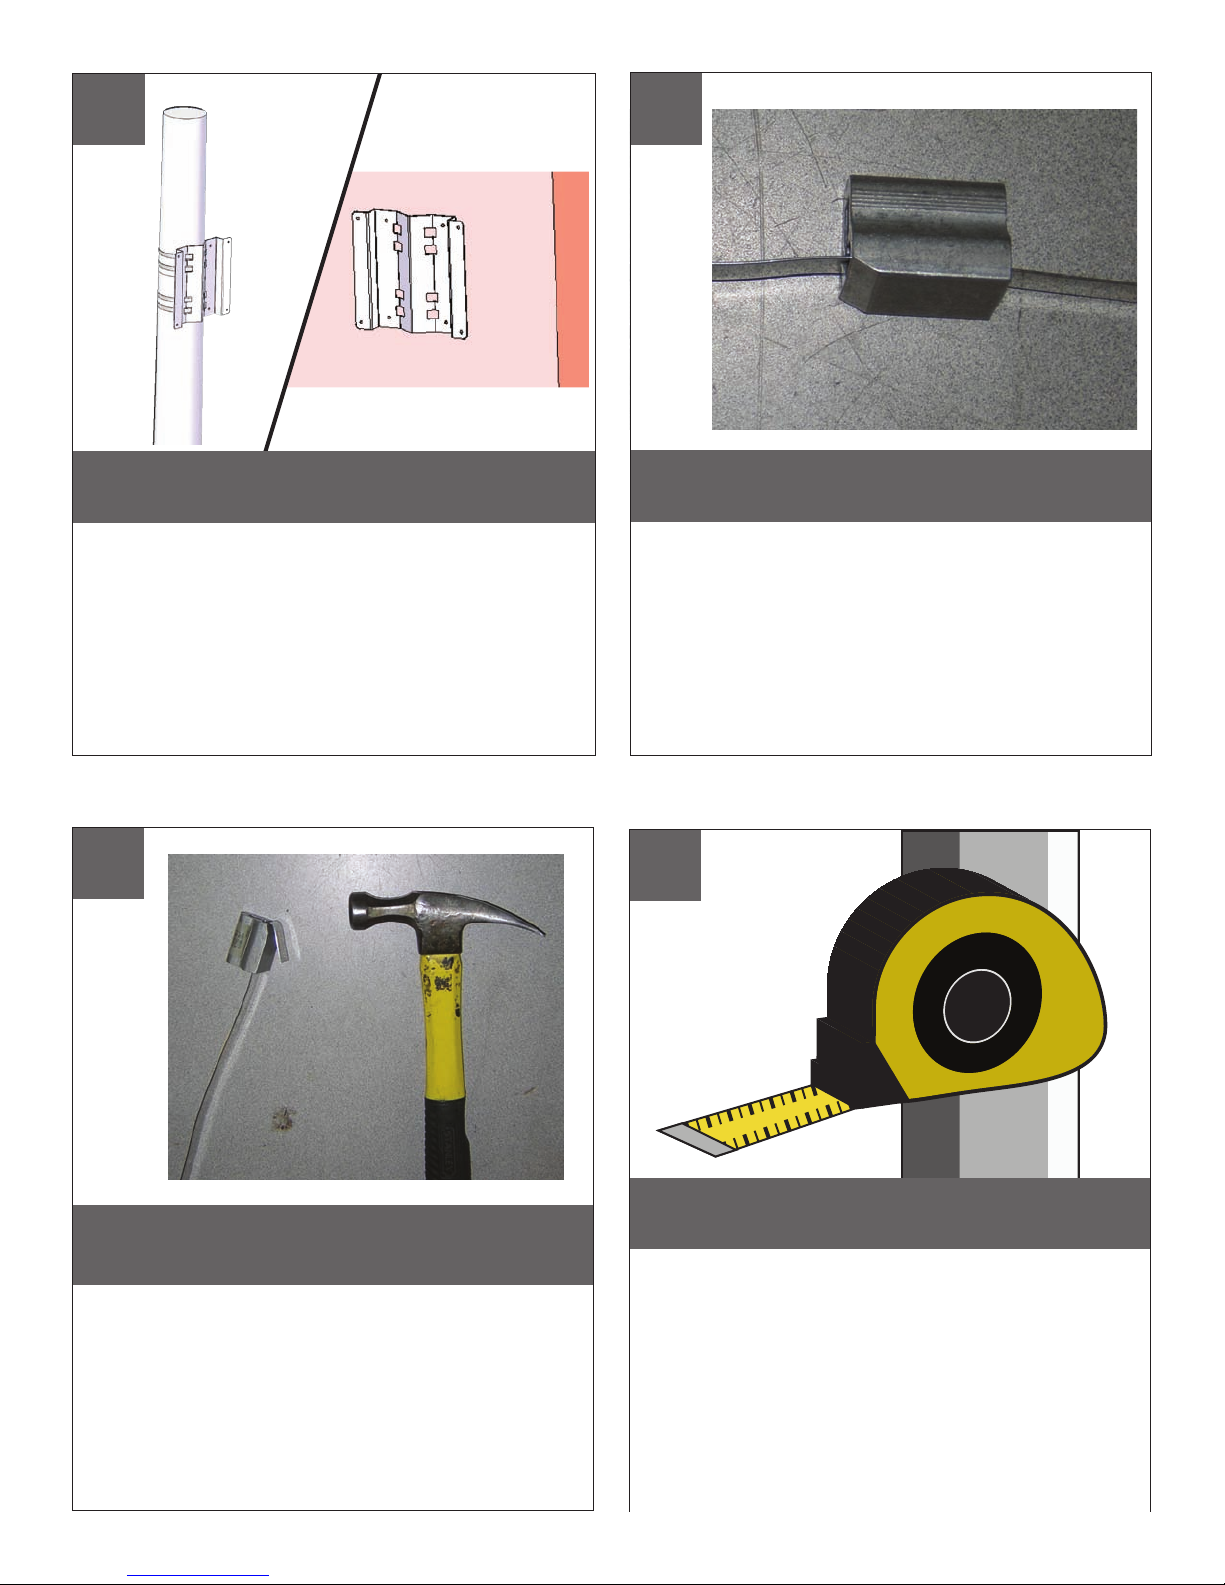
Pole Mount Assembly
1
2
Thread one retainer extrusion at the end of steel band,
allowing 1” (254mm) of band out. Beveled end of
extrusion to be out.
• Un hilo de retención de extrusión en la final de la banda de acero,
permitiendo 1 "(254 mm), de banda a cabo. Biselados final de
extrusión que se fuera.
• Thread extrusion une retenue à la fin de la bande d'acier, permettant
à 1 "(254mm) de la bande de. Biseauté fin de l'extrusion de ne pas être.
• Rijg een vasthoud-extrusie op het einde van stalen band, waardoor 1
"(254 mm) van de band uit. Schuine einde van de extrusie worden
uitgesloten.
• Passe um retentor extrusão no final da banda de aço, permitindo 1
"(254 milímetros), da banda fora. Biselado final de extrusão de ser fora.
• Iniziatore di estrusione uno fermo alla fine di banda di acciaio,
consentendo 1 "(254 millimetri) di banda fuori. Smussato fine di
estrusione di essere fuori.
3
Carefully bend steel band around beveled end of
extrusion. Hammer bend band to create a sharp
radius.
• Doblar cuidadosamente alrededor de banda de acero biselado final
de la extrusión. Libra doblado la banda para crear un plano de radio.
• Plier soigneusement autour de la bande d'acier biseautée fin de
l'extrusion. Livre bande pliée pour créer un plat de rayon.
• Buig stalen band rond schuine einde van extrusie. Pound gebogen
band voor het maken van een vlakke straal.
• Cuidadosamente dobre aço biselado fim da banda em torno de
extrusão. Libra curvados banda para criar um plano de raio.
• Attentamente piegare acciaio banda intorno smussato fine di
estrusione. Sterlina piegato banda per creare un piatto raggio.
4
Measure perimeters around pole at desired mounting location.
Measure band from outside edge of threaded retainer extrusion. Allow
for additional 1½” (254 mm) to be placed underneath additional
extrusion. Mark steel band and cut.
•
Medida de distancias en torno a polos de montaje en la ubicación deseada.
Medida de fuera de banda borde de la rosca de retención de extrusión. Dejar
para más 1½ "(254 mm), que se coloca debajo adicionales de extrusión. Marcos
de acero y banda de corte.
• Mesurer les distances autour de pôles de montage à l'emplacement désiré.
Mesure bande de bord extérieur de l'extrusion de retenue fileté. Pour permettre
supplémentaire de 1½ "(254 mm) pour être placées sous d'autres extrusion. Mark
bande d'acier et de coupe.
• Meet afstanden rond de paal te monteren gewenste locatie. Maatregel band van
buiten de rand van het threaded vasthoud-extrusie. Laat voor extra 1½ "(254 mm)
worden geplaatst onder meer extrusie. Mark stalen band en uitgesneden.
• Medida de distâncias de cerca de pólo na montagem local desejado. Medida
banda de fora de borda enfiada retentor extrusão. Permitir adicionais para 1½
"(254 mm) devem ser colocados debaixo adicionais extrusão. Mark banda de aço
e de corte.
• Misura le distanze intorno al polo di montaggio posizione desiderata. Misura banda
al di fuori del bordo del fermo filettati estrusione. Consenti per ulteriori 1½ "(254 mm)
ad essere messi sotto supplementari estrusione. Mark acciaio banda e taglio.
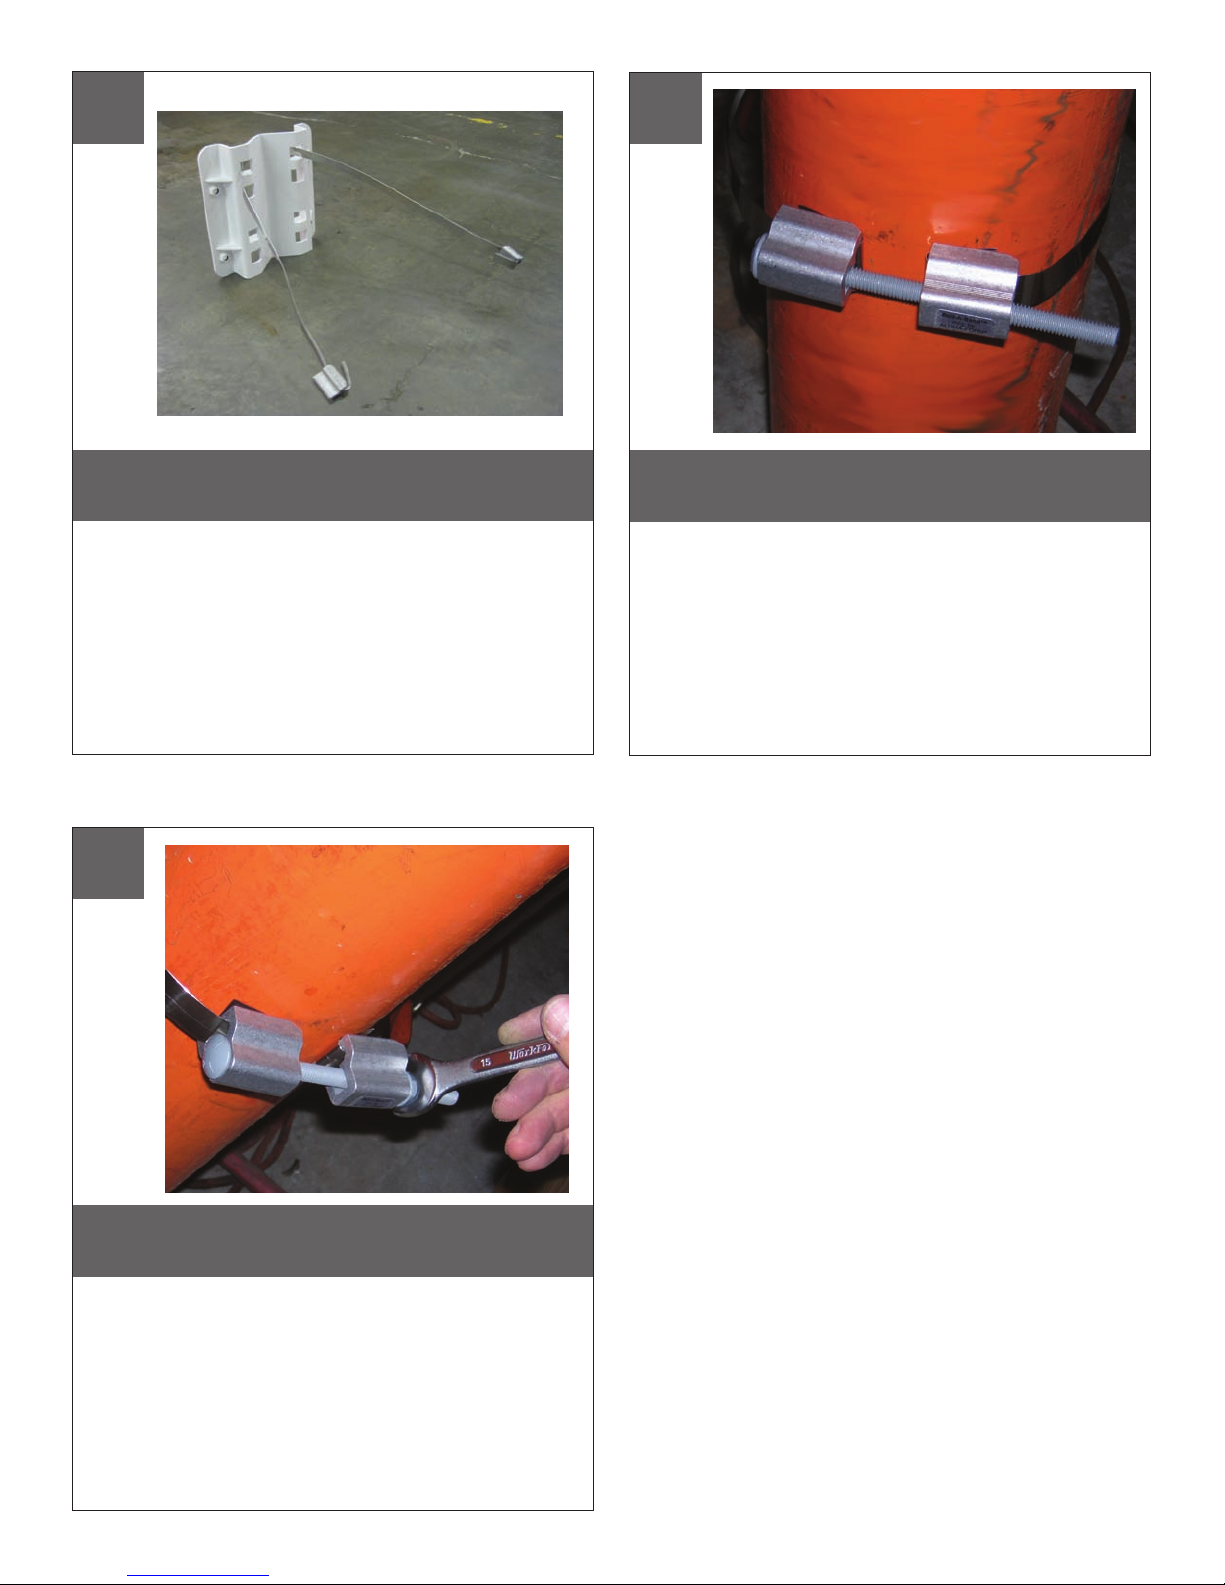
Pole Mount Assembly Continued
5
Thread mounting hardware and additional retainer extrusion
at opposite end of steel band. Refer to Block 1 and 2 for
instructions.
• Rosca de montaje de hardware adicional y anticipo de extrusión en el
extremo opuesto de la banda de acero. Consulte a Bloque 1 y 2 para
obtener instrucciones.
• Thread matériel de montage et de retenue supplémentaire d'extrusion
à face en acier fin de bande. Reportez-vous à bloc 1 et 2 pour les
instructions.
• Rijg de montage van extra hardware en vasthoud-extrusie op het
andere uiteinde van stalen band. Raadpleeg Blok 1 en 2 voor
instructies.
• Rosca de montagem e hardware adicional retentor extrusão na
extremidade oposta da banda de aço. Referem-se Bloco 1 e 2 para
obter instruções.
• Iniziatore di montaggio e supplementari fermo estrusione a fine opposta
fascia di acciaio. Fare riferimento al blocco 1 e 2 per le istruzioni.
6
Place assembly around pole at desired mounting location.
Insert bolt through retainer extrusions. Head of bolt needs to
lock into end of retainer.
• Lugar de reunión en torno a polos de montaje en la ubicación deseada.
Inserte el perno de retención a través de extrusiones. Jefe de la saeta a las
necesidades de bloqueo en la final del retenedor.
• Lieu de rassemblement autour de pôles de montage à l'emplacement désiré.
Insérer boulon de retenue extrusions. Chef de boulon doit en fin de verrouillage de la bague de retenue.
• Plaats vergadering rond de paal te monteren gewenste locatie. Plaats bout
door vasthoud extrusies. Hoofd van de bout moet vastklikken einde van
vasthoud.
• Colocar cerca de montagem em poste montagem local desejado. Inserir
ferrolho através retentor extrusões. Chefe do ferrolho precisa ser encaixado na
extremidade do dispositivo de retenção.
• Luogo di montaggio intorno al polo di montaggio posizione desiderata.
Inserire il bullone attraverso fermo estrusioni. Capo del bullone deve bloccare
in fine di fermo.
7
Thread nut to end of bolt and tighten with wrench.
• Hilo para poner fin a la tuerca de tornillo y apretar con llave.
• Thread noix à la fin de boulon et serrez avec clé.
• Thread moer tot het einde van de bout en draai met de moersleutel.
• Thread porca para o fim do ferrolho e aperte com a chave inglesa.
• Iniziatore dado alla fine del bullone e serrare con la chiave inglese.
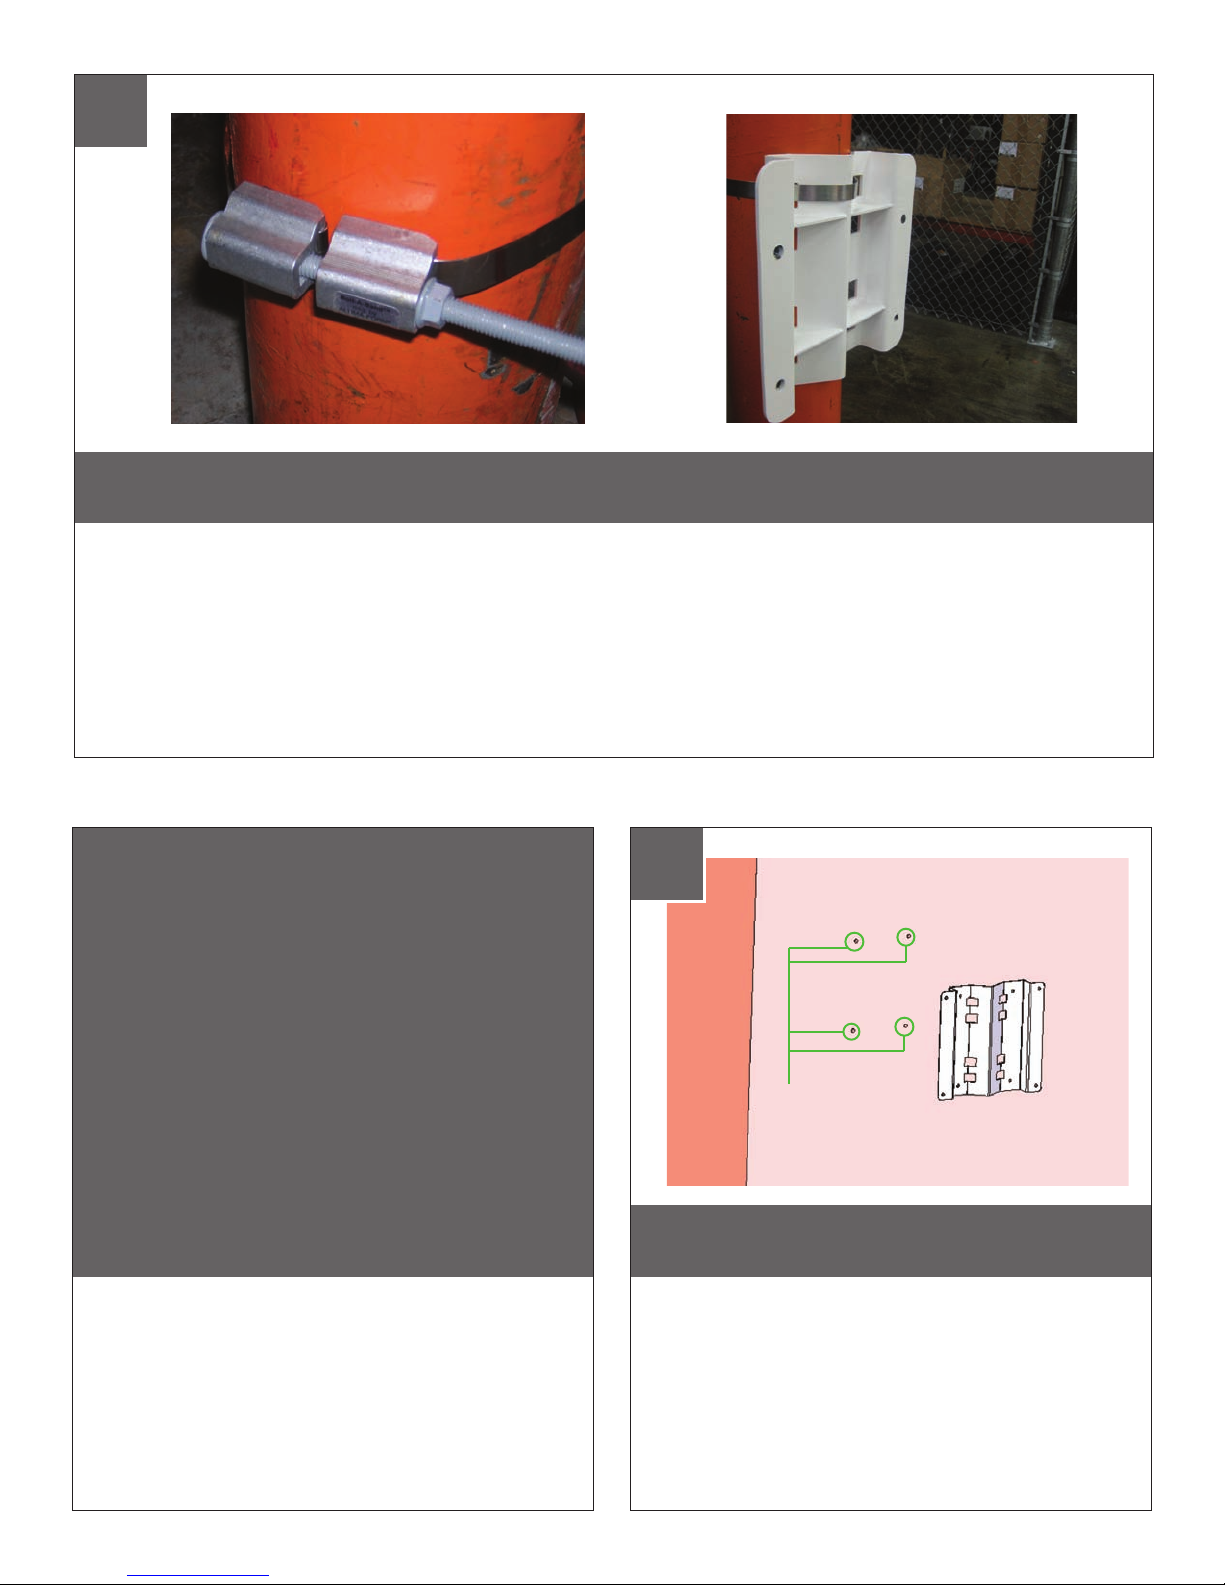
Pole Mount Assembly Continued
8
Installation is complete when nut is tight / secure and all slack has been removed from steel band.
• La instalación es completa cuando es apretado la tuerca / garantizar la seguridad de todos y la atonía se ha eliminado de la banda
de acero.
• L'installation est terminée lorsque l'écrou est serré, sécurité et tous les mou a été retiré de la bande d'acier.
• De installatie is volledig wanneer moer is strak / beveiligde en alle speling verwijderd is van staal-band.
• A instalação está completa quando porca é apertado / seguro e todos folga foi removido da banda de aço.
• L'installazione è completa quando il dado è stretto / e tutte le sicuro slack è stata rimossa dalla banda di acciaio.
From
A-Z
Repeat for multiple band applications.
• Repetición para los usos de venda múltiples.
• Répétition pour des applications de bande multiples.
• Wiederholung für mehrfache Bandanwendungen.
Wall Mount Assembly
9
(4) holes
Locate and drill (4) holes 2” deep
• Localice y perfore (4) los agujeros 2” profundamente
• Trouvez et forez (4) les trous 2 » profondément
• Lokalisieren Sie und bohren Sie (4) Löcher 2“ tief
• Repetição para aplicações de faixa múltiplas.
• Ripetizione per le applicazioni di fascia multiple.
• Encontre e perfure (4) furos 2” profundamente
• Individui e perfori (4) fora 2„ in profondità
 Loading...