

Page 1

Page 2

QUICK OVERVIEW
NOTE: Before launching Animoog, please open your iPad
Settings, select General, and turn Multitasking Gestures off.
ANISOTROPIC SYNTHESIS ENGINE
The Anisotropic Synthesis Engine (ASE) is the heart of Animoog. It is a dynamic
waveform animator that is comprised of an X/Y Grid with 8 TImbRES, each
containing 16 waveforms represented by a row of blocks. TImbRES are sounds
derived from sources that include Moog synthesizers, and Moogerfooger
analog effects modules. The oscilloscope display shows the evolving audio
waveform created by voices traveling through the X/Y Grid, allowing you to see
in detail the changes of timbre you are hearing in real time.
The ORIGIN point on the X/Y Grid determines which part of a TImbRE plays
when a key is pressed. You can also use it as a performance control. Play a note,
and at the same time touch and drag the ORIGIN. The voices will change based
on their location in the X/Y Grid.
Page 3
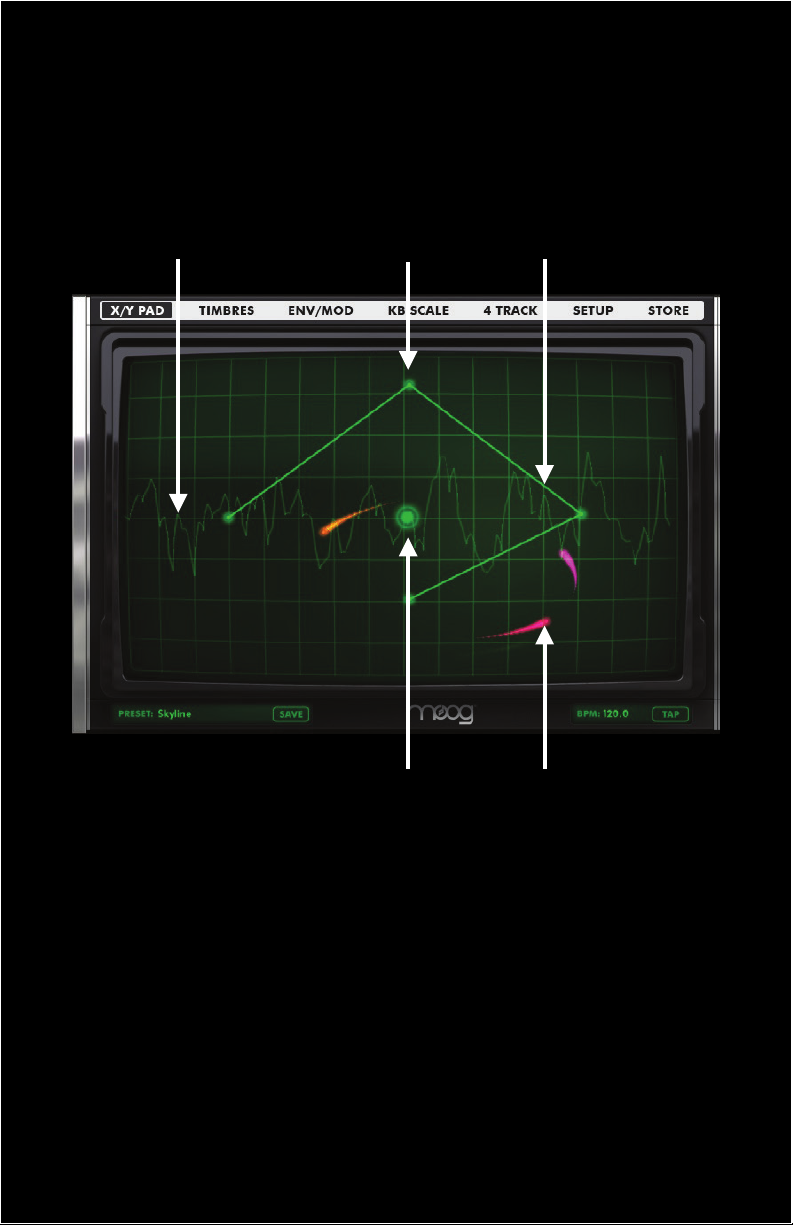
COmETS
COmETS are visual representations of each voice being played. These comets
follow a configurable PATH. Depending on the chosen preset you will see
comets orbit the path or travel fluidly through it.
OSCILLOSCOPE NODE PATH
ORIGIN COmET
ORIGIN
The ORIGIN determines which part of a timbre will play when a key is pressed.
Pressing a key while moving the ORIGIN with your finger will cause the sound
to change In real time based on its position.
OSCILLOSCOPE
The OSCILLOSCOPE provides a visual display of the waveform being generated
by Animoog.
Note: The Oscilloscope can be disengaged in the Setup> Configuration menu if desired.
Page 4
COmETS
COmETS are visual representations of each voice that is triggered when a key is
pressed. These COmETS travel through the X/Y grid as visual feedback regarding each note’s place in a timbre.
Note: If no Path or Orbit module parameters have been assigned, pressing a key simply
causes the Origin to glow.
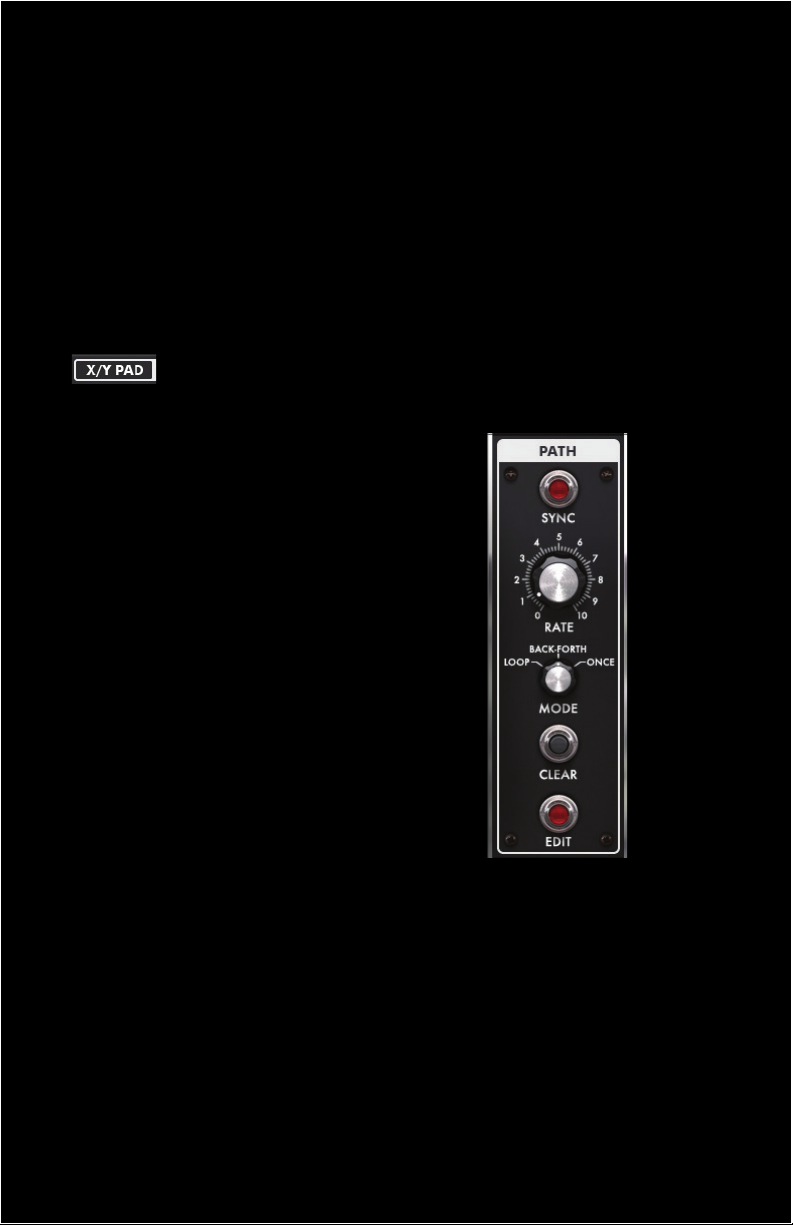
PATHS AND ORbITS
Each voice follows a path based on settings in the PATH module. Voices can
also be made to orbit a path by using the ORbIT module.
CREATING A PATH AND ORbIT
Select the X/Y PAD from the main menu.
Select the PAT H tab on the right to
access the PATH module.
Press the Edit button to create
or edit a path (Red light on).
CREATE: Touch points on the grid
to create a path. New nodes will
automatically connect to each other.
ED IT: Touch and drag nodes to
new locations.
DELETE: To delete a node, simply
double tap it.
When your path is complete, press
the EDIT button again.
PATH mODULE PARAmETERS
The R ATE control determines how fast
each COmET moves along the path.
Note: High settings create complex
sounds and geometric shapes in the X/Y grid.
mODE: determines how comets travel
through a path.
LOOP: Comets follow the path from beginning to end repeatedly.
bACK- FO RTH: Comets move between the start and end point of a path repeat-
edly.
ONCE: Comets follow the path from beginning to end and latch to the end point.
SYNC: Sets the Path RATE to be a multiple or division of Animoog’s current BPM .
• CLEAR: Erases any existing path and nodes.
Page 5
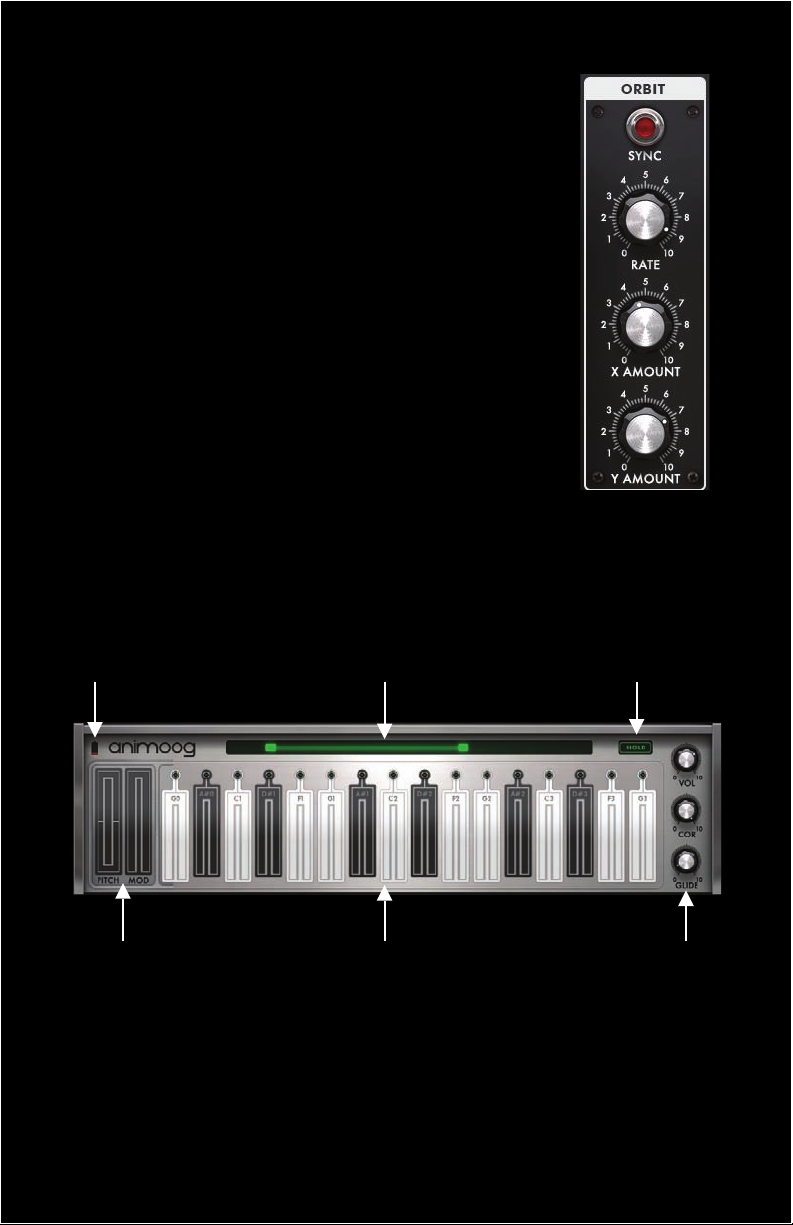
ORbIT mODULE PARAmETERS
Select the ORbIT tab to access the ORbIT mODULE.
RATE : Determines the speed at which a COmET will
orbit a Path in the X/Y Grid.
The X AmOUNT and Y AmOUNT controls determine
how a Comet will orbit the Path in the X/YGrid.
X AmOUNT: Defines left to right motion.
Y AmOUNT: Determines top to bottom motion.
At low RATE and AmOUNT settings, voices follow
the PAT H with minimal orbit.
At medium R AT E and AmOUNT settings each voice
will orbit in a circular motion as it follows the PAT H .
At maximum settings, the voices orbit a PATH so
rapidly that extremely modulated sounds occur.
SYNC: Sets the ORbIT module’s RATE to be a multiple
or division of Animoog’s current BPM.
USING THE KEYbOARD
bATTERY LIFE KEY SPACING CONTROL HOLD bUTTON
mOD STRIPS TOUCH KEYS VOL, COR, & GLIDE
TOUCH KEYS
Animoog’s TOUCH KEYS feature an indicator that displays a unique color for
each voice as it is played. Note VELOCITY is determined by where a key is
struck from top to bottom. After a note is pressed, a held key will illuminate.
Finger movement toward the top of a key will cause it to illuminate representing an increase in mODULATION amount. Key indicators and voice trails remain
illuminated until each voice has fully decayed.
Page 6
KEY SPACING
The KEY SPACING CONTROL shifts the keyboard to display lower or higher
notes in a scale. It also permits stretching or shrinking the number of keys displayed. To shift the keys, press and drag the center of the control. To increase
or decrease the number of keys displayed, press and drag the end tab.
mOD STRIPS
mOD and PITCH strips are assignable in the mOD section and can be toggled
On/Off in the SETUP page.
VOL, COR, AND GLIDE CONTROLS
The VOL (volume) knob sets Animoog’s overall volume. The COR (correction)
knob sets pitch correction between keys. At 10, no correction occurs. At 5,
rocking your finger side to side will allow for vibrato and pitch bend effects. At
0, there is no pitch correction between keys and Animoog’s keys function as a
ribbon controller. The GLIDE knob adjusts portamento time (the time it takes
for pitch to slide from note to note.)
HOLD bUTTON
The HOLD button will sustain a note indefinitely. Up to four notes can be played
simultaneously, after which the oldest voice is replaced by each new note.
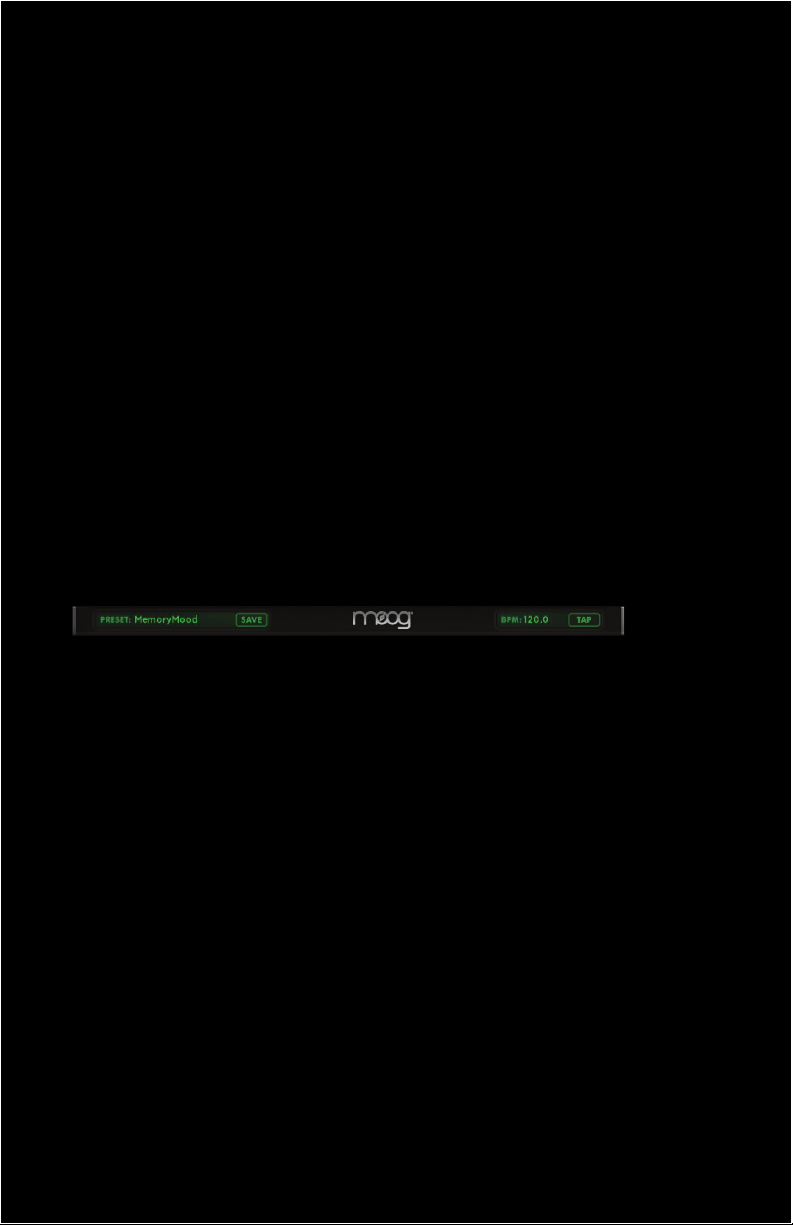
SELECTING PRESETS AND SETTING TEmPO
PRESET SELECTOR
Touch the PRESET menu to open it, then select a preset from a wide variety of
categories. Press and hold SAVE to save changes to a preset, or to create a new
preset.
bPm/TAP TEmPO
Touch and drag up or down on the BPM indicator to increase or reduce the
BPM. Tapping the TAP button initiates tap tempo.
Page 7
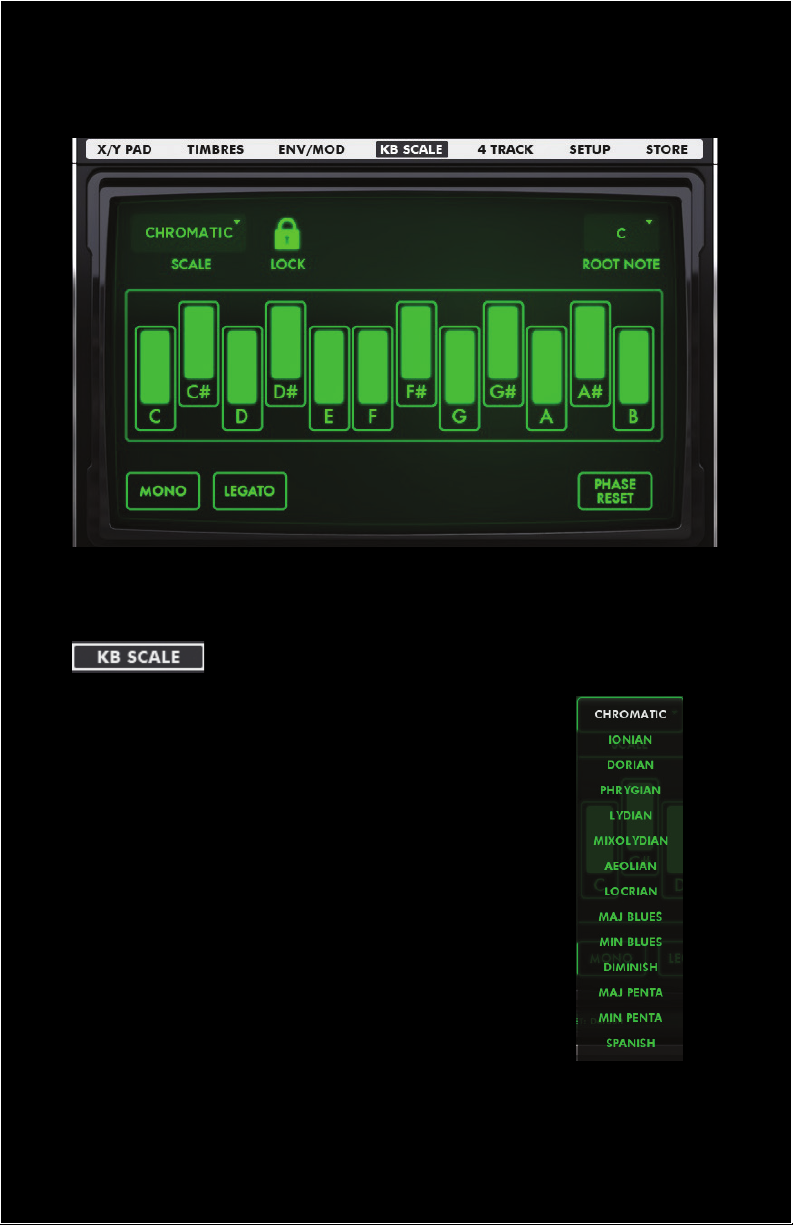
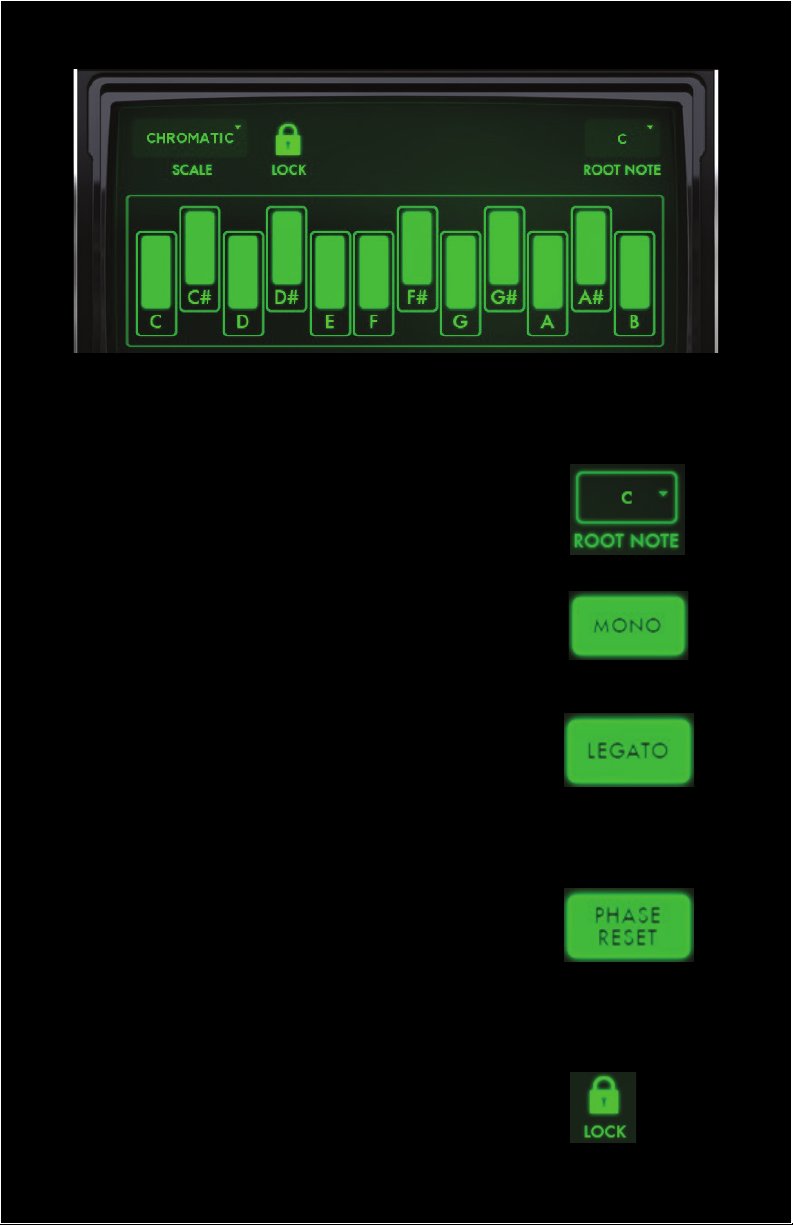
Kb SCALE PAGE
SELECT A SCALE
Touch the Kb SCALE tab on the mAIN mENU.
Touch the SCALE button. A list of scales displays
below. Select the desired scale, and the keyboard
display will update to reflect the notes included
in the scale.
Page 8
You can add or remove notes from any scale by touching the keys in the
keyboard display.
SELECT A ROOT NOTE
The root note is the first note used in a scale.
Touch the root note button. A list of notes displays
below. Select the desired note.
mONO
In mONOPHONIC mode, only one note can be played
at a time. This is the classic performance behavior
found in many Moog synthesizers.
LEGATO
In Legato mode, playing a new note while holding
down another note does not trigger a new envelope.
This means that all notes behave as a continuous note
until the keys are completely released.
NOTE: Legato mode only works with Mono mode on.
PHASE RESET
Phase Reset mode forces the ASE oscillators to reset
their start phase with each new note for a more
consistent, hard-edged attack.
With Phase Reset off, voices run free and vary from
note to note naturally.
SCALE LOCK
Scale Lock maintains the currently specified keyboard
scale when changing presets.
8
Page 9
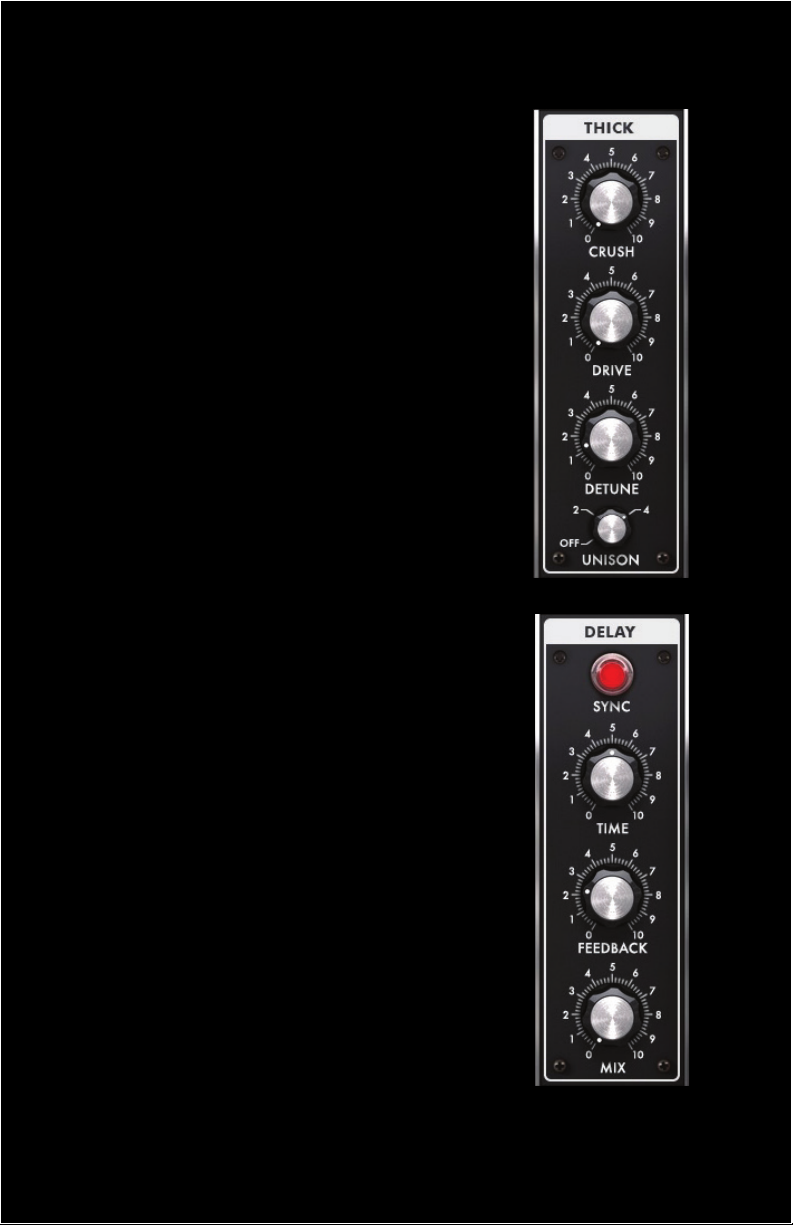
EFFECTS mODULES
THICK mODULE
Touch the THICK tab on the right to access
the Thick module.
CRUSH: Creates bit crushing effects with
aliasing and digital distortion via bit and
sample rate reduction.
DRIVE: Adds analog-style overdrive saturation
to the overall output of Animoog’s combined voices.
DETUNE: Works in conjunction with the UNISON
knob. When unison voices are added to a sound,
this control allows you to detune the pitch of the
additional voices. Low settings create classic
chorus-like effects, while higher settings create
larger intervals. At “10”, the pitch of additional
voices is detuned one full octave.
UNISON: Adds 2 or 4 additional voices to a sound.
NOTE: Unison voices are panned hard left and right.
DELAY mODULE
Touch the DELAY tab on the right to access
the Delay module.
SYNC: Sets the delay Time to be a multiple ‘or
division of the Animoog’s current BPM.
TImE: Adjusts the amount of time between when a
note is first played and when it Is repeated. Lower
settings create slap delays and doubling effects,
while higher settings create longer echoes.
FEEDbACK: Sets the amount of audio in the delay
line to be fed back into the delay’s input. Low settings
create single repeats and short echoes, while higher
settings generate long, lush delay trails that decay
over time. Higher settings can also create complex
textures.
mIX: Sets the blend of delayed vs. unaffected sound.
The higher the level, the louder the audio from the
delay. A setting of “5” sets both at equal volume.
9
Page 10

EFFECTS mODULES CONT.
FILTER mODULE
Touch the FILT E R tab on the right to access
the FILTE R module.
Select a filter TYPE:
• LP is a low pass filter that allows only frequencies
below the cutoff frequency to pass.
• bP is a band pass filter that allows only frequencies
at and around the cutoff frequency to pass.
• HP is a high pass filter that allows only frequencies
above the cutoff frequency to pass.
FREQUENCY: Determines the cutoff FREQUENCY
of the filter. This is the point at which the filter
begins to “work”.
RES: Adjusts the amount of RESONANCE, or emphasis,
at the filter’s cutoff frequency. Lower settings create
subtle colorations of the sound. Higher settings add
strong overtones. At 10, the filter is capable of
self-resonating.
DRIVE: Sets the amount of pre-filter drive from zero to full saturation. This
control is modeled after the classic Moog ladder filter design.
TECHNICAL NOTE: Unity gain is at “5”. Bipolar modulation of the drive control
inverts the signal phase as it passes below zero.
ENV: Works in conjunction with the FILTER ENVELOPE found in the E N V/ mOD
page. Positive settings apply the envelope in the normal attack, decay, sustain,
and release manner. Negative settings mean that the envelope is reversed. A
setting of “0” means no envelope is applied.
See the Env/Mod section for information on the Filter Envelope.
Page 11

EFFECTS mODULES CONT.
RECORD mODULE
Touch the RECORD tab on the right to access
the RECORD module.
Set the record tempo using the BPM/Tap
Tempo Control.
Tap the RECORD button. A countdown timer counts
off four beats before recording begins. The RECORD
button displays a white ring to indicate the amount of
recording time remaining.
Touch the RECORD button again to end the current
recording and automatically transition into Overdub
mode. From this point you can overdub a sound, or
press STOP to end your recording.
NOTE: The RECORD button also clears the memory
Bu ffe r.
OVERDUb: Allows you to record additional audio over
a previous recording stored in the Buffer.
Press the OVERDUb button and then press PLAY to
record on top of the audio file in the Buffer. You can also
press PL AY and then touch the OVERDUb button at any time.
Touch the STOP button to stop recording.
bUFFER CONTROLS
The Buffer stores a good take or mix so that an overdubbed performance can
be replaced if desired. Audio in the Buffer is stored as a clipboard.wav, which
can be copied and exported to another app. See AUDIOCOPY and AU DIO -
PASTE section.
COPY: Copies the current record Buffer audio to the clipboard.
PASTE: Places the current contents of the clipboard into the Buffer.
CLEAR: Clears the Buffer.
NOTE: Copy and Paste functions can also be used to move audio between Ani-
moog and other apps that support the AudioCopy/AudioPaste standards.
Page 12

AUDIOCOPY & AUDIOPASTE
AUDIOCOPY and AUDIOPASTE tools are used in the RECORD module and 4
TRACK RECORDER to allow sharing of audio files between them, and share
audio with other apps.
To open AUDIOCOPY/AUDIOPASTE double click on an audio file in the 4 track
editor, select AUDIOCOPY, and then follow the instructions.
Images below illustrate AUDIOCOPY and AUDIOPASTE dialogs.
Page 13

4-TRACK RECORDER
Available for downoad in the Animoog Store.
The 4-Track Recorder allows you to import, record, edit and mixdown four
channels of audio. You can then export your work or share directly to Soundcloud.
TRACK mENU AUDIO TRACK TImELINE TRACK CONTROLS
TRANSPORT CONTROLS mETRONOmE OPTIONS
TImELINE
The TImELINE is at the top of the 4 TRACK RECORDER and displays time in
Bars/Beats format. You can press and drag the timeline left or right to scroll to
different sections of a song. Press and drag up or down to zoom in or out.
TRANSPORT & mETRONOmE CONTROLS
TRANSPORT CONTROLS include buttons for REWIND TO bEGINNING, STOP,
PL AY, PAUSE, and RECORD functions.
mETRONOmE sets the volume and number of COUNT IN bEATS for the
mETRONOmE. Metronome tempo is set to Animoog’s BPM setting.
Page 14

TRACK mENU & CONTROLS
Each track contains controls for VOLUmE/ PAN ,
ARm TO RECORD, mUTE, LOOP, and SOLO.
Touching the volume slider opens a window
with PAN and VOLUmE controls.
OPTIONS
Touch the OPTIONS button to display the Options
menu used for working with projects.
UNDO: Reverts the last edit to the current project.
NEW PROjECT: Starts a new project.
LOAD PROjECT: Loads a previously saved project.
SAVE PROjECT AS: Saves the current project as new.
mIXDOWN PROjECT: Mixes project down to stereo file
for upload to SoundCloud.
RESAmPLING ON/OFF:
• ON - the armed track will record all audio currently
being output including audio in the Record module looper
and other tracks in the 4-track.
• OFF - the armed track will only record the ASE output.
FOLLOW SONG ON/OFF:
• ON – timeline scrolls to follow the current cursor position
• OFF – timeline display is stationary and does not follow the cursor.
Page 15

RECORDING AND EDITING AUDIO TRACKS
To get started, touch the OPTIONS button, then select NEW PROjECT.
RECORDING
Touch the Arm button to enable recording for a track.
Touch the Record button, then start playing Animoog.
To pause the recording, touch the Pause button.
Touch it again to resume.
Touch the Stop button to stop recording.
Touch Rewind to go back to the starting point of the recording.
CUT, COPY, AND SPLIT TRACKS
Double tap a clip to display the Edit menu:
CU T: Cuts the clip and places it on the clipboard.
COPY: Copies the clip to the clipboard.
SP LIT: Splits the clip at the current cursor location.
LOOP: Places moveable loop markers around the clip
for playing as a loop.
SHARE: Opens dialog for sharing clips on SoundCloud.
AUDIOCOPY: Copies the clip for sharing with
AudioCopy enabled apps.
NOTE: Use the Clip Color Slider on the left side of the Edit menu to change the color of a clip.
Page 16

TRACK mENU
You can paste a clip from the clipboard into a track or load a recording into the
4-track recorder from iTunes. Touch the TRACK mENU to open it, then:
LOAD CLIP: Loads a recording stored in iTunes.
PASTE CLIP: Pastes from the clipboard.
CLEAR TRACK: Clears all clips from a track.
AUDIOPASTE: Pastes audio copied via AudioCopy.
mOVING AUDIO CLIPS
Touch and drag a clip to move it within a track.
LOOPING TRACKS
Recorded audio can be looped within a track so
that the looped section plays continuously while
the player continues to move forward on the
timeline. To loop a recording:
Touch the Loop button in the track control area,
or from the Track Edit menu.
Touch and drag a loop marker to change
the loop area.
Page 17

SAVING & LOADING PROjECTS
To save a project:
Touch the OPTIONS menu and select SAVE PROjECT AS.
Type in a project name then touch SAV E .
To load an existing project:
Select Load project from the OPTIONS menu.
Select a project from the list, then touch LOAD.
mIXING DOWN PROjECTS
You can mixdown a project to a stereo MP3 file for sharing on SoundCloud.
From the OPTIONS menu select Mixdown Project.
When mixdown is complete, login to SoundCloud to upload the file.
NOTE: You can also share an individual clip in a track via the Share option on a
recording’s Edit menu.
Page 18

ENVELOPES & mODULATION
ENVELOPES
Touch the ENV/ m OD tab on the mAIN mENU.
The AmPLITUDE, FILTER, AND mODULATION ENVELOPES essentially automate the parameter they are assigned to by determining the Attack time, Decay
time, Sustain Level, and Release time of each function.
• AmP controls the dynamics of a sound.
• FI LT E R tailors the timbre of a sound over time.
• mOD can be selected as a modulation source for a
Mod slot, but is only used when selected.
Page 19

EDITING ENVELOPES
Double tap the corresponding ENVELOPE box to enlarge it.
Touch and drag the ENVELOPE NODES to adjust the Attack, Decay, Sustain,
and Release settings. Double tap the envelope to minimize the display.
NOTE: You can also modify an envelope while minimized.
LFO SECTION
The LFO (low frequency oscillator) is a mODULATION SOURCE accessible
via mOD SLOTS 1-4.
RATE : Adjusts the LFO frequency (how rapidly the LFO waveform cycles.)
SYNC: Sets the current LFO Rate to be a multiple or division of Animoog’s cur-
rent BPM, ranging from 8 Wn (whole notes) to 1/64 Wn.
SHAPE: Provides continuously variable selection between five different wave
shapes: Sine , Ramp, Sawtooth, Square, & Sample and Hold.
TECHNICAL NOTE: All of the wave shapes are bipolar (symmetrical over the
zero crossing) except for Square wave, which is unipolar.
Kb TRIG: Causes the LFO waveform to restart with each new note. This is useful
for creating consistent sound from note to note.
Page 20

mODULATION SLOTS
SOURCE
The SOURCE is a constantly changing signal that is used to
create mild to extreme modulation.
Touch the SOURCE mENU to select a source.
OFF: (A source is not necessary). You can use the CONTROL
to manipulate a destination, but a positive or negative value
must be applied to the AmOUNT.
LFO: Applies the LFO to the DESTINATION.
mOD: Applies the mODULATION ENVELOPE to the DESTINATION.
POSITION-X: Applies modulation according to a voice’s X position on the X/Y GRID.
POSITION -Y: Applies modulation according to a voice’s Y position on the X/Y GRID.
SOURCE AmOUNT
The AmOUNT control scales the maximum amount of
modulation sent from the SOURCE to the CONTROL
or DESTINATION.
The AmOUNT knob is bipolar and can be used to scale or
invert the selected source’s modulation amount. A positive
or negative value must be assigned or nothing will occur.
NOTE: Double tapping the Amount Knob returns it to 0.
Page 21

CONTROL
Control scales and adjusts the level of a SOURCE before
using it to modulate a DESTINATION, similar to a
volume control.
Touch the CONTROL menu to select a controller.
Adjust the AmOUNT knob to scale (positive) or
invert(negative) the Control. A setting of “0” means
no scaling or inversion will occur.
CONTROL AmOUNT
If the SOURCE is set to OFF, the
selected CONTROL is scaled by
the CONTROL AmOUNT knobs and
routed to the DESTINATION.
If a SOURCE has been selected,
the SOURCE AmOUNT sets the
initial modulation amount, and the
CONTROL AmOUNT scales the
minimum to maximum modulation sent
to a DESTINATION.
NOTE: If you simply want to send a
Modulation Source to a Destination with no
Control, select Off from the CONTROL menu.
DESTINATION
The DESTINATION menu allows you to select a
modulations final DESTINATION. Once selected, your
SOURCE and CONTROL will dynamically effect and
control the assigned DESTINATION parameter.
Page 22

TImbRES PAGE
SELECT A TImbRE
Touch the TImbRES tab on the mAIN mENU.
The TImbRES page contains two columns. The left column displays Timbres as
they appear in the X/Y GRID. The right column displays all available Timbres.
Previewing Timbres
Press and hold the PREVIEW button to listen to a specific TImbRE. Timbres
evolve so be sure to press the button long enough to hear all the waveforms.
LOADING TImbRES FROm THE LIbRARY
Touch a TImbRE on the left row, then touch the desired TImbRE from the
library on the right to load it into that position.
mOVING TImbRES
Touch and drag a Timbre
up or down to move it to the
desired location in the list.
Page 23

SETUP PAGE
mIDI TAb
SELECTING A mIDI CHANNEL
To control Animoog from an external MIDI device, specify a MIDI input channel
that corresponds to the MIDI output source. If mIDI IN is set to OmNI Animoog
will receive all messages sent on any MIDI channel.
NOTE: An iPad appropriate MIDI connection device is required.
PITCH bEND
RANGE: Sets the Pitch Bend range to 2, 3, 4, 5, 7, or 12 semitones.
LOAD FROm PRESET: Allows Animoog to load new Pitch Bend ranges as de-
fined within a preset.
SENDS - CH. PRESSURE, POLY PRESSURE AND VELOCITY
Touch to enable/disable the associated MIDI messages.
NOTE: Only available as part of the MIDI Expansion Pack.
REFRESH: Touch to refresh the list of connected MIDI devices.
PANIC!: Touch to reset a stuck MIDI note.
Page 24

mAPPING mIDI CCs
To map a function, touch the desired parameter.
(All controls outlined in red can be mapped.) The
outline changes to green.
Adjust the desired control on your connected MIDI
device. The CC is now mapped, and the assigned CC
number displays on the specified Animoog control.
You can assign multiple CCs. When complete,
be sure to turn off MAP CCs, save your preset,
and save your CC Map.
mANUAL mAPPING
Tap a control twice to display the mIDI CC
mAPPING box, type in a VAL UE, then touch S AVE.
To erase or change, tap a control twice, delete the numbers or type in a new
value, then touch SAVE .
SAVE/LOAD CC mAP: Press this button to save and recall any of your CC maps.
NOTE: The X/Y Origins, Module controls, Envelope ADSR, and LFO can all be
MIDI mapped.
Page 25

PRESETS TAb
NEW PRESET: Creates a new preset.
DELETE PRESET: Deletes the currently-selected preset.
RANDOm PRESET: Loads a preset based on a completely random set of param-
eters and Timbres.
ImPORT PRESETS: Import presets from iTunes. For more information see the
Importing and Exporting Presets section.
EXPORT PRESETS: Export your presets to iTunes. For more information see
Importing and Exporting Presets section.
Page 26

CONFIGURATION TAb
bACKGROUND AUDIO: Toggles background audio on/off.
mOD STRIPS: Toggles the Pitch and Mod Strips displayed on the keyboard on/off.
OSCILLOSCOPE: Toggles the oscilloscope display on the X/Y Pad on/off.
RECORDER bEEP: Toggles the recorder metronome beeps on/off.
ImPORTING AND EXPORTING PRESETS
EXPORT PRESETS
Touch the EXPORT PRESETS button. All onboard presets are compressed into
a zip file that can be saved to your iTunes application’s iPad data folder.
Connect the iPad to a computer with iTunes.
Click on the iPad under the DEVICES mENU in iTunes.
Select the APPS TAb at the top of iTunes.
Scroll down until you see FILE SHARING.
Select ANImOOG from the FILE SHARING list (You should see the exported
presets in the Animoog Documents).
You can now select and save the file to your computer from here.
Page 27

ImPORT PRESETS
Connect the iPad to a computer with iTunes.
Click on the iPad under the DEVICES mENU in iTunes.
Select the APPS TAb at the top of iTunes.
Scroll down until you see FILE SHARING.
Select Animoog from the FILE SHARING list.
Click the ADD bUTTON (From here you can search and select a presets folder
from your computer).
Once you have selected a preset or multiple presets, press OPEN.
Press the ImPORT PRESETS button in ANImOOG’S Setup menu.
Note: Specifications subject to change without notice.
Moog®, and Animoog® are registered trademarks of Moog Music Inc.
©2013 Moog Music Inc
MOOG M USIC INC. 1 60 Broadway St. Asheville, NC 28801
P: (828) 251-0090 E: info@moogmusic.com W: www.moogmusic.com
Page 28

 Loading...