

Page 1

Guitar Multi-Effects Processor
Owner’s Manual
Page 2

Contents
Precautions
Items Explanation
Main Features
Battery Operation
Panel Instruction
Connections
Operation
Patch Selecting
Drum Rhythm
Tuner
Expression Pedal
Patch Editing
Patch Storing/Copying
Patch Pre-Select Recall Function
Factory Reset
Effects Explanation
Specification
...........................................................02
.................................................03
........................................................04
.................................................04
...................................................05
..........................................................07
...............................................................08
................................................08
..................................................09
................................................................10
.............................................11
....................................................13
......................................15
...................................................17
..............................................18
.........................................................22
.....................16
Troubleshooting
Appendix
Patch List
Drum Rhythm List
...............................................................24
.........................................................24
...................................................23
...........................................25
01
Page 3
Precautions
* PLEASE READ CAREFULLY BEFORE PROCEEDING *
Power Supply
Please connect the designated AC adapter to an AC outlet of the correct
voltage.
Please be sure to use only an AC adapter which supplies 9V DC, 300
mA, center minus.
Unplug the AC power adapter when not using or during electrical storms.
Connections
Always turn off the power of this and all other equipments before
connecting or disconnecting, this will help prevent malfunction and / or
damage to other devices. Also make sure to disconnect all connection
cables and the power cord before moving this unit.
Location
To avoid deformation, discoloration, or other serious damage, do not
expose this unit to the following conditions:
Direct sunlight
Heat sources
Magnetic fields
Extreme temperature or humidity
Excessive dusty or dirty location
High humidity or moisture
Strong vibration or shock
Interference with other electrical devices
Radios and televisions placed nearby may experience reception
interference. Operate this unit at a suitable distance from radios and
televisions.
Cleaning
Clean only with a soft, dry cloth. If necessary, slightly moisten the cloth.
Do not use abrasive cleanser, cleaning alcohol, paint thinners, wax,
solvents, cleaning fluids, or chemical-impregnated wiping cloths.
Handling
Do not apply excessive force to the switches or controls.
Do not let paper, metallic, or other objects into this unit.
Take care not to drop the unit, and do not subject it to shock or excessive
pressure.
02
Page 4

Items Explanation
Patch
A patch is comprised of information about the on/off status and effect
parameter settings used in each module.
Bank
A bank is a group of ten patches. GEM Box has 8 banks, labelled with
numbers 0 to 3 (unchangeable preset banks) and letters A to d
(editable user banks).
Effect module
A patch can be thought of as a combination of up to 8 single effects.
Each such effect is referred to as an effect module.
Effect type
Some effect modules have several different effects which are referred
to as effect types. Only one of these can be selected at a time.
Effect parameter
All effect modules have various parameters that can be adjusted.
These are called effect parameters or simply parameters. When
thinking of an effect module as a compact effect, the parameters
change the tone and effect intensity similar to the knobs on the device.
Mode
Mode is the status of different function keys and controls, GEM Box
has Play Mode for selecting and playing patches, Rhythm Mode for
editing a drum rhythm, Edit Mode for modifying effects, and Store
Mode for saving patches.
03
Page 5
Main Features
8 Effect Modules
60 Effect Types
40 Preset Patches
40 User Patches
40 Drum Rhythms
Assignable Expression Pedal
Precise Tuning function
Patch Pre-Select Recall function
Compact operation interface
Lightweight and tiny for easy transportation
AC adapter 9V DC power supply
AA battery (x4) power supply
Battery Operation
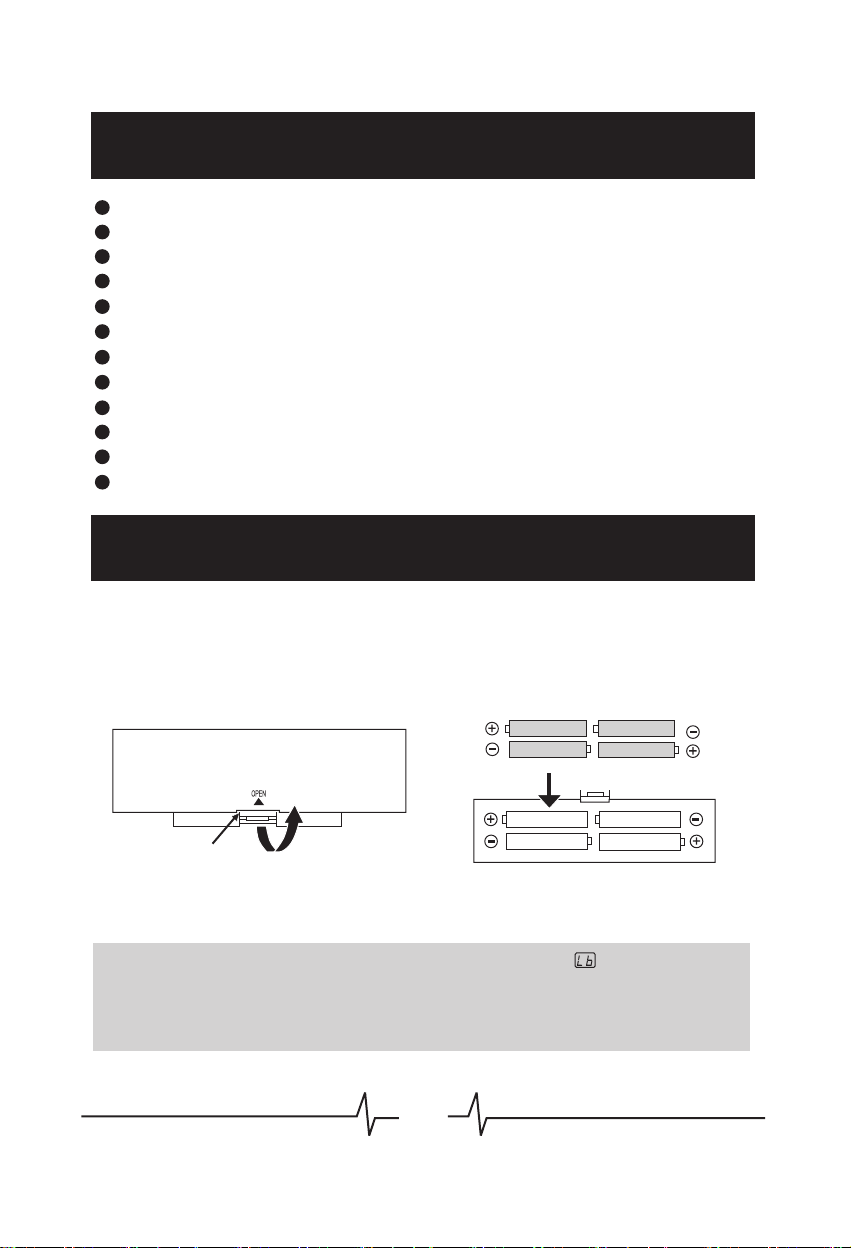
1. Turn off the GEM Box and open the battery holder on the bottom.
2. Insert 4 AA batteries and close the battery holder.
Press latch to release and then lift cover.
Latch
Note: When the baeries are geing low, the display will show to indicate this
situation.
Note: When using baeries, it is suggested to disconnect the guitar cable plug from the
[INPUT] jack when not using the device, to conserve baery power.
Four batteries (size AA)
04
Page 6
Panel Instruction
DRIVE
COMP/WAH
PEDAL
PATCH LEVEL
GAIN
RHYTHM
1
NR/CAB
EQ
PLAY / STOP
PLAY
MODULATION
STORE
4
RATE
DELAY
D.TIME
REVERB
DECAY
Guitar Multi-Effects Processor
BANK PATCH
# EDIT
PATCH
BYPASS / TUNER
HOLD FOR MUTE TUNING
2 673
EXP. PEDAL
Press
VALUE
MODULE BYPASS
5
05
DC9V
300mA
INPUT
8 91011
OUTPUT
(PHONES)
Page 7
Panel Instruction
01
Module Selector: Switches between every function module. In
patch edit mode, this knob selects the module/parameter for operation.
02
VALUE Knob with Enter Button: Dial the knob for setting master
level, or changing parameter values. Press the button to switch effect
type, ensure storing, etc.
03
LED Display: Shows bank and patch numbers, setting values, and
other information for operating.
04
PATCH – [PLAY/STOP] Footswitch: Selects patches
(backwards), controls the tuner, start/stop drum rhythm, and other
functions.
05
PATCH + [MODULE BYPASS] Footswitch: Selects patches
(forwards), controls the tuner, bypass effect module, and other
functions.
Expression Pedal: Adjusts volume or some effect parameters.
06
07
EXP. PEDAL LED: Indicates the status of the expression pedal.
08
INPUT Jack: 1/4” mono audio jack, for connecting guitar. When
operating GEM Box on batteries, plugging guitar cable into this jack will
turn on the unit.
09
OUTPUT [PHONES] Jack: 1/4” stereo audio jack, for connecting
headphone or guitar amplifier. Using a mono cable can output the
signal to an amplifier, or use a Y cable to output the signal to two
amplifiers. Also can plug a stereo headphone into this jack.
DC 9V Jack: For power supply, use a 9-volt DC regulated by AC
10
adapter, 300mA (plug polarity is positive on the barrel and negative in
the center).
11
Battery Holder: For installing batteries (AA x 4).
06
Page 8
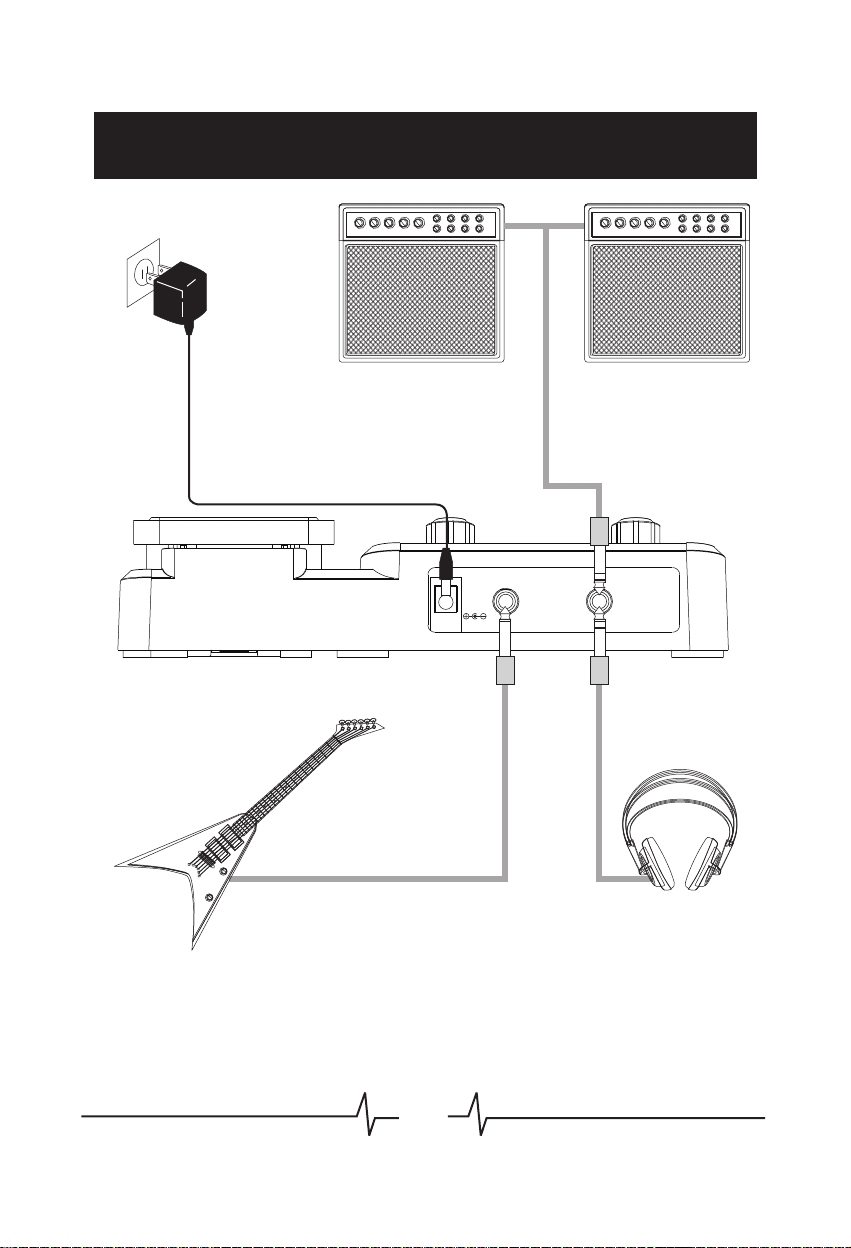
AC adapter
Connections
Guitar amplifier Guitar amplifier
DC9V
300mA
INPUT
OUTPUT
(PHONES)
Guitar Headphones
07
Page 9

Operation
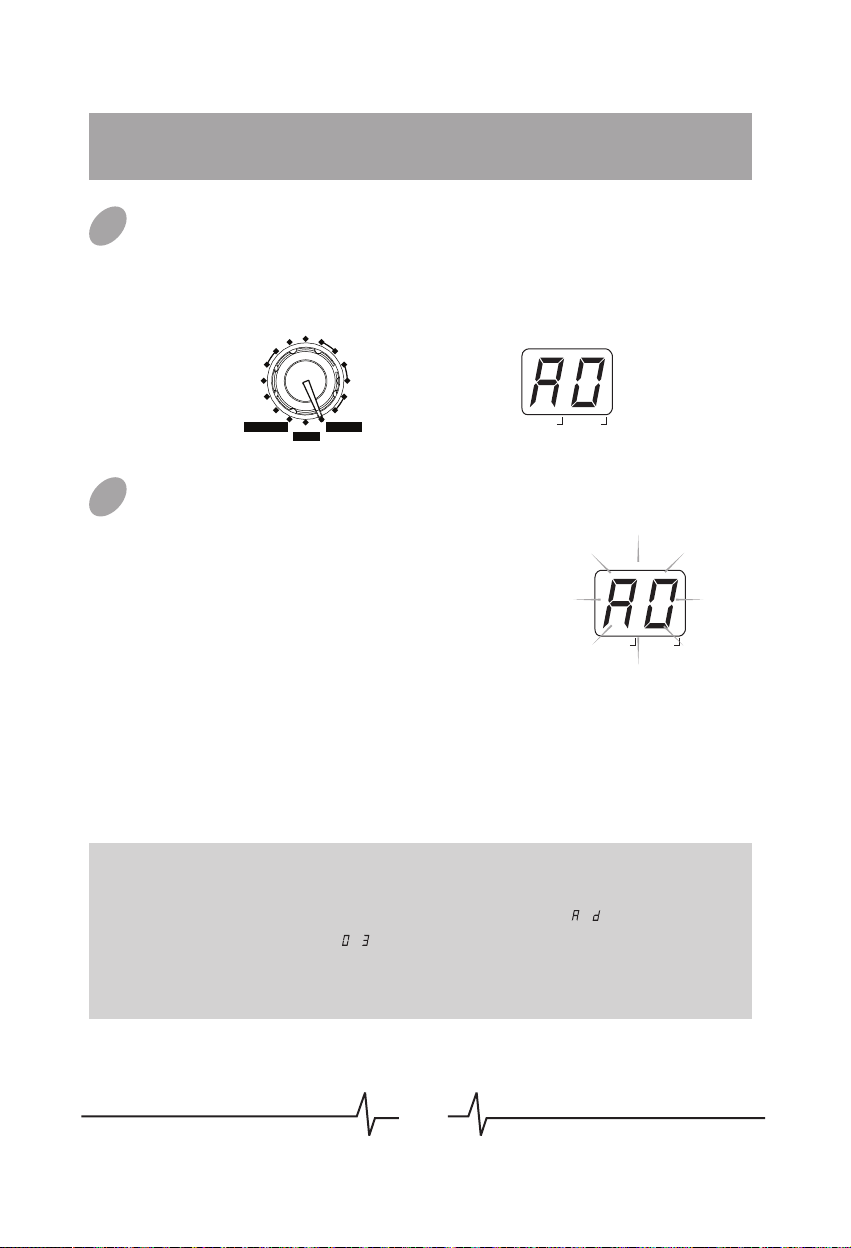
Patch Selecting
01
Power On
Plug the cable of AC Adapter
(9V, 300mA, center minus) into
DC9V
INPUT
the [DC 9V] Jack, when using
batteries, plug the guitar cable
into this jack will turn the device
on.
02
Selecting Patches
Bank
name
BANK
PATCH
Patch
name
Set the Module Selector to [PLAY],
the LED display will show the
information of bank and patch
# EDIT
number, step on [PATCH +/-]
footswitch to change patches (Hold
one footswitch to switch patches
quickly).
Pressing [PATCH +] footswitch time and again (or holding [PATCH +]
footswitch) cycles through patches in the order ~ ... ~ , ~ ...
~ , . Pressing or holding [PATCH –] footswitch will switch
patches in the opposite order.
OUTPUT
(PHONES)
Adjusting the master volume
03
Set the Module Selector to [PLAY],
rotate [VALUE] knob to adjust the
master volume of GEM Box (when
setting up the master volume, LED
display will show the current level).
The range of master volume is ~ ,
70 is the default value.
BANK PATCH
# EDIT
08
Page 10
Drum Rhythm
01
Selecting Drum Rhythm Type
BANK
Set the Module Selector to [RHYTHM],
PATCH
LED display will show the rhythm type
firstly, and then rotate the [VALUE]
knob to select the rhythm type ( ~ ).
02
Adjusting Drum Rhythm Volume
# EDIT
Set the Module Selector to [RHYTHM],
LED display will show the rhythm type
BANK
PATCH
Drum Rhythm Volume
firstly, and then press [VALUE] button
once, at that time, LED displays the
drum rhythm volume, then rotate the
[VALUE] knob to change the rhythm
# EDIT
03
Changing Drum Rhythm Tempo
volume ( ~ , the default value is ).
Set the Module Selector to
[RHYTHM], LED display will show the
rhythm type firstly, and then press
BANK
PATCH
[VALUE] button twice, at that time, the
number displayed in LED indicates the
tempo of drum rhythm, then rotate the
[VALUE] knob to change tempo.
# EDIT
The range of the displaying tempo value is ~ , indicate the real
tempo 60~270 BPM, each rhythm has its own default tempo value.
Drum Rhythm Type
Drum Rhythm Tempo
04
Start/Stop Drum Rhythm
When in RHYTHM mode or EDIT mode (Except PLAY/STORE
mode), press [PATCH –] footswitch will start the drum rhythm. When
the rhythm is playing, press [PATCH –] footswitch again to stop.
Note: You can’t stop the drum rhythm in PLAY/STORE mode.
09
Page 11

Tuner
01
Entering Bypass Tuning Mode
When in PLAY mode, press both [PATCH –]
and [PATCH +] footswitches together to
enter bypass tuning mode. LED will display
for 1 second, then begin to show tuning
indication.
02
Entering Mute Tuning Mode
BANK PATCH
BANK PATCH
When in PLAY mode, hold both [PATCH –]
and [PATCH +] footswitches together longer
than 2 seconds to enter mute tuning mode. In
course of this operation, LED will display
# EDIT
# EDIT
for 1 second then turn to display , when
releasing the footswitch, LED begin to show
tuning indication.
Note: In mute tuning mode, no sound will phonate through the output of
GEM Box.
03
Tuning
Play one guitar string at a time, and adjust the guitar pitch as
LED’s instruction.
BANK PATCH
# EDIT
The left side shows the current pitch.
#
#
#
#
03
Quit Tuner
#
BANK PATCH
# EDIT
The right side indicates how much the tuning
is off.
The indication rolls faster, the more the
pitch is off.
When in tuning mode, press both [PATCH –] and [PATCH +]
footswitches together or anyone of these 2 footswitches to quit
tuning state. GEM Box will return to PLAY mode.
10
SharpCorrectFlat
Page 12
Expression Pedal
Volume Control
01
If the [EXP. PEDAL] LED is not lighted up, the expression pedal
will be a volume pedal for controlling the master level of GEM Box.
02
Effect Control
If the [EXP. PEDAL] LED is lighted up, the expression pedal will be
an expression pedal for controlling the effect’s parameter which
was set up in PEDAL setting.
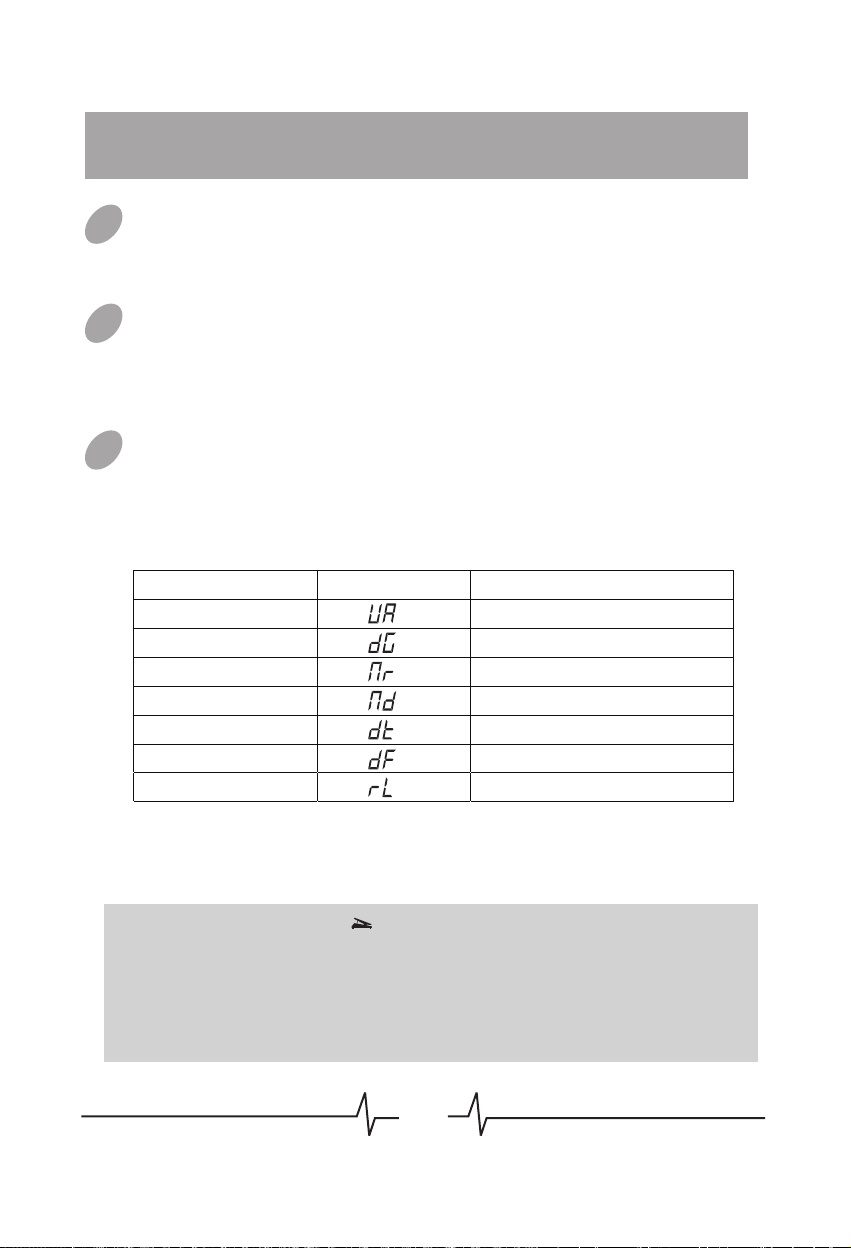
Control Assign
03
Set the Module Selector to [PEDAL], the LED display will show the
controlling object of the expression pedal.
There are 7 kinds of parameter can be controlled by the pedal,
LED will show the type of parameter in control:
Control Target LED Display Control Parameter
Wah Central Frequency
Drive Gain Gain
Modulation Rate
Modulation Depth Depth
Delay Time
Delay Feedback Feedback
Reverb Level Reverb Level
Rate/Pitch/Frequency
Time
Rotate [VALUE] knob to choose one kind of controlling target, then
the expression pedal will work with the corresponding parameter.
Note: There will be a symbol behind the effect parameter which can be controlled
by the pedal (refer to Effect Explanation for detail).
Note: If the effect module of the chosen target was not turned on, the pedal will be of
no effect.
Note: Pedal seing can be stored in patch.
Note: The expression pedal will be effective in EDIT mode.
11
Page 13
Expression Pedal
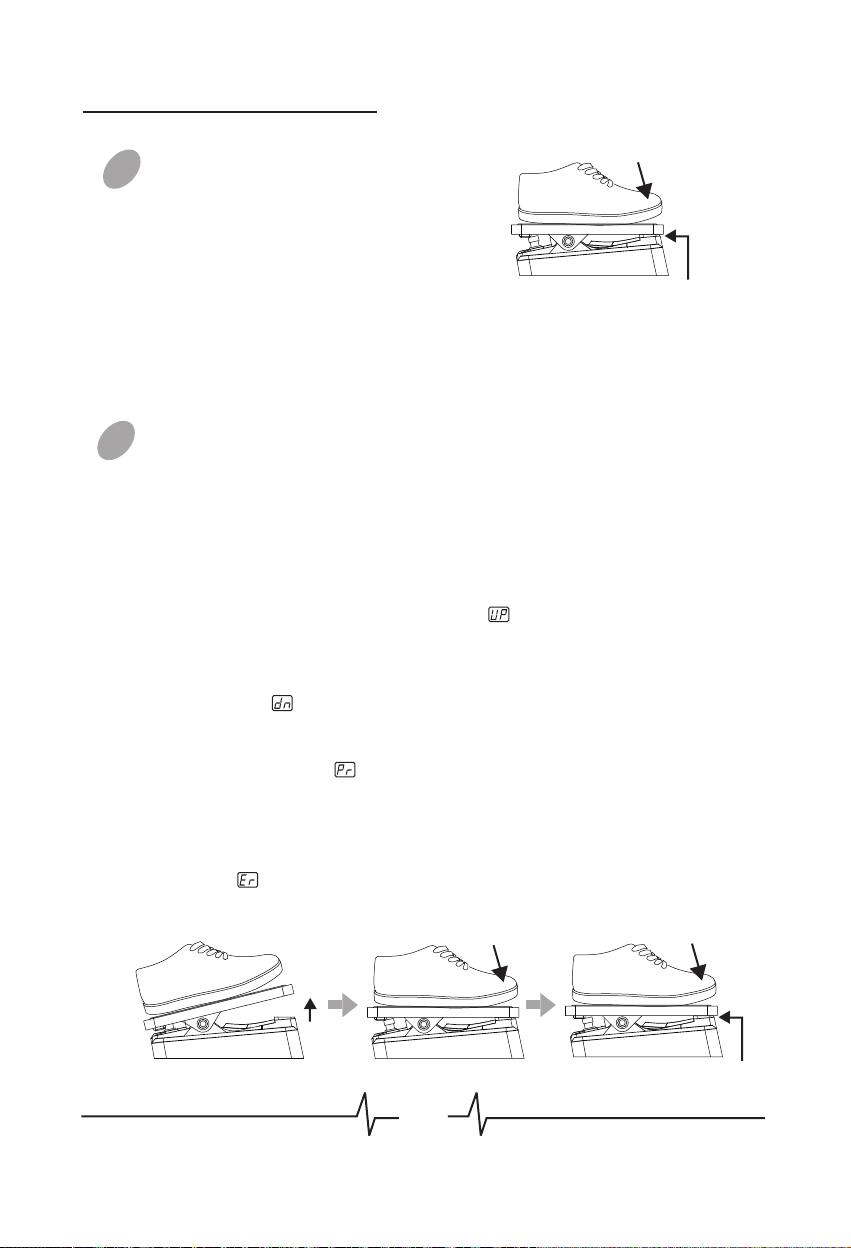
Switch Control Mode
04
(Volume-Effect)
Push down the expression pedal at full
tilt to switch the control mode from
volume control to effect control, and
[EXP.PEDAL] LED will shift from
Push strongly, so that pedal
touches here
extinguish to light. It also can switch the
control mode from effect control to
volume control,[EXP.PEDAL] LED will
shift from light to extinguish.
05
Pedal Reset
The responsivity of the expression pedal on GEM Box can be reset
as necessary. If the effect change seems insufficient when pushing
the pedal down, or if the volume or tone changes excessively even
when the pedal is only lightly pushed, or if it’s hard to switch the
pedal mode, adjust the pedal as follows:
a. Set the Module Selector to [PEDAL] and hold down [VALUE]
button while power on, the indication will appear on the LED
display, and then release the [VALUE] button.
b. Fully raise the expression pedal and press [VALUE] button once,
the indication will appear on the LED display.
c. Push the expression pedal fully down and press [VALUE] button
again, the indication will appear on the LED display.
d. Push strongly down the expression pedal at full tilt and press
[VALUE] button once more. The Pedal Reset adjustment is
completed, and GEM Box will return to the play mode. If the
indication is shown, press [VALUE] button and repeat the
procedure from step b.
Fully raise
Fully down
Push strongly, so that pedal
touches here
12
Page 14

Patch Editing
01
Select Effect Module
Set the Module Selector to the effect module which you want to
edit, the available setting options are listed below:
01.PATCH LEVEL (Para)
02.PEDAL (Para)
03.COMP/WAH (Type & Para)
04.DRIVE (Type)
05.GAIN (Para)
06.EQ (Type & Para)
07.NR/CAB (Type & Para)
08.MODULATION (Type & Para)
09.RATE (Para)
10.DELAY (Type & Para)
11.D.TIME (Para)
12.REVERB (Type & Para)
13.DECAY (Para)
BANK
Effect
type
PATCH
# EDIT
Parameter’s
value
04
03
GAIN
02
01
DRIVE
COMP/WAH
PEDAL
PATCH LEVEL
RHYTHM
Type & Para: The effect type (left
side of the display) and parameter’s
value (right side of the display) are
adjusted simultaneously.
05
EQ
NR/CAB
PLAY
06
MODULATION
RATE
DECAY
STORE
DELAY
REVERB
07
D.TIME
08
09
10
11
12
13
Para: Only adjust the
Type: Only select the effect type.
BANK
Effect
type
PATCH
# EDIT
parameter’s value.
Parameter’s
value
BANK
# EDIT
PATCH
In fact, the GAIN module is a part of DRIVE module, the RATE module
is a part of MODULATION module, the D.TIME module is a part of
DELAY module, and the DECAY module is a part of REVERB module.
They are all parameter’s value setting module which belongs to the
previous effect module.
13
Page 15

Patch Editing
Change Setting
02
Press [VALUE] knob to change effect/parameter type ahead, hold
and rotate [VALUE] knob to change effect/parameter type ahead
(clockwise) or backwards (anticlockwise), rotate [VALUE] knob to
set a new value of the effect type or parameter. As long as the
selected item’s value changes, a dot (.) will appear in the bottom
right of the display. This indicates that a setting has been changed
from the currently stored value.
DRIVE
COMP/WAH
PEDAL
PATCH LEVEL
RHYTHM
GAIN
EQ
NR/CAB
PLAY
MODULATION
RATE
DELAY
D.TIME
REVERB
DECAY
STORE
BANK
PATCH
# EDIT
Dot indicates that setting
VALUE
has been changed
03
Bypass an Effect Module
When adjusting an effect in EDIT mode, press [MODULE
BYPASS] / [PATCH +] footswitch to bypass this effect module, the
indication will appears on the display and the module will be
turned off. Pressing [MODULE BYPASS] / [PATCH +] switches
once more will return the setting to the previous condition.
BANK PATCH
# EDIT
Adjusting the Patch Level
04
PLAY / STOP
PATCH
BYPASS / TUNER
HOLD FOR MUTE TUNING
MODULE BYPASS
Set the Module Selector to [PATCH LEVEL], rotate [VALUE] knob
to adjust the volume of a patch, LED display will show the current
level.
The range of patch level is ~ .
Note: If you return to [PLAY] module and select another patch, the
changes you have made in edit mode will be lost unless you store the
patch first.
14
Page 16
Patch Storing/Copying
Enter Storing Mode
01
Set the Module Selector to [STORE] to enter storing mode, the
display will show the current editing patch’s number.
NR/CAB
EQ
MODULATION
PLAY
RATE
DECAY
STORE
DELAY
D.TIME
REVERB
GAIN
DRIVE
COMP/WAH
PEDAL
PATCH LEVEL
RHYTHM
Storing/Copying Patch
02
When in [STORE] mode, press [VALUE]
button once to do the storing, the patch’s
number on the display will begin to flash, at
that time, rotate [VALUE] knob or press
[PATCH -] / [PATCH +] footswitch to
change patch number, when you got the
expectant position, press [VALUE] button
again to confirm the patch storing, the
patch’s number on the display will stop
flashing.
BANK PATCH
# EDIT
BANK PATCH
# EDIT
Note: To cancel the store process, rotate the Module Selector to another
position, well then the patch will not be saved.
Note: An edited patch can be stored in a user bank ( ~ ), it can not be
stored in a preset patch ( ~ ).
Note: Storing an existing patch in another location can create a copy.
15
Page 17

Patch Pre-Select
Recall Function
Patch Pre-Select function can let you select the patch first but not to
activate it, and then perform an additional step to activate the patch.
To use this function, conform to the following instructions:
1. Before power on, hold down the [PATCH +] footswitch, and then
power to the GEM Box, will appear on the display and last flashing
for 3 seconds, it indicates setting up to Patch Pre-Select function
successfully.
MODULE BYPASS
PATCH
BANK PATCH
# EDIT
PLAY / STOP
BYPASS / TUNER
HOLD FOR MUTE TUNING
2. In play mode, select the patch to use
BANK PATCH
next. The selected new bank and
patch’s number flash on the display, but
the sound does not change yet.
# EDIT
3. Press both [PATCH -] and [PATCH +] footswitches together, the
selected patch will be activated, the sound changes, and the display will
stop flashing.
PLAY / STOP
BYPASS / TUNER
HOLD FOR MUTE TUNING
PATCH
MODULE BYPASS
BANK PATCH
# EDIT
BANK PATCH
# EDIT
4. To return the normal patch selecting method, turn the power off and
then on again. The Patch Pre-Select function will not preserve when
power on again.
16
Page 18

Factory Reset
Factory Reset function will initialize all setting of GEM Box. All the user
patches will be erased and overwritten by the preset patches.
To do the factory reset, conform to the following instructions:
Before power on, set the Module Selector to [PLAY], hold down the
[PATCH -] and [PATCH +] footswitch and the [VALUE] button
simultaneously, and then power to the GEM Box, will appear on the
display and last flashing.
DRIVE
COMP/WAH
PEDAL
PATCH LEVEL
RHYTHM
GAIN
EQ
NR/CAB
PLAY
MODULATION
RATE
DELAY
D.TIME
REVERB
DECAY
STORE
VALUE
HOLD
PLAY / STOP
HOLD FOR MUTE TUNING
BYPASS / TUNER
PATCH
MODULE BYPASS
BANK PATCH
# EDIT
At that time, press [VALUE] button to confirm, will be flashing in a
faster speed for 2 seconds, then turn to display at a steady status
for 3 second, then back to the normal state, the factory reset operation
have been done.
VALUE
PRESS
BANK PATCH
# EDIT
FASTER FLASHING
2 SECONDS
BANK PATCH
# EDIT
3 SECONDS
BANK PATCH
# EDIT
Note: If you want to quit Factory Reset halfway, move the Module Selector to
another location, then the Factory Reset will be canceled.
17
Page 19
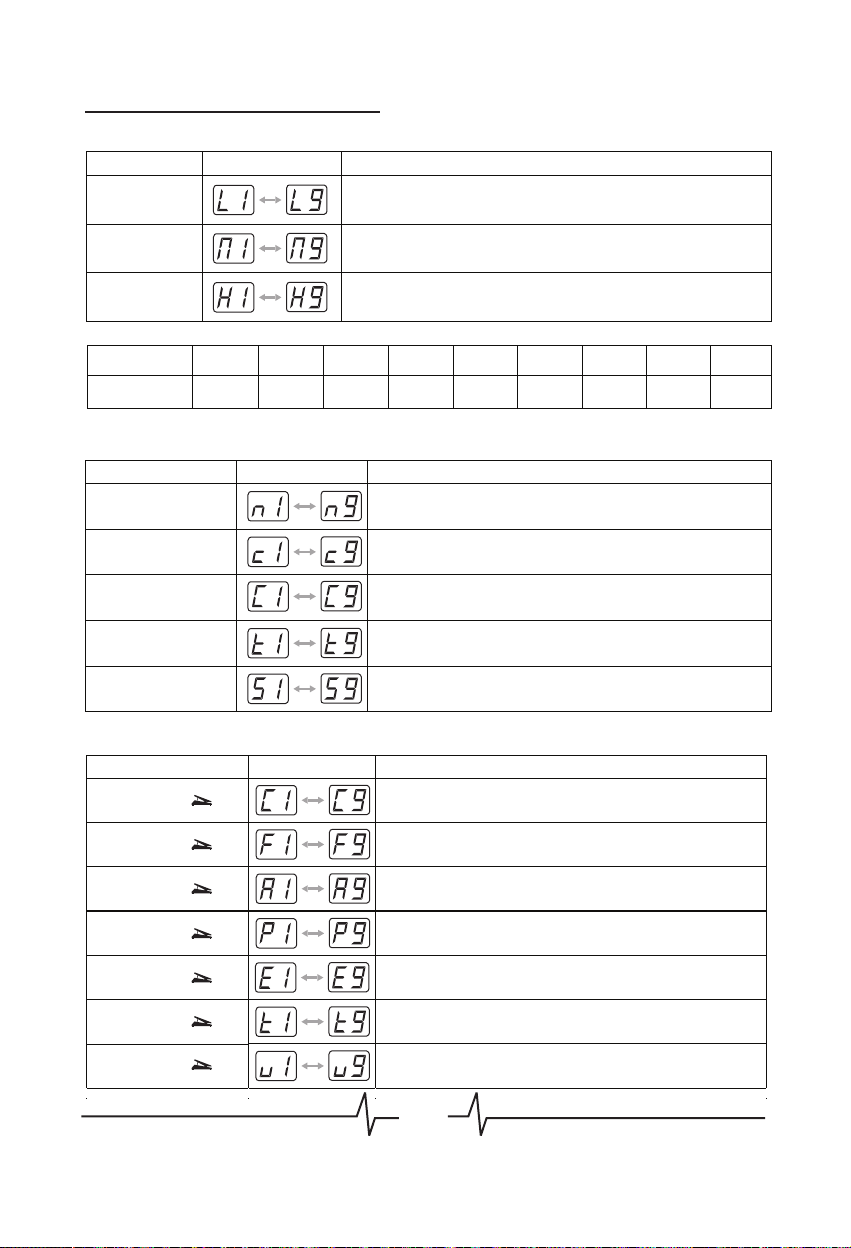
Effects Explanation
01
General Instruction
Effect Chain
Modules
COMP/WAH
Compressor
Limiter
Boost
Auto Wah
Sense Wah
Pedal Wah Rectifier Amp
Types
Preamp Drive Metal Land Low Chorus Digital Room
Tube Drive Metal Club
Vintage Drive Tweed Amp
Super Drive AC Amp
Blink Drive
Obsessive Drive
Classic Drive Mooer Boost
Distortion Mooer Drive
Fab Distortion
Pi Fuzz Mooer Fuzz
Face Fuzz Mooer Metal
Bend Fuzz
Hog Fuzz
JCM Amp
Mooer Distortion
Acoustic
Simulator
GEM Box has 8 effect modules, 60 types of effect in total, can offer up
to 8 simultaneous effects (NR/CAB module can offer 2 effects at a
time).
Each effect module has several different effect types, only one type can
be selected at a time. All effect types have various parameters that can
be adjusted, the parameters change the tone and effect intensity similar
to the knobs on the device.
EQ NRDRIVE CAB DELAY REVERB
Mid
High
Noise
Reduce
1x10 Combo
1x12 Combo
2x12 Twin
Combo
4x12 Stack
MODULATION
Flanger
Talk Flanger
Phaser
Step Phaser
Tremolo
Vibrato
Filter
Pitch Shift
Ring Mod
Analog Chamber
Mod Hall
Tape Echo
Echo
Church
Plate
Mod
02
Explain the Effects Modules/Types/Parameters
COMP/WAH Module
Type Name Display Effect Explanation
This effect is used for controlling dynamics of the signal, it limits
Compressor
Limiter
Boost
Auto Wah
high-level signals and boosts low-level signals.
The parameter’s value controls the Depth.
This effect limits high-level signals to avoid
overload.
The parameter’s value controls the Depth.
This effect can enhance the gain and dynamic of the signal.
The parameter’s value controls the Gain.
This effect creates a recurrent wah-wah sound.
The parameter’s value controls the Rate.
18
Page 20

Effects Explanation
Sense Wah
Pedal Wah
This effect varies wah sound according to picking intensity.
The parameter’s value controls the Sensitivity.
This effect varies wah sound by controlling the expression pedal.
The parameter’s value controls the Central Frequency
This mark means the parameter can be controlled by the expression pedal if corresponding
type was chosen in PEDAL module.
DRIVE Module
Type Name Display Effect Explanation
Preamp Drive
Tube Drive
Vintage Drive
Super Drive
Blink Drive
Obsessive Drive
Classic Drive
Distortion
Fab Distortion
Pi Fuzz
Face Fuzz
Bend Fuzz
Hog Fuzz
Metal Land
Metal Club
Tweed Amp
AC Amp
JCM Amp
Rectifier Amp
Mooer
Boost
Drive
Mooer
Distortion
Mooer
Mooer
Fuzz
Metal
Mooer
Acoustic Simulator
Gain
Based on a DOD
Based on an Ibanez
Based on a BOSS
Based on a BOSS
Based on a Voodoo Lab
Based on a Fulltone
Based on a ProCo™ The Rat™
Based on a BOSS
Based on a Danelectro
Based on an Electro-Harmonix
Based on a Dallas-Arbiter FUZZFACE™
Based on a Colorsound Tonebender
Based on an Electro-Harmonix
Based on a BOSS
Based on an Ibanez
Based on a Fender
Based on a Vox
Based on a Marshall
Based on a Mesa Boogie
Designed by MOOER AUDIO CO., LTD. *
Designed by MOOER AUDIO CO., LTD. *
Designed by MOOER AUDIO CO., LTD. *
Designed by MOOER AUDIO CO., LTD. *
Designed by MOOER AUDIO CO., LTD. *
Designed by MOOER AUDIO CO., LTD. *
Control the Gain of distortion effects and the Tone of Acoustic
Simulator effect.
* MOOER is a trademark of MOOER AUDIO CO., LTD. Other manufacturer names and product
names mentioned in this list are trademarks or registered trademarks of their respective owners
and are not associated or affiliated with MOOER AUDIO CO., LTD. They are trademarks of
other manufacturers and were used merely to identify whose sounds were reviewed in the
creation of this product.
®
Overdrive Preamp/250 *
®
TS9 (TUBE SCREAMER®)
®
OD-1 (Over Drive) *
®
SD-1 (SUPER OverDrive) *
®
Sparkle Drive *
®
OCD® (Obsessive Compulsive Drive™) *
*
®
DS-1 (Distortion) *
®
DD1 Fab Tone™ *
®
MT-2 (Metal Zone) *
®
SM-7 (Smash Box) *
®
Tweed Bassman® amp *
®
AC30 amp *
®
JCM800 amp *
®
Big Muff Pi® *
*
®
Hog’s Foot *
®
Dual Rectifier® amp *
*
*
19
Page 21
Effects Explanation
EQ Module
Type Name Display Effect Explanation
Low
Mid
High
This controls the bottom band of the equalizer, the central frequency
is 160Hz. The parameter’s value controls the Gain.
This controls the middle band of the equalizer, the central frequency
is 800Hz. The parameter’s value controls the Gain.
This controls the high band of the equalizer, the central frequency is
3.2KHz. The parameter’s value controls the Gain.
EQ Gain-Display Comparison:
Para-Display
Gain
1 2 3 4 5 6 7 8 9
-12dB -9dB -6dB -3dB 0dB 3dB 6dB 9dB 12dB
NR/CAB Module
Type Name Display Effect Explanation
Noise Reduction
Noise Reduction +
1x10 Combo
Noise Reduction +
1x12 Combo
Noise Reduction +
2x12 Twin Combo
Noise Reduction +
4x12 Stack
Noise Reduction function only, it will reduce the noise of input
signal. The parameter’s value controls the NR’s Intensity.
NR function + 1x10 Combo guitar amp cabinet simulator. The
parameter’s value controls the NR’s Intensity.
NR function + 1x12 Combo guitar amp cabinet simulator. The
parameter’s value controls the NR’s Intensity.
NR function + 2x12 Twin Combo guitar amp cabinet simulator.
The parameter’s value controls the NR’s Intensity.
NR function + 4x12 Stack guitar amp cabinet simulator. The
parameter’s value controls the NR’s Intensity.
MODULATION Module
Type Name Display Effect Explanation
Chorus
Flanger
Talk Flanger
Phaser
Step Phaser
Tremolo
Vibrato
This effect creates a shining dimensional sound. The parameter’s
value controls the Depth.
This effect produces an undulating and floating feeling sound. The
parameter’s value controls the Depth.
This effect produces another kind of flanger sound. The parameter’s
value controls the Depth.
This effect creates a pulsing-like sound. The parameter’s value
controls the Depth.
This effect produces a phaser sound with more pulsing feeling. The
parameter’s value controls the Depth.
This effect periodically influences the volume of the signal. The
parameter’s value controls the Depth.
This effect periodically influences the pitch of the signal. The
parameter’s value controls the Depth.
20
Page 22

Effects Explanation
Filter
Pitch Shift
Ring Mod
Rate
Pitch
Frequency
This effect produces a sweeping filter sound.
’
The parameter
s value
controls the Depth .
Transfer the pitch and blend with the original note . The parameter’s
value controls the Mix.
Produces sounds like ring bell. The parameter’s value controls the
effect’s Level.
Control the speed of effects, except Pitch Shift, Ring Mod
Control the pitch range when use Pitch Shift
Control the frequency when use Ring Mod
DELAY Module
Type Name Display Effect Explanation
Digital
Analog
Mod
Tape Echo
Echo
Delay Time
Repeat the signal with no special processing, creates the most
clean delay sound. The parameter’s value controls the Feedback.
Simulates an analog delay equipment, produces a warm and
vintage delay sound. The parameter’s value controls the Feedback.
Adds chorus effect to the delay sound, has more extensive spacy
feeling. The parameter’s value controls the Feedback.
Simulates an Tape Echo machine, creates a tape-like delay sound
The parameter’s value controls the Feedback.
Simulates the real Echo, authentic and natural delay sound. The
parameter’s value controls the Feedback.
The value indicates the delay time from 10ms~1500ms.
REVERB Module
Type Name Display Effect Explanation
Room
Chamber
Hall
Church
Plate
Mod
Decay Control the Decay of Reverb effect
Simulates the acoustics of a Room. The parameter’s value controls
the Reverb’s Level.
Simulates the acoustics of a Chamber. The parameter’s value
controls the Reverb’s Level.
Simulates the acoustics of a concert Hall. The parameter’s value
controls the Reverb’s Level.
Simulates the acoustics of a big church. The parameter’s value
controls the Reverb’s Level.
Simulates a Plate reverberation. The parameter’s value controls the
Reverb’s Level.
Add Chorus effect to a Hall reverb. The parameter’s value controls
the Reverb’s Level.
21
Page 23

Specification
No. of Effect Modules:
No. of Effect Types:
Preset Patch Memory:
User Patch Memory:
Sampling Frequency:
A/D converter:
D/A converter:
Guitar Input:
Output:
Power requirements:
Dimensions:
Weight:
Accessories:
Max. 8 simultaneous modules
60
40 Patches (4 Banks, each bank has 10 patches)
40 Patches (4 Banks, each bank has 10 patches)
48 kHz
16 bit, 384 times over sampling
16 bit, 384 times over sampling
1/4" monaural jack, input impedance 470 k Ohms
1/4" stereo jack (doubles as line/headphone jack)
AC adapter 9V DC, 300 mA (center minus plug)
or 4 IEC R6 (size AA) batteries
158 mm (D) x 237mm (W) x 63 mm (H)
730 g (without batteries)
Owner’s Manual, AC adapter 9V DC
22
Page 24

Troubleshooting
Can not power on
Check power connection.
------ Make sure the power is connected correctly.
Check the adapter.
------ Make sure the adapter’s type is DC9V/300mA/center minus.
When using battery, check whether the cable is inserted entirely to the
INPUT jack.
When using battery, check the battery, is the battery low or dead?
------ Make sure the battery is at work and the INPUT jack is connected
with an audio cable.
No sound or low volume
Check connection of cables.
------ Make sure all the cables are connected firmly.
Check the volume of guitar and amplifier.
------ Make sure each equipment’s volume is set to an appropriate level.
High noise
Check the adapter.
------ Make sure the adapter’s type is DC9V/300mA/center minus.
Check the cables.
------ Make sure the cables are connected firmly and have no quality
problem.
23
Page 25

Appendix
Patch List
Patch PatchPatch Name Pedal Assign Pedal Assign
Super Lead Wet Clean
Vintage Tremolo
Obsessive Drive
Slap Blues
Peaceful Plain
Jimi’s Vib
Funky Phaser
Traditional Metal
Power Solo
Texas Rhythm
Blues Solo
Wah Wah
Lite Flanger
Misty Coast
Randy Lead
Fuzzy Echo
Wall Shadow
Mystic River
Infinite Mirror
Volume
Volume Volume
Tremolo Rate
Volume
Volume Volume
Delay Time
Vibrato Rate
Phaser Rate
Volume
Drive Gain
Volume
Volume
Filter Rate
Flanger Rate
Flanger Depth
Volume
Delay Level
Delay Time
Reverb Level
Delay Time
Patch Name
California RiffPure Land
Rough Whip
Preamp Drive
Acoustic Clean
Rolling Wheel
Mad Wing
Modern Metal
Whirly Room
Spacy Drive
Bounce Recorder
Brit Melon
Pink Wall
Confused Room
Jumping Squirrel
Broken TV
Pop Dist
Punch Back
Vintage Drive
Reverb Level
Volume
Drive Gain
Tremolo Depth
Phaser Depth
Volume
Flanger Rate
Delay Time
Phaser Rate
Drive Gain
Delay Level
Reverb Level
Phaser Depth
Filter Depth
Volume
Delay Time
Volume
Ring FrequencyTele Ring
24
Page 26

Drum Rhythm List
Drum Rhythm List
No. Type Time Signature Default Tempo
8Beat1 4/4 120 BPM
8Beat2 4/4 120 BPM
8Beat3 4/4 120 BPM
8Beat4 4/4 120 BPM
8Beat5 4/4 120 BPM
16Beat1 4/4 120 BPM
16Beat2 4/4 120 BPM
16Beat3 4/4 120 BPM
16Beat4 4/4 120 BPM
16Beat5 4/4 120 BPM
3/4Beat 3/4 120 BPM
6/8Beat 6/8 120 BPM
Pop 4/4 120 BPM
Funk 4/4 108 BPM
Hard Rock 4/4 135 BPM
Metal 4/4 120 BPM
Punk 4/4 162 BPM
Hip Hop 4/4 96 BPM
Trip Hop 4/4 84 BPM
Dance 4/4 120 BPM
Break Beat 4/4 156 BPM
Drum n’ Bass 4/4 180 BPM
Blues 4/4 108 BPM
Jazz 4/4 120 BPM
Swing 4/4 144 BPM
Fusion 4/4 120 BPM
Reggae 4/4 90 BPM
Latin 4/4 135 BPM
Country 4/4 114 BPM
Bossanova 4/4 120 BPM
Rumba 4/4 135 BPM
Tango 4/4 120 BPM
Polka 4/4 120 BPM
World 4/4 108 BPM
Metro 2/4 2/4 120 BPM
Metro 3/4 3/4 120 BPM
Metro 4/4 4/4 120 BPM
Metro 5/4 5/4 120 BPM
Metro 6/8 6/8 120 BPM
Metro None 120 BPM
25
Page 27

MOOER AUDIO CO.,LTD
www.mooeraudio.com
 Loading...