Mooer GE300 Lite User manual

Owner's manual

Sec


Contents

PRECAUTIONS--------------------------------------------------------------------------------------------------------------------

01

Features----------------------------------------------------------------------------------------------------------------------------

02

Quick Tour---------------------------------------------------------------------------------------------------------------------

03-15

Top Panel-------------------------------------------------------------------------------------------------------------------

03-05

Back Panel------------------------------------------------------------------------------------------------------------------

06-07

Recommended Setup------------------------------------------------------------------------------------------------------

08-09

Start-----------------------------------------------------------------------------------------------------------------------------

10

Home Display-------------------------------------------------------------------------------------------------------------------

10

Signal Chain Display------------------------------------------------------------------------------------------------------------

11

Select Preset-------------------------------------------------------------------------------------------------------------------

12

Preset Editing--------------------------------------------------------------------------------------------------------------

13-14

Saving Preset-------------------------------------------------------------------------------------------------------------------

15

TUNER------------------------------------------------------------------------------------------------------------------------------

16

LOOPER----------------------------------------------------------------------------------------------------------------------------

17

GLB-EQ-----------------------------------------------------------------------------------------------------------------------------

18

FX LOOP------------------------------------------------------------------------------------------------------------------------

19-23

Expression pedal-------------------------------------------------------------------------------------------------------------

24-25

CTRL---------------------------------------------------------------------------------------------------------------------------------

26

Setting Procedure--------------------------------------------------------------------------------------------------------------

26

System Setting---------------------------------------------------------------------------------------------------------------

27-43

INPUT---------------------------------------------------------------------------------------------------------------------------

27


OUTPUT-------------------------------------------------------------------------------------------------------------------------

28

USB AUDIO------------------------------------------------------------------------------------------------------------------

29-30

MIDI-------------------------------------------------------------------------------------------------------------------------

31-37

FS MODE--------------------------------------------------------------------------------------------------------------------

38-39

FS COLOR-----------------------------------------------------------------------------------------------------------------------

40

TAP------------------------------------------------------------------------------------------------------------------------------

41

SCREEN-------------------------------------------------------------------------------------------------------------------------

42

PARA PREF----------------------------------------------------------------------------------------------------------------------

42

RESET---------------------------------------------------------------------------------------------------------------------------

43

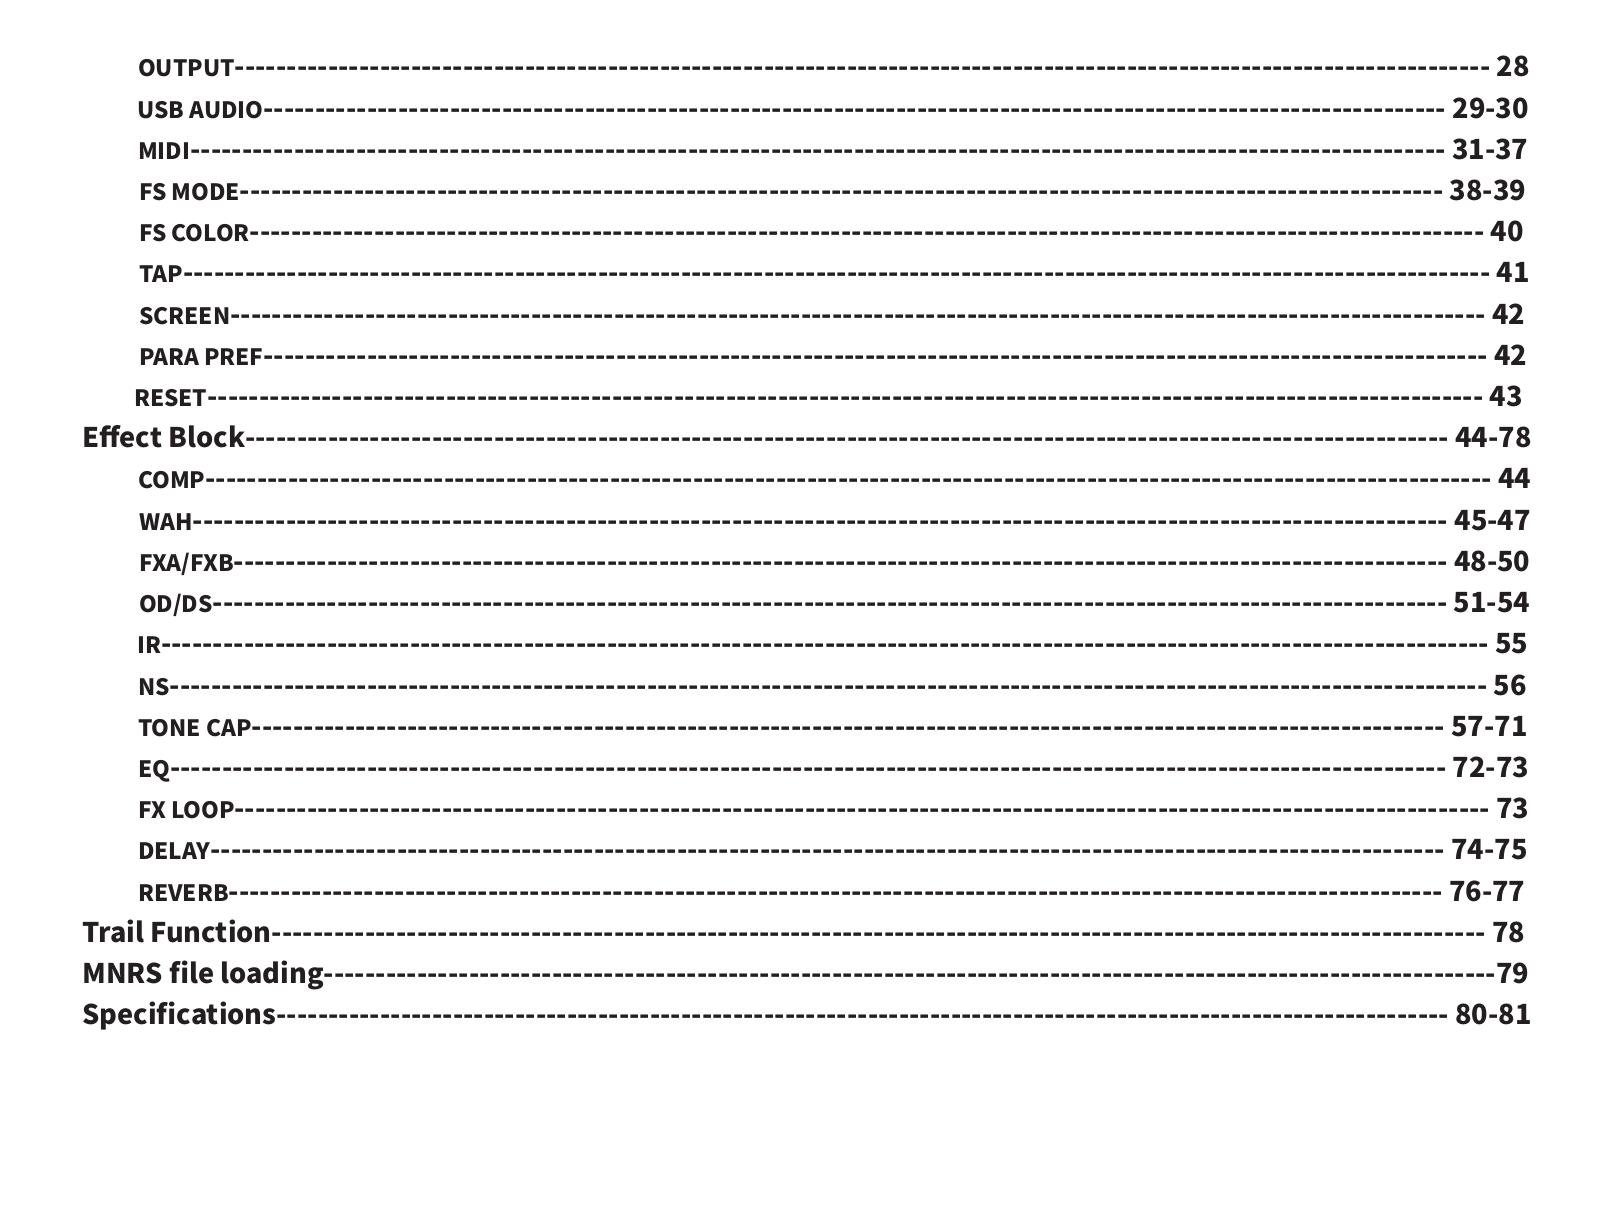
E ect Block--------------------------------------------------------------------------------------------------------------------

44-78

COMP----------------------------------------------------------------------------------------------------------------------------

44

WAH-------------------------------------------------------------------------------------------------------------------------

45-47

FXA/FXB---------------------------------------------------------------------------------------------------------------------

48-50

OD/DS-----------------------------------------------------------------------------------------------------------------------

51-54

IR--------------------------------------------------------------------------------------------------------------------------------

55

NS-------------------------------------------------------------------------------------------------------------------------------

56

TONE CAP-------------------------------------------------------------------------------------------------------------------

57-71

EQ---------------------------------------------------------------------------------------------------------------------------

72-73

FX LOOP-------------------------------------------------------------------------------------------------------------------------

73

DELAY-----------------------------------------------------------------------------------------------------------------------

74-75

REVERB---------------------------------------------------------------------------------------------------------------------

76-77

Trail Function---------------------------------------------------------------------------------------------------------------------

78

MNRS file loading-----------------------------------------------------------------------------------------------------------------

79

Specifications-----------------------------------------------------------------------------------------------------------------

80-81

PRECAUTIONS

*Please read carefully before proceeding*

Power Supply

Please connect the designated AC adapter to an AC outlet of the correct voltage. Please be sure to use only an AC adapter which supplies 9V DC 2A , center negative. Unplug the AC power adapter when not in use or during electrical storms. Highly recommend to use the original power supply.

Connections Always turn o the power of this and all other equipment before connecting or disconnecting, this will help prevent malfunction and / or damage to other devices. Also make sure to disconnect all connection cables and the power cord before moving this unit.

Cleaning

Clean only with a soft, dry cloth. If necessary, slightly moisten the cloth. Do not use abrasive cleanser, cleaning alcohol, paint thinners, wax, solvents, cleaning fluids, or chemical-impregnated wiping cloths.

Interference with other electrical devices Radios and televisions placed nearby may experience reception interference. Operate this unit at a suitable distance from radios and televisions.

Location

To avoid deformation, discoloration, or other serious damage, do not expose this unit to the following conditions:

● Direct sunlight ● Extreme temperature or humidity

● Magnetic fields ● High humidity or moisture

● Excessively dusty or dirty locations ● Strong vibrations or shocks

● Heat sources

FCC certification

This device complies with Part 15 of the FCC Rules. Operation is subject to the following two conditions:

● This device may not cause harmful interference.

● This device must accept any interference received, including interference that may cause undesired operation.

01

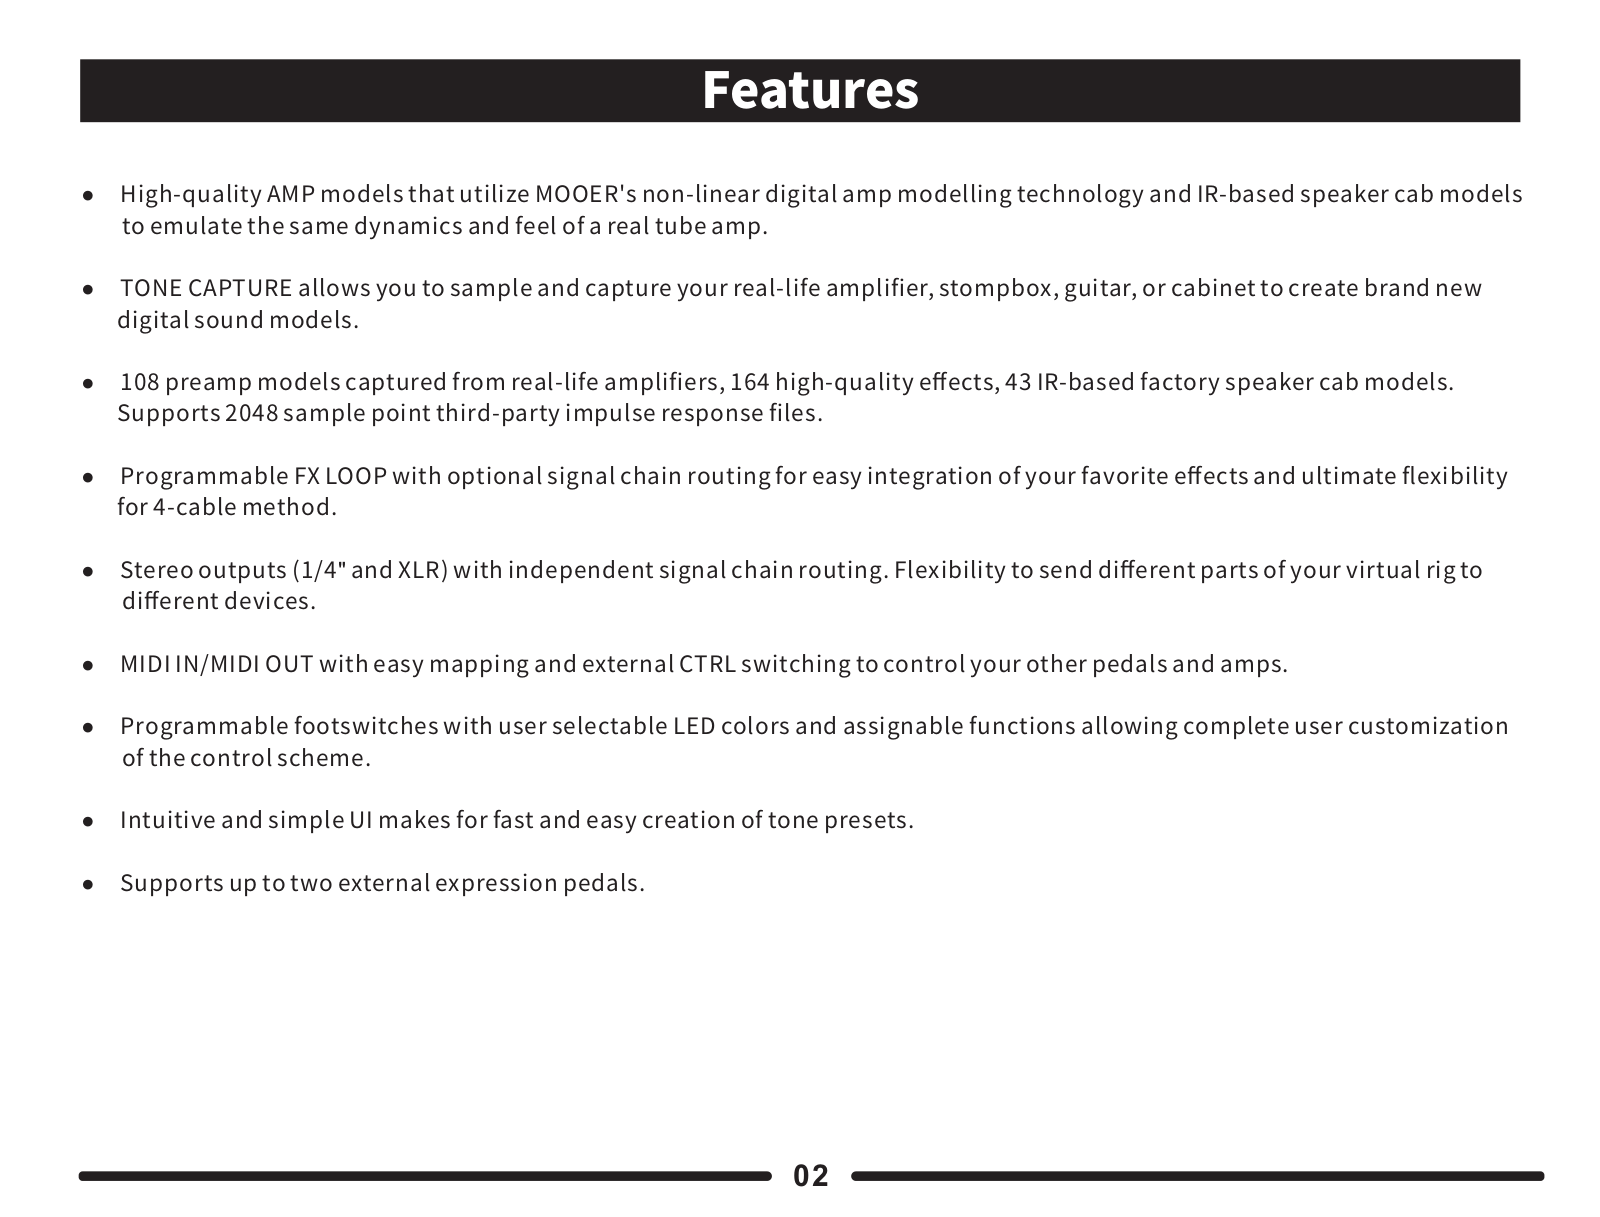
Features

● High-quality AMP models that utilize MOOER's non-linear digital amp modelling technology and IR-based speaker cab models

to emulate the same dynamics and feel of a real tube amp.

● TONE CAPTURE allows you to sample and capture your real-life amplifier, stompbox, guitar, or cabinet to create brand new

digital sound models.

● 108 preamp models captured from real-life amplifiers, 164 high-quality e ects, 43 IR-based factory speaker cab models.

Supports 2048 sample point third-party impulse response files.

● Programmable FX LOOP with optional signal chain routing for easy integration of your favorite e ects and ultimate flexibility

for 4-cable method.

● Stereo outputs (1/4" and XLR) with independent signal chain routing. Flexibility to send di erent parts of your virtual rig to

di erent devices.

● MIDI IN/MIDI OUT with easy mapping and external CTRL switching to control your other pedals and amps.

● Programmable footswitches with user selectable LED colors and assignable functions allowing complete user customization

of the control scheme.

● Intuitive and simple UI makes for fast and easy creation of tone presets.

● Supports up to two external expression pedals.

02

Mooer GE300 Lite User manual

Quick Tour

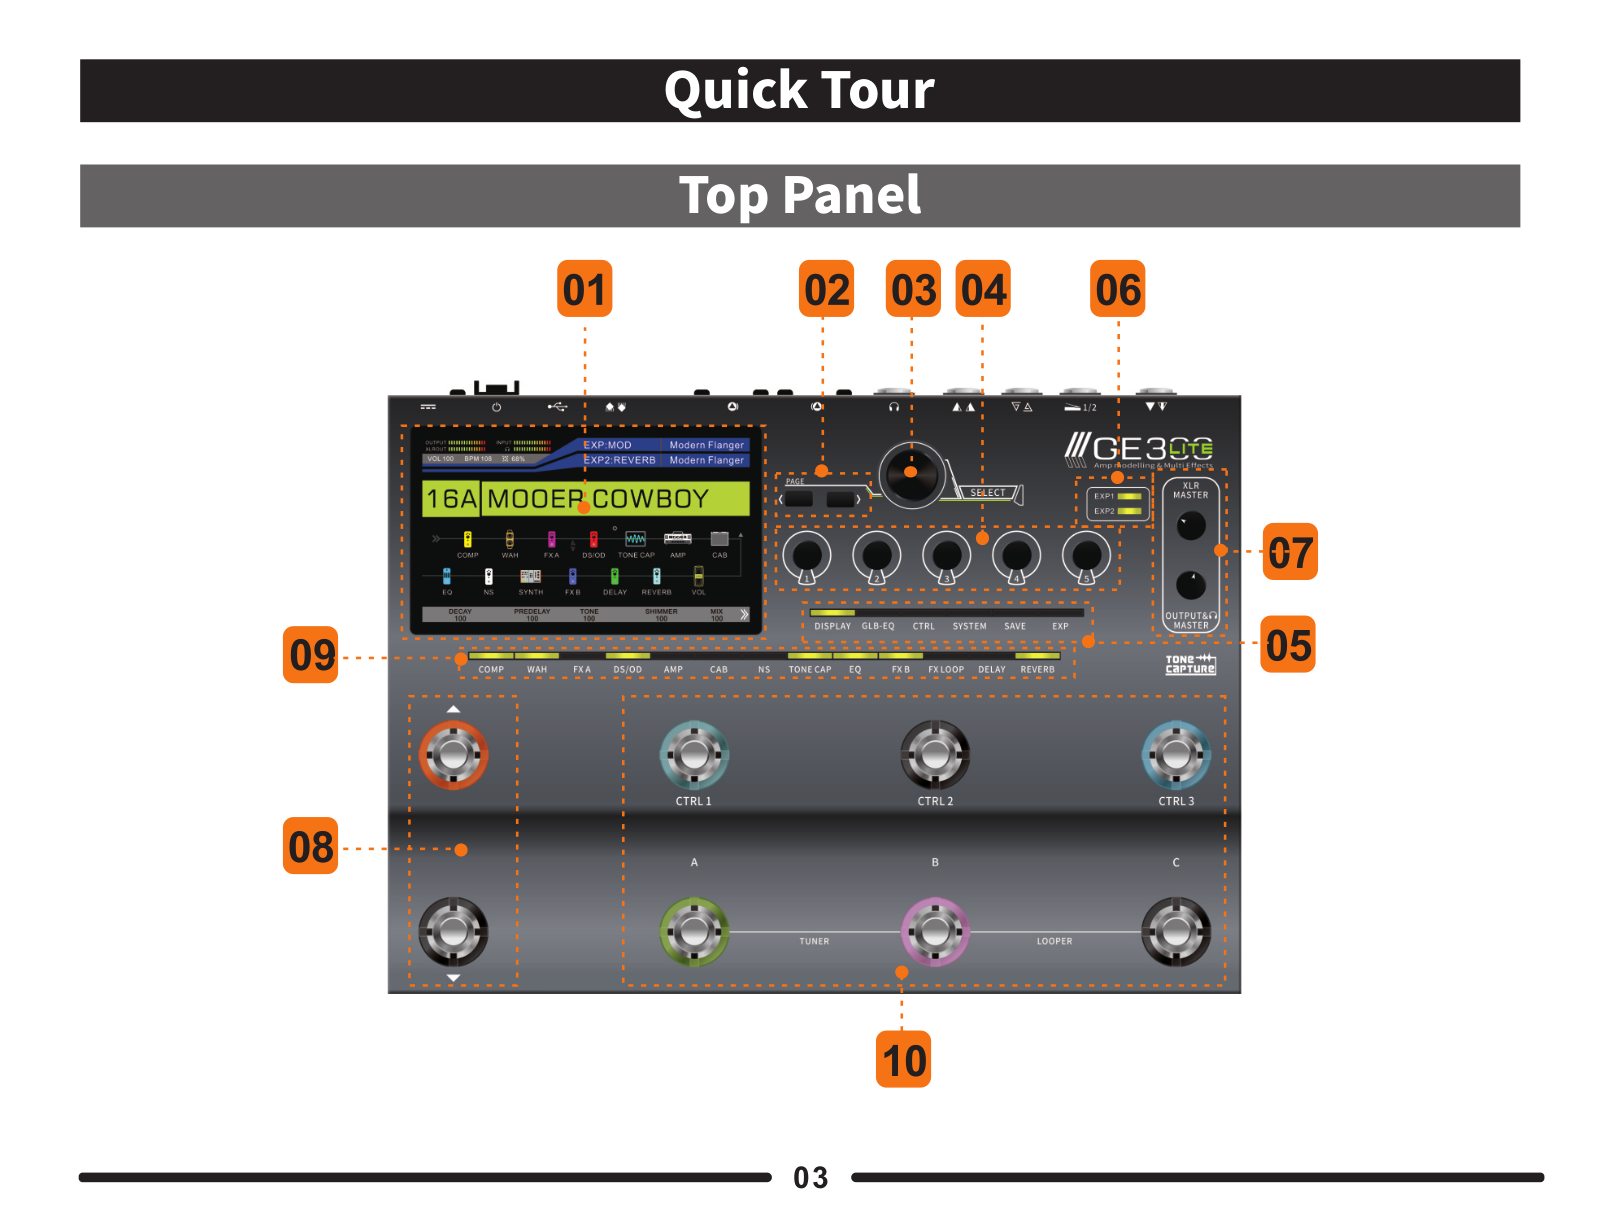
Top Panel

09

10

03

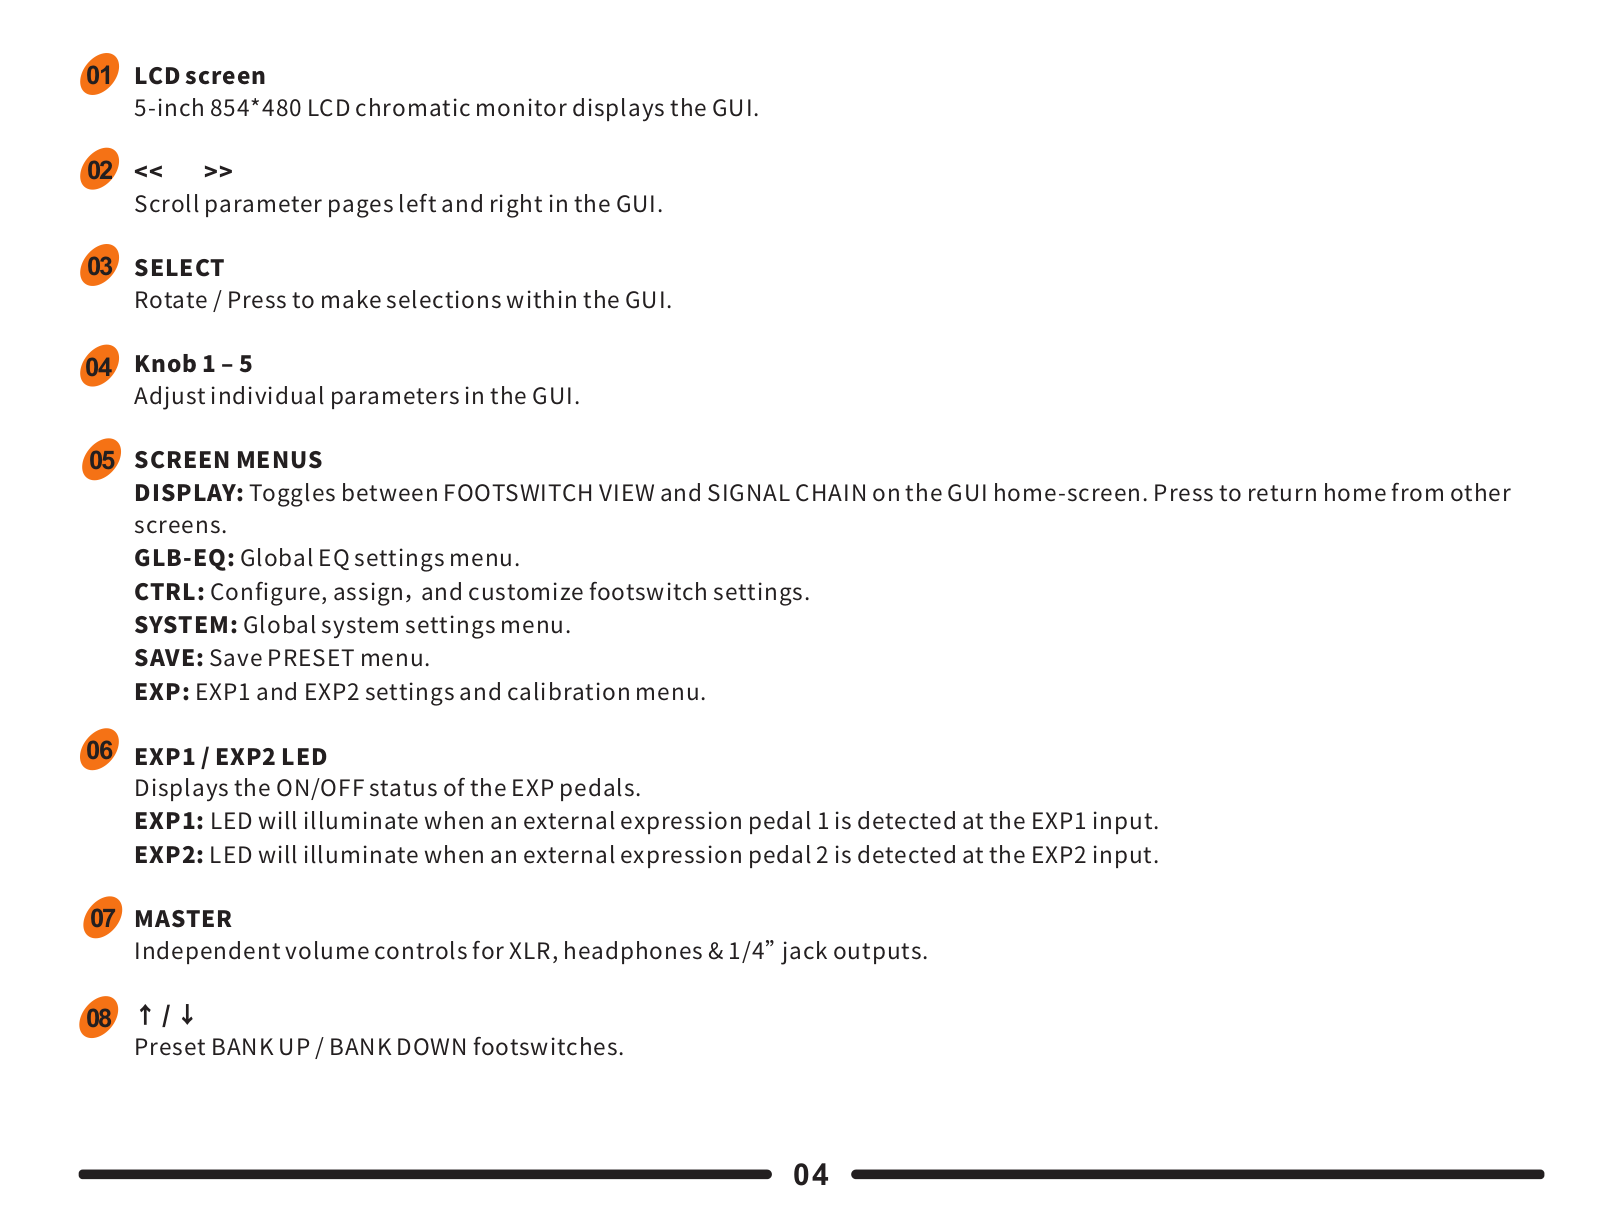
01LCD screen

5-inch 854*480 LCD chromatic monitor displays the GUI.

02<< >>

Scroll parameter pages left and right in the GUI.

03SELECT

Rotate / Press to make selections within the GUI.

04Knob 1 ‒ 5

Adjust individual parameters in the GUI.

05SCREEN MENUS

DISPLAY: Toggles between FOOTSWITCH VIEW and SIGNAL CHAIN on the GUI home-screen. Press to return home from other

screens.

GLB-EQ: Global EQ settings menu.

CTRL: Configure, assign and customize footswitch settings.

SYSTEM: Global system settings menu.

SAVE: Save PRESET menu.

EXP: EXP1 and EXP2 settings and calibration menu.

06EXP1 / EXP2 LED

Displays the ON/OFF status of the EXP pedals.

EXP1: LED will illuminate when an external expression pedal 1 is detected at the EXP1 input.

EXP2: LED will illuminate when an external expression pedal 2 is detected at the EXP2 input.

07MASTER

Independent volume controls for XLR, headphones & 1/4”jack outputs.

08↑ / ↓

Preset BANK UP / BANK DOWN footswitches.

04

09EFFECT BLOCK

Press to enter e ect block editing screen.

Press to toggle e ect block on/o .

LED displays the on/o status of the e ect block.

10CTRL 1 ‒ 3 & A, B, C

GE300 LITE o ers three di erent footswitch modes. (Refer to CTRL and FS mode section)

CTRL3

FS MODE 1: Assign functions via CTRL button.

FS MODE 2: Assign functions via CTRL button/selected preset from top column.

FS MODE 3: Assign functions via selected preset from two banks.

A , B , C

FS MODE 1: Select corresponding preset A , B , or C.

FS MODE 2: Assign functions via CTRL button/selected preset from bottom column.

FS MODE 3: Assign functions via selected preset from two banks.

A + B = TUNER B + C = LOOPER

05

Back Panel

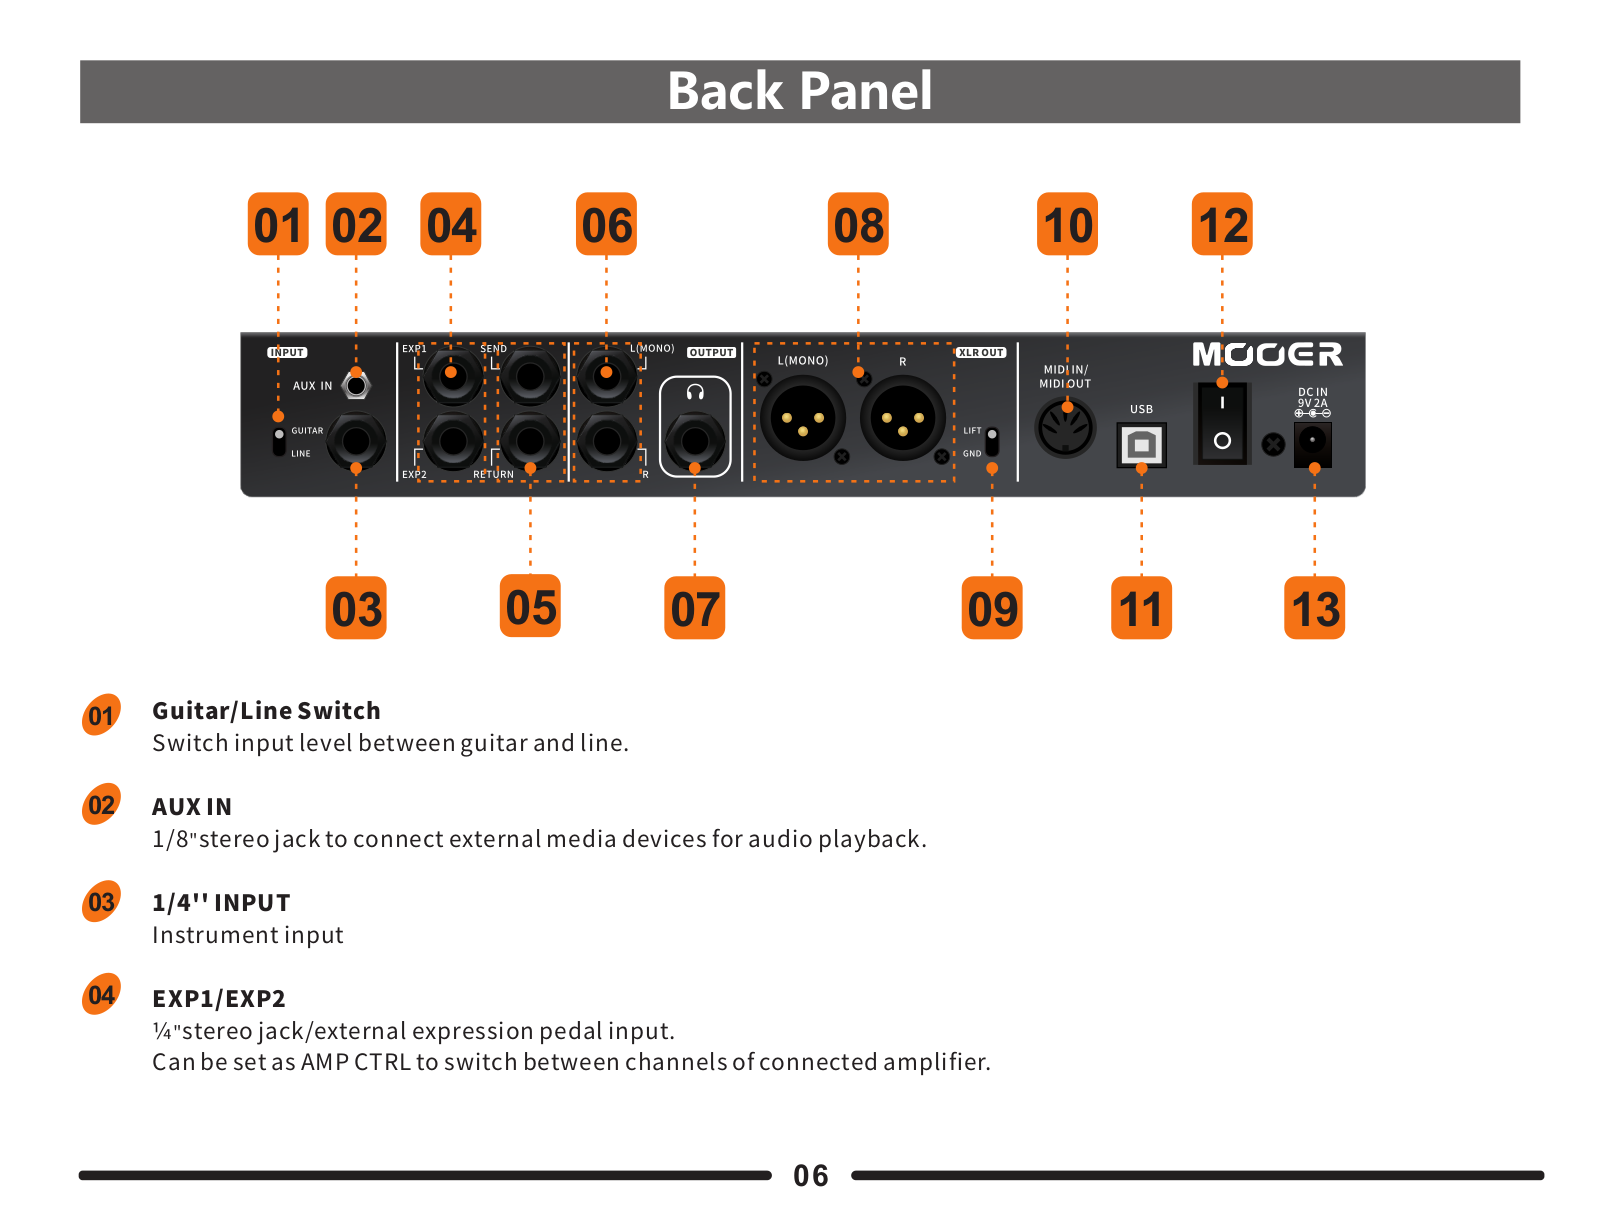
01 02

04

06

08

10

12

03

05

07

09

11

13

01Guitar/Line Switch

Switch input level between guitar and line.

02AUX IN

1/8"stereo jack to connect external media devices for audio playback.

031/4'' INPUT

Instrument input

04 EXP1/EXP2

¼"stereo jack/external expression pedal input.

Can be set as AMP CTRL to switch between channels of connected amplifier.

06

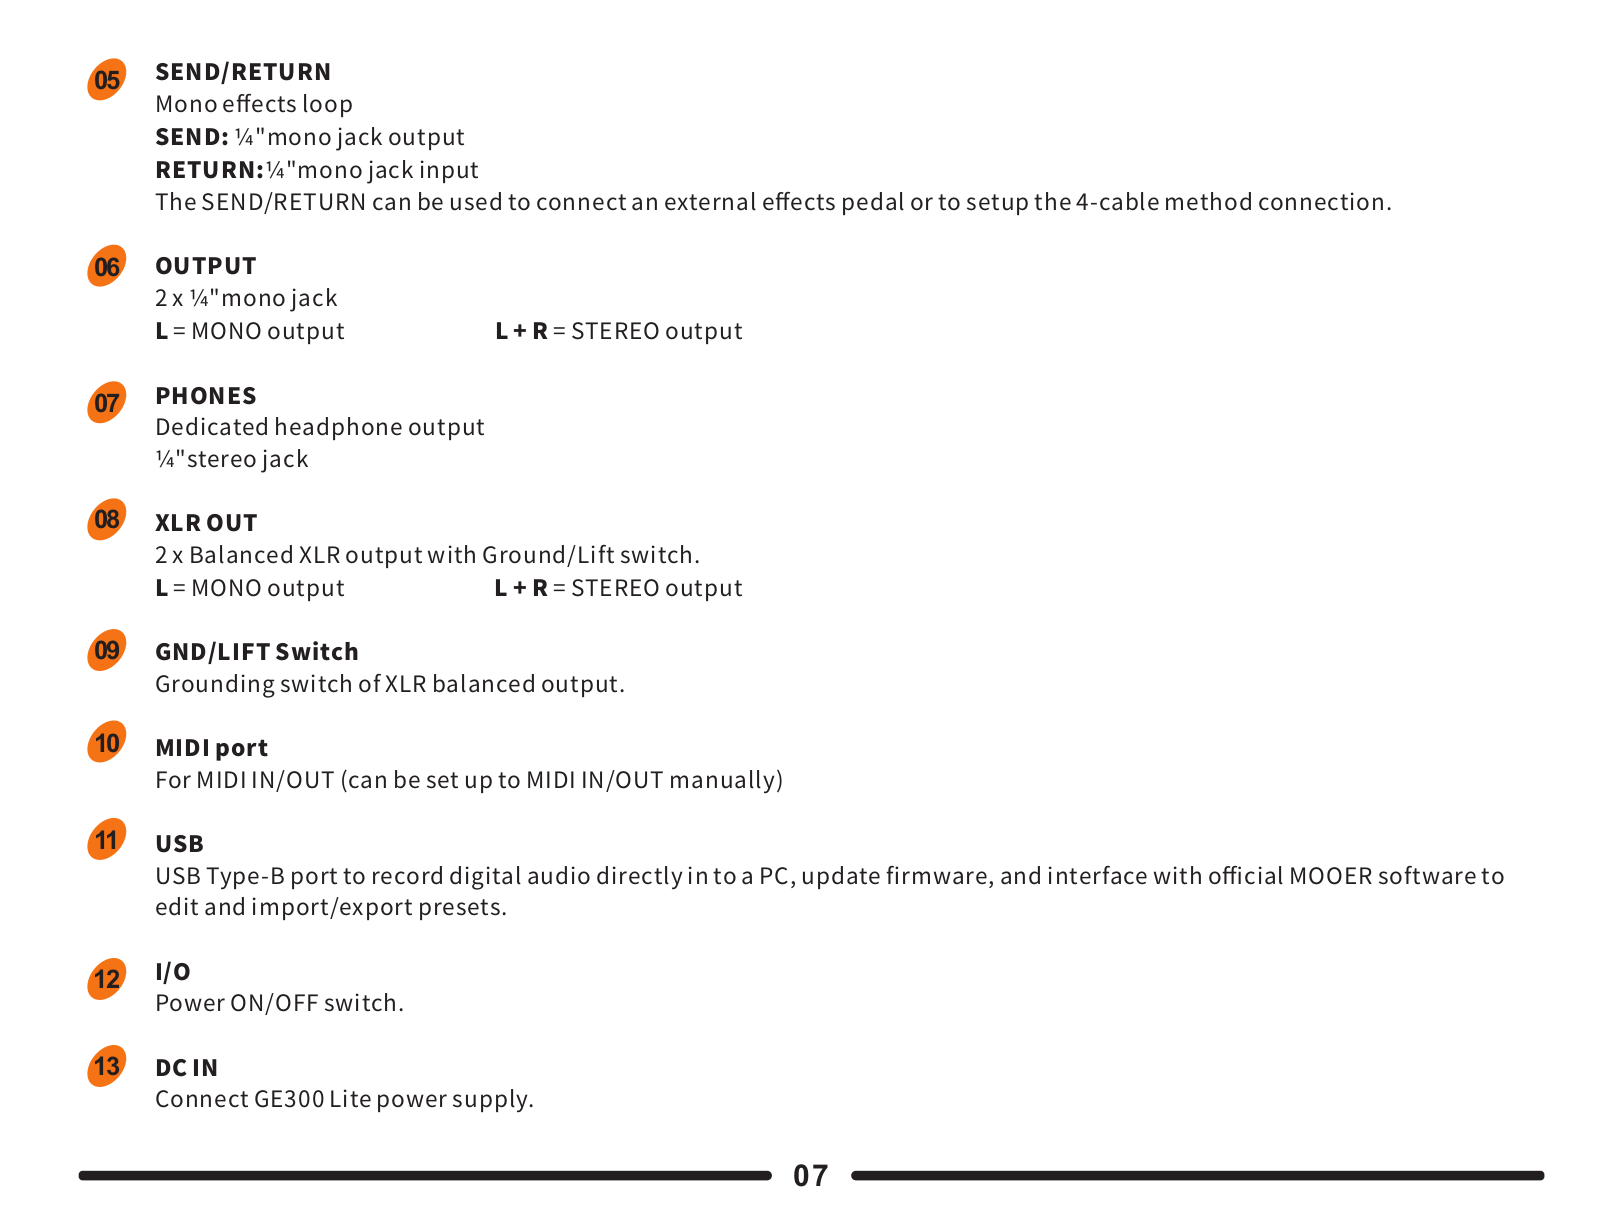
05SEND/RETURN

Mono e ects loop

SEND: ¼"mono jack output

RETURN:¼"mono jack input

The SEND/RETURN can be used to connect an external e ects pedal or to setup the 4-cable method connection.

06OUTPUT

2 x ¼"mono jack

L = MONO output L + R = STEREO output

07PHONES

Dedicated headphone output

¼"stereo jack

08XLR OUT

2 x Balanced XLR output with Ground/Lift switch.

L = MONO output L + R = STEREO output

09GND/LIFT Switch

Grounding switch of XLR balanced output.

10MIDI port

For MIDI IN/OUT (can be set up to MIDI IN/OUT manually)

11USB

USB Type-B port to record digital audio directly in to a PC, update firmware, and interface with o cial MOOER software to

edit and import/export presets.

12I/O

Power ON/OFF switch.

13DC IN

Connect GE300 Lite power supply.

07

Recommended Setup

Connecting to FRFR (Full range, flat response) speaker cabinets:

Turn on AMP and CAB SIM Blocks.

AUDIO INTERFACE/STUDIO MONITOR

STAGEMONITORORPASYSTEM

HEADSET

GUITAR

Connecting to a power amp or FX Loop: Turn on AMP Block. Try turning on/o tube setting to achieve your desired tone.

Connecting to Guitar Amplifer + FRFR Device:

Turn on AMP and CAB SIM blocks. CAB SIM block should be placed at the end of the e ects chain. From the system menu, set 1/4"

output to OFF and XLR output to ON.


CONNECTING SPEAKER RETURN

RETURN OF AMP

07

GUITAR

08

4-Cable Method:

Turn on FX LOOP block. Turn o AMP and CAB blocks. Set FX Loop to"Serial". Place stompboxes such as wah, compression, pre-EQ,

octave, etc., before SEND. Modulation, Delay, reverb e ects are recommended to be placed after RETURN.

FRFR DEVICE

CONNECT RETURN OF AMP

/ POWER AMPLIFIER

GUITAR

Connecting to a Guitar Amplifier or traditional FX LOOP:

We recommend turning o AMP and CAB blocks.

AMP INPUT FX LOOP RETURN

GUITAR

FX LOOP SEND

09

Start

1. Connect the GE300 Lite with your preferred setup.

2. Turn the MASTER volume control all the way down.

3. Plug in the power supply and switch on the GE300 LITE.

4. Rotate the MASTER volume control slowly until reaching a comfortable level.

XLR

MASTER

OUTPUT&

MASTER

Home Display

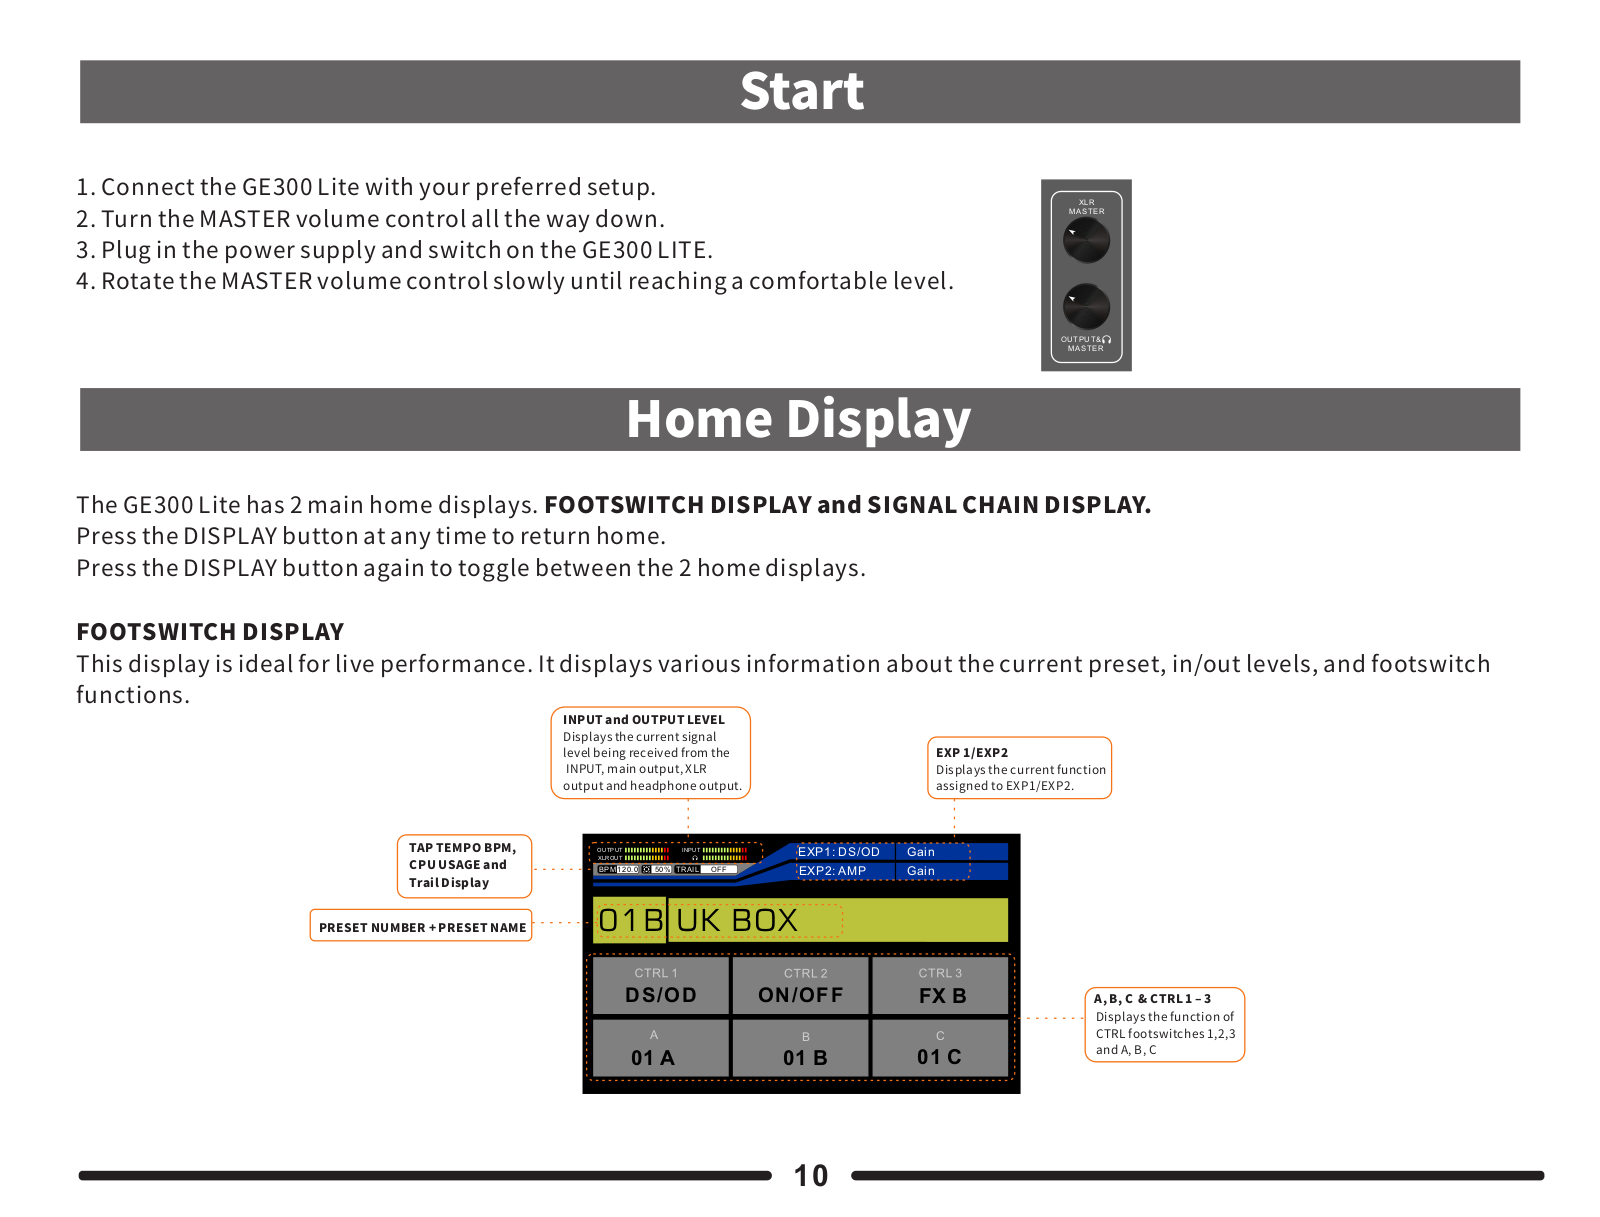
The GE300 Lite has 2 main home displays. FOOTSWITCH DISPLAY and SIGNAL CHAIN DISPLAY.

Press the DISPLAY button at any time to return home.

Press the DISPLAY button again to toggle between the 2 home displays.

FOOTSWITCH DISPLAY

This display is ideal for live performance. It displays various information about the current preset, in/out levels, and footswitch

functions.

TAP TEMPO BPM,

CPU USAGE and

Trail Display

PRESET NUMBER + PRESET NAME

INPUTandOUTPUTLEVEL

Displaysthecurrentsignal

levelbeingreceivedfromthe

INPUT,mainoutput,XLR

outputandheadphoneoutput.

OUTPUT

INPUT

XLROUT


BPM 120.0

50% TRAIL OFF

EXP 1/EXP2

Displays the current function

assigned to EXP1/EXP2.

EXP1: DS/OD

Gain

EXP2: AMP

Gain

01B UK BOX

DS/OD

ON/OFF

FX B

A, B, C & CTRL 1 ‒ 3


Displays the function of

A

B

C

CTRL footswitches 1,2,3

01 A

01 B

01 C

and A, B, C

10

Signal Chain Display

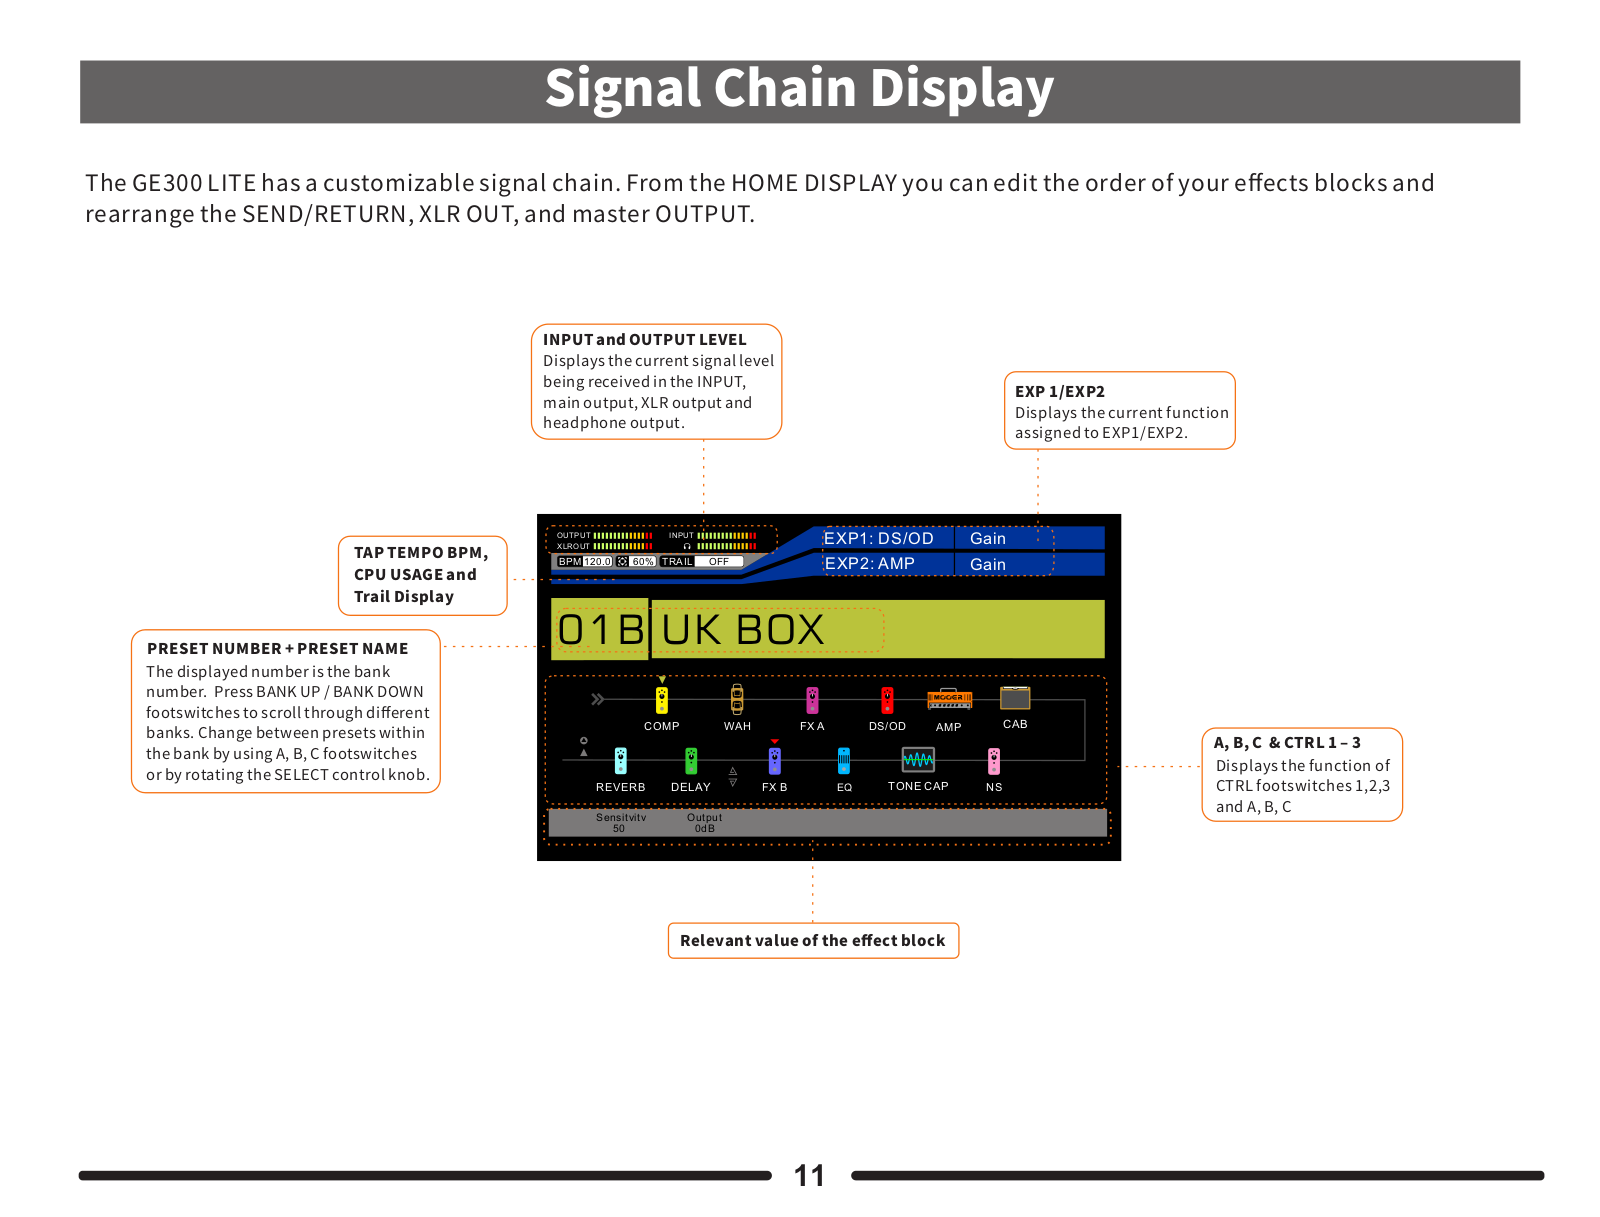
The GE300 LITE has a customizable signal chain. From the HOME DISPLAY you can edit the order of your e ects blocks and

rearrange the SEND/RETURN, XLR OUT, and master OUTPUT.

INPUTandOUTPUTLEVEL

Displaysthecurrentsignallevel

beingreceivedintheINPUT,

mainoutput,XLRoutputand

headphoneoutput.

TAP TEMPO BPM,

OUTPUT

INPUT


EXP1: DS/OD


XLROUT


BPM 120.0 60%

TRAIL

OFF


EXP2: AMP


CPU USAGE and


Trail Display

01B UK BOX


PRESET NUMBER + PRESET NAME


Thedisplayednumberisthebank


number. PressBANKUP/BANKDOWN


footswitchestoscrollthroughdi erent

COMP

WAH

FX A


DS/OD AMP

banks.Changebetweenpresetswithin


thebankbyusingA,B,Cfootswitches


orbyrotatingtheSELECTcontrolknob.

REVERB

DELAY

FX B

EQ

TONE CAP


Sensitvitv

Output


50


0dB


EXP 1/EXP2

Displays the current function

assigned to EXP1/EXP2.

Gain

Gain


CAB


A, B, C & CTRL 1 ‒ 3


Displays the function of

NS

CTRL footswitches 1,2,3


and A, B, C

Relevant value of the e ect block

11

Select Preset

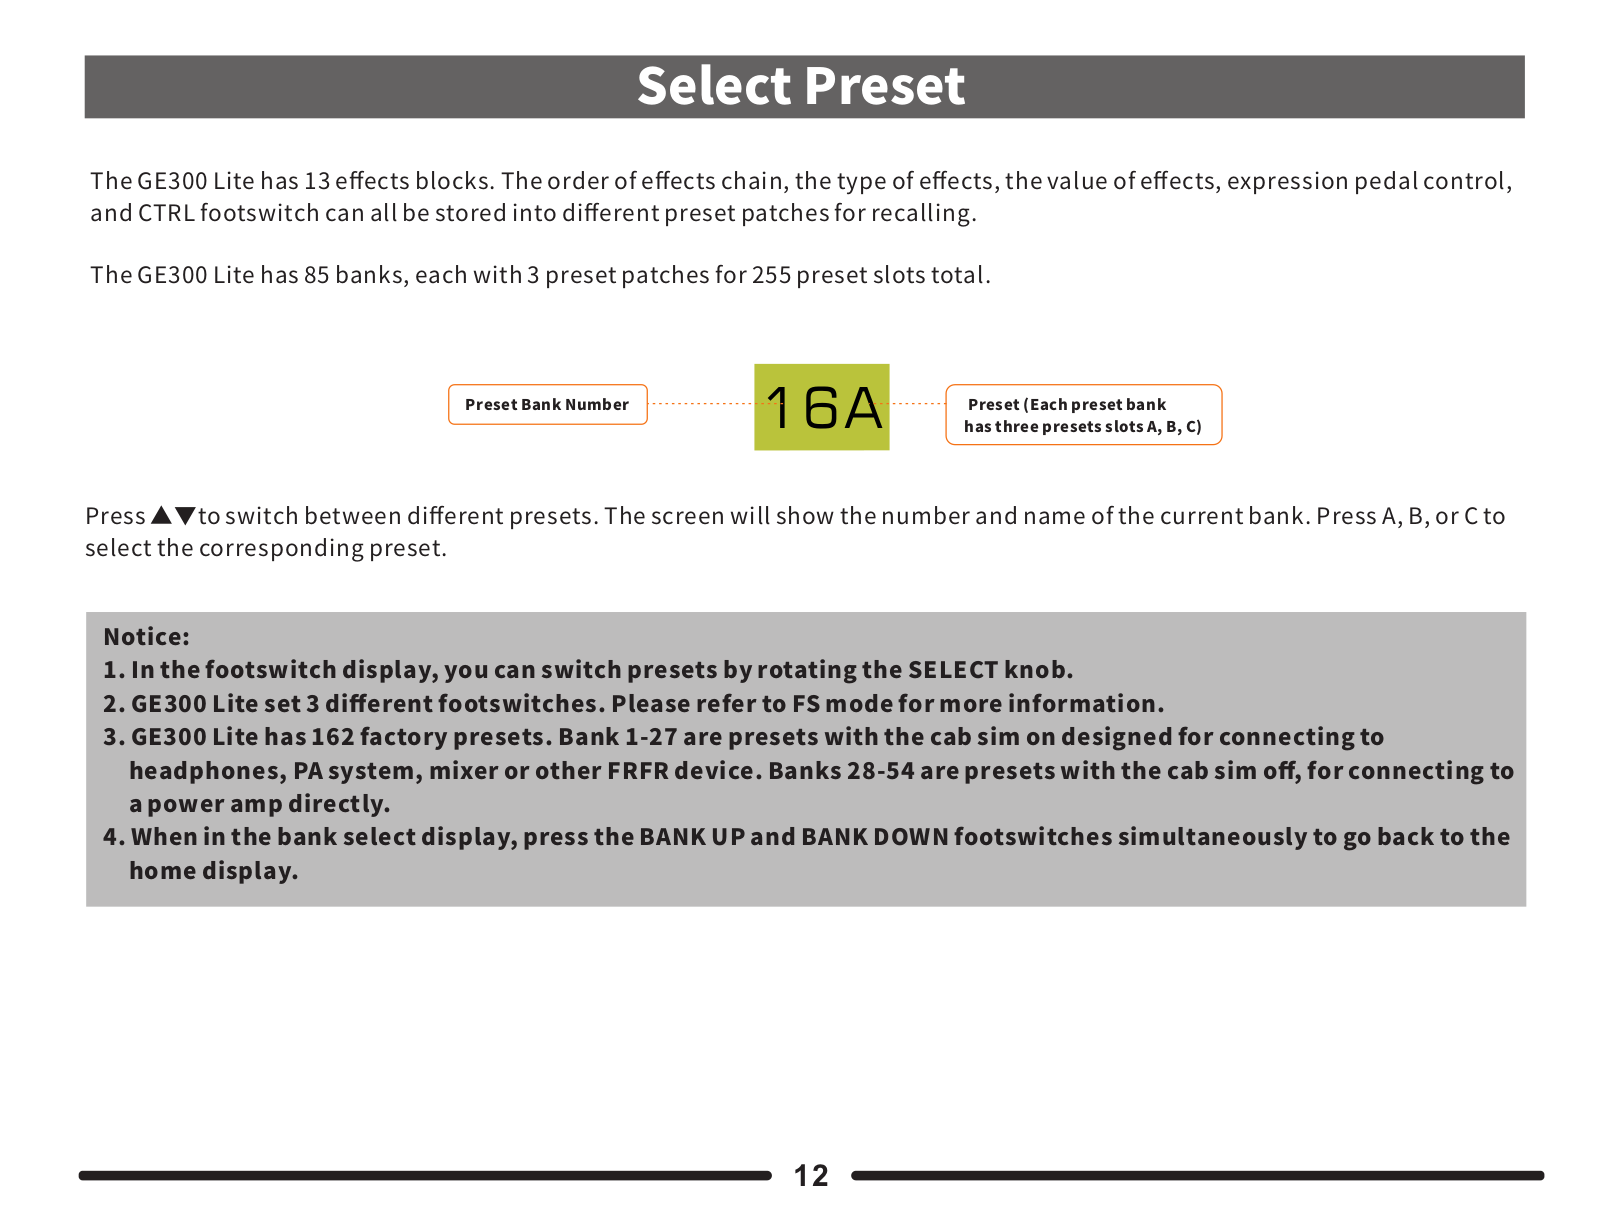
The GE300 Lite has 13 e ects blocks. The order of e ects chain, the type of e ects, the value of e ects, expression pedal control,

and CTRL footswitch can all be stored into di erent preset patches for recalling.

The GE300 Lite has 85 banks, each with 3 preset patches for 255 preset slots total.

Preset Bank Number

16A

Preset (Each preset bank


has three presets slots A, B, C)

Press ▲▼to switch between di erent presets. The screen will show the number and name of the current bank. Press A, B, or C to

select the corresponding preset.

Notice:

1. In the footswitch display, you can switch presets by rotating the SELECT knob.

2. GE300 Lite set 3 di erent footswitches. Please refer to FS mode for more information.

3. GE300 Lite has 162 factory presets. Bank 1-27 are presets with the cab sim on designed for connecting to

headphones, PA system, mixer or other FRFR device. Banks 28-54 are presets with the cab sim o , for connecting to

a power amp directly.

4. When in the bank select display, press the BANK UP and BANK DOWN footswitches simultaneously to go back to the

home display.

12

Preset Editing

1. E ect Block ON/OFF

ON: When the e ect block is o (The LED button is o ), press relevant e ect block LED button to turn on (The LED button is on).

OFF: When the e ect is on (The LED button is on), press the e ect block LED button to select it and then press a second time to turn

o (The LED button is o ).

Notice: If an e ect block is on, press twice to quickly turn it o .

2. Value Editing

A. Normal Aadjustment

● Press the desired e ect block button to enter an e ect page.

● Rotate SELECT to navigate to the desired e ect (Some e ect blocks, for example TONE CAPTURE and FX LOOP, only have one

e ect to choose from).

● Rotate knobs 1-5 to edit the value.

● Press SELECT to switch between rolls

● Some e ects have more than one page of parameters. The page number will be on the top left of the adjusting display. Press

the <> to scroll between di erent pages of parameters.

OUTPUT

INPUT

EXP1: DS/OD


Gain

XLROUT


BPM 120.0 50%

TRAIL OFF

EXP2: AMP


Gain


1 2


17: UK 212


1

2

3

4


5


SM57

5

8

U47

20

Mic 1

Center 1

Distance 1

Mic 2

Center 2


2


15


15

o

o


0dB

Distance 2

Low cut

High Cut

Early

Output

Pattern 1

13

B. E ect chain display adjustment

● Press DISPLAY to enter e ect chain display.

● Rotate SELECT to navigate to the desired e ect.

● Rotate knobs 1-5 to adjust the parameters shown right under the e ect chain.

● More parameters can be accessed by <> page scroll button.

Waveform 1

Pitch 1

Attack 1

Level 1

Filter

Sin

-12.0

50

50

o

OUTPUT

INPUT


EXP1: AMP

Master

XLROUT


BPM 114.2 68%

TRAIL

OFF


EXP2: DS/OD

Output


13C Jungle Riff


COMP


WAH

NS

FX A

DS/OD

AMP

REVERB

DELAY


FX B

EQ

TONE CAP

CAB

Waveform 1


Pitch 1

Attack 1

Level 1

Filter

Sin


-12.0

50

50

o

1

2

3

4

5

Notice: Home display adjustment supports quick editing of the current e ect. To turn e ect block On/O or change

e ect type, please press corresponding e ect block button.

3. E ect chain editing

GE300 LITE has a customizable e ect chain with 12 e ect blocks and 4 input and outputs. The order changed by users in the e ect chain display.

Moving e ect block:

● Press DISPLAY once or twice (depending on the current display screen) to enter e ect chain display.

● Rotate SELECT to navigate the yellow cursor above the e ect to move.

● Press SELECT knob to confirm pick up of the e ect. The cursor will turn red.

● Rotate SELECT knob to the position you desire. Press again to drop the e ect. Cursor will change back to yellow.

Moving input and output

● There are 4 input and outputs: 6.35mm (1/4') output, XLR output, FX LOOP SEND, and FX LOOP RETURN. All of them are

customizable.

● Press and hold SELECT for 1.5 seconds to enter input/output selection mode. The cursor will switch to input/output or light up

the input/output icon.

● Rotate SELECT to select a desired input/output.

● Press SELECT to pick up an input/output. The icon will turn red.

● Rotate SELECT to a desired position. Press SELECT again to drop the input/output. The icon will turn back to yellow.

● Press and hold SELECT for 1.5 seconds to quit the I/O selection mode.

Notice: 1. To prevent signal feedback, RETURN cannot be set in front of SEND.

2. The parameter shown under the e ect chain can be adjusted by the 1-5 knobs.

14

Saving Preset

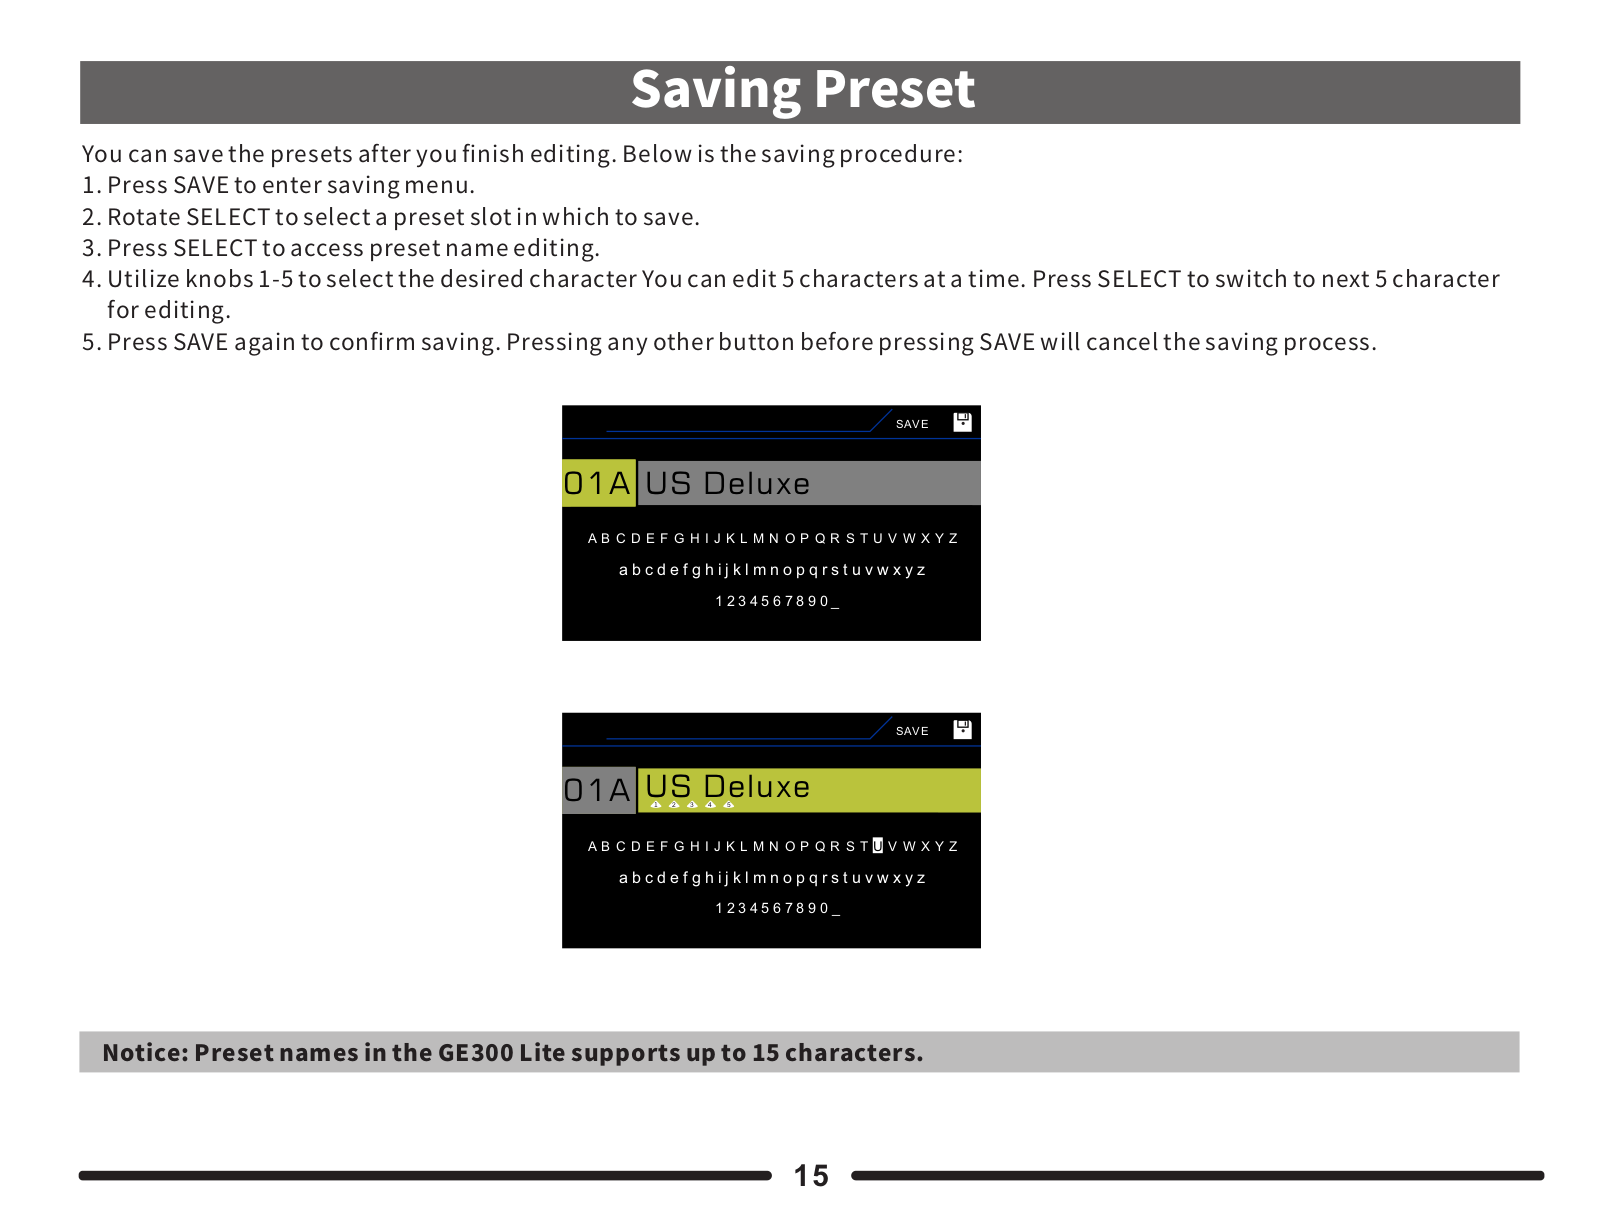
You can save the presets after you finish editing. Below is the saving procedure:

1. Press SAVE to enter saving menu.

2. Rotate SELECT to select a preset slot in which to save.

3. Press SELECT to access preset name editing.

4. Utilize knobs 1-5 to select the desired character You can edit 5 characters at a time. Press SELECT to switch to next 5 character

for editing.

5. Press SAVE again to confirm saving. Pressing any other button before pressing SAVE will cancel the saving process.

SAVE

0116A US Deluxe

A B C D E F G H I J K L M N O P Q R S T U V W X Y Z

a b c d e f g h i j k l m n o p q r s t u v w x y z

1 2 3 4 5 6 7 8 9 0 _

SAVE

0116A US Deluxe

1

2

3

4

5

A B C D E F G H I J K L M N O P Q R S T U V W X Y Z

a b c d e f g h i j k l m n o p q r s t u v w x y z

1 2 3 4 5 6 7 8 9 0 _

Notice: Preset names in the GE300 Lite supports up to 15 characters.

15

TUNER

1. Press A&B simultaneously to access the TUNER.

2. Play the guitar string and the display will show the name and pitch of the note.

3. Tune your guitar to match the pitch.

4. Rotate knob 1 to switch between MUTE and BYPASS mode.

5. Rotate knob 2 to calibrate the tuning frequency from 435Hz-445Hz.

6. Press any footswitch except for BANK UP and BANK DOWN to exit the TUNER.

TUNER

G

MUTE

A=440Hz

1

2

Notice: You can set the CTRL footswitch to the TUNER function. Please refer to CTRL section.

16

LOOPER

The GE300 Lite has a fully integrated loop station with up to 30 seconds of loop time. Press footswitch B + C simultaneously to

enter/exit the LOOPER.

OUTPUT

INPUT


EXP1: DS//OD

Gain

XLROUT


BPM 120.0

50% TRAIL

OFF

EXP2: FX B

Depth

Record display bar.


Showing the recording


LOOPER

time in seconds.


1 REC VOL: 50

TIME 6.0

2

: 50

REC VOL

UNDO

REVERSE

1/2

REC


SPEED

REC VOL. Adjust the

ONCE

STOP

record input volume

DUB

CLEAR

using control knob 1.

PLAY


PLAY VOL

Adjust the looper

playback volume using

control knob 2.

Control menu

Using CTRL1, CTRL2,CTRL3, and A,

B, C to control corresponding

function.

LOOPER INSTRUCTIONS

REC: When the track is empty, press footswitch A to start recording. The REC indicator will turn green REC , and the count-o will

start.

PLAY: Press footswitch A again to stop recording and begin playback. The PLAY indicator will turn green .

DUB: During PLAY mode, press footswitch A to DUB another track. The DUB indicator will turn green DUB . You can dub tracks as

much as you'd like.

UNDO/REDO: When there are at least two DUB tracks, users can press CTRL 1 to undo the last track. Press CTRL 1 again to redo the

track.

REVERSE: Press CTRL 2 to play the track in reverse. The count-of will count in reverse as well.

1/2 SPEED: Press CTRL 3 to play the tracks at half speed of the original. The pitch of the track will be one octave lower. The counting

bar will run at half speed as well.

ONCE: Press footswitch B to stop playing tracks after playing back once.

STOP/CLEAR: Press footswitch C to stop playback. STOP will turn green. Press and hold footswitch C to access CLEAR. All the tracks

will be deleted, and STOP will turn black again.

Notice

1. Looper will keep running in the background if you quit during playback mode or recording mode. You can use the GE300 Lite's other functions as

you like, for example, preset editing, CTRL footswitch actions, or switching between presets.

2. The LOOPER will automatically save the recorded files even after it turns o .

3. REC VOL and PLAY VOL are set to 50 as the default value. You can adjust them to your preference.

17

GLB-EQ

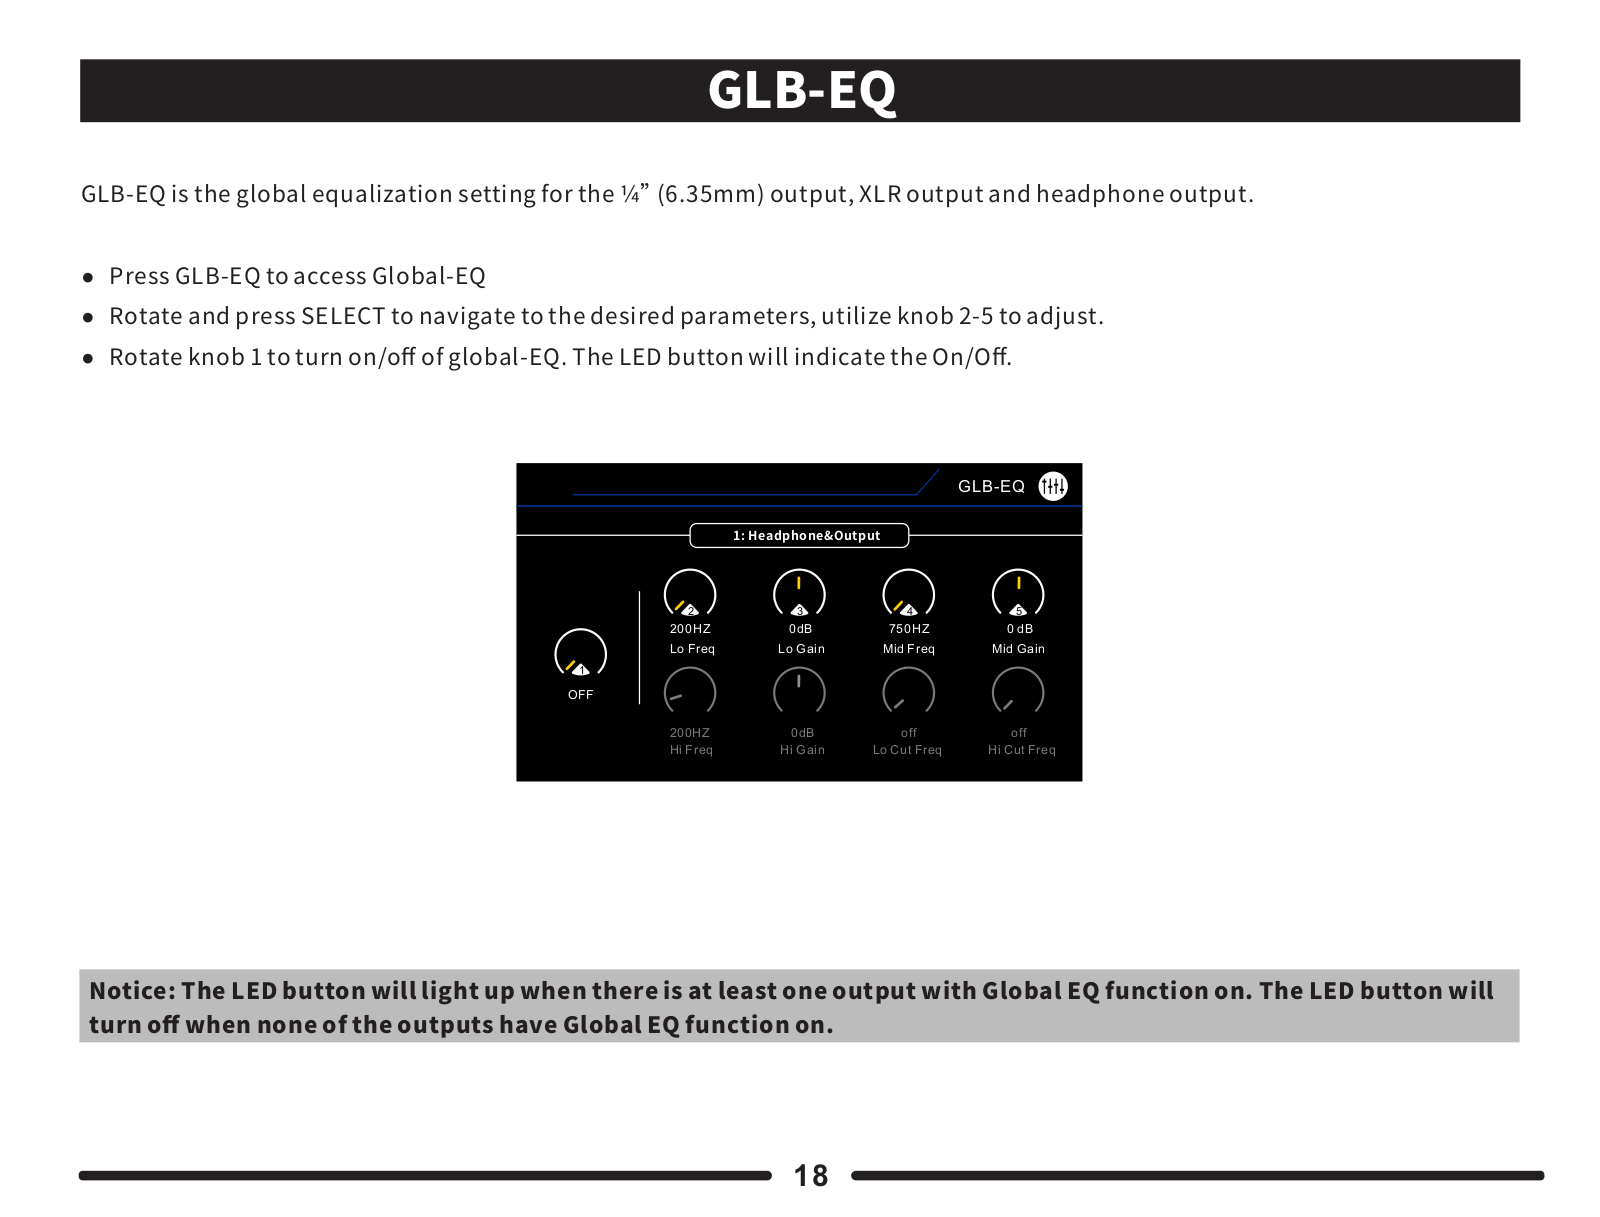
GLB-EQ is the global equalization setting for the ¼”(6.35mm) output, XLR output and headphone output.

● Press GLB-EQ to access Global-EQ

● Rotate and press SELECT to navigate to the desired parameters, utilize knob 2-5 to adjust.

● Rotate knob 1 to turn on/o of global-EQ. The LED button will indicate the On/O .


GLB-EQ


1: Headphone&Output


2

3

4

5


200HZ

0dB

750HZ

0 dB

Lo Freq

Lo Gain

Mid Freq

Mid Gain

1


OFF


200HZ

0dB

off

off

Hi Freq

Hi Gain

Lo Cut Freq

Hi Cut Freq

Notice: The LED button will light up when there is at least one output with Global EQ function on. The LED button will

turn o when none of the outputs have Global EQ function on.

18

FX LOOP

GE300 LITE has built-in FX LOOP meeting demands from di erent situations.

1. For external stompboxes

● You can simply connect your own stompboxes into the FX LOOP as the diagram shows.

GUITAR

OUTPUT

INPUT

XLROUT


BPM 120.0

50% TRAIL OFF

EXP1: DS/OD

Gain

EXP2:FX B

Depth

OUTPUT

INPUT

XLROUT


BPM 120.0

50% TRAIL OFF

EXP1: DS/OD

Gain

EXP2:FX B

Depth

01A US Deluxe


01A US Deluxe


COMP

WAH

FX A


DS/OD AMP

CAB

COMP

WAH

FX A

DS/OD AMP

CAB

REVERB DELAY

FX B

EQ

TONE CAP

NS

REVERB DELAY

FX B

EQ TONE CAP

NS

Send Level

Return Level

Drv

Wet

Loop Mode


Send Level

Return Level


0dB

0dB

0

100

Series


0dB

+3.0dB


● Adjust the position of the SEND and RETURN as you wish. Picture below: External pedal is placed between

Below is an example, the external pedal is placed between FXB and Delay of GE300 LITE.

delay and noise gate of GE300 LITE.

19

● Press FX LOOP button to turn on FX LOOP. The FX LOOP can be set to SERIAL and PARALLEL mode.

External pedals


External pedals


FX B

EQ

FX B

EQ

Serial mode, SEND and RETURN are in the same

Parallel mode, SEND and RETURN are in the same

position of the e ect chain, turn on FX LOOP

position of the e ect chain, turn on FX LOOP


External pedals


External pedals


FX B

NS

FXB

EQ TONE CAP NS

Serial mode, SEND and RETURN are in two di erent Parallel mode, SEND and RETUTN are in two di erent

position of the e ects chain, turn on FX LOOP position of the e ects chain, turn on FX LOOP

20

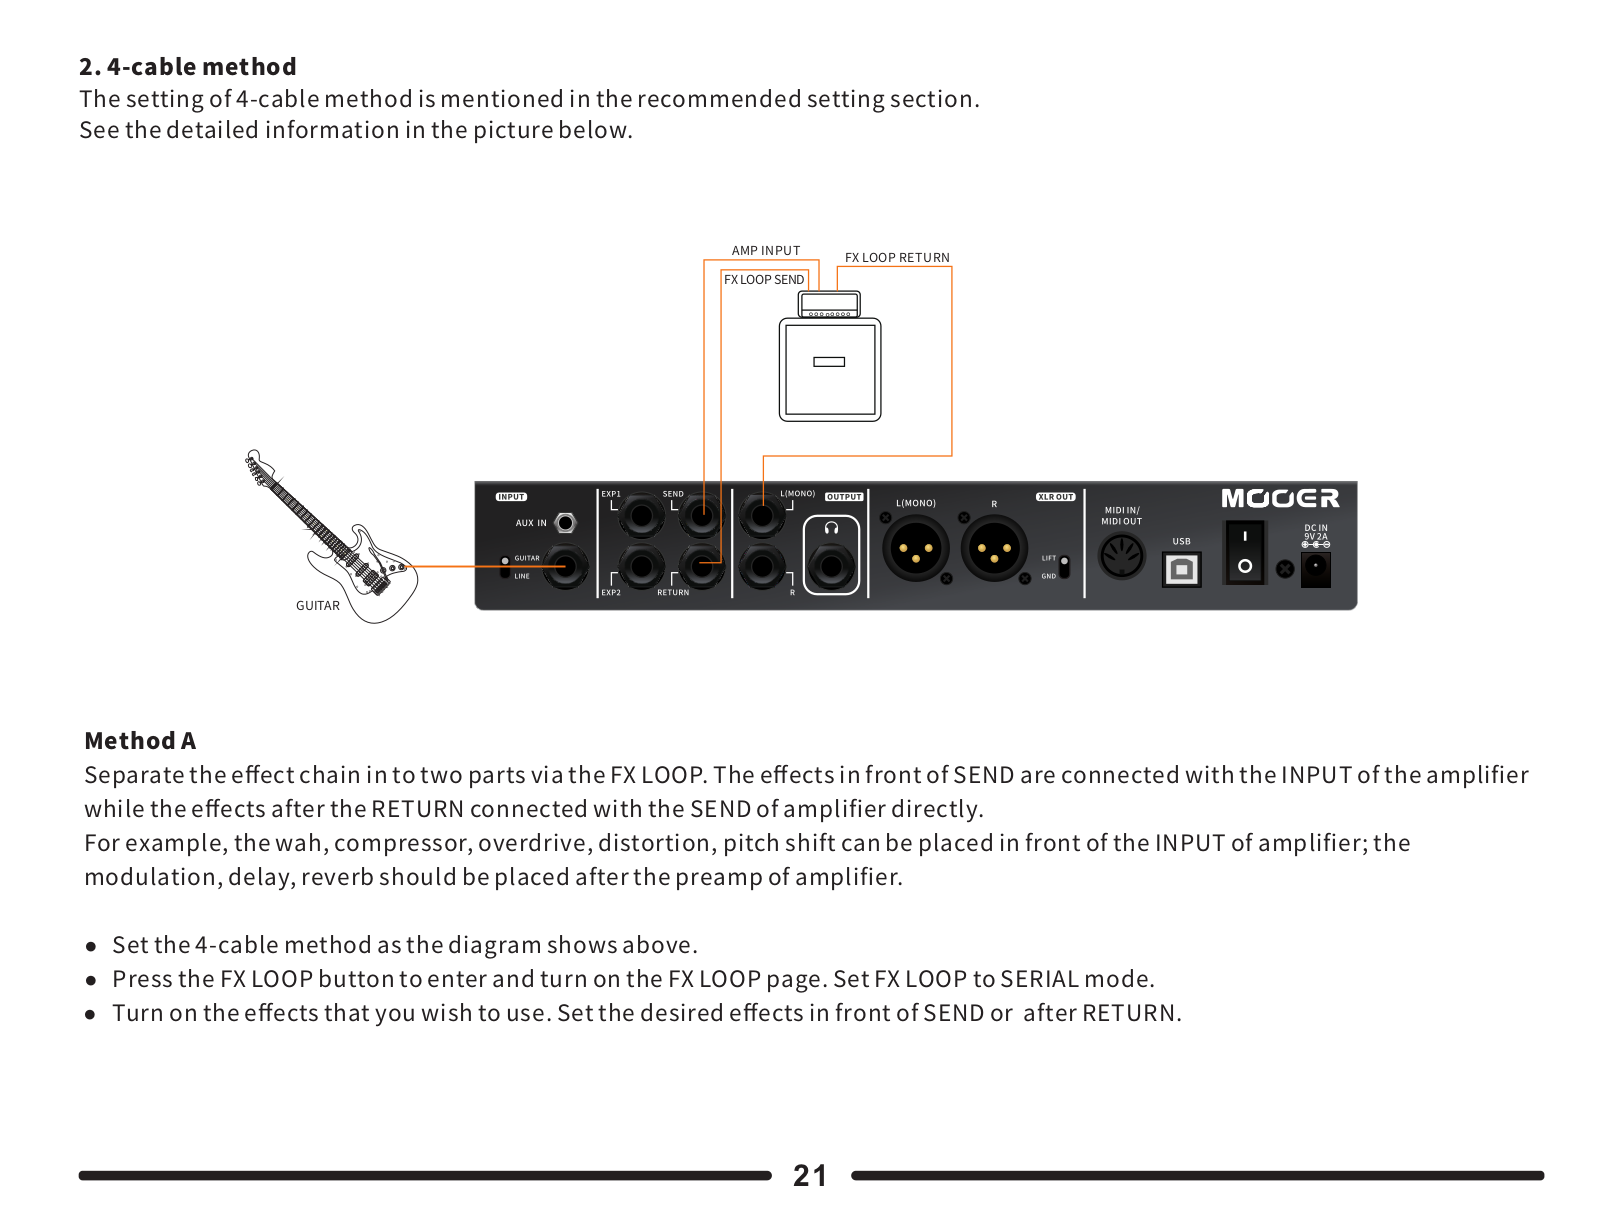
2. 4-cable method

The setting of 4-cable method is mentioned in the recommended setting section.

See the detailed information in the picture below.

AMP INPUT

FX LOOP RETURN

FXLOOPSEND

GUITAR

Method A

Separate the e ect chain in to two parts via the FX LOOP. The e ects in front of SEND are connected with the INPUT of the amplifier

while the e ects after the RETURN connected with the SEND of amplifier directly.

For example, the wah, compressor, overdrive, distortion, pitch shift can be placed in front of the INPUT of amplifier; the

modulation, delay, reverb should be placed after the preamp of amplifier.

● Set the 4-cable method as the diagram shows above.

● Press the FX LOOP button to enter and turn on the FX LOOP page. Set FX LOOP to SERIAL mode.

● Turn on the e ects that you wish to use. Set the desired e ects in front of SEND or after RETURN.

21


GE300 LITE SEND to INPUT of amplifier

GUITAR

COMP

WAH

FX A

DS/OD


GE300 LITE RETURN to the SEND of amplifier

REVERB

DELAY

FX B

EQ

NS

GE300 LITE OUTPUT to the RETURN of amplifier


COMP

WAH

FX A

DS/OD

REVERB

DELAY

FX B

EQ

NS

These e ects are in front of INPUT of amplifier These e ects are places between SEND and RETURN of

amplifier.

Notice: For avoiding misunderstanding, picture above hides the e ect blocks that will not used in this method, for

example, AMP, CAB, TONE CAPTURE.

22

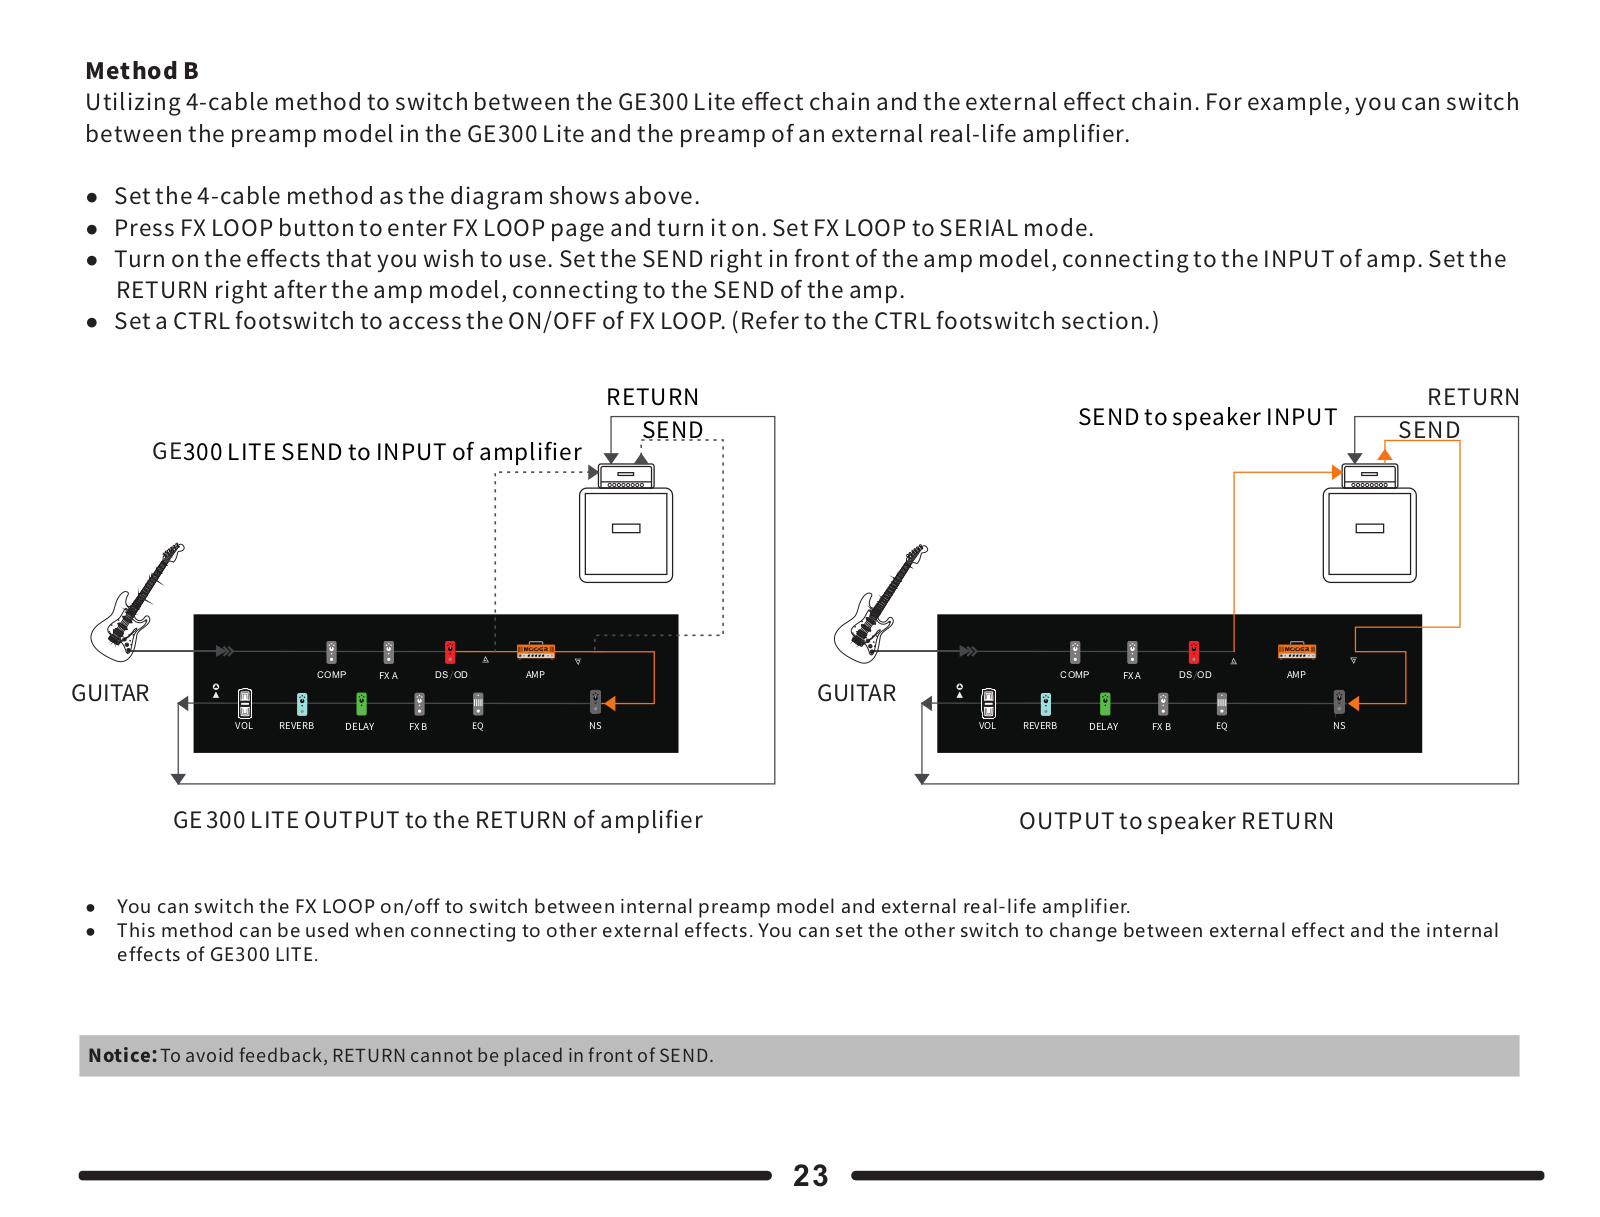
Method B

Utilizing 4-cable method to switch between the GE300 Lite e ect chain and the external e ect chain. For example, you can switch

between the preamp model in the GE300 Lite and the preamp of an external real-life amplifier.

● Set the 4-cable method as the diagram shows above.

● Press FX LOOP button to enter FX LOOP page and turn it on. Set FX LOOP to SERIAL mode.

● Turn on the e ects that you wish to use. Set the SEND right in front of the amp model, connecting to the INPUT of amp. Set the

RETURN right after the amp model, connecting to the SEND of the amp.

● Set a CTRL footswitch to access the ON/OFF of FX LOOP. (Refer to the CTRL footswitch section.)

RETURN

SEND to speaker INPUT

RETURN

SEND

SEND

GE300 LITE SEND to INPUT of amplifier

COMP

FX A

DS/OD

AMP

COMP

FX A

DS/OD

AMP

GUITAR


GUITAR


VOL REVERB DELAY

FX B

EQ

NS

VOL REVERB DELAY

FX B

EQ

NS

GE300 LITE OUTPUT to the RETURN of amplifier

OUTPUT to speaker RETURN

You can switch the FX LOOP on/off to switch between internal preamp model and external real-life amplifier.

This method can be used when connecting to other external effects. You can set the other switch to change between external effect and the internal effects of GE300 LITE.

Notice To avoid feedback, RETURN cannot be placed in front of SEND.

23

Loading...
+ 59 hidden pages