Mooer GE250 User manual

Amp Modelling & Multi E ects

Owner's Manual

NR

IR

HQ

DRUM

70 SEC

MODELLING

LOADER

EFFECTS

MACHINE

LOOPER


Contents


PRECAUTIONS------------------------------------------------------------------------------------------------------------------------------------------------

01


Features--------------------------------------------------------------------------------------------------------------------------------------------------------

02


Top Panel--------------------------------------------------------------------------------------------------------------------------------------------------

03-04


Back Panel-----------------------------------------------------------------------------------------------------------------------------------------------------

05


Home Display-------------------------------------------------------------------------------------------------------------------------------------------------

06


Setup--------------------------------------------------------------------------------------------------------------------------------------------------------

07-12

Play--------------------------------------------------------------------------------------------------------------------------------------------------------------

13


Preset Editing---------------------------------------------------------------------------------------------------------------------------------------------

13-15

Turn e ects blocks on/o -------------------------------------------------------------------------------------------------------------------------------

14


Detailed Value editing-----------------------------------------------------------------------------------------------------------------------------------

14


E ects Chain Order---------------------------------------------------------------------------------------------------------------------------------------

14

Saving------------------------------------------------------------------------------------------------------------------------------------------------------

15

TONE CAPTURE -------------------------------------------------------------------------------------------------------------------------------------------

16-17

TUNER-----------------------------------------------------------------------------------------------------------------------------------------------------------

18

RHYTHM--------------------------------------------------------------------------------------------------------------------------------------------------------

19


LOOPER-----------------------------------------------------------------------------------------------------------------------------------------------------

20-21

LOOPER & DRUM MACHINE Jam Mode )-------------------------------------------------------------------------------------------------------------

21


GLB-EQ----------------------------------------------------------------------------------------------------------------------------------------------------------

22


FX LOOP--------------------------------------------------------------------------------------------------------------------------------------------------------

23


Expression Pedal-----------------------------------------------------------------------------------------------------------------------------------------

24-28

Calibration--------------------------------------------------------------------------------------------------------------------------------------------

24-25


Volume Pedal---------------------------------------------------------------------------------------------------------------------------------------------

26


Wah Pedal-------------------------------------------------------------------------------------------------------------------------------------------------

26


Merge---------------------------------------------------------------------------------------------------------------------------------------------------

27-28

CTRL SETTING-------------------------------------------------------------------------------------------------------------------------------------------------

29

SYSTEM SETTING------------------------------------------------------------------------------------------------------------------------------------------

30-35

INPUT LEVEL----------------------------------------------------------------------------------------------------------------------------------------------

31

USB AUDIO--------------------------------------------------------------------------------------------------------------------------------------------

31-33

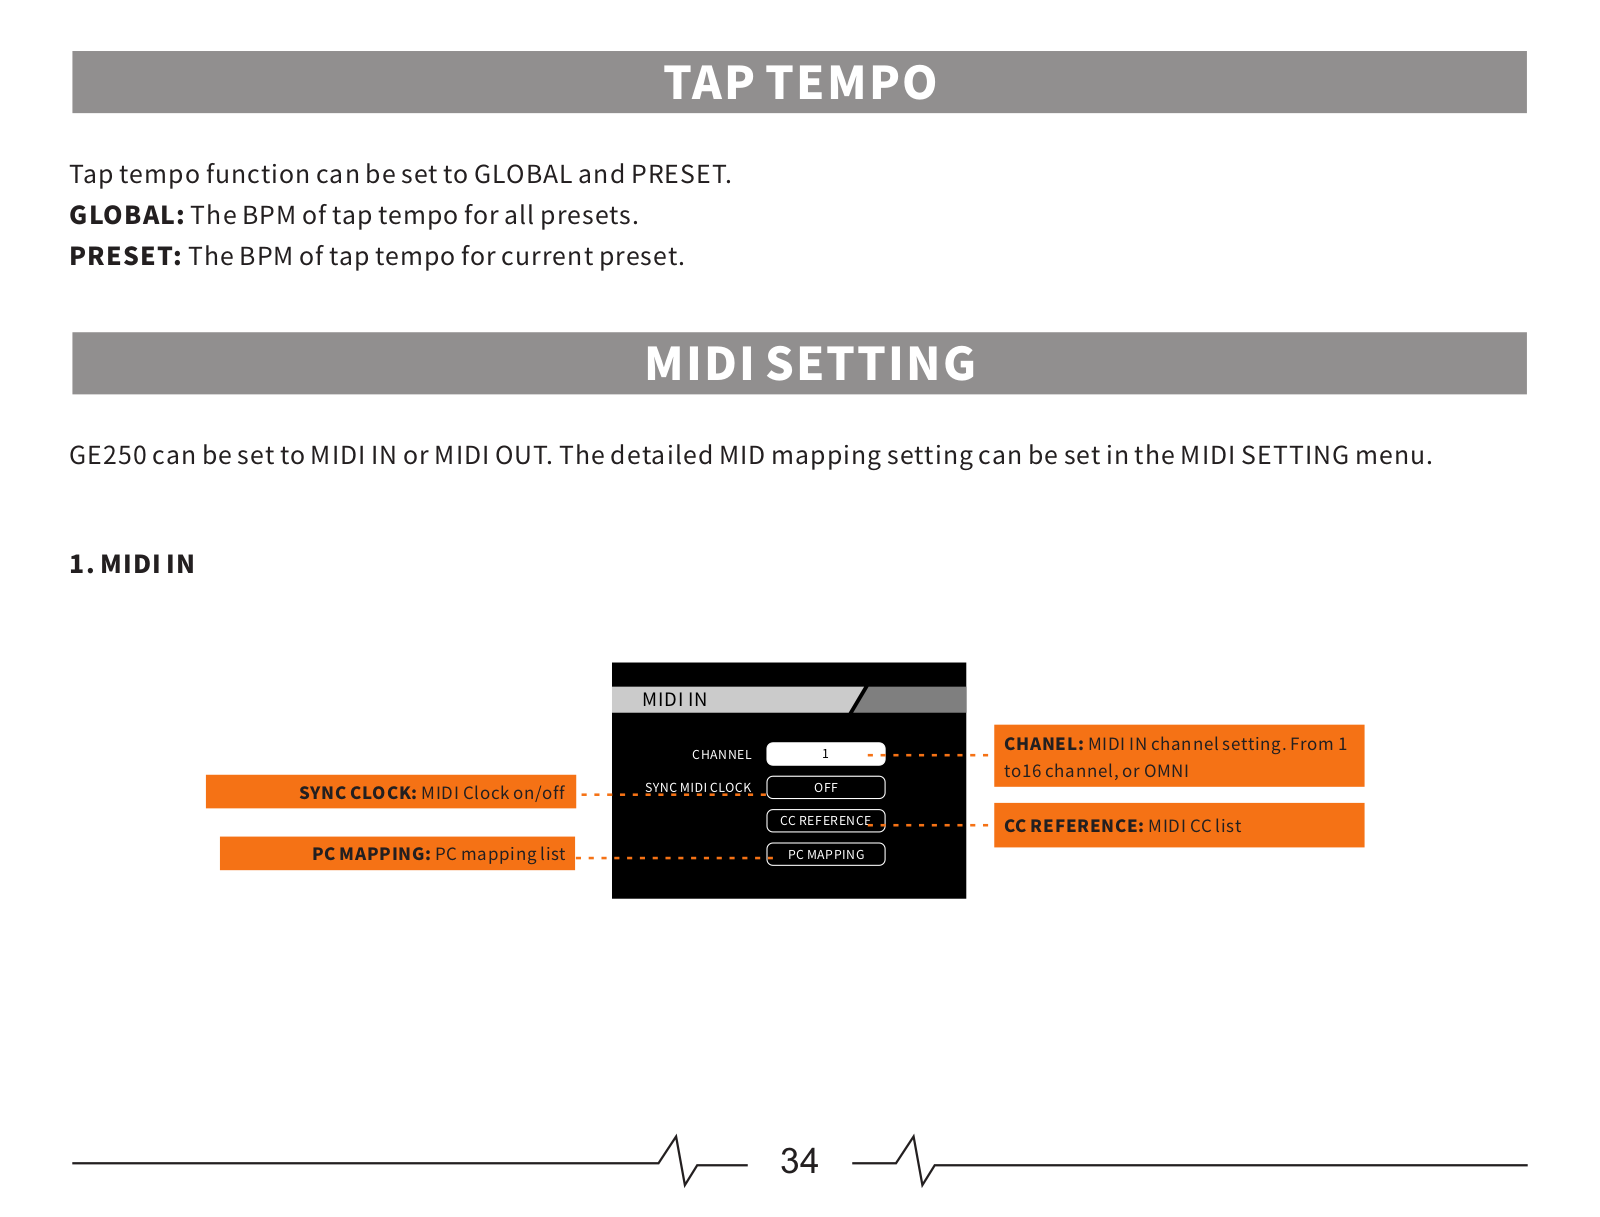
TAP TEMPO------------------------------------------------------------------------------------------------------------------------------------------------

34

MIDI SETTING-----------------------------------------------------------------------------------------------------------------------------------------

34-35

   CAB SIM THRU---------------------------------------------------------------------------------------------------------------------------------------------

35

TRAIL-------------------------------------------------------------------------------------------------------------------------------------------------------

36

LOOPER MODE--------------------------------------------------------------------------------------------------------------------------------------------

36

SCREEN----------------------------------------------------------------------------------------------------------------------------------------------------

37

RESET------------------------------------------------------------------------------------------------------------------------------------------------------

37

E ect List---------------------------------------------------------------------------------------------------------------------------------------------------

38-49

Firmware Update----------------------------------------------------------------------------------------------------------------------------------------------

51

Specifications--------------------------------------------------------------------------------------------------------------------------------------------------

52

PRECAUTIONS

Pleasereadcarefullybeforeproceeding

PowerSupply

PleaseconnectthedesignatedACadaptertoanACoutletofthecorrectvoltage.PleasebesuretouseonlyanACadapter

whichsupplies9VDC,1A,centernegative.UnplugtheACpoweradapterwhennotinuseorduringelectricalstorms.

Pleaseonlyusetheoriginalpowersupplyincludedwithyourdevice.

Connections

AlwaysturnoffthepowertotheGE250andalladjacentequipmentbeforeconnectingordisconnecting.Thiswillhelp

preventmalfunctionand/ordamagetootherdevices.Alsomakesuretodisconnectallconnectedcablesandthepower

cordbeforemovingthisunit.

CareandMaintenance

Cleanonlywithasoft,drycloth.Ifnecessary,slightlymoistenthecloth.Donotuseabrasivecleanser,cleaningalcohol,

paintthinners,wax,solvents,cleaningfluids,orchemically-impregnatedwipingcloths.

Interferencewithradios,televisions,andotherelectricaldevicesplacednearbymaycausereceptioninterference.

Operatethisunitatasuitabledistancefromradiosandtelevisions.

Location

Toavoiddeformation,discoloration,orotherseriousdamage,donotexposethisunittothefollowingconditions:

● Directsunlight ● Extremetemperatureorhumidity

● Magneticfields ● Moisture

● Excessivelydustyordirtylocations ● Strongvibrationsorshocks

● Heatsources

FCCCertificationThisdevicecomplieswithPart15ofFCCRules.Operationissubjecttothefollowingtwoconditions:

● Thisdevicemaynotcauseharmfulinterference.

● Thisdevicemustacceptanyinterferencereceived,includinginterferencethatmaycauseundesiredoperation.

01

Features

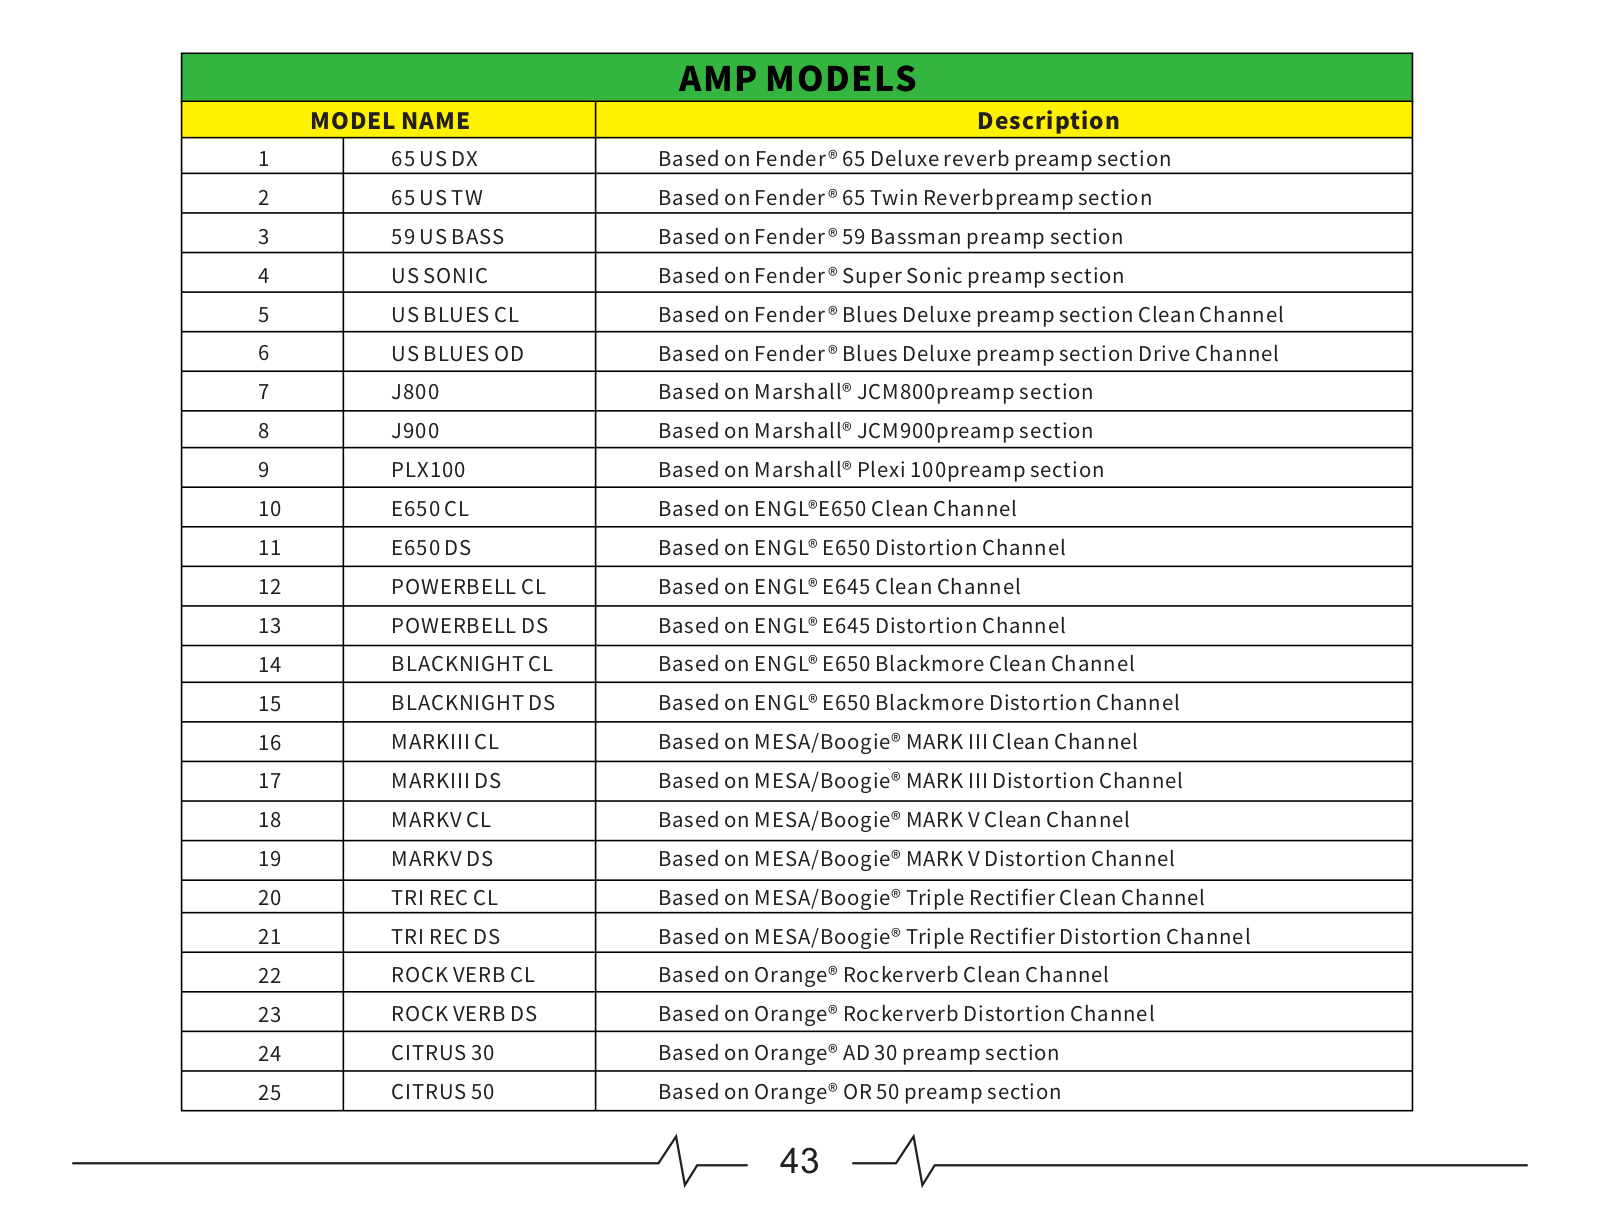
● 70high-qualityAMPmodelsthatutilizeMOOER'snon-lineardigitalampmodellingtechnology.Supportsloading

extraampmodelsviacomputereditor.

● 32IR-basedfactoryspeakercabmodelstoemulatethesamedynamicsandfeelofarealtubeamp.

● 10userslotstoloadinyourfavoritethird-partyIRfiles(2048samplepoints).

● 11differenteffectsblockswithover180high-qualityeffectsthatcoverallthebasesfromyourfavoritestompboxes

andpluginstostudiorackunits.

● TONECAPTUREfunctionallowsyoutosampleandcaptureyourreal-lifeamplifiertocreatebrand-newdigitalamp

models.

● Storeandrecallupto85banksofpresets,eachbankwith3patchesfor255patchestotal.

● ProgrammableFXLOOPwithoptionalsignalchainroutingforeasyintegrationofyourfavoriteeffectsandultimate

flexibilityfor4-cablemethodandampsetups.

● Stereooutputs(unbalanced1/4”andbalancedXLR).

● MIDIfunctioncanautomaticallymatchthesignalsource.SupportsMIDIINorMIDIOUTassetbytheuser.

● GlobalEQfunctionallowsindividualEQsettingformainoutput,headphoneoutput,andXLRbalancedoutput.

● Brand-newRHYTHMmodulewith60drummachinesand10Metronomestyles.

● CTRLfunctionsupportsON/OFFswitchofeffectmodules,TAPTEMPOfunction.

● 70secondlooperwithPRE/POSTmode.

● TrailOnfunctionfordelay&reverbeffects.

● Programmablebuilt-inexpressionpedalwithsupportforasecondexpressionpedal.

● Direct,low-latencyUSBaudioletsGE250doubleupasadigitalaudiointerfaceandtheincludededitingsoftware

makesita“one-stop-shop”forrecordingguitar.

02

Mooer GE250 User manual

Top Panel

Amp modelling & Multi Effects

01

BANK


09


06 07

08

05


2

EXP2: MOD

Modern Flanger

PRESET


VALUE


VOL: 75


EXP: MOD Modern Flanger

78%


OUTPUT ON

XLR OUT OFF


XLR OUT


LEAD GUITAR

MASTER


OUTPUT

SYSTEM

SAVE


31A


DISPLAY


MASTER

CTRL

EXP


GLB-EQ

AMP TONE CAP

CAB NS

EQ

DELAY REVERB

RHYTHM

10

A


B


C


TUNER


TONE


CAPTURE


03

02

04

03

01 BANKUP/BANKDOWNFOOTSWITCHES:Presstoswitchbetween85banks.

02 A/B/CFOOTSWITCHES:PresstoswitchbetweenPresetA/B/C.

03 EFFECTSBLOCKS:Presstoselecteffectsmoduleandentertheeditmenu.Presstwicetoturnoffthecurrentmodule.

04 RHYTHM:DrumMachine/Metronomebutton.Presstoturnon/offdrummachineormetronome.

05EDITORBUTTONS

DISPLAY:PresstoenterthePreset/effectchaindisplaypage.

SYSTEM:Presstoentersystemmenu.

SAVE:Presstosavecurrentsetting.

GLB-EQ:PresstoenterglobalEQsettingsmenu.GLB-EQsupportsXLR,6.35mm(1/4'')outputandheadphone

output.

CTRL:PresstoenterControlFootswitchmenu.

EXP:Presstoentertheexpressionpedalsettingmenu.

06 OUTOUT/HEADPHONE/ MASTER:6.35mm(1/4'')output,headphoneoutputandmastervolumeknob.

07 XLROUTMASTER:XLRoutputleveladjust.

08 VALUE:Editorknob.Navigateandeditdifferentvaluesandparameters.

093.5''TFTDISPLAYSCREEN

10EXPRESSIONPEDAL:Built-inexpressionpedal.Canbesettocontrolwaheffect,volumelevel,orcustomizedvalues.

04

Back Panel

01

02

03

04

05

06

07

08

09

10

11

12

13

14


FXLOOP

XLR OUT

OUTPUT


MIDI IN/

DC 9V


AUX IN EXP 2

IN

SEND

RETURN


L(MONO)

R

MIDI OUT


USB

1A


L(MONO)

R


01

AUX IN: 1/8'' stereo jack to connect external media devices for audio playback.


02

EXP2: ¼''stereo jack/external expression pedal input.


03IN: Instrument input.

¼'' mono jack .

04

SEND: 1/4'' FX LOOP. Can connect extra stompboxes, 4-cable method with amplifier.

05

RETURN: 1/4'' FX LOOP. Can connect extra stompboxes, 4-cable method with amplifier.

06

XLR OUT: XLR balanced output.

07

GND/LIFT switch: Grounding switch for XLR output.

08

OUTPUT: 1/4'' L/R unbalanced output.

09

PHONES: Dedicated headphone output. 1/8”stereo jack.

10MIDI IN / OUT: MIDI ports for MIDI IN/OUT.

11USB: USB Type-B port to connect to direct record digital audio.

Interface with official MOOER software to edit and import/export presets and update firmware.

12I/O: Power ON/OFF switch.

13DC IN: Connect GE250 power supply.

14CABLE TIDY: Loop the cable from your power supply to avoid accidental disconnection.

05

Home Display

01

04


EXP1: MOD

VOL: 50


EXP1: MOD


GLB.BPM:120


05

EXP2: MOD


68%


02

GLB.BPM:120


EXP2: MOD

68%

06

31A

LEAD Guitar


03

OUTPUT ON

XLR OUT OFF

07


LEAD GUITAR

08


COMP

DS


AMP

CAB

SEND


10


09


31A

NS

DELAY

EQ

MOD


REV

RETURN

01 EXP 1 display

02 EXP 2 display

03 CAB SIM THRU display

04 Preset volume level display

05 BPM value

06 DSP resource load

07 EXP Volume display

08 Current preset number

09Current preset name

10Current effects chain

06

Setup

1. Connecting to FRFR devices

Connect to FRFR (full range, flat response) speaker cabinet, for example, studio monitor, audio interface, stage

monitor, PA system or headphones.

It is recommended to turn on the AMP and CAB SIM blocks with FRFR devices.

Audio Interface, studio monitor

Stage monitor or PA system


FXLOOP

XLR OUT

OUTPUT


MIDI IN/

DC 9V

AUX IN

EXP 2

IN

SEND

RETURN


L(MONO)

R

MIDI OUT


USB

1A


L(MONO)

R


Guitar

Headphone

Note: XLR output can prevent signal attenuation and interference from long-distance transfers.

07

2. Connecting to powered speakers + amplifier

It is recommended to turn on the AMP section when using a guitar speaker cabinet and/or amplifier.

To the power amplifier


To the RETURN of amplifier


FXLOOP

XLR OUT

OUTPUT


MIDI IN/

DC 9V

AUX IN

EXP 2

IN

SEND

RETURN


L(MONO)

R

MIDI OUT


USB

1A


L(MONO)

R


Guitar

08

3. Connecting to a FRFR speaker + amplifier

Recommended settings procedure:

● Press SYSTEM button to enter system settings.

● Select CAB SIM THRU setting.

● When connecting to FRFR speaker, set CAB SIM on. When connecting to an amplifier, set CAB SIM toTHRU.

To the power amplifier

To the RETURN of amplifier

Stage monitor or PA system


FXLOOP

XLR OUT

OUTPUT


MIDI IN/

DC 9V

AUX IN

EXP 2

IN

SEND

RETURN


L(MONO)

R

MIDI OUT


USB

1A


L(MONO)

R


Guitar

To the mixer or FRFR equipment

09

4. 4-Cable Method connection

GE250's FX Loop supports connecting to an amplifier via the 4-cable method. In this setup, the GE250 can play the

role of stompboxes in front of the preamp section and effects added after the preamp section. For example, wah,

compressor, pre-EQ, pitch shift, and drive might be the pre-stompbox effects while modulation, delay, and reverb

are the post-stompbox effects.

Here is the setup procedure:

● Turn on the FX LOOP module. Turn off AMP and CAB modules.

● Set FX LOOP to Serial.

● Press DISPLAY to enter effects chain display. Move the pre-stompbox effects in front of the SEND and move the

post-stompbox effects after the RETURN.

Guitar

AUX IN

EXP 2

IN

Amplifier Return

AmplifierInput

Amplifier

Amplifier send


FXLOOP

XLR OUT

OUTPUT

MIDI IN/


DC 9V

SEND

RETURN


L(MONO)

MIDI OUT

USB


R

1A

L(MONO) R

10

5. Connecting to the INPUT of an amplifier

GE250 plays the role of pre-stompboxes in this setup. It is recommended to turn off the AMP and CAB modules.

Amplifier Input


Guitar


Amplifier


FXLOOP

XLR OUT

OUTPUT


MIDI IN/

DC 9V

AUX IN

EXP 2

IN

SEND

RETURN


L(MONO)

R

MIDI OUT


USB

1A


L(MONO)

R


11

6. Connecting to the FX LOOP of an amplifier

GE250 plays the role of post-stompbox in this setup.

It is recommended to turn off the AMP and CAB modules.

Guitar


Amplifier Input

Amplifier Return


Amplifier send


Amplifier


AUX IN

EXP 2

IN

SEND

FXLOOP

XLR OUT

OUTPUT

R

RETURN


L(MONO)


L(MONO)

R


MIDI IN/

MIDI OUT

DC 9V

USB

1A

12

Play

1. Set up the connections depending on your requirements.

2. Rotate the MASTER volume knobs to the minimum value.

3. Plug in the power supply and switch on the GE250.

4. After the GE250 boots up successfully, adjust the MASTER volume level as you desire.

Preset Editing

The GE250 has 10 effects blocks. The order of effects chain, effect type, effect values, effects block on/off, expression

pedal, and CTRL footswitch settings can all be saved into preset patches for easy access and sharing.

The GE250 has 85 banks. Each bank includes 3 presets for 255 preset patch slots in total.

EXP1: MOD


VOL: 50

GLB.BPM:120

EXP2: MOD

68%

OUTPUT ON

XLR OUT OFF

Bank Number

31A

Preset Address


LEAD GUITAR

You can switch banks by pressing ▼▲footswitches. Then press A/B/C to select presets.

On the preset page, you can switch between different presets by rotating the VALUE knob.

13

1. Turn effects blocks on/off

On: When the module is off, press the relevant effects block to turn it on.

Off: When the module is on, press the relevant effect block to enter the effect module. Press twice to turn it off.

The LED light indicates if an effects block is on/off.

2. Detailed Value editing

● Press desired effects block to enter editing menu.

● Use the VALUE knob to select and make a decision.

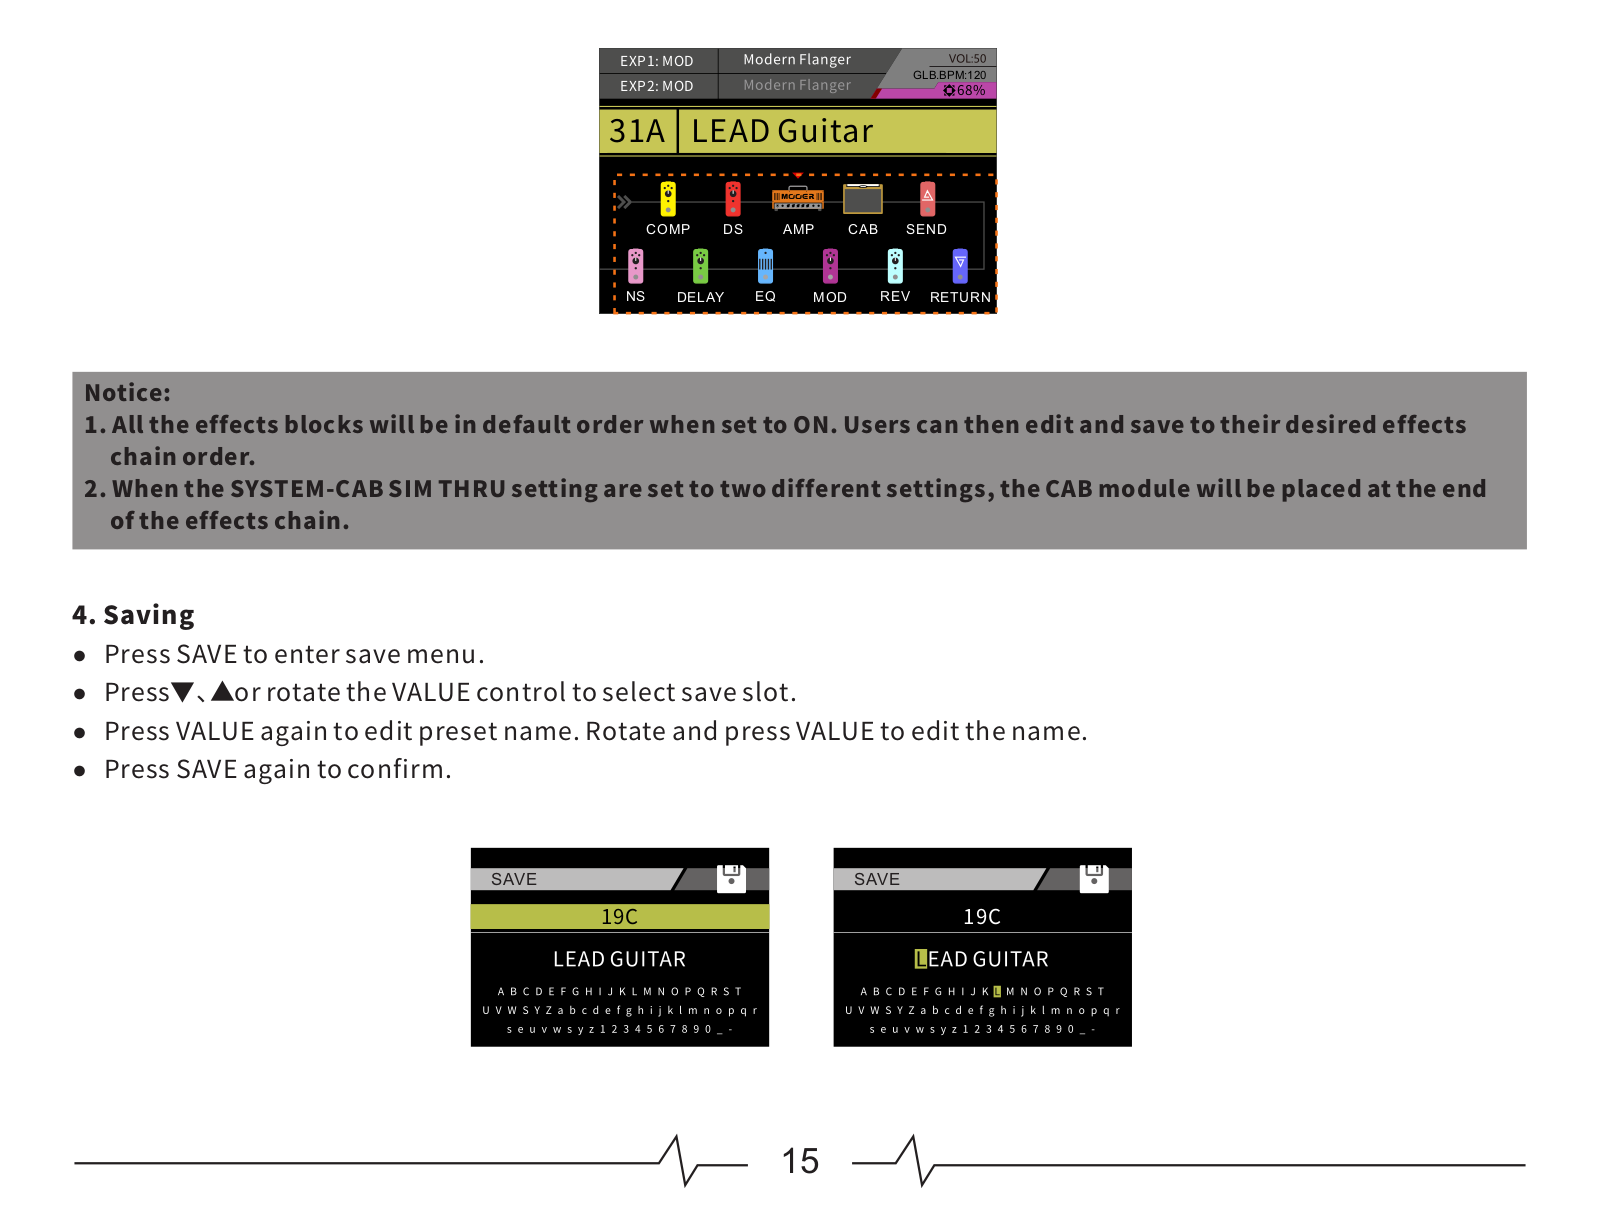
3. Effects Chain order

GE250 supports adjusting effects chain.

Press the DISPLAY button to enter the effects chain page. When the effects block is on, the effects block icon will

display its designated color. When the effects block is off, the effects block icon will be grey.

● Press the DISPLAY button to enter effects chain page.

● Rotate the VALUE to navigate to the desired effect and press VALUE to confirm.

● Rotate VALUE again to place effect in the desired place in the effects chain. Press VALUE again to confirm.

14

Loading...
+ 39 hidden pages