

Page 1

GE 200
Amp modelling & Multi Effects
Page 2

CONTENTS
PRECAUTIONS
MAIN FEATURES
LAYOUT
.................................................................
REAR PANEL
QUICK TOUR
PLAY
CHAIN
......................................................................
..................................................................
EFFECTS BLOCKS
CTRL/TAP
........................................................................
EXP
EXP FUNCTI ON
EXP CALIBR ATE
MERG E
..............................................................
................................................................
SYSTEM SETTINGS
IO
UD
A
B
S
U
FS MOD E
CAB SI M THRU
..............................................................
...........................................................
..................................................
.........................................................
.......................................................
.............................................
......................................................
....................................................
............................................
...........................................................
......................................................
01
02
03
04
05
08
09
10
11
12
13
14
15
17
17
18
18
SAVING PRESETS
RHYTHM
LOOPER
TUNER
USB
.........................................................................
.................................................................
.................................................................
....................................................................
SPECIFICATIONS
MODEL
...............................................................
..............................................
................................................
25-29
19
20
21
22
23
24
Page 3
PRECAUTIONS
Power Supply
Plea se connect the designated AC ad apter to an AC outle t of the
corr ect voltage. Please be sure to use only an AC adapte r which
supp lies 9V DC(±10%), , center negative. Unplug the AC
powe r adapter when not in use or durin g electrical st orms.
Connections
or disconnecting, this will help prevent malfunction and / or damage to
other devices. Also make sure to disconnect all connection cables and
the power cord before moving this unit.
Cleaning
Clean only with a soft, dry cloth. If necessary, slightly moisten the cloth.
Do not use abrasive cleanser, cleaning alcohol, paint thinners, wax,
solvents, cleaning fluids, or chemical-impregnated wiping cloths.
Interference with other electrical devices
Radios and televisions placed nearby may experience reception
interference.
Operate this unit at a suitable distance from radios and televisions.
Location
To avoid deformation, discoloration, or other serious damage, do not
expose this unit to the following conditions:
Direct sunlight
Magnetic fields
Excessive dusty or dirty location
Strong vibrations or shocks
FCC certification
This device complies with Part 15 of the FCC Rules. Operation is subject
to the following two conditions:
that may cause undesired operation.
Heat sources
Extreme temperature or humidity
High humidity or moisture
01
Page 4

MAIN FEATURES
55 hig h quality amplifier models
26 bui lt-in speaker cab models and added support
rd
for 3 part y IR cab models
70 hig h quality effects. Including Com pressors, dri ves, noise gate s,
eq’s, modu lation,pitch, filters, delays and rever bs
52 sec ond looper with half speed and reverse effects
Drum m achine with 40 drum patterns and 10 metronome r hythms
Stor e and recall up to 200 User presets
Adju stable signal chain lets you arrange the inte rnal effects
how yo u like
USB co nnectivity for PC editing and direct audio re cording to comp uter
Auxi liary input and dedicated headphone outpu t for audio playb ack
and to tally immersive practice sessions
02
Page 5
01
Amp mo delli ng & Mult i Effec ts
LAYOUT
02
GE 200
Amp mo delli ng & Mult i Effec ts
03
06 07 08
EXP 2
CTRL/ TAP
EXP
04
TUNER
HALF SP EEDREVER SE
12 13
01
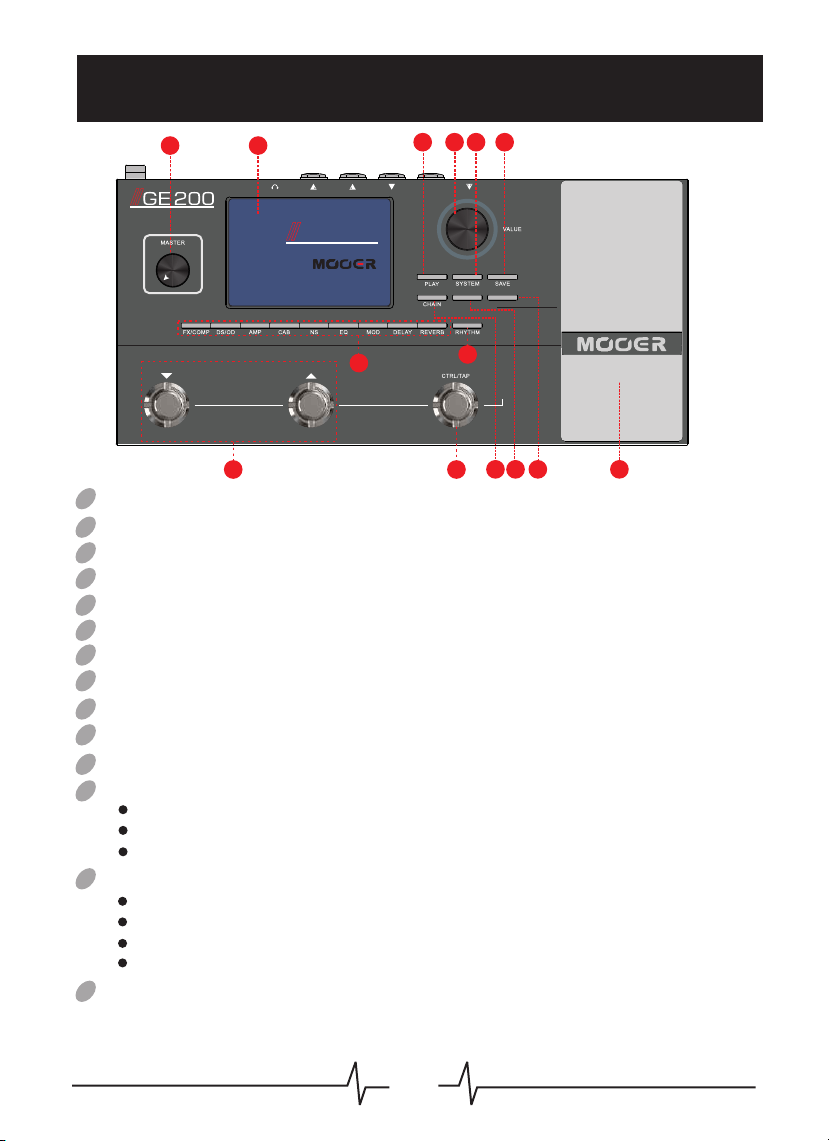
MASTER: Adjust s th e master volume out pu t of GE 200
02
LCD DISPLAY
VALUE: Use d to n avigate menu scre en s and adjust parame te rs
03
04
EFFECT BLOCKS : Acc ess edit screen and O N/ OFF for respectiv e effect modu le s
05
RHYTHM: Access e di t screen and ON/OFF f or D rum machine and met ro nome
PLAY: En ter preset menu scr ee n
06
07
SYSTEM: Enter s ys tem settings menu
08
SAVE: Acces s pr eset save menu
09
CHAIN: Enter si gn al chain menu scree n
10
CTRL/TAP : En ter settings menu f or C TRL/TAP footswitch
11
EXP: Enter sett in gs and calibratio n me nu for expression p ed als (EXP/EXP2)
12
▼ and ▲ FOOTSWITC HE S
LOOPE R
05
RECOR D
DUB
STOP
CLEAR
11
09 10
14
Preset DOWN and U P in PLAY me nu and CHAIN menu
Press both simu lt aneously to enter /e xit TUNER
REVERSE and HAL F SP EED when using LOOP ER
13
CTRL/TAP FOOTSWITCH
Press and hold to s wi tch between TAP and CTR L mode
In TAP mode (flashe s) P re ss and release mu lt iple times to contr ol Tap Tempo
In CTRL mode (Solid colour ) Pr ess to toggle ass ig ned effects b lo cks on/off
Press to confir m pr eset selection in f oo tswitch mode 2
14
EXPRESSION PE DA L: Can be setup to cont ro l various paramet er s
and functions i n re al time.
Go to the EXP set tings and calibra ti on menu to setup
03
Page 6
REAR PANEL
EXP 2
02 03 04 05 06 0701
01
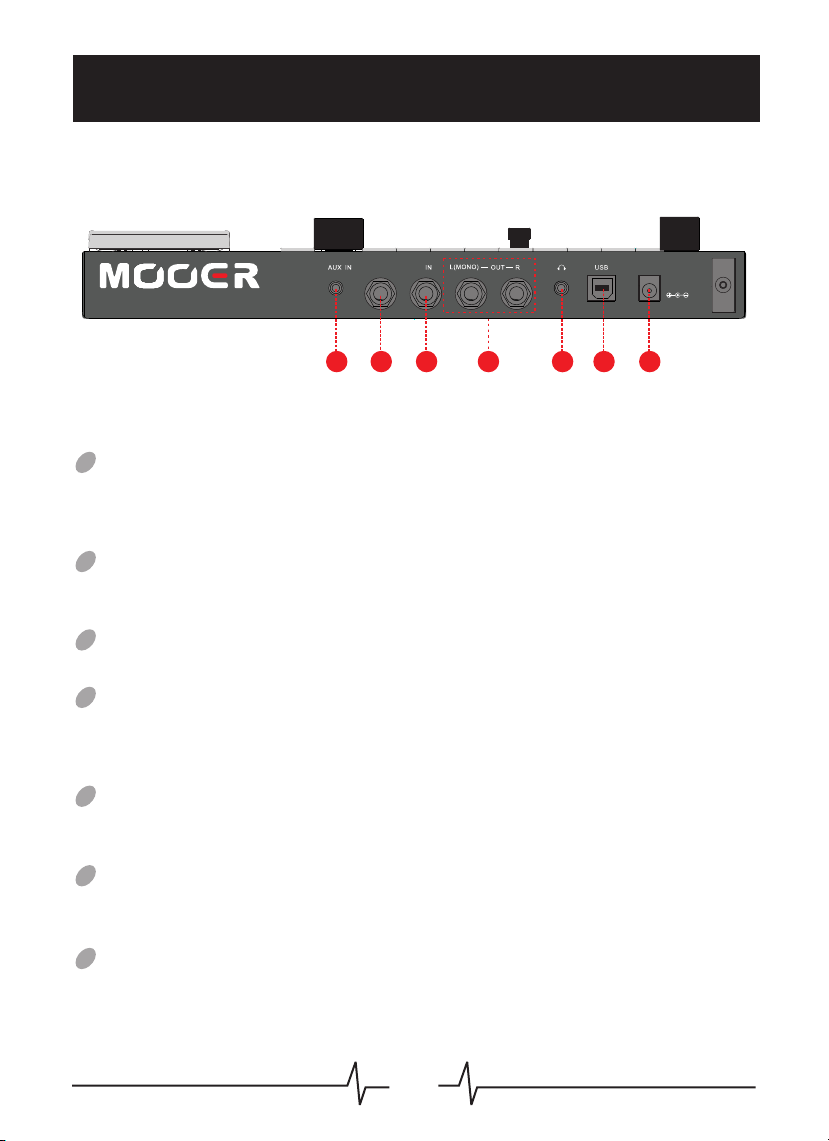
AUX IN
Connect an exte rn al a udio source suc h as a n mp3 player or mobil e ph one
using a 1/8” ster eo j ack cable. Th is w ill allow you to play ba ck music throug h
your GE200
02
EXP 2
Connect an exte rn al e xpression ped al u sing a 1/4" stereo ja ck c able. Go to
the EXP set ti ngs and calibrati on m enu to setup.
03
IN
Connect your in st rument using a 1/4" j ac k cable
04
OUT
These are your ma in a ud io outputs for Ge 20 0.
Connect to the L output when u si ng a mono setup.
Connect to both L and R output s fo r true stereo out pu t.
05
HEADPHONES
Connect your he ad ph ones to this outp ut f or practice or for mo ni toring when
using the GE200 a s a so un card
DC 9V
600m A
06
USB
Connect a USB cab le t o a PC computer for dir ec t recording, soft wa re
updates or pres et e di ting using the de di cated editor soft wa re.
07
DC 9V
Connect to a 9V DC po we r so urce
04
Page 7
QUICK TOUR
EXP 2
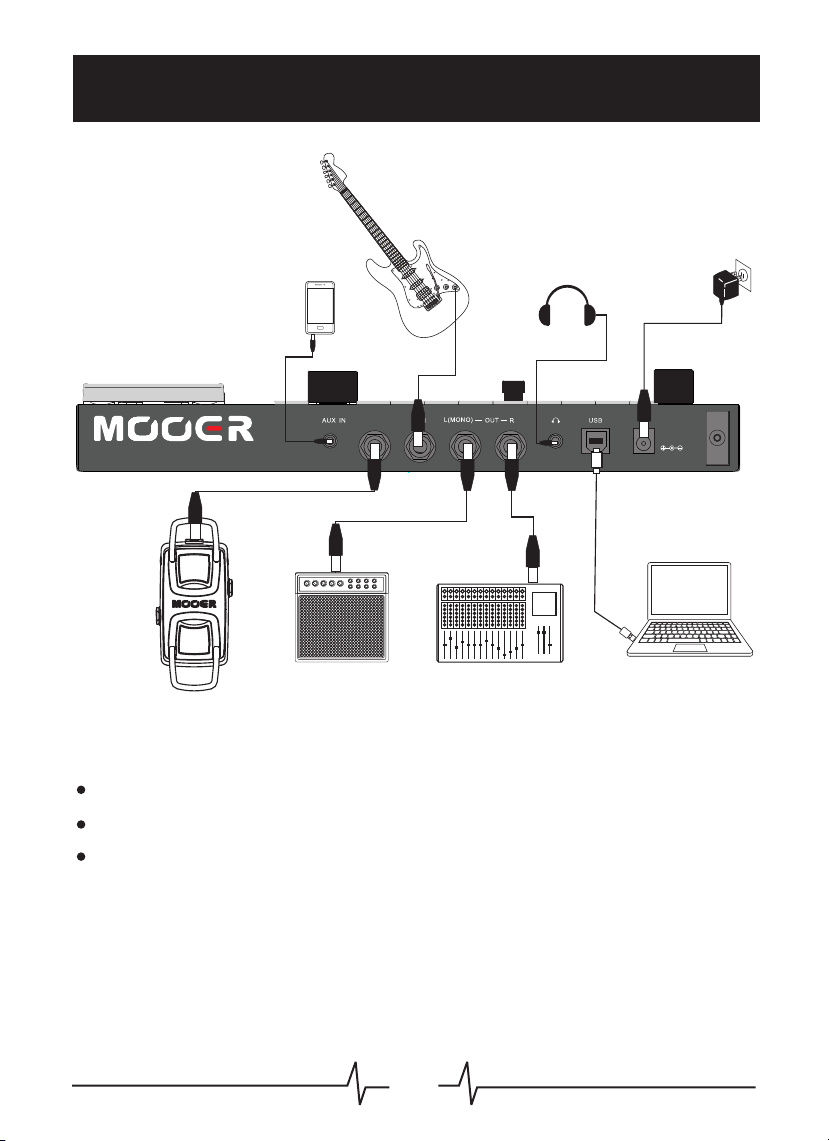
Conn ect the GE200 up to your desired equipment
Conn ect your guitar to the INPUT jack
Conn ect the power
DC 9V
600m A
05
Page 8
AMP
PRE SET
VOL : 100
CAB -L THR U CAB -R OFF
EXP 2 :
BAS S
EXP : CAB
DIS TANCE
P023
MOOER GE200
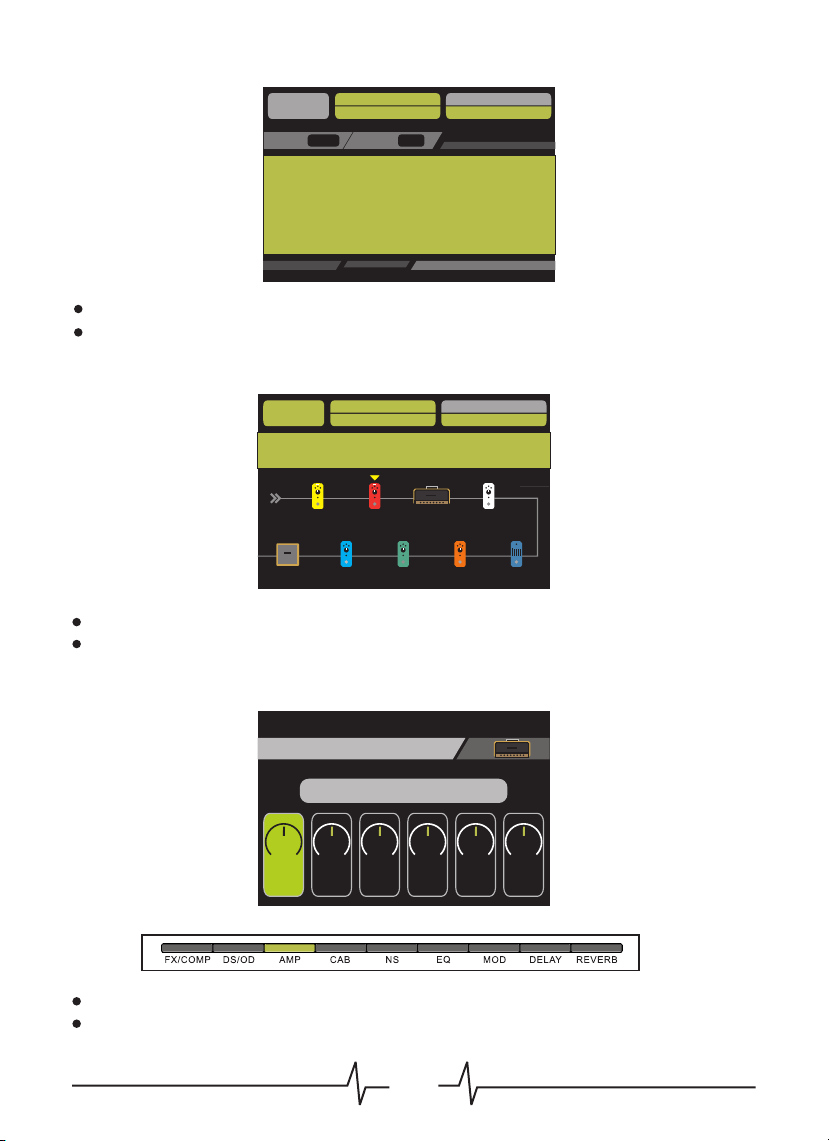
Press the PLAY button to ente r th e PLAY scr een
Press the ▼ or ▲ foot sw itches to change th e pr eset
PRE SET
VOL : 100
P 0 4 6
CAB
EXP 2 : SPEED EXP : CAB
BAS S
DIS TANCE
MOOER GE 200
FX
REV ERB DEL AY MOD EQ
AMP
DS
NS GAT E
Press the CHAIN b ut ton to enter the CHAI N SC REEN
Use the VALU E co ntrol to edit the ord er o f your effe ct s blocks
AMP
01:65 US DX
050
050
050
050
050
GAI N
BAS S
MID
TREBLE
PRE S
050
MST
Press the eff ects block dedica te d button to turn the bl oc k on/off
Use the VALU E co ntrol to adjust the e ffects bloc k se ttings
06
Page 9
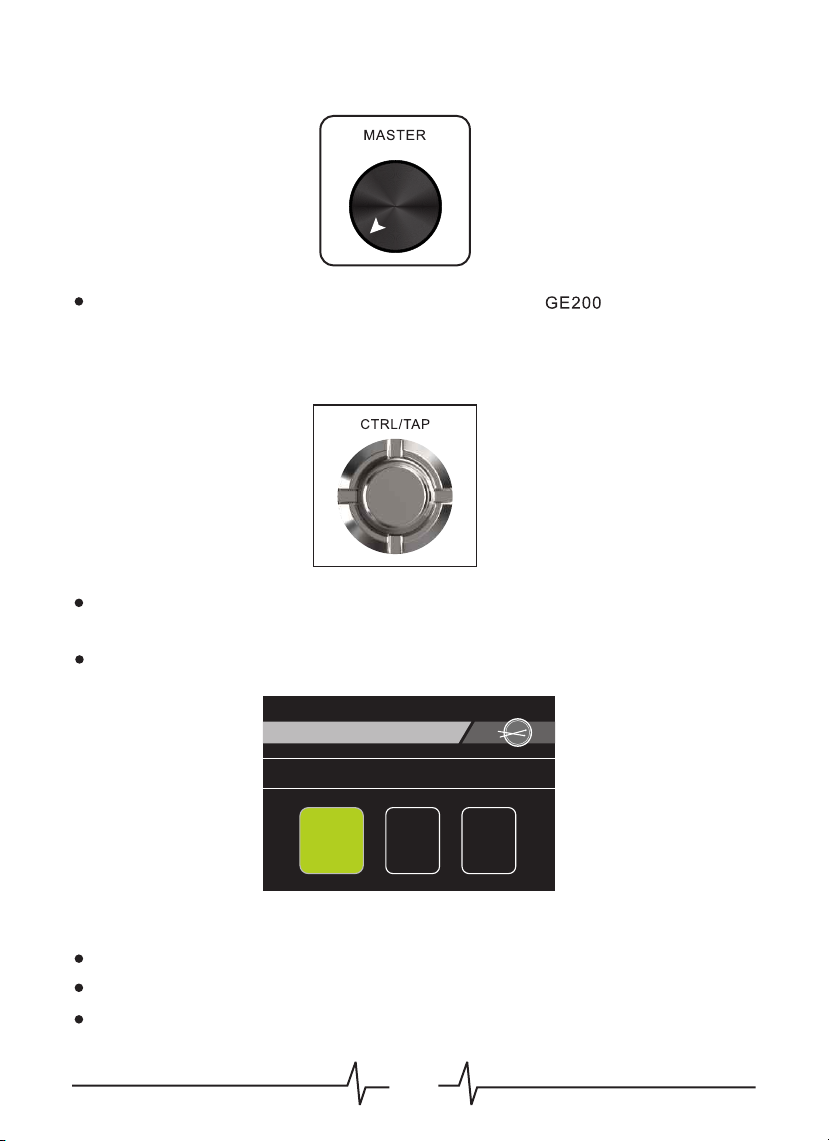
Use the MASTER co nt rol to adjust the out pu t volume of
Press the CTRL/ TAP footsw it ch to toggle assi gn ed effects bl oc ks
on/off or c on trol the tap tempo
Press and hold th e CT RL/TAP foo tswitch to chan ge i ts function
RHYTHM
RHYTHM
8BEAT3
NO.03
BMP
120
VOL
12
Press the RHYTH M bu tton to switch the dr um m achine on/off
Use the VALU E co ntrol to change pat te rn speed and volume
You ca n al so use the CTRL/TAP footswi tc h to control the temp o
07
Page 10
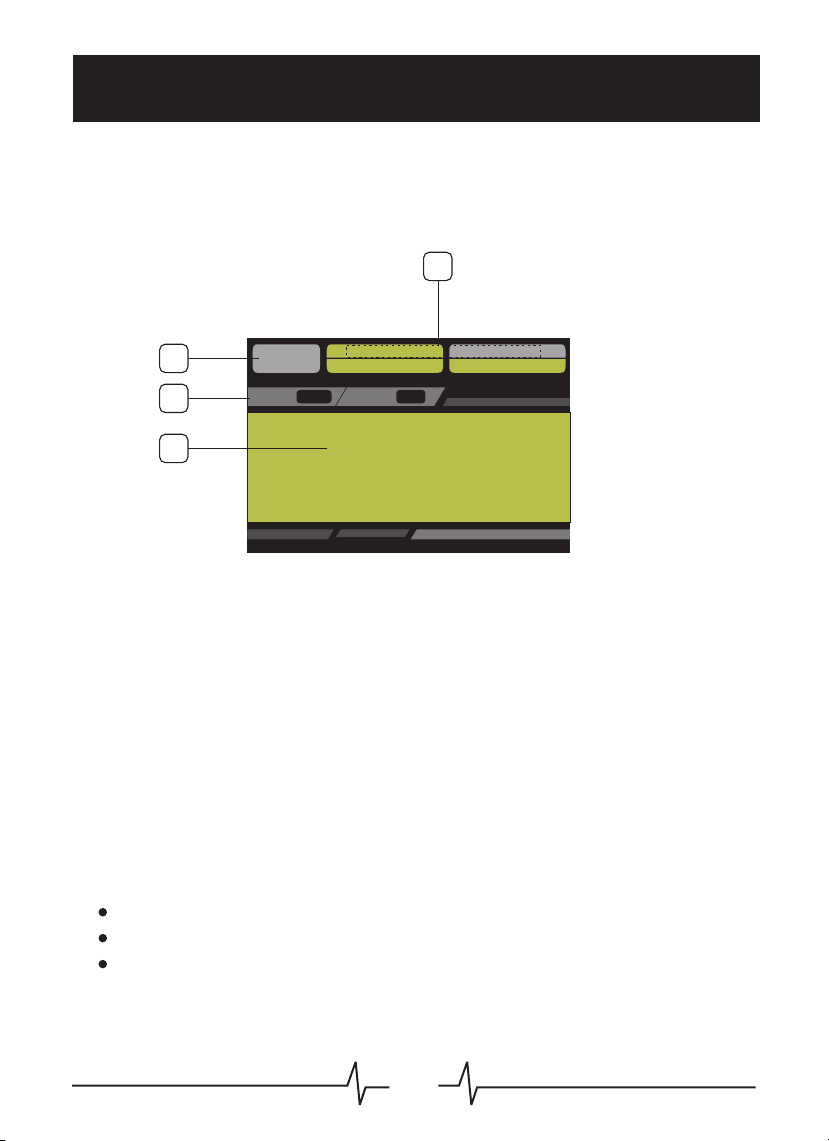
PLAY
This is the live op er ation screen for GE 20 0. After setting up an d or ganising your
presets, go to th is s creen to use the GE20 0 in a l ive situation. Pr es s the PLAY
button to navig at e to this screen.
When in PLAY the screen will di sp lay various infor ma tion about your c ur rent preset
03
AMP
02
04
PRE SET
VOL : 100
CAB -L T HRU CA B-R O FF
EXP 2 :
BAS S
EXP : CAB
DIS TAN CE
01
P023
MOOER GE200
1. Preset name an d nu mber
2. Preset volum e
3. EXP and EX P 2 functions and p ar ameters
4. CAB SIM on/off status for each ou tp ut
Press the ▼ and ▲ foo ts witches to change t he p reset down and up . Pre se ts can also
be navigated quic kl y by rotating the VALUE control kno b.
Press the VALU E control knob to tog gl e between “preset s el ection” and “pr es et volume”.
To adjust the PRESE T volume
Press the VALU E control knob unti l th e preset volume is hi gh lighted
Rotate the VAL UE control knob to ad ju st the volume
Don’t forget to s av e the preset to keep yo ur c hanges!!!
08
Page 11

CHAIN
This screen dis pl ay s the signal chai n of y our currently sel ec ted preset along wi th
the on/off st atus of each effe ct block. It also a ll ows you to edit the sig na l chain of the
effects w it hin your presets. We recommend u si ng this screen when s et ting up and
programming a n ew p re set.
EXP 2 : SPE ED E XP: C AB
BAS S
DIS TAN CE
MOOER GE200
01
PRESET
VOL: 100
P 0 4 6
05
02
FX
CAB
REVERB DELAY M OD EQ
DS
AMP
NS GATE
04
03
1. Preset name an d nu mber
2. Signal chain i np ut
3. Signal chain o ut pu t
4. Effect s bl ocks
5. Cursor
Changing the orde r of y our effec ts b locks within the si gn al chain will make a bi g
differe nc e to how they sound, ju st l ike a traditional p ed alboard and amp rig .
To change the order of yo ur e ffects bl oc ks,
Rotate VAL UE t o move the Cursor
Press VALU E to ‘ pickup’ the selected effects block (the C ur sor will turn red )
Rotate VAL UE t o relocate the effect block to you r de sired position in
the signal chain
Press VALU E to ‘ drop’ the selected eff ect block and confi rm t he new location
(the Cursor wil l tu rn b ack to yellow)
09
Page 12

EFFECTS BLOCKS
There are 9 eff ects blocks in GE20 0, e ach with a dedicate d bu tton on the front p an el.
FX/COMP: Comp re ssors and wah wah ped al s
DS/OD: Distor ti on and Overdrive pe da ls
AMP: Amplifier mod el s
CAB: Speaker ca bi ne t models
NS: Noise Suppres so rs
EQ: Equalizat io n mo dels
MOD: Modulati on a nd Filter eff ec ts
DELAY: Delay pedals
REVERB: Rever b mo de ls
Press an effe cts block button to t og gle it on/off a nd enter it’s s et tings page
AMP
01:65 US DX
050
050
050
050
050
GAI N
BAS S
MID
TREBLE
PRE S
050
MST
In the effe ct b lock settings pag e yo u can change the effect model and ad ju st all of
it’s para me ters
Rotate the VAL UE control to highl ig ht a parameter
Press the VALU E control to select t ha t parameter
Rotate the VAL UE control to adjus t th e parameter
Press the VALU E control to confir m
10
Page 13

CTRL/TAP
The CTRL/TAP footswitch h as 2 m ain functions
CTRL: Toggl e as signed effe ct s blocks on/off
TAP: Tap t he f ootswitch multi pl e times to contro l th e tempo of your delay s
To switch between t he se two functions pr es s and hold the CTRL/TAP foots wi tch for
a second
Press the CTRL/ TAP button t o en ter the setup scr ee n for the CTRL/TAP footswit ch .
Use the VALU E co ntrol to select one o f th e two options.
CTRL TAP
CTRL
TAP
Select TAP to make th e de fault function of t he C TRL/TAP footswitch
“TAP TEMPO” withi n th e preset
Select CTRL to assign effects blocks to b e sw itched on/off u sing
the CTRL/TAP footswitch
CTRL SETTI NG
FX/ COMB
CAB
MOD
DS/ OD A MP
NS EQ
DEL AY REV ERB
Use the VALU E co ntrol to highligh t an d select which effects blocks yo u wi sh to
assign to be swit ch ab le using the CTRL /TAP foo ts witch.
CTRL/TAP f oo tswitch is also use d to c onfirm preset sel ec tion when using
FOOTSWITCH MO DE 2 ( see the settings me nu )
11
Page 14

EXP
EXP
GE200 has a built-i n ex pression peda l (E XP) and the facilit y to s upport a second
GE200 has a built-i n ex pression peda l (E XP) and the facilit y to s upport a second
external expr es si on pedal (EXP2) . To use an external ex pr ession pedal with
external expr es si on pedal (EXP2) . To use an external ex pr ession pedal with
GE200, connec t it t o the EXP2 input usin g a TRS stereo jack c ab le.
GE200, connec t it t o the EXP2 input usin g a TRS stereo jack c ab le.
Both EXP an d EX P2 can be assigned to c on trol any effe ct parameter in any o f th e 9
Both EXP an d EX P2 can be assigned to c on trol any effe ct parameter in any o f th e 9
effects b lo cks.
effects b lo cks.
Both expressi on p ed als can be calibr at ed and setup in the EXP menu.
Both expressi on p ed als can be calibr at ed and setup in the EXP menu.
EXP SELECT
EXP SELECT
EXP
EXP
EXP 2
EXP 2
EXP V OL PED AL
EXP V OL PED AL
EXP: Setup and ca li brate the built-i n EX P pedal
EXP: Setup and ca li brate the built-i n EX P pedal
EXP2: Setup and c al ib rate the extern al E XP2 pedal
EXP2: Setup and c al ib rate the extern al E XP2 pedal
EXP VOL PEDAL ON/O FF : Activating this w il l assign the EXP pe dal to behave lik e
EXP VOL PEDAL ON/O FF : Activating this w il l assign the EXP pe dal to behave lik e
the MASTER volu me c ontrol when the ass ig ned function is not a ct ive. This s et ting is
the MASTER volu me c ontrol when the ass ig ned function is not a ct ive. This s et ting is
saved per individ ua l preset.
saved per individ ua l preset.
OFF
OFF
EXP SELECT
EXP SELECT
FUNCTION
FUNCTION
CALIBRATE
CALIBRATE
MERGE
MERGE
FUNCTION: Ass ig n an effect par am eter to the express io n pedal
FUNCTION: Ass ig n an effect par am eter to the express io n pedal
CALIBRATE: C alibrate the expr es sion pedal
CALIBRATE: C alibrate the expr es sion pedal
MERGE: Assign M ER GE as the expressio n pe dals function
MERGE: Assign M ER GE as the expressio n pe dals function
(Refer to the MER GE s ection of this manu al f or more details)
(Refer to the MER GE s ection of this manu al f or more details)
12
12
Page 15

EXP FUNCTION
EXP FUNCTION
01
02
1. Select the effect block by rota ti ng the VALUE c on trol
2. Select the par am eter by rotating th e VALUE control
Press the value c on trol to toggle betw ee n effect bloc k an d effect pa ra meter selection
Please note: Any paramet er m arked with an wil l al so allow you to turn th e ef fect block
on/off when act iv ating the EXP pedal. WAH P OSITION for examp le
CAB
DISTANCE
*
*
*
13
Page 16

EXP CALIBRATE
EXP CALIBRATE
MIN
MAX
CLI CK TO ACCEP T
PRE SS
1. Set the pedal in t he h eel down position
and press the VALUE control to conf ir m
EXP CALIBRATE
MIN
MAX
CLI CK TO ACCEP T
PRE SS
2. Set the pedal in t he t oe down position
and press the VALUE control to conf ir m
EXP CALIBRATE
MIN
MAX
PRE SS
CLI CK TO ACCEP T
3. Set the pedal in t he t oe down position
and apply forwa rd p ressure.
Whilst applyi ng f orward pressure , pr ess
the VALUE co nt rol to confirm.
This will s et t he sensitivity of t he E XP
pedals toe down a ct ivation switch
14
Page 17

MERGE
MERGE is a specia l fu nction which allo ws y ou to control multi pl e parameters from
any effec ts b locks and set the par am eter value end poin ts f or both heel down a nd
toe down positi on s. This can be us ed i n many ways, but it’s very good for bl en ding
seamlessly be tw ee n two diffe re nt sounds or having a dv anced control ove r sp ecial
effects .
In this example w e wi ll s how you how to cont ro l DELAY ti me , feedback and le ve l
simultaneou sl y wi th the EXP pe da l, using the MERGE fu nc tion.
Activate EXP pedal and set in the he el -down position af te r assigning the M ER GE
function from t he E XP settings m en u. You must set up each par am eter value one at
a time.
DLY
01: DIGITA L
1/4
SUB -D
(Heel down)
015 020
LEV EL
F.BAC K
698 m s
TIM E
Open the DELAY effect s bl ock by pressing t he D ELAY but ton
Set the EXP ped al in the heel down pos it ion
Select the LEVE L paramet er a nd set it to a value of 1 5
Do not press the VALUE control agai n ye t…..
DLY
01: DIGITA L
1/4
SUB -D
(Toe down)
060 020
LEV EL
F.BAC K
698 m s
TIM E
Set the EXP ped al in the toe down posi ti on
Change the LEVEL paramet er v alue to 60.
(The box surrou nd in g LEVEL will change colour )
You ca n no w control LEVEL between th es e two set value point s us ing the EXP ped al
Press the VALU E control to confir m an d prepare to assign y ou r next paramete r
15
Page 18

DLY
01: DIGITA L
060 010
LEV EL
F.BAC K
120 0 ms
TIM E
1/4
SUB -D
Repeat steps 1 an d 2 fo r the F.BACK with a value o f 50 i n the heel down posit io n
and 10 in the toe down po si tion
Repeat steps 1 an d 2 fo r the TIME with a v al ue of 300ms in the heel d ow n position
and 1200ms in the t oe d ow n position
DLY
01: DIGITA L
(Heel down)
015 050
LEV EL
DLY
F.BAC K
01: DIGITA L
300 m s
TIM E
1/4
SUB -D
1/4
SUB -D
(Toe down)
060 010
LEV EL
F.BAC K
120 0 ms
TIM E
Now try moving th e EX P back and fort h an d you will see how all of t he a ssigned
parameters si mu ltaneously move b et ween their set end po in ts. HAVE FUN !! !!
16
Page 19

SYSTEM SETTINGS
Enter the syste m se ttings menu using t he S YSTEM button. In th is m enu you will
find various gl ob al s ettings which c an b e used to setup your Ge 20 0.
SYSTE M
INP UT LEVE L
USB AU DIO
FS MO DE RES ET
INPUT LEVEL: Adj us t the INPUT gai n le vel
USB AUD IO: Configure the U SB AU DIO outputs
FS MODE: Change t he F OOTSWITCH MODE
SCREEN: Adjus t th e brightness leve l of t he display screen
CAB SIM THRU: Ass ig n CAB simulation to o ut puts
RESET: Reset GE20 0 to f actory settings a nd v iew current syste m fi rmware versio n
SCR E EN
CAB S IM TURU
USB
USB AUDI O
LEF T OUT
RIG HT OUT
REC V OL :100 PL AY VO L:050
USB AUD IO OUTPUTS
DRY: Outputs your u na ffected ins tr ument signal and by pa sses
the signal proc es sing
EFFECT: Outputs t he f ully processed si gn al from
REC VOL: Adjust s th e level of the digita l au dio sent to your comp ut er
PLAY VOL: Adjusts t he l evel of the monitor ( pl ayback) volume of
AU
EFF ECT
EFF ECT
D
IO
17
Page 20

FS MODE
GE200 has two different footsw it ch modes. The se modes depict how t he
footswitche s ca n be used to change pre se ts.
FS MODE
FOO T SWITC H MODE
SEL ECT PRE SET
CON FIRM
MODE 1:
Press ▼ or ▲ footsw it ch to change preset d ow n or up
Press and hold ▼ or ▲ f oo tswitch to quickl y sc roll through mult ip le presets
MODE 2:
Press ▼ or ▲ to selec t th e preset you wish to ch an ge to
Press CTRL/TAP footswit ch t o confirm the sel ec tion and change the p re set
MOD E 2
CTR L/TAP
CAB SIM THRU
The speaker cab in et s imulation in GE 20 0 can be configured t o affect vari ou s output
combination s.
This can be usefu l in v ar ious situatio ns .
For example,
You ma y wi sh to connect the LEF T output of GE2 00 t o your on-stage amp li fier
with CAB SIM disa bl ed.
Whilst connec ti ng the RIGHT ou tp ut of GE200 direct to t he PA system with
the CAB SIM enabl ed .
CAB SIM TH RU
LEF T OUT CAB
RIG HT OUT CAB
ON: The CAB SIM is en ab led for this output
THRU: The CAB SIM i s di sabled for this out pu t
THR U
ON
18
Page 21

SAVING PRESETS
Pres s the SAVE button to save your current preset
SAVE
P025
A B C D E F G H I J K L M N O P Q R S
T U V W S Y Z 1 2 3 4 5 6 7 8 9 0
MOOER GE200
Rota te VALU E to select preset space
Pres s VALUE t o enter preset name
Pres s the SAVE button to confirm
Pres s PLAY or CHAIN buttons to exit without saving
_
19
Page 22

RHYTHM
Ge200 has a built in RHYTHM module with 40 drum machines and 10 Metronome
styles for you to use when practicing.
Press the RHYTHM button to toggle this module on/off an d en ter it’s edit screen.
RHYTHM
01
8BEAT3
NO.03
RHYTHM
BMP
120
VOL
12
02 03 04
1. Sel ect between RHYTHM (drum machine) or METRONOME
2. Sel ect pattern sty le
3. Adju st the RHYTHM speed
4. Adju st the RHYTHM playback volume
CTRL /TAP fo otswitch can be used to tap the tempo of the drum machine
20
Page 23

LOOPER
has an i ntegrated 52 second looper, complete with sp ecial effects.
Pres s the ▲ and CTRL/TAP footswitches simultaneously to acce ss the
loop er screen
LOOPER
LOOPER
P025 M OOER GE 200
PRESET
P025 M OOER GE 200
OFF 00. 0S
OFF 00. 0S
REC : 100
REC : 100
REV ERSE: O FF HAL F SPEED : OFF
REV ERSE: O FF HAL F SPEED : OFF
PLAY: 1 00
PLAY: 1 00
You can us e th e VALUE control to adjust the following parameters
PLAY: Playback volume of the looper
REC: Recording level of the looper
PRESET: Current Preset
RECO RD
DUB
STOP
CLEA R
TUNE R
HALF S PEEDREVE RSE
LOOP ER
Use the footswitches to control the looper
CTRL/TAP
Press once to begin recording, playback and overdub
Double press to stop
Press and hold to clear the current loop from memory
▼: Press to toggle REVERSE effect on/ off
▲: Press to toggle HALF SPEED on/off
21
Page 24

TUNER
Pres s ▼ and ▲ footswitches simultaneously to ente r/exit the guit ar tuner
in GE2 00
04
TUNER
E
03
MUTE
01 02
A= 435HZ
1. MUTE/BYPASS the audio s ignal
2. Tuner calibrati on
3. Nearest Note
4. Displays red whe n the note is flat or s harp
Disp lays green when the note has achieved the corre ct pitch
22
Page 25

USB
can be c onnected to a win dows PC via USB for direct recording,
soft ware updates or preset editing using the dedi cated editor so ftware
100
PRESE TLIST
P00 1: TWIN
P00 2: TIMMY
P00 3: JCM9 00
P00 4: 5150 CORE
P00 5: DR Z
P00 6: JM
P00 7: AS I LAY DYIN G
P00 8: AC30
P00 9: CHOR US CLEA N
P01 0: WAH LEA D
P011: D UMBLE 50
P01 2: AC DRIV E
P01 3: JAZZ C HORUS
P01 4: 5150 TS
P01 5: AR Z
P01 6: JM
P01 7: AS I LAY DYIN G
P01 8: AC30
P01 9: CHOR US CLEA N
EXP: CAB
DISTANCE
EXP2: AMP
BASS
P004: 5150CORE
CRY WAH
Q
POSITION
PEAK
73
100
24
67
5350 4X 12
Down load the PC software and more information on us ing this device
as a sou ndcard from www.mooeraudio.com
23
Page 26

SPECIFICATIONS
NO.o f Effect Types: 151
Pres et : 200
Inpu t: 1/4 ” mono aud io jack
Outp ut: 1/4 ” mono aud io jack
AUX IN : 1/8” stereo audio jac k
Head phone out: 1/8” s tereo audio jack
EXP2 : 1 /4” stereo jack cable
Samp ling rate: 44.1 K
Samp ling accuracy: 24bit
Sign al to noise ratio : 98dB
Impu lse Response :
Format: WAV
Samplin g ra te: 44.1K H z(Full Samp li ng rate sup ported)
Samplin g ac curacy: 2 4bit
Samples : 51 2
Powe r requirements: 9V DC 600mA
Dime nsions: 297mmX145.5 mmX45.5 mm
Weight: 1. 4Kg
Acce ssories: Owner’s Manual, AC adapter 9V D C, USB CABLE
24
24
Page 27

MODEL
FX/COMP
MODEL NAME BASED ON
1
2
3
4
5
6
7
8
1
2
3
4
5
6
7
8
9
10
11
12
13
14
15
16
17
18
19
20
CRY WAH
535 WAH
AUTO WAH
TALK WAH AH
TALK WAH OH
TOUCH WA H
YELLO W COMP
BLUE CO MP
DUNLO P GCB95
DUNLO P Cryba by 535Q
MOOER @ WAH
MOOER R edKid Tal k wah ’AH ’
MOOER R edKid Tal k wah ’OH ’
MOOER E NVELOPE a uto-w ah
MOOER Y ELLOW C OMP compress or
MOOER B LUE COMP compr essor
DS/OD
MODEL NAME BASED ON
TUBE DR
808
PURE BO OST
FLEX BO OST
DDRIV E
BLACK RAT
GREY FAZ E
MUFFY
MTL ZONE
MTL MASTER
OBSES SIVE DIST
JIMMY O D
FULL DRV
SHRED
BeeBe e PRE
BeeBe e +
RIET
TIGHT D S
FULL DS
GOLD CL ON
B.K. Bu tler Tubed rive
IBANE Z Ts808
MOOER P URE BOOST
MOOER F LEX BOOST
BARBE R Direct Dr ive
ProCo R at
Dunlo p Fu zz Face
EH Big Mu ff
BOSS ME TAL ZONE
Digit ech METAL MAS TER
Fullt one OCD
Paul Co ch rane Tim my OD
Fullt one Fulld rive 2
Marsh al l Shred m aster
Xotic B B Preamp
Xotic B B Plus
Suhr Ri ot
Amptw eaker Tigh tRock
Fullt one GT-500
Klon Ce nt aur
*N OTE S: All p rod uct n ame c all ed th eir c omp any, here is o nly u sed i n thi s pro duc t sim ula tio n eff ect o f ton e types.
25
Page 28

MODEL NAME BASED ON
1
2
3
4
5
6
7
8
9
10
11
12
13
14
15
16
17
18
19
20
21
22
23
24
25
26
27
28
29
30
31
32
33
34
35
36
37
38
39
40
41
42
43
44
45
46
47
48
49
50
51
52
53
54
55
*N OTE S: All p rod uct n ame c all ed th eir c omp any, here is o nly u sed i n thi s pro duc t sim ula tio n eff ect o f ton e types.
65 US DX
65 US TW
59 US BASS
US SONIC
US BLUES C L
US BLUES O D
J800
J900
PLX 100
E650 CL
E650 DS
POW ERB ELL C L
POW ERB ELL D S
BLACKN IGH T CL
BLACKN IGH T DS
MARKII I CL
MARKII I DS
MARKV CL
MARKV DS
TRI REC CL
TRI REC DS
ROCK VRB C L
ROCK VRB D S
CITRUS 3 0
CITRUS 5 0
SLOW 100 C R
SLOW 100 D S
DR.ZEE 1 8 JR
DR.ZEE R ECK
JET 1 00H C L
JET 1 00H O D
JAZ Z 120
UK30 CL
UK30 OD
HWT 103
PV 50 50 CL
PV 50 50 DS
REGAL TON E CL
REGAL TON E Od1
REGAL TON E Od2
CAROL CL
CAROL OD
CARDEF F
EV 50 50 CL
EV 50 50 DS
HT CL UB CL
HT CL UB DS
HUGEN CL
HUGEN OD
HUGEN DS
KOC HE OD
KOC HE DS
ACOUST IC 1
ACOUST IC 2
ACOUST IC 3
Fen der 6 5 Del uxe r eve rb
Fen der 6 5 Twin R eve rb
Fen der 5 9 Bas sma n
Fen der S upe r Son ic
Fen der B lue s Del uxe c lea n cha nne l
Fen der B lue s Del uxe
Marsha ll JC M80 0
Marsha ll JC M90 0
Marsha ll Pl exi 1 00
Engl E65 0 Cle an
Engl E65 0 Dis tor tio n
Engl E64 5 Cle an
Engl E64 5 Dis tor tio n
Engl EN6 50 Bl ack mor e Cle an
Engl EN6 50 Bl ack mor e Dis tor tio n
Mesa Boo gie M ARK I II Cl ean
Mesa Boo gie M ARK I II Di sto rti on
Mesa Boo gie M ARK V C lea n
Mesa Boo gie M ARK V D ist ort ion
Mesa Boo gie Tr ipl e Rec tif ier C lea n
Mesa Boo gie Tr ipl e Rec tif ier D ist ort ion
Ora nge R ock erv erb C lea n
Ora nge R ock erv erb D ist ort ion
Ora nge AD 3 0
Ora nge O R 50
Soldan o SLO -10 0 Cru nch
Soldan o SLO -10 0 Dis tor tio n
DR.Z Maz 18 Jr
DR.Z Z-W rec k
Jet City J CA1 00H C lea n
Jet City J CA1 00H D ist ort ion
Roland J C-1 20
Vox AC30 Cle an
Vox AC30 Ove rdr ive n
Hiwatt D R-1 03
Peavey 5 150 C lea n
Peavey 5 150 D ist ort ion
Tone King Fa lco n Rhy thm
Tone King Fa lco n Twee d
Tone King Fa lco n Lea d
Two Rock Co ral C lea n
Two Rock Co ral O ver dri ven
Two Rock Ca rdi ff
EVH 5 150 C lea n
EVH 5 150 D ist ort ion
Blacks tar H T Sta ge 10 0 Cle an
Blacks tar H T Sta ge 10 0 Dis tor tio n
Diezel H age n Cle an
Diezel H age n Ove rdr ive
Diezel H age n Dis tor tio n
Koch Pow ert one O ver dri ve
Koch Pow ert one D ist ort ion
Aco ust ic si mul ato r 1
Aco ust ic si mul ato r 2
Aco ust ic si mul ato r 3
AMP
26
Page 29

CAB
MODEL NAME BASED ON
1
2
3
4
5
6
7
8
9
10
11
12
13
14
15
16
17
18
19
20
21
22
23
24
25
26
US DLX 112
US TWN 21 2
US BASS 410
SONIC 112
BLUES 112
1960 412
EAGLE P41 2
EAGLE S41 2
MARK 112
REC 412
CITRUS 41 2
CITRUS 21 2
SLOW 412
DR.ZEE 112
DR.ZEE 21 2
JAZZ 212
UK 212
HWT 412
PV 5050 412
REGAL TO NE 110
TWO STO NES 212
CARDEFF 112
EV 5050 412
HT 412
GAS STATION 412
ACOUSTI C 112
Fender De lu xe reverb 112
Fender Twi n reverb 112
Fender Ba ss man 410
Fender Su pe r Sonic 112
Fender Bl ue s deluxe 112
Marshal l 19 60A 412
Engl Pro XX L 412
Engl Vi nt age XXL 412
Mesa Boog ie M ark 112
Mesa Boog ie R ectifie r 412
Orange Pc 41 2
Orange Pc 21 2
Soldano S LO 4 12
DR.Z Maz 112
DR.Z Z-Wreck 212
Roland JC 12 0 212
Vox AC30 212
Hiwatt Ap4 12
Peavey 51 50 4 12
Tone King Fal co n 110
Two Rock 212
Two Rock 112
EVH 5150 41 2
Blackst ar H TV 412
Diezel Ha ge n 412
1 x 12” cabin et f or acoust ic amplif ic ation
NS
MODEL NAME BASED ON
1
2
3
*N OTE S: All p rod uct n ame c all ed th eir c omp any, here is o nly u sed i n thi s pro duc t sim ula tio n eff ect o f ton e types.
NOISE KIL LE R
INTEL REDUCE R
NOISE GATE
MOOER NOI SE K ILLER
MOOER Int el ligent No ise Reduc ti on
MOOER Dig it al noise ga te
27
Page 30

EQ
MODEL NAME BASED ON
1
2
3
4
MOOER G
MOOER HM
MOOER G-6
CUSTO M EQ
5 band grap hi c EQ for guit ar
5 band grap hi c EQ for BASS g uitar
6 band grap hi c EQ for Guit ar
3 band para me tric EQ wit h adjusta bl e frequen cies and
±12Db boo st /cut
MOD
MODEL NAME BASED ON
1
2
3
4
5
6
7
8
9
10
11
12
13
14
15
16
17
18
19
PHASER
STEP PH ASER
FAT PHA SER
FLANGER
JET-FLAN GE R
TREMOLO
STUTTER
VIBRATO
PITCH SHI FT
DETUNE
ROTARY
ANA-CHO RU S
TRI-CHO RU S
RING MOD
Q-FILTER
HIGH PAS S
LOW PASS
SLOW GEAR
LOFI
Based on th e MO OER NINET Y ORANG E
Square wa ve p hase shif ter
Low frequ en cy phase sh ifter
Based on th e MO OER E-LAD Y
Based on th e MO OER JET FLANGER
Based on th e MO OER TRE LICOPTE R
Choppy cu t off filte r
Pitch mod ul ation
Dry signal pitch sh ifter. Can si mulat e classic wh ammy.
Fine tune p it ch adjust ment
Simulat es a v intage le slie rota ti ng speake r
Stompbo x st yle analo g chorus
Rich mult i st age choru s
Ring modu la tor
Static no tc h filter (l ike a half co ck ed wah peda l)
Static hi gh f requenc y pass filt er
Static lo w fr equency p ass filte r
Auto volu me s well
Low rate sa mp ling filt er
*N OTE S: All p rod uct n ame c all ed th eir c omp any, here is o nly u sed i n thi s pro duc t sim ula tio n eff ect o f ton e types.
28
Page 31

DELAY
MODEL NAME BASED ON
1
2
3
4
5
6
7
8
9
DIGITAL
ANALOG
DYNAMIC
REAL
TAPE
MOD
REVERSE
DUAL DELAY
PINGPON G
Recrea tes the crystal-clear repeats of the 80’s delay units
Modelle d af ter class ic stompb ox d elays wit h BB chips
Digital D el ay which re sponds to i ns trument d ynamics
Realist ic a nd natura l echoe
Recreat es s wirly 70’s tape ec ho
Digital D el ay with mod ulated re pe ats
Backwar ds d elay
2 delays wi th i ndepend ent contr ol s
Stereo de la y
REVERB
MODEL NAME BASED ON
1
2
3
ROOM
HALL
CHURCH
Small roo m re verb
Large roo m re verb
Huge room r ev erb
4
5
6
7
*N OTE S: All p rod uct n ame c all ed th eir c omp any, here is o nly u sed i n thi s pro duc t sim ula tio n eff ect o f ton e types.
PLATE
SPRING
MOD
CAVE
Studio st yl e plate rev erb
Classic s pr ing rever b tank
Reverb wi th m odulati on
Spaciou s an d atmosph eric reve rb
29
Page 32

MOOER AUDIO CO.,LTD
Shenzhen, China
www.mooeraudio.com
 Loading...