

MOODY 336 MK1 Owner's Manual


Details of ownership
Owners
Address:
Telephone number:
Name of yacht:
Registered number:
Hull number:
Engine number:
Ignition key number:
Cockpit door key number:
Distributor:
name:
-MS-^M^
VHF
call sign and number:
A
B
C
D
E
F
G
H
1
J
K
L
Alpha
Bravo
Charlie
Delta
Echo
Foxtrot
Golf
Hotel
India
Juliet
Kilo
Lima
Phonetic alphabet
Mike
M
N
November
Oscar
O
P
Papa
Quebec
Q
R
Romeo
Sierra
S
T
Tango
U
Uniform
V
Victor
w
Whiskey
X
X-Ray
Y
Z
0
1
2
3
4
5
6
7
8
9
Yankee
Zulo
Zero
Wun
Too
Thuree
Power
Fife
Six
Sev-en
Ate
Nin-er
Page 2 Issue 3

Hull, deck gear & below decks
Hull
Glass Reinforced Plastic (GRP) is used throughout the construction of the hull and
decks. Hull stiffening is achieved using balsa or foam
inside of the hull and by the fitting of bulkheads. Each bulkhead is bonded in
position using GRP and then further secured with bolts through the GRP bonding.
An inner GRP floor also adds to the strength and stability of the hull. Extra
strengthening is also applied to the keel attachment area in order to withstand the
loads imposed on the keel. Deck areas are surfaced with an integrally moulded non
slip finish.
Keels
stiffeners
moulded to the
The following keel options are
Yacht
Moody 31
Moody 336
Moody 35
Moody 376
Moody 425
Eclipse 33
Eclipse 38
Eclipse 43
available:-
Keel
Options
Fin or Bilge
Fin or Bilge
Fin or Bilge
Fin or Scheel
Fin or Scheel
Fin or Bilge
Shoal
Shoal
Issue 3
Page 1.1

Antlfouling
Antifouling
season.
should be checked on a regular basis and replaced at least once a
The
antifouling
used
on
your yacht
is
____________________
Upholstery_______________________________________
Cleaning
Dust and grit should be removed frequently with a soft brush or the upholstery
attachment of a vacuum cleaner.
Creases
Where creases occur, raise the pile by brushing with a clean, damp cloth. Do not
saturate the fabric as the cotton backing may shrink. When dry, brush in the
direction of the pile with a soft brush.
Stains
Take immediate action, the longer stains are left the more difficult it is to remove
them. Nearly all stains can be removed by sponging lightly with warm water or a dry
foam upholstery shampoo. If this is not
effective,
covers can be removed and dry
cleaned. If heavily stained it is recommended that a reputable upholstery cleaner
is called in.
Ventilators_______________
Ensure that there is no entry of water through the deck seal. Reseal if necessary.
Issue 3 Page 1.9
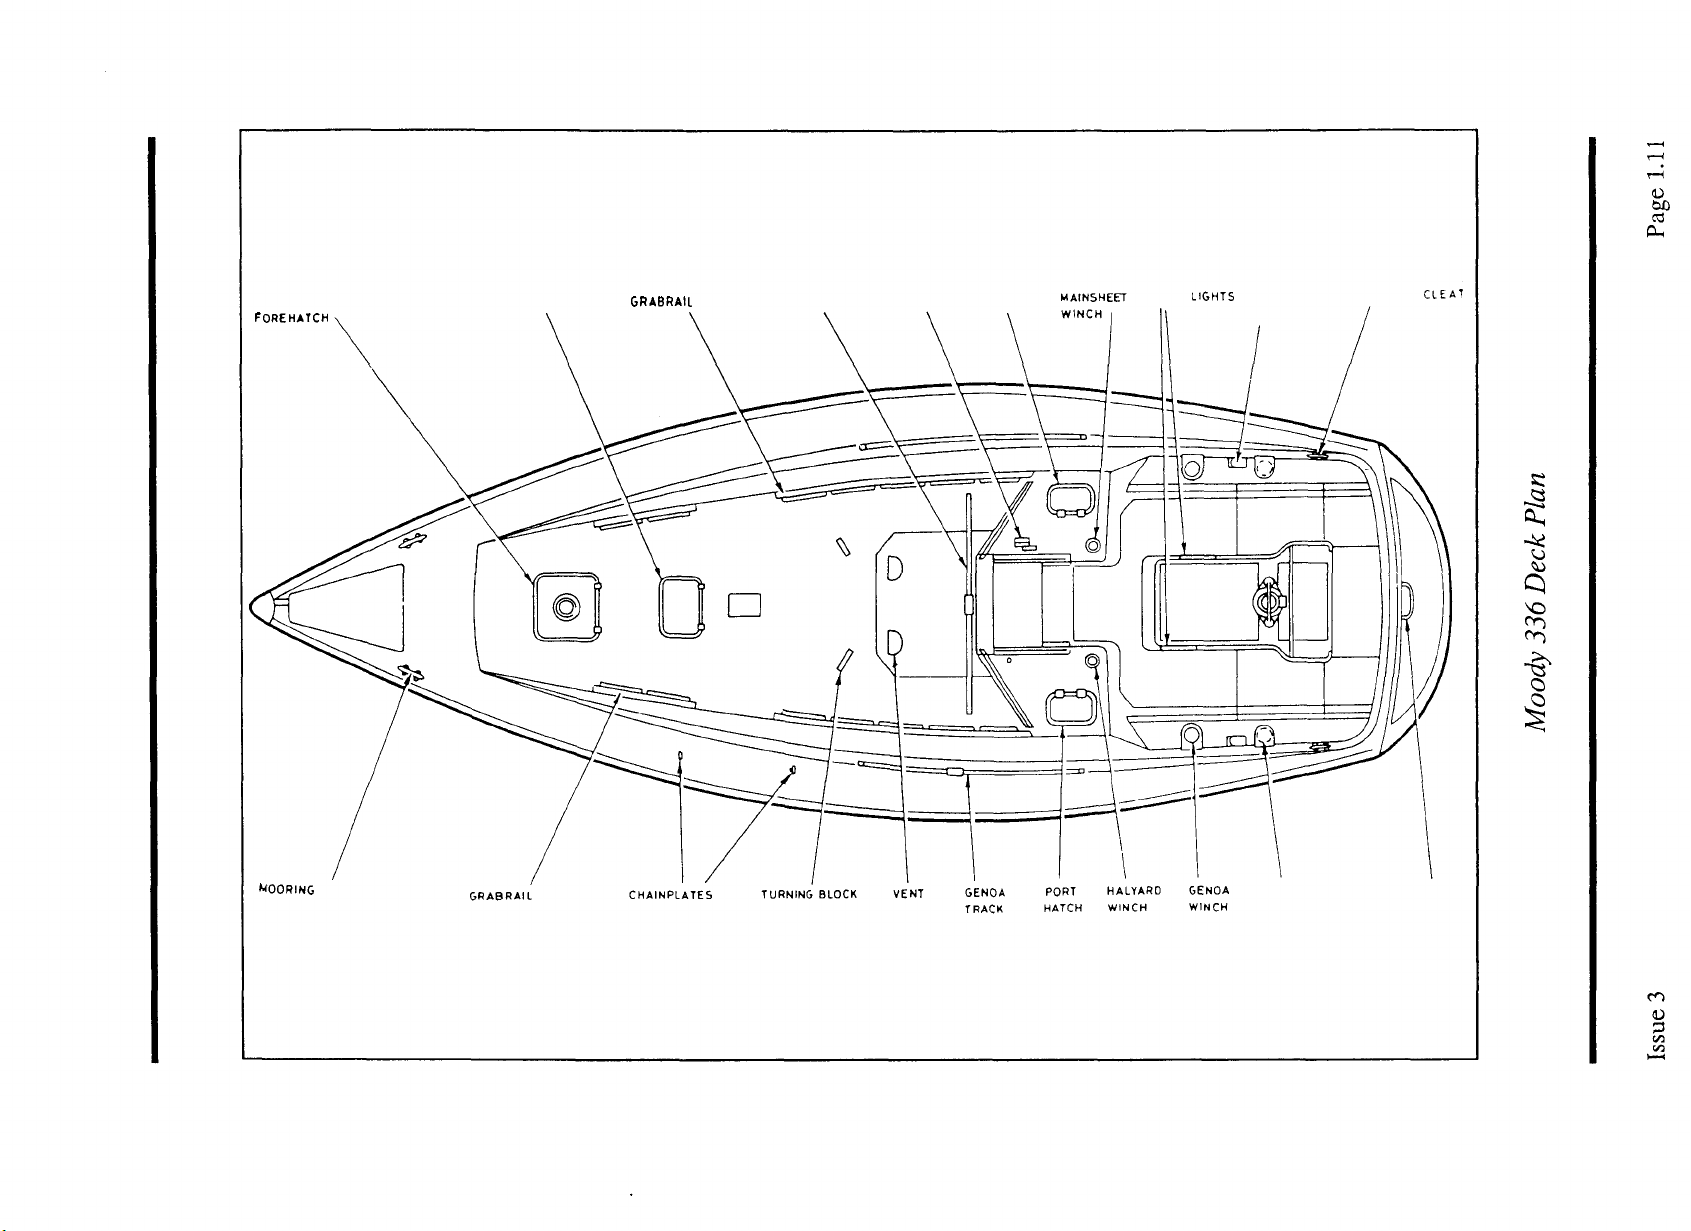
VENTILATED
FOREHATCH
SALOON HATCH
GRABRAIL
MAINSHEET TRACK JAMMER
STARBOARD
HATCH
PORT
LIGHTS
TURNING
BLOCK
MOORING
CLEAT
MOORING
CLEAT
SPINNAKER WINCH
(OPTIONAL)
D STEP
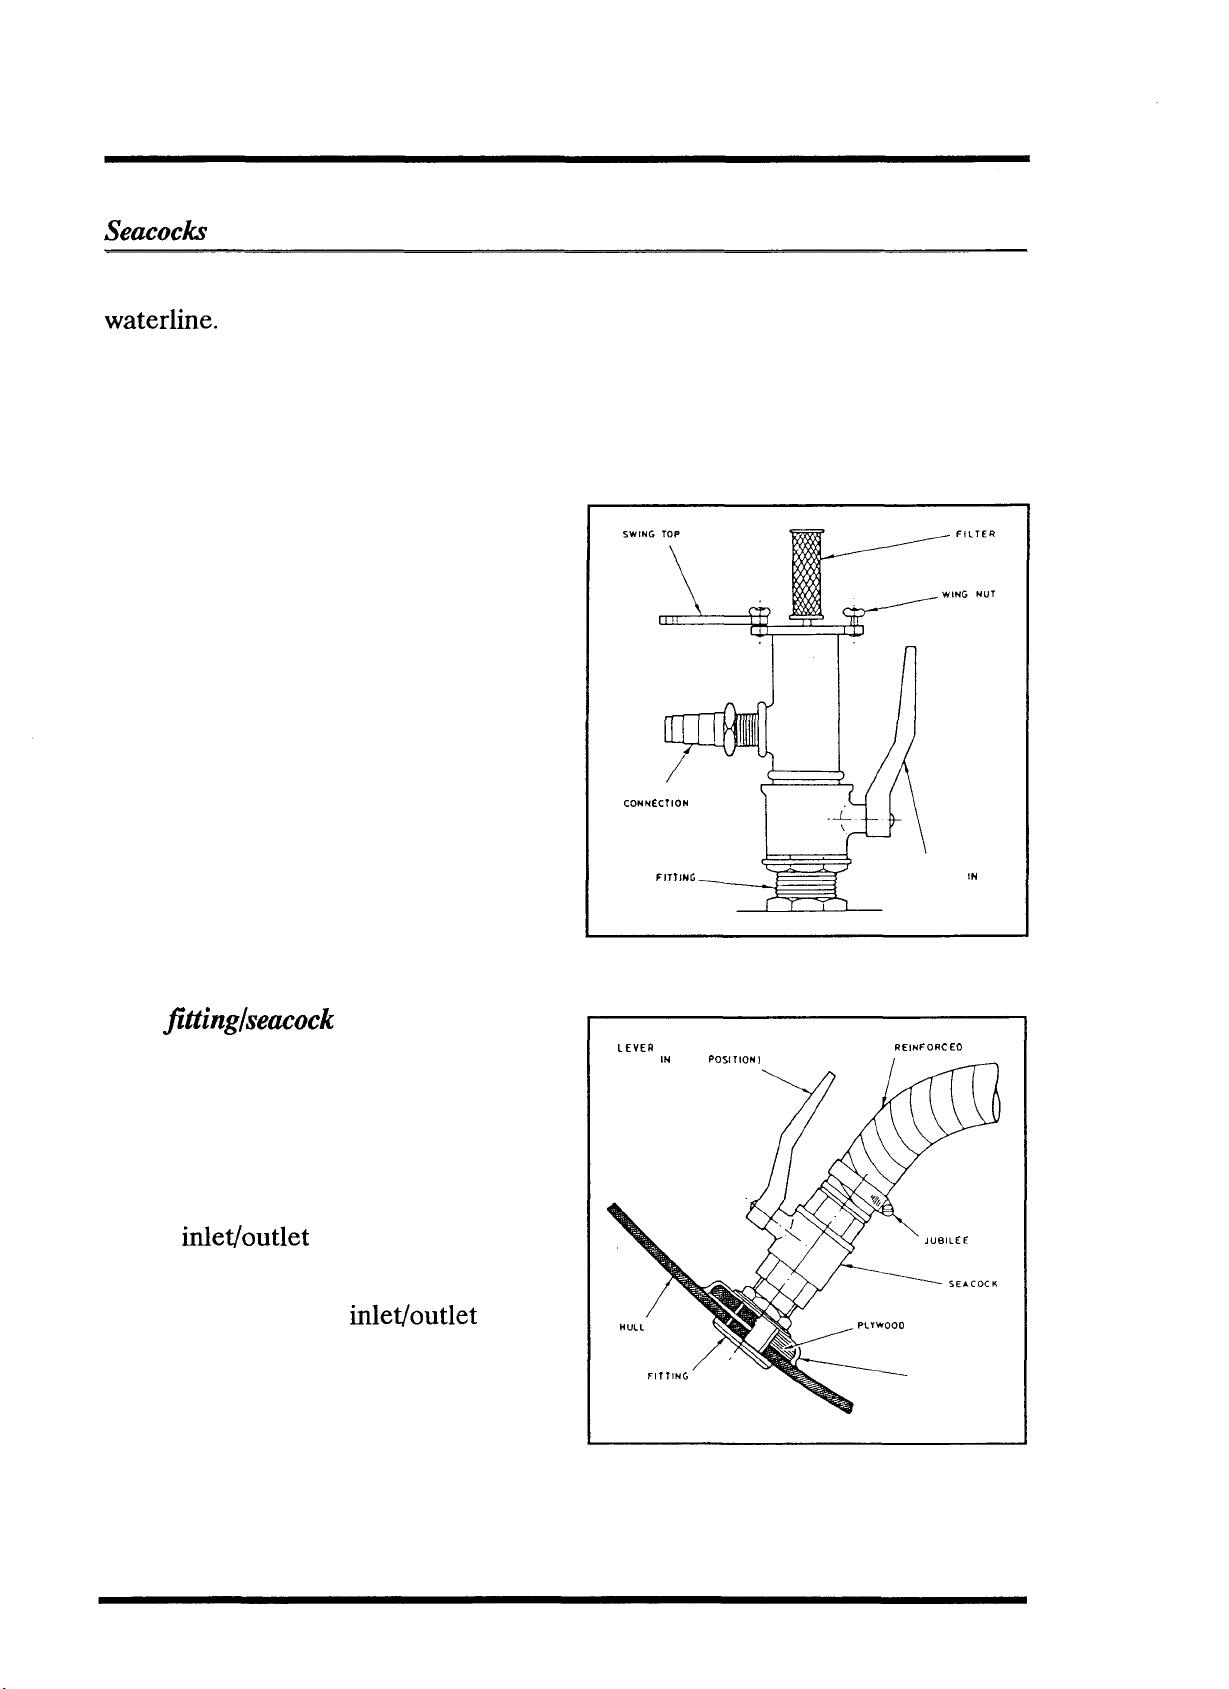
Seacocks________________________________________
Seacocks are fitted to all inlets and outlets which penetrate the hull below the
waterline.
The hull area around the penetration point is reinforced with an internal
plywood backing plate which is resin coated and bedded on compound. With the
exception of the engine cooling system inlet, all current Moody yachts are fitted
with a ball valve combined with a skin fitting.
Water inlet seacock and strainer
This type of seacock is fitted to the engine
cooling system inlet and it is operated as
follows:
1 To open - turn the knob anticlockwise
2 To close - turn the knob clockwise
INLET HOSE
CONNECTION
Skin
fitting/seacock
This type of seacock is used for sink,
shower and cockpit drains and marine
toilet inlet and outlets. It is operated as
follows:
1 To open - turn the lever to align with
the
inlet/outlet
hose.
2 To close - turn the lever until it is at
right angles to the
inlet/outlet
hose.
LEVER
SKIN
FITTING
(SHOWN
OPEN POSITION)
Water inlet seacock and strainer
PLYWOOD
REINFORCED
JUBILEE
BACKING PLATE
RESIN COAT ING
LEVER
(SHOWN
SKIN
IN
OPEN
FITTING
POS(TION)
IN
HOSE
CLIP
Page 1.2
Skin fitting/seacock
Issue 3

Cathodic
protection
All yachts are fitted with hull mounted sacrificial anodes as these give the best
results. These are usually mounted in the region of the engine compartment to keep
the bonding cable run to a
minunum.
Attachment
This is achieved by using studs permanently fixed to the inside of the hull to which
the anode is secured using nuts and locking washers.
Bonding
Bonding cables are internally attached to the mounting studs. The anode is bonded
to the engine, stern tube, rudder stock and
T'
bracket. There is no requirement for
the more remote skin fittings and seacocks or the keel mounting bolts to be
protected.
Hatches
and
portlights________________________________
All yachts use the following range of
Moody 31
Quantity
2
1
Type
Portlight
Hatch
Moody 336
Quantity
1
1
2
Type
Portlight
Portlight
Portlight
Lewmar
Manufacturer
Vetus
Lewmar
Manufacturer
Lewmar
Lewmar
Lewmar
hatches and portlights;
Model No.
PT100
(White)
86005S
Model No.
8906
8912
8932
Size
(")
12
3/8
X 5
1/2
19 3/4 X 19 3/4
Size
(")
4x10
5x12
5x15
Issue 3
2
1
1
Hatch
Hatch
Hatch
Lewmar
Lewmar
Lewmar
82005S
86005S
83005S
7 3/4 X 13
19 3/4 X 19 3/4
15
5/8
3/8
X 17 3/4
Page 1.3
Deck gear
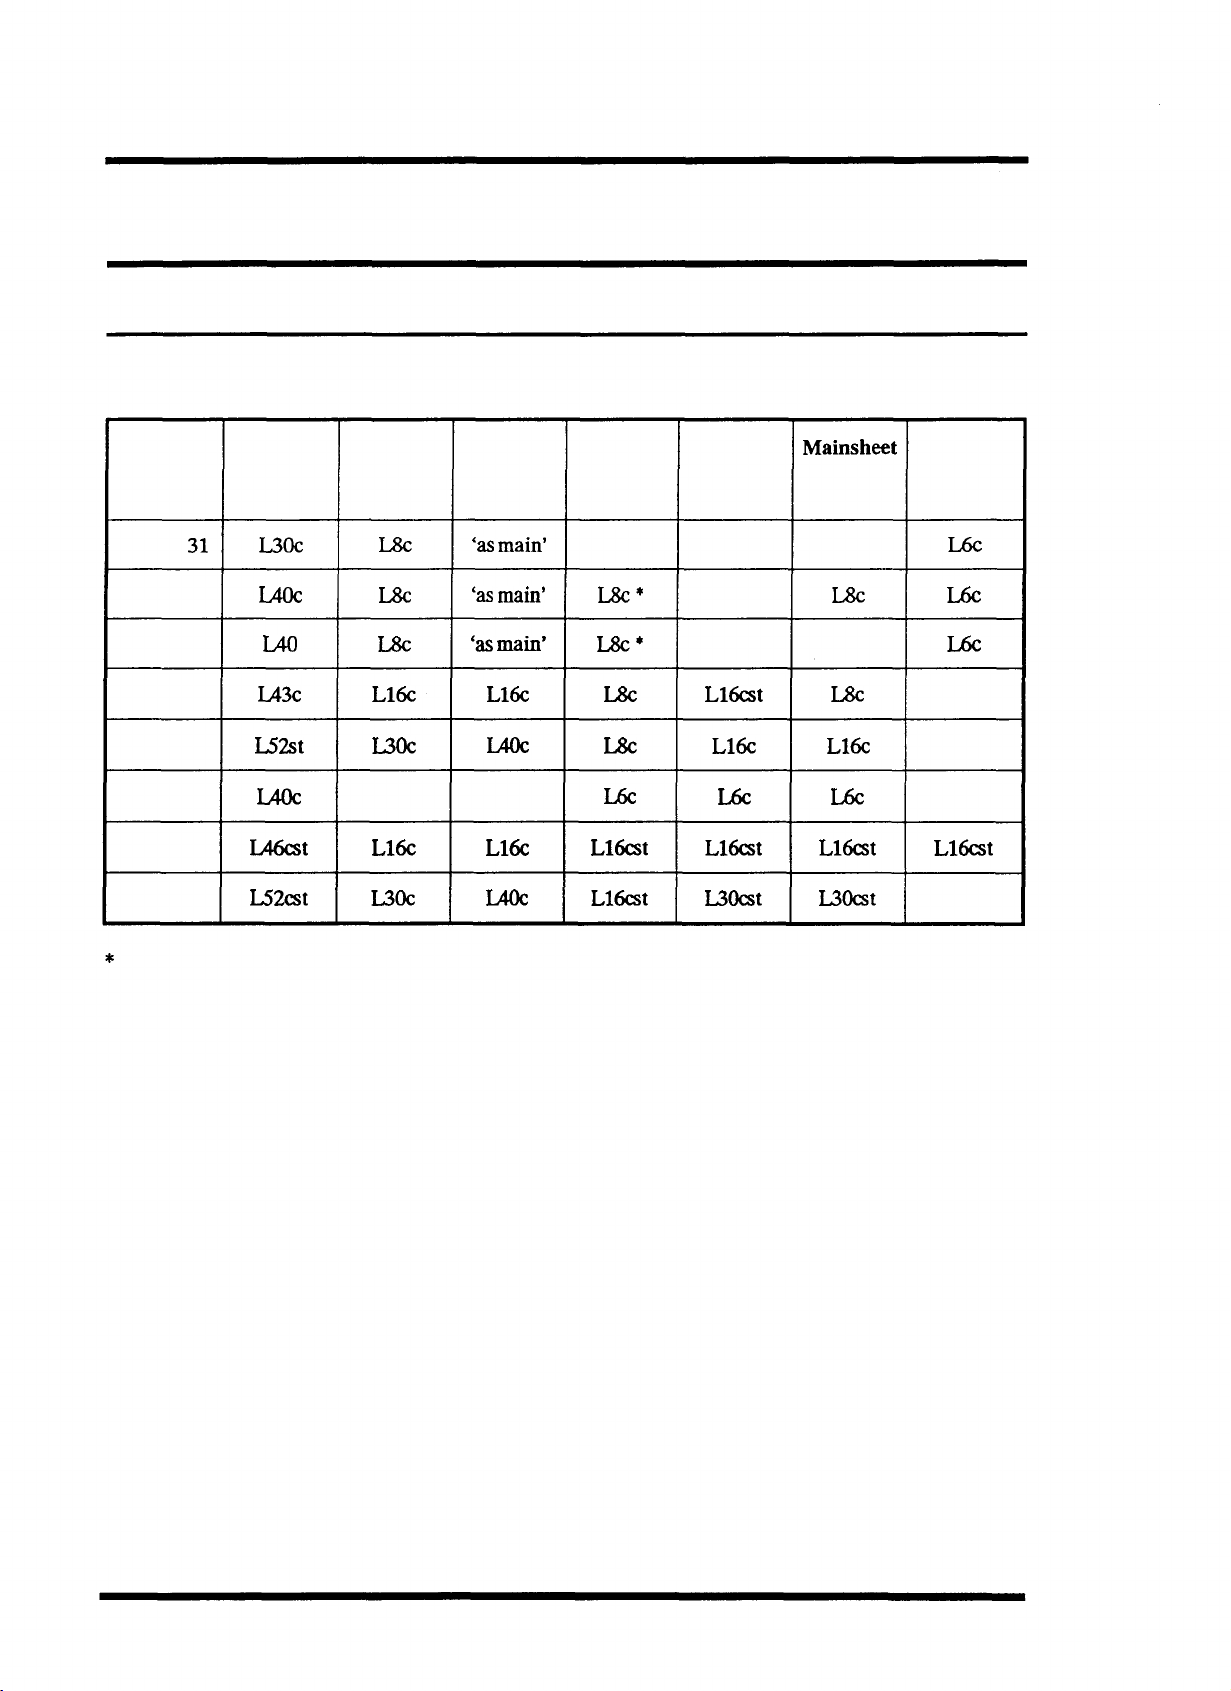
Winches and windlasses
The following Lewmar winches are used:
Yacht
Moody
Moody 336
Moody 35
Moody 376
Moody 425
Eclipse 33
Eclipse 38
Eclipse 43
31
Genoa
Sheets
L30c
L40c
L40
L43c
L52st
L40c
L46cst
L52cst
Main
Halyard
L8c
L8c
L8c
L16c
L30c
L7c
L16c
L30c
Genoa
Halyard
'as
main'
'as
main'
'as
main'
L16c
L40c
-
L16c
L40c
Furling genoa not fitted as standard.
Genoa
Furling
Line
-
L8c*
L8c*
L8c
L8c
L6c
L16cst
L16cst
Furling
Mainsail
Controls
-
-
-
L16cst
L16c
L6c
L16cst
LSOcst
Mainsheet
-
L8c
-
L8c
L16c
L6c
L16cst
L30cst
Mainsail
Reefing
Lines
L6c
L6c
L6c
-
-
-
L16cst
-
Page 1.6
Issue 3

The following windlasses are offered as options:
Yacht
Moody 31
Moody 336
Moody 35
Moody 376
Moody 425
Eclipse 33
Eclipse 38
Eclipse 43
Option/model
-
*Royal
*Royal
*Seawolf520
Royal
*Seawolf520
Royal
*Seawolf520
Anchorman (gypsy only)
*Power 700
(gypsy only -12V)
Power 700
(gypsy
only
-12V)
Power 1000
(gypsy only -12V)
Manufacturer
-
Lofirans
Lofrans
Simpson
Simpson Lawrence
Simpson Lawrence
Simpson Lawrence
Simpson Lawrence
Simpson Lawrence
Simpson Lawrence
Lawrence
Lofrans
Lofrans
Chain Size
-
8mm
8mm
5/16"
8mm
5/16"
10mm
9.5mm
5/16"
5/16"
9.5mm
9.5mm
* Not fitted as standard -
'Seawolf
to be replaced March 1991.
Using the windlass
It is recommended that your anchor chain is suitably marked to indicate the
amount of chain you have out while at anchor.
When lying at anchor in a heavy swell the chain will snatch either causing chain slip
or excessive loads to be applied to the windlass. For safety it is recommended that
a rope bridle be applied to transfer the load to a cleat.
Below decks
Upholstery_______________________________________
Your yacht has been upholstered with either the Christiana, Ravenna, Dash or
Onyx range of materials. They all meet the Fire and Safety Regulation Act and
have been tested to BS5852
to the maintenance section.
PTI.
For information on care of your upholstery refer
Issue 3
Page 1.7

Maintenance
Hull
Minor scratches and abrasions should be attended to in their early stages, initially
by using a medium grade rubbing compound. If this is ineffective, rub the area
lightly with 400 grade wet and dry paper (used with water) until the mark
disappears. Smooth the area with 800 grade followed by 1200 grade (both wet) and
then apply a silicone free wax polish.
Stress cracks should be looked at by an expert and some remedial action taken.
f Rubbing with abrasive compounds and materials removes the
* layer, great care should be taken.
gelcoat.
As this is only a thin
Annual cleaning
Wash the hull annually with warm water containing a little detergent. Stubborn
stains and polish should be removed with a recommended release agent or oil
removing fluid. Polish the hull with a silicone free wax polish.
Seacocks_______________________________________
Check regularly:
1 Security of attachment
2 Security and condition of hose and hose clips
3 Free operation of the valve
Sacrificial anodes _ __
The anode should be replaced when it is approximately two thirds eroded. If any
doubt exists as to whether the anode will survive the season - change it! The core
of the anode is a galvanised steel strip which provides the attachment lugs for the
anode. The anode is removed by undoing the two securing nuts and washers. It is
recommended that when replacing the anode, the nuts, washers and backing sheet
are also replaced.
Page 1.8 Issue 3

Sails, spars & rigging
Spars and rig
Your yacht is fitted with a
support, proper handling and caring routine
durable. Information on stepping the mast can be gained from the Kemp handbook
supplied with the yacht.
Kemp
aluminium mast and boom which, given good
mainenance,
should be remarkably
Rigging___________________
Standing
The standing rigging is the only support provided for the mast and it is vital that it
is adjusted and maintained correctly. In a seaway, if the rig is too slack, the mast
head or spreader area can build up movement thereby increasing the shock loading
on the stays. On the other hand, overtensioned rigging puts a higher total load on
the stays and can be just as damaging. The entire standing rigging is stainless steel
including all terminals, toggles, bottle screws and wire ropes. Some yachts are fitted
with a furling headsail system and an
information refer to
supplied with the yacht.
rigging____________________________________
'Hints
in-mast
and advice on rigging and tuning your Kemp
furling mainsail system. For further
Mast',
Rigging
Stainless steel rigging stretches and should therefore be regularly checked and
adjusted, particularly during the first season. It is recommended that reference be
made to the instructions given in
Mast'
adjustment
supplied with the yacht.
'Hints
and advice on rigging and tuning your Kemp
IssueS
Page
2.1

Maintenance
Rigging checks
During the sailing season when your yacht is in commission, regular maintenance
checks should be carried out and particularly before a long voyage.
1 Examine all
steel/wire
ropes for corrosion, wear and damage.
2 Examine all terminations for signs of wear, cracks or damage. Pay particular
attention to all split pins, they should be the largest size possible to pass through
the cotter pinhole with at least 3/4" protruding through the hole.
3 Examine all bottle screws for signs of wear or damage and ensure they are
safety',
i.e. the inner threads are visible through both safety holes. Where bottle
'in
screws are covered with tape or plastic tubing, remove to enable examination.
4 Ensure the ends of the spreader bar are protected to prevent sail
chafing.Ensure
the rig is correctly adjusted.
5 Remove halyards from the mast leaving messenger lines for
rereefmg.
6 Check all running rigging for signs of wear, paying particular attention to all eye
splices and end terminations. On the wire/rope halyards check the wire rope
splice. If the rope side of the splice is starting to swell then the wire has started
to rust and the halyard should be replaced. Wash halyards which are not being
replaced and soak rope joins in linseed oil (also soak joins on new halyards).
7 Check over the standing rigging paying particular attention to the wire where it
enters the swage fittings. Should there be any sign at all of cracking in any one
of the wire strands then replace the shroud concerned.
8 Look for signs of wear of ridging on clevis pins where they may rock or work in
chain plates or shroud tangs, also look for corresponding wear on mating fittings.
9 Where shrouds locate into mast by means of a shroud terminal in a slot, ensure
that there is no undue wear.
10
Renew all split pins for recommissioning.
Pane
2.10
IssueS

Mast________________________________^^^^^^^^^^_^^
See autumn overhaul in Kemps
mast'
Roller
booklet.
furling_____________________________________
'Hints
and advice on rigging and tuning your Kemp
Roller furling gear must be lubricated and cleaned regularly in accordance with the
manufacturers
recommendations..
Sails___________________________________________
Sails should be checked regularly and repairs effected for the following:
1 Chaffing occurring mainly at spreaders and on foot of large sails.
2 Tears at batten pockets and at all attachment points, tack, clew, head, sail and
reefing cringles.
3 Any other damage.
4 When a sail is lowered it should be bagged and stowed below as soon as possible.
5 On return to harbour, release the tension on the clew outhaul of the main,
remove batterns, flake the sail over the boom, secure with ties and put on sail
cover.
6 Furling headsails and mainsails should be checked carefully
for
any signs of wear
on the stitched seams.
Ropes____________________________________________
All ropes should be checked regularly during the season for the following:
1 Signs of wear or damage where constantly cleated, clamped or passed round
sheave blocks or through fairleads.
2 Damage to whipping or heat shrink sleeves.
3 All splices are serviceable. It is important where polyester ropes are spliced to
steel wire ropes, such as halyards.
IssueS
Page
2.11

Running rigging
The running rigging comprises all the lines and relative mechanics used to hoist and
control the sails, this includes halyards, sheets, guys, lifts, downhauls and outhauls
together with their various shackles, blocks, cleats and winches. It is essential that
they are inspected regularly for any signs of wear or stress. Information on types of
cordage, wire ropes and fittings can be gained from a good chandler.
Sails
All yachts are supplied with Lucas sails which are manufactured from woven
dacron. This material has good tensile strength, resists abrasion and is not unduly
affected by moisture, however, it can be damaged by ultra-violet light and should
not therefore be exposed unnecessarily to sunlight. If treated with care and
maintained correctly these sails should give many seasons good service.
Yacht
Moody
Moody 336
Moody 35
Moody 376
Moody 425
Eclipse 33
Eclipse 38
Eclipse 43
31
I(M)
11.73
12.88
12.88
14.33
15.77
12.19
14.33
16.00
J(M)
3.81
4.11
4.09
4.57
5.03
3.10
4.57
5.03
P(M)
10.21
10.97
10.90
12.60
13.95
10.51
12.50
14.02
E(M)
3.51
3.73
3.78
4.34
4.72
3.50
4.34
4.72
Page 2.6 Issue 3

Folding Sails
Mainsail
If your yacht does not have a
of folding is with the sail still on the boom:
1 Tighten topping lift to support boom.
2 Lower the sail fully.
3 Ensure the coachroof hatches are closed.
4 Ease the tension in the foot of the sail by releasing the clew
5 Remove the battens to minimise stretch and chafing in the batten pockets.
6 Stand close to the mast on the opposite side of the pile of mainsail.
7 With an assistant at the leech, take hold of the sail about eighteen inches from
the boom , pull up together and lay the sail halfway over the boom. The bottom
of the hanging fold should be just below the bottom of the boom.
8 Take a further foot of sail and fold back over the boom in the opposite direction.
9 Continue this layering action until the entire sail is laid over the boom.
self-furling
mainsail system, one of the easiest methods
outhaul.
10
Secure the sail to the boom using sail ties.
11
The halyard can either be removed and stowed or left attached to the head of
the sail. If left on the sail, secure to the boom by passing a sail tie through the
head of the sail and then tension the halyard.
12
If the sail is to remain folded for more than a few hours, put the sail cover on to
prevent damage.
Issue 3 Page 2.7
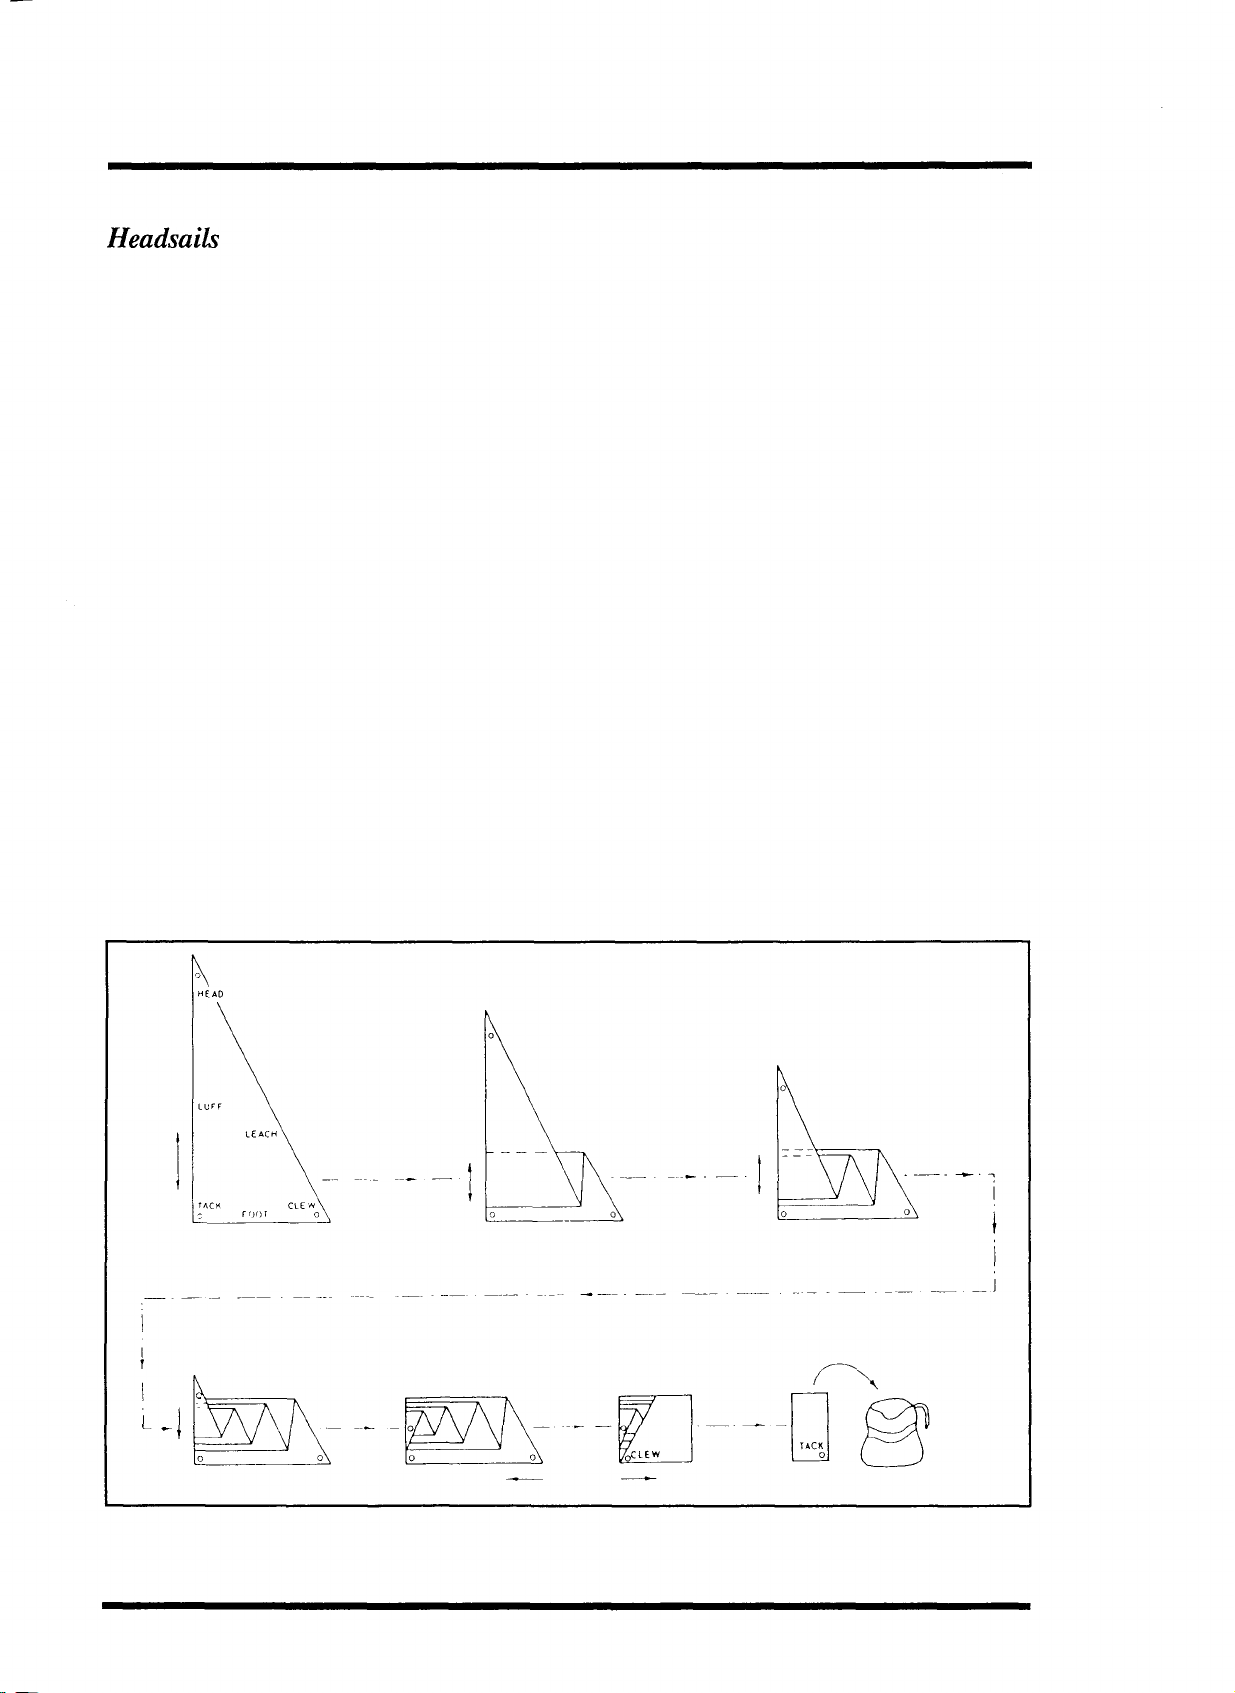
Headsails
Some yachts are fitted with furling headsails but if not, the headsail must be
removed and bagged when not in use.
Bagging
1 Put the head of the sail into the sailbag.
2 Work the luff, leech and body of the sail in together.
3 Leave the tack and clew until last and pass the sailbag neck cord through both
tack and clew before drawing tight. This enables the tack to be connected to the
stemhead and the sheets to be fitted to the clew before the sail is released from
the sailbag. The sheets can then be run back and secured without being snatched
by the sail. The sail can also be hanked to the forestay, one hank at a time, until
only the head is left to be attached to the halyard. In adverse conditions sails
bagged in this way can save a great deal of time on the foredeck.
Folding
1 Lay the headsail out flat in a convenient position, a pontoon or jetty is ideal.
2 The sail should then be folded following the steps illustrated.
L
_
Folding a headsail
Page 2.8 Issue 3

Setting sails
No yacht
included to assist in setting sails correctly.
Hoisting
Whilst this is a very straight forward procedure in itself, the amount of tension in
the halyard depends on wind conditions. All modern sails respond well to differing
tensions. Hoist the sail fully ensuring that on a mainsail there are no wrinkles in the
luff and also that on a
between the hanks. Creases in a sail are the first sign of incorrect tension and
depending on their position on the sail, indicate whether there is too much or too
little tension in the halyard.
Sheeting and trimming
The basic rule of sail sheeting is "let it out till it flaps,
Trimming and sheeting are best explained in books specifically written for the
purpose. It is recommended that every yacht's library has one.
wil
sail well if the sails are badly set. The points which
headsail
the luff does not curve away from the forestay
pul
follow
it in till it stops."
are
therefore
Kicker
This controls the amount of twist in the mainsail and also ensures that the boom
does not
strap, the only exception being when the mainsail is sheeted in hard. The easiest
way to tension the lacking strap to the optimum position is by using the top batten
as a guide. This should be parallel to the boom. If it lies to leeward, tighten the
kicking strap and if it lies to windward loosen it.
Mainsail
All current production yachts are fitted with either slab reefing or in-mast furling
systems.
'kick
reefing______________________________________
up'.
Therefore, there must always be some tension in the kicking
Issue 3 Page 2.9
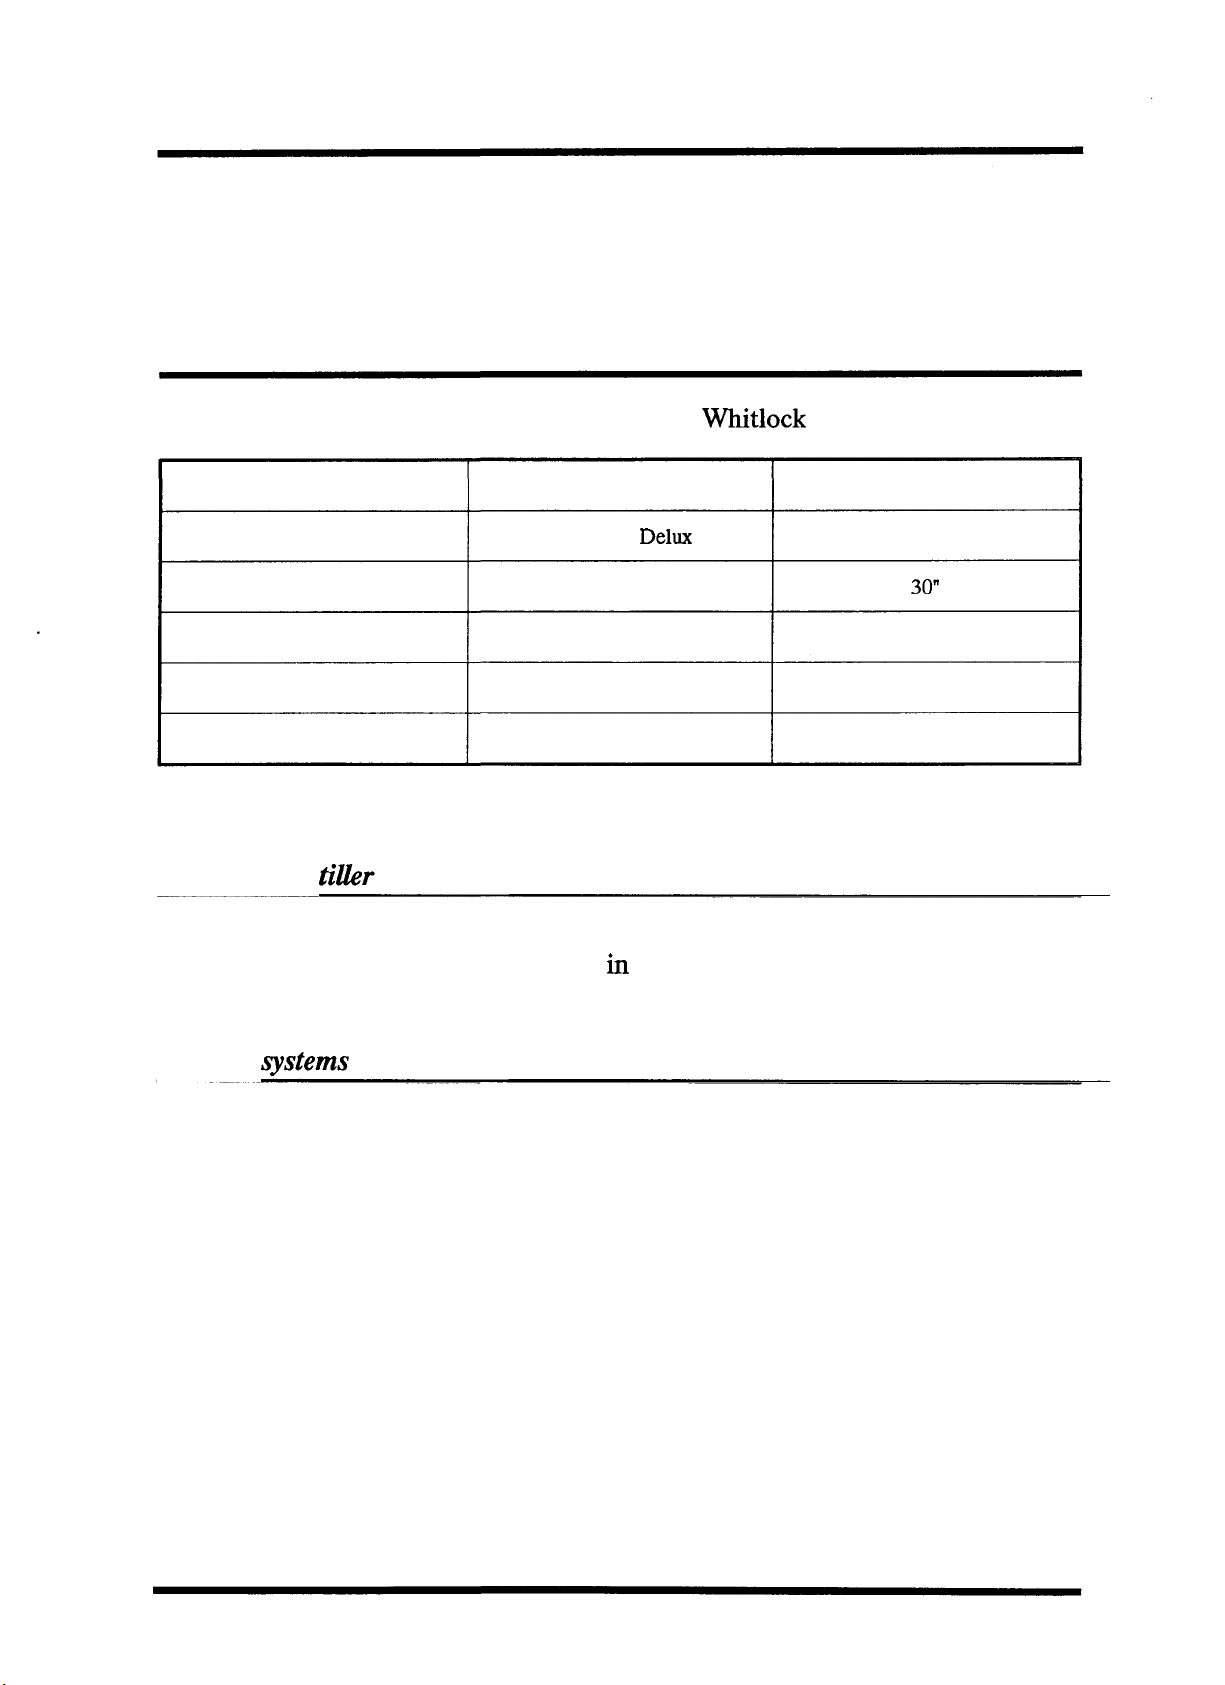
Steering systems
Single station steering systems
All steering systems fitted are manufactured by
Yacht
* Moody 31
Moody 336
Moody 35
Moody 376
Moody 425
Model
Cobra 5R
Cobra 5R Delux
Constellation 400
Constellation 400
Constellation 400
Delux
Whitlock
Marine
Wheel Size
26"
30"
36"
36"
36"
* Tiller steering is standard on Moody 31, wheel steering fitted only as an option.
Emergency
tiller___________________________________
All yachts, less those fitted with two steering positions as standard, are supplied
with an emergency tiller. This is fitted
hi
a tiller socket located either within the
yacht or externally under a blanking cover.
Cobra
systems____________________________________
The system is complete with friction brake and integral stainless steel output lever.
The system consists of:
Universal tiller lever, bored and keyed to suit the rudder stock.
Stainless steel draglink complete with rose joints and rudder stop ring, fitted
beneath the pedestal.
Either Retrofit guard rail or a single lever engine control and guard rail (see
illustrations on pages 3.5 and 3.6.
Issue 3
Page 3.1
 Loading...