

montwill PVE 4.001.3422B, PVE 4.001.3522B, PVE 4.001.3722B, PVE 4.001.6422B, PVE 4.001.7782B Operating Instructions Manual
...
status 03/06 - PVE41XGB.doc page 1 of 12
subject to alterations; errors including printer’s errors
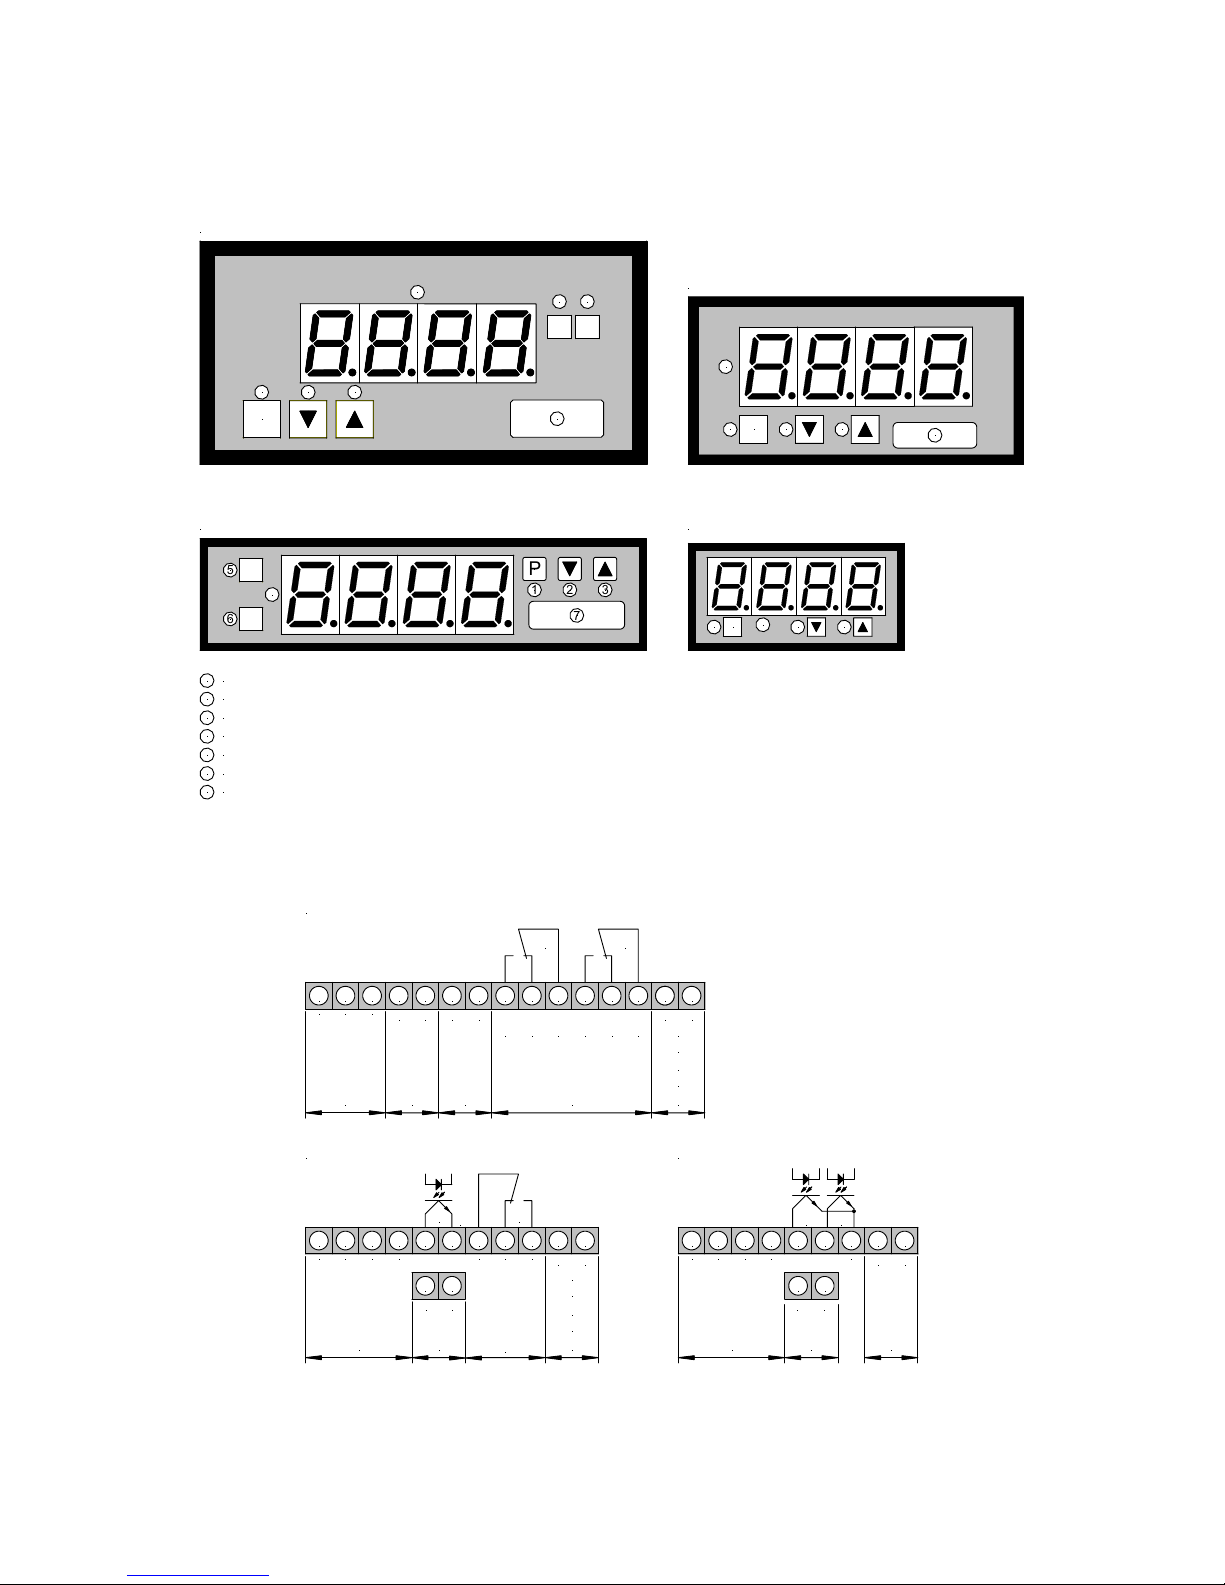
Operating instructions for PVE4 units
- panel meter for standard signals
- freely scalable display with set points from –999 up to 9999
P
1 2 3
6
7
4
Housing size 96x48
5
6
5
7
32
P
1
4
Housing size 96x24
P
4
1 2 3
7
Housing size 72x36
P 2 31
4
Housing size 48x24
1
2
3
4
5
6
7
Program key
Minus key
Plus key
7-segment display
Setpoint indication 1
Setpoint indication 2
Insertable dimensionstrip
Terminal connection
10V
0/4-20mA
0V
- + + -
sensor
supply
(option)
analog
output
(option)
230V AC
115 V AC
1513121110987654321
- +
24V DC
or
14
or
setpoints
signal
inputs (DC)
S1S2
10V
50V
0/4-20mA
0V
- +
signal input s (DC)
analog-
output
(option)
987
65
4321
- +
24VDC
galv.
insulated
S2
65
COM
S1
10V
50V
0/4-20mA
0V
signal input s (DC)
analog
output
(option)
230V AC
115 V AC
1110987654321
- +
24V DC
or
or
setpoint
- +
65
S2
COM
COM
NC
NO
S1
Housing size 96x48 and 96x24
Housing size 72x36 Housing size 48x24
NONCCOMNONC
COM
status 03/06 - PVE41XGB.doc page 2 of 12
subject to alterations; errors including printer’s errors
Ordering code
TYPE ORDER NUMBER (housing size 96x48)
PVE 4.001.1522B Power supply 230 VAC terminal connection 15=L 14=N
PVE 4.001.1422B Power supply 115 VAC terminal connection 15=L 14=N
PVE 4.001.1722B Power supply 24 VDC terminal connection 15=L+ 14=L–
(galvanic insulated)
TYPE ORDER NUMBER (housing size 96x24)
PVE 4.001.3522B Power supply 230 VAC terminal connection 15=L 14=N
PVE 4.001.3422B Power supply 115 VAC terminal connection 15=L 14=N
PVE 4.001.3722B Power supply 24 VDC terminal connection 15=L+ 14=L–
(galvanic insulated)
TYPE ORDER NUMBER (housing size 72x36)
PVE 4.001.6522B Power supply 230 VAC terminal connection 11=L 10=N
PVE 4.001.6422B Power supply 115 VAC terminal connection 11=L 10=N
PVE 4.001.6722B Power supply 24 VDC terminal connection 11=L+ 10=L–
(galvanic insulated)
TYPE ORDER NUMBER (housing size 48x24)
PVE 4.001.7782B Power supply 24 VDC terminal connection 9=L+ 8=L–
(galvanic insulated)
Options
Housing
96x48
Housing
96x24
Housing
72x36
Housing
48x24
Green LED x x x x
Protection IP54 x x x x
Protection IP65 x x x x
Plug in terminal with protection IP40 x x x
Plug in terminal with protection IP54 x x x
Plug in terminal with protection IP65 x x x
Sensor supply 24 VDC/50 mA x
Sensor supply 24 VDC/50 mA (for UB 24 VDC) x
Sensor supply 24 VDC/20 mA (for UB 230 VAC) x
Sensor supply 24 VDC/20 mA (for UB 115 VAC) x
Sensor supply 10 VDC/20 mA x x
Analogue output 0-10 VDC (12 bit) x x x x
Analogue output 0-20 mA/load 500 Ω
x x x x
Analogue output 4-20 mA/load 500 Ω
x x x x
Setpoints as open emitter x
Dimension strips on request x x x x
Other power supplies on request x x x x

status 03/06 - PVE41XGB.doc page 3 of 12
subject to alterations; errors including printer’s errors
Proper use
The devices of the PVE4 range for standard signals (direct voltage, direct current) are used for the
evaluation of different sensor signals. The electronic circuit alters the sensor signal lying at the input
and displays it in a 7-segment display. The use of the devices regarding to the ambient conditions
must be in accordance to their protection type.
Programming
(see also programming example)
The PVE4 must be installed by a suitably qualified specialist (e.g. with a qualification in
industrial electronics).
1. Assemble the unit in a suitable panel cut-out.
2. Connect device in line with connection diagram. Connect screen of the sensor line with suitable
potential. Switch on supply voltage. This is followed by a segment test with subsequent switching
to operating mode.
3. Press program key [P]. Program number 0 is displayed (lights up).
4. Change program number by simultaneously pressing program key [P] and V key.
5. By pressing the V or W key, the display changes to the value stored under this program number.
6. Change displayed value by pressing the W or V key.
7. With program numbers 1 and 2, the applied voltage (sensor calibration under program number 0
active) can be saved by simultaneously pressing the [P] and W keys. This is confirmed by the
appearance of a horizontal bar in the display. If a different calibration mode (1, 2, 3) is selected, it
is not necessary to apply a voltage to the measuring input. In these modes, all that is needed is to
assign certain display data to the stored restart points (offset and full-scale). The programming is
also carried out under the program numbers 1 and 2 and must be saved with the [P] and W keys.
The appearance of horizontal bars in the display confirms that the save was successful.
8. If no further keys are pressed, the device changes back to operating mode after approx. 7
seconds. This definitively saves all the data, which do not have to be explicitly saved with the P
and W keys.
Programming lock
Keyboard lock
Possible jumper settings on the back
Variation 1
Unrestricted programming. The user has access to all program
numbers.
Variation 2
Programming locked, programming is not possible. The
programming mode is blocked.
Variation 3
Restricted programming. The program numbers 1...6 are blocked
for the user. The program number 61...68 (setpoints) can be
freely configured.
1 2 3
1 2 3
1 2 3
terminaljumper
1
2
3
status 03/06 - PVE41XGB.doc page 4 of 12
subject to alterations; errors including printer’s errors
Setpoints
Operating characteristics of the relays
The following diagrams illustrate the behavior of the setpoints (relays). The hysteresis can be programmed freely for each setpoint. In open circuit mode, the respective relay rises on reaching the
threshold, while in closed circuit mode, the respective relay falls when the threshold is reached. By
using the closed circuit mode, for example, a breakdown of the supply voltage can be signaled in the
form of an alarm.
Definition: The hysterisis is the width of the window between the two threshold values of a setpoint!
setpoint
on
off
hysteresis
display
fallen raised
setpoint
on
off
hysteresis
display
raised fallen
Open curcuit mode Closed curcuit mode
MIN/MAX data
Additional functions in normal mode for memory inquiry of the MIN/MAX data.
The MIN/MAX memory is a volatile memory in which, after switching on the device or since the last
erasure, the relevant minimum and/or maximum values are stored.
• By pressing the V key, the MAX memory is displayed.
• By pressing the W key, the MIN memory is displayed.
• Simultaneously pressing the W and V keys erases the memory stored in the display.
Special functions with adjustable fixed zero for the lowest digit of the display
Via program number 9 (PN9 = 1), a permanent zero can be parameterised for the lowest digit. The
lowest (smallest) digit is then – without being rounded up or down – overwritten with a static zero. At
the analogue output and the threshold values for the relays, the lowest digit overwritten with a zero is
nevertheless evaluated. The function is intended to stabilise the display if, due to the sensor value,
permanent drifting or jumping of the displayed measurement occurs at the lowest digit.
 Loading...