

Montreux
Instruction Manual

3
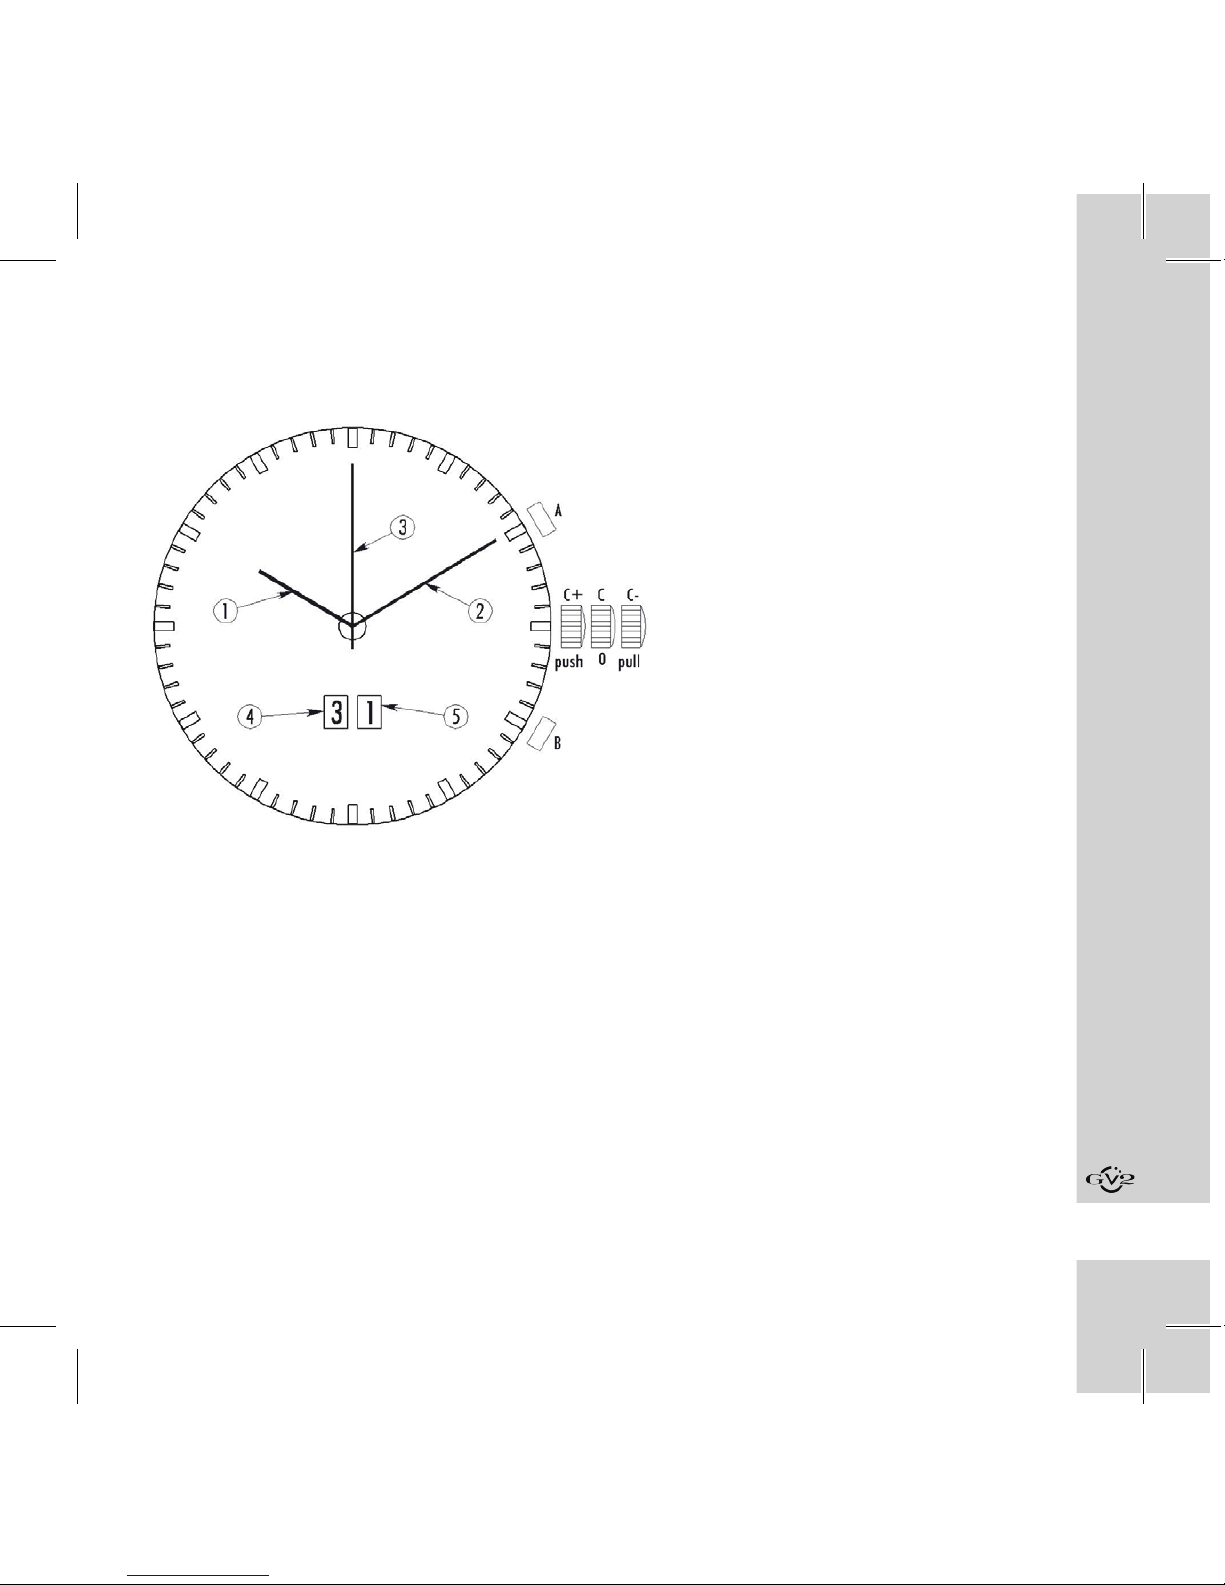
GENERAL DESCRIPTION
BUTTON:
• A : Pusher at 2 o’clock
• B : Pusher at 4 o’clock
• C- : Crown pulled
• C+ : Crown pushed
• C0 : Crown in neutral position

4
DIAL:
• Central hands: Hour (1)/ Minute (2)/ Second(3)
• 4 o’clock : First digit of date (4) or tenth of the
chronograph (left wheel)
• 5 o’clock : Second digit of date (5) or hundredth of
the chronograph (right wheel)
MODES
This section describes the two different available
modes:
• Local Time
• Chronometer 1/100 of second
Those two different modes are sequentially displayed
by pressing the crown (C+).
By default and after a reset (when the battery is
replaced), the local time is the rst displayed mode.

5
From this mode is possible to access to the other
modes such as indexing or setting time.
LOCAL TIME
This mode displays the local time with hours, minutes
and second.
When entering into the local time mode the hands
display these following elements:
• 1 (center - short) displays hours, the hand moves
forward of 1.5
o
every 6 minutes.
• 2 (center - medium) displays minutes, the hand
moves forward of 2
o
every 20 seconds.
• 3 (center - large) displays seconds.
• 4 displays the rst digit of the date.
• 5 displays the second digit of the date.
From this mode is possible to access two different
sub functions:

6
• Hand’s indexing: By pressing simultaneously the A
and B pushers during more than two seconds.
• Local time setting mode: By pulling the crown (C-).
As previously dened the next mode, CHRONO
1/100 of second, is displayed by pressing the crow
(C+).
After a reset, the displayed time is 00:00:00 with the
date set to January 1, 2000.

7
CALIBRATING
This mode is useful when you have a misalignment
between the hands and the dial.
Watch needs to be in TIME mode in order to
calibrate
After pressing simultaneously on the pushers A and B
during more than two seconds, all hands go to their
nominal position. If there is a misalignment between the
hand and the wished index, the hands have to be indexed.

8
The nominal position is the following:
• Minute: Hand (1) pointing “12”
• Hour: Hand (2) pointing “12”
• Second: Hand (3) pointing “12”
• First Digit (4): Display “0”
• Second Digit (5): Display “0”
The indexation is performed as below:
• After the initialization at the position 0 of all hands,
the user has the possibility to indexing the rst
hand.
• A long pressure on the pusher A (more than 2
seconds) allows a fast increment of the selected
hand. This fast indexation happens clockwise for all
hands.
• A short pressure on the pusher B changes the
selected hour/disc.

9
• At any time during the indexation, it’s possible to
quit this mode by pressing the crown C+.
LOCAL TIME SETTING
This mode allows setting the local time.
Description of the functionality:
• By pulling the crown C- from any city time mode,
the user enters directly into the Time setting mode.
• Upon entry this mode, the hour hand can be set.
• A Short press on A forwards an hour hand step by
step (respectively minute, year, month, and date for
the other setting).
• Long press (>2s) on the A pusher forwards a fast
increment of the setting.
• Pressing on B allows to move between hours/discs
the next setting

10
• At any time and in all states, it’s possible to quit the
setting mode by releasing the crown back to neutral
position C0.
Display:
• M1(center - short) displays the hours.
• M2(center - medium) displays the minutes.
M
MIN
AM PM
Y D
M1
M2
M3
M4 M5

11
• M3 (center- long) indicates the type of setting.
Thereafter the position of the second’s hand
according the setting:
• Hour Setting : 45’ = AM, 15’ = PM
• Minute Setting : 30’
• Year Setting : 55’
• Month Setting : 00’
• Day Setting : 05’
• M4 (7H30) displays the rst digit of the date
(respectively month, year) with an indication about
AM/PM
• M5 (4H30) displays the second digit of the date
(respectively month, year)

12
CHRONO
Hereafter the description of the chronograph 1/100
of second on 12 hours:
Descriptions of the functionality:
• Entry in this mode: By pressing the crown C+
twice from the time mode. There are three display
possibilities :
• Initialization: If the chrono isn’t running or after
a reset.
• Running mode: If the chrono is running.
• Stop mode: If the chrono was launched but not
reset.
• With the Chrono mode set, a pressure on the
pusher A starts running the Chrono mode.

13
• From the Running mode, there are two possibilities:
• Pressing on A: Stop the chrono and display the
measured time.
• Pressing on B: Split the chrono and display the
measured time, while the time is still running in
background.
• From the Split mode, two possibilities are available
to the user :
• Pressing on B: Return on the Running mode
and display the real value of the chrono and not
the splitting value.
• Pressing on A: Enter in the Split&Stop mode.
That is that the chrono that was running is
stopped but the display stay with the split value.
A new pressure on B allows displaying the real
time stopped.

14
• From the Stop mode, two possibilities are available
for the user :
• Pressing on A: Return at the Running mode
• Pressing on B: Reset of the chrono, display
00:00:00:00
• From all states: It’s possible by pressing the
crown C+ twice to go to the next mode Time
Display:
• M1 (center - short) displays the chrono hour.
• M2 (center - medium) displays the chrono minute.
• M3 (center - large) displays the chrono second.
• M4 (7H30)
• Displays “0” when the chrono is running.
• Displays the tenth when the chrono isn’t
running (stop or split).

15
• M5 (4H30)
• Displays “0” when the chrono is running.
• Displays the hundredth when the chrono isn’t
running (stop or split).
The reset of the chrono is automatically
performed after 11h 59min 59sec 00
1/100

www.gevrilgroup.com • 866-425-9882
 Loading...