

montpellier MWD7512 Installation And Operating Instructions Manual
Washer Dryer
MWD7512
White | Black | Silver
Please read these instructions carefully before attempting to install or use this appliance.
We recommend that you keep these instructions in a safe place for future reference.
Installation and Operating Instructions
THE PERFECT BALANCE OF FUNCTION AND STYLE
LAUNDRY - DISHWASHING - COOKING - COOLING

Thank you for choosing this Montpellier Washer Dryer.
Our Washer Dryer has been designed to provide you with the best combination of style, reliability and performance to
give you years of trouble-free use.
You may be familiar with a similar product, but please take time to read these instructions carefully before installing or
using your Washer Dryer to ensure you get the most from your purchase.
We recommend that you keep this manual in a safe place for future reference.
Your Washer Dryer is covered by a comprehensive two year Parts & Labour
Guarantee. In the unlikely event that you experience a problem with your Washer
Dryer, you can rest assured that you are fully protected against the cost of repairs
for the rst 24 months . Please note that any claim must be accompanied by the
model reference number, serial number and proof of purchase.
To activate your guarantee, you will need your product serial number. This can be
found on the rear of the machine.
There are two ways to register your Guarantee:
• Online: Visit the Support page on our website and complete the online Product
Registration form. www.montpellier-appliances.com
• By Post: Simply detach and ll in the form provided, attach a stamp and send
it in the post. Don’t forget to include your e-mail address so that we can send
conrmation through to you.
Welcome
Note: We are unable to take registrations over the phone.
ACROSS ALL OUR MODELS
YEAR
GUARANTEE
PA RT S & L A BO UR
www.montpellier-appliances.com

What’s Included with Your Washer Dryer
• 4 blanking caps.
• Fill hose.
• Guarantee registration leaet – don’t forget to activate your free 2 year guarantee.
See the inside cover for further details.
• Liquid detergent level plate.
Contents
Putting Your Safety First 4
Get to Know Your Washer Dryer 6
Front View 6
Rear View 7
Setting Up Your Washer Dryer 8
Guidance for Installing your Washer Dryer 8
Removing the Transportation Safety Screws 8
Levelling your Washer Dryer 9
Connecting your Washer Dryer to the water supply 9
Connecting the Drain Hose to your Washer Dryer 10
Connecting your Washer Dryer to the electrical supply 10
Control Panel Layout 11
Using Your Washer Dryer 11
Detergent Drawer Compartments 12
Using your Washer Dryer for the rst time 12
Getting the Best from Your Washer Dryer 12
Selecting a Programme 14
Taking Care of Your Washer Dryer 20
Cleaning 20
Maintenance 20
Problem Solving 23
Technical Specications 25
Product Fiche 26
Here For You 27
After-sales assistance 27
Your 2 year Manufacturer’s guarantee 27
What is not covered under the Guarantee 27
SERVICE HELP-LINE 27

Putting Your Safety First
4
Putting Your Safety First
• Your Washer Dryer conforms to current safety
requirements. Inappropriate use can, however, lead
to personal injury and damage to property. To avoid
the risk of accidents and damage to your Washer
Dryer, read this user guide carefully before using it
for the rst time. It contains important information
on the installation, safety, use and maintenance of
your Washer Dryer. Retain this user guide for future
use and pass it on to any new owners.
• Read this user guide before using or installing your
Washer Dryer.
• Your Washer Dryer is for domestic use only and
is only intended to wash and dry items which are
specied by the manufacturer to be machine
washable and dryable on the label, and textiles
composed of hand washable wool or wool blend
fabrics as well as satin, lace, silk and other
hand-washable garments. Do not use your Washer
Dryer for any purpose not expressly specied in
this user guide.
• This appliance can be used by children aged from
8 years and above and persons with reduced
physical, sensory or mental capabilities or lack of
experience and knowledge if they have been given
supervision or instruction concerning use of the
appliance in a safe way and understand the hazards
involved. Children shall not play with the appliance.
Cleaning and user maintenance shall not be made
by children without supervision.
• Before setting up your Washer Dryer, check for any
external visible damage. Do not install or use your
Washer Dryer if it is damaged.
• Before setting up your Washer Dryer, remove the
four transportation safety screws and the rubber
washers from the back of the machine (refer to
page 8).
• Some water may be left in your Washer Dryer as a
result of quality checks during production. This will
not aect the operation of your Washer Dryer.
• Before connecting your Washer Dryer, ensure
that the information on the data plate (voltage
and connected load) matches that of the mains
electricity supply. If in doubt, consult a qualied
electrician.
• Do not connect your Washer Dryer to the mains
electricity supply using an extension lead.
• A damaged power cord/plug can cause re or give
you an electric shock. When damaged it must be
replaced, this should only be done by qualied
personnel.
• Make sure that the door of your Washer Dryer is
not restricted and can be opened fully.
• Exhaust air must not be discharged into a
ue which is used for exhausting fumes from
appliances burning gas or other fuel.
• Make sure hoses and cables do not cause a trip
hazard.
• Never remove the plug from the socket by pulling
the cord. Always hold the plug.
• Never touch the power cord/plug with wet hands as
this could cause a short circuit or electric shock.
• Do not touch your Washer Dryer if your hands or
feet are wet.
• Do not keep ammable or explosive chemicals
near your Washer Dryer.
• Faulty components must only be replaced by a
suitably qualied Service Agent using genuine
spare parts.
• Unauthorised repairs could result in unforeseen
dangers for the user. Repairs should only be
undertaken by an approved service agent.
• In the event of a fault or for cleaning purposes,
your Washer Dryer is only completely isolated
from the electricity supply when it is unplugged
from the mains.
• Your Washer Dryer must only be connected to
your water supply using the supplied new ll hose.
Old hoses must not be reused.
• Do not make any alterations to your Washer Dryer,
unless authorised to do so by Montpellier.
• The packaging of the machine could be hazardous
to children. Do not allow children to play with the
packaging or small parts from the Washer Dryer.
Please refer to the disposal instructions on the
rear cover.
• Do not climb on your Washer Dryer.
• Do not turn your Washer Dryer upside down or on
its side.
• Do not lift your Washer Dryer using the door or
detergent drawer.
• Please ensure that you have removed all of the
packaging materials and protective tape from the
outside of your Washer Dryer, inside the drum and
inside the detergent drawer before using.
CAUTION: To ensure your safety and the
safety of others, please read the following
safety precautions before you operate your
Washer Dryer.

Putting Your Safety First
5
Putting Your Safety First
• Do not exceed the maximum load for the washing
or drying programme you have chosen.
• Never force the door open when your Washer
Dryer is running.
• Never open the detergent drawer while the
machine is running.
• Thoroughly rinse o any chemicals such as stain
remover from your garments before beginning a
washing and drying programme.
• Please follow the manufacturers’ instructions
regarding the use of fabric conditioner or any
similar products that you intend to use in your
Washer Dryer.
• Residue may build up on detergent and softeners
exposed to air for a long period of time.
• Only put softener or detergent in the drawer at the
beginning of each wash.
• Please ensure that garments loaded into your
Washer Dryer are free from foreign objects such as
nails, needles, lighters and coins.
• Do not stop your Washer Dryer before the drying
phase of a programme has been completed.
• Do not touch the door, drain hose or any
discharged water while your Washer Dryer in
running. The high temperatures involved pose a
burn risk.
• Do not use a detergent ball/device if you have
selected a washing and drying programme as this
may cause a re hazard.
• Open the drum door fully after the drying process.
Do not touch the door glass. It will reach high
temperatures and pose a burn risk.
• Clean the lint trap regularly.
• The necessary ambient temperature for operation
of your Washer Dryer is 15-25 °C.
• Where the temperature is below 0 °C, hoses
may split or the electronic card may not operate
correctly.
• Unplug your Washer Dryer and switch o the water
supply if the Washer Dryer is left unused for a long
time. We also recommend that you leave the door
open to prevent build up of humidity inside the
Washer Dryer.
• If the laundry is not washed.
• If oil based stains are not pre-treated before
beginning a washing or drying programme.
• Laundry that has a high amount of sponge, foam,
rubber or rubber like parts and accessories.
• Rubber, sponge, latex, shower bonnets, watertight
textile products, rubber based objects and clothes
or pillows lled with rubber sponge must not be
dried in your Washer Dryer.
WARNING: Do not dry your laundry under
the conditions specied below as they
present a re risk:
Get to Know Your Washer Dryer
6
Get to Know Your Washer Dryer
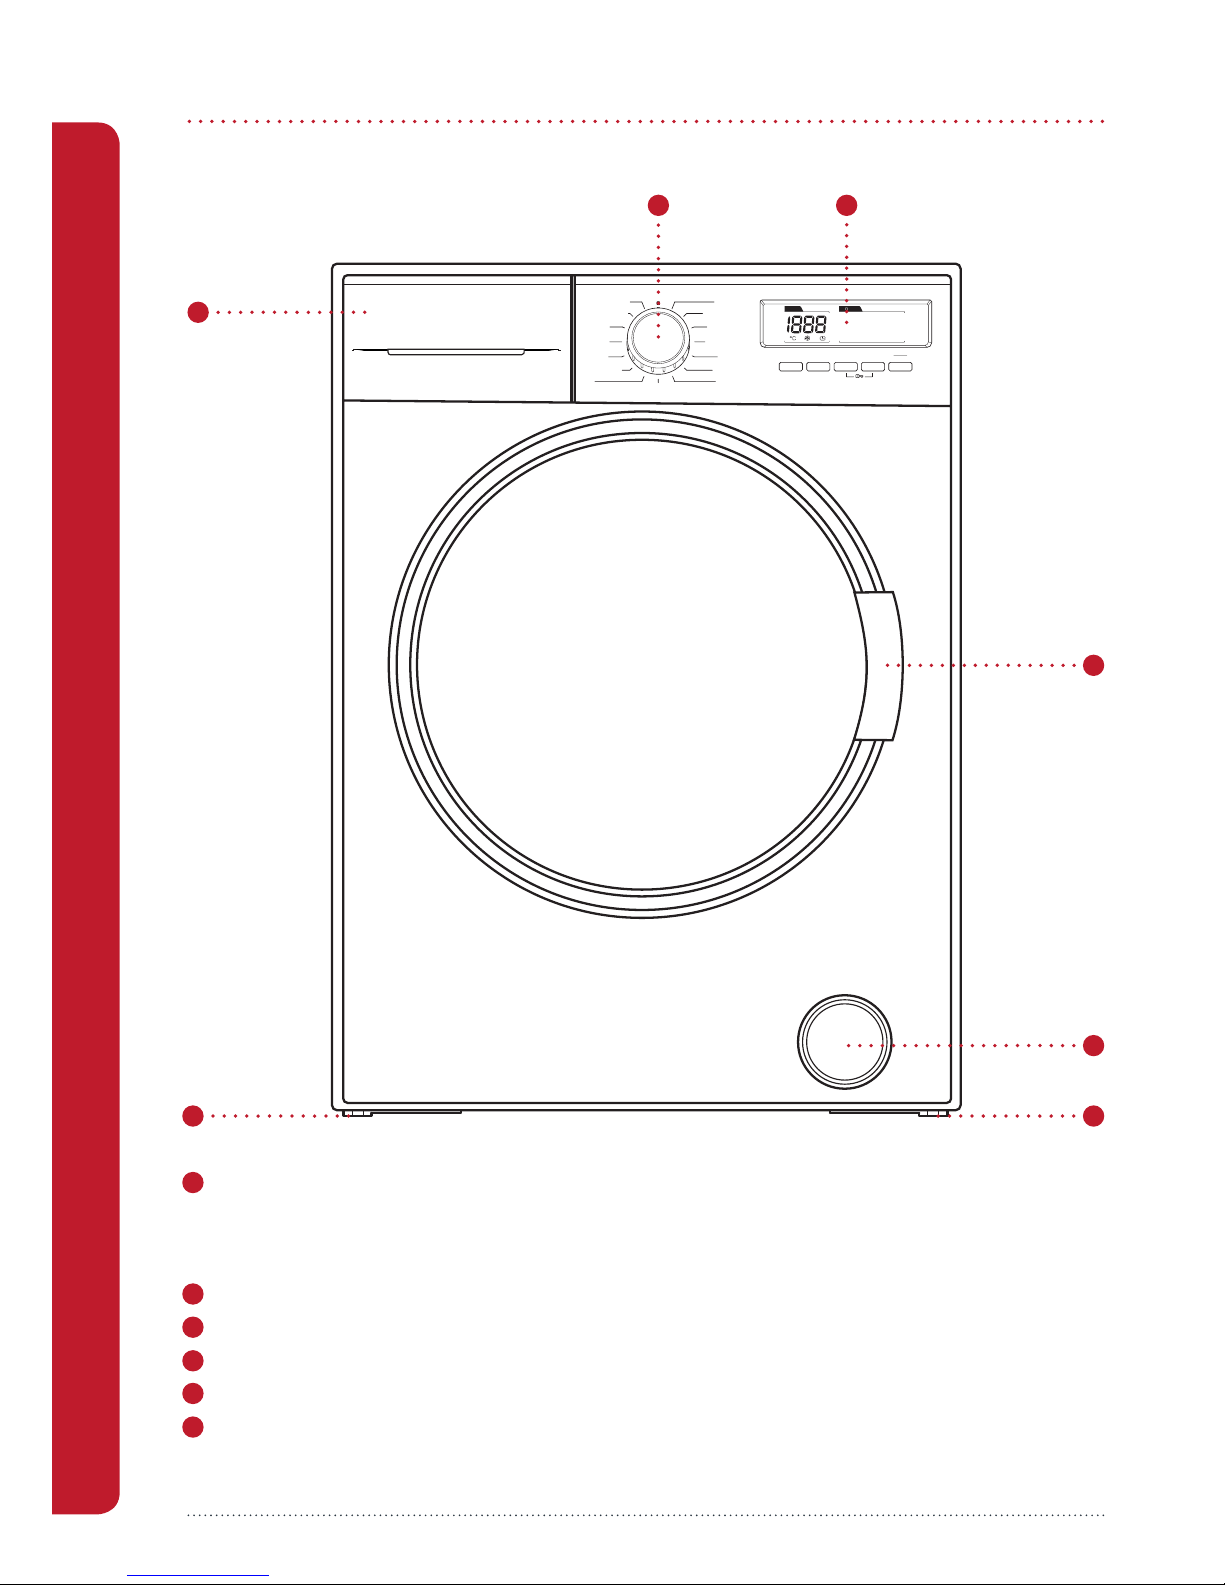
Front View
1 Detergent Drawer – for inserting detergent and fabric conditioner. Contains 3 compartments:
• Main Wash.
• Softener.
• Pre-Wash.
2 Programme Dial – for selecting a washing and/or drying programme.
3 Control Panel – for conguring and viewing programme settings.
4 Door Handle - for access to the drum.
5 Pump Filter Cover – for access to the pump lter (for maintenance purposes only).
6 Adjustable Feet (x4) – for adjusting the level and height of your machine.
Spin
Daily Fast
Gentle Dry
Cotton Dry
Quick Wash & Dry
Cotton Wash & Dry
SuperRapid 15'
Cotton
Cotton Eco
Eco 20°C
Synthetics
Wool
Curtain
Rinse
Allergy Safe
Display Functions
StartDelayDry eveling LSpinTemp.
60' 60 C
o
Pause
STOP
1
2 3
4
5
Figure 1
66
Get to Know Your Washer Dryer
7
Get to Know Your Washer Dryer
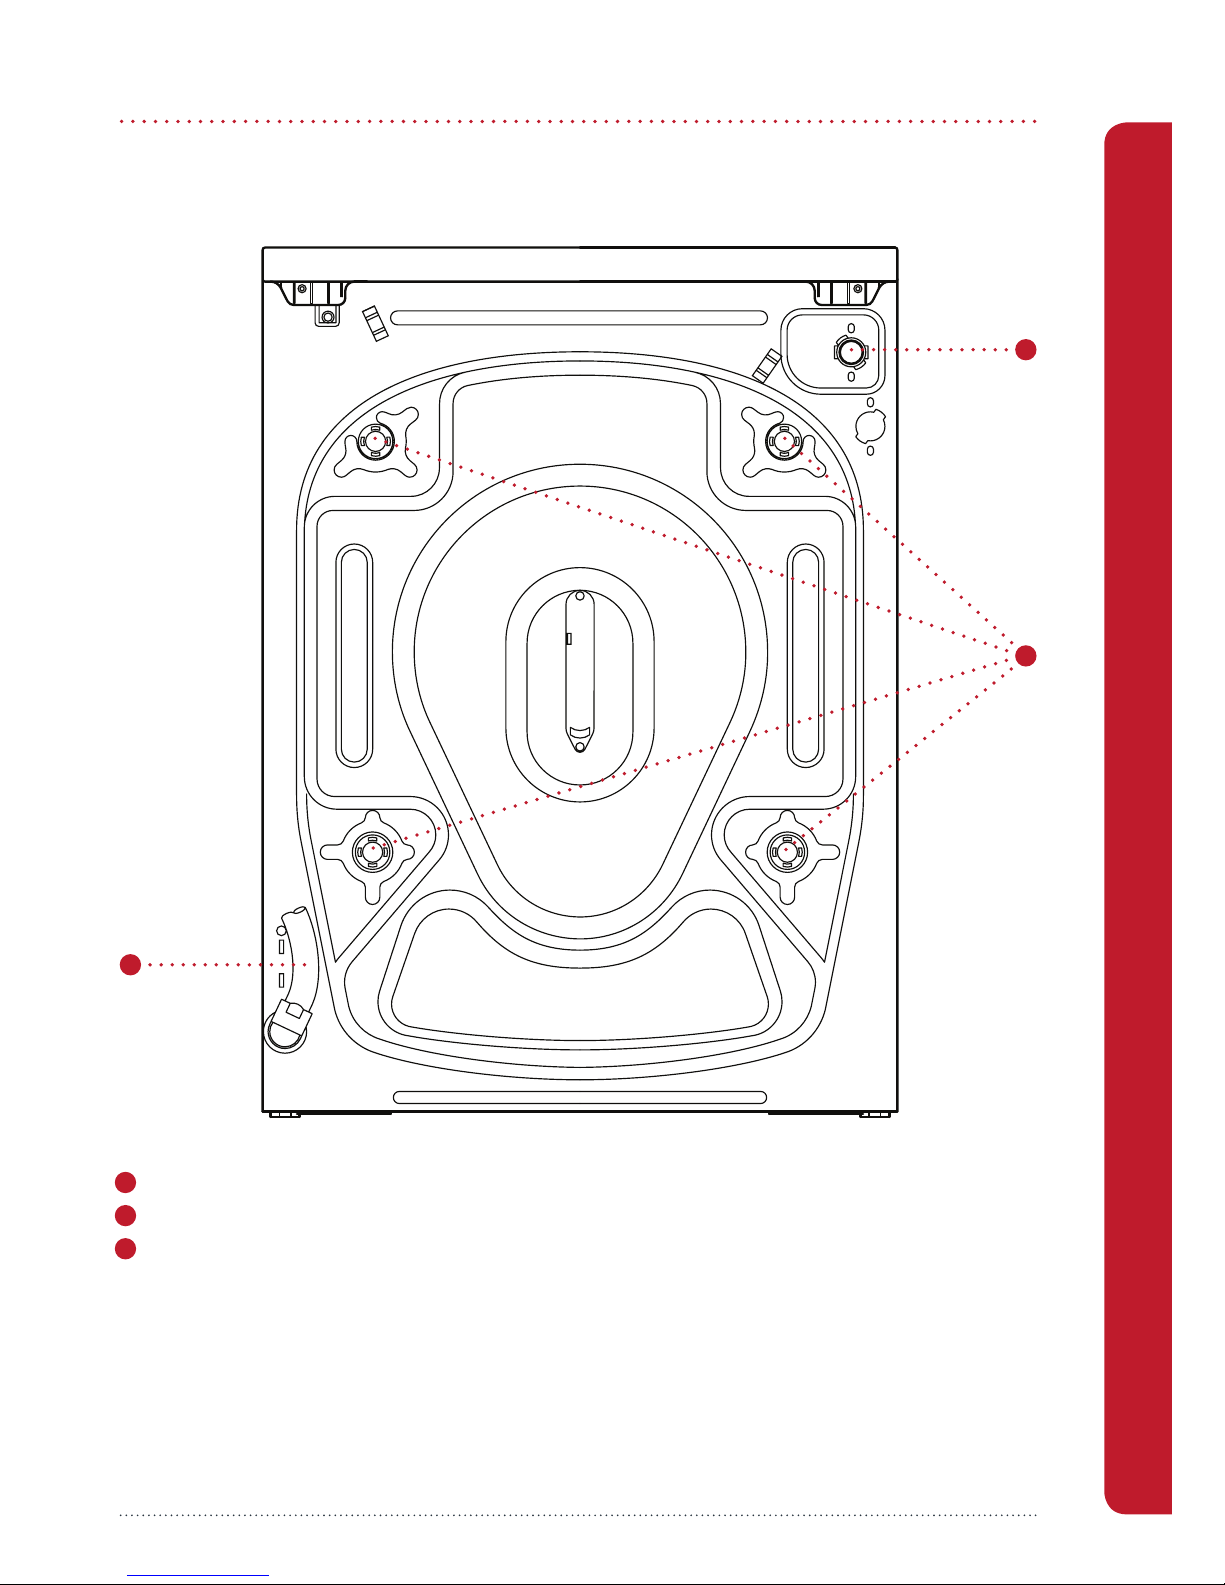
Rear View
1 Transportation Safety Screws (x4): These must be removed before using your Washer Dryer (see page 8).
2 Water supply connection – for connecting your Washer Dryer to the cold water supply.
3 Drain hose connection – for draining dirty water from your Washer Dryer.
1
2
3
Figure 2
8
Guidance for installing your Washer
Dryer
We recommend that you follow the guidance below
when selecting a suitable location to install your
Washer Dryer.
Install your washer Dryer in an area that will allow
the door to fully open.
Make sure your Washer Dryer is located close to
electrical and plumbing connections.
We recommend installing your Washer Dryer on a
concrete oor and if possible in the corner of the
room. This will provide the greatest stability.
Do not install your Washer Dryer on a soft surface
such as carpet or rug.
Do not install your Washer Dryer in an area where
the temperature may drop below freezing. If hoses
freeze they may split or burst.
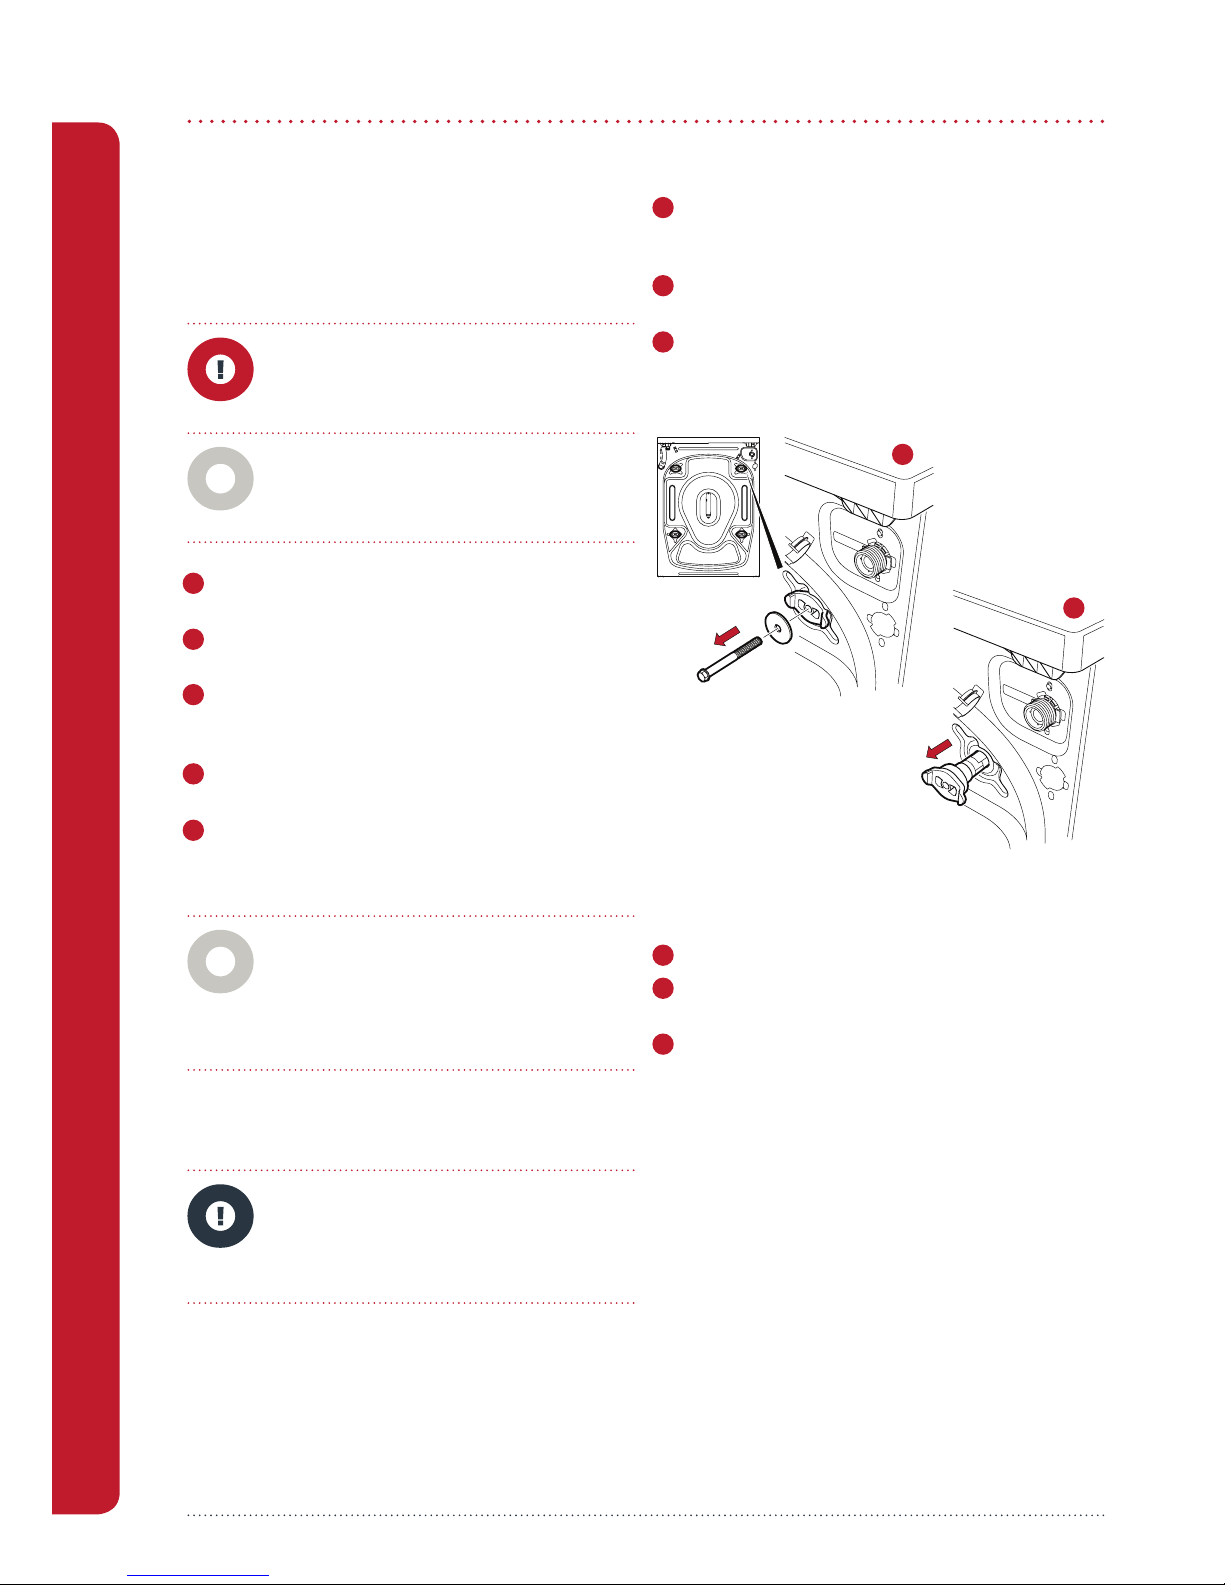
Removing the Transportation Safety
Screws
There are four transportation safety screws located
on the rear of your Washer Dryer (as shown in
Figure 3). They are used to protect your Washer Dryer
from damage during transportation and must be
removed before rst use. Please keep them in a safe
place and re-t them if transporting your Washer Dyer
in the future.
To remove the transportation safety screws:
1 Using a suitable spanner, rotate each safety
screw anti-clockwise until loose, and remove
(see Figure 3(a)).
2 Pull out the remaining plastic sections of each
screw by hand (see Figure 3(b)).
3 Insert the blanking caps into the four holes.
Push the cap until the connectors click into place.
When tted correctly, the cap will be ush with
the machine.
To ret the transportation safety screws for
transportation:
1 Remove each of the four blanking caps.
2 Insert the plastic sections of the safety screws into
the four holes.
3 Position the safety screws into the plastic sections
inserted in step 2 and use a suitable spanner to
tighten until secure.
Setting Up Your Washer Dryer
Setting Up Your Washer Dryer
WARNING: Risk of injury. Your Washer
Dryer is heavy and we strongly
recommend that it is moved by a
minimum of two people.
Note: The dimensions of your Washer
Dryer are 85 x 60 x 60 cm. Make sure that
the installation area has sucient space to
accommodate your appliance.
Note: If you have to install your Washer
Dryer on a wooden oor, we recommend the
installation of a water resistant wooden base
with a minimum thickness of 30 mm. Ideally
the base should be bolted down and span
several joists.
CAUTION: Before operating your Washer
Dryer, the transportation safety screws must
be removed. Failure to do so may cause
damage to your machine and will invalidate
your guarantee.
Figure 3
a
b
9
Setting Up Your Washer Dryer
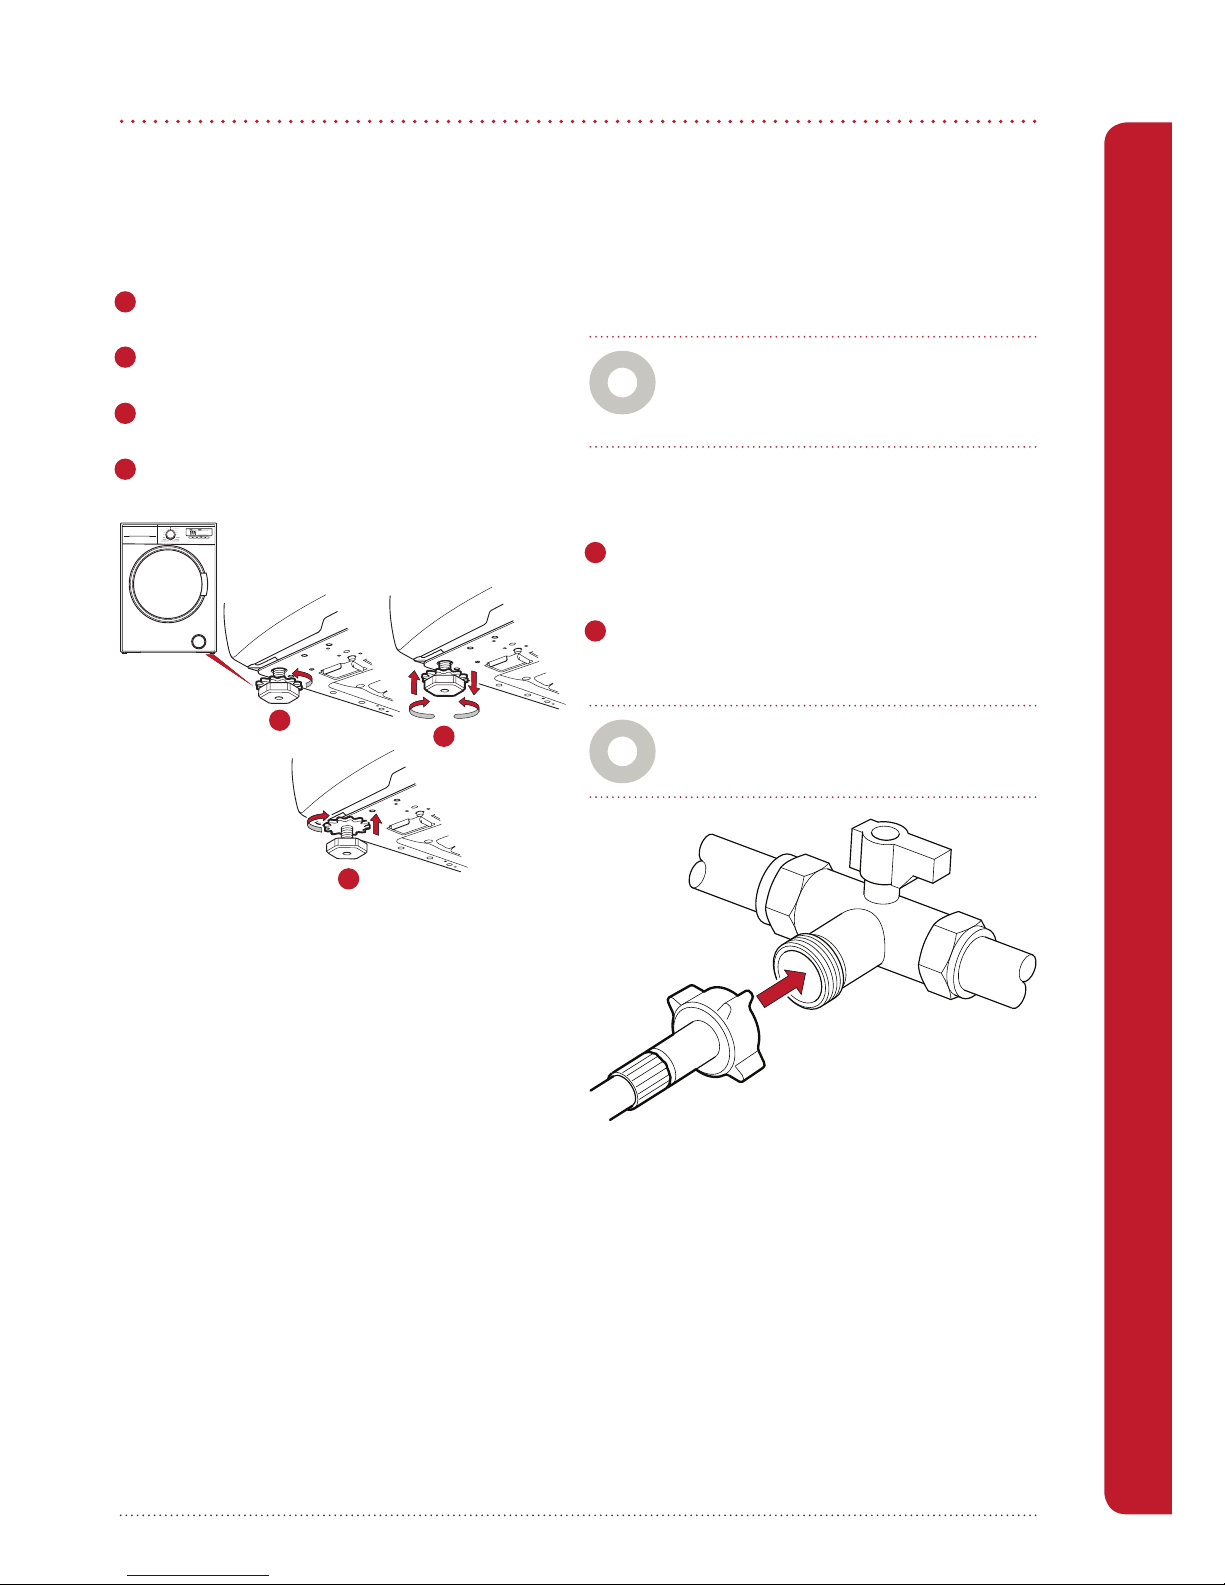
Levelling your Washer Dryer
Your Washer Dryer is supported by four adjustable
feet. Adjust the feet as necessary to ensure that your
appliance is level and secure:
1 Turn the plastic locking nut anti-clockwise to
loosen (see Figure 4(a)).
2 Turn the feet clockwise to increase the height of
the Washer Dryer (see Figure 4(b)).
3 Turn the feet anti-clockwise to decrease the height
of the Washer Dryer (see Figure 4(b)).
4 Once the Washer Dryer is level, turn the plastic
locking nuts clockwise to tighten (see Figure 4(c)).
Connecting your Washer Dryer to the
water supply
Your Washer Dryer must be connected to the cold
water supply only. This increases eciency as only
the minimum amount of water required to wash your
laundry is heated.
To connect your Washer Dryer to the cold water
supply:
1 Connect the angled end of the ll hose to the
cold water inlet at the rear of the Washer Dryer by
screwing clockwise until hand tight (see Figure 5).
2 Connect the straight end of the ll hose to a
19 mm (3/4”) cold water tap by screwing clockwise
until hand tight.
Setting Up Your Washer Dryer
Spin
Daily Fast
Gentle Dry
Cotton Dry
Quick Wash & Dry
Cotton Wash & Dry
Rapid 15'
Cotton
Cotton Eco
Eco 20°C
Synthetics
Wool
Curtain
Rinse
Allergy Safe
Display Functions
Start/PauseDelayDry levelSpinTemp
60' 60 C
o
Note: If your previous machine had a hot
water connection, we recommend that you
check the hot tap on your water supply is
closed to prevent leakage.
Note: Make sure that the ll hose is not
trapped, kinked or cross-threaded.
Figure 4
Figure 5
a
b
c
 Loading...